
1© 2016 All Rights Reserved. iRobot, Roomba and Create are registered trademarks of iRobot Corporation. Arduino is a trademark of Arduino SA. Raspberry Pi is a trademark of the Raspberry Pi Foundation.
Programing Create 2 with Prime SenseClement Wong, iRobot Software Lead
Project GoalsThe iRobot® Create 2 is an affordable robotics platform for researchers and hobbyists. This second-generation platform is robust and equipped with the same sensors that allows the iRobot Roomba® to reliably perform floor cleaning tasks. The platform is also expandable. Many owners of Create 2 enhance the capabilities of their robot by adding an external computer to increase the computational power and perform more complicated tasks. In the past, their choice of computers was only big heavy laptop computers. Now, single-board computers are so tiny, it’s possible to put them in the dustbin of the robot! Again, in the past, they tried to improve their robots’ perception by adding advanced but expensive sensors. Now, 3D sensors are so cheap and so easy to program. We think it’s time to bring the platform to a whole new level!
The following is what we want to accomplish:
1. Integrate 3D sensing technology with Create 2
2. Add significant computational power
3. Preserve the award-winning industry design and look-n-feel
4. Do all of the above cheaply.
Before we get started, let’s show you what the robot looks like after you’ve finished this project:
It can’t possibly look more awesome than this! The PrimeSense 3D sensor sits on top of the Create 2. The Raspberry Pi and the battery pack are tucked nicely in the dustbin and best of all, no exposed cables!
Let’s work on the hardware a little bit and then we get involved in the software installation, which is arguably the more challenging part of the project.
2© 2016 All Rights Reserved. iRobot, Roomba and Create are registered trademarks of iRobot Corporation. Arduino is a trademark of Arduino SA. Raspberry Pi is a trademark of the Raspberry Pi Foundation.
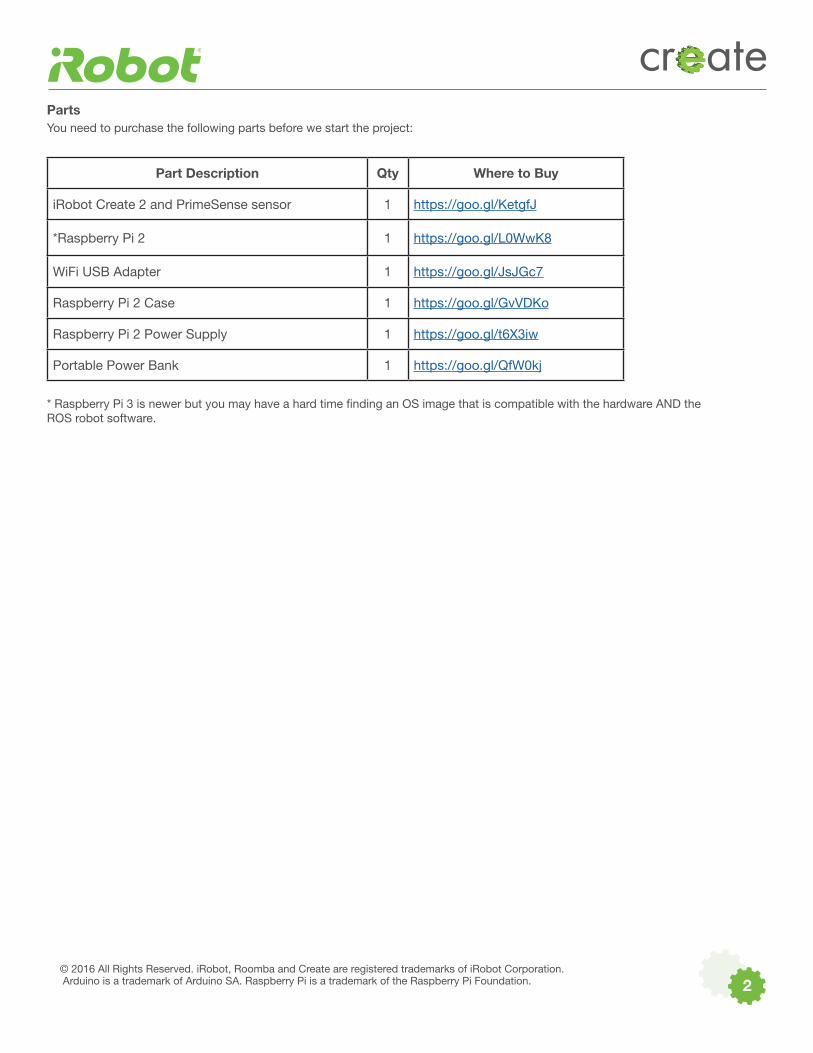
Part Description Qty Where to Buy
iRobot Create 2 and PrimeSense sensor 1 https://goo.gl/KetgfJ
*Raspberry Pi 2 1 https://goo.gl/L0WwK8
WiFi USB Adapter 1 https://goo.gl/JsJGc7
Raspberry Pi 2 Case 1 https://goo.gl/GvVDKo
Raspberry Pi 2 Power Supply 1 https://goo.gl/t6X3iw
Portable Power Bank 1 https://goo.gl/QfW0kj
* Raspberry Pi 3 is newer but you may have a hard time finding an OS image that is compatible with the hardware AND the ROS robot software.
PartsYou need to purchase the following parts before we start the project:

3© 2016 All Rights Reserved. iRobot, Roomba and Create are registered trademarks of iRobot Corporation. Arduino is a trademark of Arduino SA. Raspberry Pi is a trademark of the Raspberry Pi Foundation.
Hardware
First, we remove the motor and the housing for the cleaning head.
And then we cut a rectangular acrylic plate and attach it to the bottom of the dustbin. We also drill a hole of the right side of the dustbin.
We would place the battery pack and the Raspberry Pi in the dustbin as shown in the photo.
When we put the dustbin back on the robot, the whole assembly would look like this.
4© 2016 All Rights Reserved. iRobot, Roomba and Create are registered trademarks of iRobot Corporation. Arduino is a trademark of Arduino SA. Raspberry Pi is a trademark of the Raspberry Pi Foundation.
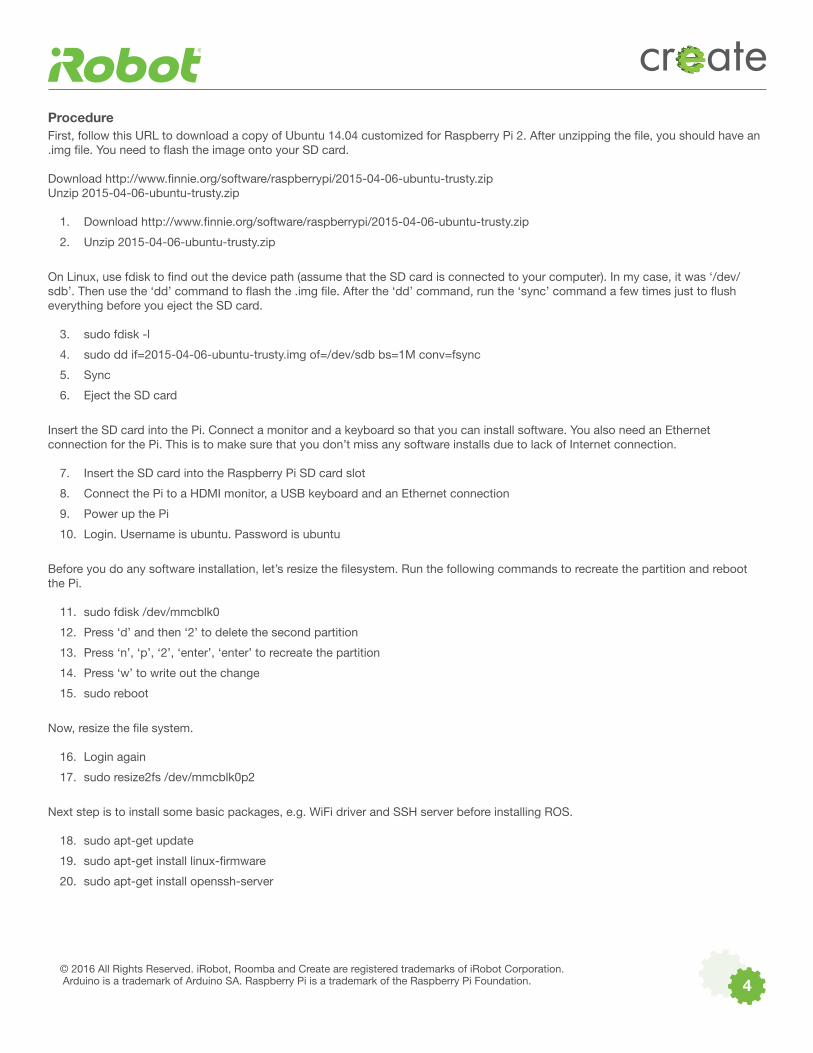
Procedure First, follow this URL to download a copy of Ubuntu 14.04 customized for Raspberry Pi 2. After unzipping the file, you should have an .img file. You need to flash the image onto your SD card. Download http://www.finnie.org/software/raspberrypi/2015-04-06-ubuntu-trusty.zipUnzip 2015-04-06-ubuntu-trusty.zip
1. Download http://www.finnie.org/software/raspberrypi/2015-04-06-ubuntu-trusty.zip
2. Unzip 2015-04-06-ubuntu-trusty.zip
On Linux, use fdisk to find out the device path (assume that the SD card is connected to your computer). In my case, it was ‘/dev/sdb’. Then use the ‘dd’ command to flash the .img file. After the ‘dd’ command, run the ‘sync’ command a few times just to flush everything before you eject the SD card.
3. sudo fdisk -l
4. sudo dd if=2015-04-06-ubuntu-trusty.img of=/dev/sdb bs=1M conv=fsync
5. Sync
6. Eject the SD card
Insert the SD card into the Pi. Connect a monitor and a keyboard so that you can install software. You also need an Ethernet connection for the Pi. This is to make sure that you don’t miss any software installs due to lack of Internet connection.
7. Insert the SD card into the Raspberry Pi SD card slot
8. Connect the Pi to a HDMI monitor, a USB keyboard and an Ethernet connection
9. Power up the Pi
10. Login. Username is ubuntu. Password is ubuntu
Before you do any software installation, let’s resize the filesystem. Run the following commands to recreate the partition and reboot the Pi.
11. sudo fdisk /dev/mmcblk0
12. Press ‘d’ and then ‘2’ to delete the second partition
13. Press ‘n’, ‘p’, ‘2’, ‘enter’, ‘enter’ to recreate the partition
14. Press ‘w’ to write out the change
15. sudo reboot
Now, resize the file system.
16. Login again
17. sudo resize2fs /dev/mmcblk0p2
Next step is to install some basic packages, e.g. WiFi driver and SSH server before installing ROS.
18. sudo apt-get update
19. sudo apt-get install linux-firmware
20. sudo apt-get install openssh-server

5© 2016 All Rights Reserved. iRobot, Roomba and Create are registered trademarks of iRobot Corporation. Arduino is a trademark of Arduino SA. Raspberry Pi is a trademark of the Raspberry Pi Foundation.
Some ROS software requires properly configured locale settings. Let’s do it.
21. sudo update-locale LANG=C LANGUAGE=C LC_ALL=C LC_MESSAGES=POSIX
Add ROS repositories and update:
22. sudo sh -c ‘echo “deb http://packages.ros.org/ros/ubuntu trusty main” > /etc/apt/sources.list.d/ros-latest.list’
23. sudo apt-key adv --keyserver hkp://ha.pool.sks-keyservers.net --recv-key 0xB01FA116
24. sudo apt-get update
Now, install the ROS Indigo base software. It may take a while.
25. sudo apt-get install ros-indigo-ros-base
26. sudo apt-get install python-rosdep
27. sudo rosdep init
28. rosdep update
29. echo “source /opt/ros/indigo/setup.bash” >> ~/.bashrc
30. source ~/.bashrc
31. sudo apt-get install python-rosinstall
Now, install the ROS Turtlebot software. Again, this may take a while.
32. sudo apt-get install python-serial
33. sudo apt-get install ros-indigo-turtlebot
34. sudo apt-get install ros-indigo-turtlebot-apps
35. sudo apt-get install ros-indigo-turtlebot-interactions
36. sudo apt-get install ros-indigo-kobuki-ftdi
37. sudo apt-get install ros-indigo-rocon-remocon
38. sudo apt-get install ros-indigo-rocon-qt-library
39. sudo apt-get install ros-indigo-ar-track-alvar-msgs
You need to setup a few variables in order to start the Turlebot software correctly.
40. sudo vi /opt/ros/indigo/setup.bash
Add the following:
• export TURTLEBOT_BASE=create• export TURTLEBOT_STACKS=circles• export TURTLEBOT_3D_SENSOR=asus_xtion_pro• export TURTLEBOT_SERIAL_PORT=/dev/ttyUSB0• export TURTLEBOT_BATTERY=/home/ubuntu/BAT0
The Turtlebot acutually looks a bit different from the iRobot-Create-2-PrimeSense combo, so let’s modify the look in the visualizer.
41. sudo vi /opt/ros/indigo/share/turtlebot_description/urdf/turtlebot_library.urdf.xacro
42. Comment out or remove the “Stacks” section
43. sudo vi /opt/ros/indigo/share/turtlebot_description/urdf/turtlebot_properties.urdf.xacro
44. Change the value of cam_pz from 0.2870 to 0.1143

6© 2016 All Rights Reserved. iRobot, Roomba and Create are registered trademarks of iRobot Corporation. Arduino is a trademark of Arduino SA. Raspberry Pi is a trademark of the Raspberry Pi Foundation.
You also want to fix the baud rate and wheel separation for Create 2.
45. sudo vi /opt/ros/indigo/lib/python2.7/dist-packages/create_node/robot_types.py
46. Change the baud rate of create from 57600 to 115200
47. Change the wheel separation from 0.26 to 0.235
Just in case the default user, ‘ubuntu’ does not have access to the serial port. Add ‘ubuntu’ to the ‘dialout’ group.
48. sudo adduser ubuntu dialout
The Turtlebot software can monitor the battery usage by the computer. However, for the Raspberry Pi 2, it is not available. In order to start the Turtlebot software without errors, you need to put in some fake battery charge information.
49. mkdir ~/BAT0
50. sh -c ‘echo “4785000” > ~/BAT0/charge_full’
51. sh -c ‘echo “5856000” > ~/BAT0/charge_full_design’
52. sh -c ‘echo “2206000” > ~/BAT0/charge_now’
The hostname of the Pi is currently ‘ubuntu’ by default. Let’s change it to ‘create2-pi2’.
53. sudo sed -i.bak s/ubuntu/create2-pi2/g /etc/hosts
54. sudo sed -i.bak s/ubuntu/create2-pi2/g /etc/hostname
Setup the ROS_MASTER_URI and ROS_HOSTNAME environment variables so that you can connect to the robot via a network connection.
55. vi ~/.bashrc
Add the following:
56. export ROS_MASTER_URI=http://localhost:11311
57. export ROS_HOSTNAME=create2-pi2.YOUR-DOMAIN-NAME-HERE
The default ubuntu installation does not have wireless software pre-installed. So let’s install wpa-supplicant and configure wlan0 to connect to your wireless network. Again, reboot the Pi after the wlan0 configuration.
58. sudo apt-get install wpasupplicant
59. sudo vi /etc/network/interfaces
60. Add wireless network SSID and Password for wlan0:
• allow-hotplug wlan0• iface wlan0 inte dhcp• wpa-key_mgmt WPA-PSK• wpa-ssid “YOUR-WIFI-SSID-HERE”• wpa-psk “YOUR_WIFI-PASSWORD-HERE”
61. sudo reboot
62. Pull the Ethernet connection
63. Disconnect the Pi from the keyboard and the monitor.
64. Connect the Pi to the portable battery, the PrimeSense sensor and the iRobot Create 2 serial cable.
7© 2016 All Rights Reserved. iRobot, Roomba and Create are registered trademarks of iRobot Corporation. Arduino is a trademark of Arduino SA. Raspberry Pi is a trademark of the Raspberry Pi Foundation.
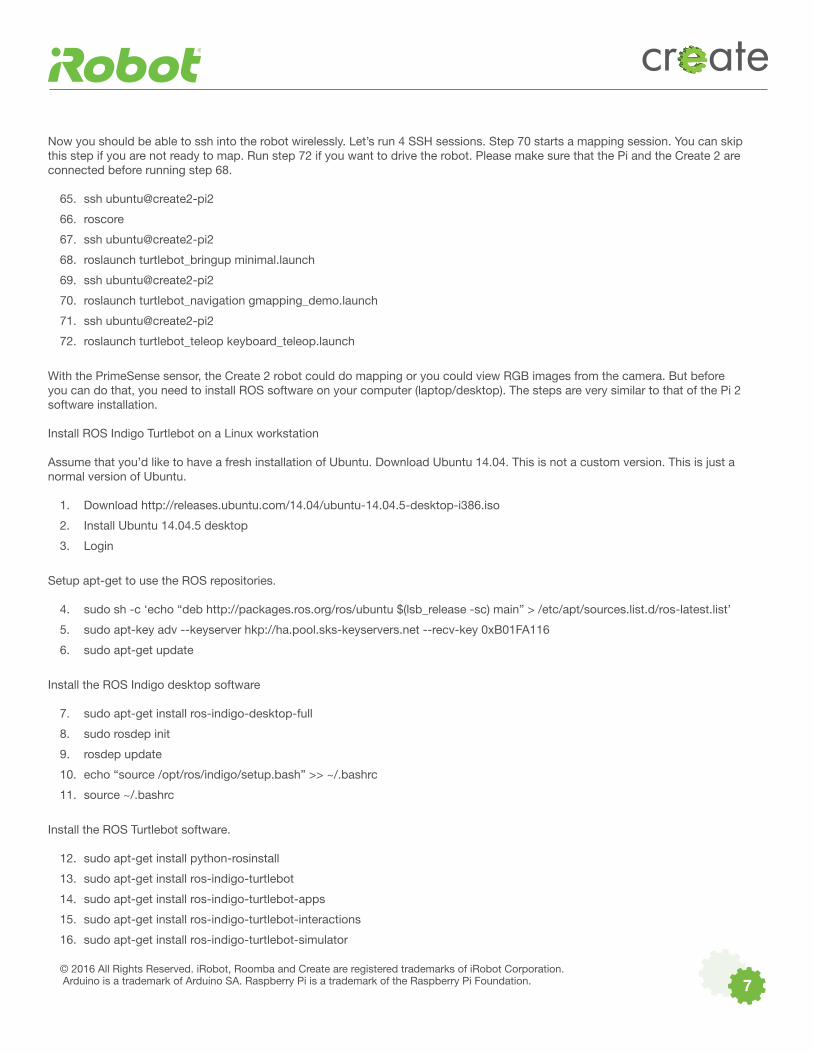
Now you should be able to ssh into the robot wirelessly. Let’s run 4 SSH sessions. Step 70 starts a mapping session. You can skip this step if you are not ready to map. Run step 72 if you want to drive the robot. Please make sure that the Pi and the Create 2 are connected before running step 68.
65. ssh ubuntu@create2-pi2
66. roscore
67. ssh ubuntu@create2-pi2
68. roslaunch turtlebot_bringup minimal.launch
69. ssh ubuntu@create2-pi2
70. roslaunch turtlebot_navigation gmapping_demo.launch
71. ssh ubuntu@create2-pi2
72. roslaunch turtlebot_teleop keyboard_teleop.launch
With the PrimeSense sensor, the Create 2 robot could do mapping or you could view RGB images from the camera. But before you can do that, you need to install ROS software on your computer (laptop/desktop). The steps are very similar to that of the Pi 2 software installation.
Install ROS Indigo Turtlebot on a Linux workstation
Assume that you’d like to have a fresh installation of Ubuntu. Download Ubuntu 14.04. This is not a custom version. This is just a normal version of Ubuntu.
1. Download http://releases.ubuntu.com/14.04/ubuntu-14.04.5-desktop-i386.iso
2. Install Ubuntu 14.04.5 desktop
3. Login
Setup apt-get to use the ROS repositories.
4. sudo sh -c ‘echo “deb http://packages.ros.org/ros/ubuntu $(lsb_release -sc) main” > /etc/apt/sources.list.d/ros-latest.list’
5. sudo apt-key adv --keyserver hkp://ha.pool.sks-keyservers.net --recv-key 0xB01FA116
6. sudo apt-get update
Install the ROS Indigo desktop software
7. sudo apt-get install ros-indigo-desktop-full
8. sudo rosdep init
9. rosdep update
10. echo “source /opt/ros/indigo/setup.bash” >> ~/.bashrc
11. source ~/.bashrc
Install the ROS Turtlebot software.
12. sudo apt-get install python-rosinstall
13. sudo apt-get install ros-indigo-turtlebot
14. sudo apt-get install ros-indigo-turtlebot-apps
15. sudo apt-get install ros-indigo-turtlebot-interactions
16. sudo apt-get install ros-indigo-turtlebot-simulator

8© 2016 All Rights Reserved. iRobot, Roomba and Create are registered trademarks of iRobot Corporation. Arduino is a trademark of Arduino SA. Raspberry Pi is a trademark of the Raspberry Pi Foundation.
17. sudo apt-get install ros-indigo-kobuki-ftdi
18. sudo apt-get install ros-indigo-rocon-remocon
19. sudo apt-get install ros-indigo-rocon-qt-library
20. sudo apt-get install ros-indigo-ar-track-alvar-msgs
Again, adjust the hostname.
21. sudo sed -i.bak s/ubuntu/create2-desktop/g /etc/hosts
22. sudo sed -i.bak s/ubuntu/create2-desktop/g /etc/hostname
You need to add the same Turtlebot environment variables.
23. sudo vi /opt/ros/indigo/setup.bash
24. Add the following:
• export TURTLEBOT_BASE=create• export TURTLEBOT_STACKS=circles• export TURTLEBOT_3D_SENSOR=asus_xtion_pro• export TURTLEBOT_SERIAL_PORT=/dev/ttyUSB0• export TURTLEBOT_BATTERY=/home/ubuntu/BAT0
For configuring your computer to connect to the Create 2 robot, add the following ROS variables.
25. vi ~/.bashrc
26. Add the following:
• export ROS_MASTER_URI=http://create2-pi2.YOUR-DOMAIN-NAME-HERE:11311• export ROS_HOSTNAME=create2-desktop.YOUR-DOMAIN-NAME-HERE
Reboot, login and then run the Turtlebot visualizer. Make sure that the robot is already powered up.
27. sudo reboot
28. Login again
29. roslaunch turtlebot_rviz_launchers view_navigation.launch


