Download - Product update v5.3.6

v5.3.6 – Release features
GPS based attendance & Core HR letters generation
(As seen on the Webinar)

GPS – enabled attendance marking system
How to use it in greytHR?

Step 1: Login as an ‘Admin’ and click on the ‘Banner’
**Only who ever subscribed to Attendance module will be able to see the banner

Step 2: Define the ‘location’ for mark attendance

Step 2.1 : Click on ‘Generate Access Code’

Step 2.2: Select the Employee → Send SMS

Step 2.3: Click the Link in the SMS
•Once you click on the link, we re-direct you to play store to download the App called ‘Office Locator’
•Install the App in your device to mark the office coordinates

Step 2.4: Open the App in your device
Click on ‘Let’s Get Started’ to start marking the office locations for attendance marking
Note: Your device ‘Location access’ should be enabled for this App

Step 2.5: Enter the Radius
System will automatically capture the location and enter the radius to select the range in and around office
What is Radius? The Blue color circle is the RadiusWhich means, how many meters around your office we can start allowing your employee to mark attendance
**You can change your radius – but minimum should be 50 meters

Step 2.6: Submit the location captured
Enter the Access code (which you received via SMS) → Name your location that you captured→ Click ‘Submit Location‘
Example: We can name as “Chennai Office” or etc.,

Step 2.7: Activate the location received from employee

Step 3: Select the attendance marking type
Note: Auto Sign In is an upcoming feature which can allow you to sign in automatically once you reach the target place
Watch out! We will come back soon on this.
Select the option called ‘Manual Sign In’ to allow employees login using mobile app, post which your employees has to open the mobile app and say ‘Sign In’
How does it look in greytHR Mobile App?

In case if your out of the office premise (i.e when you are out of marked location)
** Sign in / Sign out button will not be visible

When you’re in the office premise (i.e when you are within the marked location)
** Sign in / Sign out button will be visible like shown

How can I invite the employees who have not installed the mobile app?

You can invite your employees by clicking on the option as shown

Note: Employee mobile number should be updated to carry on this task

Can I also see how many employees are using mobile App in my company?

Under Employee → Main → Overview (status is available)
Note: By clicking on the ‘More’ button you can send invite once again from here

You can now use GPS based Attendance without any hassle

How to generate letter(s) for multiple employees in one go?

Steps to generate letters for bulk employees
Step 1: Click on ‘Employee’ menu
Step 2: Under Employee → Admin → Generate Letter
Step 3: Select the ‘Template’ and select ‘Employees’

Step 1: Click on the ‘Employee’ menu
Note: Login as an ‘Admin’ or ‘Payroll Admin’ to carry this operation

Step 2: Select ‘Generate Letter’ from admin menu

Step 3: Click ‘Prepare a letter’

Step 3.1: Select the ‘Letter Template’

Step 3.2: Select the ‘Employee(s)’

Step 3.3: Preview the letter and Click ‘Finish’

Step 3.4: Post the letters in ESS for every employee

Step 3.5: Click ‘Download’ for bulk download

How to Edit/Create my own letters in greytHR?

Step 1: Click on the ‘Employee’ menu
(C) Greytip Software Pvt. Ltd.,
Note: Login as an ‘Admin’ or ‘Payroll Admin’ to carry this operation

Step 2: Go to Setup –> Letter Template

Step 3: Click on ‘New Letter Template’
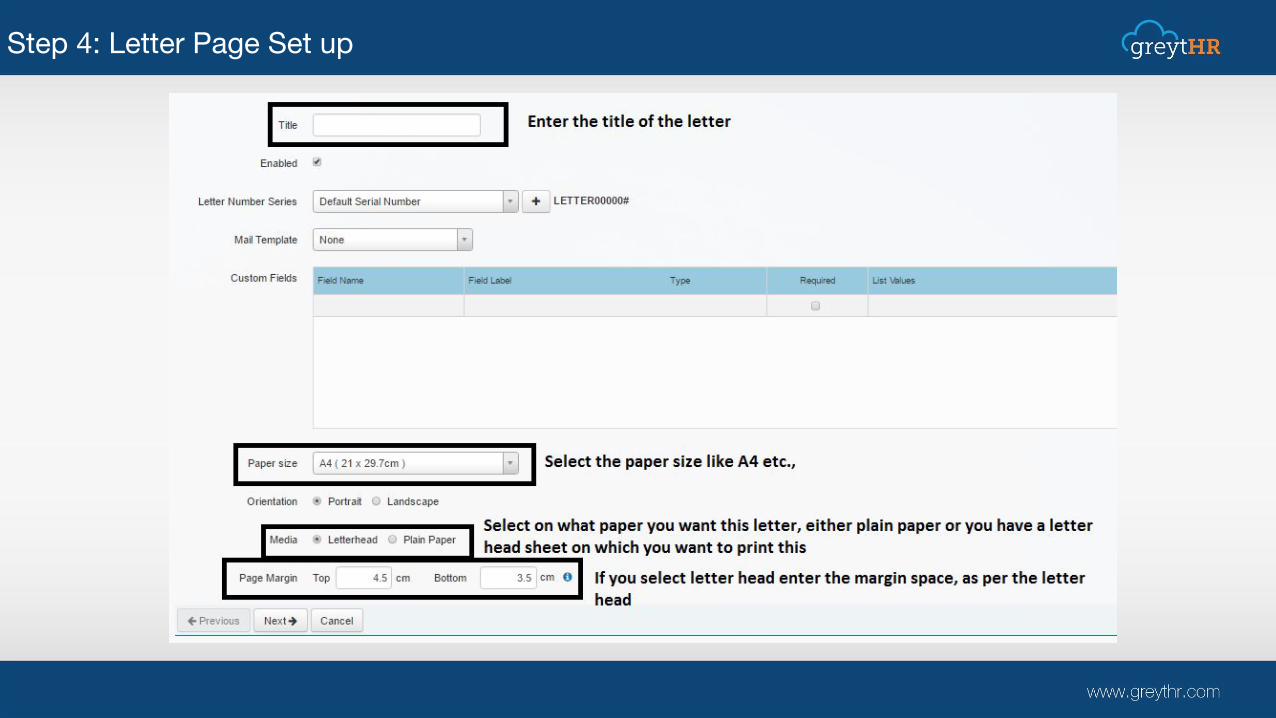
Step 4: Letter Page Set up

Step 5: Enter the text in the space for editing

Sample:
**All these auto fill columns will update automatically for each employee as you generate

Step 6: Click Finish
Now in Employee → Generate letter, you can generate for employee(s)
**If once you create a template – it stays for a lifetime and can be generated for any number of employees

Multiple reviewers for Reimbursement approval

You can have ‘max of 2 level’ reviewers for Reimbursement requests
‘Your reimbursements can be reviewed by either your regional accounts managers, business accounts manager or Department Heads too.’

Introducing 15 more Shops Act & CLRA Reports
For states like: Haryana, Punjab, Kerala, A.P & Karnataka, U.P

What are those Forms?
CLRA
Form XII - Register of Contractors - CLRA Central RulesForm XIV - Employment Card - CLRA Central RulesForm XV - Service Certificate - CLRA Central Rules
Punjab
Form C - Register of Employees – PunjabForm E - Register of Deductions - PunjabForm D - Register of Wages - Punjab
Haryana
Form C - Register of Employees - HaryanaForm E - Register of Deductions - HaryanaForm D - Register of Wages - Haryana
Andhra Pradesh
Form XII - Register of Advances of Wages - Andhra Pradesh
Kerala
Form A - Register of Employment - KeralaForm H - Quarterly Return - Kerala
Uttar Pradesh
Form G - Register of Attendance and Wages - UP Shop ActForm U - Combined annual return for shops & establishments - Karnataka
Karnataka
Form D - Central - Equal Remuneration Rules Common for all states

For further queries on PF, refer
https://www.stacowiki.in/en/
For more details, check out
https://www.greythr.com/in/
For any queries, write to us at [email protected]
Thank you


