Download - Principles of photography I
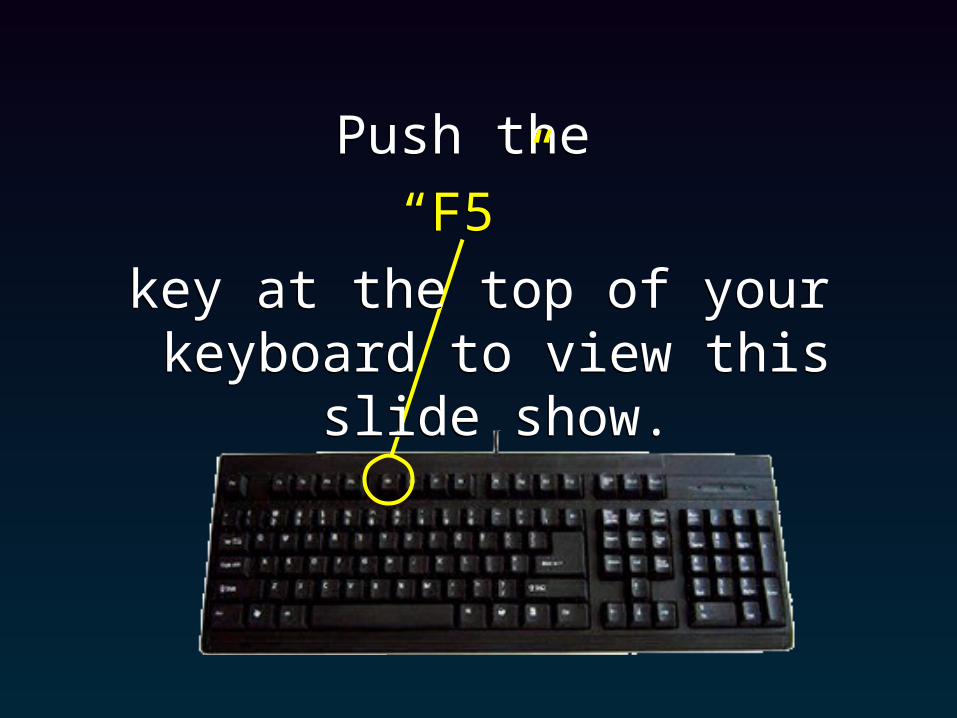
Push the
“F5”
key at the top of your keyboard to view this slide show.
Push the
“F5”
key at the top of your keyboard to view this slide show.
Principles of Photography I
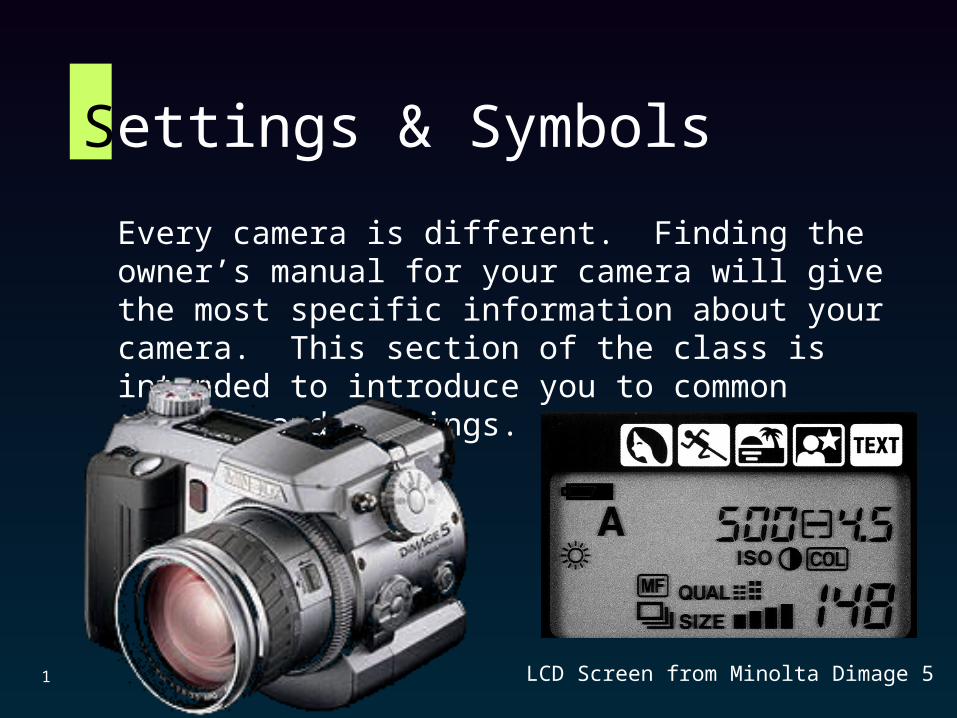
Settings & Symbols
Every camera is different. Finding the owner’s manual for your camera will give the most specific information about your camera. This section of the class is intended to introduce you to common symbols and settings.
1 LCD Screen from Minolta Dimage 5
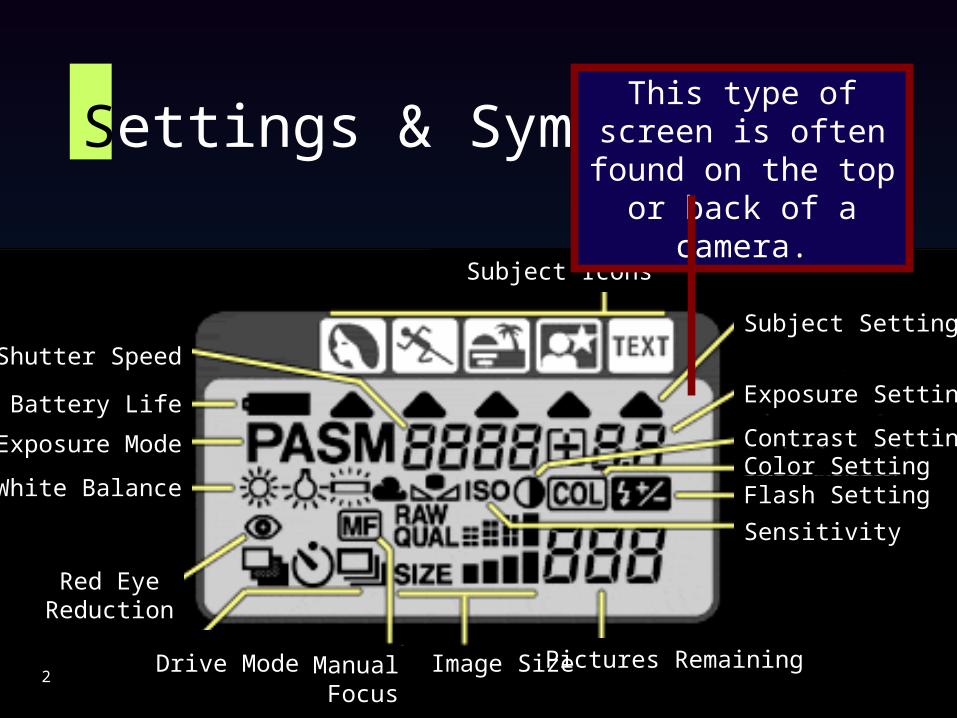
Settings & Symbols
2
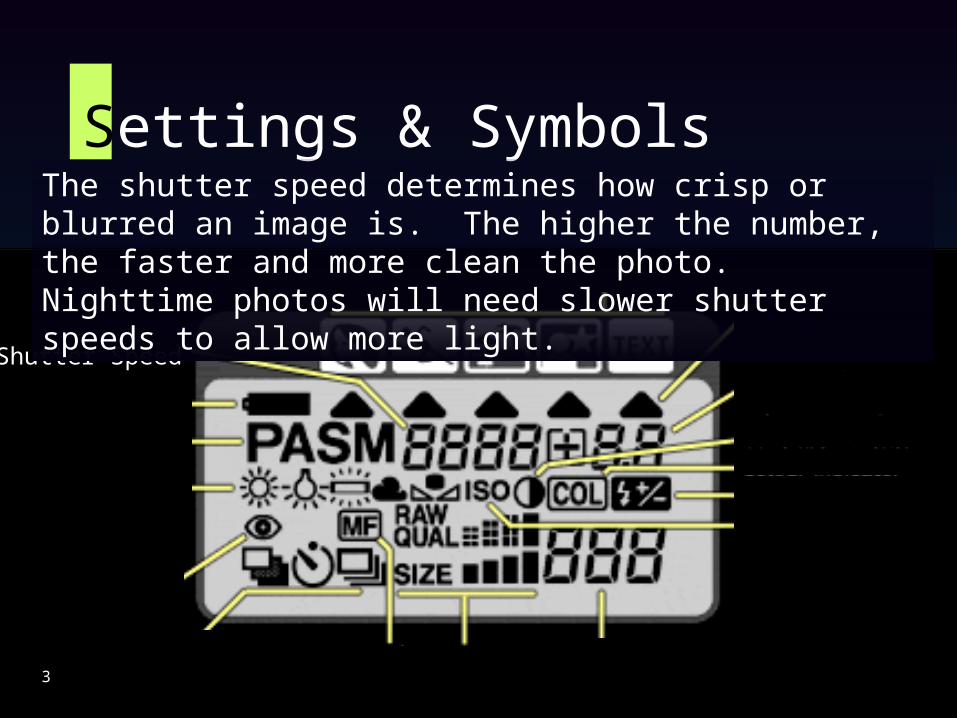
Shutter Speed
Battery Life
Exposure Mode
White Balance
Red Eye Reduction
Drive Mode Manual Focus
Image Size Pictures Remaining
Sensitivity
Flash SettingColor SettingContrast Setting
Exposure Setting
Subject Setting
Subject Icons
This type of screen is often found on the top or back of a camera.
Settings & Symbols
3
Shutter Speed
Battery Life
Exposure Mode
White Balance
Red Eye Reduction
Drive Mode Manual Focus
Image Size Pictures Remaining
Sensitivity
Flash SettingColor SettingContrast Setting
Exposure Setting
Subject Setting
Subject Icons
The shutter speed determines how crisp or blurred an image is. The higher the number, the faster and more clean the photo. Nighttime photos will need slower shutter speeds to allow more light.
Settings & Symbols
3
Shutter Speed
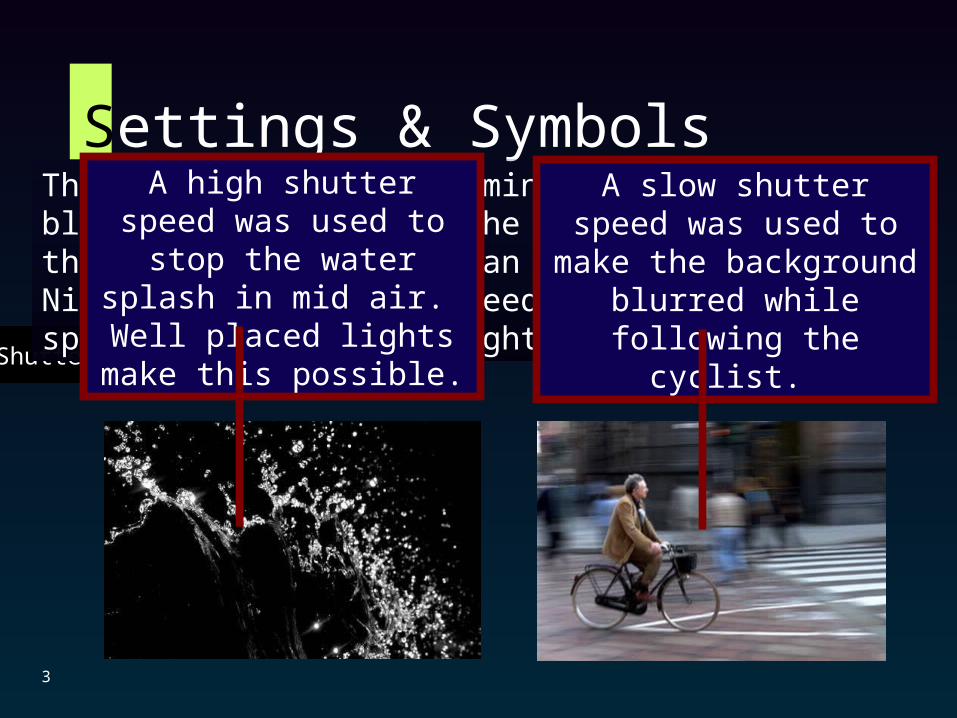
The shutter speed determines how crisp or blurred an image is. The higher the number, the faster and more clean the photo. Nighttime photos will need slower shutter speeds to allow more light.
A slow shutter speed was used to make the background blurred while following the
cyclist.
A high shutter speed was used to stop the water splash
in mid air. Well placed lights make this possible.
Settings & Symbols
4
Shutter Speed
Battery Life
Exposure Mode
White Balance
Red Eye Reduction
Drive Mode Manual Focus
Image Size Pictures Remaining
Sensitivity
Flash SettingColor SettingContrast Setting
Exposure Setting
Subject Setting
Subject Icons
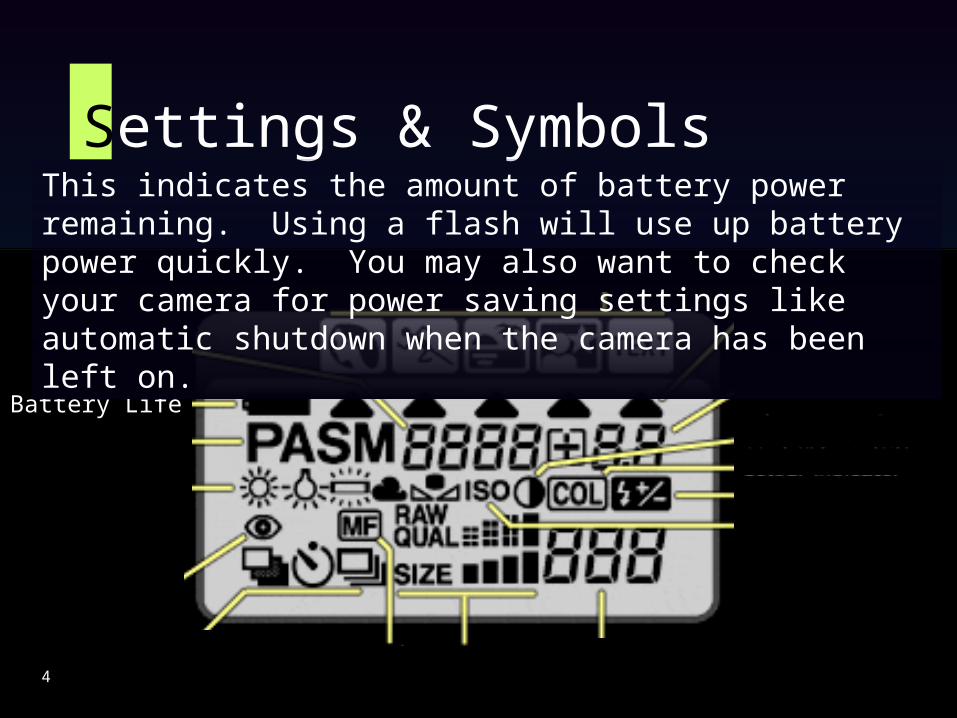
This indicates the amount of battery power remaining. Using a flash will use up battery power quickly. You may also want to check your camera for power saving settings like automatic shutdown when the camera has been left on.
Settings & Symbols
5
Shutter Speed
Battery Life
Exposure Mode
White Balance
Red Eye Reduction
Drive Mode Manual Focus
Image Size Pictures Remaining
Sensitivity
Flash SettingColor SettingContrast Setting
Exposure Setting
Subject Setting
Subject Icons
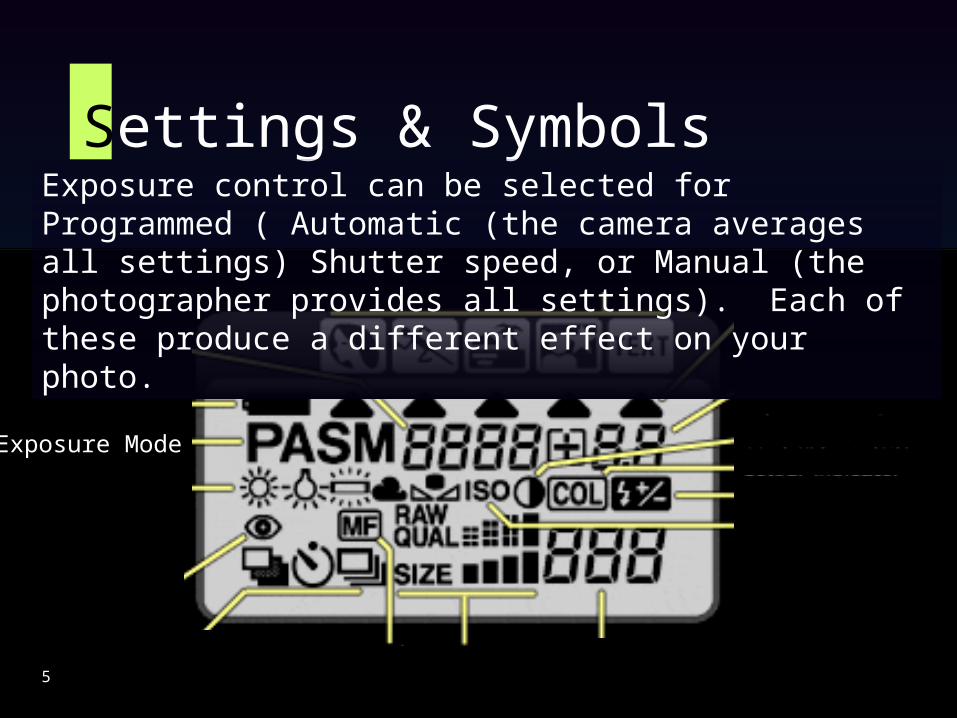
Exposure control can be selected for Programmed ( Automatic (the camera averages all settings) Shutter speed, or Manual (the photographer provides all settings). Each of these produce a different effect on your photo.
Settings & Symbols
6
Shutter Speed
Battery Life
Exposure Mode
White Balance
Red Eye Reduction
Drive Mode Manual Focus
Image Size Pictures Remaining
Sensitivity
Flash SettingColor SettingContrast Setting
Exposure Setting
Subject Setting
Subject Icons
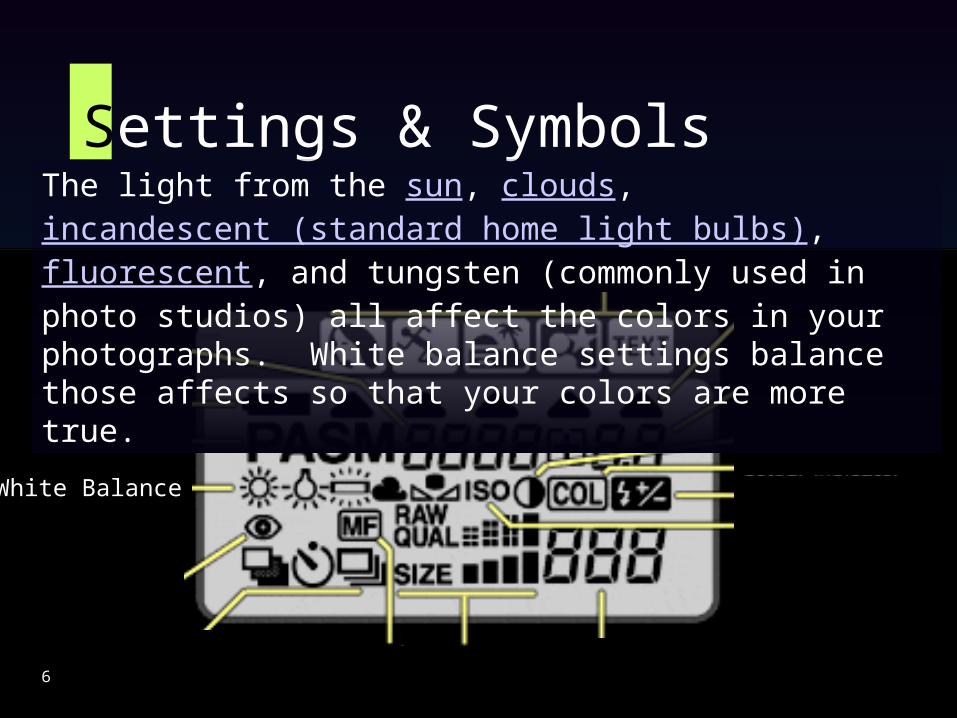
The light from the sun, clouds, incandescent (standard home light bulbs), fluorescent, and tungsten (commonly used in photo studios) all affect the colors in your photographs. White balance settings balance those affects so that your colors are more true.
• The sun offers all colors of the rainbow, but the tones are different depending on the time of day.
Settings & Symbols
6
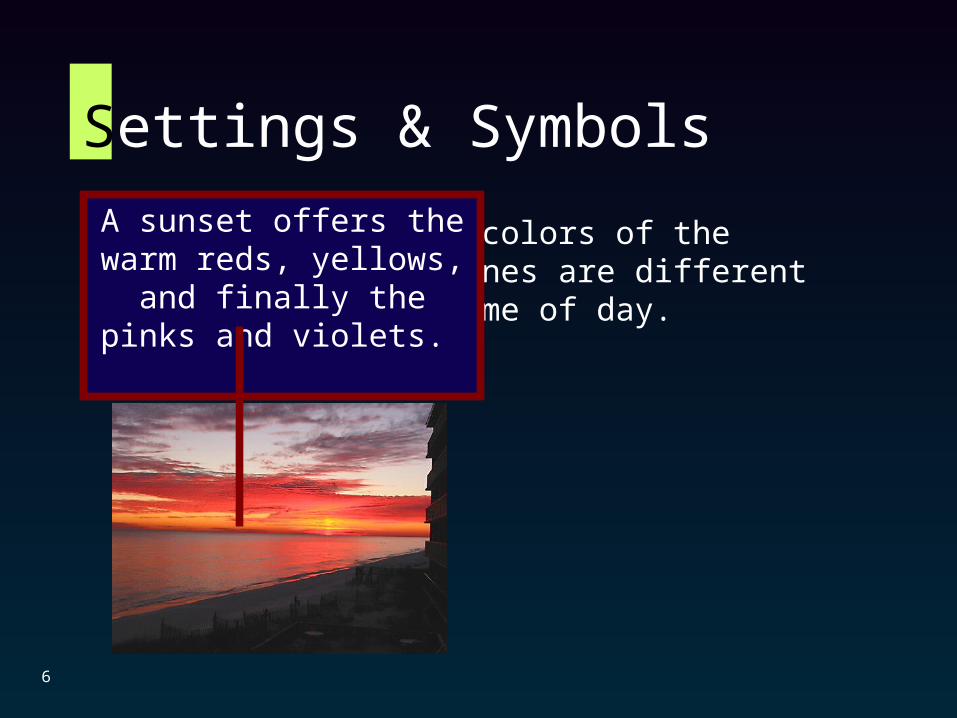
A sunset offers the warm reds, yellows, and finally the
pinks and violets.
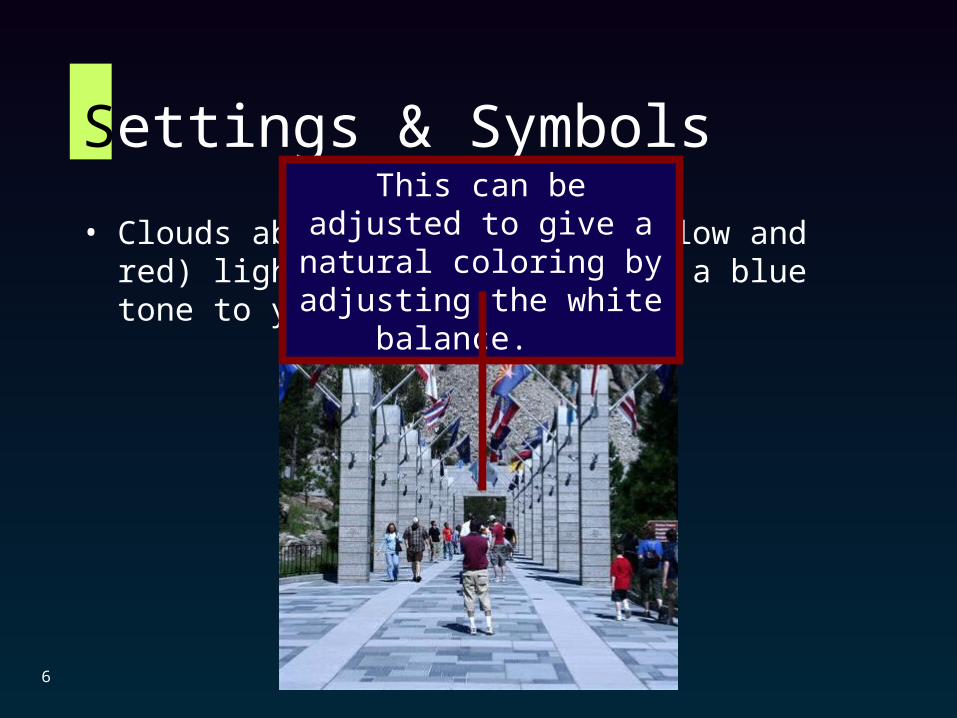
• Clouds absorb the slower (yellow and red) light waves. This gives a blue tone to your photos.
Settings & Symbols
6
This can be adjusted to give a natural coloring by
adjusting the white balance.
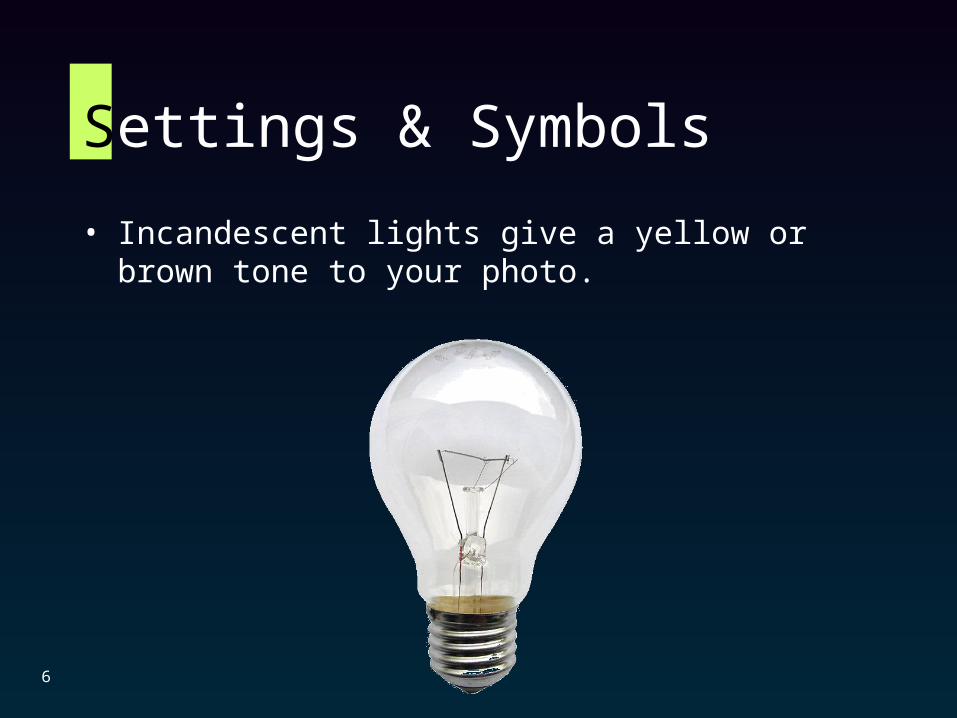
• Incandescent lights give a yellow or brown tone to your photo.
Settings & Symbols
6
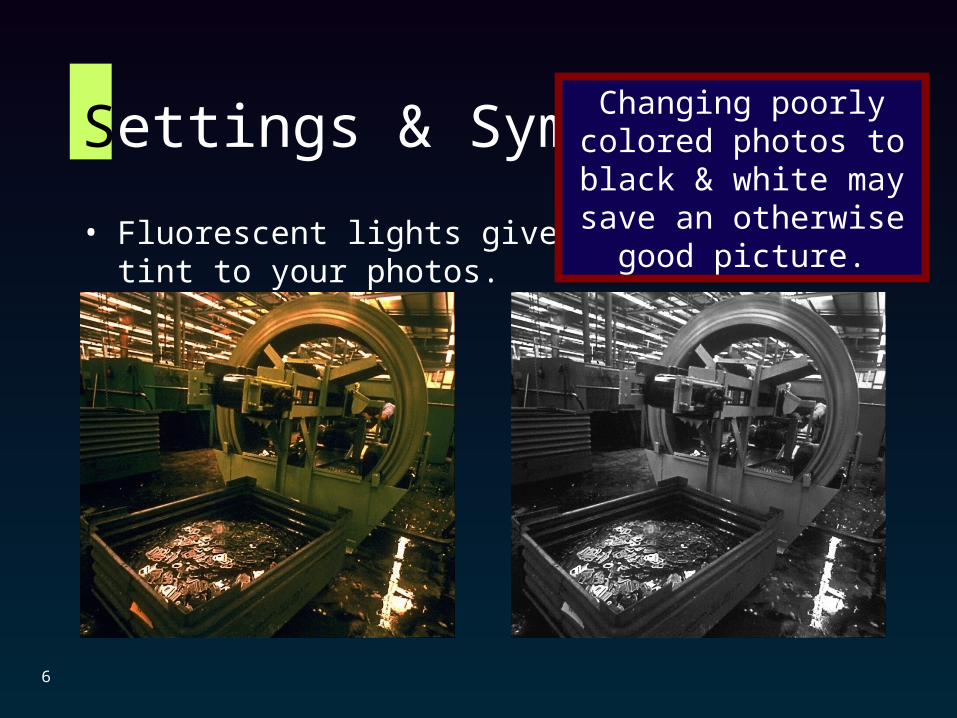
• Fluorescent lights give a dull green tint to your photos.
Settings & Symbols
6
Changing poorly colored photos to black & white may save an otherwise
good picture.
Settings & Symbols
7
Shutter Speed
Battery Life
Exposure Mode
White Balance
Red Eye Reduction
Drive Mode Manual Focus
Image Size Pictures Remaining
Sensitivity
Flash SettingColor SettingContrast Setting
Exposure Setting
Subject Setting
Subject Icons
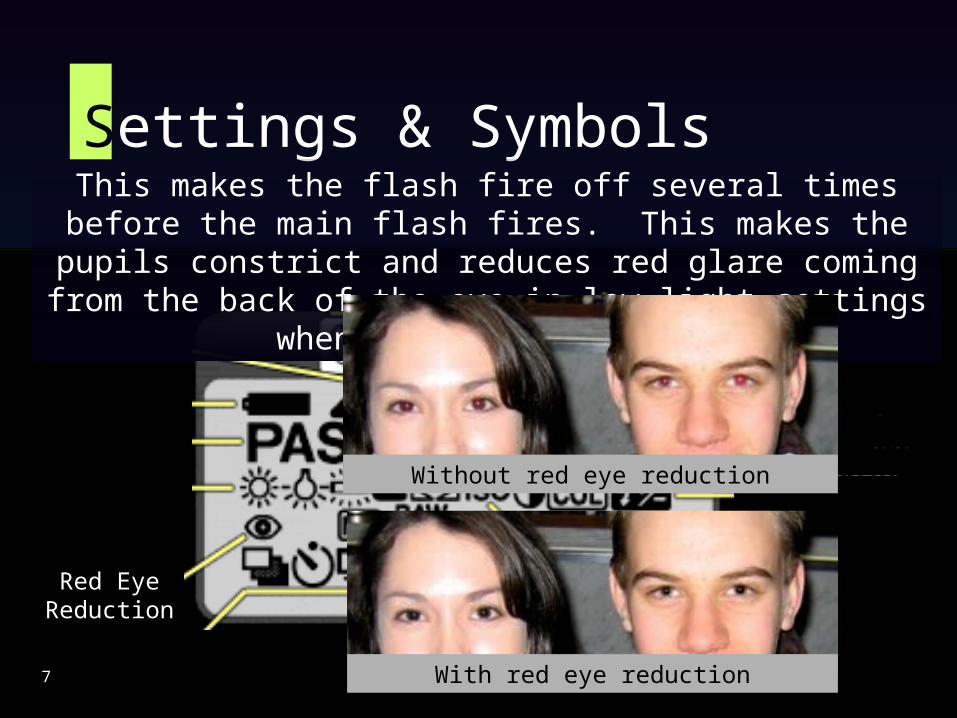
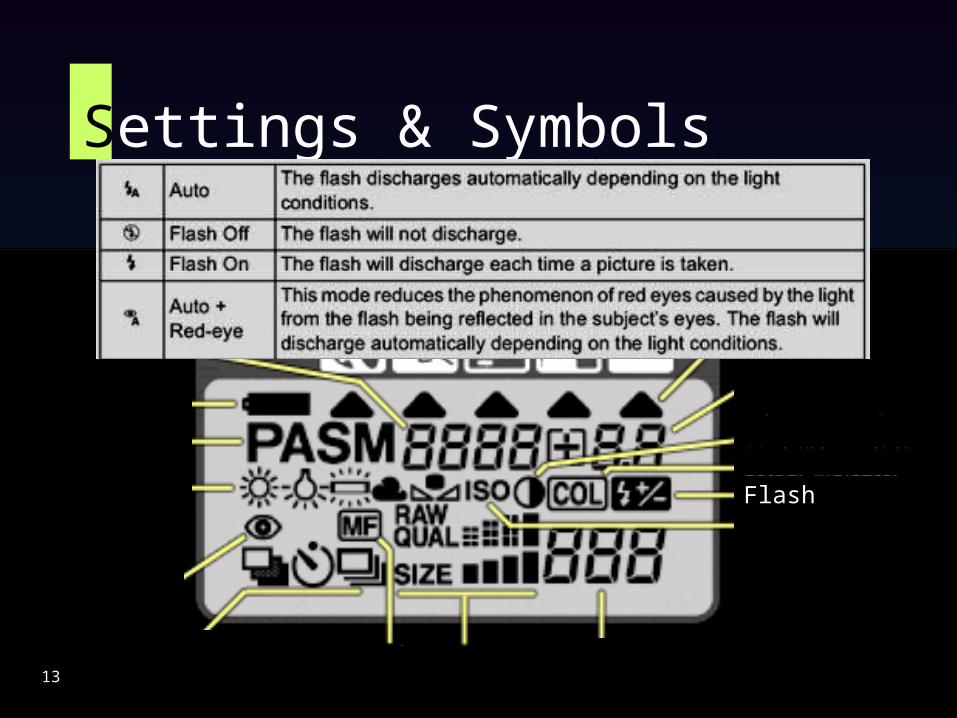
This makes the flash fire off several times before the main flash fires. This makes the pupils constrict and reduces red glare coming from the back of the eye in
low light settings when a flash is used.
With red eye reduction
Without red eye reduction
Settings & Symbols
8
Shutter Speed
Battery Life
Exposure Mode
White Balance
Red Eye Reduction
Drive Mode Manual Focus
Image Size Pictures Remaining
Sensitivity
Flash SettingColor SettingContrast Setting
Exposure Setting
Subject Setting
Subject Icons
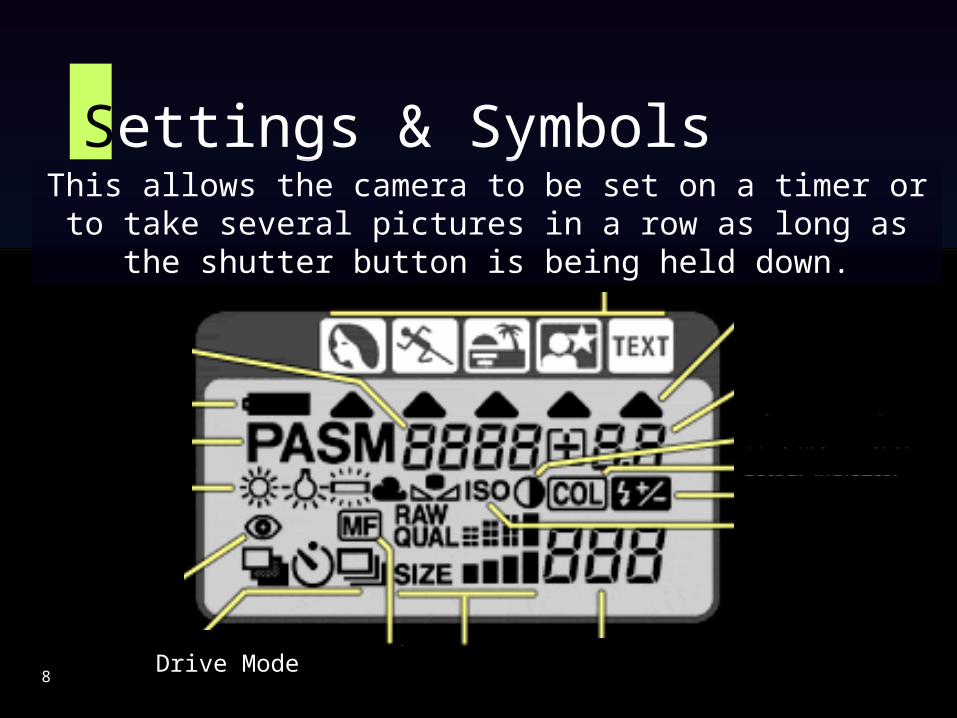
This allows the camera to be set on a timer or to take several pictures in a row as long as the shutter button
is being held down.

Settings & Symbols
9
Shutter Speed
Battery Life
Exposure Mode
White Balance
Red Eye Reduction
Drive Mode Manual Focus
Image Size Pictures Remaining
Sensitivity
Flash SettingColor SettingContrast Setting
Exposure Setting
Subject Setting
Subject Icons
Most automatic cameras do not allow manual focus, but if you can, this is good for close ups of flowers, bugs, or other photos with a shallow depth of field.

Settings & Symbols
10
Shutter Speed
Battery Life
Exposure Mode
White Balance
Red Eye Reduction
Drive Mode Manual Focus
Image Size Pictures Remaining
Sensitivity
Flash SettingColor SettingContrast Setting
Exposure Setting
Subject Setting
Subject Icons
This sets the size of the photo file saved onto your memory card. The larger the size, the better quality picture you will produce. Smaller file sizes are better
for uses like email and websites.
Settings & Symbols
11
Shutter Speed
Battery Life
Exposure Mode
White Balance
Red Eye Reduction
Drive Mode Manual Focus
Image Size Pictures Remaining
Sensitivity
Flash SettingColor SettingContrast Setting
Exposure Setting
Subject Setting
Subject Icons
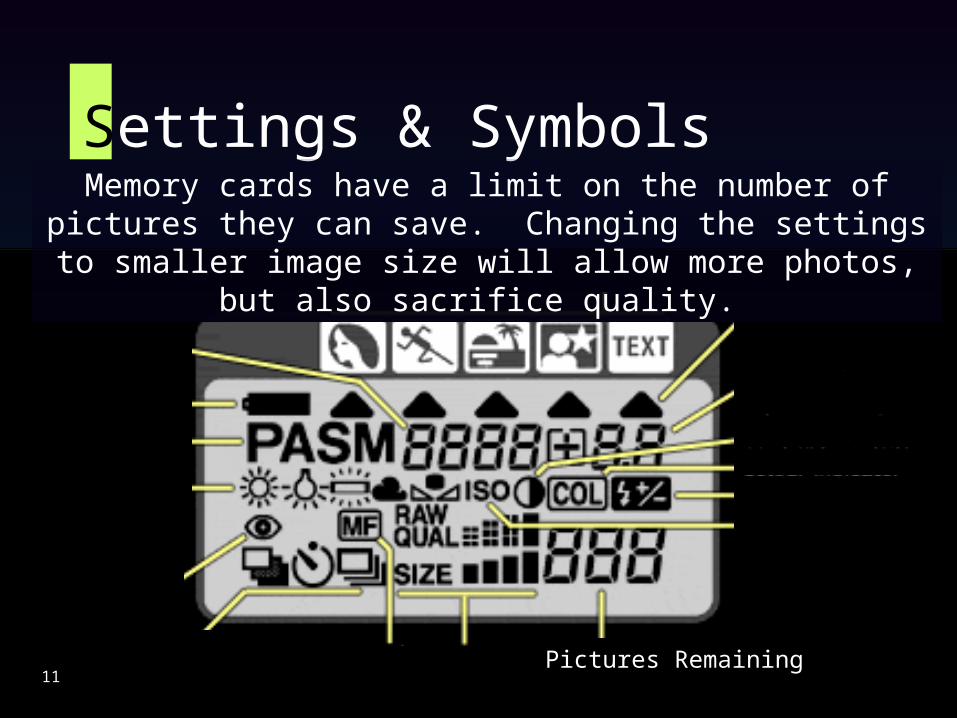
Memory cards have a limit on the number of pictures they can save. Changing the settings to smaller image size will allow more photos, but also sacrifice quality.
Settings & Symbols
12
Shutter Speed
Battery Life
Exposure Mode
White Balance
Red Eye Reduction
Drive Mode Manual Focus
Image Size Pictures Remaining
Sensitivity
Flash SettingColor SettingContrast Setting
Exposure Setting
Subject Setting
Subject Icons
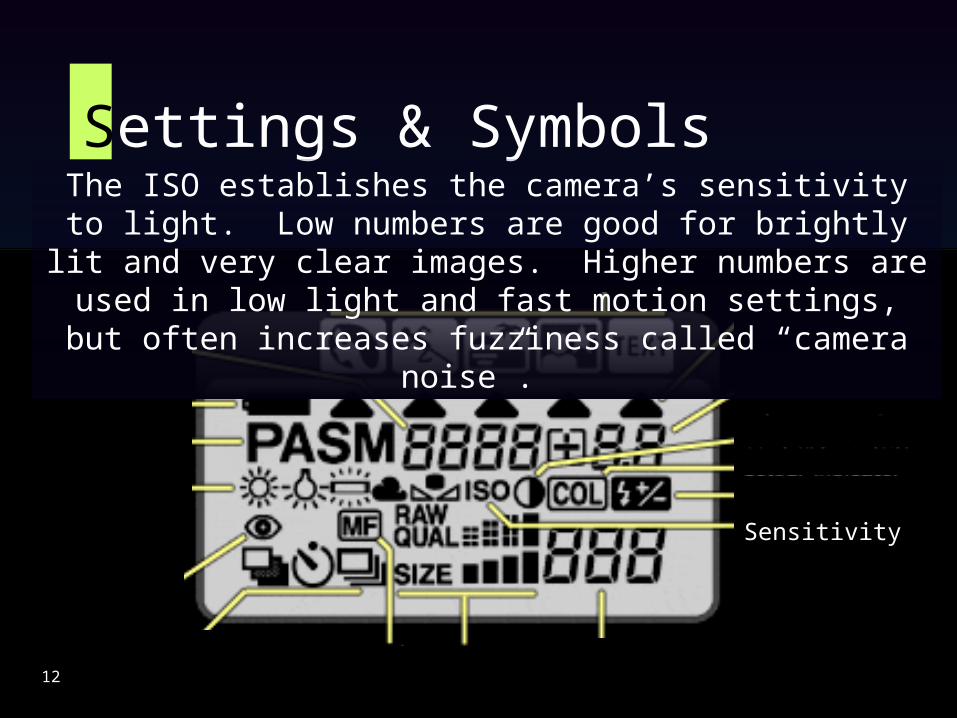
The ISO establishes the camera’s sensitivity to light. Low numbers are good for brightly lit and very clear
images. Higher numbers are used in low light and fast motion settings, but often increases fuzziness called
“camera noise”.
Settings & Symbols
13
Shutter Speed
Battery Life
Exposure Mode
White Balance
Red Eye Reduction
Drive Mode Manual Focus
Image Size Pictures Remaining
Sensitivity
Flash SettingColor SettingContrast Setting
Exposure Setting
Subject Setting
Subject Icons

Settings & Symbols
14
Shutter Speed
Battery Life
Exposure Mode
White Balance
Red Eye Reduction
Drive Mode Manual Focus
Image Size Pictures Remaining
Sensitivity
Flash SettingColor SettingContrast Setting
Exposure Setting
Subject Setting
Subject Icons
Color settings allow a choice of black & white photos, sepia (old fashioned brown tone), negative, and
more.
Settings & Symbols
15
Shutter Speed
Battery Life
Exposure Mode
White Balance
Red Eye Reduction
Drive Mode Manual Focus
Image Size Pictures Remaining
Sensitivity
Flash SettingColor SettingContrast Setting
Exposure Setting
Subject Setting
Subject Icons
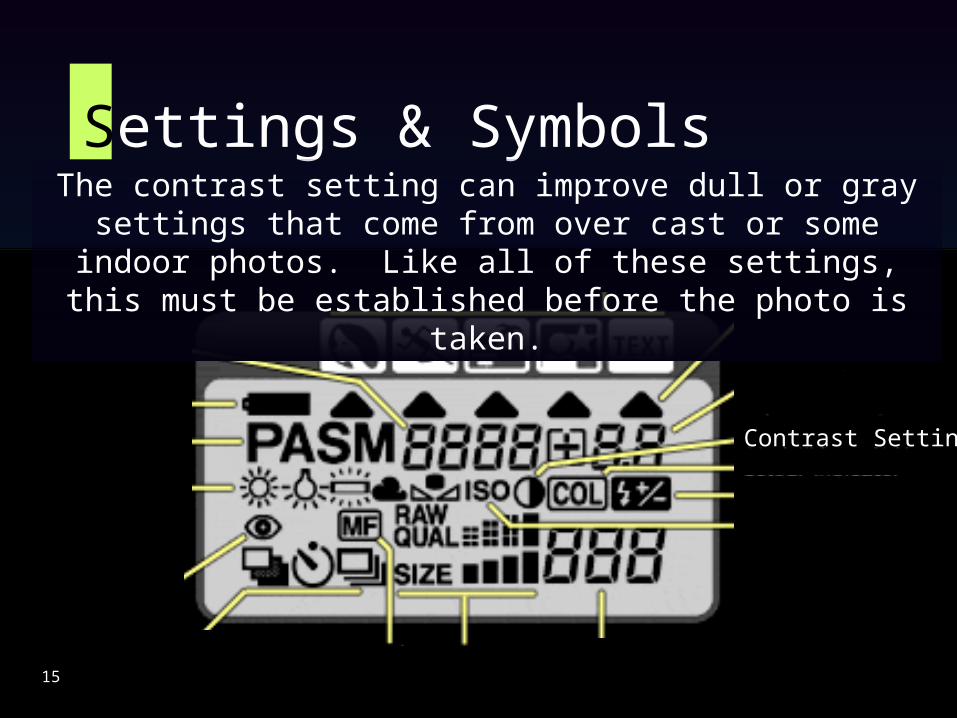
The contrast setting can improve dull or gray settings that come from over cast or some indoor photos. Like all of these settings, this must be established before
the photo is taken.

Settings & Symbols
16
Shutter Speed
Battery Life
Exposure Mode
White Balance
Red Eye Reduction
Drive Mode Manual Focus
Image Size Pictures Remaining
Sensitivity
Flash SettingColor SettingContrast Setting
Exposure Setting
Subject Setting
Subject Icons
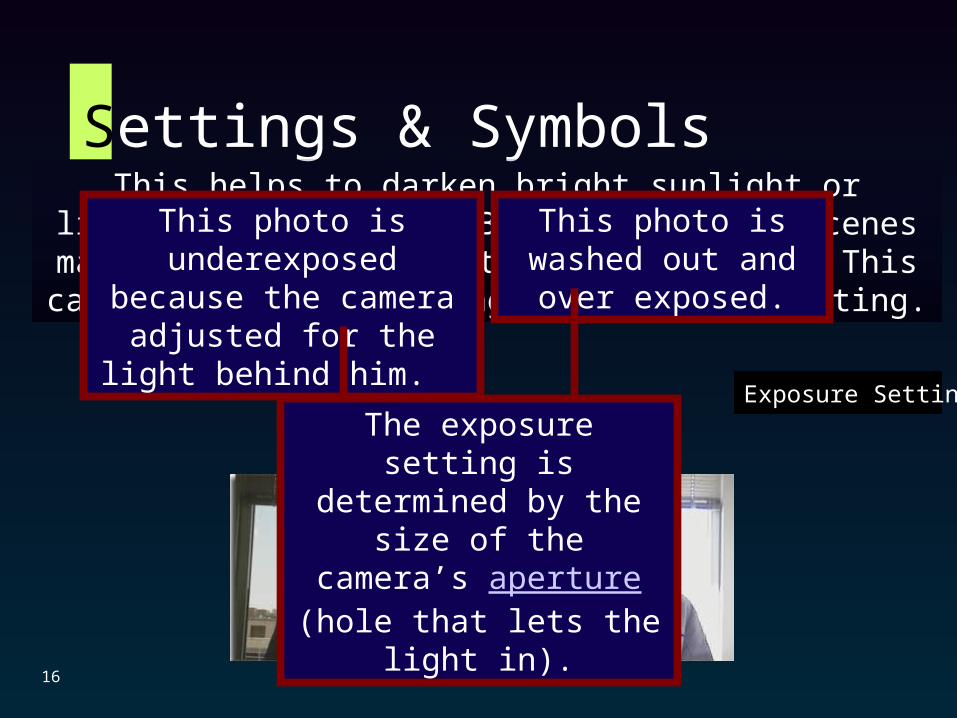
This helps to darken bright sunlight or lighten dark scenes. Brightening dark scenes may produce photos that are washed out. This can be adjusted by using
the contrast setting.
Settings & Symbols
16
Exposure Setting
Subject Icons
This helps to darken bright sunlight or lighten dark scenes. Brightening dark scenes may produce photos that are washed out. This can be adjusted by using
the contrast setting.
This photo is underexposed because the camera adjusted for the light behind him.
This photo is washed out and over exposed.
The exposure setting is determined by the size of the camera’s aperture (hole that
lets the light in).
Settings & Symbols
17
Shutter Speed
Battery Life
Exposure Mode
White Balance
Red Eye Reduction
Drive Mode Manual Focus
Image Size Pictures Remaining
Sensitivity
Flash SettingColor SettingContrast Setting
Exposure Setting
Subject Setting
Subject Icons
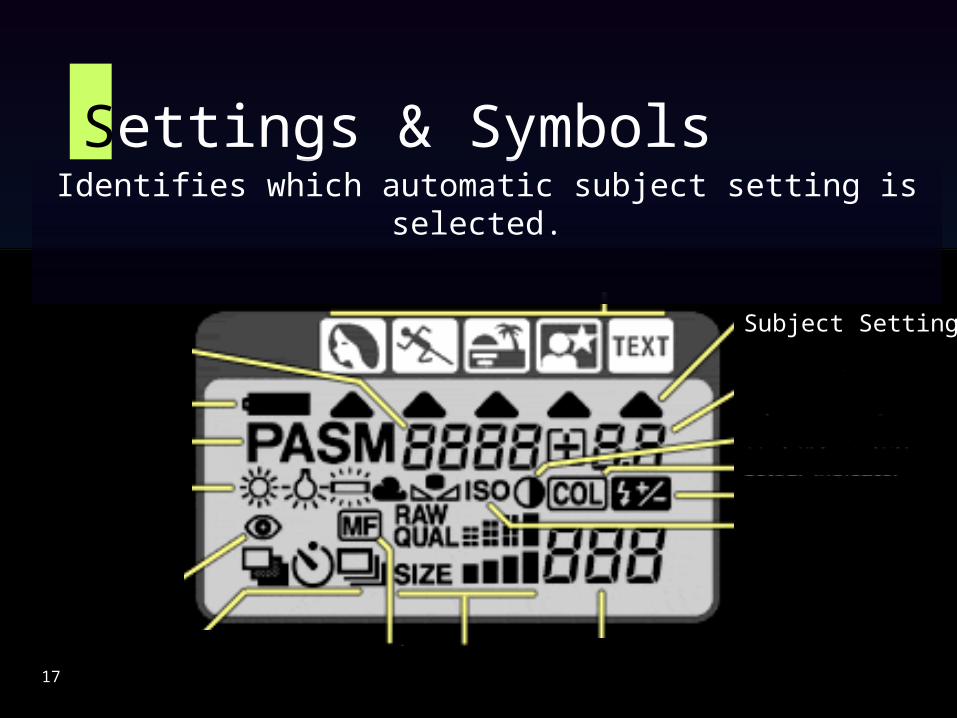
Identifies which automatic subject setting is selected.
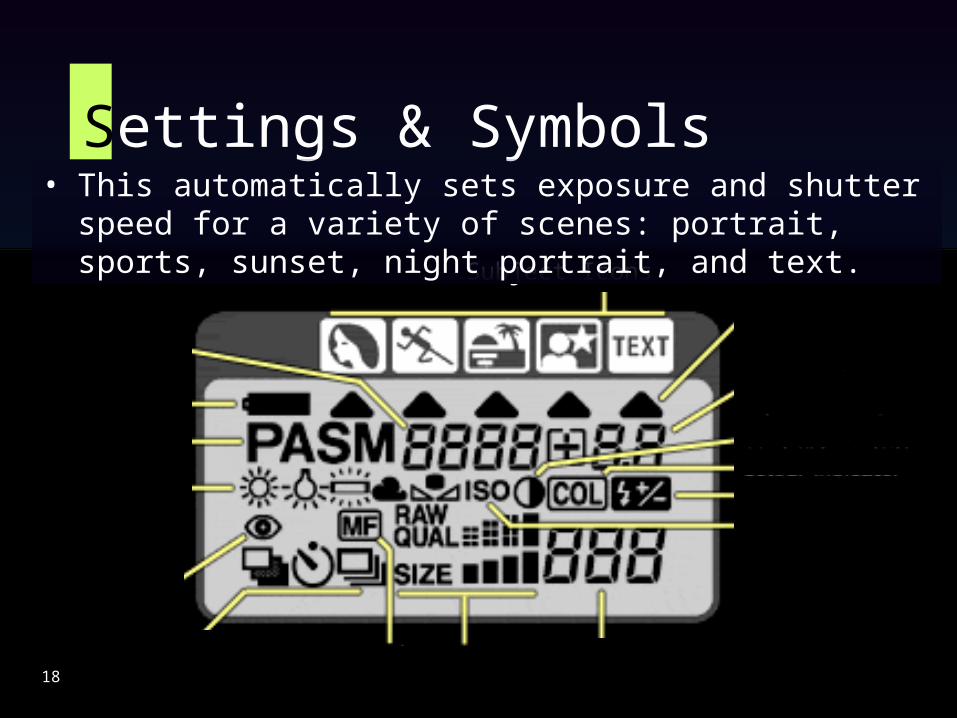
Settings & Symbols
18
Shutter Speed
Battery Life
Exposure Mode
White Balance
Red Eye Reduction
Drive Mode Manual Focus
Image Size Pictures Remaining
Sensitivity
Flash SettingColor SettingContrast Setting
Exposure Setting
Subject Setting
Subject Icons
• This automatically sets exposure and shutter speed for a variety of scenes: portrait, sports, sunset, night portrait, and text.
Settings & Symbols
19
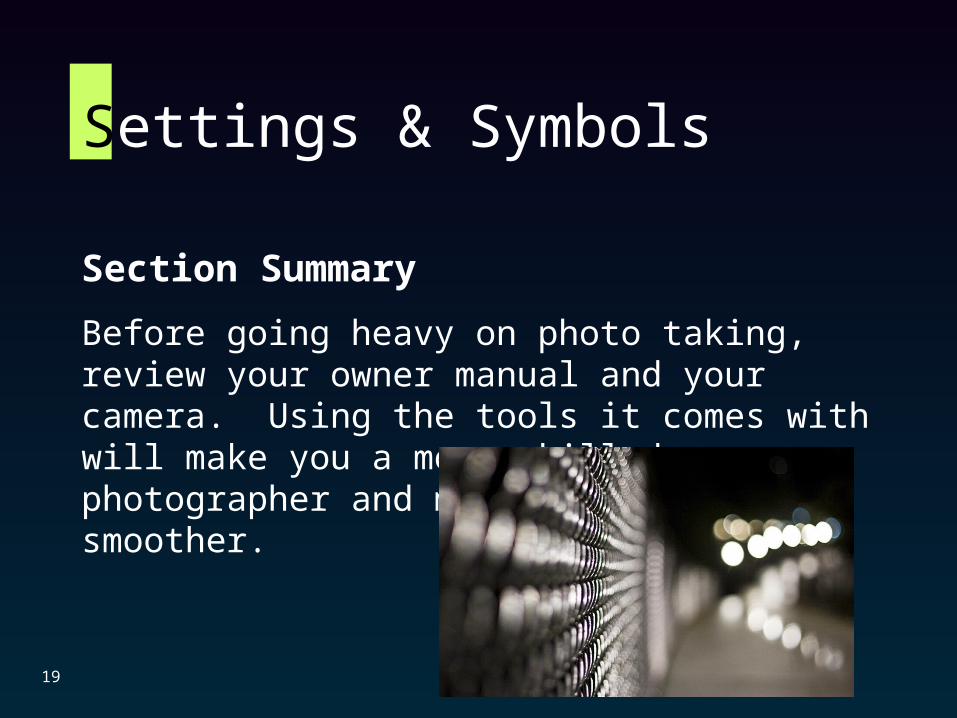
Section Summary
Before going heavy on photo taking, review your owner manual and your camera. Using the tools it comes with will make you a more skilled photographer and make this class go smoother.
What the Arts Teach
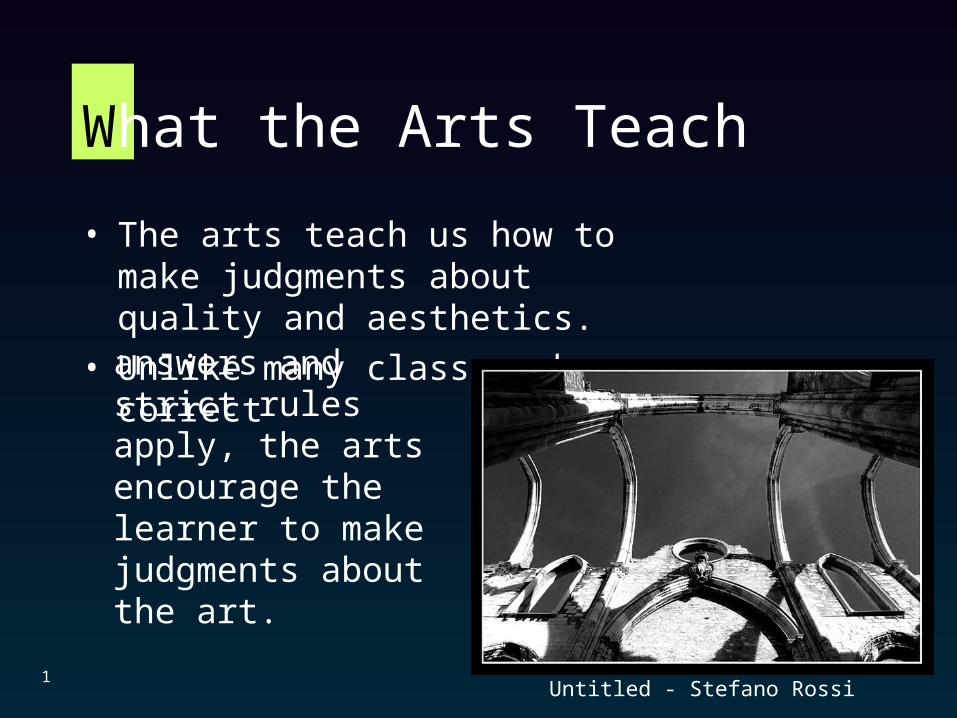
• The arts teach us how to make judgments about quality and aesthetics.
• Unlike many classes where correct
1Untitled - Stefano Rossi
answers and strict rules apply, the arts encourage the learner to make judgments about the art.
Introduction
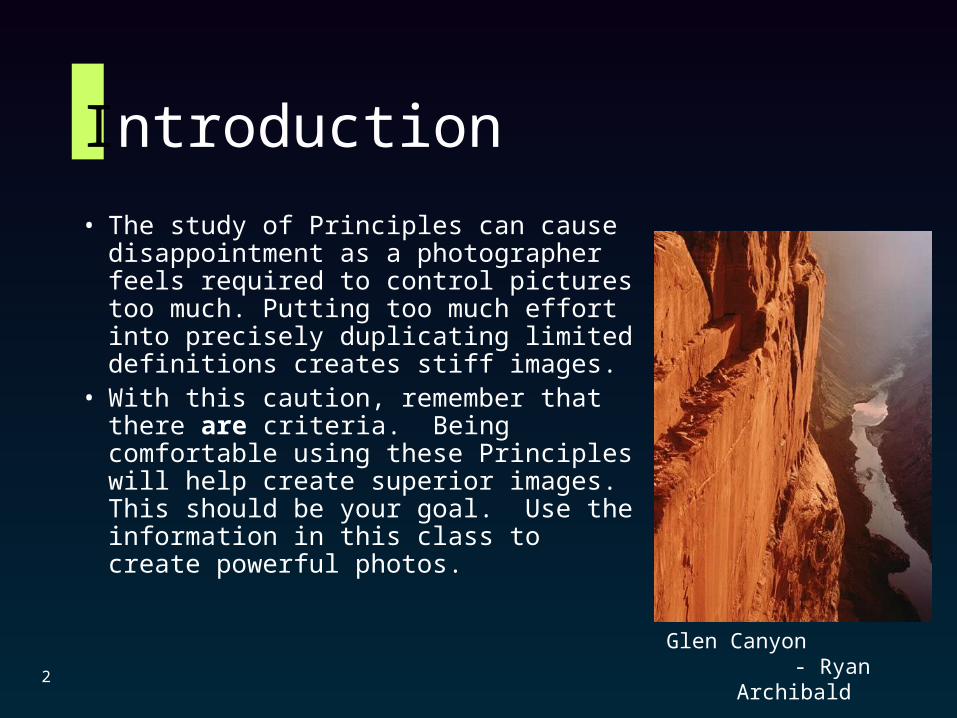
• The study of Principles can cause disappointment as a photographer feels required to control pictures too much. Putting too much effort into precisely duplicating limited definitions creates stiff images.
• With this caution, remember that there are criteria. Being comfortable using these Principles will help create superior images. This should be your goal. Use the information in this class to create powerful photos.
Glen Canyon - Ryan Archibald2

Introduction
There are many Principles of photography. This class allows work in five specific Principles.
• Realism
• Expressionism
• Emphasis
• Movement
• Balance
Dock Construction - Bob Brawdy3
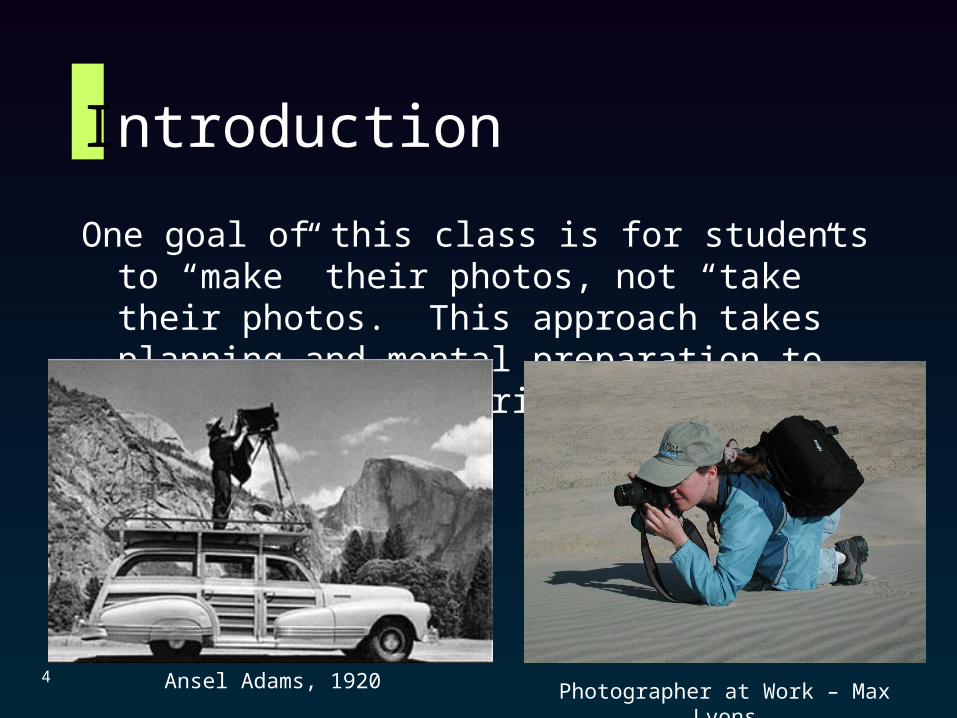
Introduction
One goal of this class is for students to “make” their photos, not “take” their photos. This approach takes planning and mental preparation to capture that one brief moment.
Ansel Adams, 19204Photographer at Work – Max Lyons
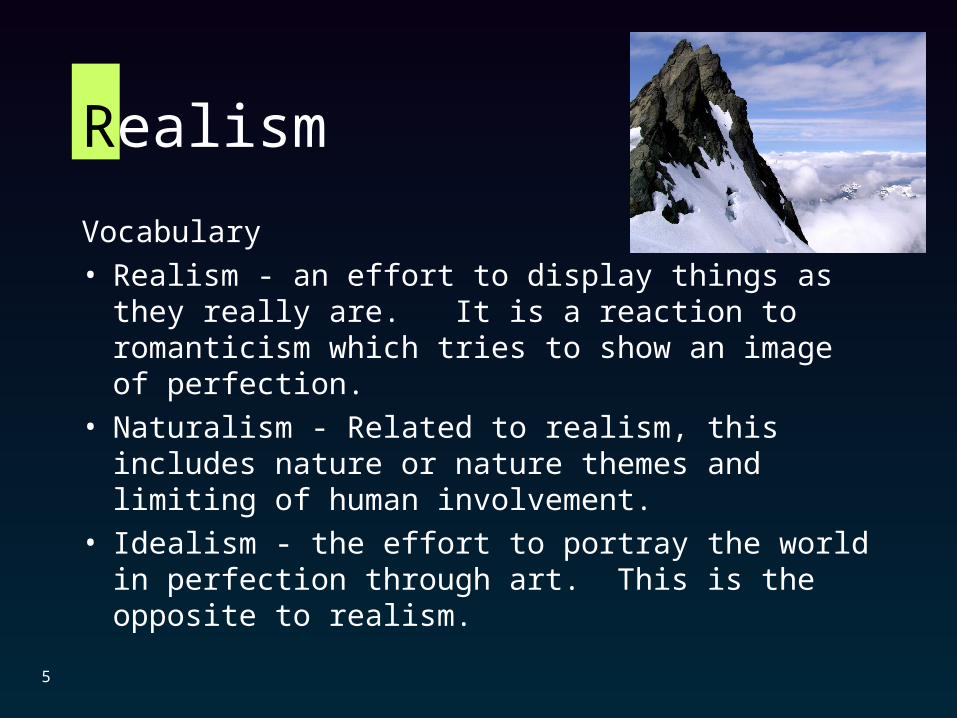
Realism
Vocabulary
• Realism - an effort to display things as they really are. It is a reaction to romanticism which tries to show an image of perfection.
• Naturalism - Related to realism, this includes nature or nature themes and limiting of human involvement.
• Idealism - the effort to portray the world in perfection through art. This is the opposite to realism.
5
Realism
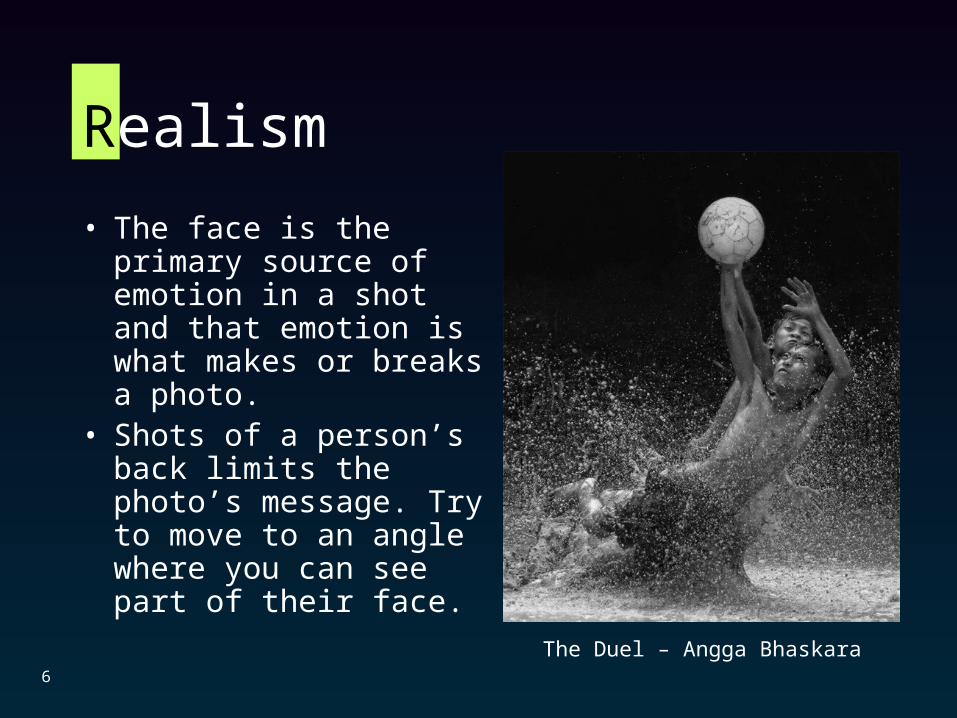
• The face is the primary source of emotion in a shot and that emotion is what makes or breaks a photo.
• Shots of a person’s back limits the photo’s message. Try to move to an angle where you can see part of their face.
The Duel – Angga Bhaskara6
Realism
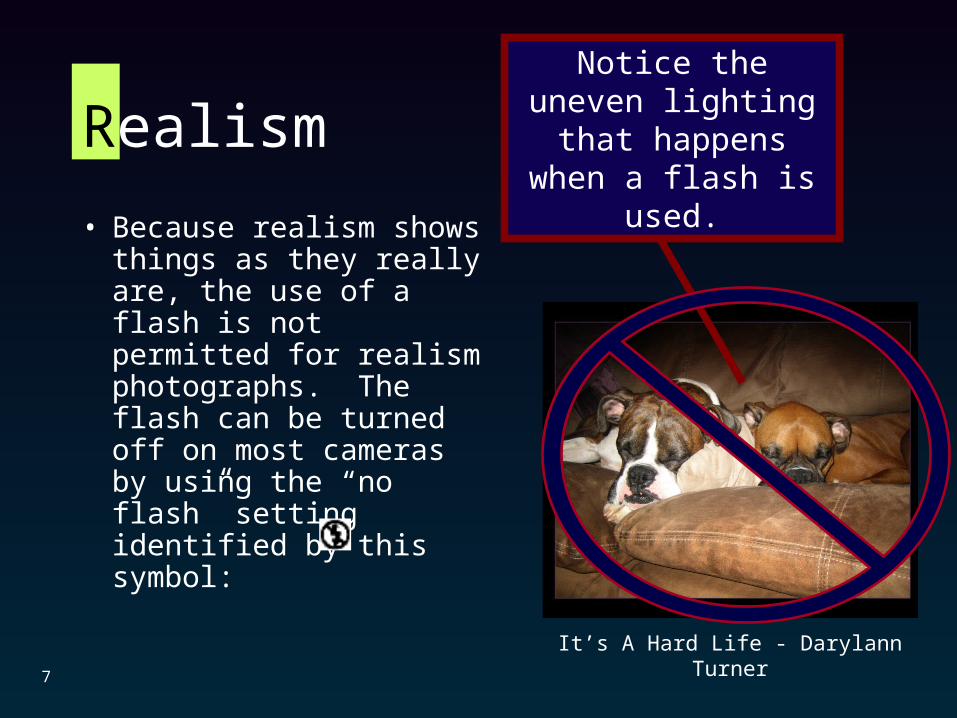
• Because realism shows things as they really are, the use of a flash is not permitted for realism photographs. The flash can be turned off on most cameras by using the “no flash” setting identified by this symbol:
It’s A Hard Life - Darylann Turner
7
Notice the uneven lighting that happens when a flash is used.
Realism
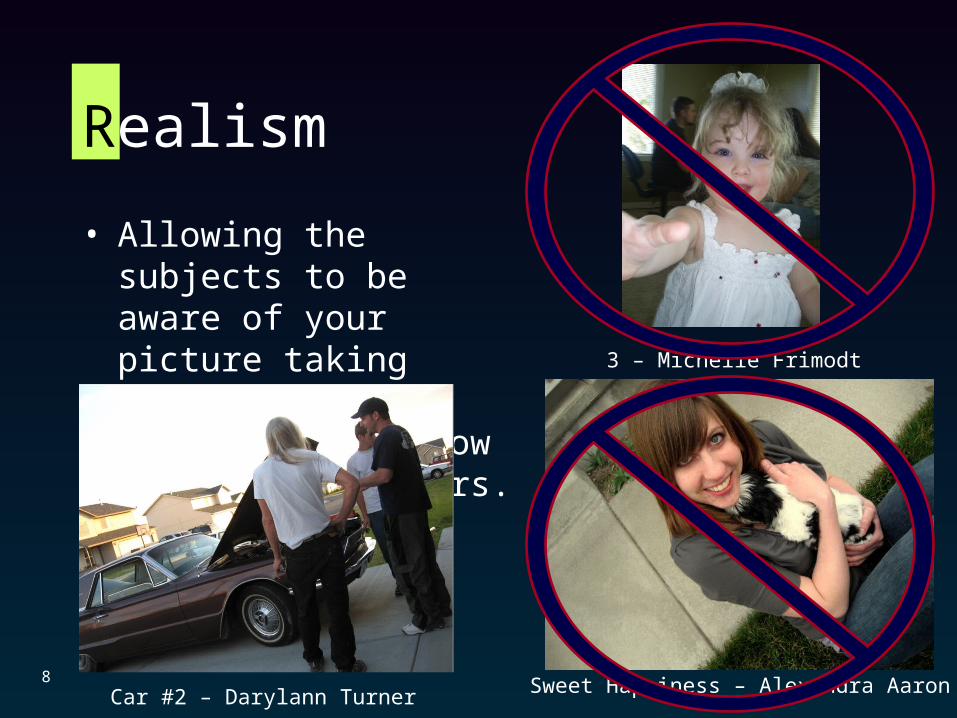
• Allowing the subjects to be aware of your picture taking destroys the Realism. They now become only actors.
Sweet Happiness – Alexandra Aaron8
3 – Michelle Frimodt
Car #2 – Darylann Turner
Realism
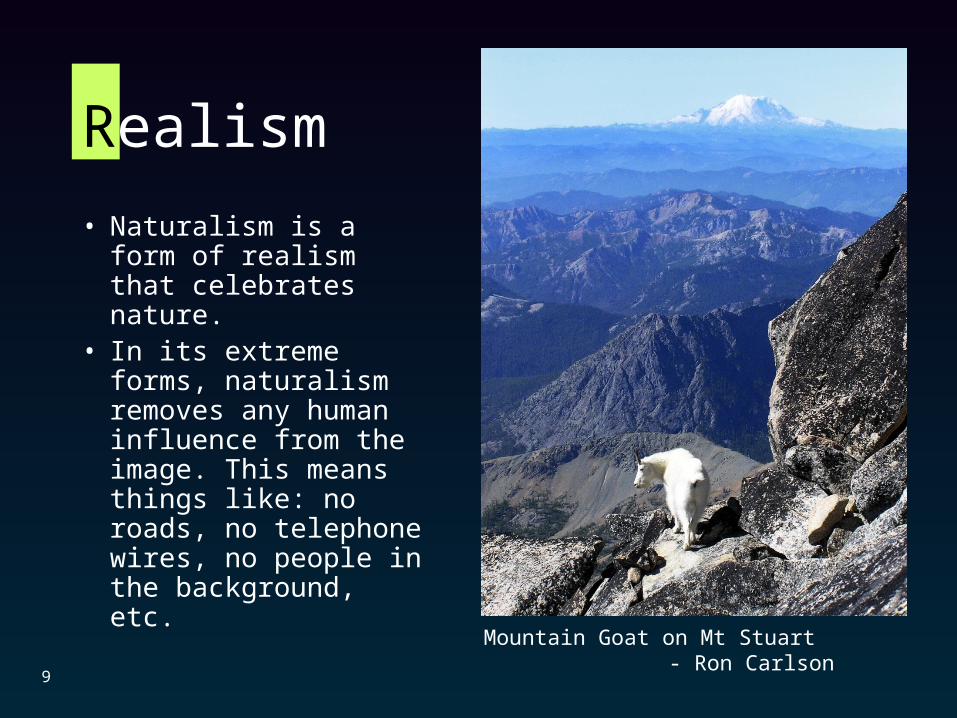
• Naturalism is a form of realism that celebrates nature.
• In its extreme forms, naturalism removes any human influence from the image. This means things like: no roads, no telephone wires, no people in the background, etc.
Mountain Goat on Mt Stuart - Ron Carlson
9
Realism
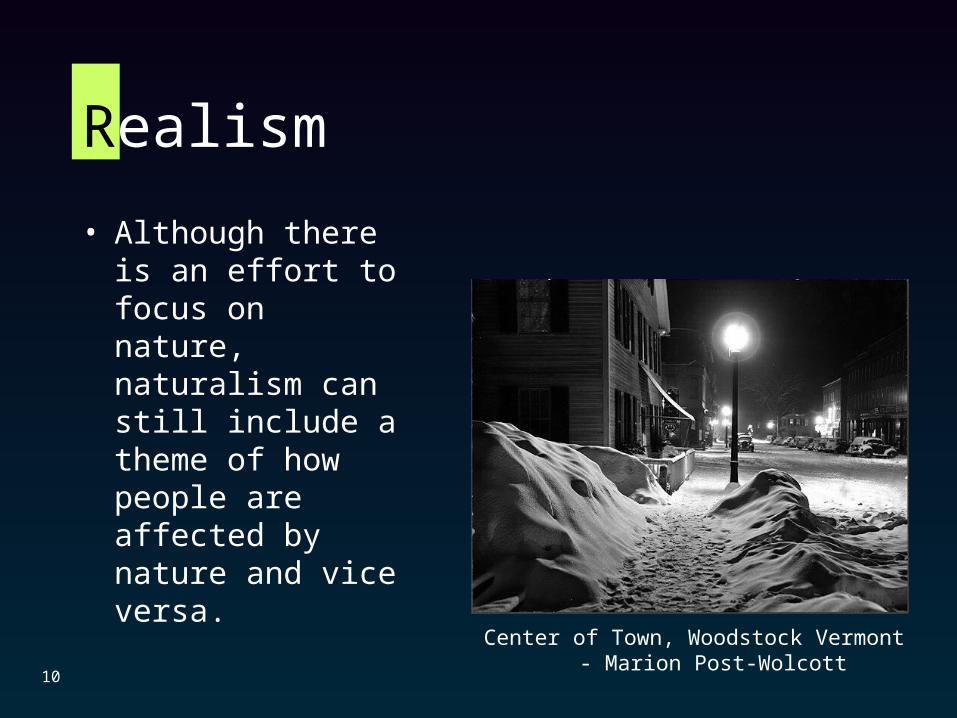
• Although there is an effort to focus on nature, naturalism can still include a theme of how people are affected by nature and vice versa.
Center of Town, Woodstock Vermont - Marion Post-Wolcott
10
Realism
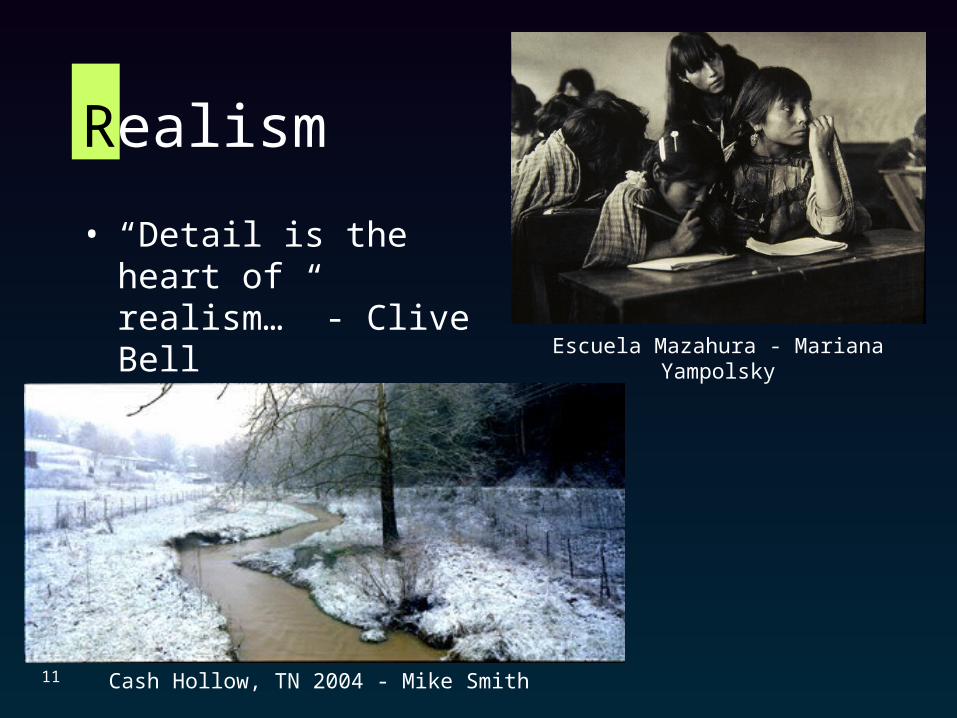
• “Detail is the heart of realism…” - Clive Bell
Cash Hollow, TN 2004 - Mike Smith
Escuela Mazahura - Mariana Yampolsky
11
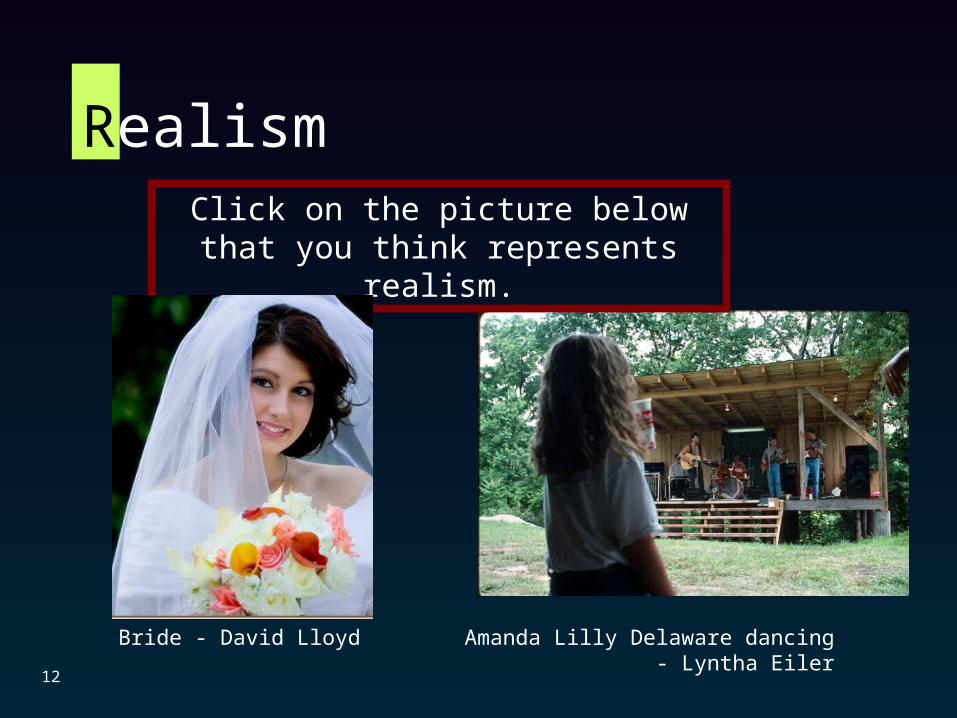
Realism
Amanda Lilly Delaware dancing - Lyntha Eiler
Bride - David Lloyd
Click on the picture below that you think represents realism.
12
Realism
Click Here To Continue
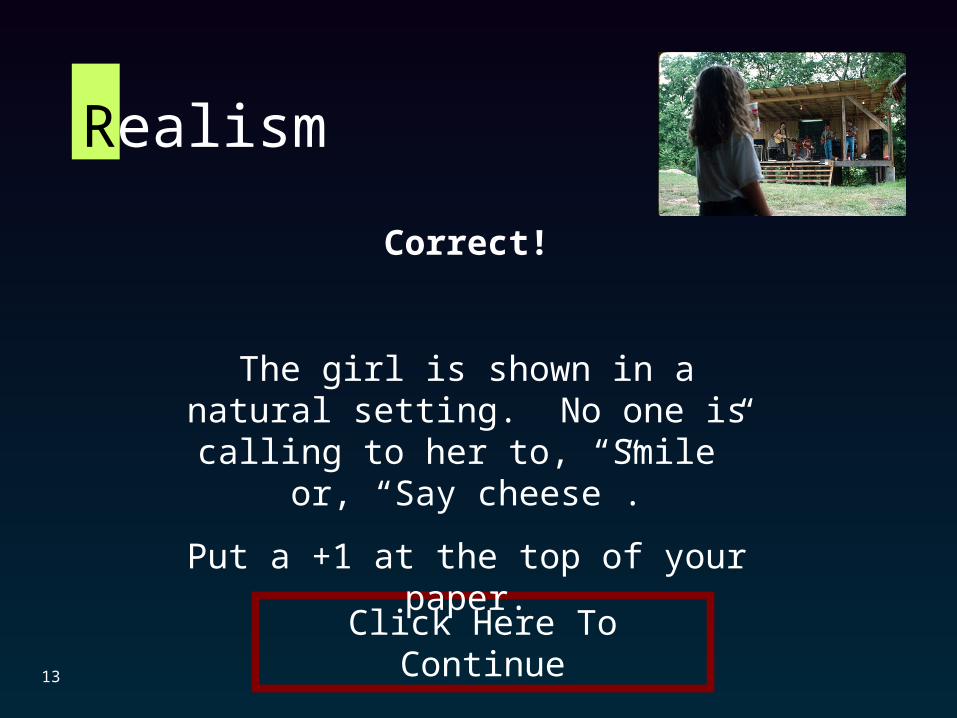
Correct!
The girl is shown in a natural setting. No one is calling to her to, “Smile” or, “Say
cheese”.
Put a +1 at the top of your paper.
13
Realism
Click Here To Continue
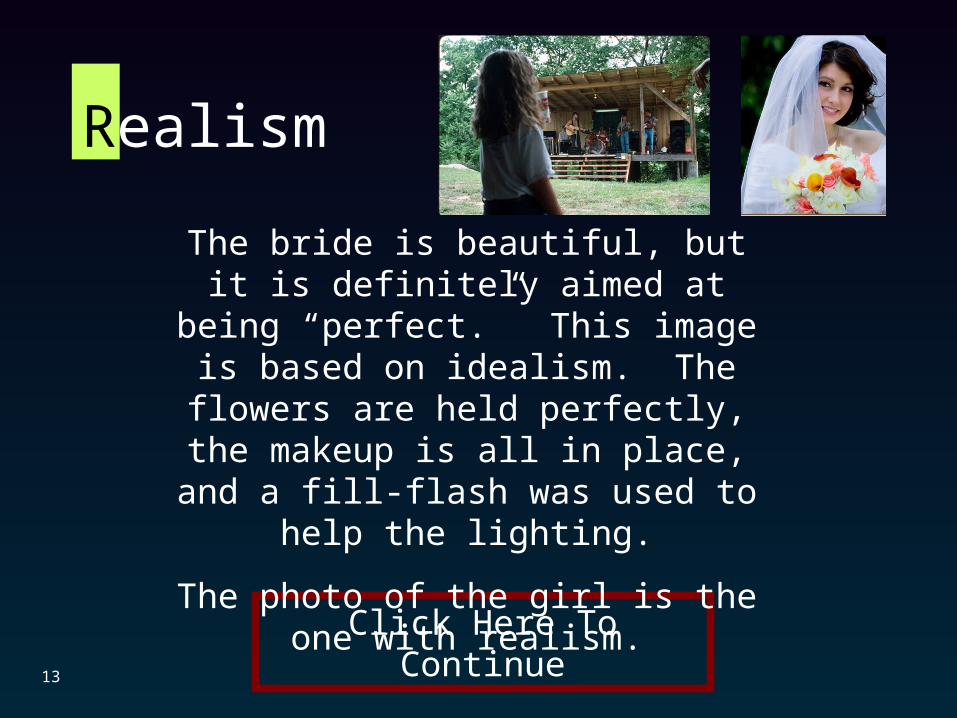
The bride is beautiful, but it is definitely aimed at being “perfect.” This image is based on idealism. The flowers are held
perfectly, the makeup is all in place, and a fill-flash was used to help the lighting.
The photo of the girl is the one with realism.
13
Realism
14
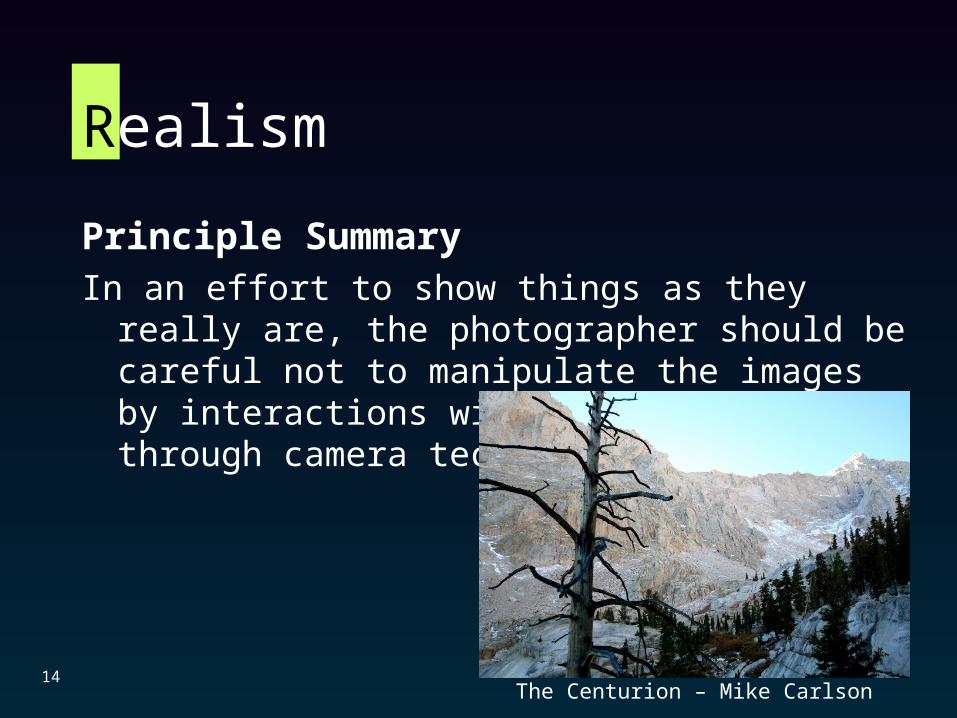
Principle SummaryIn an effort to show things as they really are, the
photographer should be careful not to manipulate the images by interactions with the subject or through camera technology.
The Centurion – Mike Carlson
Realism
15
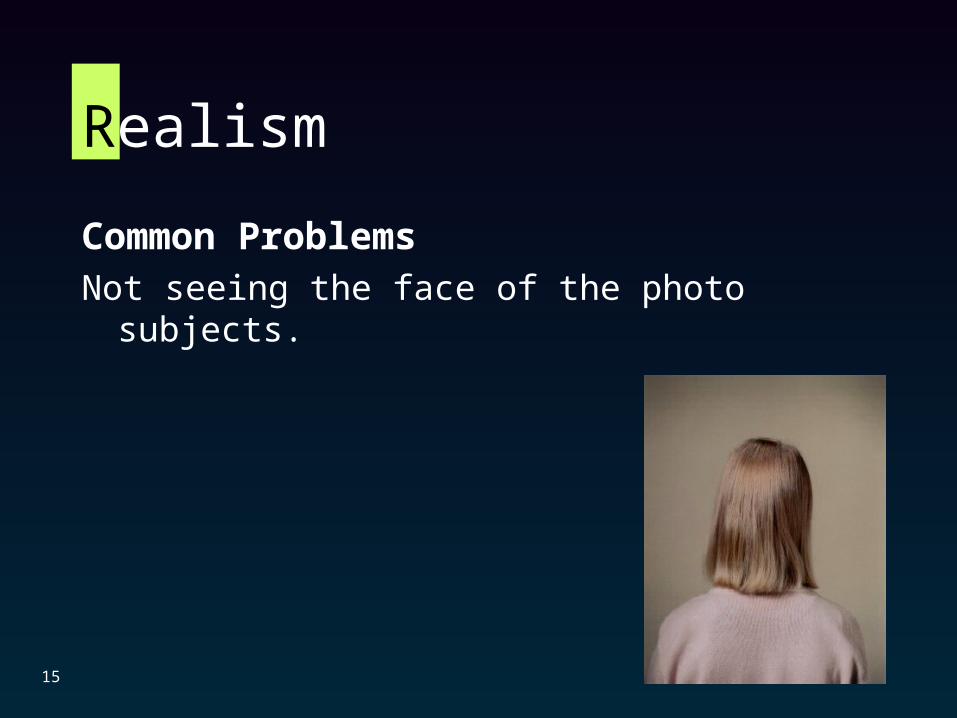
Common ProblemsNot seeing the face of the photo subjects.
What the Arts Teach
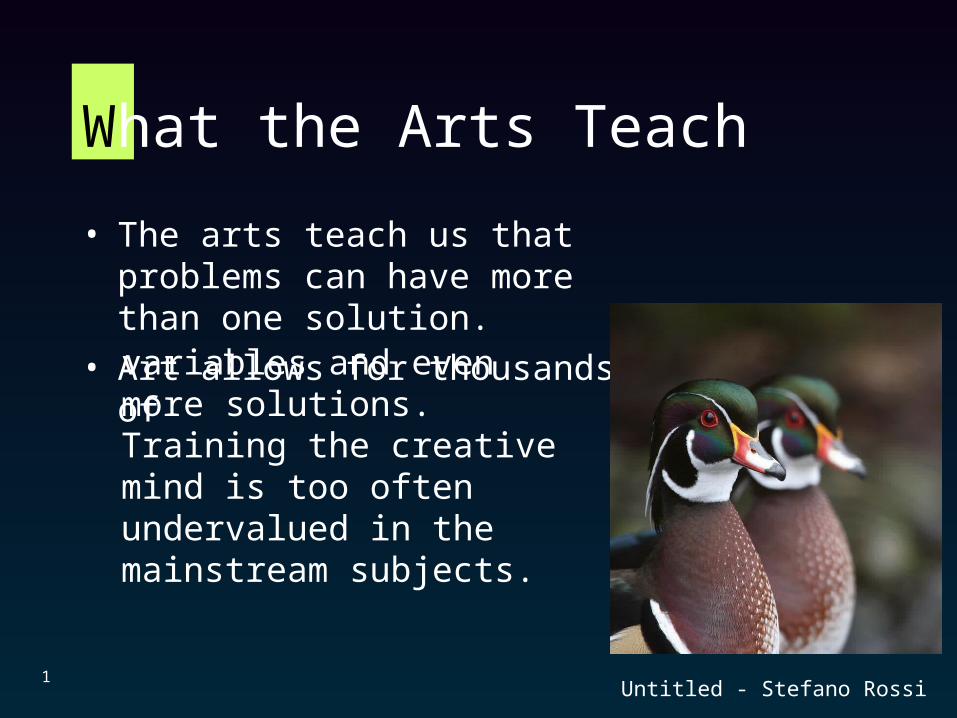
• The arts teach us that problems can have more than one solution.
• Art allows for thousands of
1Untitled - Stefano Rossi
variables and even more solutions. Training the creative mind is too often undervalued in the mainstream subjects.
Expressionism
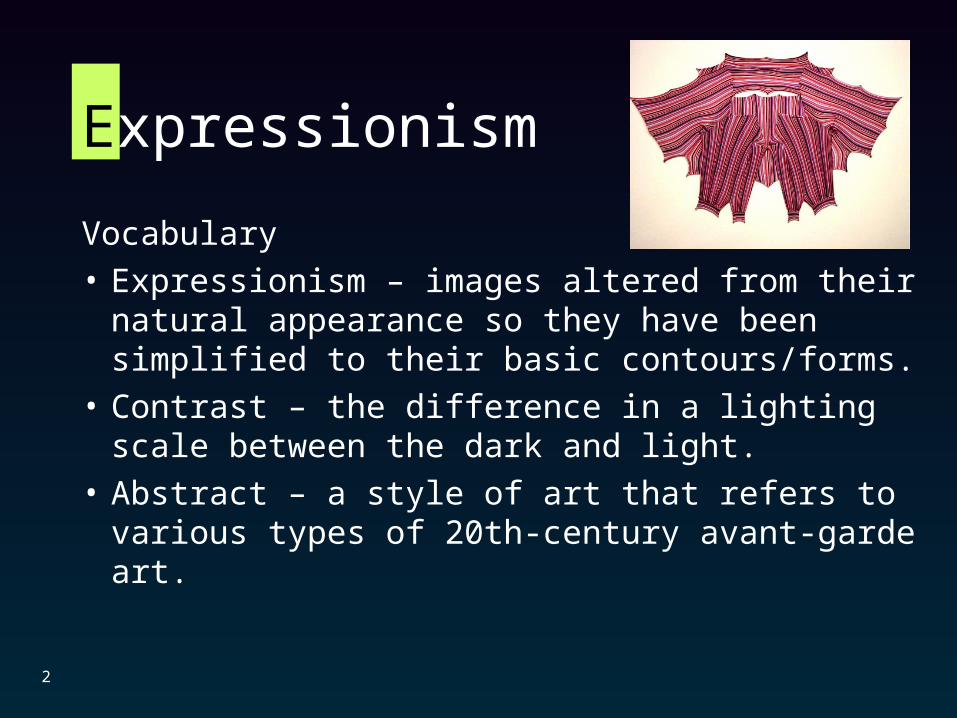
Vocabulary
• Expressionism – images altered from their natural appearance so they have been simplified to their basic contours/forms.
• Contrast – the difference in a lighting scale between the dark and light.
• Abstract – a style of art that refers to various types of 20th-century avant-garde art.
2
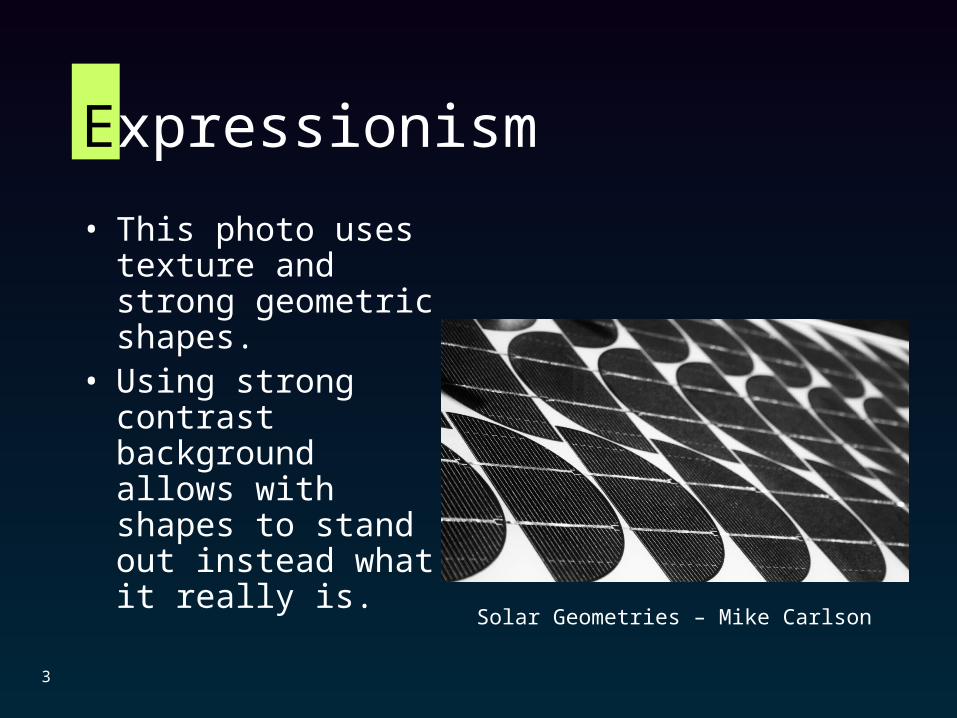
Expressionism
• This photo uses texture and strong geometric shapes.
• Using strong contrast background allows with shapes to stand out instead what it really is.
Solar Geometries – Mike Carlson
3
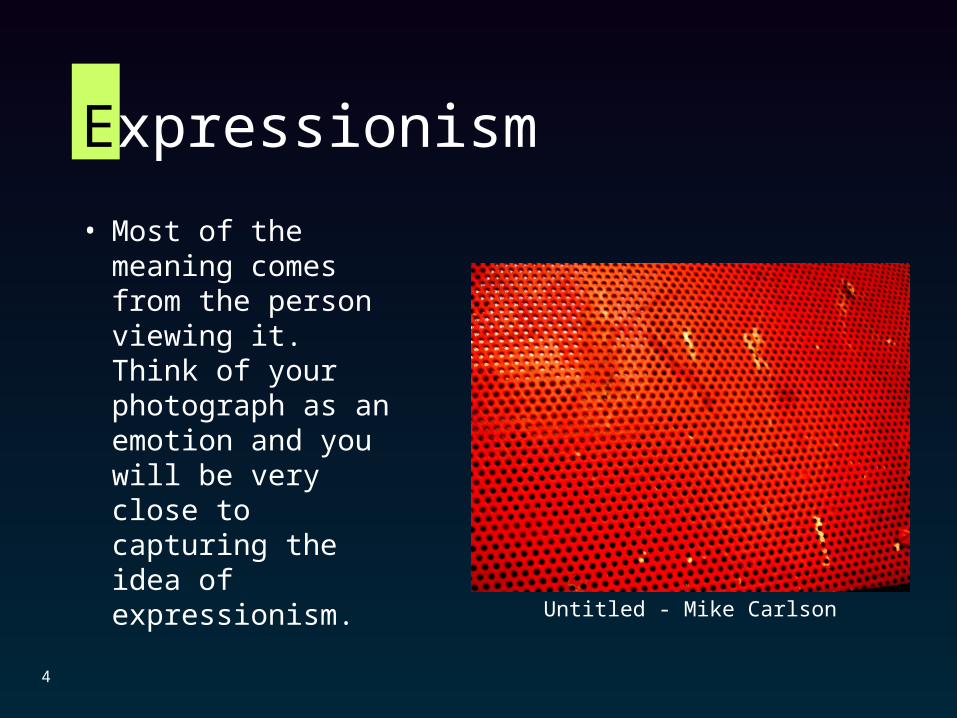
Expressionism
• Most of the meaning comes from the person viewing it. Think of your photograph as an emotion and you will be very close to capturing the idea of expressionism.
Untitled - Mike Carlson
4
Expressionism
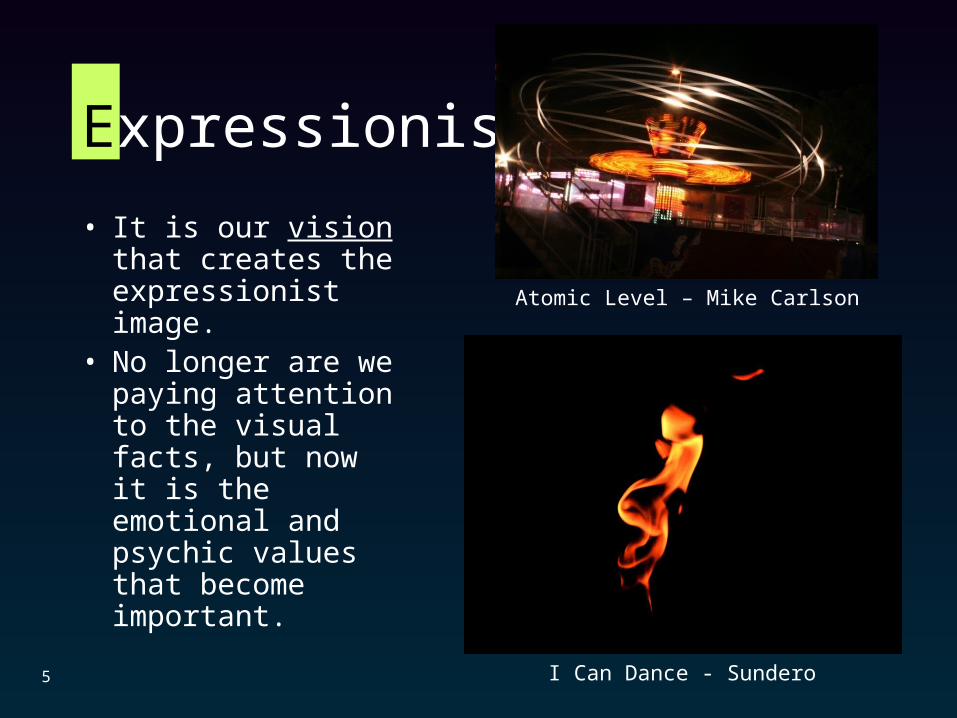
• It is our vision that creates the expressionist image.
• No longer are we paying attention to the visual facts, but now it is the emotional and psychic values that become important.
I Can Dance - Sundero
Atomic Level – Mike Carlson
5
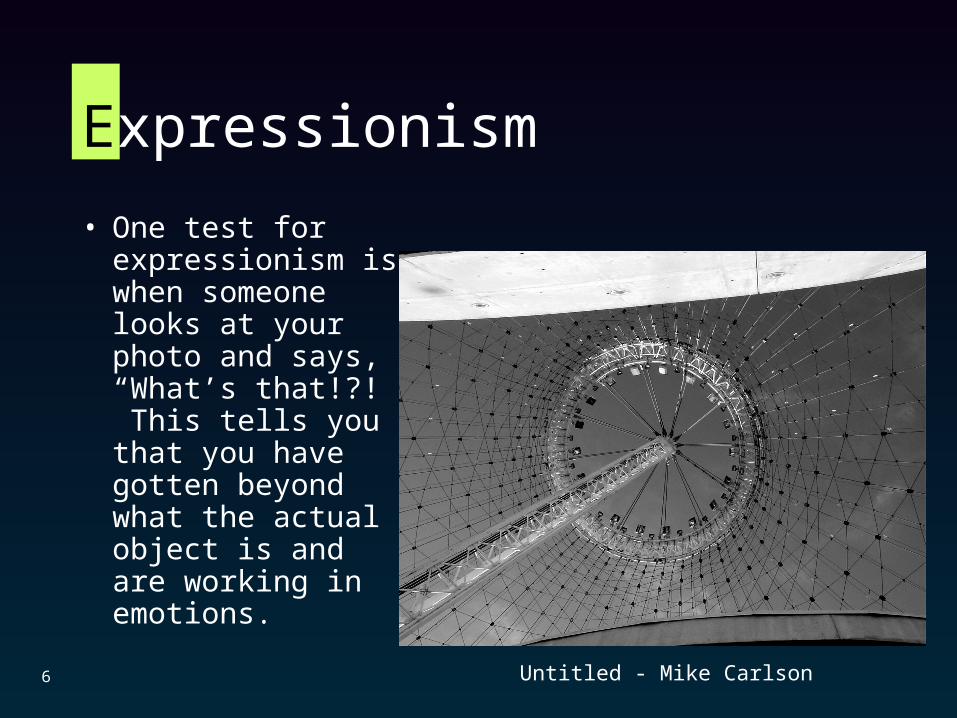
Expressionism
• One test for expressionism is when someone looks at your photo and says, “What’s that!?!” This tells you that you have gotten beyond what the actual object is and are working in emotions.
Untitled - Mike Carlson6
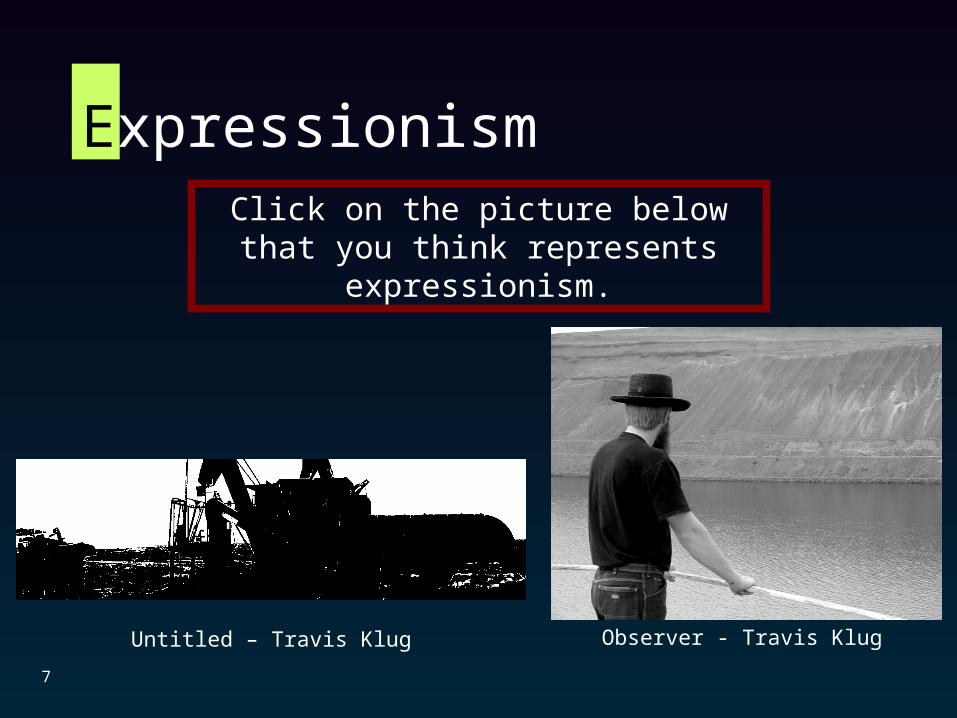
Observer - Travis KlugUntitled – Travis Klug
Click on the picture below that you think represents expressionism.
7
Expressionism
Click Here To Continue
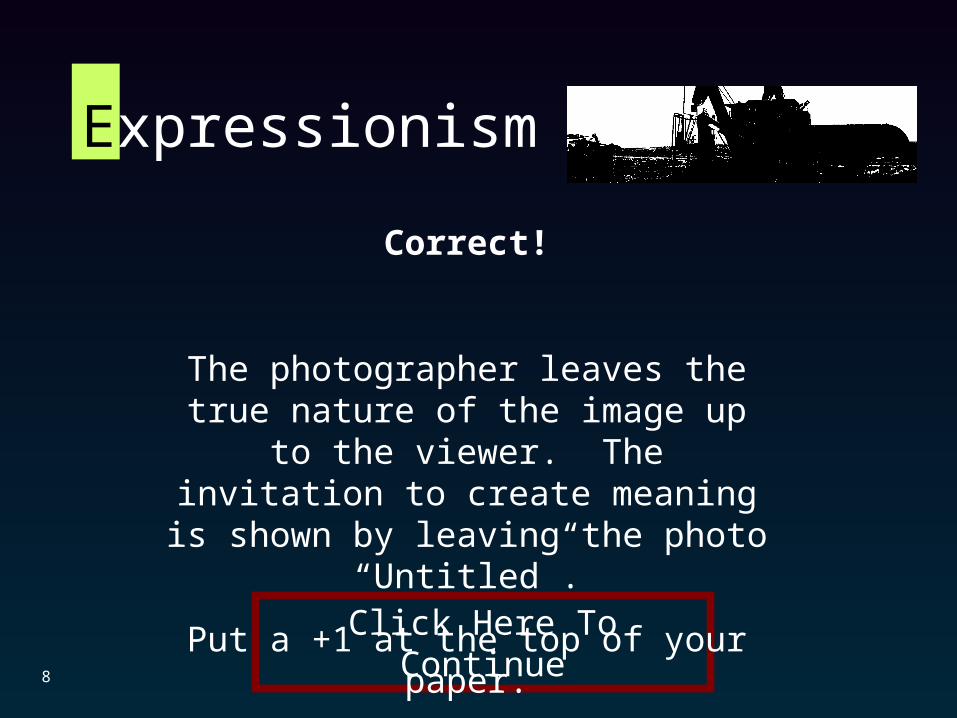
Correct!
The photographer leaves the true nature of the image up to the viewer. The invitation to create meaning is shown by leaving the
photo “Untitled”.
Put a +1 at the top of your paper.
8
Expressionism
Click Here To Continue
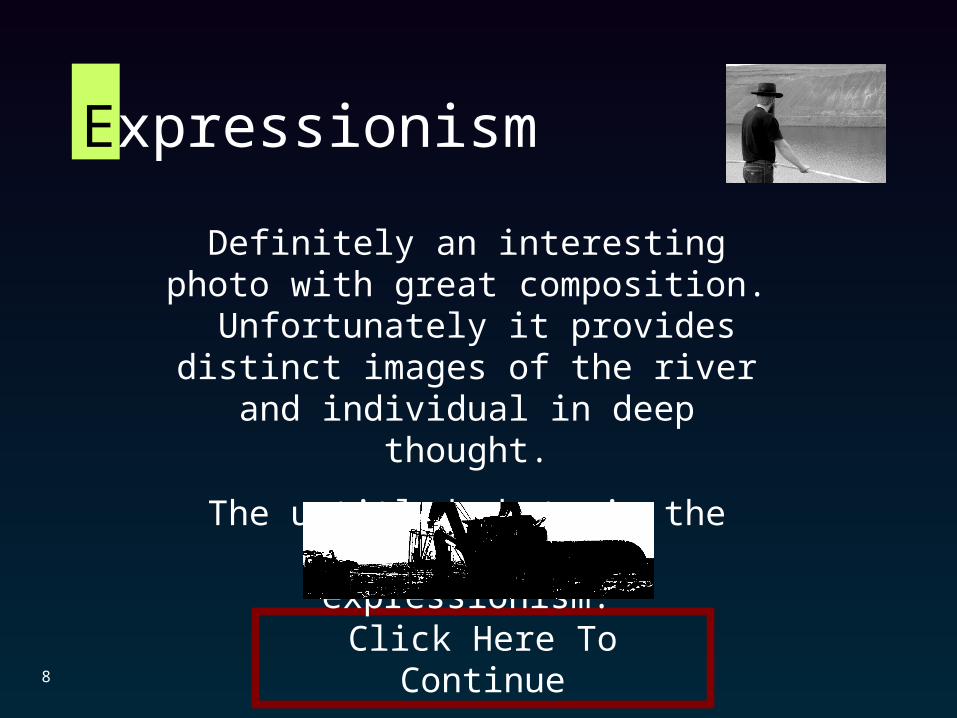
Definitely an interesting photo with great composition. Unfortunately it provides
distinct images of the river and individual in deep thought.
The untitled photo is the best example of expressionism.
8
Expressionism

Expressionism
On your next click, a photo will appear. Pay attention to your first reaction. This is the emotional connection the art is trying to make.
GC17-08 - Pogo9
Expressionism
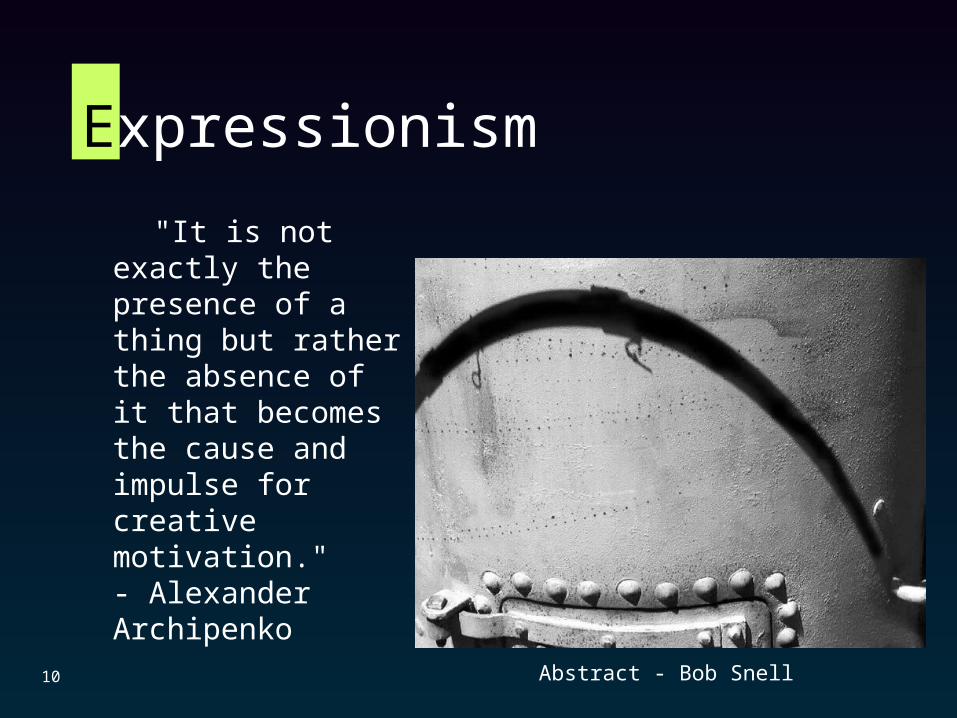
"It is not exactly the presence of a thing but rather the absence of it that becomes the cause and impulse for creative motivation."- Alexander Archipenko
Abstract - Bob Snell10
Expressionism
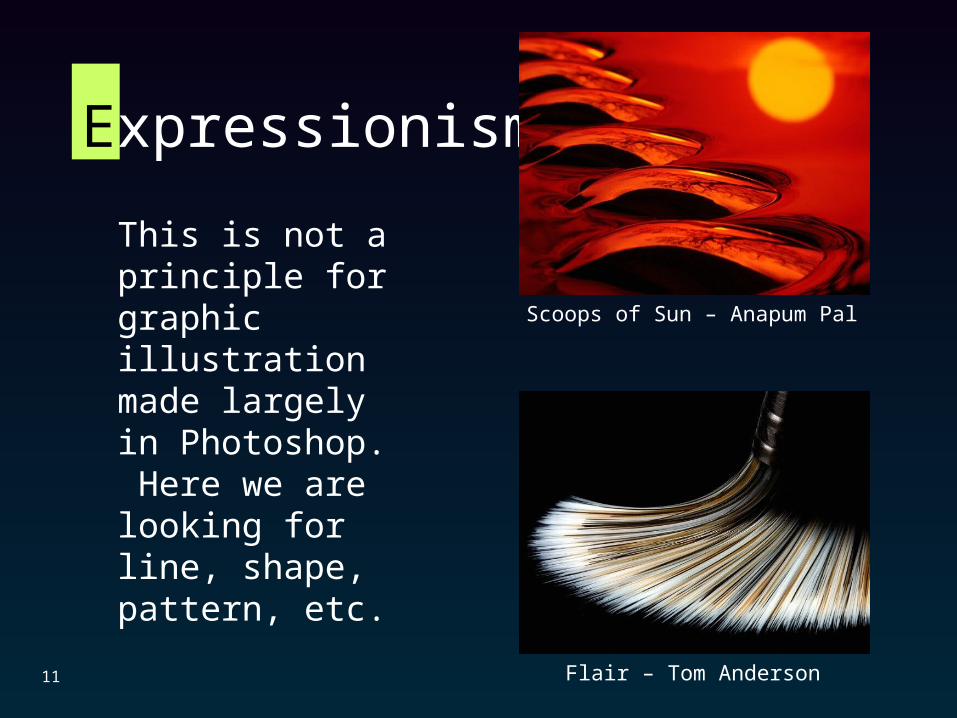
This is not a principle for graphic illustration made largely in Photoshop. Here we are looking for line, shape, pattern, etc.
Flair – Tom Anderson11
Scoops of Sun – Anapum Pal
Expressionism
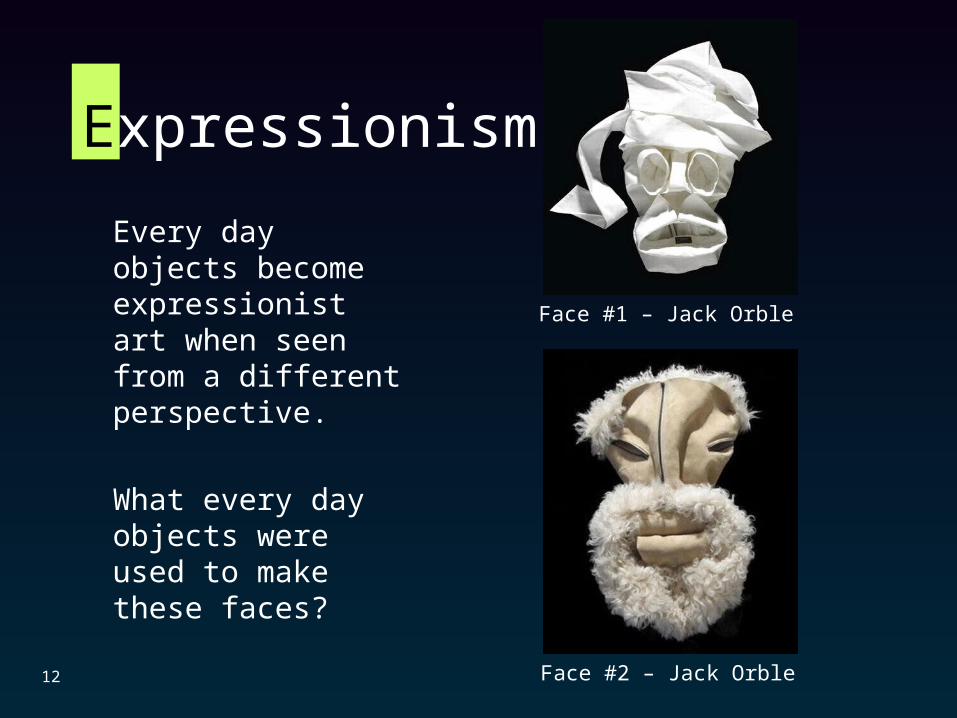
Every day objects become expressionist art when seen from a different perspective.
What every day objects were used to make these faces?
Face #2 – Jack Orble12
Face #1 – Jack Orble
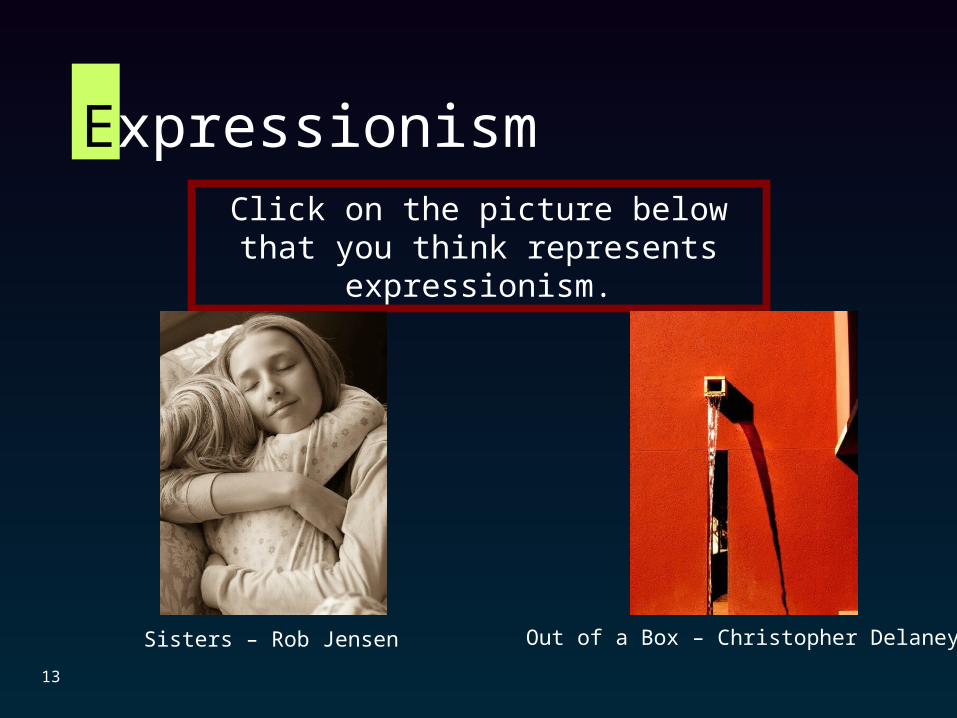
Out of a Box – Christopher DelaneySisters – Rob Jensen
Click on the picture below that you think represents expressionism.
13
Expressionism
Click Here To Continue
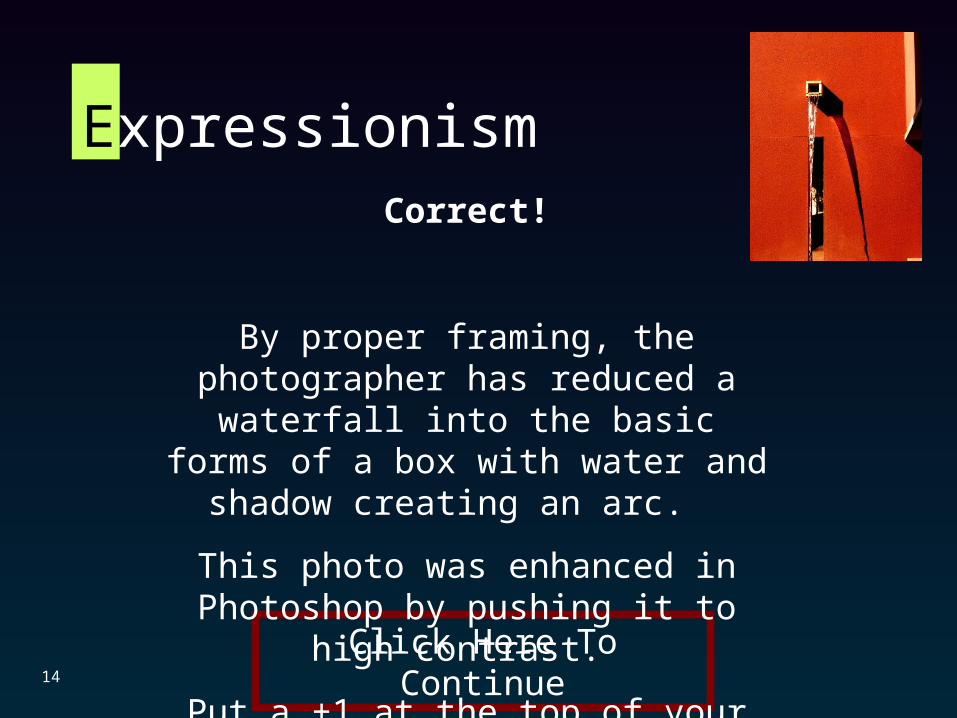
Correct!
By proper framing, the photographer has reduced a waterfall into the basic forms of a box with water and shadow creating an arc.
This photo was enhanced in Photoshop by pushing it to high contrast.
Put a +1 at the top of your paper.
14
Expressionism
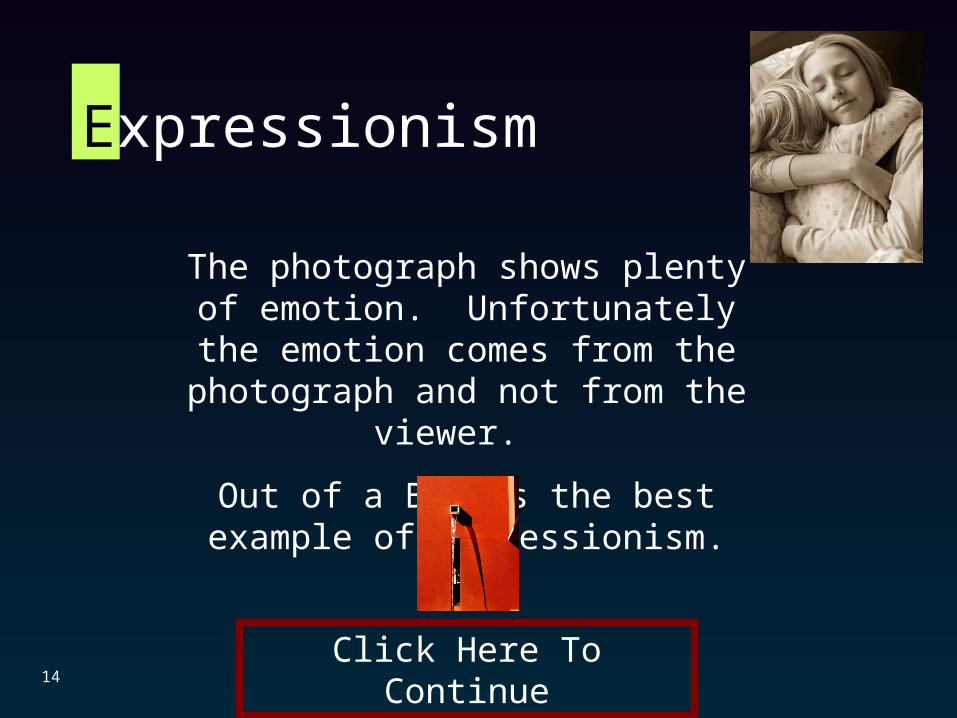
Click Here To Continue
The photograph shows plenty of emotion. Unfortunately the emotion comes from the
photograph and not from the viewer.
Out of a Box is the best example of expressionism.
14
Expressionism
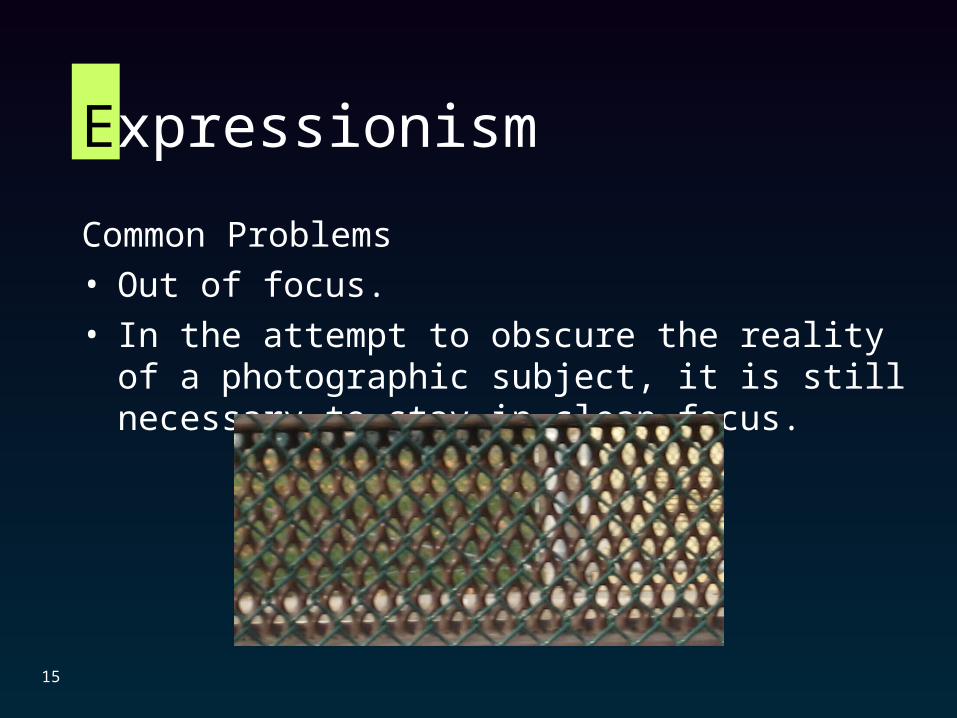
Common Problems
• Out of focus.
• In the attempt to obscure the reality of a photographic subject, it is still necessary to stay in clean focus.
15
Expressionism
Expressionism
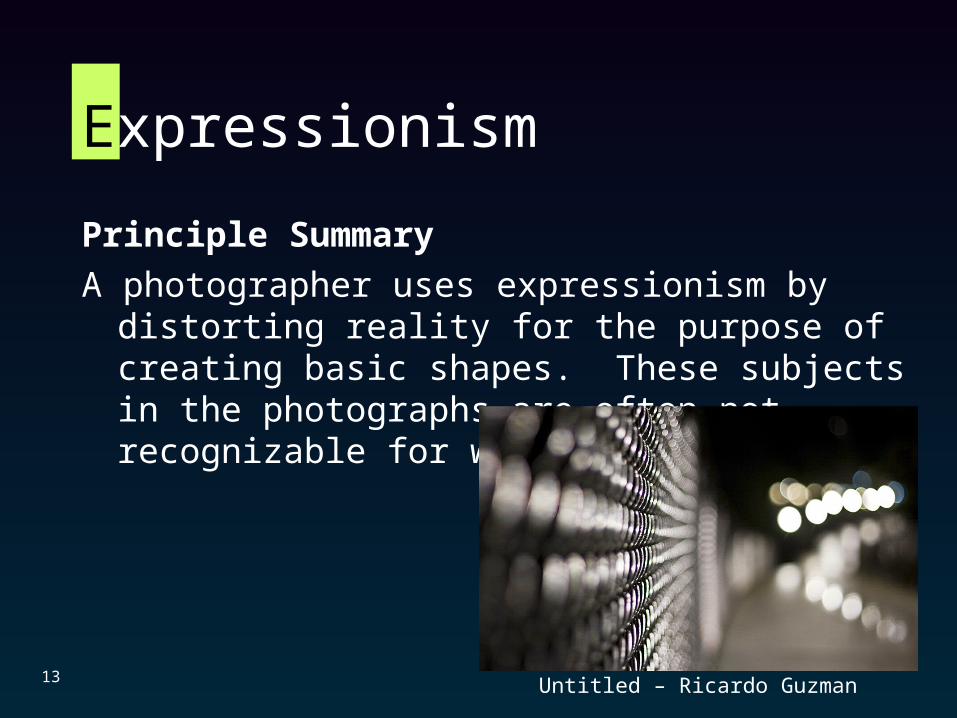
Principle Summary
A photographer uses expressionism by distorting reality for the purpose of creating basic shapes. These subjects in the photographs are often not recognizable for what they really are.
13 Untitled – Ricardo Guzman

What the Arts Teach
• The arts teach that multiple perspectives are valuable.
• One of the large lessons in art is that there are many ways
1
to see and interpret the world.
Untitled - Walter Horishnyk
Emphasis
Vocabulary
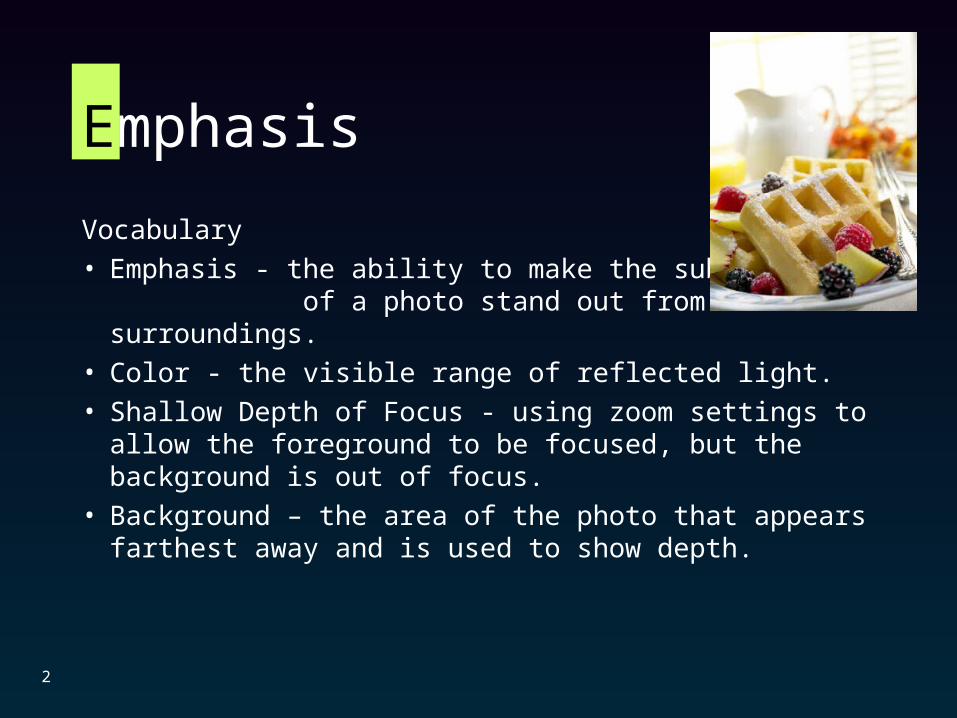
• Emphasis - the ability to make the subject of a photo stand out from its surroundings.
• Color - the visible range of reflected light.
• Shallow Depth of Focus - using zoom settings to allow the foreground to be focused, but the background is out of focus.
• Background – the area of the photo that appears farthest away and is used to show depth.
2
Emphasis
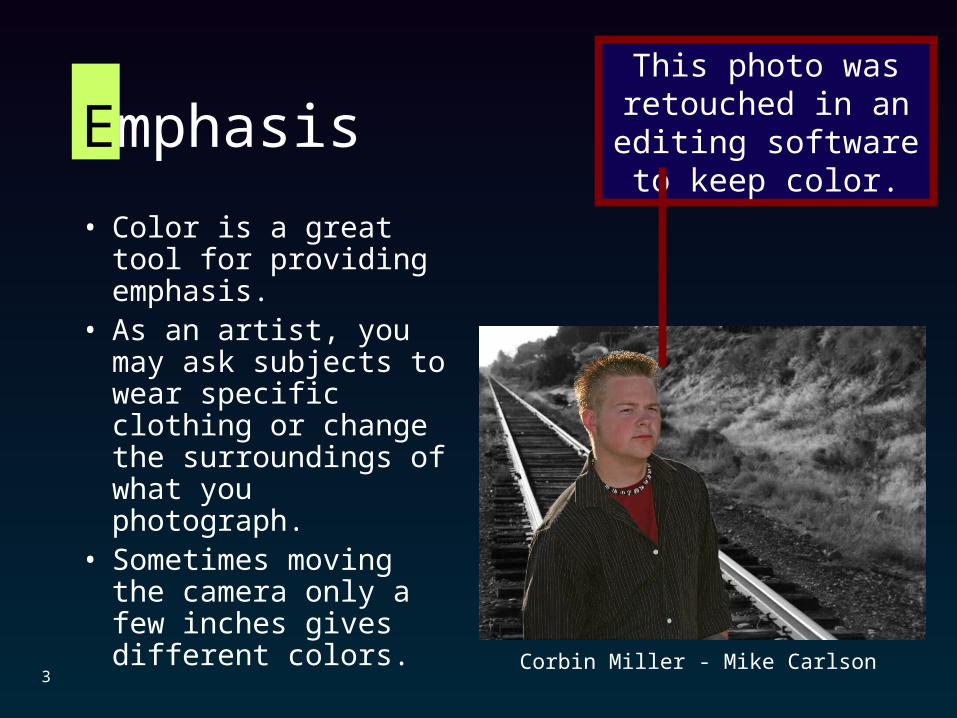
• Color is a great tool for providing emphasis.
• As an artist, you may ask subjects to wear specific clothing or change the surroundings of what you photograph.
• Sometimes moving the camera only a few inches gives different colors.
This photo was retouched in an editing software to keep color.
Corbin Miller - Mike Carlson3
Emphasis
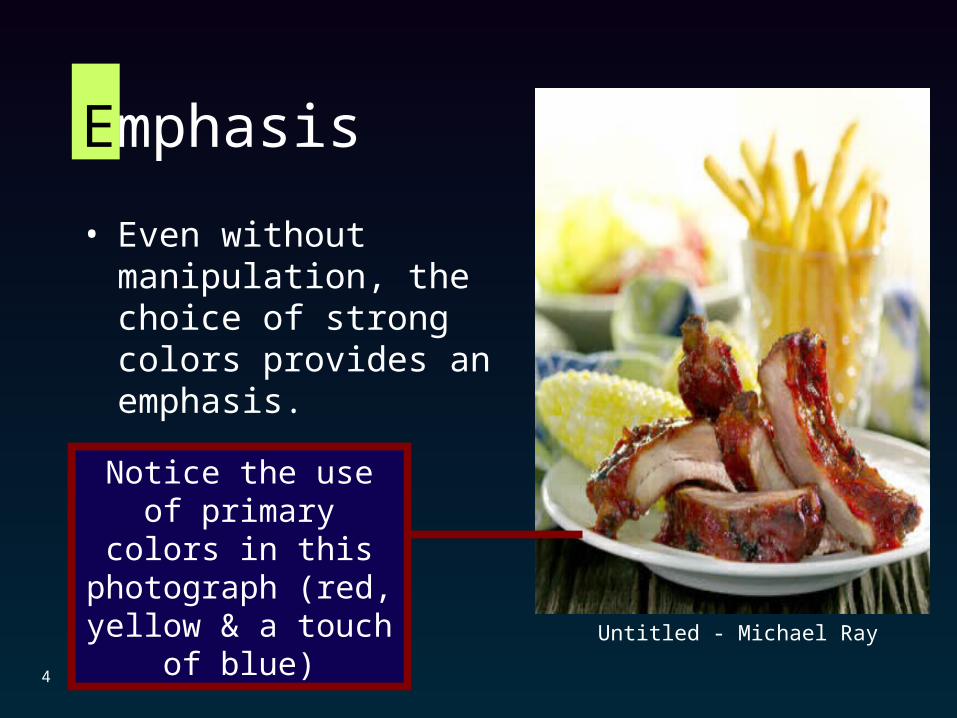
• Even without manipulation, the choice of strong colors provides an emphasis.
Untitled - Michael Ray
Notice the use of primary colors in this
photograph (red, yellow & a touch of blue)
4
Emphasis
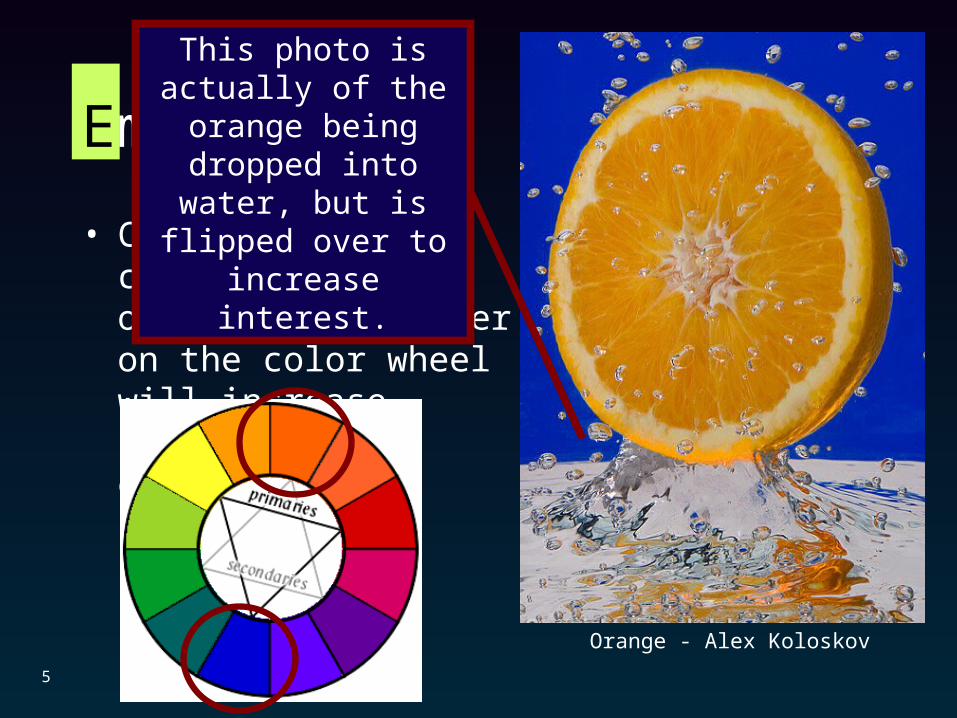
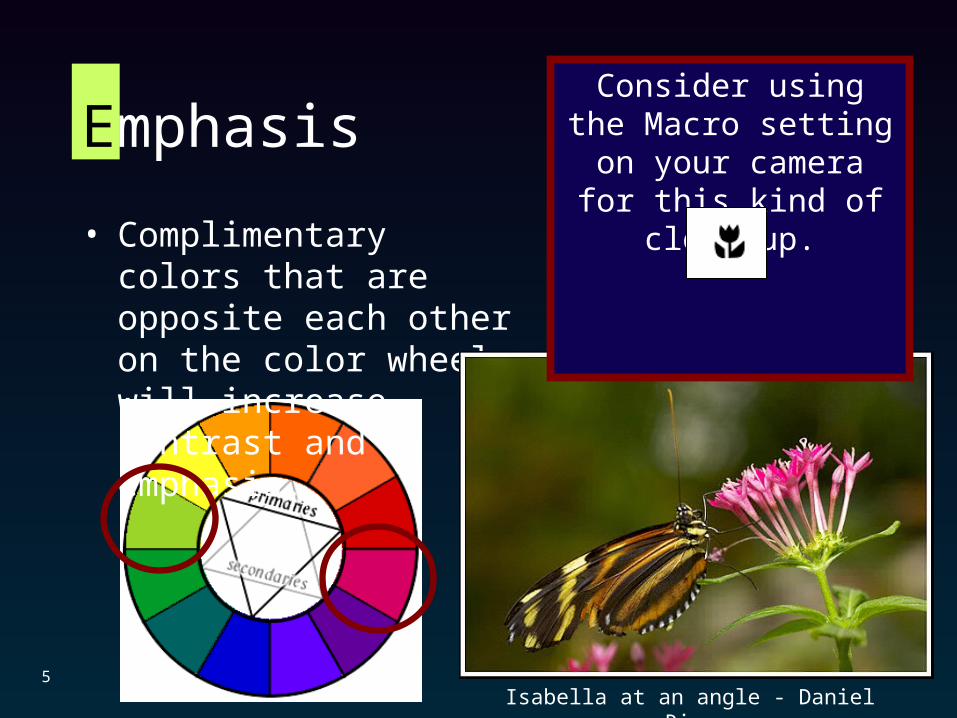
• Complimentary colors that are opposite each other on the color wheel will increase contrast and emphasis.
Orange - Alex Koloskov
5
This photo is actually of the orange being
dropped into water, but is flipped over to increase interest.
Emphasis
Isabella at an angle - Daniel Rice5
• Complimentary colors that are opposite each other on the color wheel will increase contrast and emphasis.
Consider using the Macro setting on your camera for
this kind of close-up.
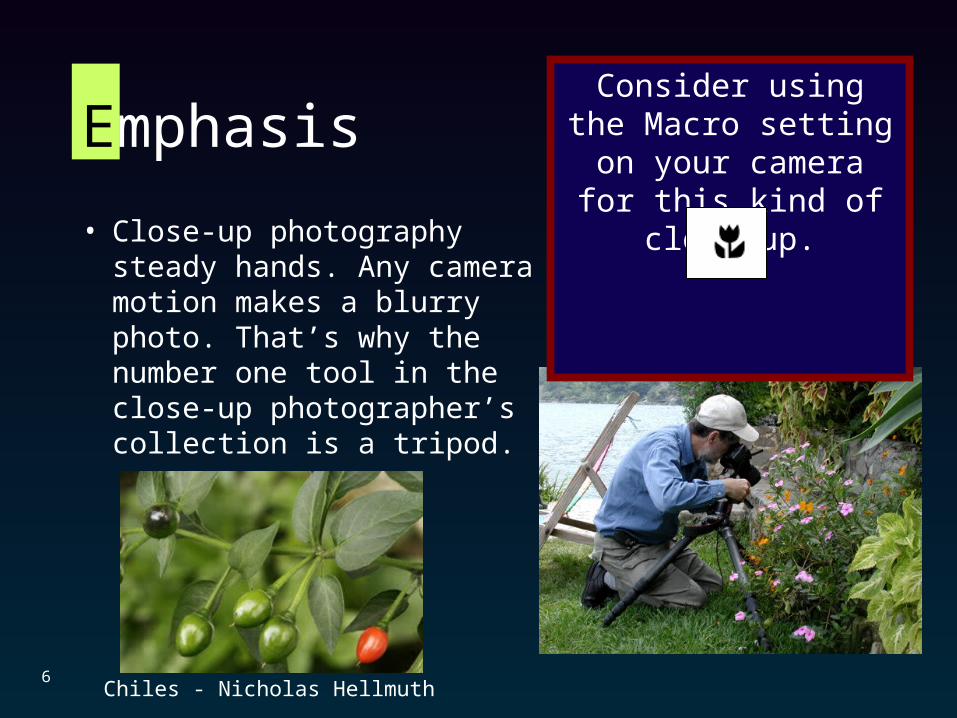
Emphasis
Chiles - Nicholas Hellmuth6
• Close-up photography steady hands. Any camera motion makes a blurry photo. That’s why the number one tool in the close-up photographer’s collection is a tripod.
Consider using the Macro setting on your camera for
this kind of close-up.
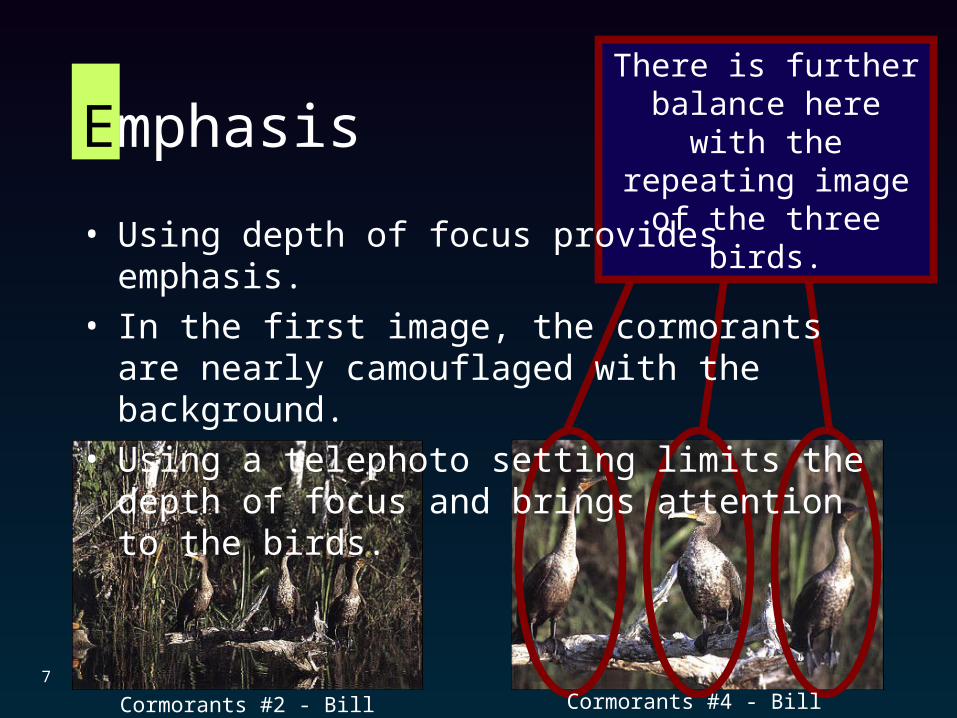
EmphasisThere is further balance here with the repeating
image of the three birds.
Cormorants #4 - Bill SillikerCormorants #2 - Bill Silliker7
• Using depth of focus provides emphasis.
• In the first image, the cormorants are nearly camouflaged with the background.
• Using a telephoto setting limits the depth of focus and brings attention to the birds.
Emphasis
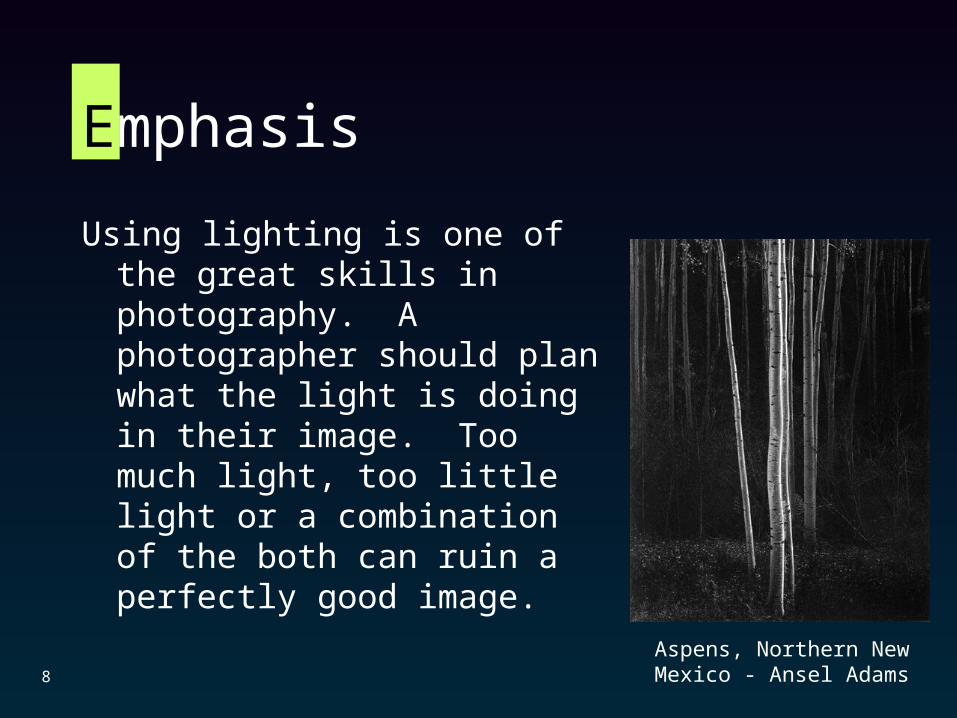
Using lighting is one of the great skills in photography. A photographer should plan what the light is doing in their image. Too much light, too little light or a combination of the both can ruin a perfectly good image.
Aspens, Northern New Mexico - Ansel Adams8
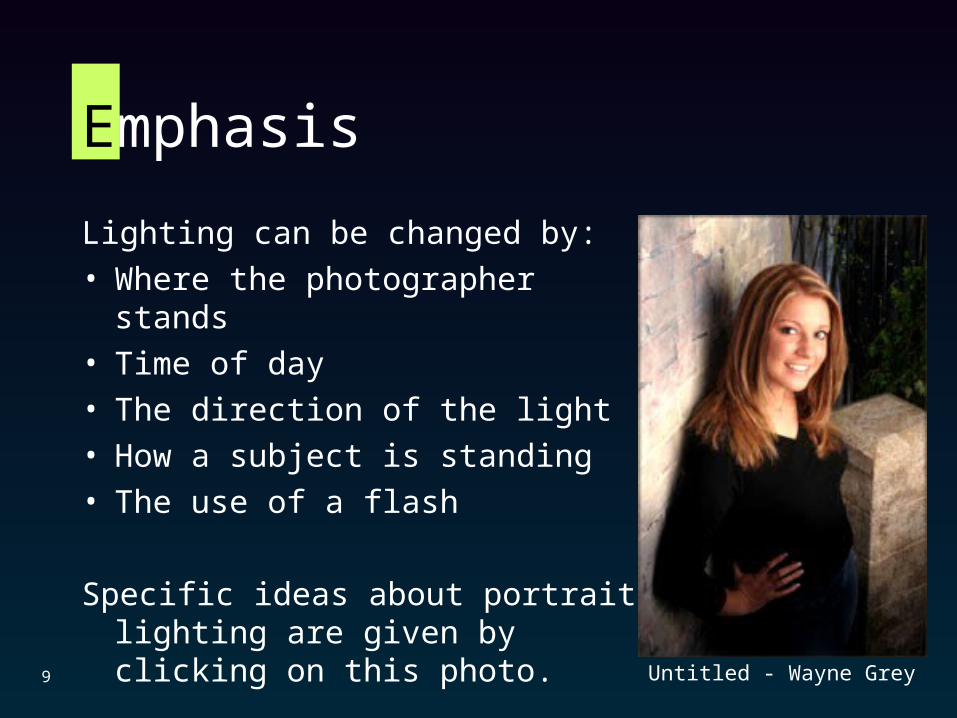
Emphasis
Lighting can be changed by:
• Where the photographer stands
• Time of day
• The direction of the light
• How a subject is standing
• The use of a flash
Specific ideas about portrait lighting are given by clicking on this photo.
Untitled - Wayne Grey9
Emphasis
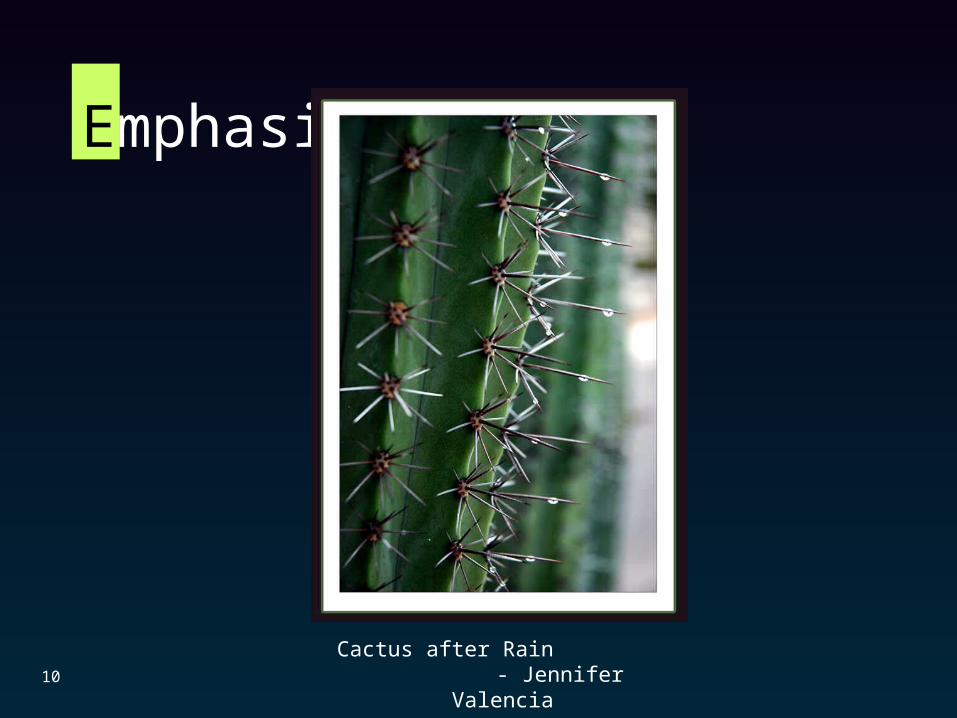
Cactus after Rain - Jennifer Valencia10

Emphasis
Tubes - Eric Noel11
Emphasis
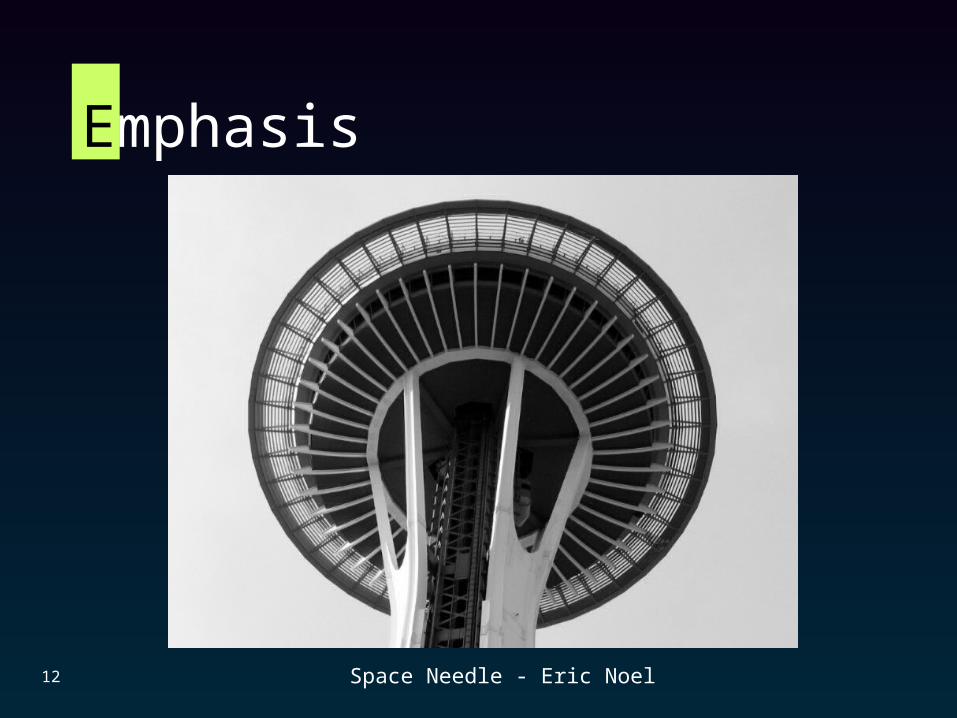
Space Needle - Eric Noel12
Emphasis
13
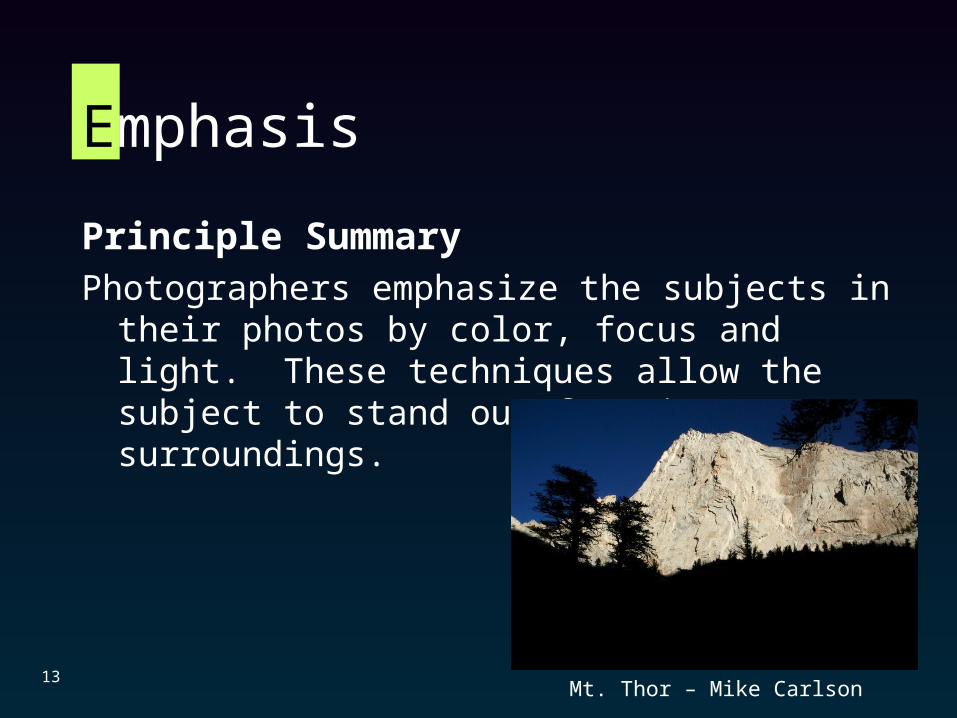
Principle SummaryPhotographers emphasize the subjects in their photos by
color, focus and light. These techniques allow the subject to stand out from its surroundings.
Mt. Thor – Mike Carlson
Half Way Point
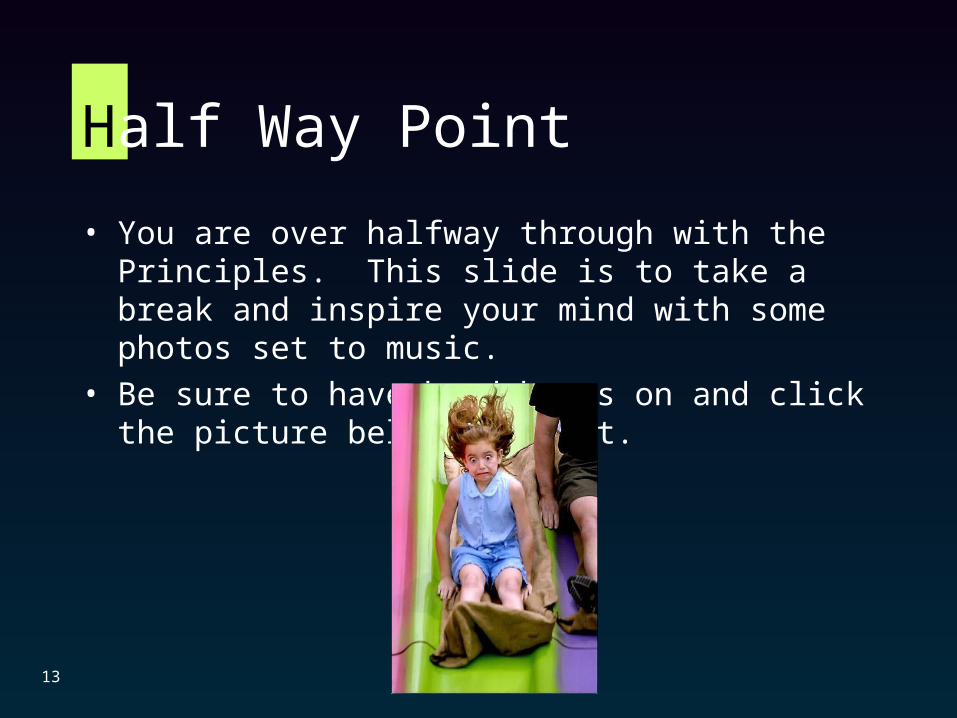
• You are over halfway through with the Principles. This slide is to take a break and inspire your mind with some photos set to music.
• Be sure to have headphones on and click the picture below to start.
13
What the Arts Teach
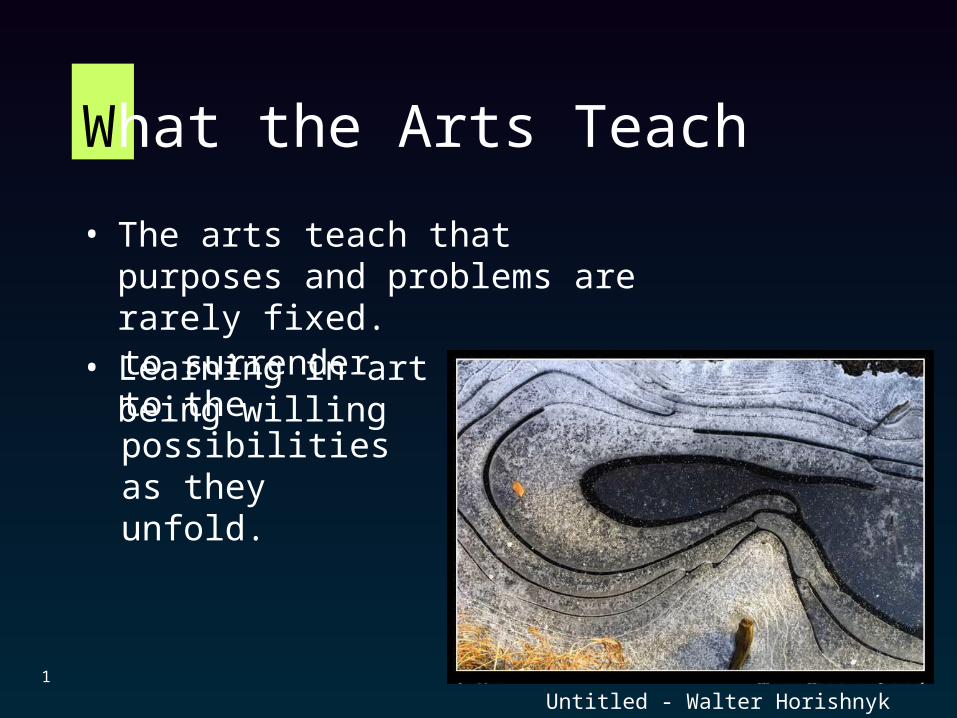
• The arts teach that purposes and problems are rarely fixed.
• Learning in art requires being willing
1
to surrender to the possibilities as they unfold.
Untitled - Walter Horishnyk
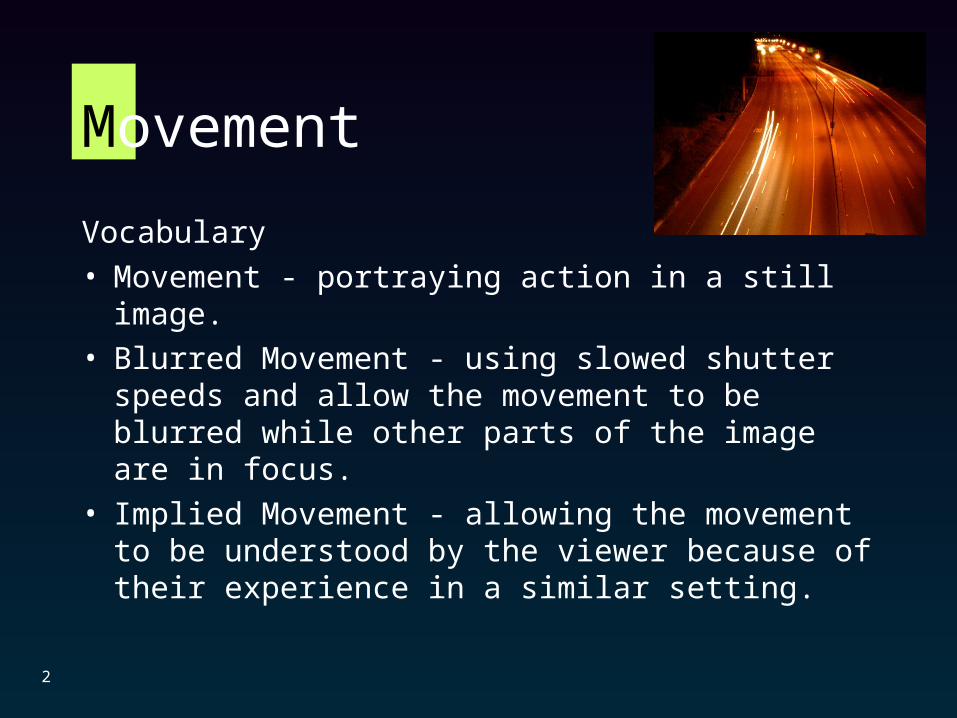
Movement
Vocabulary
• Movement - portraying action in a still image.
• Blurred Movement - using slowed shutter speeds and allow the movement to be blurred while other parts of the image are in focus.
• Implied Movement - allowing the movement to be understood by the viewer because of their experience in a similar setting.
2
Movement
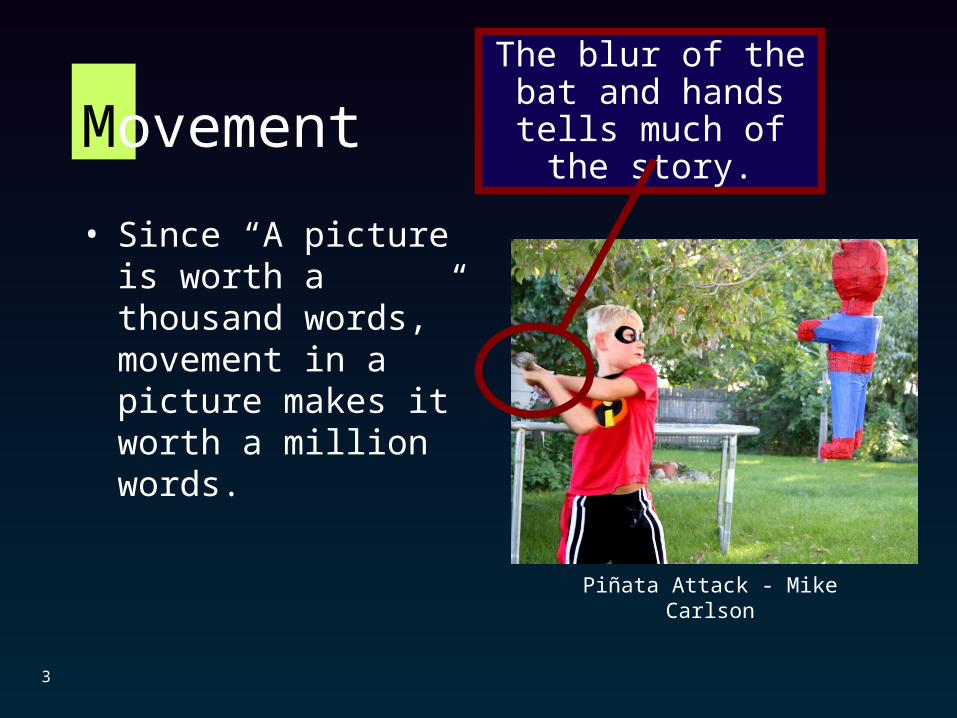
• Since “A picture is worth a thousand words,” movement in a picture makes it worth a million words.
Piñata Attack - Mike Carlson
3
The blur of the bat and hands tells much of the
story.
Movement
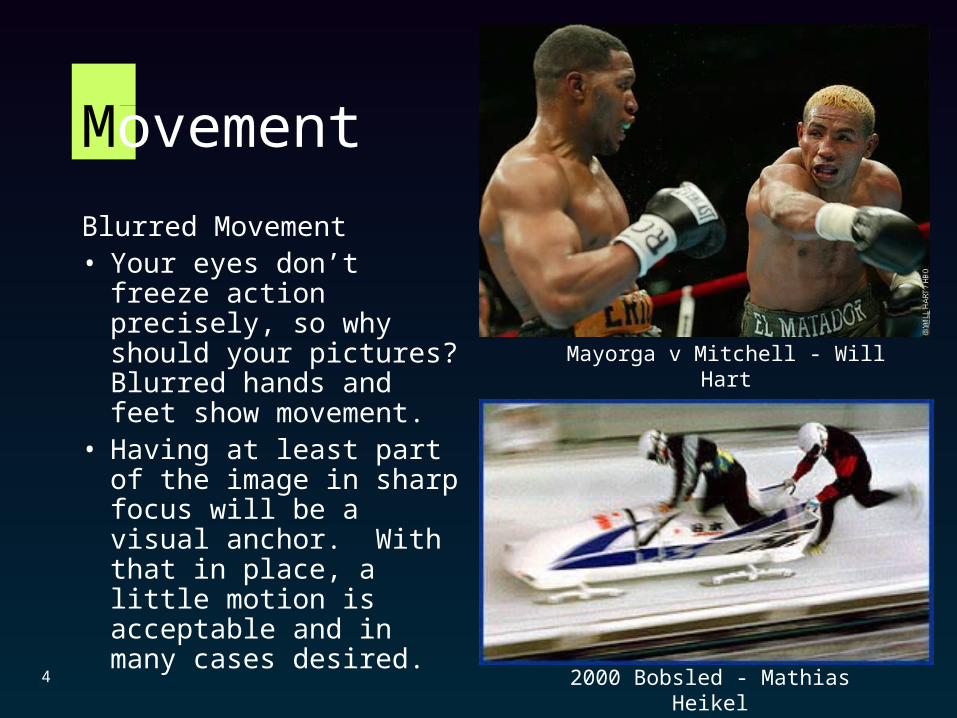
Blurred Movement• Your eyes don’t freeze
action precisely, so why should your pictures? Blurred hands and feet show movement.
• Having at least part of the image in sharp focus will be a visual anchor. With that in place, a little motion is acceptable and in many cases desired.
Mayorga v Mitchell - Will Hart
2000 Bobsled - Mathias Heikel4
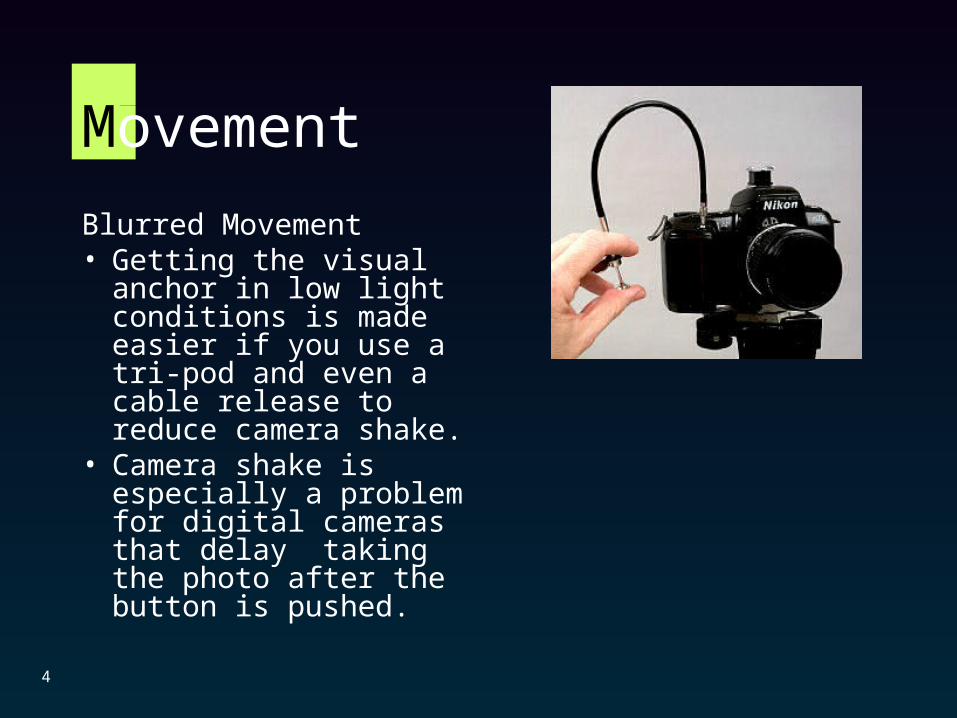
Movement
Blurred Movement• Getting the visual anchor
in low light conditions is made easier if you use a tri-pod and even a cable release to reduce camera shake.
• Camera shake is especially a problem for digital cameras that delay taking the photo after the button is pushed.
4
Movement
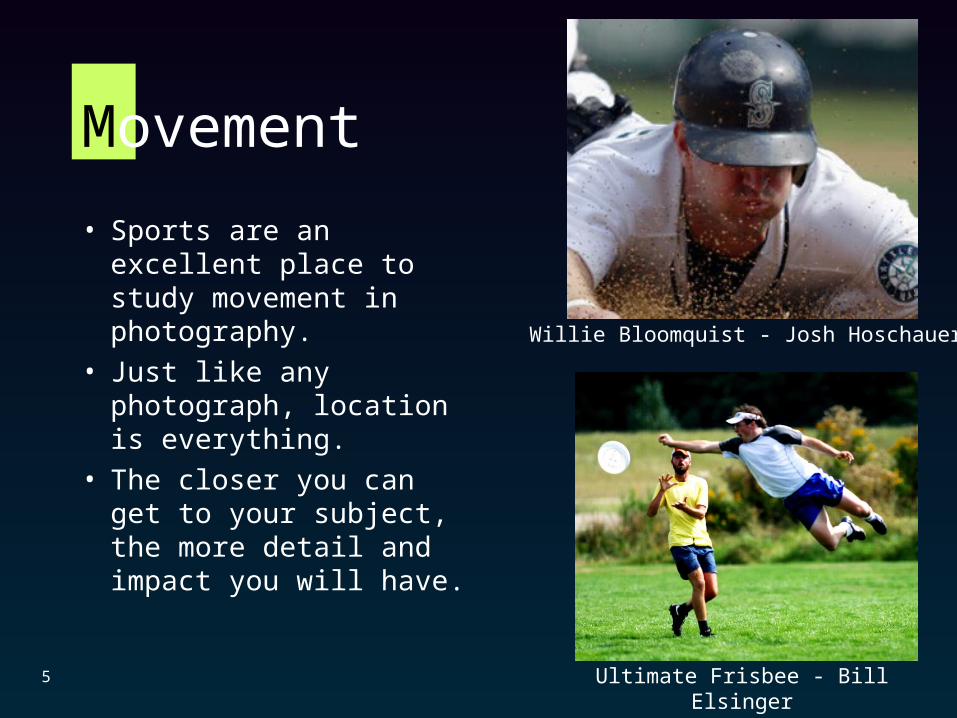
• Sports are an excellent place to study movement in photography.
• Just like any photograph, location is everything.
• The closer you can get to your subject, the more detail and impact you will have.
Willie Bloomquist - Josh Hoschauer
Ultimate Frisbee - Bill Elsinger5
Movement
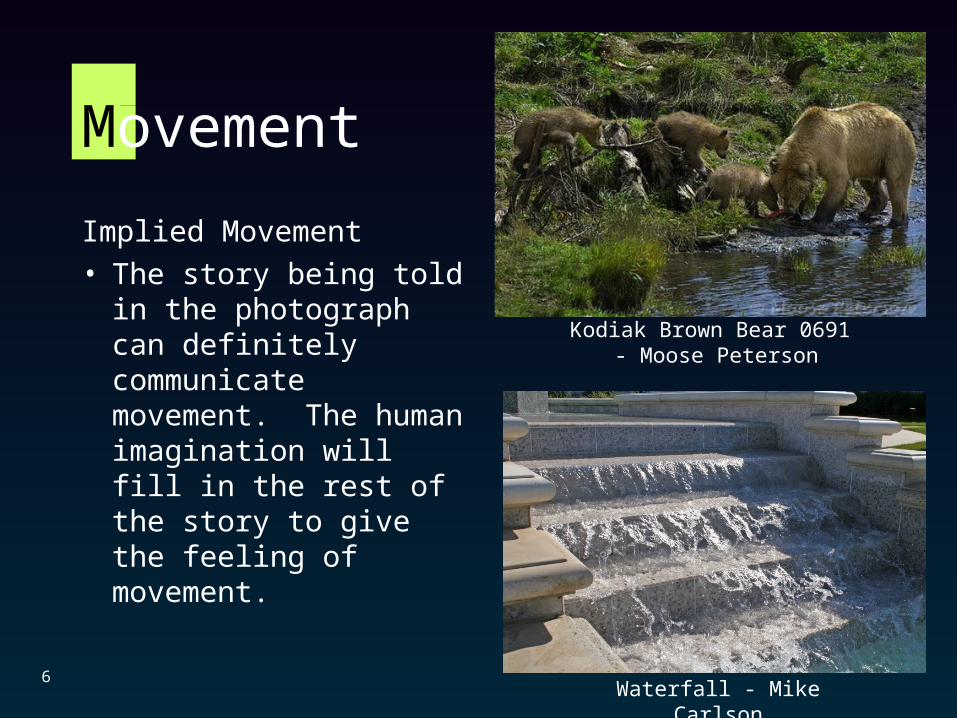
Implied Movement
• The story being told in the photograph can definitely communicate movement. The human imagination will fill in the rest of the story to give the feeling of movement.
Kodiak Brown Bear 0691 - Moose Peterson
Waterfall - Mike Carlson6
Movement
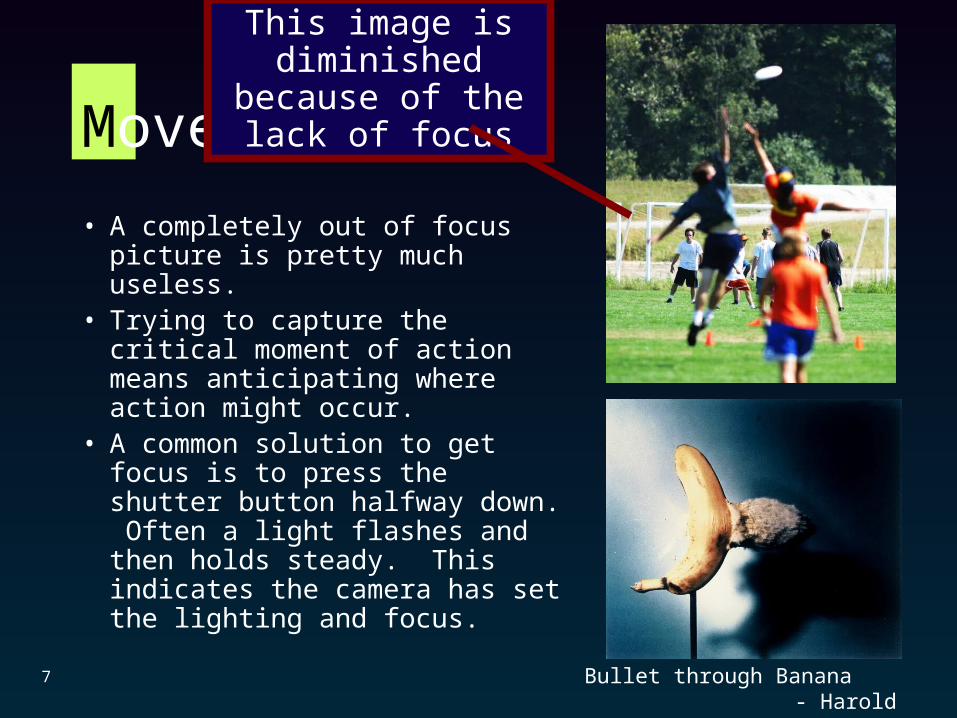
• A completely out of focus picture is pretty much useless.
• Trying to capture the critical moment of action means anticipating where action might occur.
• A common solution to get focus is to press the shutter button halfway down. Often a light flashes and then holds steady. This indicates the camera has set the lighting and focus.
This image is diminished because of
the lack of focus
Bullet through Banana - Harold Edgerton
7
Movement
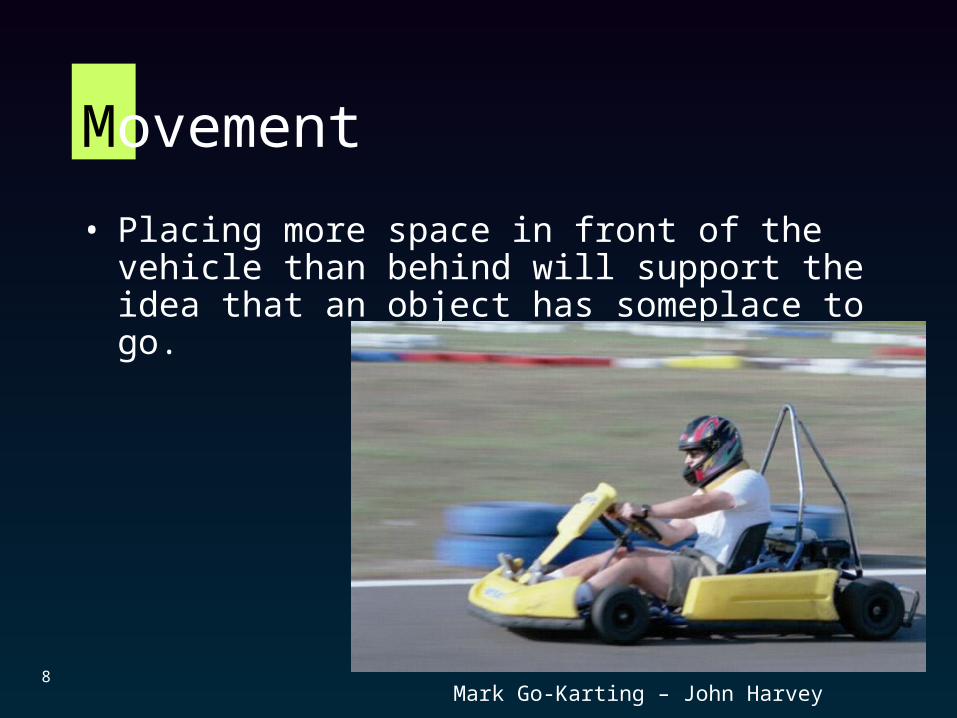
• Placing more space in front of the vehicle than behind will support the idea that an object has someplace to go.
Mark Go-Karting – John Harvey8
Movement
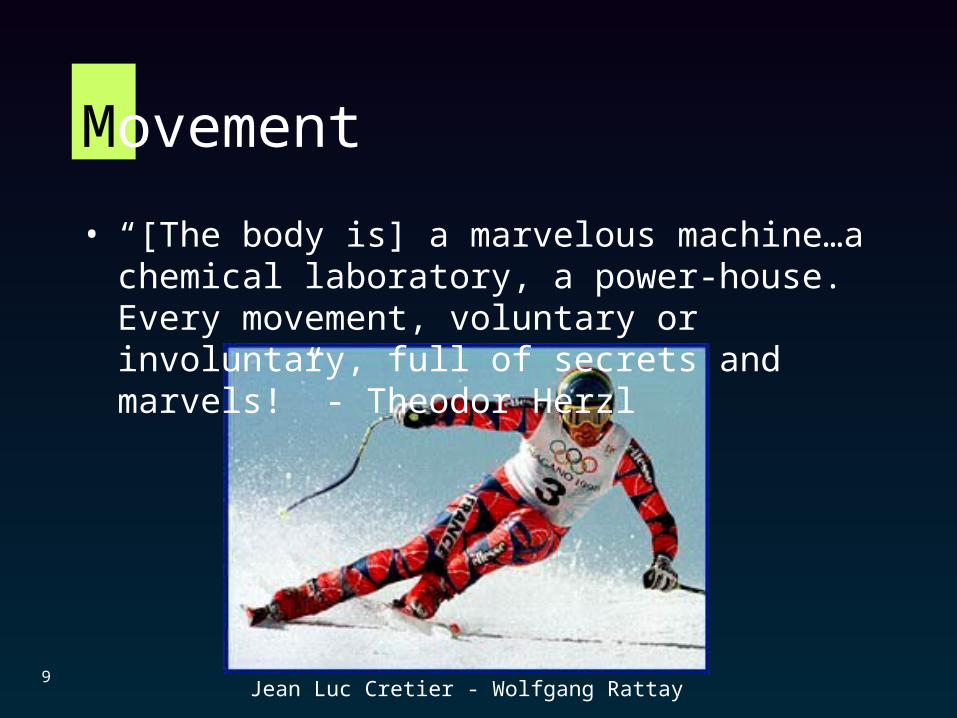
• “[The body is] a marvelous machine…a chemical laboratory, a power-house. Every movement, voluntary or involuntary, full of secrets and marvels!” - Theodor Herzl
Jean Luc Cretier - Wolfgang Rattay9
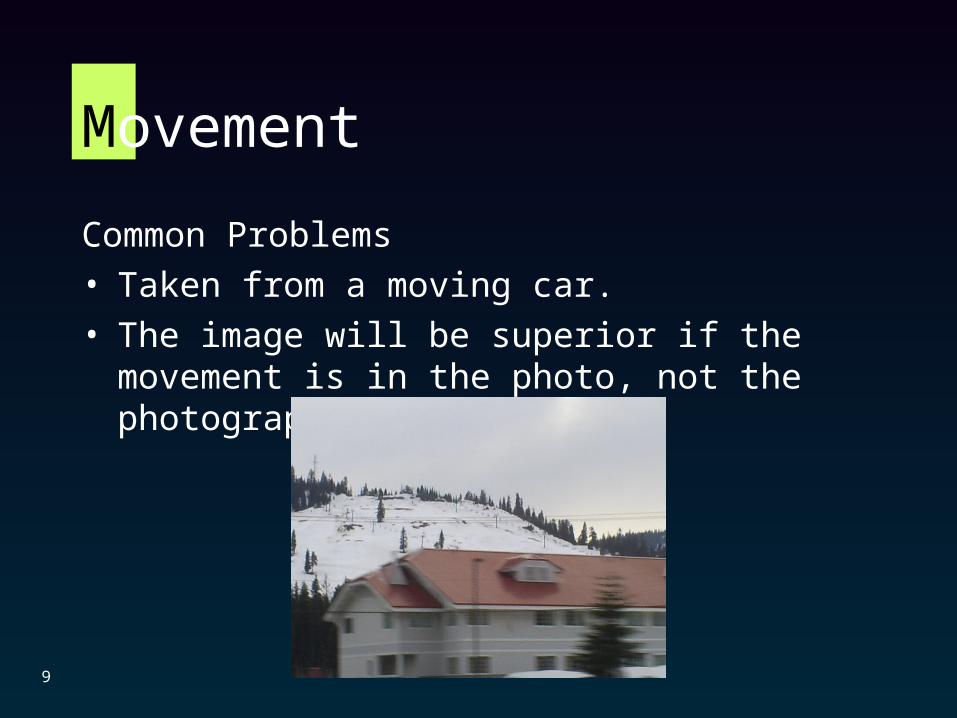
Movement
Common Problems
• Taken from a moving car.
• The image will be superior if the movement is in the photo, not the photographer.
9
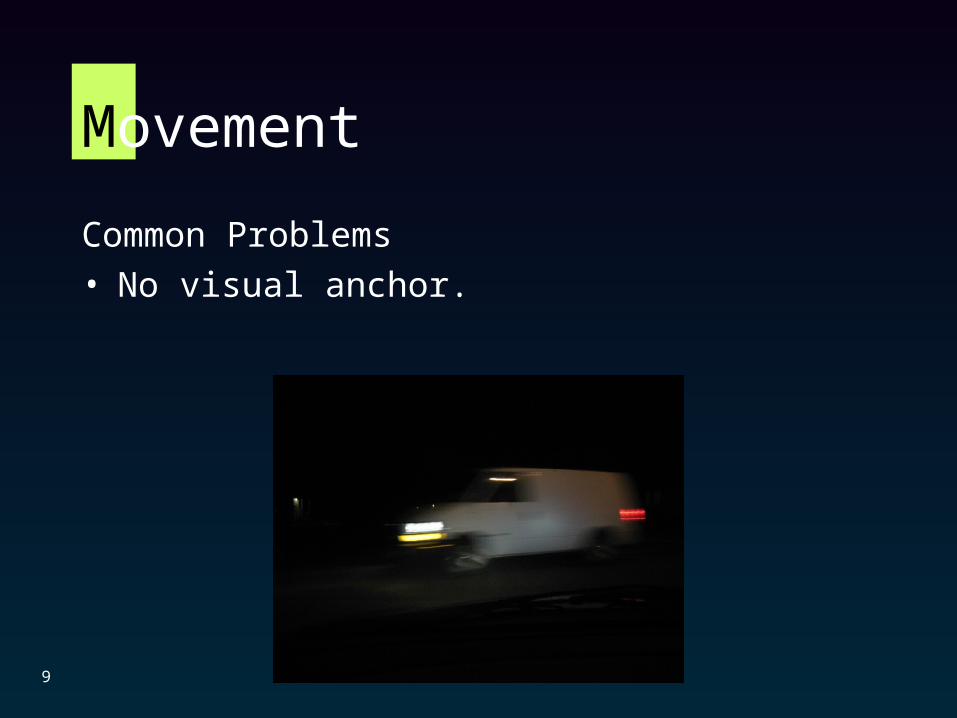
Movement
Common Problems
• No visual anchor.
9
Movement
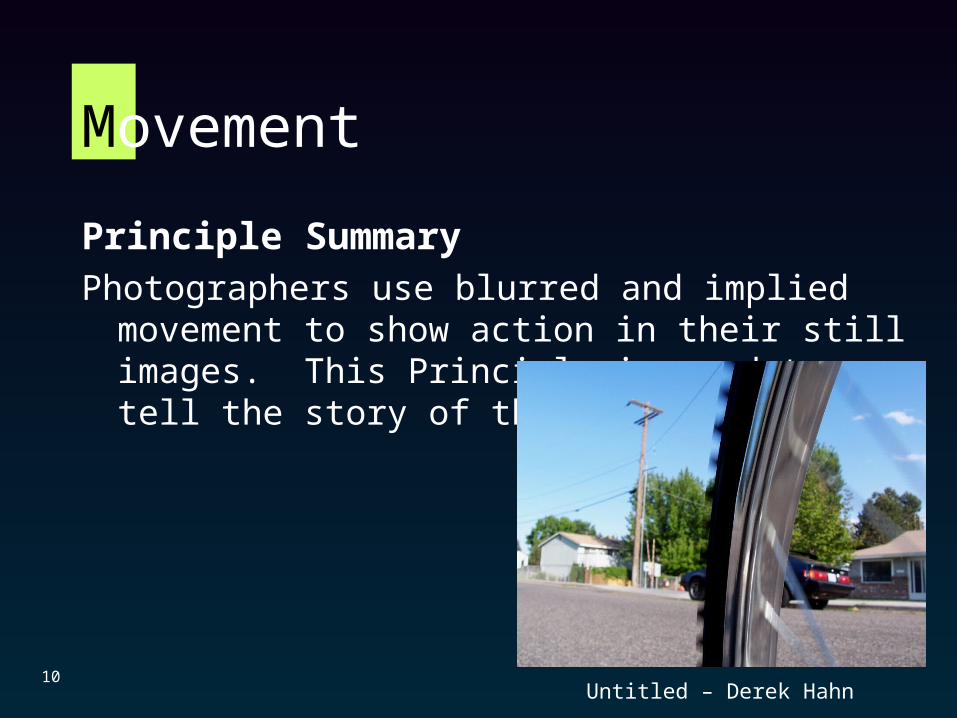
10
Principle SummaryPhotographers use blurred and implied movement to show
action in their still images. This Principle is used to tell the story of the image.
Untitled – Derek Hahn
What the Arts Teach
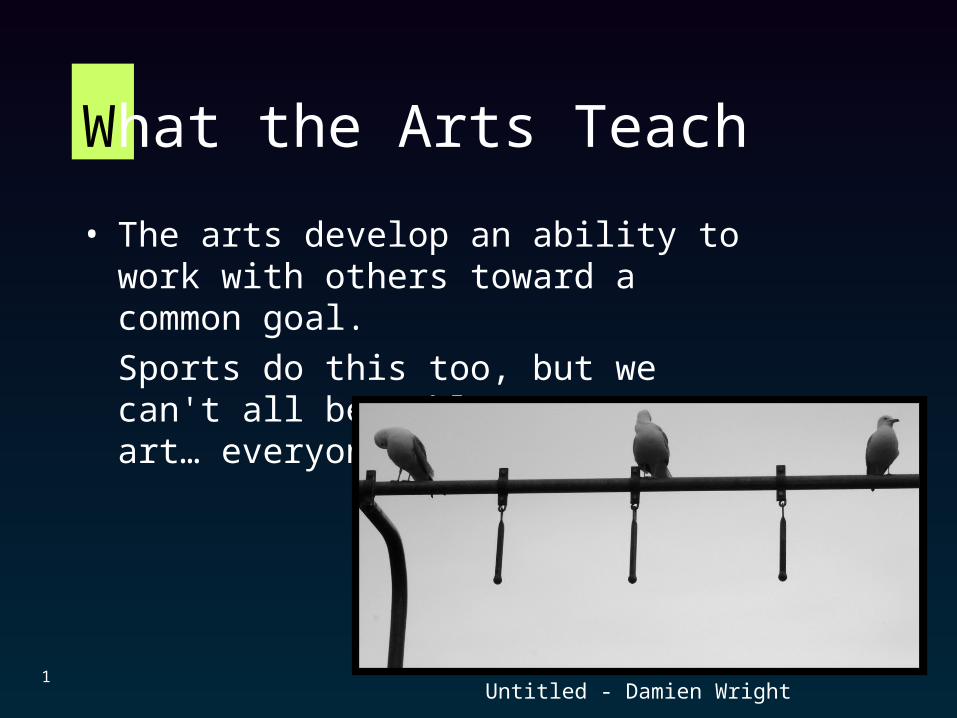
• The arts develop an ability to work with others toward a common goal.
Sports do this too, but we can't all be athletes. In art… everyone can be a winner.
1Untitled - Damien Wright
Balance
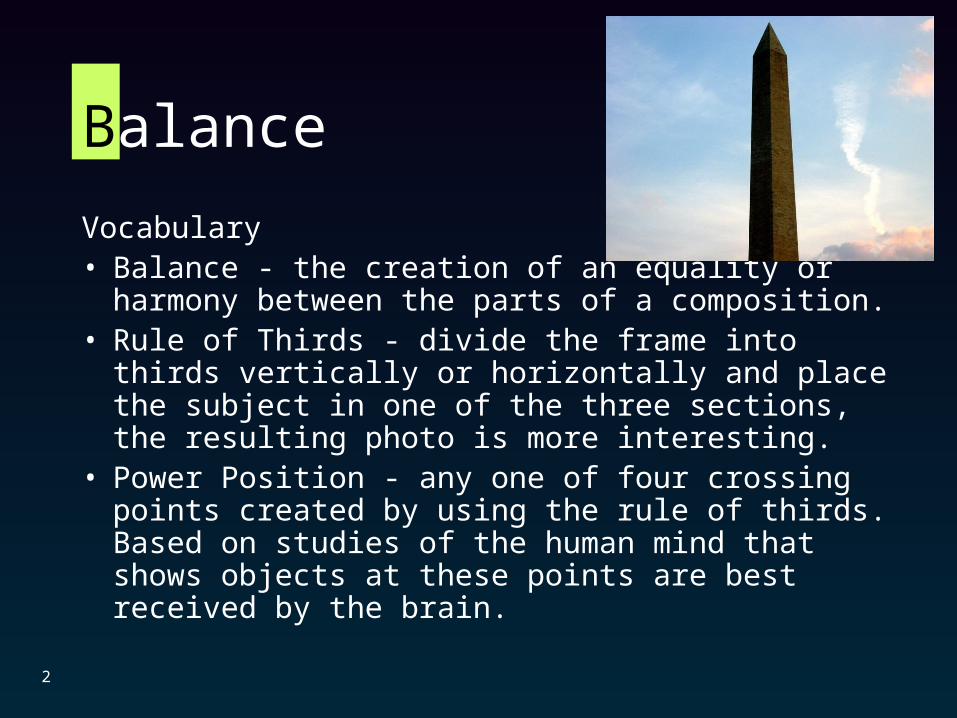
Vocabulary• Balance - the creation of an equality or harmony between
the parts of a composition.• Rule of Thirds - divide the frame into thirds vertically or
horizontally and place the subject in one of the three sections, the resulting photo is more interesting.
• Power Position - any one of four crossing points created by using the rule of thirds. Based on studies of the human mind that shows objects at these points are best received by the brain.
2
Balance
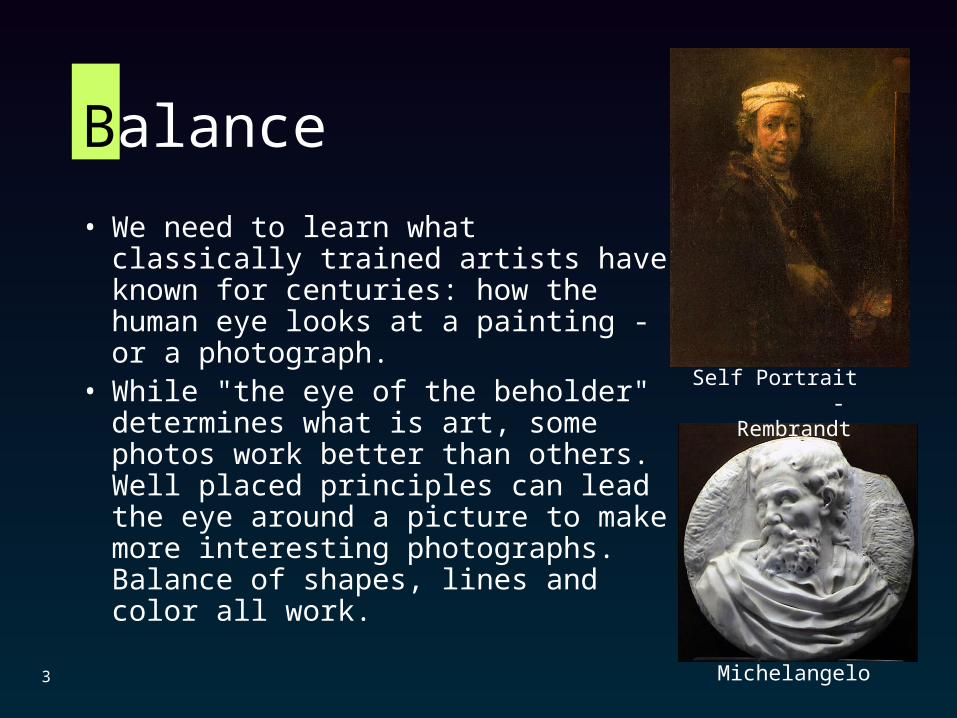
• We need to learn what classically trained artists have known for centuries: how the human eye looks at a painting - or a photograph.
• While "the eye of the beholder" determines what is art, some photos work better than others. Well placed principles can lead the eye around a picture to make more interesting photographs. Balance of shapes, lines and color all work.
Self Portrait - Rembrandt
Michelangelo3
Balance
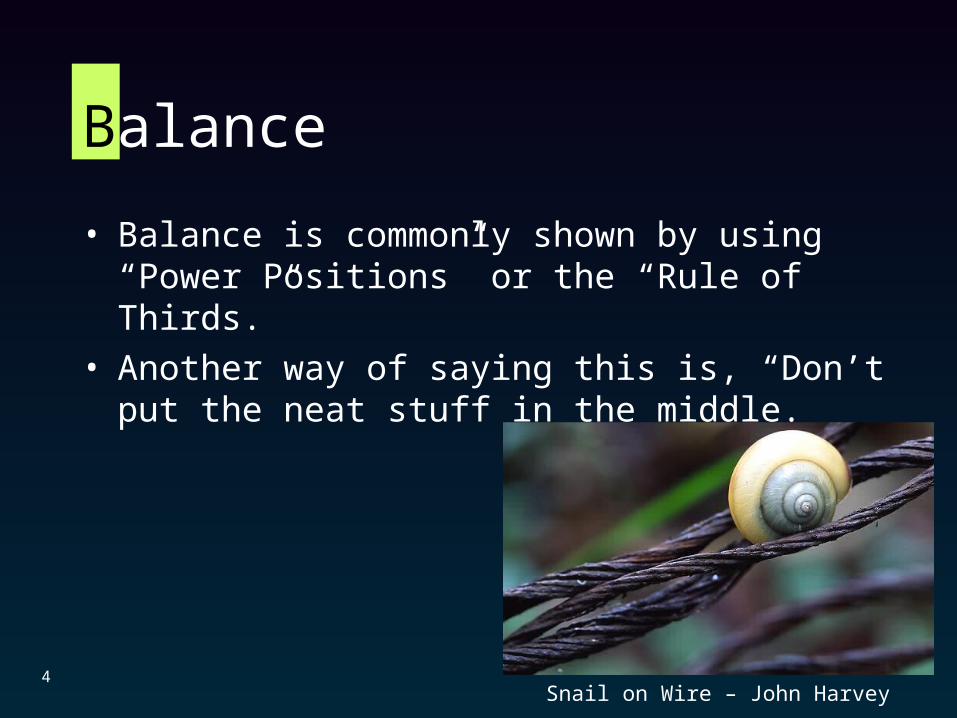
• Balance is commonly shown by using “Power Positions” or the “Rule of Thirds.”
• Another way of saying this is, “Don’t put the neat stuff in the middle.
Snail on Wire – John Harvey4
Balance
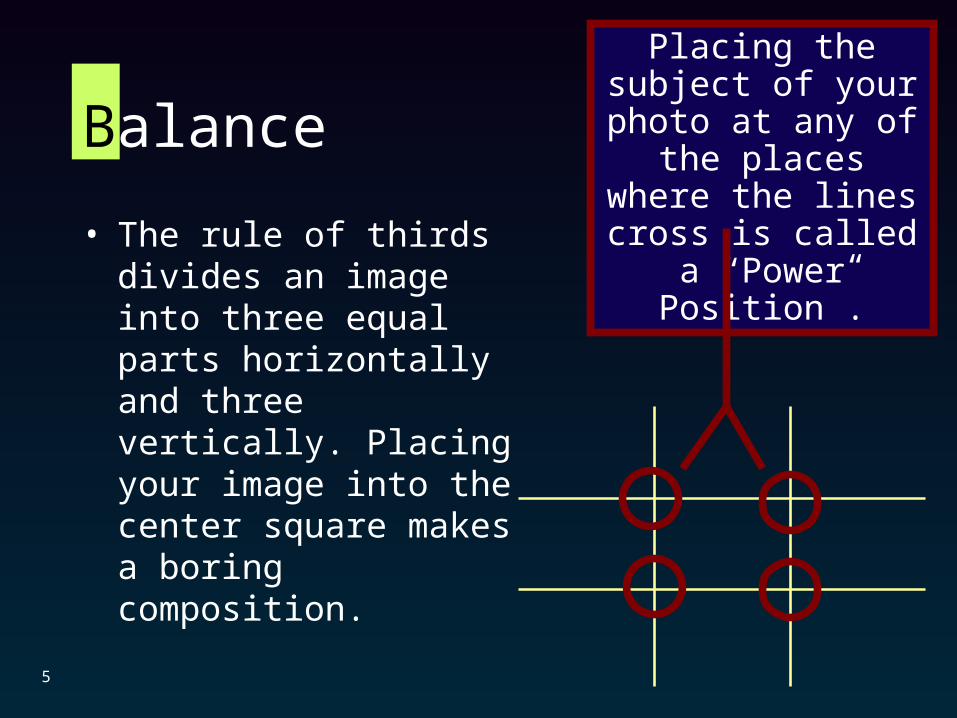
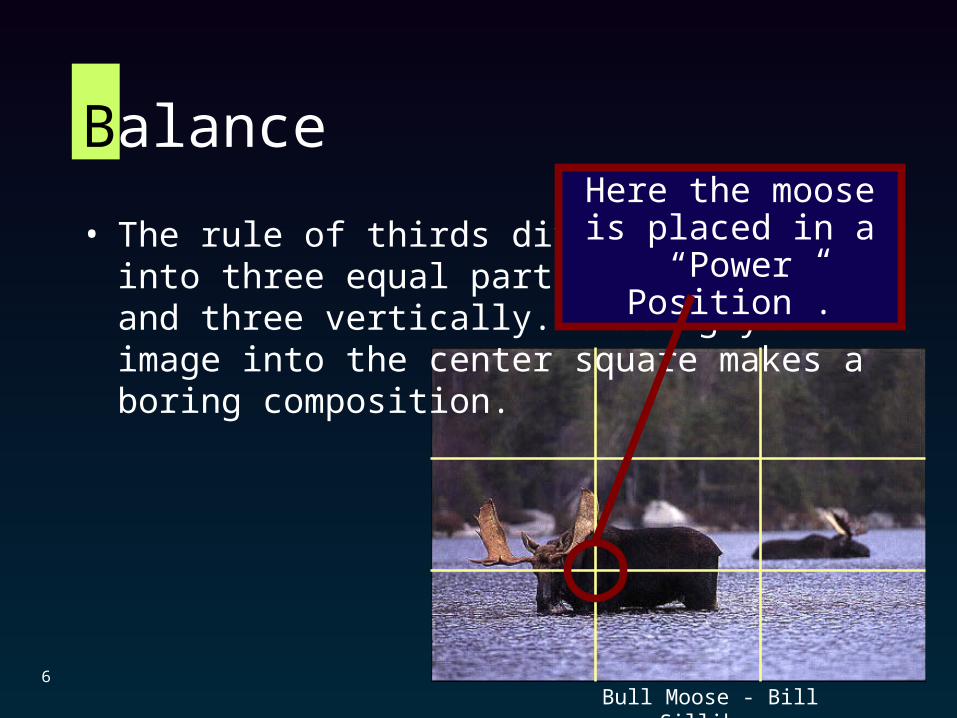
• The rule of thirds divides an image into three equal parts horizontally and three vertically. Placing your image into the center square makes a boring composition.
Placing the subject of your photo at any of the places where the lines cross is called a
“Power Position”.
5
Balance
• The rule of thirds divides an image into three equal parts horizontally and three vertically. Placing your image into the center square makes a boring composition.
Bull Moose - Bill Silliker
Here the moose is placed in a “Power
Position”.
6

Balance
• Being aware of these three Principles and how they should be positioned, isolated and enhanced will provide you with a basis to avoid the typical subject-centered image with a 50/50 split.
Composition – John Harvey
Here the house is placed in a “Power Position” with
strength added by the lighthouse along the line of
thirds.
7
Balance
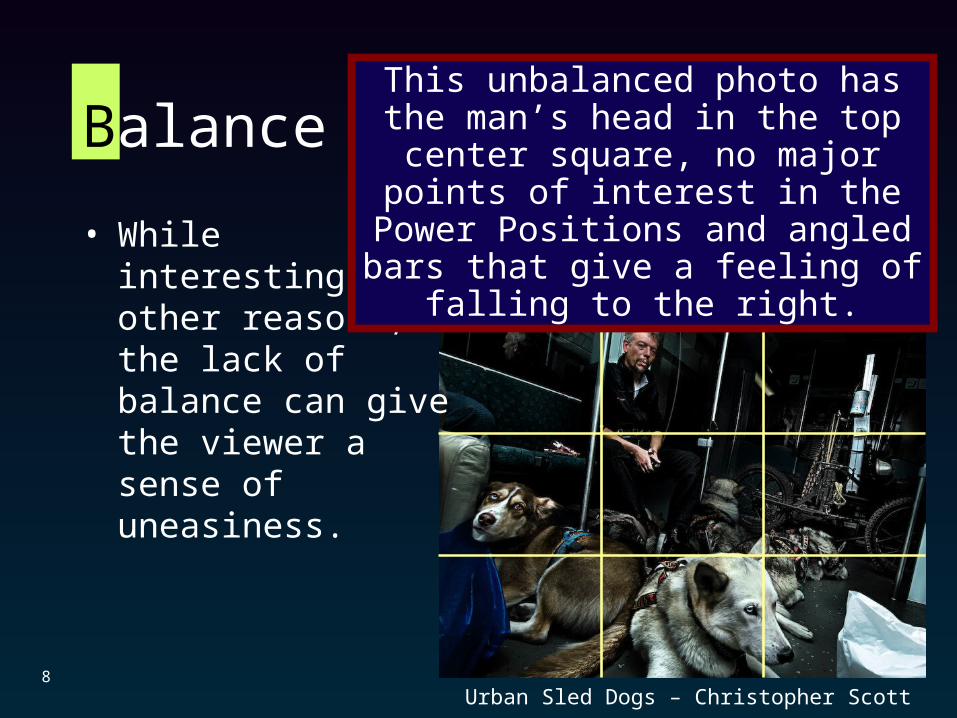
• While interesting for other reasons, the lack of balance can give the viewer a sense of uneasiness.
Urban Sled Dogs – Christopher Scott8
This unbalanced photo has the man’s head in the top center square, no major points of interest in the Power Positions
and angled bars that give a feeling of falling to the right.
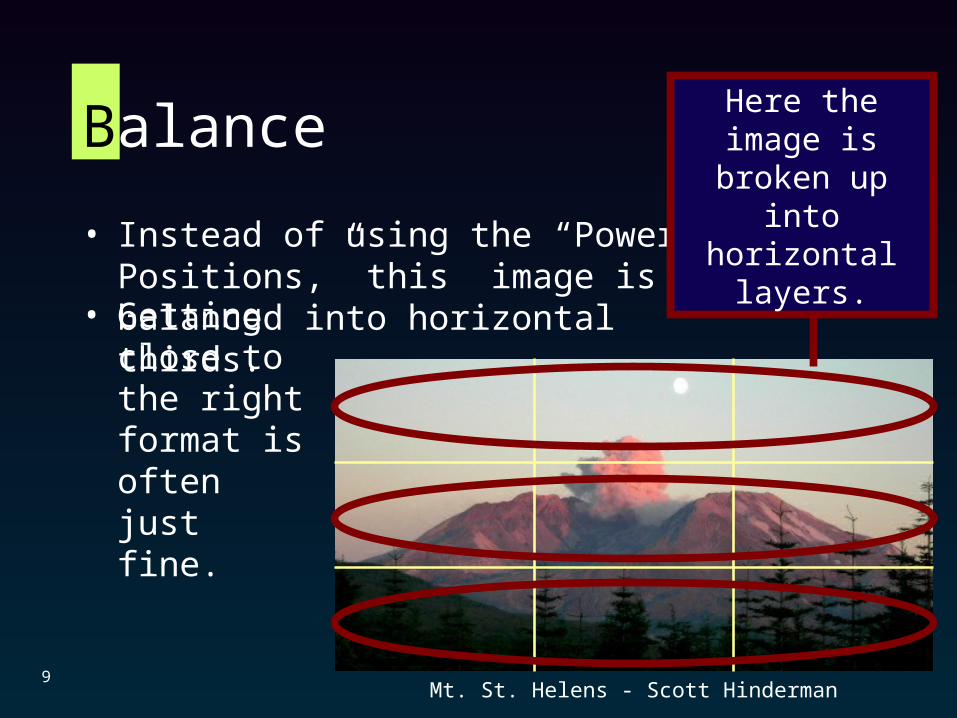
Balance
• Instead of using the “Power Positions,” this image is balanced into horizontal thirds.
• Getting close to the right format is often just fine.
Mt. St. Helens - Scott Hinderman9
Here the image is broken up into
horizontal layers.
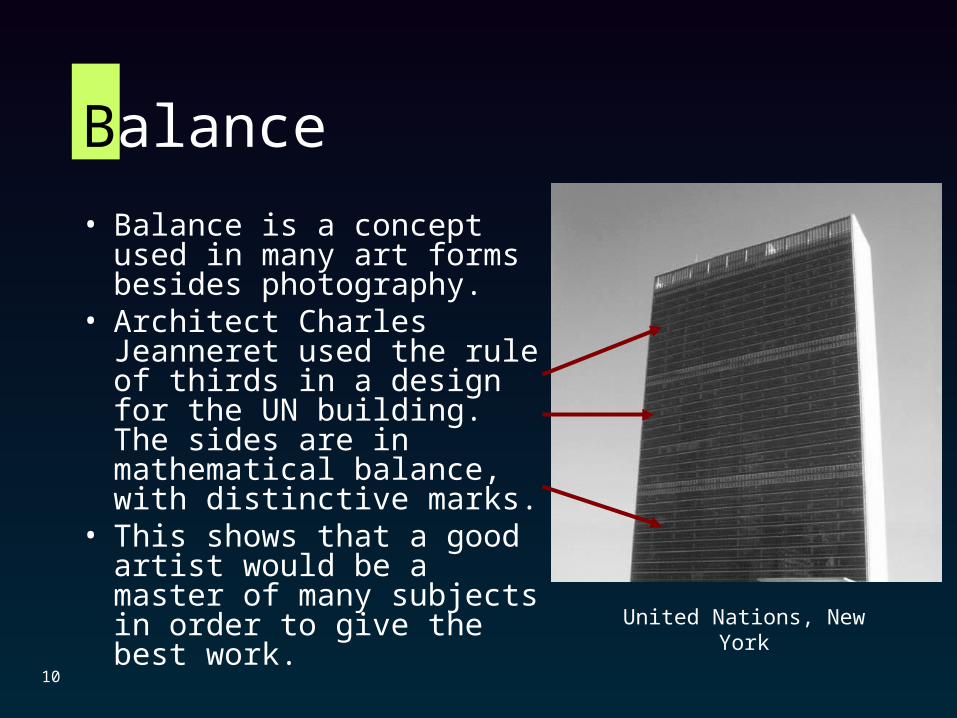
Balance
• Balance is a concept used in many art forms besides photography.
• Architect Charles Jeanneret used the rule of thirds in a design for the UN building. The sides are in mathematical balance, with distinctive marks.
• This shows that a good artist would be a master of many subjects in order to give the best work.
United Nations, New York
10
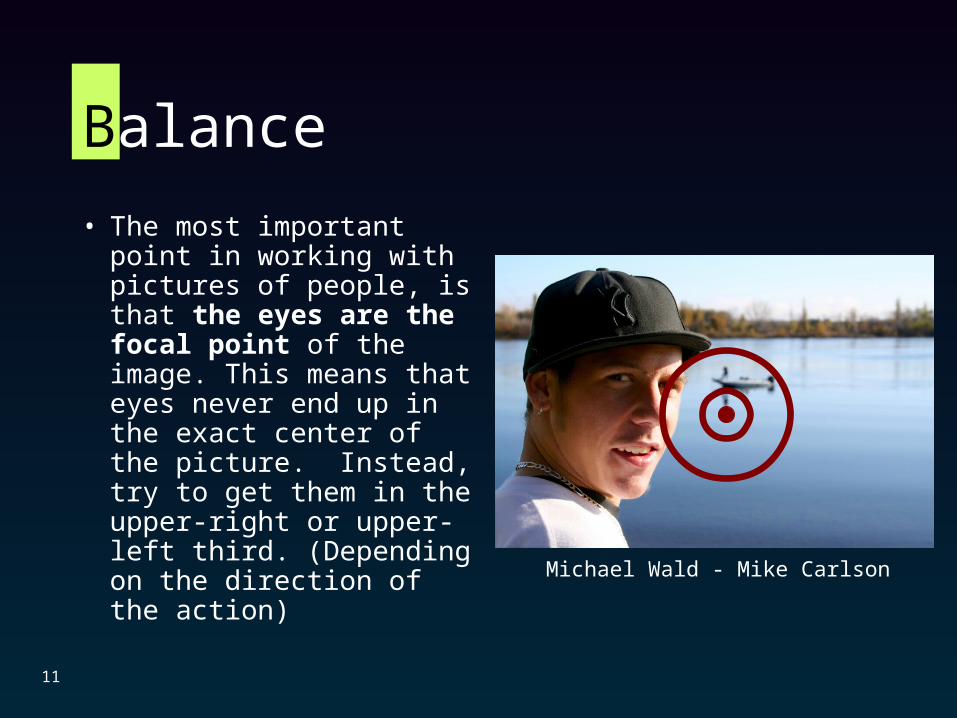
• The most important point in working with pictures of people, is that the eyes are the focal point of the image. This means that eyes never end up in the exact center of the picture. Instead, try to get them in the upper-right or upper-left third. (Depending on the direction of the action)
Balance
11
Michael Wald - Mike Carlson
Balance
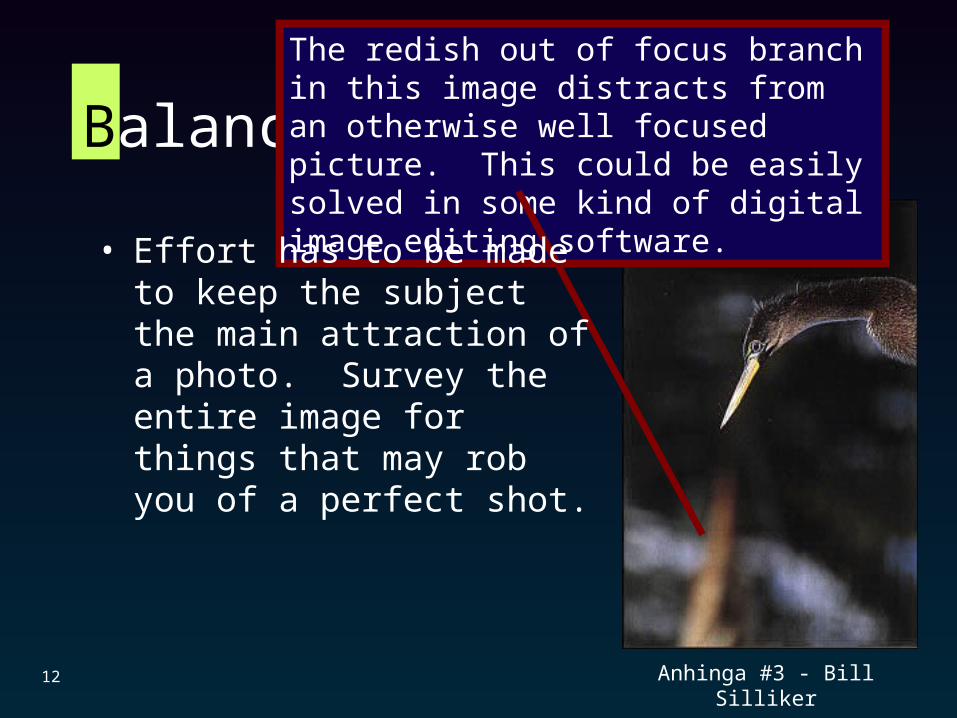
Anhinga #3 - Bill Silliker12
The redish out of focus branch in this image distracts from an otherwise well focused picture. This could be easily solved in some kind of digital image editing software.
• Effort has to be made to keep the subject the main attraction of a photo. Survey the entire image for things that may rob you of a perfect shot.
Balance
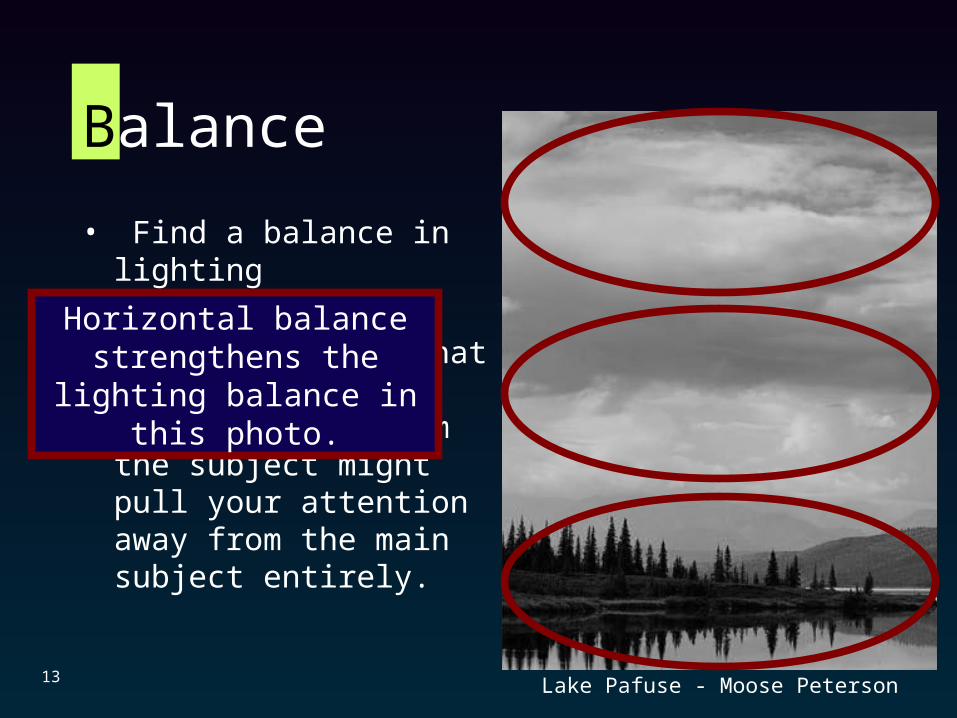
• Find a balance in lighting
• A significantly brighter object that immediately pulls your eye away from the subject might pull your attention away from the main subject entirely.
Lake Pafuse - Moose Peterson13
Horizontal balance strengthens the lighting balance in this photo.
Balance
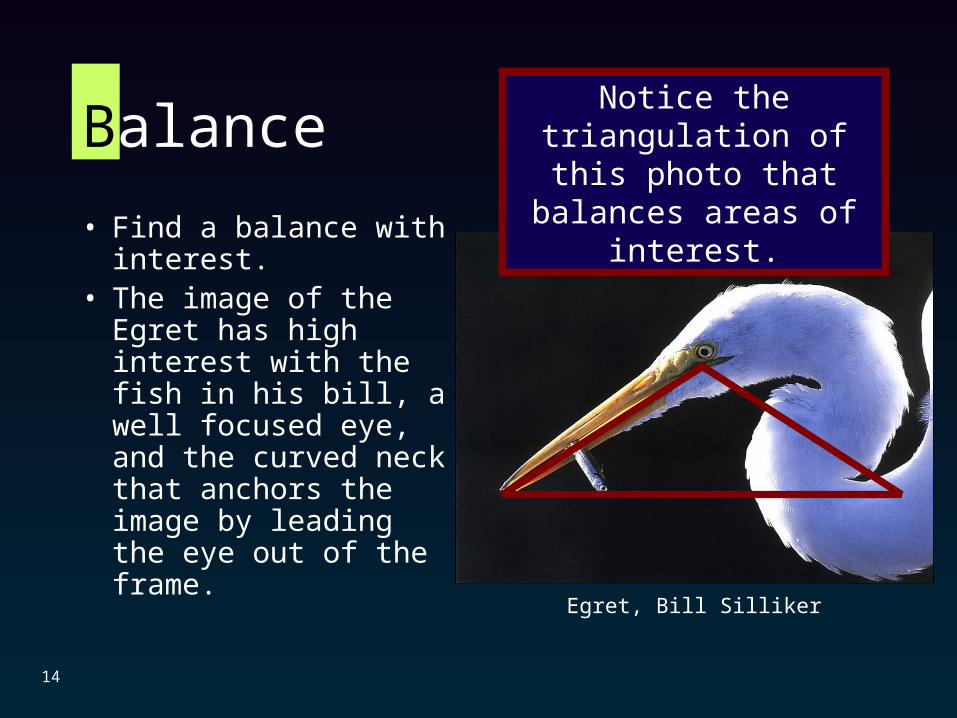
• Find a balance with interest.
• The image of the Egret has high interest with the fish in his bill, a well focused eye, and the curved neck that anchors the image by leading the eye out of the frame.
Notice the triangulation of this photo that balances
areas of interest.
Egret, Bill Silliker
14
Balance
14
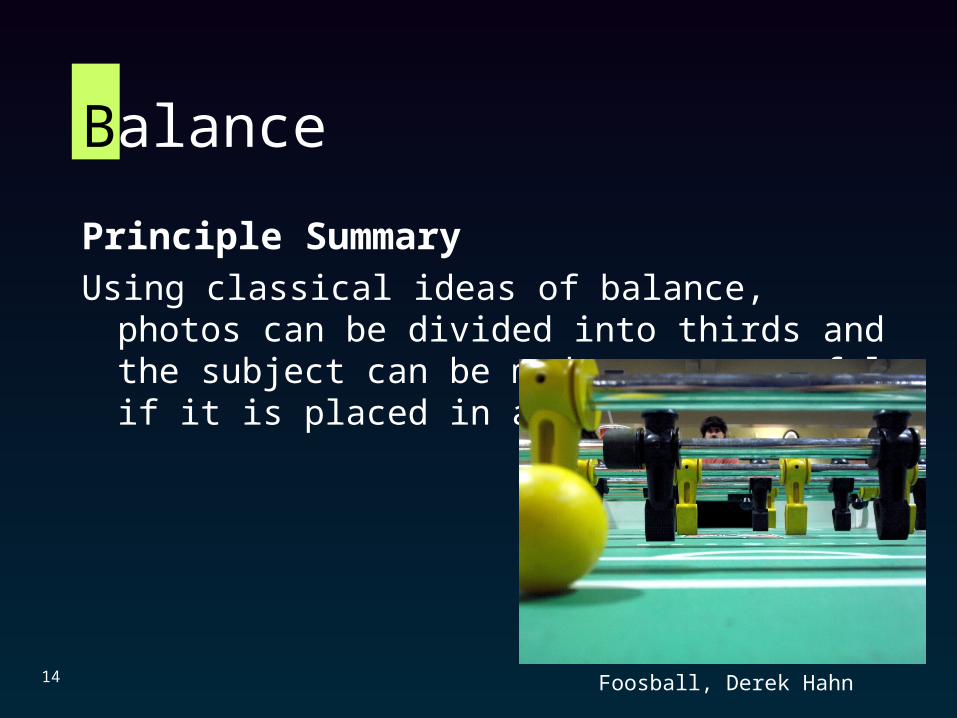
Principle SummaryUsing classical ideas of balance, photos can be divided into
thirds and the subject can be made more powerful if it is placed in a power position.
Foosball, Derek Hahn
Titles
• Titling your photographs is another way for the artist to communicate with the viewer. While it is not necessary to title all art… being capable of appropriate naming gives you the power to chose. In other words, if you don’t possess the skill of naming, then you are left without the choice.
• What follows are a series of photos intended to get your mind flowing rapidly using brainstorming.
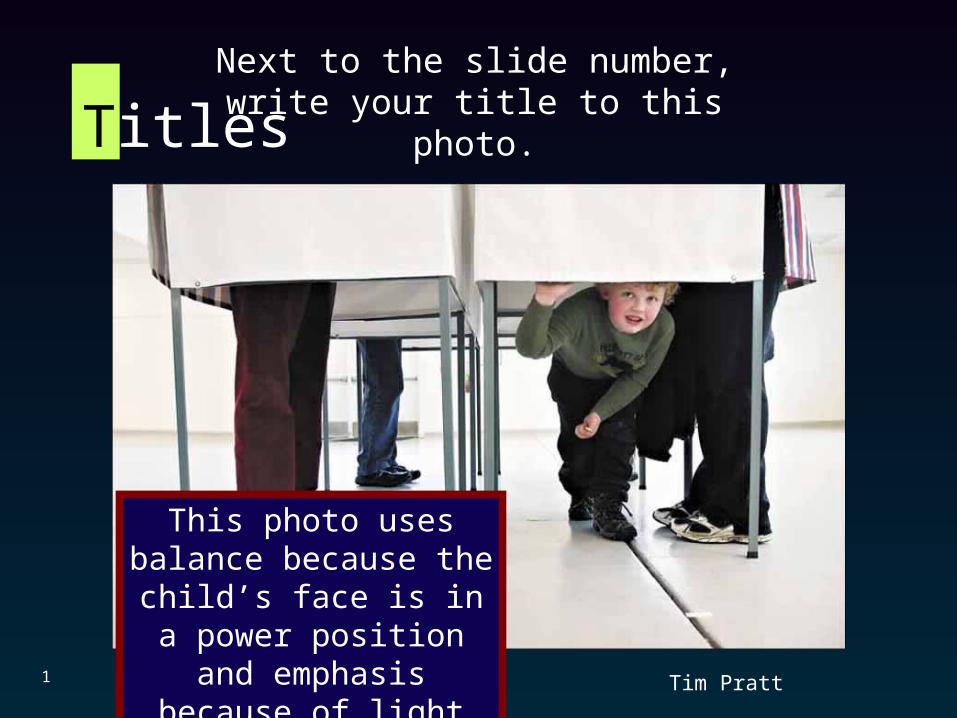
Titles
1
Next to the slide number, write your title to this photo.
Tim Pratt
This photo uses balance because the child’s face is
in a power position and emphasis because of light
and color.
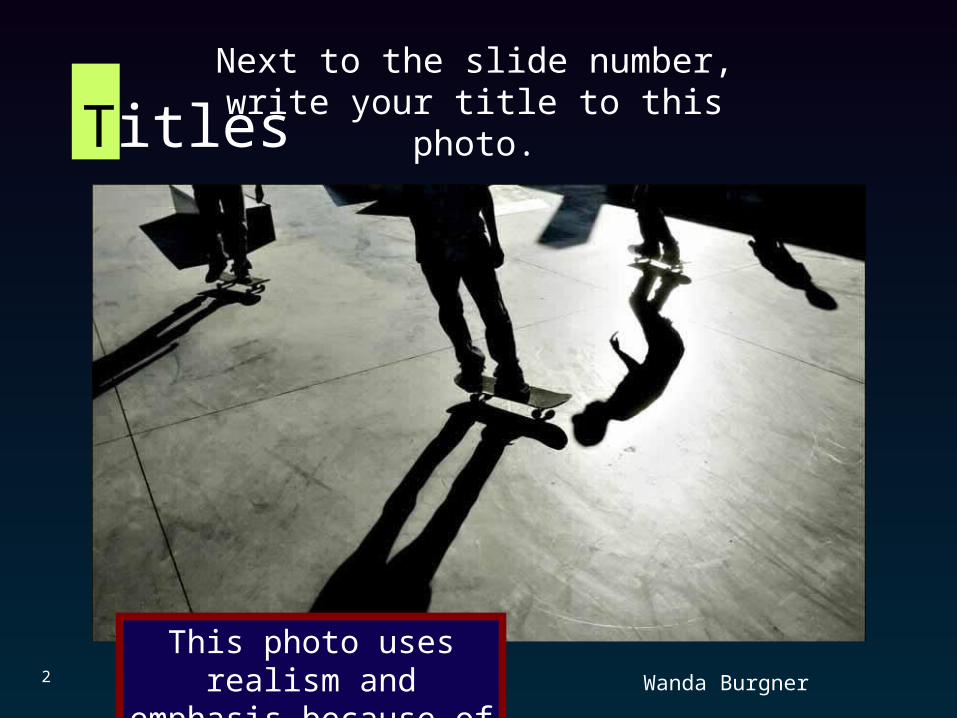
Titles
2
Next to the slide number, write your title to this photo.
Wanda Burgner
This photo uses realism and emphasis because of light
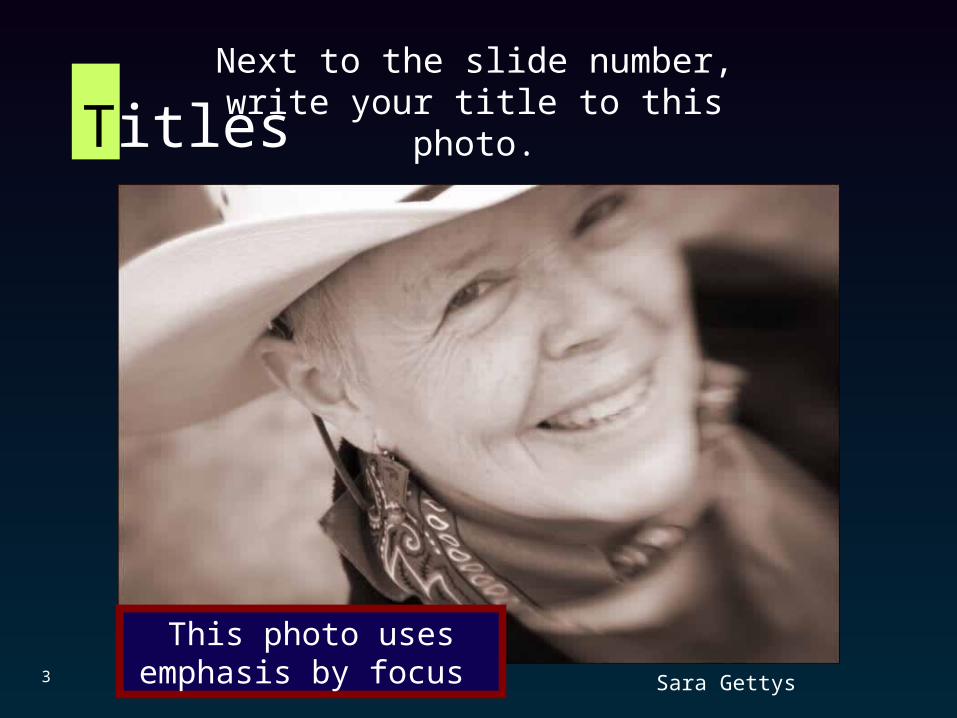
Titles
3 Sara Gettys
Next to the slide number, write your title to this photo.
This photo uses emphasis by focus
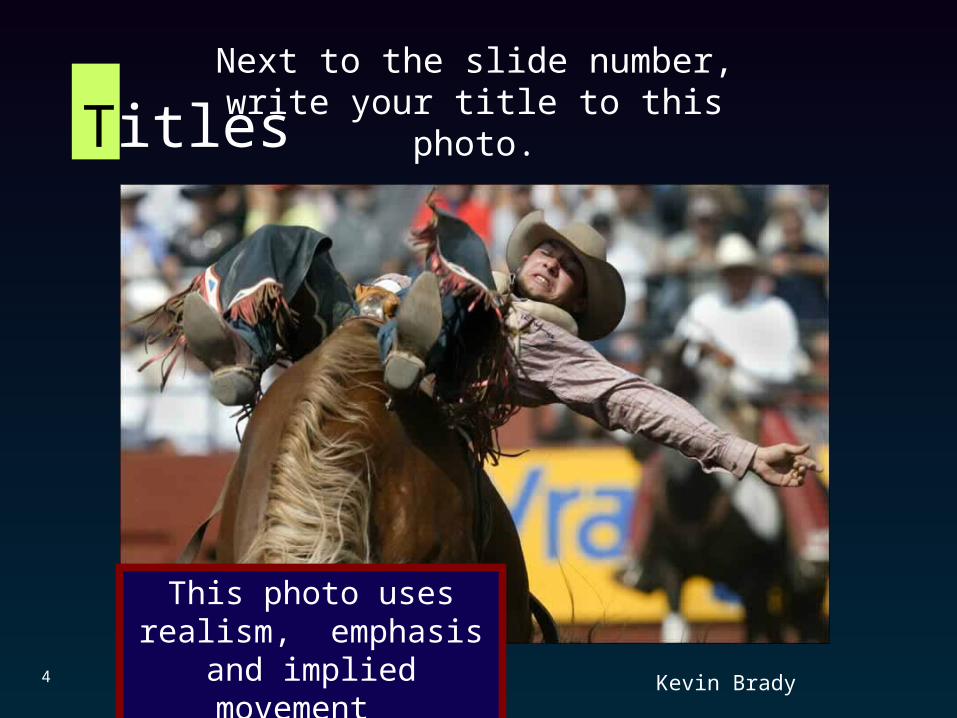
Titles
4
Next to the slide number, write your title to this photo.
Kevin Brady
This photo uses realism, emphasis and implied
movement
Titles
5
Next to the slide number, write your title to this photo.
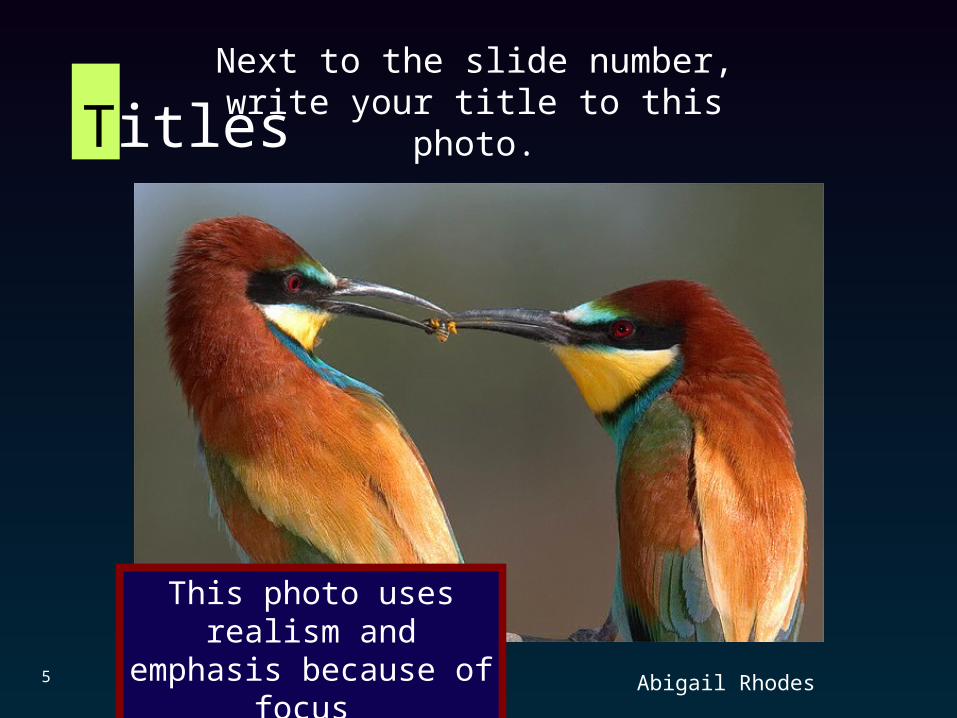
Abigail Rhodes
This photo uses realism and emphasis because of focus
Titles
6
Next to the slide number, write your title to this photo.
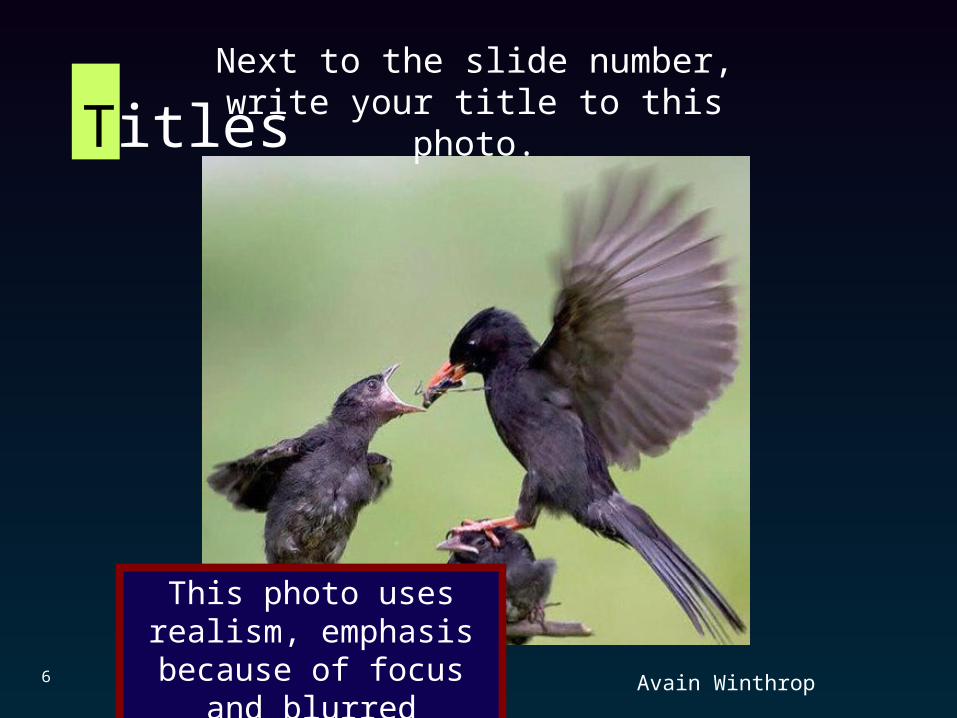
Avain Winthrop
This photo uses realism, emphasis because of focus
and blurred movement
Titles
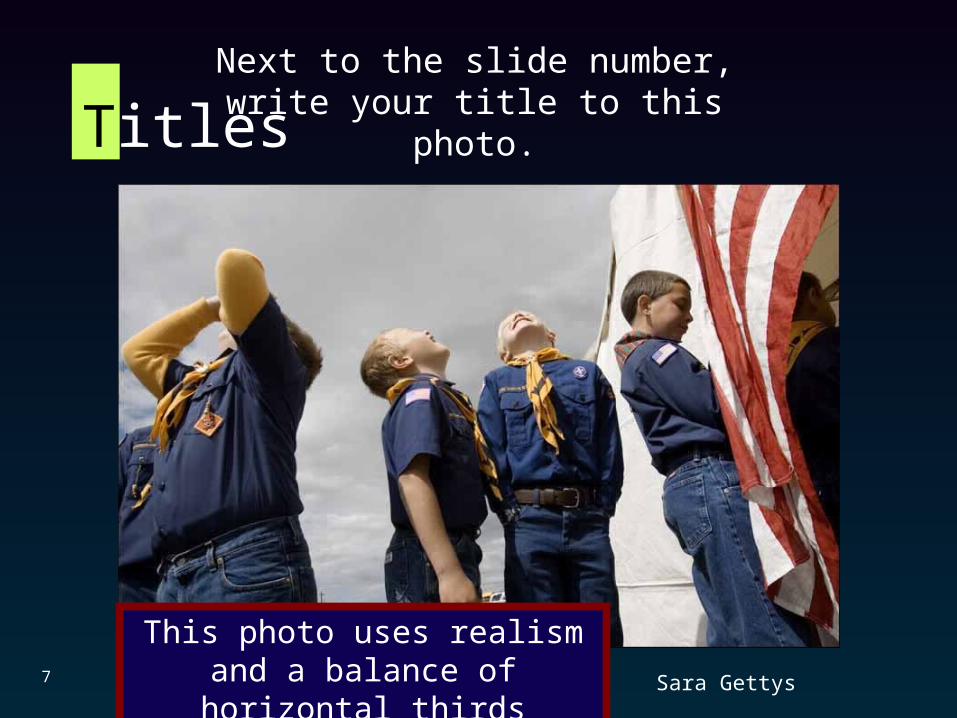
7 Sara Gettys
Next to the slide number, write your title to this photo.
This photo uses realism and a balance of horizontal thirds
Titles
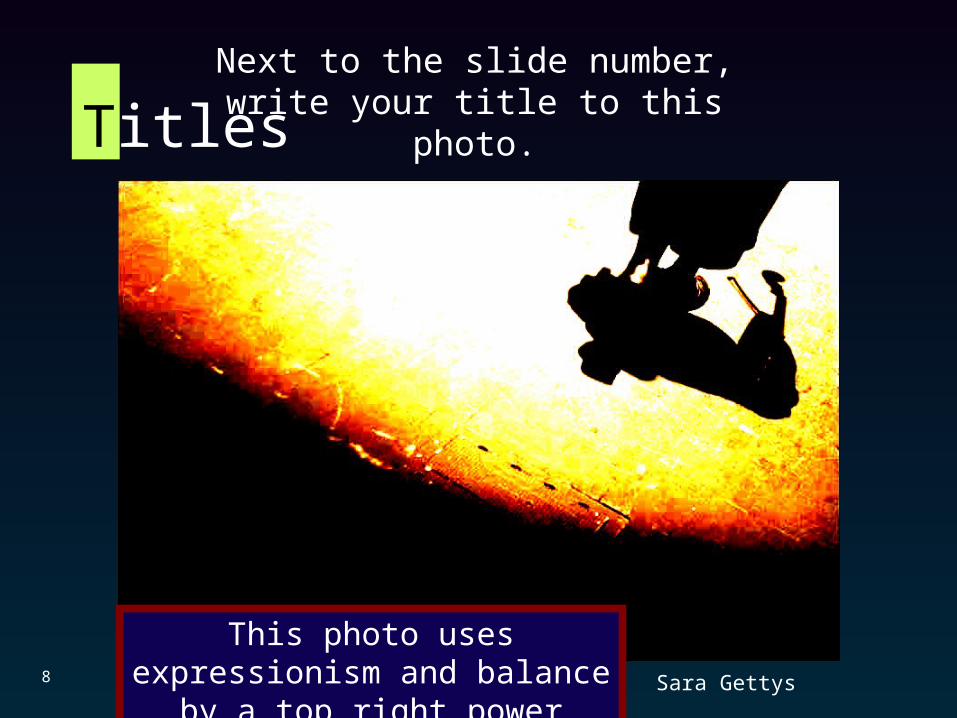
8 Sara Gettys
Next to the slide number, write your title to this photo.
This photo uses expressionism and balance by a top right power position
Titles
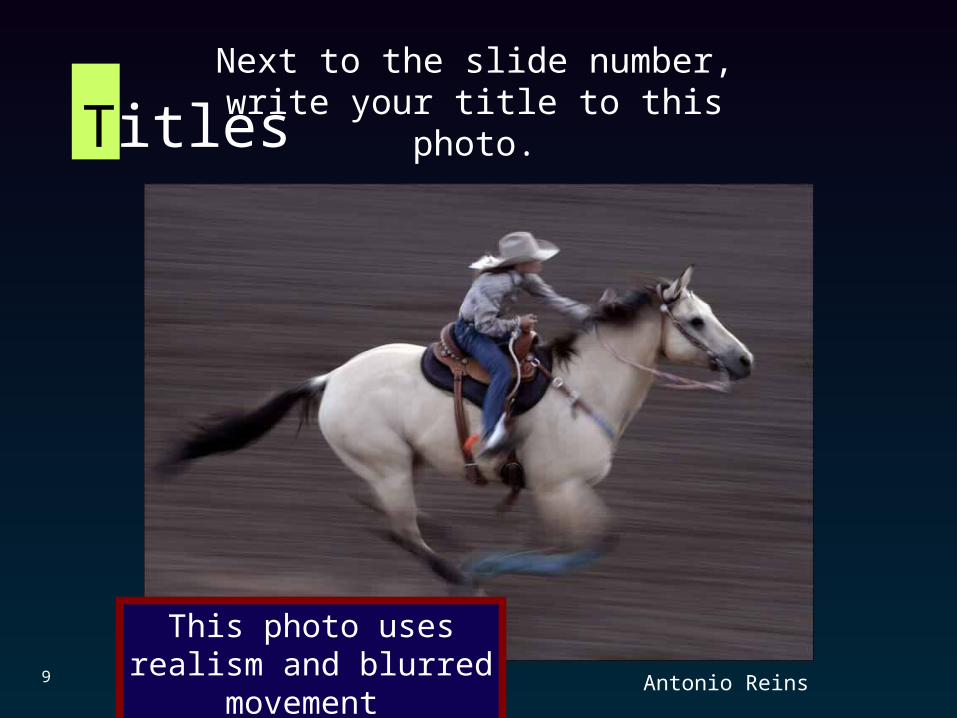
9
Next to the slide number, write your title to this photo.
Antonio Reins
This photo uses realism and blurred movement
Titles
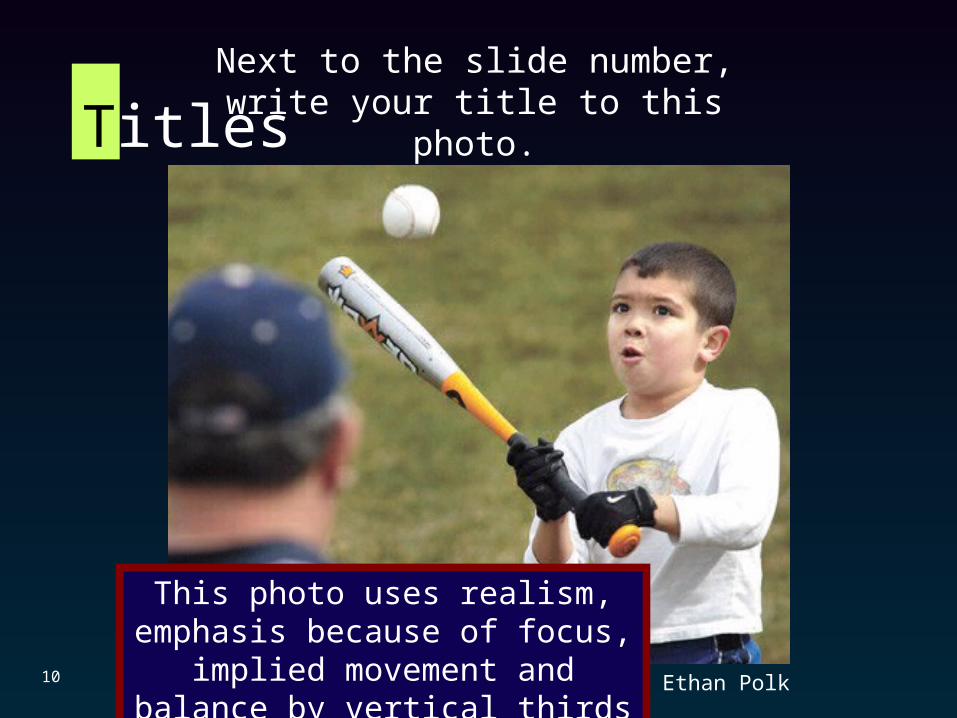
10
Next to the slide number, write your title to this photo.
Ethan Polk
This photo uses realism, emphasis because of focus, implied movement
and balance by vertical thirds
Titles
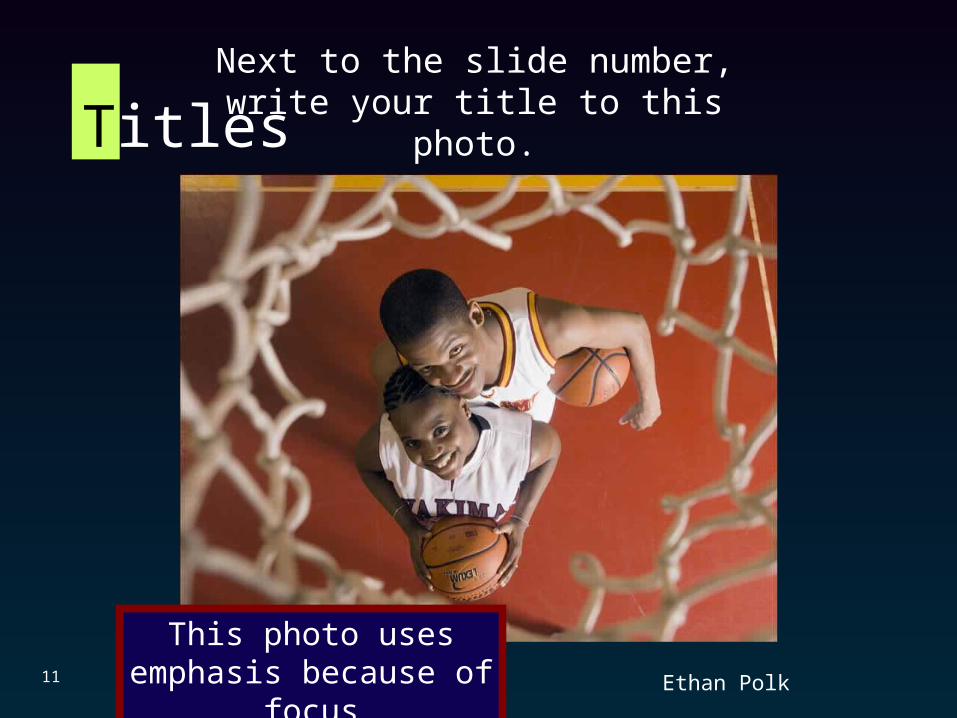
11
Next to the slide number, write your title to this photo.
Ethan Polk
This photo uses emphasis because of focus
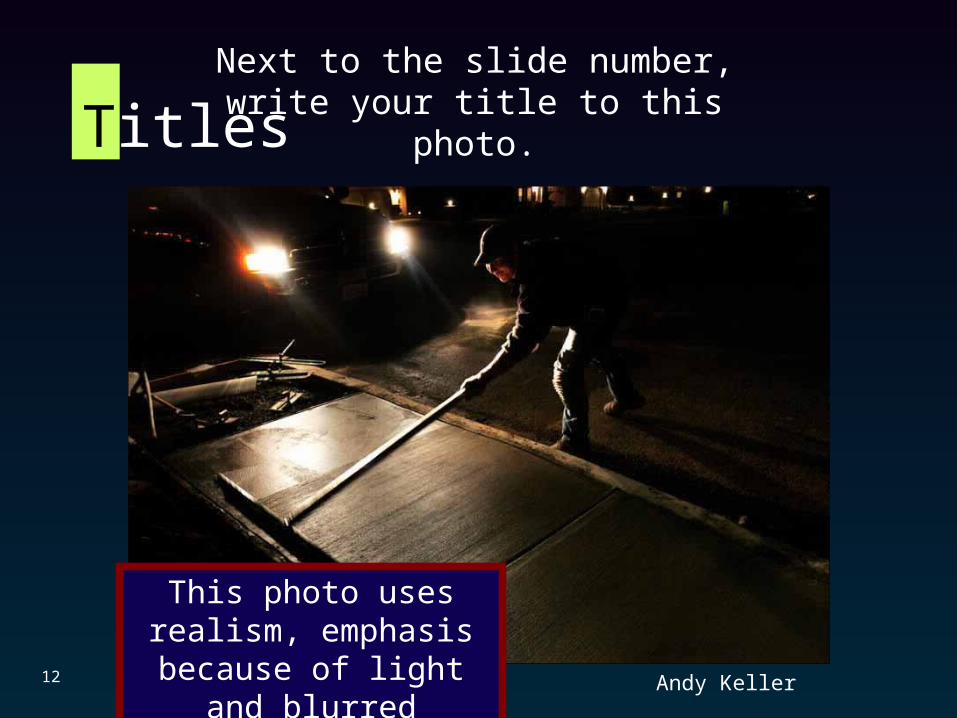
Titles
12 Andy Keller
Next to the slide number, write your title to this photo.
This photo uses realism, emphasis because of light
and blurred movement
Titles
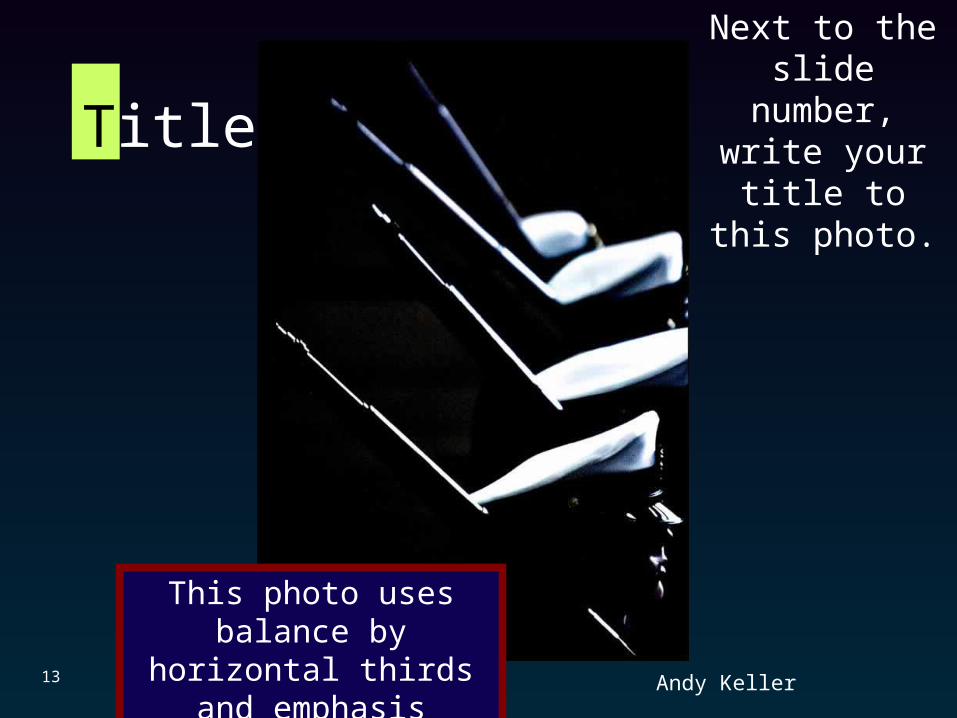
13 Andy Keller
Next to the slide number,
write your title to this
photo.
This photo uses balance by horizontal thirds and
emphasis because of light

Titles
14
Next to the slide number, write your title to this photo.
Hannah Gregorich
This photo uses balance by lining up the subject with a power line
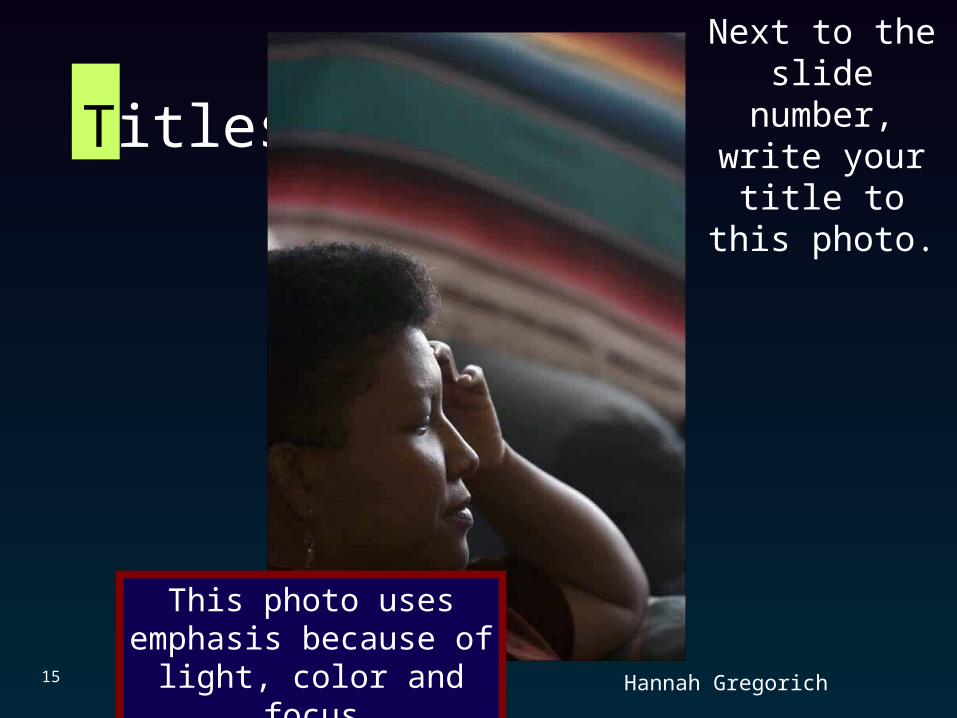
Titles
15
Next to the slide number,
write your title to this
photo.
Hannah Gregorich
This photo uses emphasis because of light, color and
focus
Titles
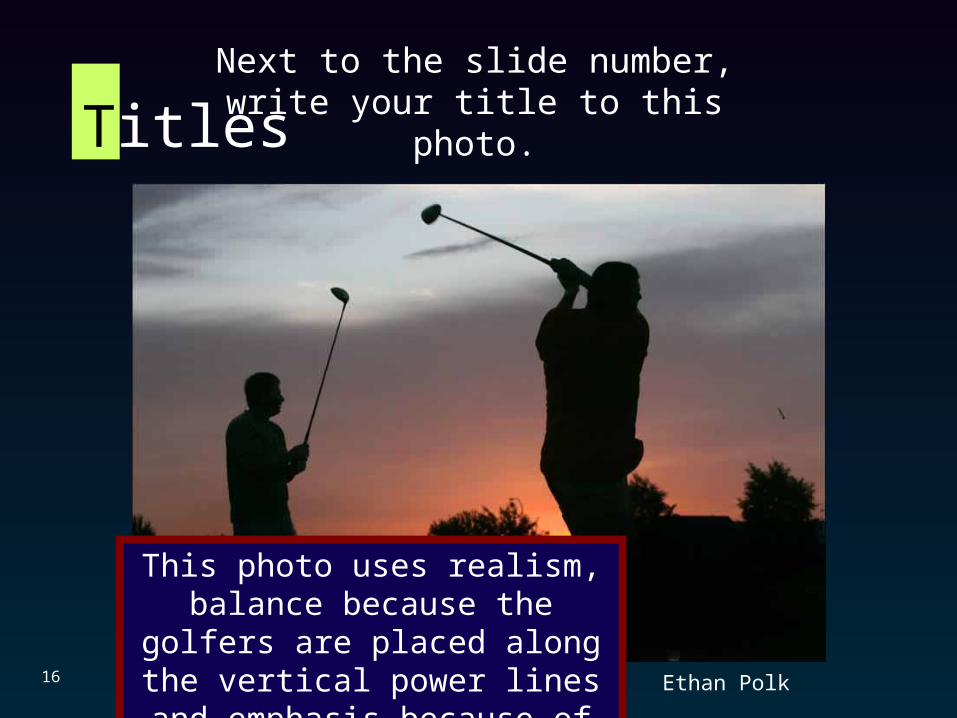
16
Next to the slide number, write your title to this photo.
Ethan Polk
This photo uses realism, balance because the golfers are placed along
the vertical power lines and emphasis because of light and color
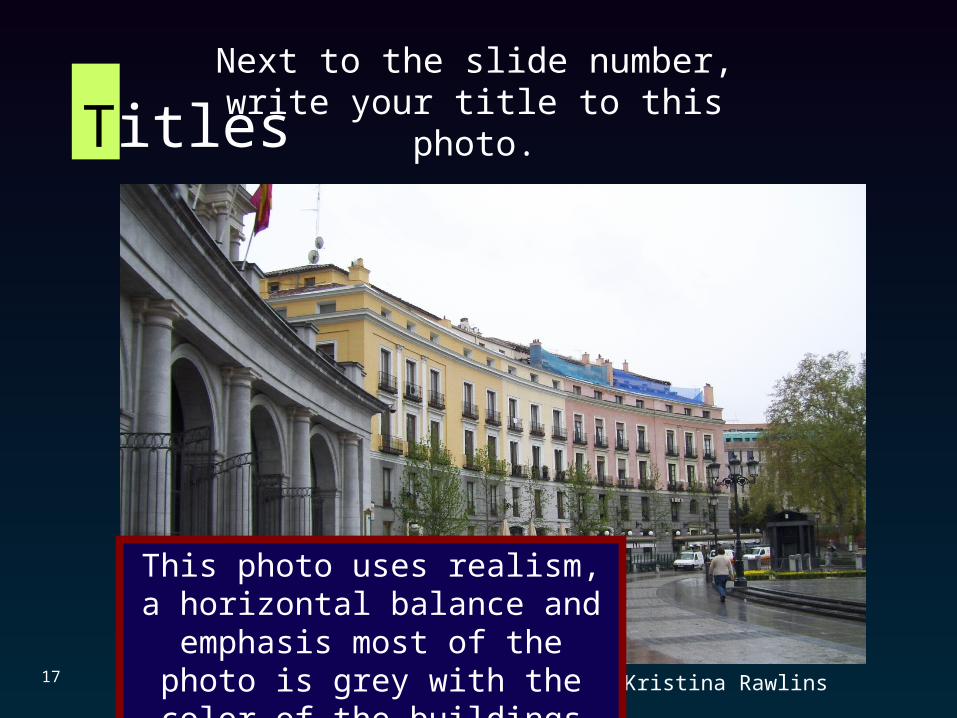
Titles
17
Next to the slide number, write your title to this photo.
Kristina Rawlins
This photo uses realism, a horizontal balance and emphasis most of the photo is grey with the color of the
buildings standing out.
Titles
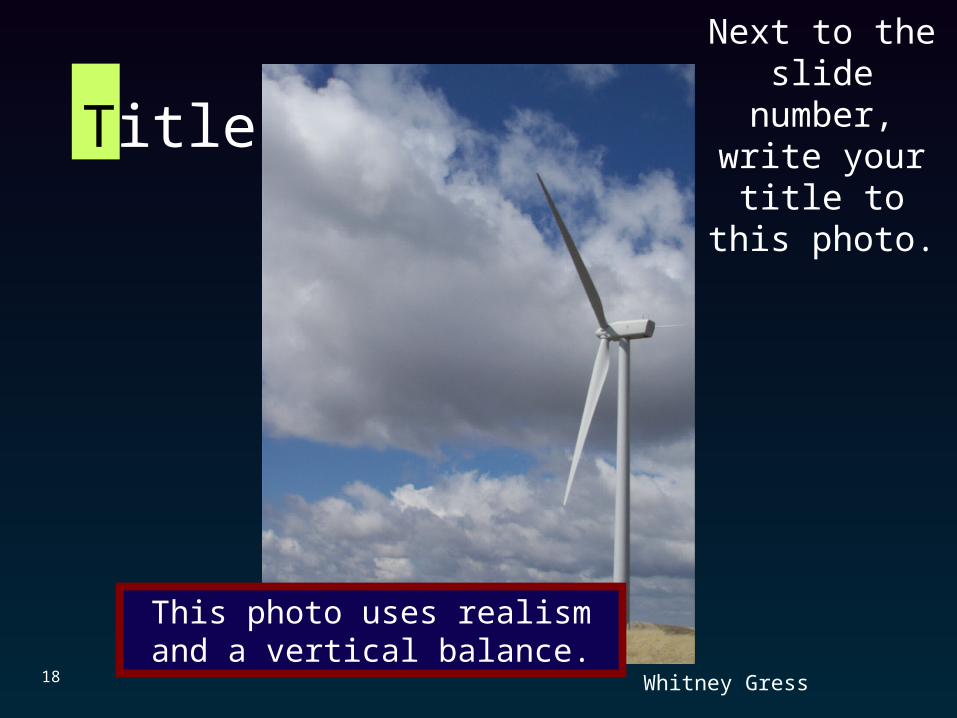
18 Whitney Gress
This photo uses realism and a vertical balance.
Next to the slide number,
write your title to this
photo.
Titles
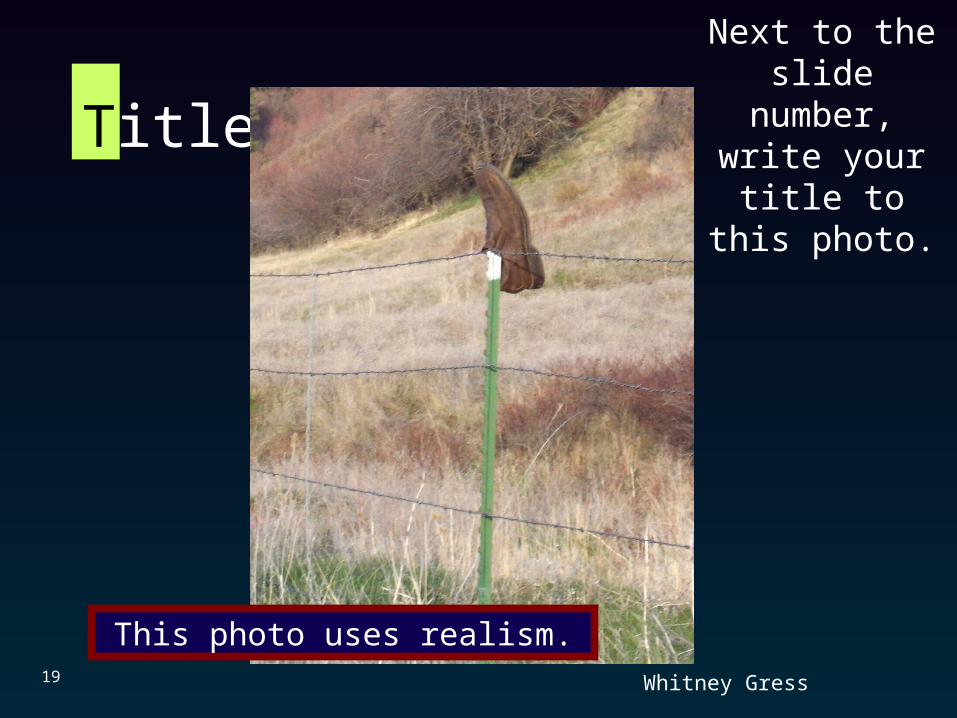
19 Whitney Gress
This photo uses realism.
Next to the slide number,
write your title to this
photo.
Titles
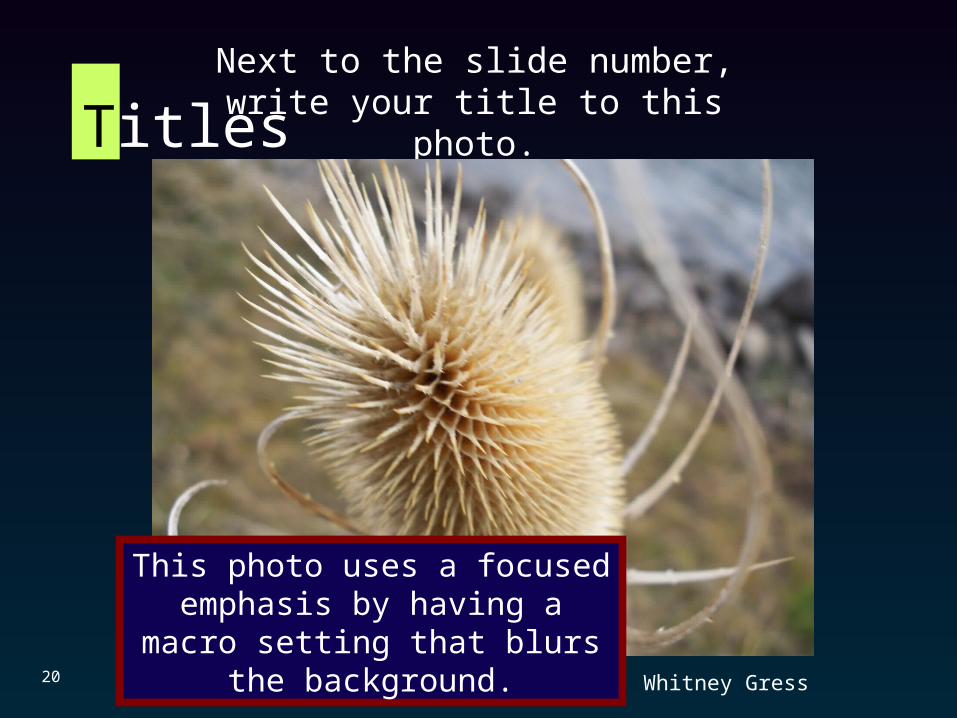
20
Next to the slide number, write your title to this photo.
Whitney Gress
This photo uses a focused emphasis by having a macro setting that blurs
the background.
Titles
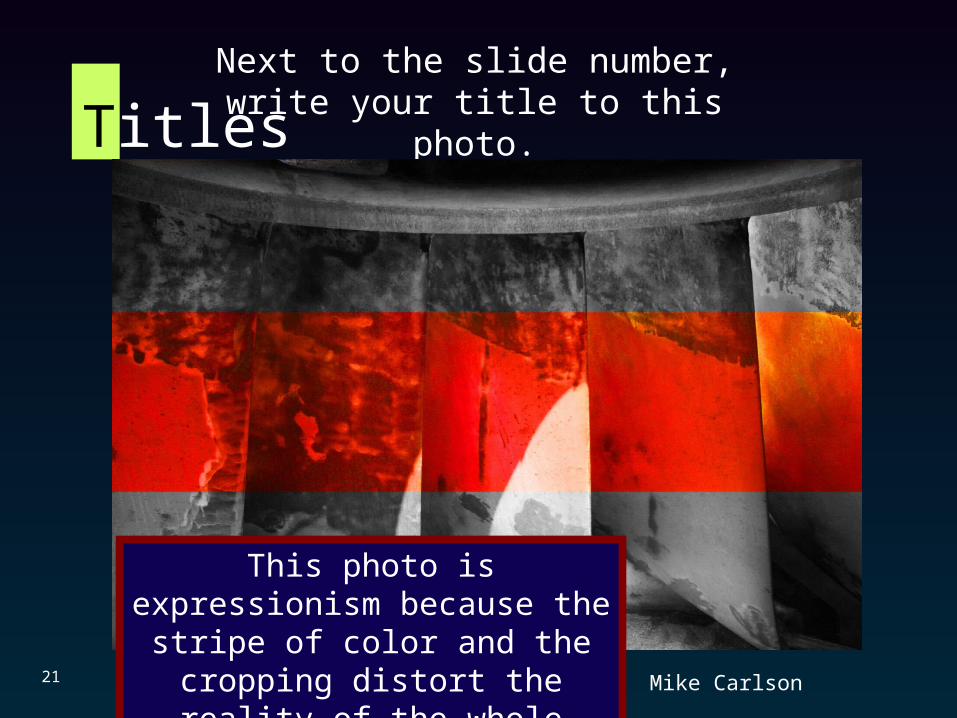
21
Next to the slide number, write your title to this photo.
Mike Carlson
This photo is expressionism because the stripe of color and the cropping
distort the reality of the whole image for an emotional effect.
Titles
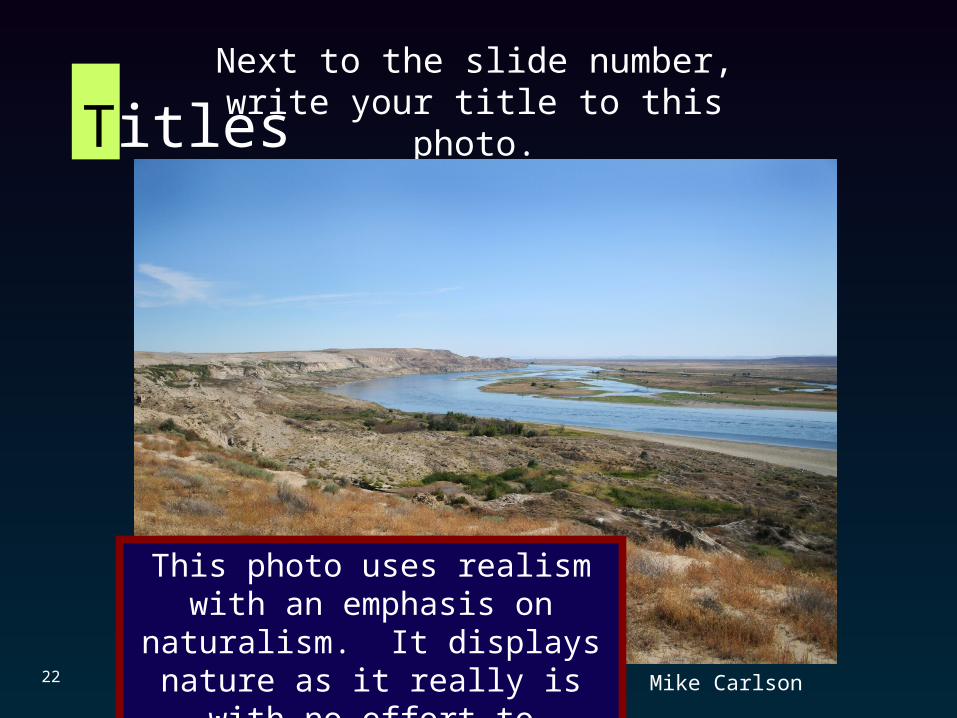
22
Next to the slide number, write your title to this photo.
Mike Carlson
This photo uses realism with an emphasis on naturalism. It displays nature as it really is with no effort to
idealize it.
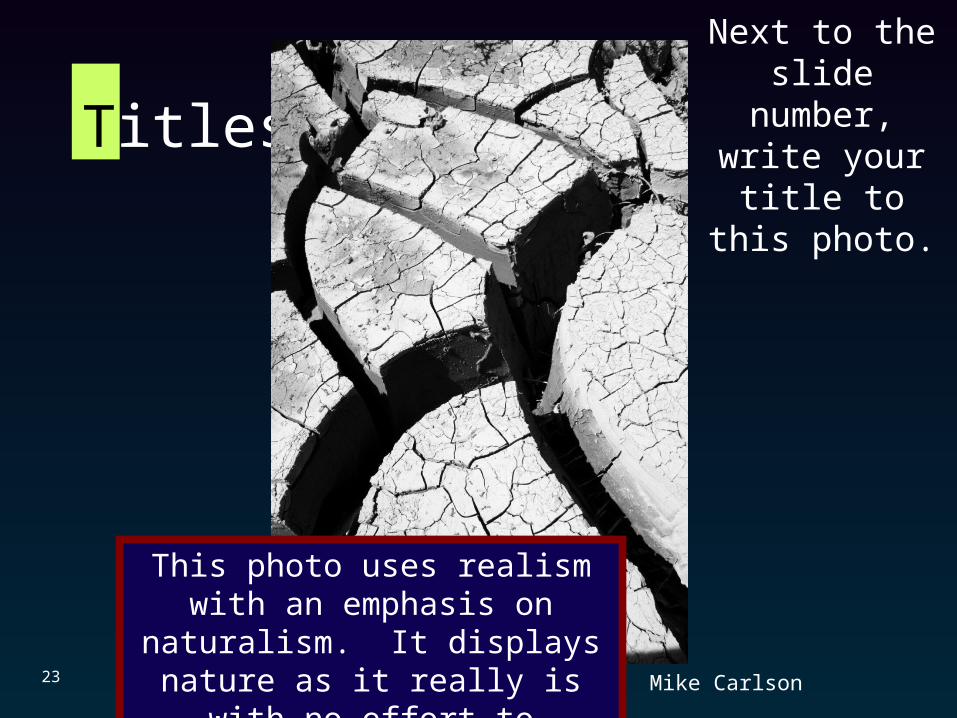
Titles
23 Mike Carlson
This photo uses realism with an emphasis on naturalism. It displays nature as it really is with no effort to
idealize it.
Next to the slide number,
write your title to this
photo.
Titles
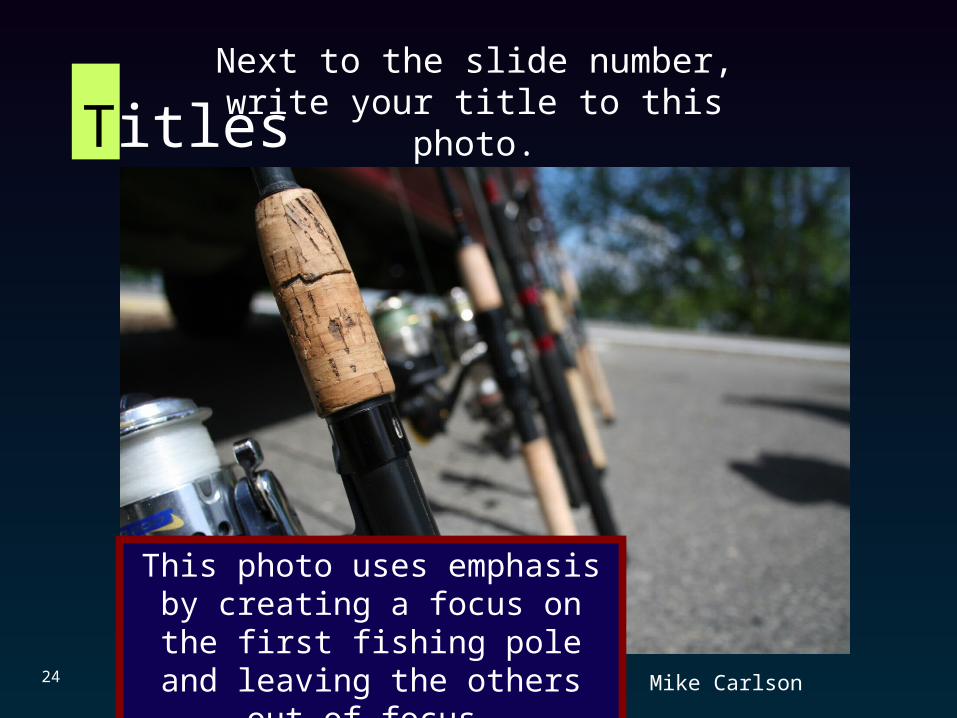
24
Next to the slide number, write your title to this photo.
Mike Carlson
This photo uses emphasis by creating a focus on the first fishing pole and
leaving the others out of focus.
Titles
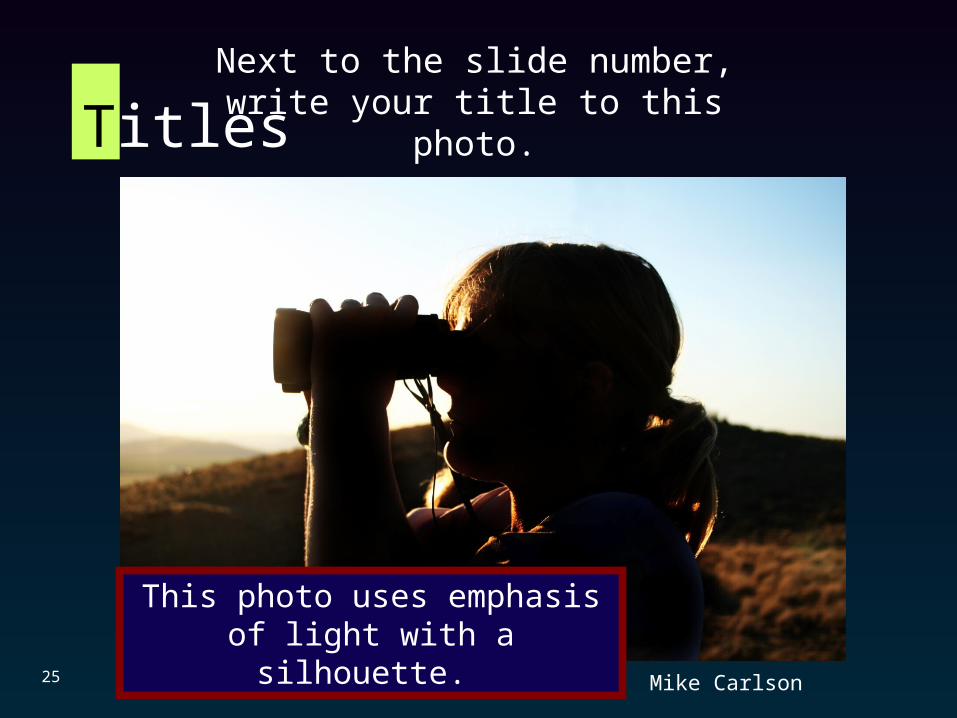
25
Next to the slide number, write your title to this photo.
Mike Carlson
This photo uses emphasis of light with a silhouette.

Titles
17
Summary• Titling your photographs is another way for the artist to
communicate with the viewer.
Science in Action – Mike Carlson


