genesig® easy q16 validation kit handbook HB21.02.03
Published Date: 12/11/2017
1
PrimerdesignTM Ltd
genesig® Easy
q16 Validation kit
For use on the genesig® q16
50 reactions
For general laboratory and research use only.
genesig® easy q16 validation kit handbook HB21.02.03
Published Date: 12/11/2017
2
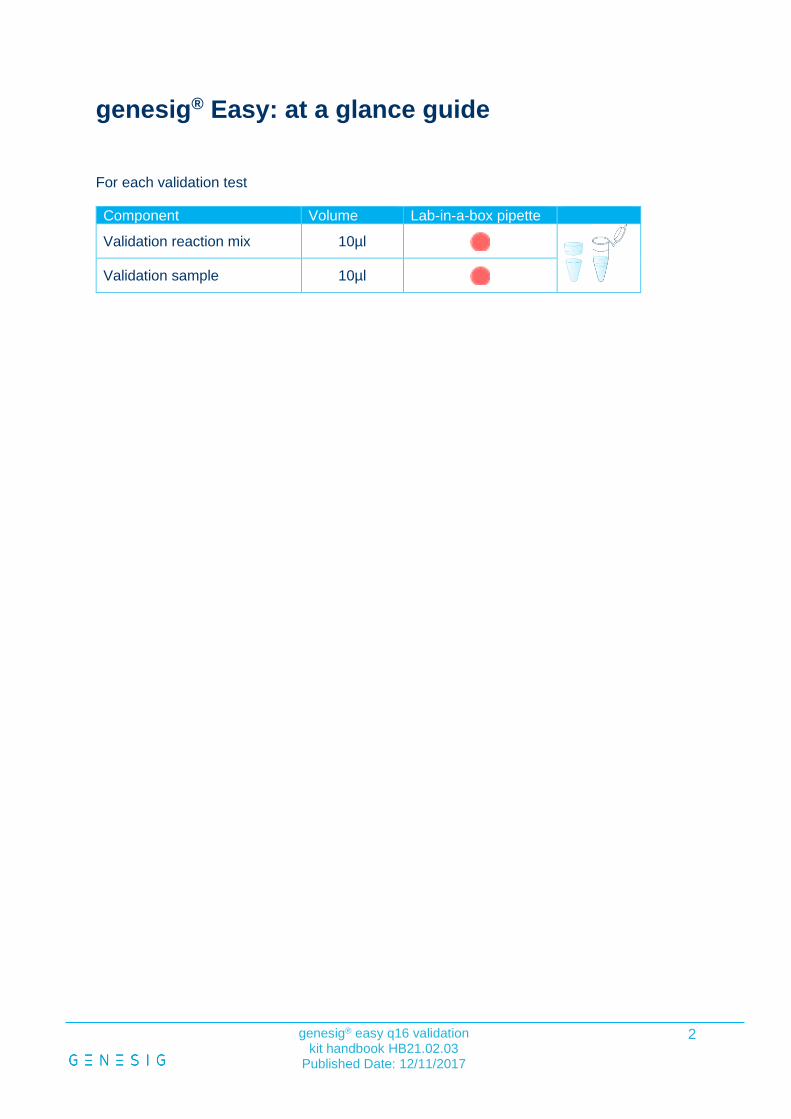
genesig® Easy: at a glance guide
For each validation test
Component Volume Lab-in-a-box pipette
Validation reaction mix 10µl
Validation sample 10µl
genesig® easy q16 validation kit handbook HB21.02.03
Published Date: 12/11/2017
3
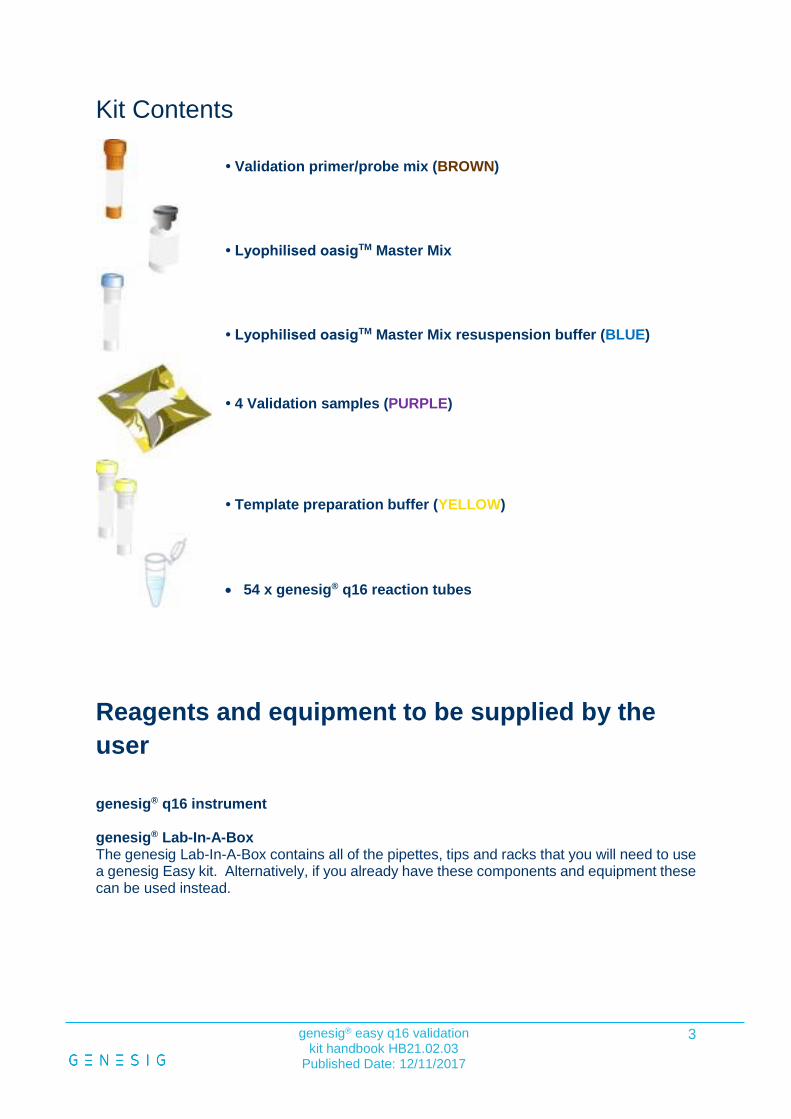
Kit Contents
• Validation primer/probe mix (BROWN) • Lyophilised oasigTM Master Mix • Lyophilised oasigTM Master Mix resuspension buffer (BLUE)
• 4 Validation samples (PURPLE) • Template preparation buffer (YELLOW)
• 54 x genesig® q16 reaction tubes
Reagents and equipment to be supplied by the
user
genesig® q16 instrument genesig® Lab-In-A-Box The genesig Lab-In-A-Box contains all of the pipettes, tips and racks that you will need to use a genesig Easy kit. Alternatively, if you already have these components and equipment these can be used instead.
genesig® easy q16 validation kit handbook HB21.02.03
Published Date: 12/11/2017
4
Kit and test introduction
This kit is a validation kit for use on the q16 instrument. The core components of this kit are
identical to those in the standard genesig EASY kit range.
The kit includes samples that are carefully designed to confirm that the thermal profile and
optical capability of your q16 instrument is performing optimally.
Simply use these samples as if it were a “real-world” samples.
The validation is split into 2 tests. The first confirms that the software element of the q16 is
performing correctly. The second test confirms that the machine optics are performing
optimally.
genesig® easy q16 validation kit handbook HB21.02.03
Published Date: 12/11/2017
5
Step-by-step guide
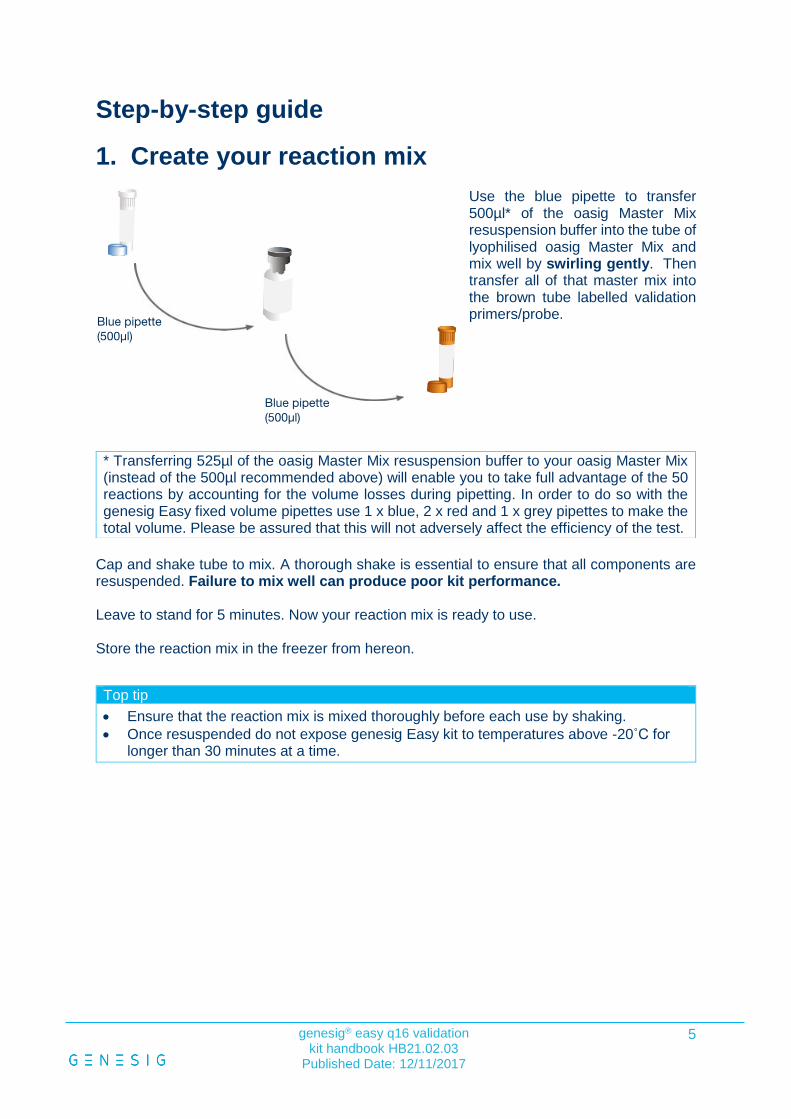
1. Create your reaction mix
Use the blue pipette to transfer 500µl* of the oasig Master Mix resuspension buffer into the tube of lyophilised oasig Master Mix and mix well by swirling gently. Then transfer all of that master mix into the brown tube labelled validation primers/probe.
Cap and shake tube to mix. A thorough shake is essential to ensure that all components are resuspended. Failure to mix well can produce poor kit performance. Leave to stand for 5 minutes. Now your reaction mix is ready to use. Store the reaction mix in the freezer from hereon.
Top tip
• Ensure that the reaction mix is mixed thoroughly before each use by shaking.
• Once resuspended do not expose genesig Easy kit to temperatures above -20˚C for longer than 30 minutes at a time.
* Transferring 525µl of the oasig Master Mix resuspension buffer to your oasig Master Mix (instead of the 500µl recommended above) will enable you to take full advantage of the 50 reactions by accounting for the volume losses during pipetting. In order to do so with the genesig Easy fixed volume pipettes use 1 x blue, 2 x red and 1 x grey pipettes to make the total volume. Please be assured that this will not adversely affect the efficiency of the test.
genesig® easy q16 validation kit handbook HB21.02.03
Published Date: 12/11/2017
6
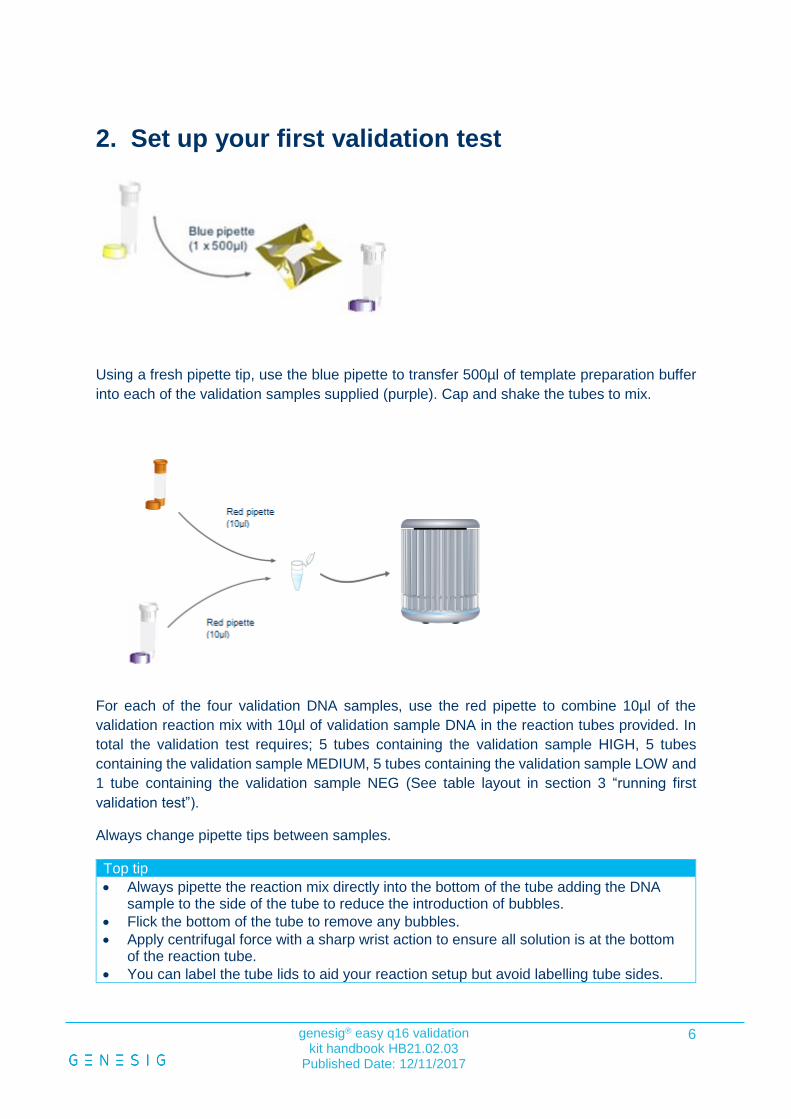
2. Set up your first validation test
Using a fresh pipette tip, use the blue pipette to transfer 500µl of template preparation buffer
into each of the validation samples supplied (purple). Cap and shake the tubes to mix.
For each of the four validation DNA samples, use the red pipette to combine 10µl of the
validation reaction mix with 10µl of validation sample DNA in the reaction tubes provided. In
total the validation test requires; 5 tubes containing the validation sample HIGH, 5 tubes
containing the validation sample MEDIUM, 5 tubes containing the validation sample LOW and
1 tube containing the validation sample NEG (See table layout in section 3 “running first
validation test”).
Always change pipette tips between samples.
Top tip
• Always pipette the reaction mix directly into the bottom of the tube adding the DNA sample to the side of the tube to reduce the introduction of bubbles.
• Flick the bottom of the tube to remove any bubbles.
• Apply centrifugal force with a sharp wrist action to ensure all solution is at the bottom of the reaction tube.
• You can label the tube lids to aid your reaction setup but avoid labelling tube sides.
genesig® easy q16 validation kit handbook HB21.02.03
Published Date: 12/11/2017
7
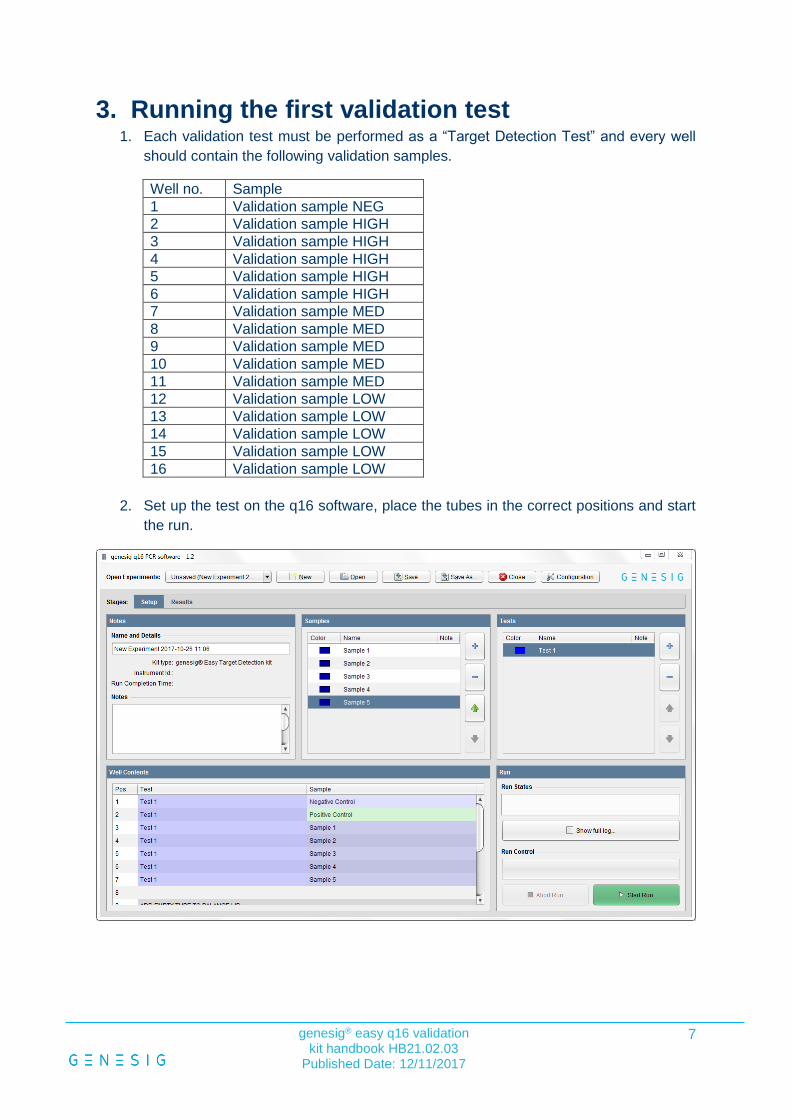
3. Running the first validation test 1. Each validation test must be performed as a “Target Detection Test” and every well
should contain the following validation samples.
Well no. Sample
1 Validation sample NEG
2 Validation sample HIGH
3 Validation sample HIGH
4 Validation sample HIGH
5 Validation sample HIGH
6 Validation sample HIGH
7 Validation sample MED
8 Validation sample MED
9 Validation sample MED
10 Validation sample MED
11 Validation sample MED
12 Validation sample LOW
13 Validation sample LOW
14 Validation sample LOW
15 Validation sample LOW
16 Validation sample LOW
2. Set up the test on the q16 software, place the tubes in the correct positions and start
the run.
genesig® easy q16 validation kit handbook HB21.02.03
Published Date: 12/11/2017
8
Data Interpretation
A positive validation test will produce Cq values that fall within the range mentioned below. NOTE: The sample “Status” column is not used during the validation test. Cq values can be obtained by clicking on the “Details” tab positioned next to the “Sample Results” displayed above the results table.
Well no. Sample Status Cq (Test) Cq (I.C.)
1 Validation Sample NEG PASS n/a 24-28
2 Validation Sample HIGH PASS 14-18 24 to no amplification
3 Validation Sample HIGH
POSITIVE 14-18 24 to no amplification 4 Validation Sample HIGH
5 Validation Sample HIGH
6 Validation Sample HIGH
7 Validation Sample MED
POSITIVE 20-24 24 to no amplification
8 Validation Sample MED
9 Validation Sample MED
10 Validation Sample MED
11 Validation Sample MED
12 Validation Sample LOW
POSITIVE 26-30 24-28
13 Validation Sample LOW
14 Validation Sample LOW
15 Validation Sample LOW
16 Validation Sample LOW
If a well produces a Cq value outside of the pass range above this is a failed validation
test. In this eventuality, please contact your Primerdesign representative for further
advice.
genesig® easy q16 validation kit handbook HB21.02.03
Published Date: 12/11/2017
9
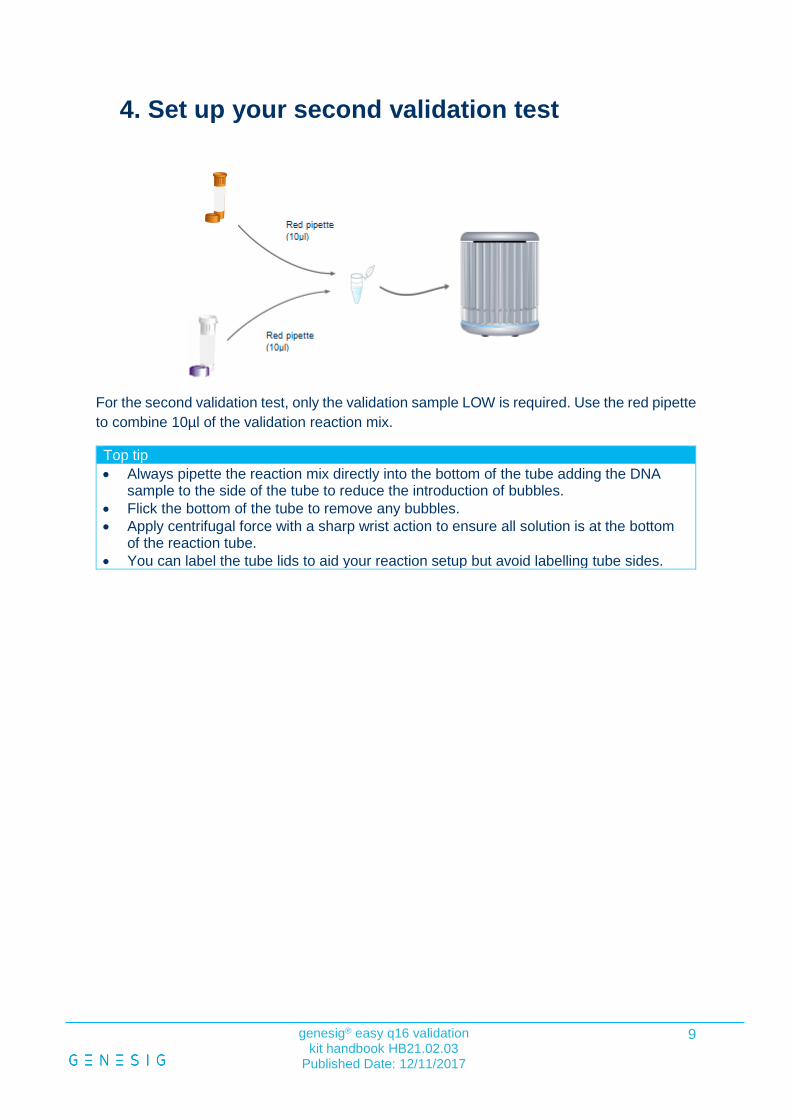
4. Set up your second validation test
For the second validation test, only the validation sample LOW is required. Use the red pipette
to combine 10µl of the validation reaction mix.
Top tip
• Always pipette the reaction mix directly into the bottom of the tube adding the DNA sample to the side of the tube to reduce the introduction of bubbles.
• Flick the bottom of the tube to remove any bubbles.
• Apply centrifugal force with a sharp wrist action to ensure all solution is at the bottom of the reaction tube.
• You can label the tube lids to aid your reaction setup but avoid labelling tube sides.
genesig® easy q16 validation kit handbook HB21.02.03
Published Date: 12/11/2017
10
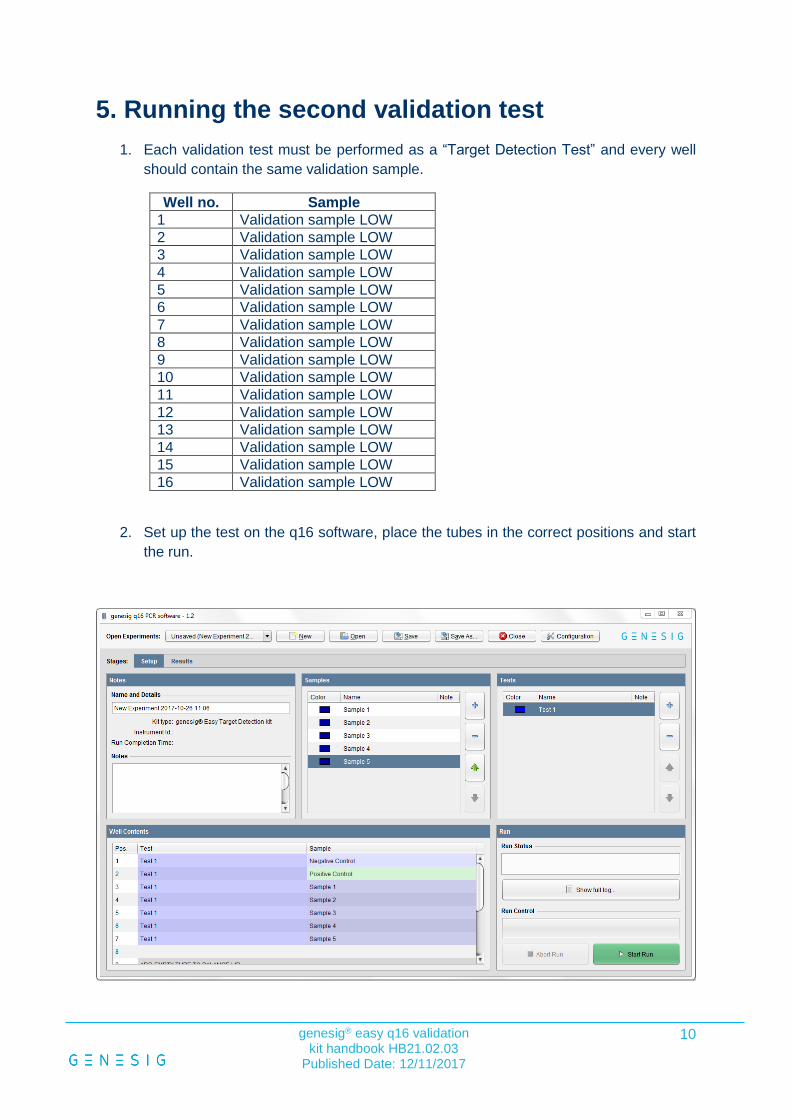
5. Running the second validation test
1. Each validation test must be performed as a “Target Detection Test” and every well
should contain the same validation sample.
Well no. Sample
1 Validation sample LOW
2 Validation sample LOW
3 Validation sample LOW
4 Validation sample LOW
5 Validation sample LOW
6 Validation sample LOW
7 Validation sample LOW
8 Validation sample LOW
9 Validation sample LOW
10 Validation sample LOW
11 Validation sample LOW
12 Validation sample LOW
13 Validation sample LOW
14 Validation sample LOW
15 Validation sample LOW
16 Validation sample LOW
2. Set up the test on the q16 software, place the tubes in the correct positions and start
the run.
genesig® easy q16 validation kit handbook HB21.02.03
Published Date: 12/11/2017
11
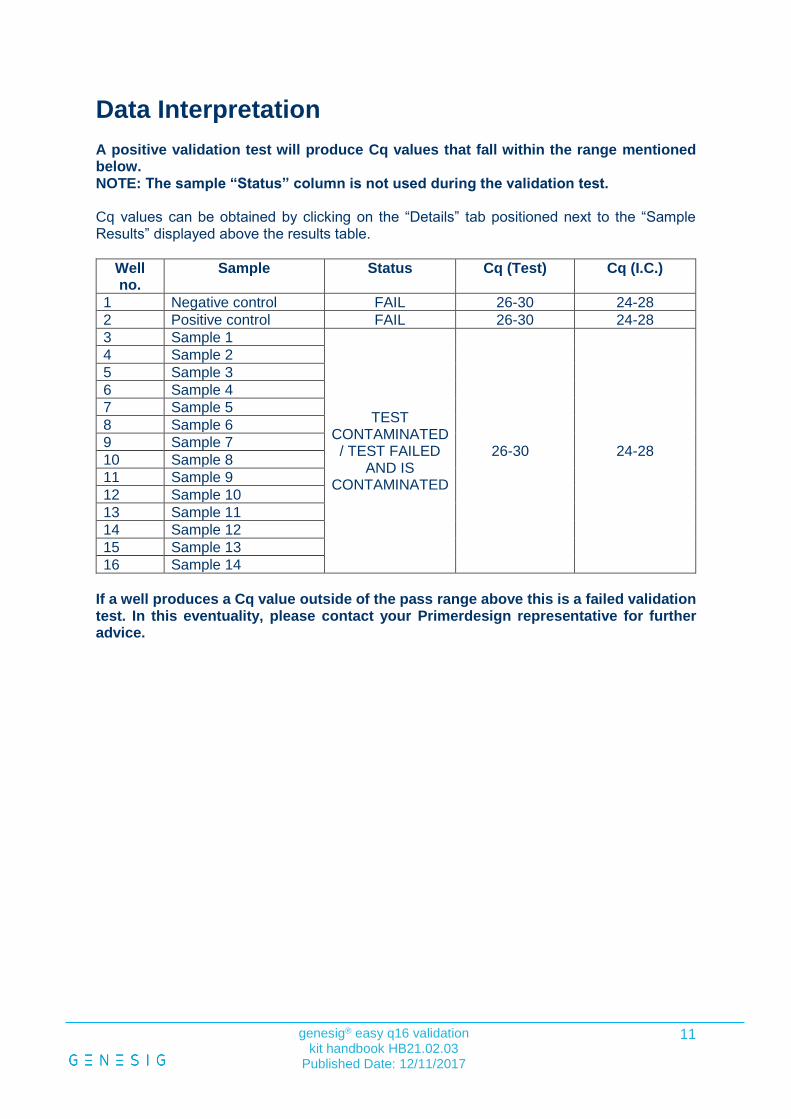
Data Interpretation
A positive validation test will produce Cq values that fall within the range mentioned below. NOTE: The sample “Status” column is not used during the validation test. Cq values can be obtained by clicking on the “Details” tab positioned next to the “Sample Results” displayed above the results table.
Well no.
Sample Status Cq (Test) Cq (I.C.)
1 Negative control FAIL 26-30 24-28
2 Positive control FAIL 26-30 24-28
3 Sample 1
TEST CONTAMINATED / TEST FAILED
AND IS CONTAMINATED
26-30 24-28
4 Sample 2
5 Sample 3
6 Sample 4
7 Sample 5
8 Sample 6
9 Sample 7
10 Sample 8
11 Sample 9
12 Sample 10
13 Sample 11
14 Sample 12
15 Sample 13
16 Sample 14
If a well produces a Cq value outside of the pass range above this is a failed validation test. In this eventuality, please contact your Primerdesign representative for further advice.

genesig® easy q16 validation kit handbook HB21.02.03
Published Date: 12/11/2017
12
Kit storage and stability
This lyophilised kit is stable at room temperature but should be stored at -20ºC on arrival. Once the lyophilised components have been resuspended they should not be exposed to temperatures above -20ºC for longer than 30 minutes at a time and unnecessary repeated freeze/thawing should be avoided. The kit is stable for six months from the date of resuspension under these circumstances. Primerdesign does not recommend using the kit after the expiry date stated on the pack.
Notices and disclaimers This product is developed, designed and sold for research purposes only. It is not intended for human diagnostic or drug purposes or to be administered to humans unless clearly expressed for that purpose by the Food and Drug Administration in the USA or
the appropriate regulatory authorities in the country of use. During the warranty period Primerdesign genesig® detection kits
allow precise and reproducible data recovery combined with excellent sensitivity. For data obtained by violation to the general GLP guidelines and the manufacturer’s recommendations the right to claim under guarantee is expired. PCR is a proprietary technology covered by several US and foreign patents. These patents are owned by Roche Molecular Systems Inc. and have been sub-licensed by PE Corporation in certain fields. Depending on your specific application you may need a license from Roche or PE to practice PCR. Additional information on purchasing licenses to practice the PCR process may be obtained by contacting the Director of Licensing at Roche Molecular Systems, 1145 Atlantic Avenue, Alameda, CA 94501 or Applied Biosystems business group of the Applera Corporation, 850 Lincoln Centre Drive, Foster City, CA 94404. In addition, the 5' nuclease assay and other homogeneous amplification methods used in connection with the PCR process may be covered by U. S. Patents 5,210,015 and 5,487,972, owned by Roche Molecular Systems, Inc, and by U.S. Patent 5,538,848, owned by The Perkin-Elmer Corporation.
Trademarks
PrimerdesignTM is a trademark of Primerdesign Ltd.
genesig® is a registered trademark of Primerdesign Ltd. oasigTM is a trademark of Primerdesign Ltd.


