
Instruction Manual
Products for better dentistry
Perfect shades first time every time
Pressable CeramicSystem PRESS
SCH Matchmaker Press Manual3 30/3/05 5:34 pm Page 1

PressableCeramicPRESS
Matchmaker Pressable Ceramic is designed to enable the Clinical and Technical Team to provide beautiful, lifelike all ceramic crowns as well asinlays, onlays and veneers. Its special leucite and glass matrix imparts strength in excess of the requirements of EN ISO 6872 together with optical properties which blend seamlessly with the natural tooth. This special matrix is also less abrasive to the opposing dentition than traditional feldspathic porcelain formulae.
Matchmaker Pressable Ceramic is designed to match standard shades and be fast and simple to use – a benefit in a busy dental laboratory.However, since it has been designed in conjunction with the Matchmaker LF Low Fusing Ceramic range and Matchmaker Living Stains, therange of artistic and clinical options is virtually endless.
Within the Matchmaker Pressable system are many ancillary products which enable both dentists and dental technicians routinely to obtainsuperb results. These range from furnaces to special die colours, investment, rings, pressing rods etc.
Shade Range
The shade range of Matchmaker Pressable Pellets enable the requirements of every clinical situation to be matched. The product range and theirapplications are shown on pages 4 and 5. All pellets in the range can be used with the opalescent enamel options from the Matchmaker LF range.
Products for better dentistry
Pressable CeramicSystem PRESS
Perfect shadesfirst time every time
SCH Matchmaker Press Manual3 30/3/05 5:35 pm Page 2

Index
Techniques & Pellet Selection 4
Tooth & Die Preparation 6
Waxing Up for Crowns & Inlays 7
Sprueing & Pellet Size Selection 8
Investing 9
Pressing, Devesting & Finishing 10
Preparation of the Core 11
Glazing & Staining 12
Physical Properties 13
Pressing Programmes 15
PressableCeramicPRESS
Products for better dentistry
Pressable CeramicSystem PRESS
Perfect shadesfirst time every time
SCH Matchmaker Press Manual3 30/3/05 5:35 pm Page 3

4
Techniques &Pellet SelectionPRESS
Matchmaker Pressable - for Press & Stain and the Simple Crown Technique
Matchmaker Pressable Translucent pellets are designed both for Press & Stain and the majority of situations where only an incisal edge needs tobe added to the pressing together with staining at the glaze stage where required. Use the complementary Matchmaker LF Low Fusing Ceramicand Matchmaker Living Stains. The range of shades shown below includes three Hollywood bleach shades and is supplied in standard 2g and 5gpellets.
Matchmaker Pressable Translucent Pellets are also the pellets of choice for Press over Metal
Matchmaker Pressable - for the Layering Crown Technique
Matchmaker Pressable Standard pellets have higher chroma and less translucency and are suitable where a full layering technique is required.Such situations would occur when the underlying tooth is particularly dark in colour or the restoration needs additional colours to be added tomatch an adjacent tooth. Because a thin layer of Matchmaker LF Clear is applied under the enamels, great vitality can be attained. The rangealso includes four Hollywood bleach shades and is compatible with the whole range of Matchmaker LF Low Fusing layering porcelain.
Shade Code
TA1 169-TA1
TA2 169-TA2
TA3 169-TA3
TB1 169-TB1
TB2 169-TB2
TB3 169-TB3
Shade Code
TC1 169-TC1
TC2 169-TC2
TD2 169-TD2
THA0 169-THA0
THB0 169-THB0
THB000 169-THB000
2g Pellets
Shade Code
A1 169-A1
A2 169-A2
A3 169-A3
A3.5 169-A3.5
A4 169-A4
2g Pellets
Shade Code
B1 169-B1
B2 169-B2
B3 169-B3
B4 169-B4
C1 169-C1
Shade Code
TA1 569-TA1
TA2 569-TA2
TA3 569-TA3
TB1 569-TB1
TB2 569-TB2
TB3 569-TB3
Shade Code
TC1 569-TC1
TC2 569-TC2
TD2 569-TD2
THA0 569-THA0
THB0 569-THB0
THB000 569-THB000
5g Pellets
Shade Code
D4 169-D4
HA0 169-HA0
HA00 169-HA00
HB0 169-HB0
HB00 169-HB00
Shade Code
C2 169-C2
C3 169-C3
C4 169-C4
D2 169-D2
D3 169-D3
Opacious Dentine
Neutral orClear Enamel
Dentine
Enamel
Matchmaker PRESS
SCH Matchmaker Press Manual3 30/3/05 5:35 pm Page 4

5
Techniques &Pellet SelectionPRESS
Matchmaker Pressable - for Veneer and Inlays
Matchmaker Pressable TT series pellets are designed for veneers and inlays where it is primarily enamel that is being replaced. Their subtle pigmentation reduces the subsequent number of staining cycles required. Usually only an incisal edge needs to be added to the pressing togetherwith staining at the glaze stage where required. In many situations, the crown can be pressed to the final anatomical shape with just stain andglaze required. Use the complementary Matchmaker LF Low Fusing Ceramic and Matchmaker Living Stains. The pellets and their application areshown below:
Matchmaker Pressable - for Occlusal Restorations with greater opacity
Matchmaker Pressable OT series pellets have greater opacity and are designed for occlusal restorations. Usually only staining is needed at theglaze stage. Use the complementary Matchmaker Living Stains. The pellets and their application are shown below:
Matchmaker Pressable - for Custom Shading
Matchmaker Pressable V series pellets are designed for clinical situations where satisfactory results are not readily achieved using standard materials. Shade V1 has a chameleon effect, absorbing the colours of the underlying teeth. The other two shades are used as a base where theshade has been observed in the mouth by the Ceramist who will then match it using artistic flair and the Matchmaker LF powders andMatchmaker Living Stains range of available complementary materials.
Shade Code
TT1 167-TT1
TT2 167-TT2
TT3 167-TT3
TT4 167-TT4
Veneers and Inlays to match shades
A1, B2, C1
A2, A3, B2
A3.5, A4, B3, B4
C1, D2
2g Pellets
Shade Code
OT1 168-OT1
OT2 168-OT2
OT3 168-OT3
OT4 168-OT4
Occlusal Restorations with greater opacity to match shades
A1, B1
C1, D2
A3, C2
Bleached tooth inlays
2g Pellets
Shade Code
V1 166-V1
V2 166-V2
V3 166-V3
Shade description
Translucent
Neutral
Whitish
2g Pellets
SCH Matchmaker Press Manual3 30/3/05 5:35 pm Page 5

6
Tooth & DiePreparationPRESS
Crowns
Reduce the incisal edge by 1.5-2.0 mm and labial and buccal walls by1-1.5 mm. Prepare a well-formed deep chamfer or 90° shoulder withrounded internal edge. There should be no sharp edges, all lineangles should be rounded with a minimum space of 1 mm axially.
Veneers
Prepare an incisal reduction of 1.5-2.0 mm (minimum 1.0mm), 0.7labially and a minimum of 0.5 mm in the gingival area. All preparationmargins should be deep chamfers. Avoid putting the porcelain enameljunction at the area of contact with the opposing dentition.
Hint: After cutting the preparation, the dentist should take thestump colour using the Matchmaker Pressable shade guide formatching tooth preps.
Inlays and Onlays
Inner walls should not be prepared parallel, but taper approx. 15°towards the occlusal surface. Occlusal reduction should be a minimum 2mm. Box preparations should have rounded corners andedges. The margin between porcelain and enamel should be out ofcontact with the opposing dentition and feather edges must beavoided.
Care: Avoid preparations with sharp angles or corners.
In the laboratory block out any undercuts and eliminate all sharp
line angles. If a pencil is used to mark the margins seal the pencil
line with die hardener or clear varnish so that the marking does not
come off with the wax. Apply one or two coats of coloured
Matchmaker PRESS Die Colour of the shade previously selected in
the surgery, leaving a gap of 1mm from the preparation margin and
allow to dry thoroughly before waxing up. Use Matchmaker PRESS
Ash Free Carving Wax which has been developed for pressable
ceramics and which burns out without residue.
Do not use sticky wax.
Tooth Preparation
Die Preparation
SCH Matchmaker Press Manual3 30/3/05 5:35 pm Page 6

7
Waxing Up for Crowns & InlaysPRESS
Using either of the two techniques shown below, wax up to giveoverall porcelain thicknesses as shown on the right.
Use Matchmaker PRESS Ash Free Wax Cervical Brown round the cervical area and Ivory for the rest of the wax up. To facilitatechecking that the wax is of even thickness, a thin layer of CervicalBrown may be applied overall before waxing up in the Ivory.
Note : The substructure itself (coping before layering) should have aminimum thickness of 0.8mm and be as uniform in thickness aspossible.
The pattern does not undergo any dimensional change during thepressing process and so will have precisely the same dimensions asthe wax up.
There are two methods of Waxing up
Method 1: The restoration is waxed up fully anatomically and thenreduced using appropriate instruments. The pattern can be used as adiagnostic wax up.
Method 2: The restoration is waxed up leaving space to allow forlayering the Matchmaker LF Low Fusing Ceramic on top. For theLayering Crown Technique or veneers the coping should be waxed toat least 70% of the total size of the finished crown – minimum0.8mm to press (This can be reduced to 0.6mm after pressing andtrimming).
Note : Matchmaker Pressable Ceramic should ALWAYS be thickerthan the layer of Matchmaker LF Low Fusing Ceramic which isapplied to the surface i.e. at least 70% of the total crown thickness.
Waxing Up for Crowns and Inlays
SCH Matchmaker Press Manual3 30/3/05 5:35 pm Page 7

8
Sprueing &Pellet Size SelectionPRESS
Anterior Crowns and Veneers
The wax sprue should be 3-3.5mm in diameter and be 5-6mm longand should not taper at or before the join to the patterns. Wax thepatterns securely onto the crucible former so that they are at anangle of approximately 45 degrees and in a central position. Foranterior crowns the attachment should be to the incisal edge. Forveneers it should be to the incisal third.
The minimum distance between patterns or sprues should be 3mmand between the pattern and the interior wall 6mm.
Posterior Crowns
For posterior crowns the sprue should be attached to the thickestpart of the crown such as a buccal or lingual cusp at an angle of 45 degrees from the occlusal surface.
Care: For successful pressing the material must always flow from athicker area to one which is thinner and can never then flow to athicker one again, see diagrams opposite. Either use multiple spruesto thick areas or else build up the thickness of the thinner area andcut back after pressing. When using two or more sprues, the distance separating them should not be less than 3.0mm.
Do not mix the type of restoration in the same ring i.e. crowns andveneers as you will require a different concentration of investmentliquid to achieve the correct expansion.
Always use Matchmaker PRESS Sprue rods to ensure clean burn outand straight pressing sprue channels.
Pellet Size selectionWeigh the wax pattern with the sprue attached. Select pellets inaccordance with table opposite. For units which are 0.2g or less(small inlays, veneers etc) a phantom sprue (a sprue without arestoration attached) with a height the same as the sprue unit maybe used.
Sprueing
Wax Weight Pellets Required Ring Size
Up to 0.6g 1 x 2 g 200g (100g)
From 0.6 to 1.4g 2 x 2g 200g
From 1.4 to 1.7g 1 x 5g 300g
From 1.7 to 2.2g 3 x 2g 300g
From 2.2 to 2.6g 1 x 5g + 1 x 2g 300g
From 2.6 to 3.0g 2 x 5g 300g
Minimum Thickness1.5mm
Minimum DistanceBetween Sprues
3.0mm
SCH Matchmaker Press Manual3 30/3/05 5:35 pm Page 8

9
InvestingPRESS
Investing with the Matchmaker Pressing Ring
Spray the wax patterns using Matchmaker PRESS Surface TensionRelief liquid and gently blow off any excess. Do not use debubblizeror sprays that leave residues.
For the best result use a Matchmaker PRESS Pressing Ring size 200gor larger. This ring helps to ensure that the base of the mould isabsolutely flat and prevents cracks in the investment. It also avoidsthe need for a stabilising ring to be used. The units should be atleast 6mm from the wall of the ring.
Fill to just below the top of the ring with Matchmaker PRESSInvestment for pressable ceramics. Put on the base former turning itgently. (Investment should exude easily through the opening).
After the investment has set, turn the mould base former andremove. Gently press the investment from the Matchmaker PRESSPressing Ring.
Investing with Paper Sleeve and Former
When using a paper sleeve remove the backing and stick it to a ringat the appropriate mark. Put the ring onto the crucible former andput the stabilising ring in place. Fill to just below the stabilisingring with Matchmaker PRESS Investment for pressable ceramics.Remove the stabilising ring and put on the mould base former turning it gently. (Investment should exude easily through the opening).
After the investment has set, remove the foil. Then turn the mouldbase former and ring carefully to remove them. Smooth the underside with a plaster knife.
Notes: The base of the mould must be absolutely flat so that themould stands perfectly upright in the injection furnace.
Do not use a model trimmer with water. Follow the directions forpreheating in the instructions for the investment
Investing
SCH Matchmaker Press Manual3 30/3/05 5:35 pm Page 9

10
Pressing, Devesting& FinishingPRESS
Pressing
Select one or more pellets in the shade chosen from one of theMatchmaker Pressable Pellet ranges. Preheat the investment mouldin a preheated burnout furnace according to the investment instructions. For best results use a Matchmaker disposable pressingrod.
When using re-useable rods they must be completely clean andshould be preheated in the burnout furnace for a minimum of 15minutes prior to pressing.
With the investment mould still in the furnace rotate so that theopen end is facing upwards. Place the ceramic pellet(s) (where morethan one size, insert the smaller one first) and where appropriate thepreheated pressing rod into the investment ring and place the ringinto the pressing furnace when requested to do so by the furnacecycle. Follow the instruction for the programmed cycle as shown.
Do not preheat the Matchmaker Pressable Pellets or disposablepressing rods.
Decontaminate the pressing furnace before use and at regular intervals of every one to two weeks in accordance with the decontamination cycle of the furnace manufacturer.
Devesting
Care: After pressing allow the investment to bench cool until roomtemperature. Never devest if the inside of the mould is still warm.
Mark the length of a spare pressing rod on the mould and separatealong the length of the mark. Then carefully break apart the sectionsof the mould.
Roughly sandblast the pressed patterns with fresh 50 micron aluminium oxide at 4 bars pressure and then clean completely at 2bars with glass beads.
Finishing
Cut off the sprues carefully using a suitable cut-off disc. Take greatcare not to heat the ceramic material. To reduce heat, the materialmay be cut under a waterjet or through a wet sponge. Do not usecarbide burs or use a high speed handpiece.
The pressed units are fitted back carefully onto the dies and thenprepared according to the technique used.
For Typical Pressing Programmes see page 15.
Pressing, Devesting and Finishing
SCH Matchmaker Press Manual3 30/3/05 5:35 pm Page 10

11
Preparationof the CorePRESS
For Press and StainFor Press and Stain the Matchmaker Pressable core should have beenpressed to the full anatomical shape. The surface should then bemicroblasted using fresh 50 micron aluminium oxide at low pressureand then thoroughly cleaned using an ultrasonic cleaner beforestaining with Matchmaker Living Stains see page 12.
For Veneering - when pressed to full anatomical formIf the Matchmaker Pressable core has been pressed to the fullanatomical shape then it is reduced in the incisal region usingSchottlander Super V diamonds or Resi-Diamon points. The surfaceshould then be microblasted using fresh 50 micron aluminium oxideat low pressure and then thoroughly cleaned using an ultrasoniccleaner. It is then ready for the build-up with the Matchmaker LFLow Fusing Ceramic as described in the Matchmaker LF instructionmanual.
For Veneering - when pressed to reduced formIf the Matchmaker Pressable core has been waxed up and pressed toits reduced form ready for veneering then the surface should belightly ground using Schottlander Super V diamonds or Resi-Diamon points. The surface should be microblasted using fresh50 micron aluminium oxide at low pressure and then thoroughlycleaned using an ultrasonic cleaner. It is then ready for the build-upwith the Matchmaker LF Low Fusing Ceramic as described in theMatchmaker LF instruction manual.
Hint: For even greater vitality, a thin layer of Matchmaker LF Clearmay be laid down in between the dentine and enamel layers.
Notes: The coping should be waxed to at least 70% of the total sizeof the finished crown - minimum 0.8mm to press (This can bereduced to 0.6mm after pressing and trimming).
Matchmaker Pressable Ceramic should ALWAYS be thicker than theylayer of Matchmaker LF Low Fusing Ceramic which is applied tothe surface i.e. at least 70% of the total crown thickness.
Preparation of the Core
Opacious Dentine
Neutral orClear Enamel
Dentine
Enamel
Matchmaker PRESS
SCH Matchmaker Press Manual3 30/3/05 5:35 pm Page 11
12
Glazing & StainingPRESS
Glaze firing
Due to the high processing temperature of Matchmaker PressableCeramics, glaze powder and liquid must be used to achieve a glazedsurface.
Make any final adjustments and characterise the surface. Note thatif a smoother surface is required after glazing, then the surfacebefore final glaze must have been made smoother using very fineabrasives or rubbers.
The unit must then be thoroughly cleaned using an ultrasonic orsteam cleaner.
Mix the Matchmaker LF Glaze Powder with the Matchmaker LFGlaze & Stain Liquid to a thin creamy consistency and apply asthinly as possible over the surface. Any excess should be removedwith the brush.
Introduce into the furnace and fire on cycle shown below withoutvacuum.
Application of Surface Stains
Select the shade or combination of shades using the MatchmakerLiving Stains Shade Plate.
Mix the Matchmaker Living Stains with the Matchmaker LF Glaze& Stain Liquid and apply as required and fire. When cool apply afurther coat of glaze powder mixed with glaze liquid and fire.
When required, Matchmaker Living Stains may be mixed withMatchmaker LF Glaze Powder to give a softer colour wash.
Introduce into the furnace and fire on the cycle shown below.
After glazing and staining the fit surface of the finished restorationshould be etched with a suitable hydrofluoric acid gel according tothe manufacturers instructions
Warning: Hydrofluoric acid is extremely dangerous. Requestsafety data sheet from suppliers before use.
Glazing and Staining
Shade Code
White 616-01
Yellow 616-02
Peach 616-03
Orange Brown 616-04
Dark Brown 616-05
Pink 616-06
Blue 616-07
Shade Code
Grey 616-08
Red Brown 616-09
Black 616-10
A 616-A
B 616-B
C 616-C
D 616-D
Matchmaker Living Stains
Matchmaker LF Start Temp Minimum Temp Rise Vacuum High Temp Hold Time ºC Drying Time ºC / Min ºC Without Vacuum
Glaze with Glaze Powder 450 4 minutes 45 No 750 1 minute
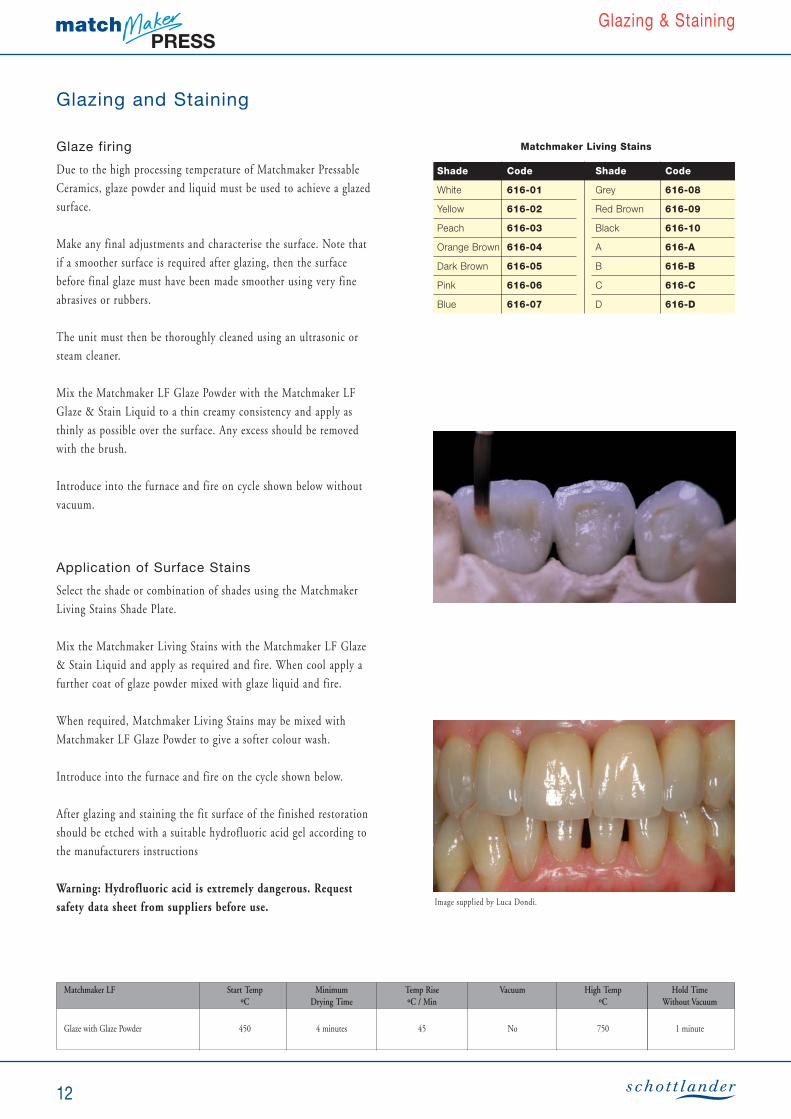
Image supplied by Luca Dondi.
SCH Matchmaker Press Manual3 30/3/05 5:35 pm Page 12

Physical Properties
13
Physical Properties& Pressing ProgrammesPRESS
Pressable CeramicSystem PRESS
Perfect shadesfirst time every time
SCH Matchmaker Press Manual3 30/3/05 5:35 pm Page 13

14
Physical PropertiesPRESS
Coefficient of Linear Thermal Expansion
Although it is always thermal expansion which is quoted, it is in factprimarily the contraction on cooling that this measure predicts.Ideally the core material should have a contraction slightly less thanthat of the overlaid veneering material. The coefficient ofMatchmaker PRESS enables a matching veneering material,Matchmaker LF, to have been produced which is also compatiblewith standard alloys i.e. in the range 13.9 - 15.1 at 10-6 K-1. Thecoefficient of Expansion is measured between 25 and 500°C inaccordance with EN ISO 9693:2000.
Glass Transition Temperature
The transition of a glass from an elastic to a viscoelastic phase isdefined by TG the glass transition temperature. Above TG stresses arerelaxed as the material flows but beneath it considerable stresses canbe built up within the material. Hence thermal expansion is alwaysmeasured below TG. The glass transition temperature is measured inaccordance with EN ISO 9693:2000. For a core material 580ºC isan ideal glass transition temperature when veneered with a low fusing porcelain with dentine firing temperature of 750-800ºC.
Other Properties
Porosity of fired ceramic: complies with EN ISO 9693:2000
Chemical Solubility: complies with EN ISO 6872:1998
Flexural Strength: 115 MPa in accordance with EN ISO 6872:1998
Physical Properties
0
3
6
9
12
15
Matchmaker Competitor PRESS
Coefficient of Linear Thermal Expansion
0
100
200
300
400
500
600
Matchmaker Competitor PRESS
Glass TransitionTemperature
SCH Matchmaker Press Manual3 30/3/05 5:36 pm Page 14

15
PressingProgrammesPRESS
Typical Pressing Programmes
Start Temp Heat Rate Final Temp Hold Time Pressing Time VacuumºC ºC / min ºC min min 100 %
Matchmaker Pressable Furnace 700 60 950 20 10 Full pressing cycle
T1 R T2 H1 H2 VºC ºC / min ºC min min 100 %
Optimal Auto Press Furnace 700 60 950 20 10 Full pressing cycle
Start Temp Heat Rate Final Temp Hold Time Pressing Time VacuumºC ºC / min ºC min min On Off
EP 500 Furnace 700 T 60 T 950 20 Refer to manual V1 500 V2 950Full pressing cycle
The above cycles are suitable for pressing 2 gram pellets using disposable pressing rods in 100 or 200 gram rings. When pressing 2 x 2gram pellets in a 200g ring it may be necessary to increase the pressing time.
When pressing 5 gram pellets in 300 gram rings increase the hold time by 5 minutes and the pressing time (in the Matchmaker PressableFurnace) to 15 minutes. For Matchmaker Press over Metal, see separate instructions.
T1 R T2 H1 H2 VºC ºC / min ºC min min 50 HPA
Touch Press 700 60 950 20.00 10.00 Full pressing cycle
Start Temp Heat Rate Final Temp Hold Time Pressing Time VºC ºC / min ºC min min 100 %
Gemini 2 800 60 950 20 10 Full pressing cycle
T1 R T2 H1 H2 VºC ºC / min ºC min min 100 %
Pro Press 700 60 950 20 10 Full pressing cycle
Start Temp Heat Rate Final Temp Hold Time Pressing Time Vacuum ºCºC ºC / min ºC min min On Off
EP 600 700 T 60 T 950 20 Refer to manual V1 500 V2 950Full pressing cycle
SCH Matchmaker Press Manual3 30/3/05 5:36 pm Page 15

Matchmaker MC is a complete bonded crown system, offering levels of quality and consistency that are greatlysuperior to those of any previous system. Matchmaker MC allows you to create beautiful, highly individual crownsthat sparkle with vitality and natural fluorescence. Thanks to the systems components, a perfect match is guaranteed time after time.
Matchmaker LF has been developed both for metal ceramic crowns and bridges and also as a veneering ceramicon top of Matchmaker Press ceramic cores, inlays, onlays and veneers.
Matchmaker LF is compatible with all standard coefficient alloys and with a special leucite and glass matriximparts strength in excess of the requirements of EN ISO 9693. This special matrix is also less abrasive to theopposing dentition than traditional feldspathic porcelains.
Matchmaker ALX is a leucite free veneering ceramic that has been specially formulated for bonding to aluminiumoxide copings. The dentine fires at 980ºC and shows remarkable vitality and colour veracity in the whole of theshade range A1 to D4 and the latest bleach shades HA0, HB0 and HB00.
Matchmaker Zr has been specially developed for layering on top of zirconium bridges and copings. Coefficient ofexpansion, shades and light handling properties have been carefully developed to give superb results over thewhole range of such frameworks. The dentine fires at 810ºC and shows remarkable vitality and colour veracity inthe whole of the shade range A1 to D4 and the latest bleach shades HA0, HB0 and HB00.
Davis Schottlander & Davis LtdFifth Avenue, Letchworth Garden City,
Herts SG6 2WD, EnglandTel +44 (0)1462 480848
Fax +44 (0)1462 482802e-mail: [email protected]
www.schottlander.com
W32
30-E
/030
5
Metal Ceramic MC
Low FusingCeramic LF
Ceramic forAluminium Oxide ALX
Ceramic forZirconium Frameworks Zr
SCH Matchmaker Press Manual3 30/3/05 5:36 pm Page 16


