Download - PaymentWorks Supplier Reference

PaymentWorks New Vendor Registration Guide Page 1 Version 1.3
PaymentWorks Supplier Reference
New Vendor Registration

PaymentWorks New Vendor Registration Guide Page 2 Version 1.3
Table of Contents
Registering with your customer on PaymentWorks 3
1. Invitation to Register 3
2. Creating a PaymentWorks Account 5
Registering 5
Verify your account 6
3. Accessing the new vendor registration form 6
4. Form Submission and Approval 7

PaymentWorks New Vendor Registration Guide Page 3 Version 1.3
Registering with your customer on PaymentWorks PaymentWorks is a cloud-based system that enables large and mid-sized organizations
to securely exchange information with suppliers to ensure efficiency throughout the
invoice to pay process.
Vendors use PaymentWorks to:
• Track and inquire about the status of submitted invoices
• Ensure your customers have all your current profile information
• Enable and manage electronic payments
• Request early pay discounts
Please note that not all customers use all functionalities in PaymentWorks. Some may
display invoice information, whereas others may just require your supplier information.
Registration Overview
This manual will walk you through the registration process on PaymentWorks, which is a
four-step process:
1. Invitation to Register
2. Creating a PaymentWorks Account
3. Completing the Registration Form
4. Submitting the Form and Approval
1. Invitation to Register Most vendors begin the registration process on PaymentWorks by responding to an
invitation sent by their customer. If you are a new vendor and have not received an
invitation from your customer, contact your customer representative and make sure
they have your email address and were able to send the invitation.
Occasionally invitations are sent to Spam or Junk folders. If you have not received an
expected invitation or other communication from PaymentWorks, look in these folders

PaymentWorks New Vendor Registration Guide Page 4 Version 1.3
or check with whoever administers the mail server for your organization to see whether
the message(s) were caught at the server.
To start the registration process, click on the link at the bottom of the email. This e-mail
will come from [email protected]. Note that your customer’s message
may differ from the one shown below.
Key point: It is very important to use the invitation link to begin your vendor
registration to on PaymentWorks. Without clicking the invitation, you will
make an account that is not associated with your customer, and they will
not receive any information you update in your account.
PaymentWorks New Vendor Registration Guide Page 5 Version 1.3
If you are not the right person to complete the New Vendor Registration form, please
forward the email to the appropriate contact in your company.
2. Creating a PaymentWorks Account
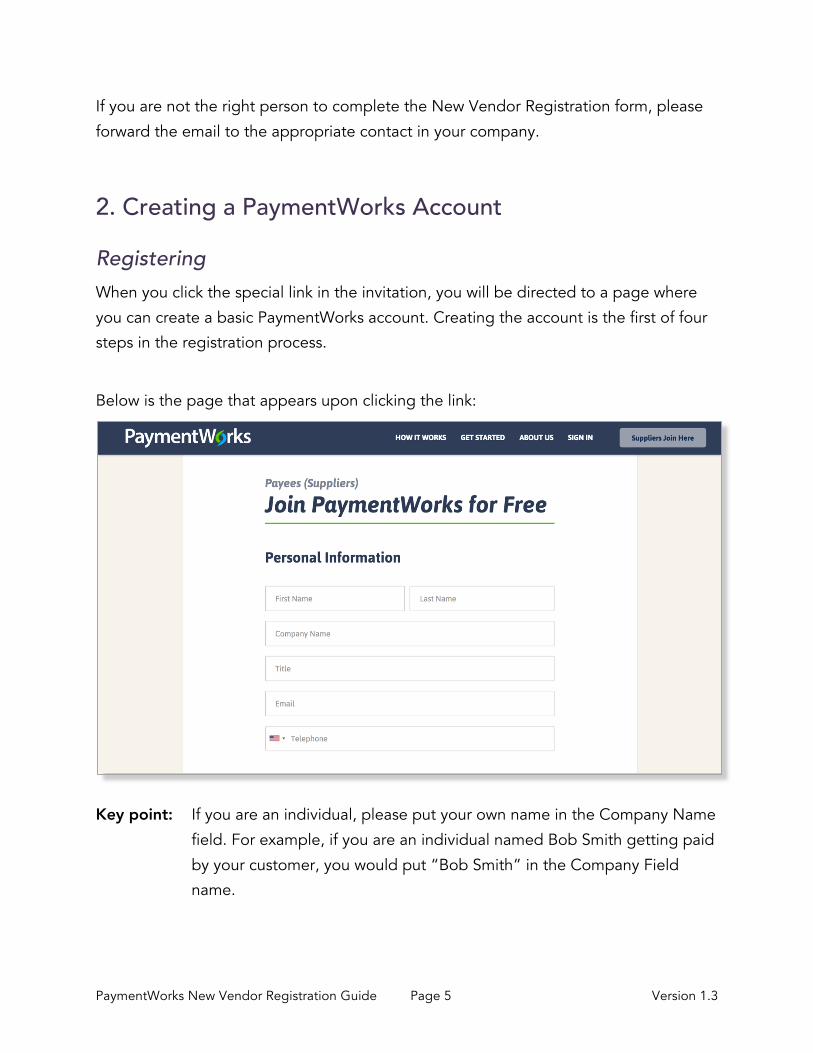
Registering When you click the special link in the invitation, you will be directed to a page where
you can create a basic PaymentWorks account. Creating the account is the first of four
steps in the registration process.
Below is the page that appears upon clicking the link:
Key point: If you are an individual, please put your own name in the Company Name
field. For example, if you are an individual named Bob Smith getting paid
by your customer, you would put “Bob Smith” in the Company Field
name.

PaymentWorks New Vendor Registration Guide Page 6 Version 1.3
Verify your account An email will be sent to the e-mail you used to create your PaymentWorks account.
This e-mail, titled “PaymentWorks Account Registration” will come from
[email protected]. Click Verify to activate your account.
Key point: Once you verify your email there is one more step in the registration
process.
3. Accessing the new vendor registration form After verifying your account, you will be prompted to log into your account.
Once you log in, you will see the new vendor registration form appear. Each
companies’ new vendor registration may look different, but an example is provided
below:

PaymentWorks New Vendor Registration Guide Page 7 Version 1.3
4. Form Submission and Approval A confirmation page will appear once you have successfully completed the New
Vendor Registration. The confirmation will appear as shown below.

PaymentWorks New Vendor Registration Guide Page 8 Version 1.3
You may receive a message that your tax ID is invalid. In this case, you should go back
into your account and edit your company profile. Please refer to section on Company
Profile of this document to see how to edit your Company Profile details.
When your customer approves your new vendor registration form, you will be notified
via email.


