
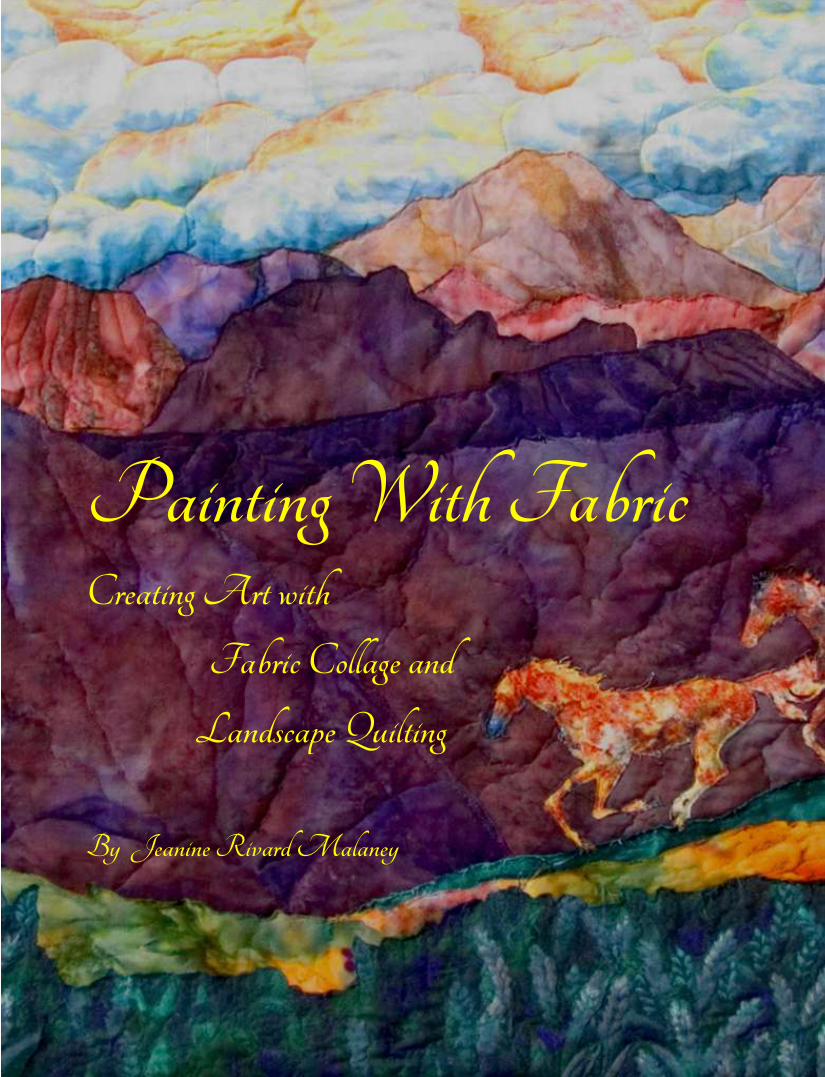
Painting With Fabric Creating Art with
Fabric Collage and
Landscape Quilting
By Jeanine Rivard Malaney
Jeanine Rivard Malaney
ii
Preface
Painting With Fabric is my technique of creating artworks with fabric utilizing fabric
collage, raw edge appliqué and free-motion quilting.
I have lectured and given demonstrations of my technique for quilt clubs and artists. I
have also taught one-on-one in my home studio setting. Though I have been asked many
times if I would teach a hands-on workshop, I always decline. My reason is this: my
technique of Painting With Fabric is by definition a unique art form utilizing the medium
of fabric. Every painting I create in fabric collage is unique because of fabric choices.
The only way I could teach many in a classroom setting would be for me to create "kits"
ahead of time. This would violate the uniqueness of this technique! There are many
appliqué’ wall-hanging kits already available for purchase at your typical quilt shop. For
example, McKenna Ryan designs and kits are fabulous. This would be another way you
might start this art form, by practicing with a commercially available kit. My technique
of fabric collage allows individual creativity and hence each painting is truly original and
unique.
Copyright © 2012 Jeanine Rivard Malaney
All rights reserved.
ISBN: 1480199729 ISBN-13: 978-1480199729
Table of Contents
Preface ......................................................................................................................... ii
About the Author ........................................................................................................ iii
Chapter One - Introduction and Inspiration ..................................................................... 1
I Painting With Fabric ................................................................................................. 1
II Introducing Me ........................................................................................................ 2
III Getting Started ....................................................................................................... 3
IV Equipment List ....................................................................................................... 3
V Design Wall............................................................................................................. 4
Chapter Two - Design and Composition ......................................................................... 7
I Finding an Inspiration ............................................................................................... 7
II From Inspiration to Design ...................................................................................... 7
III From Design to "Canvas" ....................................................................................... 8
A. Example 1 Layering ......................................................................................... 9
B. Example 2 Layering ....................................................................................... 10
C. Example 3 Layering ....................................................................................... 14
IV Choosing Fabrics ................................................................................................. 18
Chapter Three - Sewing to Stabilize ............................................................................. 21
I From Design Wall to Sewing Machine ................................................................... 21
II Working with Monofilament Thread ..................................................................... 21
Chapter Four - Sewing for Dimension .......................................................................... 25
I To Border or Not to Border ..................................................................................... 25
II Layer and Pin with Batting and Backing ................................................................ 25
III Enhancing with Quilting....................................................................................... 26
Painting With Fabric
v
Chapter Five - Finishing Touches ................................................................................ 29
I Painting to Add Detail and Shading ........................................................................ 29
II Squaring Up .......................................................................................................... 30
III Binding ................................................................................................................ 30
IV Signing Your Art ................................................................................................. 30
Chapter Six - Care and Framing ................................................................................... 33
I Hanging Options ..................................................................................................... 33
II Care ....................................................................................................................... 33
Chapter Seven - Step by Step Summary ....................................................................... 34
Painting With Fabric Technique of Fabric Collage .................................................... 34
Chapter Eight - More on Design and Composition ....................................................... 35
I Elements of Design ................................................................................................. 35
II Inspiration: Deciding What to Create .................................................................... 35
III Composition: A Good Foundation........................................................................ 36
IV Light: The Magic ................................................................................................ 38
V Color: Your Palette .............................................................................................. 38
VI Layering Techniques ............................................................................................ 39
VII More Design Tips ............................................................................................... 39
A. Sky ................................................................................................................. 39
B. Water ............................................................................................................. 40
C. Mountains -- Rocks and Cliffs ........................................................................ 40
D. Trees .............................................................................................................. 41
E. Anchoring ...................................................................................................... 41
F. Horizon .......................................................................................................... 41
G. Focal Point ..................................................................................................... 41
H. Shade and Shadows ........................................................................................ 41
Jeanine Rivard Malaney
vi
Chapter Nine - More on Fabric Selection ..................................................................... 43
I Sky.......................................................................................................................... 43
II Water ..................................................................................................................... 44
III Mountains and Rocks ........................................................................................... 45
IV Ground, Sand or Greenery Background................................................................ 46
V Bushes and Trees ................................................................................................... 47
VI Flowers ................................................................................................................ 48
VII Figures/Animals.................................................................................................. 49
VIII Buildings ........................................................................................................... 49
IX No No’s ............................................................................................................... 50
Chapter Ten - Painting on Fabric ................................................................................. 51
I When and Why to Paint .......................................................................................... 51
II Shading with Paint ................................................................................................. 51
III Painting in Detail.................................................................................................. 53
IV Painting in Highlights .......................................................................................... 54
V Buying Paints for Fabric ........................................................................................ 56
Chapter Eleven - Professional Touches ........................................................................ 57
I Borders with Mitered Corners ................................................................................. 57
II Making Your Own Binding with Square Corners .................................................. 59
III Dowel Sleeve Tips ............................................................................................... 64
IV Quality Features Checklist ................................................................................... 64
Chapter Twelve - Step by Step with Illustrations .......................................................... 65
I Find an inspiration; sketch a design or layout; plan for layering ............................. 65
A. Inspiration ...................................................................................................... 65
B. Layout ............................................................................................................ 66
C. Layering plan ................................................................................................. 66

Painting With Fabric
vii
II Start with "canvas" on design wall ........................................................................ 66
III Choose fabrics and layer for focus, perspective, contrast, light/shadow ............... 67
A. Fabric selection - fields .................................................................................. 67
B. Fabric selection – trees ................................................................................... 67
C. Fabric selection – buildings ............................................................................ 68
IV Layout with pins and then glue-stick all ............................................................... 69
V Baste on machine with monofil thread and free motion foot .................................. 74
VI Repeat above steps as needed ............................................................................... 74
VII Paint in further detail and shading as needed ...................................................... 75
VIII Press and square up ........................................................................................... 75
IX Optional: Add borders that coordinate and/or calm; press .................................... 77
X Layer and pin with batting and backing ................................................................. 79
XI Quilt to enhance dimension and highlight features ............................................... 80
XII Press and square up............................................................................................. 81
XIII Add binding, sign and/or add label to back ....................................................... 81
XIV Frame or add sleeve to hang from dowel ........................................................... 82
XV Enjoy for many years! ........................................................................................ 83
Chapter Thirteen - Unique Designs ............................................................................... 85
I Photo Interpretation ................................................................................................ 85
II Your Unique Fabric Stash ..................................................................................... 88
1
Chapter One - Introduction and Inspiration
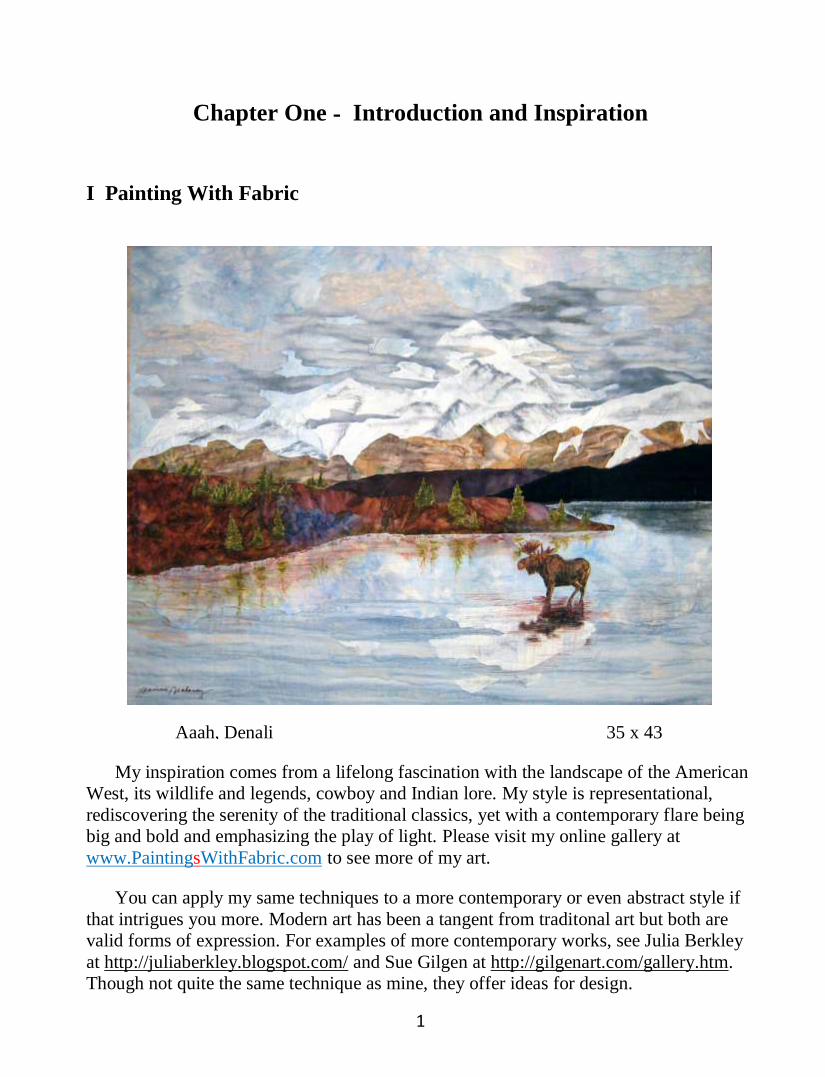
I Painting With Fabric
My inspiration comes from a lifelong fascination with the landscape of the American
West, its wildlife and legends, cowboy and Indian lore. My style is representational,
rediscovering the serenity of the traditional classics, yet with a contemporary flare being
big and bold and emphasizing the play of light. Please visit my online gallery at
www.PaintingsWithFabric.com to see more of my art.
You can apply my same techniques to a more contemporary or even abstract style if
that intrigues you more. Modern art has been a tangent from traditonal art but both are
valid forms of expression. For examples of more contemporary works, see Julia Berkley
at http://juliaberkley.blogspot.com/ and Sue Gilgen at http://gilgenart.com/gallery.htm.
Though not quite the same technique as mine, they offer ideas for design.
Aaah, Denali 35 x 43

7
Chapter Two - Design and Composition
I Finding an Inspiration
Deciding what to create is often a big challenge. Ideas can be found in magazines,
your own photos or scrapbooks, calendars, notecards, travel brochures, etc. Look for
drama, excitement, light play or maybe serenity and calmness. With practice you will
begin to see compositions all around you. You can take photographs of scenes or objects
of interest. If you have some drawing ability, you can even sketch original creations or
combine ideas from different sources or different photos. Set aside a box or folder and
start collecting pictures of interest. This is fun to do while watching TV, cutting pictures
from magazines. Be sure you do not use your fabric scissors for cutting paper as paper
will dull them.
For me, what brings me joy to paint, what I feel a lot of emotion about, are scenes
which calm, comfort, renew, or inspire. I see God’s majesty in nature and I focus on
mountains, lakes, streams, and trails, wildlife, endangered species, red rock formations in
the southwest deserts, and even cactus like the quirky prickly pear or giant saguaro. I am
attracted to old fences, horses, cowboys, Indian lore, ranches, old churches, trains.
Another of my hobbies is studying cosmic and quantum physics, so I am exploring ways
to represent these topics in my art.
You do not need to figure this all out before beginning to create; start with one idea
and meanwhile build your inspiration folder. You will find your style emerge with time
and practice.
II From Inspiration to Design
You must start with a plan; from your inspiration photo or photos, do a layout or
composition on paper. You do not need to have artistic drawing ability, you can use
words or even just circles and arrows and numbers. What you are doing is identifying
your main objects so that you can plan for layering. Unlike piecework in a quilt top, this
technique I am sharing is layered collage. So for instance, if you are doing a landscape,
the farthest plane is the sky, so this fabric must go down first; then maybe a layer of
distant mountains. Next might be hills and distant trees, then a house or cabin or
whatever is your focal point with some mid-way trees or plants. The last (top-most)
layers would be the foreground. For the foreground and maybe even for the mid-ground
of the landscape, I usually add a ground background of general greenery (or desert
beiges) as a backdrop to those close-up trees, grasses, or flowers and to fill the gaps.

Painting With Fabric
9
A. Example 1 Layering
Here is a simple window box we saw at Kalaloch, Washington which is on the
Pacific Ocean edge of Olympic National Park.
The Inspiration Photo
Painting “Cabin at Kalaloch” 16 x 20
Jeanine Rivard Malaney
18
IV Choosing Fabrics
Selecting fabrics and building your stash is another enjoyable part of this hobby. In
every town I travel to, I check out the quilt shop if available. Each shop carries some
unique fabrics. I only use 100% cotton since it then handles and behaves uniformly.
With experience, you may wish to experiment with other materials. I also recommend
buying from quilt shops; though more expensive (average $10/yard) than Wal-Mart, the
quality is better. These shops get first runs. Many also offer hand-dyed cottons and batiks
not found elsewhere. Usually you only need to buy 1/4 yard, though I usually buy 1/2
yard of material for skies or borders. I buy several yards of muslin to use as a "canvas"
and for backing. Sometimes I buy fun prints on sale for backing but I like plain, cheap
muslin best because you can easily see the quilting on the back side which is interesting
for show and tell. You do not have to wash these fabrics before using them, though you
will probably have to iron them when ready to use. I use Warm &Natural cotton batting.
It is thin and not too puffy for these wall hanging works of art.
With experience, you will recognize what sorts of colors and prints are useful to you
and hence you can collect and build a stash not specific to a project. Then you are
prepared for most any design you want to do without having to make a special shopping
trip. Batiks are wonderful for this artform. They can be shaped into mountains, rocks,
forest background, etc. Some fabrics can be used on the reverse side for a quieter effect,
such as for a reflection in water. Some fabrics will have flowers or animals to cut out and
use. Fussy cutting these objects is another activity that is good simultaneous with TV.
Beware of busy, repetitious prints. They do not reflect reality in nature. Learn more about
fabric choices in Chapter Nine – More on Fabric Selection.
It is most helpful to organize your stash by useful categories, such as: sky material;
greenery material; flowers; trees; mountain/rock material; ground/sand; and
figures/animals or whatever objects useful as cutouts. I sorted my stash initially into shoe
boxes. Now I use the drawers of a spare dresser. Very handy!

29
Chapter Five - Finishing Touches
I Painting to Add Detail and Shading
Using fabric paint or fabric paint markers is totally optional. It allows you to paint in
some detail or shading that you could not achieve with fabric pieces. This can be done at
any stage from layout to before or after quilting. Some fabric markers are actually fabric
dyes (read the label carefully). These are good for shading but beware, they "bleed"
through the material quickly.
One example of paint use is to mark cliffs and ridges in a batik material to better
indicate mountains. Another example is to shade one side of brown tree trunks to show
the shaded side, away from direct sunlight, by darkening it with darker brown or even
purple. Sometimes you can add fine lines, such as for thin branches, with the fine tip end
of fabric markers. In Chapter Twelve - Step by Step with Illustrations, I present many
more before and after examples of adding details or shading with paint along with photos
for clarification.
Along the Animas River 22 x 29
All mountains are painted on one piece of batik fabric. Train detail is painted.

43
Chapter Nine - More on Fabric Selection
Here are some examples and discussion of good and bad prints for use in landscape
collage.
I Sky
The sky is usually your lightest value, except Western skies can be an intense cobalt
blue. Figure I-a fabrics are all great for skies. The second one down is hand-dyed without
a pattern. I can place the light section of it (see right edge) at the horizon for realism or
stitch around it for a cloud. Likewise, I would make clouds in the bottom three. Beware
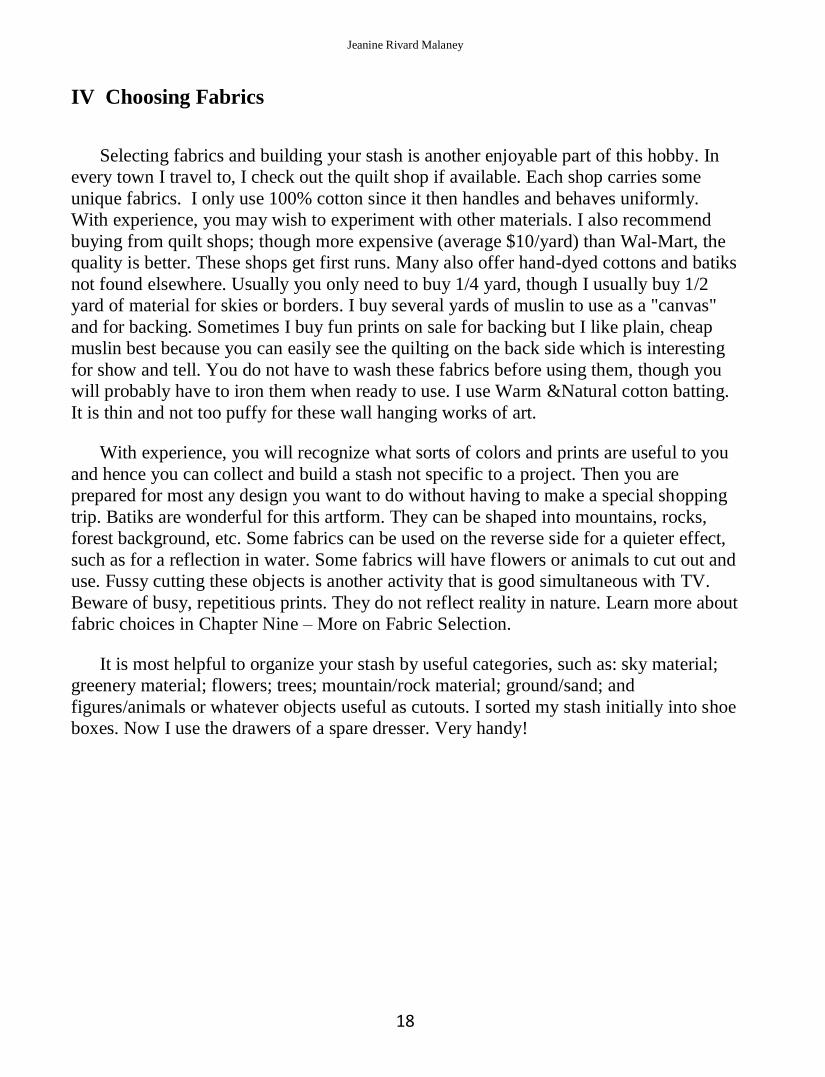
of printed sky materials as shown in Figure I-b. Each looks much too fakey, unless you
use a small amount for a small sky or camouflage with trees so that the repeated pattern
is not obvious.
Figure I-a Great sky fabrics
Jeanine Rivard Malaney
44
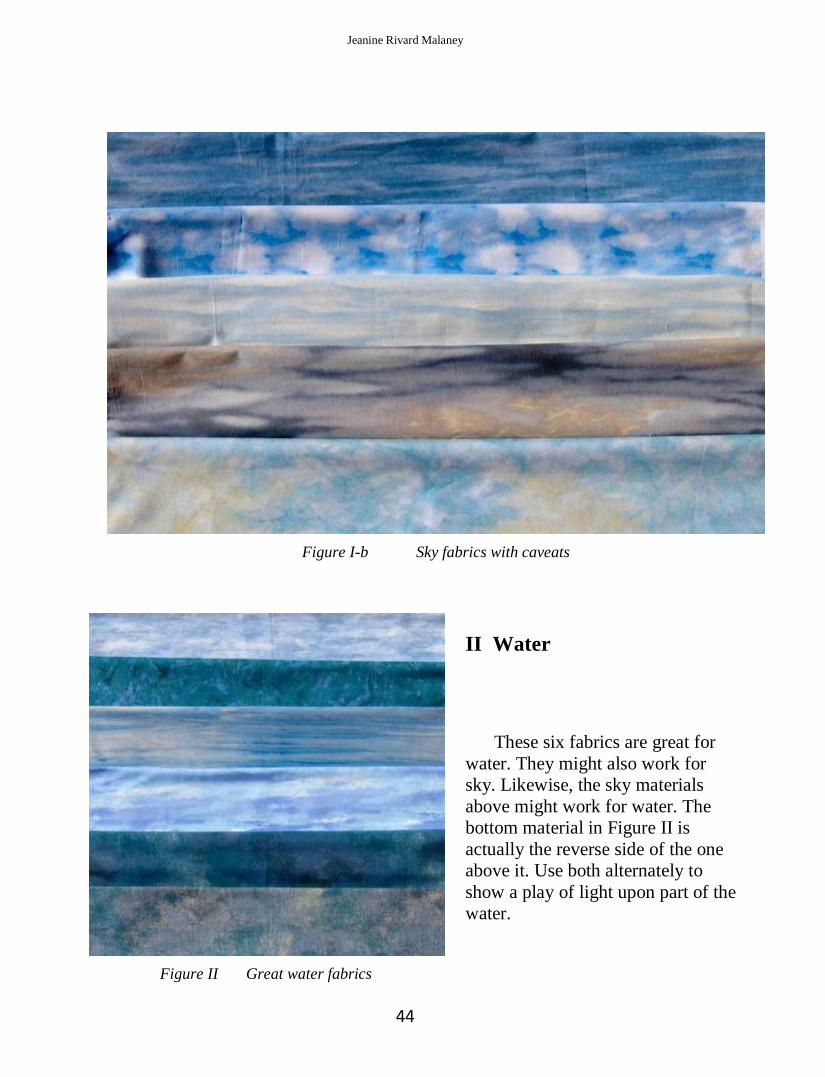
II Water
These six fabrics are great for
water. They might also work for
sky. Likewise, the sky materials
above might work for water. The
bottom material in Figure II is
actually the reverse side of the one
above it. Use both alternately to
show a play of light upon part of the
water.
Figure I-b Sky fabrics with caveats
Figure II Great water fabrics
Jeanine Rivard Malaney
62
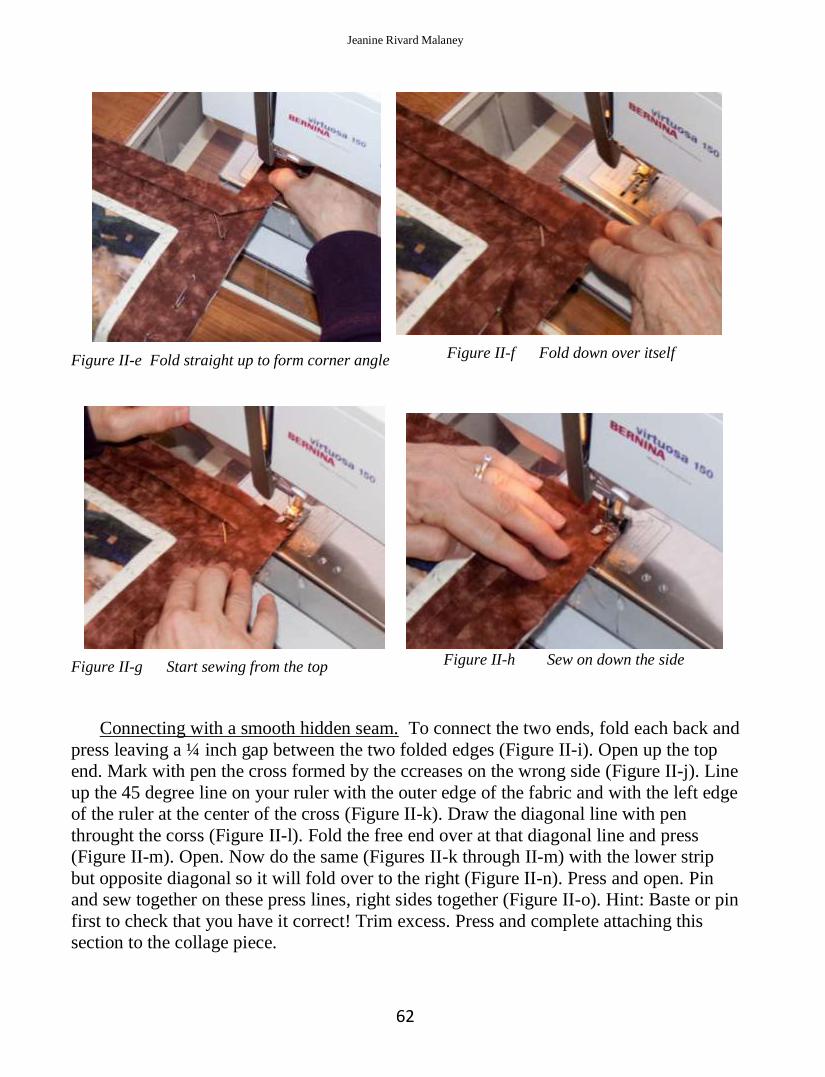
Connecting with a smooth hidden seam. To connect the two ends, fold each back and
press leaving a ¼ inch gap between the two folded edges (Figure II-i). Open up the top
end. Mark with pen the cross formed by the ccreases on the wrong side (Figure II-j). Line
up the 45 degree line on your ruler with the outer edge of the fabric and with the left edge
of the ruler at the center of the cross (Figure II-k). Draw the diagonal line with pen
throught the corss (Figure II-l). Fold the free end over at that diagonal line and press
(Figure II-m). Open. Now do the same (Figures II-k through II-m) with the lower strip
but opposite diagonal so it will fold over to the right (Figure II-n). Press and open. Pin
and sew together on these press lines, right sides together (Figure II-o). Hint: Baste or pin
first to check that you have it correct! Trim excess. Press and complete attaching this
section to the collage piece.
Figure II-h Sew on down the side
Figure II-g Start sewing from the top
Figure II-f Fold down over itself
Figure II-e Fold straight up to form corner angle
Painting With Fabric
85
Chapter Thirteen - Unique Designs
I Photo Interpretation
Many of my designs are extrapolated from photos. I utilize my husband’s
photography from places we’ve experienced together. Your experiences will be unique.
When using a photo for inspiration, here are two important things to remember:
A. Get permission if using someone else’s photo. Photographers are artists and own
their work.
B. Study and simplify. A photograph contains much more information than you can
reproduce in fabric! You must first decide what will be your focus and then
eliminate most of the extraneous detail in the photo. This is a most important step
for if you skip this step, your design will meander as you work to “copy” the
photo. This will probably result in a poor composition. I usually try several
sketches. If you do not have drawing ability, you can “cut and paste” to create
your composition; ie., cut up the photo and rearrange just the pieces you want to
use. Or use markers to block out details in the photo itself.
On the next few pages are some examples of designs I created and the photos I used
for inspiration. You can see more on my website www.PaintingsWithFabric.com
Enjoy!
The first examples shown on the next page are a triad of scenes from Arches
National Park in Utah. Each is 12 x 12 inches and the three are meant to hang in a
grouping. From top to bottom, they are “The Three Gossips”, “Window Rock”, and
“Delicate Arch”.
Painting With Fabric
89
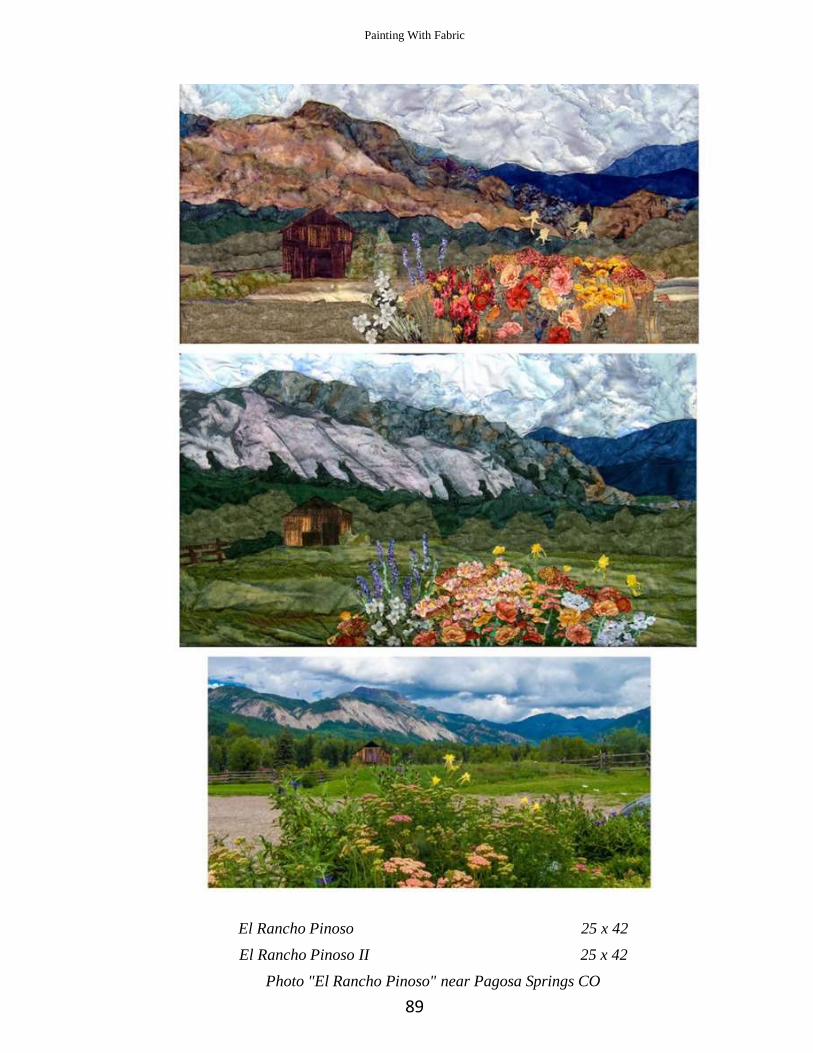
El Rancho Pinoso 25 x 42
El Rancho Pinoso II 25 x 42
Photo "El Rancho Pinoso" near Pagosa Springs CO


