
CP-871 © Panduit Corp. 2006
OPERATION MANUAL
Website: www.panduit.com E-mail: [email protected]
Technical Support: 888-506-5400, ext. 3255
Fax: (630) 759-7532
PA25085A01Rev. 00 3-2006

CP-871 OPERATION MANUAL
Page: 1 of 30
TABLE OF CONTENTS A. SAFETY REGULATIONS ENGLISH...........................................................................4
A1. Symbols........................................................................................................................4
A2. Product description ......................................................................................................4
A3. Responsibilities ............................................................................................................4
A4. Personal qualifications .................................................................................................4
A5. Danger areas................................................................................................................4
A6. Safety requirements .....................................................................................................4
1. ABOUT THIS OPERATOR MANUAL.........................................................................5
1.1. Important Information ...................................................................................................5
1.1.1. Manufacturer and Contact Address ........................................................................................5
1.1.2. Target Market..........................................................................................................................5
1.1.3. Obligation to Read ..................................................................................................................5
1.1.4. Validity.....................................................................................................................................5
1.1.5. Contents and Purpose ............................................................................................................5
1.1.6. Location...................................................................................................................................5
1.1.7. Symbols ..................................................................................................................................6
1.1.7.1. Security Tags....................................................................................................................................... 6
1.1.7.2. Security Tag ........................................................................................................................................ 6
1.2. Product Description......................................................................................................7
1.2.1. Tag ..........................................................................................................................................7
1.2.2. Application...............................................................................................................................7
1.2.3. Application Limits ....................................................................................................................7
1.2.4. Conformance...........................................................................................................................7
1.2.5. Danger Areas ..........................................................................................................................8

CP-871 OPERATION MANUAL
Page: 2 of 29
1.2.6. Technical Data ........................................................................................................................8
2. OPERATING ELEMENTS ...........................................................................................9
2.1. Main Switch ..................................................................................................................9
2.2. Control Panel................................................................................................................9
2.2.1. Display ....................................................................................................................................9
2.2.2. Keyboard...............................................................................................................................10
2.3. Monitors, Menus.........................................................................................................10
3. OPERATION..............................................................................................................11
3.1. Production ..................................................................................................................11
3.1.1. Display ..................................................................................................................................11
3.1.2. Activate Cycle .......................................................................................................................11
3.1.3. Settings .................................................................................................................................12
3.1.4. Menu Counters......................................................................................................................12
3.1.4.1. Reset Counter ................................................................................................................................... 13
3.1.4.2. Programming Batch ........................................................................................................................... 13
3.1.4.3. Total Counter..................................................................................................................................... 13
3.1.5. Functions...............................................................................................................................14
3.1.5.1. Crimp Speed...................................................................................................................................... 14
3.1.5.2. Crimp Force....................................................................................................................................... 14
3.1.5.3. Pneumatic Valve (Option) .................................................................................................................. 15
3.1.5.4. Split Cycle.......................................................................................................................................... 16
4. TOOL REPLACEMENT.............................................................................................17
4.1. Roller Carrier ..............................................................................................................17
4.2. Contact guide plate ....................................................................................................18
4.3. Applicator Assembly...................................................................................................19
4.4. Setting the Crimp Height ............................................................................................20
5. CRIMP FORCE MONITORING ACO05 ....................................................................21
6. ERROR MESSAGES.................................................................................................21

CP-871 OPERATION MANUAL
Page: 3 of 29
7. MAINTENANCE.........................................................................................................22
7.1. Daily Maintenance......................................................................................................22
7.1.1. Cleaning Processing Room...................................................................................................22
7.2. Lubrication..................................................................................................................23
7.3. Machine Preparation ..................................................................................................23
7.4. Slide............................................................................................................................24
7.5. Tool Base Plate ..........................................................................................................24
8. SETTINGS .................................................................................................................25
8.1. Setting Crimping Height at 135.788mm.....................................................................25
9. REPAIRS ...................................................................................................................26
9.1. Replace Main Fuse ....................................................................................................26
10. APPENDIX .................................................................................................................27
10.1. EU-Safety Data Sheet KLÜBER ................................................................................27

CP-871 OPERATION MANUAL
Page: 4 of 29
A. SAFETY REGULATIONS ENGLISH
A1. Symbols
Please follow exactly the work and processes marked with this pictogram. Failure to do so may result in death or severe injury.
Please follow exactly the work and processes marked with this pictogram. Failure to do so may lead to minor injuries and to damage to the machine.
A2. Product description The PANDUIT CP-871 is a crimping machine for the processing of all terminal, disconnect and butt splice crimping contacts up to a cross section of 6mm2 (AWG10). The CA-800EZ and CA9 applicators can be fit in. The operator interface consists of membrane keypad and a display. Functions such as speed control, split cycle, pneumatic valve control, and various counter functions are selectable over the interface. The CP-871 may only be used as described in the enclosed operating manual. Any deviation of the operation mode, additions and extensions must first be discussed with Panduit.
A3. Responsibilities The machine operator is responsible for ensuring that every employee who uses the PANDUIT CP-871 has received training in accordance with these operating instructions (initial operation, operation, maintenance). The training of the operating personnel must include the following:
• Purpose of the machine (see section A2 Product description).
• Danger areas (see section A4 Personal qualifications).
• Safety instructions (see Default A6 Safety requirements).
• Operating the machine in accordance with these operating instructions.
A4. Personal qualifications To ensure that all instructions are understood, training must take place in the language of the operating personnel. This means that the following personnel qualifications are required:
Assembly, initial operation, instruction
Technical specialist staff who have a good command of English and/or German as well as of the language of the operating personnel.
Operation Trained staff in accordance with A3 Responsibilities.
Maintenance, service
Technical specialist staff who have a good command of English or German.
A5. Danger areas • The whole area of the processing space
underneath the Plexiglas cover - Danger due to the Crimp process of
the applicator - Danger from Crimp stroke • The entire interior area of the machine
and the metal casing: - Danger from electrical current - Danger from mechanical moving parts
A6. Safety requirements • This machine has been designed in
accordance with the European Standard EN294.
• The machine must only be operated in rooms that are dry and free from dust.
• Never operate the machine without its protective covers.
• Never work on the machine without wearing eye protection.
• Disconnect the machine from the electrical and/or compressed air supply before carrying out any maintenance work.
• Never operate the machine with the mains earth disconnected.
• Do not make any modifications to the machine and only utilise it for its intended purpose according to Paragraph A2 Product description. Other applications are only permitted with the written approval of the manufacturer. The manufacturer will accept no liability for damage resulting from the disregard of this regulation.
• Never operate the machine without first having read through and understood all instructions.
• Repair work may only be carried out by authorised persons who have been specially trained for this work.
• Ensure if you work on the machine that long hair is not worn loose, and do not wear loose clothing or ornaments that could become caught in the moving parts of the machine.
• Only use the lubricant that was delivered with this machine according to these operating instructions.
CP-871 OPERATION MANUAL
Page: 5 of 29
1. ABOUT THIS OPERATOR MANUAL Thank you for trusting the PANDUIT Technology. With the PANDUIT CP-871, you have acquired a semi-automatic crimping machine for the processing of all terminal, disconnect and butt splice crimping contacts up to a diameter of 6mm2
(AWG 10).
1.1. Important Information
1.1.1. Manufacturer and Contact Address See Cover Page
1.1.2. Target Market Technical Specialists (Team Leader, fitter) See Chapter A4 Personal qualifications on Page 4
1.1.3. Obligation to Read As operator and user one is obliged to read and understand this Reference Manual before the initial operation, especially the chapter on safety regulations. Your safety is at stake! Should there be any questions or lack of clarity, please contact your local Panduit representative.
1.1.4. Validity This User Manual is valid for the PANDUIT CP-871 only.
1.1.5. Contents and Purpose This Reference Manual contains all relevant information regarding the assembly, function, commissioning and operation of the CP-871. This Reference Manual is part of the client documentation and void without the Operating Manual and the Maintenance Manual.
1.1.6. Location This Reference Manual must be available to the team leader / fitter at the working place.
CP-871 OPERATION MANUAL
Page: 6 of 29
1.1.7. Symbols
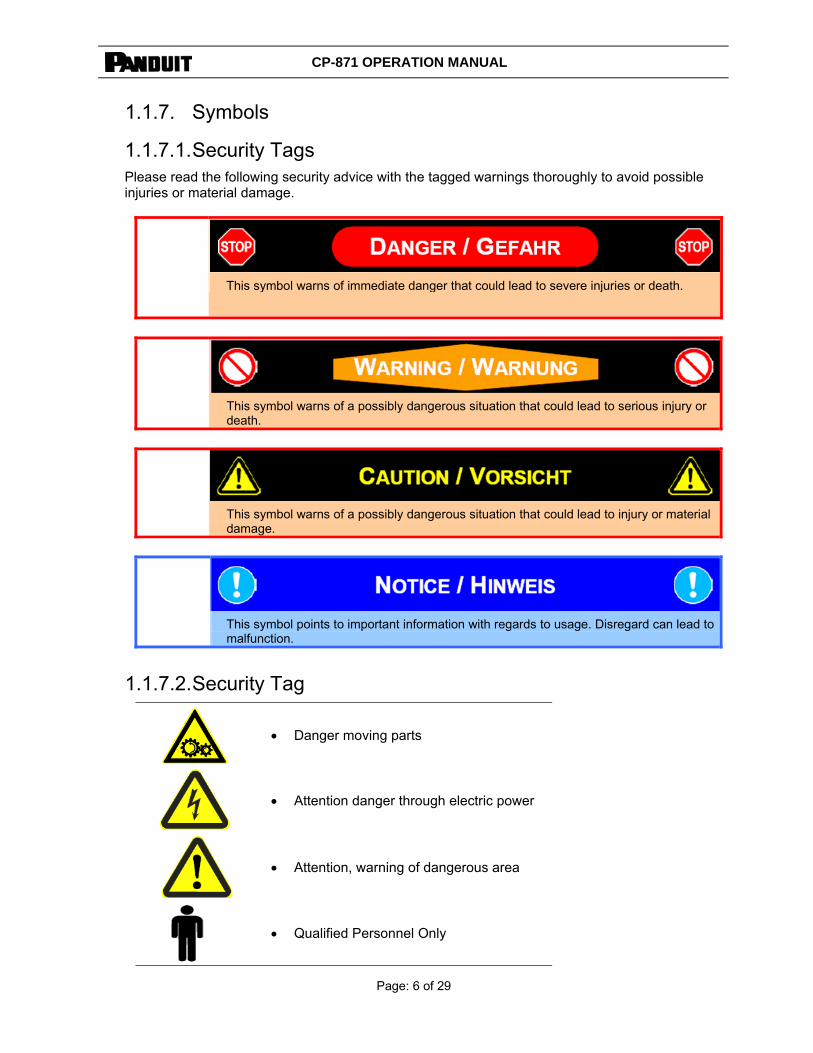
1.1.7.1. Security Tags Please read the following security advice with the tagged warnings thoroughly to avoid possible injuries or material damage.
This symbol warns of immediate danger that could lead to severe injuries or death.
This symbol warns of a possibly dangerous situation that could lead to serious injury or death.
This symbol warns of a possibly dangerous situation that could lead to injury or material damage.
This symbol points to important information with regards to usage. Disregard can lead to malfunction.
1.1.7.2. Security Tag
• Danger moving parts
• Attention danger through electric power
• Attention, warning of dangerous area
• Qualified Personnel Only

CP-871 OPERATION MANUAL
Page: 7 of 29
1.2. Product Description
1.2.1. Tag The nameplate is situated on the left side of press and contains the following information:
Model: CP-871 Voltage information: 110 VAC bis T10A 230 VAC T 6A 50/60 Hz 255 VA
1.2.2. Application The PANDUIT CP-871 may only be used for processing crimping contacts and cables, i.e. to activate the applicators.
1.2.3. Application Limits Enviromental Temperature: +5°C to +40°C Storage and Transport Temperature: -25°C to +55°C Relative humidity: 90% on 20°C 50% on 40°C
1.2.4. Conformance The CP-871 conforms entirely with the CE and EMV guidelines (mechanic and electric security, electromagnetic tolerance.)

CP-871 OPERATION MANUAL
Page: 8 of 29
1.2.5. Danger Areas Danger through moving parts in the working area
1.2.6. Technical Data Force 3.7 Tons / (33 kN) Power (0.75 KW)
Cross Section Range Up to approx. AWG 10 / (6mm2). Material thickness up to .039 in. / (1mm) length of the crimping zone, up to .315 in. / (8mm)
Stroke 1.57 in. / (40 mm); Optional 1.18 in. / (30 mm) Shut Height 5.345 in. / (135.788 mm) Height Adjustment Range ± .0098 in. / (0.25 mm), in increments Cycle Time Adjustable from 350ms to 1 s Press Activation Foot Pedal Noise Level < 70 dB (A) Power Connector 115 VAC bis 230 VAC Net Frequency 50/60 Hz Capacity 255 VA Dimensions [mm] (W x H x D) 13“ x 30“ x 16“ / (320 x 750 x 400 mm) Weight 176 lbs. / (80 kg) Dimensions in ( ) are metric

CP-871 OPERATION MANUAL
Page: 9 of 29
2. OPERATING ELEMENTS 2.1. Main Switch
The CP-871 has no main switch. The power supply is cut off by removing the power cord from the machine or by using the emergency stop button.
Picture 2.1: Main Switch
2.2. Control Panel
Picture 2.2: Control Panel with Keyboard
2.2.1. Display
Picture 2.3: Display
12345678912345671234567891234567
LED Operational
Display
Keyboard
Emergency-Stop Button
12345678912345671234567891234567

CP-871 OPERATION MANUAL
Page: 10 of 29
2.2.2. Keyboard
Escape Key: Leave the entry mask or the menus
Creeping Speed Key –Left: Moves the machine with reduced speed against the machining direction
Enter Key: Activate the entry mask or confirm the entry
Creeping Speed Key – Right: Moves the machine with reduced speed in the machining direction
Minus Key: Minimize the value in a input field or scroll in the selection menu or in the sub-menus.
Operational LED: The LED indicates that the machine is in the upper dead center and ready for use.
Plus Key: Increase value in the input field or or scroll in the selection menu or in the sub-menus.
2.3. Monitors, Menus Main Menu Selection menus Menu Counters Menu Functions Menu Settings
B a t c h : 0 0 9 9 9 9C o u n t e r : 9 9 9 9 9 9
C o u n t e r s M e n u :
F u n c t i o n s M e n u :
9 9 0 9 0 0 0 0 T o t a l C o u n t e r
9 9 0 9 0 0 R e s e t C o u n t e r
0 0 0 9 0 0 S e t B a t c h
1 0 0 % C r i m p S p e e d
O N / O F F C r i m p F o r c e
O N / O F F 2 2 0 m sP n e u m a t i c V a l v e
O N / O F F 1 2 0 °S p l i t C y c l e
S p e e d 7 5 %S p l i t C y c l e
# # # # P a s s w o r d
E n g l i s h L a n g u a g e
S e t t i n g C o n t r a s t :
S e t t i n g s M e n u :
0 0 0 9 0 0 E n d u r a n c e T e s t

CP-871 OPERATION MANUAL
Page: 11 of 29
3. OPERATION The user’s task is as follows: • Installing the tools • Installing and setting the contact roller/retooling the contact guide plate • Programming the counter functions and settings • Producing cable
The CP-871 may only be operated by trained personnel (PANDUIT personnel or trained personnel at the user)
3.1. Production Start the CP-871 by plugging the power cable and/or unlocking the emergency-stop button.
3.1.1. Display Entries may always be made once the prompt in the display flashes.
3.1.2. Activate Cycle
• The machine gets started with the foot pedal
CP-871 OPERATION MANUAL
Page: 12 of 29
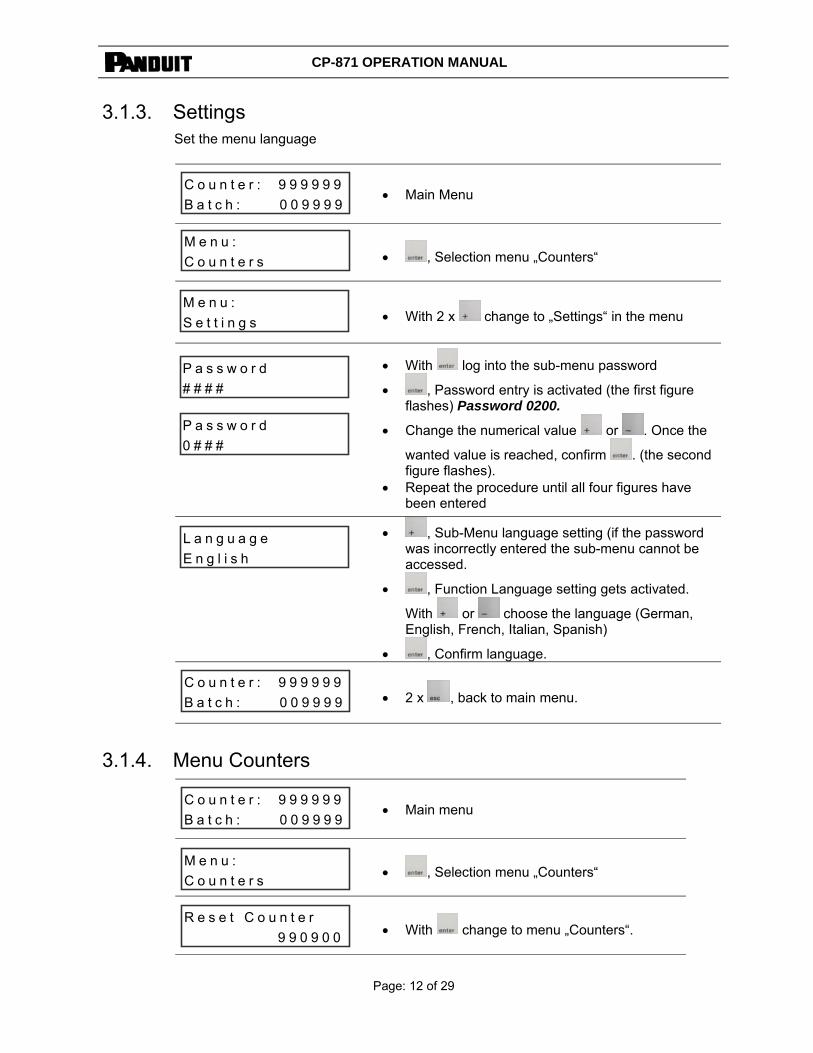
3.1.3. Settings Set the menu language
• Main Menu
• , Selection menu „Counters“
• With 2 x change to „Settings“ in the menu
• With log into the sub-menu password
• , Password entry is activated (the first figure flashes) Password 0200.
• Change the numerical value or . Once the
wanted value is reached, confirm . (the second figure flashes).
• Repeat the procedure until all four figures have been entered
• , Sub-Menu language setting (if the password was incorrectly entered the sub-menu cannot be accessed.
• , Function Language setting gets activated.
With or choose the language (German, English, French, Italian, Spanish)
• , Confirm language.
• 2 x , back to main menu.
3.1.4. Menu Counters
• Main menu
• , Selection menu „Counters“
• With change to menu „Counters“.
# # # # P a s s w o r d
0 # # # P a s s w o r d
B a t c h : 0 0 9 9 9 9C o u n t e r : 9 9 9 9 9 9
B a t c h : 0 0 9 9 9 9C o u n t e r : 9 9 9 9 9 9
B a t c h : 0 0 9 9 9 9C o u n t e r : 9 9 9 9 9 9
C o u n t e r s M e n u :
C o u n t e r s M e n u :
S e t t i n g s M e n u :
E n g l i s h L a n g u a g e
9 9 0 9 0 0R e s e t C o u n t e r

CP-871 OPERATION MANUAL
Page: 13 of 29
3.1.4.1. Reset Counter
• , Activate „Reset Counter” (figures flash).
• , Reset Counter
• 2 x , back to the main menu or directly to
the submenu „Set Batch” with .
3.1.4.2. Programming Batch
• , Submenu „Set Batch“.
• , Activate function „Set Batch“.
• With or Enter Batch.
• , Confirm entry.
• 2 x , back to main menu or directly to
sub-menu „Total Counter“ with
• Once the Batch is reached „Batch
Processed“ will appear. By pressing the new Batch is activated. To deactivate the Batch function, programm a Batch value of „000000“.
3.1.4.3. Total Counter
• 2 x , sub-menu „Total Counter” (Information)
• 2 x , back to main menu. With into
sub-menu „Det Batch” or with 2x into sub-menu „Reset Counter”.
B a t c h P r o c e s s e dC o u n t e r : 9 9 9 9 9 9
0 0 2 5 0 0S e t B a t c h
B a t c h : 0 0 9 9 9 9C o u n t e r : 9 9 9 9 9 9
B a t c h : 0 0 9 9 9 9C o u n t e r : 9 9 9 9 9 9
B a t c h : 0 0 9 9 9 9C o u n t e r : 9 9 9 9 9 9
9 9 0 9 0 0R e s e t C o u n t e r
0 0 0 0 0 0R e s e t C o u n t e r
0 0 0 9 0 0S e t B a t c h
9 9 0 9 0 0 0 0T o t a l C o u n t e r

CP-871 OPERATION MANUAL
Page: 14 of 29
3.1.5. Functions
• Main Menu
• , Selection menu „Counters“
• With go to menu „Functions“
• With go to sub-menu „Functions“.
3.1.5.1. Crimp Speed
• , „Crimp Speed“ function is activated (figures are flashing).
• With and one can adjust the
pressing speed in percentage. • 100% max. speed ca. 350ms • 5% min .speed ca. 1s
• , accept entry.
• 2 x , back to main menu or with direct
into the sub-menu „Crimp Force“ (Crimp Force monitoring).
3.1.5.2. Crimp Force This feature does not function with PANDUIT product and is not supported by PANDUIT.
B a t c h : 0 0 9 9 9 9C o u n t e r : 9 9 9 9 9 9
C o u n t e r s M e n u :
F u n c t i o n s M e n u :
1 0 0 % C r i m p S p e e d
1 0 0 % C r i m p S p e e d
B a t c h : 0 0 9 9 9 9C o u n t e r : 9 9 9 9 9 9
0 8 0 % C r i m p S p e e d

CP-871 OPERATION MANUAL
Page: 15 of 29
3.1.5.3. Pneumatic Valve (Option)
A badly set feeder timing may damage the machine. Always install pneumatic tools without contact material, until the feeder timing is properly set.
• 2 x , sub-menu „Pneumatic Valve“.
• With , „Pneumatic Valve“ function is activated (figures are flashing).
• With and activation of the „Pneumatic
Valve“ function and by pressing the key timing of the valve can be programmed.
• , accept entry. • The length of time the valve is engaged is
permanently programmed and can not be changed..
• 2 x , back to the main menu or with go
directly into the sub-menu „Split Cycle“.
• Connect the compressed air on the pressure gauge.
• Assemble the tool according to Chapter 4.3 Applicator Assembly on page 19.
• Connect both pneumatic attachments at the valve
• Switch on the air pressure unit using the main switch at the pressure gauge.
• Set gage at 6 bar processing pressure
B a t c h : 0 0 9 9 9 9C o u n t e r : 9 9 9 9 9 9
O F F P n e u m a t i c V a l v e
O N 2 2 0 m sP n e u m a t i c V a l v e

CP-871 OPERATION MANUAL
Page: 16 of 29
3.1.5.4. Split Cycle
• 3 x , sub-menu „Split Cycle“.
• , „Split Cycle“ function is activated (figures are flashing).
• With and the „Split Cycle“ function
can be activated and by press the key, the breakpoint can be programmed.
• The „Split Cycle“ is used mainly for end
sleeve contacts, to centre the contact in the crimping stamp and to ensure easier handling for the operator.
• Change to the sub-menu „Split Cycle Speed“
with .
• , „Split Cycle Speed“ function is activated (figures are flashing).
• With and the pressing speed can be adjusted in percent.The speed is programmed from the upper dead center to the breakpoint.
• 100% max. Speed. • 5% min. Speed.
• , accept entry.
• 2 x , back to the main menu or with back into the previous menu.
• Press the key to initialise the machine (min. 3s)
O N 1 2 0 °S p l i t C y c l e
Break point
Upper dead center
B a t c h : 0 0 9 9 9 9C o u n t e r : 9 9 9 9 9 9
O F F S p l i t C y c l e
S p e e d 7 5 %S p l i t C y c l e
S p e e d 4 5 %S p l i t C y c l e

CP-871 OPERATION MANUAL
Page: 17 of 29
4. TOOL REPLACEMENT 4.1. Roller Carrier
• Loosen both inner hexagon bolts of the pipe clamp on the left side of the machine.
side banded
• Turn the roller carrier 90° to the right for side banded contacts.
• Set the height according to the contact roll. • Tighten both hexagon bolts on the pipe
clamp.
• Attach the rear dead stop. • Assemble the contact roll. • Set the braking power for the contact roll
using the forward dead stop and the spring.

CP-871 OPERATION MANUAL
Page: 18 of 29
4.2. Contact guide plate
• Loosen both of the knurled screws and lift the sheet plate.
• Pull the sheet plate to the right and then remove it.
• Assemble the sheet plate onto the distance bolt at the left for side feed applicators.
• Attach the sheet plate using the knurled screws.
• The contact material must be fed through the black leading bracket
• Feed material into the applicator.
Side banded

CP-871 OPERATION MANUAL
Page: 19 of 29
4.3. Applicator Assembly
• Open the front guard and remove the contact material.
• Move the clamping lever on the left downwards until the clamps are open.
• Assemble / disassemble the tool in the nut and after remove at the bottom from the retaining clamps of the applicator ground plate.
• Move the clamping lever upwards until the clamping fingers clamp the tool in their respective grooves.
• Check that the tool is properly fastened and close the protective cover.
• Set the tool according to the operating guidelines set out by the manufacturer.

CP-871 OPERATION MANUAL
Page: 20 of 29
4.4. Setting the Crimp Height The crimping height of the CA-800EZ and CA9 applicators can be adjusted within the applicator. Further crimp height adjustments can be made to the press itself.
After each tool change, (before the first crimp), set the height of the machine to 0 Not doing so may damage the tool. Only qualified personnel may carry out this setting.
• Micro adjustment of the crimp height.
• Turn the flange toothed surface. • Minus direction, towards the left, increases
the crimping height. (e.g. 1.27 => 1.30). • Plus direction, towards the right, decreases
the crimping height (e.g. 1.27 => 1.24).
• The setting is limited to ± 0.25 mm. • The graduation is 0.025 mm per line. • The reference point (135.788 mm) is marked
with the figure 0.
• Should the height setting not be used, this function can be blocked by tightening the inner hexagonal screw.

CP-871 OPERATION MANUAL
Page: 21 of 29
5. CRIMP FORCE MONITORING ACO05
This feature does not function with PANDUIT product and is not supported by PANDUIT.
6. ERROR MESSAGES
Fault Action
Open Protection Cover • Connect protection cover to CP-871.
Machine not in Home Position
• With the help of or return to Home Position. The green LED glows
• By activating the key in the main menu (minimum 3x), the machine returns to the home position. The machine changes the turning direction automatically as soon as it is in contact with a resistor.
CFM not ready • Turn on CFM and check the connection of
the cable. • Set the CFM to the production menu.
No display on the monitor • Disengage the emergency-off button or
plug into power. • Check the fuse

CP-871 OPERATION MANUAL
Page: 22 of 29
7. MAINTENANCE
Activate the Emergency-Off button and separate the CP-871 from the power.
7.1. Daily Maintenance • Clean the machine and the operating unit with a brush or a clean cloth
7.1.1. Cleaning Processing Room
• Open protection cover and disassemble tool.
• Remove contact band residue, cable and lubricating residue by brushing and vacuum cleaning inside the machine below the wastage hole.

CP-871 OPERATION MANUAL
Page: 23 of 29
7.2. Lubrication
Lubricate the guide and all movable parts on the tool faceplate. Lubricating interval: at least every 3 months Lubricating Grease: Microlub GBU Y 131 (Will be delivered with the unit)
Use the lubricating grease delivered with the unit only according to the the available instructions. Please note that the information relating to the lubricating grease is given in the attachment to chapter 10 Appendix on page 27.
7.3. Machine Preparation
• Open protection cover. Disassemble applicator.
• Take machine down to the bottom
death centre with or keys • Open safety cover. • Activate Emergency-Off button and
separate the machine from the power supply system.
Press the Emergency-Off button and unplug the power supply. Lubricating work may only be carried out by trained personnel (PANDUIT personnel or trained personnel at the user)

CP-871 OPERATION MANUAL
Page: 24 of 29
7.4. Slide
• Open safety cover • Clean the slide’s guides (A / B) with
a lint free cloth. • Lubricate the left guide (A) and the
right guide (B) on all three faces.
7.5. Tool Base Plate
• Clean the clamping claws of the tool base plate with lint free cloth and the delivered brush.
• Lightly lubricate the clamping claws of the three bolts.
• Open and close the clamping claws a few times
• Close safety cover • Deactivate Emergency-Off button and connect the machine to the power supply system.
• Bring the machine through operate key (min. 1x) in the main menu automatically into the upper dead center.
A B

CP-871 OPERATION MANUAL
Page: 25 of 29
8. SETTINGS 8.1. Setting Crimping Height at 135.788mm
The crimping height may only be set by trained personnel (PANDUIT personnel or trained personnel at the User) who have a SLM crimping height gage or a similar device at their disposal.
• Set the height with help of the fine adjustment on the crimping machine until the display in the window lies within the range of ± 005μ
• Turn the ring at the edged surface. • Plus direction to the right, crimping
height increases (e.g. (1.27 => 1.30)
• Minus direction to the left, crimping height decreases (e.g. 1.27 => 1.24)
• Now loosen the adhesives with the scale and assemble them in such a way that the reference „0“corresponds again with the white line.
• Remove the limitation pin and assemble into the hole above the reference position. This will make sure that the limitations are again symmetrical.
• Remove the SLE CM gage. The machine is now set onto a crimp height of
135.788.

CP-871 OPERATION MANUAL
Page: 26 of 29
9. REPAIRS
Press the Emergency-Off button and unplug the CP-871’s power supply. Fuses may only be replaced by trained personnel (PANDUIT personnel or trained personnel at the user).
9.1. Replace Main Fuse
• Lift out the fuse holder with a screwdriver. Always replace both main fuses. 100/115 VAC = 2 x 10 A/T 230/240 VAC = 2 x 6 A/T
Picture 5.1: Replace main fuse
• Place the fuse holder back into the CP-871 and plug the line cord.
Fuses Fuse holder
Lift Fuse holder with a screw driver

CP-871 OPERATION MANUAL
Page: 27 of 29
10. APPENDIX 10.1. EU-Safety Data Sheet KLÜBER

CP-871 OPERATION MANUAL
Page: 28 of 29

CP-871 OPERATION MANUAL
Page: 29 of 29
Index A
Activate Cycle.......................................................11 Appendix...............................................................27 Applicator Assembly .............................................19
C
CFM not ready ..................................................21 Cleaning Processing Room ..................................22 Contact Lead ........................................................18 Control Panel ......................................................... 9 Crimp Force..........................................................14 Crimp force monitoring..........................................21 Crimp Speed.........................................................14
D
Daily Maintenance ..........................................22, 23 Danger Areas ........................................................ 8 Display................................................................... 9
E
EU- safety Data Sheet KLÜBER...........................27
F
Functions ..............................................................14
K
Keyboard ..............................................................10
L
Lubricating Grease: ............................................23
M
Machine..............................................................21 Machine Preparation.............................................23
Main Switch............................................................ 9 Menu Counters .................................................... 12 Monitors, Menus .................................................. 10
N
No display on the monitor............................. 21
O
Open Protection Cover ..................................... 21
P
Pneumatic Valve .................................................. 15 Programming Batch ............................................. 13
R
REPAIRS ............................................................. 26 Replace Main Fuse .............................................. 26 Reset Counter...................................................... 13 Roller Carrier........................................................ 17
S
Security Tag........................................................... 6 Security Tags ......................................................... 6 Setting.................................................................. 25 Setting the Crimp Height ...................................... 20 Settings................................................................ 12 Slide..................................................................... 24 Split Cycle ............................................................ 16
T
Technical Data ....................................................... 8 Tool Base Plate.................................................... 24 Total Counter ....................................................... 13

CP-871 © Panduit Corp. 2006
REFERENCE MANUAL
Website: www.panduit.com E-mail: [email protected]
Technical Support: 888-506-5400, ext. 3255
Fax: (630) 759-7532
PA25085A01Rev. 00 3-2006

CP-871 REFERENCE MANUAL
Page: 1 of 31
TABLE OF CONTENTS
A. SAFETY REGULATIONS ENGLISH......................................................................... 4
A1. Symbols...................................................................................................................... 4
A2. Product description .................................................................................................... 4
A3. Responsibilities .......................................................................................................... 4
A4. Personal qualifications ............................................................................................... 4
A5. Danger areas.............................................................................................................. 4
A6. Safety requirements ................................................................................................... 4
1. ABOUT THIS OPERATOR MANUAL....................................................................... 5
1.1. Important Information ................................................................................................. 5
1.1.1. Manufacturer and Contact Address ...................................................................................... 5
1.1.2. Target Market........................................................................................................................ 5
1.1.3. Obligation to Read ................................................................................................................ 5
1.1.4. Validity................................................................................................................................... 5
1.1.5. Contents and Purpose .......................................................................................................... 5
1.1.6. Location................................................................................................................................. 5
1.1.7. Symbols ................................................................................................................................ 6
1.1.7.1. Security Tags..................................................................................................................................... 6
1.1.7.2. Security Tag ...................................................................................................................................... 6
1.2. Product Description.................................................................................................... 7
1.2.1. Tag ........................................................................................................................................ 7
1.2.2. Application............................................................................................................................. 7
1.2.3. Application Limits .................................................................................................................. 7
1.2.4. Conformance......................................................................................................................... 7
1.2.5. Danger Areas ........................................................................................................................ 8
1.2.6. Technical Data ...................................................................................................................... 8
CP-871 REFERENCE MANUAL
Page: 2 of 31
2. FUNCTIONS .............................................................................................................. 9
2.1. Processing.................................................................................................................. 9
2.2. Crimping Connections................................................................................................ 9
3. CIRCUIT POINTS .................................................................................................... 10
3.1. Overview .................................................................................................................. 10
3.1.1. Crimp Force Monitoring (Optional) ...................................................................................... 10
3.1.2. Pneumatic Valve (Optional) ................................................................................................ 10
3.1.3. FOOT PEDAL ..................................................................................................................... 10
3.1.4. Fuse Holder......................................................................................................................... 10
3.1.5. Power Supply ...................................................................................................................... 10
4. OPERATING ELEMENTS ....................................................................................... 11
4.1. Main Switch .............................................................................................................. 11
4.2. Control Panel............................................................................................................ 11
4.2.1. Display ................................................................................................................................ 12
4.2.2. Keyboard............................................................................................................................. 12
5. MONITORS, MENUS............................................................................................... 13
5.1. Main Menu................................................................................................................ 14
5.2. Settings .................................................................................................................... 14
5.2.1. Menu language ................................................................................................................... 14
5.2.2. Contrast Setting .................................................................................................................. 15
5.2.3. Endurance Test................................................................................................................... 16
5.3. Menu Counters......................................................................................................... 17
5.3.1. Reset Counter ..................................................................................................................... 17
5.3.2. Programming Batch ............................................................................................................ 17
5.3.2.1. Total Counter................................................................................................................................... 18
5.4. Functions.................................................................................................................. 18
5.4.1. Crimp Speed ....................................................................................................................... 18
5.4.2. Crimp Force ........................................................................................................................ 18

CP-871 REFERENCE MANUAL
Page: 3 of 31
5.4.3. Pneumatic Valve (Option) ................................................................................................... 19
5.4.4. Split Cycle ........................................................................................................................... 20
6. TOOL REPLACEMENT........................................................................................... 21
6.1. Roller Carrier ............................................................................................................ 21
6.2. Contact guide plate .................................................................................................. 22
6.3. Applicator Assembly................................................................................................. 23
6.4. Remove lateral cover ............................................................................................... 24
6.5. Setting the Crimp Height .......................................................................................... 25
7. START-UP ............................................................................................................... 26
7.1. Connect Compressed air ......................................................................................... 27
8. PRODUCTION ......................................................................................................... 28
8.1. Production start ........................................................................................................ 28
9. FAULT MESSAGES ................................................................................................ 29
10. DISPOSAL............................................................................................................... 30
10.1. Packaging................................................................................................................. 30
10.2. Machine.................................................................................................................... 30

CP-871 REFERENCE MANUAL
Page: 4 of 31
A. SAFETY REGULATIONS ENGLISH
A1. Symbols
Please follow exactly the work and processes marked with this pictogram. Failure to do so may result in death or severe injury.
Please follow exactly the work and processes marked with this pictogram. Failure to do so may lead to minor injuries and to damage to the machine.
A2. Product description The PANDUIT CP-871 is a crimping machine for the processing of all terminal, disconnect and butt splice crimping contacts up to a cross section of 6mm2 (AWG10). The CA-800EZ and CA9 applicators can be fit in. The operator interface consists of membrane keypad and a display. Functions such as speed control, split cycle, pneumatic valve control, and various counter functions are selectable over the interface. The CP-871 may only be used as described in the enclosed operating manual. Any deviation of the operation mode, additions and extensions must first be discussed with Panduit.
A3. Responsibilities The machine operator is responsible for ensuring that every employee who uses the PANDUIT CP-871 has received training in accordance with these operating instructions (initial operation, operation, maintenance). The training of the operating personnel must include the following:
• Purpose of the machine (see section A2 Product
description).
• Danger areas (see section A4 Personal qualifications).
• Safety instructions (see Default A6 Safety
requirements).
• Operating the machine in accordance with these
operating instructions.
A4. Personal qualifications To ensure that all instructions are understood, training must take place in the language of the operating personnel. This means that the following personnel qualifications are required:
Assembly, initial operation, instruction
Technical specialist staff who have a good command of English and/or German as well as of the language of the operating personnel.
Operation Trained staff in accordance with A3 Responsibilities.
Maintenance, service
Technical specialist staff who have a good command of English or German.
A5. Danger areas • The whole area of the processing space
underneath the Plexiglas cover - Danger due to the crimp process of the applicator
- Danger from crimp stroke • The entire interior area of the machine and
the metal casing: - Danger from electrical current - Danger from mechanical moving parts
A6. Safety requirements • This machine has been designed in
accordance with the European Standard EN294.
• The machine must only be operated in rooms that are dry and free from dust.
• Never operate the machine without its protective covers.
• Never work on the machine without wearing eye protection.
• Disconnect the machine from the electrical and/or compressed air supply before carrying out any maintenance work.
• Never operate the machine with the mains earth disconnected.
• Do not make any modifications to the machine and only utilise it for its intended purpose according to Paragraph A2 Product description. Other applications are only permitted with the written approval of the manufacturer. The manufacturer will accept no liability for damage resulting from the disregard of this regulation.
• Never operate the machine without first having read through and understood all instructions.
• Repair work may only be carried out by authorised persons who have been specially trained for this work.
• Ensure if you work on the machine that long hair is not worn loose, and do not wear loose clothing or ornaments that could become caught in the moving parts of the machine.
• Only use the lubricant that was delivered with this machine according to these operating instructions.

CP-871 REFERENCE MANUAL
Page: 5 of 31
1. ABOUT THIS OPERATOR MANUAL Thank you for trusting the PANDUIT Technology. With the PANDUIT CP-871, you have acquired a semi-automatic crimping machine for the processing of all terminal, disconnect and butt splice crimping contacts up to a diameter of 6mm2 (AWG 10).
1.1. Important Information
1.1.1. Manufacturer and Contact Address See Cover Page
1.1.2. Target Market Technical Specialists (Team Leader, fitter) See Chapter A4 Personal qualifications on Page 4
1.1.3. Obligation to Read As operator and user one is obliged to read and understand this Reference Manual before the initial operation, especially the chapter on safety regulations. Your safety is at stake! Should there be any questions or lack of clarity, please contact your local Panduit representative.
1.1.4. Validity This User Manual is valid for the PANDUIT CP-871 only.
1.1.5. Contents and Purpose This Reference Manual contains all relevant information regarding the assembly, function, commissioning and operation of the CP-871. This Reference Manual is part of the client documentation and void without the Operating Manual and the Maintenance Manual.
1.1.6. Location This Reference Manual must be available to the team leader / fitter at the working place.

CP-871 REFERENCE MANUAL
Page: 6 of 31
1.1.7. Symbols
1.1.7.1. Security Tags Please read the following security advice with the tagged warnings thoroughly to avoid possible injuries or material damage.
This symbol warns of immediate danger that could lead to severe injuries or death.
This symbol warns of a possibly dangerous situation that could lead to serious injury or death.
This symbol warns of a possibly dangerous situation that could lead to injury or material damage.
This symbol points to important information with regards to usage. Disregard can lead to malfunction.
1.1.7.2. Security Tag
• Danger moving parts
• Attention danger through electric power
• Attention, warning of dangerous area
• Qualified Personnel Only

CP-871 REFERENCE MANUAL
Page: 7 of 31
1.2. Product Description
1.2.1. Tag The nameplate is situated on the left side of press and contains the following information:
Model: CP-871 Voltage information: 110 VAC bis T10A 230 VAC T 6A 50/60 Hz 255 VA
1.2.2. Application The PANDUIT CP-871 may only be used for processing crimping contacts and cables, i.e. to activate the applicators.
1.2.3. Application Limits Enviromental Temperature: +5°C to +40°C Storage and Transport Temperature: -25°C to +55°C Relative humidity: 90% on 20°C 50% on 40°C
1.2.4. Conformance The CP-871 conforms entirely with the CE and EMV guidelines (mechanic and electric security, electromagnetic tolerance.)

CP-871 REFERENCE MANUAL
Page: 8 of 31
1.2.5. Danger Areas
Picture 1.2.5: Danger Areas
Danger through moving parts in the working area
1.2.6. Technical Data Force 3.7 Tons / (33 kN)
Power (0.75 KW)
Cross Section Range Up to approx. AWG 10 / (6mm2). Material thickness up to .039 in. / (1mm) length of the crimping zone, up to .315 in. / (8mm)
Stroke 1.57 in. / (40 mm); Optional 1.18 in. / (30 mm)
Shut Height 5.345 in. / (135.788 mm)
Height Adjustment Range ± .0098 in. / (0.25 mm), in increments
Cycle Time Adjustable from 350ms to 1 s
Press Activation Foot Pedal
Noise Level < 70 dB (A)
Power Connector 115 VAC bis 230 VAC
Net Frequency 50/60 Hz
Capacity 255 VA
Dimensions [in] (W x H x D) 13“ x 30“ x 16“ / (320 x 750 x 400 mm)
Weight 176 lbs. / (80 kg)
Dimensions in ( ) are metric

CP-871 REFERENCE MANUAL
Page: 9 of 31
2. FUNCTIONS 2.1. Processing
The stripped conductor is held in the connector. Processing is activated with the foot pedal. The crimping press moves the tool down to the lower dead center and thereafter to the upper dead center. The tool separates the connector from the carrier strip, crimps the connector with the conductor and feeds a new connector into position. The carrier strip is cut by the applicator die.
2.2. Crimping Connections The term crimping comes from the English word “to crimp” which means press, impress, fold or fold deform. In the electrical installation language, crimping means to mechanically fold or press the connector onto the conductor.
Bare Connector Stripped conductor Crimped Product
CP-871 REFERENCE MANUAL
Page: 10 of 31
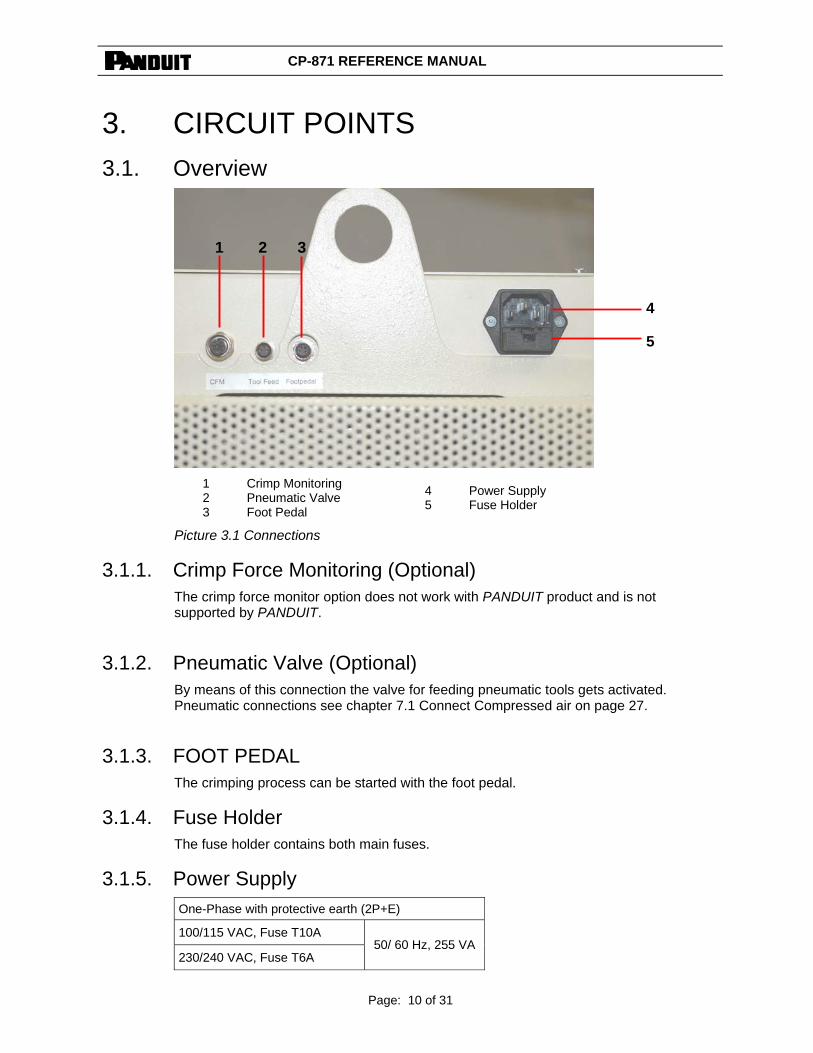
3. CIRCUIT POINTS 3.1. Overview
1 Crimp Monitoring 2 Pneumatic Valve 3 Foot Pedal
4 Power Supply 5 Fuse Holder
Picture 3.1 Connections
3.1.1. Crimp Force Monitoring (Optional) The crimp force monitor option does not work with PANDUIT product and is not supported by PANDUIT.
3.1.2. Pneumatic Valve (Optional) By means of this connection the valve for feeding pneumatic tools gets activated. Pneumatic connections see chapter 7.1 Connect Compressed air on page 27.
3.1.3. FOOT PEDAL The crimping process can be started with the foot pedal.
3.1.4. Fuse Holder The fuse holder contains both main fuses.
3.1.5. Power Supply One-Phase with protective earth (2P+E)
100/115 VAC, Fuse T10A
230/240 VAC, Fuse T6A 50/ 60 Hz, 255 VA
1 2 3
4 5

CP-871 REFERENCE MANUAL
Page: 11 of 31
4. OPERATING ELEMENTS 4.1. Main Switch
The CP-871 has no main switch. The power supply is cut off by removing the power cord from the machine or by using the emergency stop button.
Picture 4.1: Main Switch
4.2. Control Panel
Picture 4.2: Control Panel with Keyboard
LED Operational
Display
Keyboard
Emergency Stop Button
12345678912345671234567891234567
CP-871 REFERENCE MANUAL
Page: 12 of 31
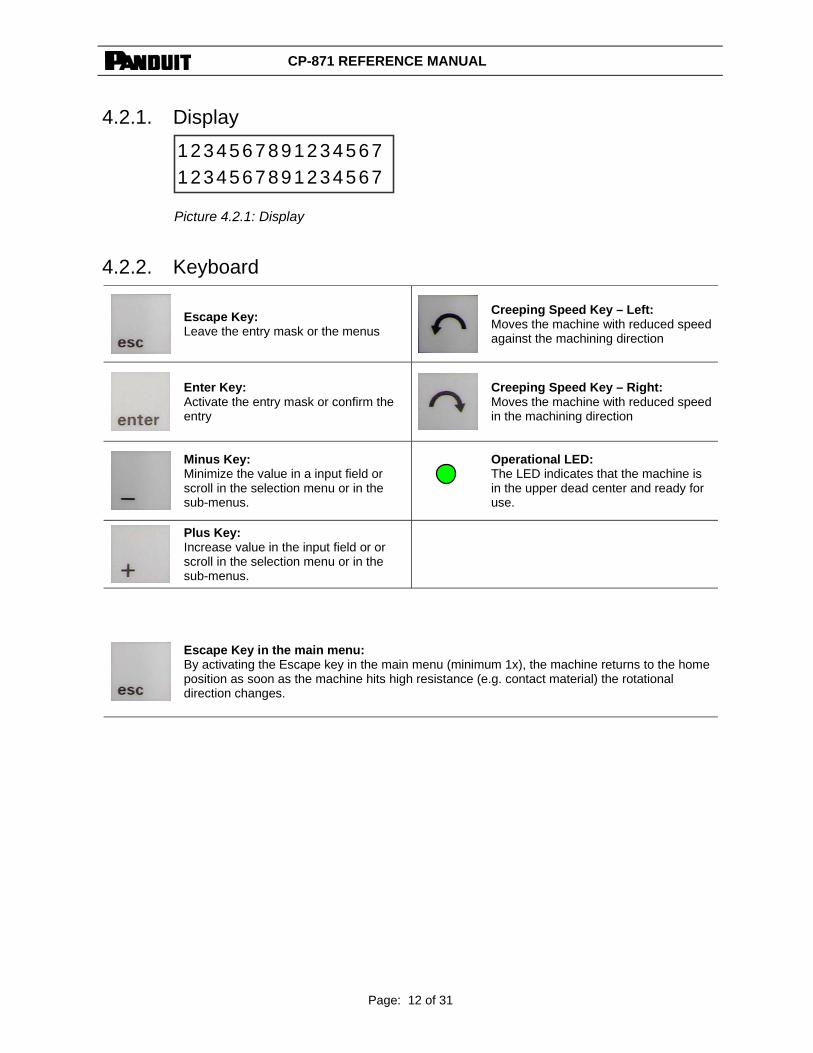
4.2.1. Display
Picture 4.2.1: Display
4.2.2. Keyboard
Escape Key: Leave the entry mask or the menus
Creeping Speed Key – Left: Moves the machine with reduced speed against the machining direction
Enter Key: Activate the entry mask or confirm the entry
Creeping Speed Key – Right: Moves the machine with reduced speed in the machining direction
Minus Key: Minimize the value in a input field or scroll in the selection menu or in the sub-menus.
Operational LED: The LED indicates that the machine is in the upper dead center and ready for use.
Plus Key: Increase value in the input field or or scroll in the selection menu or in the sub-menus.
Escape Key in the main menu: By activating the Escape key in the main menu (minimum 1x), the machine returns to the home position as soon as the machine hits high resistance (e.g. contact material) the rotational direction changes.
12345678912345671234567891234567

CP-871 REFERENCE MANUAL
Page: 13 of 31
5. MONITORS, MENUS Start menu When starting the CP-871, the software version is briefly indicated. Main Menu Selection menus Menu Counters Menu Functions Menu Settings
C o u n t e r s M e n u :
F u n c t i o n s M e n u :
9 9 0 9 0 0 0 0 T o t a l C o u n t e r
9 9 0 9 0 0 R e s e t C o u n t e r
0 0 0 9 0 0 S e t B a t c h
1 0 0 % C r i m p S p e e d
O N / O F F C r i m p F o r c e
O N / O F F 2 2 0 m sP n e u m a t i c V a l v e
O N / O F F 1 2 0 °S p l i t C y c l e
S p e e d 7 5 %S p l i t C y c l e
# # # # P a s s w o r d
E n g l i s h L a n g u a g e
S e t t i n g C o n t r a s t :
S e t t i n g s M e n u :
0 0 0 9 0 0 E n d u r a n c e T e s t
D r i v e V . X X . X X P a n e l V . X X . X X
C o u n t e r : 9 9 9 9 9 9B a t c h : 0 0 9 9 9 9

CP-871 REFERENCE MANUAL
Page: 14 of 31
5.1. Main Menu
• Lot Counter • Piece Counter
• Error Message Display • Safety cover open, crimping error, machine not at
home position, activating device not ready.
• Information Display • Lot processed
5.2. Settings
5.2.1. Menu language
• Main Menu
• , Selection menu „Counters“
• With 2 x change to „Settings“ in the menu
• With log into the sub-menu password
• , Password entry is activated (the first figure flashes) Password 0200.
• Change the numerical value or . Once
the wanted value is reached, confirm . (the second figure flashes).
• Repeat the procedure until all four figures have been entered
• , Sub-Menu language setting (if the password
was incorrectly entered the sub-menu cannot be accessed.
• , Function Language setting gets activated.
With or choose the language (German, English, French, Italian, Spanish)
• , Confirm language.
• 2 x , back to main menu.
# # # # P a s s w o r d
0 # # # P a s s w o r d
B a t c h : 0 0 9 9 9 9C o u n t e r : 9 9 9 9 9 9
B a t c h : 0 0 9 9 9 9C o u n t e r : 9 9 9 9 9 9
C o u n t e r s M e n u :
S e t t i n g s M e n u :
E n g l i s h L a n g u a g e
C O V E R O P E N S A F E T Y
B a t c h : 0 0 9 9 9 9C o u n t e r : 9 9 9 9 9 9
B a t c h P r o c e s s e dC o u n t e r : 9 9 9 9 9 9
CP-871 REFERENCE MANUAL
Page: 15 of 31
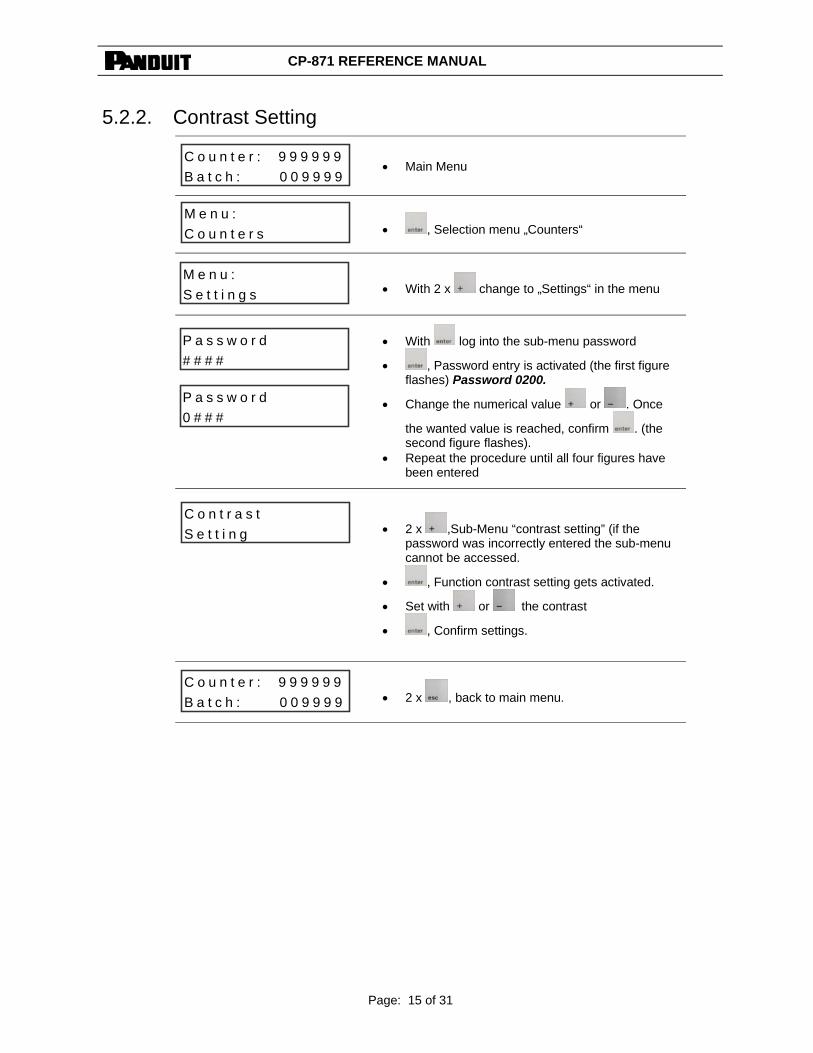
5.2.2. Contrast Setting
• Main Menu
• , Selection menu „Counters“
• With 2 x change to „Settings“ in the menu
• With log into the sub-menu password
• , Password entry is activated (the first figure flashes) Password 0200.
• Change the numerical value or . Once
the wanted value is reached, confirm . (the second figure flashes).
• Repeat the procedure until all four figures have been entered
• 2 x ,Sub-Menu “contrast setting” (if the password was incorrectly entered the sub-menu cannot be accessed.
• , Function contrast setting gets activated.
• Set with or the contrast
• , Confirm settings.
• 2 x , back to main menu.
S e t t i n g C o n t r a s t
B a t c h : 0 0 9 9 9 9C o u n t e r : 9 9 9 9 9 9
C o u n t e r s M e n u :
S e t t i n g s M e n u :
# # # # P a s s w o r d
0 # # # P a s s w o r d
B a t c h : 0 0 9 9 9 9C o u n t e r : 9 9 9 9 9 9

CP-871 REFERENCE MANUAL
Page: 16 of 31
5.2.3. Endurance Test
• Main Menu
• , Selection menu „Counters“
• With 2 x change to „Settings“ in the menu
• With log into the sub-menu password
• , Password entry is activated (the first figure flashes) Password 0200.
• Change the numerical value or . Once
the wanted value is reached, confirm . (the second figure flashes).
• Repeat the procedure until all four figures have been entered
• 3 x , sub-menu „Endurance Test“ (if password
was entered incorrectly, the menu cannot be selected).
• , Function “Endurance Test” is activated. With
or the number of cycles get chosen.
• , Confirm entry. the Endurance Test is activated and the number of cycles chosen are processed.
• By pressing . Endurance Test can be discontinued
• 2 x , back to main menu.
B a t c h : 0 0 9 9 9 9C o u n t e r : 9 9 9 9 9 9
C o u n t e r s M e n u :
S e t t i n g s M e n u :
# # # # P a s s w o r d
0 # # # P a s s w o r d
B a t c h : 0 0 9 9 9 9C o u n t e r : 9 9 9 9 9 9
0 0 0 9 0 0 E n d u r a n c e T e s t

CP-871 REFERENCE MANUAL
Page: 17 of 31
5.3. Menu Counters
• Main menu
• , Selection menu „Counters“
• With change to menu „Counters“.
5.3.1. Reset Counter
• , Activate „Reset Counter” (figures flash).
• , Reset Counter
• 2 x , back to the main menu or directly to the
submenu “Set Batch” with .
5.3.2. Programming Batch
• , Submenu „Set Batch“.
• , Activate function „Set Batch“.
• With or Enter Batch.
• , Confirm entry.
• 2 x , back to main menu or directly to sub-
menu „Total Counter“ with
• Once the Batch is reached „Batch Processed“ will
appear. By pressing the new Batch is activated. To deactivate the Batch function, programm a Batch value of „000000“.
B a t c h P r o c e s s e dC o u n t e r : 9 9 9 9 9 9
0 0 2 5 0 0S e t B a t c h
B a t c h : 0 0 9 9 9 9C o u n t e r : 9 9 9 9 9 9
B a t c h : 0 0 9 9 9 9C o u n t e r : 9 9 9 9 9 9
B a t c h : 0 0 9 9 9 9C o u n t e r : 9 9 9 9 9 9
C o u n t e r s M e n u :
9 9 0 9 0 0R e s e t C o u n t e r
9 9 0 9 0 0R e s e t C o u n t e r
0 0 0 0 0 0R e s e t C o u n t e r
0 0 0 9 0 0S e t B a t c h

CP-871 REFERENCE MANUAL
Page: 18 of 31
5.3.2.1. Total Counter
• 2 x , sub-menu „Total Counter” (Information)
• 2 x , back to main menu. With into sub-
menu „Det Batch” or with 2x into sub-menu „Reset Counter”.
5.4. Functions
• Main Menu
• , Selection menu „Counters“
• With go to menu „Functions“
• With go to sub-menu „Functions“.
5.4.1. Crimp Speed
• , „Crimp Speed“ function is activated (figures are flashing).
• With and one can adjust the pressing
speed in percentage. • 100% max. speed ca. 350ms • 5% min .speed ca. 1s
• , accept entry.
• 2 x , back to main menu or with direct
into the sub-menu „Crimp Force“ (Crimp Force monitoring).
5.4.2. Crimp Force This feature does not function with PANDUIT product and is not supported by PANDUIT.
B a t c h : 0 0 9 9 9 9C o u n t e r : 9 9 9 9 9 9
9 9 0 9 0 0 0 0T o t a l C o u n t e r
B a t c h : 0 0 9 9 9 9C o u n t e r : 9 9 9 9 9 9
C o u n t e r s M e n u :
F u n c t i o n s M e n u :
1 0 0 % C r i m p S p e e d
1 0 0 % C r i m p S p e e d
B a t c h : 0 0 9 9 9 9C o u n t e r : 9 9 9 9 9 9
0 8 0 % C r i m p S p e e d

CP-871 REFERENCE MANUAL
Page: 19 of 31
5.4.3. Pneumatic Valve (Option)
A badly set feeder timing may damage the machine. Always install pneumatic tools without contact material, until the feeder timing is properly set.
• 2 x , sub-menu „Pneumatic Valve“.
• With , „Pneumatic Valve“ function is activated (figures are flashing).
• With and activation of the „Pneumatic
Valve“ function and by press the key timing of the valve can be programmed.
• , accept entry. • The length of time the valve is engaged is
permanently programmed and can not be changed..
• 2 x , back to the main menu or with go directly into the sub-menu „Split Cycle“.
• Connect the compressed air on the pressure gauge.
• Assemble the tool according to Chapter 6.3 Applicator Assembly on page 23.
• Connect the applicator to the normally open port of the pneumatic valve.
• Switch on the air pressure unit using the main switch at the pressure gauge.
• Set gage at 6 bar processing pressure
B a t c h : 0 0 9 9 9 9C o u n t e r : 9 9 9 9 9 9
O F F P n e u m a t i c V a l v e
O N 2 2 0 m sP n e u m a t i c V a l v e

CP-871 REFERENCE MANUAL
Page: 20 of 31
5.4.4. Split Cycle
• 3 x , sub-menu „Split Cycle“.
• , „Split Cycle“ function is activated (figures are flashing).
• With and the „Split Cycle“ function can
be activated and by press the key the breakpoint can be programmed.
• The „Split Cycle“ is used mainly for end sleeve contacts, to centre the contact in the crimping stamp and to ensure easier handling for the operator.
• Change to the sub-menu „Split Cycle Speed“ with
.
• , „Split Cycle Speed“ function is activated (figures are flashing).
• With and the pressing speed can be
adjusted in percent.The speed is programmed from the upper dead center to the breakpoint.
• 100% max. Speed. • 5% min. Speed.
• , accept entry.
• 2 x , back to the main menu or with back
into the previous menu.
• Press the key to initialise the machine (min. 3s)
O N 1 2 0 °S p l i t C y c l e
Break point
Upper dead center
B a t c h : 0 0 9 9 9 9C o u n t e r : 9 9 9 9 9 9
O F F S p l i t C y c l e
S p e e d 7 5 %S p l i t C y c l e
S p e e d 4 5 %S p l i t C y c l e
CP-871 REFERENCE MANUAL
Page: 21 of 31
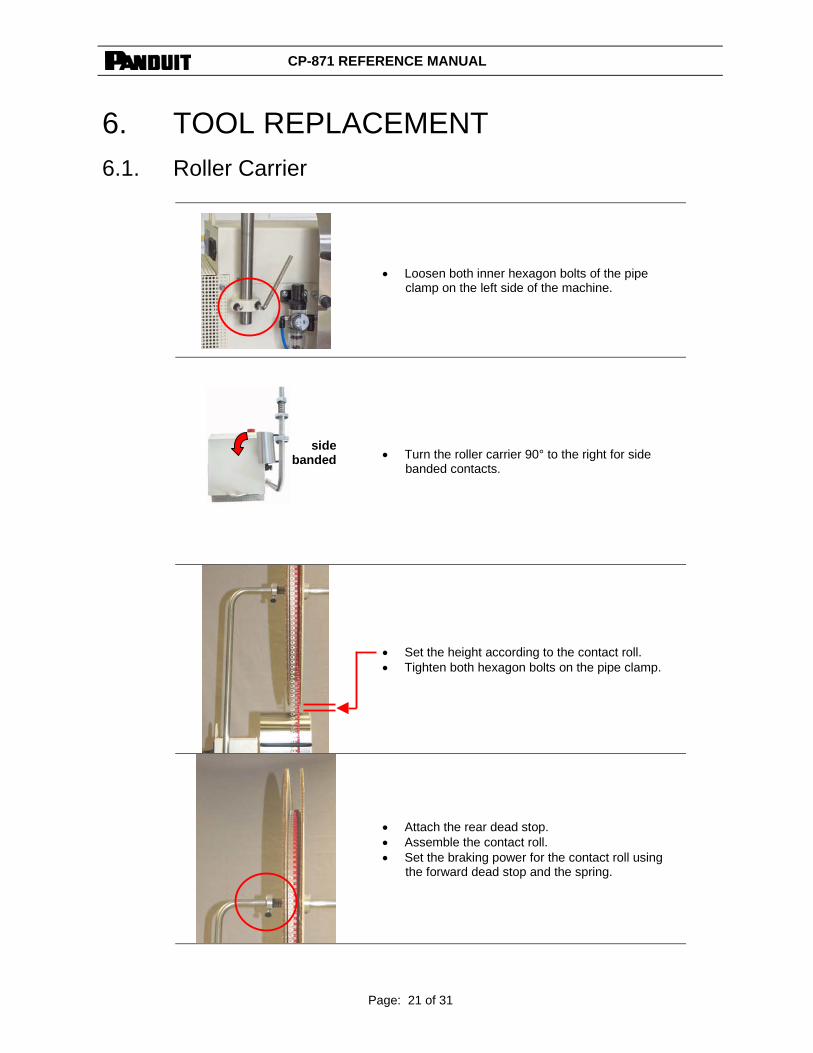
6. TOOL REPLACEMENT 6.1. Roller Carrier
• Loosen both inner hexagon bolts of the pipe clamp on the left side of the machine.
side banded • Turn the roller carrier 90° to the right for side
banded contacts.
• Set the height according to the contact roll. • Tighten both hexagon bolts on the pipe clamp.
• Attach the rear dead stop. • Assemble the contact roll. • Set the braking power for the contact roll using
the forward dead stop and the spring.

CP-871 REFERENCE MANUAL
Page: 22 of 31
6.2. Contact guide plate
• Loosen both of the knurled screws and lift the sheet plate.
• Pull the sheet plate to the right and then remove it.
• Assemble the sheet plate onto the distance bolt at the left for side feed applicators.
• Attach the sheet plate using the knurled screws.
• The contact material must be fed through the black leading bracket
• Feed material into the applicator.
side- banded

CP-871 REFERENCE MANUAL
Page: 23 of 31
6.3. Applicator Assembly
• Open the front guard and remove the contact material.
• Move the clamping lever on the left downwards until the clamps are open.
• Assemble / disassemble the tool in the nut and after remove at the bottom from the retaining clamps of the applicator ground plate.
• Move the clamping lever upwards until the clamping fingers clamp the tool in their respective grooves.
• Check that the tool is properly fastened and close the protective cover.
• Set the tool according to the operating guidelines set out by the manufacturer.

CP-871 REFERENCE MANUAL
Page: 24 of 31
6.4. Remove lateral cover To use large tools on the machine a part of the lateral safety cover can be removed.
As part of the tools may protrude laterally from the machine’s guard, these may come in touch with movable mechanical parts. If this happens, the machine may no longer conform to the CE standard rules. Therefore removal of the lateral part of the guard is at ones own risk.
• Open the front guard (safety cover) and remove contact material
• Loosen both knurled screws and lift the sheet plate.
• Pull the sheet plate to the right and remove.
• Loosen both inside hexagonal screws.
• Remove the lateral cover piece. • Assemble the tool and the contact lead.
To ensure safety, assemble the lateral cover piece removed immediately after use.

CP-871 REFERENCE MANUAL
Page: 25 of 31
6.5. Setting the Crimp Height The crimping height of the CA-800EZ and CA9 applicators can be adjusted within the applicator. Further crimp height adjustments can be made to the press itself.
After each tool change, (before the first crimp), set the height of the machine to 0 Not doing so may damage the tool. Only qualified personnel may carry out this setting.
• Micro adjustment of the crimp height.
• Turn the flange toothed surface. • Minus direction, towards the left, increases the
crimping height. (e.g. 1.27 => 1.30). • Plus direction, towards the right, decreases the
crimping height (e.g. 1.27 => 1.24).
• The setting is limited to ± 0.25 mm. • The graduation is 0.025 mm per line. • The reference point (135.788 mm) is marked with
the figure 0.
• Should the height setting not be used, this function can be blocked by tightening the inner hexagonal screw.

CP-871 REFERENCE MANUAL
Page: 26 of 31
7. START-UP
The CP-871 may only be started-up by trained personnel (Panduit personnel or trained personnel at the user).
• After unpacking use the included lifting column and lift the machine with a crane or another auxiliary device onto a leveled working area (table, workbench, etc.)
• Open the safety cover and remove any packaging residuals. • Connect the foot pedal. • Plug in the line cord.

CP-871 REFERENCE MANUAL
Page: 27 of 31
7.1. Connect Compressed air
• The air pressure’s entry pressure may never exceed 7 bar / 0.7 MPa • Operating pressure must be set at a minimum of 4-5 bar / 0.4-0.5 MPa • Use only dry, clean, oil free air pressure.
• Connect the compressed air to the service unit. • Adjust the operating pressure.
To do so pull the setting button from the interlock and turn clockwise until the manometer shows 4-5 bar (0.4-0.5 MPa). Press the setting button downward until it engages.
Picture 7.1: Connect Compressed air
Setting Button Manometer
Main switch Connection
CP-871 REFERENCE MANUAL
Page: 28 of 31
8. PRODUCTION
• Engage the CP-871 by plugging the line cord and/or unlocking the Emergency-Off button. The CP-871 activates itself.
• Set the menu language according to the instructions in chapter 5.2.1 Menu language on page 14.
• Assemble the contact material according to the instructions in chapter 6.1 Roller Carrier on page 21 and chapter 6.2 Contact guide plate on page 22.
• Assemble the applicator according to the applicator instructions in chapter 6.3 Applicator Assembly on page 23.
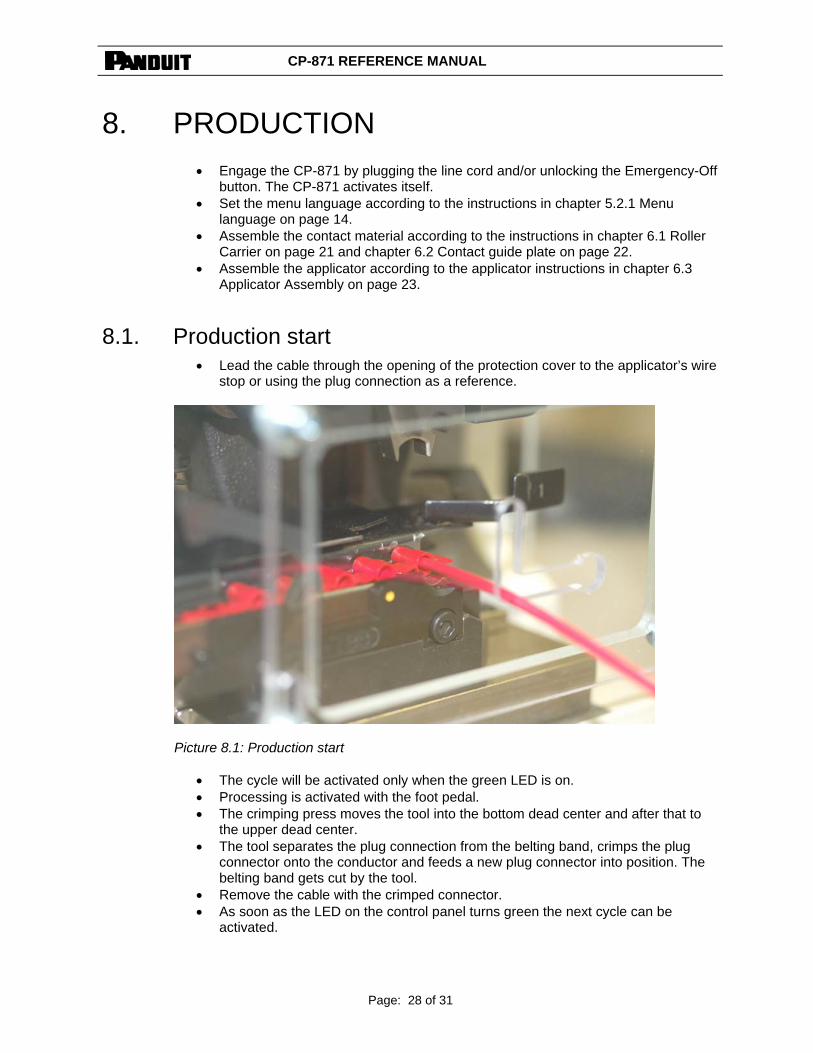
8.1. Production start • Lead the cable through the opening of the protection cover to the applicator’s wire
stop or using the plug connection as a reference.
Picture 8.1: Production start
• The cycle will be activated only when the green LED is on. • Processing is activated with the foot pedal. • The crimping press moves the tool into the bottom dead center and after that to
the upper dead center. • The tool separates the plug connection from the belting band, crimps the plug
connector onto the conductor and feeds a new plug connector into position. The belting band gets cut by the tool.
• Remove the cable with the crimped connector. • As soon as the LED on the control panel turns green the next cycle can be
activated.

CP-871 REFERENCE MANUAL
Page: 29 of 31
9. FAULT MESSAGES
Fault Diagnosis Action Message: Protection Cover open
• Protection cover open • Connect protection cover to CP-871.
Message: Machine not in home Position
• Machine is not in the upper dead center or blocked • With the help of or
return to Home Position. The green LED glows
• By activating the key in the main menu (minimum 3x), the machine returns to the home position. The machine changes the turning direction automatically as soon as it is in contact with a resistor.
Message: Crimp Drive not ready
• 15 V Error • Over current fault • Over temperature fault • Watchdog fault
• Check fuse on print • machine over-loaded • replace drive
Message: CFM not ready
• Crimp force monitoring without function.
• Turn on CFM and check the connection of the cable.
• Set the CFM to the production menu.
No display on the monitor • Power supply not connected • Fuse defect • Emergency stop activated
• Disengage the emergency-off button or plug in power.
• Check the fuse
Machine does not switch on
• Power supply not connected • Fuse defect • Emergency stop activated
• Disengage the emergency-off button
• Plug in power • Check fuse on the power
supply. Wrong crimping height • Crimp height not adjusted • Adjust the crimp height on the
machine adjustment.
Contact material does not feed correctly
• Roller carrier wrong adjusted • Contact break wrong
adjusted • Contact guide plate wrong
mounted
• Adjust the position of the roll on the roller carrier.
• Set the contact break. • Mount the contact guide right.
The contact material must be fed trough the black leading bracket.
CP-871 REFERENCE MANUAL
Page: 30 of 31
10. DISPOSAL The equipment must be properly disposed of according to the local and legal regulations.
10.1. Packaging The packaging consists of environment friendly materials such as wood, nails, cardboard, paper and synthetics and can be disposed of as regular waste.
10.2. Machine The machine is made up of 90% aluminium and steel, 5% other metals and up to 5% electric materials and synthetics. The environmentally friendly disposal of the machine must be done according to each country legal regulations.

CP-871 REFERENCE MANUAL
Page: 31 of 31
Index A
Application .............................................................7 Application Limits...................................................7 Applicator Assembly ............................................23
C
CFM not ready .................................................29 CIRCUIT POINTS................................................10 Connect Compressed air .....................................27 Connector ..............................................................9 Contact guide plate..............................................22 Contact material does not feed correctly ..29 Contrast Setting ...................................................15 Control Panel .......................................................11 Crimp Drive not ready....................................29 Crimp Force.........................................................18 Crimp Speed........................................................18 Crimping Connections ...........................................9
D
Danger Areas ........................................................8 Display.................................................................12 Disposal...............................................................30
E
Endurance Test ...................................................16
F
Fault Messages ...................................................29 Functions .............................................................18 Fuse Holder .........................................................10
K
Keyboard .............................................................12
M
Machine ...............................................................30 Machine does not switch on ........................29 Machine not in home Position .....................29
Main Menu .......................................................... 14 Main Switch ........................................................ 11 Menu Counters ................................................... 17 Menu language ................................................... 14 Monitors, Menus ................................................. 13
N
No display on the monitor ........................... 29
P
Packaging ........................................................... 30 Pneumatic Valve ................................................. 19 Power Supply...................................................... 10 Processing ............................................................ 9 Production........................................................... 28 Programming Batch ............................................ 17 Protection Cover open.................................. 29
R
Remove lateral cover .......................................... 24 Reset Counter..................................................... 17 Roller Carrier ...................................................... 21
S
Security Tag.......................................................... 6 Security Tags........................................................ 6 Setting the Crimp Height ..................................... 25 Settings............................................................... 14 software-Version ................................................. 13 Split Cycle........................................................... 20 START-up........................................................... 26
T
Tag ....................................................................... 7 Technical Data...................................................... 8 Total Counter ...................................................... 18
W
Wrong crimping height ................................. 29

CP-871 PA25085A01
Rev. 00 3-2006
SPARE PARTS MANUAL © Panduit Corp. 2006
Website: www.panduit.com E-mail: [email protected]
Technical Support: 888-506-5400, ext. 3255
Fax: (630) 759-7532
CP-871 SPARE PARTS MANUAL
Page: 1 of 2
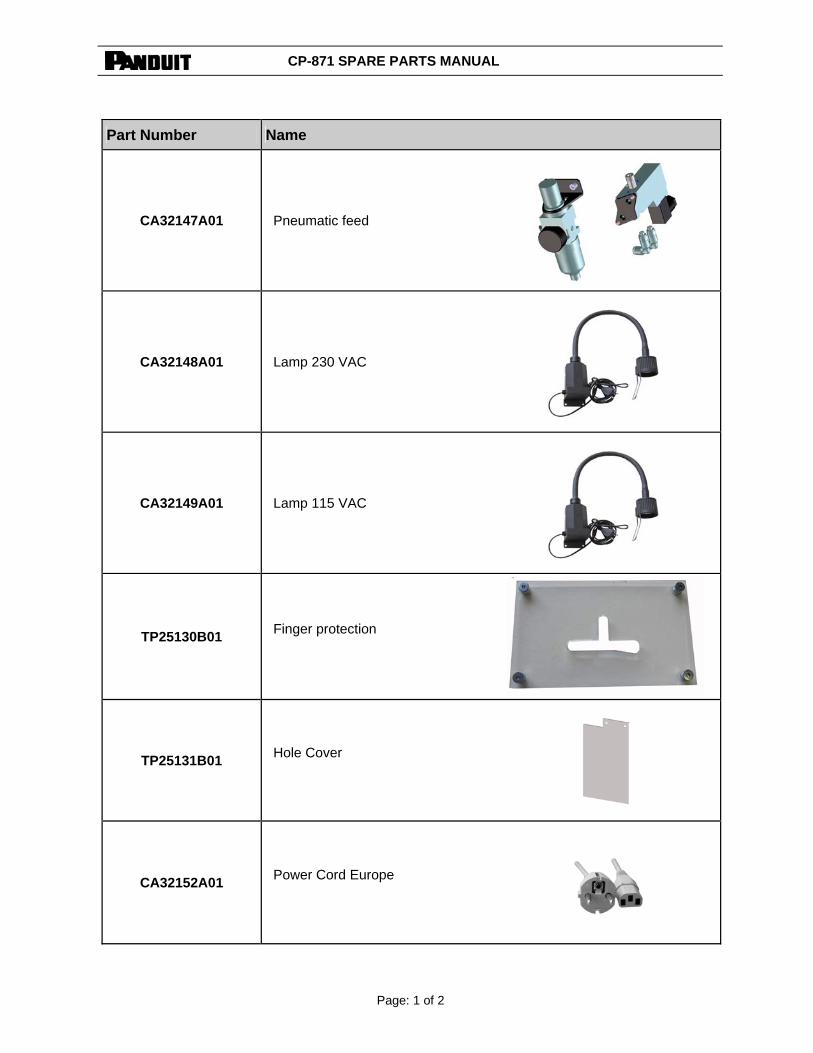
Part Number Name
CA32147A01 Pneumatic feed
CA32148A01 Lamp 230 VAC
CA32149A01 Lamp 115 VAC
TP25130B01 Finger protection
TP25131B01 Hole Cover
CA32152A01 Power Cord Europe

CP-871 SPARE PARTS MANUAL
Page: 2 of 2
Part Number Name
CA32153A01 Power Cord USA
CA32154A01 Fuses 6.3 A/T 5x20 (230V)
CA32155A01 Fuses 10A/T SPT 5x20 (115V)
CA32156A01 Foot pedal
CA32157A01 Grease Microlube GBUY 131
CA32158A01 Hex Key Set
CA32159A01 Packaging


