
1 Copyright © 2016 Matrix Technology Solutions Ltd
www.matrixtsl.com HP0176
MIAC Raspberry Pi
Getting Started Guide
MI5769 MIAC Raspberry Pi with Wi-Fi
MI6693 MIAC Raspberry Pi with Wi-Fi & Bluetooth

2 Copyright © 2016 Matrix Technology Solutions Ltd
Introduction 3
Making a backup 4
The start-up process files 5
Kernel drivers 6
Bash script example 7
Python programming 8
Alternative access methods
RS232 9
WiFi Network share 9
Remote Login via SSH 10
Remote Desktop (RDP) 10
Connecting to a network 11
Security 12
Contents

3 Copyright © 2016 Matrix Technology Solutions Ltd
Introduction
The Raspberry Pi based version of the Matrix TSL
“MIAC” programmable controller offers a wide
range of connectivity, language and programming
options.
This article will discuss some of those methods by
the use of a demonstration program, in this case
written in Python due to it being a popular choice
on the Raspberry Pi platform. Being a scripting
language this also enables quick modification and
testing on the device itself.
A host PC, preferably with WiFi connectivity, is
needed for access to the MIAC. A Linux based PC
has many advantages, but for this article we
assume the use of a Windows based PC. A
development environment is not required,
however there are several tools that will prove
useful and it is suggested that these, or similar,
be installed on a Windows PC.
• Raspberry Pi CM-Boot-Installer (USB utility)
• Win32DiskImager (Disk image copy utility)
• Putty (SSH client)
Remote Desktop (RDP client)
The Raspberry Pi Compute Module Boot Installer
(CM-Boot-Installer.exe) that gives USB based
connectivity can be downloaded from the
Raspberry Pi Foundation web site, currently at:
https://www.raspberrypi.org/documentation/
hardware/computemodule/CM-Boot-
Installer.exe
Once installed on your PC, “RPi Boot” can be run
from the program menu to connect to the MIAC
as attached storage.
Note that for a Linux host it is possible to mount
all the partitions of the solid state drive of the
MIAC compute module. For a Windows host only
the boot partition is accessible via USB.
4 Copyright © 2016 Matrix Technology Solutions Ltd
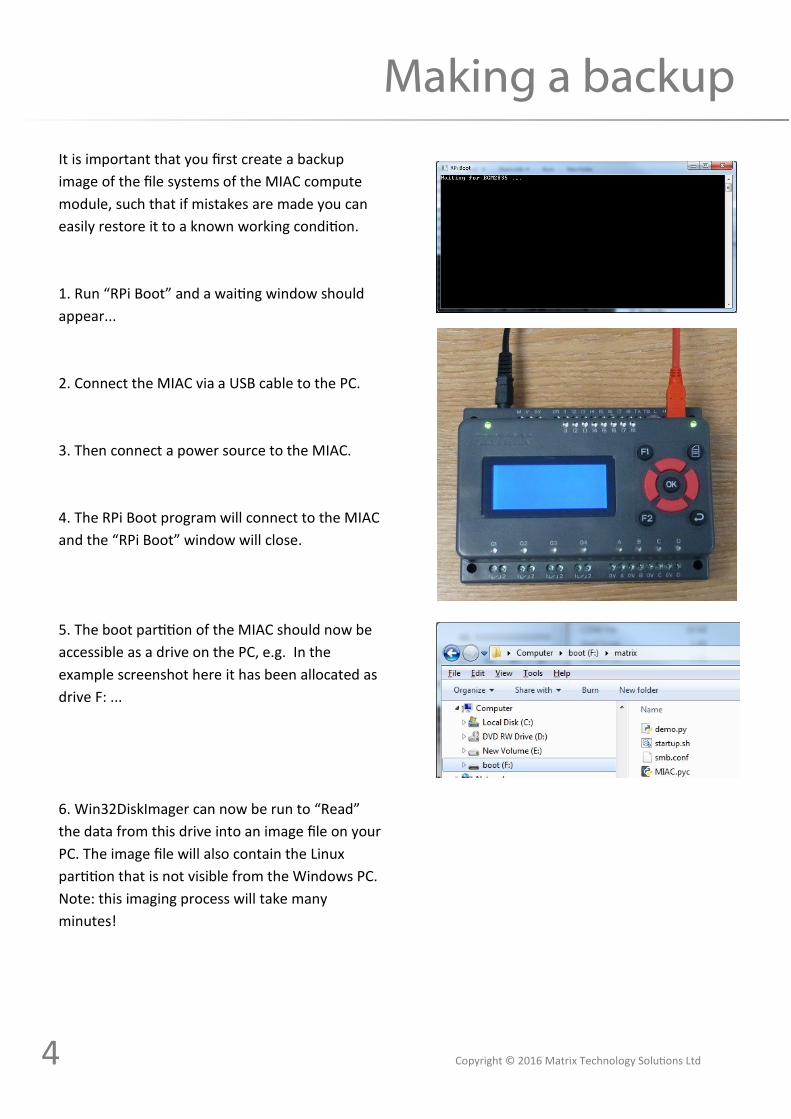
Making a backup
It is important that you first create a backup
image of the file systems of the MIAC compute
module, such that if mistakes are made you can
easily restore it to a known working condition.
1. Run “RPi Boot” and a waiting window should
appear...
2. Connect the MIAC via a USB cable to the PC.
3. Then connect a power source to the MIAC.
4. The RPi Boot program will connect to the MIAC
and the “RPi Boot” window will close.
5. The boot partition of the MIAC should now be
accessible as a drive on the PC, e.g. In the
example screenshot here it has been allocated as
drive F: ...
6. Win32DiskImager can now be run to “Read”
the data from this drive into an image file on your
PC. The image file will also contain the Linux
partition that is not visible from the Windows PC.
Note: this imaging process will take many
minutes!

5 Copyright © 2016 Matrix Technology Solutions Ltd
The start-up process files
In the “matrix” sub-directory of the boot partition
you will see two files, “startup.sh” and
“demo.py”.
These are provided to enable program control of
the MIAC, providing a way to program the MIAC
through this simple attached drive approach.
You are free to edit these files to create your own
application.
Under normal operation, once the MIAC has
booted the operating system, the startup.sh
script is run.
The typical contents of this script are shown
below.
The purpose of this script is to display the IP
address of the MIAC onto the screen and then
run the Python program “demo.py”.
This can easily be edited to run some other
application instead.
The application does not necessarily have to
reside on the boot partition, but this does have
the advantage of being accessible from Windows
via the USB connection. Alternative locations will
be discussed later.
To put the MIAC back into run mode, remove the
power supply, disconnect the USB cable and then
re-apply power to the MIAC.
#!/bin/bash
echo -en "\f\nMIAC Startup Shell\n" > /dev/mdk
uname -sr > /dev/mdk
for i in `seq 1 10`; do
sleep 2
IP="$(hostname -I)"
if [ "$IP" != "" ]; then
echo "${IP}" > /dev/mdk
break
fi
done
/boot/matrix/demo.py &

6 Copyright © 2016 Matrix Technology Solutions Ltd
Kernel drivers
The MIAC has pre-installed kernel driver modules
that simplify the interface to the MIAC custom
hardware. These install two device drivers:
/dev/mdk for access to display and keypad
/dev/mio for access to input and output
As seen in the previous bash example, sending
text to the /dev/mdk device will cause that text
to be printed on the MIAC gLCD.
The display driver also supports some special
characters and escape sequences:
“\f” form-feed, clears the screen
“\n” newline, moves text cursor to the next line
“\033[5;20H” moves it to row 5 column 20
“\033[47m” turns the backlight on
“\033[40m” turns the backlight off
“\033[119;39;1p” turns pixel at x=119 y=39 on
“\033[119;39;0p” turns pixel at x=119 y=39 off
“\033[0;0;119;39;1l” draws a line 0,0 to 119,39
“\033[0;0;119;39;0l” clears a line 0,0 to 119,39
“\033[0;0;119;39;1r” draws rectangle to 119,39
“\033[0;0;119;39;0r” clears rectangle to 119,39
A read from /dev/mdk will return one character
if the current keypad status is different to the
status at the previous read. The meaning of the
character is as follows:
‘0’ no key pressed
‘1’ F2 key is pressed
‘2’ Left key is pressed
‘3’ F1 key is pressed
‘4’ Down key is pressed
‘5’ OK key is pressed
‘6’ Up key is pressed
‘7’ Back key is pressed
‘8’ Right key is pressed
‘9’ Menu key is pressed
The MAIC input output driver is implemented in a
similar way such that outputs can be controlled
by sending text commands to /dev/mio
“AH” will set solid state output A high (source)
Similarly for B, C and D.
“AL” will set solid state output A low (sink)
Similarly for B, C and D.
“Q1H” will turn relay Q1 on
Similarly for Q2, Q3 and Q4.
“Q1L” will turn relay Q1 off
Similarly for Q2, Q3 and Q4.
These command strings can be concatenated so
for example the following bash script will turn on
relay Q3 and set output B low:
echo Q3HBL > /dev/mio
To read an ADC input, from inputs I1 to I8, first a
read request is sent to the /dev/mio device, e.g.
“I1” requests the ADC value from input I1
A subsequent read from the device /dev/mio will
then return the 10 bit ADC integer value as a
string between “0” and “1023”.
Hence an application can be implemented
entirely in script.
This could also be used in exec() commands in
PHP so as to implement web server based
applications.
These kernel device drivers are also used by the
MIAC python library, which is available as source
and provides a good technical reference for the
commands.

7 Copyright © 2016 Matrix Technology Solutions Ltd
Bash script example
#!/bin/bash
echo -en "\fPress any key\nOK to exit" > /dev/mdk
KEY=””
while [ “$KEY” != “5” ]; do
read –n1 KEY < /dev/mdk
echo -en "\033[4;10H${KEY}" > /dev/mdk
done
echo -en "\fBye!" > /dev/mdk
The above example script echoes pressed key
codes to the display and exits when the OK key is
pressed
First the screen is cleared, with the “\f” and a
message displayed.
A while loop is then entered which exits when
the OK keypad, key code “5” is pressed.
The keypad is read as one character from the
/dev/mdk device.
This is then echoed to screen, preceded by a
cursor command to row 4 and column 10.
On exit of the loop the clear screen commend is
sent followed by the text “Bye!”

8 Copyright © 2016 Matrix Technology Solutions Ltd
Python programming
The Raspberry Pi based MIAC comes with
numerous pre-installed applications and utilities
including Python and Idle.
The Python programming language is supported
via the use of the MIAC.py library.
The Python demo.py program demonstrates
some of the functionality of that library.
The MIAC.py library is included in the Python
application by adding the line “import MIAC”
MIAC functions can then be used, such as found
in the demo.py PrintMenu() function below:
Here MIAC.Clear() is used to clear the display,
MIAC.Cursor(2,1) places the cursor at line 2,
column 1 ready for subsequent text writing via
MIAC.PrintText(). The demo.py application also
demonstrates how to read any one of the
analogue inputs by using MIAC.ReadVoltage
(input), where “input” is a number between 1
and 8. Relay outputs are controlled with
MIAC.RelayOn(channel) and MIAC.RelayOff
(channel). Similarly the solid state outputs are
controlled with MIAC.OutputHigh(channel) and
MIAC.OutputLow(channel), where “channel” is a
number between 1 and 4.
This demonstration program first presents a
menu option screen, where key F1 can be
pressed to select the inputs test screen, or F2 to
select the outputs test screen. The inputs test
screen displays all eight inputs as voltages. The
outputs test screen allows the use of the keypad
left and right pads to select any output, then the
up and down pads respectively turn on and off
the output. The back key returns to the menu.
The program screens are shown below.
import MIAC
def PrintMenu():
MIAC.Clear()
MIAC.Cursor(2,1)
MIAC.PrintText('F1 for Input Test')
MIAC.Cursor(3,1)
MIAC.PrintText('F2 for Output Test')
return

9 Copyright © 2016 Matrix Technology Solutions Ltd
Alternative access methods
In addition to the USB drive connection method,
the MIAC can also connect via other methods
whilst it is running.
RS232 serial terminal access
In its factory default state, the MIAC provides
terminal access via the RS232 connections at
115,200 baud. This port outputs boot up
information and then provides a login prompt.
Wireless access
In its factory default state, the MIAC provides a
Wireless Access Point mode with an SSID of
“MIAC_AP” and no passphrase.
The connecting PC will need to connect via WiFi
to the MIAC Access Point, which has a DHCP
server, and then communication can take place
to the AP gateway IP address shown on the MIAC
screen at boot, usually 192.168.0.1. Various
connection methods have been pre-installed as
defaults, but these can be modified by the user.
Page 10 has details on how to change the MIAC
wireless connection from an Access Point to a
client on an existing wireless network. In either
case the following methods apply.
Network share
The MIAC has a pre-defined network share of the
“Public” directory of the standard user “pi”. This
is accessible via the IP address shown on the
MIAC start-up screen. This default configuration
can be changed or removed by editing the
“smb.conf” file found in the directory “/etc/
samba”. Please see general Linux documentation
relating to samba and smb.conf for details.

10 Copyright © 2016 Matrix Technology Solutions Ltd
Remote Login via Secure Shell
Terminal connection can be made via a SSH client
to the IP address shown on the start-up screen,
the login account being the default “pi” with
password “raspberry”. Please see general Linux
documentation relating to adding users or
changing passwords.
Remote Desktop
A full remote desktop, for example as above
running Python via the Idle IDE, can be accessed
via a Remote Desktop client to the IP address
shown on the start-up screen. This is provided via
the pre-installed xrdp package. Please see
general Linux documentation relating to
removing xrdp if not required, or adding user
accounts or changing passwords.

11 Copyright © 2016 Matrix Technology Solutions Ltd
It’s probably a good idea to make a system image backup before you proceed, unless you have Linux PC ac-
cess to the complete MIAC file system. Otherwise errors implementing these steps could lock you out.
Login to the MIAC via ssh or remote desktop
Disable the hotspot access point:
sudo reboot
sudo nano /boot/startup.sh
All done, re-boot:
# Wait a while for the network to be established
sleep 3
# Output the allocated IP address to the MIAC gLCD
hostname -I > /dev/mdk
Add to the startup.sh script to display the IP address allocated by your DHCP server on startup:
allow-hotplug wlan0
iface wlan0 inet dhcp
wpa-conf /etc/wpa_supplicant/wpa_supplicant.conf
sudo nano /etc/network/interfaces
Change the network interface wlan0 details:
ctrl_interface=DIR=/var/run/wpa_supplicant GROUP=netdev
update_config=1
network={
ssid="your ssid"
psk="your psk"
}
sudo nano /etc/wpa_supplicant/wpa_supplicant.conf
Add your WiFi Access Point details:
# DAEMON_CONF=“/etc/hostapd/hostapd.conf”
sudo update-rc.d hostapd disable
sudo nano /etc/default/hostapd
Connecting to a network

12 Copyright © 2016 Matrix Technology Solutions Ltd
Security
Please note that these connections do not
implement security or authentication, except for
the usual user “pi” and password “raspberry” in
the case of the terminal, ssh and xrdp. This is
done to simplify use for new users. However, it is
recommended that you secure your application,
at least by changing passwords or disabling
unwanted features. Other than the hints outlined
previously, it is beyond the scope of this
document to describe how security could be
implemented. There are numerous sources of
such information either relating to the Raspberry
Pi or Linux in general.

13 Copyright © 2016 Matrix Technology Solutions Ltd
Matrix Technology Solutions Ltd.
The Factory
33 Gibbet Street
Halifax, HX1 5BA, UK
t: +44 (0)1422 252380
www.matrixtsl.com
HP0176


