
UserManual
USB 2.0 Digital
Intraoral Camera
Before attempting to connect or operate this product, please read these instructions completely
Downloaded from www.Manualslib.com manuals search engine

Copyright © 2006 Sota Precision Optics, Inc.All Rights Reserved
No part of this publication may be copied or distributed, transmitted, transcribed, stored in a retrieval system, or translated into any human or computer language, in any form or any means, electronic, mechanical, magnetic manual or otherwise, or disclosed to third parties without the expressed written consent of Sota Precision Optics, Inc.
Disclaimer
Sota Precision Optics, Inc. makes no representation or warranties with respect to the content of this document and specifically disclaims any implied warranties of merchantability or fitness for any particular purpose. Further, Sota Precision Optics, Inc. reserves the right to revise this publication and make changes in it from time to time without obligation of Sota Precision Optics, Inc. to notify any person or organization of such revision or changes.
Trademarks
Microsoft is a registered trademark; Windows, Windows 95/98/ME, and Windows NT/2000/XP are trademarks of Microsoft Corporation. All other names are trademarks of their respective companies.
Claris i310 TM
Document No. X00089 Rev. D
Downloaded from www.Manualslib.com manuals search engine

1
Table of Contents
Indications for Use............................................2
System Requirements .......................................2
Safety Instructions ...........................................3
Cautions..........................................................4
Important Safeguards .......................................5
Software Setup ................................................8
Controls and Functions .................................... 23
Basic Operation ............................................. 23
Features and Specifications .............................. 25
Warranty....................................................... 27
Contact Us..................................................... 28
Downloaded from www.Manualslib.com manuals search engine
2
Indications for Use
Claris i310D intraoral camera system is indicated for use to provide the dentist and the patient with a view of the mouth before and after the dental procedure, which assists the dentist in describing the dental procedure being performed as well as showing the results.
System Requirements
Intel Pentium 4 1.5GHz or higher 256MB of RAM or higher XVGA (1024x768) or higher resolution video adapter and monitor CD-ROM or DVD drive Available USB 2.0 port Microsoft Windows 2000/XP or later
Downloaded from www.Manualslib.com manuals search engine

3
Safety Instructions
Illustrated below is the label on the camera.
THIS SYMBOL ALERTS THE USER THAT IMPORTANT LITERATURE CONCERNING THE OPERATION AND MAINTENANCE OF THIS UNIT HAS BEEN INCLUDED. THEREFORE, IT SHOULD BE READ CAREFULLY IN ORDER TO AVOID ANY PROBLEMS.
CAUTION
TO REDUCE THE RISK OF ELECTRIC SHOCK, DO NOT REMOVE COVER. NO USER- SERVICEABLE PARTS
INSIDE. REFER MAINTENANCE TO QUALIFIED SERVICE PERSONNEL.
WARNING: TO PREVENT FIRE OR ELECTRIC SHOCK, DO NOT EXPOSE THIS DEVICE TO MOISTURE.
CAUTION
CHANGES OR MODIFICATIONS NOT EXPRESSLY APPROVED BY THE MANUFACTURER COULD VOID THE WARRANTY.
Downloaded from www.Manualslib.com manuals search engine
4
Cautions
Federal law restricts this device to sale by or on the order of a Licensed Dental practitioner.
Cautions on safety
Be careful not to damage the USB cable. Be sure to hold the plug when disconnecting the cable.
Do not leave the USB cable plugged into an USB 2.0 port without connecting it to the camera; fire or electronic shock may result.
Do not place a container with water or liquid, or any small metallic objects on this unit. If water, liquid, or any metallic objects enters this unit, pull out the USB cable immediately and contact your dealer.
When smoke, abnormal sound or smell occurs, disconnect the USB cable and contact your dealer.
When the unit is not in use for a long time, pull out the USB cable.
Do not apply impacts to this unit.
Cautions on installation
Do not install this unit in a poorly ventilated place, a dusty place, an unstable place, or where soot or steam occurs.
Do not use this unit at high temperatures (higher than 40 C) and at low temperatures (lower than 5 C)
Do not use in surgical theaters in hospitals where safety requirements are different from a standard dental clinic, which is the designated place for this device to be used.
Any desktop or laptop that is used with the camera should meet medical standard (EN60601 certified)
Cautions on cleaning
Pull out the USB cable before cleaning.
Do not wipe the surfaces using benzene, thinner, etc., as this may degrade the cover.
Lightly wipe off dirt on the cover and the operation panel section with a soft cloth (i.e. flannel, etc.). When the cover is very dirty, rub it with a cloth moistened with diluted detergent, and finish with a dry cloth.
Downloaded from www.Manualslib.com manuals search engine

5
Important Safeguards
In addition to the careful attention devoted to quality standards in the manufacturing of our intraoral camera, we place significant effort to ensure safety in the design of our equipment.
This section lists important information that will help assure your safe and proper use of the equipment. Please read the instructions carefully before operating your camera and keep it in a handy place for future reference.
Installation
1. Read and Follow Instructions – All of the safety and operating instructions should be read before the intraoral camera is operated. Follow operating and use instructions.
2. Retain Instructions – The safety and operating instructions should be retained for future reference.
3. Heed Warnings – Comply with all warnings on the camera and in the operating instructions.
4. This camera should be operated only from the type of power source indicated on the marketing label. If you are not sure of the type of power supply in your home/office, consult your dealer or local power company.
5. Attachments – Do not use attachments unless recommended by the camera manufacturer as they may cause hazards.
CAUTION
MAINTAIN ELECTRIC SAFETY. POWER LINE OPERATED EQUIPMENT OR ACCESSORIES CONNECTED TO THIS UNIT
SHOULD BEAR THE UL LISTING MARK OR CSA CERTIFICATION MARK ON THE ACCESSORY ITSELF AND
SHOULD NOT HAVE BEEN MODIFIED SO AS TO DEFEAT THE SAFETY FEATURES. THIS WILL HELP AVOID ANY POTENTIAL
HAZARD FROM ELECTRIC SHOCK OR FIRE. IF IN DOUBT, CONTACT QUALIFIED SERVICE PERSONNEL.
6. Water and Moisture – Do not use this camera near water. In effect, do not use near a bathtub, washbowl, kitchen sink, laundry tubes, or swimming pool, or in a damp basement.
Downloaded from www.Manualslib.com manuals search engine

6
7. Accessories – Do not place this camera on an unstable cart, stand, tripod, bracket, or table. The camera may fall causing injury to a child or adult and serious damage to the device. Use only with a cart, stand, tripod, bracket, or table recommended by the manufacturer, or sold with the camera. Any mounting of the product should follow the manufacturer’s instructions, and should use a mounting accessory recommended by the manufacturer.
8. A device and cart combination should be moved with care. Quick stops, excessive force and uneven surfaces may cause the device and cart combination to overturn.
USE
9. Cleaning – Unplug this camera from the USB port before cleaning. Do not use liquid cleaners or aerosol cleaners. Use a damp cloth for cleaning.
10. Objects and Liquid Entry – Never push objects of any kind into the camera through openings as they may touch dangerous voltage points or may cause a short circuit that could result in a fire or electric shock. Never spill liquids of any kind on the camera.
11. Lightning – For added protection for this camera during a lightning storm- or when it is left unattended and unused for long periods of time, unplug it from the USB port. This will prevent damage to the camera due to lightning and power-line surges.
12. Do not point the LED to the patient’s eye which may cause eye damage.
SERVICE
16. Servicing – Do not attempt to service this camera yourself as opening or removing covers may expose you to dangerous voltage or other hazards. Refer all maintenance to a qualified technician.
17. Conditions Requiring Service – Unplug this camera from the USB port and refer servicing to a qualified technician under the following conditions:
a. When the USB cable or USB port is damaged.
b. If liquid has been spilled, or objects have fallen into the camera.
c. If the camera has been exposed to rain or water.
Downloaded from www.Manualslib.com manuals search engine
7
d. If the camera does not operate normally by following the operating instructions. Adjust only those controls that are covered by the operating instructions. Improper adjustments of any other controls may result in damage and will often require extensive work by a qualified technician to restore the camera to its normal operation.
e. If the camera has been dropped or the cover has been damaged.
f. When the camera exhibits a distinct change in performance.
18. Replacement Parts – When replacement parts are required, have the service technician verify that the replacements he or she uses have the same safety characteristics as the original parts. Use of replacements specified by the camera manufacturer can prevent fire, electric shock or other hazards.
19. Safety Check – Upon completion of any service or repairs to the equipment, make sure to perform safety checks recommended by the manufacturer to determine that the camera is in safe operating condition.
Downloaded from www.Manualslib.com manuals search engine
8
Software Setup
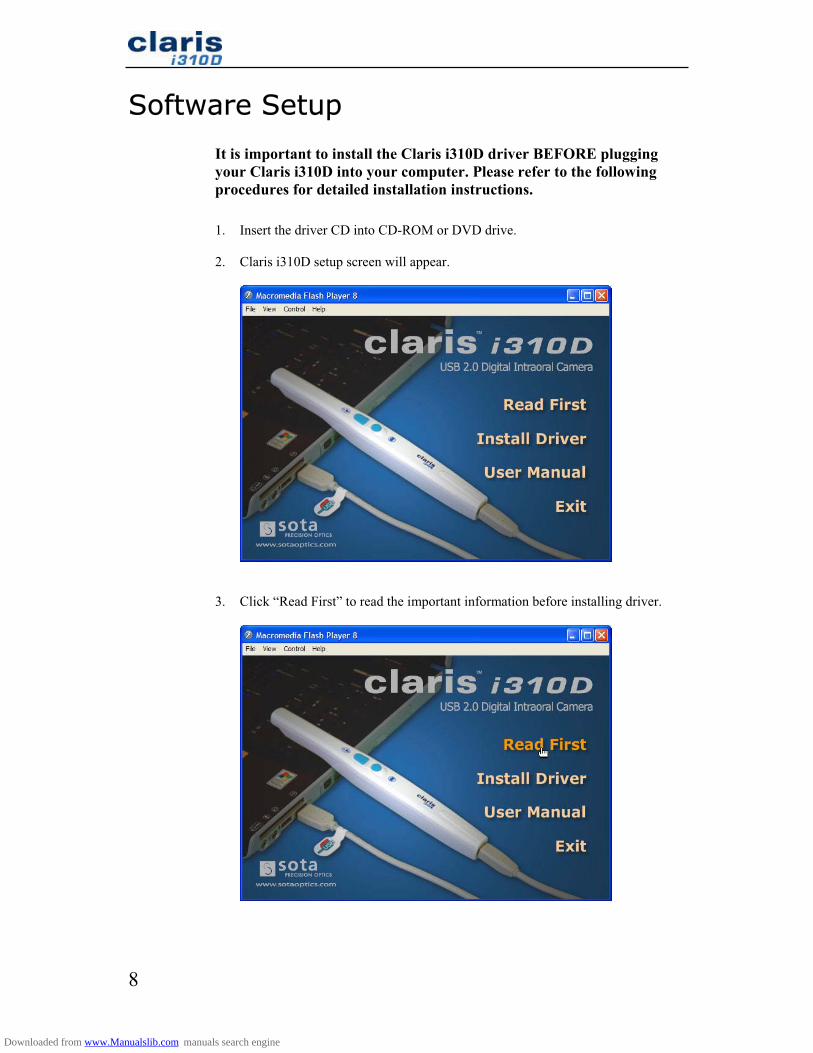
It is important to install the Claris i310D driver BEFORE plugging your Claris i310D into your computer. Please refer to the following procedures for detailed installation instructions.
1. Insert the driver CD into CD-ROM or DVD drive.
2. Claris i310D setup screen will appear.
3. Click “Read First” to read the important information before installing driver.
Downloaded from www.Manualslib.com manuals search engine
9
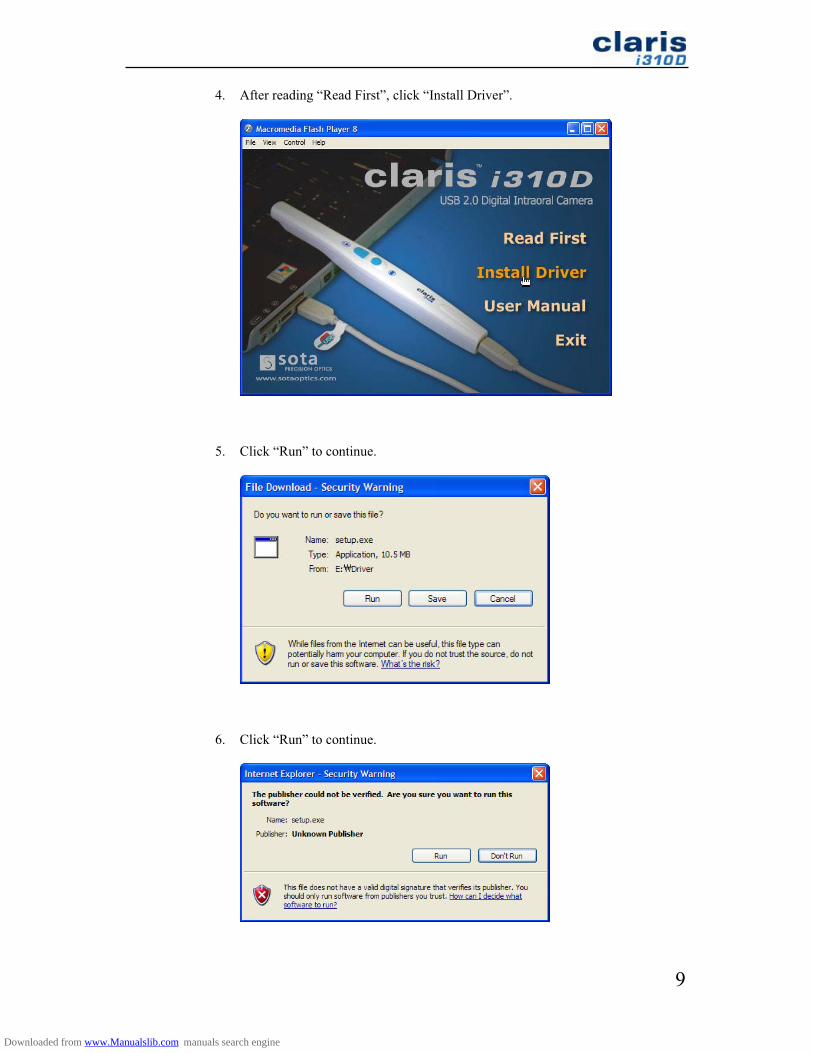
4. After reading “Read First”, click “Install Driver”.
5. Click “Run” to continue.
6. Click “Run” to continue.
Downloaded from www.Manualslib.com manuals search engine
10
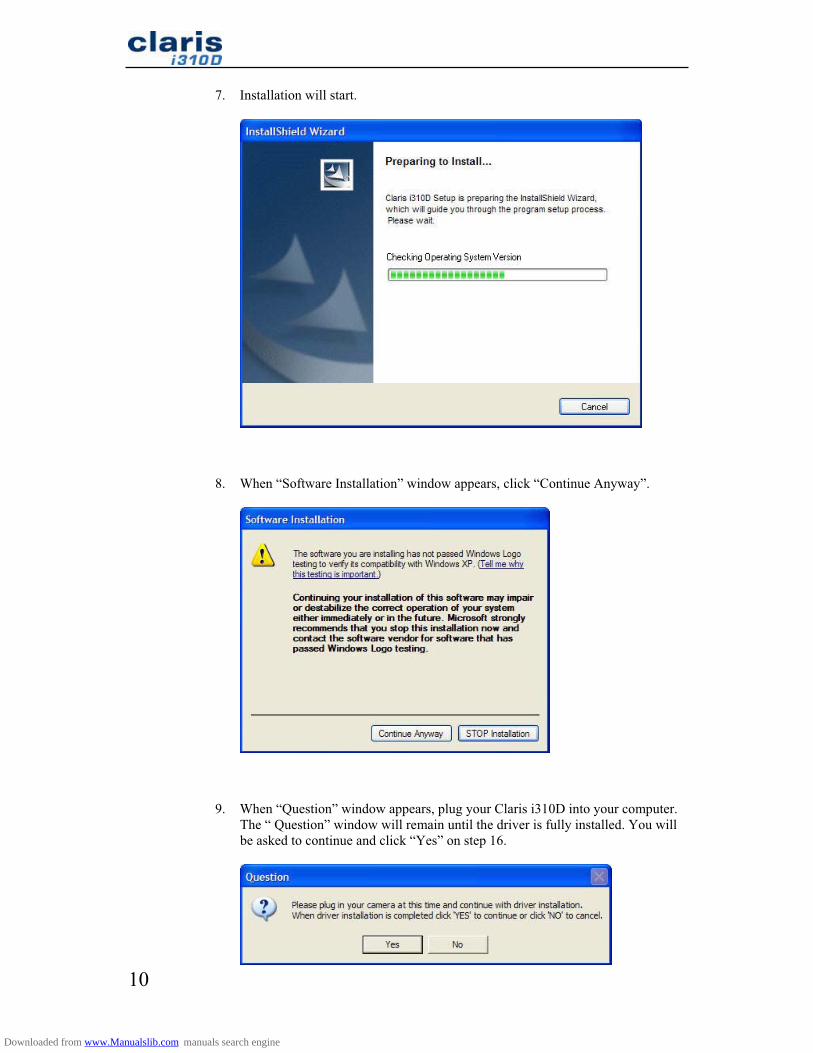
7. Installation will start.
8. When “Software Installation” window appears, click “Continue Anyway”.
9. When “Question” window appears, plug your Claris i310D into your computer. The “ Question” window will remain until the driver is fully installed. You will be asked to continue and click “Yes” on step 16.
Downloaded from www.Manualslib.com manuals search engine
11
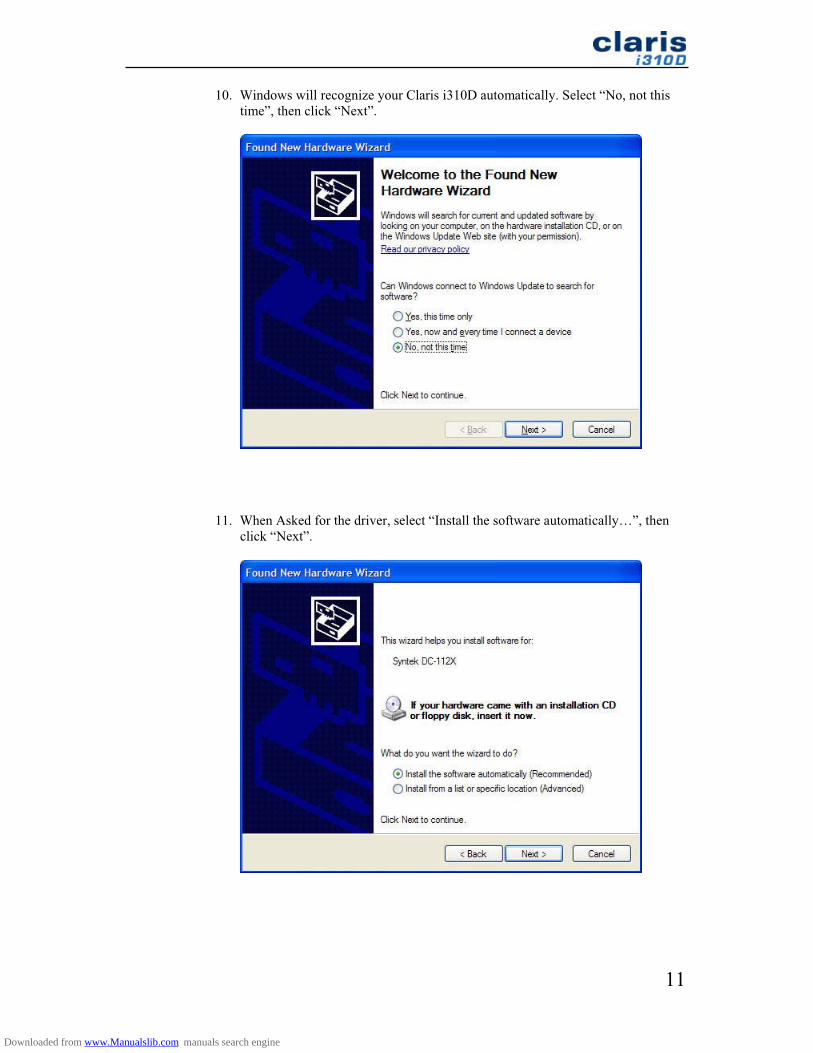
10. Windows will recognize your Claris i310D automatically. Select “No, not this time”, then click “Next”.
11. When Asked for the driver, select “Install the software automatically…”, then click “Next”.
Downloaded from www.Manualslib.com manuals search engine
12
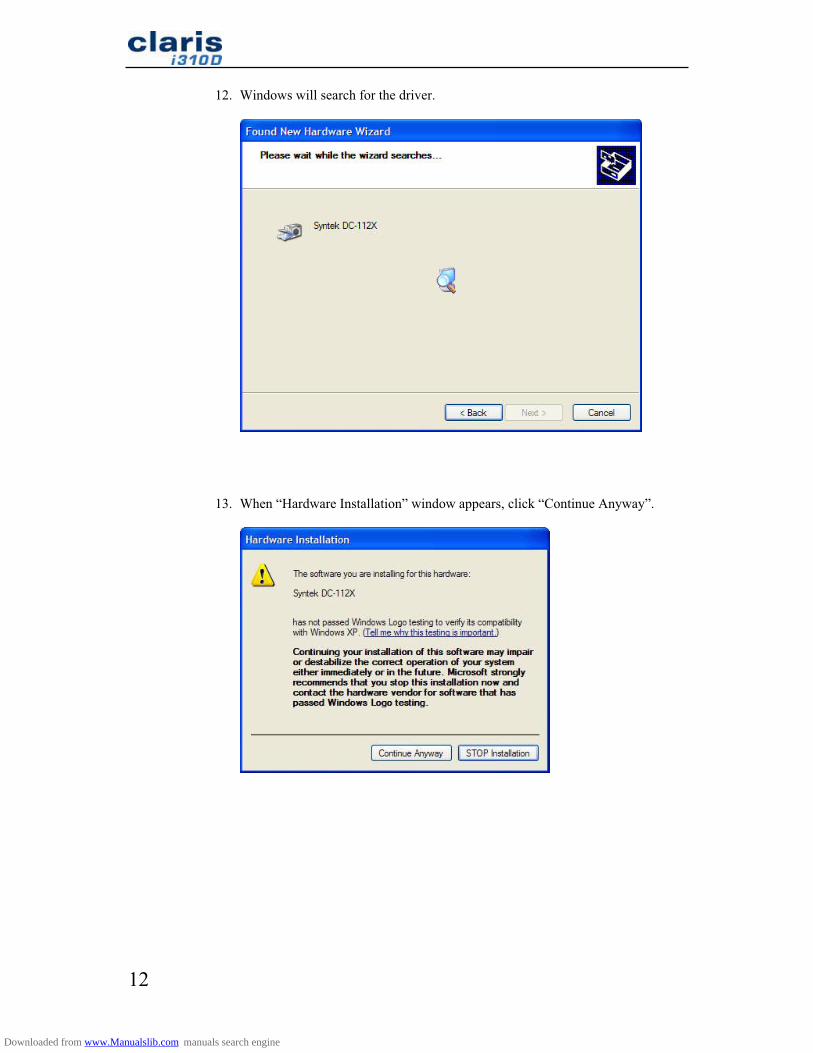
12. Windows will search for the driver.
13. When “Hardware Installation” window appears, click “Continue Anyway”.
Downloaded from www.Manualslib.com manuals search engine

13
14. Driver installation will start.
15. Click “Finish” to complete installing the driver.
16. Now click “Yes” on “Question” window from step 9 to continue.
Downloaded from www.Manualslib.com manuals search engine
14
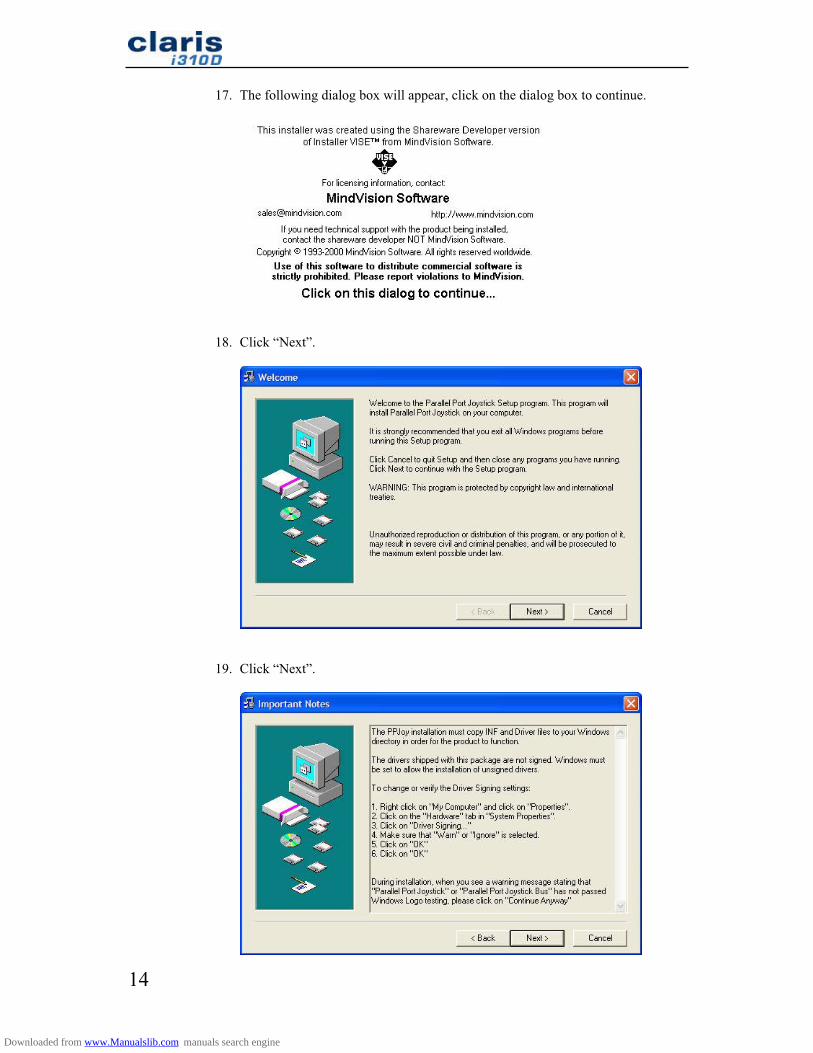
17. The following dialog box will appear, click on the dialog box to continue.
18. Click “Next”.
19. Click “Next”.
Downloaded from www.Manualslib.com manuals search engine

15
20. Click “Next”.
21. Click “Next”.
22. Click “Next”.
Downloaded from www.Manualslib.com manuals search engine

16
23. When “Software Installation” window appears, click “Continue Anyway”.
24. When “Hardware Installation” window appears, click “Continue Anyway”.
25. When “Parallel Port Joystick” window appears, close it.
Downloaded from www.Manualslib.com manuals search engine
17
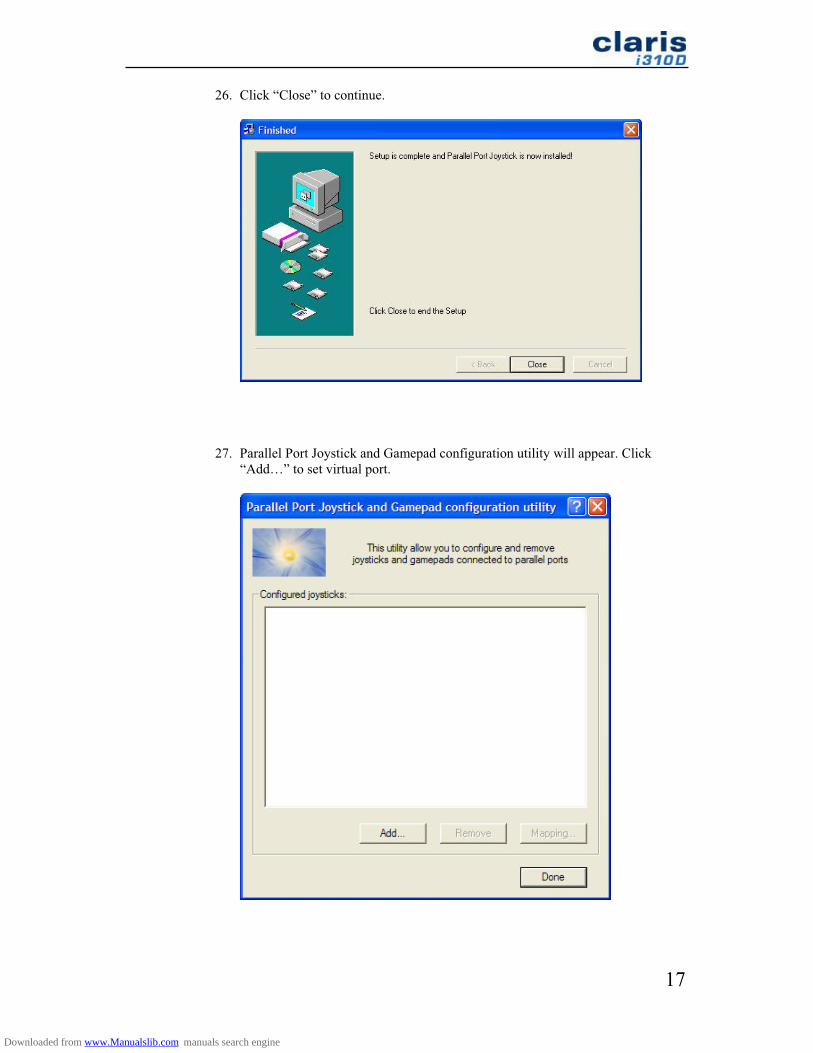
26. Click “Close” to continue.
27. Parallel Port Joystick and Gamepad configuration utility will appear. Click “Add…” to set virtual port.
Downloaded from www.Manualslib.com manuals search engine

18
28. Set parameters as following. Then click “Add”.
29. Select “No, not this time”, and click “Next”.
Downloaded from www.Manualslib.com manuals search engine
19
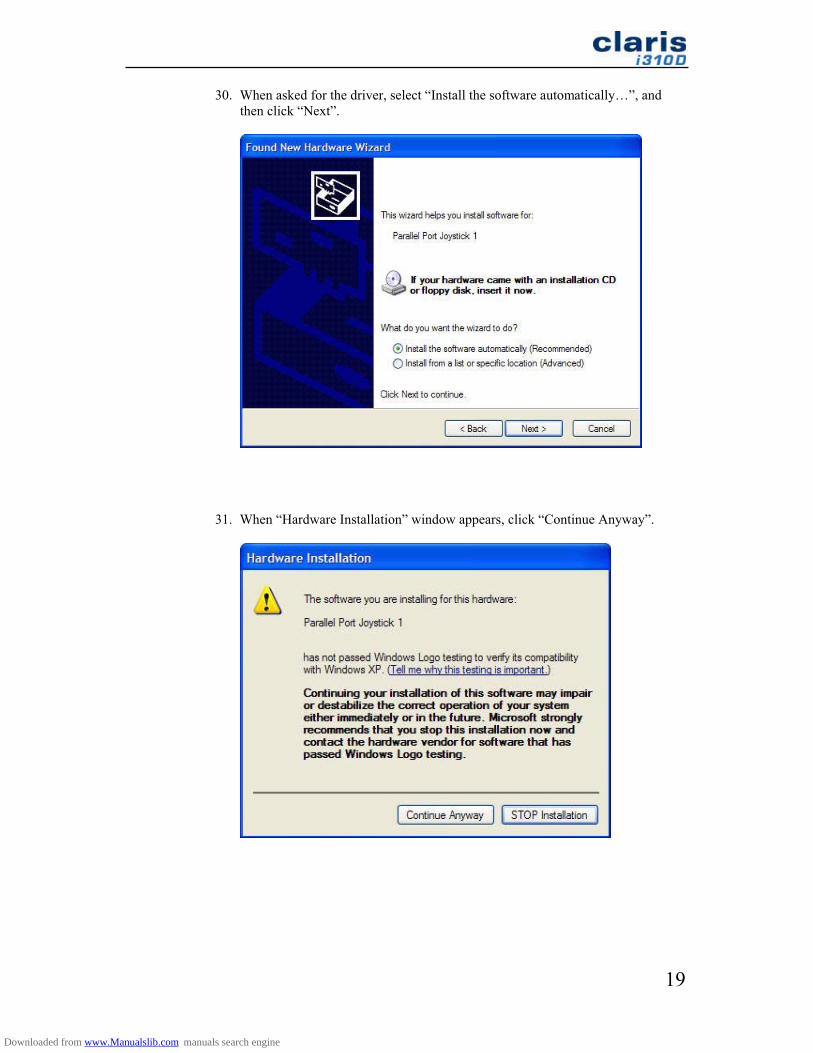
30. When asked for the driver, select “Install the software automatically…”, and then click “Next”.
31. When “Hardware Installation” window appears, click “Continue Anyway”.
Downloaded from www.Manualslib.com manuals search engine
20
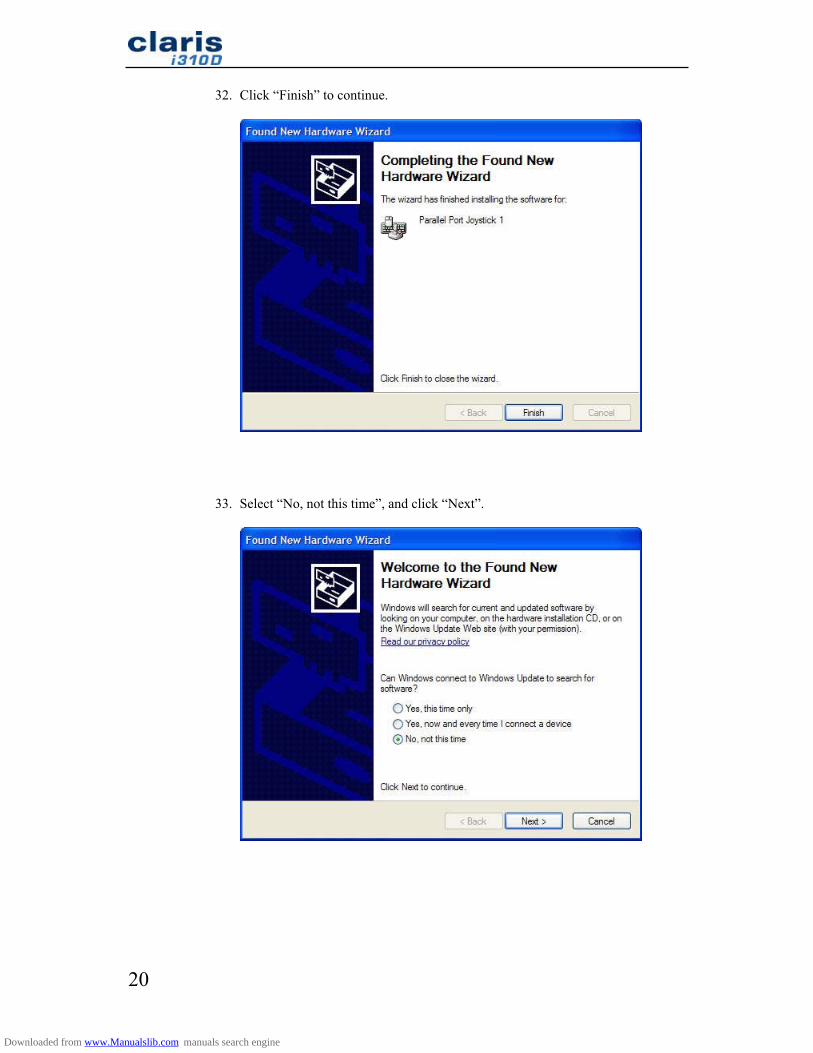
32. Click “Finish” to continue.
33. Select “No, not this time”, and click “Next”.
Downloaded from www.Manualslib.com manuals search engine
21
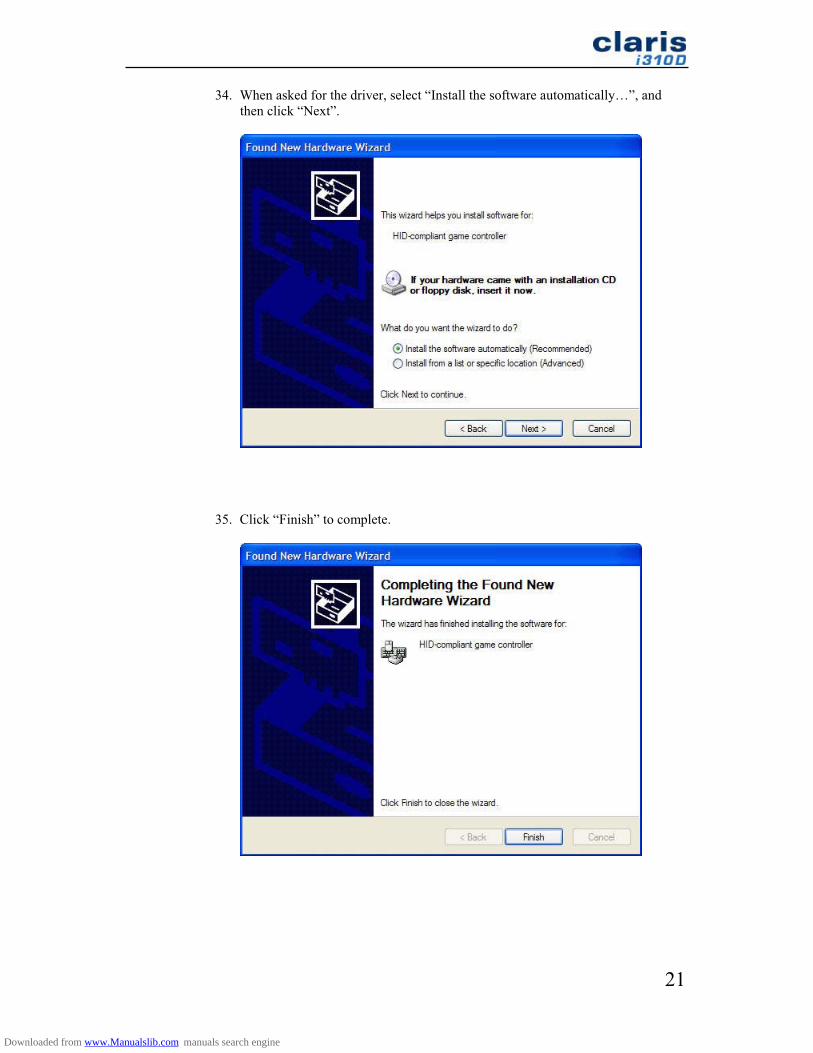
34. When asked for the driver, select “Install the software automatically…”, and then click “Next”.
35. Click “Finish” to complete.
Downloaded from www.Manualslib.com manuals search engine
22
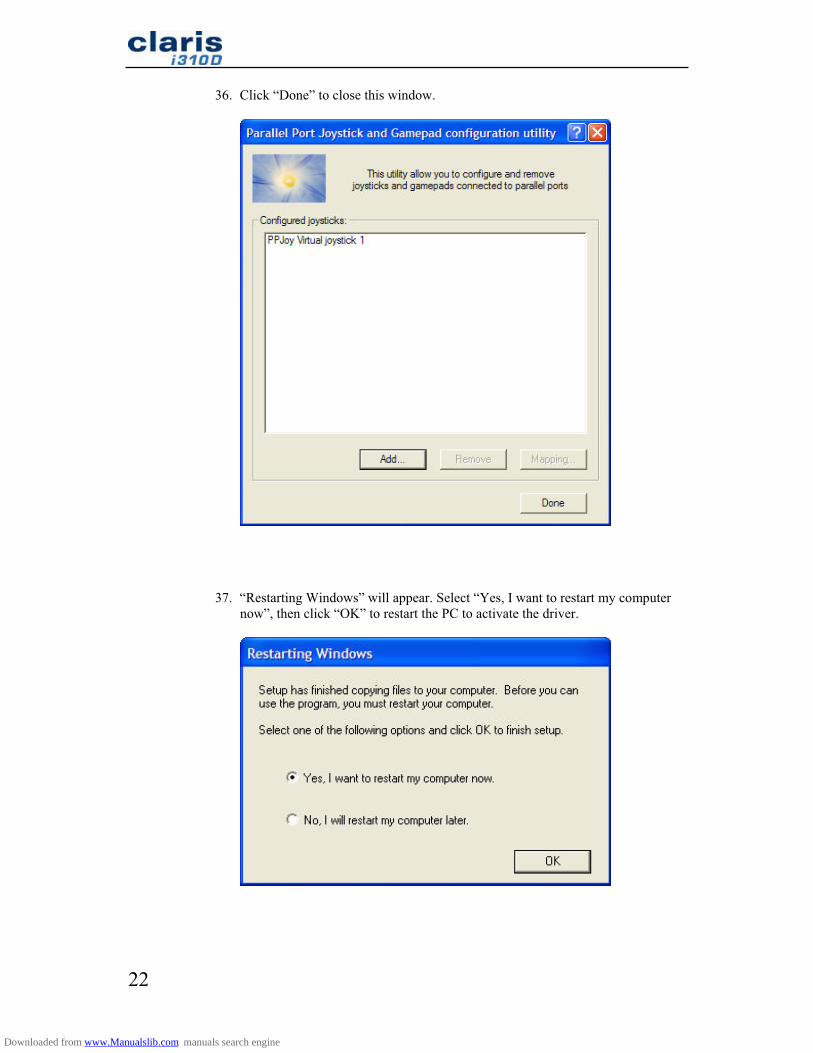
36. Click “Done” to close this window.
37. “Restarting Windows” will appear. Select “Yes, I want to restart my computer now”, then click “OK” to restart the PC to activate the driver.
Downloaded from www.Manualslib.com manuals search engine
23
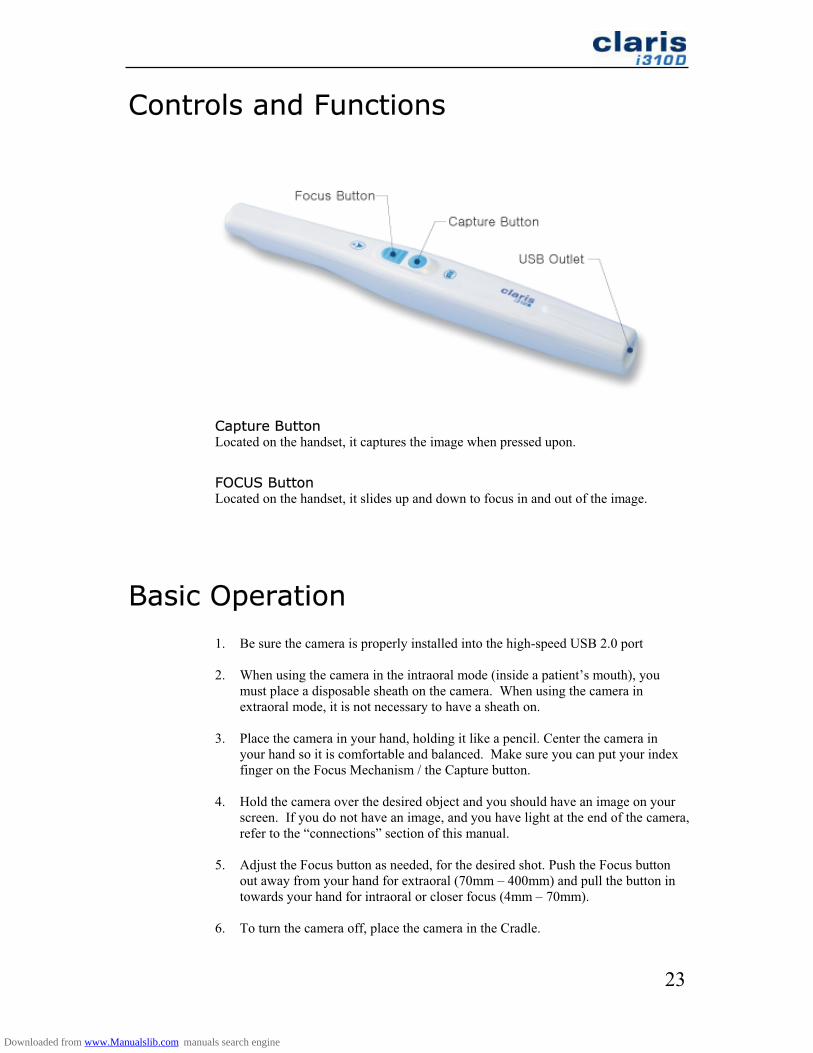
Controls and Functions
Capture ButtonLocated on the handset, it captures the image when pressed upon.
FOCUS Button Located on the handset, it slides up and down to focus in and out of the image.
Basic Operation
1. Be sure the camera is properly installed into the high-speed USB 2.0 port
2. When using the camera in the intraoral mode (inside a patient’s mouth), you must place a disposable sheath on the camera. When using the camera in extraoral mode, it is not necessary to have a sheath on.
3. Place the camera in your hand, holding it like a pencil. Center the camera in your hand so it is comfortable and balanced. Make sure you can put your index finger on the Focus Mechanism / the Capture button.
4. Hold the camera over the desired object and you should have an image on your screen. If you do not have an image, and you have light at the end of the camera, refer to the “connections” section of this manual.
5. Adjust the Focus button as needed, for the desired shot. Push the Focus button out away from your hand for extraoral (70mm – 400mm) and pull the button in towards your hand for intraoral or closer focus (4mm – 70mm).
6. To turn the camera off, place the camera in the Cradle.
Downloaded from www.Manualslib.com manuals search engine

24
How to use a disposable sheath
1. Camera InsertionWith the window side down towards the paper backing, slide the camera beneath the white tab into the sheath opening. Push the camera to the end of the sheath.
2. Protective Covering Removal Hold the camera at the cable end and pull the blue tab removing the protective cover in the direction shown. Discard cover.
3. Paper Backing RemovalBeginning at the top end of the camera, peel the paper backing in the direction shown as disregard. After use, dispose of sheaths properly.
4. Camera Inserted in Sheath.
CAUTIONThe sheath must be removed after each patient use and the intraoral camera must be cleaned and disinfected after each patient use and prior to the replacement with a new sheath.
Downloaded from www.Manualslib.com manuals search engine
25
Features and Specifications
Camera Handpiece
Polycarbonate construction
Small handpiece (8.3 inches long, 0.85 inches wide; 0.24 oz)
Proprietary custom built high-performance color video camera
Sony DSP (Digital Signal Processing) Integrated Circuits that assures long-term stability and reliability
1/4 Sony Super HAD Grade 6 CCF (highest grade Sony CCD)
Ergonomic, adjustable one-finger Focus Mechanism
One-click Capture button
Operating Voltage: 5V, powered by the USB port
LED
High Power Chip Type White LEDs
24000 mcd from 8 bright LEDs with luminous intensity of 3000mcd each
Low Current Consuming LEDs with 20mA each
Optics
High performance direct optical system
768x494 Pixels (NTSC visible)
60 degree full field of view
Range from 1/2 molar to full face (4mm to infinity)
New ED Lens Technology (Extended Depth) gives longest depth of field available, which reduces user focusing
No color smear like grin lens optical design
No dark corners during the entire operational region
No blue light effect common in LED cameras
Disposable Sheaths
Initial quantity of 50 sheaths provided
Additional orders must be placed with Sota Precision Optics
Downloaded from www.Manualslib.com manuals search engine

26
USB 2.0
Hi-speed USB 2.0 interface
Data transfer rate up to 480Mbits/second
30 frames per second at resolutions of up to 720x480
Streaming video with zero compression
Capture Rate: 30fps at VGA(640x480)
Frame Size: QCIF(160x120) to VGA(640x480)
Software Interface: Video for Windows, TWAIN interface, WDM driver
Data Format: YUV 4-2-2, YUV 4-2-0, RGB
Downloaded from www.Manualslib.com manuals search engine
27
Warranty
Warranty Overview
This SOTA equipment is warranted to be free from defects in material and workmanship from the date of installation for a period of 24 months. Please contact SOTA representative for extended warranty program.
In the event the product is returned by the dealer or the end-user and the warranty has expired, SOTA reserves the right to collect a reasonable fee from the end user for services mutually agreed upon.
Any item returned to the factory in Orange, California, through SOTA’s Authorized Dealer, will be repaired or replaced at our option at no charge provided that our inspection indicates it to have been defective. Dealer labor, shipping and handling charges are not covered by this warranty.
This warranty does not apply to damage due to shipping, misuse, or careless handling. Warranty is void if installed, repaired, or serviced by anyone other than an authorized SOTA Dealer service personnel. SOTA is not liable for indirect or consequential damage or loss of any nature in connection with this equipment.
This warranty is in lieu of all other warranties expressed or implied. No representative or person is authorized to assume for us any liability in connection with the sale of our equipment.
Service Policy Guidelines
In the event that you have difficulty that requires factory service, please follow these instructions:
Call (714) 532-6100 and request a return authorization (RA) number. Be sure to have the serial number, the nature of the problem, and a major credit card readily available to give our customer service representative. Please mark the number on the outside of the shipping box and packing slip. Items shipped without the RA written on the outside package will be returned to the customer at their cost. All non-warranty repairs will need a credit card, or some form of payment prior to the repair work being authorized.
If your repair is deemed under warranty, SOTA agrees to repair or replace the item within 14 days from the time it was received and will then be shipped to the person or persons whose name appears on the shipping label.
Returns are not accepted without prior written approval by SOTA. Defective products will be repaired or replaced per SOTA’s warranty program. Sterile sheaths are considered perishable items and are not returnable under any circumstances unless defective. SOTA cannot be responsible for any missing items unless contacted within 72 hours of shipment received by the customer.
Downloaded from www.Manualslib.com manuals search engine

28
Contact Us
We at SOTA are interested in your comments about our products. While we enjoy the good, it is more important that we are made aware of any problems you may have encountered with the sales, installation, training or technical support. We appreciate any suggestions or comments that will help us make Claris i310 a better tool. You can contact us at Phone: (888) 266-SOTA or at [email protected].
Downloaded from www.Manualslib.com manuals search engine

Sota Precision Optics, Inc. 1073 North Batavia Street, Orange, CA 92867 U.S.A.
Tel: 888-266-SOTA Fax: 714-532-6107
Website: www.sotaoptics.com
Downloaded from www.Manualslib.com manuals search engine


