
© NOVEMBER 2003– LNS PUBLICATION NO. 864510-0002 REV. 01 T
MAGNETIC CONVEYOR PARTS AND SERVICE MANUAL
Thank you for choosing an LNS Chip Conveyor. We are proud to have you among our LNS family of users. LNS Chip Conveyors simply and reliably remove waste from machining operations. Machine efficiency is increased and operator safety is improved since the conveyor work with little operator attention and without interrupting production time. LNS Conveyors are available for many types of machine tools or other applications. They can be arranged to deliver wet or dry waste to containers or to conveyor or chute-type disposal systems. For further information, contact:
Inside Sales Department LNS TURBO 203 Turbo Drive Kings Mountains, NC 28086
This Service Manual is intended to assist with the normal maintenance that will assure long service life of your LNS Chip Conveyor. It is in three parts – an Installation Section, a Service Instruction Section, followed by a Parts Section, which includes drawings and parts lists for the basic elements of the conveyors.

Page 1 TURBO MAGNETIC CONVEYOR PARTS AND SERVICE MANUAL
© NOVEMBER 2003– LNS .............................................................. PUBLICATION NO. 864510-0002 REV. 01
NOTICE
ALL INFORMATION CONTAINED IN THIS MANUAL IS INTENDED TO BE CORRECT; HOWEVER INFORMATION AND DATA IN THIS MANUAL ARE SUBJECT TO CHANGE WITHOUT NOTICE. LNS MAKES NO WARRANTY OF ANY KIND WITH REGARD TO THIS INFORMATION OR DATA. FURTHER, LNS IS NOT RESPONSIBLE FOR ANY OMISSIONS OR ERRORS OR CONSEQUENTIAL DAMAGE CAUSED BY THE USER OF THE PRODUCT. LNS RESERVES THE RIGHT TO MAKE MANUFACTURING CHANGES, WHICH MAY NOT BE INCLUDED IN THIS MANUAL. LNS supplies data necessary for the proper instruction, test, operation and maintenance of this product. LNS retains all proprietary rights in and to the information so disclosed and such shall not be reproduced, copied, or used in whole or in part for purposes other than those for which it is furnished.
1. TABLE OF CONTENTS
CONTENTS PAGE
Introduction & Table of Contents . . . . . . . . . . . . . . . . . . . . . . . . 1 Instructions for Ordering Parts . . . . . . . . . . . . . . . . . . . . . . . . . . 2 Warranty . . . . . . . . . . . . . . . . . . . . . . . . . . . . . . . . . . . . . . . . . . 2 Magnetic Conveyor Features . . . . . . . . . . . . . . . . . . . . . 3 Installation & Start-up . . . . . . . . . . . . . . . . . . . . 3-5 Conveyor Terminology . . . . . . . . . . . . . . . . . . . . . . . . 6 Service Section . . . . . . . . . . . . . . . 7-15 Instructions for Installing Seals . . . . . . . . . . . . . . . . . . . . . . . 7-8 Removal & Installation of Baffle & Top Cover . . . . . . . . . . . . 8-9 Replacement Of Drive Shaft & Sprockets . . . . . . . . . . . . . . . 9-10 Replacement of Chain & Magnet Assemblies . . . . . . . . . . . 11-12 Replacement of Chain Tensioning Components. . . . . . . . . . 12 Gear Reducer Installation, Maintenance & Repair . . . . . . . . 12-15 Trouble Shooting Guide . . . . . . . . . . . . . . . . . . . . . . . 16-17 Maintenance Schedule . . . . . . 18 Magnetic Conveyor Service Parts . . . . . . . . . . . . . . . . . . . 19-24 Magnetic Conveyor Electrical Information. . . . . . . . . . . . . . . . . . 25-27
2. INSTRUCTIONS FOR ORDERING PARTS
INSTRUCTIONS FOR ORDERING PARTS Furnish the following information on your order: Furnish exact shipping instructions:
• Model and serial no. of machine • Complete shipping address • Catalog number and name of part • Mode of delivery • Quantity wanted • Parcel post, truck line, etc • Purchase order number • Bill to address

Page 2 TURBO MAGNETIC CONVEYOR PARTS AND SERVICE MANUAL
© NOVEMBER 2003– LNS .............................................................. PUBLICATION NO. 864510-0002 REV. 01
How to find the model and serial number of your machine: The machine model number and serial number is stamped on the machine nameplate located on the motor cover.
DIRECT YOUR ORDER TO: LNS Turbo
203 Turbo Drive Kings Mountains, NC 28086 U.S.A.
Telephone: (704) 739-7111 Fax: (704) 739-6039
WARRANTY Seller warrants that within 12 months from original shipment, if its products are operated by the original specified user: Seller will repair or replace, at its option, free of charge except freight, FOB shipping point, any parts it finds nonconforming on these conditions:
a. on request, user promptly allows seller to inspect, and user returns all requested parts to seller’s plant, and
b. user has operated and maintained products in accordance with seller’s maintenance and operational literature and good business practice; and
c. products have not been misused, abused, damaged by accident or altered without seller’s written consent; and
d. user employs trained maintenance and operating personnel; and e. buyer meets all payment obligations;
Seller warrants products manufactured by others to the extent warranted by their original manufacturers, on these conditions. Parts, which have expected life shorter than one year under normal usage, are excluded. USED PRODUCTS ARE SOLD AS IS. SELLER MAKES NO WARRANTY FOR USED PRODUCTS EXCEPT AS TO TITLE. BUYER MAY INSPECT AND TEST BEFORE SHIPMENT AND ACCEPTS USED PRODUCTS ON THESE TERMS. THIS WARRANTY IS EXCLUSIVE AND IN LIEU OF ALL OTHER WARRANTIES WHETHER WRITTEN, ORAL, OR IMPLIED, (INCLUDING ANY WARRANTY OF MERCHANTABILITY OR FITNESS FOR PARTICULAR PURPOSE.)

Page 3 TURBO MAGNETIC CONVEYOR PARTS AND SERVICE MANUAL
© NOVEMBER 2003– LNS .............................................................. PUBLICATION NO. 864510-0002 REV. 01
MAGNETIC CONVEYORS LNS’ Magnetic conveyor design enables efficient removal of ferrous materials. Its unique design features self-lubricating synthetic track that greatly increases chain guide life and substantially reduces chain wear and stretch. Ideal for cast iron applications, the Magnetic conveyor is sealed to prevent abrasive material from contacting any moving parts. The heavy gauge stainless steel conveying surface eliminates surface deflection and protects magnets from damage. The magnetic conveyor handles most chip types, except long, stringy chips. It can be custom designed to meet various coolant flow rates. It is imperative to know the maximum flow rate before ordering the conveyor so the unit can be properly sized. Most magnetic conveyors are equipped with a variable speed drive (AC Inverter) as standard equipment. This feature maximizes chip removal while minimizing coolant loss.

Page 4 TURBO MAGNETIC CONVEYOR PARTS AND SERVICE MANUAL
© NOVEMBER 2003– LNS .............................................................. PUBLICATION NO. 864510-0002 REV. 01
INSTALLATION AND STARTUP PRE-START CHECKS Your LNS Conveyor has been test-run prior to shipment to insure proper operation. However, it is recommended that the following checks be made before startup:
1. Check the conveyor thoroughly for any damage that may have occurred during shipment. Be sure to note any damage on the freight bill before accepting the conveyor from the freight company.
2. Check the packing list thoroughly before accepting the shipment.
3. Remove all shipping and packing materials before installing the conveyor.
4. Clean the coolant tank thoroughly before installing the new conveyor.
5. Put the conveyor in position under the machine.
6. Make sure the conveyor lower horizontal section is level with the machine tool. If the conveyor is
supplied with an adjustable leg, be sure a crane or forklift properly supports the conveyor before loosening the locking bolts on the support leg. Loosen the bolts that secure the adjustable support leg. With the casters resting on the floor and the conveyor discharge end supported by a crane or forklift, adjust the discharge end of the conveyor vertically until the proper height is obtained to level the horizontal load section of the conveyor. Once the conveyor is properly leveled, tighten the locking bolts on the support leg.
7. The coolant tank should be cleaned of any chip residue from prior machining operations before
installing the conveyor.
8. Have a certified electrician wire the conveyor to the machine with the electrical cable provided.
9. VERY IMPORTANT: Make sure the rotation of the drive shaft corresponds with the directional arrows located on the drive shaft of the conveyor. If the drive shaft is moving in the opposite direction of the directional arrows, immediately stop the conveyor, disconnect the power supply, and reverse the power supply leads to the conveyor. Recheck the drive shaft for rotation. Conveyor damage will occur if the conveyor is rotating in the opposite direction of the directional arrows!!!
10. Please contact the LNS Conveyor Service Department, if you have any problems with the installation.

Page 5 TURBO MAGNETIC CONVEYOR PARTS AND SERVICE MANUAL
© NOVEMBER 2003– LNS .............................................................. PUBLICATION NO. 864510-0002 REV. 01
START-UP INSTRUCTIONS LEVELING
A Level should be placed across tail section and on the top cover in the load section, perpendicular to the travel of the belt. Adjust the conveyor support leg, if so equipped, or shim as necessary to level. Failure to properly level the magnetic conveyor can cause coolant and chips to overflow the conveyor baffles causing excessive contamination in the coolant tank and/or coolant spills on the floor.
ELECTRICAL CONTROLS If the conveyor is supplied with electrical controls, check the voltage of the system supplied to be sure it matches with that to be used. Read the Electrical Controls section in this manual for more details before installing the conveyor. A qualified electrician in accordance with local codes must connect electrical equipment to the power source. If the conveyor power source is the basic machine, refer to the basic machine manufacturers wiring diagram. DO NOT DRILL HOLES IN CONVEYOR FRAME TO MOUNT ELECTRICAL POWER BOXES OR ACCESSORIES WITHOUT FIRST CONSULTING LNS.
For proper belt direction refer to the arrow on the end of the drive shaft or the diagram shown on Page 5. If the belt is running backwards stop the conveyor immediately! VERY IMPORTANT: MAKE SURE THE ROTATION OF THE DRIVE SHAFT CORRESPONDS WITH THE DIRECTIONAL ARROWS LOCATED ON THE DRIVE SHAFT OF THE CONVEYOR. IF THE DRIVE SHAFT IS MOVING IN THE OPPOSITE DIRECTION OF THE DIRECTIONAL ARROWS, IMMEDIATELY STOP THE CONVEYOR, DISCONNECT THE POWER SUPPLY, AND REVERSE THE POWER SUPPLY LEADS TO THE CONVEYOR. RECHECK THE DRIVE SHAFT FOR ROTATION. CONVEYOR DAMAGE WILL OCCUR IF THE CONVEYOR IS ROTATING IN THE OPPOSITE DIRECTION OF THE DIRECTIONAL ARROWS!!!
DANGER! DO NOT TURN ON ELECTRICAL SUPPLY PRIOR TO COMPLETING THE PRE-START CHECK LIST THAT FOLLOWS.

Page 6 TURBO MAGNETIC CONVEYOR PARTS AND SERVICE MANUAL
© NOVEMBER 2003– LNS .............................................................. PUBLICATION NO. 864510-0002 REV. 01
CONVEYOR ELECTRICAL SERVICE CONNECTION Upon completion of the above pre-start activities, check to be sure the conveyor is in the "OFF" position. The conveyor control may be equipped with an emergency stop power control switch. If it is supplied with a "mushroom" type, PULL ON, PUSH OFF make sure it is in the PULL OFF position during installation of the conveyor. After verification that both control switches are in the "OFF" position, connect the conveyor to your power supply. Once the power supply connections are completed, pull the EMERGENCY STOP button to the PULL ON position and turn the VARIABLE SPEED CONTROL to the FORWARD position. Verify the correct conveyor drive rotation. VERY IMPORTANT: MAKE SURE THE ROTATION OF THE DRIVE SHAFT CORRESPONDS WITH THE DIRECTIONAL ARROWS LOCATED ON THE DRIVE SHAFT OF THE CONVEYOR. IF THE DRIVE SHAFT IS MOVING IN THE OPPOSITE DIRECTION OF THE DIRECTIONAL ARROWS, IMMEDIATELY STOP THE CONVEYOR, DISCONNECT THE POWER SUPPLY, AND REVERSE THE POWER SUPPLY LEADS TO THE CONVEYOR. RECHECK THE DRIVE SHAFT FOR ROTATION. CONVEYOR DAMAGE WILL OCCUR IF THE CONVEYOR IS ROTATING IN THE OPPOSITE DIRECTION OF THE DIRECTIONAL ARROWS!!! COOLANT FILLING Fill the coolant tank with water-soluble coolant solution of your choice. After initial start-up, you may find it necessary to add coolant to restore the desired fluid level. This is because the conveyor load section acts as an additional reservoir and complete drain down of the conveyor does not occur even during system idle periods. If you are using an oil coolant you may need to consult with the factory since the maximum conveyor flow rate allowed is reduced when higher viscosity fluids are used. Make sure you know the viscosity of the coolant before consulting the factory to determine the maximum flow rate.

Page 7 TURBO MAGNETIC CONVEYOR PARTS AND SERVICE MANUAL
© NOVEMBER 2003– LNS .............................................................. PUBLICATION NO. 864510-0002 REV. 01
ROUTINE MAINTENANCE
PERIODIC INSPECTION
The LNS Magnetic conveyor has been designed to be almost maintenance free; however, the following periodic checks should be completed at the recommended service intervals to ensure continuous and trouble-free operation. Also refer to the RECOMMENDED MAINTENANCE SCHEDULE on page 20 to setup a routine maintenance schedule.
CAUTION ! ALWAYS DISCONNECT POWER TO CONVEYOR BEFORE ATTEMPTING ANY MAINTENANCE PROCEDURES.
AFTER FIRST 100 HOURS After the first 100 hours of operation and the regular intervals complete the following:
1. Drain and refill the speed reducer while the oil is warm. Refill the housing to the proper oil level on the plug. Use high-grade gear oil. See the speed reducer section of the manual for suggested oil types and grades to match your operating conditions.
2. After the initial break-in period, speed reducer oil should be changed every six (6) months or
2500 operating hours (whichever comes first).
3. Inspect bearings to determine if they have grease fittings. If so, grease sparingly when necessary. Over greasing the bearings will damage the seal and cause premature failure.
4. Remove the access plate on the under side of the discharge section of the magnetic conveyor
and visually inspect the shrink tube that encapsulate the magnet assemblies to insure that the shrink tube does not show signs of excessive wear. If the magnet(s) are exposed, it indicates a clearance problem normally caused by a heavy object dropping on the stainless steel top cover causing a dent(s) in the cover. THIS CONDITION MUST BE CORRECTED IMMEDIATELY!!!

Page 8 TURBO MAGNETIC CONVEYOR PARTS AND SERVICE MANUAL
© NOVEMBER 2003– LNS .............................................................. PUBLICATION NO. 864510-0002 REV. 01
CONVEYOR TERMINOLOGY

Page 9 TURBO MAGNETIC CONVEYOR PARTS AND SERVICE MANUAL
© NOVEMBER 2003– LNS .............................................................. PUBLICATION NO. 864510-0002 REV. 01
SERVICE SECTION Most smaller assemblies of the conveyor, such as the drive, seals, gearbox, motor, and top cover can be disassembled by careful reference to the exploded parts drawings shown later in this manual. However, the chain, magnet assemblies, drive sprockets, drive shaft and tensioning assembly can be removed by following the sequence described in this section. Refer to the Parts Section in this manual for part designation and catalog numbers. INSTRUCTIONS FOR INSTALLING SEALS
1. Remove baffle weldment, guide rails and stainless steel cover by loosening and removing fasteners. 2. Remove damaged double bulb seal on frame in load section and Buna Seal in incline and discharge
section. (Note: Older model conveyors may have Neoprene Sponge Rubber on frame in the incline and discharge section).
3. Strip off any adhesive left on the surface of the frame and clean surface thoroughly.
4. Apply the double bulb seal using Zip Grip starting at the top of the lower curve (See fig. below). The
double bulb seal must be run continuously in this area to prevent leakage. Do not splice seal. In order to make a continuous run of seal, a notch must be cut in the seal to turn the two corners at the tail section of the conveyor (see notch cutout below).

Page 10 TURBO MAGNETIC CONVEYOR PARTS AND SERVICE MANUAL
© NOVEMBER 2003– LNS .............................................................. PUBLICATION NO. 864510-0002 REV. 01
5. Apply Buna Seal on top of the adhesive strip in the incline and discharge section starting at the top of the lower curve (See fig. 2). No notching is required in this section.
6. Put holes in seals where there are holes in the frame. A ¼” drill may be used for this purpose, using
the holes in the frame as a guide. Do not drill any new holes in the frame.
7. If the seals are also damaged on top of the stainless steel cover, repeat steps 1-8 for these seals but use the Neoprene Sponge Seal in the incline and discharge section instead of the Buna Seal. The double bulb seal will still be required in the horizontal section area as before. If the seals on the stainless steel cover are not damaged, there is no need to replace them.
8. Reassemble the conveyor using the assembly procedure outline below.

Page 11 TURBO MAGNETIC CONVEYOR PARTS AND SERVICE MANUAL
© NOVEMBER 2003– LNS .............................................................. PUBLICATION NO. 864510-0002 REV. 01
INSTRUCTIONS FOR REMOVING AND ASSEMBLING THE BAFFLE WELDMENT AND STAINLESS STEEL TOP COVER
1. Disconnect Power from the conveyor. (Use Lock Out/ Tag Out Procedure). Note: only authorized, trained electricians are to perform this task.
2. Remove the bolts and nuts securing the guide rails from both the right and left side of the conveyor.
3. Remove the guide rails that run up the incline on both sides and wrap around the discharge radius
peripheral.
4. Once the incline guide rails are removed, remove the bolts and nuts that attach the stainless steel top cover and baffle weldment to the conveyor frame.
5. Remove the baffle weldment and stainless steel top cover. Inspect the seals to make sure they are not
damaged. If so, replace any damaged seals before reassembling the conveyor.
6. Once the desired maintenance is completed on the stainless steel top cover or baffles weldment, reinstall using the following steps.
7. Install the stainless steel top cover and baffle weldment making sure the seals are properly seated and
in good condition. Use a high grade calking if necessary to insure a watertight seal between the stainless steel top cover and the frame.
8. Install the baffle weldment making sure the seals are properly seated and in good condition. Use a high
grade calking if necessary at any seams of the seal to insure a watertight seal between the baffle weldment and the stainless steel top cover.
9. After positioning the stainless steel top cover, seals and baffle weldment on the conveyor frame, insert
the mounting bolts in each hole first to keep all parts aligned and then tighten the nuts by hand only.
10. Tighten the mounting bolts, starting in the lower curve and alternating from side to side as the bolts are tightened in the curve and the load section of the conveyor.
11. After tightening these bolts, install the guide rails and install and finger tighten the remaining mounting
bolts and nuts in the incline and discharge sections. Finish tightening the rest of the bolts in the incline and discharge section of the conveyor alternating sides as before.
12. Reconnect any wiring if it was removed per the wiring schematic.
13. Test run the conveyor making sure that the belt direction is correct. The chips should be carried up the
incline toward the discharge when the belt is rotating correctly.
14. Failure to run the belt in the correct direction can cause damage to the conveyor.
15. Reinstall the conveyor into the machine tool.
16. Reconnect the electrical power to the conveyor.
17. Test run conveyor to insure proper operation.

Page 12 TURBO MAGNETIC CONVEYOR PARTS AND SERVICE MANUAL
© NOVEMBER 2003– LNS .............................................................. PUBLICATION NO. 864510-0002 REV. 01
INSTRUCTONS FOR REPLACING DRIVE SHAFT AND / OR DRIVE SPROCKETS 1. Remove the 1 ½” hole plugs and run the conveyor until a master link on the chain can be seen through the
opening. Stop the conveyor at this point 2. Disconnect Power from the conveyor. (Use Lock Out/ Tag Out Procedure). Note: only authorized, trained
electricians are to perform this task. 3. Remove the motor and gearbox from the drive shaft by loosening the set-screws in the gearbox that clamps
onto the drive shaft and unbolting the motor from the motor mounting bracket. 4. Remove the flat, rectangular inspection plate located on the underneath side of the discharge end. 5. Remove one of the bolts from each side of the chain ramp allowing it to drop down a little. This will make
the drive shaft easier to remove and allow the belt chain more clearance to slide over the sprockets. 6. Remove the bolts and nuts securing the guide rails from both the right and left side of the conveyor. 7. Remove the guide rails that run up the incline on both sides and wrap around the discharge radius
peripheral. 8. Once the incline guide rails are removed, fold back the stainless steel slider face just enough that you can
access the drive shaft inside of the conveyor. 9. Remove the two bolts located in the vertical face at the tail end (opposite to the discharge end). 10. Once the two plugs are removed, install the two (for 6651 models use ¼-20 X 2 1/4” long screws and for
6650 models use 3/8-16 X 3” long screws) screws and tighten both of these screws until they bottom out. This will compress the belt tensioning springs and take the tension off of the conveyor belt.
11. Remove the master links on the chain on both sides of the conveyor. Remove the chain from the sprockets. 12. Remove the bearing mounting bolts and remove the flanged bearings by loosening the set-screws and
untwisting the elliptical locking collar on the bearings. 13. Remove the four external snap rings from the drive shaft grooves (that are located on each side of the drive
sprockets) and slide them down the drive shaft. Note the snap rings cannot be removed from the shaft without sliding them down the shaft diameter without damaging them.
14. Loosen the set-screws from the drive sprockets. This will allow the sprockets to float freely on the drive
shaft. 15. Remove the drive shaft. Make sure the drive sprockets do not drop into the conveyor when removing the
drive shaft. 16. Replace the drive shaft. While installing the drive shaft back into the frame make sure to reinstall the drive
sprockets, keys and snap rings as shown on the exploded view of the parts section of this manual. 17. Make sure the drive shaft is positioned so that the sprockets are correctly centered in the frame before
locking the shaft down by tightening the locking collars on the flanged bearings onto the drive shaft. 18. Position the belt chain over the drive sprockets, re-install the master links, position the drive sprockets with
the keys in place and reinstall the external snap rings. 19. Install the bolts in each side of the chain ramp which were removed in step 5. 20. Make sure both sprockets are installed so they are in time with each other. Insure that the set screws in the
drive sprockets are tighten. If the sprockets are not in time the conveyor will not operate.

Page 13 TURBO MAGNETIC CONVEYOR PARTS AND SERVICE MANUAL
© NOVEMBER 2003– LNS .............................................................. PUBLICATION NO. 864510-0002 REV. 01
21. Remove the tension bolts installed in step #10 and reinstall the original bolts. Note: Apply a high grade caulking to the face of the bolts to make sure this area is watertight.
22. Fold the stainless steel slider face back down onto the conveyor. 23. Reinstall the guide rails on both sides of the conveyor. 24. Install the flat, rectangular inspection plate, which was removed in step 4. 25. Install the motor and gearbox. 26. Reconnect any wiring if it was removed per the wiring schematic. 27. Test run the conveyor making sure that the belt direction is correct. The chips should be carried up the
incline toward the discharge when the belt is rotating correctly. 28. Failure to run the belt in the correct direction can cause damage to the conveyor. 29. Reinstall the conveyor into the machine tool. 30. Reconnect the electrical power to the conveyor. 31. Test run conveyor to insure proper operation.

Page 14 TURBO MAGNETIC CONVEYOR PARTS AND SERVICE MANUAL
© NOVEMBER 2003– LNS .............................................................. PUBLICATION NO. 864510-0002 REV. 01
INSTRUCTONS FOR REPLACING THE CHAIN AND MAGNET ASSEMBLIES
1. Remove the 1 ½” hole plugs and run the conveyor until a master link on the chain can be seen through the opening. Stop the conveyor at this point.
2. Disconnect Power from the conveyor. (Use Lock Out/ Tag Out Procedure). Note: only authorized,
trained electricians are to perform this task.
3. Remove the bolts and nuts securing the guide rails from both the right and left side of the conveyor.
4. Remove the guide rails that run up the incline on both sides and wrap around the discharge radius peripheral.
5. Once the incline guide rails are removed, remove the bolts and nuts that attach the stainless steel top
cover and baffle weldment to the conveyor frame.
6. Remove the baffle weldment and stainless steel top cover. Inspect the seals to make sure they are not damaged. If so, replace any damaged seals before reassembling the conveyor.
7. Remove the two bolts located in the vertical face at the tail end (opposite to the discharge end).
8. Once the two plugs are removed, install the two (for 6651 models use ¼-20 X 2 1/4” long screws and for
6650 models use 3/8-16 X 3” long screws) screws and tighten both of these screws until they bottom out. This will compress the belt tensioning springs and take the tension off of the conveyor belt.
9. Remove the master links on the chain on both sides of the conveyor. Remove the chain from the
sprockets.
10. As you remove the chain from the conveyor, remove each magnet from the chain as soon as possible by removing the chain pins from the magnet carriers. Lay the magnets out to keep them in proper orientation.
11. Inspect the chain and magnets and replace any damaged parts.
12. To reinstall the chain and magnet assemblies, lay the chain out on the floor. Make sure each side is the
same length and the pins on each side are a mirror image of other.
13. Mark the chain, if necessary, to show where the magnet carriers are to be located.
14. Guide the chain over the drive sprockets and install the magnet assemblies in their proper positions as the belt is installed back into the conveyor track until all of the chain and magnets have been installed.
15. Position the belt chain over the drive sprockets and re-install the master links.
16. Make sure both chain and magnets are installed over the sprockets so they are symmetrical and the
magnet assemblies run perpendicular with the conveyor track.
17. Remove the tension bolts installed in step #7 and reinstall the original bolts. Note: Apply a high grade caulking to the face of the bolts to make sure this area is watertight.
18. Install the stainless steel top cover and baffle weldment making sure the seals are properly seated and
in good condition. Use a high grade calking if necessary to insure a watertight seal between the stainless steel top cover and the frame.
19. Install the baffle weldment making sure the seals are properly seated and in good condition. Use a high
grade calking if necessary at any seams of the seal to insure a watertight seal between the baffle weldment and the stainless steel top cover.

Page 15 TURBO MAGNETIC CONVEYOR PARTS AND SERVICE MANUAL
© NOVEMBER 2003– LNS .............................................................. PUBLICATION NO. 864510-0002 REV. 01
20. After positioning the stainless steel top cover, seals and baffle weldment on the conveyor frame, insert the mounting bolts in each hole first to keep all parts aligned and then tighten the nuts by hand only.
21. Tighten the mounting bolts, starting in the lower curve and alternating from side to side as the bolts are
tightened in the curve and the load section of the conveyor.
22. After tightening these bolts, install the guide rails and install and finger tighten the remaining mounting bolts and nuts in the incline and discharge sections. Finish tightening the rest of the bolts in the incline and discharge section of the conveyor alternating sides as before.
23. Reconnect any wiring if it was removed per the wiring schematic.
24. Test run the conveyor making sure that the belt direction is correct. The chips should be carried up the
incline toward the discharge when the belt is rotating correctly.
25. Failure to run the belt in the correct direction can cause damage to the conveyor.
26. Reinstall the conveyor into the machine tool.
27. Reconnect the electrical power to the conveyor.
28. Test run conveyor to insure proper operation.

Page 16 TURBO MAGNETIC CONVEYOR PARTS AND SERVICE MANUAL
© NOVEMBER 2003– LNS .............................................................. PUBLICATION NO. 864510-0002 REV. 01
INSTRUCTIONS FOR REMOVAL AND INSTALLATION OF CHAIN TENSIONING COMPONENTS
1. Follow the “INSTRUCTONS FOR REPLACING THE CHAIN AND MAGNET ASSEMBLIES”, which is located in this section of the manual, to remove the chain, magnet assemblies and stainless steel top cover.
2. Slide the take-up sprocket off of the stub shaft.
3. Remove the take-up housing assembly by removing the six barrel nuts.
4. Inspect the take-up housing gasket to insure it is not damaged. Replace if torn or damaged.
5. Remove the stub staft, springs and roll pins from the take-up housing assembly. Refer to the
“MAGNETIC CONVEYOR TENSIONING ASSEMBLY” section of this manual, which shows an exploded view of the parts for reference.
6. Inspect all parts and repair or replace any damaged parts.
7. Follow reverse order of this procedure to reassemble.
GEAR REDUCER MAINTENANCE
• Hot oil and reducers can cause severe burns. Use extreme care when removing lubrication plugs and vents.
• Make certain that the power supply is disconnected before attempting to service or remove any components. Lock out the power supply and tag it to prevent unexpected application of power.
• Reducers are not to be considered fail safe or self-locking devices. If these features are required, a properly sized, independent holding device should be utilized. Reducers should not be used as a brake.
• Any brakes that are used in conjunction with a reducer must be sized or positioned
in such a way so as to not subject the reducer to loads beyond the catalog rating. • Lifting supports including eyebolts are to be used for vertically lifting the gearbox
only and no other associated attachments or motors. • If the speed reducer cannot be located in a clear and dry area with access to
adequate cooling air supply, then precautions must be taken to avoid the ingestion of contaminants such as water and the reduction in cooling ability due to exterior contaminants.
• Mounting bolts should be routinely checked to ensure that the unit is firmly anchored for proper operation.
GENERAL GEAR REDUCER OPERATION Run the motor, which drives the reducer and check the direction of the reducer output rotation. If the rotation direction is incorrect, read the motor nameplate for instruction to reverse the direction of rotation.
! WARNING
! CAUTION
! WARNING

Page 17 TURBO MAGNETIC CONVEYOR PARTS AND SERVICE MANUAL
© NOVEMBER 2003– LNS .............................................................. PUBLICATION NO. 864510-0002 REV. 01
GEAR REDUCER INSTALLATION
1. If any of the mounting bolts have been lost, use grade 5 or higher fasteners. The mounting fasteners should be the largest standard size that will fit in the base mounting hole.
2. For shipment of replacement gear reducers, pipe plugs are installed in the unit and a vent plug is packed
separately. After mounting the unit in position, remove the appropriate pipe plug and install the vent plug in the location shown on page 5. On double reduction units both the primary and the secondary must be vented. Failure to vent the unit can cause premature seal wear or loss of seal and oil. These conditions are not covered by warranty. Check for correct oil level..
3. Connect motor to speed reducer.
DO NOT CHANGE MOUNTING POSITIONS WITHOUT CONTACTING FACTORY. Altering the mounting position may require special lubrication provisions, which must be factory installed. Do not operate the reducer without making sure it contains the correct amount of oil. Do not overfill or underfill with oil, or injury to personnel, reducer, or other equipment may result. For safe operation and to maintain the unit warranty, when changing a factory installed fastener for any reason, it becomes the responsibility of the person making the change to properly account for fastener grade, thread engagement, load, tightening torque and the means of torque retention.
! CAUTION
! CAUTION
! CAUTION

Page 18 TURBO MAGNETIC CONVEYOR PARTS AND SERVICE MANUAL
© NOVEMBER 2003– LNS .............................................................. PUBLICATION NO. 864510-0002 REV. 01
LUBRICATION – STANDARD GEAR REDUCTER
All standard reducers ordered from the factory are filled with lubricant to operate within a 30° to 100° F ambient temperature range. Double and triple reduction units have separate oil sumps and must be filled/checked independently. Prior to startup, verify that the oil is at the level shown on the drawings on page 13. If the ambient temperature will be outside the range for the lubricant installed at the factory, drain and refill the reducer with the proper viscosity lubricant prior to use. Consult the chart on page 12 or the factory for alternate lubricants. Change intervals: Standard compounded lubricants should be changed every six months or 2500 operating hours, whichever comes first.
Oil should be changed more often if reducer is used in a severe environment (i.e., dusty, humid). . Do not mix different oils in the reducer. Oils should be compatible with Viton® seal material.
! CAUTION
! CAUTION
Page 19 TURBO MAGNETIC CONVEYOR PARTS AND SERVICE MANUAL
© NOVEMBER 2003– LNS .............................................................. PUBLICATION NO. 864510-0002 REV. 01
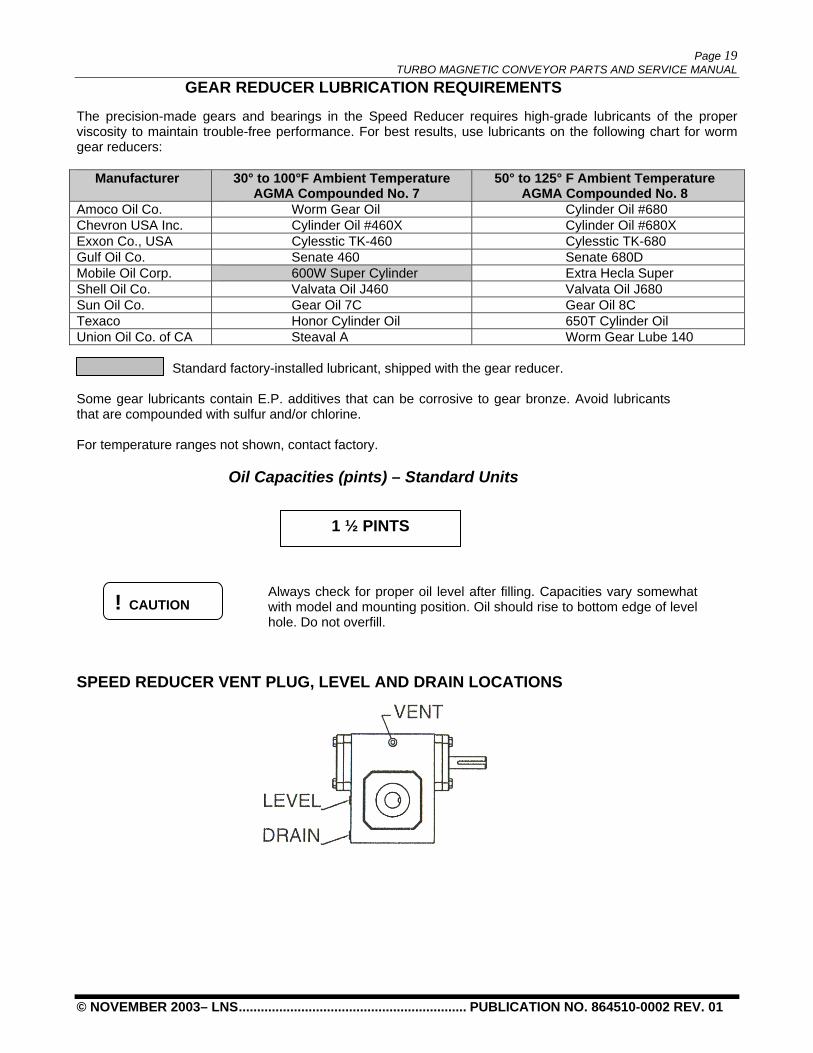
GEAR REDUCER LUBRICATION REQUIREMENTS
The precision-made gears and bearings in the Speed Reducer requires high-grade lubricants of the proper viscosity to maintain trouble-free performance. For best results, use lubricants on the following chart for worm gear reducers:
Manufacturer 30° to 100°F Ambient Temperature AGMA Compounded No. 7
50° to 125° F Ambient Temperature AGMA Compounded No. 8
Amoco Oil Co. Worm Gear Oil Cylinder Oil #680 Chevron USA Inc. Cylinder Oil #460X Cylinder Oil #680X Exxon Co., USA Cylesstic TK-460 Cylesstic TK-680 Gulf Oil Co. Senate 460 Senate 680D Mobile Oil Corp. 600W Super Cylinder Extra Hecla Super Shell Oil Co. Valvata Oil J460 Valvata Oil J680 Sun Oil Co. Gear Oil 7C Gear Oil 8C Texaco Honor Cylinder Oil 650T Cylinder Oil Union Oil Co. of CA Steaval A Worm Gear Lube 140 Standard factory-installed lubricant, shipped with the gear reducer. Some gear lubricants contain E.P. additives that can be corrosive to gear bronze. Avoid lubricants that are compounded with sulfur and/or chlorine. For temperature ranges not shown, contact factory.
Oil Capacities (pints) – Standard Units
Always check for proper oil level after filling. Capacities vary somewhat with model and mounting position. Oil should rise to bottom edge of level hole. Do not overfill.
SPEED REDUCER VENT PLUG, LEVEL AND DRAIN LOCATIONS
1 ½ PINTS
! CAUTION

Page 20 TURBO MAGNETIC CONVEYOR PARTS AND SERVICE MANUAL
© NOVEMBER 2003– LNS .............................................................. PUBLICATION NO. 864510-0002 REV. 01
SYNTHETIC LUBRICANTS
Synthetic lubricants provide the potential for numerous benefits including wider temperature range and increased interval between changes. Use of synthetics can cause problems if they are not compatible with the seals or the conventional lubricants they replace. For continuous duty at normal ambient temperatures (-10°F to 105°F) we recommend the use of Mobil SHC 634 which is compatible with the standard compounded oil shipped in our product and the Viton® seal material used. For other temperatures, or for intermittent operation below 20°F, contact the factory for a recommendation.
MAINTENANCE – GEAR REDUCERS
Frequently check the oil level of the reducer. If oil level is low, (refer to reducer vent and level position chart) add proper lubrication through the filler plug until it comes out the oil level plug. Inspect vent plug often to ensure it is clean and operrating.
Mounting bolts should be routinely checked to ensure that the unit is firmly anchored for proper operation.
Seals: Seals are a wear item and eventually need to be replaced. Replacement can be accomplished by following the steps below:
1. Remove the worn seal without damaging the shaft surface of the seal bore. This can be done by drilling a .062 diameter hole in the seal casing (being careful not to drill into the bearing behind the seal). Screw a #10 sheet metal screw into the hole and pry out the seal.
2. Clean the seal bore of sealant.
3. Before installing the new seal, use electrical tape to cover any keyways on the shaft to prevent seal lip
damage.
4. Grease the seal lips with bearing grease and apply a sealant to the seal bore.
5. Slide the seal into the shaft being careful not to fold the inner lip over on any shaft steps.
6. Press the seal itno its bore with a sleeve that presses on the seal casing, being careful to keep the seal square in its bore.
! CAUTION

Page 21 TURBO MAGNETIC CONVEYOR PARTS AND SERVICE MANUAL
© NOVEMBER 2003– LNS .............................................................. PUBLICATION NO. 864510-0002 REV. 01
MAGNETIC CONVEYOR TROUBLE SHOOTING GUIDE The following chart will show some problems, their probable causes and possible solutions.
PROBLEM POSSIBLE CAUSE POSSIBLE SOLUTION
Conveyor is running in reverse. Drive shaft is rotating opposite the directional arrows on the conveyor
Polarity is wrong on conveyor motor leads. Change motor leads on the conveyor. Make sure drive shaft is rotating in same direction as directional arrows. Directional arrows are located on the conveyor frame at the drive shaft section of the conveyor.
The conveyor is jamming or the belt will not run.
a). Loose magnet assembly, broken magnet assembly, or broken chain.
Refer to SERVICE SECTION for proper procedure for taking conveyor apart. Check conveyor for worn track and broken magnet assemblies.
b). Broken take-up stub shaft or take- up sprocket worn excessively.
Replace take-up stub shaft and / or take-up sprocket.
c). Chain has jumped time. Inspect chain for wear and replace if necessary. Reinstall to insure proper timing on both sides of the conveyor.
(d) The master link on the belt of the conveyor has separated.
Replace the master link assembly.
(e) The magnet assemblies have fallen off the chain and are laying in the conveyor.
Reattach or replace the magnet assemblies if they are damaged.
(f) The magnet assemblies are not properly aligned with the belt.
Realign the magnet assemblies with the chaint.
(g) Overload relay in drive motor control circuit has tripped out.
Reset overload relay.
(h) Overload relay is undersized for the amp. draw of the motor. (See electrical schematic or read the full amp. draw ratings on the motor to determine the correct overload relay or fuse setting for the conveyor.
Replace the overload relay with the correct size for the conveyor drive motor.
(i) Conveyor chain is broken. Repair the damaged section or replace the chain.
(j) Sheared or missing key at gear reducer. Replace failed or missing parts AFTER determining cause of failure;
(k) Worn-out drive sprockets, excessively loose or broken drive chain
Replace worn or broken parts.
(l) Motor has failed. Replace motor.
(m) Gear reducer has failed. Replace Gear Reducer. After running for some time, conveyor starts having trouble lifting fine materials up incline section.
a) Conveyor track could be worn or there could be broken magnet assemblies.
Refer to SERVICE SECTION for proper procedure for taking conveyor apart. Check conveyor for worn track and broken magnet assemblies
b) Slider face has a residue built up on it. Clean slider face with a strong solvent cleaner and polish with Scotch Brite.

Page 22 TURBO MAGNETIC CONVEYOR PARTS AND SERVICE MANUAL
© NOVEMBER 2003– LNS .............................................................. PUBLICATION NO. 864510-0002 REV. 01
MAGNETIC CONVEYOR TROUBLE SHOOTING GUIDE (CONT.)
PROBLEM POSSIBLE CAUSE POSSIBLE SOLUTION Conveyor amp draw is higher than normal.
Chain may require lubrication. Remove discharge access plate and spray lubricate on the chain (both sides)
Excessive wear of the conveyor track.
(a) Conveyor is not level or square. Properly level conveyor.
Material has a jerking motion as it moves up stainless steel top cover.
Chain has stretched or tensioning springs in tail section block need replacement.
Refer to SERVICE SECTION for proper procedure for taking conveyor apart.
Conveyor has excess coolant dripping from discharge section.
Leaking seals in lower horizontal section or incline section
Refer to SERVICE SECTION for proper procedures to replace conveyor seals.

Page 23 TURBO MAGNETIC CONVEYOR PARTS AND SERVICE MANUAL
© NOVEMBER 2003– LNS .............................................................. PUBLICATION NO. 864510-0002 REV. 01
MAGNETIC CONVEYOR MAINTENANCE SCHEDULE The following chart shows a suggested maintenance schedule for the conveyor to insure proper operation and longevity.
Time Frame Procedure Problem Resolution
Daily Check conveyor to insure the chips are being carried out properly.
See the trouble shooting guide in this manual.
See the trouble shooting guide in this manual.
Daily Inspect rotation of drive shaft. Insure the rotation matches the arrows on the drive shaft.
If the drive shaft is rotating in the wrong direct it will cause damage to the conveyor.
If the drive shaft is rotating in the wrong direction, immediately stop the conveyor and reverse the motor leads.
Weekly Check the coolant flow to insure the baffles are not overflowing
Either the conveyor is not level or a restriction is damming up the conveyor baffles.
Level, if necessary, or clear the restriction.
Weekly Check slider face to insure there is not a residue build up.
Chips are not being carried up the incline effectively.
Clean the slider face with an industrial cleaner and polish with Scotch Brite if necessary.
Weekly Check slider face to insure there are no dents.
Dents in the slider face can cause the magnet assembly shrink wrap material to wear through.
Repair or replace slider face if damaged.
Every 3 months Check magnet assemblies for shrink wrap wear.
Remove discharge access cover and inspect magnet assemblies.
Refurbish magnet assemblies if necessary and investigate the cause of the shrink wrap wear.
Every 3 months Check to insure the conveyor is level.
Conveyor may have been bumped or moved out of position.
Level per procedures in this manual.
Every 6 months Check flange bearing to see if they need lubrication.
Do not over apply grease. Too much grease will break the seal and cause premature bearing failure.
Grease lightly with a grease gun if a grease fitting is in the bearing.
Every 6 months Remove the discharge access cover and inspect the chain for lubrication.
Check the full amp draw on the motor before and after lubrication of the chain.
Spray lubrication on the chain on both sides.
Every 6 months or 2500 operating hours (whichever comes first)
Change gear reducer oil with proper oil recommended in this manual.
Inspect the gear reducer to insure there are no leaks at the seal and that vent hole is not clogged.
After changing the oil, test run the gear reducer to insure proper operation
Annually Remove the slider face and inspect for main component wear.
Inspect take-up tensioning assembly, magnet assemblies, drive components, and seals. Also insure that the inside of the frame is dry.
Replace any damaged or excessively worn parts.

Page 24 TURBO MAGNETIC CONVEYOR PARTS AND SERVICE MANUAL
© NOVEMBER 2003– LNS .............................................................. PUBLICATION NO. 864510-0002 REV. 01
MAGNETIC CONVEYOR TOP COVER & SEALS
MICROFINE® S CLEAT SCRAPPER PARTS
PAR
T N
AM
E
Seal
, Bun
a Se
al, V
iton
Dou
ble
Bul
b
CA
TALO
G
NO
.
66M
23
66M
24
ITEM
N
O.
28
29
PAR
T N
AM
E
Stai
nles
s St
eel T
op C
over
G
uide
Rai
l Se
al, N
eopr
ene
CA
TALO
G
NO
.
66M
10
66M
21
66M
22
ITEM
NO
.
11
12
27

Page 25 TURBO MAGNETIC CONVEYOR PARTS AND SERVICE MANUAL
© NOVEMBER 2003– LNS .............................................................. PUBLICATION NO. 864510-0002 REV. 01
MAGNETIC CONVEYOR TENSIONING ASSEMBLY
PAR
T N
AM
E
Spro
cket
, Tak
e-up
H
ousi
ng, T
ake-
up
Sprin
g, C
ompr
essi
on
Stub
Sha
ft W
eldm
ent
Rol
l Pin
G
aske
t, C
over
CA
TALO
G
NO
.
66M
13
66M
11
66M
14
66M
12
66M
37
66M
40
ITEM
N
O.
26
30
31
33
34
57
PAR
T N
AM
E
Nut
, Bar
rel
Cov
er
Nut
, Jam
Hex
B
olt,
Hex
-Hea
d W
ashe
r, Lo
ck
Scre
w, S
ocke
t-Hea
d B
utto
n G
aske
t, Ta
ke-u
p H
ousi
ng
CA
TALO
G
NO
.
66M
25
66M
26
66M
29
66M
30
66M
31
66M
33
66M
35
ITEM
N
O.
4 13
18
19
20
21
25

Page 26 TURBO MAGNETIC CONVEYOR PARTS AND SERVICE MANUAL
© NOVEMBER 2003– LNS .............................................................. PUBLICATION NO. 864510-0002 REV. 01
MAGNETIC CONVEYOR TRACK & MAGNET ASSEMBLY
PAR
T N
AM
E
Was
her,
Nyl
on
Mag
net A
ssem
bly
Mas
ter L
ink,
Cha
in
Trac
k, U
pple
r Hor
izon
tal
Pin
CA
TALO
G
NO
.
66M
2 66
M1
66M
27
66M
7 66
M28
ITEM
N
O.
32
33
66
81
82
PAR
T N
AM
E
Nut
, Bar
rel
Trac
k, C
urve
Tr
ack,
Low
er H
oriz
onta
l (R
ight
-Han
d Sh
own)
Tr
ack,
Low
er H
oriz
onta
l (L
eft-H
and
Not
sho
wn)
Tr
ack,
Incl
ine
C
hain
CA
TALO
G
NO
.
66M
25
66M
17
66M
12-R
66
M12
-L
66M
18
66M
3
ITEM
N
O.
4 6 7 8 9

Page 27 TURBO MAGNETIC CONVEYOR PARTS AND SERVICE MANUAL
© NOVEMBER 2003– LNS .............................................................. PUBLICATION NO. 864510-0002 REV. 01
MAGNETIC CONVEYOR DRIVE COMPONENTS
PAR
T N
AM
E
Supp
ort B
rack
et
Torq
ue A
rm
Was
her,
Flat
N
ut, H
ex
Bol
t, H
ex-H
ead
Was
her,
Lock
K
ey
Set-S
crew
CA
TALO
G
NO
.
66M
39
66M
8 66
M41
66
M42
66
M43
66
M44
75
B44
75
B43
ITEM
N
O.
50
51
53
54
55
56
68
69
PAR
T N
AM
E
Was
her,
Lock
B
earin
g, F
lang
e D
rive
Shaf
t Sp
rock
et, D
rive
Snap
Rin
g, E
xter
nal
Bol
t, H
ex-H
ead
Plug
B
olt,
Hex
-Hea
d
CA
TALO
G
NO
.
66M
31
66M
4 66
M5
66M
6 66
M32
66
M34
66
M36
66
M38
ITEM
N
O.
20
39
40
41
42
43
46
47

Page 28 TURBO MAGNETIC CONVEYOR PARTS AND SERVICE MANUAL
© NOVEMBER 2003– LNS .............................................................. PUBLICATION NO. 864510-0002 REV. 01
MAGNETIC CONVEYOR DRIVE COMPONENTS - 2
PAR
T N
AM
E
Was
her.
Flat
W
ashe
r, Lo
ck
Bol
t, H
ex-H
ead
Key
CA
TALO
G
NO
.
66M
48
66M
49
66M
50
75B
-44
ITEM
N
O.
57
58
59
68
PAR
T N
AM
E
Mot
or
Bol
t, H
ex-H
ead
Key
G
ear R
educ
er
CA
TALO
G
NO
.
66M
9-A
66
M45
66
M46
66
M9-
B
ITEM
N
O.
22
23
24
48

Page 29 TURBO MAGNETIC CONVEYOR PARTS AND SERVICE MANUAL
© NOVEMBER 2003– LNS .............................................................. PUBLICATION NO. 864510-0002 REV. 01
MAGNETIC CONVEYOR ACCESS COVER
PAR
T N
AM
E
Bol
t, H
ex-H
ead
Acc
ess
Cov
er
CA
TALO
G
NO
.
66M
38
66M
47
ITEM
N
O.
47
52
PAR
T N
AM
E
Bol
t, Jh
ex-H
ead
Cha
in R
amp
CA
TALO
G
NO
.
66M
34
66M
20
ITEM
N
O.
43
45

Page 30 TURBO MAGNETIC CONVEYOR PARTS AND SERVICE MANUAL
© NOVEMBER 2003– LNS .............................................................. PUBLICATION NO. 864510-0002 REV. 01
MAGNETIC CONVEYOR ELECTRICAL INFORMATION LNS’ chip conveyors are supplied with a variety of drive packages and electrical controls, depending on conveyor application and customer preference. Only a qualified electrician or machine service technician should perform any maintenance, repairs or adjustments on this equipment. READ THIS SECTION BEFORE APPLING ELECTRICAL POWER TO THIS EQUIPMENT.
WARNING! ONLY QUALIFIED ELECTRICIAN OR SERVICEMAN SHOULD PERFORM ANY ELECTRICAL TROUBLESHOOTING OR MAINTENANCE TO THIS EQUIPMENT. DO NOT PERFORM ANY MAINTENANCE, REPAIRS OR ADJUSTMENTS ON THIS EQUIPMENT WITHOUT FIRST LOCKING OUT ALL ELECTRICAL CONTROLS. PERSONNEL SHOULD BE TRAINED IN OSHA COMPLIANT LOCK-OUT/TAG-OUT AND ELECTRICAL SAFETY PROCEDURES. MAKE CERTAIN THAT THE POWER SUPPLY IS DISCONNECTED BEFORE ATTEMPTING TO SERVICE OR REMOVE ANY COMPONENTS! AT NO TIMES SHOULD CIRCUIT CONTINUITY BE CHECKED BY SHORTING TERMINALS WITH A SCREWDRIVER OR OTHER METAL DEVICE. NEVER SHOULD ADJUSTMENTS, MAINTENANCE OR CLEANING BE PREFORMED WITHOUT FOLLOWING PROPER SAFETY PROCEDURES IN ACCORDANCE WITH LOCAL, STATE AND NATIONAL SAFETY CODES. Before making any electrical connections be certain the voltage for which the conveyor drive and control are wired is the same as incoming voltage being delivered by the electric power supply. Failure to do so may result in injury or damage to the equipment. It may be necessary in the case of 220/440V, 3 phase, for example, to change the motor wiring from one voltage to another. Normally a wiring diagram is located inside the motor terminal box, which indicates proper wiring for the incoming voltage supplied. Some machines are equipped with internal electrical controls and a multi-pin type accessory plug for connecting the chip conveyor. LNS chip conveyors can be ordered with a mateing plug, so that connecting the conveyor is as simple as plugging it in. The best and most common source of power for the chip conveyor is the machine electrical cabinet. It is the customer’s responsibilities at the time of placing the purchase order to determine what, if any, electrical components are present and/or order the appropriate conveyor control. Even if the machine has no plug or other provision for connecting a chip conveyor, the conveyor can be ordered from LNS with both halves of a quick-disconnect style plug. One half will come pre-wired to the conveyor control cable. The other half of the plug will be wired to the machine electrical cabinet where it will be connected to the power supply. The chip conveyor can then be quickly unplugged for cleaning or service without having to disconnect “hard wired” connections. Before starting the chip conveyor, check to be sure no tools, packing, or other material have been left on the conveyor, Start the conveyor and verify proper direction of belt travel. VERY IMPORTANT: MAKE SURE THE ROTATION OF THE DRIVE SHAFT CORRESPONDS WITH THE DIRECTIONAL ARROWS LOCATED ON THE DRIVE SHAFT OF THE CONVEYOR. IF THE DRIVE SHAFT IS MOVING IN THE OPPOSITE DIRECTION OF THE DIRECTIONAL ARROWS, IMMEDIATELY STOP THE CONVEYOR, DISCONNECT THE POWER SUPPLY, AND REVERSE THE POWER SUPPLY LEADS TO THE CONVEYOR. RECHECK THE DRIVE SHAFT FOR ROTATION. CONVEYOR DAMAGE WILL OCCUR IF THE CONVEYOR IS ROTATING IN THE OPPOSITE DIRECTION OF THE DIRECTIONAL ARROWS!!!

Page 31 TURBO MAGNETIC CONVEYOR PARTS AND SERVICE MANUAL
© NOVEMBER 2003– LNS .............................................................. PUBLICATION NO. 864510-0002 REV. 01
TIME DELAY DEVICES
The use of a time delay device is not suggested on a Magnetic Conveyor. If the conveyor is not running when the machine tool is cutting chips it may cause a large chip build up in the conveyor frame. This condition may cause the coolant flow to be restricted which can result in coolant overflowing the conveyor baffles allowing excessive chips to flow into the coolant tank or coolant spills onto the floor. This condition may diminish the effectiveness of the conveyor and result in downtime due to excessive maintenance cost due to more frequent coolant tank cleanings and / or maintenance. This may also result in shorter pump life and/or more frequent pump maintenance.
AC SUPPLY CIRCUIT AMP LOAD FOR MICROFINE® S CONVEYORS
Your LNS chip conveyor is equipped with an AC motors to drive the conveyor chain. The full load amp draw is based on the horsepower of the AC motor, as well as the input AC voltage. The conveyor motor control circuit is not separately fused. The customer must provide a circuit breaker or a fused disconnect switch on the power supply to the conveyor
It may be necessary to change a circuit protection device on the incoming power supply line to accommodate the higher full load amp draw. Refer to the following tables to determine the full load amp draw on the AC supply circuit:
AC CURRENT REQUIREMENTS FOR MAGNETIC CONVEYORS
Voltage
3 Phase Belt Drive Type Belt Drive
Horsepower Full Amp. Load Rating
230 VAC Fixed Speed 1/2 2.20 A
230 VAC Variable Speed 1/2 2.20 A
460 VAC Fixed Speed 1/2 1.10 A
460 VAC Variable Speed 1/2 1.10 A

Page 32 TURBO MAGNETIC CONVEYOR PARTS AND SERVICE MANUAL
© NOVEMBER 2003– LNS .............................................................. PUBLICATION NO. 864510-0002 REV. 01
(OPTIONAL) VARIABLE SPEED DRIVE If the conveyor is equipped with a variable speed control, the belt speed of the conveyor will be controlled by a variable speed inverter drive located on the conveyor electrical control panel. The conveyor belt speed is adjustable from near zero to approximately 32 feet per minute. The belt speed should be set at the lowest possible speed that will remove chips fast enough to keep them from accumulating in the load section of the conveyor. Setting the belt speed too low may allow chips to build up in the horizontal load section of the conveyor. Setting the belt speed too fast increases the amount of coolant carried out into the chip container. Note: The variable speed control should not be used as an ON-OFF switch. Only the ON-OFF switch switch should be used to turn the conveyor motor on or off. The control is designed for safe and convenient operation. All controls are mounted on the front cover. No access to the inside of the control enclosure is required. The OFF/FORWARD switch controls the incoming line power to the inverter. It must be in the FORWARD position for the conveyor to operate. The SPEED CONTROL potentiometer controls the inverter output frequency. The conveyor belt speed can be varied from nearly zero to the maximum using this control. CONTROL PANEL OF VARIABLE INSIDE VIEW OF VARIABLE SPEED CONTROL SPEED CONTROL

Page 33 TURBO MAGNETIC CONVEYOR PARTS AND SERVICE MANUAL
© NOVEMBER 2003– LNS .............................................................. PUBLICATION NO. 864510-0002 REV. 01
VARIABLE SPEED CONTROL ELECTRICAL SCHEMATIC


