
LOADING DRIVERS FOR SKYVIEW 2.0 XBEE INTERFACE USB DEVICE ON WINDOWS 8
After you have loaded the Skyview 2.0 software, with the xBee interface plugged in to your USB drive, you try to start
the program from your “Start/All Programs” button, you may get an error message box like the one below:
If your Skyview screen looks like this or the image below, with no green lights under “Communication Status” in the far
left of the screen, this is another indication that the drivers for the xBee interface have not loaded.

To load the drivers, follow the steps below:
From the Metro Start Screen, open “Settings” (move your mouse to the bottom-right-corner of the screen and wait for
the pop-out bar to appear, then click the Gear icon)
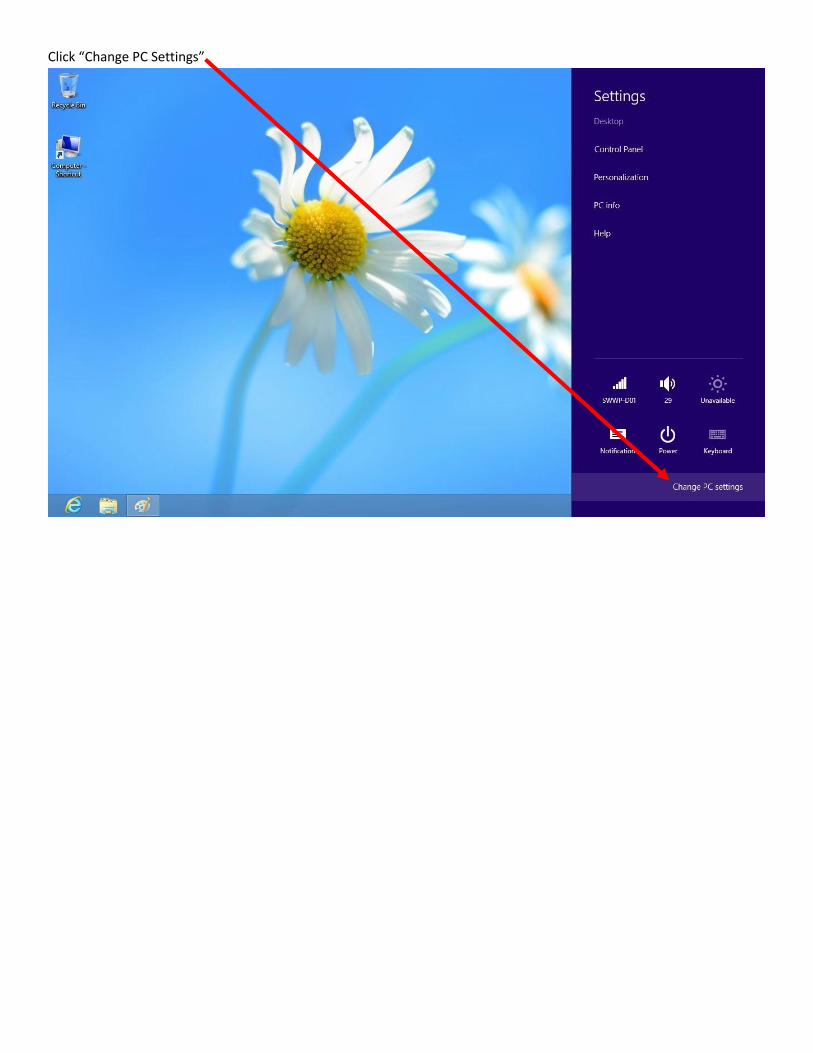
Click “Change PC Settings”

Click ‘General’
Scroll down in the panel on the right, and click ‘Restart Now’ under ‘Advanced Startup’
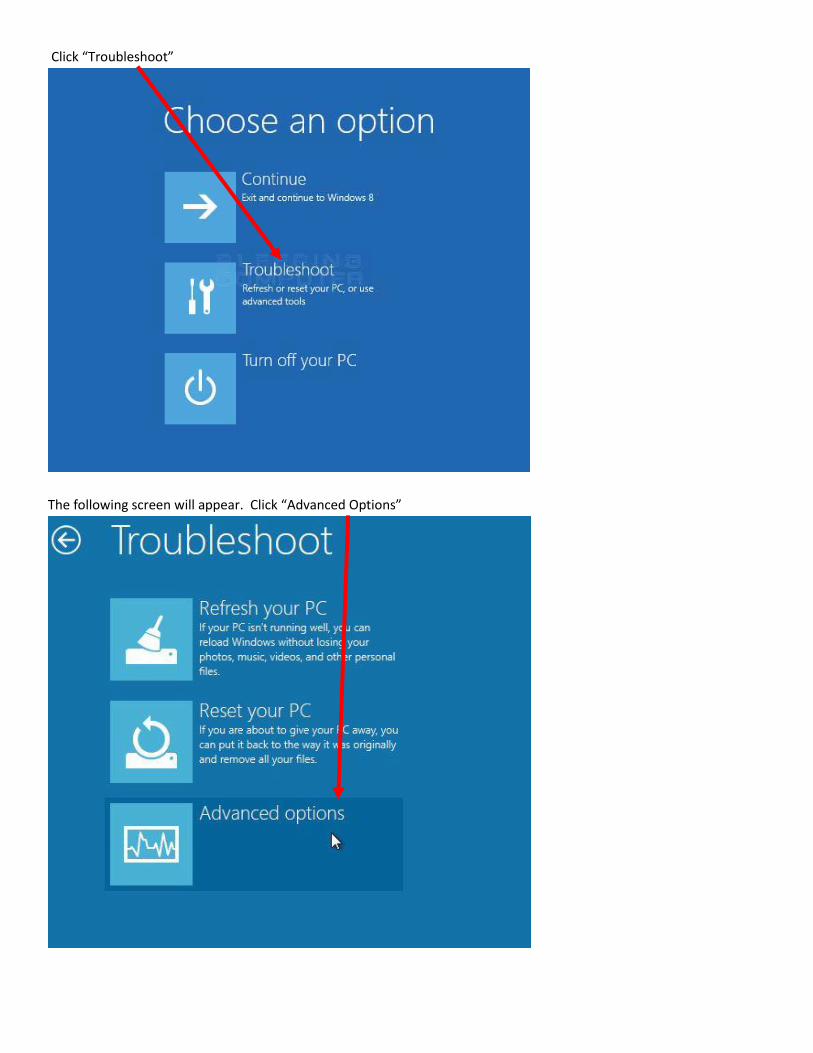
Click “Troubleshoot”
The following screen will appear. Click “Advanced Options”

Click “Startup Settings”
Click “Restart,” and when the computer restarts, select “Disable Driver Signature Enforcement” (you will need to use
your keyboard to select the number on the list rather than using the mouse):

Once the computer has restarted, again go to the Metro Start Menu, and then select “Search” (magnifying glass icon),
and click “Settings.” Type “Device Manager” into the search box:
Click “Device Manager” on the left side of the screen.

In the Device Manager screen, locate the SWWP USB Xbee device. It will be listed under “other devices” as below, or
Universal Serial Bus controllers (you may have to “expand” that menu item to see the list):
Right click on the name of the device, and select “update driver” from the menu that will appear (no screen shot
available)

The following screen will appear. Select “Browse my computer for driver software”

In the next screen, click the “browse” button.
In the Browse For Folder, find the CD Rom drive containing the Skyview 2.0 software, or the location of your
downloaded Skyview 2.0 file.

Double click on the “ftdi” folder.

Single click (or “select”) only, on the “Drivers” folder within the ftdi folder.
Click “OK”

The next screen that comes up should look like the one below:
Click “Next”
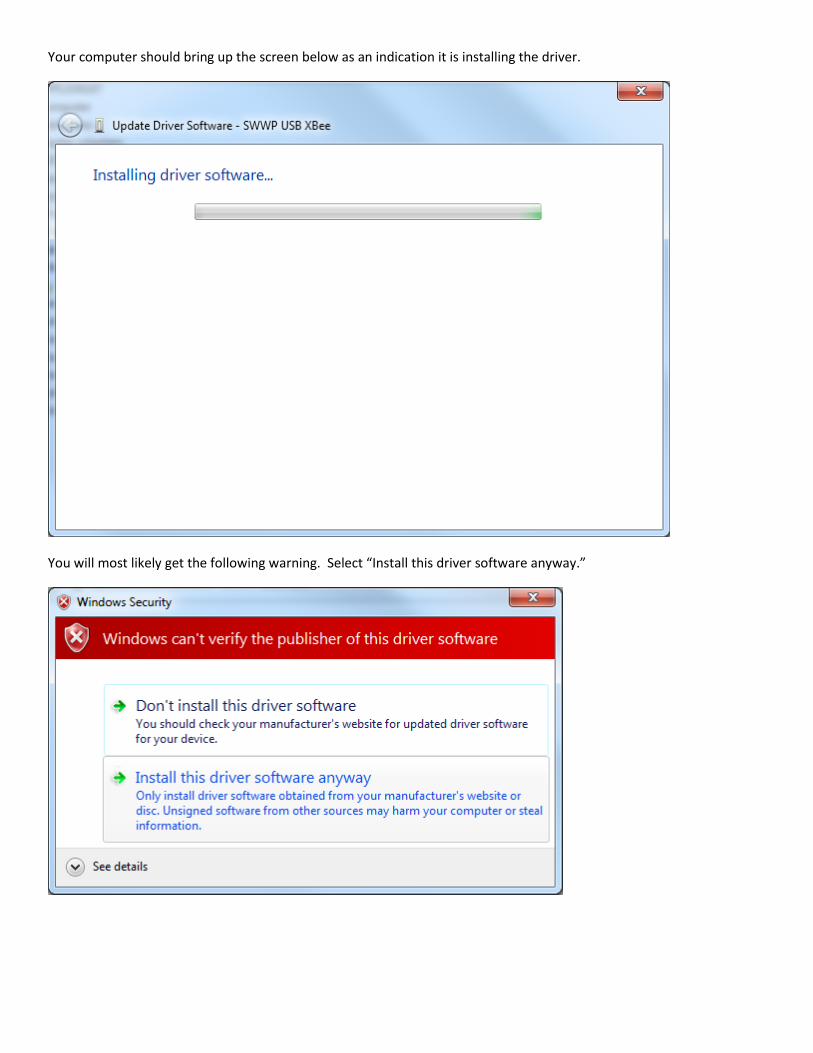
Your computer should bring up the screen below as an indication it is installing the driver.
You will most likely get the following warning. Select “Install this driver software anyway.”

The computer will continue installing the driver software.

It should only take 30 – 60 seconds or so, and you should get the confirmation screen below:

Once you no longer see an item in Device Manager with a yellow exclamation point, close out of the Device Manager.
The drivers are now installed!

Now go to Metro Start Menu, click “Search,” and select “Skyview 2.0”

The Skyview 2.0.0.vi software should now come up on your screen with the USB and Interface lights showing GREEN
under “Communication Status” on the far left:
Now you can proceed with entering your serial number in the Turbine Setup screen under step 1. Once the 8 digit
number is entered there, click “add turbine” under step 2

The serial number will show up in the “My Turbines” screen, and the count will initiate under step 4 (60 second count).

Within the 60 seconds, the turbine serial number should show up in the “My Turbines Found”
field

Occasionally the interface will “find” the turbine before you have a chance to enter the serial number, in which case the
serial number will show up in an encoded format under “Other Turbines Found”

To get it to “jump” over to “My Turbines Found” simply go to the File menu in the upper left corner of the screen, and
click on “Disconnect from USB Converter”
The USB and Interface lights will go out. As soon as they do, click on File/Connect to USB Converter. The turbine’s serial
number will “jump” over to the My Turbines Found field and you will notice all five Communication Status lights will be
green:

You are communicating with your turbine!

The first thing you should do is to “set” the date in the Overview screen because it will likely have an erroneous date
showing there.
Enjoy your wireless communication! If you have questions about the various tabs and information, please read your
Skyview Instruction Manual included on the CD Rom that you received containing the Skyview software.


