Download - LANDING GEAR POWER SWING - Ag Growth

LANDING GEAR POWER SWINGELECTRIC AND HYDRAULIC (10"/13")ASSEMBLY & OPERATION
Original Instructions
Part Number: 31041 R1
Revised: 28/11/2018
Read this manual before using product. Failure to follow instructions and safety precautions can result in serious injury, death, or property damage. Keep manual for future reference.

This product has been designed and constructed according to general engineering standardsa. Other local regulations may apply and must be followed by the operator. We strongly recommend that all personnel associated with this equipment be trained in the correct operational and safety procedures required for this product. Periodic reviews of this manual with all employees should be standard practice. For your convenience, we include this sign-off sheet so you can record your periodic reviews.
a. Standards include organizations such as the American Society of Agricultural and Biological Engineers, American National Standards Institute, Canadian Standards Association, International Organization for Standardization, EN Standards, and/or others.
Date Employee Signature Employer Signature

New in this Manual
The following changes have been made in this revision of the manual:
Description Section
This is for a new product; first release of manual.


HUTCHINSON/MAYRATH LANDING GEAR POWER SWING ELECTRIC AND HYDRAULIC (10"/13")
TABLE OF CONTENTS
1. Introduction .......................................................................................................................... 72. Safety .................................................................................................................................... 92.1. General Safety Information ...................................................................................... 92.2. Assembly Safety..................................................................................................... 102.3. Operational Safety.................................................................................................. 102.4. Maintenance Safety................................................................................................ 122.5. Hydraulic Safety ..................................................................................................... 122.6. Safety Decals ......................................................................................................... 12
2.6.1. Decal Installation/Replacement ................................................................ 122.6.2. Safety Decal Locations and Details.......................................................... 13
3. Assembly ............................................................................................................................ 153.1. Assembly Safety..................................................................................................... 153.2. Tools Required ....................................................................................................... 153.3. Power Swing Components ..................................................................................... 163.4. Power Swing Assembly.......................................................................................... 18
3.4.1. Replace the Transition.............................................................................. 183.5. Electric Drive Option............................................................................................... 19
3.5.1. Install the Landing Gear (Electric) ............................................................ 193.5.2. Install and Connect the Receiver Box ...................................................... 21
3.6. Hydraulic Drive Option ........................................................................................... 253.6.1. Attach the Landing Gear to the Transition (Hydraulic) ............................. 253.6.2. Install and Connect the 2-Spool Valve ..................................................... 27
4. Operation ............................................................................................................................ 314.1. Pre-Operational Checklist ...................................................................................... 314.2. Electric Power Swing Operation............................................................................. 324.3. Hydraulic Drive ....................................................................................................... 344.4. Hydraulic Power Swing Operation.......................................................................... 354.5. Transporting ........................................................................................................... 36
5. Maintenance & Storage...................................................................................................... 375.1. Maintenance Procedures ....................................................................................... 375.2. Storage Procedure ................................................................................................. 38
6. Appendix............................................................................................................................. 396.1. Open/Closed-Center Valve Conversion ................................................................. 396.2. Power Swing Remote Transmitter Instructions ...................................................... 40
6.2.1. Programming Receivers ........................................................................... 41
7. Hutchinson/Mayrath Warranty .......................................................................................... 43
31041 R1 5

HUTCHINSON/MAYRATH LANDING GEAR POWER SWING
ELECTRIC AND HYDRAULIC (10"/13")
6 31041 R1

HUTCHINSON/MAYRATH - LANDING GEAR POWER SWING 1. INTRODUCTION
ELECTRIC AND HYDRAULIC (10"/13")
1. IntroductionThank you for purchasing a Hutchinson/Mayrath Landing Gear Power Swing. This equipment will allow safe and efficient operation when you read and follow all of the instructions contained in this manual. With proper care, your Landing Gear Power Swing will provide you with many years of trouble-free operation.
Keep this manual handy for frequent reference and to review with new personnel. A sign-off form is provided on the inside front cover for your conve-nience. If any information in this manual is not understood or if you need additional information, please contact your local distributor or dealer for assis-tance.
This manual should be regarded as part of the equipment. Suppliers of both new and second-hand equipment are advised to retain documentary evidence that this manual was provided with the equipment.
31041 R1 7

1. INTRODUCTION HUTCHINSON/MAYRATH - LANDING GEAR POWER SWING
ELECTRIC AND HYDRAULIC (10"/13")
8 31041 R1

HUTCHINSON/MAYRATH - LANDING GEAR POWER SWING 2. SAFETY
ELECTRIC AND HYDRAULIC (10"/13")
2. Safety2.1. GENERAL SAFETY INFORMATION
The Safety Alert symbol identifies important safety messages on the product and in the manual. When you see this symbol, be alert to the possibility of personal injury or death. Follow the instructions in the safety messages.
Why is SAFETY important?
• Accidents disable and kill.• Accidents cost.• Accidents can be avoided.
SIGNAL WORDS: Note the use of the signal words DANGER, WARNING, CAUTION, and NOTICE with the safety messages. The appropriate signal word for each message has been selected using the definitions below as a guideline.
DANGER
Indicates an imminently hazardous situation that, if not avoided, will result in serious injury or death.
WARNING
Indicates a hazardous situation that, if not avoided, could result in serious injury or death.
CAUTION
Indicates a hazardous situation that, if not avoided, may result in minor or moderate injury.
NOTICE
Indicates a potentially hazardous situation that, if not avoided, may result in property damage.
31041 R1 9

2. SAFETY HUTCHINSON/MAYRATH - LANDING GEAR POWER SWING
ELECTRIC AND HYDRAULIC (10"/13")
YOU are responsible for the SAFE use and maintenance of your equipment. YOU must ensure that you and anyone else who is going to work around the equipment understands all procedures and related SAFETY information contained in this manual.
Remember, YOU are the key to safety. Good safety practices not only protect you, but also the people around you. Make these practices a working part of your safety program.
Important: Below are general instructions that apply to all safety practices. Any instructions specific to a certain safety practice (e.g., Operational Safety), can be found in the appropriate section. Always read the complete instructional sections and not just these safety summaries before doing anything with the equipment.
• It is the equipment owner, operator, and maintenance personnel's responsi-bility to read and understand ALL safety instructions, safety decals, and man-uals and follow them when assembling, operating, or maintaining the equipment. All accidents can be avoided.
• Equipment owners must give instructions and review the information initially and annually with all personnel before allowing them to operate this product. Untrained users/operators expose themselves and bystanders to possible serious injury or death.
• Use this equipment for its intended purposes only.• Do not modify the equipment in any way without written permission from the
manufacturer. Unauthorized modification may impair the function and/or safety, and could affect the life of the equipment. Any unauthorized modifica-tion of the equipment voids the warranty.
• Do not allow any unauthorized person in the work area.
2.2. ASSEMBLY SAFETY
• Read and understand the assembly instructions to get to know the sub-assemblies and hardware that make up the equipment before proceeding to assemble the product.
• Do not take chances with safety. The components are large, heavy, and can be hard to handle. Always use the proper tools, stands, jacks, and hoists for the job.
• Always have two or more people assembling the equipment. Because of the weight, do not attempt assembly alone.
2.3. OPERATIONAL SAFETY
• Do not operate with any of the safety guards removed.• Keep body, hair, and clothing away from moving parts. Stay away from intake
during operation.• Do not stand in the path of the Power Swing when it is moving.
Refer to your auger manual for full safety instructions.
10 31041 R1

HUTCHINSON/MAYRATH - LANDING GEAR POWER SWING 2. SAFETY
ELECTRIC AND HYDRAULIC (10"/13")
Figure 2.1
31041 R1 11

2. SAFETY HUTCHINSON/MAYRATH - LANDING GEAR POWER SWING
ELECTRIC AND HYDRAULIC (10"/13")
2.4. MAINTENANCE SAFETY
• Shut down and lock out all power before attempting maintenance of any kind. If applicable, disconnect PTO driveline from tractor or hydraulic hoses on units with hydraulic drive hoppers.
• After maintenance is complete, replace and secure all safety guards and safety devices, and if applicable, service doors and cleanout covers.
• Support auger tube before attempting maintenance on the undercarriage assembly. Auger should be in full down position for maintenance.
• Use only genuine Hutchinson/Mayrath replacement parts or equivalent. Replacement parts such as intake guards, pulley guards, PTO driveline shields, winches, and lift cables must meet ASABE standards or serious injury may result. Use of unauthorized parts will void warranty. If in doubt, contact Hutchinson/Mayrath or your Hutchinson/Mayrath dealer.
• Do not modify any auger components without authorization from Hutchinson/Mayrath. Modification can be dangerous and result in serious injuries.
2.5. HYDRAULIC SAFETY
• Clean connections before attaching to tractor.• Inspect hydraulic fittings and hoses for damage on a daily basis. Repair if
damaged.• Do not disconnect hydraulic couplers when hydraulic system is pressurized.• Wear proper hand and face protection when searching for hydraulic leaks.
Escaping fluid under pressure can penetrate the skin, causing infection and/or toxic reaction. In case of accident, see a doctor immediately.
• Repair all leaks and breaks in hydraulic valve or hose immediately. Rupture could cause damage and/or personal injury.
2.6. SAFETY DECALS
• Keep safety decals clean and legible at all times.• Replace safety decals that are missing or have become illegible. See decal
location figures that follow.• Replaced parts must display the same decal(s) as the original part.• Replacement safety decals are available free of charge from your distributor,
dealer, or factory.
2.6.1. DECAL INSTALLATION/REPLACEMENT
1. Decal area must be clean and dry, with a temperature above 50°F (10°C).2. Decide on the exact position before you remove the backing paper.3. Align the decal over the specified area and carefully press the small portion
with the exposed sticky backing in place.4. Slowly peel back the remaining paper and carefully smooth the remaining
portion of the decal in place.
12 31041 R1

HUTCHINSON/MAYRATH - LANDING GEAR POWER SWING 2. SAFETY
ELECTRIC AND HYDRAULIC (10"/13")
5. Small air pockets can be pierced with a pin and smoothed out using the sign backing paper.
2.6.2. SAFETY DECAL LOCATIONS AND DETAILS
Replicas of the safety decals that are attached to the equipment and their messages are shown in the figure(s) that follow. Safe operation of the equipment requires that you familiarize yourself with the various safety decals and the areas or particular functions that the decals apply to, as well as the safety precautions that must be taken to avoid serious injury, death, or damage.
* Hutchinson/Mayrath reserves the right to update safety decals without notice. Safety decals may not be exactly as shown.
Figure 2.2 Safety Decal Location (Hydraulic model)
DECAL # 20806
WARNINGHIGH PRESSURE FLUID HAZARD
Hydraulic fluid can cause serious injury if it penetrates the skin. If it does, see a doctor immediately. • Relieve pressure before unhooking hydraulic line. • Wear proper hand and eye protection, and use wood
or cardboard, not hands, when searching for leaks.60802adanaC ni edaM
31041 R1 13

2. SAFETY HUTCHINSON/MAYRATH - LANDING GEAR POWER SWING
ELECTRIC AND HYDRAULIC (10"/13")
14 31041 R1

HUTCHINSON/MAYRATH - LANDING GEAR POWER SWING 3. ASSEMBLY
ELECTRIC AND HYDRAULIC (10"/13")
3. Assembly
Before starting assembly of your new Power Swing, please read the following instructions carefully and familiarize yourself with all the sub-assemblies and hardware. Arrange all parts for easy access during assembly. Assemble equipment in an open area with a level surface.
3.1. Assembly Safety
• Do not take chances with safety. The components can be large, heavy, and hard to handle. Always use the proper tools, rated lifting equipment, and lifting points for the job.
• Carry out assembly in a large open area with a level surface.
• Always have two or more people assembling the equipment.
• Make sure you have sufficient lighting for the work area.
• Tighten all fasteners according to their specifications. Do not replace or substitute bolts, nuts, or other hardware that is of lesser quality than the hardware supplied by the manufacturer.
3.2. TOOLS REQUIRED
• 1/2” drive impact wrench (recommended)• 1/2”, 5/8”, 3/4” and 1-1/8” sockets, for 1/2” drive• 1/2”, 5/8”, 11/16”, 3/4”, 7/8”, 15/16”, 1", 1-1/16” and 1-1/8” flat wrenches
WARNING Before continuing, ensure you have read and understand the relevant information in the safety section. Safety information is provided to help prevent serious injury, death, or property damage.
31041 R1 15
3. ASSEMBLY HUTCHINSON/MAYRATH - LANDING GEAR POWER SWING
ELECTRIC AND HYDRAULIC (10"/13")
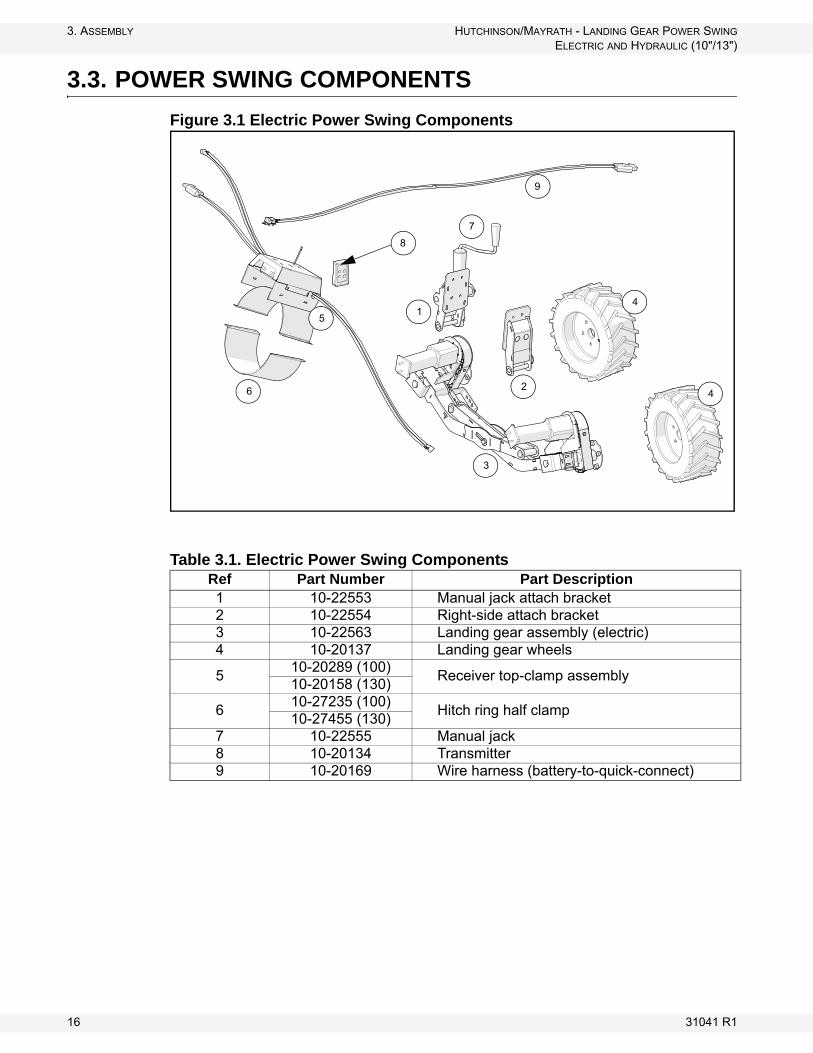
3.3. POWER SWING COMPONENTS
Figure 3.1 Electric Power Swing Components
Table 3.1. Electric Power Swing ComponentsRef Part Number Part Description1 10-22553 Manual jack attach bracket2 10-22554 Right-side attach bracket3 10-22563 Landing gear assembly (electric)4 10-20137 Landing gear wheels
510-20289 (100)
Receiver top-clamp assembly10-20158 (130)
610-27235 (100)
Hitch ring half clamp10-27455 (130)
7 10-22555 Manual jack8 10-20134 Transmitter9 10-20169 Wire harness (battery-to-quick-connect)
2
14
4
3
5
6
8
7
9
16 31041 R1
HUTCHINSON/MAYRATH - LANDING GEAR POWER SWING 3. ASSEMBLY
ELECTRIC AND HYDRAULIC (10"/13")
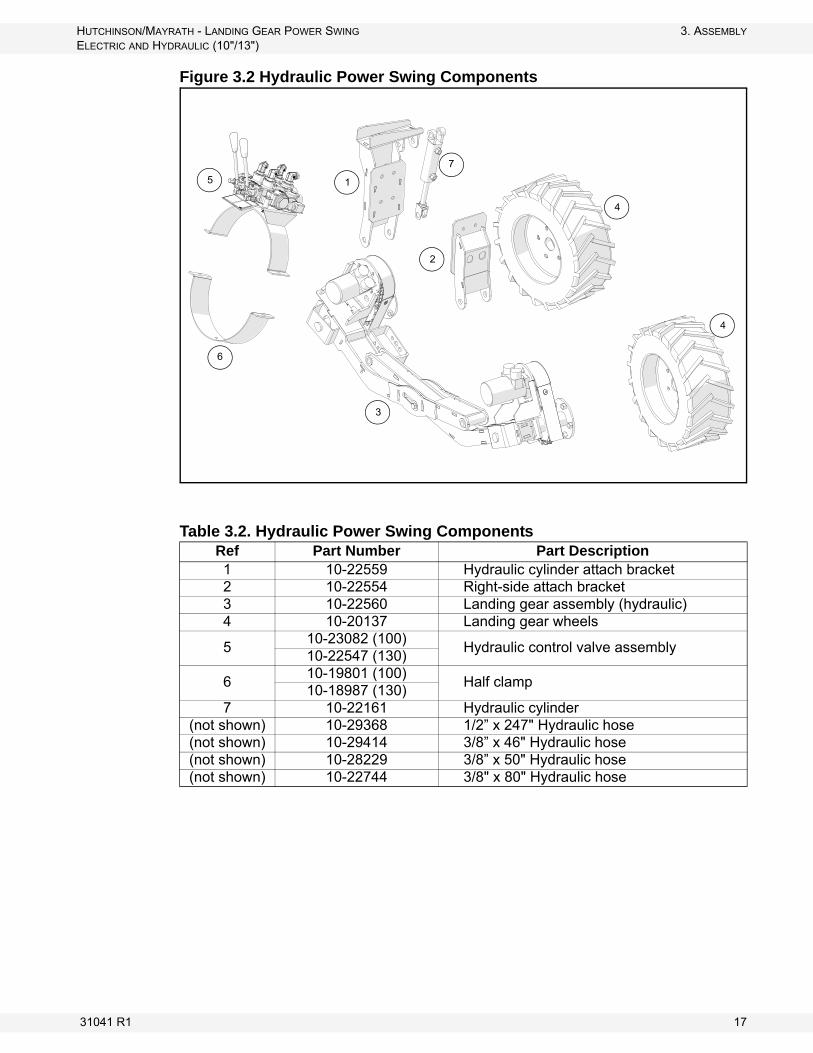
Figure 3.2 Hydraulic Power Swing Components
Table 3.2. Hydraulic Power Swing ComponentsRef Part Number Part Description1 10-22559 Hydraulic cylinder attach bracket2 10-22554 Right-side attach bracket3 10-22560 Landing gear assembly (hydraulic)4 10-20137 Landing gear wheels
510-23082 (100)
Hydraulic control valve assembly10-22547 (130)
610-19801 (100)
Half clamp10-18987 (130)
7 10-22161 Hydraulic cylinder(not shown) 10-29368 1/2” x 247" Hydraulic hose(not shown) 10-29414 3/8” x 46" Hydraulic hose(not shown) 10-28229 3/8” x 50" Hydraulic hose(not shown) 10-22744 3/8" x 80" Hydraulic hose
4
4
2
1
3
5
7
6
31041 R1 17

3. ASSEMBLY HUTCHINSON/MAYRATH - LANDING GEAR POWER SWING
ELECTRIC AND HYDRAULIC (10"/13")
3.4. POWER SWING ASSEMBLY
3.4.1. REPLACE THE TRANSITION
Note: This procedure applies only to augers with transitions that do not include a welded bracket on each side for landing gear attachment.
1. Remove the hopper and transition from the swing tube.2. Remove the existing transition from hopper.3. Remove the two cable attach brackets from the existing transition and mount
to the new transition using the six existing 7/16” x 1-1/4” bolts and locknuts.4. Attach the new transition (that includes welded brackets) to the hopper using
the two previously-removed 5/8” x 1-1/2” bolts and locknuts. DO NOT OVER-TIGHTEN: tighten to a slightly loose fit only as these bolts act as pivot points.
5. Open the service door on the transition, then bring the tube and transition together guiding the flight shaft into the u-joint.
6. Secure the transition to the swing tube using the twelve existing 7/16” x 1-1/4” bolts and locknuts.
7. Tighten set screws on the u-joint, then close and secure the service door.
Figure 3.3 Replacing the Transition
Table 3.3. Replacing the TransitionRef Part Number Part Description
110-21686 (100)
Transition assembly10-29977 (130)
2A2B
10-1959010-19600
5/8” x 1-1/2” bolt5/8” locknut
1
2B
2B
2A
2A
18 31041 R1

HUTCHINSON/MAYRATH - LANDING GEAR POWER SWING 3. ASSEMBLY
ELECTRIC AND HYDRAULIC (10"/13")
3.5. ELECTRIC DRIVE OPTION
3.5.1. INSTALL THE LANDING GEAR (ELECTRIC)
1. Fasten the right-side attach bracket to the right-side transition bracket using four 7/16" x 1-1/4" bolts and locknuts.
2. Fasten the jack attach bracket to the left-side transition bracket using four 7/16" x 1-1/4" bolts and locknuts.
3. Slide the upper manual jack attachment onto the manual jack attach pin, and secure using a lynch pin.
4. Connect the landing gear assembly to the attach brackets:a. At the right-side attach bracket, use a landing gear pin and a lynch pin.
b. At the jack-attach bracket, use a landing gear pin, three 3/4” rim washers per side (as spacers), and a lynch pin.
5. Align the bottom manual jack attachment with the 5/8” hole in the landing gear attachment point, and secure using a 5/8” x 4” bolt and 5/8” locknut.
6. Bolt both wheels to the landing gear power swing assembly using five wheel bolts per wheel. Tighten bolts securely.
Table 3.4. Attaching the Landing Gear to the Transition (Electric)Ref Part Number Part Description1 10-22553 Jack attach bracket2 10-22554 Right-side attach bracket3 10-22555 Manual jack
4a4b
10-1869810-17593
7/16” x 1-1/4” bolts7/16” locknuts
5 10-22168 Landing gear pins6a6b
10-2781510-19600
5/8” x 4” bolt 5/8” locknut
7 10-19979 3/4” rim washers8 10-29998 Lynch pins9 10-20137 Wheel (tire on rims)
10 10-20565 Wheel bolts
31041 R1 19

3. ASSEMBLY HUTCHINSON/MAYRATH - LANDING GEAR POWER SWING
ELECTRIC AND HYDRAULIC (10"/13")
Figure 3.4 Attaching the Landing Gear to the Transition (Electric)
4B
4A 10
5
8
5
3
6A
4A
4B
4B
8
3
4B
8
6B
2
1
9
77
(X3)
(X3)
20 31041 R1

HUTCHINSON/MAYRATH - LANDING GEAR POWER SWING 3. ASSEMBLY
ELECTRIC AND HYDRAULIC (10"/13")
3.5.2. INSTALL AND CONNECT THE RECEIVER BOX
1. Position the receiver top clamp assembly approximately 24" from the transition attach plate and secure using eight 7/16” x 1-1/4” bolts and locknuts. Tighten both sides securely.
2. Remove cover from the receiver box and top clamp assembly. This means removing the four sheet metal screws located on the sides of the cover.
3. Remove radio antenna and transmitter from the crate (it will be in a separate bag). Screw antenna into the socket on the clamp-base.
4. Replace cover, making sure that the antenna fits through the top hole, as shown in Figure 3.5. Replace sheet metal screws, and tighten securely.
Figure 3.5 Install the Receiver Box
Table 3.5. Installing and Connecting the Receiver BoxRef Part Number Part Description
1a10-20289 (100)
Receiver top clamp assembly10-20158 (130)
1b10-27235 (100)
Hitch ring half clamp10-27455 (130)
2a2b
10-1869810-17593
7/16” x 1-1/4” bolts 7/16” locknuts
3 10-19274 Sheet metal screws (#14 x 5/8”)4 10-20524 Antenna5 10-20268 5/8” x 1/2” insulated clamp
6a6b
990080010-28449
1/4” x 3/4” bolt1/4” locknut
1
3 34
24”
2A
2B
1A
1B
31041 R1 21

3. ASSEMBLY HUTCHINSON/MAYRATH - LANDING GEAR POWER SWING
ELECTRIC AND HYDRAULIC (10"/13")
5. The electrical cables are pre-installed to the receiver box. Uncoil the two shorter (4’) electrical cables and identify the positive and negative wires. The positive wire has a red boot and printing on it.
6. Attach the wires to the motor terminals on the Power Swing. The positive wire with the red boot connects to the positive (+) terminal on the electric motor. To connect: a. Unscrew the nut on the motor terminal.
b. Place the wire on, and then replace the nut.
c. Tighten securely.
d. Repeat the same steps for the negative wire and terminal.
7. Route the long electrical cable up the swing tube and secure it using an insulated clamp, a 1/4” x 3/4” bolt, and a 1/4” locknut.
8. Uncoil the tractor wire harness. 9. Connect the end opposite the quick-connect to the battery and chassis
ground using the 5/16” lugged connectors supplied with the kit:a. Attach the positive wire directly to the positive terminal on the tractor
battery (the positive wire has a circuit breaker on it).
b. Attach the negative wire to a tractor chassis ground point (assuming that the tractor battery is also grounded to the chassis).
10. Attach the receiver cable quick connect to the tractor wire harness quick connect.
Note: Ensure that both tires are turning in the same direction. If they are not, reverse the wires on one of the motors.
NOTICE
If these electrical cables are not hooked up properly the electric controller will be damaged.
22 31041 R1

HUTCHINSON/MAYRATH - LANDING GEAR POWER SWING 3. ASSEMBLY
ELECTRIC AND HYDRAULIC (10"/13")
Figure 3.6 Connecting the Receiver Box
QUICK CONNECT
6A
5
6B
NEGATIVE WIRE CONNECTS TO NEGATIVE MOTOR TERMINAL.
POSITIVE WIRE WITH RED BOOT CONNECTS TO POSITIVE MOTOR TERMINAL.
31041 R1 23

3. ASSEMBLY HUTCHINSON/MAYRATH - LANDING GEAR POWER SWING
ELECTRIC AND HYDRAULIC (10"/13")
Figure 3.7 Power Swing Wiring Diagram
TRACTORPOWER SWING
LONG ELECTRICAL CABLE
RECEIVER BOX
QUICK CONNECTSHORT ELECTRICAL CABLE
TRACTOR WIRE HARNESS
SHORT ELECTRICAL CABLE
+ -
+ -
POSITIVE WIRE
NEGATIVE WIRE
RED BOOT
24 31041 R1

HUTCHINSON/MAYRATH - LANDING GEAR POWER SWING 3. ASSEMBLY
ELECTRIC AND HYDRAULIC (10"/13")
3.6. HYDRAULIC DRIVE OPTION
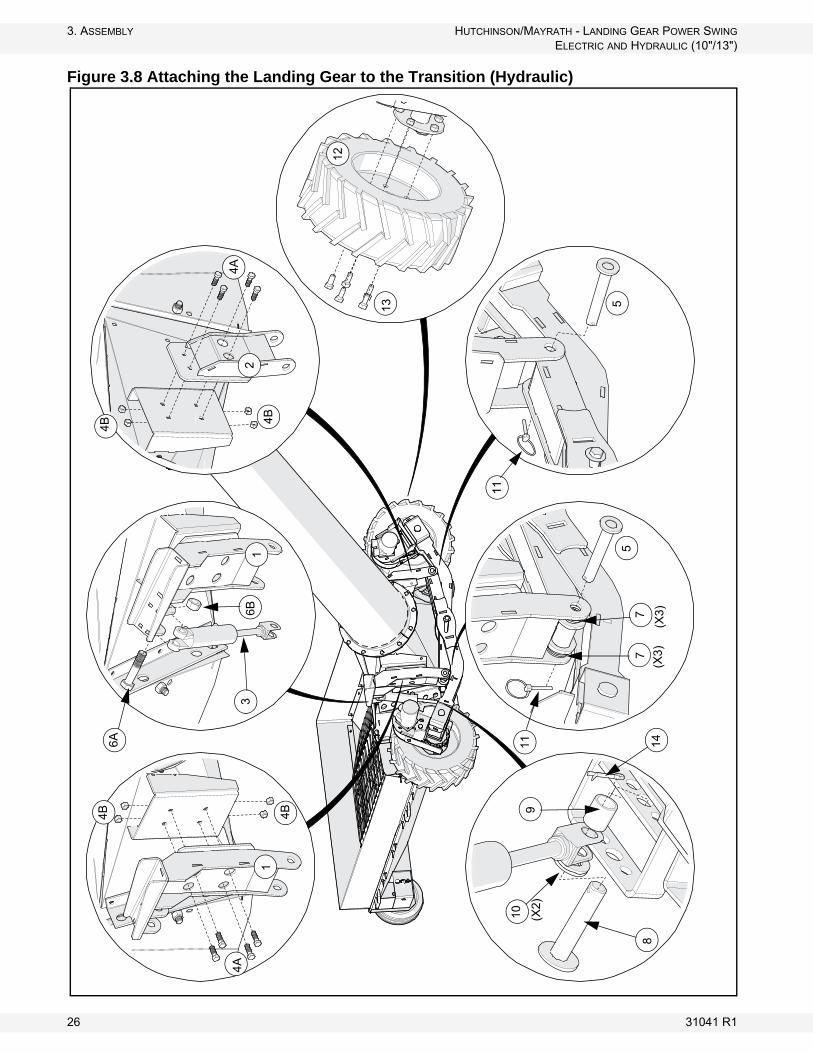
3.6.1. ATTACH THE LANDING GEAR TO THE TRANSITION (HYDRAULIC)
1. Fasten the right-side attach bracket to the right-side transition bracket using four 7/16” x 1-1/4” bolts and locknuts.
2. Fasten the hydraulic cylinder attach bracket to the left-side transition bracket using four 7/16” x 1-1/4” bolts and locknuts.
3. Connect the landing gear power swing assembly to the attach brackets on the transition:a. At the right-hand attach brackets, use a landing gear pin and a lynch pin.
b. At the hydraulic cylinder attach bracket, use a landing gear pin, three 3/4” rim washers per side (as spacers), and a lynch pin.
4. Align the cap end of the hydraulic cylinder with the mounting flange on the hydraulic cylinder attach bracket, and the rod end with the landing gear cylinder mount flange. Secure the cylinder using a 3/4” x 3-1/2” bolt and locknut on the cap end, and a 3/4” pin, a spacer bushing, two 3/4” washers, and a lynch pin on the rod end.
5. Bolt both wheels to the landing gear power swing assembly using five wheel bolts per wheel. Tighten bolts securely.
Table 3.6. Attaching Landing Gear to the Transition (Hydraulic)Ref Part Number Part Description
1 10-22559 Hydraulic cylinder attach bracket
2 10-22554 Right-side attach bracket
3 10-22161 Hydraulic cylinder
4A4B
10-1869810-17593
7/16” x 1-1/4” bolts7/16” locknuts
5 10-22168 Landing gear pins
6A6B
10-2039810-19601
3/4” x 3-1/2” bolt3/4” locknut
7 10-19979 3/4” rim washers
8 10-22577 3/4” pin
9 10-22578 Spacer bushing
10 10-19979 3/4” Washers
11 10-29998 Lynch pins
12 10-20137 Wheel (tire on rim)
13 10-20565 Wheel bolts
14 10-18155 Cotter pin
31041 R1 25
3. ASSEMBLY HUTCHINSON/MAYRATH - LANDING GEAR POWER SWING
ELECTRIC AND HYDRAULIC (10"/13")
Figure 3.8 Attaching the Landing Gear to the Transition (Hydraulic)
3
78
11
13
(X3)
(X3)
12
4A2
4B
4B
5
77
5
11 14
910
8
4A
1
4B4B6A
36B
1
(X2)
26 31041 R1

HUTCHINSON/MAYRATH - LANDING GEAR POWER SWING 3. ASSEMBLY
ELECTRIC AND HYDRAULIC (10"/13")
3.6.2. INSTALL AND CONNECT THE 2-SPOOL VALVE
Note: The 2-Spool hydraulic control valve can be converted between closed center and open center. See “Open/Closed-Center Valve Conversion” on page 39. To determine whether your hydraulic system is an open system or a closed system, check your tractor manual.
1. Position the 2-spool valve assembly at a 20° angle away from the main auger tube and approximately 24” from the transition attach plate. Secure using two 7/16” x 1-1/4” bolts and locknuts.
2. Install two elbow fittings into the power swing hydraulic cylinder ports. Connect two hydraulic hoses between the 2-spool valve and the power swing hydraulic cylinder.
3. Install two 45° fittings into the left power swing hydraulic motor ports. Connect one hydraulic hose between the 2-spool valve and the left power swing hydraulic motor.
4. Install two 45° fittings into the right power swing hydraulic motor ports. Connect one hydraulic hose between the 2-spool valve and the right power swing hydraulic motor.
5. Connect one hydraulic hose between the two power swing hydraulic motors.6. Secure the two hoses from the right power swing hydraulic motor to the
transition using four line blocks and two 5/16" x 2-1/2" bolts, flat washers and locknuts.
7. Connect the hydraulic supply and return hoses to the 2-spool valve and run the hoses up the swing tube to the tractor. Secure hoses to the swing tube using two line blocks, a 5/16” x 2-1/2” bolt, flat washer, and locknut.
8. Install 1/2” pioneer couplers onto the other end of the hydraulic supply and return hoses.
31041 R1 27

3. ASSEMBLY HUTCHINSON/MAYRATH - LANDING GEAR POWER SWING
ELECTRIC AND HYDRAULIC (10"/13")
Table 3.7 Installing and Connecting the 2-Spool ValveItem Description Part Number QTY
1 1/2” x 247” Hydraulic Hose (Supply) 10-29368 12 1/2” x 247” Hydraulic Hose (Return) 10-29368 13 3/8” x 46” Hydraulic Hose (Power Swing Motor) 10-29414 14 3/8” x 80” Hydraulic Hose (Power Swing Motor) 10-22744 15 3/8” x 46” Hydraulic Hose (Power Swing Cylinder) 10-29414 16 3/8” x 50” Hydraulic Hose (Power Swing Cylinder) 10-28229 17 Steel Elbow 6 MORB x 3/8 NSPM 10-22191 28 Adapter, 45 Deg, #10 MORB x #6 FNPSM 10-22556 4
9Hydraulic valve assembly and half-clamp (top)
10-23082 (100)1
10-22547 (130)
Half-clamp (bottom)10-19801(100)
110-18987 (130)
10a10b
7/16” x 1-1/4” bolt 7/16” locknut
10-1869810-17593
22
11a11b11c
5/16” x 2-1/2” bolt5/16” flat washer5/16” locknut
10-1763110-2733610-19980
333
12 3/8" X 50" Hydraulic Hose 10-28229 1
28 31041 R1

HUTCHINSON/MAYRATH - LANDING GEAR POWER SWING 3. ASSEMBLY
ELECTRIC AND HYDRAULIC (10"/13")
Figure 3.9 Installing and Connecting the 2-Spool Valve
1
2
3
4
56
11A
11B
10B
10A
35
12
11C
24”
6
12
4
31041 R1 29

3. ASSEMBLY HUTCHINSON/MAYRATH - LANDING GEAR POWER SWING
ELECTRIC AND HYDRAULIC (10"/13")
Figure 3.10 Hydraulic Motor Hose Connection Detail
12
3
4
30 31041 R1

HUTCHINSON/MAYRATH - LANDING GEAR POWER SWING 4. OPERATION
ELECTRIC AND HYDRAULIC (10"/13")
4. Operation
Operators must observe safety procedures at all times and follow the pre-opera-tional checklist before each start-up.
4.1. PRE-OPERATIONAL CHECKLIST
Before operating Power Swing each time, the operator must confirm the following:
• All fasteners are secure as per assembly instructions.• Hydraulic hoses are in good condition.• Hydraulic connections are in place and secure.• Proper maintenance has been performed.• Guards are in place and secure.
WARNING Before continuing, ensure you have read and understand the relevant information in the safety section. Safety information is provided to help prevent serious injury, death, or property damage.
WARNING
High Pressure Fluid Hazard
Hydraulic fluid can cause serious injury if it penetrates the skin. If this occurs, see a doctor immediately.
Relieve pressure before disconnecting hydraulic line.
Wear proper hand and eye protection, and use wood or cardboard, not hands, when searching for leaks.
Keep all hoses and other components in good repair
31041 R1 31
4. OPERATION HUTCHINSON/MAYRATH - LANDING GEAR POWER SWING
ELECTRIC AND HYDRAULIC (10"/13")
4.2. ELECTRIC POWER SWING OPERATION
Note: Remotes will be programmed from the factory—to reprogram your remote (or to add additional remotes, please see the Appendix.
Important: Registering more than one remote transmitter to a single Power Swing is acceptable but registering one remote transmitter to multiple Power Swings is not recommended.
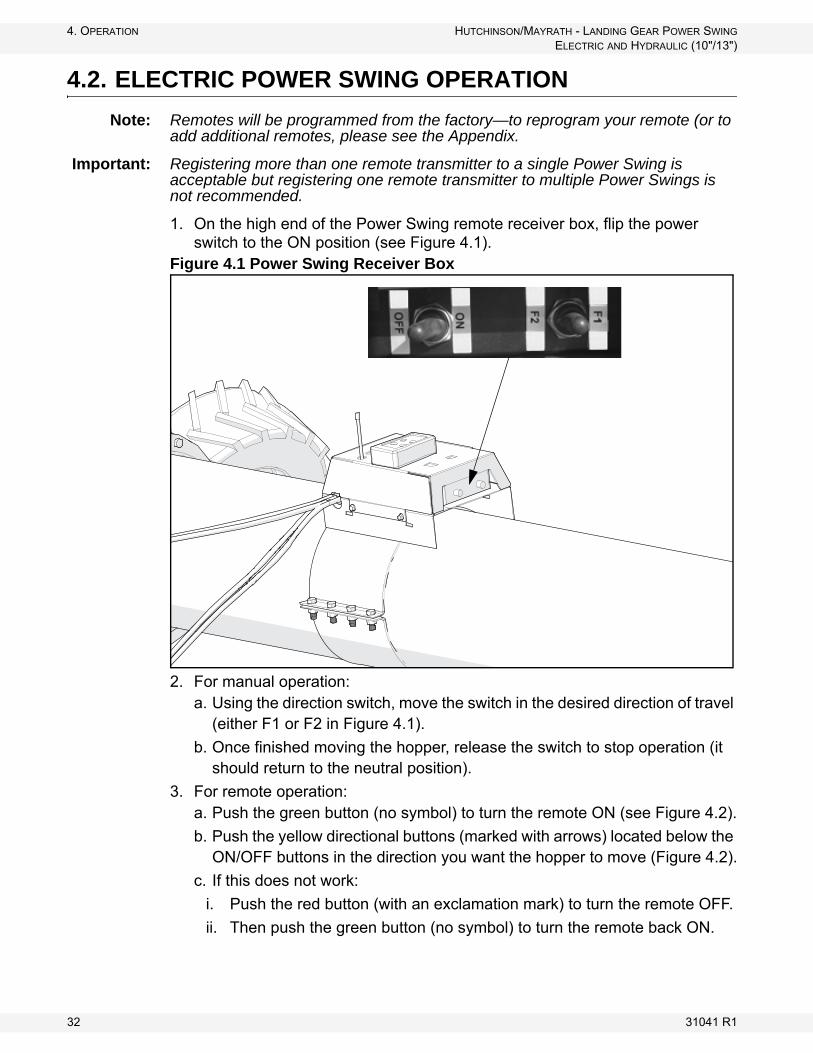
1. On the high end of the Power Swing remote receiver box, flip the power switch to the ON position (see Figure 4.1).
Figure 4.1 Power Swing Receiver Box
2. For manual operation: a. Using the direction switch, move the switch in the desired direction of travel
(either F1 or F2 in Figure 4.1).
b. Once finished moving the hopper, release the switch to stop operation (it should return to the neutral position).
3. For remote operation: a. Push the green button (no symbol) to turn the remote ON (see Figure 4.2).
b. Push the yellow directional buttons (marked with arrows) located below the ON/OFF buttons in the direction you want the hopper to move (Figure 4.2).
c. If this does not work:
i. Push the red button (with an exclamation mark) to turn the remote OFF.
ii. Then push the green button (no symbol) to turn the remote back ON.
POWERSWITCH
DIRECTIONSWITCH
32 31041 R1

HUTCHINSON/MAYRATH - LANDING GEAR POWER SWING 4. OPERATION
ELECTRIC AND HYDRAULIC (10"/13")
iii. Operate the remote as outlined above, using the two yellow directional buttons (marked with arrows) located at the bottom of the remote to move the hopper as desired.
Figure 4.2 Remote Transmitter
4. Use the manual jack on the power swing to raise or lower the hopper.
GREEN “ON” BUTTON
31041 R1 33

4. OPERATION HUTCHINSON/MAYRATH - LANDING GEAR POWER SWING
ELECTRIC AND HYDRAULIC (10"/13")
4.3. HYDRAULIC DRIVE
Note: If the installed couplers do not fit your tractor’s hydraulic pressure and return ports, refer to your tractor specifications or contact your dealer regarding coupler compatibility.
1. Ensure that the hydraulic lines are properly connected and secure.
2. Keep hydraulic lines away from moving parts.3. Do not connect or disconnect the hydraulic couplers when under pressure.
Consult the tractor manual for the correct procedure.Important: Because the Power Swing has a control valve independent of the tractor, the
tractor hydraulic control has to be engaged when using the Power Swing.
CAUTION
Do not disconnect coupler under pressure.Relieve pressure and then disconnect.
CAUTION
Do not start equipment until area is clear of all untrained personnel.
34 31041 R1

HUTCHINSON/MAYRATH - LANDING GEAR POWER SWING 4. OPERATION
ELECTRIC AND HYDRAULIC (10"/13")
4.4. HYDRAULIC POWER SWING OPERATION
1. Ensure that the valve is in the proper configuration (open-center or closed center).
2. Adjust the tractor’s output flow using the flow control lever to achieve 4-5 gpm. This will ensure a controlled speed.
3. Put the lever that controls your tractor hydraulics in the detent position where the hydraulics stay engaged all the time.
4. In order to activate the Power Swing:a. Push the right-side control lever on the Power Swing valve control
assembly to raise the hopper.
b. Use the left-side control lever to move the hopper in the desired direction of travel.
c. Once finished moving the hopper to the desired position, use the right side control lever to lower the hopper.
Figure 4.3 Control Valve Lever Functions
LIFT/LOWER HOPPER
MOVE HOPPER LEFT/RIGHT
31041 R1 35

4. OPERATION HUTCHINSON/MAYRATH - LANDING GEAR POWER SWING
ELECTRIC AND HYDRAULIC (10"/13")
4.5. TRANSPORTING
When transporting the auger, be sure to use the provided safety chain to lock the swing hopper to the bracket. Since the Power Swing adds more weight to the swing hopper, extra caution is needed when transporting your auger.
Important: The INTAKE FEED side of swing hopper must face main auger when in the transport position. Do not operate auger with hopper in transport position. This will damage the u-joint.
Important: Read the auger operation manual for further hydraulic safety instructions.
NOTICE
Hopper must be in transport position when lowering, raising, or moving auger.
36 31041 R1
HUTCHINSON/MAYRATH - LANDING GEAR POWER SWING 5. MAINTENANCE & STORAGE
ELECTRIC AND HYDRAULIC (10"/13")
5. Maintenance & Storage5.1. MAINTENANCE PROCEDURES
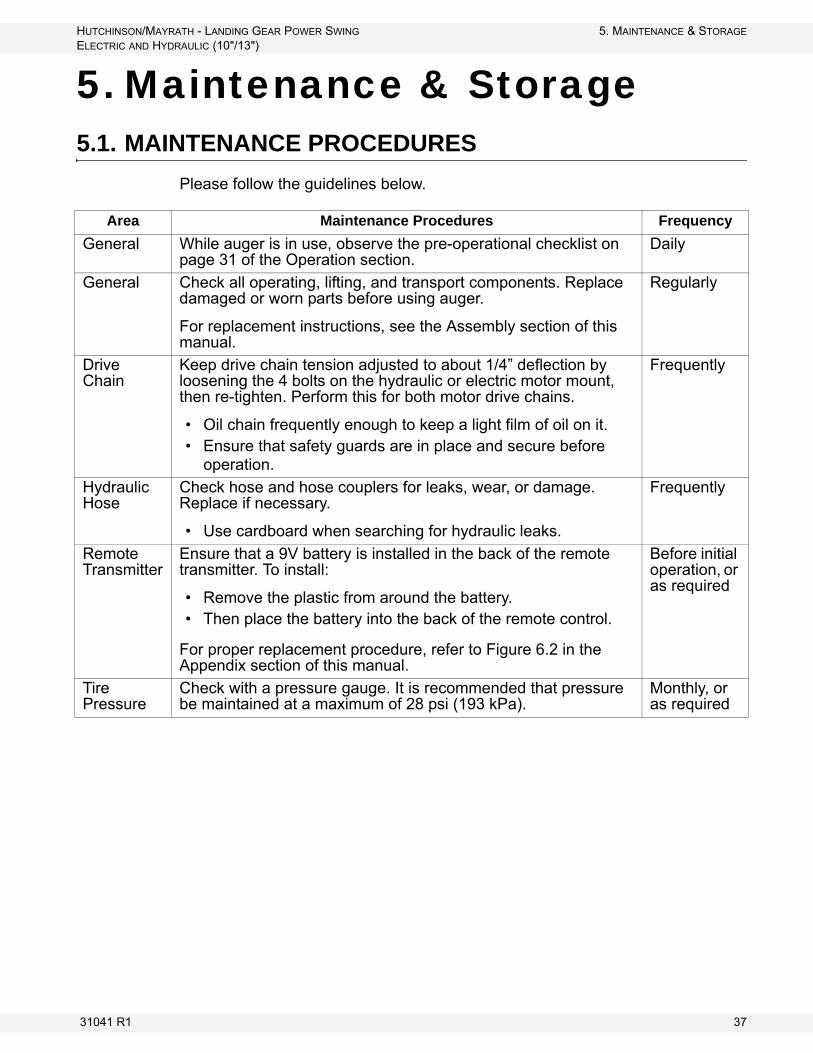
Please follow the guidelines below.
Area Maintenance Procedures Frequency
General While auger is in use, observe the pre-operational checklist on page 31 of the Operation section.
Daily
General Check all operating, lifting, and transport components. Replace damaged or worn parts before using auger.
For replacement instructions, see the Assembly section of this manual.
Regularly
Drive Chain
Keep drive chain tension adjusted to about 1/4” deflection by loosening the 4 bolts on the hydraulic or electric motor mount, then re-tighten. Perform this for both motor drive chains.
• Oil chain frequently enough to keep a light film of oil on it. • Ensure that safety guards are in place and secure before
operation.
Frequently
Hydraulic Hose
Check hose and hose couplers for leaks, wear, or damage. Replace if necessary.
• Use cardboard when searching for hydraulic leaks.
Frequently
Remote Transmitter
Ensure that a 9V battery is installed in the back of the remote transmitter. To install:
• Remove the plastic from around the battery.• Then place the battery into the back of the remote control.
For proper replacement procedure, refer to Figure 6.2 in the Appendix section of this manual.
Before initial operation, or as required
Tire Pressure
Check with a pressure gauge. It is recommended that pressure be maintained at a maximum of 28 psi (193 kPa).
Monthly, or as required
31041 R1 37

5. MAINTENANCE & STORAGE HUTCHINSON/MAYRATH - LANDING GEAR POWER SWING
ELECTRIC AND HYDRAULIC (10"/13")
5.2. STORAGE PROCEDURE
TO PROTECT POWER SWING IN STORAGE DURING THE OFF-SEASON:
1. Raise wheels to full up position.2. Clean out axle assembly and lubricate chains with a light coating of oil.3. Inspect unit for damage and note any repairs required. Order replacement
parts from your dealer.4. Check tire pressure and inflate to 24 psi (165 kPa).
Important: Use only genuine Hutchinson/Mayrath replacement parts or equivalent. Replacement parts MUST meet ASABE standards or serious injuries may result. Use of unauthorized parts will void warranty. If in doubt, contact Hutchinson/Mayrath or your local Hutchinson/Mayrath dealer. Do not modify any compo-nents of the Power Swing.
TO PREPARE FOR USE AFTER STORAGE:
1. Check tire pressure and inflate according to recommendation on side wall if necessary.
2. Keep decals clean. Replace any decal that is damaged or not clearly visible.3. Conduct general maintenance procedure before using auger.
38 31041 R1

HUTCHINSON/MAYRATH - LANDING GEAR POWER SWING 6. APPENDIX
ELECTRIC AND HYDRAULIC (10"/13")
6. Appendix
6.1. OPEN/CLOSED-CENTER VALVE CONVERSION
Note: The standard configuration for the control valve is closed-center. The closed-center plug is pre-installed when delivered from Hutchinson/Mayrath.
The control valve can be converted from the closed-center to the open-center configuration by removing the conversion plug.
• Remove outlet plug to access the closed-center plug.• Remove the closed-center conversion plug for open-center operation.• Re-install outlet plug.
Note: Retain the conversion plug that was removed for future use.
Figure 6.1 Conversion Plug Location
11
2
Table 6.1 Remove PlugsItem Description
1 Outlet Plug2 Closed-Center Plug
31041 R1 39

6. APPENDIX HUTCHINSON/MAYRATH - LANDING GEAR POWER SWING
ELECTRIC AND HYDRAULIC (10"/13")
6.2. POWER SWING REMOTE TRANSMITTER INSTRUCTIONS
Figure 6.2 shows the controls and indicators for the power swing remote and receiver.
Figure 6.2 Remote Transmitter and Receiver Controls and Indicators
Note: The transmitter LED blinks on and off when the transmitter and receiver are active (turned on by the transmitter) and no other button is pressed. The LED turns fully on while a transmitter button is pressed, unless the transmitter battery is low, in which case the LED pulses on and off.
The transmitter automatically transmits a STOP signal after 30 minutes; this de-activates the receiver and the transmitter keypad.
ON
OFF
LED
HOPPER MOVE
MOTION (LEFT/RIGHT)
POWER (ON/OFF)
POWER LEDSET LED
FAULT LED
RECEIVER
TRANSMITTER
(↑-↓)
(INTERNAL)
(INTERNAL)
40 31041 R1

HUTCHINSON/MAYRATH - LANDING GEAR POWER SWING 6. APPENDIX
ELECTRIC AND HYDRAULIC (10"/13")
The remote transmitter that comes with each power swing is normally factory programmed to function with the power swing receiver. Refer to specific instructions for programming additional or replacement remotes according to the serial number of the power swing receiver.
6.2.1. PROGRAMMING RECEIVERS
Turn on all the remote transmitters before programming.
Note: To de-register all remote transmitters from the receiver, hold down the OFF button on a remote for at least 60 seconds.
TO REGISTER THE FIRST REMOTE TRANSMITTER:
1. Switch OFF the receiver.Note: Steps 2 and 3 must be done within 10 seconds of each other. The FAULT LED on
the receiver flashes for the duration of the registration window.
2. Switch ON the receiver.3. On the first remote, press the ON button and the yellow Down-Arrow Motion
button at the same time and hold until the red light on the receiver SET LED illuminates solid red. Release buttons. The remote is programmed, and should be set aside.
TO REGISTER A SECOND REMOTE TRANSMITTER:
1. Switch OFF the receiver.Note: Steps 2 and 3 must be done within 10 seconds of each other. The FAULT LED on
the receiver flashes for the duration of the registration window.
2. Switch ON the receiver.3. On a 2nd remote, press and release the ON button once, then press the ON
button and the Down-Arrow Motion button at the same time and hold until the red light on the receiver SET LED illuminates solid red. Release buttons. The remote is programmed, and should be set aside.
TO REGISTER A THIRD REMOTE TRANSMITTER:
1. Switch OFF the receiver.Note: Steps 2 and 3 must be done within 10 seconds of each other. The FAULT LED on
the receiver flashes for the duration of the registration window.
2. Switch ON the receiver.3. On a 3rd remote, press and release the ON button twice, then press the ON
button and the Down-Arrow Motion button at the same time and hold until the red light on the receiver SET LED illuminates solid red. Release buttons. The remote is programmed, and should be set aside.
TO REGISTER A FOURTH REMOTE TRANSMITTER:
1. Switch OFF the receiver.Note: Steps 2 and 3 must be done within 10 seconds of each other. The FAULT LED on
the receiver flashes for the duration of the registration window.
31041 R1 41

6. APPENDIX HUTCHINSON/MAYRATH - LANDING GEAR POWER SWING
ELECTRIC AND HYDRAULIC (10"/13")
2. Switch ON the receiver.3. On a 4th remote, press and release the ON button three times, then press the
ON button and the Down-Arrow Motion button at the same time and hold until the red light on the receiver SET LED illuminates solid red. Release buttons. The remote is programmed, and should be set aside.
42 31041 R1

7. Hutchinson/Mayrath Warranty

514 W. Crawford Street
Clay Center, Kansas, 67432 USA
Phone: (800) 523-6993 or (785) 632-2161
Fax: (785) 632-5964
Website: www.hutchinson-mayrath.com
Email: [email protected]
© Ag Growth International Inc. 2018Printed in Canada


