
LabelWriter Twin Turbo
www.dymo.com
Quick Start
LW Twin Turbo_QSC.indd 1 23-01-2006 15:41:22

Follow these steps to install the LabelWriter printer and print your first label.
1. Unpacking your LabelWriter PrinterNOTE For Windows, do not plug the printer into your computer until asked to do so during the software installation.
1 Unpack your printer and save the original packing materials.
2 Make sure you have all the items shown in Figure 1.
Your LabelWriter printer is a direct thermal printer and does not use toner, ink cartridges, or a ribbon. Instead, it uses heat from a thermal print head to print on specially treated labels. Labels are the only supplies you will ever need to buy.
QSG
Switching Adapter
SHOCK HAZARD
RISK OF ELECTRIC SHOCK
DRY LOCATION USE ONLY.
NON-SERVICEABLE P ARTS INSIDE.
FOR USE WITH ITE ONLY .
END AST FOR KONT ORSMASKINER.
CAUTION
Tested to complywith FCC standards
FOR HOME OROFFICE USE
I.T.E. POWER SUPPLYC
Model No.:TESA2-2401000
U.S. P/N: 90819Europe P/N: 924883
INPUT:100-240V-50/60Hz Max0.64A
OUTPUT:24V --- 0-1.0A
MADE IN CHINA
LISTED 15WM E198850
UL
UL N10926
Figure 1
Power adapter
LabelWriter printer
CD-ROM
Roll of labelsQuick Start Guide
USB cablePower cable
2
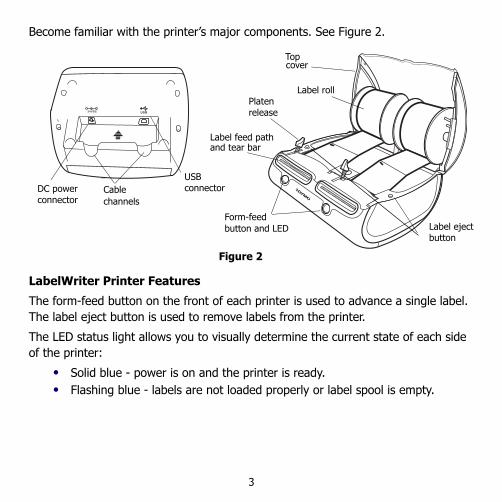
Become familiar with the printer’s major components. See Figure 2.
LabelWriter Printer Features
The form-feed button on the front of each printer is used to advance a single label. The label eject button is used to remove labels from the printer.
The LED status light allows you to visually determine the current state of each side of the printer:
• Solid blue - power is on and the printer is ready. • Flashing blue - labels are not loaded properly or label spool is empty.
Figure 2
USBconnectorDC power
connectorCable channels
Form-feed
Label feed path and tear bar
cover
button and LED Label ejectbutton
Platenrelease
Label roll
Top
3

2. Installing the SoftwareTo install the software on a Windows system
NOTE Do not connect the printer to your computer until instructed to do so during the software installation.
1 Insert the LabelWriter CD into your CD-ROM drive. After a few seconds, the installation screen appears.
If the installation screen does not appear:
a. Click Start and then Run on the Windows taskbar. The Run dialog box appears.
b. Enter D:\install.exe (where D is the letter assigned to the CD-ROM drive) and click OK.
2 Select the language version you wish to install and then follow the on-screen instructions.
To install the software on a Macintosh system
1 Insert the DYMO LabelWriter CD into the CD-ROM drive.
After a few seconds, the DYMO Label Software Installer icon appears. See Figure 3.
2 Double-click the Installer icon and then follow the on-screen instructions.
DYMO LabelSoftware Installer
Figure 3
4

3. Connecting your LabelWriter PrinterAt some point during the software installation, you will be asked to connect your LabelWriter printer to the USB port.
NOTE For Windows, do not connect the printer to your computer until instructed to do so during the software installation.
To connect the power
1 Plug the power cord into the power adapter. See Figure 4.
2 Plug the power adapter into the power connector on the bottom of the printer. See Figure 5. Make sure to push the plug in completely.
3 Plug the other end of the power cord into a power outlet.
To connect the USB cable
1 Plug the USB cable into the USB port on the bottom of the printer. See Figure 5.
2 Insert the power and USB cables into the right and left cable channels and set the printer down on your work surface.
3 When prompted during the software installation and while the printer is turned on, plug the USB cable into an available USB port on your computer. See Figure 6.
Switching Adapter
SHOCK HAZARDRISK OF ELECTRIC SHOCK
DRY LOCATION USE ONLY.
NON-SERVICEABLE PARTS INSIDE.
FOR USE WITH ITE ONLY.
END AST FOR KONTORSMASKINER.
CAUTION
Tested to complywith FCC standards
FOR HOME OROFFICE USE
I.T.E. POWER SUPPLYC
Model No.:TESA2-2401000
U.S. P/N: 90819Europe P/N: 924883
INPUT:100-240V-50/60Hz Max0.64A
OUTPUT:24V --- 0-1.0A
MADE IN CHINA
LISTED 15WM E198850
UL
UL N10926
Power Adapter
Power Cord
Figure 4
Figure 5
Power USB
CableChannels
Figure 6
5

4. Loading Labels1 Press the form-feed button to eject the labels that protected the printer during
shipment.
2 Open the top cover and remove the label spool from one side of the printer.
3 Hold the spool spindle in your left hand and place the label roll on the spindle so that the labels feed from underneath.
4 Place the spool guide on the right side of the spool and adjust it to fit snugly against the roll. See Figure 7.
5 Insert the label spool into the slots in the printer cover.
6 Cut the first label in half so that you have a clean edge and insert the label into the label feed slot. See Figure 8.
The printer feeds the labels, stopping at the beginning of the first label. If the printer stops without feeding the label, make sure the label is fully inserted and then press the form-feed button.
Repeat these steps to load the second roll of labels.
7 Close the top cover.
You are now ready to print your first label.
Figure 7
Figure 8
6

5. Printing your First Label1 Start the DYMO Label software by doing one of the following:
• For Windows, click Start, then Programs>DYMO Label>DYMO Label.• For Macintosh, double-click the DYMO Label icon in the folder where you
installed the software.
(Windows) The first time you open the application, you are asked to register. Follow the on-screen instructions to register the software. You are also asked to enter your default return address and default logo file.
2 At the main window, click once on the label and type some text.
3 Choose a font and a justification setting from the Formatting toolbar.
4 Choose left or right from the Label Roll drop-down list.
5 Click to print the label.
Congratulations! You are now ready to start designing and printing labels.
For complete details on how to use the software, refer to the DYMO Label Software User Guide on the DYMO LabelWriter CD-ROM and the online Help.
7

930113
DYMO bvba
Industriepark-Noord 30
9100 Sint-Niklaas
Belgium
DYMO Purchase Registration
Sanford Australia
1-11 Keysborough Ave,
Keysborough, Victoria 3173
Australia
8


