
KerbalEdu
Mission Editor Tutorial
This lesson is intended as an introduction to the KerbalEdu Mission Library and
Mission Editor, with the goal of learning to create a mission for classroom use.
Objectives
The KerbalEdu user will learn:
● How to use the Mission Library
● About the options in the Mission Editor, and about using HyperEdit
● How to plan, publish and document user missions
Timeline: The KerbalEdu user can learn the basics in one hour. An afternoon should be set aside for
making an actually playable mission.
Materials:
● KerbalEdu installed on the user’s computer
● An account for the Mission Library, included in every KerbalEdu purchase
● This guide
Grouping: Grouping can be used with this lesson. Anyone from students to teachers can be taught to
plan and build missions. To keep the Mission Library stocked with good-quality missions, every mission
should be tested before publishing!
Execution
The lesson is planned as a self-study session with several optional topics. The learning activities start
with orientation and a guide for how to log in to the KerbalEdu Mission Library. Next, editing the
mission and events is discussed in detail, with less focus on mission options and contracts. The
lesson gives hints about the limits of the editor and explains how to import save files from
KerbalEdu. Additionally, the lesson gives guidelines for how to use the HyperEdit mod with KerbalEdu.
Publishing the mission is described last. Finally, the ‘Lesson challenge’ goal is to create and publish a
practice mission in the KerbalEdu Mission Library.
Learning Activities
Orientation
The Mission Editor requires a fair understanding of working with KerbalEdu. What it does not
require is any understanding of actual mission files or previous modding experience. The user
does not need any mods, but they are supported by the Mission Editor. In particular, we
recommend a mod called HyperEdit, which allows users to set up missions before uploading
them to the Editor.
Saving
Mission files can be imported into the Editor, allowing fast changes and modifications, such as
making a mission out of a student’s saved game and picking up where they left off in the next
lesson. The KerbalEdu Mission Editor’s benefits include the event system, easy access to data in
the mission file, as well as rapid publishing and access through the Library. Starting a game at a
preset point is great for conserving time in the classroom!

KerbalEdu Mission Library
The KerbalEdu Mission Library can be accessed through kerbaledu.com/kerbalmissionlibrary.
The login credentials are identical to those used when downloading KerbalEdu from
kerbalspaceprogram.com.
My profile
You can change your Mission Library screen name (public) in My profile. You can also find all
missions you have published listed in here.
Mission Library
Figure: Browsing doesn’t require login.
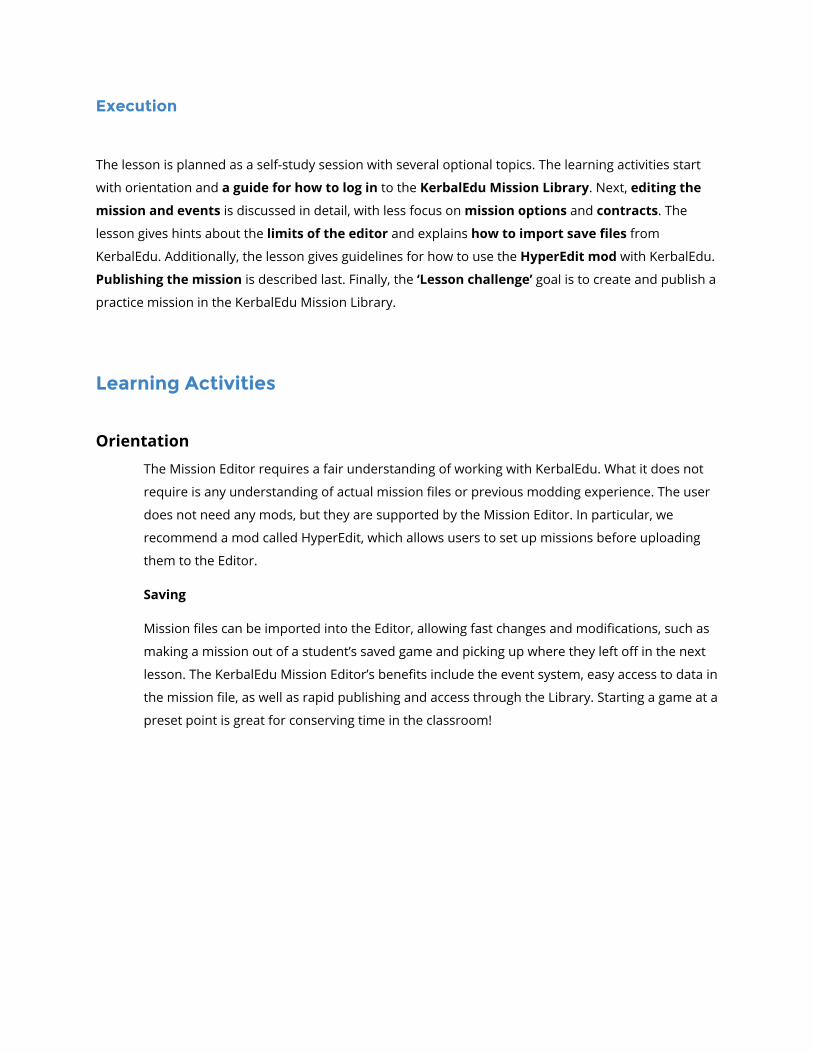
In the Mission Library, users can search for missions, rate them and browse available content.
The missions are accessed by clicking their names.
Mission page
Figure: Mission view.
The mission page offers all the information that the creator provided when they published the
mission. If the mission is yours and you have logged in, you can edit it on the fly. The main
options here are ‘additional materials ‘, which includes lesson plans, and the ‘Launch in
KerbalEdu ’ button, which does not require login. The launch button will attempt to tell your
operating system to launch KerbalEdu with this mission.
Mission editor
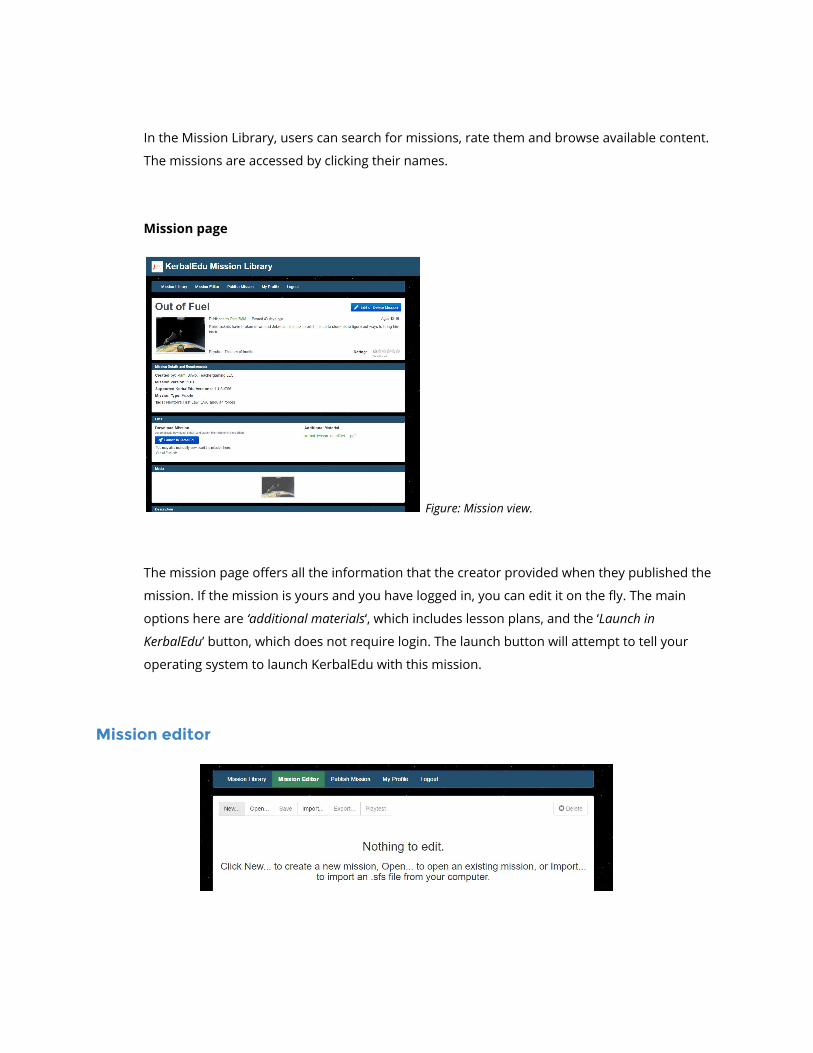
When launching the Mission Editor, you are greeted with the ‘Nothing to edit’ message and
a few options. ‘New’ gives you a few options from which to start, ‘Open’ opens a saved
Mission, and ‘Save’ saves the mission but does not publish it. ‘Import’ can be used to start
working with an .sfs file saved from the game. (Note: Even .sfs files from the commercial Kerbal
Space Program and its demo are accepted, if they are made using the version of KSP the current
KerbalEdu is based on. )
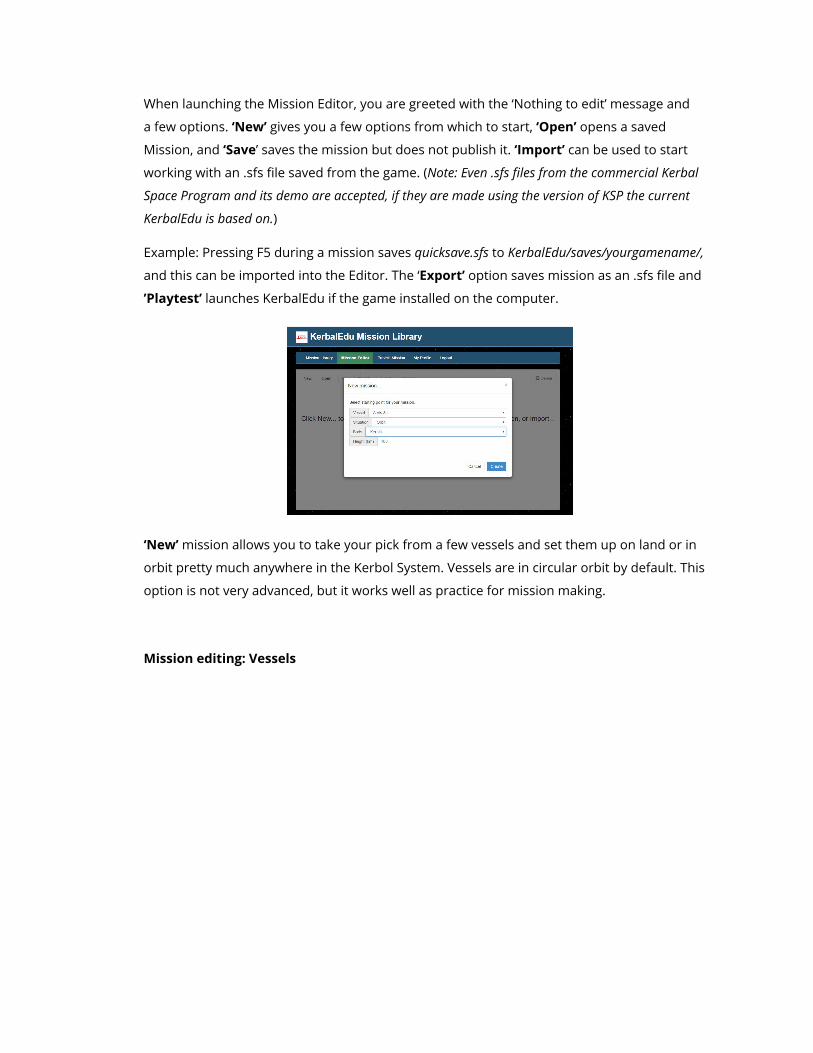
Example: Pressing F5 during a mission saves quicksave.sfs to KerbalEdu/saves/yourgamename/,
and this can be imported into the Editor. The ‘Export’ option saves mission as an .sfs file and
’Playtest’ launches KerbalEdu if the game installed on the computer.
‘New’ mission allows you to take your pick from a few vessels and set them up on land or in
orbit pretty much anywhere in the Kerbol System. Vessels are in circular orbit by default. This
option is not very advanced, but it works well as practice for mission making.
Mission editing: Vessels
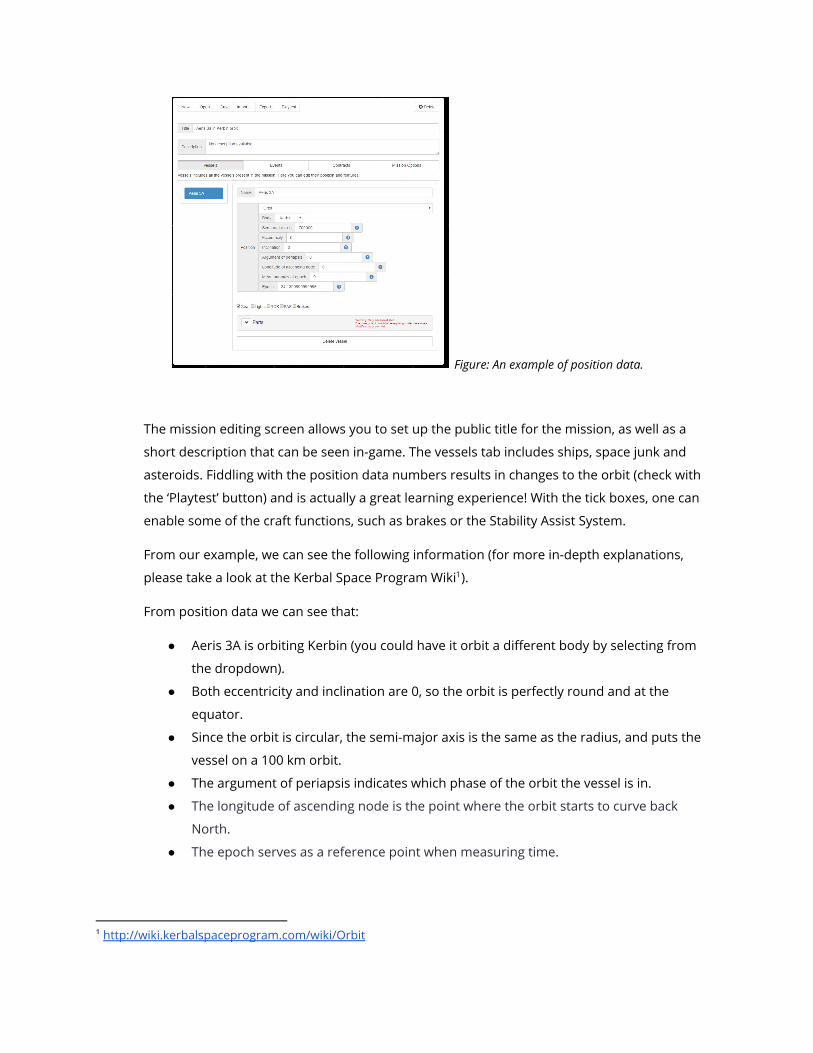
Figure: An example of position data.
The mission editing screen allows you to set up the public title for the mission, as well as a
short description that can be seen in-game. The vessels tab includes ships, space junk and
asteroids. Fiddling with the position data numbers results in changes to the orbit (check with
the ‘Playtest’ button) and is actually a great learning experience! With the tick boxes, one can
enable some of the craft functions, such as brakes or the Stability Assist System.
From our example, we can see the following information (for more in-depth explanations,
please take a look at the Kerbal Space Program Wiki ). 1
From position data we can see that:
● Aeris 3A is orbiting Kerbin (you could have it orbit a different body by selecting from
the dropdown).
● Both eccentricity and inclination are 0, so the orbit is perfectly round and at the
equator.
● Since the orbit is circular, the semi-major axis is the same as the radius, and puts the
vessel on a 100 km orbit.
● The argument of periapsis indicates which phase of the orbit the vessel is in.
● The longitude of ascending node is the point where the orbit starts to curve back
North.
● The epoch serves as a reference point when measuring time.
1 http://wiki.kerbalspaceprogram.com/wiki/Orbit
● The mean anomaly at epoch is the angle that dictates how long it takes for a vessel to
get to the highest point of the orbit. Currently the Aeris is on a circular orbit, so the
angle is 0.
Parts
Hosted in the parts category is raw data from the save file about the vessel. You
can open up the parts with the down arrow and see what is inside. It is generally
advisable not to edit values unless you know what you are doing! While easier tasks
like filling the fuel tanks work pretty well (part / RESOURCE / amount and maxamount ),
some changes such as renaming command module crew members can cause the
game to crash when loading the mission.
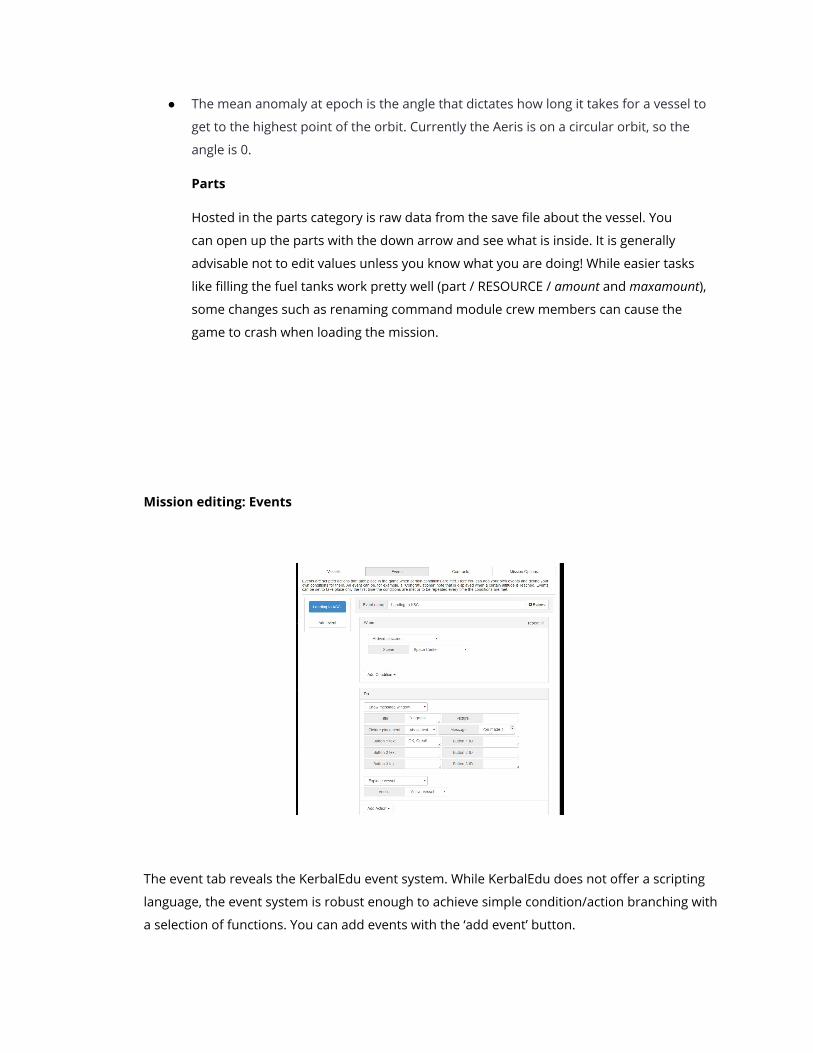
Mission editing: Events
The event tab reveals the KerbalEdu event system. While KerbalEdu does not offer a scripting
language, the event system is robust enough to achieve simple condition/action branching with
a selection of functions. You can add events with the ‘add event’ button.
In our example, we added an event called ‘Return to KSC ’. The event fires up when (the player)
arrives at the scene of the Kerbal Space Center. We could add extra conditions for this event,
such as requiring a button push, or make it repeatable. By default, events fire up only once.
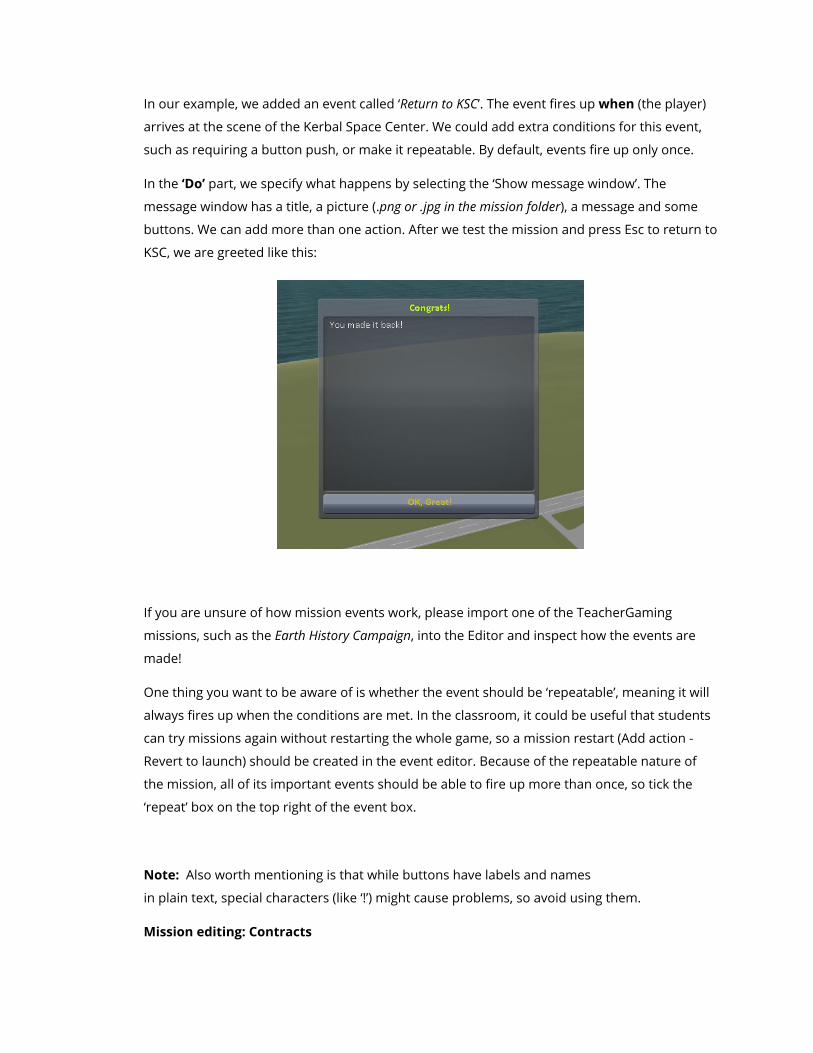
In the ‘Do’ part, we specify what happens by selecting the ‘Show message window’. The
message window has a title, a picture (.png or .jpg in the mission folder ), a message and some
buttons. We can add more than one action. After we test the mission and press Esc to return to
KSC, we are greeted like this:
If you are unsure of how mission events work, please import one of the TeacherGaming
missions, such as the Earth History Campaign , into the Editor and inspect how the events are
made!
One thing you want to be aware of is whether the event should be ‘repeatable’, meaning it will
always fires up when the conditions are met. In the classroom, it could be useful that students
can try missions again without restarting the whole game, so a mission restart (Add action -
Revert to launch) should be created in the event editor. Because of the repeatable nature of
the mission, all of its important events should be able to fire up more than once, so tick the
‘repeat’ box on the top right of the event box.
Note: Also worth mentioning is that while buttons have labels and names
in plain text, special characters (like ‘!’) might cause problems, so avoid using them.
Mission editing: Contracts

Contracts are part of the Kerbal Space Program ‘Career’ game mode and they can be edited
here. Using contracts is limited to imported save games from the ‘Career’ game mode. At this
point, career editing is possible but difficult. Hardcoded contracts can cause some problems.
Figure: Contract information.
Mission editing: Mission Options
General information specifies what kind of mission you are dealing with, where the player
starts, and whether they have an active vessel. You can also enable & disable mission-specific
plugins (ex. Scenario modules). The plugin enabled here is the Edu Event System, which
manages the events. Generally speaking, you should not make changes to these, unless you
know what you are doing. Universal time is based on seconds after the game starts, and it
affects planetary rotations. However, rewinding your vessel’s orbit by editing UT is not possible.
“Copy directory to installation” is for complex missions that use mods or other data in addition
to the .sfs file, or comprise of multiple .sfs files.
Limits of the Mission Editor
Crew names
Changing a crew member’s name in the command module causes a crash, because the
crew member is no longer mentioned in the mission file list of Kerbals. Editing the list of
Kerbals is not supported at this point (Mar 2016) by the Mission Editor.
Full-fledged programming
The KerbalEdu event system is not a fully fledged programming or scripting system. (One
should turn to for C# and Kerbal Plugins for that.)
Docked ships breaking things
The events will not fire if the ship name is changed. For more details, see the lesson challenge
below.
Importing .sfs save files from the game
Following screenshot is from a save used in the TeacherGaming mission ‘Out of Fuel’. The game has
spawned asteroids and there is some debris from the player ship. You can clear these away with the
‘delete’ button if needed, or change their orbital position to suit your needs.
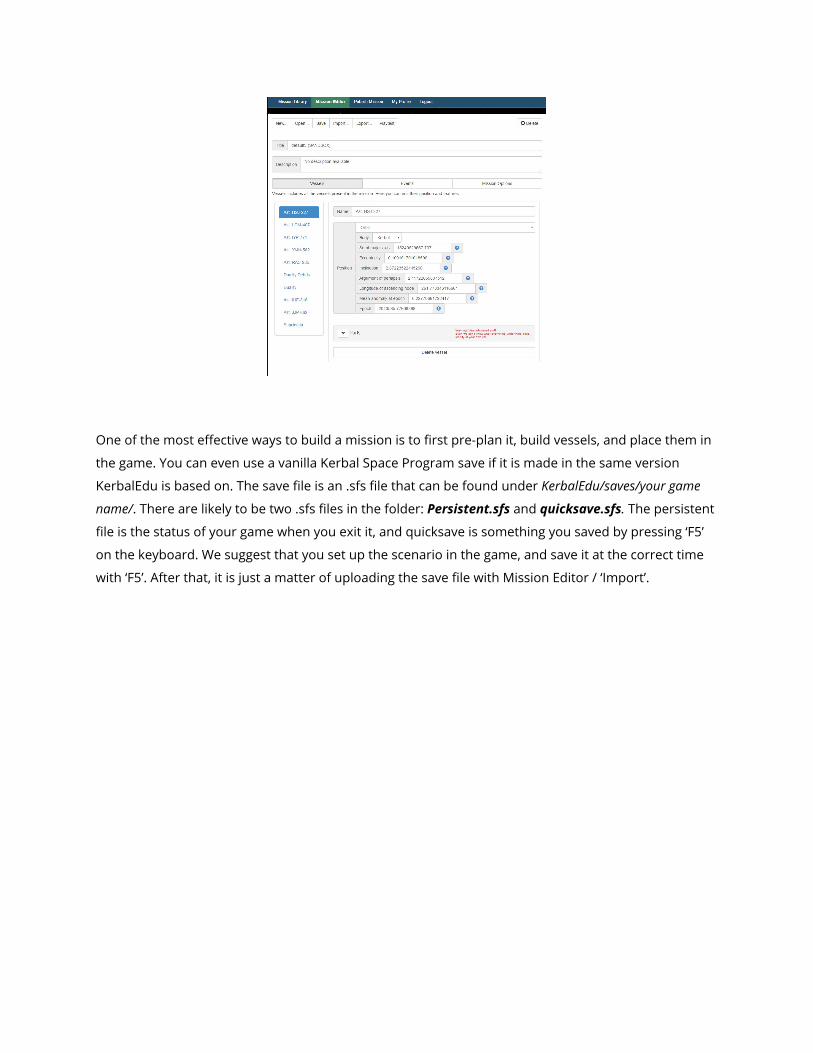
One of the most effective ways to build a mission is to first pre-plan it, build vessels, and place them in
the game. You can even use a vanilla Kerbal Space Program save if it is made in the same version
KerbalEdu is based on. The save file is an .sfs file that can be found under KerbalEdu/saves/your game
name/ . There are likely to be two .sfs files in the folder: Persistent.sfs and quicksave.sfs . The persistent
file is the status of your game when you exit it, and quicksave is something you saved by pressing ‘F5’
on the keyboard. We suggest that you set up the scenario in the game, and save it at the correct time
with ‘F5’. After that, it is just a matter of uploading the save file with Mission Editor / ‘Import’.

Using a third party mod: HyperEdit
Although not necessarily required for mission editing, HyperEdit is a useful modification for
that purpose. It is published under GNU General Public License by Kerbaltek.
Download an older version, since KerbalEdu is not always up to date with the newest Kerbal
Space Program. In November 2016, the correct file was “HyperEdit_1.5.2.1_for_Kerbal_1.1.3 ”.
After downloading the package, unzip it to the KerbalEdu folder. After this you are all set.
Figure: The version number is visible on the bottom right of the main menu.
During the game you can see a ‘H‘ icon on the top right corner of the screen. HyperEdit is a tool
that lets you change orbits quickly (even those of planets), teleport ships and adjust resources
on the fly. Additionally, it can be used to open the Kerbal cheat menu, normally accessed
through Alt-F12 (PC). Using HyperEdit will make educational mission planning much easier by
letting you build ships and directly teleport them from the launchpad to orbit. When you are
done, simply press ‘F5’ and import the quicksave.sfs to Mission Editor.
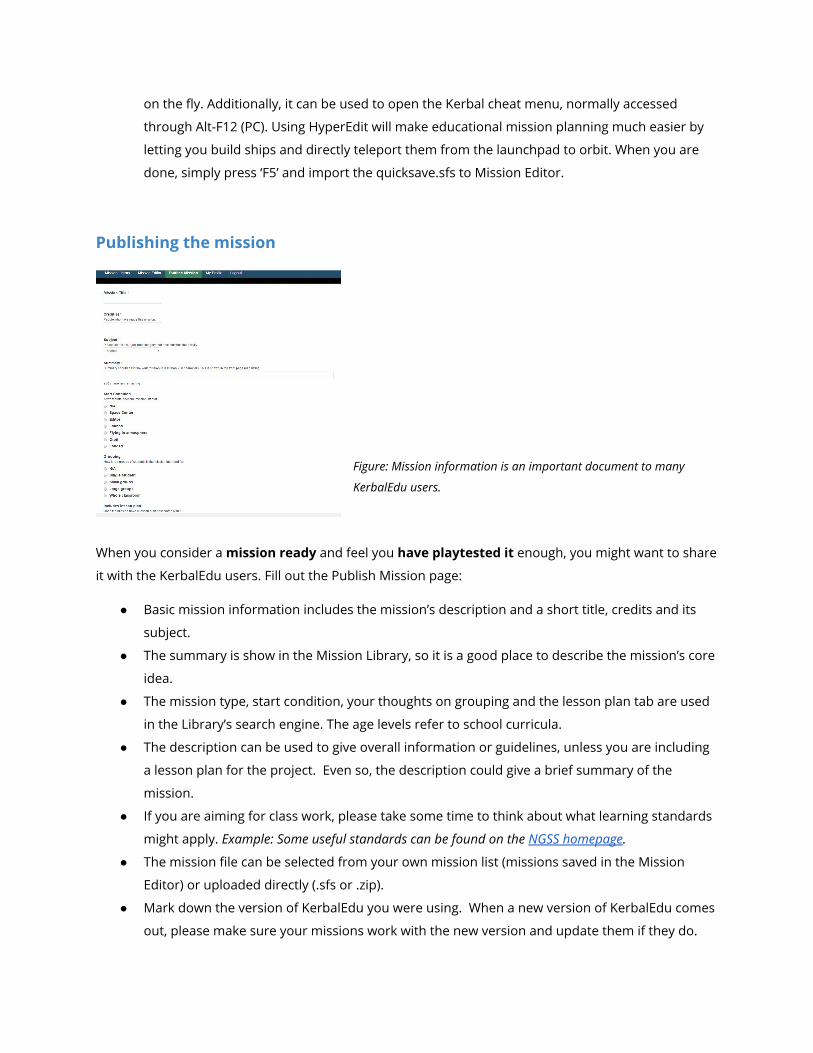
Publishing the mission
Figure: Mission information is an important document to many
KerbalEdu users.
When you consider a mission ready and feel you have playtested it enough, you might want to share
it with the KerbalEdu users. Fill out the Publish Mission page:
● Basic mission information includes the mission’s description and a short title, credits and its
subject.
● The summary is show in the Mission Library, so it is a good place to describe the mission’s core
idea.
● The mission type, start condition, your thoughts on grouping and the lesson plan tab are used
in the Library’s search engine. The age levels refer to school curricula.
● The description can be used to give overall information or guidelines, unless you are including
a lesson plan for the project. Even so, the description could give a brief summary of the
mission.
● If you are aiming for class work, please take some time to think about what learning standards
might apply. Example: Some useful standards can be found on the NGSS homepage .
● The mission file can be selected from your own mission list (missions saved in the Mission
Editor) or uploaded directly (.sfs or .zip).
● Mark down the version of KerbalEdu you were using. When a new version of KerbalEdu comes
out, please make sure your missions work with the new version and update them if they do.
● Lesson plans, guides, or study material can be uploaded in “Additional material” when you save
the mission. PDF files work best.
● Screenshots will give lessons a finished look. The version number is for bookkeeping.
● Remember to write down mod data if you have used mods while building the mission file.
(Note: If you are using the flight assistant autopilot ‘MechJeb’, this should definitely be noted, because
it imports new parts to the game. However, if you have used HyperEdit when making the mission, it
does not need to be mentioned here because it does not interfere with the game itself. )
● Hosted study material can be introduced through the ‘Relevant links’ category, while a
walkthrough can be uploaded to your Youtube or Vimeo account and then linked to the
mission.
Finally, read through the Terms of Use. If you agree with them, you can check the box and press “Save
& Publish ”. The mission should appear in the public library of missions.
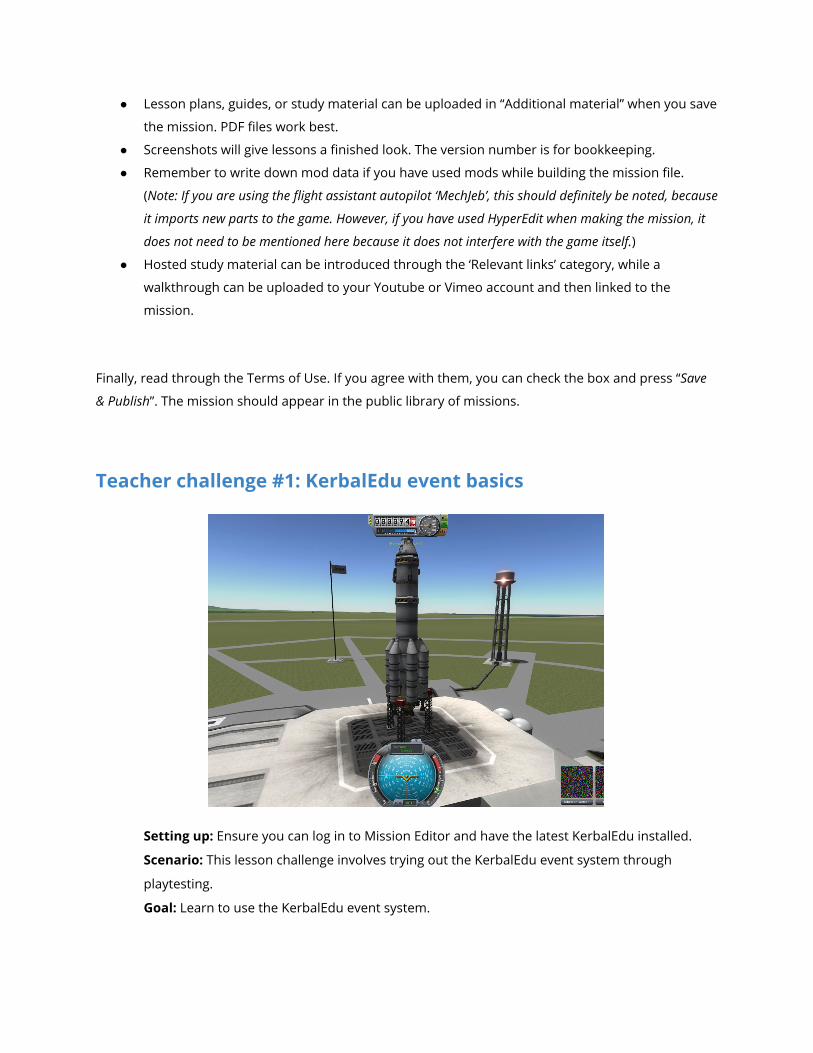
Teacher challenge #1: KerbalEdu event basics
Setting up: Ensure you can log in to Mission Editor and have the latest KerbalEdu installed.
Scenario: This lesson challenge involves trying out the KerbalEdu event system through
playtesting.
Goal: Learn to use the KerbalEdu event system.

The challenge involves:
a) Using mission presets.
b) Setting up events that respond to player input.
c) Using the ‘Playtest’ option for testing your mission.
First log in to the Mission Library and click on ‘Mission Editor.’
Select New (mission) and pick the ‘Kerbal X’ vessel. Set the situation as ‘Launch’ and launch from
‘Launchpad’. Click ‘Create’. Next, you can see the title ‘Kerbal X on Launchpad’. Press Save and then
Playtest. If KerbalEdu is installed on your computer, it should be launched. Some operating systems
give a security warning, asking whether you want to start a command from ‘startfromurl.cmd ’ - click on
‘yes’.
KerbalEdu will load up with your scenario. You can see the rocket on the launch pad. Before launching,
we want to set up the game to notify us when the rocket is past 1000 m and 5000 m. Press ‘Esc’ and
select ‘Space Center’’. Exit the program and return to the Mission Editor.
What you need to do next is set up a queue of events in the Events tab. There will not be any events to
start with, so click on the ‘Add event’ button.
● Name the first event “1000 m flight”.

● When: Change the condition from the dropdown menu (Default ‘Action Group State’ ) to
‘Altitude ’. Vessel: ‘-Active Vessel-’ . Type ‘1000’ in the Altitude box. Change ‘Comparison’ to ‘Above ’.
● Do: Select ‘Show message window’ from the dropdown menu. Set the title to “Congratulations ”.
Message: “You have made it to 1000 m altitude! ”
Create a second, similar event for 5000 m. Again, make a message appear when the active ship hits
5000 m altitude.
The third event will be a little different. At 10000 m, create an event that reverts the mission back to
the launchpad. When “Altitude” is 10000. Do “Revert back to launch”.
Playtest the mission: Does it work like it should? Is the altitude event popping up too early? Did you
use a ‘Below ’ comparison instead of ‘Above ’?
Play around with the Mission Editor while moving the vessel to orbit other planets, and see what else
you can do.
Teacher challenge #2: Kerbals falling down
Setting up: Ensure you can log in to Mission Editor and have the latest KerbalEdu installed.
Scenario: This lesson challenge involves making a simple mission that involves modifying
orbital information.
Goal: Learn to modify orbital information.
The challenge involves:
a) Using mission presets
b) Setting up required orbital information and events.
c) Using the ‘Playtest’ option for testing your mission.
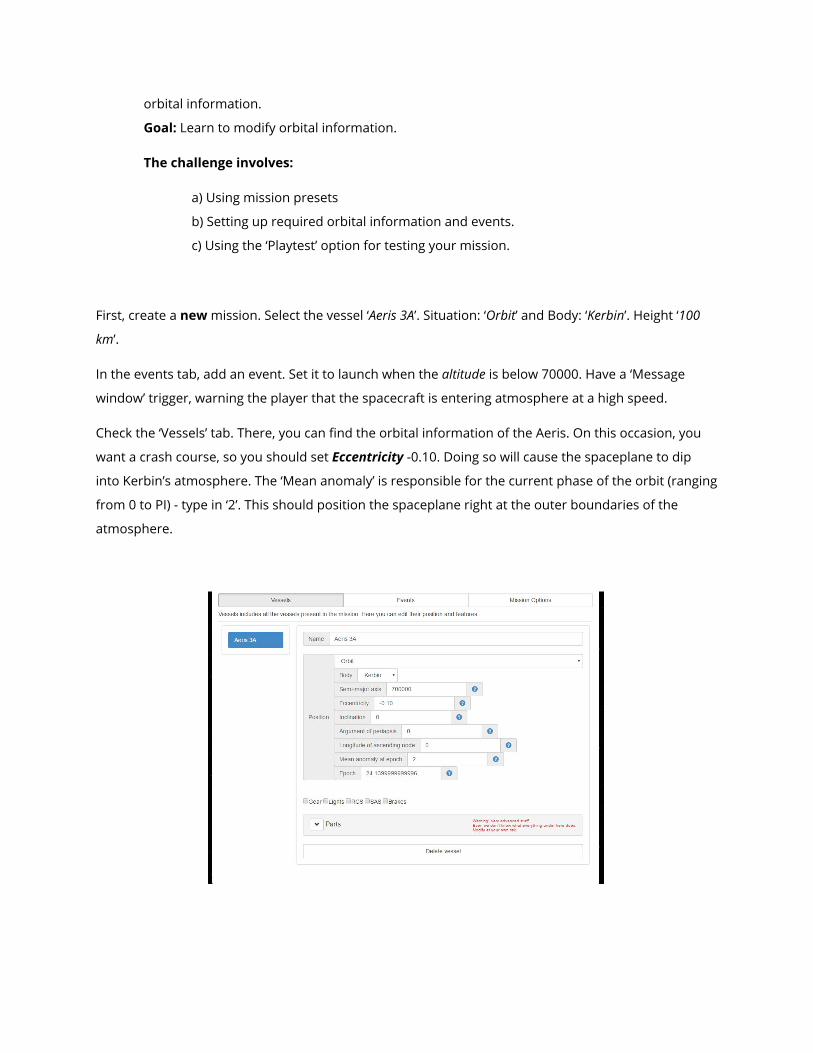
First, create a new mission. Select the vessel ‘Aeris 3A ’. Situation: ‘Orbit ’ and Body: ‘Kerbin ’. Height ‘100
km ’.
In the events tab, add an event. Set it to launch when the altitude is below 70000. Have a ‘Message
window’ trigger, warning the player that the spacecraft is entering atmosphere at a high speed.
Check the ‘Vessels’ tab. There, you can find the orbital information of the Aeris. On this occasion, you
want a crash course, so you should set Eccentricity -0.10. Doing so will cause the spaceplane to dip
into Kerbin’s atmosphere. The ‘Mean anomaly’ is responsible for the current phase of the orbit (ranging
from 0 to PI) - type in ‘2’. This should position the spaceplane right at the outer boundaries of the
atmosphere.

Playtest the mission. If the game starts with a black screen, your ship blew up immediately at the start,
and you need to change the orbital information. You should play around with orbital information
around other planets in order to see how position data changes the craft orientation.
This scenario is tricky, but not impossible, to solve. If you want to make it more challenging (a true
unpowered landing), you can open the parts menu and find “MK1IntakeFuselage ”. Under the fuselage,
select the bottom resource tab and change the amount of LiquidFuel to 0. After the change, you can
congratulate yourself, because you have just successfully modified Kerbal parts!
Teacher challenge #3: My Asteroid Redirect Mission
Setting up: Ensure you can log in to Mission Editor and have the latest KerbalEdu installed.
Scenario: This lesson challenge involves building and publishing a mission in the KerbalEdu
Mission Library. You have probably seen films where an asteroid destroys the Earth. Well, this
time you are the director! Make an “asteroid redirection” mission where players try to change
the orbit of the asteroid.
Goal: Learn to create material for your own class, and get first-hand experience of publishing a
mission.
The challenge involves:

a) Setting up the scene (ship to orbit) and making a save file in KerbalEdu.
b) Importing the save to the Mission Editor.
c) Adjusting orbital information of an asteroid to a more suitable one for the classroom
mission.
d) Setting up events for the failure/success of the mission.
e) Publishing the mission in the Mission Library under the name of “Mission Editor
training: Asteroid mission ” or something similar.
First, build the vessel you are going to use with the mission, or use the craft we supply the example
mission with. The vessel should have a grabbing hook to be able to attach to the rock. (We are planning
to push the asteroid away from its orbit, but if you’d like to send Bruce Kerman himself to attach
nuclear devices on the rock, go ahead.) Then move the ship to orbit, either by flying it there or using
HyperEdit. Save the game with ‘F5’. Import the quicksave.sfs to the Mission Editor.
In the picture above, you can see list including two spacecraft and a bundle of asteroids. The next step
is very straightforward: copy your orbit information from your ship over to the first asteroid, and then
move your ship back on the orbit so it won’t collide with the asteroid right away. Rename the mission.
(In the picture: ‘default2 SANDBOX’. )
For our example mission, we put ‘Rokship ’ on a collision trajectory with Kerbin, and replaced Ast.
HSJ-227’s position information with information from Rokship . Since being in the same position
results in an explosion, we’ll need to tweak the position of the asteroid. Changing the epoch by -0.0001
should move the rock a few kilometers away, depending on the actual orbit. Remember to change the
asteroid’s Body (of influence) to ‘Kerbin’, since ‘Kerbol’ is the sun.
In our example mission, we have a ship with drilling equipment and an ISRU that lets us convert huge
amounts of fuel from the asteroid. First, dock to the correct side of the asteroid, and second, use your
engines to lift the periapsis of the asteroid above the atmosphere. The mission fails if the asteroid
reaches the upper atmosphere. Keep thrust low, so the asteroid doesn’t start spinning!
Note: Docked ships event anomaly
The example mission was easy to set up, but a bit harder to make event-rich, due to the
inherited feature of docked crafts changing their names. Kerbal does not have immutable
‘global names’ for ships, so docked ships are considered a new craft with a new name. In the
asteroid mission, you can see how events break down when a new ship named ‘X’ cannot
communicate with an event tailored for a ship named ‘Y’. Although we cannot actually change
how the program is written, we can attempt some workarounds:
a) Use the ‘Active vessel’ (player controlled) in the events. The example mission will fail if
active vessel has its periapsis and altitude below 80 km.
b) Check that the vessel name returns back to the original after undocking.
In the class, you can tell students that renaming vessels will break the game! As for the
event system, in the classroom the teacher can validate mission success even if the game
does not. For example: We do not have the means to check if a cabbage was brought onto
Duna. In summary, it should be noted that events work well with one ship, and with simple,
well-defined goals using one ‘Active vessel’ .
If you do not want to go the trouble of creating a new mission from scratch, you can
always download and import the example mission into the Mission Editor. We include the
‘Rokship’ craft file in the mission materials, so you can use it for your own missions by copying
it to KerbalEdu/Ships/VAB . The ship does not have fuel problems, since it can drill up ore and
make propellants with the ISRU.
Reflection
● What you would want to teach with KerbalEdu? What could you teach with the Mission Editor?
● Which STEM topics are suitable for the asteroid mission? Gravity and mass? Acceleration?
● How would you or your students improve the design of the asteroid ship to prevent the
asteroid from rolling around?
● Fiction vs. scientific reality. If you use the asteroid mission in the classroom, you could have a
discussion about movies in which an asteroid threat is eliminated in an unrealistic manner.
Assessment
After you are done with your mission, you can gauge how well it fits into the curriculum. How does it
challenge the problem-solving capabilities of the students? What concepts will you need to teach them
to unlock the game’s full learning potential? For example, pushing the asteroid away is a clear
demonstration of Newton’s Third Law!
Mission editing enables you to start right from the problem without the need to spend time on
preparation in class. Focusing on the learning process is always good idea. While building our example
mission, we ended up iterating and moving the starting point from a 5 km distance to 500 meters from
the asteroid. This simple change eliminated at least ten minutes of idle waiting time while the craft
approached the asteroid. Additionally, students can observe their craft’s momentum visually with the
asteroid serving as a reference point.
Publishing the mission is the last task. Some teachers may not be comfortable with the idea of
distributing the mission to the entire KerbalEdu audience. However, exposing yourself to criticism a
part of becoming a better mission designer, and it is the best way to get your students to play missions
you created, since published missions can be launched anywhere without logging in.
Standards Alignment
Teacher standards 2
1. Set high expectations which inspire, motivate and challenge pupils
2. Promote good progress and outcomes by pupils
3. Demonstrate good subject and curriculum knowledge
4. Plan and teach well structured lessons
5. Adapt teaching to respond to the strengths and needs of all pupils
6. Make accurate and productive use of assessment
7. Manage behaviour effectively to ensure a good and safe learning environment
8. Fulfil wider professional responsibilities
Next Generation Science Standards: Practices For K-12 Science Classrooms 3
1. Asking questions (for science) and defining problems (for engineering)
2. Developing and using models
3. Planning and carrying out investigations
4. Analyzing and interpreting data
5. Using mathematics and computational thinking
6. Constructing explanations (for science) and designing solutions (for engineering)
7. Engaging in argument from evidence
8. Obtaining, evaluating, and communicating information
2 Teachers’ Standards Guidance for school leaders, school staff and governing bodies. July 2011. UK 3 Science and Engineering partices in NGSS/A Framework for K-12 Science Education


