Download - Introduction to GeoServer
Introduction to GeoServer
Tutorial ID: IGET_WEBGIS_003
This tutorial has been developed by BVIEER as part of the IGET web portal intended to provide easy access to geospatial education. This
tutorial is released under the Creative Commons license. Your support will help our team to improve the content and to continue to offer high
quality geospatial educational resources. For suggestions and feedback please visit www.iget.in.
IGET_WEBGIS_003 Introduction to GeoServer
2
Introduction to GeoServer
Objective: In this tutorial we will learn about the GeoServer GUI and how to create the workspaces, stores,
publishing, styling and grouping the layers.
Software: OpenGeo Suite 3.0
Level: Beginner
Time required: 4 hours
Prerequisites and Geospatial Skills:
Basic computer skills
IGET_WEBGIS_001 and IGET_WEBGIS_002 should be completed
Readings
Introduction to the OpenGeo Suite, Chapter 3: GeoServer, pp. 39 – 78.
http://presentations.opengeo.org/2012_FOSSGIS/suiteintro.pdf
Tutorial Data: The tutorial data of this exercise may be downloaded from the associated folder

IGET_WEBGIS_003 Introduction to GeoServer
3
Introduction
GeoServer is an open source web mapping server written in Java platform. It is a subset of a web server model
specially designed to share and publishes the Geographical information over the internet. It utilizes Web Mapping
Service (WMS), Web Feature Service (WFS), Web Coverage Service (WCS) and many other open protocols for
transfer the Geographical information, such as maps, spatial attributes and Feature data sets. Through these
protocols GeoServer can serve the data and maps in an efficient and powerful way. GeoServer supports the most
common data sources like, Geo Tiff, Shapefile, ArcGrid, JPEG200 and GDAL formats and various databases viz.,
PostGIS, SQL Server, DB2, Oracle Spatial and ArcSDE.
You are recommended to read the GeoServer concepts before proceeding to the exercise from following link:
http://workshops.opengeo.org/suiteintro/geoserver/concepts.html
GeoServer Graphic User Interface (GUI)
1. Start OpenGeo Suite Dashboard via, Start All Programs OpenGeo Suite 3.0 OpenGeo Suite
Dashboard.
2. In OpenGeo Suite Dashboard click on ‘Start’ button to start the server.
3. Click on the ‘Configure’ button in GeoServer column
4. Now ‘GeoServer: Welcome’ page will be opened in your default web browser.
5. You need to fill your credentials to login into the GeoServer to carry out the configuration tasks. By
default the user name and password is ‘admin’ and ‘geoserver’. After filling the credentials click on
‘Login’ button.
3

IGET_WEBGIS_003 Introduction to GeoServer
4
6. After successful login, you can notice more options appeared in the GeoServer: Welcome window.
7. The GUI of the GeoServer: Welcome window is divided into 2 main parts
i. Main Panel (shown in the orange box): It contains the information that corresponds to the
selected option from the navigation panel.
ii. Navigation Panel (show in green box): Navigation panel is further grouped into following
groups.
a. About & Status
b. Data
c. Services
d. Settings
e. Tile Caching
f. Security
g. Scripting
h. Demos
i. Tools
2
5
6
7i 7ii

We will learn each of the above the groups in detail as we move further
Creating a workspace A workspace is the name for a notional container used to group similar data together. A workspace consists of a
Name and a Namespace URI (Uniform Resource Identifier). The workspace name should not contain any spaces.
8. In the navigation panel of ‘GeoServer: Welcome’ page, click on ‘Workspaces’
9. Now you will be redirect to the ‘GeoServer: Workspaces’ page. In order to create a workspace, click on
‘Add new workspace’ under Workspace in Main Panel.
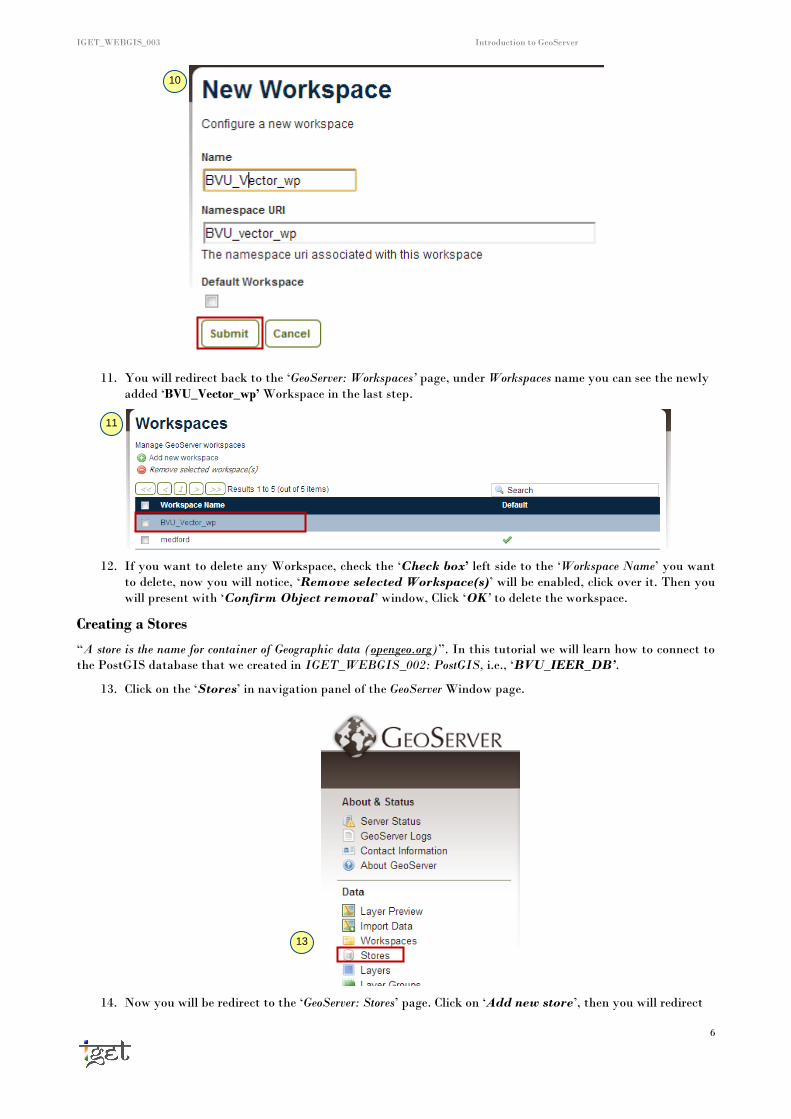
10. Now you will redirect to ‘GeoServer: New workspace’ page. Here we have to specify the Name and Name
Space URI, enter ‘BVU_Vector_wp’ and ‘BVU_vector_wp’ respectively in Name and Namespace URI,
click on ‘Submit’ button.
8
9
IGET_WEBGIS_003 Introduction to GeoServer
6
11. You will redirect back to the ‘GeoServer: Workspaces’ page, under Workspaces name you can see the newly
added ‘BVU_Vector_wp’ Workspace in the last step.
12. If you want to delete any Workspace, check the ‘Check box’ left side to the ‘Workspace Name’ you want
to delete, now you will notice, ‘Remove selected Workspace(s)’ will be enabled, click over it. Then you
will present with ‘Confirm Object removal’ window, Click ‘OK’ to delete the workspace.
Creating a Stores
“A store is the name for container of Geographic data (opengeo.org)”. In this tutorial we will learn how to connect to
the PostGIS database that we created in IGET_WEBGIS_002: PostGIS, i.e., ‘BVU_IEER_DB’.
13. Click on the ‘Stores’ in navigation panel of the GeoServer Window page.
14. Now you will be redirect to the ‘GeoServer: Stores’ page. Click on ‘Add new store’, then you will redirect
13
10
11

IGET_WEBGIS_003 Introduction to GeoServer
7
to the ‘GeoServer: New data source’ page.
15. Select ‘PostGIS’ under ‘Vector Data Sources’
16. You will present with a form, where you have to fill the basic information to connect our PostGIS
database created in IGET_WEBGIS_002. Select BVU_vector_wp’ from down drop list under Workspace,
enter Data Source Name as ‘BVU_Vector_st’, ‘Description’ as ‘Vector files of BVU toposheet’ and Make sure
check box of ‘Enabled’ is checked.
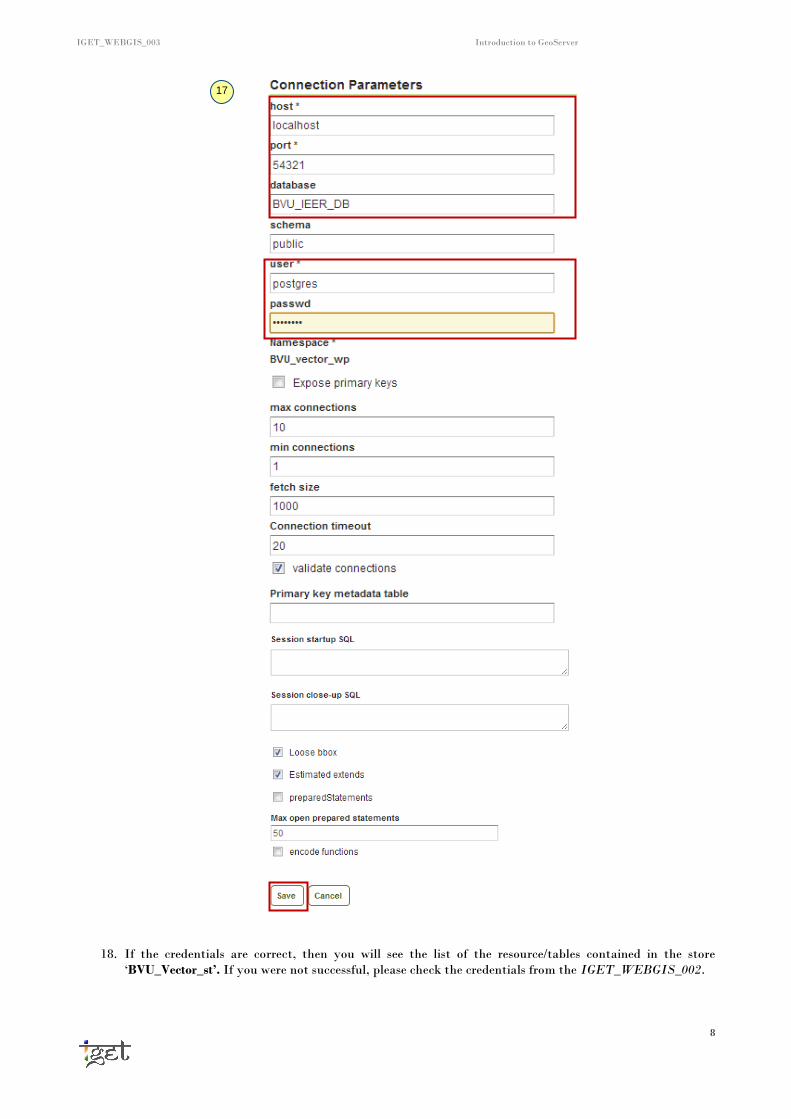
17. Go to the ‘Connection Parameters’ section, type ‘54321’ under ‘port’, ‘BVU_IEER_DB’ under
‘database’ and enter ‘postgres’ as username and also as password under ‘user’ and ‘password’ fields.
Leave all other fields as default and click on ‘Save’.
15
16
IGET_WEBGIS_003 Introduction to GeoServer
8
18. If the credentials are correct, then you will see the list of the resource/tables contained in the store
‘BVU_Vector_st’. If you were not successful, please check the credentials from the IGET_WEBGIS_002.
17

IGET_WEBGIS_003 Introduction to GeoServer
9
Publishing a layer
19. To publish a (single) layer click on the ‘Publish’ button, this is located against to the desired layer to be
published under ‘action’ field. For example: if you want publish ‘agriculture_bvu’ click on publish against
to it, under ‘action’ field here.
20. Now you will redirect to the ‘Edit Layer’ page, here we have to configure the layer for publishing. Change
the ‘Basic Resource info’ under ‘Data’ tab as shown below.
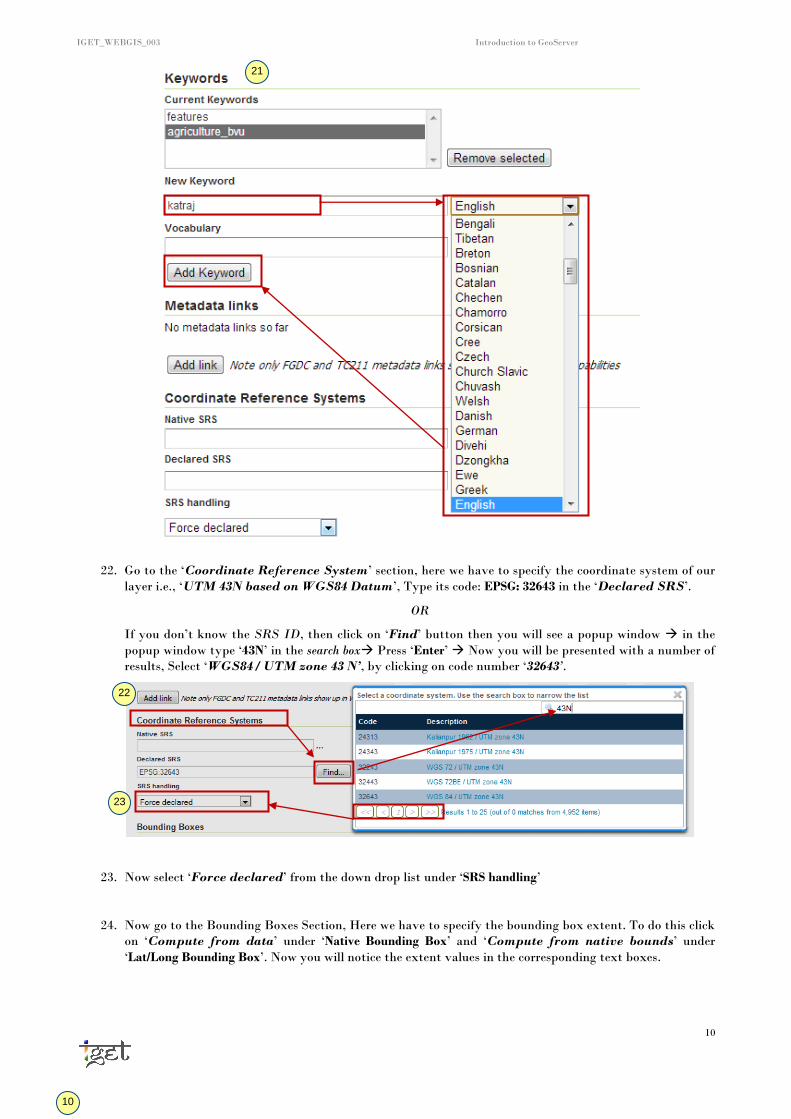
21. Go to the ‘New Keyword’ text box, add the relevant keywords, Keywords makes the layers and
information easily searchable on server. In our case, the toposheet belongs to Katra area of Pune city. So
we are adding these two keywords now. To add keyword, type ‘Katraj’ in ‘New keyword’ text box
Select the language as ‘English’ from the down drop list located right side to the text box Click on
‘Add Keyword’ button to add the key word. Similar add the keyword ‘Pune’.
19
20
IGET_WEBGIS_003 Introduction to GeoServer
10
22. Go to the ‘Coordinate Reference System’ section, here we have to specify the coordinate system of our
layer i.e., ‘UTM 43N based on WGS84 Datum’, Type its code: EPSG: 32643 in the ‘Declared SRS’.
OR
If you don’t know the SRS ID, then click on ‘Find’ button then you will see a popup window in the
popup window type ‘43N’ in the search box Press ‘Enter’ Now you will be presented with a number of
results, Select ‘WGS84 / UTM zone 43 N’, by clicking on code number ‘32643’.
23. Now select ‘Force declared’ from the down drop list under ‘SRS handling’
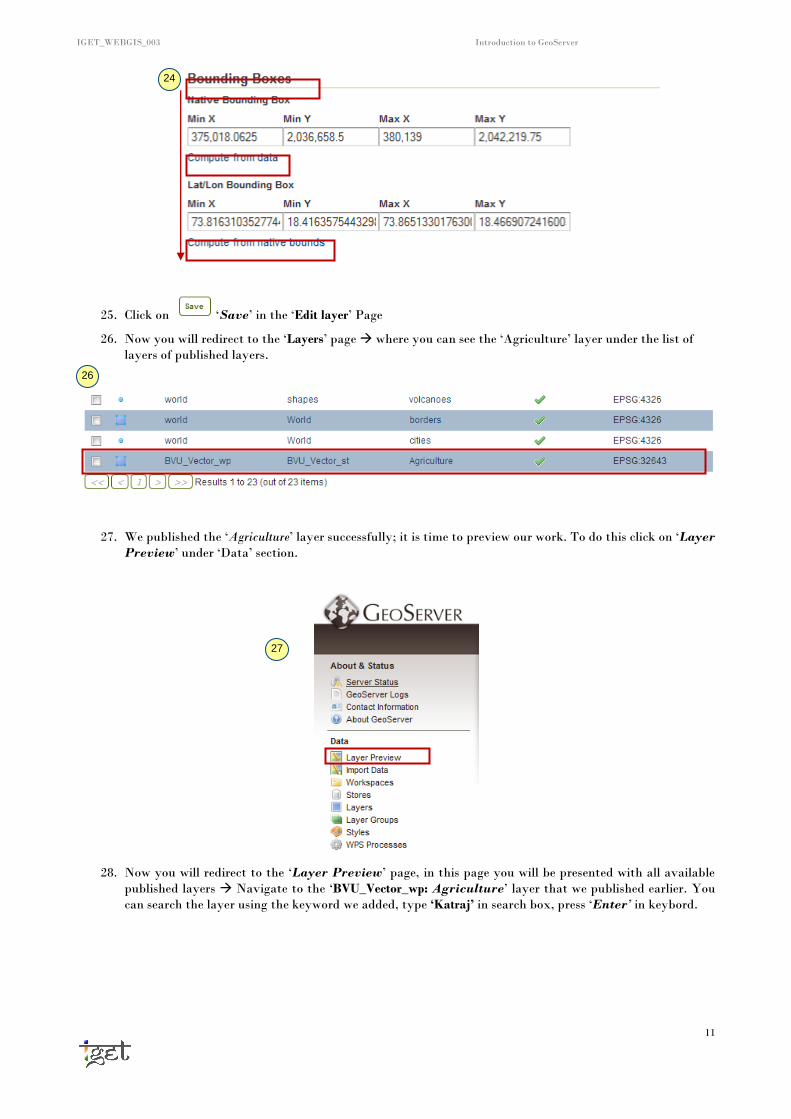
24. Now go to the Bounding Boxes Section, Here we have to specify the bounding box extent. To do this click
on ‘Compute from data’ under ‘Native Bounding Box’ and ‘Compute from native bounds’ under
‘Lat/Long Bounding Box’. Now you will notice the extent values in the corresponding text boxes.
10
21
22
23
IGET_WEBGIS_003 Introduction to GeoServer
11
25. Click on ‘Save’ in the ‘Edit layer’ Page
26. Now you will redirect to the ‘Layers’ page where you can see the ‘Agriculture’ layer under the list of
layers of published layers.
27. We published the ‘Agriculture’ layer successfully; it is time to preview our work. To do this click on ‘Layer
Preview’ under ‘Data’ section.
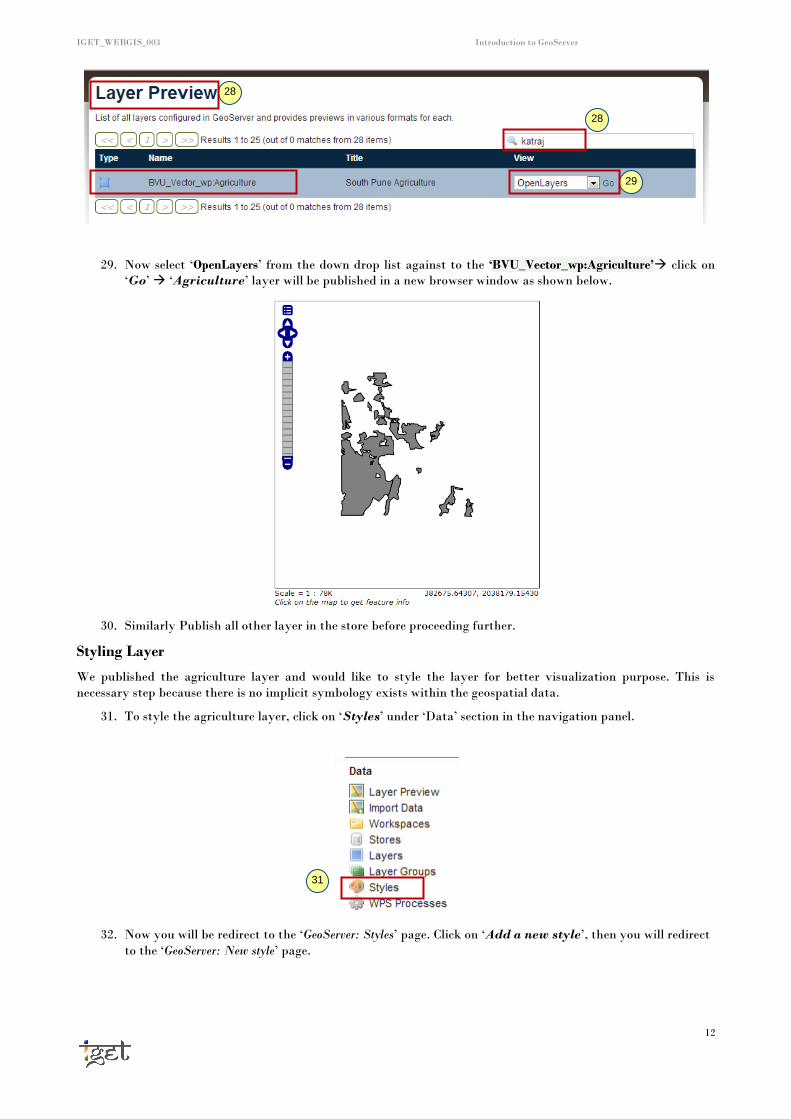
28. Now you will redirect to the ‘Layer Preview’ page, in this page you will be presented with all available
published layers Navigate to the ‘BVU_Vector_wp: Agriculture’ layer that we published earlier. You
can search the layer using the keyword we added, type ‘Katraj’ in search box, press ‘Enter’ in keybord.
24
26
27
IGET_WEBGIS_003 Introduction to GeoServer
12
29. Now select ‘OpenLayers’ from the down drop list against to the ‘BVU_Vector_wp:Agriculture’ click on
‘Go’ ‘Agriculture’ layer will be published in a new browser window as shown below.
30. Similarly Publish all other layer in the store before proceeding further.
Styling Layer
We published the agriculture layer and would like to style the layer for better visualization purpose. This is
necessary step because there is no implicit symbology exists within the geospatial data.
31. To style the agriculture layer, click on ‘Styles’ under ‘Data’ section in the navigation panel.
32. Now you will be redirect to the ‘GeoServer: Styles’ page. Click on ‘Add a new style’, then you will redirect
to the ‘GeoServer: New style’ page.
28
29
28
31

IGET_WEBGIS_003 Introduction to GeoServer
13
33. Now name the style as ‘Agruculture Style BVU’ select ‘BVU_Vector_wp‘ from workspace dropdown and
select polygon from copy from existing style dropdown
34. Now click on ‘copy’, you will notice the text box below is filled with an xml code as show below. It is
known as ‘Styled Layer Descriptor (SLD)’, an xml file based on the OGC specified format that is used
to describe the symbol of features. To know more about the SLD please visit
http://www.opengeospatial.org/standards/sld
35. Now edit the this Code as per our requirements, we have to edit Name, Title and CssParemeter as shown in
the below figure. The color codes are in hexadecimal format
32
34
33

IGET_WEBGIS_003 Introduction to GeoServer
14
36. Now validate the xml code by clicking on the validate button at bottom of the page. If there are no errors,
you can see ‘No Validation errors’ message on screen similar to the image below.
37. Now click ‘Submit’ button, you will be redirected to GeoServer: Styles page.
38. To assign this style to any polygon layer click on ‘Layers’ in Navigation panel.
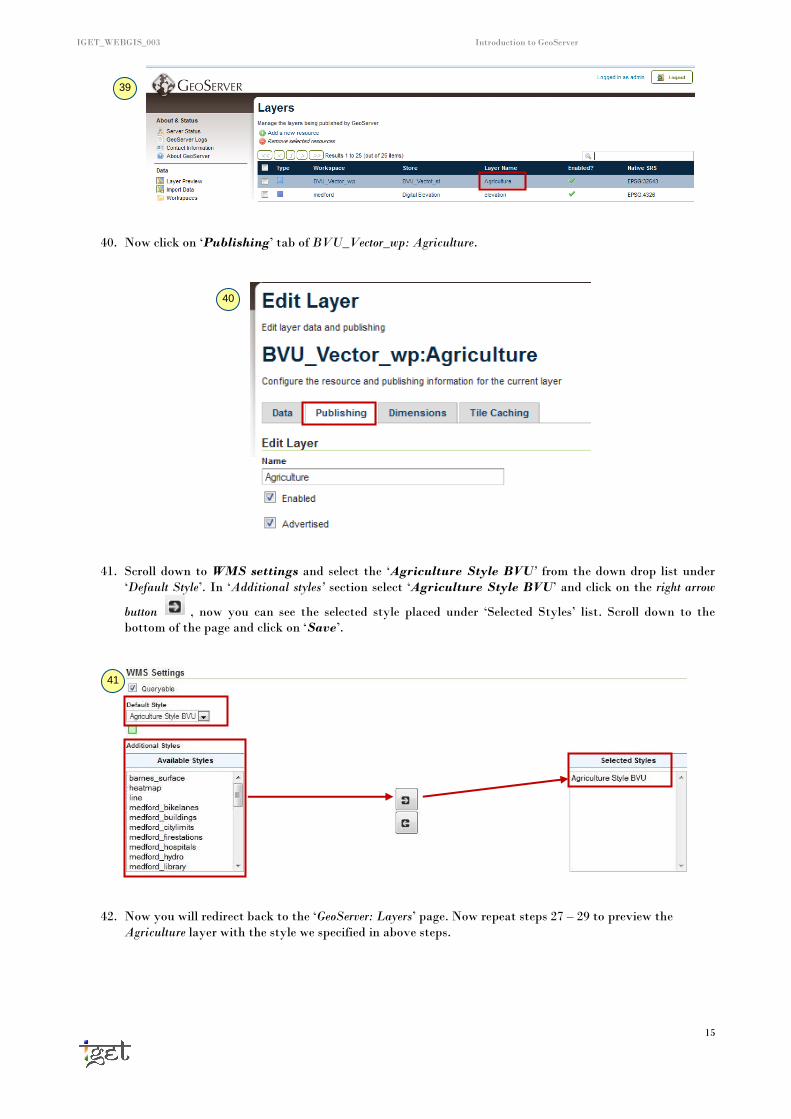
39. Now you will redirect to the ‘GeoServer: Layers’ page. Now click on ‘Agriculture’ layer of
BVU_Vector_wp under ‘Layer Name’ section.
37
38
36
35
Hexadecimal Color code
IGET_WEBGIS_003 Introduction to GeoServer
15
40. Now click on ‘Publishing’ tab of BVU_Vector_wp: Agriculture.
41. Scroll down to WMS settings and select the ‘Agriculture Style BVU’ from the down drop list under
‘Default Style’. In ‘Additional styles’ section select ‘Agriculture Style BVU’ and click on the right arrow
button , now you can see the selected style placed under ‘Selected Styles’ list. Scroll down to the
bottom of the page and click on ‘Save’.
42. Now you will redirect back to the ‘GeoServer: Layers’ page. Now repeat steps 27 – 29 to preview the
Agriculture layer with the style we specified in above steps.
39
40
41

IGET_WEBGIS_003 Introduction to GeoServer
16
Grouping the layers
A Layer Group is a collection of layers. It contains the information of individual layers and facilitates to request
multiple layers through a single WMS request. It saves our time, provides easy access to the layers and makes our
work smarter. In this section we will learn how to create a ‘transportation group’.
43. To create a Layer group, click on ‘Layer Groups’ under Data section in Navigation panel of GeoServer page.
44. Now we will direct to ‘GeoServer: Layer Groups’. Click on ‘Add new layer group’.
45. In the ‘New Layer Group’ page, enter ‘BVU_Transportation’ as ‘Name’ Select workspace as
BVU_Vector_wp. In the Coordinate reference system use ‘Find’ to select ‘EPSG:32643’ as SRS
43
44
42

IGET_WEBGIS_003 Introduction to GeoServer
17
46. Click on ‘Add Layers’, select Bus stops, Highways and Street Roads layers (Published in Step 30) by
clicking on their name under Name field in ‘Choose new layer’ popup window. Use remove button to
remove any wrongly added layer.
47. After adding the layers click on ‘Generate Bounds’ button to calculate the extent of the layer and leave
all other fields default, scroll down to click on ‘Save’.
48. No you will redirect to the ‘GeoServer: Layer Groups’ page. Where you can see newly added
‘BVU_Transportation’ Group in the list.
45
45
46
47
46
48
IGET_WEBGIS_003 Introduction to GeoServer
18
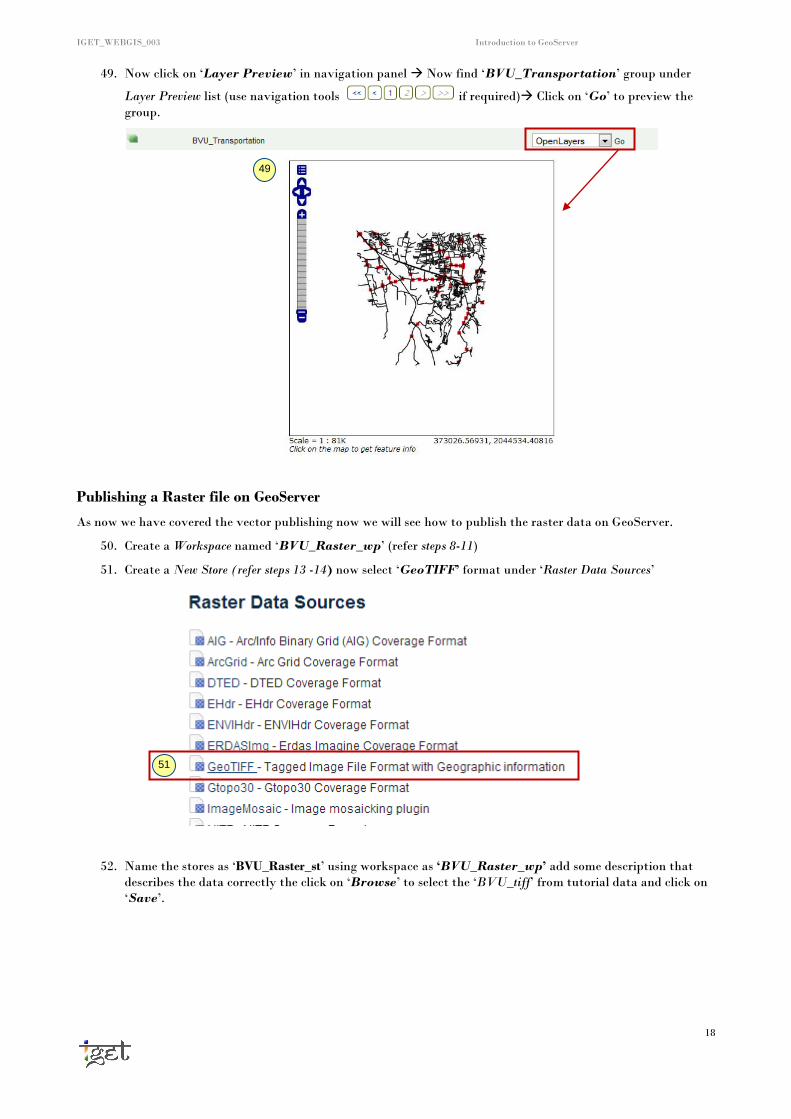
49. Now click on ‘Layer Preview’ in navigation panel Now find ‘BVU_Transportation’ group under
Layer Preview list (use navigation tools if required) Click on ‘Go’ to preview the
group.
Publishing a Raster file on GeoServer
As now we have covered the vector publishing now we will see how to publish the raster data on GeoServer.
50. Create a Workspace named ‘BVU_Raster_wp’ (refer steps 8-11)
51. Create a New Store (refer steps 13 -14) now select ‘GeoTIFF’ format under ‘Raster Data Sources’
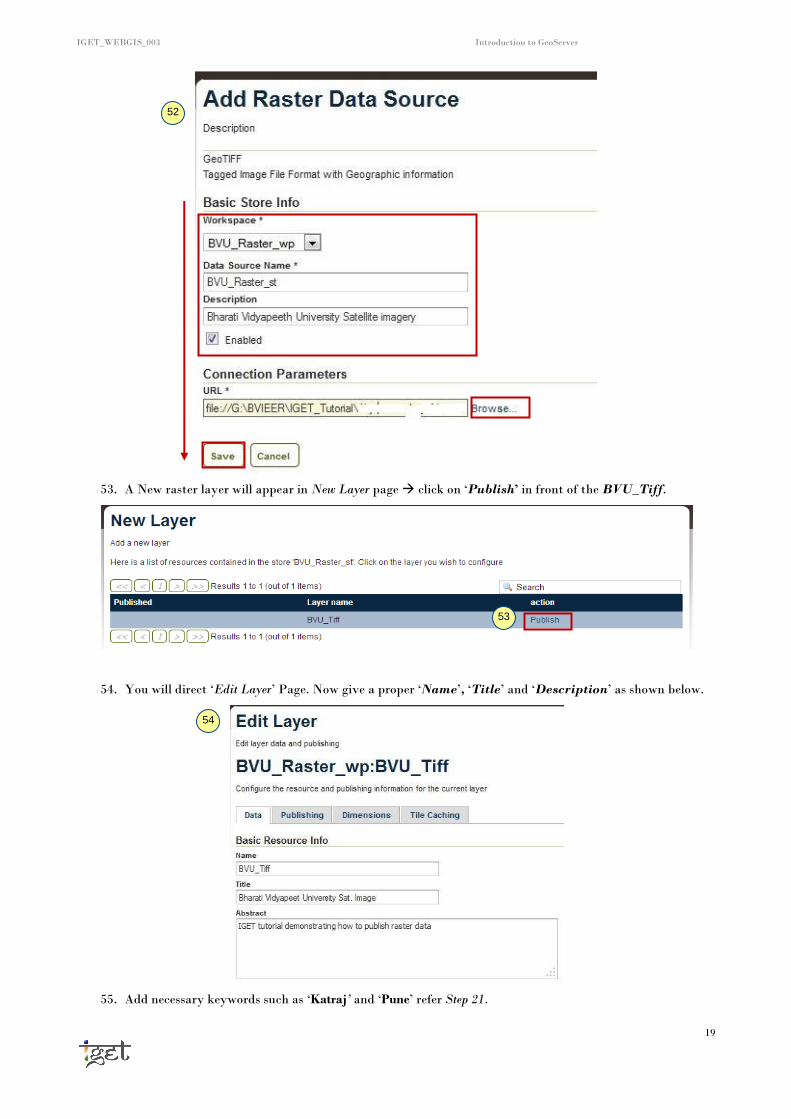
52. Name the stores as ‘BVU_Raster_st’ using workspace as ‘BVU_Raster_wp’ add some description that
describes the data correctly the click on ‘Browse’ to select the ‘BVU_tiff’ from tutorial data and click on
‘Save’.
51
49
IGET_WEBGIS_003 Introduction to GeoServer
19
53. A New raster layer will appear in New Layer page click on ‘Publish’ in front of the BVU_Tiff.
54. You will direct ‘Edit Layer’ Page. Now give a proper ‘Name’, ‘Title’ and ‘Description’ as shown below.
55. Add necessary keywords such as ‘Katraj’ and ‘Pune’ refer Step 21.
52
53
54

IGET_WEBGIS_003 Introduction to GeoServer
20
56. Unlike the vector data you don’t have to generate the Bounding box and declare the Coordinate Reference
system since Geotiff format includes the CRS information. If you think anything went wrong you can
change the SRS. Now we are accepting it because the layer is assigned to right SRS, click on ‘Save’ to
finish.
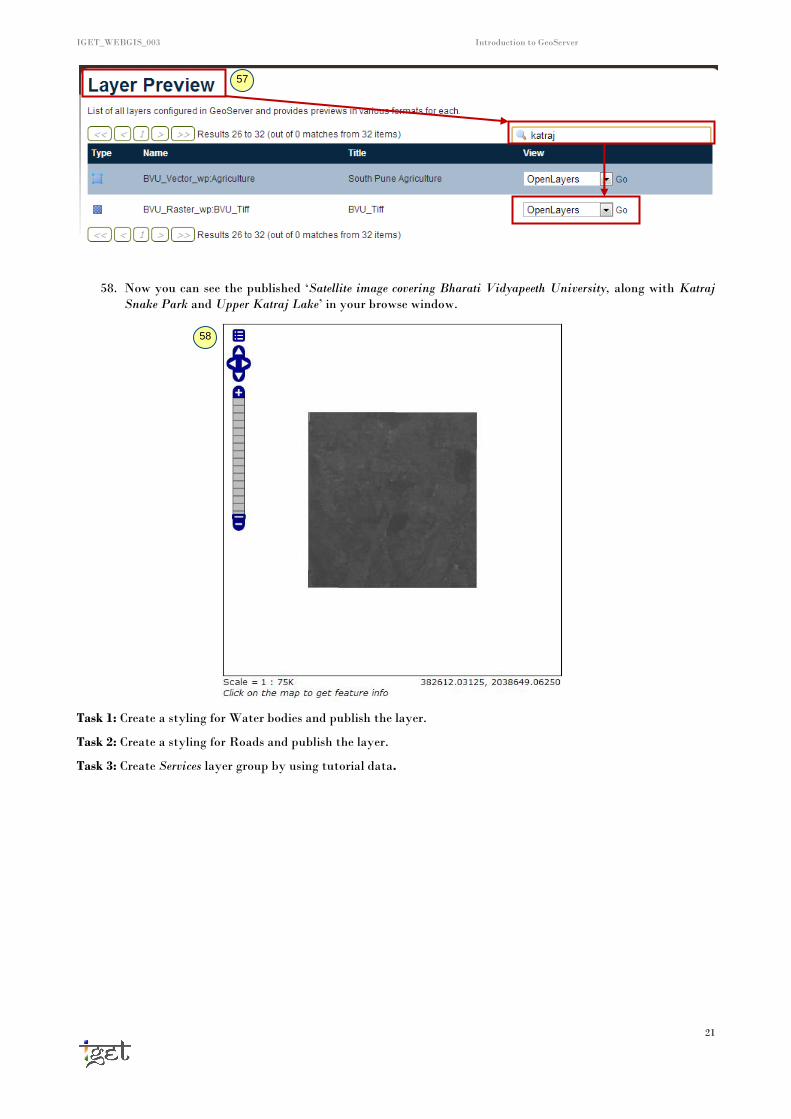
57. Now go to the ‘Layer Preview’ search for ‘Katraj’ (Note: this will work only if you have added katraj as
keyword as mentioned in step 55). Navigate to ‘BVU_Raster_wp: BVU_Tiff’ Click on ‘Go’.
56
55
IGET_WEBGIS_003 Introduction to GeoServer
21
58. Now you can see the published ‘Satellite image covering Bharati Vidyapeeth University, along with Katraj
Snake Park and Upper Katraj Lake’ in your browse window.
Task 1: Create a styling for Water bodies and publish the layer.
Task 2: Create a styling for Roads and publish the layer.
Task 3: Create Services layer group by using tutorial data.
57
58


