
TRACK NAVI
TRAININg
ANAlysIs
bARomeTRIC
CompATIble
log
DIgITAlwIReless
DIgITAlwIReless
DIgITAlwIReless
ReADy
US
BIKE COMPUTER
GPS®

page 3
Contents
www.sigmasport.com ROX®10.0
ROX®10.0 Contents
Contents
1 Functions and contents ............................................................................................................................................ 7
1.1 Foreword ............................................................................................................................................................... 7
1.2 Contents ................................................................................................................................................................ 7
1.2.1 optional accessories .............................................................................................................. 8
1.3 RoX 10.0 gps functions ................................................................................................................................ 8
1.3.1 ANT+™ speed transmitter (optional accessory) ....................................................... 8
1.3.2 ANT+™ heart rate transmitter (optional accessory) ............................................... 8
1.3.3 ANT+™ cadence transmitter (optional accessory) .................................................. 8
1.3.4 gps transmitter ....................................................................................................................... 9
1.3.5 Favorites ...................................................................................................................................... 9
1.3.6 pC/mAC interface .................................................................................................................. 9
2 Attaching the RoX 10.0 gps and initial use ................................................................................................... 10
2.1 Attaching the bracket ...................................................................................................................................... 10
2.2 before initial use ............................................................................................................................................... 10
2.3 Initial use ................................................................................................................................................................ 10
2.4 pairing the transmitters with the RoX 10.0 gps ............................................................................... 10
2.5 synchronizing the transmitters ................................................................................................................... 11
2.5.1 synchronizing the speed ....................................................................................................... 11
2.5.2 synchronizing the cadence .................................................................................................. 11
2.5.3 synchronizing the chest belt ............................................................................................... 11
3 menu tree ....................................................................................................................................................................... 12
4 operating concept ...................................................................................................................................................... 13
4.1 RoX 10.0 gps navigation principle ........................................................................................................... 13
4.2 button functions ................................................................................................................................................. 14
4.3 operating concept for the remaining menu .......................................................................................... 15
4.3.1 Top display segment ............................................................................................................... 15
4.3.2 bottom display segment ....................................................................................................... 15
4.4 Training menu operating concept & display structure ...................................................................... 16
4.4.1 “bikecomputer” view mode .................................................................................................. 16
4.4.1.1 Top display segment ............................................................................................................... 16
4.4.1.2 middle display segment ......................................................................................................... 17
4.4.1.3 bottom display segment ....................................................................................................... 17
4.4.2 “Track View” mode .................................................................................................................. 17
4.4.3 “Altitude View” mode .............................................................................................................. 17
5 Training with the RoX 10.0 gps .......................................................................................................................... 18
5.1 Favorites A and b ............................................................................................................................................... 18
5.2 Calibrating the altitude IAC+ ......................................................................................................................... 19
5.3 power calculation or measurement .......................................................................................................... 20

page 4
Contents
www.sigmasport.com ROX®10.0
ROX®10.0 Contents
5.3.1 power calculation .................................................................................................................... 20
5.3.2 power measurement ............................................................................................................. 20
5.4 Intensity zones .................................................................................................................................................... 21
5.5 Training .................................................................................................................................................................. 21
5.5.1 Using the short menu to select training settings ...................................................... 21
5.5.2 starting logs ............................................................................................................................... 22
5.5.3 stopping/ending logs ............................................................................................................ 22
5.5.4 saving logs .................................................................................................................................. 22
5.5.5 Auto pause .................................................................................................................................. 23
5.5.6 Displaying training parameters.......................................................................................... 24
5.5.7 lap message view ................................................................................................................... 24
5.6 Training functions .............................................................................................................................................. 25
5.6.1 Zoom function in Track View and Altitude View .......................................................... 25
5.6.2 same track back function .................................................................................................... 25
5.6.3 Track found message ............................................................................................................ 25
5.6.4 off-track alarm .......................................................................................................................... 25
5.6.5 wrong direction message ................................................................................................... 25
5.6.6 waypoint alarm ........................................................................................................................ 25
5.7 Analysis .................................................................................................................................................................. 25
6 load track ....................................................................................................................................................................... 26
6.1 memory capacity for track data .................................................................................................................. 26
6.1.1 Track data memory ................................................................................................................. 26
6.2 Driven tracks ...................................................................................................................................................... 27
6.2.1 start track .................................................................................................................................. 27
6.2.2 show track .................................................................................................................................. 27
6.2.3 show altitude profile ............................................................................................................... 27
6.3 stored tracks ..................................................................................................................................................... 28
6.3.1 start track .................................................................................................................................. 28
6.3.2 show track .................................................................................................................................. 28
6.3.3 show altitude profile ............................................................................................................... 29
6.3.4 show details ............................................................................................................................... 29
7 memory ........................................................................................................................................................................... 30
7.1 Current tour ......................................................................................................................................................... 30
7.2 stored tours ......................................................................................................................................................... 30
7.3 stored data ........................................................................................................................................................... 31
7.3.1 Tour data – bicycle .................................................................................................................. 32
7.3.2 Tour data – heart rate .......................................................................................................... 32
7.3.3 Tour data – time ...................................................................................................................... 32
7.3.4 Tour data – power .................................................................................................................. 32
7.3.5 Tour data – temperature ..................................................................................................... 33
page 5
Contents
www.sigmasport.com ROX®10.0
ROX®10.0 Contents
7.3.6 Tour data – altimeter ............................................................................................................. 33
7.3.7 Tour data – uphill ..................................................................................................................... 33
7.3.8 Tour data – downhill ............................................................................................................... 33
7.3.9 Tour data – laps ....................................................................................................................... 34
7.3.10 Tour data – show track ......................................................................................................... 34
7.3.11 Tour data – graph. analysis ................................................................................................. 34
7.4 Total values ........................................................................................................................................................... 35
7.4.1 Total values – bicycle ............................................................................................................. 35
7.4.2 Total values – heart rate ...................................................................................................... 35
7.4.3 Total values – uphill ................................................................................................................. 35
7.4.4 Total values – downhill ........................................................................................................... 35
8 status info ...................................................................................................................................................................... 36
8.1 battery .................................................................................................................................................................... 36
8.2 gps signal ............................................................................................................................................................. 36
8.3 memory .................................................................................................................................................................. 36
9 extras................................................................................................................................................................................ 37
9.1 stopwatch ............................................................................................................................................................. 37
9.2 Countdown ............................................................................................................................................................ 37
9.3 Compass ............................................................................................................................................................... 37
10 settings............................................................................................................................................................................ 38
10.1 scale unit ............................................................................................................................................................ 38
10.2 Device .................................................................................................................................................................. 38
10.3 bike 1-3 & totals ............................................................................................................................................. 39
10.3.1 pairing with the RoX 10.0 gps ......................................................................................... 40
10.3.2 pairing power meters ............................................................................................................ 40
10.3.3 Total Values ................................................................................................................................ 41
10.4 Altitude ................................................................................................................................................................ 41
10.5 User ...................................................................................................................................................................... 41
10.6 Heart rate intensity zones .......................................................................................................................... 42
10.7 Heart rate target zone ................................................................................................................................ 42
10.8 power target zone.......................................................................................................................................... 42
10.9 gps settings ..................................................................................................................................................... 43
10.10 Favorites .......................................................................................................................................................... 43
10.11 Firmware update ......................................................................................................................................... 48
10.12 Factory settings .......................................................................................................................................... 48
11 Important information, troubleshooting, and FAQ ......................................................................................... 49
11.1 Important information .................................................................................................................................. 49
11.1.1 RoX 10.0 gps water resistance ..................................................................................... 49
11.1.2 water resistance of the transmitter (optional accessory) ................................... 49
11.1.3 Chest belt care (optional accessory) ............................................................................... 49

page 6
Contents
www.sigmasport.com ROX®10.0
ROX®10.0
11.1.4 Training advice .......................................................................................................................... 49
11.2 Troubleshooting............................................................................................................................................... 50
11.3 Frequently asked questions ........................................................................................................................ 51
12 Technical data ............................................................................................................................................................... 53
12.1 max, min, and default values ...................................................................................................................... 53
12.2 Temperature, batteries ................................................................................................................................ 55
13 warranty and guarantee ......................................................................................................................................... 56
14 Index .................................................................................................................................................................................. 58

page 7
Foreword
www.sigmasport.com ROX®10.0
ROX®10.0Functions and contents
1 Functions and contents
1.1 Foreword
Thank you for choosing a sIgmA spoRT bike computer. your new RoX 10.0 gps will be a reliable companion for years to come. To familiarize yourself with and learn how to use the many functions of your new bike computer, please read these operating instructions carefully.
enjoy the ride with your new RoX 10.0 gps!
The RoX 10.0 gps is a gps bike computer that provides you with a broad range of information both during and after your rides:
− speed, time, distance, power and position, altitude, incline, heart rate, intensity zones, and much more.
− Download all information to a pC or mac so that you can view and analyze your ride data.
− plan tracks with DATA CeNTeR 3.1.
1.2 Contents
RoX 10.0 gps black or white bike computer
CR2450 twist-lock bracket
Usb charger (5V, 1A)
Usb type A to micro-b cable
Attachment materials RoX 10.0 gps quick start guide
DATA CeNTeR 3.1 on CD (including operating instructions)
page 8
RoX 10.0 gps functionsFunctions and contents
www.sigmasport.com ROX®10.0
ROX®10.0
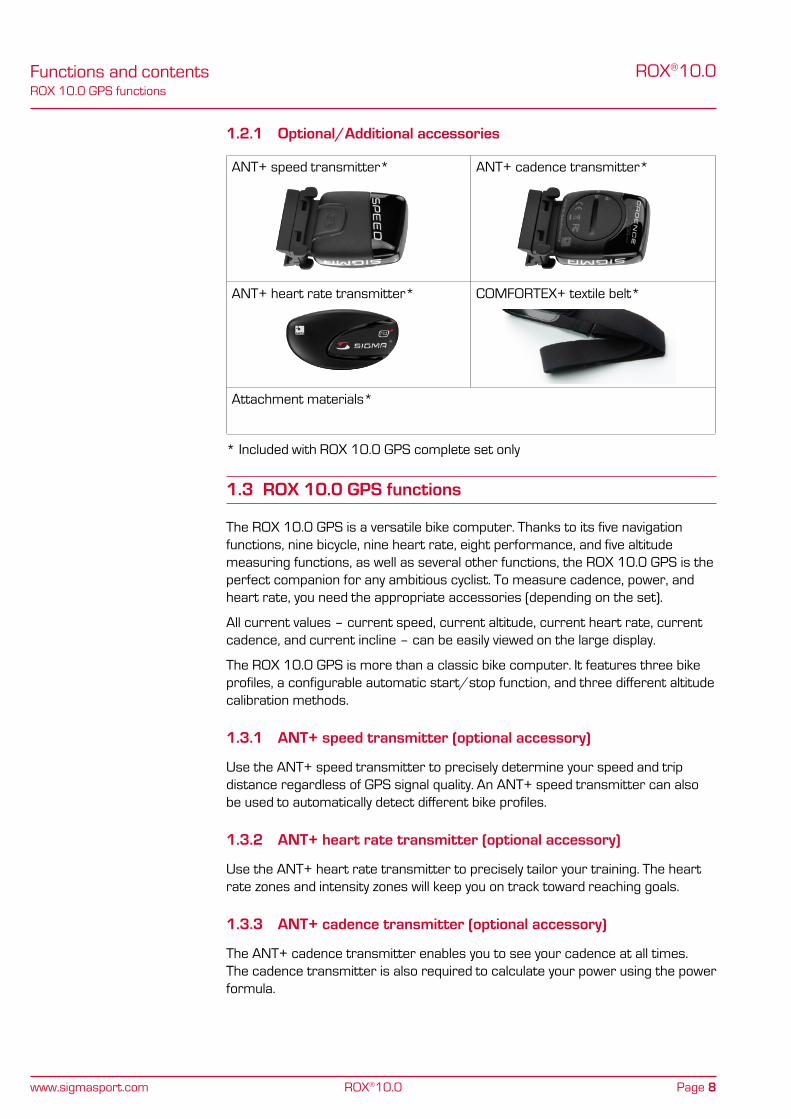
1.2.1 Optional/Additional accessories
ANT+ speed transmitter*
ANT+ cadence transmitter*
ANT+ heart rate transmitter*
ComFoRTeX+ textile belt*
Attachment materials*
* Included with RoX 10.0 gps complete set only
1.3 ROX 10.0 GPS functions
The RoX 10.0 gps is a versatile bike computer. Thanks to its five navigation functions, nine bicycle, nine heart rate, eight performance, and five altitude measuring functions, as well as several other functions, the RoX 10.0 gps is the perfect companion for any ambitious cyclist. To measure cadence, power, and heart rate, you need the appropriate accessories (depending on the set).
All current values – current speed, current altitude, current heart rate, current cadence, and current incline – can be easily viewed on the large display.
The RoX 10.0 gps is more than a classic bike computer. It features three bike profiles, a configurable automatic start/stop function, and three different altitude calibration methods.
1.3.1 ANT+ speed transmitter (optional accessory)
Use the ANT+ speed transmitter to precisely determine your speed and trip distance regardless of gps signal quality. An ANT+ speed transmitter can also be used to automatically detect different bike profiles.
1.3.2 ANT+ heart rate transmitter (optional accessory)
Use the ANT+ heart rate transmitter to precisely tailor your training. The heart rate zones and intensity zones will keep you on track toward reaching goals.
1.3.3 ANT+ cadence transmitter (optional accessory)
The ANT+ cadence transmitter enables you to see your cadence at all times. The cadence transmitter is also required to calculate your power using the power formula.
page 9
RoX 10.0 gps functionsFunctions and contents
www.sigmasport.com ROX®10.0
ROX®10.0
1.3.4 GPS transmitter
The integrated gps transmitter determines your current speed and distance ridden. when the RoX 10.0 gps is switched on, it automatically searches for gps satellites. when indoors, you may not be able to receive gps satellite signals, or those received may be weak. move outdoors to for better satellite reception or use the optionally available ANT+ speed transmitter.
1.3.5 Favorites
Favorites A & b allow you to personalize your RoX 10.0 gps.
select up to 28 functions that are most important to you during a ride. Don”t worry, the RoX 10.0 gps will record all functions in the background for post ride analysis.
This reduces the amount of “clicking” and lets you focus on your ride.
1.3.6 PC /Mac interface
The RoX 10.0 gps can be connected to a pC or mac. The micro Usb cable supplied can be used to charge the RoX 10.0 gps and transfer data between your computer and the RoX 10.0 gps.
you can also configure the settings for the RoX 10.0 gps on the computer and then transmit them to the bike computer. This enables you to quickly and easily configure your RoX 10.0 gps without having to navigate through all the menu levels. before starting, install the Data Center software from the CD supplied. Keep an eye out for regular updates online.

page 10
Attaching the bracketAttaching the RoX 10.0 gps and initial use
www.sigmasport.com ROX®10.0
ROX®10.0
2 Attaching the ROX 10.0 GPS and initial use
2.1 Attaching the bracket
− Determine whether you want to attach to the handlebars or stem.
− Remove the yellow foil.
− please bracket on handlebar or stem and attach using either cable ties (permanent attachment) or the o-rings.
Detailed attachment information can be found in the quick start guide provided.
2.2 Before initial use
Fully charge the RoX 10.0 gps: Charge the device using the micro Usb cable and the Usb port on your pC or use the wall charger supplied. The process takes approximately three hours.
on the back of your RoX 10.0 gps, lift the rubber plug to expose the micro Usb port. The battery should only be charged at room temperature. Never charge the RoX 10.0 gps if a crossed out battery icon is displayed - the RoX 10.0 gps must cool down first.
2.3 Initial use
1. press and hold the ENTER button for five seconds.
2. press ENTER to change the language.
3. Now press the and buttons to select your desired language then press ENTER .
4. Configure the remaining settings using the same method.
2.4 Pairing the transmitters with the ROX 10.0 GPS
To use the transmitters, they must be paired with the RoX 10.0 gps.
Information on how to pair the transmitters can be found under “ANT+ pairing” in section ‘10.3 bike 1–3 & totals’.

page 11
synchronizing the transmittersAttaching the RoX 10.0 gps and initial use
www.sigmasport.com ROX®10.0
ROX®10.0
2.5 Synchronizing the transmitters
To synchronize the transmitters, the RoX 10.0 gps must be switched on and in training mode. once synchronization is complete, the respective values appear on the RoX 10.0 gps”s top display segment in “bikecomputer” view mode.
Note:
The RoX 10.0 gps has been designed for use with up to three bikes. you have already used the pairing menu to assign the sensors to a specific bike (bike 1, 2, or 3). you must manually select the bike that you are riding (default: bike 1).
This can be done as follows:
− open the short menu (simultaneously press the two top buttons – BACK and ENTER )
− press or to go to ‘bike selection’
− press ENTER
− press or to select the relevant bike
− press ENTER to confirm
− press BACK to exit the short menu
IMPORTANT:
The RoX 10.0 gps only displays values for paired sensors for which you have chosen a bike.
2.5.1 Synchronizing the speed
There are two options for synchronizing the speed:
− start cycling – the receiver usually synchronizes with the transmitter after five wheel rotations.
− spin the wheel until the current speed appears on the display.
2.5.2 Synchronizing the cadence
There are two options for synchronizing the cadence:
− start cycling – the receiver usually synchronizes with the transmitter after five pedal rotations.
− Turn the pedals until the current cadence appears on the display.
2.5.3 Synchronizing the chest belt
slightly moisten the electrodes and put on the chest belt. move into the vicinity of the RoX 10.0 gps or get onto your bike. The RoX 10.0 gps usually synchronizes with the chest belt in less than 10 seconds.
The current heart rate then appears on the display.

page 12
synchronizing the transmittersmenu tree
www.sigmasport.com ROX®10.0
ROX®10.0
3 Menu tree
Training
load track Driven tracks stored tracks
memory Current tour stored tours Total values
Tour 1....
bicycle
Heart rate Time
power Temperature
Altimeter Uphill
Downhill laps
show track graph. analysis
Delete tour!
bicycle Heart rate
Uphill Downhill
bicycle Heart rate
Time power
Temperature Altimeter
Uphill Downhill
laps show track
graph. analysis
status info battery gps signal memory
extras stopwatch Countdown Compass
settings scale unit Device bike 1–3 & totals Altitude
User Intensity zone Target zone power target zone
gps settings Favorites Firmware update Factory settings

page 13
RoX 10.0 gps navigation principleoperating concept
www.sigmasport.com ROX®10.0
ROX®10.0
4 Operating concept
4.1 ROX 10.0 GPS navigation principle
The RoX 10.0 gps has up to seven menu levels. when navigating through the RoX 10.0 gps menus and submenus, you can use the tree diagram in section ‘3 menu tree’ as a guide.
The navigation bar at the top of the RoX 10.0 gps screen will help guide you through the menus. The possible functions of the BACK and ENTER buttons are also displayed in the navigation bar:
− go to the next level down (eNTeR/seleCT/eDIT)
− go back to the next level up (bACK)
− go to the next editable position (NeXT)
− Activate or deactivate a function (oN/oFF)
− scroll forward or backward within the menu levels ( and )
− Confirm/save a setting (sAVe).

page 14
button functionsoperating concept
www.sigmasport.com ROX®10.0
ROX®10.0
4.2 Button functions
Back/Stop button
press this button to exit the submenus or stop a current data log.
press and hold the button in training mode to reset all data and save the current trip.
Start/Lap button
Minus button
press this button to start a data log. During a data log press this button to start a new lap.
scroll backward in a menu level …
… or lower/change the value displayed …
… or zoom out in Track/Altitude View.
Enter button
press this button to access the submenus or zoom the top display data (HR, Alti, Cad, slope).
press and hold the button to turn the RoX 10.0 gps on and off.
simultaneously press the BACK and ENTER buttons to open the short menu.
Mode button
Plus button
press this button to switch between the “bikecomputer”, “Track View” and “Altitude View” modes in the training menu.
scroll forward in a menu level …
… or increase/change the value displayed …
… or zoom in in Track/Altitude View
simultaneously press the START and MODE buttons.
Backlight on/off
Shortcut Only in training mode

page 15
operating concept for the remaining menuoperating concept
www.sigmasport.com ROX®10.0
ROX®10.0
4.3 Operating concept for the remaining menu
All settings are done following the same procedure:
− press the and buttons to select the desired menu.
− open this menu by pressing ENTER .
− Navigate to the respective unit using and and press ENTER to edit it.
− The value to be edited has a black background and can be modified by pressing the and buttons.
− save your changes by pressing ENTER .
4.3.1 Top display segment
The top line of the upper display segment will change depending on which menu you are in. The possible functions of the BACK and ENTER buttons will be displayed to assist you.
The second line of the top display segment always shows which menu/submenu you are currently in.
4.3.2 Bottom display segment
The submenus and programmable values are displayed in the bottom display segment.
press the and buttons to select the desired menu/submenu. press ENTER to open the menu/submenu.
Enter Enter Enter

page 16
Training menu operating concept & display structureoperating concept
www.sigmasport.com ROX®10.0
ROX®10.0
4.4 Training menu operating concept & display structure
The RoX 10.0 gps”s training menu is divided into three view modes:
Training Bikecomputer Track View Altitude View
while training, you can track your current training values using the three modes “bikecomputer”, “Track View” and “Altitude View”. press the MODE button to switch between the different modes.
4.4.1 “Bikecomputer” view mode
The “bikecomputer” view mode is divided into three display segments.
4.4.1.1 Top display segment
The first line displays the following values:
battery status indicator or
battery charging
gps signal available
beneath these, four current values are displayed:
Current heart rate (only if you are wearing the chest belt)
Current cadence (only if the cadence transmitter has been attached)
Current altitude (permanent)
Current incline (permanent)
press ENTER to zoom in so that only one of the four functions is displayed. press ENTER to scroll through each current value and return to the multi-view screen.
page 17
Training menu operating concept & display structureoperating concept
www.sigmasport.com ROX®10.0
ROX®10.0
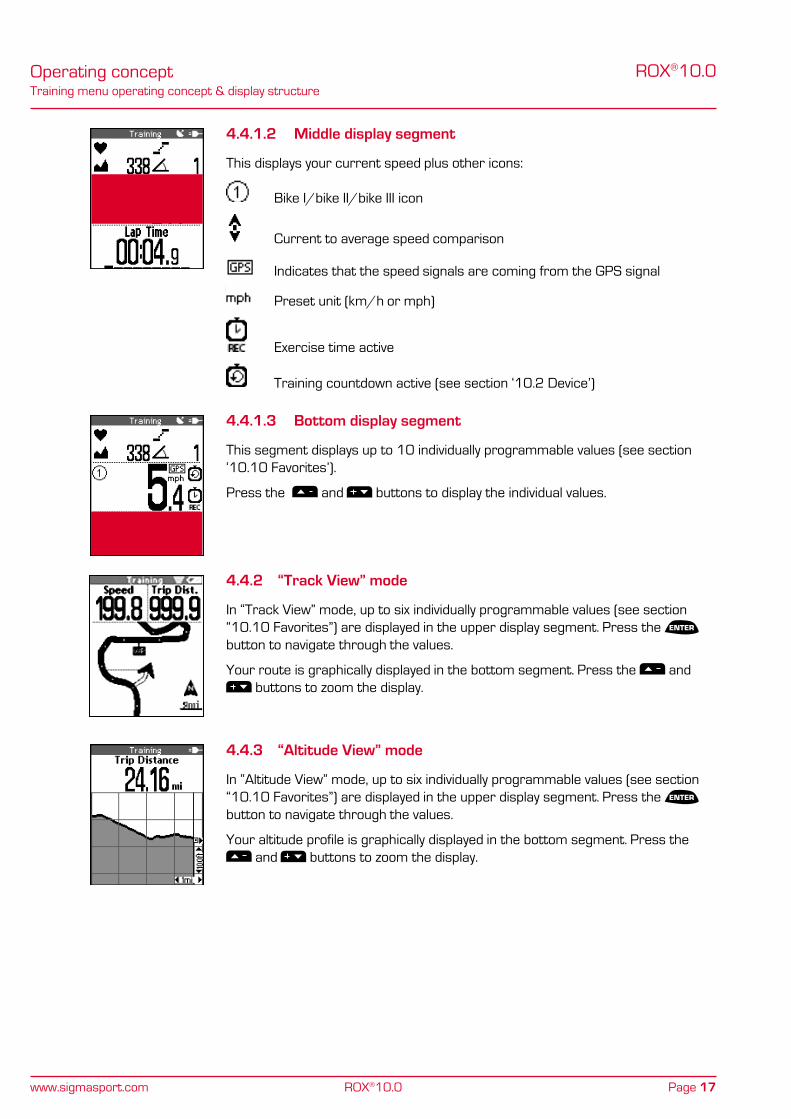
4.4.1.2 Middle display segment
This displays your current speed plus other icons:
bike I/bike II/bike III icon
Current to average speed comparison
Indicates that the speed signals are coming from the gps signal
preset unit (km/h or mph)
exercise time active
Training countdown active (see section ‘10.2 Device’)
4.4.1.3 Bottom display segment
This segment displays up to 10 individually programmable values (see section ‘10.10 Favorites’).
press the and buttons to display the individual values.
4.4.2 “Track View” mode
In “Track View” mode, up to six individually programmable values (see section “10.10 Favorites”) are displayed in the upper display segment. press the ENTER button to navigate through the values.
your route is graphically displayed in the bottom segment. press the and buttons to zoom the display.
4.4.3 “Altitude View” mode
In “Altitude View” mode, up to six individually programmable values (see section “10.10 Favorites”) are displayed in the upper display segment. press the ENTER button to navigate through the values.
your altitude profile is graphically displayed in the bottom segment. press the and buttons to zoom the display.

page 18
Favorites A + bTraining with the RoX 10.0 gps
www.sigmasport.com ROX®10.0
ROX®10.0
5 Training with the ROX 10.0 GPS
5.1 Favorites A + B
The functions/values that are most important to you can be stored under favorites A and b. This enables you to quickly and easily access the functions you want (speed, altitude, heart rate, cadence, incline, and the favorite functions) while riding. Up to 28 functions can be stored in each of the favorites.
once you set favorites A and b they cannot be changed during a training session (see section ‘10.10 Favorites’). Ten functions per favorite can be specified for the “bikecomputer” view mode, and six for each of the “Track View”, “Altitude View” and “lap message” view modes.
before each ride, choose favorites A or b using the short menu.
preset functions for favorite A in “bikecomputer” view mode:
1. Trip distance 2. exercise time
3. Average speed 4. max. speed
5. max. incline uphill 6. Trip distance uphill
7. Altitude ascent 8. Altitude profile
9. Temperature 10. Clock
preset functions for favorite b in “bikecomputer” view mode:
1. Trip distance 2. exercise time
3. lap time 4. Average speed
5. power 6. Average heart rate
7. Intensity zone 8. Altitude ascent
9. Temperature 10. Clock
preset functions for favorite A in “Track View” mode:
1. Current speed 2. Trip distance
3. Time of arrival 4. Distance to destination
5. gps accuracy 6. Driving direction
preset functions for favorite b in “Track View” mode:
1. Current speed 2. Trip distance
3. Current heart rate 4. Current power
5. gps accuracy 6. Driving direction

page 19
Calibrating the altitude IAC+Training with the RoX 10.0 gps
www.sigmasport.com ROX®10.0
ROX®10.0
preset functions for favorite A in “Altitude View” mode:
1. Current speed 2. Trip distance
3. Incline 4. Current altitude
5. Altitude ascent 6. Trip distance uphill
preset functions for favorite b in “Altitude View” mode:
1. Current speed 2. Trip distance
3. Incline 4. Current rise rate
5. Altitude ascent 6. max. altitude
preset functions for favorite A in “lap message”:
1. lap time 2. lap number
3. Avg. HR per lap 4. empty
5. lap distance 6. Avg. lap speed
preset functions for favorite b in “lap message”:
1. Avg. HR per lap 2. Avg. power per lap
3. lap time 4. empty
5. lap distance 6. Avg. lap speed
5.2 Calibrating the altitude IAC+
The RoX 10.0 gps”s altitude measurement is determined by barometric air pressure. Any change to the weather means a change to the air pressure, which can lead to a change to your current altitude. To offset these changes in air pressure, you must enter a reference altitude into the RoX 10.0 gps (process known as calibration).
The RoX 10.0 gps offers three types of calibration (only one has to be used):
1. Home altitude 1–3
The home altitude is a known altitude of your start location. you can program up to three different home altitudes.
2. Current altitude
The current altitude is the altitude at your current location. The current altitude is used if you are out on your bike and altitude information is provided.
3. Air pressure at sea level
If you are at an unknown altitude, you can enter the “air pressure reduced to sea level” to calculate the current altitude. The air pressure reduced to sea level can be found online (e.g. www.meteo24.de), in the daily newspaper, or at airports.

page 20
power calculation or measurementTraining with the RoX 10.0 gps
www.sigmasport.com ROX®10.0
ROX®10.0
Altitude points list
To prevent weather-induced changes of altitude, the device stores “altitude measurement points”. every time the user calibrates the barometric altitude, the RoX 10.0 gps stores the location. whenever the user returns to this location (within a 30 m radius), the altitude is automatically calibrated.
The altitude measurement points from the IAC+ altitude calibration are stored in the altitude points list (see ‘10.4 Altitude’). you can also delete individual altitude measurement points from this list.
CAUTION:
The air pressure at your weather station is the air pressure at the measurement site and not the air pressure reduced to sea level! An opening below the button on the RoX 10.0 gps is used to measure the air pressure. This opening must not be covered. Do not insert sharp objects into the measurement hole!
5.3 Power calculation or measurement
The RoX 10.0 gps can calculate (!) the power using of several parameters or power values sent via an ANT+ compatible power meter. please choose between power meter and formula under settings/Device/power meter or Formula.
5.3.1 Power calculation
power is calculated (!) using speed, cadence, incline, bike weight, bike type, rider position, body weight, shoulder width and body height. The wind speed is not considered.
power can only be calculated when a cadence transmitter is used.
The power values displayed are approximations and are calculated given average wind speed and average road conditions.
5.3.2 Power measurement
The RoX 10.0 gps is fully compatible with ANT + compatible power meters (e.g. sRm power meter – www.srm.de). These power meters measure power using forces (e.g. on the pedals) and are independent of external influences.
For a full list of compatible devices, visit www.thisisant.com/directory

page 21
Intensity zonesTraining with the RoX 10.0 gps
www.sigmasport.com ROX®10.0
ROX®10.0
5.4 Intensity zones
The arrow below the bar chart indicates which intensity zone you are currently training in. Intensity distribution is also continuously calculated and displayed throughout your training session.
Athletes can set their intensity zones themselves (see section ‘10.6 Heart rate intensity zones’). In the default setting, the intensity zones are based on common german definitions of the training zones:
− Intensity zone 1 = 60–70% HRmax (e.g. be1)
− Intensity zone 2 = 70–80% HRmax (e.g. be1/2)
− Intensity zone 3 = 80–90% HRmax (e.g. be2 or development zone)
− Intensity zone 4 = 90–100% HRmax (e.g. Ce or peak zone)
5.5 Training
5.5.1 Using the short menu to select training settings
you can use the short menu to select the following basic settings for your training:
− Altitude
− Favorites A or b
− load track
− Track settings (reverse track (on/off), same track back (on/off), and track direction (driving direction/north)
− Target zone alarm
− Auto pause (on/off)
− Altitude (home altitude 1–3, sea level calib., manual calib.)
Information about altitude settings can be found in section ‘5.2 Calibrating the altitude IAC+’.
− bike selection
− Calibrate compass
To access the short menu, simultaneously press the BACK and ENTER buttons in training mode.
press the and buttons to select the desired functions and open or confirm these by pressing ENTER .
page 22
TrainingTraining with the RoX 10.0 gps
www.sigmasport.com ROX®10.0
ROX®10.0
Functional description of track settings:
1. Reverse track (on/off)
Use this function to reverse the direction of a tour that you have stored. If, for example, you have downloaded a tour to your RoX 10.0 gps from the Internet and have switched the start and finish locations, you can directly reverse the tour on the RoX 10.0 gps. If you do not do this, your device will indicate that you are riding in the wrong direction.
Note
“Reverse track” must be activated before a track is loaded to reverse the track!
2. same track back (on/off)
Use this function to return along the same track that you have just ridden.
3. Track direction (driving direction/north)
Use this function to define the type of direction indication. Driving direction means that the route is always in front of you. North means that the track is always pointing north and the arrow rotates on the display in accordance with your ride direction. This means that if you are cycling south, the arrow on the display will point down.
5.5.2 Starting logs
To start logs for your training session, press the START button. A brief confirmation message “exercise time started” is displayed and the “stopwatch active” icon appears in the “bikecomputer” view mode.
5.5.3 Stopping/ending logs
To end logs for your training session, press the STOP button. A brief confirmation message “exercise time stopped” is displayed and the “exercise time active” icon disappears from the “bikecomputer” view mode.
you can continue the log at any time by pressing the START button.
5.5.4 Saving a log
To reset all values and save the log, press and hold the STOP button for five seconds.
The tour evaluation data can be found under the menu item “memory/stored Tours”.

page 23
TrainingTraining with the RoX 10.0 gps
www.sigmasport.com ROX®10.0
ROX®10.0
5.5.5 Auto pause
The auto pause function can be activated and deactivated in the short menu.
Auto pause function activated:
you can start training as soon as you have pressed start. The RoX 10.0 gps waits until it can record a speed of more than 2.2 km/h before starting to record the training session. From then on, the activated auto pause function ensures that the exercise time pauses for speeds of less than 2.2 km/h (“Auto pause” appears on the display) and restarts at speeds of over 2.2 km/h (auto start).
Note:
If you have stopped the device manually, it will no longer automatically restart; you must also manually restart it.
Auto pause function deactivated:
The exercise time starts as soon as you have pressed START and stops when you press STOP . This enables you to record your heart rate even when resting, for example.
Note:
The exercise time is linked to the logging. If the exercise time is stopped, no data is recorded for further analysis. If the auto pause function is activated, the exercise time is identical to the trip time. If the auto pause function is deactivated, the trip time and the exercise time differ.

page 24
TrainingTraining with the RoX 10.0 gps
www.sigmasport.com ROX®10.0
ROX®10.0
5.5.6 Displaying training parameters
During the training session your current training parameters can be displayed using the three modes “bikecomputer”, “Track View” and “Altitude View” and the preset values or values defined in the favorites.
All training parameters for the current ride are stored under the menu item “memory/Current Tour” and can be used to evaluate the training session after the tour.
5.5.7 Lap Message view
you can use the lap function to start a new lap (or interval) after riding a certain distance or reaching a certain position. This enables you to compare your performance on different sections with similar distances.
A training log must be started for the lap function to operate.
press the LAP button to end the current lap and automatically start a new one. The “lap message” view appears for eight seconds, displaying all the key values for the last lap. The display then jumps back to the previous view mode.
The preset lap functions can be changed (see ‘10.10 Favorites’).
Note
The analysis data for the individual laps can be found under the menu path “memory/Current Tour or stored Tours (section ‘7.3.9 Tour data – laps’).

page 25
Training functionsTraining with the RoX 10.0 gps
www.sigmasport.com ROX®10.0
ROX®10.0
5.6 Training functions
5.6.1 Zoom function in Track View and Altitude View
press the and buttons to select the optimum zoom setting.
5.6.2 Same track back function
with the “same track back” function, the RoX 10.0 gps guides you back to your start location.
5.6.3 Track found message
The “track found message” appears if you ride along a previously loaded track.
5.6.4 Off-track alarm
The “off-track alarm” helps you stay on route and is triggered if you leave it.
5.6.5 Wrong direction message
The RoX 10.0 gps detects if you are riding in the wrong direction and indicates this message.
If a tour has been incorrectly stored (start and end points mixed up), you can use the “Reverse track” function (see section ‘5.5.1 Using the short menu to select training settings’) to directly reverse the tour on the RoX 10.0 gps.
Note
“Reverse track” must be activated before a track is loaded to reverse the track!
5.6.6 Waypoint alarm
The waypoint alarm reminds users that they have reached an interesting waypoint that was marked in advance.
5.7 Analysis
The analyses for the current tour, stored tours, and total values can be found under the menu item “memory”.

page 26
memory capacity for track dataload track
www.sigmasport.com ROX®10.0
ROX®10.0
6 Load track
Load track Driven tracks Stored tracks
This function enables you to select, start, display, and delete driven or stored tracks.
Note
Information on the memory capacity of the tracks and points can be found in section ‘6.1.1 Track data memory’.
6.1 Memory capacity for track data
The memory for the training sessions can store up to 100 training files. The maximum storage period also depends on the log interval selected.
The log times in hours per log interval can be seen in the table:
Log interval Log time in hours
1 sec 8:12:00
2 sec 16:25:00
5 sec 41:04:00
10 sec 82:08:00
20 sec 164:16:00
30 sec 246:24:00
The log interval can be set at the menu path “settings/Device” (see section ‘10.2 Device’).
6.1.1 Track data memory
The track memory can store up to 50 tracks with a total of up to approx. 42,000 track points.
A maximum of 384 waypoints can be stored. you can also mark special points of interest (poI) located near the route as waypoints.
page 27
Driven tracks load track
www.sigmasport.com ROX®10.0
ROX®10.0
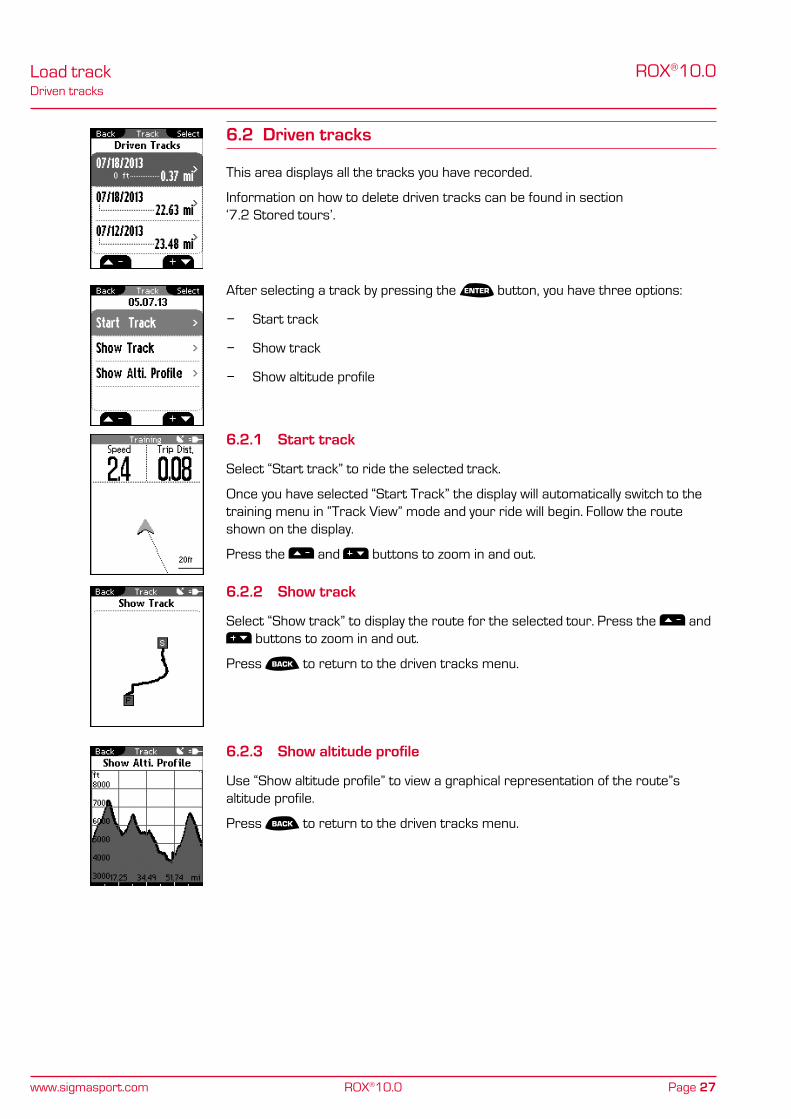
6.2 Driven tracks
This area displays all the tracks you have recorded.
Information on how to delete driven tracks can be found in section ‘7.2 stored tours’.
After selecting a track by pressing the ENTER button, you have three options:
− start track
− show track
− show altitude profile
6.2.1 Start track
select “start track” to ride the selected track.
once you have selected “start Track” the display will automatically switch to the training menu in “Track View” mode and your ride will begin. Follow the route shown on the display.
press the and buttons to zoom in and out.
6.2.2 Show track
select “show track” to display the route for the selected tour. press the and buttons to zoom in and out.
press BACK to return to the driven tracks menu.
6.2.3 Show altitude profile
Use “show altitude profile” to view a graphical representation of the route”s altitude profile.
press BACK to return to the driven tracks menu.

page 28
stored tracksload track
www.sigmasport.com ROX®10.0
ROX®10.0
6.3 Stored tracks
Note
Information on the memory capacity for tracks and waypoints can be found in section ‘6.1.1 Track data memory’.
Here you can locate the tracks that you have transferred to the RoX 10.0 gps with the help of sIgmA Data Center.
Data Center enables you to download, modify, and store tracks from other users or plan your own tracks on an interactive map. These tracks can be loaded onto the RoX 10.0 gps. Further information about Data Center can be found in the Data Center instructions.
After selecting a track by pressing the ENTER button, you have four options:
− start track
− show track
− show altitude profile
− show details
6.3.1 Start track
select “start track” to cycle the selected track.
once you have selected “start track” by pressing ENTER , the track starts. The display automatically switches to the training menu in “Track View” mode. Follow the route shown on the display.
6.3.2 Show track
select “show track” to display the route for the selected tour.
press BACK to return to the stored tracks menu.

page 29
stored tracksload track
www.sigmasport.com ROX®10.0
ROX®10.0
6.3.3 Show altitude profile
select “show altitude profile” to view a graphical representation of the trip”s altitude profile.
press BACK to return to the stored tracks menu.
6.3.4 Show details
select “show Details” to see the following:
− Trip distance
− Altitude ascent ↑
− Ride Rating

page 30
Current tourmemory
www.sigmasport.com ROX®10.0
ROX®10.0
7 Memory
Memory Current tour Stored tours Total values
7.1 Current tour
Current tour provides all values for your current tour. These are divided into 11 sub-items (see section ‘7.3 stored data’).
7.2 Stored tours
stored tours provides an overview of your stored/saved tours.
Use the and buttons to select the tour for which you want to view then press ENTER .
All the values for the selected tour are displayed. These are divided into 11 sub-items (see section ‘7.3 stored data’).
you can delete individual tours. press the and buttons to select “Delete tour!” then press ENTER .
The question “Are you sure?” appears. press the ENTER button again to delete the tour.
page 31
stored datamemory
www.sigmasport.com ROX®10.0
ROX®10.0
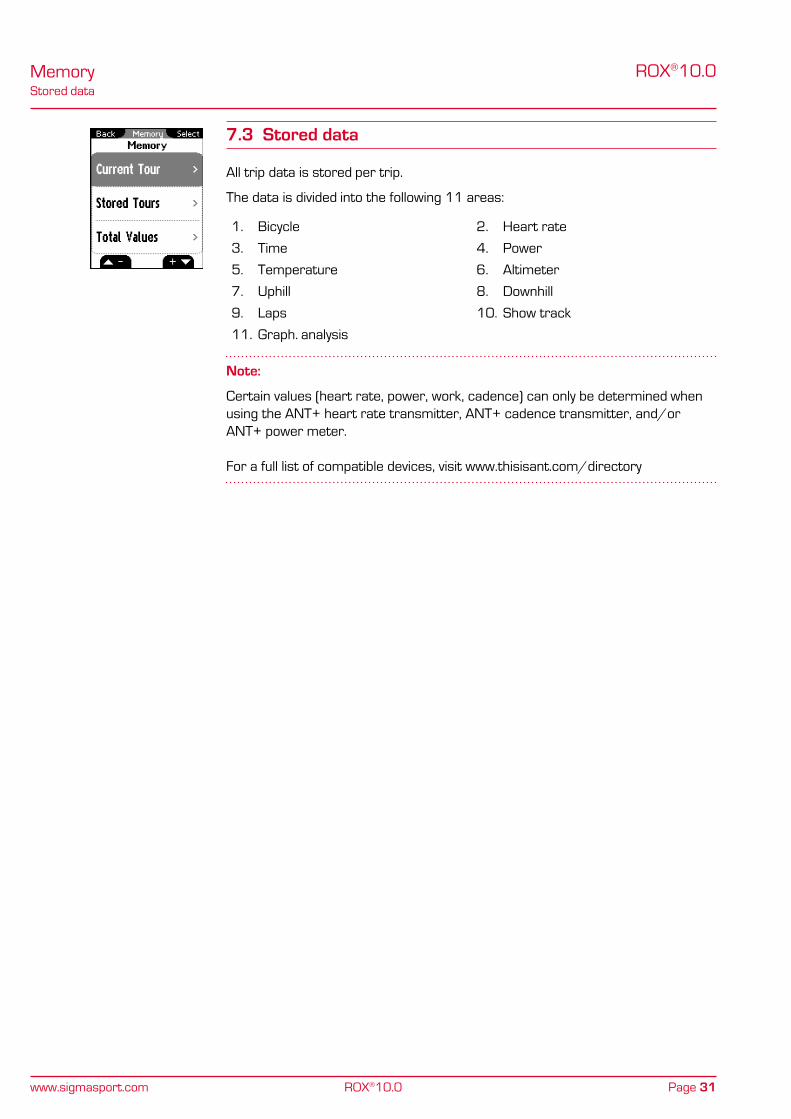
7.3 Stored data
All trip data is stored per trip.
The data is divided into the following 11 areas:
1. bicycle 2. Heart rate
3. Time 4. power
5. Temperature 6. Altimeter
7. Uphill 8. Downhill
9. laps 10. show track
11. graph. analysis
Note:
Certain values (heart rate, power, work, cadence) can only be determined when using the ANT+ heart rate transmitter, ANT+ cadence transmitter, and/or ANT+ power meter. For a full list of compatible devices, visit www.thisisant.com/directory

page 32
stored datamemory
www.sigmasport.com ROX®10.0
ROX®10.0
7.3.1 Tour data – bicycle
The bicycle menu displays the following bike values:
− Average speed
− max. speed
− Trip distance
− Average expansion
− Average cadence
− max. cadence
7.3.2 Tour data – heart rate
The heart rate menu displays the following values:
− Average heart rate
− max. heart rate
− Average % of the max. heart rate
− Calories
− Time in target zone
− Time at intensity 1
− Time at intensity 2
− Time at intensity 3
− Time at intensity 4
7.3.3 Tour data – time
The time menu displays the following values:
− start date
− start time
− exercise time
− Trip time
Note:
Reset all data prior to the start of a ride to ensure proper start date and time
7.3.4 Tour data – power
The power menu displays the following values:
− Average power
− max. power
− work (kj)
− Average power in w/kg
− Time in target zone

page 33
stored datamemory
www.sigmasport.com ROX®10.0
ROX®10.0
7.3.5 Tour data – temperature
The temperature menu displays the following values:
− Average temperature
− min. temperature
− max. temperature
7.3.6 Tour data – altimeter
The altimeter menu displays the following values:
− Average altitude
− Average incline
− Average rise rate
7.3.7 Tour data – uphill
The uphill menu displays the following values:
− Altitude ascent ↑
− max. altitude
− Trip distance ↑
− Trip time ↑
− Average speed ↑
− Average rise rate ↑
− max. rise rate ↑
− Average incline ↑
− max. incline ↑
− Average expansion ↑
7.3.8 Tour data – downhill
The downhill menu displays the following values:
− Altitude descent ↓
− Trip distance ↓
− Trip time ↓
− Average speed ↓
− Average rise rate ↓
− max. rise rate ↓
− Average incline ↓
− max. incline ↓
− Average expansion ↓

page 34
stored datamemory
www.sigmasport.com ROX®10.0
ROX®10.0
7.3.9 Tour data – laps
The lap menu displays the following values:
− Average lap time
− Average lap distance
− lap
− lap 01, 02 ...... (average speed, distance)
The individual values for each lap can be found in the respective submenus:
1. lap time 2. Time since start
3. lap distance 4. Distance since start
5. Avg. lap speed 6. max. lap speed
7. Avg. heart rate per lap 8. max. heart rate per lap
9. Calories per lap 10. Avg. lap cadence
11. max. lap cadence 12. Avg. lap power
13. max. lap power 14. Avg. lap altitude
15. max. lap altitude 16. lap altitude ↑
17. lap altitude ↓ 18. Avg. incline ↑
19. Avg. incline ↓
7.3.10 Tour data – show track
show track displays a graphical outline of your route.
7.3.11 Tour data – graph. analysis
graph analysis displays graphs of the following values:
− speed
− Heart rate
− Cadence
− power
− Altitude

page 35
Total valuesmemory
www.sigmasport.com ROX®10.0
ROX®10.0
7.4 Total values
All total values for the three bikes are divided into the following sub-areas:
1. bicycle 2. Heart rate
3. Uphill 4. Downhill
7.4.1 Total values – bicycle
Displays the total values for the distance and trip time for each bike.
7.4.2 Total values – heart rate
Displays the total calories for each bike.
7.4.3 Total values – uphill
Displays the total values for the altitude ascent, max. altitude, distance ↑ and trip time ↑ for each bike.
7.4.4 Total values – downhill
Displays the total values for the altitude descent, distance ↓ and trip time ↓ for each bike.
page 36
batterystatus info
www.sigmasport.com ROX®10.0
ROX®10.0
8 Status info
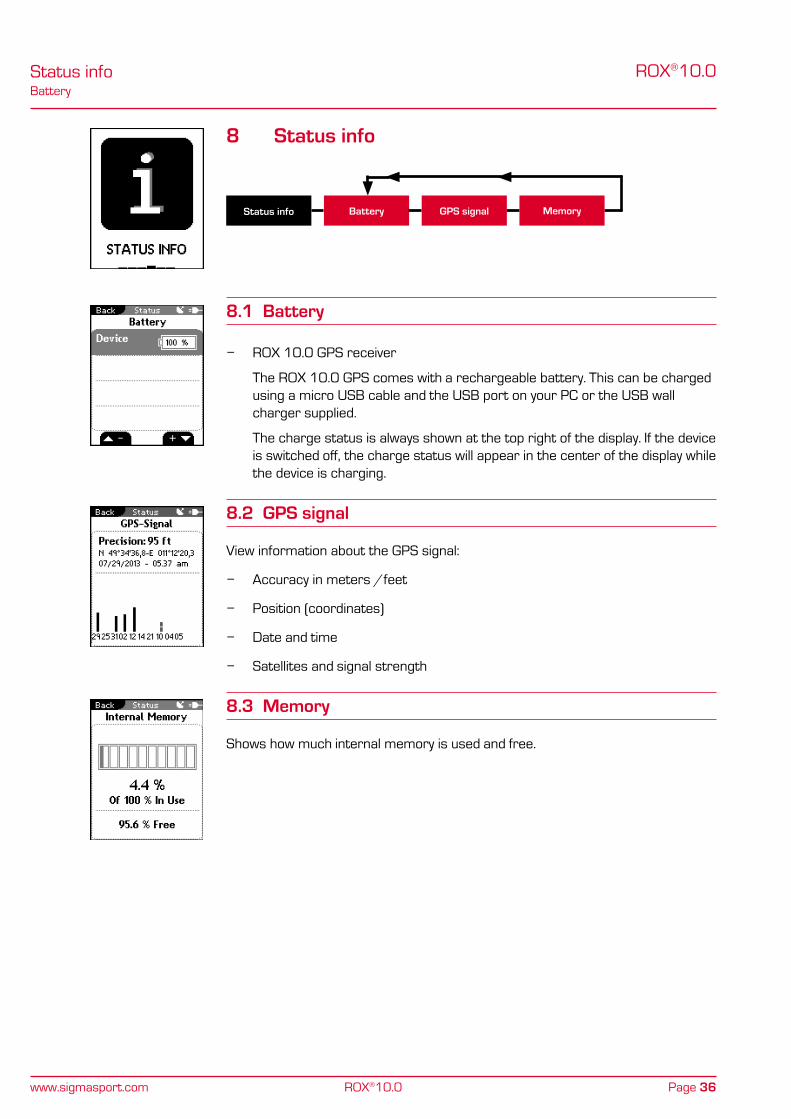
Status info Battery GPS signal Memory
8.1 Battery
− RoX 10.0 gps receiver
The RoX 10.0 gps comes with a rechargeable battery. This can be charged using a micro Usb cable and the Usb port on your pC or the Usb wall charger supplied.
The charge status is always shown at the top right of the display. If the device is switched off, the charge status will appear in the center of the display while the device is charging.
8.2 GPS signal
View information about the gps signal:
− Accuracy in meters /feet
− position (coordinates)
− Date and time
− satellites and signal strength
8.3 Memory
shows how much internal memory is used and free.

page 37
stopwatchextras
www.sigmasport.com ROX®10.0
ROX®10.0
9 Extras
Extras Stopwatch Countdown Compass
Note
In addition to the normal training functions, your RoX 10.0 gps has functions that you can use when not training.
9.1 Stopwatch
Use the stopwatch to record times during sports events.
start the stopwatch by pressing the START button. The stopwatch in “extras” is not the same as the stopwatch in the training mode.
press the START button again (after starting the stopwatch) to time laps. press the STOP button to stop the stopwatch and ENTER to reset it to zero.
press the and buttons to scroll through the list of laps.
9.2 Countdown
Use the countdown function to make sure you do not miss important events.
press the ENTER button to pre-program the countdown. press the and buttons as well as the ENTER button to set the time.
After setting the time, start the countdown by pressing the START button. press the ENTER button to pause the countdown and STOP to end the countdown.
Note
please note that the countdown in the “extras” menu is not the same as the countdown in the “Training” menu.
9.3 Compass
The compass indicates your direction and location so that you can navigate while on or off the bike.

page 38
scale unitsettings
www.sigmasport.com ROX®10.0
ROX®10.0
10 Settings
Settings Scale unit Device Bike 1-3 & totals Altitude
User Intensity zone Target zone Power target zone
GPS settings Favorites Firmware update Factory settings
All functions can either be set on the RoX 10.0 gps or on the pC and then transferred to the RoX 10.0 gps.
10.1 Scale unit
you can define the following units for the RoX 10.0 gps:
− speed (km/h, mph)
− Distance (km, miles)
− Altitude (meter, feet)
− Temperature (°C, °F)
− weight (kg, lb)
− Date (DD.mm.yyyy, mm/DD/yyyy)
− Clock (24h, 12h)
10.2 Device
− language press the and buttons followed by ENTER to select the language for the RoX 10.0 gps.
− log interval
press the and buttons followed by ENTER to select the recording interval (1 sec, 2 sec, 5 sec, 10 sec, 20 sec, 30 sec) for the RoX 10.0 gps.
For information about how the log recording interval affects the memory capacity, see section ‘6.1.1 Track data memory’.
− Time zone
press the and buttons followed by ENTER to select the time zone.
page 39
bike 1–3 & totalssettings
www.sigmasport.com ROX®10.0
ROX®10.0
Note:
Time zones are listed alphabetically (i.e. - Us - eastern -05:00, or Us - Central -06:00)
− summer (daylight savings) time (on/off)
− Countdown (on/off)
press the and buttons followed by ENTER to specify the time for a countdown to help you complete your training. The countdown begins as soon as your training session starts.
− my name
− Auto pause (on/off)
− Target zone alarm (on/off)
− button tone (on/off)
− system tone (on/off)
− Contrast
press the and buttons followed by ENTER to set the contrast (1–4) on the RoX 10.0 gps.
− backlight time
press the and buttons followed by ENTER to set the backlight time (permanent, 5 min on, 2 min on, 30 sec on) for the RoX 10.0 gps.
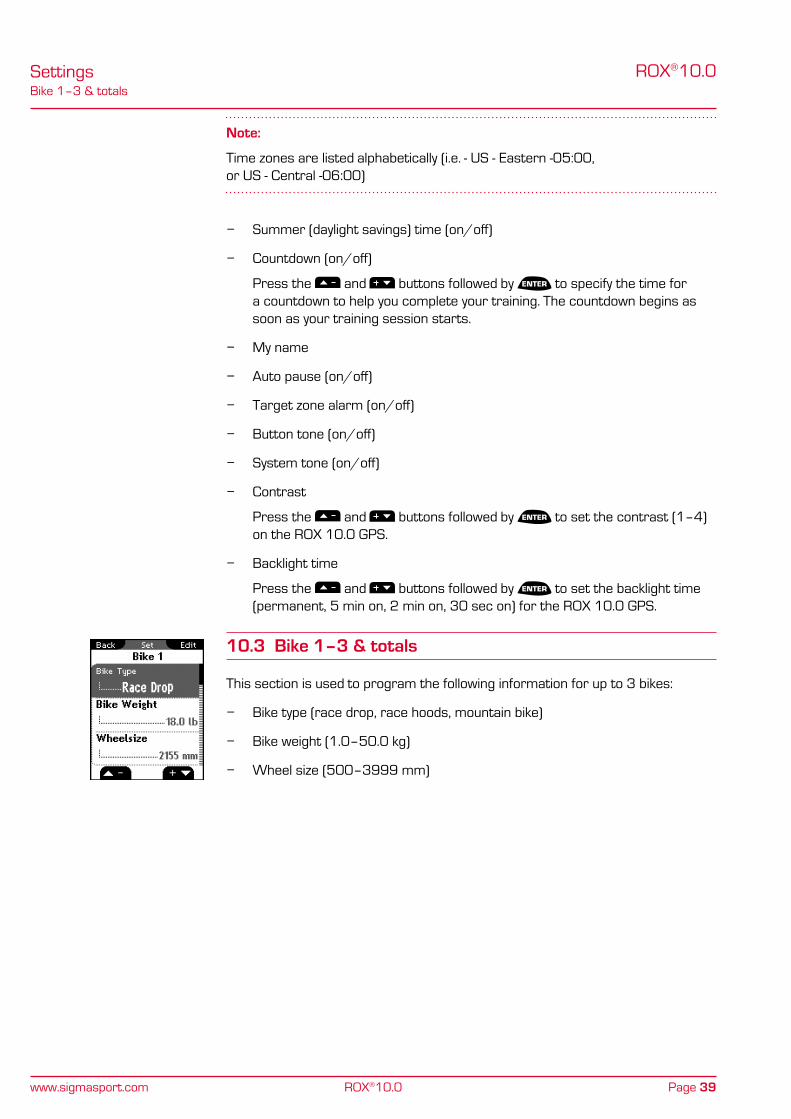
10.3 Bike 1–3 & totals
This section is used to program the following information for up to 3 bikes:
− bike type (race drop, race hoods, mountain bike)
− bike weight (1.0–50.0 kg)
− wheel size (500–3999 mm)

page 40
bike 1–3 & totalssettings
www.sigmasport.com ROX®10.0
ROX®10.0
10.3.1 Pairing with the ROX 10.0 GPS
ANT+ pairing (speed, cadence, heart rate, power)
The transmitter to be paired must be activated (by the magnet passing the ANT+ speed or ANT+ cadence transmitters or by putting on the chest belt with the heart rate transmitter).
press the and buttons to select the appropriate transmitter for pairing and start the pairing process by pressing the ENTER button (“search”).
“search” appears briefly followed by the transmitterʼs ID. The pairing process is now complete and the transmitter can be used for training.
Note
maintain a gap of one to two feet between the transmitter and the RoX 10.0 gps. Also ensure that there are no other ANT+ transmitters within a 20 foot radius. This process assigns the transmitter(s) to a specific bike number (bike 1, 2 or 3). when in training mode, you must manually select the bike number you are riding (default: bike 1). For additional information, please refer to section „2.5 synchronizing the Transmitters“
10.3.2 Pairing power meters
press the and buttons to select “power meter set.” then press ENTER .
press ENTER again to trigger the pairing process with the power meter.
Activate your power meter as described by the manufacturer (usually by turning the pedals or the wheel).
once the pairing process has successfully completed, you can calibrate the power zero point automatically or manually. please note that this is not necessary for all power meters. For additional information, please refer to the operating instructions of your power meter.
Note
The zero point is the value that the power meter sends to the RoX 10.0 gps if it is not recording any forces. It is important to set the zero point before setting off or the automatic zero point will be activated. This value is used to calculate all power data.
IMPORTANT:
To use the power meter’s values, switch to ‘power meter’ under ‘settings --> Device --> power m./Formula’.

page 41
Altitudesettings
www.sigmasport.com ROX®10.0
ROX®10.0
10.3.3 Total Values
− Total values (total distance, total ride time, total calories, total altitude ascent, total maximum altitude, total distance up, total time up, total altitude descent, total distance down, total time down)
enter existing cumulative totals (i.e. - transferred from your old bicycle computer) and all new values will be added.
10.4 Altitude
The home altitude is the altitude of your usual start location (usually your home). you can find this information on road or country maps. you can set three different home altitudes on the RoX 10.0 gps.
− Home altitude 1
− Home altitude 2
− Home altitude 3
− Altitude points list
The altitude measurement points that are manually entered during rides are stored here in the altitude points list (see section ‘5.2 Calibrating the altitude IAC+’)
In this setting option you can also delete individual altitude measurement points.
Note
The altitude points list stores a maximum of 20 altitude measurement points.
10.5 User
Use this area to set the following user data:
− gender (male, female)
− Date of birth (mm/dd/yyyy)
− body weight (40–400 lbs)
− body height (40–100 inches)
− shoulder width (15–30 inches)
− max. HR (100–240 bpm)

page 42
Heart rate intensity zonessettings
www.sigmasport.com ROX®10.0
ROX®10.0
10.6 Heart rate intensity zones
The RoX 10.0 gps has four intensity zones, which make it easier to manage your training. The values are automatically calculated based on your maximum heart rate. you can manually modify the % values for the individual intensity zones.
The four pre-calculated zones are:
− Intensity zone 1 (60–70%)
− Intensity zone 2 (70–80%)
− Intensity zone 3 (80–90%)
− Intensity zone 4 (90–100%)
Note
In training mode you can view the intensity zone function which includes the percentage of time spent in each zone.
10.7 Heart rate target zone
you can select one of three target zones when training with the RoX 10.0 gps. The target zones “Fitness” and “Fatburning” are automatically calculated based on your maximum heart rate. you can personalize the heart rate value for the “Individual” target zone. The target zone function can also be deactivated.
− Fitness
− Fatburning
− Individual
− off
If the target zone is activated, a zone indicator arrow next to the heart rate and an optional beep sound indicate if you are above or below the target zone in training mode.
10.8 Power target zone
set the upper and lower limits of the power target zone function or deactivate the function. The following values can be set:
− on or off
− lower limit and upper limit
page 43
gps settingssettings
www.sigmasport.com ROX®10.0
ROX®10.0
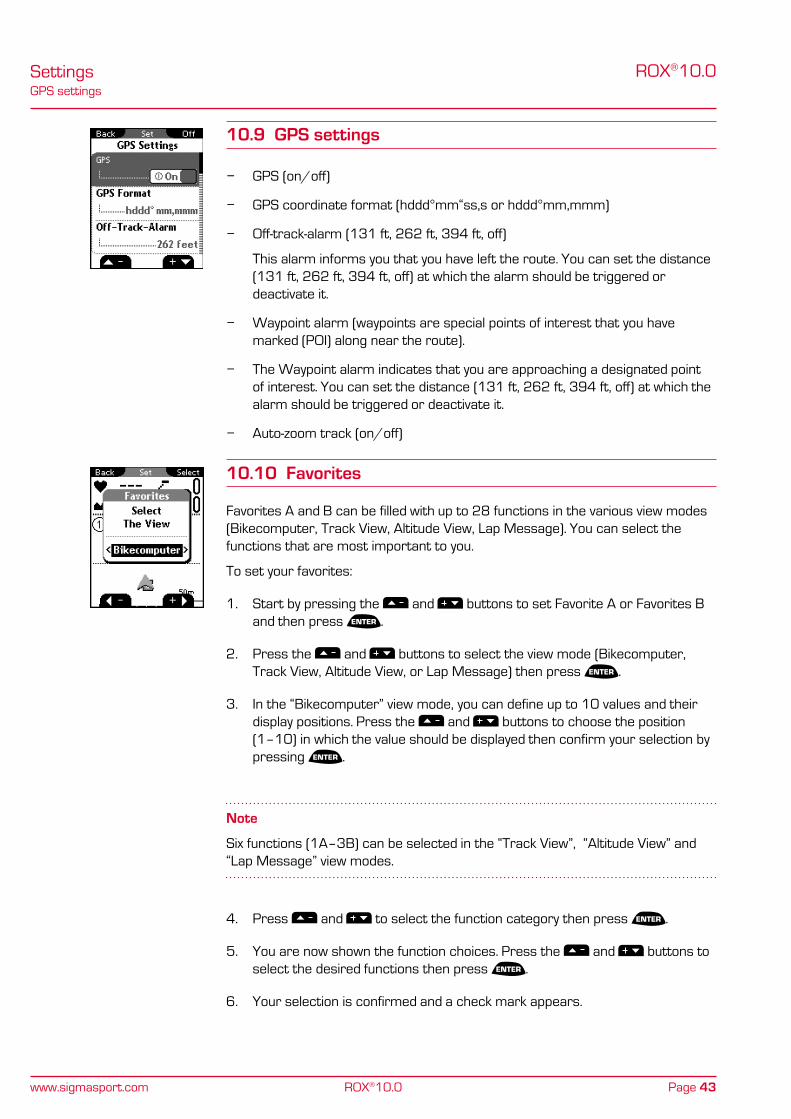
10.9 GPS settings
− gps (on/off)
− gps coordinate format (hddd°mm“ss,s or hddd°mm,mmm)
− off-track-alarm (131 ft, 262 ft, 394 ft, off)
This alarm informs you that you have left the route. you can set the distance (131 ft, 262 ft, 394 ft, off) at which the alarm should be triggered or deactivate it.
− waypoint alarm (waypoints are special points of interest that you have marked (poI) along near the route).
− The waypoint alarm indicates that you are approaching a designated point of interest. you can set the distance (131 ft, 262 ft, 394 ft, off) at which the alarm should be triggered or deactivate it.
− Auto-zoom track (on/off)
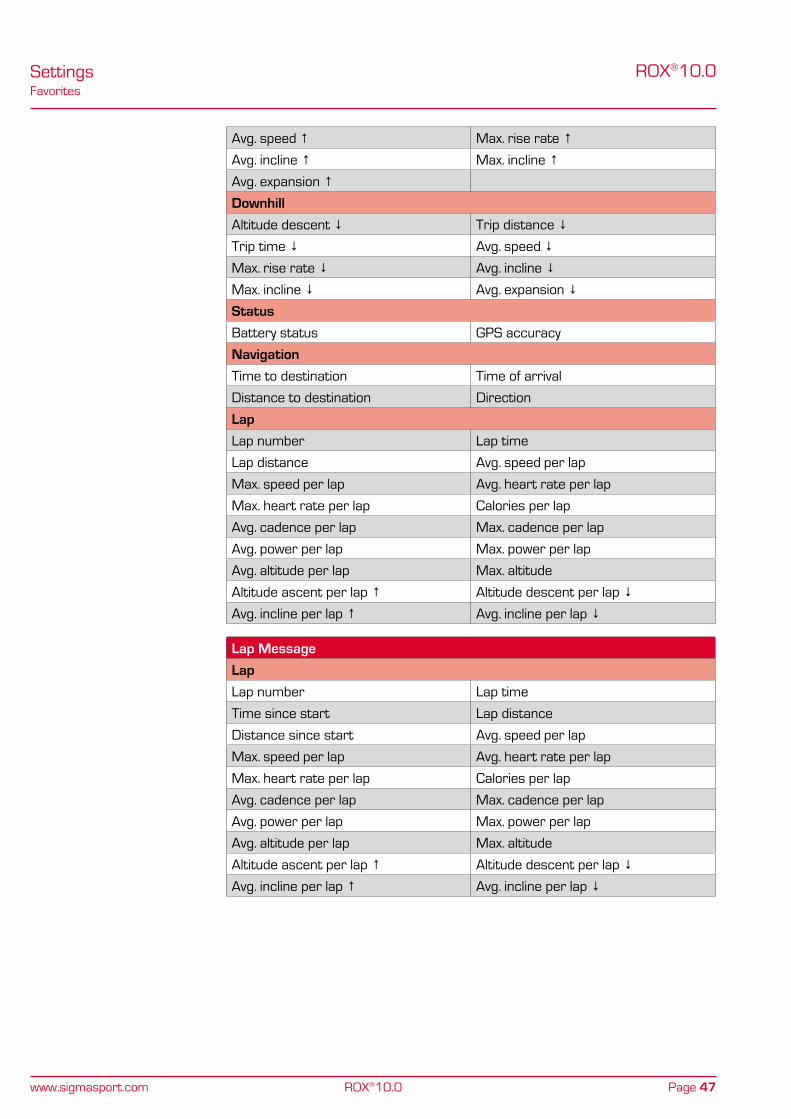
10.10 Favorites
Favorites A and b can be filled with up to 28 functions in the various view modes (bikecomputer, Track View, Altitude View, lap message). you can select the functions that are most important to you.
To set your favorites:
1. start by pressing the and buttons to set Favorite A or Favorites b and then press ENTER .
2. press the and buttons to select the view mode (bikecomputer, Track View, Altitude View, or lap message) then press ENTER .
3. In the “bikecomputer” view mode, you can define up to 10 values and their display positions. press the and buttons to choose the position (1–10) in which the value should be displayed then confirm your selection by pressing ENTER .
Note
six functions (1A–3b) can be selected in the “Track View”, “Altitude View” and “lap message” view modes.
4. press and to select the function category then press ENTER .
5. you are now shown the function choices. press the and buttons to select the desired functions then press ENTER .
6. your selection is confirmed and a check mark appears.
page 44
Favoritessettings
www.sigmasport.com ROX®10.0
ROX®10.0
7. The RoX 10.0 gps automatically moves to the next setting position. select the next function and repeat steps 4 through 6.
8. press the BACK button to return to the view mode (step 2). Repeat the steps above to program the other view modes..
The following list contains all the selectable functions that can be added to your favorites:

page 45
Favoritessettings
www.sigmasport.com ROX®10.0
ROX®10.0
Bikecomputer
Bicycle
Current speed Avg. speed
max. speed Trip distance
expansion Avg. expansion
Current cadence Avg. cadence
max. cadence
Heart rate
Current heart rate Avg. heart rate
max. heart rate % of the max. heart rate
Avg. % HR max Calories
Target zone Intensity zone
Heart rate graph
Time
exercise time Trip time
Clock Date
Countdown
Power
Current power 3s avg. power
30s avg. power Avg. power
max. power work in kJ
Current power in w/kg power target zone
Temperature
Current temperature minimum temperature
maximum temperature
Altitude
Current altitude Incline (in %)
Rise rate Altitude profile
Uphill
Altitude ascent ↑ max. altitude
Trip distance ↑ Trip time ↑
Avg. speed ↑ max. rise rate ↑
Avg. incline max. incline
Avg. expansion
Downhill
Altitude descent ↓ Trip distance ↓
Trip time ↓ Avg. speed ↓
max. rise rate ↓ Avg. expansion
Status
battery status gps accuracy
gps signal

page 46
Favoritessettings
www.sigmasport.com ROX®10.0
ROX®10.0
Navigation
Time to destination Time of arrival
Distance to destination Direction
mini track
Lap
lap number lap time
lap distance Avg. speed per lap
max. speed per lap Avg. heart rate per lap
max. heart rate per lap Calories per lap
Avg. cadence per lap max. cadence per lap
Avg. power per lap max. power per lap
Altitude ascent per lap ↑ Altitude descent per lap ↓
Avg. incline per lap ↑ Avg. incline per lap ↓
Track View, Altitude View
Bicycle
Current speed Avg. speed
max. speed Trip distance
expansion Avg. expansion
Current cadence Avg. cadence
max. cadence
Heart rate
Current heart rate Avg. heart rate
max. heart rate % of the max. heart rate
Avg. % of the max. heart rate Calories
Time
exercise time Trip time
Clock Date
Countdown
Power
Current power 3s avg. power
30s avg. power Avg. power
max. power work in kJ
Current power in w/kg
Temperature
Current temperature minimum temperature
maximum temperature
Altitude
Current altitude Incline (in %)
Rise rate
Uphill
Altitude ascent ↑ max. altitude
Trip distance ↑ Trip time ↑
page 47
Favoritessettings
www.sigmasport.com ROX®10.0
ROX®10.0
Avg. speed ↑ max. rise rate ↑
Avg. incline ↑ max. incline ↑
Avg. expansion ↑
Downhill
Altitude descent ↓ Trip distance ↓
Trip time ↓ Avg. speed ↓
max. rise rate ↓ Avg. incline ↓
max. incline ↓ Avg. expansion ↓
Status
battery status gps accuracy
Navigation
Time to destination Time of arrival
Distance to destination Direction
Lap
lap number lap time
lap distance Avg. speed per lap
max. speed per lap Avg. heart rate per lap
max. heart rate per lap Calories per lap
Avg. cadence per lap max. cadence per lap
Avg. power per lap max. power per lap
Avg. altitude per lap max. altitude
Altitude ascent per lap ↑ Altitude descent per lap ↓
Avg. incline per lap ↑ Avg. incline per lap ↓
Lap Message
Lap
lap number lap time
Time since start lap distance
Distance since start Avg. speed per lap
max. speed per lap Avg. heart rate per lap
max. heart rate per lap Calories per lap
Avg. cadence per lap max. cadence per lap
Avg. power per lap max. power per lap
Avg. altitude per lap max. altitude
Altitude ascent per lap ↑ Altitude descent per lap ↓
Avg. incline per lap ↑ Avg. incline per lap ↓

page 48
Firmware updatesettings
www.sigmasport.com ROX®10.0
ROX®10.0
10.11 Firmware update
Caution
Firmware updates reset all values to zero restore initial factory settings.. before starting the firmware update, download your ride data and all relevant settings to your pC or mac.
To complete the firmware update:
1. Use the micro Usb cable to connect your RoX 10.0 gps to your pC or mac then press ENTER on the RoX 10.0 gps.
2. open the “Data Center” on your pC.
3. within the Data Center, select the Firmware Update option and follow the on-screen instructions. Additional information can be found in the Data Center instruction manual.
After the update, the RoX 10.0 gps turns off.
10.12 Factory settings
Caution
Resetting the RoX 10.0 gps to factory settings resets all values to zero and restores initial factory settings. before restoring the factory settings, download your ride data and all relevant settings to your pC or mac.
To restore the factory settings:
1. press the and buttons to select “yes” then press ENTER .
2. The question “Are you sure?” appears. Confirm that you are sure by pressing ENTER .
3. The device is now reset to factory settings.
After the RoX 10.0 gps has been reset to factory settings, it turns off.

page 49
Important informationImportant information, troubleshooting, and FAQ
www.sigmasport.com ROX®10.0
ROX®10.0
11 Important information, troubleshooting, and FAQ
11.1 Important information
11.1.1 ROX 10.0 GPS water resistance
The RoX 10.0 gps is watertight in accordance with standard IpX7. It can be used in the rain without risk of damage. The buttons can be pressed.
11.1.2 Water resistance of the transmitters (optional accessory)
ANT+ speed transmitter and ANT+ cadence transmitter
watertight in accordance with IpX7: They can be used in the rain without risk of damage.
ANT+ heart rate transmitter
watertight up to 3 ATm and therefore suitable for many sporting activities.
General
ANT+ wireless transmission does not work under water!
11.1.3 Chest belt care (optional accessory)
The ComFoRTeX+ cloth chest belt is machine washable on the delicate cycle. Conventional laundry detergent is recommended.
Note
bleach or detergents containing bleach must not be used. Do not use soap or fabric softener! Do not dry clean the ComFoRTeX+ chest belt. Air dry only. lay flat to dry and do not iron.
11.1.4 Training advice
Consult your physician before starting an exercise program.
If you have a pacemaker, please check with your physician prior to use!

page 50
TroubleshootingImportant information, troubleshooting, and FAQ
www.sigmasport.com ROX®10.0
ROX®10.0
11.2 Troubleshooting
No speed displayed via the ANT+ speed transmitter
− Do you have both the ANT+ speed transmitter and the magnet properly installed?
− Has the ANT+ speed transmitter been paired with the RoX 10.0 gps? (see section ‘10.3 bike 1–3 & totals’)
− Have you checked the distance between the magnet and the ANT+ speed transmitter (max. 12 mm or 1/2 inch)? If the distance between the magnet and transmitter is correct and the transmitter is properly paired, the leD light on the transmitter will flash with the first 10 wheel rotations.
− Have you checked whether the magnet is magnetized?
− Have you checked the ANT+ speed transmitter”s battery status? To do so, press the button on the transmitter and check if the leD illuminates.
No speed displayed via the GPS signal
− you can switch off the gps function under the menu path “settings/gps settings”. Is it switched on?
− Are you outdoors?
− Does your RoX 10.0 gps have satellite connection? (see section ‘8.2 gps signal’). please note that it can initially take approx. 1 minute for a gps signal to be received.
No cadence displayed
− Do you have both the ANT+ cadence transmitter and the magnet properly installed?
− Has the ANT+ cadence transmitter been paired with the RoX 10.0 gps? (see section ‘10.3 bike 1–3 & totals’)
− Have you checked the distance between the magnet and the ANT+ cadence transmitter (max. 12 mm or 1/2 inch)? If the distance between the magnet and transmitter is correct and the transmitter is properly paired, the leD light on the transmitter will flash with the first 10 pedal rotations..
− Have you checked whether the magnet is magnetized?
− Have you checked the ANT+ cadence transmitter”s battery status?
No heart rate displayed
− Are the electrodes moist enough?
− Is the ANT+ heart rate transmitter correctly positioned against your body?
− Has the ANT+ heart rate transmitter been paired with the RoX 10.0 gps?
− Have you checked the ANT+ heart rate transmitter”s battery status?

page 51
Frequently asked questionsImportant information, troubleshooting, and FAQ
www.sigmasport.com ROX®10.0
ROX®10.0
Blank display
− Have you checked the RoX 10.0 gps”s charge status?
− Is the battery charged?
− Is the RoX 10.0 gps switched on?
Display weak/slow
− Is the temperature too high (> 140 °F) or too low (< 32 °F)?
Incorrect speed displayed
− Have two magnets been attached?
− Is the magnet correctly positioned (parallel and centrally alligned to the ANT+ speed transmitter)?
− Is the wheel size correctly set?
11.3 Frequently asked questions
Can I change the batteries myself?
The RoX 10.0 gps uses an integrated lithium ion rechargeable battery that you can not change yourself.
All lithium ion batteries will lose capacity over time and/or after a large number of charge cycles. In spite of this fact, even after several years and many charges, their capacity remains at approx. 75%.
please contact our customer service team if you have problems or questions about your battery.
If you plan to store the RoX 10.0 gps for an extended period of time (i.e. - winter), please store at room temperature. The pre-storage charge should be approx. 60%
The battery will not fully charge
please disconnect the micro Usb cable from the RoX 10.0 gps and reconnect it after 20 seconds.
Can I charge the ROX 10.0 GPS while riding?
yes. The RoX 10.0 gps can be charged while in use if using an external battery source (i.e. sIgmA IICoN). This will greatly extend operating time. please note that the protective cover is open while charging, therefore the RoX 10.0 gps is no longer waterproof.
A crossed out battery icon has appeared on the display. What should I do?
The RoX 10.0 gps is too warm and must cool down.
Never try to charge the battery when the icon is shown, please allow time for cooling. The battery should only be charged at room temperature.

page 52
Frequently asked questionsImportant information, troubleshooting, and FAQ
www.sigmasport.com ROX®10.0
ROX®10.0
Can another person with a different bike computer/heart rate monitor cause interference?
The ANT+ transmitter work on a high digital frequency and are extremely resistant to electromagnetic interferences. The pairing process assigns the transmitters to specific bikes. All other ANT+ transmitters that are not paired are ignored in training mode. This almost entirely prevents any interference between two different devices.
How long will the battery in the transmitter last?
In general, all three transmitter batteries should last at least a year (based on one hour of use each day). The heart rate transmitter”s battery lasts for three years.
Is the ANT+ transmission system compatible with other transmission systems (e.g. Bluetooth, STS, DTS etc.)?
No, the various transmission systems are not intercompatible.
Why has the altitude changed even though I have not moved?
The RoX 10.0 gps”s altitude measurement is based on a barometric altitude measurement. barometric air pressure constantly changes, therefore current altitude can change even though you are not moving.
Why do I always have to calibrate the current altitude?
barometric air pressure is used determine the current altitude, the constant changes to the current air pressure lead to changes to the current altitude. To offset these fluctuations and achieve an accuracy of one meter in the current altitude information, a reference altitude should be entered before each trip. entering this reference altitude is known as calibration.
Data transfer between the ROX 10.0 GPS and the Data Center software does not work or is faulty or slow:
please ensure that the RoX 10.0 gps is installed in the device manager as a Com port.
Avoid connecting the device via a Usb hub.
preferably use Usb 1.1 or 2.0 connections.
If you still have data transfer problems, please contact our customer service team.

page 53
max, min, and default valuesTechnical data
www.sigmasport.com ROX®10.0
ROX®10.0
12 Technical data
12.1 Max, min, and default values
Unit Min. Max.
Bicycle
Current speed kmh/mph 2.2 199.8
Avg. speed kmh/mph 0.00 199.80
max. speed kmh/mph 0.00 199.80
Trip distance km/mi 0.00 9999.99
expansion m/ft 0.0 10.0
Avg. expansion m/ft 0.0 10.0
Current cadence rpm 20 180
Avg. cadence rpm 20 180
max. cadence rpm 20 180
Heart rate
Current heart rate bpm 30 240
Avg. heart rate bpm 30 240
max. heart rate bpm 30 240
% of the max. heart rate % 12 240
Avg. % of the max. heart rate % 12 240
Calories kcal 0 99999
Time
exercise time mm:ss.x/hhh:mm:ss 00:00.0 999:59:59
Trip time mm:ss.x/hhh:mm:ss 00:00.0 999:59:59
Time hh:mm:ss (12 h/24 h) 00:00:00 23:59:59
Date DD.mm.yyyy or mm/dd/yyyy
01.01.2011 31.12.2099
Countdown hh:mm:ss 00:00:00 09:59:59
Power
Current power watt 0 2000
3s avg. power watt 0 2000
30s avg. power watt 0 2000
Avg. power watt 0 2000
max. power watt 0 2000
work in kJ kj 0 99999
Current power watt/lb 0 80
power target zone watt 0 2000
Temperature
Current temperature °C/°F -10.0/+14.0 +70.0/150.0
minimum temperature °C/°F -10.0/+14.0 +70.0/150.0
maximum temperature °C/°F -10.0 +70.0/150.0

page 54
max, min, and default valuesTechnical data
www.sigmasport.com ROX®10.0
ROX®10.0
Unit Min. Max.
Altitude
Current altitude ft -999 16.999
Incline (%) % -99 99
Current rise rate ft/min -499 499
Uphill
Rise rate ft 0 99999
max. altitude ft -999 16.999
Trip distance uphill km /mi 0 9999.99
Trip time uphill mm:ss.x/hhh:mm:ss 00:00.0 999:59:59
Avg. speed uphill mph 0.00 199.80
max. positive uphill speed ft/min 0 499
Avg. incline uphill % 0 99.5
max. incline uphill % 0 99
Avg. expansion uphill ft/r 0.0 10.0
Downhill
Incline ft 0 -99999
Trip distance downhill km /mi 0 9999.99
Trip time downhill mm:ss.x/hhh:mm:ss 00:00.0 999:59:59
Avg. speed downhill mph 0.00 199.80
max. negative rise rate ft/min -499 0
Avg. incline downhill % -99.5 0
max. incline downhill % -99 0
Avg. expansion downhill ft/r 0.0 10.0
Status
battery status % 0 100
gps accuracy ft 0 -
gps signal strength - - -
Navigation
Time to destination (estimated) hh:mm:ss 00:00:00 99:59:59
estimated time of arrival hh:mm:ss 00:00:00 23:59:59
Distance to destination mi 0 9999.99
Direction No UNIT N Nw
Laps
lap number No UNIT 0 999
lap time mm:ss.x/hhh:mm:ss 00:00.0 999:59:59
Time since start mm:ss.x/hhh:mm:ss 00:00.0 999:59:59
lap distance mi 0 9999.99
Distance since start mi 0 9999.99
Avg. max. speed per lap mph 0.00 199.80
max. speed per lap mph 0.00 199.80
Avg. HR per lap bpm 40 240

page 55
Temperature, batteriesTechnical data
www.sigmasport.com ROX®10.0
ROX®10.0
Unit Min. Max.
max. HR per lap bpm 40 240
Calories per lap kcal 0 99999
Avg. cadence per lap rpm 20 180
max. cadence per lap rpm 20 180
Avg. power per lap watt 0 2000
max. power per lap watt 0 2000
Avg. altitude per lap ft -999 16.999
max. altitude per lap ft -999 16.999
Altitude ascent per lap ft 0 99999
Altitude descent per lap ft 0 -99999
Avg. incline per lap ↑ % 0 99.5
Average incline per lap ↓ % -99 0
12.2 Temperature, batteries
Bike computer
Ambient temperature +140 degrees F/ +14 degrees F
ANT+ speed transmitter
Ambient temperature +140 degrees F/ +14 degrees F
battery type CR 2032 (ref. no. 00342)
ANT+ cadence transmitter
Ambient temperature +140 degrees F/ +14 degrees F
battery type CR 2032 (ref. no. 00342)
ANT+ heart rate transmitter
Ambient temperature +140 degrees F/ +14 degrees F
battery type CR 2032 (ref. no. 00342)

page 56
Temperature, batterieswarranty and guarantee
www.sigmasport.com ROX®10.0
ROX®10.0
13 Warranty and guarantee
we are liable to our contracting partners for defects in line with legal provisions. The warranty does not extend to batteries. In the event of a warranty claim, please contact the retailer from whom you purchased your bike computer. you can also send your bike computer, together with your receipt and all accessories, to the address below. please ensure you pay sufficient postage.
sIgmA spoRT UsA 3487 swenson Ave. st. Charles, Il 60174, U.s.A.
Toll free: 888-744-6277 e-mail: [email protected]
In the event of justified warranty claims, you will receive a replacement device. you will only be entitled to the model available at the time of replacement. The manufacturer retains the right to make technical modifications.
batteries must not be disposed of in household waste (battery law - battg)! please take the batteries to an official collection point for disposal.
electronic devices must not be disposed of in household waste. please take the device to an official waste collection point.
The Ce declaration can be found at: www.sigmasport.com
This device complies with part 15 of the FCC Rules and with Rss-210 of Industry Canada. operation is subject to the following two conditions:
1 This device may not cause harmful interference
2 This device must accept any interference received, including interference that may cause undesired operation.
Changes or modifications made to this equipment not expressly approved by sIgmA may void the FCC authorization to operate this equipment.
This Class b digital apparatus complies with Canadian ICes-003.
This equipment has been tested and found to comply with the limits for a Class b digital device, pursuant to part 15 of the FCC Rules. These limits are designed to provide reasonable protection against harmful interference in a residential installation. This equipment generates, uses and can radiate radio frequency energy and, if not installed and used in accordance with the instructions, may cause harmful interference to radio communications. However, there is no guarantee that interference will not occur in a particular installation. If this
lI
lI = lithium Ion

page 57
Temperature, batterieswarranty and guarantee
www.sigmasport.com ROX®10.0
ROX®10.0
equipment does cause harmful interference to radio or television reception, which can be determined by turning the equipment off and on, the user is encouraged to try to correct the interference by one or more of the following measures:
− Reorient or relocate the receiving antenna.
− Increase the separation between the equipment and receiver.
− Connect the equipment into an outlet on a circuit different from that to which the receiver is connected.
− Consult the dealer or an experienced technician for help.

Index
page 58www.sigmasport.com ROX 10.0
RoX®10.0
14 Index
A
Attaching the bracket 10
Auto pause 23, 39
C
Calibrating the altitude 19
Compass 37
Current tour 30
D
Device settings 38
setting the backlight time 39
setting the display contrast 39
Displaying the memory space 36
Driven tracks 27
F
Favorites 9, 18
setting favorites 43
Firmware update 47
G
gps sensor 9
gps settings 42
gps signal 36
I
Initial use 10
Intensity zones 21
setting the intensity zone 41
L
load track 26
M
memory capacity 26
menu tree 12
message – track found 25
message – wrong direction 25
O
off-track alarm 25
operating concept 13, 14, 15, 16
optional accessories 8
P
pairing the sensors 10, 40
pC interface 9
power calculation 20
power measurement 20
R
Rechargeable battery 36
Restoring factory settings 47
RoX 10.0 functions 8
S
same track back function 25
selecting the time zone 38
selecting training settings 21
setting bike 1-3 39
setting the altitude 41
setting the countdown 37
setting the language 38
setting the log interval 38
setting the power target zone 42
setting the target zone/heart rate 42
setting the units 38
setting user data 41
short menu 21
stopwatch 37
stored data 31
Tour data – altimeter 33
Tour data – bicycle 32
Tour data – downhill 33
Tour data – graph. 34
Tour data – heart rate 32
Tour data – laps 34
Tour data – power 32
Tour data – show track 34
Tour data – temperature 33

Index
page 59www.sigmasport.com ROX 10.0
RoX®10.0
Tour data – time 32
Tour data – uphill 33
stored tours 30
stored tracks 28
show track 28
start track 28
switching summer time on/off 38
switching system tones on/off 39
switching the countdown on/off 39
switching the target zone alarm on/off 39
synchronizing the transmitters 11
T
Technical data 52
Total values 35
Track settings 22
Reverse track 22
same track back 22
Track direction 22
Training 21
Displaying training parameters 24
lap message view 24
starting logs 22
stopping/ending logs 22
storing a log 22
Troubleshooting 49
W
water resistance 48
waypoint alarm 25
Z
Zoom function in Track View and Altitude View 25

SIGMA-ElEktro GmbHDr. -Julius -Leber -Straße 15D-67433 Neustadt /Weinstraße
SIGMA SPort ASIA4F, No.192, Zhonggong 2nd Rd., Xitun Dist., Taichung City 407, Taiwan
SIGMA SPort USA3487 Swenson Ave.St. Charles, IL 60174, U.S.A.


