
Powerful Mass Email System for Gmail
Created by: Ajay Goel
September 2015
GMass – Getting Started Guide

GMass Getting Started Guide Page i
Table of Contents
Section 1: Set Up Google Chrome & GMass ........................................................................... 1
Who Should Use This Guide ................................................................................................ 1
Benefits of Using GMass in Gmail ....................................................................................... 1
Additional GMass Advantages ............................................................................................. 1
Requirements for Using GMass ........................................................................................... 1
Creating a Gmail Account .................................................................................................... 2
Downloading the Google Chrome Browser .......................................................................... 4
Obtaining the GMass Extension ........................................................................................... 5
Section 2: – How to Use GMass .............................................................................................. 7
Starting GMass in Gmail ...................................................................................................... 7
Creating a Google Sheets Spreadsheet .............................................................................. 8
Selecting a Google Spreadsheet ....................................................................................... 10
Creating a Gmail Message in GMass ................................................................................. 11
Using GMass without a Spreadsheet ................................................................................. 13
Draft Messages .................................................................................................................. 14
GMass Report Folders ....................................................................................................... 17
Access Google Drive at Any Time ...................................................................................... 18
Index .......................................................................................................................................... i

GMass Getting Started Guide Page 1
Section 1: Set Up Google Chrome & GMass
Who Should Use This Guide
The GMass Getting Started Guide is for those interested in using GMass. Google Chrome and Gmail are required for GMass. Both Gmail and Google Chrome Installation instructions are included. If you already have them, skip to Section 2 on Page 7.
Benefits of Using GMass in Gmail
GMass was created to easily help you with your email marketing requirements. It is a powerful mass email and mail merge tool for Gmail.
GMass is an excellent choice for
Email Marketing
Email Newsletters
Mail Merge
Mass Email
Additional GMass Advantages
Send email marketing campaigns to 10,000 people
Connect to Google Sheets
Personalization
Scheduling
Open and click tracking
Create email lists based on search results
Send emails as replies to the last conversation you had with each person
Requirements for Using GMass
Google Chrome must be your browser
For GMass, you need a Gmail account, or
Google Apps for Work (very reasonably priced)

GMass Getting Started Guide Page 2
Creating a Gmail Account
It is easy to open a Gmail Account, if you do not have one already. To obtain Gmail, perform these following steps.
1. In the Google Chrome browser, go to Google: https://accounts.google.com/signup.
2. The Create your Google Account screen appears for you to enter your information. Refer to Figure 1.
Figure 1 - Create Your Google Account Screen
3. Google Products gives you access to Gmail, Google Docs, Google Sheets, etc., as displayed in Figure 2.

GMass Getting Started Guide Page 3
Figure 2 - Google Products Screen
4. For more detailed information on Google account products, click on this link: http://www.google.com/about/products/

GMass Getting Started Guide Page 4
Downloading the Google Chrome Browser
Now you can download Google Chrome at: https://www.google.com/chrome/. To do so:
1. Click Download to install Google Chrome to a personal computer or mobile device, as shown in Figure 3.
Figure 3 - Google Chrome Download Screen
2. Then click the Download Chrome button, as displayed in Figure 4.
Figure 4 - Get Google Chrome Choices
3. Downloading for other platforms also available. See Figure 5.
Figure 5 - More Choices to Download Chrome

GMass Getting Started Guide Page 5
Obtaining the GMass Extension
You are now ready to install and set up GMass from Google Chrome.
1. With Google Chrome open, go to GMass at: https://www,gmass.co/
2. The Main GMass page opens, as displayed in Figure 6.
Note: For this step you must have Google Chrome open. You will be unable to install GMass from a different browser. An installation error message appears on the GMass page.
Figure 6 – The GMass Main Page
3. Open Google Chrome and click the Add GMass to Chrome button. See Figure 7
Figure 7 - Add GMass to Chrome Button in Google Chrome

GMass Getting Started Guide Page 6
4. Select Add extension at Add GMass: Powerful mail merge for Gmail. (Figure 8)
5. Click on the button for Connect GMass Now! when it appears, as you see in Figure 9.
Figure 8 - Add GMass Extension Screen
Figure 9 - Connect GMass to Gmail Prompt
6. The Request for Permission for GMass screen appears. Refer to Figure .
7. Click Allow for GMass to:
View and Manage your Mail
Know who you are on Google
View Your email Address
View and Manage your Spreadsheet in Google Drive
8. You should see the GMass Mail Merge for Gmail has been added to Chrome confirmation.
9. It will state info about GMass and Google Extensions, as shown in Figure 10.
Figure 11 – GMass Had Been Added to Chrome
Figure 10 - Request for Permission Screen
Figure 10 - Request for Permission

GMass Getting Started Guide Page 7
Section 2: – How to Use GMass
Starting GMass in Gmail
The procedure for using GMass from Gmail is easy. Take the following steps.
1. Open Gmail if it is not already open
2. Notice the top of your Gmail screen now has 2 new, red GMass buttons, as in Figure 11.
Figure 11 - GMass Buttons at the Top of Gmail
Connects to an email list in a Google Docs Spreadsheet.
Send a follow-up campaign based on opens and clicks
Note: You downloaded GMass in Google Chrome. The two GMass buttons will appear at the top of each of your Gmail account.
3. Your Google Drive space opens.
4. Any documents and folders that you have created will display in your Google Drive. Refer to Figure 12.

GMass Getting Started Guide Page 8
Figure 12 - Documents on a Google Drive
Creating a Google Sheets Spreadsheet
1. Click the New button which appears in the left column of your screen.
2. From the New Menu options, click Google Sheets to create a new spreadsheet. See Figure 13.
3. A new, blank and untitled Google Spreadsheet opens up. Refer to Figure 14.
Figure 13 - New Button and Selecting Google Sheets

GMass Getting Started Guide Page 9
Figure 14 – A New, Blank, Untitled Google Sheet
4. You may want to type your contacts manually, if you do not have many contacts, or
5. You can Copy and Paste text from existing spreadsheet data, or
6. You can Upload a Spreadsheet from your computer and import any of these file formats:
.xls .xlsx .xlsm .xlt .xltx .xltm .ods .csv .txt .tsv .tab
7. Ensure that your spreadsheet’s top row includes the column headings that you require.
8. GMass automatically uses column headings in the spreadsheet. See Figure 15.
Figure 15 - Contact Information in a Google Spreadsheet

GMass Getting Started Guide Page 10
9. The top field displays Untitled spreadsheet if you have not saved the spreadsheet yet, as shown in Figure 16.
Figure 16 - An Untitled Spreadsheet, which has Not Been Saved
10. Name the untitled spreadsheet and it will be saved automatically. See Figure 17.
Figure 17 - Saved Spreadsheet
Selecting a Google Spreadsheet
1. Return to your Gmail Inbox.
2. Click on the button to Connect to a Google Sheets Spreadsheet
Connects to an email list in Google Spreadsheet
3. A small window opens for you to select a Google Spreadsheet. See Figure 19.
4. Next, click on the Connect to Spreadsheet button, as shown in Figure 20.
Figure 19 - A Google Sheets Spreadsheet Selected
5. The new Google Sheets Spreadsheet that was just created is listed. Refer to Figure 20.
Figure 18 - Select a Google Sheets Spreadsheet

GMass Getting Started Guide Page 11
Figure 20 – New Google Sheets Spreadsheet Created
Creating a Gmail Message in GMass
1 A New Message window pops up displaying your list of spreadsheet’s email addresses.
2 Click the up arrow at the top right of the screen to work in a larger display. See Figure 21
Figure 21 - List of Spreadsheet's Email Addresses in the New Message
2. Each recipient will receive a separate email and will not see the other recipients.
GMass Getting Started Guide Page 12
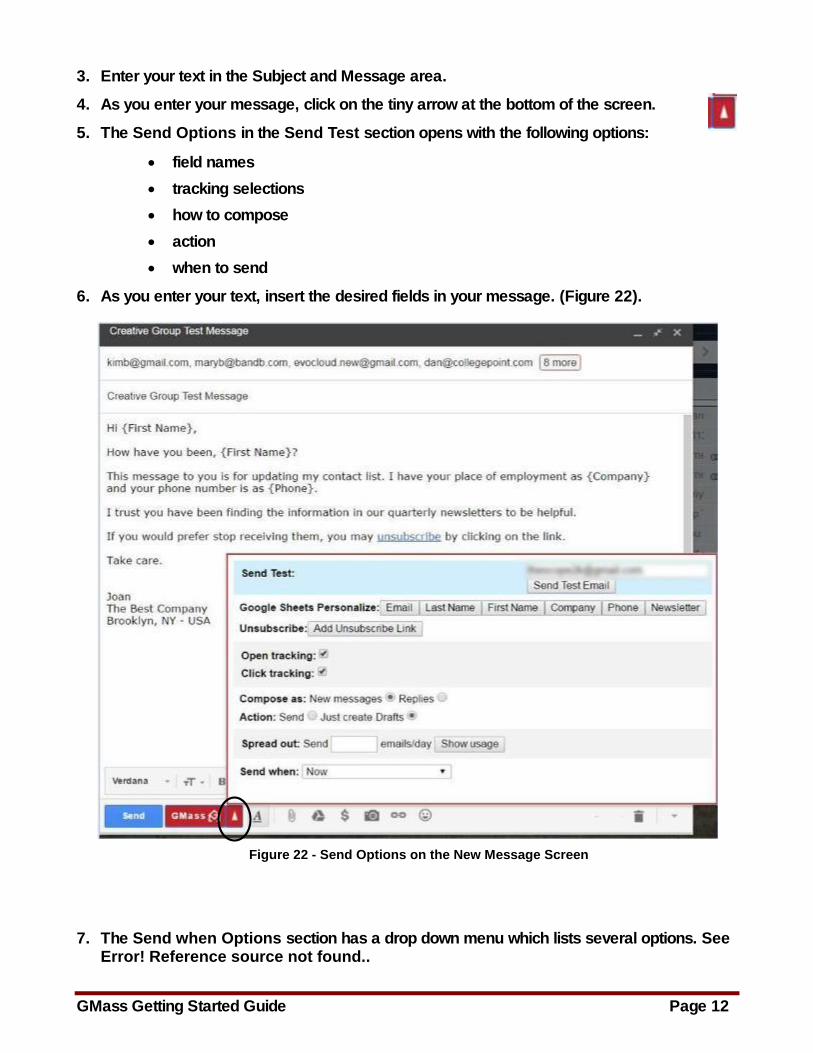
3. Enter your text in the Subject and Message area.
4. As you enter your message, click on the tiny arrow at the bottom of the screen.
5. The Send Options in the Send Test section opens with the following options:
field names
tracking selections
how to compose
action
when to send
6. As you enter your text, insert the desired fields in your message. (Figure 22).
Figure 22 - Send Options on the New Message Screen
7. The Send when Options section has a drop down menu which lists several options. See Error! Reference source not found..

GMass Getting Started Guide Page 13
Figure 23 – Send When Options
8. As an alternative, you can enter the desired date and time under Selecting Custom date/time, as displayed in Figure 24.
Figure 24 - Desired Time Under Custom Options
To test, you may want to send draft messages before you send the real ones.
9. After completing the message, you must click the GMass Send button at the bottom of the screen and not the Gmail Send button. Refer to Figure 25.
Figure 25 - The GMass Send Button at the Message Bottom
Using GMass without a Spreadsheet
Using a spreadsheet is not an absolute necessity. As an alternative, if you do not have a spreadsheet, you can do one of the following:
1. In Gmail, click Compose to create a New Message.
2. Since GMass is activated, the GMass buttons appear at the bottom of your new message.
3. Manually type in addresses in the “To” field, (“CC” field or “BCC” field), or
4. Copy and paste addresses in the “To” field. (“CC” field or “BCC” field). Refer to Figure 26.

GMass Getting Started Guide Page 14
Figure 26 – New Message using Typed or Copied & Pasted Addresses
Note: Without using a spreadsheet (containing fields), you will not be able to personalize your message. A majority of email users send emails without personalization.
Draft Messages
5. To view Drafts messages, click on the Drafts folder to view them. See Figure 27.
Figure 27 - List of Messages Sent as Drafts

GMass Getting Started Guide Page 15
6. You can view one or more of the messages to verify they were individually addressed, as displayed in Figure 28.
Figure 28 - An Recipient's Message Showing Individual Fields Populated
After you send out Draft messages, your Gmail Inbox will receive notifications:
1. That your GMass Drafts have been created, and what actions you want to take.
2. A message informs you that GMass Drafts were Sent as real messages. See Figure 29.
Figure 29 – GMass Drafts Message Notifications

GMass Getting Started Guide Page 16
Click on the Notify Message that your Drafts have been created and you will view:
3. Details about your Drafts
4. One link to actually Send the Message and another link to Delete the Draft. Refer to Figure 30.
Figure 30 – GMass Drafts Creation – Notify Message Details
5. Click Send and the following messages display, as in Figure 31 and Figure 32.
Figure 31 – Send These Drafts? Message 1
Figure 32 – Send
These Drafts? Message 2
6. Open the Your GMass Drafts have been Sent message in your Gmail Inbox.
7. This confirmation presents the details about your final messages that were sent. Examine Figure 33.

GMass Getting Started Guide Page 17
Figure 33 – Message Sent Confirmation Email in your Gmail Inbox
GMass Report Folders
Notice that after you click on the GMass Reports folder, 3 red GMass buttons display at the top of Gmail, as in Figure 34.
1. Down in the left column you will find the GMass Reports Folders. Three sub-folders display numbers of messages under:
Campaigns
Opens
Sent Copies
GMass Scheduled
2. The Campaigns sub-folder lists the Campaigns you sent. See Figure 35.
Figure 35 - The Campaigns Sub-Folder Listing Your Campaigns
3. The Opens Sub-Folder lists when recipients’ opened your messages. Examine Figure 36.
Figure 34 – Clicking on GMass Folders Displays 3 GMass Red Buttons

GMass Getting Started Guide Page 18
Figure 36 – Opens Sub-Folder Listing When Recipients Opened Your Messages
4. The Sent Copies Sub-Folder gives a list of your Sent GMass Messages. (Figure 37)
Figure 37 – Sent Copies Sub-Folder Listing Your Sent Messages
Access Google Drive at Any Time
You can always access Google Sheets or other Google Docs on your Google Drive. To access your Google Drive, from within Gmail, perform any of the options below:
To access Google spreadsheets you have previously saved, you can:
1. Click on the GMass icon at the top right of your screen to access your existing spreadsheets, or
2. As an alternative, from your Google Chrome browser, you can navigate to: https://drive.google.com/drive/my-drive. You may be prompted to log in. or

GMass Getting Started Guide Page 19
In order to create a new spreadsheet or other type of Google document on your Google Drive, do the following:
1. In Gmail, click the Google Apps icon at the top, right of the screen.
2. Click on the Google Drive icon from the Google Apps selections. Examine Figure 38.
Figure 38 - Access Your Google Drive from Google Apps
GMass Getting Started Guide
Created by: Joan Patterson Garcia,
GMass User

GMass Getting Started Guide Page i
Index
A
Access Google Drive at Any Time ......................................................................................... 18 Additional GMass Advantages ................................................................................................. 1
B
Benefits of Using GMass in Gmail ........................................................................................... 1
C
Creating a Gmail Account ........................................................................................................ 2 Creating a Gmail Message in GMass ..................................................................................... 11 Creating a Google Sheets Spreadsheet .................................................................................. 8
D
Downloading the Google Chrome Browser ............................................................................. 4 Draft Messages ..................................................................................................................... 14
G
GMass Report Folders .......................................................................................................... 17
O
Obtaining the GMass Extension .............................................................................................. 5
R
Requirements for Using GMass ............................................................................................... 1
S
Section 1: Set Up Google Chrome & GMass ........................................................................... 1 Section 2: – How to Use GMass .............................................................................................. 7 Selecting a Google Spreadsheet ........................................................................................... 10 Starting GMass in Gmail .......................................................................................................... 7
T
Table of Contents ....................................................................................................................... i
U
Using GMass without a Spreadsheet .................................................................................... 13
W
Who Should Use This Guide ................................................................................................... 1


