Download - FZ102E 1. FEATURES - Clarion

2 FZ102E
Be sure to unfold and read the next page.Seite 2 ausfalten und die Informationen zu den Bedienelementen beachten.
Despliegue la página 2 para ver la página de controles.Taita sivu 2, jotta voit lukea ohjaustoiminnot kuvaavan sivun.
Ne manquez pas de déplier la page 2 pour lire le contenu consacré aux commandes.Assicurarsi di passare alla pagina 2 per leggere le informazioni relative ai Controlli.
Vouw pagina 2 open om de pagina over de bediening te lezen.Var noga med att veckla ut sidan 2 för att läsa sidan med information om kontrollerna.
Denetimler Sayfasını okumak için katlanmış sayfa 2'yi açtığınızdan emin olun.3TATA X3
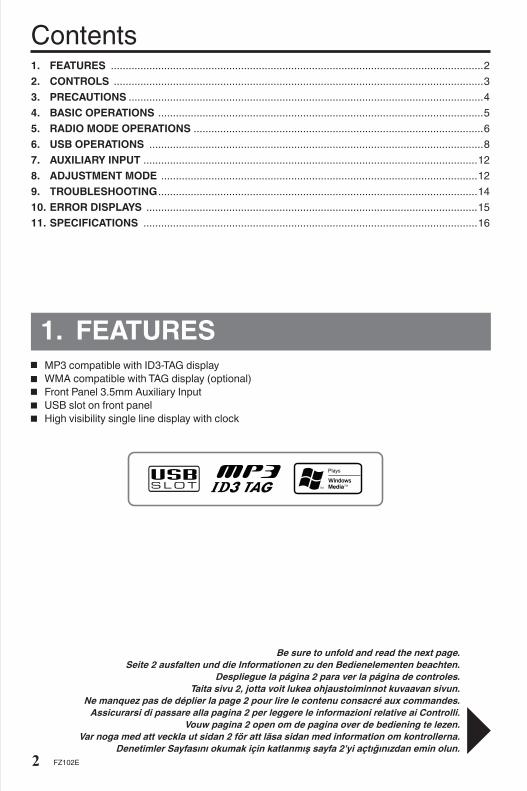
1. FEATURES ..............................................................................................................................22. CONTROLS .............................................................................................................................33. PRECAUTIONS ........................................................................................................................44. BASIC OPERATIONS ..............................................................................................................55. RADIO MODE OPERATIONS ..................................................................................................66. USB OPERATIONS .................................................................................................................87. AUXILIARY INPUT .................................................................................................................128. ADJUSTMENT MODE ...........................................................................................................129. TROUBLESHOOTING ............................................................................................................1410. ERROR DISPLAYS ................................................................................................................1511. SPECIFICATIONS .................................................................................................................16
Contents
All Rights Reserved. Copyright © 2011: Clarion Co., Ltd.
Clarion Co., Ltd.
1. FEATURESMP3 compatible with ID3-TAG displayWMA compatible with TAG display (optional)Front Panel 3.5mm Auxiliary InputUSB slot on front panelHigh visibility single line display with clock
Owner’s Manual Guide de l'utilisateur BenutzerhandbuchManuale dell’utenteGebruikershandleidingManual del usuarioKäyttöopasBruksanvisningKullanıcı Kılavuzu
USB/MP3 RECEIVER AUTORADIO USB/MP3 USB-/MP3-RECEIVER RICEVITORE USB/MP3 USB/MP3-RADIOCOMBINATIE RECEPTOR DE USB Y MP3 USB/MP3-VASTAANOTIN USB/MP3/RADIO USB/MP3 ALICISI
USB/MP3/WMA RECEIVER AUTORADIO USB/MP3/WMA USB-/MP3-/WMA-RECEIVER RICEVITORE USB/MP3/WMA USB/MP3/WMA-RADIOCOMBINATIE RECEPTOR DE USB, MP3 Y WMA USB/MP3/WMA-VASTAANOTIN USB/MP3/WMA-RADIO USB/MP3/WMA ALICISI
FZ102E
FZ102E_Cover.indd 1 7/23/2012 4:42:31 PM
FZ102E 280-9130-00
Printed in Malaysia
2 FZ102E
Be sure to unfold and read the next page.Seite 2 ausfalten und die Informationen zu den Bedienelementen beachten.
Despliegue la página 2 para ver la página de controles.Taita sivu 2, jotta voit lukea ohjaustoiminnot kuvaavan sivun.
Ne manquez pas de déplier la page 2 pour lire le contenu consacré aux commandes.Assicurarsi di passare alla pagina 2 per leggere le informazioni relative ai Controlli.
Vouw pagina 2 open om de pagina over de bediening te lezen.Var noga med att veckla ut sidan 2 för att läsa sidan med information om kontrollerna.
Denetimler Sayfasını okumak için katlanmış sayfa 2'yi açtığınızdan emin olun.3TATA X3
1. FEATURES ..............................................................................................................................22. CONTROLS .............................................................................................................................33. PRECAUTIONS ........................................................................................................................44. BASIC OPERATIONS ..............................................................................................................55. RADIO MODE OPERATIONS ..................................................................................................66. USB OPERATIONS .................................................................................................................87. AUXILIARY INPUT .................................................................................................................128. ADJUSTMENT MODE ...........................................................................................................129. TROUBLESHOOTING ............................................................................................................1410. ERROR DISPLAYS ................................................................................................................1511. SPECIFICATIONS .................................................................................................................16
Contents
All Rights Reserved. Copyright © 2011: Clarion Co., Ltd.
Clarion Co., Ltd.
1. FEATURESMP3 compatible with ID3-TAG displayWMA compatible with TAG display (optional)Front Panel 3.5mm Auxiliary InputUSB slot on front panelHigh visibility single line display with clock
Owner’s Manual Guide de l'utilisateur BenutzerhandbuchManuale dell’utenteGebruikershandleidingManual del usuarioKäyttöopasBruksanvisningKullanıcı Kılavuzu
USB/MP3 RECEIVER AUTORADIO USB/MP3 USB-/MP3-RECEIVER RICEVITORE USB/MP3 USB/MP3-RADIOCOMBINATIE RECEPTOR DE USB Y MP3 USB/MP3-VASTAANOTIN USB/MP3/RADIO USB/MP3 ALICISI
USB/MP3/WMA RECEIVER AUTORADIO USB/MP3/WMA USB-/MP3-/WMA-RECEIVER RICEVITORE USB/MP3/WMA USB/MP3/WMA-RADIOCOMBINATIE RECEPTOR DE USB, MP3 Y WMA USB/MP3/WMA-VASTAANOTIN USB/MP3/WMA-RADIO USB/MP3/WMA ALICISI
FZ102E
FZ102E_Cover.indd 1 7/23/2012 4:42:31 PM
FZ102E 280-9130-00
Printed in Malaysia

English
4 FZ102E3 FZ102E
2. CONTROLS, COMMANDES, BEDIENELEMENTE, COMANDI, BEDIENINGSELEMENTEN, CONTROLES, OHJAUSTOIMINNOT, KONTROLLER, DENETİMLER
English
MAIN UNIT, LECTEUR, STEUERGERÄT, UNITÀ PRINCIPALE, HOOFDEENHEID, UNIDAD PRINCIPAL, PÄÄYKSIKKÖ, HUVUDENHET, ANA ÜNİTE
USE OF CONTROLS, ADJUSTMENTS, OR PERFORMANCE OF PROCEDURES OTHER THAN THOSE SPECIFIED HEREIN, MAY RESULT IN HAZARDOUS RADIATION EXPOSURE.
THE PLAYER SHOULD NOT BE ADJUSTED OR REPAIRED BY ANYONE EXCEPT PROPERLY QUALIFIED SERVICE PERSONNEL.
THIS EQUIPMENT HAS DIFFERENT POWER SUPPLY (12V OR 24V) DEPENDS ON THE MODEL. PLEASE CHECK WITH YOUR SERVICE DEALER FOR THE CORRECT POWER SUPPLY IN THIS UNIT. INCORRECT POWER SUPPLY USAGE MAY RESULT THE EQUIPMENT PERMANENT UNUSABLE AND VOID THE WARRANTY.
CAUTION
3. PRECAUTIONS
CHANGES OR MODIFICATIONS TO THIS PRODUCT NOT APPROVED BY THE MANUFACTURER WILL VOID THE WARRANTY.
INFORMATION FOR USERS:
Note: [TA] button will be disabled for non RDS model.
Remarque Le bouton [TA] sera désactivé pour le modèle qui ne prend pas en charge RDS.
Hinweis: Die Taste [TA] ist bei Modellen ohne RDS-Funktion deaktiviert.
Nota: Nei modelli non RDS, il pulsante [TA] viene disattivato.
Opmerking: De knop [TA] is uitgeschakeld bij andere dan RDS-modellen.
Nota: El botón [TA](Información de tráfico) está desactivado en los modelos que no son RDS.
Huomautus: [TA]-painike ei ole käytössä muissa kuin RDS-malleissa.
Obs! [TA]-knappen är avaktiverad för icke RDS-modeller.
Not: RDS olmayan model için [TA] düğmesi devre dışı bırakılır.
FrançaisD
eutschItaliano
NederlandsEspañol
Suomi
SvenskaTürkçe
FZ102E_Cover.indd 2 7/23/2012 4:42:31 PM
English
4 FZ102E3 FZ102E
2. CONTROLS, COMMANDES, BEDIENELEMENTE, COMANDI, BEDIENINGSELEMENTEN, CONTROLES, OHJAUSTOIMINNOT, KONTROLLER, DENETİMLER
English
MAIN UNIT, LECTEUR, STEUERGERÄT, UNITÀ PRINCIPALE, HOOFDEENHEID, UNIDAD PRINCIPAL, PÄÄYKSIKKÖ, HUVUDENHET, ANA ÜNİTE
USE OF CONTROLS, ADJUSTMENTS, OR PERFORMANCE OF PROCEDURES OTHER THAN THOSE SPECIFIED HEREIN, MAY RESULT IN HAZARDOUS RADIATION EXPOSURE.
THE PLAYER SHOULD NOT BE ADJUSTED OR REPAIRED BY ANYONE EXCEPT PROPERLY QUALIFIED SERVICE PERSONNEL.
THIS EQUIPMENT HAS DIFFERENT POWER SUPPLY (12V OR 24V) DEPENDS ON THE MODEL. PLEASE CHECK WITH YOUR SERVICE DEALER FOR THE CORRECT POWER SUPPLY IN THIS UNIT. INCORRECT POWER SUPPLY USAGE MAY RESULT THE EQUIPMENT PERMANENT UNUSABLE AND VOID THE WARRANTY.
CAUTION
3. PRECAUTIONS
CHANGES OR MODIFICATIONS TO THIS PRODUCT NOT APPROVED BY THE MANUFACTURER WILL VOID THE WARRANTY.
INFORMATION FOR USERS:
Note: [TA] button will be disabled for non RDS model.
Remarque Le bouton [TA] sera désactivé pour le modèle qui ne prend pas en charge RDS.
Hinweis: Die Taste [TA] ist bei Modellen ohne RDS-Funktion deaktiviert.
Nota: Nei modelli non RDS, il pulsante [TA] viene disattivato.
Opmerking: De knop [TA] is uitgeschakeld bij andere dan RDS-modellen.
Nota: El botón [TA](Información de tráfico) está desactivado en los modelos que no son RDS.
Huomautus: [TA]-painike ei ole käytössä muissa kuin RDS-malleissa.
Obs! [TA]-knappen är avaktiverad för icke RDS-modeller.
Not: RDS olmayan model için [TA] düğmesi devre dışı bırakılır.
FrançaisD
eutschItaliano
NederlandsEspañol
Suomi
SvenskaTürkçe
FZ102E_Cover.indd 2 7/23/2012 4:42:31 PM
5
English
FZ102E
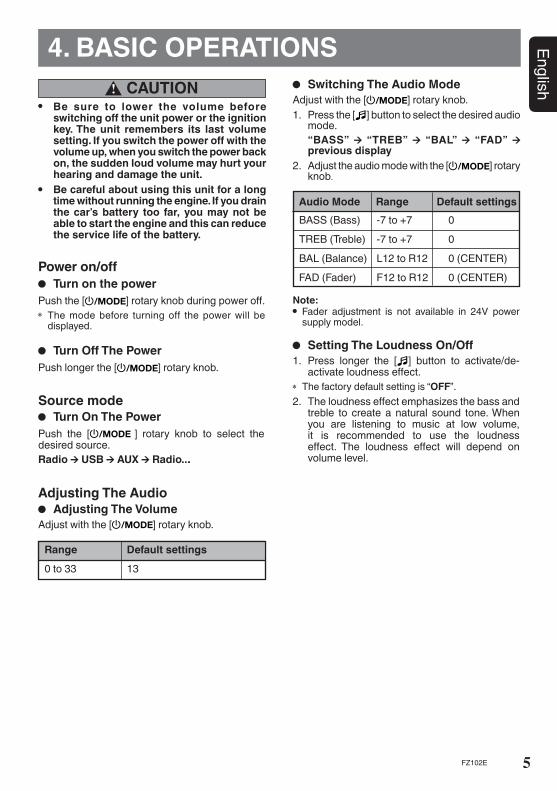
4. BASIC OPERATIONS CAUTION !
Be sure to lower the volume before switching off the unit power or the ignition key. The unit remembers its last volume setting. If you switch the power off with the volume up, when you switch the power back on, the sudden loud volume may hurt your hearing and damage the unit.
Be careful about using this unit for a long time without running the engine. If you drain the car’s battery too far, you may not be able to start the engine and this can reduce the service life of the battery.
Power on/off Turn on the power
Push the [ ] rotary knob during power off.* The mode before turning off the power will be
displayed.
Turn Off The PowerPush longer the [ ] rotary knob.
Source mode Turn On The Power
Push the [ ] rotary knob to select the desired source.Radio USB AUX Radio...
Adjusting The Audio Adjusting The Volume
Adjust with the [ ] rotary knob.
0 to 33 13Default settingsRange
Switching The Audio ModeAdjust with the [ ] rotary knob.1. Press the [ ] button to select the desired audio
mode. “BASS” “TREB” “BAL” “FAD”
previous display2. Adjust the audio mode with the [ ] rotary
knob.
Note: Fader adjustment is not available in 24V power
supply model.
BASS (Bass)
TREB (Treble)
BAL (Balance)
FAD (Fader)
-7 to +7
-7 to +7
L12 to R12
F12 to R12
0
0
0 (CENTER)
0 (CENTER)
Range Default settingsAudio Mode
Setting The Loudness On/Off1. Press longer the [ ] button to activate/de-
activate loudness effect.* The factory default setting is “OFF”.2. The loudness effect emphasizes the bass and
treble to create a natural sound tone. When you are listening to music at low volume, it is recommended to use the loudness effect. The loudness effect will depend on volume level.
1. FEATURES ......................................................................................................................................22. CONTROLS .....................................................................................................................................33. PRECAUTIONS ................................................................................................................................34. BASIC OPERATIONS .......................................................................................................................55. RADIO MODE OPERATIONS ..........................................................................................................66. USB OPERATIONS ..........................................................................................................................87. AUXILIARY INPUT..........................................................................................................................128. ADJUSTMENT MODE ....................................................................................................................129. TROUBLESHOOTING ....................................................................................................................1410. ERROR DISPLAYS .........................................................................................................................1511. SPECIFICATIONS ..........................................................................................................................16
English
FZ102E_Owner_manual.indb 5 7/24/2012 9:55:18 AM

6
English
FZ102E
5. RADIO MODE OPERATIONSListening to the radio
Radio ModePush the [ ] rotary knob and select the radio mode.
Select the bandPress the [BAND] button to select the desired band.FM1 FM2 FM3 AM FM1...
Tuning a station Select the tuning method
Press longer the [BAND] button to toggle be-tween Auto and Manual tuning method.* is lit in the display for Manual Tuning mode.
Auto tuning the stations Press longer the [BAND] button to toggle be-tween Auto and Manual tuning method.DX SEEK(Automatically tune in to a receivable broadcast station)Press the [ ] / [ ] button.
LOCAL SEEK(Tune in to broadcast station with strong reception sensitivity)Press longer the [ ] / [ ] button.
Manual tuning the stationsStep tuning(Change the frequency one step at a time)Press the [ ] / [ ] button.Quick tuning(Change the frequency rapidly)Press longer the [ ] / [ ] button.
Storing radio stations Storing manually
1. Select a radio band and tune in a desired radio station.
2. Press longer the [DIRECT] button to store the station into preset memory.
Note: Preset memory function can store up to 24 sta-
tions: Six stations for each of FM1, FM2, FM3 and AM.
Recall a stored station1. Select the desired band.2. Press the corresponding [DIRECT] button to
recall the stored station.
About RDS (Radio Data System)This unit has a built-in RDS decoder system that supports broadcast stations transmitting RDS data.This system can display the name of the broad-cast station being received (PS) and can auto-matically switch to the broadcast station with the best reception as you move long distances (AF switching).Also, if a traffic announcement or programme type is broadcast from an RDS station, no matter what mode you are in, this broadcast is received. Additionally, if EON information is received, this information enables automatic switching of other preset stations on the same network and interrup-tion of the station being received with traffic infor-mation from other stations (TP). This function is not available in some areas.When using the RDS function, always set the ra-dio to FM mode. AF : Alternative Frequency PS : Programme Service Name PTY : Programme Type EON : Enhanced Other Network TP : Traffic Programme
RDS interrupt does not function during AM radio reception.When set receives RDS signal, and can read PS data, PS appears in the display.
CAUTION For some countries, RDS (Radio Data
System) broadcasting is not supported. It is recommended to turn off all the RDS settings.
Radio Mode Operations
FZ102E_Owner_manual.indb 6 7/24/2012 9:55:18 AM

7
English
FZ102E
Storing radio stations Storing manually
1. Select a radio band and tune in a desired radio station.
2. Press longer the [DIRECT] button to store the station into preset memory.
Note: Preset memory function can store up to 24 sta-
tions: Six stations for each of FM1, FM2, FM3 and AM.
Recall a stored station1. Select the desired band.2. Press the corresponding [DIRECT] button to
recall the stored station.
About RDS (Radio Data System)This unit has a built-in RDS decoder system that supports broadcast stations transmitting RDS data.This system can display the name of the broad-cast station being received (PS) and can auto-matically switch to the broadcast station with the best reception as you move long distances (AF switching).Also, if a traffic announcement or programme type is broadcast from an RDS station, no matter what mode you are in, this broadcast is received. Additionally, if EON information is received, this information enables automatic switching of other preset stations on the same network and interrup-tion of the station being received with traffic infor-mation from other stations (TP). This function is not available in some areas.When using the RDS function, always set the ra-dio to FM mode. AF : Alternative Frequency PS : Programme Service Name PTY : Programme Type EON : Enhanced Other Network TP : Traffic Programme
RDS interrupt does not function during AM radio reception.When set receives RDS signal, and can read PS data, PS appears in the display.
For some countries, RDS (Radio Data System) broadcasting is not supported. It is recommended to turn off all the RDS settings.
Radio Mode Operations
Traffic announcement (TA) Setting the TA standby mode
Press the [TA] button during TA indicator off.
Searching for a TP stationPress the [TA] button during TP indicator off.Note: TP indicator lit on when a TP station is found.
TA interruptsIn the TA standby mode, when a traffic announce-ment broadcast starts, “TRA INFO” appears in the display. The traffic announcement broadcast is received as top priority regardless of the func-tion mode so you can listen to it.
Cancelling an traffic announcementPress the [TA] button during TA interrupts.
Cancelling the TA standby modePress the [TA] button during TP and TA indicator on.Note: TA standby mode is also cancelled when [TA]
button is pressed during TP station searching operation.
Emergency broadcasting Emergency broadcast
If an emergency broadcast is received, all the function mode operations are stopped. “ALARM” appears in the display and the emer-gency broadcast can be heard.
Volume setting of TA, emergency broadcast (ALARM) and PTYDuring a TA, ALARM or PTY interrupt, turn the [ ] rotary knob to set the volume to the desired level.When the TA, ALARM or PTY interrupt ends, the volume returns to the level it had before the inter-rupt.The factory default setting is “15”.Other RDS adjustment can be performed in Adjustment mode. Please refer to “Adjustment Mode” for further details.
Cancelling an emergency broadcastPress the [TA] button during interrupts.
Please disable TA standby mode if broad-casting stations in your country do not support RDS. Otherwise, you may face difficulties searching for station.
CAUTION
FZ102E_Owner_manual.indb 7 7/24/2012 9:55:18 AM
8
English
FZ102E
6. USB OPERATIONS
Do not try to put your fingers in the USB insertion slot. Also never insert foreign objects into the slot. USB memory device insertion may result in protruding as it might be dangerous to the user while driv-ing. For safety purposes, it is advisable to use an USB extension cable to connect between the USB memory device and the USB slot on the main unit.
Do not leave a USB memory device unat-tended in an automobile. Exposure to direct sunlight or high temperatures may cause deformation or other malfunction of the USB memory device.
When the device is subjected to static electricity or electric noise, this may result in the loss of data.
Insert and remove an USB memory device only when the device is not being accessed. Connecting or disconnecting the device at the following times may result in the loss of data:
- When the device is subjected to static electricity or electric noise.
About USB USB is the abbreviation of Universal Serial Bus,
an external bus standard that supports data transfer rates of 12Mbps. This unit is compatible with USB 1.1/2.0 with maximum data transfer rates of 12Mbps (Full Speed).
USB memory devices that can be played by connecting to the unit’s USB cable are limited to those recognized as “USB mass storage class devices”; operation is not guaranteed with all USB memory devices.
Devices compatible with “USB Mass Storage Class” can be used merely by connecting to the host device, without need for special drivers or application software.
Consult the manufacturer of your USB memory device for information regarding whether it is supported by “USB Mass Storage Class” standards. Please note that iPod device and hard disk drive (HDD) are not supported.
To prevent the accidental loss of data, always back up important data to your computer.
This unit does not support connections to a computer. In addition, connections made through a USB hub device are also not sup-ported.
If the USB memory device supports multiple partitions, only the first partition will be sup-ported.
USB memory devices with security functions cannot be played.
The order in which tracks are recorded may dif-fer depending on the USB memory device con-nected (the actual playback order may not be the same as that indicated on your computer’s display).
Audio files playable on this unit are limited to MP3/WMA files.
Precautions when creating MP3/WMA On USB memory device
USB 1.1 and 2.0 compatible with a maximum transfer rates of up to 12Mbps. (Full speed).
Precautions when creating MP3/WMAUsable sampling rates and bit rates:
Decode Format
Sampling Rate (kHz)
Bit-rate (kbps)
MPEG 1, 2 - Layer 3
MPEG-1 : 32, 44.1, 48 MPEG-2 : 16, 22.05, 24
MPEG-1 : 32 - 320 MPEG-2 : 32 - 160 VBR
MP3
Decode FormatSampling Rate (kHz) Bit-rate (kbps)
v7/8/922.05, 32, 44.1, 48
WMA
32 - 320
Notes: Content protected audio file (DRM – Digital Rights
Management) is not supported. Filesize less than 12KB will not be supported.
CAUTION
FZ102E_Owner_manual.indb 8 7/24/2012 9:55:19 AM

9
English
FZ102E
File extensionsOnly MP3/WMA file with the correct file exten-sion (“.MP3” or “.WMA”) and encoded format (Refer to the table above) will be played.
USB Operations
Logical format (File system)1. When transferring MP3/WMA file to an USB
memory device,please make sure the USB memory device is formatted in“FAT16” or “FAT32” file system. USB memory device that is formatted other than the specified file system will not be able to detect by the system.
2. The folder name and file name can be displayed as the title during MP3/WMA play but the title must be within 30 single byte alphabetical let-ters and numerals (excluding an extension).
3. Do not affix a name to a file inside a folder hav-ing the same name.
Number of files or folders
1. Up to 255 files can be recognized per folder. Up to 5000 files can be played.
* Exceeding the files limitation may cause unexpect-ed operation failure.
2. Up to a maximum of 255 folders can be supported.
ID3 tag/ WMA tag
The folder name will be displayed as “ROOT” which the file allocates in the root folder.
For MP3, supports ID3 Tags V2.4/2.3/2.2/1.1/1.0. The MP3 player decodes each file ID3 TAG ver
2 by default, if ID3 TAG ver 2 is unavailable, ID3 TAG ver 1 will be decoded.
UNICODE ID3 (Chinese, Japanese and etc) is not supported. Only ASCII characters can be displayed in Tags
If ID3 TAG has Japanese, Chinese character or other non supported characters, “ ” will be displayed as substitution.
File playing orderWhen selected for playing folder up down func-tions, files and folders are accessed in the order in which they were written into the USB memory device. Because of this, the order in which they are expected to be played may not match the order in which they are actually played. For example, a medium with the following folder/ file hierarchy is shown below.
FZ102E_Owner_manual.indb 9 7/24/2012 9:55:19 AM

10
English
FZ102E
USB Operations
USB memory device connection Connecting a USB memory device
Connect the USB memory device into the slot with the correct direction. System switches to USB mode automatically.Notes: Always insert the USB memory device fully into the
slot. Incomplete connections may cause the USB memory device not be recognized.
Depending on the number of tracks recorded, some amount of time may be required until all tracks are read into the unit.
USB memory devices may have different shape depends on brands. Some USB memory devices may not be able to plug into the slot due to the shape design. Please use an extension cable in-stead.
Please reconnect the USB memory device when it cannot be detected properly.
Do not forcibly connect the USB memory device to the slot with incorrect direction as this will damage the USB memory device as well as the USB slot.
Unplug the USB memory deviceRemove the USB memory device from the USB slot.
Play/pausePress the [ ] button to toggle play/pause.
Selecting a folder1. Press the [ ] button to move the next
folder.2. Press the [ ] button to move the previous
folder.Notes: Press the [ ] button while in the final folder
will shift to the first folder. Folder without a MP3/WMA file is not selectable. The first track will always be selected when shifting
to next/previous folder. Track selection and other special playback mode
cannot be triggered during folder selection display.
Selecting a track1. Press the [ ] button to move to the beginning
of the next track.2. Press the [ ] button to move to the beginning
of the current track.3. Press the [ ] button twice to move to the
beginning of the previous track.Note: Unsupported track with MP3/WMA extension will
be skipped. “--:--“ will be blinked for a few seconds before jumping to the next track automatically.
Playback USB mode
Push the [ ] rotary knob to select the USB mode.* Track will start to play or resume automatically.Note: If there is no USB memory device inserted,
“NO USB” will be displayed.
Top functionPress the [BAND] button, then the USB will start playing from the first track of current folder.
Scan Scan play
Press the [SCN] button.Notes: This function plays the first 10 seconds of all the
tracks. Scan play starts from the next track after the track currently being played.
The indicator lights in the display.
All scan play Press longer the [SCN] button.Notes: This function plays the first 10 seconds of the first
track of all the folders. All scan play starts from the first track of next folder after the track currently be-ing played.
The and indicators light in the display.
FZ102E_Owner_manual.indb 10 7/24/2012 9:55:20 AM

11
English
FZ102E
Play/pausePress the [ ] button to toggle play/pause.
Selecting a folder1. Press the [ ] button to move the next
folder.2. Press the [ ] button to move the previous
folder.Notes: Press the [ ] button while in the final folder
will shift to the first folder. Folder without a MP3/WMA file is not selectable. The first track will always be selected when shifting
to next/previous folder. Track selection and other special playback mode
cannot be triggered during folder selection display.
Selecting a track1. Press the [ ] button to move to the beginning
of the next track.2. Press the [ ] button to move to the beginning
of the current track.3. Press the [ ] button twice to move to the
beginning of the previous track.Note: Unsupported track with MP3/WMA extension will
be skipped. “--:--“ will be blinked for a few seconds before jumping to the next track automatically.
Top functionPress the [BAND] button, then the USB will start playing from the first track of current folder.
USB Operations
Scan Scan play
Press the [SCN] button.Notes: This function plays the first 10 seconds of all the
tracks. Scan play starts from the next track after the track currently being played.
The indicator lights in the display.
All scan play Press longer the [SCN] button.Notes: This function plays the first 10 seconds of the first
track of all the folders. All scan play starts from the first track of next folder after the track currently be-ing played.
The and indicators light in the display.
Repeat Repeat play
Press the [RPT] button.Notes: This function plays the current track repeatedly. The indicator lights in the display.
All random playPress longer the [RDM] button.Notes: This function plays all the tracks of all the folders in
a random order. The and indicators light in the display.
All repeat play Press longer the [RPT] button.Notes: This function plays all tracks of the current folder
repeatedly. The and indicators light in the display.
Random Random play
Press the [RDM] button.Notes: This function plays all tracks of current folder in a
random order. The indicator lights in the display.
To cancel scan/repeat/random playPress the operating button previously selected.
Switching the displayPress the [DISP] button to select the desired display.Each time the button is pressed, the display switches in the following order:Main-1 display (Track No., Play Time) Main-2 Display (Folder No., Track No.) Track Name Folder Name Title Tag Artist Tag Album Tag Main-1 Display...Note: Once selected, the preferred display becomes the
display default. When a function adjustment such as volume is made, the screen will momentarily switch to that function’s display, then revert back to the preferred display several seconds after the adjustment.
FZ102E_Owner_manual.indb 11 7/24/2012 9:55:20 AM

12
English
FZ102E
7. AUXILIARY INPUT
8. ADJUSTMENT MODE
AUX mode1. Connect the external music player to the
AUX input. 2. Push the [ ] rotary knob select AUX
mode.This system has an external jack input in the front panel where you can listen to sounds and music from external devices connected to this unit.Notes: Use only the 3.5mm stereo jack for the AUX jack
input. Volume can be adjusted through the unit. Remove the audio jack from AUX input during AUX
mode will not revert to Radio mode automatically.
Note:For some countries, RDS (Radio Data System) broad-casting is not supported. It is recommended to turn off all the RDS settings.1. Press longer the [DISP] button to enter adjust-
ment selection display.2. Press the [ ] / [ ] button to select the Item
name.(“AF” “REG” “PTY” “PTY-SEL”) “CLOCK” “12/24 HR” “CLK ADJ” “SCROLL” “RESET” “AF”…Notes: Items in bracket (PTY, PTY SEL, AF and REG)
are known as RDS Mode adjustment. It will only be available for selection during Radio mode FM band.
“PTY-SEL” is available only when “PTY ON”. “REG” is available only when “AF ON”.
Setting Regional (REG)1. Select “REG”.2. Turn the [ ] rotary knob to select “ON”
or “OFF”.Notes: When the REG function is ON, the optimum re-
gional station can be received. When this function is OFF, if the regional station area switches as you drive, a regional station for that region is received.
The factory default setting is “OFF”. This function is disabled when a national station
such as BBC R2 is being received. The REG function ON/OFF setting is valid when
the AF function is ON.
Setting alternate frequency (AF)1. Select “AF”.2. Turn the [ ] rotary knob to select “ON”
or “OFF”.Notes: The AF function switches to a different frequency
on the same network in order to maintain optimum reception.
The factory default setting is “OFF”. If the reception of the current broadcast station de-
teriorates, “SEARCH” appears in the display and the radio searches for the same programme on another frequency.
Cancelling a PTY interrupt broadcastPress the [TA] button during the PTY interrupt broadcast.
Setting Programme Type (PTY)1. Select “PTY”.2. Turn the [ ] rotary knob to select “ON”
or “OFF”.Notes: This function enables you to listen to a broadcast
of the selected programme type even if the unit is on a function mode other than radio.
Some countries do not yet have PTY broadcast. In the TA standby mode, a TP station has priority
over a PTY broadcast station. The factory default setting is “OFF”.
PTY SEEKDuring PTY item display, press the [ ] / [ ] button to search for a PTY broadcast.Note: If no station with the selected PTY broadcast can
be received, the unit returns to the previous receiv-ing station.
FZ102E_Owner_manual.indb 12 7/24/2012 9:55:21 AM

13
English
FZ102E
Setting Regional (REG)1. Select “REG”.2. Turn the [ ] rotary knob to select “ON”
or “OFF”.Notes: When the REG function is ON, the optimum re-
gional station can be received. When this function is OFF, if the regional station area switches as you drive, a regional station for that region is received.
The factory default setting is “OFF”. This function is disabled when a national station
such as BBC R2 is being received. The REG function ON/OFF setting is valid when
the AF function is ON.
Cancelling a PTY interrupt broadcastPress the [TA] button during the PTY interrupt broadcast.
Setting Programme Type (PTY)1. Select “PTY”.2. Turn the [ ] rotary knob to select “ON”
or “OFF”.Notes: This function enables you to listen to a broadcast
of the selected programme type even if the unit is on a function mode other than radio.
Some countries do not yet have PTY broadcast. In the TA standby mode, a TP station has priority
over a PTY broadcast station. The factory default setting is “OFF”.
PTY ITEM Contents
News NewsAffairs Today’s eventsInfo InformationSport SportsEducate EducationDrama DramaCulture CultureScience ScienceVaried VarietyPop M Pop musicRock M Rock musicEasy M Easy musicLight M Light musicClassics ClassicsOther M Other musicWeather WeatherFinance FinanceChildren For childrenSocial SocialReligion ReligionPhone In Phone inTravel TravelLeisure LeisureJazz JazzCountry CountryNation M Nation musicOldies OldiesFolk M Folk musicDocument Documentaries
Adjustment Mode
Selecting Program Type 1. Select “PTY SEL”.2. Press the [ ] button.3. Turn the [ ] rotary knob to select the
desired PTY.
* The PTY selection mode is cancelled automati-cally 7 seconds after a PTY is selected.
PTY SEEKDuring PTY item display, press the [ ] / [ ] button to search for a PTY broadcast.Note: If no station with the selected PTY broadcast can
be received, the unit returns to the previous receiv-ing station.
Setting clock type1. Select “CLOCK”.2. Turn the [ ] rotary knob to select “RDS”
or “USER”.Notes: Set to display RDS or User adjustable clock. The factory default setting is “USER”.
Setting clock format1. Select "12/24 HR".2. Turn the [ ] rotary knob to select "12HR"
or "24HR"Notes: Set user clock format. The factory default setting is “12HR”. This setting is only available when User Clock is
selected.
Adjusting the clock 1. Select “CLK ADJ”.2. Press the [ ] button.3. Press [ ] / [ ] button to select the hour or
the minute.4. Turn the [ ] rotary knob to adjust the
time.5. Press the [ ] button to memory the new
setting value.Notes: This adjustment allows the user clock to be set by
user. The factory default setting is “1:00”. This setting is only available when User Clock is
selected.
Setting the method for title scroll1. Select “SCROLL”.2. Turn the [ ] rotary knob to select “ON”
or “OFF”.Notes: Set the MP3/WMA title to scroll continuously or once. The factory default setting is “ON”
Restoring to factory default setting1. Select “RESET”.2. Press the [ ] button.
A confirmation message will be displayed.3. Turn the [ ] rotary knob to select “YES”.4. Press the [ ] button again to reset.Notes: All settings and preset memory channels will be
returned to initial stage. User will have to manually perform those settings again.
Once reset, system will automatically turn off.
FZ102E_Owner_manual.indb 13 7/24/2012 9:55:21 AM
14
English
FZ102E
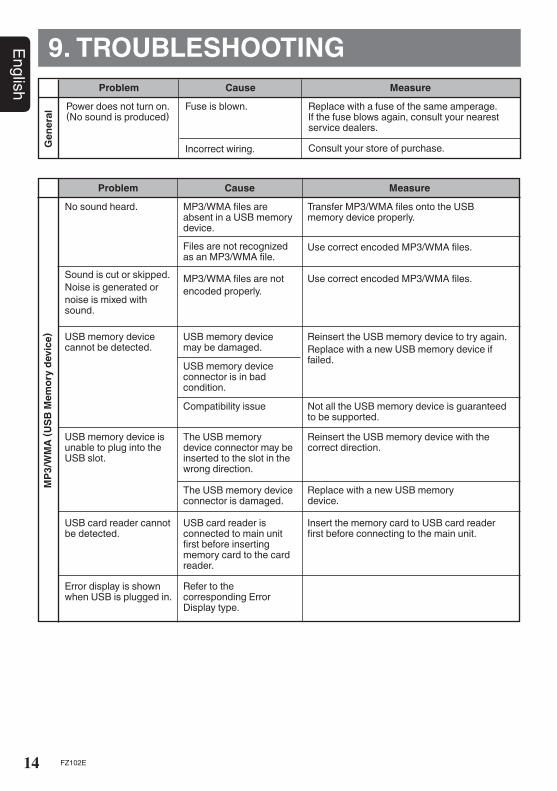
9. TROUBLESHOOTING
Replace with a fuse of the same amperage. If the fuse blows again, consult your nearest service dealers.
Power does not turn on. (No sound is produced)
Problem Cause Measure
Fuse is blown.
Incorrect wiring.Gen
eral
Consult your store of purchase.
Problem Cause Measure
Replace with a new USB memory device.
MP3
/WM
A ( U
SB M
emor
y de
vice
)
No sound heard.
Sound is cut or skipped.Noise is generated ornoise is mixed with sound.
USB memory device cannot be detected.
USB memory device is unable to plug into the USB slot.
MP3/WMA files are absent in a USB memory device.
Files are not recognized as an MP3/WMA file.
MP3/WMA files are notencoded properly.
USB memory device may be damaged.
The USB memory device connector may be inserted to the slot in the wrong direction.
Transfer MP3/WMA files onto the USB memory device properly.
Use correct encoded MP3/WMA files.
Use correct encoded MP3/WMA files.
Reinsert the USB memory device to try again.Replace with a new USB memory device if failed.
Reinsert the USB memory device with the correct direction.
USB memory device connector is in bad condition.
The USB memory device connector is damaged.
Compatibility issue Not all the USB memory device is guaranteed to be supported.
USB card reader cannot be detected.
USB card reader is connected to main unit first before inserting memory card to the card reader.
Insert the memory card to USB card reader first before connecting to the main unit.
Error display is shown when USB is plugged in.
Refer to the corresponding Error Display type.
10. ERROR DISPLAYS
FZ102E_Owner_manual.indb 14 7/24/2012 9:55:22 AM

15
English
FZ102E
10. ERROR DISPLAYS
Unplug the USB memory device and re-plug into the slot.Replace with another supported USB memory device.
MNT ERR
Error Display Cause Measure
Failure detection of USB mem-ory device when it is plugged into the slot.The connected USB device is not supported
NO FILE
USB ERR
No audio file is detected in the media.
An error occurred when control-ling the USB device or data error.
Replace with audio contents loaded USB memory device.
Make sure the correct file system of the USB device is being used.Unplug the USB memory device and re-plug into slot.
Note: Short circuit USB connector will power off the unit automatically. Replace with another USB memory device.
FZ102E_Owner_manual.indb 15 7/24/2012 9:55:22 AM

16
English
FZ102E
11. SPECIFICATIONSFM tunerFrequency Range: 87.5 MHz to 108 MHzUsable Sensitivity: 11 dBuv40 dB Quieting Sensitivity: 17 dBuvStereo Separation (1 kHz): 35 dBFrequency Response (±3 dB): 30 Hz to 15 kHz
AM tunerFrequency Range:MW 531 kHz to 1602 kHzLW 153 kHz to 279 kHzUsable Sensitivity: 25 µV
Audio (24V)Maximum Power Output: 40 W (20 W X 2 ch)Continuous Average Power Output: 15 W X 2, into 4 Ω, 20 Hz to 20 kHz,1%THDBass Control Action (100 Hz): ±14 dBTreble Control Action (10 kHz): ±14 dB
Audio (12V)Maximum Power Output: 140 W (35 W X 4 ch)Continuous Average Power Output: 15 W X 4, into 4 Ω, 20 Hz to 20 kHz,1%THDBass Control Action (100 Hz): ±14 dBTreble Control Action (10 kHz): ±14 dB
Note: Specifications and design are subject to change with-
out notice for further improvement.
General (24V)Power Supply Voltage: 28 V DC (21 V to 32 V allowable), negative groundCurrent Consumption: Less than 6 ASpeaker Impedance: 4 Ω (4 Ω to 8 Ω allowable) Weight: 1.336 lb.(0.606 kg)Dimensions: 178 mm Width X 50 mm Height X 100 mm Depth
General (12V)Power Supply Voltage: 14V DC (10.8V to 15.6 V allowable), negative groundCurrent Consumption: Less than 10 ASpeaker Impedance: 4 Ω (4 Ω to 8 Ω allowable) Weight: 1.336 lb.(0.606 kg)Dimensions: 178 mm Width X 50 mm Height X 100 mm Depth
Common in USB-MP3/WMA Max. Files Support : 5000Max. Folders Support : 255Max. File per Folder : 255Max. File Name Support : 30 charactersMax. Folder Name Support : 30 characters
FZ102E_Owner_manual.indb 16 7/24/2012 9:55:22 AM

2 FZ102E
Be sure to unfold and read the next page.Seite 2 ausfalten und die Informationen zu den Bedienelementen beachten.
Despliegue la página 2 para ver la página de controles.Taita sivu 2, jotta voit lukea ohjaustoiminnot kuvaavan sivun.
Ne manquez pas de déplier la page 2 pour lire le contenu consacré aux commandes.Assicurarsi di passare alla pagina 2 per leggere le informazioni relative ai Controlli.
Vouw pagina 2 open om de pagina over de bediening te lezen.Var noga med att veckla ut sidan 2 för att läsa sidan med information om kontrollerna.
Denetimler Sayfasını okumak için katlanmış sayfa 2'yi açtığınızdan emin olun.3TATA X3
1. FEATURES ..............................................................................................................................22. CONTROLS .............................................................................................................................33. PRECAUTIONS ........................................................................................................................44. BASIC OPERATIONS ..............................................................................................................55. RADIO MODE OPERATIONS ..................................................................................................66. USB OPERATIONS .................................................................................................................87. AUXILIARY INPUT .................................................................................................................128. ADJUSTMENT MODE ...........................................................................................................129. TROUBLESHOOTING ............................................................................................................1410. ERROR DISPLAYS ................................................................................................................1511. SPECIFICATIONS .................................................................................................................16
Contents
All Rights Reserved. Copyright © 2011: Clarion Co., Ltd.
Clarion Co., Ltd.
1. FEATURESMP3 compatible with ID3-TAG displayWMA compatible with TAG display (optional)Front Panel 3.5mm Auxiliary InputUSB slot on front panelHigh visibility single line display with clock
Owner’s Manual Guide de l'utilisateur BenutzerhandbuchManuale dell’utenteGebruikershandleidingManual del usuarioKäyttöopasBruksanvisningKullanıcı Kılavuzu
USB/MP3 RECEIVER AUTORADIO USB/MP3 USB-/MP3-RECEIVER RICEVITORE USB/MP3 USB/MP3-RADIOCOMBINATIE RECEPTOR DE USB Y MP3 USB/MP3-VASTAANOTIN USB/MP3/RADIO USB/MP3 ALICISI
USB/MP3/WMA RECEIVER AUTORADIO USB/MP3/WMA USB-/MP3-/WMA-RECEIVER RICEVITORE USB/MP3/WMA USB/MP3/WMA-RADIOCOMBINATIE RECEPTOR DE USB, MP3 Y WMA USB/MP3/WMA-VASTAANOTIN USB/MP3/WMA-RADIO USB/MP3/WMA ALICISI
FZ102E
FZ102E_Cover.indd 1 7/23/2012 4:42:31 PM
FZ102E 280-9130-00
Printed in Malaysia


