
AKUCAL positioning guide.
© J2 Medical, LP 2011
for orthopedic templating

The AKUCAL POSITIONING GUIDE: J2 MEDICAL, LP
The following slide presentation serves as a positioning guide for using the Akucal
correctly in common situations. Specific surgeons may require a particular joint or bony area to
be marked according to their requirements. Please note: proper placement of the Akucal
calibration marker may differ slightly from patient to patient depending on the patient’s unique
body composition.
The Akucal is not typically placed in direct contact with the patient; however, in the
event that it does directly contact the patient, the device will need to be sanitized according to
governing health and safety hygiene requirements with a safe, non-abrasive cleaning solution
after each use. Alternatively, you can protect the calibration sphere with our clear, plastic
disposable sleeves. Replaceable marker holders are also available at www.j2medical.com
© J2 Medical, LP 2011
Quick Tips
1). Always place the marker at bone level. 2). Rotate the marker size indicator (located beside the marker) so it is facing the tube. 3). Always place the suction cup over a smooth, flat surface. 4). Press the base of the Akucal down prior to lowering the suction lever. 5). Keep your Akucal and suctioning surface clean and free of debris. 6). Please do not try to remove the Akucal before you release the suction cup lever. 7). And as always; if you have any questions or concerns about anything CALL US! We are here to help you.

The Pelvis
© J2 Medical, LP 2011
First, position the patient to include the upper 1/3 of the femoral shaft on the pelvic image. There are two options for marker placement on a pelvic image.
1. If possible, place the calibration sphere at the level of the greater trochanter on the lateral side of the pelvis, equivalent to the level of the hip joint. Unless the patient is narrow at the hip, the marker will be projected beyond the margin of the image; thus, refer to option (2) - (next slide).
Side View
Top View

2. Move the marker carefully to the same vertical height (bone level) between the patient’s thighs where it will be visible in the captured image. For best results, the suction base should be placed near the knees and the arm bent toward the pubis symphesis.
The Pelvis (cont.)
© J2 Medical, LP 2011
© J2 Medical, LP 2011
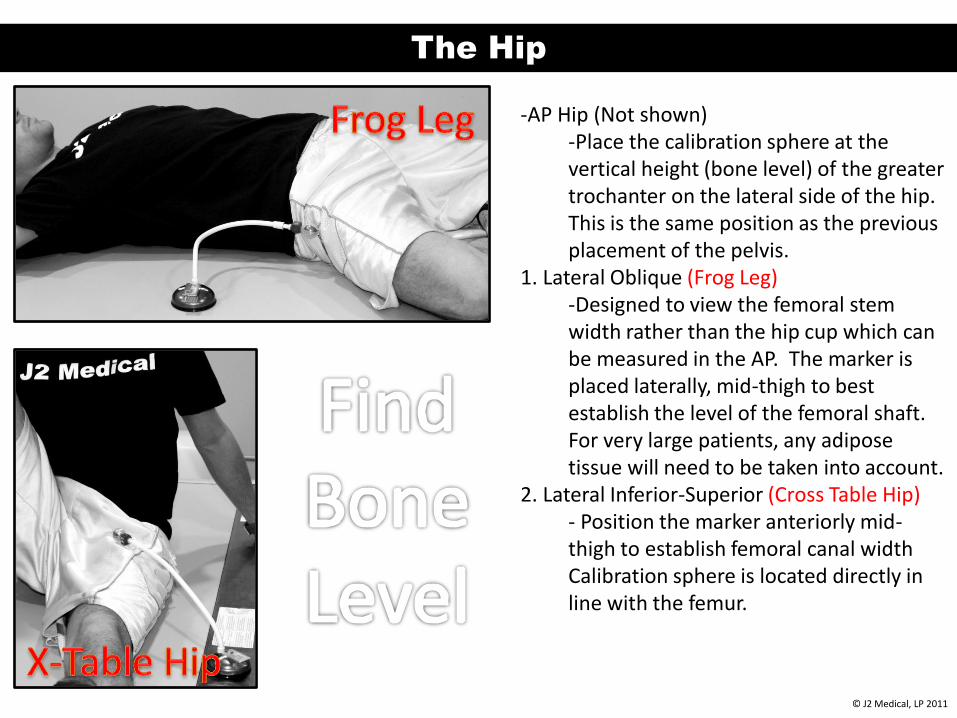
The Hip
-AP Hip (Not shown) -Place the calibration sphere at the vertical height (bone level) of the greater trochanter on the lateral side of the hip. This is the same position as the previous placement of the pelvis.
1. Lateral Oblique (Frog Leg) -Designed to view the femoral stem width rather than the hip cup which can be measured in the AP. The marker is placed laterally, mid-thigh to best establish the level of the femoral shaft. For very large patients, any adipose tissue will need to be taken into account.
2. Lateral Inferior-Superior (Cross Table Hip) - Position the marker anteriorly mid-thigh to establish femoral canal width Calibration sphere is located directly in line with the femur.

© J2 Medical, LP 2011
The Femur, Long Bones, etc.
-AP Femur Place the marker midway between anterior and posterior surfaces over the shaft on the lateral side of the bone. -Lateral Femur (ML) Place the marker on the anterior aspect near the femoral midshaft intersecting the femoral mid-line.

© J2 Medical, LP 2011
The Femur, Long Bones, etc. (cont.)
-LM (Cross Table) Place the calibration sphere anterior mid-line of the limb around the area of interest if known. As the surgeon will need to know how the lateral was taken, annotate the image with horizontal beam (x-table) or LM if possible.

© J2 Medical, LP 2011
The Knee
Position patient so an equal amount of femoral and tibial shafts are visible on the image. -AP
Marker is placed all the lateral aspect of the knee in the joint line, roughly midway between anterior and posterior surfaces, however if a patient is very muscular, this must be taken into account.
-Lateral (ML)
Marker is placed on the anterior side of the knee, either superior or inferior to patella in the midline.
-Lateral (LM) See “Femur” Slide 5.

© J2 Medical, LP 2011
The Shoulder
-AP Marker is placed on the lateral side of the humeral head at the mid-point between the palpable anterior and posterior bony prominences of the acromion - to best define the humeral head.
side
AP

-AP Marker is placed along the lateral aspect of the upper arm at the mid-point between the anterior and posterior side.
-Lateral
Marker is placed on the posterior side of the upper arm midway between the lateral and medial surfaces of the limb.
The Humerus
© J2 Medical, LP 2011

The Cervical Spine
-AP Place marker on the lateral side of the neck over the midpoint between the anterior and posterior aspects of the neck.
-Lateral
Place the marker near the cervical spinous processes on the posterior aspect of the neck.
AP
LAT
© J2 Medical, LP 2011

The Thoracic & Lumbar Spine
-Lateral Place the marker near the spinous processes at the appropriate spinal region (bone level).
Thoracic
Lumbar
© J2 Medical, LP 2011

© J2 Medical, LP 2011
J2 Medical, LP 701 E. Warrington Ave Pittsburgh, PA 15210 (412) 573 6116 (office) (412) 573 6127 (fax)
www.j2medical.com


