Download - Drying Notes on laundry - stekabolig.dk
1 2 3 4 5 6
Display panel / ButtonsProgramme selector / Off
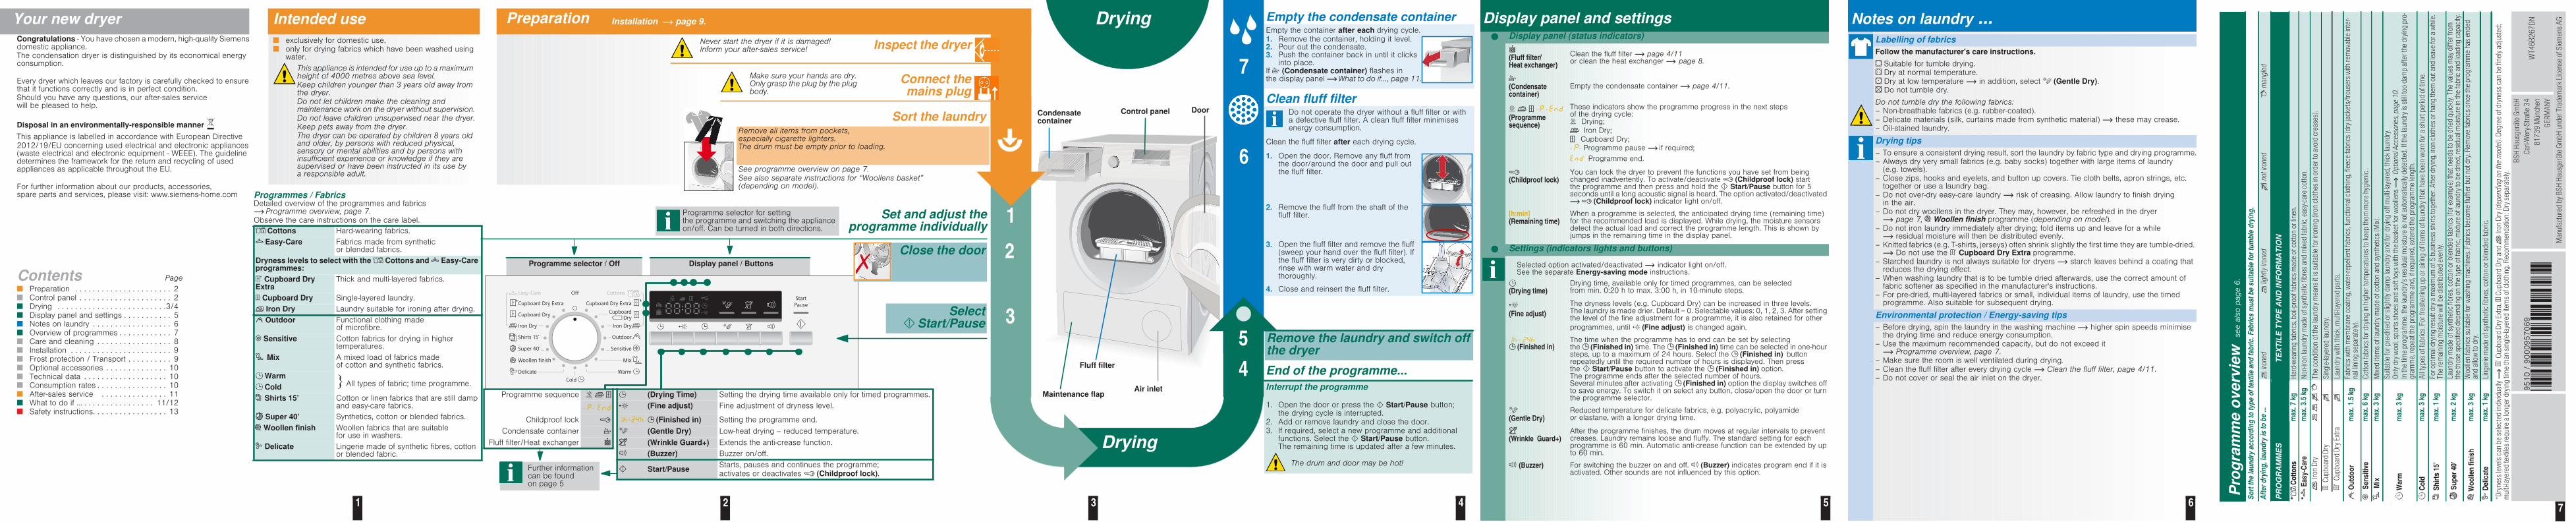
Empty the condensate containerEmpty the container after each drying cycle.1. Remove the container, holding it level.2. Pour out the condensate. 3. Push the container back in until it clicks
into place.If (Condensate container) flashes in the display panel What to do if..., page 11.
Clean fluff filterDo not operate the dryer without a fluff filter or with a defective fluff filter. A clean fluff filter minimises energy consumption.
Clean the fluff filter after each drying cycle.
1. Open the door. Remove any fluff from the door/around the door and pull out the fluff filter.
2. Remove the fluff from the shaft of the fluff filter.
3. Open the fluff filter and remove the fluff (sweep your hand over the fluff filter). If the fluff filter is very dirty or blocked, rinse with warm water and dry thoroughly.
4. Close and reinsert the fluff filter.
7
6
Programmes / FabricsDetailed overview of the programmes and fabrics
Programme overview, page 7.Observe the care instructions on the care label.
Cottons Hard-wearing fabrics.
Easy-Care Fabrics made from synthetic or blended fabrics.
Dryness levels to select with the Cottons and Easy-Care programmes:
Cupboard Dry Extra
Thick and multi-layered fabrics.
Cupboard Dry Single-layered laundry.
Iron Dry Laundry suitable for ironing after drying.
Outdoor Functional clothing made of microfibre.
Sensitive Cotton fabrics for drying in higher temperatures.
Mix A mixed load of fabrics made of cotton and synthetic fabrics.
Warm All types of fabric; time programme.Cold
Shirts 15’ Cotton or linen fabrics that are still damp and easy-care fabrics.
Super 40’ Synthetics, cotton or blended fabrics.
Woollen finish Woollen fabrics that are suitable for use in washers.
Delicate Lingerie made of synthetic fibres, cotton or blended fabric.
Your new dryerCongratulations - You have chosen a modern, high-quality Siemens domestic appliance.The condensation dryer is distinguished by its economical energy consumption.
Every dryer which leaves our factory is carefully checked to ensure that it functions correctly and is in perfect condition.Should you have any questions, our after-sales service will be pleased to help.
Disposal in an environmentally-responsible manner
This appliance is labelled in accordance with European Directive
2012/19/EU concerning used electrical and electronic appliances (waste electrical and electronic equipment - WEEE). The guideline determines the framework for the return and recycling of used appliances as applicable throughout the EU.
For further information about our products, accessories, spare parts and services, please visit: www.siemens-home.com
Intended use Preparation
Set and adjust theprogramme individually
1
2
Dryingexclusively for domestic use,only for drying fabrics which have been washed using water.
This appliance is intended for use up to a maximum height of 4000 metres above sea level.Keep children younger than 3 years old away from the dryer.Do not let children make the cleaning and maintenance work on the dryer without supervision.Do not leave children unsupervised near the dryer.Keep pets away from the dryer.The dryer can be operated by children 8 years old and older, by persons with reduced physical, sensory or mental abilities and by persons with insufficient experience or knowledge if they are supervised or have been instructed in its use by a responsible adult.
Drying
Display panel and settings Display panel (status indicators)
(Fluff filter/Heat exchanger)
Clean the fluff filter page 4/11or clean the heat exchanger page 8.
(Condensate container)
Empty the condensate container page 4/11.
- -
(Programme sequence)
These indicators show the programme progress in the next steps of the drying cycle:
Drying;
Iron Dry;
Cupboard Dry;
- - Programme pause if required;
Programme end.
(Childproof lock)You can lock the dryer to prevent the functions you have set from being changed inadvertently. To activate/deactivate (Childproof lock) start the programme and then press and hold the Start/Pause button for 5 seconds until a long acoustic signal is heard. The option activated/deactivated
(Childproof lock) indicator light on/off.
[h:min](Remaining time)
When a programme is selected, the anticipated drying time (remaining time) for the recommended load is displayed. While drying, the moisture sensors detect the actual load and correct the programme length. This is shown by jumps in the remaining time in the display panel.
Settings (indicators lights and buttons)
(Drying time)Drying time, available only for timed programmes, can be selected from min. 0:20 h to max. 3:00 h, in 10-minute steps.
(Fine adjust)
The dryness levels (e.g. Cupboard Dry) can be increased in three levels. The laundry is made drier. Default = 0. Selectable values: 0, 1, 2, 3. After setting the level of the fine adjustment for a programme, it is also retained for other
programmes, until (Fine adjust) is changed again.
- (Finished in)
The time when the programme has to end can be set by selecting the (Finished in) time. The (Finished in) time can be selected in one-hour steps, up to a maximum of 24 hours. Select the (Finished in) button repeatedly until the required number of hours is displayed. Then press the Start/Pause button to activate the (Finished in) option. The programme ends after the selected number of hours.Several minutes after activating (Finished in) option the display switches off to save energy. To switch it on select any button, close/open the door or turn the programme selector.
(Gentle Dry) Reduced temperature for delicate fabrics, e.g. polyacrylic, polyamide or elastane, with a longer drying time.
(Wrinkle Guard+)
After the programme finishes, the drum moves at regular intervals to prevent creases. Laundry remains loose and fluffy. The standard setting for each programme is 60 min. Automatic anti-crease function can be extended by up to 60 min.
(Buzzer) For switching the buzzer on and off. (Buzzer) indicates program end if it is activated. Other sounds are not influenced by this option.
Close the door
3
Contents Page
Preparation . . . . . . . . . . . . . . . . . . . . . . 2Control panel . . . . . . . . . . . . . . . . . . . . . 2Drying . . . . . . . . . . . . . . . . . . . . . . . . .3/4Display panel and settings . . . . . . . . . . . 5Notes on laundry . . . . . . . . . . . . . . . . . . 6Overview of programmes . . . . . . . . . . . . 7Care and cleaning . . . . . . . . . . . . . . . . . 8Installation . . . . . . . . . . . . . . . . . . . . . . . 9Frost protection / Transport . . . . . . . . . . 9Optional accessories . . . . . . . . . . . . . . 10Technical data . . . . . . . . . . . . . . . . . . . 10Consumption rates . . . . . . . . . . . . . . . . 10After-sales service . . . . . . . . . . . . . . . 11What to do if ... . . . . . . . . . . . . . . . . 11/12Safety instructions. . . . . . . . . . . . . . . . . 13
Never start the dryer if it is damaged!Inform your after-sales service! Inspect the dryer
Sort the laundryRemove all items from pockets,especially cigarette lighters.The drum must be empty prior to loading.
See programme overview on page 7.See also separate instructions for “Woollens basket” (depending on model).
Make sure your hands are dry. Only grasp the plug by the plug body.
Connect themains plug
End of the programme...
Interrupt the programme
1. Open the door or press the Start/Pause button; the drying cycle is interrupted.
2. Add or remove laundry and close the door.3. If required, select a new programme and additional
functions. Select the Start/Pause button. The remaining time is updated after a few minutes.
The drum and door may be hot!
Notes on laundry ...Labelling of fabrics
Follow the manufacturer's care instructions.
Suitable for tumble drying.Dry at normal temperature.Dry at low temperature in addition, select (Gentle Dry).Do not tumble dry.
Do not tumble dry the following fabrics:– Non-breathable fabrics (e.g. rubber-coated).– Delicate materials (silk, curtains made from synthetic material) these may crease.– Oil-stained laundry.
Drying tips
– To ensure a consistent drying result, sort the laundry by fabric type and drying programme.– Always dry very small fabrics (e.g. baby socks) together with large items of laundry
(e.g. towels).– Close zips, hooks and eyelets, and button up covers. Tie cloth belts, apron strings, etc.
together or use a laundry bag.– Do not over-dry easy-care laundry risk of creasing. Allow laundry to finish drying
in the air.– Do not dry woollens in the dryer. They may, however, be refreshed in the dryer
page 7, Woollen finish programme (depending on model).– Do not iron laundry immediately after drying; fold items up and leave for a while
residual moisture will then be distributed evenly.– Knitted fabrics (e.g. T-shirts, jerseys) often shrink slightly the first time they are tumble-dried.
Do not use the Cupboard Dry Extra programme.– Starched laundry is not always suitable for dryers starch leaves behind a coating that
reduces the drying effect.– When washing laundry that is to be tumble dried afterwards, use the correct amount of
fabric softener as specified in the manufacturer's instructions.– For pre-dried, multi-layered fabrics or small, individual items of laundry, use the timed
programme. Also suitable for subsequent drying.
Environmental protection / Energy-saving tips
– Before drying, spin the laundry in the washing machine higher spin speeds minimise the drying time and reduce energy consumption.
– Use the maximum recommended capacity, but do not exceed it Programme overview, page 7.
– Make sure the room is well ventilated during drying.– Clean the fluff filter after every drying cycle Clean the fluff filter, page 4/11.– Do not cover or seal the air inlet on the dryer.
Remove the laundry and switch off the dryer
5
4
Control panel
Fluff filter
SelectStart/Pause
Door
Installation page 9.
Selected option activated/deactivated indicator light on/off.See the separate Energy-saving mode instructions.
Condensate container
Air inletProgramme sequence (Drying Time) Setting the drying time available only for timed programmes.
- - (Fine adjust) Fine adjustment of dryness level.
Childproof lock - (Finished in) Setting the programme end.
Condensate container (Gentle Dry) Low-heat drying reduced temperature.
Fluff filter/Heat exchanger (Wrinkle Guard+) Extends the anti-crease function.
(Buzzer) Buzzer on/off.
Start/Pause Starts, pauses and continues the programme;activates or deactivates (Childproof lock).
Programme selector for setting the programme and switching the appliance on/off. Can be turned in both directions.
Maintenance flap
Further information can be found on page 5
7
Pro
gra
mm
e o
verv
iew
see a
lso p
age 6
.
So
rt t
he
lau
nd
ry a
cco
rdin
g t
o t
ype
of
text
ile a
nd
fab
ric.
Fab
rics
mu
st b
e su
itab
le f
or
tum
ble
dry
ing
.
Aft
er d
ryin
g, l
aun
dry
is t
o b
e ...
ir
oned
li
ght
ly ir
oned
no
t iro
ned
man
gle
d
PR
OG
RA
MM
ES
T
EX
TIL
E T
YP
E A
ND
IN
FO
RM
AT
ION
*C
ott
on
sm
ax. 7
kg
Har
d-w
eari
ng fa
bri
cs, b
oil-p
roof
fab
rics
mad
e of
cot
ton
or li
nen.
* E
asy-
Car
em
ax. 3
.5 k
gN
on-ir
on la
und
ry m
ade
of s
ynth
etic
fib
res
and
mix
ed fa
bri
c, e
asy-
care
cot
ton.
Iro
n D
ryT
he c
ond
ition
of t
he la
und
ry m
eans
it is
sui
tab
le fo
r ir
onin
g (i
ron
clot
hes
in o
rder
to a
void
cre
ases
).
Cup
boa
rd D
ry
Sin
gle
-laye
red
laun
dry
.
Cup
boa
rd D
ry E
xtra
La
und
ry w
ith th
ick,
mul
ti-la
yere
d p
arts
.
Ou
tdo
or
max
. 1.5
kg
Fab
rics
with
mem
bra
ne c
oatin
g, w
ater
-rep
elle
nt fa
bri
cs, f
unct
iona
l clo
thin
g, f
leec
e fa
bri
cs (d
ry ja
cket
s/tr
ouse
rs w
ith r
emov
able
inte
r-na
l lin
ing
sep
arat
ely)
.
Sen
siti
vem
ax. 6
kg
Cot
ton
fab
rics
for
dry
ing
in h
ighe
r te
mp
erat
ures
to k
eep
them
mor
e hy
gie
nic
.
Mix
max
. 3 k
gM
ixed
item
s of
laun
dry
mad
e of
cot
ton
and
syn
thet
ics
(Mix
).
War
mm
ax. 3
kg
Sui
tab
le fo
r p
re-d
ried
or
slig
htly
dam
p la
und
ry a
nd fo
r d
ryin
g o
ff m
ulti-
laye
red
, thi
ck la
und
ry.
Onl
y d
ry w
ool,
spor
ts s
hoes
and
sof
t toy
s w
ith th
e b
aske
t for
woo
llens
O
ptio
nal A
cces
sori
es, p
age
10
.In
the
time
pro
gra
mm
e, th
e la
und
ry's
res
idua
l moi
stur
e is
not
aut
omat
ical
ly d
etec
ted
. If t
he la
und
ry is
stil
l too
dam
p a
fter
the
dry
ing
pro
-g
ram
me,
rep
eat t
he p
rog
ram
me
and
, if r
equi
red
, ext
end
the
pro
gra
mm
e le
ngth
.
Co
ldm
ax. 3
kg
All
typ
es o
f fab
rics
. For
fres
heni
ng u
p o
r ai
ring
of i
tem
s of
laun
dry
that
hav
e b
een
wor
n fo
r a
shor
t per
iod
of t
ime.
Sh
irts
15’
max
. 1 k
gFo
r op
timal
dry
ing
res
ult d
ry a
max
imum
of 5
bus
ines
s sh
irts
tog
ethe
r. A
fter
dry
ing
, iro
n cl
othe
s or
han
g th
em o
ut a
nd le
ave
for
a w
hile
. T
he r
emai
ning
moi
stur
e w
ill b
e d
istr
ibut
ed e
venl
y.
Su
per
40’
max
. 2 k
gLa
und
ry m
ade
of s
ynth
etic
fib
res,
cot
ton
or b
lend
ed fa
bri
cs (f
or e
xam
ple
) tha
t nee
ds
to b
e d
ried
qui
ckly
. The
val
ues
may
diff
er fr
om
the
thos
e sp
ecifi
ed d
epen
din
g o
n th
e ty
pe
of fa
bri
c, m
ixtu
re o
f lau
ndry
to b
e d
ried
, res
idua
l moi
stur
e in
the
fab
ric
and
load
ing
cap
acity
.
Wo
olle
n f
inis
hm
ax. 3
kg
Woo
llen
fab
rics
sui
tab
le fo
r w
ashi
ng m
achi
nes.
Fab
rics
bec
ome
fluff
ier
but
not
dry
. Rem
ove
fab
rics
onc
e th
e p
rog
ram
me
has
end
ed
and
allo
w to
dry
.
Del
icat
em
ax. 1
kg
Ling
erie
mad
e of
syn
thet
ic fi
bre
s, c
otto
n or
ble
nded
fab
ric.
*Dry
ness
leve
ls c
an b
e se
lect
ed in
div
idua
lly
C
upb
oard
Dry
Ext
ra,
Cup
boa
rd D
ry a
nd
Iron
Dry
(dep
end
ing
on
the
mod
el).
Deg
ree
of d
ryne
ss c
an b
e fin
ely
adju
sted
; m
ulti-
laye
red
text
iles
req
uire
a lo
nger
dry
ing
tim
e th
an s
ing
le-la
yere
d it
ems
of c
loth
ing
. Rec
omm
end
atio
n: D
ry s
epar
atel
y.
9510 /
9000957069
*957069*
BS
H H
ausg
erät
e G
mb
H
Car
l-Wer
y-S
traß
e 3
4
81
73
9 M
ünch
en
GE
RM
AN
Y
WT
46
B2
67
DN
Man
ufac
ture
d b
y B
SH
Hau
sger
äte
Gm
bH
und
er T
rad
emar
k Li
cens
e of
Sie
men
s A
G

8
Care and cleaningDryer housing, control panel– Wipe clean with a soft, damp cloth.– Do not clean with a water jet.– Remove detergent and cleaning agent residue immediately.– During drying, water may occasionally accumulate between the window and the seal.
This does not affect the proper operation of your dryer.
Heat exchanger
The heat exchanger requires cleaning once a month, however this varies depending on how frequently the dryer is used.Allow the dryer to cool down and place an absorbent cloth under the maintenance flap.Residual water may escape.
1. Unlock the maintenance flap and open completely.
2. Turn both locking levers towards each another.
3. Pull out the cap.
4. Remove the heat exchanger.
Take care not to damage the heat exchanger.When cleaning, use water only. Do not use hard or sharp-edged objects.
5. Rinse the heat exchanger and the cap on all sides with a jet of water to completely remove all of the fluff.
6. Remove any fluff from the seals on the dryer and heat exchanger.
7. Allow to drip dry fully.8. First insert the heat exchanger, then the cap.9. Turn back both locking levers and close the
maintenance flap until it locks closed.
Moisture sensors
The dryer is equipped with stainless steel moisture sensors.Moisture sensors measure the moisture level of the laundry.After sustained, repeated operation, a fine layer of limescale may form on the moisture sensors.
1. Open the door.
2. Clean the moisture sensors with a damp sponge which has a rough surface.
Do not use steel wool or abrasive agents!
Only when switched off!
9
Installation– Scope of delivery: dryer, operating and installation instructions, basket for woollens
(depending on the model).– Check the dryer for transport damage.– The dryer is very heavy. Do not attempt to lift it on your own.– Be careful to avoid sharp edges.– Do not lift the dryer by protruding parts (e.g. the door) - risk of breakage.– Do not set up in a room that is susceptible to frost.
Freezing water may cause damage.– If in doubt, have the appliance connected by a specialist.
Setting up the dryer– The mains plug must always be accessible.– Ensure that the appliance is placed on a clean, level and
firm surface.– Do not obstruct the air inlet on the dryer.– Keep the area around the dryer clean.– Level the dryer using the threaded feet
and a spirit level.Never remove the threaded feet!
For mains connection, see Safety instructions page 13.– Connect to an AC earthed socket. If in doubt have the socket checked by a specialist.– The mains voltage and the voltage shown on the rating plate ( page 10) must be the same.– The connected load and necessary fuse protection are specified on the rating plate.
Converting the installed load Note the fuse protection of the socket (10/16 Amps.).
1. Turn the programme selector to Off.2. Press and hold the (Fine adjust) button.3. Turn the programme selector to Cotton Cupboard Dry Extra; wait until the recent
setting appears in the display: =10A or =16A.4. Press the (Fine adjust) button to change the settings.5. Turn the programme selector to Off.
Frost protection / Transport
Preparation1. Empty the condensate container page 4/11.2. Select any programme using the programme selector.3. Press the Start/Pause button condensation is pumped into the container.4. Wait several minutes or until the dryer stops, and then empty the condensate container
again.5. Turn the programme selector to Off.
1.Take all accessory parts out of the drum.The drum must be empty.
Make sure that the air inlet remains unobstructed
Clean and level
Do not install the dryer behind a door or sliding door which could prevent or obstruct the dryer door from opening.This will prevent children from locking themselves in and risking their lives.
2.
3.
Do not operate the dryer if there is a risk of frost.
10
Technical Data
Dimensions (DxWxH) 60 x 60 x 85 cm (height adjustable)
Weight approx. 45 kg
Max. capacity 7 kg
Condensate container 4,0 l
Connection voltage 220-240 V
Connected load 2100-2800 W
Fuse protection 10 A / 16 A
Ambient temperature 5 - 35°C
Product number Production number Inside of door
The rating plate can be found on the back of the dryer.
Power consumption when switched off 0,10 W
Power consumption when ready for use (left-on mode) 1,00 W
Drum interior light (depending on model): The drum lights up after the door is opened and after the programme starts, and switches off automatically.
Consumption values table (The value on the label is achieved at the maximum heat setting.)
ProgrammeSpin speed which
is used for spinning the laundry
Duration** Energy consumption**
Cottons7 kg 3.5 kg 7 kg 3.5 kg
10 A 16 A 10 A 16 A 10 A 16 A 10 A 16 A
Cupboard Dry* 1400 rpm 121 min 95 min 92 min 62 min 3.50 kWh 3.50 kWh 2.00 kWh 2.00 kWh
1000 rpm 141 min 111 min 99 min 69 min 4.08 kWh 4.08 kWh 2.33 kWh 2.33 kWh
800 rpm 161 min 128 min 115 min 85 min 4.66 kWh 4.66 kWh 2.86 kWh 2.86 kWh
Iron Dry* 1400 rpm 100 min 74 min 82 min 52 min 2.52 kWh 2.52 kWh 1.78 kWh 1.78 kWh
1000 rpm 119 min 88 min 92 min 62 min 3.18 kWh 3.18 kWh 2.23 kwh 2.23 kwh
800 rpm 140 min 100 min 103 min 73 min 3.85 kWh 3.85 kWh 2.81 kwh 2.81 kwh
Easy-Care 3.5 kg 3.5 kg
Cupboard Dry* 800 rpm 52 min 46 min 1.42 kWh 1.42 kWh
600 rpm 65 min 56 min 1.74 kWh 1.74 kWh
* Programme setting for testing in accordance with the applicable EN61121 standard.** The values may differ from those specified, depending on the type of fabric, composition of laundry to be dried, residual moisture in the fabric, the
degree of dryness that has been set and the amount of laundry being loaded.
Most efficient programme for cotton fabricsThe following "standard cottons programme" (identified with ) is suitable for drying normal, wet cotton laundry and is most efficient in terms of its combined energy consumption for drying wet cotton laundry.
Standard programme for cottons in accordance with current EU regulation 932/2012
Programme Load Energy consumption Programme duration
Cottons Cupboard Dry 7 kg/3.5 kg10 A 16 A 10 A 16 A
4.08kWh/2.33 kWh 4.08kWh/2.33 kWh 141 min/99 min 111 min/69 min
Programme setting for testing and energy labelling in accordance with Directive 2010/30/EU.
Optional accessories (order from the after-sales service using the order number, depending on the model)
Washer-dryer stack connection setThe dryer can be placed on top of a suitable washing machine with the same width and depth to save space. The dryer must be fastened to the washing machine using this connection set.WZ 20400: with pull-out worktop.Wollens basketFor drying individual wollen fabrics, sports shoes and soft toys (see separate instructions for “Woollens basket”).
PlatformFor easier loading and unloading. The basket contained in the drawer can be used to carry the laundry.
Connection fittings for condensation outletThe condensation is conveyed directly via a hose.
WZ11410
WZ 20600
WZ 20500
WZ20160 11
What to do if ...
Turn the programme selector to Off and remove the mains plug from the socket.
The Start/Pause indicator light does not light up.
Mains plug plugged in?Programme selected?Check the socket fuse.
The display panel light and indicator lights (depending on model) go out and the Start/Pause indicator light flashes.
Energy-saving mode is activated see the separate Energy-saving mode instructions.
The display panel switches off. The appliance goes into the sleep mode after activating (Finished in) option page 5.
The (Condensate container) indicator light flashes.
Empty the condensate container page 4.Press the Start/Pause button to reset the displayed indication and then press the Start/Pause button again to restart the appliance if necessary.If featured, check the hose for condensation outlet.
(Fluff filter/Heat exchanger) indicator light flashes.
Clean the fluff filter page 4.Press the Start/Pause button to reset the displayed indication and then press the Start/Pause button again to restart the appliance if necessary.Clean the heat exchanger page 8.
Dryer does not start. Start/Pause button selected? Door closed?Programme set?
After-sales service
If you cannot rectify the fault yourself (e.g. switching off/on) What to do if..., page 11/12, please contact our after-sales service. We will always find an appropriate solution and avoid unnecessary visits by engineers.
The contact details of your local after-sales service can be found in the enclosed after-sales service directory.– GB 0344 892 8999 (Calls charged at local or mobile rate.)– IE 01450 2655 (0.03 € per minute at peak. Off peak 0.0088 € per minute.)
Please provide the after-sales service the product number (E no.) and the production number (FD) of the appliance.
Product number Production number
You can find this information:inside the door* / in the opened service flap* and on the rear of the appliance.*depending on the model
Trust the expertise of the manufacturer. Contact us for assistance. In this way, you can rest assured that the repair will be carried out by trained service technicians using original spare parts.
12
What to do if ...
Programme terminates shortly after starting.
Ambient temperature greater than 5°C?Is the appliance loaded with the laundry?Load too small for selected programme?/Use timed programme page 6/7.Loaded laundry dry?
Water is leaking out. Make sure the dryer is level.Clean the heat exchanger seal.
The door opens by itself. Push the door closed until you hear it engage.
Creasing. Laundry load exceeded?Remove articles of clothing immediately after the end of the programme, hang up and pull into shape.Unsuitable programme selected page 7.
Laundry is not dried correctly or is still too damp.
After the end of the programme, warm laundry feels damper than it actually is. Spread the laundry out and allow the heat to disperse.
Finely adjust the dryness level – this extends the drying time but does not increase the temperature. Your laundry will become drier.
Select a programme with a longer drying time or increase the drying level. This does not increase the temperature.
Select a time programme for extended drying of laundry that is still damp.
If you have exceeded the maximum load for the programme, the laundry may not be dried correctly.
Clean the moisture sensor in the drum. A fine layer of limescale may adversely affect the performance of the sensors and your washing will not dry properly.
Drying has been interrupted as a result of a power cut, because the condensate container is full or because the maximum drying time has been exceeded.
Drying time too long. Clean the fluff filter under running water page 4/11.
Insufficient supply of air Ensure that air can circulate.
Air inlet possibly blocked Clear inlet page 9.
Ambient temperature higher than 35°C Ventilate the room.
One or more indicator lights are flashing.
Clean the fluff filter and heat exchanger page 4,8/11.Check the installation conditions page 9.Switch off, allow to cool, switch back on and restart the programme.
Power failure. Remove the laundry from the dryer immediately and spread out. This allows the heat to dissipate. Be careful as the door, the drum and the laundry may be hot.
13
Safety instructions Emergency – Pull the appliance plug out of the socket immediately or disconnect the fuse.
ONLY use the dryer...
– in rooms inside the house.– to dry fabrics.
The dryer must NEVER...
– be used for purposes other than those described above.– be modified in terms of its technology or properties.
Hazards – The dryer must not be used by children or persons who have not been instructed in its use.
– Do not leave children unsupervised near the dryer.– Keep pets away from the dryer.– Remove all objects from pockets, and lighters in particular Risk of explosion.– Do not lean or sit on the door Risk of tipping.
Installation – Secure loose cables Risk of tripping.– Do not operate a dryer if there is a risk of frost.
Mains connection
– Connect the dryer to an AC earthed socket according to specifications, otherwise it cannot be guaranteed that the appliance is completely safe.
– The cable cross-section must be sufficient.
– Only use earth-leakage circuit breakers with the following symbol: – The appliance plug and socket must be compatible.– Do not use multiple plugs/connectors and/or extension cables. – Do not touch or hold the appliance plug with wet hands Risk of electric shock.– Never pull the appliance plug out of the socket by its cable.– Do not damage the mains lead Risk of electric shock.
Operation – Only load the drum with laundry.Check the contents before you switch the dryer on.
– Do not use the dryer if the laundry has been in contact with solvents, oil, wax, grease or paint (e.g. hair setting spray, nail polish remover, stain remover, cleaning solvent, etc.) fire/explosion hazard.
– The tumble dryer is not to be used if industrial chemicals have been used for cleaning.
– Dust (e.g. coal dust, flour) poses a danger: do not use the dryer explosion hazard.
– Do not turn off the dryer until the drying process ends, unless the laundry will be removed quickly and spread out, so that the heat can dissipate.
– Do not put laundry containing foamed material/rubber in the dryer elastic material may be destroyed and the dryer may be damaged due to possible deformation of the foamed material.
– When cleaning the fluff filter, make sure that no foreign material (down or filling material) gets into the air duct opening. If necessary, clean the drum beforehand with a vacuum cleaner. If foreign material should still get into the air duct call the after-sales service Risk of fire/explosion.
– Light things, such as long hair, may be sucked into the air inlet of the dryer Risk of injury.
– Final part of a tumble dryer cycle occurs without heat (cool down cycle), to ensure that the items are left at a temperature that ensures that the items will not be damaged.
– Switch off the dryer once the programme has ended.– The exterior of the appliance's rear panel becomes very hot during
operation. Never touch the hot surface of the appliance's rear panel. Keep children away from the appliance Risk of burns!
– The water from condensation is not drinking water and may be contaminated with fluff.
Defect – Do not use the dryer if it is defective or if you suspect that it is.Repairs must only be carried out by the after-sales service.
– Do not use the dryer if the mains cable is defective. To avoid danger, only have the defective mains cable replaced by the after-sales service.
Spare parts – For safety reasons, you must only use genuine spare parts and accessories.
Disposal – Pull out the appliance plug, then cut off the mains cable from the appliance.Dispose of the appliance at a municipal waste disposal site.
– Packaging: Keep all packaging out of reach of babies and children Risk of suffocation.
– All materials are environmentally sound and can be reused. Dispose of them in an environmentally-responsible manner.
siemens-home.com/welcome
Registeryourproductonline
Tumble dryerWT46B267DN
en Operating and installation instructions
Observe the safety instructions on page 13.
Read these instructions and the separate Energy-saving mode instructions before switchingon the dryer.
1 2
Display panel / ButtonsProgramme selector / Off
Programmes / FabricsDetailed overview of the programmes and fabrics
Programme overview, page 7.Observe the care instructions on the care label.
Cottons Hard-wearing fabrics.
Easy-Care Fabrics made from synthetic or blended fabrics.
Dryness levels to select with the Cottons and Easy-Care programmes:
Cupboard Dry Extra
Thick and multi-layered fabrics.
Cupboard Dry Single-layered laundry.
Iron Dry Laundry suitable for ironing after drying.
Outdoor Functional clothing made of microfibre.
Sensitive Cotton fabrics for drying in higher temperatures.
Mix A mixed load of fabrics made of cotton and synthetic fabrics.
Warm All types of fabric; time programme.Cold
Shirts 15’ Cotton or linen fabrics that are still damp and easy-care fabrics.
Super 40’ Synthetics, cotton or blended fabrics.
Woollen finish Woollen fabrics that are suitable for use in washers.
Delicate Lingerie made of synthetic fibres, cotton or blended fabric.
Your new dryerCongratulations - You have chosen a modern, high-quality Siemens domestic appliance.The condensation dryer is distinguished by its economical energy consumption.
Every dryer which leaves our factory is carefully checked to ensure that it functions correctly and is in perfect condition.Should you have any questions, our after-sales service will be pleased to help.
Disposal in an environmentally-responsible manner
This appliance is labelled in accordance with European Directive
2012/19/EU concerning used electrical and electronic appliances (waste electrical and electronic equipment - WEEE). The guideline determines the framework for the return and recycling of used appliances as applicable throughout the EU.
For further information about our products, accessories, spare parts and services, please visit: www.siemens-home.com
Intended use Preparation
exclusively for domestic use,only for drying fabrics which have been washed using water.
This appliance is intended for use up to a maximum height of 4000 metres above sea level.Keep children younger than 3 years old away from the dryer.Do not let children make the cleaning and maintenance work on the dryer without supervision.Do not leave children unsupervised near the dryer.Keep pets away from the dryer.The dryer can be operated by children 8 years old and older, by persons with reduced physical, sensory or mental abilities and by persons with insufficient experience or knowledge if they are supervised or have been instructed in its use by a responsible adult.
Contents Page
Preparation . . . . . . . . . . . . . . . . . . . . . . 2Control panel . . . . . . . . . . . . . . . . . . . . . 2Drying . . . . . . . . . . . . . . . . . . . . . . . . .3/4Display panel and settings . . . . . . . . . . . 5Notes on laundry . . . . . . . . . . . . . . . . . . 6Overview of programmes . . . . . . . . . . . . 7Care and cleaning . . . . . . . . . . . . . . . . . 8Installation . . . . . . . . . . . . . . . . . . . . . . . 9Frost protection / Transport . . . . . . . . . . 9Optional accessories . . . . . . . . . . . . . . 10Technical data . . . . . . . . . . . . . . . . . . . 10Consumption rates . . . . . . . . . . . . . . . . 10After-sales service . . . . . . . . . . . . . . . 11What to do if ... . . . . . . . . . . . . . . . . 11/12Safety instructions. . . . . . . . . . . . . . . . . 13
Never start the dryer if it is damaged!Inform your after-sales service!
Installation page 9.
Programme sequence (Drying Time) Setting the drying time available only for timed programmes.
- - (Fine adjust) Fine adjustment of dryness level.
Childproof lock - (Finished in) Setting the programme end.
Condensate container (Gentle Dry) Low-heat drying
Fluff filter/Heat exchanger (Wrinkle Guard+) Extends the anti-crease function.
(Buzzer) Buzzer on/off.
Start/Pause Starts, pauses and continues the programme;activates or deactivates
Programme selector for setting the programme and switching the appliance on/off. Can be turned in both directions.
Further information can be found on page 5

3 4
Display panel / Buttons
Empty the condensate containerEmpty the container after each drying cycle.1. Remove the container, holding it level.2. Pour out the condensate. 3. Push the container back in until it clicks
into place.If (Condensate container) flashes in the display panel What to do if..., page 11.
Clean fluff filterDo not operate the dryer without a fluff filter or with a defective fluff filter. A clean fluff filter minimises energy consumption.
Clean the fluff filter after each drying cycle.
1. Open the door. Remove any fluff from the door/around the door and pull out the fluff filter.
2. Remove the fluff from the shaft of the fluff filter.
3. Open the fluff filter and remove the fluff (sweep your hand over the fluff filter). If the fluff filter is very dirty or blocked, rinse with warm water and dry thoroughly.
4. Close and reinsert the fluff filter.
7
6
Set and adjust theprogramme individually
1
2
Drying
Drying
Close the door
3
Never start the dryer if it is damaged!Inform your after-sales service! Inspect the dryer
Sort the laundryRemove all items from pockets,especially cigarette lighters.The drum must be empty prior to loading.
See programme overview on page 7.See also separate instructions for “Woollens basket” (depending on model).
Make sure your hands are dry. Only grasp the plug by the plug body.
Connect themains plug
End of the programme...
Interrupt the programme
1. Open the door or press the Start/Pause button; the drying cycle is interrupted.
2. Add or remove laundry and close the door.3. If required, select a new programme and additional
functions. Select the Start/Pause button. The remaining time is updated after a few minutes.
The drum and door may be hot!
Remove the laundry and switch off the dryer
5
4
Control panel
Fluff filter
SelectStart/Pause
DoorCondensate container
Air inletSetting the drying time available only for timed programmes.
Fine adjustment of dryness level.
Setting the programme end.
Low-heat drying reduced temperature.
Extends the anti-crease function.
Buzzer on/off.
Starts, pauses and continues the programme;activates or deactivates (Childproof lock).
Programme selector for setting the programme and switching the appliance on/off. Can be turned in both directions.
Maintenance flap

5 6
Do not operate the dryer without a fluff filter or with
Display panel and settings Display panel (status indicators)
(Fluff filter/Heat exchanger)
Clean the fluff filter page 4/11or clean the heat exchanger page 8.
(Condensate container)
Empty the condensate container page 4/11.
- -
(Programme sequence)
These indicators show the programme progress in the next steps of the drying cycle:
Drying;
Iron Dry;
Cupboard Dry;
- - Programme pause if required;
Programme end.
(Childproof lock)You can lock the dryer to prevent the functions you have set from being changed inadvertently. To activate/deactivate (Childproof lock) start the programme and then press and hold the Start/Pause button for 5 seconds until a long acoustic signal is heard. The option activated/deactivated
(Childproof lock) indicator light on/off.
[h:min](Remaining time)
When a programme is selected, the anticipated drying time (remaining time) for the recommended load is displayed. While drying, the moisture sensors detect the actual load and correct the programme length. This is shown by jumps in the remaining time in the display panel.
Settings (indicators lights and buttons)
(Drying time)Drying time, available only for timed programmes, can be selected from min. 0:20 h to max. 3:00 h, in 10-minute steps.
(Fine adjust)
The dryness levels (e.g. Cupboard Dry) can be increased in three levels. The laundry is made drier. Default = 0. Selectable values: 0, 1, 2, 3. After setting the level of the fine adjustment for a programme, it is also retained for other
programmes, until (Fine adjust) is changed again.
- (Finished in)
The time when the programme has to end can be set by selecting the (Finished in) time. The (Finished in) time can be selected in one-hour steps, up to a maximum of 24 hours. Select the (Finished in) button repeatedly until the required number of hours is displayed. Then press the Start/Pause button to activate the (Finished in) option. The programme ends after the selected number of hours.Several minutes after activating (Finished in) option the display switches off to save energy. To switch it on select any button, close/open the door or turn the programme selector.
(Gentle Dry) Reduced temperature for delicate fabrics, e.g. polyacrylic, polyamide or elastane, with a longer drying time.
(Wrinkle Guard+)
After the programme finishes, the drum moves at regular intervals to prevent creases. Laundry remains loose and fluffy. The standard setting for each programme is 60 min. Automatic anti-crease function can be extended by up to 60 min.
(Buzzer) For switching the buzzer on and off. (Buzzer) indicates program end if it is activated. Other sounds are not influenced by this option.
Notes on laundry ...Labelling of fabrics
Follow the manufacturer's care instructions.
Suitable for tumble drying.Dry at normal temperature.Dry at low temperature in addition, select (Gentle Dry).Do not tumble dry.
Do not tumble dry the following fabrics:– Non-breathable fabrics (e.g. rubber-coated).– Delicate materials (silk, curtains made from synthetic material) these may crease.– Oil-stained laundry.
Drying tips
– To ensure a consistent drying result, sort the laundry by fabric type and drying programme.– Always dry very small fabrics (e.g. baby socks) together with large items of laundry
(e.g. towels).– Close zips, hooks and eyelets, and button up covers. Tie cloth belts, apron strings, etc.
together or use a laundry bag.– Do not over-dry easy-care laundry risk of creasing. Allow laundry to finish drying
in the air.– Do not dry woollens in the dryer. They may, however, be refreshed in the dryer
page 7, Woollen finish programme (depending on model).– Do not iron laundry immediately after drying; fold items up and leave for a while
residual moisture will then be distributed evenly.– Knitted fabrics (e.g. T-shirts, jerseys) often shrink slightly the first time they are tumble-dried.
Do not use the Cupboard Dry Extra programme.– Starched laundry is not always suitable for dryers starch leaves behind a coating that
reduces the drying effect.– When washing laundry that is to be tumble dried afterwards, use the correct amount of
fabric softener as specified in the manufacturer's instructions.– For pre-dried, multi-layered fabrics or small, individual items of laundry, use the timed
programme. Also suitable for subsequent drying.
Environmental protection / Energy-saving tips
– Before drying, spin the laundry in the washing machine higher spin speeds minimise the drying time and reduce energy consumption.
– Use the maximum recommended capacity, but do not exceed it Programme overview, page 7.
– Make sure the room is well ventilated during drying.– Clean the fluff filter after every drying cycle Clean the fluff filter, page 4/11.– Do not cover or seal the air inlet on the dryer.
Remove the laundry and switch off
Selected option activated/deactivated indicator light on/off.See the separate Energy-saving mode instructions.

7
Pro
gra
mm
e o
verv
iew
see a
lso p
age 6
.
So
rt t
he
lau
nd
ry a
cco
rdin
g t
o t
ype
of
text
ile a
nd
fab
ric.
Fab
rics
mu
st b
e su
itab
le f
or
tum
ble
dry
ing
.
Aft
er d
ryin
g, l
aun
dry
is t
o b
e ...
ir
oned
li
ght
ly ir
oned
no
t iro
ned
man
gle
d
PR
OG
RA
MM
ES
T
EX
TIL
E T
YP
E A
ND
IN
FO
RM
AT
ION
*C
ott
on
sm
ax. 7
kg
Har
d-w
eari
ng fa
bri
cs, b
oil-p
roof
fab
rics
mad
e of
cot
ton
or li
nen.
* E
asy-
Car
em
ax. 3
.5 k
gN
on-ir
on la
und
ry m
ade
of s
ynth
etic
fib
res
and
mix
ed fa
bri
c, e
asy-
care
cot
ton.
Iro
n D
ryT
he c
ond
ition
of t
he la
und
ry m
eans
it is
sui
tab
le fo
r ir
onin
g (i
ron
clot
hes
in o
rder
to a
void
cre
ases
).
Cup
boa
rd D
ry
Sin
gle
-laye
red
laun
dry
.
Cup
boa
rd D
ry E
xtra
La
und
ry w
ith th
ick,
mul
ti-la
yere
d p
arts
.
Ou
tdo
or
max
. 1.5
kg
Fab
rics
with
mem
bra
ne c
oatin
g, w
ater
-rep
elle
nt fa
bri
cs, f
unct
iona
l clo
thin
g, f
leec
e fa
bri
cs (d
ry ja
cket
s/tr
ouse
rs w
ith r
emov
able
inte
r-na
l lin
ing
sep
arat
ely)
.
Sen
siti
vem
ax. 6
kg
Cot
ton
fab
rics
for
dry
ing
in h
ighe
r te
mp
erat
ures
to k
eep
them
mor
e hy
gie
nic
.
Mix
max
. 3 k
gM
ixed
item
s of
laun
dry
mad
e of
cot
ton
and
syn
thet
ics
(Mix
).
War
mm
ax. 3
kg
Sui
tab
le fo
r p
re-d
ried
or
slig
htly
dam
p la
und
ry a
nd fo
r d
ryin
g o
ff m
ulti-
laye
red
, thi
ck la
und
ry.
Onl
y d
ry w
ool,
spor
ts s
hoes
and
sof
t toy
s w
ith th
e b
aske
t for
woo
llens
O
ptio
nal A
cces
sori
es, p
age
10
.In
the
time
pro
gra
mm
e, th
e la
und
ry's
res
idua
l moi
stur
e is
not
aut
omat
ical
ly d
etec
ted
. If t
he la
und
ry is
stil
l too
dam
p a
fter
the
dry
ing
pro
-g
ram
me,
rep
eat t
he p
rog
ram
me
and
, if r
equi
red
, ext
end
the
pro
gra
mm
e le
ngth
.
Co
ldm
ax. 3
kg
All
typ
es o
f fab
rics
. For
fres
heni
ng u
p o
r ai
ring
of i
tem
s of
laun
dry
that
hav
e b
een
wor
n fo
r a
shor
t per
iod
of t
ime.
Sh
irts
15’
max
. 1 k
gFo
r op
timal
dry
ing
res
ult d
ry a
max
imum
of 5
bus
ines
s sh
irts
tog
ethe
r. A
fter
dry
ing
, iro
n cl
othe
s or
han
g th
em o
ut a
nd le
ave
for
a w
hile
. T
he r
emai
ning
moi
stur
e w
ill b
e d
istr
ibut
ed e
venl
y.
Su
per
40’
max
. 2 k
gLa
und
ry m
ade
of s
ynth
etic
fib
res,
cot
ton
or b
lend
ed fa
bri
cs (f
or e
xam
ple
) tha
t nee
ds
to b
e d
ried
qui
ckly
. The
val
ues
may
diff
er fr
om
the
thos
e sp
ecifi
ed d
epen
din
g o
n th
e ty
pe
of fa
bri
c, m
ixtu
re o
f lau
ndry
to b
e d
ried
, res
idua
l moi
stur
e in
the
fab
ric
and
load
ing
cap
acity
.
Wo
olle
n f
inis
hm
ax. 3
kg
Woo
llen
fab
rics
sui
tab
le fo
r w
ashi
ng m
achi
nes.
Fab
rics
bec
ome
fluff
ier
but
not
dry
. Rem
ove
fab
rics
onc
e th
e p
rog
ram
me
has
end
ed
and
allo
w to
dry
.
Del
icat
em
ax. 1
kg
Ling
erie
mad
e of
syn
thet
ic fi
bre
s, c
otto
n or
ble
nded
fab
ric.
*Dry
ness
leve
ls c
an b
e se
lect
ed in
div
idua
lly
C
upb
oard
Dry
Ext
ra,
Cup
boa
rd D
ry a
nd
Iron
Dry
(dep
end
ing
on
the
mod
el).
Deg
ree
of d
ryne
ss c
an b
e fin
ely
adju
sted
; m
ulti-
laye
red
text
iles
req
uire
a lo
nger
dry
ing
tim
e th
an s
ing
le-la
yere
d it
ems
of c
loth
ing
. Rec
omm
end
atio
n: D
ry s
epar
atel
y.
9510 /
9000957069
*957069*
BS
H H
ausg
erät
e G
mb
H
Car
l-Wer
y-S
traß
e 3
4
81
73
9 M
ünch
en
GE
RM
AN
Y
WT
46
B2
67
DN
Man
ufac
ture
d b
y B
SH
Hau
sger
äte
Gm
bH
und
er T
rad
emar
k Li
cens
e of
Sie
men
s A
G

8
Care and cleaningDryer housing, control panel– Wipe clean with a soft, damp cloth.– Do not clean with a water jet.– Remove detergent and cleaning agent residue immediately.– During drying, water may occasionally accumulate between the window and the seal.
This does not affect the proper operation of your dryer.
Heat exchanger
The heat exchanger requires cleaning once a month, however this varies depending on how frequently the dryer is used.Allow the dryer to cool down and place an absorbent cloth under the maintenance flap.Residual water may escape.
1. Unlock the maintenance flap and open completely.
2. Turn both locking levers towards each another.
3. Pull out the cap.
4. Remove the heat exchanger.
Take care not to damage the heat exchanger.When cleaning, use water only. Do not use hard or sharp-edged objects.
5. Rinse the heat exchanger and the cap on all sides with a jet of water to completely remove all of the fluff.
6. Remove any fluff from the seals on the dryer and heat exchanger.
7. Allow to drip dry fully.8. First insert the heat exchanger, then the cap.9. Turn back both locking levers and close the
maintenance flap until it locks closed.
Moisture sensors
The dryer is equipped with stainless steel moisture sensors.Moisture sensors measure the moisture level of the laundry.After sustained, repeated operation, a fine layer of limescale may form on the moisture sensors.
1. Open the door.
2. Clean the moisture sensors with a damp sponge which has a rough surface.
Do not use steel wool or abrasive agents!
Only when switched off!
9
Installation– Scope of delivery: dryer, operating and installation instructions, basket for woollens
(depending on the model).– Check the dryer for transport damage.– The dryer is very heavy. Do not attempt to lift it on your own.– Be careful to avoid sharp edges.– Do not lift the dryer by protruding parts (e.g. the door) - risk of breakage.– Do not set up in a room that is susceptible to frost.
Freezing water may cause damage.– If in doubt, have the appliance connected by a specialist.
Setting up the dryer– The mains plug must always be accessible.– Ensure that the appliance is placed on a clean, level and
firm surface.– Do not obstruct the air inlet on the dryer.– Keep the area around the dryer clean.– Level the dryer using the threaded feet
and a spirit level.Never remove the threaded feet!
For mains connection, see Safety instructions page 13.– Connect to an AC earthed socket. If in doubt have the socket checked by a specialist.– The mains voltage and the voltage shown on the rating plate ( page 10) must be the same.– The connected load and necessary fuse protection are specified on the rating plate.
Converting the installed load Note the fuse protection of the socket (10/16 Amps.).
1. Turn the programme selector to Off.2. Press and hold the (Fine adjust) button.3. Turn the programme selector to Cotton Cupboard Dry Extra; wait until the recent
setting appears in the display: =10A or =16A.4. Press the (Fine adjust) button to change the settings.5. Turn the programme selector to Off.
Frost protection / Transport
Preparation1. Empty the condensate container page 4/11.2. Select any programme using the programme selector.3. Press the Start/Pause button condensation is pumped into the container.4. Wait several minutes or until the dryer stops, and then empty the condensate container
again.5. Turn the programme selector to Off.
1.Take all accessory parts out of the drum.The drum must be empty.
Make sure that the air inlet remains unobstructed
Clean and level
Do not install the dryer behind a door or sliding door which could prevent or obstruct the dryer door from opening.This will prevent children from locking themselves in and risking their lives.
2.
3.
Do not operate the dryer if there is a risk of frost.

10
Technical Data
Dimensions (DxWxH) 60 x 60 x 85 cm (height adjustable)
Weight approx. 45 kg
Max. capacity 7 kg
Condensate container 4,0 l
Connection voltage 220-240 V
Connected load 2100-2800 W
Fuse protection 10 A / 16 A
Ambient temperature 5 - 35°C
Product number Production number Inside of door
The rating plate can be found on the back of the dryer.
Power consumption when switched off 0,10 W
Power consumption when ready for use (left-on mode) 1,00 W
Drum interior light (depending on model): The drum lights up after the door is opened and after the programme starts, and switches off automatically.
Consumption values table (The value on the label is achieved at the maximum heat setting.)
ProgrammeSpin speed which
is used for spinning the laundry
Duration** Energy consumption**
Cottons7 kg 3.5 kg 7 kg 3.5 kg
10 A 16 A 10 A 16 A 10 A 16 A 10 A 16 A
Cupboard Dry* 1400 rpm 121 min 95 min 92 min 62 min 3.50 kWh 3.50 kWh 2.00 kWh 2.00 kWh
1000 rpm 141 min 111 min 99 min 69 min 4.08 kWh 4.08 kWh 2.33 kWh 2.33 kWh
800 rpm 161 min 128 min 115 min 85 min 4.66 kWh 4.66 kWh 2.86 kWh 2.86 kWh
Iron Dry* 1400 rpm 100 min 74 min 82 min 52 min 2.52 kWh 2.52 kWh 1.78 kWh 1.78 kWh
1000 rpm 119 min 88 min 92 min 62 min 3.18 kWh 3.18 kWh 2.23 kwh 2.23 kwh
800 rpm 140 min 100 min 103 min 73 min 3.85 kWh 3.85 kWh 2.81 kwh 2.81 kwh
Easy-Care 3.5 kg 3.5 kg
Cupboard Dry* 800 rpm 52 min 46 min 1.42 kWh 1.42 kWh
600 rpm 65 min 56 min 1.74 kWh 1.74 kWh
* Programme setting for testing in accordance with the applicable EN61121 standard.** The values may differ from those specified, depending on the type of fabric, composition of laundry to be dried, residual moisture in the fabric, the
degree of dryness that has been set and the amount of laundry being loaded.
Most efficient programme for cotton fabricsThe following "standard cottons programme" (identified with ) is suitable for drying normal, wet cotton laundry and is most efficient in terms of its combined energy consumption for drying wet cotton laundry.
Standard programme for cottons in accordance with current EU regulation 932/2012
Programme Load Energy consumption Programme duration
Cottons Cupboard Dry 7 kg/3.5 kg10 A 16 A 10 A 16 A
4.08kWh/2.33 kWh 4.08kWh/2.33 kWh 141 min/99 min 111 min/69 min
Programme setting for testing and energy labelling in accordance with Directive 2010/30/EU.
Optional accessories (order from the after-sales service using the order number, depending on the model)
Washer-dryer stack connection setThe dryer can be placed on top of a suitable washing machine with the same width and depth to save space. The dryer must be fastened to the washing machine using this connection set.WZ 20400: with pull-out worktop.Wollens basketFor drying individual wollen fabrics, sports shoes and soft toys (see separate instructions for “Woollens basket”).
PlatformFor easier loading and unloading. The basket contained in the drawer can be used to carry the laundry.
Connection fittings for condensation outletThe condensation is conveyed directly via a hose.
WZ11410
WZ 20600
WZ 20500
WZ20160 11
What to do if ...
Turn the programme selector to Off and remove the mains plug from the socket.
The Start/Pause indicator light does not light up.
Mains plug plugged in?Programme selected?Check the socket fuse.
The display panel light and indicator lights (depending on model) go out and the Start/Pause indicator light flashes.
Energy-saving mode is activated see the separate Energy-saving mode instructions.
The display panel switches off. The appliance goes into the sleep mode after activating (Finished in) option page 5.
The (Condensate container) indicator light flashes.
Empty the condensate container page 4.Press the Start/Pause button to reset the displayed indication and then press the Start/Pause button again to restart the appliance if necessary.If featured, check the hose for condensation outlet.
(Fluff filter/Heat exchanger) indicator light flashes.
Clean the fluff filter page 4.Press the Start/Pause button to reset the displayed indication and then press the Start/Pause button again to restart the appliance if necessary.Clean the heat exchanger page 8.
Dryer does not start. Start/Pause button selected? Door closed?Programme set?
After-sales service
If you cannot rectify the fault yourself (e.g. switching off/on) What to do if..., page 11/12, please contact our after-sales service. We will always find an appropriate solution and avoid unnecessary visits by engineers.
The contact details of your local after-sales service can be found in the enclosed after-sales service directory.– GB 0344 892 8999 (Calls charged at local or mobile rate.)– IE 01450 2655 (0.03 € per minute at peak. Off peak 0.0088 € per minute.)
Please provide the after-sales service the product number (E no.) and the production number (FD) of the appliance.
Product number Production number
You can find this information:inside the door* / in the opened service flap* and on the rear of the appliance.*depending on the model
Trust the expertise of the manufacturer. Contact us for assistance. In this way, you can rest assured that the repair will be carried out by trained service technicians using original spare parts.

12
What to do if ...
Programme terminates shortly after starting.
Ambient temperature greater than 5°C?Is the appliance loaded with the laundry?Load too small for selected programme?/Use timed programme page 6/7.Loaded laundry dry?
Water is leaking out. Make sure the dryer is level.Clean the heat exchanger seal.
The door opens by itself. Push the door closed until you hear it engage.
Creasing. Laundry load exceeded?Remove articles of clothing immediately after the end of the programme, hang up and pull into shape.Unsuitable programme selected page 7.
Laundry is not dried correctly or is still too damp.
After the end of the programme, warm laundry feels damper than it actually is. Spread the laundry out and allow the heat to disperse.
Finely adjust the dryness level – this extends the drying time but does not increase the temperature. Your laundry will become drier.
Select a programme with a longer drying time or increase the drying level. This does not increase the temperature.
Select a time programme for extended drying of laundry that is still damp.
If you have exceeded the maximum load for the programme, the laundry may not be dried correctly.
Clean the moisture sensor in the drum. A fine layer of limescale may adversely affect the performance of the sensors and your washing will not dry properly.
Drying has been interrupted as a result of a power cut, because the condensate container is full or because the maximum drying time has been exceeded.
Drying time too long. Clean the fluff filter under running water page 4/11.
Insufficient supply of air Ensure that air can circulate.
Air inlet possibly blocked Clear inlet page 9.
Ambient temperature higher than 35°C Ventilate the room.
One or more indicator lights are flashing.
Clean the fluff filter and heat exchanger page 4,8/11.Check the installation conditions page 9.Switch off, allow to cool, switch back on and restart the programme.
Power failure. Remove the laundry from the dryer immediately and spread out. This allows the heat to dissipate. Be careful as the door, the drum and the laundry may be hot.
13
Safety instructions Emergency – Pull the appliance plug out of the socket immediately or disconnect the fuse.
ONLY use the dryer...
– in rooms inside the house.– to dry fabrics.
The dryer must NEVER...
– be used for purposes other than those described above.– be modified in terms of its technology or properties.
Hazards – The dryer must not be used by children or persons who have not been instructed in its use.
– Do not leave children unsupervised near the dryer.– Keep pets away from the dryer.– Remove all objects from pockets, and lighters in particular Risk of explosion.– Do not lean or sit on the door Risk of tipping.
Installation – Secure loose cables Risk of tripping.– Do not operate a dryer if there is a risk of frost.
Mains connection
– Connect the dryer to an AC earthed socket according to specifications, otherwise it cannot be guaranteed that the appliance is completely safe.
– The cable cross-section must be sufficient.
– Only use earth-leakage circuit breakers with the following symbol: – The appliance plug and socket must be compatible.– Do not use multiple plugs/connectors and/or extension cables. – Do not touch or hold the appliance plug with wet hands Risk of electric shock.– Never pull the appliance plug out of the socket by its cable.– Do not damage the mains lead Risk of electric shock.
Operation – Only load the drum with laundry.Check the contents before you switch the dryer on.
– Do not use the dryer if the laundry has been in contact with solvents, oil, wax, grease or paint (e.g. hair setting spray, nail polish remover, stain remover, cleaning solvent, etc.) fire/explosion hazard.
– The tumble dryer is not to be used if industrial chemicals have been used for cleaning.
– Dust (e.g. coal dust, flour) poses a danger: do not use the dryer explosion hazard.
– Do not turn off the dryer until the drying process ends, unless the laundry will be removed quickly and spread out, so that the heat can dissipate.
– Do not put laundry containing foamed material/rubber in the dryer elastic material may be destroyed and the dryer may be damaged due to possible deformation of the foamed material.
– When cleaning the fluff filter, make sure that no foreign material (down or filling material) gets into the air duct opening. If necessary, clean the drum beforehand with a vacuum cleaner. If foreign material should still get into the air duct call the after-sales service Risk of fire/explosion.
– Light things, such as long hair, may be sucked into the air inlet of the dryer Risk of injury.
– Final part of a tumble dryer cycle occurs without heat (cool down cycle), to ensure that the items are left at a temperature that ensures that the items will not be damaged.
– Switch off the dryer once the programme has ended.– The exterior of the appliance's rear panel becomes very hot during
operation. Never touch the hot surface of the appliance's rear panel. Keep children away from the appliance Risk of burns!
– The water from condensation is not drinking water and may be contaminated with fluff.
Defect – Do not use the dryer if it is defective or if you suspect that it is.Repairs must only be carried out by the after-sales service.
– Do not use the dryer if the mains cable is defective. To avoid danger, only have the defective mains cable replaced by the after-sales service.
Spare parts – For safety reasons, you must only use genuine spare parts and accessories.
Disposal – Pull out the appliance plug, then cut off the mains cable from the appliance.Dispose of the appliance at a municipal waste disposal site.
– Packaging: Keep all packaging out of reach of babies and children Risk of suffocation.
– All materials are environmentally sound and can be reused. Dispose of them in an environmentally-responsible manner.

siemens-home.com/welcome
Registeryourproductonline
Tumble dryerWT46B267DN
en Operating and installation instructions
Observe the safety instructions on page 13.
Read these instructions and the separate Energy-saving mode instructions before switchingon the dryer.


