
Quick Start Guide
A guide to setting up Credit Hound®
Document version 3.0
Credit Hound Quick Start Guide Draycir
2 Copyright © 2011 Draycir Limited
Table of Contents Overview .................................................................................................................................... 3
Enabling your Sage accounting software ................................................................................... 4
Registering 3rd Party Integration for Sage 200, Sage MMS and Sage Line 100 ...................... 4
Registering 3rd Party Integration for Sage 50 / Sage Line 50 .................................................. 4
Creating a company using the wizard ......................................................................................... 5
Licence key ............................................................................................................................ 6
Creating users ......................................................................................................................... 7
Types of users .................................................................................................................... 8
Selecting a database system .................................................................................................. 9
Selecting an accounting system ............................................................................................ 10
Selecting the Demo System .............................................................................................. 10
Selecting your live accounting system .............................................................................. 11
Company details ................................................................................................................... 13
Company contacts ................................................................................................................ 14
Individuals and Groups ...................................................................................................... 15
Assigning users to a company ............................................................................................... 16
Ageing periods ...................................................................................................................... 17
Logging onto Credit Hound for the first time ............................................................................ 18
Data Synchroniser .................................................................................................................... 19
Configuring a Credit Hound company ................................................................................... 19
Configuring Windows Scheduled Tasks (Windows XP) ......................................................... 19
Credit Hound Quick Start Guide Draycir
3 Copyright © 2011 Draycir Limited
Overview Once you have installed your Credit Hound software, you need to tell Credit Hound what
accounting system and company data you want to use. Some accounting systems require you
to enable them to work with 3rd party applications, such as Credit Hound. Please make sure
you have already done this before setting up a company in Credit Hound.

Credit Hound Quick Start Guide Draycir
4 Copyright © 2011 Draycir Limited
Enabling your Sage accounting software Credit Hound makes use of Sage’s SDO objects and ODBC connectivity for Sage 50, Sage Line
100 and Sage200/Sage MMS.
Different versions of the Sage accounting products range require you to register or enable the
SDO objects.
Registering 3rd Party Integration for Sage 200, Sage MMS and Sage Line 100
To enable third party integration for Sage 200, Sage MMS or Sage Line 100, Sage Business
Partners can telephone Sage on 0845 111 7733 and choose Business Partner Services. Request
an enable string for client ‘Customisation and Integration’.
Qualification Criteria:
Service is ONLY available to registered Sage Mid-Market Solutions Developers
Developers are required to apply on behalf of the customer
Customers must be registered users of Sage 200 / Sage MMS. At the time of writing, Sage does not charge for this service. Users of Sage 200/Sage MMS
should contact their Sage Reseller.
Registering 3rd Party Integration for Sage 50 / Sage Line 50
To enable third party integration for Sage 50 / Sage Line 50, you can request a serial number
and activation key from Sage Customer Services by the following methods:
Telephone: 0845 1116666 (Great Britain),
0845 2450280 (Northern Ireland),
01 6420863 (Republic of Ireland)
E-Mail: [email protected]
Qualification Criteria:
Only customers with a registered copy of Sage 50 / Sage Line 50 are eligible for a serial number and activation key.
At the time of writing, Sage does not charge for this service.

Credit Hound Quick Start Guide Draycir
5 Copyright © 2011 Draycir Limited
Creating a company using the wizard When you run Credit Hound for the first time, a wizard will appear. Use this wizard to create a
new Credit Hound company which is linked to a company in your accounts. This wizard can
also be found in the Credit Hound Manager under ‘Setup -> Configuration Settings’.
Credit Hound Quick Start Guide Draycir
6 Copyright © 2011 Draycir Limited
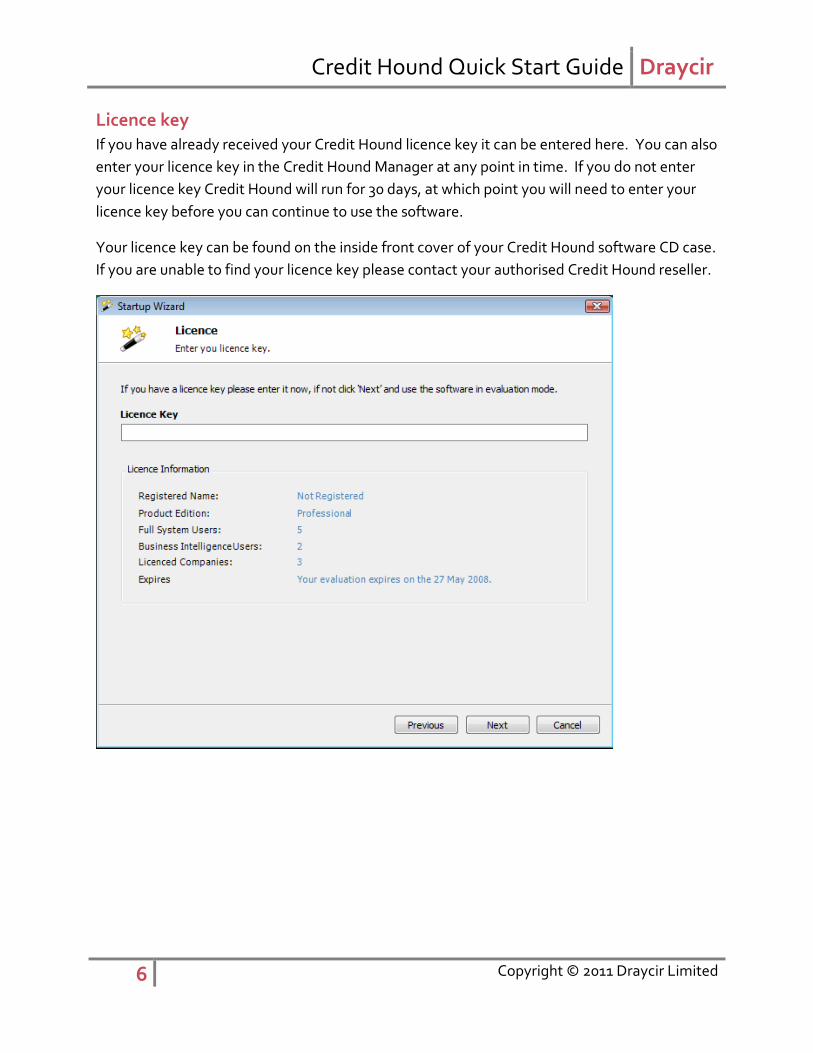
Licence key
If you have already received your Credit Hound licence key it can be entered here. You can also
enter your licence key in the Credit Hound Manager at any point in time. If you do not enter
your licence key Credit Hound will run for 30 days, at which point you will need to enter your
licence key before you can continue to use the software.
Your licence key can be found on the inside front cover of your Credit Hound software CD case.
If you are unable to find your licence key please contact your authorised Credit Hound reseller.
Credit Hound Quick Start Guide Draycir
7 Copyright © 2011 Draycir Limited
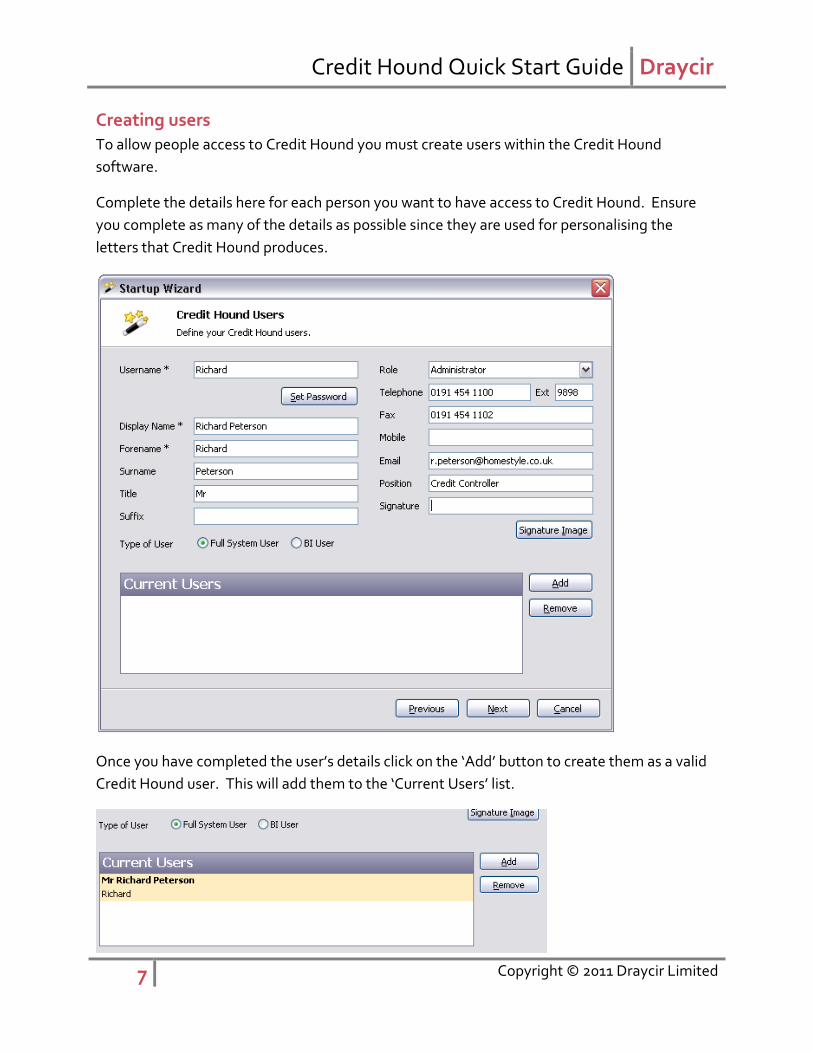
Creating users
To allow people access to Credit Hound you must create users within the Credit Hound
software.
Complete the details here for each person you want to have access to Credit Hound. Ensure
you complete as many of the details as possible since they are used for personalising the
letters that Credit Hound produces.
Once you have completed the user’s details click on the ‘Add’ button to create them as a valid
Credit Hound user. This will add them to the ‘Current Users’ list.
Credit Hound Quick Start Guide Draycir
8 Copyright © 2011 Draycir Limited
Types of users
There are two types of users in Credit Hound:
Full System User
A Full System User is someone who performs the tasks of credit control (calling clients chasing
for payment, writing letters, etc.)
BI User
A BI user (Business Intelligence User) is someone who manages the credit controller, normally
a manager or director. BI Users cannot chase clients for payment, but they can review what is
going on within credit control, such as looking at individual accounts and running reports.
Please note that when purchasing your Credit Hound software you need to specify the number
of Full System Users and BI Users you require. You will only be able to add that number of
each type of user. If you require more users of either type, please contact your Credit Hound
reseller.
Credit Hound Quick Start Guide Draycir
9 Copyright © 2011 Draycir Limited
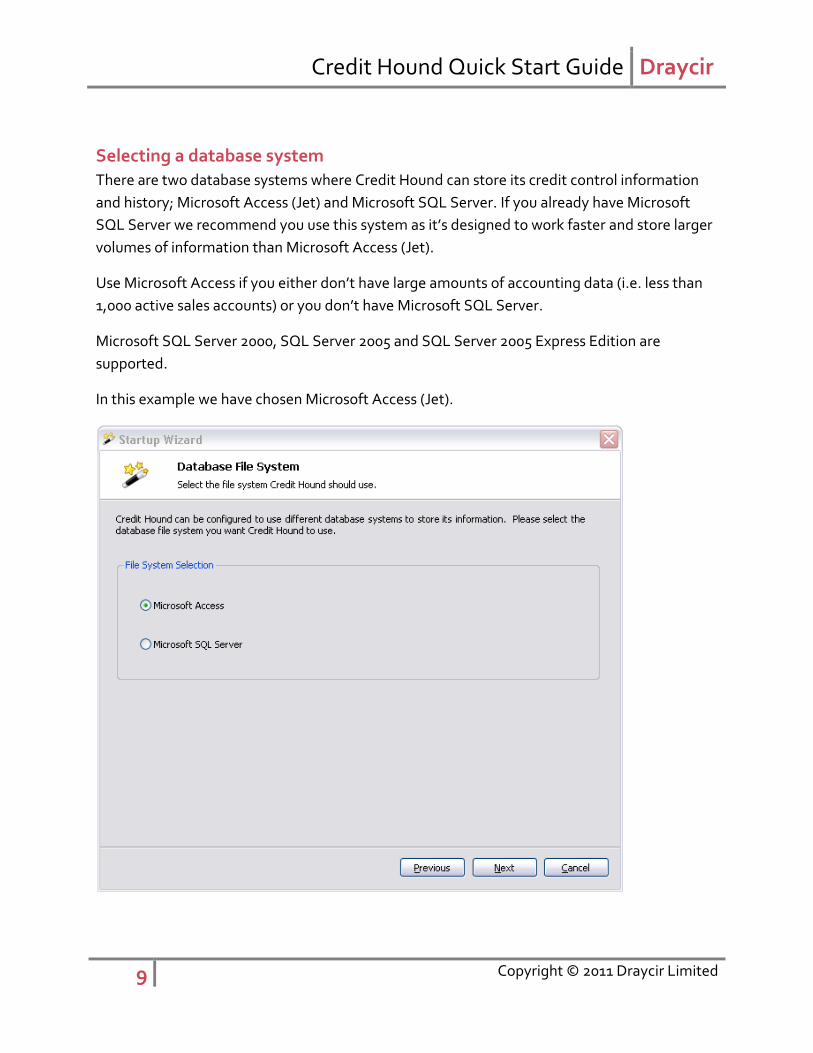
Selecting a database system
There are two database systems where Credit Hound can store its credit control information
and history; Microsoft Access (Jet) and Microsoft SQL Server. If you already have Microsoft
SQL Server we recommend you use this system as it’s designed to work faster and store larger
volumes of information than Microsoft Access (Jet).
Use Microsoft Access if you either don’t have large amounts of accounting data (i.e. less than
1,000 active sales accounts) or you don’t have Microsoft SQL Server.
Microsoft SQL Server 2000, SQL Server 2005 and SQL Server 2005 Express Edition are
supported.
In this example we have chosen Microsoft Access (Jet).
Credit Hound Quick Start Guide Draycir
10 Copyright © 2011 Draycir Limited
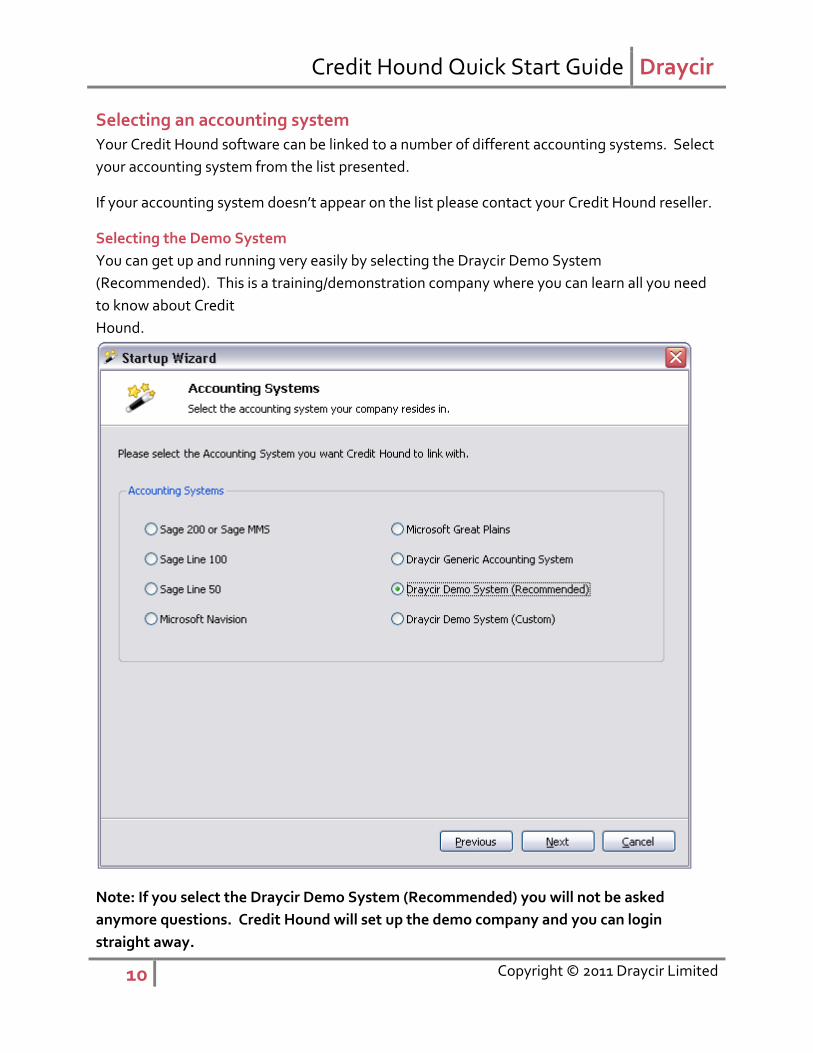
Selecting an accounting system
Your Credit Hound software can be linked to a number of different accounting systems. Select
your accounting system from the list presented.
If your accounting system doesn’t appear on the list please contact your Credit Hound reseller.
Selecting the Demo System
You can get up and running very easily by selecting the Draycir Demo System
(Recommended). This is a training/demonstration company where you can learn all you need
to know about Credit
Hound.
Note: If you select the Draycir Demo System (Recommended) you will not be asked
anymore questions. Credit Hound will set up the demo company and you can login
straight away.
Credit Hound Quick Start Guide Draycir
11 Copyright © 2011 Draycir Limited
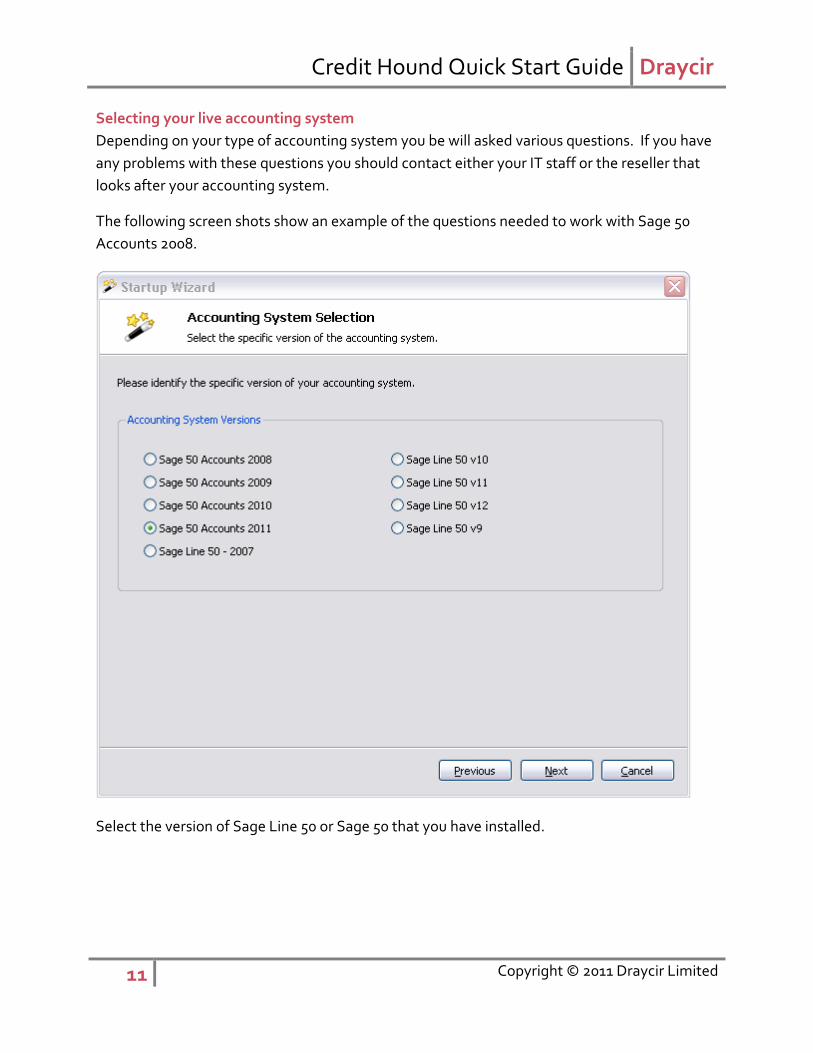
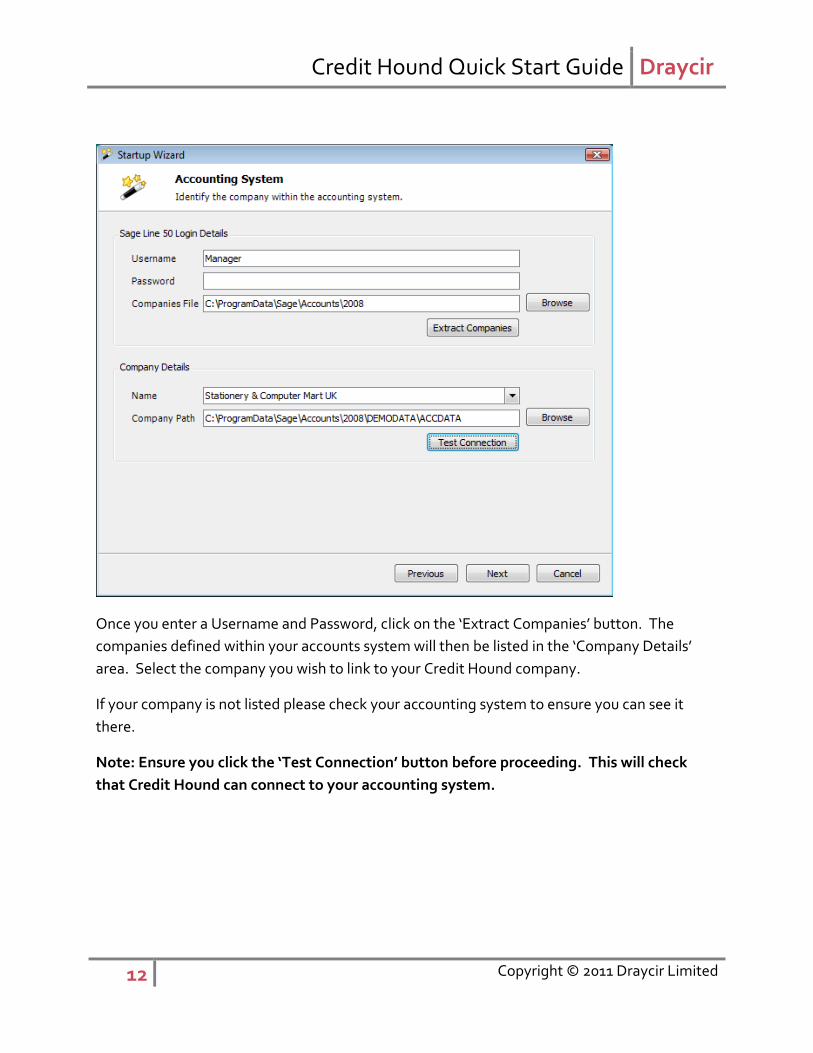
Selecting your live accounting system
Depending on your type of accounting system you be will asked various questions. If you have
any problems with these questions you should contact either your IT staff or the reseller that
looks after your accounting system.
The following screen shots show an example of the questions needed to work with Sage 50
Accounts 2008.
Select the version of Sage Line 50 or Sage 50 that you have installed.
Credit Hound Quick Start Guide Draycir
12 Copyright © 2011 Draycir Limited
Once you enter a Username and Password, click on the ‘Extract Companies’ button. The
companies defined within your accounts system will then be listed in the ‘Company Details’
area. Select the company you wish to link to your Credit Hound company.
If your company is not listed please check your accounting system to ensure you can see it
there.
Note: Ensure you click the ‘Test Connection’ button before proceeding. This will check
that Credit Hound can connect to your accounting system.
Credit Hound Quick Start Guide Draycir
13 Copyright © 2011 Draycir Limited
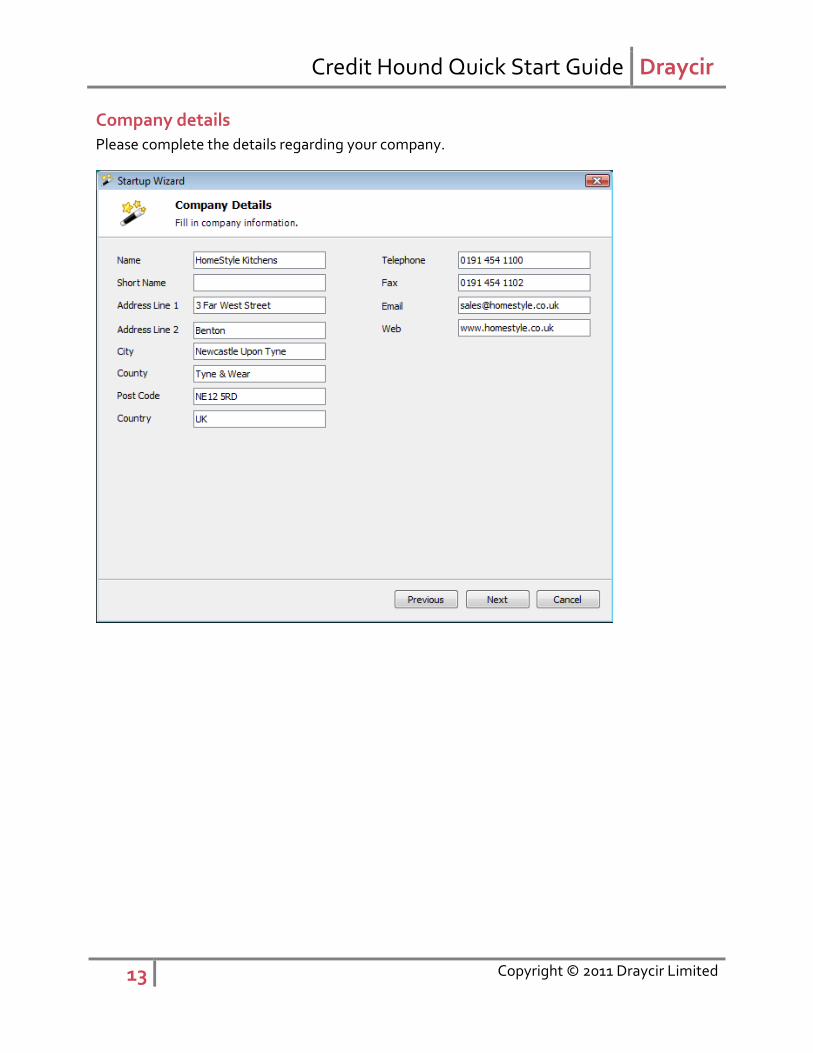
Company details
Please complete the details regarding your company.
Credit Hound Quick Start Guide Draycir
14 Copyright © 2011 Draycir Limited
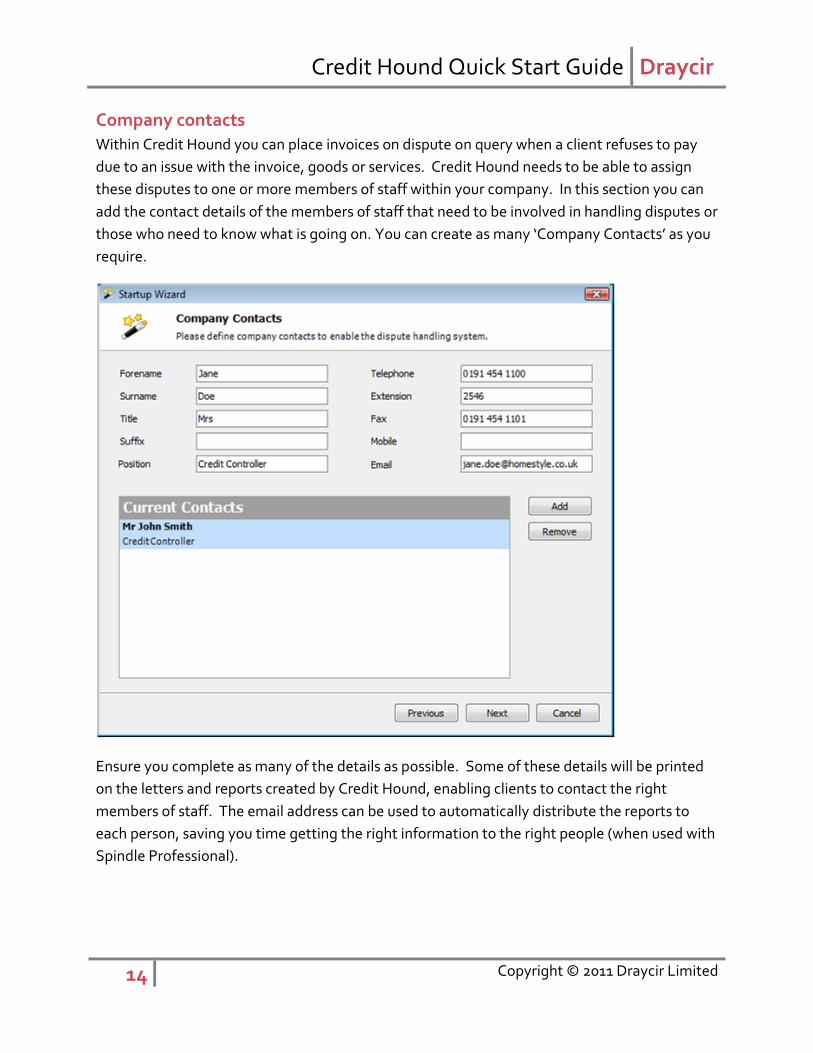
Company contacts
Within Credit Hound you can place invoices on dispute on query when a client refuses to pay
due to an issue with the invoice, goods or services. Credit Hound needs to be able to assign
these disputes to one or more members of staff within your company. In this section you can
add the contact details of the members of staff that need to be involved in handling disputes or
those who need to know what is going on. You can create as many ‘Company Contacts’ as you
require.
Ensure you complete as many of the details as possible. Some of these details will be printed
on the letters and reports created by Credit Hound, enabling clients to contact the right
members of staff. The email address can be used to automatically distribute the reports to
each person, saving you time getting the right information to the right people (when used with
Spindle Professional).
Credit Hound Quick Start Guide Draycir
15 Copyright © 2011 Draycir Limited
Individuals and Groups
You can create a group of people as well as individuals, e.g. Sales, Customer
Services, and Warehouse, etc. Simply fill in the first name, the telephone and
fax number and email address.
Credit Hound Quick Start Guide Draycir
16 Copyright © 2011 Draycir Limited
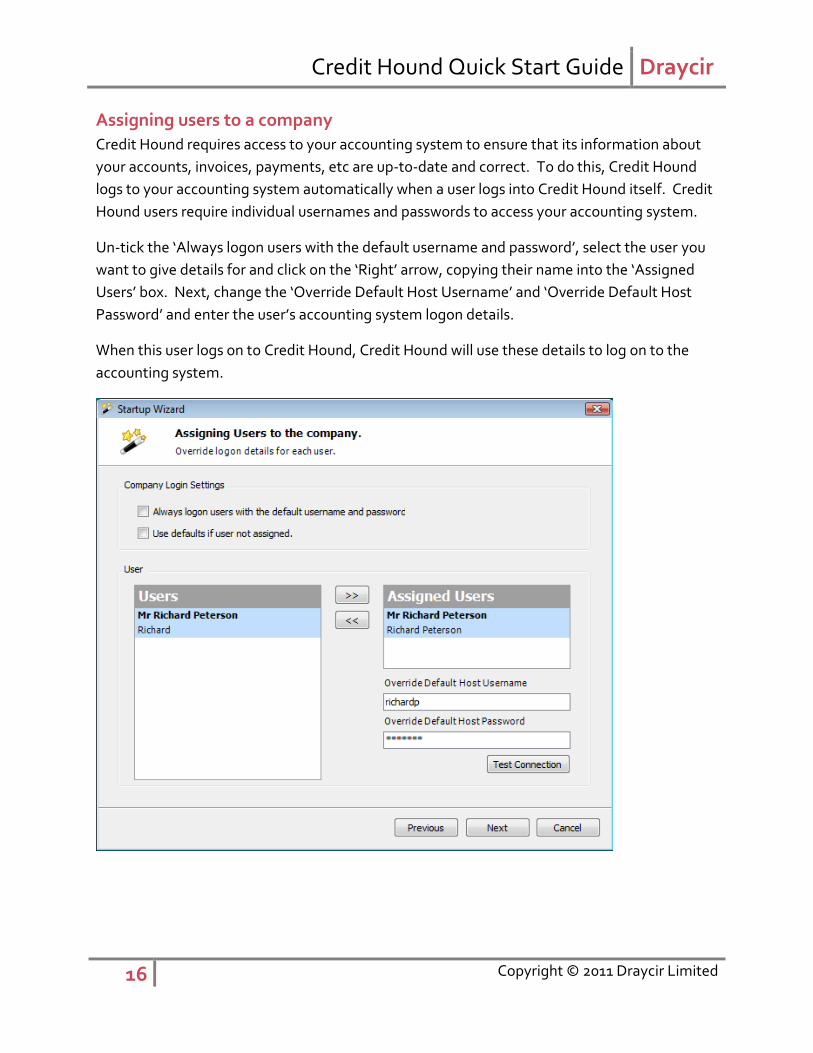
Assigning users to a company
Credit Hound requires access to your accounting system to ensure that its information about
your accounts, invoices, payments, etc are up-to-date and correct. To do this, Credit Hound
logs to your accounting system automatically when a user logs into Credit Hound itself. Credit
Hound users require individual usernames and passwords to access your accounting system.
Un-tick the ‘Always logon users with the default username and password’, select the user you
want to give details for and click on the ‘Right’ arrow, copying their name into the ‘Assigned
Users’ box. Next, change the ‘Override Default Host Username’ and ‘Override Default Host
Password’ and enter the user’s accounting system logon details.
When this user logs on to Credit Hound, Credit Hound will use these details to log on to the
accounting system.
Credit Hound Quick Start Guide Draycir
17 Copyright © 2011 Draycir Limited
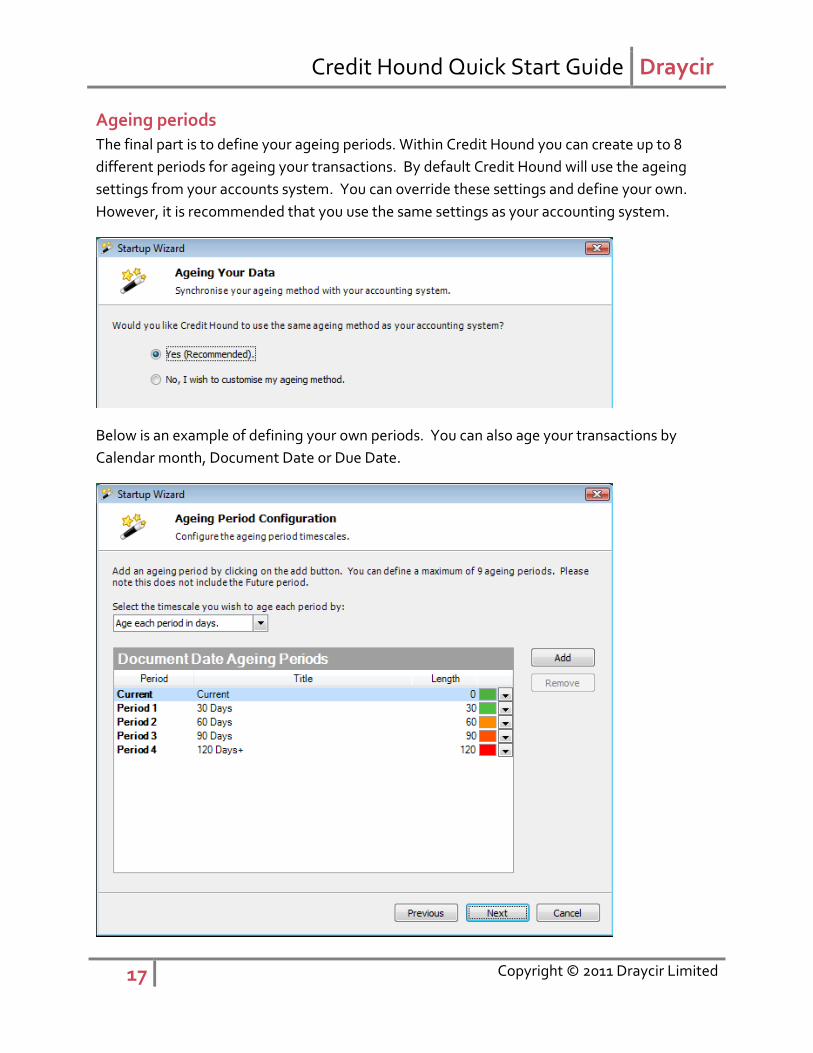
Ageing periods
The final part is to define your ageing periods. Within Credit Hound you can create up to 8
different periods for ageing your transactions. By default Credit Hound will use the ageing
settings from your accounts system. You can override these settings and define your own.
However, it is recommended that you use the same settings as your accounting system.
Below is an example of defining your own periods. You can also age your transactions by
Calendar month, Document Date or Due Date.
Credit Hound Quick Start Guide Draycir
18 Copyright © 2011 Draycir Limited
Logging onto Credit Hound for the first time Once you’ve completed the wizard you can run Credit Hound for the first time.
Credit Hound will ask you to login using one of the user names you created in the early stages
of the wizard and then to select a company.
Once you’ve selected the company you will be asked to ‘Synchronise’ your accounting data
with Credit Hound. The synchronisation will copy all of the relevant information from your
sales ledger into Credit Hound, enabling you to chase your clients for outstanding invoices.
This process may take some time depending on the amount of accounts and transactions you
have in your company accounts.
Please refer to the help file for details of using Credit Hound. The help file can be found by
pressing F1 from within Credit Hound or by using Start -> Programs -> Draycir -> Credit Hound
Credit Hound Quick Start Guide Draycir
19 Copyright © 2011 Draycir Limited
Data Synchroniser Credit Hound needs to synchronise its own data with your accounting systems data. This is
usually performed when you first log in to Credit Hound but can take some time if you have a
large set of accounting data. You can use the Credit Hound Data Synchroniser and the
Windows task scheduler to automatically perform this task at a more favourable time of day,
such as early morning or late evening.
Go to Credit Hound Manager -> Setup -> Companies and edit the required company. Tick
‘Automatically synchronise this company using the Credit Hound Data Synchroniser’ to notify
Credit Hound that the synchronisation will be performed via the ‘Windows Scheduled Tasks’.
Configuring a Credit Hound company
Launch the Credit Hound Manager from ‘Start Menu -> All Programs -> Draycir -> Credit
Hound -> Credit Hound Manager’.
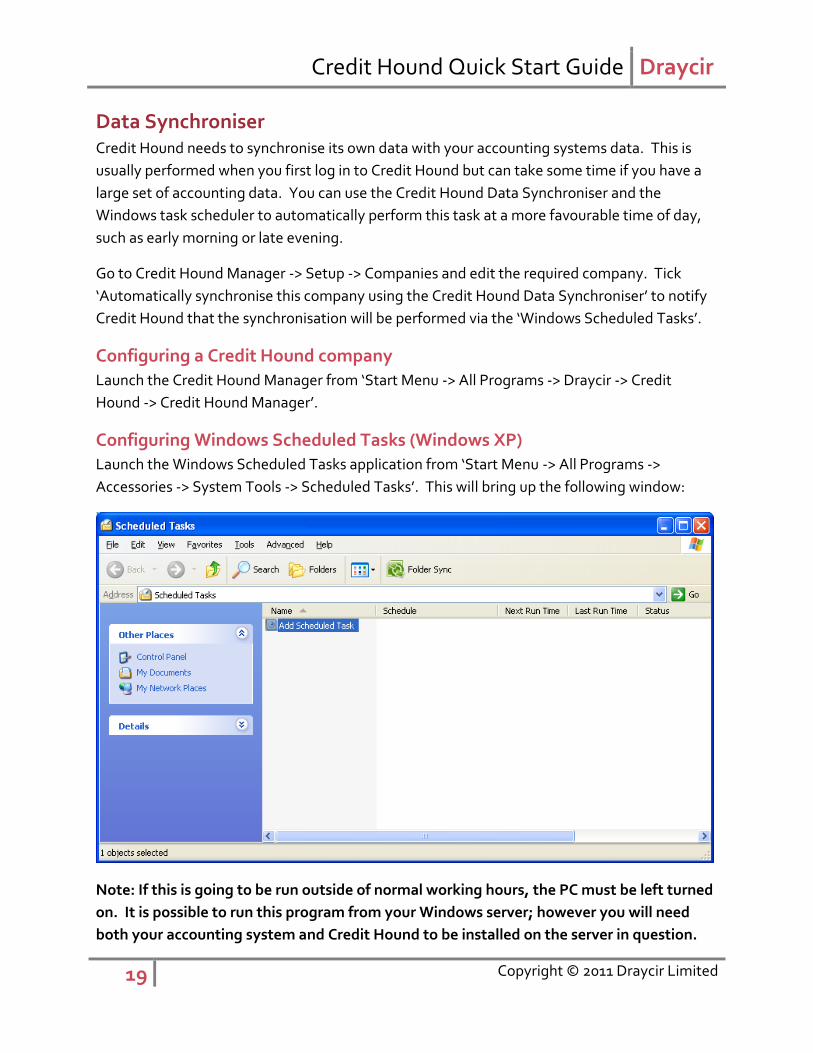
Configuring Windows Scheduled Tasks (Windows XP)
Launch the Windows Scheduled Tasks application from ‘Start Menu -> All Programs ->
Accessories -> System Tools -> Scheduled Tasks’. This will bring up the following window:
Note: If this is going to be run outside of normal working hours, the PC must be left turned
on. It is possible to run this program from your Windows server; however you will need
both your accounting system and Credit Hound to be installed on the server in question.


