
CONTROL SYSTEM SCHEDULES
CONTROL SYSTEM DESCRIPTION
The lighting control system for this area includes the following equipment:
Manufacture:
Location: (as per electrical drawings)
Schedule:
Lutron "EcoSystem"
1 - EcoSystem ballast (specifed with fixtures)
2 - EcoSystem daylight sensors, two per floor (C-SR-M1-WH)
3 - EcoSystem Programmer, one per system (C-PDSA-CLR)
4 - EcoSystem Wall Station Control, one per floor (CC-4BRL-WH)
18 February 2007
RS Lighting Design Page 1

R
Job Name:
Job Number:
Model Numbers:
Page SPECIF ICAT ION SUBMITTAL
EcoSystem Ballasts c-1 07.18.06
Digital Dimming BallastsFive Control InputEcoSystemTM
EcoSystemTM Multiple Control Input Ballasts
Features
• Continuous, flicker-free dimming from 100% to 10%• Provides power for and responds to one occupancy
sensor, one photo sensor, and one personal controlinput (infrared receiver or wallstation)
• Communicates status and sensor inputs over theEcoSystem Bus
• Programmed rapid start design ensures full rated lamplife while dimming and cycling
• Lamps turn on to any dimmed level without flashing tofull brightness
• Low harmonic distortion throughout the entire dimmingrange
• Frequency of operation ensures that ballast does notinterfere with infrared devices
• End-of-lamp-life protection circuitry ensures safeoperation throughout entire lamp life
• Ultra-quiet operation• Nonvolatile memory restores all ballast settings after
power failure• Ballasts maintain consistent light output for differing
lamp lengths (i.e. 4’, 3’, 2’ have same relative output)• 100% performance tested at factory
Digital electronic dimming ballasts maximize thebenefits of a lighting management system. EcoSystemBallasts offer 100% to 10% dimming; ideal for usewhere saving energy, increasing flexibility, andmaximizing productivity are the goals of the lightingdesign.
EcoSystem case type G
EcoSystem case type J
Pag
Ballast specified with fixtures -
Refer to fixture specifications
for descriptions

R
Job Name:
Job Number:
Model Numbers:
Page SPECIF ICAT ION SUBMITTAL
EcoSystem Ballasts c-2 07.18.06
Digital Dimming BallastsFive Control InputEcoSystemTM
Specifications
Environment
• Minimum lamp starting temperature: 50 °F (10 °C)• Temperature operating range: 50-140 °F (10-60 °C)• Relative humidity: less than 90% non-condensing• Sound Rating: inaudible in a 27 dB ambient• Maximum ballast case temperature: 75 °C (167 °F)
Ballast Wiring & Mounting
• Ballast is grounded by a mounting screw to the fixture• Terminal blocks on the ballast accept the following wire
gauges:Power Wiring, Lamp Wiring, and EcoSystem Bus:
only one #18 AWG solidClass 2 Sensors:
only one #22 AWG solid• Only one wire per terminal• Class 2 sensor wiring must be separated from all
power and Class 1 wiring, consult all applicable localand national codes.
• See Class 2 Sensor Wiring Details page• Ballast mounts using two screws (or sheet metal
feature and one screw) within a fluorescent fixture.
Lamp Seasoning
Refer to your lamp company for lamp seasoningrequirements prior to dimming.
Standards
• UL Listed (evaluated to the requirements of UL935)• CSA certified (evaluated to the requirements of C22.2
No. 74)• Class P thermally protected• Meets ANSI C82.11 High Frequency Ballast Standard• Meets FCC Part 18 Non-Consumer requirements for
EMI/RFI emissions• Meets ANSI C62.41 Category A surge protection
standards up to and including 4 kV• Manufacturing facilities employ ESD reduction
practices that comply with the requirements ofANSI/ESD S20.20
• Lutron Quality Systems registered to ISO 9001.2000
Performance
• Operating Voltage: 120 or 277 V~ at 60 Hz• Grounding: ballast and fixture must be properly
grounded for proper dimming. • Dimming Range: 100% to 10% measured relative light
output• Lamp Starting: programmed rapid start• Lamp Current Crest Factor: less than 1.7• Light Output Variation: Constant ±2% light output for
line voltage variations of ±10%• Lamp Life: Average lamp life meets or exceeds rating
of lamp manufacturer• Ballast Factor: greater than .85 for T8 lamps and equal
to 1.0 for T5 lamps• Power Factor: 0.95 minimum• Total Harmonic Distortion (THD): Less than 20%• Inaudible in a 27 dBA ambient• Maximum Inrush Current: 3 A per ballast at 277 V~,
7A per ballast at 120 V~• Class 2 Output: +20V , 50mA max.
Pag
BBallast specified with fixtures -
Refer to fixture specifications Refer to fixture specifications
for descriptions

R
Job Name:
Job Number:
Model Numbers:
Page SPECIF ICAT ION SUBMITTAL
EcoSystem Ballasts c-3 07.18.06
Digital Dimming BallastsFive Control InputEcoSystemTM
Digital Ballast Models
120 VOLTS 277 VOLTS
Lamp Lamps Ballast BallastWatts per Case Current Current(length) ballast Type (Amps) Model Number (Amps) Model Number
17 W 1 J .19 EC5 T817 J 120 1 .08 EC5 T817 J 277 1(24'') 2 J .31 EC5 T817 J 120 2 .15 EC5 T817 J 277 2
25 W 1 J .24 EC5 T825 J 120 1 .12 EC5 T825 J 277 1(36'') 2 J .43 EC5 T825 J 120 2 .19 EC5 T825 J 277 2
32 W 1 J .25 EC5 T832 J 120 1 .11 EC5 T832 J 277 1(48'') 2 J .48 EC5 T832 J 120 2 .21 EC5 T832 J 277 2
2 G -- -- .21 EC5 T832 G 277 2L3 G -- -- .31 EC5 T832 G 277 3L
14 W 1 J .16 EC5 T514 J 120 1 .07 EC5 T514 J 277 1(22'') 2 J .28 EC5 T514 J 120 2 .12 EC5 T514 J 277 2
21 W 1 J .22 EC5 T521 J 120 1 .09 EC5 T521 J 277 1(34'') 2 J .40 EC5 T521 J 120 2 .18 EC5 T521 J 277 2
28 W 1 J .28 EC5 T528 J 120 1 .12 EC5 T528 J 277 1(45.3”) 2 J .53 EC5 T528 J 120 2 .23 EC5 T528 J 277 2
24 W 1 J .26 EC5 T524 J 120 1 .13 EC5 T524 J 277 1(21.5'') 2 J .45 EC5 T524 J 120 2 .20 EC5 T524 J 277 2
39 W 1 J .38 EC5 T539 J 120 1 .17 EC5 T539 J 277 1(33.4'') 2 J .76 EC5 T539 J 120 2 .31 EC5 T539 J 277 2
54 W 1 J .50 EC5 T554 J 120 1 .22 EC5 T554 J 277 1(45.3'') 2 J 1.0 EC5 T554 J 120 2 .43 EC5 T554 J 277 2
LampType
T8 linearand U-bent
T5 linear
T5 HO linearhigh output
Pag
Ballast specified with fixtures -
Refer to fixture specifications
for descriptions

R
Job Name:
Job Number:
Model Numbers:
Page SPECIF ICAT ION SUBMITTAL
EcoSystem Ballasts c-4 07.18.06
Digital Dimming BallastsFive Control InputEcoSystemTM
EcoSystem Ballast Case Dimensions
G Case DimensionsA = 9.5'' (241 mm)B = 8.9'' (226 mm)C = 7.1'' (180 mm)D = 1.0'' (25 mm)E = 2.38'' (60 mm)
A
E
DBC
AB
CED
F
J Case DimensionsA = 18.0'' (457 mm)B = 17.68'' (449 mm)C = 6.82'' (173 mm)D = .394'' (10 mm)E = 1.0'' (25 mm)F = 1.18'' (30 mm)
G Case
J Case
G case ballasts ship with 36'' leads for lamp connections and 18''leads for Hot, Neutral, E1 and E2 connections
Pag
Ballast specified with fixtures -
Refer to fixture specifications
for descriptions

R
Job Name:
Job Number:
Model Numbers:
Page SPECIF ICAT ION SUBMITTAL
EcoSystem Ballasts c-5 07.18.06
Digital Dimming BallastsFive Control InputEcoSystemTM
EcoSystem Ballast Wiring Diagrams
Wiring to Three Lamps (G case shown)
BLUBLU
REDRED
YELYEL
N/CN/C
Wiring to Two Lamps (G case shown)
BLUBLU
REDRED
YELYEL
B/WB/W
BLUBLU
REDRED
Wiring to One Lamp (J case shown)
NOTICE
• Maximum ballast to lamp socket lead length is 7' (2 m)• Wire colors shown are labeled on the ballast, but may vary depending upon fixture construction• Only ballasts in the G case are provided with leads
Red
Red
Red
Blue
Blue
Blue
Yellow
Yellow
Striped
Pag
Ballast specified with fixtures -
Refer to fixture specifications
for descriptions

R
Job Name:
Job Number:
Model Numbers:
Page SPECIF ICAT ION SUBMITTAL
EcoSystem Ballasts c-6 07.18.06
Digital Dimming BallastsFive Control InputEcoSystemTM
Class 2 Sensor Wiring Details
Fixture Manufacturers:
• UL 1598 6.17.1 allows:Factory installed power limited wiring and branchcircuit wiring that come in random contact within theluminaire shall have insulation rated for the maximumvoltage that exists in any of the circuits. (EcoSystemballast circuits require minimum 600V insulated wire)
• UL 1598 6.17.2.1 requires:Luminaires designed for the field installation of powerlimited circuits shall be provided with a means ofsegregating or separating the field-installed powerlimited circuit wiring from the branch circuit wiringwithin the luminaire (see UL 1598 6.17 for details)
Lutron Requires:
• Keep class 1 and class 2 wiring separate.• Where separation is not possible, use a 600V
insulated cable with a shield. Connect the shield toground to provide better noise immunity for lowvoltage circuits.
Electrical Contractors and Engineers:
• All field installed Class 2 wiring must be separatedfrom line voltage wiring by at least 0.25 in (6.4 mm)
• Some local electrical codes require Class 2 wiring tobe separately routed in a metal conduit
• Ballasts Class 2 Sensor terminals only accept #22AWG solid conductors
• UL 1598 6.17.2.2 requires that:Class 2 wiring within fixtures must be permanentlyseparated a minumum 0.25 in (6.4 mm) by:
a) separate entries for field installed branch circuitwiring and power limited wiring, and
b) reliable routing of the conductors within theluminaire; or
c) barriers that comply with UL 1598 6.17.2.3 and6.17.2.4.
Lutron Requires:
• Keep class 1 and class 2 wiring separate.• Where separation is not possible, use a 600V
insulated cable with a shield. Connect the shield toground to provide better noise immunity for low voltagecircuits.
Pag
BBallast specified with fixtures -
Refer to fixture specifications Refer to fixture specifications
for descriptions

R
Job Name:
Job Number:
Model Numbers:
Page SPECIF ICAT ION SUBMITTAL
EcoSystem Ballasts c-7 07.18.06
Digital Dimming BallastsFive Control InputEcoSystemTM
EcoSystem Ballast Wiring Diagrams (continued)
+20V
DaylightOccIR
Common
Cla
ss 2
(#2
2 A
WG
So
lid)
E2E1
Cla
ss 2
Bu
s
DHNEU
277 V
oltSH
G Case Terminals
Daylight Sensor
#22AWG solid only
Wiring to a Daylight Sensor
• Sensor wiring summary:
Sensor Wire Ballast Terminal Terminal ColorRed +20 V RedBlack Common BlackWhite IR WhiteYellow Daylight Yellow
• Make sure that the supply breaker to the Digital Ballastis OFF when wiring
• Connect the four conductors to the four Digital Ballastterminals as shown
• Daylight sensor must be placed within 50' (15 m) ofthe ballast
• Ballast Class 2 terminals only accept one #22 AWGsolid wire
+2
0V
Da
ylig
ht
IRCo
mm
on
Class 2
(#22 AWG Solid)
Occ
J Case Terminals
Daylight Sensor
#22AWG solid only
Notes
• Consult the daylight sensor specification sheet toproperly locate the sensor
• Do not place the sensor above pendant fixtures,directly below lighting fixtures, or within skylight wells
• When wiring both a wallstation and daylight sensor toone ballast, only connect the IR wire (white) from thekeypad, cap off the white wire from the daylight sensor
• All sensor and wallstation wiring is Class 2. Follow allapplicable national and local codes for proper circuitseparation and protection.
Pag
Ballast specified with fixtures -
Refer to fixture specifications
for descriptions

R
Job Name:
Job Number:
Model Numbers:
Page SPECIF ICAT ION SUBMITTAL
EcoSystem Ballasts c-8 07.18.06
Digital Dimming BallastsFive Control InputEcoSystemTM
Wiring to a Lutron Occupant Sensor (LOS-XX)
• Sensor wiring summary:
Sensor Wire Ballast Terminal Terminal ColorRed +20 V RedBlack Common BlackBlue Occ Blue
• Make sure that the supply breaker to the Digital Ballastis OFF when wiring
• Connect the three conductors to the three ballastterminals as shown
• Occupant sensor must be placed within 50' (15 m) ofthe ballast
• Ballast Class 2 terminals only accept one #22 AWGsolid wire
+20V
DaylightOccIR
Common
Cla
ss 2
(#2
2 A
WG
So
lid)
E2E1
Cla
ss 2
Bu
s
DHNEU
277 V
oltSH
G Case Terminals
OccupantSensor
#22AWG solid only
+2
0V
Da
ylig
ht
IRCo
mm
on
Class 2
(#22 AWG Solid)
Occ
J Case Terminals
OccupantSensor
#22AWG solid only
EcoSystem Ballast Wiring Diagrams (continued)
Notes
• Occupant sensors from other manufacturers may beused with EcoSystem ballasts if the sensor meets thefollowing criteria:Vin = +20V , current draw less than 35 mA
• If other manufacturer’s occupant sensors are usedterminal colors and sensor wire colors may not match
• All sensor and wallstation wiring is Class 2. Follow allapplicable national and local codes for proper circuitseparation and protection.
Pag
Ballast specified with fixtures -
Refer to fixture specifications
for descriptions

R
Job Name:
Job Number:
Model Numbers:
Page SPECIF ICAT ION SUBMITTAL
EcoSystem Ballasts c-9 07.18.06
Digital Dimming BallastsFive Control InputEcoSystemTM
+20V
DaylightOccIR
Common
Cla
ss 2
(#2
2 A
WG
So
lid)
E2E1
Cla
ss 2
Bu
s
DHNEU
277 V
oltSH
G Case Terminals
IR Receiver
#22AWG solid only
Wiring to an IR Receiver and Wallstation
• Wiring summary:
Sensor Wire Ballast Terminal Terminal ColorRed +20 V RedBlack Common BlackWhite IR White
• Make sure that the supply breaker to the Digital Ballastis OFF when wiring
• Connect the three conductors to the three DigitalBallast terminals as shown
• Receiver must be placed within 50' (15 m) of theballast
• Ballast Class 2 terminals only accept one #22 AWGsolid wire
+2
0V
Da
ylig
ht
IRCo
mm
on
Class 2
(#22 AWG Solid)
Occ
J Case Terminals
#22AWG solid only
EcoSystem Ballast Wiring Diagrams (continued)
IR Receiver
Notes
• Only one wallstation or IR receiver can be wired to adigital ballast
• A wallstation cannot be wired to the same digitalballast as an IR receiver
• If a daylight sensor and wallstation/IR receiver areconnected to one ballast, do not connect the daylightsensor’s IR output
• All sensor and wallstation wiring is Class 2. Follow allapplicable national and local codes for proper circuitseparation and protection.
Wallstation
Wires to Digital Ballast

R
Job Name:
Job Number:
Model Numbers:
Page SPECIF ICAT ION SUBMITTAL
EcoSystem Ballasts c-10 07.18.06
Digital Dimming BallastsFive Control InputEcoSystemTM
Multiple Sensors with One Ballast
• EcoSystem ballasts accept up to 3 sensor inputseach. A single ballast accepts wiring for one daylightsensor input, one occupant sensor input and one IRinput (wallstation or IR receiver)
• EcoSystem daylight sensors have IR outputs that allowthe device to operate as a programming port. Inapplications where a daylight sensor and wallstationare wired to the same ballast, do not connect thewhite wire of the daylight sensor to the ballast. Thewallstation operates as the programming port throughits integral IR receiver.
• Use the chart below as a guide for wiring multipledevices to a ballast.
EcoSystem Ballast Wiring Diagrams (continued)
Daylight sensor Occupant Wallstation or Daylight Sensor(with IR) sensor IR receiver (no IR)
Daylight sensor(with IR)
Occupantsensor
Wallstation orIR Receiver
Daylight sensor(no IR)
+2
0V
Da
ylig
ht
IRCo
mm
on
Class 2
(#22 AWG Solid)
Occ
YYYYYY
YYYY
YYYY
YY
NN
NN
NN NNNN
NN
NN
NN
Pag
Ballast specified with fixtures -
Refer to fixture specifications
for descriptions
R
Job Name:
Job Number:
Model Numbers:
Page SPECIF ICAT ION SUBMITTAL
EcoSystem Ballasts c-11 07.18.06
Digital Dimming BallastsFive Control InputEcoSystemTM
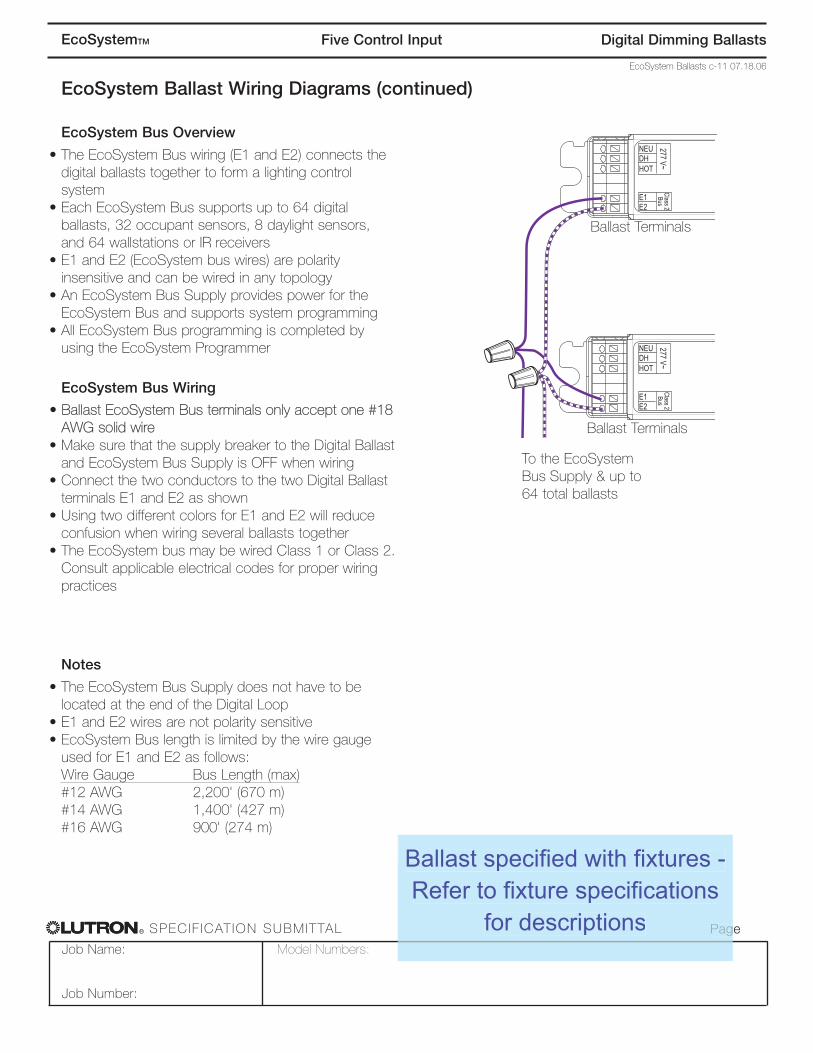
Notes
• The EcoSystem Bus Supply does not have to belocated at the end of the Digital Loop
• E1 and E2 wires are not polarity sensitive• EcoSystem Bus length is limited by the wire gauge
used for E1 and E2 as follows:Wire Gauge Bus Length (max)#12 AWG 2,200' (670 m)#14 AWG 1,400' (427 m)#16 AWG 900' (274 m)
E1E2
NEU
HOT
DH277 V
~C
lass 2B
us
E1E2
NEU
HOT
DH
277 V~
Class 2B
us
To the EcoSystemBus Supply & up to64 total ballasts
Ballast Terminals
Ballast Terminals
EcoSystem Ballast Wiring Diagrams (continued)
EcoSystem Bus Overview
• The EcoSystem Bus wiring (E1 and E2) connects thedigital ballasts together to form a lighting controlsystem
• Each EcoSystem Bus supports up to 64 digitalballasts, 32 occupant sensors, 8 daylight sensors,and 64 wallstations or IR receivers
• E1 and E2 (EcoSystem bus wires) are polarityinsensitive and can be wired in any topology
• An EcoSystem Bus Supply provides power for theEcoSystem Bus and supports system programming
• All EcoSystem Bus programming is completed byusing the EcoSystem Programmer
EcoSystem Bus Wiring
• Ballast EcoSystem Bus terminals only accept one #18AWG solid wire
• Make sure that the supply breaker to the Digital Ballastand EcoSystem Bus Supply is OFF when wiring
• Connect the two conductors to the two Digital Ballastterminals E1 and E2 as shown
• Using two different colors for E1 and E2 will reduceconfusion when wiring several ballasts together
• The EcoSystem bus may be wired Class 1 or Class 2.Consult applicable electrical codes for proper wiringpractices
Pag
Ballast specified with fixtures -
Refer to fixture specifications
for descriptions

R
Job Name:
Job Number:
Model Numbers:
Page SPECIF ICAT ION SUBMITTAL
EcoSystem Ballasts c-12 07.18.06
Digital Dimming BallastsFive Control InputEcoSystemTM
E1E2
NEU
HOT
DH
277 V~
Class 2B
us
E1E2
NEU
HOT
DH
277 V~
Class 2B
us
LUTRONLUTRON
3-Wire Dimmer
White
3-Wire Dimmer Wiring
EcoSystem Ballasts and 3-wire dimmers
• Lutron 3-wire dimmers only control a ballast it is wiredto; EcoSystem does not support grouping of 3-wirecontrol input
• EcoSystem Bus must be wired to the ballast andpowered for 3-wire control to operate the ballast
3-Wire Control Wiring
• Make sure that the supply breaker to the Digital Ballastis OFF when wiring
• Wire as shownLine input: Connects to:Hot Dimmer Black WireNeutral Dimmer White WireDimmer wire: Connects to:Yellow Ballast Orange (DH)Red Ballast Black (HOT)White Ballast White (NEU)Green Earth Ground
• EcoSystem ballast line voltage and 3-wire inputterminals only accept one #18 AWG solid wire
Emergency and 3-wire
• EcoSystem ballasts controlled by a wallbox dimmershould not be used for emergency/egress lightingunless an external emergency ballast is used in thefixture. See Lutron Ap. Note #50.
• EcoSystem ballasts may be used foremergency/egress lighting when controlled by aLutron dimming panel (GP); where the panel is adedicated emergency panel.
Notice
3-Wire control turns off digital ballasts when the controlis in the off position. The digital ballast inputs: daylightsensor, wallstation, occupant sensor, and IR receiverwill not function when the digital ballast is turned off.
Red
Bla
ck
Green
Yellow
Ora
nge
Neutral Whi
te
Ground
Hot / Black
Pag
Ballast specified with fixtures -
Refer to fixture specifications
for descriptions

R
Job Name:
Job Number:
Model Numbers:
Page SPECIF ICAT ION SUBMITTAL
EcoSystem Ballasts c-13 07.18.06
Digital Dimming BallastsFive Control InputEcoSystemTM
Lamp Mounting for T5
Keep lamp 3/8'' ± 1/8'' away from the grounded metalsurface.
Lamp Mounting for T8
May fluorescent lamp sockets are available withmounting slots to vary the height of the lamp awayfrom the grounded metal fixture surface. Use theseslots to get the outside edge of the lamp to be 1/2'' ± 1/4'' away from the grounded metal surface.
Having a lamp too close to the grounded metal willmake the minimum intensity too low and will reducelamp life. Having a fluorescent lamp too far away fromthe grounded metal will make the lamp flicker or notturn on at all.
Ballast/Socket Leads
Lead lengths from ballast to socket must not exceed7' (2 m) for T5 lamps.
Lamp Sockets
Lamp sockets as per IEC 60400 are required toensure positive lamp-pin to socket contact. T5 linearlamps require rotary locking sockets.
Attention Electricians and Fixture Manufacturers
Lamp Seasoning
Consult lamp manufacturer’s recommendations onlamp seasoning prior to dimming
Further Information
For further information please visitwww.lutron.com/ecosystem or contact our 24-hourTechnical Support Center at1-800-523-9466
Pag
Ballast specified with fixtures -
Refer to fixture specifications
for descriptions

R
Job Name:
Job Number:
Model Numbers:
PageSPECIF ICAT ION SUBMITTAL
C-SR-M1-1 7.18.06
Daylight SensorC-SR-M1-WHEcoSystemTM
Fixture Mountable Daylight Sensor
This daylight sensor is designed specifically to workwith Lutron’s EcoSystem to implement daylightharvesting. It allows the EcoSystem to automaticallydim the lights when the available daylight is high andbrighten the lights when the available daylight is low inorder to maintain a specific light level in the space. Anintegrated IR receiver resides within the sensor toallow access to the system for advancedprogramming.
Features
• Photopic response matches human eye• Mounts easily on any ceiling tile or fixture with 3/8 in.
(10mm) diameter hole• Threaded mounting stud (may be shortened for
applications with limited fixture height)• Calibrated for daylight sensitivity through the Lighting
Control System to which it is attached• Receives IR signals and transfers them to an
EcoSystem Digital Ballast or Ballast Module• The Infrared Receiver receives IR programming signals
from up to 8 ft away.• Constructed of flame retardant material with UL94 HB
rating• Meets IEC 801-2. Tested to withstand 15kV
electrostatic discharge without damage
������
PageDaylight Sensory g

R
Job Name:
Job Number:
Model Numbers:
PageSPECIF ICAT ION SUBMITTAL
C-SR-M1-2 7.18.06
Daylight SensorC-SR-M1-WHEcoSystemTM
Specifications
Standards
• Designed for Class 2 operation only. Voltages do notexceed 35VDC. Complies with requirements of NFPA70, of the National Electric Code (NEC)
• Follow all applicable national and/or local wiringregulations when installing this sensor
• Designed to give a linear response to changes inviewed light level
• For use with Lutron EcoSystem products only
Power
• Operating Voltage: Low-voltage Class 2, 20VDC• Analog Signal: 0 - 2 mA• IR Output: 0-20VDC
Environment
• Temperature: 32-113°F (0-45°C)• Relative humidity: less than 90% non-condensing
• Sensor lead length = 4” (101mm) minimum beyondthreaded stud.
• Total wire length from sensor to device must notexceed 200 ft (61m).
• Threaded Stud Diameter = 3/8” (9.5mm) maximum.• Use 3/8-16 nut (provided) for mounting.
������
1.25” (32mm)
0.69” (17mm)
1.18” (30mm)
Dimensions
PageDaylight Sensory g

R
Job Name:
Job Number:
Model Numbers:
PageSPECIF ICAT ION SUBMITTAL
C-SR-M1-3 7.18.06
Daylight SensorC-SR-M1-WHEcoSystemTM
Mounting
Determine the proper location of the DaylightSensor using the adjacent diagrams.
• The arrow on the Daylight Sensor points toward thearea viewed by the sensor
• Place the daylight sensor so its viewing area iscentered upon the nearest window at a distance ofbetween 1-2 H from the window
• The effective window height, H, starts 3 feet up fromthe floor or at the window sill, whichever is higher, andends at the top of the window.
• Ensure that the view of the Daylight Sensor is notobstructed
• Do not position the Daylight Sensor in the well of askylight or above indirect lighting fixtures
Mounting the Daylight Sensor
• Drill a 3/8 in. (10mm) diameter hole in the ceiling tileor pendant fixture
• Thread the wires through the hole• Install the Daylight Sensor into the hole• Secure the Daylight Sensor with the mounting
hardware provided (hand tighten only).
Note - If the stem of the Daylight Sensor must beshortened due to its location (for instance, in apendant fixture) this should be done prior to wiring.
Arrow points toward the area viewedby the sensor
3ft (0.9m)
H
1-2H
Bottom of sensor
H = Effective Window Height
Wiring to an EcoSystem Ballast
• Connect the sensor’s wires as described:Wire TerminalRed 20VDC Black CommonYellow DaylightWhite IR Signal
• Make sure that the supply breaker to the controlsystem is OFF
• Only #22AWG solid wire for ballast terminals• If IR Output is not required or used by a keypad input,
the white wire should be capped.
+20V
DaylightOccIR
Common
Cla
ss 2
(#2
2 A
WG
So
lid)
E2E1
Cla
ss 2
Bu
s
DHNEU
27
7 V
oltSH
Mounting and Wiring
Ceiling Tile or FixturePendant Fixture
Daylight Sensor
#22AWG solid only
PageDaylight Sensory g

Job Name:
Job Number:
Model Numbers:
SPECIF ICATION SUBMITTAL
C-PDA-CLR 7.05.05
ProgrammerC-PDA-CLREcoSystemTM
EcoSystem Programmer
The EcoSystem Programmer is the key to an intelligentEcoSystem. Capable of adjusting EcoSystem to the needsof any space, the Programmer allows users to define lightlevels, adjust sensor & control preferences, set groups, andadjust multiple settings on every ballast. On the side offlexibility, the Programmer allows re-purposing of any spacethrough programmed groups that do not require costly re-wiring of a space. The Programmer now allows the abilitiesof a team of electricians to fit in the palm of your hand.
Features• No limit to number of ballasts it can program• Password protected for system integrity• Wireless infrared communication with lighting system• Handles programming changes for all sensors, wall controls,
and ballasts• Simple user interface allows programming without training or
guidebook
PageEcoSystem Programmery g PagPag

Job Name:
Job Number:
Model Numbers:
SPECIF ICATION SUBMITTAL
C-PDA-CLR 7.05.05
ProgrammerC-PDA-CLREcoSystemTM
Specifications
• Transmits infrared signal a minimum of 8 feet • Attached stylus for screen item selection• Connection cord for synching with computer to
download data and software• Rechargeable battery
DimensionsW: 3.00” (76mm)H: 4.75” (212mm)D: 0.50” (13mm)
Functionality
Lighting Control• Personal control of the light level of individual
fixtures or groups of fixtures from 100% to 10%brightnessbrightness
Device Setup• Daylight Sensor: Setup the amount of natural
versus daylight that will illuminate a room• Occupant Sensor: Setup the Time-out length,
Occupied level and Unoccupied Level• Wall Control: Setup the scene levels for each
button of the wall stations
Grouping• Setup IR/Wall Control, daylight, and occupant
sensor fixture groups so that sensors can affectmultiple ballasts
Ballasts• Diagnostics: This information needs to be
gathered• Configuration: Set Maximum level, Minimum
level, Fade time, Burn-In, or Emergency level foreach ballast or all ballasts on the system
• Replacement: Replace ballasts without anyreprogramming; Install a new ballast and theprogramming from the old ballast will betransferred to the new one
• Addressing: This begins the automaticaddressing of individual or multiple ballasts
PageEcoSystem Programmery g PagPag
CC-4BRL-1 02.21.06
4-Button WallstationCC-4BRL-WHEcoSystemTM
R
Job Name:
Job Number:
Model Numbers:
Page 1SPECIF ICAT ION SUBMITTAL
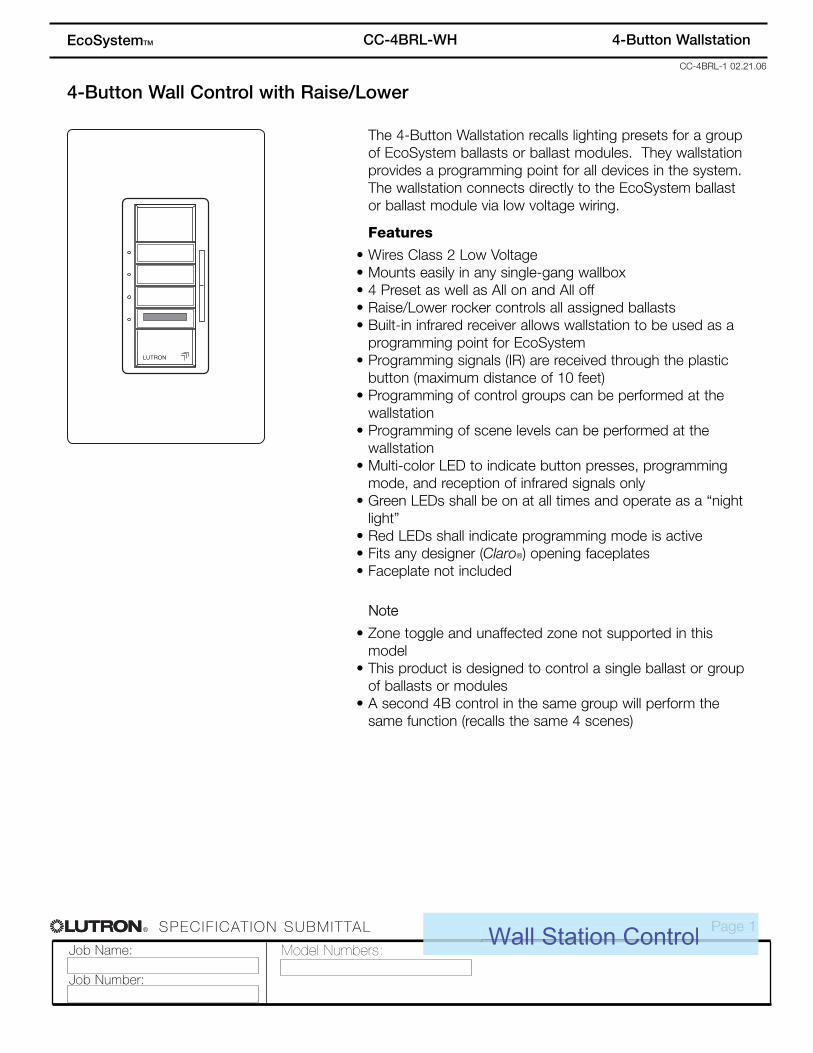
4-Button Wall Control with Raise/Lower
The 4-Button Wallstation recalls lighting presets for a groupof EcoSystem ballasts or ballast modules. They wallstationprovides a programming point for all devices in the system.The wallstation connects directly to the EcoSystem ballastor ballast module via low voltage wiring.
Features
• Wires Class 2 Low Voltage• Mounts easily in any single-gang wallbox• 4 Preset as well as All on and All off• Raise/Lower rocker controls all assigned ballasts• Built-in infrared receiver allows wallstation to be used as a
programming point for EcoSystem• Programming signals (IR) are received through the plastic
button (maximum distance of 10 feet)• Programming of control groups can be performed at the
wallstation• Programming of scene levels can be performed at the
wallstation• Multi-color LED to indicate button presses, programming
mode, and reception of infrared signals only• Green LEDs shall be on at all times and operate as a “night
light”• Red LEDs shall indicate programming mode is active• Fits any designer (Claro®) opening faceplates• Faceplate not included
Note
• Zone toggle and unaffected zone not supported in thismodel
• This product is designed to control a single ballast or groupof ballasts or modules
• A second 4B control in the same group will perform thesame function (recalls the same 4 scenes)
Page 1 Wall Station ControlWall Station Control
CC-4BRL-2 02.21.06
4-Button WallstationCC-4BRL-WHEcoSystemTM
R
Job Name:
Job Number:
Model Numbers:
Page 2SPECIF ICAT ION SUBMITTAL
Specifications
Standards
• Designed for Class 2 operation only. Voltages donot exceed 35 V . Complies with requirementsof NFPA 70, of the National Electric Code (NEC)
• Follow all applicable national and/or local wiringregulations when installing this wallstation
• For use with EcoSystem products only
Mechanical
• Gloss finish available in white• Green LED night light, red LED for programming• Programming transmissions (IR) received through
plastic button. (maximum distance = 10 ft)
Power
• Operating Voltage: Low-voltage Class 2, 20 V• Output Signal: 0 - 20 V• Current Draw: 20 mA maximum
Environment
• Temperature: 32-104 °F (0-40 °C)• Relative humidity: less than 90% non-condensing.
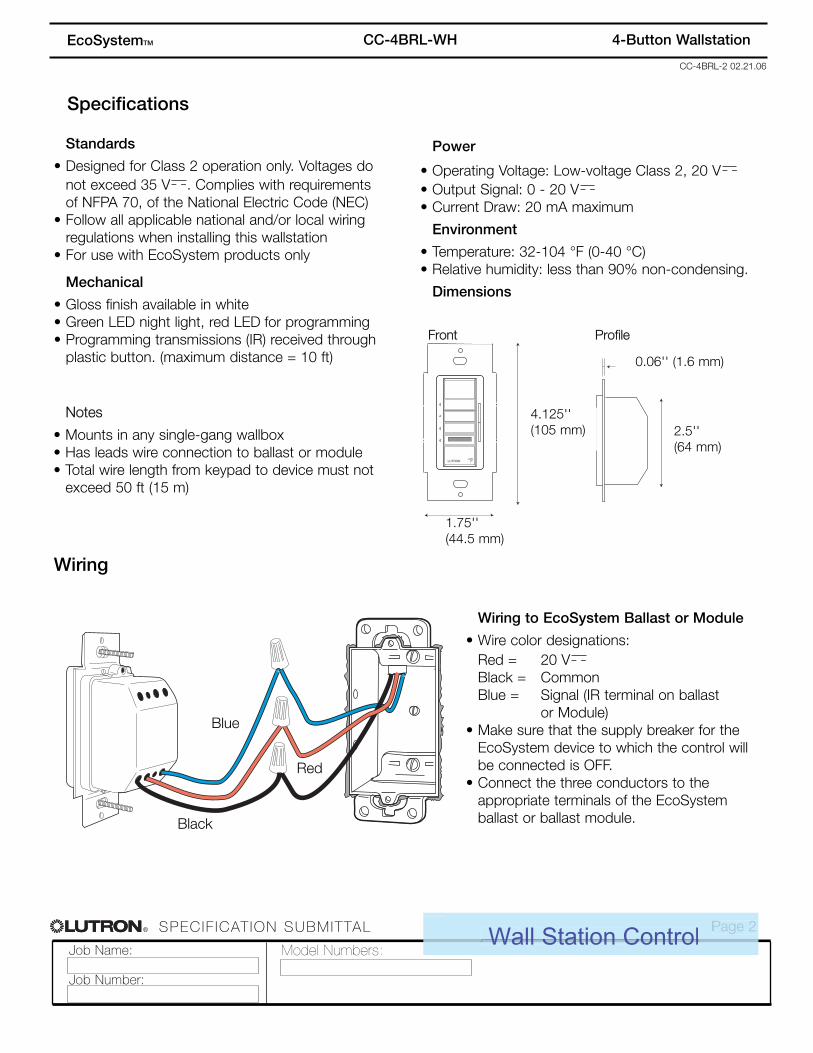
Dimensions
Notes
• Mounts in any single-gang wallbox• Has leads wire connection to ballast or module• Total wire length from keypad to device must not
exceed 50 ft (15 m)
Wiring to EcoSystem Ballast or Module
• Wire color designations:Red = 20 VBlack = CommonBlue = Signal (IR terminal on ballast
or Module)• Make sure that the supply breaker for the
EcoSystem device to which the control willbe connected is OFF.
• Connect the three conductors to theappropriate terminals of the EcoSystemballast or ballast module.
Wiring
Front Profile
0.06'' (1.6 mm)
2.5''(64 mm)
4.125''(105 mm)
1.75''(44.5 mm)
Red
Black
Blue
Page 2 Wall Station ControlWall Station Control


