
CLM4.5 Tutorial: Basic Modifica6ons
Danica Lombardozzi

Review: The 4 commands to run CLM
# go into scripts directory into the source code download cd /glade/p/cesm/lmwg/CLM2014_tutorial_n03_clm4_5_62/scripts # (1) create a new case in the directory “cases” in your home directory ./create_newcase -case ~/I1850CLM45_001 -res f19_g16 -compset I1850CLM45 -mach yellowstone # go into the case you just created in the last step cd ~/I1850CLM45_001 # (2) invoke cesm_setup ./cesm_setup # (3) build the executable ./I1850CLM45_001.build # (4) submit your run to the batch queue ./I1850CLM45_001.submit
Set of commands to build and run the model on a supported machine: ”yellowstone”

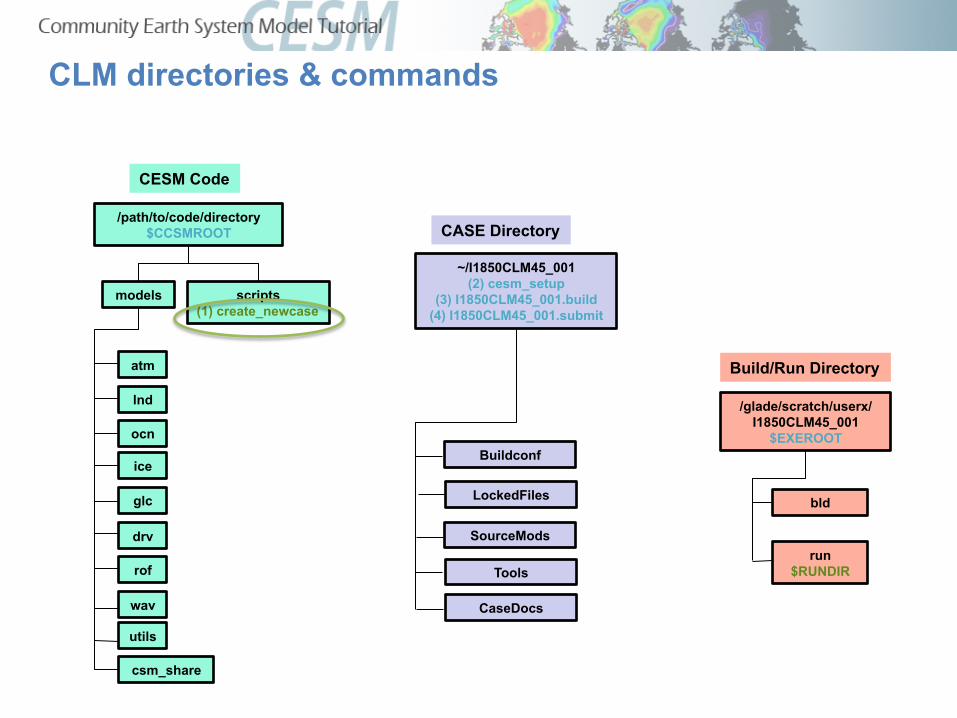
CLM directories & commands
models scripts (1) create_newcase
/path/to/code/directory $CCSMROOT
CESM Code
atm
lnd
ocn
ice
glc
csm_share
rof
drv
wav
utils
~/I1850CLM45_001 (2) cesm_setup
(3) I1850CLM45_001.build (4) I1850CLM45_001.submit
SourceMods
CASE Directory
Tools
CaseDocs
Buildconf
LockedFiles
run $RUNDIR
/glade/scratch/userx/ I1850CLM45_001
$EXEROOT
Build/Run Directory
bld
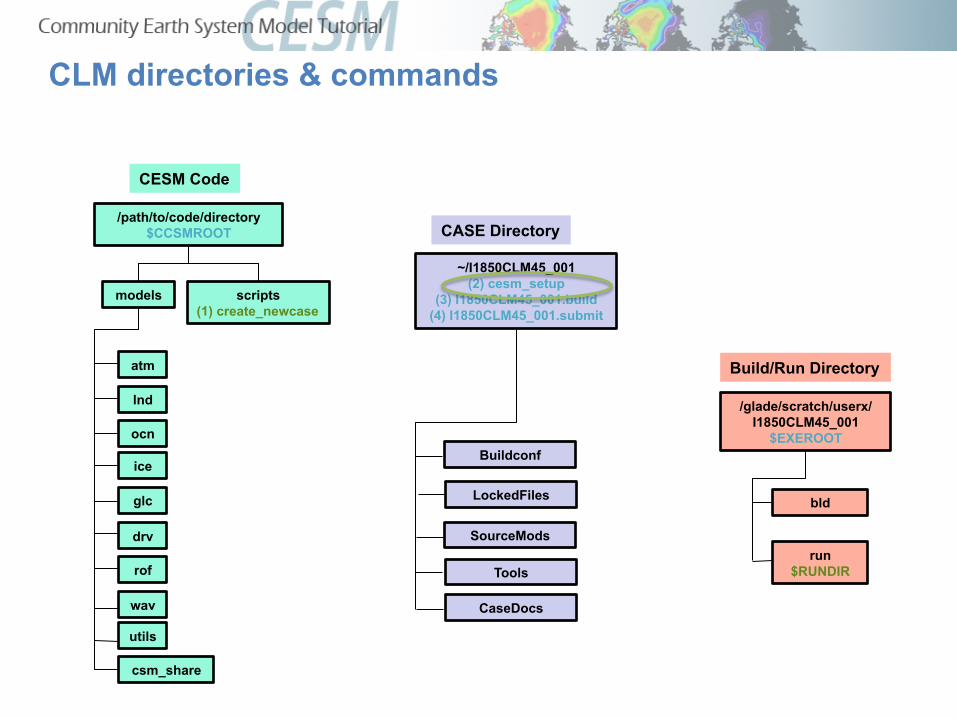
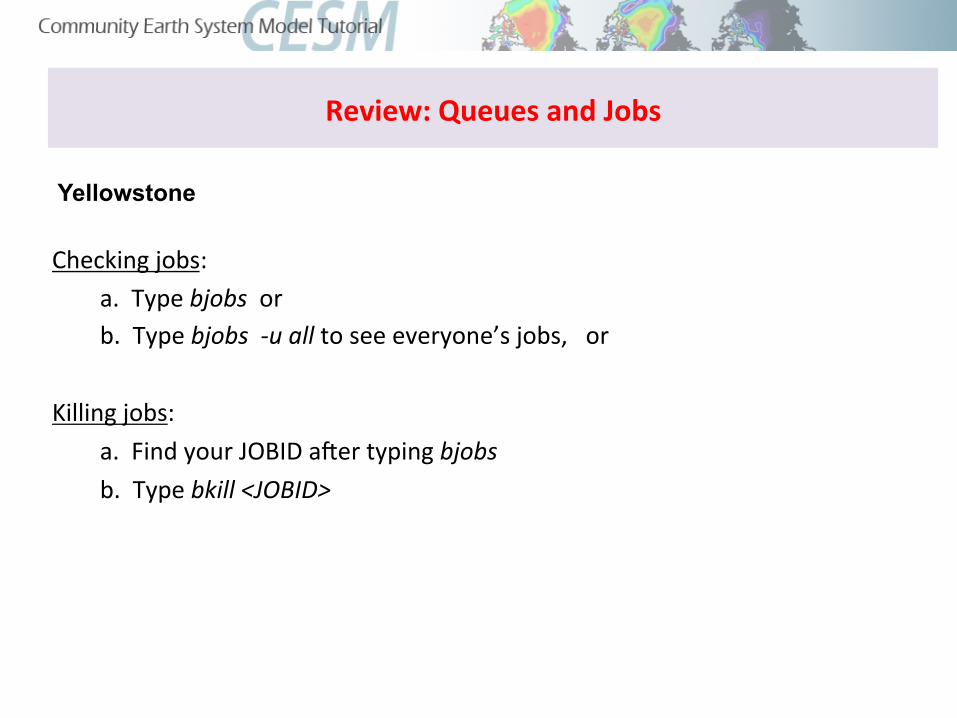
Review: Queues and Jobs
Checking jobs: a. Type bjobs or b. Type bjobs -‐u all to see everyone’s jobs, or
Killing jobs: a. Find your JOBID aCer typing bjobs b. Type bkill <JOBID>
Yellowstone
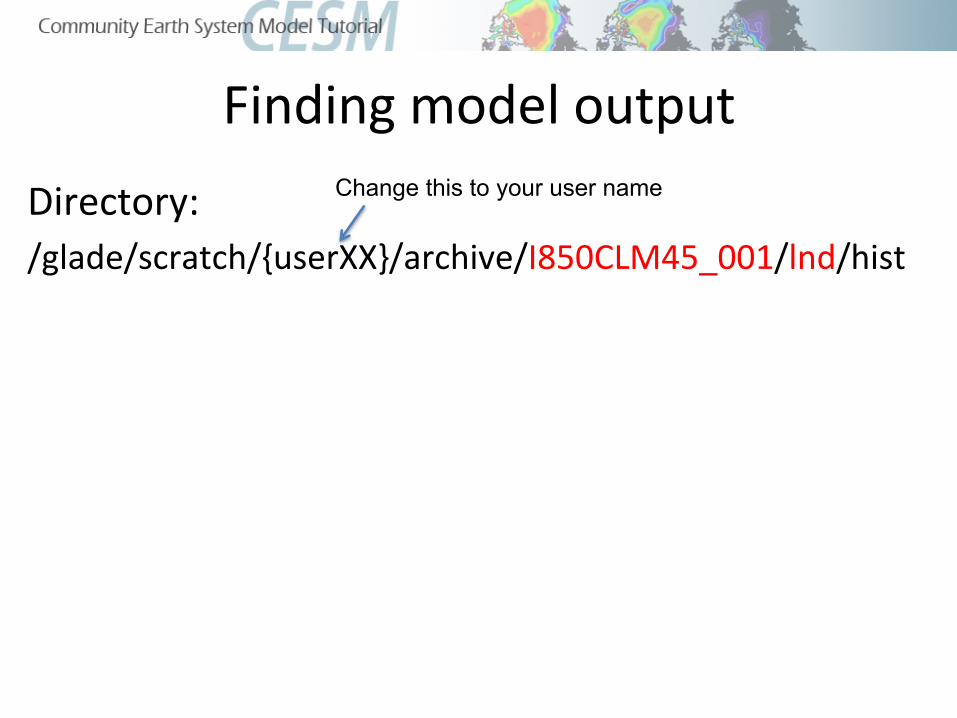
Finding model output Directory: /glade/scratch/{userXX}/archive/I850CLM45_001/lnd/hist
Change this to your user name

Finding model output Directory: /glade/scratch/{userXX}/archive/I850CLM45_001/lnd/hist
Files (use “ls” to list them): I1850CLM45_001.h0.0001-‐12.nc
Case Name Time
Output Type (history)
File Type (netCDF)
Change this to your user name

3 Types of Basic ModificaYons
1. Component Sets
2. ENV files (env_[command])
3. Namelist files (user_nl_[model])

3 Types of Basic ModificaYons
1. Component Sets
2. ENV files (env_[command])
3. Namelist files (user_nl_[model])
Set up a simulation for 2000

create_newcase requires 4 arguments
./create_newcase –case ~/I1850CLM45_001 –res f19_g16 –compset I1850CLM45 -mach yellowstone
YourCaseName yellowstone I1850CLM45
(I = CLM only, 1850) f19_g16 (2-degree)
What is the casename ?
Which resolution?
Which model configuration ? Which set of components ?
Which machine are you running on?
Crea6ng a new case

Changing SimulaYon Components Compset, or component set: predefined opYons for running the model
Use compset to change the type of simulaYon
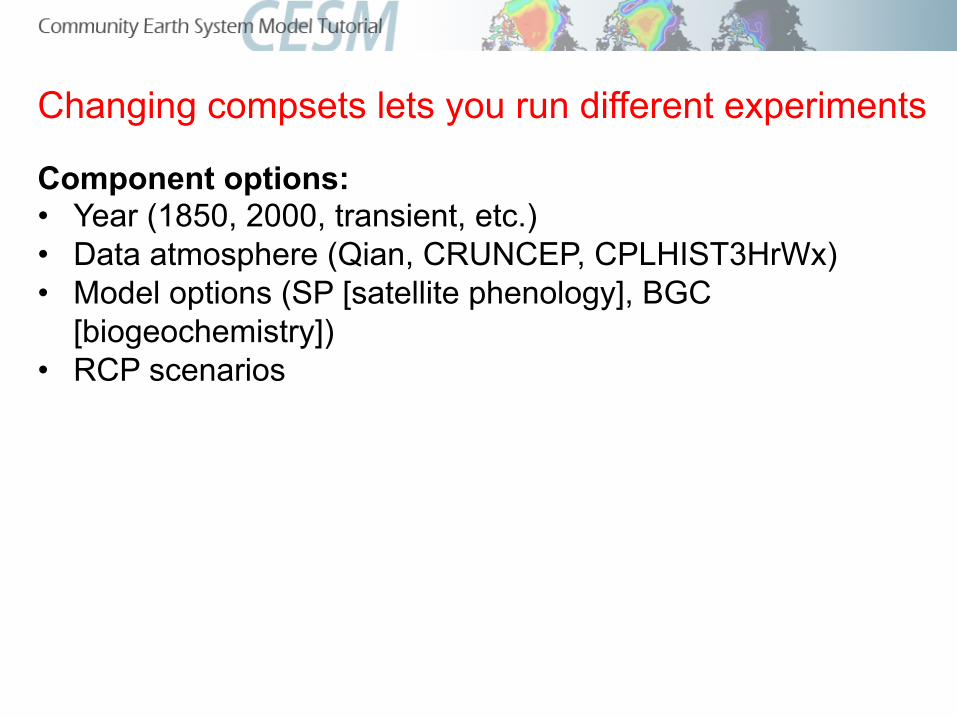
Changing compsets lets you run different experiments
Component options: • Year (1850, 2000, transient, etc.) • Data atmosphere (Qian, CRUNCEP, CPLHIST3HrWx) • Model options (SP [satellite phenology], BGC
[biogeochemistry]) • RCP scenarios

Changing compsets lets you run different experiments
Component options: • Year (1850, 2000, transient, etc.) • Data atmosphere (Qian, CRUNCEP, CPLHIST3HrWx) • Model options (SP [satellite phenology], BGC
[biogeochemistry]) • RCP scenarios
Examples of simulations using different compsets:
• Stabilize (“spin up”) a biogeochemsitry (includes N & C cycles) simulation for 1850
• Run a transient historical simulation from 1850-2000 based on the 1850 spin up
• Run a transient future simulation from 2000 through 2100 using RCP8.5
• Run a “time slice” simulation for 2000

Where to find a list of compsets: http://www.cesm.ucar.edu/models/cesm1.2/clm/scripts/ccsm_utils/Case.template/config_compsets.xml • Website lists ALL compsets for CESM. CLM only = “I” compsets
In CESM scripts directory, can run: ./create_newcase –list compsets
models scripts (1) create_newcase
/path/to/code/directory $CCSMROOT
CESM Code
Tip: Add “ | more” at the end of the command line, then use the spacebar to scroll through the options
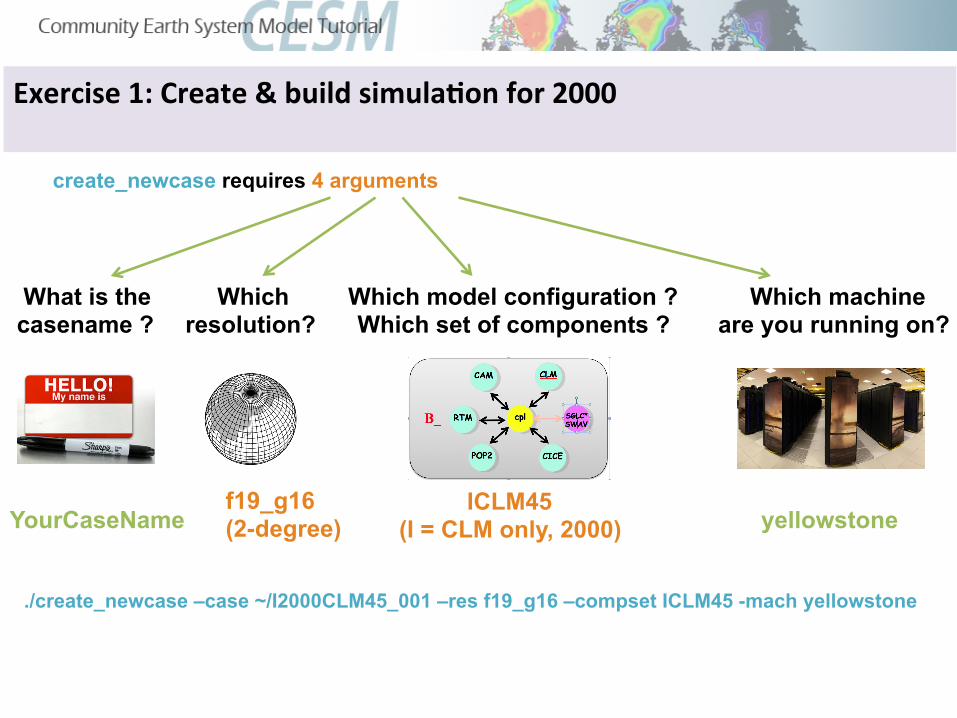
create_newcase requires 4 arguments
./create_newcase –case ~/I2000CLM45_001 –res f19_g16 –compset ICLM45 -mach yellowstone
YourCaseName yellowstone ICLM45
(I = CLM only, 2000) f19_g16 (2-degree)
What is the casename ?
Which resolution?
Which model configuration ? Which set of components ?
Which machine are you running on?
Exercise 1: Create & build simula6on for 2000

Exercise 1: Create & build simulation for 2000
# go into scripts directory into the source code download cd /glade/p/cesm/lmwg/CLM2014_tutorial_n03_clm4_5_62/scripts # (1) create a new case in the directory “cases” in your home directory ./create_newcase -case ~/I2000CLM45_001 -res f19_g16 -compset ICLM45 -mach yellowstone # go into the case you just created in the last step cd ~/I2000CLM45_001 # (2) invoke cesm_setup ./cesm_setup # (3) build the executable ./I2000CLM45_001.build Stop Here # (4) submit your run to the batch queue ./I2000CLM45_001.submit

3 Types of Basic ModificaYons
1. Component Sets
2. ENV files (env_[command].xml)
3. Namelist files (user_nl_[model])
Changing the length of the run

Review: The 4 commands to run CLM
# go into scripts directory into the source code download cd /glade/p/cesm/lmwg/CLM2014_tutorial_n03_clm4_5_62/scripts # (1) create a new case in the directory “cases” in your home directory ./create_newcase -case ~/I2000CLM45_001 -res f19_g16 -compset ICLM45 -mach yellowstone # go into the case you just created in the last step cd ~/I2000CLM45_001 # (2) invoke cesm_setup ./cesm_setup # (3) build the executable ./I2000CLM45_001.build # (4) submit your run to the batch queue ./I2000CLM45_001.submit
Set of commands to build and run the model on a supported machine: ”yellowstone”
Change the run length BEFORE submitting

ENV files
Example 2. Simulations for a different length of time
When modifying files, use an editor of your choice Examples:
emacs nedit vi
Two steps to change run length: 1) Modify env_run.xml to set desired simulated length
2) Modify I2000CLM45_001.run to tell computer how much computer time is needed to complete the simulation (Wall Clock Time)

“xmlchange" command Use when modifying “xml” files (e.g. env_run.xml) 1. Benefit: Won’t let you mess up the syntax! 2. For help, type ./xmlchange –help 3. Use “./xmlquery list” to list all variables and their values in all the .xml files
Example: ediYng env_run.xml via the xmlchange tool ./xmlchange {variable to be changed}={value to change to}
* We won’t use xml commands right now, but you will during the next section.

In a text editor*, open env_run.xml * If you don’t have a preferred editor, emacs is more user friendly.
Type “emacs env_run.xml” (or “emacs anyfilename”)
~/I2000CLM45_001 (2) cesm_setup
(3) I2000CLM45_001.build (4) I2000CLM45_001.submit
SourceMods
CASE Directory
Tools
CaseDocs
Buildconf
LockedFiles
1) Modify env_run.xml to set desired simulated length


env_run.xml
RunYme variables can be changed in env_run.xml at any point during the run and control the mechanics of the run (length, resubmits, and archiving).
Common variables to change include
1. STOP_OPTION à sets the run Yme interval type, i.e. nmonths, ndays, nyears
2. STOP_N à sets the number of intervals to run the model during the specified wallclock* Yme. * Wallclock Yme is set in your YourCaseName.run file and is a measure
of the actual Yme.
3. RESUBMIT à sets the number of Ymes to resubmit the run

env_run.xml
Exercise 2: Run simulaYon for 5 years (Part 1)
1. STOP_OPTION à change to “nyears”
2. STOP_N à change to “5”
3. RESUBMIT à sets the number of Ymes to resubmit the run To use resubmit, can set “STOP_N” to 1, then set RESUBMIT to “4”. ** This will run 5 different simulaYons for 1 year each **

Run Scripts: Wall clock Yme
Using a text editor, open I2000CLM45_001.run
~/I2000CLM45_001 (2) cesm_setup
(3) I2000CLM45_001.build (4) I2000CLM45_001.submit
SourceMods
CASE Directory
Tools
CaseDocs
Buildconf
LockedFiles
2) Modify I2000CLM45_001.run to tell computer how much computer time is needed to complete the simulation (Wall Clock Time)

Review run script: I2000CLM45_001.run Common BSUB command to change:
#BSUB –q regular queue type (also: economy, premium, etc.) #BSUB -‐o cesm.stdout.%J machine standard out #BSUB -‐e cesm.stderr.%J machine standard error #BSUB -‐J ICLM200045_001 job name #BSUB -‐W 2:00 wallclock Yme requested* #BSUB -‐P UCGD0001 project number
*Note: Maximum allowable wall clock Yme on Yellowstone is 12 hours. Submissions requesYng under an hour typically have shorter wait Ymes in the queue.
Run Scripts: Wall clock Yme
Files written to case directory
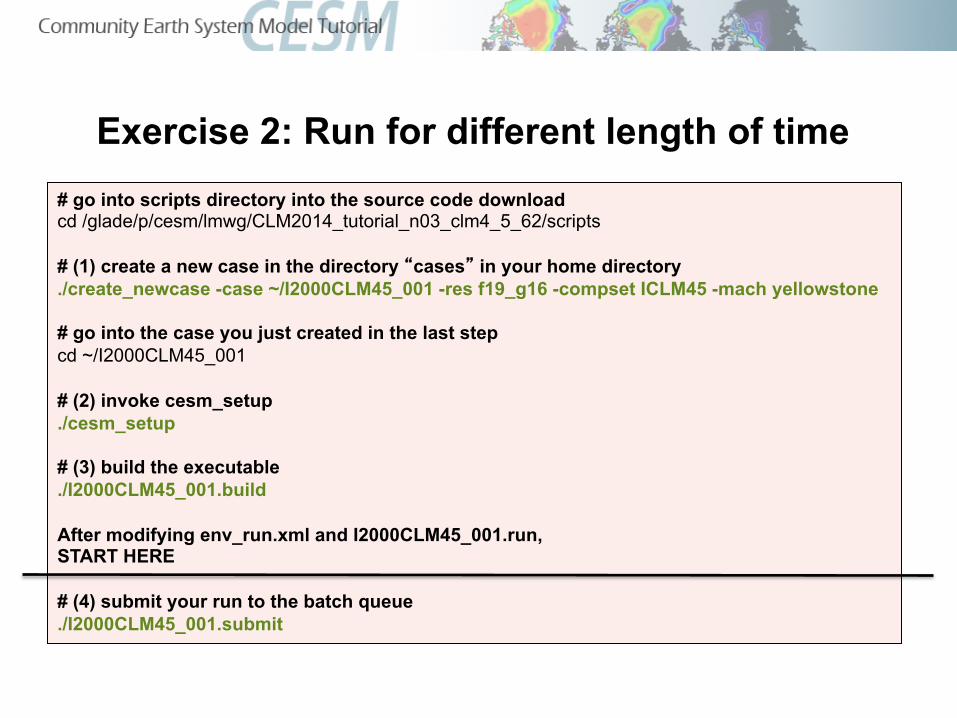
Exercise 2: Run for different length of time # go into scripts directory into the source code download cd /glade/p/cesm/lmwg/CLM2014_tutorial_n03_clm4_5_62/scripts # (1) create a new case in the directory “cases” in your home directory ./create_newcase -case ~/I2000CLM45_001 -res f19_g16 -compset ICLM45 -mach yellowstone # go into the case you just created in the last step cd ~/I2000CLM45_001 # (2) invoke cesm_setup ./cesm_setup # (3) build the executable ./I2000CLM45_001.build After modifying env_run.xml and I2000CLM45_001.run, START HERE # (4) submit your run to the batch queue ./I2000CLM45_001.submit

3 Types of Basic ModificaYons
1. Component Sets
2. ENV files (env_[command])
3. Namelist files (user_nl_[model]) * Going back to I1850CLM45_001 case, changing data record frequency
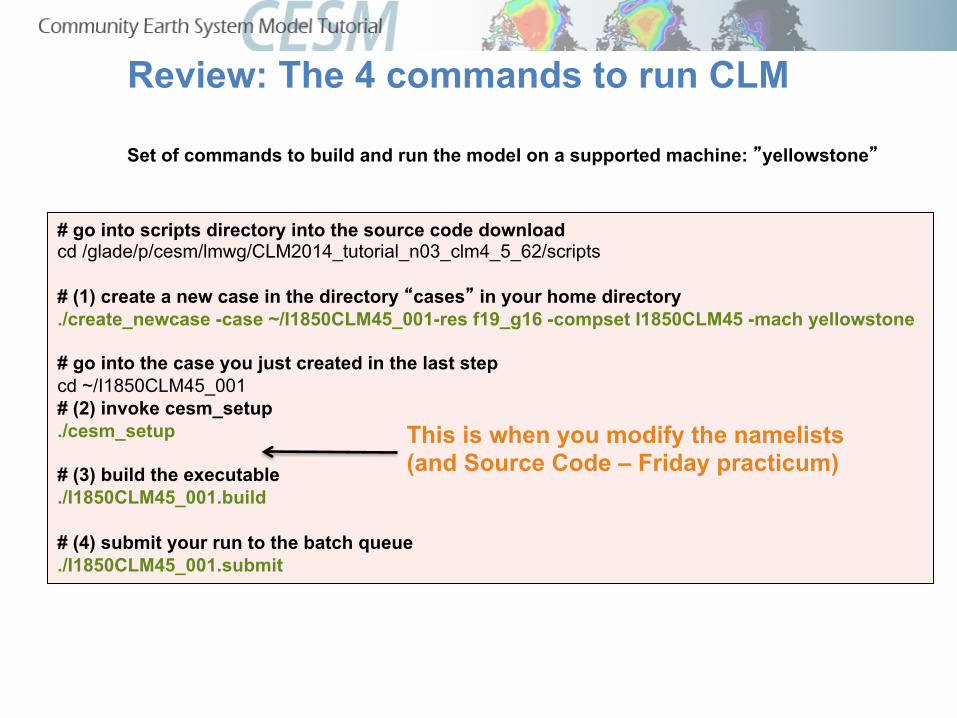
Review: The 4 commands to run CLM
# go into scripts directory into the source code download cd /glade/p/cesm/lmwg/CLM2014_tutorial_n03_clm4_5_62/scripts # (1) create a new case in the directory “cases” in your home directory ./create_newcase -case ~/I1850CLM45_001-res f19_g16 -compset I1850CLM45 -mach yellowstone # go into the case you just created in the last step cd ~/I1850CLM45_001 # (2) invoke cesm_setup ./cesm_setup # (3) build the executable ./I1850CLM45_001.build # (4) submit your run to the batch queue ./I1850CLM45_001.submit
Set of commands to build and run the model on a supported machine: ”yellowstone”
This is when you modify the namelists (and Source Code – Friday practicum)

models scripts (1) create_newcase
/path_to_code/CodeDir $CCSMROOT
CESM Code
atm
lnd
ocn
ice
glc
csm_share
rof
drv
wav
utils
~/I1850CLM45_001 (2) cesm_setup user_nl_datm user_nl_cice user_nl_clm user_nl_cpl
user_nl_pop2 user_nl_rtm
(3) I1859CLM45_001.build (4) I1850CLM45_001.submit
CASE Directory
run $RUNDIR
atm_in drv_flds_in
drv_in ice_in lnd_in
pop2_in rof_in
/glade/scratch/userx/ I1850CLM45_001
$EXEROOT
Build/Run Directory
bld SourceMods
Tools
CaseDocs atm_in
drv_flds_in drv_in ice_in lnd_in
pop2_in rof_in
Buildconf
LockedFiles
CLM directories & commands

models scripts (1) create_newcase
/path_to_code/CodeDir $CCSMROOT
CESM Code
atm
lnd
ocn
ice
glc
csm_share
rof
drv
wav
utils
~/I1859CLM45_001 (2) cesm_setup user_nl_datm user_nl_cice user_nl_clm user_nl_cpl
user_nl_pop2 user_nl_rtm
(3) I1850CLM45_001.build (4) I1850CLM45_001.submit
CASE Directory
cesm_setup creates namelist modification files user_nl_xxx this is where you modify your namelists
run $RUNDIR
atm_in drv_flds_in
drv_in ice_in lnd_in
pop2_in rof_in
/glade/scratch/userx/ I1850CLM45_001
$EXEROOT
Build/Run Directory
bld SourceMods
Tools
CaseDocs atm_in
drv_flds_in drv_in ice_in lnd_in
pop2_in rof_in
Buildconf
LockedFiles
CLM directories & commands

models scripts (1) create_newcase
/path_to_code/CodeDir $CCSMROOT
CESM Code
atm
lnd
ocn
ice
glc
csm_share
rof
drv
wav
utils
~/I1850CLM45_001 (2) cesm_setup user_nl_datm user_nl_cice user_nl_clm user_nl_cpl
user_nl_pop2 user_nl_rtm
(3) I1850CLM45_001.build (4) I1850CLM45_001.submit
CASE Directory
cesm_setup creates namelist modification files user_nl_xxx this is where you modify your namelists
The build script creates namelists in the run directory
run $RUNDIR
atm_in drv_flds_in
drv_in ice_in lnd_in
pop2_in rof_in
/glade/scratch/userx/ I1850CLM45_001
$EXEROOT
Build/Run Directory
bld SourceMods
Tools
CaseDocs atm_in
drv_flds_in drv_in ice_in lnd_in
pop2_in rof_in
Buildconf
LockedFiles
CaseDocs contains copy of the namelists for reference only (should not be edited)
CLM directories & commands
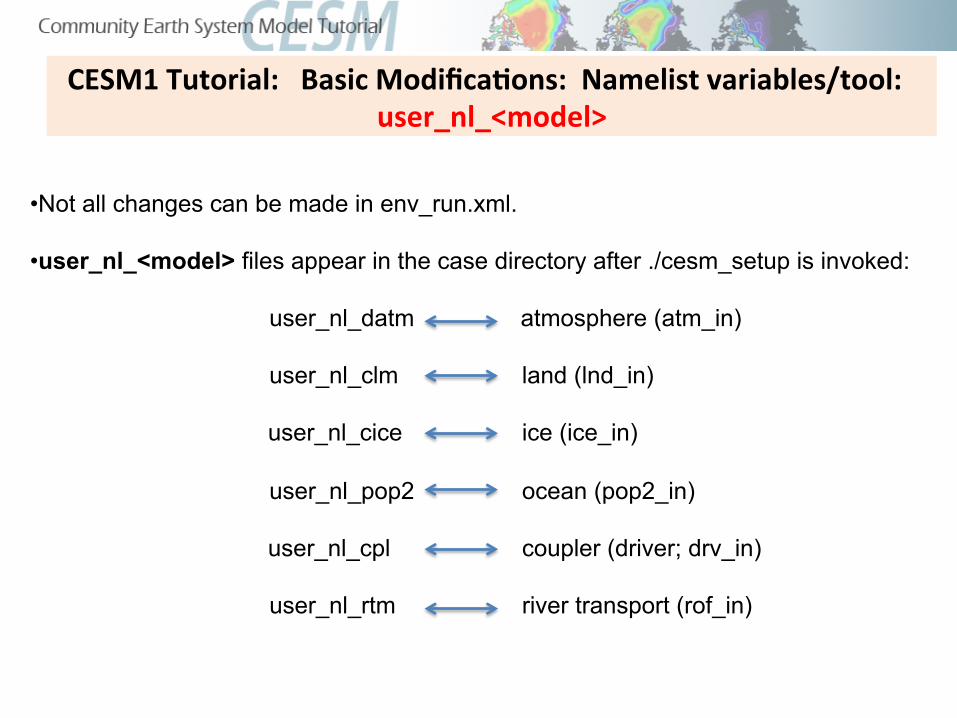
• Not all changes can be made in env_run.xml.
• user_nl_<model> files appear in the case directory after ./cesm_setup is invoked:
user_nl_datm atmosphere (atm_in)
user_nl_clm land (lnd_in)
user_nl_cice ice (ice_in)
user_nl_pop2 ocean (pop2_in)
user_nl_cpl coupler (driver; drv_in) user_nl_rtm river transport (rof_in)
CESM1 Tutorial: Basic Modifica6ons: Namelist variables/tool: user_nl_<model>

Modifying Namelists
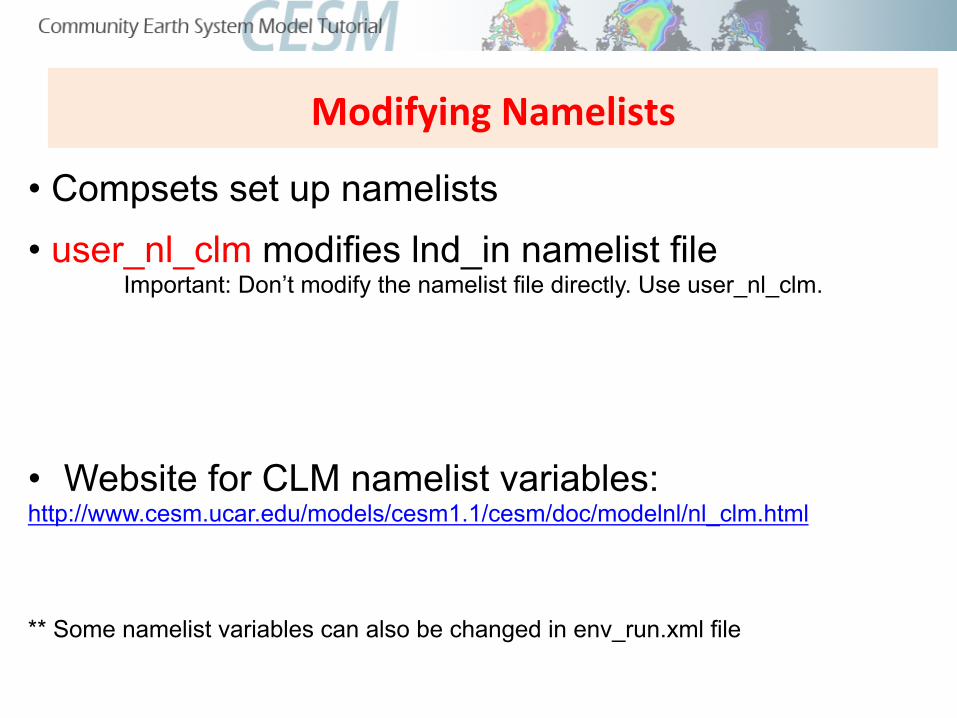
• Compsets set up namelists • user_nl_clm modifies lnd_in namelist file
Important: Don’t modify the namelist file directly. Use user_nl_clm.
Modifying Namelists
• Compsets set up namelists • user_nl_clm modifies lnd_in namelist file
Important: Don’t modify the namelist file directly. Use user_nl_clm.
• Website for CLM namelist variables: http://www.cesm.ucar.edu/models/cesm1.1/cesm/doc/modelnl/nl_clm.html ** Some namelist variables can also be changed in env_run.xml file

Looking at Namelist Files
• cd into your case directory, then CaseDocs • (~/I1850CLM45_001/CaseDocs)
• Open lnd_in with text editor
• cd into your run directory • (glade/scratch/I1850CLM45_001/run)
• Open lnd_in with text editor
Option 1
Option 2


Different compsets will change the status of some of these things.

Example ModificaYon: user_nl_clm
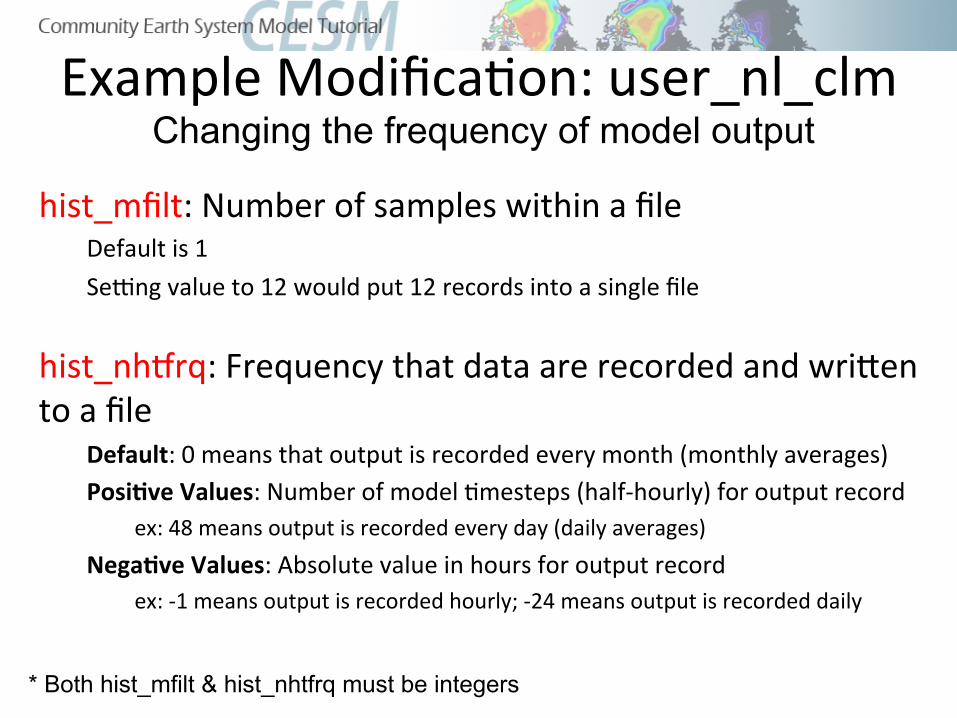
hist_mfilt: Number of samples within a file Default is 1 Serng value to 12 would put 12 records into a single file
* Both hist_mfilt & hist_nhtfrq must be integers
Changing the frequency of model output
Example ModificaYon: user_nl_clm
hist_mfilt: Number of samples within a file Default is 1 Serng value to 12 would put 12 records into a single file
hist_nhsrq: Frequency that data are recorded and writen to a file
Default: 0 means that output is recorded every month (monthly averages) Posi6ve Values: Number of model Ymesteps (half-‐hourly) for output record ex: 48 means output is recorded every day (daily averages)
Nega6ve Values: Absolute value in hours for output record ex: -‐1 means output is recorded hourly; -‐24 means output is recorded daily
* Both hist_mfilt & hist_nhtfrq must be integers
Changing the frequency of model output

Daily output with a years worth of daily records in a file: hist_mfilt = 365 hist_nhsrq = -‐24 Monthly output with each month writen to a separate file (default, as in I2000CLM45_001 case): hist_mfilt = 1 hist_nhsrq = 0
Example ModificaYon: user_nl_clm Changing the frequency of model output

Example 3: Modify user_nl_clm to get monthly output, 1 file per month in I1850CLM45_001
For this tutorial, we changed the default data record setting to daily in the I1850CLM45 compset.
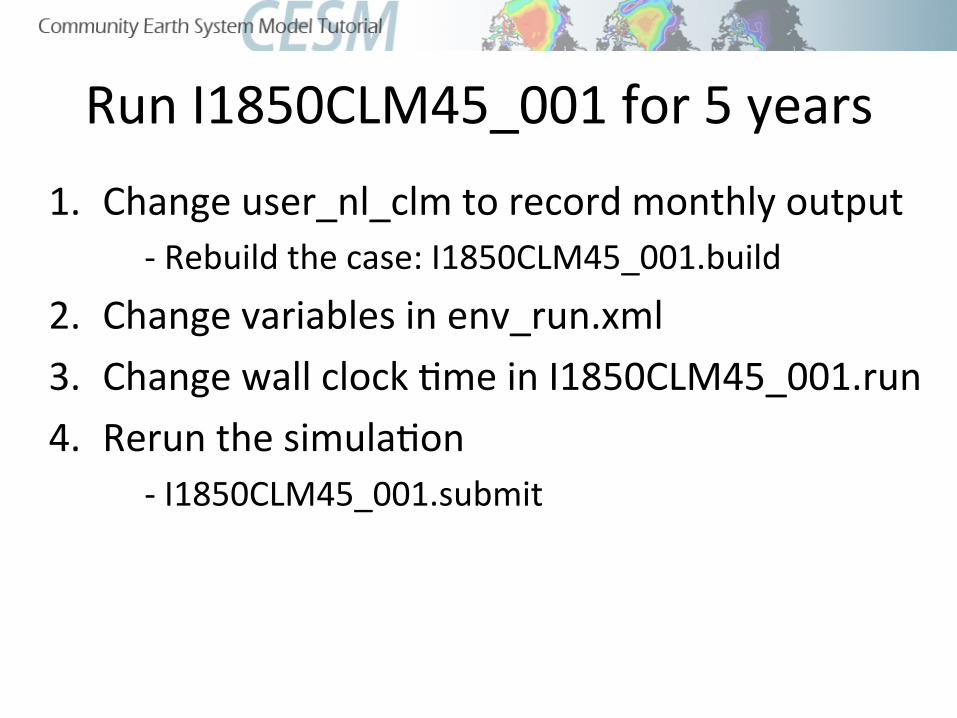
Run I1850CLM45_001 for 5 years 1. Change user_nl_clm to record monthly output
-‐ Rebuild the case: I1850CLM45_001.build
2. Change variables in env_run.xml 3. Change wall clock Yme in I1850CLM45_001.run 4. Rerun the simulaYon
-‐ I1850CLM45_001.submit

Review: The 4 commands to run CLM
# go into scripts directory into the source code download cd /glade/p/cesm/lmwg/CLM2014_tutorial_n03_clm4_5_62/scripts # (1) create a new case in the directory “cases” in your home directory ./create_newcase -case ~/I1850CLM45_001 -res f19_g16 -compset I1850CLM45 -mach yellowstone # go into the case you just created in the last step cd ~/I1850CLM45_001 # (2) invoke cesm_setup ./cesm_setup After modifying namelists, START HERE # (3) build the executable ./I1850CLM45_001.build # (4) submit your run to the batch queue ./I1850CLM45_001.submit
Set of commands to build and run the model on a supported machine: ”yellowstone”

1. Component Sets 2. ENV files (env_[command]) 3. Namelist files (user_nl_[model])
Now YOU know how to run the model!
Use these 3 basic modifications to run a variety of simulations.
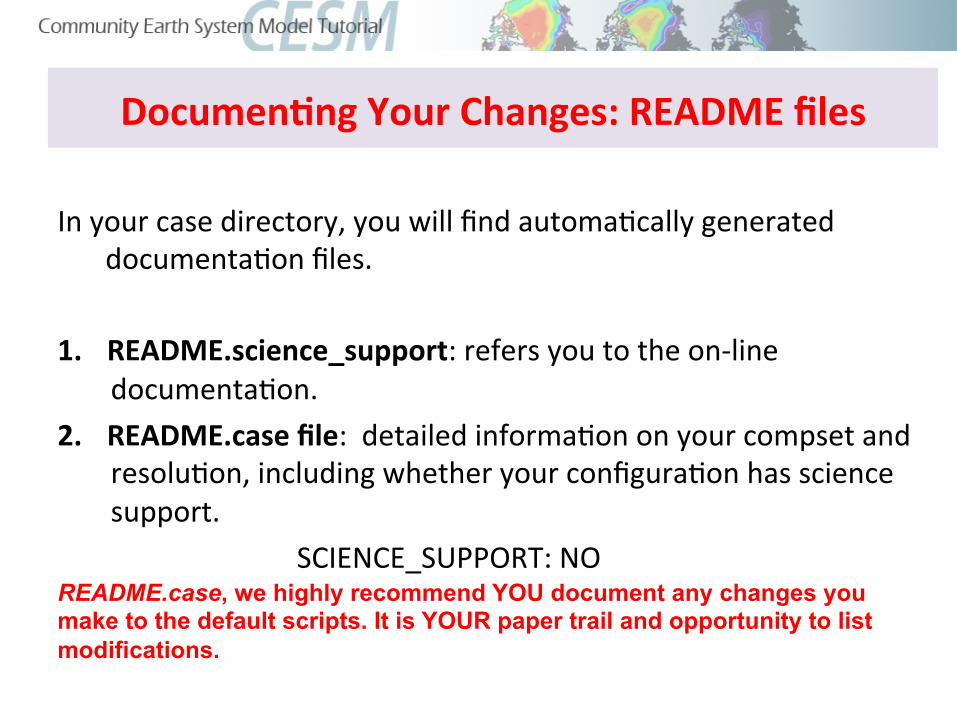
Documen6ng Your Changes: README files
In your case directory, you will find automaYcally generated documentaYon files.
1. README.science_support: refers you to the on-‐line
documentaYon. 2. README.case file: detailed informaYon on your compset and
resoluYon, including whether your configuraYon has science support.
SCIENCE_SUPPORT: NO
README.case, we highly recommend YOU document any changes you make to the default scripts. It is YOUR paper trail and opportunity to list modifications.

For additional information on running & configuring CLM, see CLM User’s Guide:
http://www.cesm.ucar.edu/models/cesm1.2/clm/models/lnd/clm/doc/UsersGuide/book1.html

CLM4.5 Tutorial: Running for Single-‐Point/
Regional Cases

Objectives for This Session
1. Make you sick of the four steps to run CLM/CESM! (really make you familiar enough with it that you comfortable using them)
2. Give you some familiarity with the CLM datasets that you would customize for your site.
3. Get you familiar with the process on how you change your case to use your own datasets.
4. Give an introduction to the process of making CLM input datasets, so that you can study it on your own later (using the CLM User’s Guide).
5. Give an introduction to PTCLM that makes the process of creating datasets easier.
6. Do all this in an incremental fashion so we start with standard out of the box cases, and end on something more complex.

Caveat!
This is our first go of teaching this section. The way that the PTCLM and getregional scripts work here is very different than the last public version of the model! So if you want to use the public release, you’ll want to study the CLM User’s Guide for their specific use. If you really need this version of the model for development – you’ll need to ask for access to it after the tutorial. For the development version, you’ll want to study the README files and other documentation inside the distribution.

Three Sections we will Divide Work into
1. Work with out of the box single point cases to become familiar with the datasets that you need to change to work on your own site.
2. Work with the getregional script that subsets existing datasets to get you familiar with setting up a case with your own datasets.
3. Introduction to the process of making datasets, and to PTCLM that helps you with it.
4. Gives you two chances to bail early!

Examples and questions are on yellowstone
1. These slides are at… • http://www.cesm.ucar.edu/events/tutorials/
20140219/day2-practical2-kluzek.pdf 1. The examples and questions are under: • /glade/p/cesm/lmwg/CLM2014_tutorial_space 2. In the Day2 subdirectory (and the cases
and other examples are in there as well) 3. Three files: • SinglePtExercisesI.txt • SinglePtExercisesII.txt • SinglePtExercisesIII.txt

Section I – Running Supported Single Point Resolutions

Objectives for Section I (Running Supported Single Point
Resolutions)
1. Continue familiarizing you with the steps to create cases.
2. Start with the closest cases to what you’ve already worked on.
3. Create some out of the box single point cases. 4. Look at the input datasets that depend on the
site location. 5. Discuss what’s in those datasets.

What are the different options for running single point or regional cases?
There are three different options we will address: 1. Run supported resolutions out of the box (there are a few
available). 2. Subset global datasets using the “getregional” script 3. Run PTCLM to create datasets for you to use.
The other option that we will give a brief introduction to is… • Create datasets on your own using CLM tools (PTCLM just makes
this simpler).

create_newcase requires 4 arguments
./create_newcase –case Day2Brazil –res 1x1_brazil –compset ICLM45 -mach yellowstone
Day2Brazil yellowstone ICLM45
(I = CLM only, 2000) 1x1_brazil (a single point in brazil)
What is the casename ?
Which resolution? (or location)
Which machine are you running on?
Crea;ng a new case for a single point
courtesy: c.hannay
Which model configuration? Which set of components?

Remember: The 4 commands to run CLM
# go into scripts directory into the source code download cd /glade/p/cesm/lmwg/CLM2014_tutorial_n03_clm4_5_62/scripts # (1) create a new case in the directory “cases” in your home directory ./create_newcase -case ~/cases/Day2brazil –res 1x1_brazil -compset ICLM45 -mach yellowstone # go into the case you just created in the last step cd ~/cases/Day2brazil # (2) invoke cesm_setup ./cesm_setup # (3) build the executable ./Day2brazil.build # (4) submit your run to the batch queue ./Day2brazil.submit
1. ./create_newcase 2. ./cesm_setup 3. Build the case 4. Submit to the batch queue and run the simulation
So for a supported single-point case…

Get a list of the resolutions you can use
…. ====================================================== Component Grids: name (alias) ====================================================== reg null CLM_USRDAT 1x1_numaIA 1x1_brazil 1x1_smallvilleIA 1x1_camdenNJ 1x1_mexicocityMEX 1x1_vancouverCAN 1x1_tropicAtl 1x1_urbanc_alpha 5x5_amazon ...
1. ./create_newcase -list grids

Supported Single Point Resolutions
…. ====================================================== Component Grids: name (alias) ====================================================== reg null CLM_USRDAT 1x1_numaIA 1x1_brazil ß This is the case we just ran (for Novo Progresso Brazil) 1x1_smallvilleIA 1x1_camdenNJ 1x1_mexicocityMEX ß This is an urban case that includes Meteorlogical forcing 1x1_vancouverCAN 1x1_tropicAtl 1x1_urbanc_alpha 5x5_amazon ...
1. create_newcase -list grids

create_newcase requires 4 arguments
./create_newcase –case Day2MexCity –res 1x1_mexicocityMEX –compset I1PTCLM45 -mach yellowstone
Day2MexCity yellowstone I1PTCLM45
(with tower Meteorology) 1x1_mexicocityMEX
What is the casename ?
Which resolution? (or location)
Which machine are you running on?
Crea;ng a new case for Mexicocity
courtesy: c.hannay
Which model configuration ? Which set of components ?
Which meteorology?
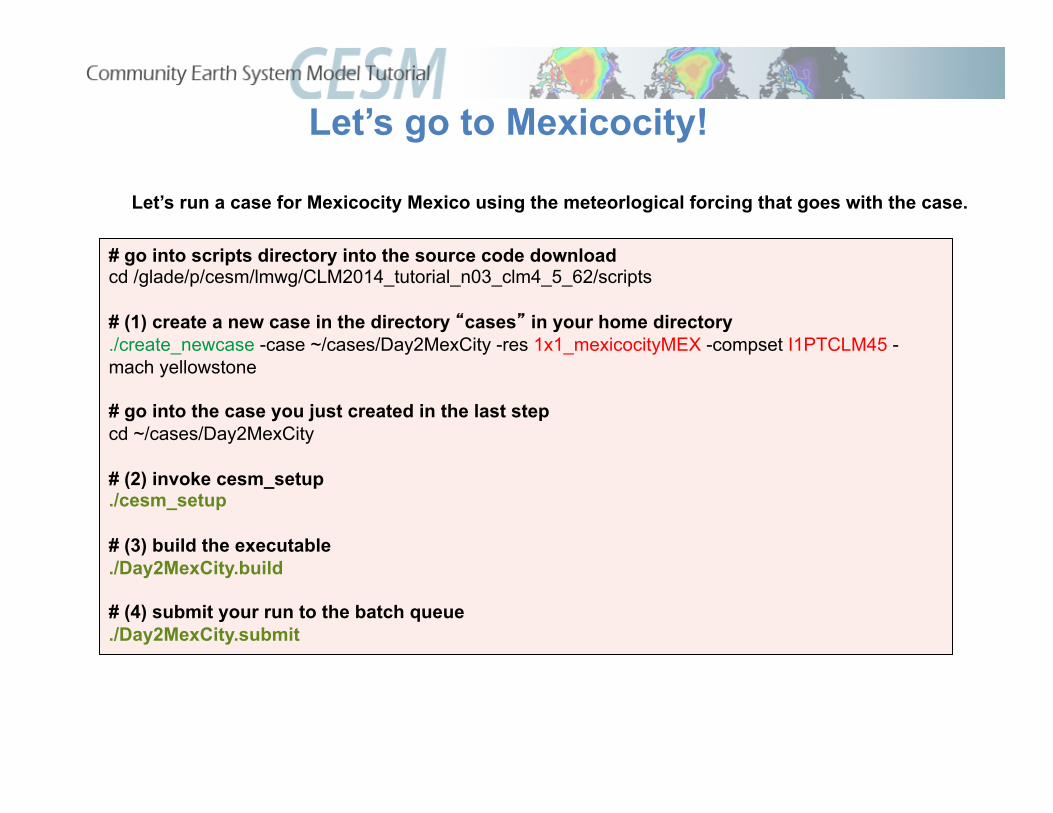
Let’s go to Mexicocity!
# go into scripts directory into the source code download cd /glade/p/cesm/lmwg/CLM2014_tutorial_n03_clm4_5_62/scripts # (1) create a new case in the directory “cases” in your home directory ./create_newcase -case ~/cases/Day2MexCity -res 1x1_mexicocityMEX -compset I1PTCLM45 -mach yellowstone # go into the case you just created in the last step cd ~/cases/Day2MexCity # (2) invoke cesm_setup ./cesm_setup # (3) build the executable ./Day2MexCity.build # (4) submit your run to the batch queue ./Day2MexCity.submit
Let’s run a case for Mexicocity Mexico using the meteorlogical forcing that goes with the case.

models scripts (1) create_newcase
/path_to_code/CodeDir $CCSMROOT
CESM Code
atm
lnd
ocn
ice
glc
csm_share
rof
drv
wav
utils
~/cases/case01 (2) cesm_setup (3) case01.build
(4) case01.submit
SourceMods
CASE Directory
Tools
CaseDocs
Buildconf
LockedFiles
/glade/p/cesm/cseg/inputdata
atm lnd ocn ice glc wav
/glade/p/cesm/cseg/inputdata $DIN_LOC_ROOT
INPUTDATA Directory
rof share cpl
run $RUNDIR
/glade/scratch/userx/ case01
$EXEROOT
Build/Run Directory
bld
CLM directories & commands
Namelist files are here (both locations)
env_run file is here
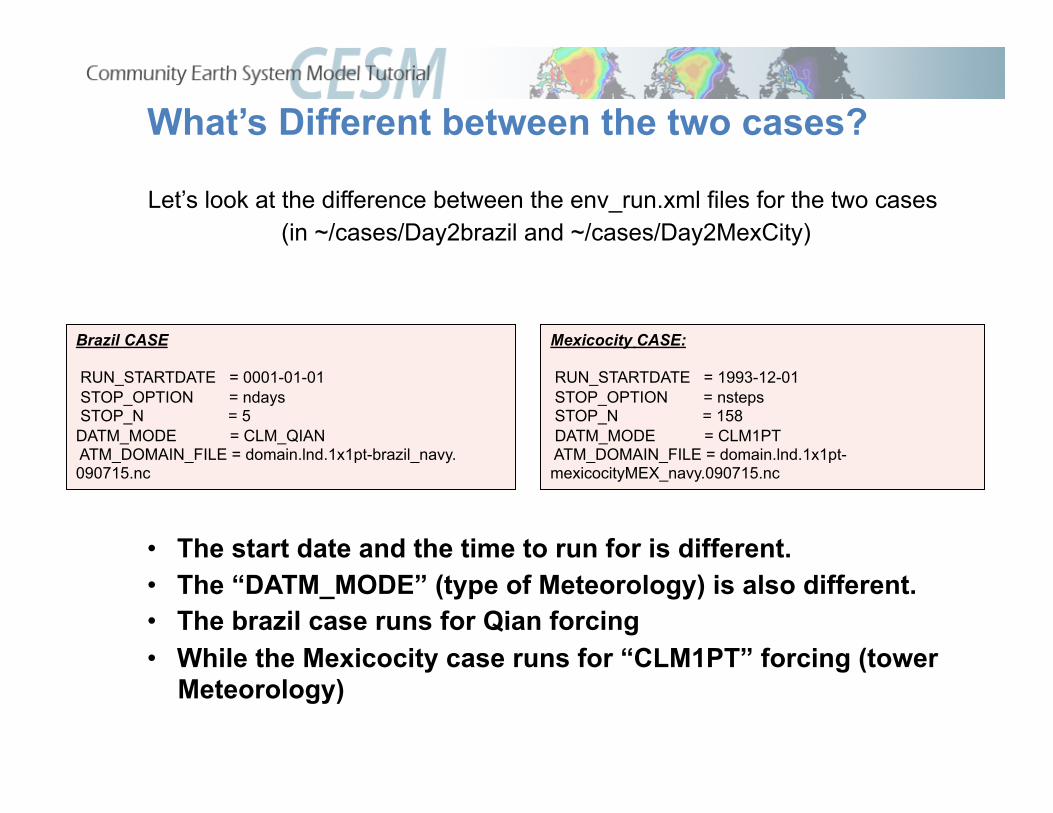
What’s Different between the two cases?
Brazil CASE RUN_STARTDATE = 0001-01-01 STOP_OPTION = ndays STOP_N = 5 DATM_MODE = CLM_QIAN ATM_DOMAIN_FILE = domain.lnd.1x1pt-brazil_navy.090715.nc
• The start date and the time to run for is different. • The “DATM_MODE” (type of Meteorology) is also different. • The brazil case runs for Qian forcing • While the Mexicocity case runs for “CLM1PT” forcing (tower
Meteorology)
Mexicocity CASE: RUN_STARTDATE = 1993-12-01 STOP_OPTION = nsteps STOP_N = 158 DATM_MODE = CLM1PT ATM_DOMAIN_FILE = domain.lnd.1x1pt-mexicocityMEX_navy.090715.nc
Let’s look at the difference between the env_run.xml files for the two cases (in ~/cases/Day2brazil and ~/cases/Day2MexCity)

Aside: What’s the deal with DATM_MODE? There are four modes used with CLM that specify the type of Meteorological data that’s used:
• CLMCRUNCEP • CLM_QIAN
• CLM1PT • CPLHIST3HrWx
• CLMCRUNCEP – Use global NCEP forcing at half-degree resolution from CRU goes from 1900-2010
• CLM_QIAN – Use NCEP forcing at T62 resolution corrected by Qian et. al. goes from 1948-2004
• CLM1PT – Use the local meteorology from your specific tower site • CPLHIST3HrWx – Use atmospheric data from a previous CESM simulation
DATM_MODE provides the specific datasets that are used to provide atmospheric lowest layer: winds, pressure, humidity, solar, long-wave down, temperature, and precipitation.

What’s Different between the two cases? (cont)
Brazil CASE fatmlndfrc = ’$DIN_LOC_ROOT/share/domains/domain.clm/domain.lnd.1x1pt-brazil_navy.090715.nc’ fsurdat = '/$DIN_LOC_ROOT/lnd/clm2/surfdata_map/surfdata_1x1_brazil_simyr2000_c130927.nc'
Mexicocity CASE: fatmlndfrc = '/$DIN_LOC_ROOT/share/domains/domain.clm/domain.lnd.1x1pt-mexicocityMEX_navy.090715.nc' fsurdat = '$DIN_LOC_ROOT/lnd/clm2/surfdata_map/surfdata_1x1_mexicocityMEX_simyr2000_c130927.nc'
Let’s look at the difference between the namelist lnd_in files for the two cases (in ~/cases/Day2brazil/CaseDocs and ~/cases/Day2MexCity/CaseDocs)
The two files that are different are: Domain file – Where in the world you are (or for global
simulations what specific grid resolution) Surface dataset – description of surface type, vegetation, and
soil and etcetera.
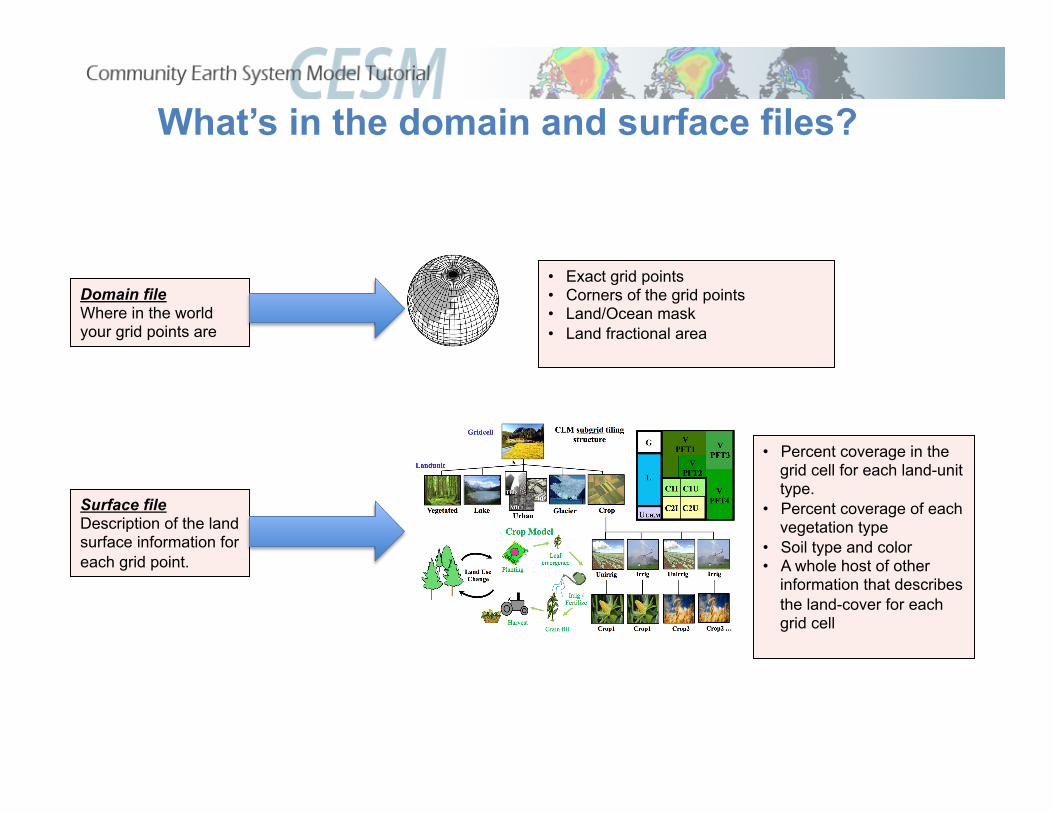
What’s in the domain and surface files?
Domain file Where in the world your grid points are
• Exact grid points • Corners of the grid points • Land/Ocean mask • Land fractional area
Surface file Description of the land surface information for each grid point.
• Percent coverage in the grid cell for each land-unit type.
• Percent coverage of each vegetation type
• Soil type and color • A whole host of other
information that describes the land-cover for each grid cell

Review 1. Steps to create a case are: 2. ./create_newcase 3. ./cesm_setup 4. $CASE.build 5. $CASE.submit 6. Created an out of the box case for a single point in brazil and one
in Mexicocity Mexico 7. We compared the two, the main difference is the domain and
surface datasets. 8. Domain datasets have grid information 9. Surface datasets have land-type information for each grid point

Exercise I 1. Setup a case for brazil 2. Setup a case for Mexicocity 3. In your case directory (for either case) in what env*.xml file is the domain file found? 4. Looking in your case directory for the brazil case in the CaseDocs/lnd_in file figure
out the creation date string (_cYYMMDD format) of the surface dataset? 5. Looking in your case directory for the brazil case in the CaseDocs/lnd_in file figure
out the creation date string of the domain dataset (.YYMMDD format)?
Extra Credit 1. In which of the namelist files (the files that end in _in) (for the brazil case in your case
directory under CaseDocs) are the Meteorology forcing streams files found (this case is with Qian forcing)?
2. For the brazil case look in each of the streams files for meteorological forcing (Solar, Precip and TPQW) , how many total active variables are there (data variables that don’t just describe the grid point location) (look for the variableNames field inside the fieldInfo field)?
3. Looking in the” CaseDocs/datm.stream.txt.CLM_QIAN.Solar” file for the brazil case figure out the creation date for the datm forcing data (from the filepath with a .cYYMMDD format)?
4. What resolution is the forcing dataset for the brazil case? 5. In the meteorological forcing streams file for the Mexicocity case – how many active
variables are there (as in extra credit question 2 above)?

Exercise I 1. Setup a case for brazil 2. Setup a case for Mexicocity 3. In your case directory (for either case) in what env*.xml file is the domain file found? • env_run.xml file 4. Looking in your case directory for the brazil case in the CaseDocs/lnd_in file figure out the creation
date string (_cYYMMDD format) of the surface dataset? • c130927 Sep/27/2013 5. Looking in your case directory for the brazil case in the CaseDocs/lnd_in file figure out the creation
date string of the domain dataset (.YYMMDD format)? • 090715 July/15/2009
Extra Credit 1. In which of the namelist files (the files that end in _in) (for the brazil case in your case directory
under CaseDocs) are the Meteorology forcing streams files found? • datm_atm_in 2. For the brazil case look in each of the streams files for meteorological forcing (Solar, Precip and
TPQW) , how many total active variables are there? • 6 (Precip, Solar, Temperature, Pressure, Humidity, and Wind-speed) 3. Looking in the” CaseDocs/datm.stream.txt.CLM_QIAN.Solar” file for the brazil case figure out the
creation date for the datm forcing data? • c080727 Jul/27/2008 4. What resolution is the forcing dataset for the brazil case? • T62 94x192 points, at equator (210km or 1.875 degree’s) 5. In the meteorological forcing streams file for the Mexicocity case – how many active variables are
there? • 10 (additionally includes LW down, height, and Solar split into direct and diffuse)

Section II – Using getregional to subset global datasets

Objectives for Section II (Using getregional to subset global
datasets )
1. Start introducing the directory with tools to make CLM input files.
2. Examine the CLM tool: getregional_datasets.pl 3. Use it to create a dataset over Alaska (domain
and surface datasets). 4. Create a case that uses the Alaska datasets. 5. Thus we demonstrate how to create a case
that uses your own datasets in the simplest way possible.

CLM Tools for creating Datasets
Review: the two datasets that are specific to the resolution are these two files: • Domain file
• Surface dataset These files can be created using various tools provided by the
CLM distribution
To create the domain file you use “gen_domain”. To create the surface dataset you use “mksurfdata_map”.
Here we will use the script “getregional_datasets.pl” to create these two files by pulling out a sub-region from an existing 2-
degree resolution datasets.

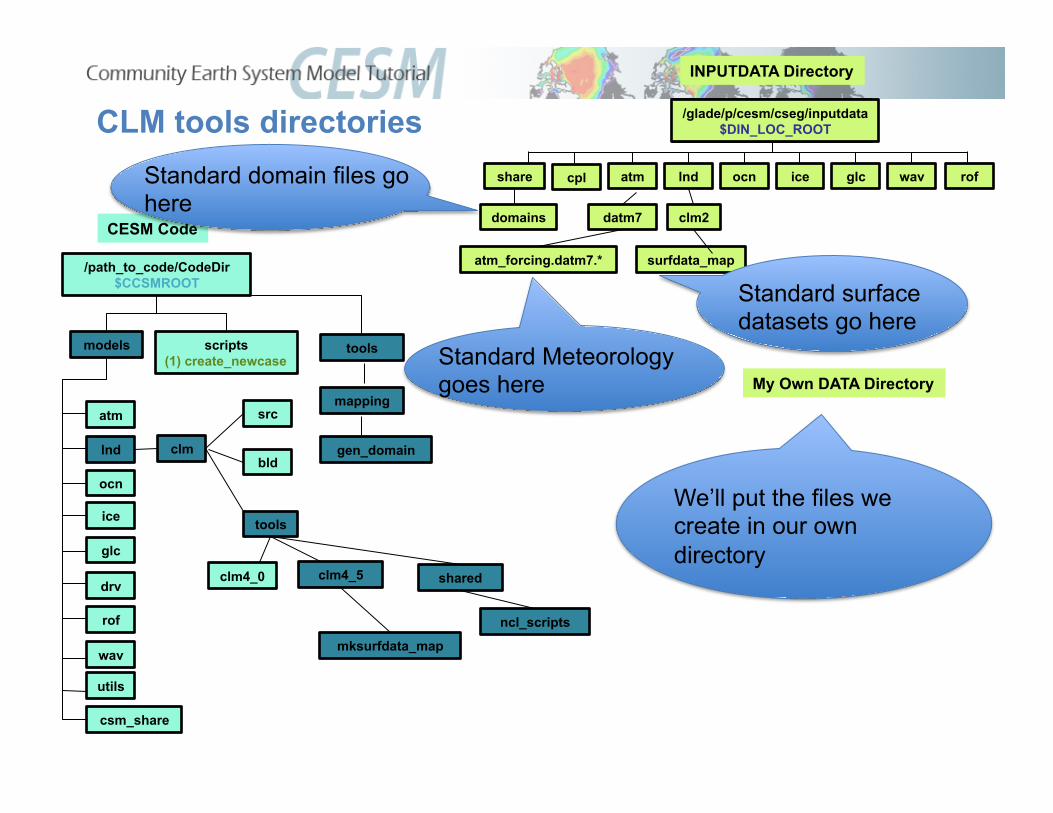
CLM tools directories
models scripts (1) create_newcase
/path_to_code/CodeDir $CCSMROOT
CESM Code
atm
lnd
ocn
ice
glc
csm_share
rof
drv
wav
utils
/glade/p/cesm/cseg/inputdata
atm lnd ocn ice glc wav
/glade/p/cesm/cseg/inputdata $DIN_LOC_ROOT
INPUTDATA Directory
rof share cpl
tools
clm
src
bld
tools
mapping
gen_domain
clm4_0 clm4_5 shared
clm2
My Own DATA Directory
mksurfdata_map
surfdata_map
datm7
atm_forcing.datm7.*
domains
getregional script is here ncl_scripts
Creates domain files
Creates surface datasets
CLM tools directories
models scripts (1) create_newcase
/path_to_code/CodeDir $CCSMROOT
CESM Code
atm
lnd
ocn
ice
glc
csm_share
rof
drv
wav
utils
/glade/p/cesm/cseg/inputdata
atm lnd ocn ice glc wav
/glade/p/cesm/cseg/inputdata $DIN_LOC_ROOT
INPUTDATA Directory
rof share cpl
tools
clm
src
bld
tools
mapping
gen_domain
clm4_0 clm4_5 shared
clm2
My Own DATA Directory
mksurfdata_map
surfdata_map
datm7
atm_forcing.datm7.*
domains
Standard surface datasets go here
ncl_scripts
We’ll put the files we create in our own directory
Standard domain files go here
Standard Meteorology goes here

Sub-setting global datasets When sub-setting other datasets you pick a box to use by picking the Southwest and Northeast corners of a box to use. The getregional script will then pull out all of the grid points that are within that box, which could be as small as one point.
SW Corner
NE Corner
And pick NE corner
Pick SW corner
Defines a box of grid points to use as your region to run on

Sub-setting global datasets You can run over a smaller region (or a single point) by creating files that are a subset of the global files for these and run with the resultant files. We do that
using the script in the: models/lnd/clm/tools/shared/ncl_scripts directory: getregional_datasets.pl
The script requires as input a list of input files, the accompanying output files for the region, and the latitude and longitude for the Southwest (SW) and Northeast
(NE) corners to extract. # go into the source code download cd /glade/p/cesm/lmwg/CLM2014_tutorial_n03_clm4_5_62 # Save the location of the getregional script cd models/lnd/clm/tools/shared/ncl_scripts setenv GETREGDIR `pwd` # Create a location to make datasets (here we make it in scratch space – # IN GENERAL YOU WOULD MAKE IT IN A LOCATION YOU WOULDN’T LOSE IT RATHER THAN SCRATCH) setenv MYDATADIR /glade/scratch/$USER/mygetregionaldata mkdir –p $MYDATADIR cd $MYDATADIR # Copy the input and output lists (and in general you would edit them) cp $GETREGDIR/sample_* . # Run getgetional for a region over Alaska $GETREGDIR/getregional_datasets.pl -ne 74.0,221.0 -sw 51.0,189.0 –I sample_inlist -o sample_outlist

Creating a case based on getregional files We use the CLM_USRDAT as the resolution
We use the –user_mods_dir option to “./create_newcase” This is the same mechanism you would use to create a case based on your own datasets that you
create yourself (by any means).
# (0) go into the scripts directory of the source code download cd /glade/p/cesm/lmwg/CLM2014_tutorial_n03_clm4_5_62/scripts # (1) create a new case in the directory “cases” in your home directory ./create_newcase -res CLM_USRDAT -user_mods_dir $MYDATADIR -mach yellowstone \ -case ~/cases/Day2Alaska -compset ICLM45BGC # go into the case you just created in the last step cd ~/cases/Day2Alaska # (2) invoke cesm_setup ./cesm_setup # (3) build the executable ./Day2Alaska.build # (4) submit your run to the batch queue ./Day2Alaska.submit

Exercise II 1. Use getregional_datasets.pl in the CLM tools directory to create a
domain and surface dataset from the 0.9x1.25 global datasets for a region over Alaska
2. What is the creation date string (ending _cYYMMDD form) of the files you just created?
3. What are the name of the files created by getregional that you can use to run a case from (in the $MYDATADIR directory)?
Extra Credit
1. Create and run a case using create_newcase for the datasets you created 2. Why might you want to subset a region of the global datasets? 3. In what two directories in the model code tree is gen_domain found? 4. In what two CLM tools directories is there a program to create surface
datasets?

Exercise II 1. Use getregional_datasets.pl in the CLM tools directory to create a domain
and surface dataset from the 0.9x1.25 global datasets for a region over Alaska
2. What is the creation date string (ending _cYYMMDD form) of the files you just created?
• c131122 Nov/22/2013 3. What are the name of the files created by getregional that you can use to run
a case from (in the $MYDATADIR directory)? • user_nl_clm and xmlchange_cmnds
Extra Credit 1. Create and run a case using create_newcase for the datasets you created 2. Why might you want to subset a region of the global datasets? • Save time and computing resources 3. In what two directories in the model code tree is gen_domain found? • ./models/lnd/clm/tools/shared/gen_domain • ./tools/mapping/gen_domain_files/ 3. In what two CLM tools directories is there a program to create surface datasets? • ./models/lnd/clm/tools/clm4_5/mksurfdata_map • ./models/lnd/clm/tools/clm4_0/mksurfdata_map

Section III – Using PTCLMmkdata
Objectives for Section III (Using PTCLMmkdata)
1. Give an introduction to the tools that make CLM input files.
2. Give an overview of the process to create input files.
3. Go over the steps that PTCLMmkdata uses to create datasets.
4. Create some datasets using PTCLMmkdata. 5. Create a case based on the datasets created.

What is PTCLM?
PTCLM is a script that helps you:
• Create • Manage
• Run
Datasets for running CLM based on tower site data for a single-point. It works similar to getregional to create
datasets and files that point to them that can be put into a case.
The meteorology that you force the sites with can either be from:
Tower site Standard global forcing
PTCLM directory
models scripts (1) create_newcase
/path_to_code/CodeDir $CCSMROOT
CESM Code
atm
lnd
ocn
ice
glc
csm_share
rof
drv
wav
utils
/glade/p/cesm/cseg/inputdata
atm lnd ocn ice glc wav
/glade/p/cesm/cseg/inputdata $DIN_LOC_ROOT
INPUTDATA Directory
rof share cpl
tools
clm
src
bld
tools
mapping
gen_domain
clm4_0 clm4_5 shared
clm2
My Own DATA Directory
mksurfdata_map PTCLM
PTCLM runs the programs: mknoocnmap.pl gen_domain mkmapdata.sh mksurfdata_map
mkmapdata
PTCLM is here
mknoocnmap.pl is here
mkmapdata.sh is here

What is the data flow for creating datasets?

What is the data flow for creating the domain file?

What are the steps that PTCLMmkdata does for you to create datasets?
1. Runs mknoocnmap.pl to create the mapping file that is required by CESM.
2. Runs gen_domain to create your domain file. 3. Runs mkmapdata.sh to create mapping files between
your point and the raw datasets that mksurfdata_map uses.
4. Runs mksurfdata.pl to create your surface dataset. 5. Puts the datasets into a directory that also has files to
help setup your case and use the datasets just created (user_nl files and xmlchange_cmnds file).

What the deal with the mapping files?
To create surface datasets you read in various “raw” datasets (for PFT, lake, glacier, etc.) at different resolutions and regrid them to your site. The mapping files regrid from the “raw” dataset resolution to your output site.
Your site
Dataset 1 at resolution 1
Dataset 2 at resolution 2
Dataset 3 at resolution 3 Surface Dataset
Mapping files from dataset resolution to your site
Mksurfdata_map uses the datasets and the maps to create surface datasets

OK so how do I run PTCLM now? PTCLMmkdata as we said before runs the other file creation scripts to create datasets for you. This is easier than learning each of the previous programs. However, if something goes wrong you may have to look
into the programs that PTCLMmkdata calls to figure out what is up.
# Setup the names that we’ll use… setenv CESM_ROOT /glade/p/cesm/lmwg/CLM2014_tutorial_n03_clm4_5_62 setenv CSMDATA /glade/p/cesmdata/cseg/inputdata setenv MYSITE 1x1pt_US-UMB # Setup your data directory (NOTE: NORMALLY THIS WOULD NOT BE IN SCRATCH SPACE!!!!) setenv MYDATADIR /glade/scratch/$USER/mydatadir mkdir -p $MYDATADIR/$MYSITE #copy the mapping files over so they won’t have to be created again cp -p $CSMDATA/lnd/clm2/PTCLMmydatafiles/$MYSITE/map_*_140121.nc $MYDATADIR/$MYSITE/ # Run PTCLM giving it the creation date string for the mapping files, the site name, # where the standard input files are located and the output directory to put your files # They will be put into a subdirectory with the site-name under this directory $CESM_ROOT/models/lnd/clm/tools/shared/PTCLM/PTCLMmkdata \ --map_gdate 140121 -s US-UMB -d $CSMDATA --mydatadir $MYDATADIR
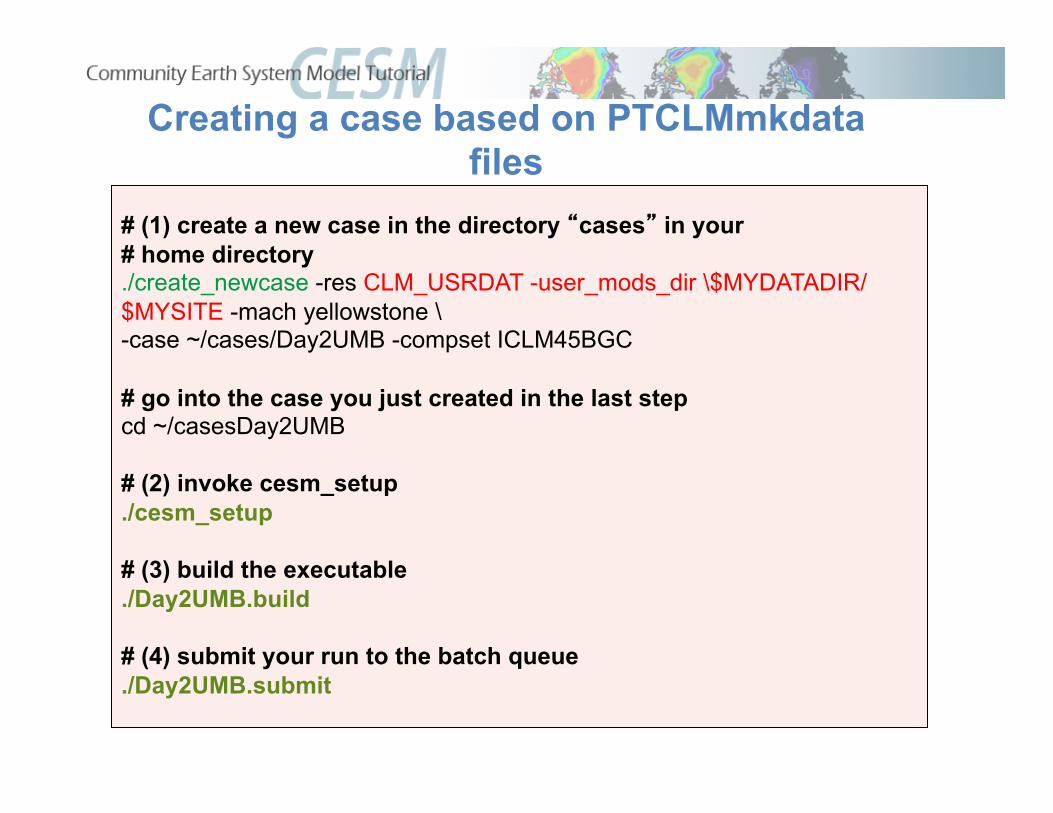
Creating a case based on PTCLMmkdata files
# (1) create a new case in the directory “cases” in your # home directory ./create_newcase -res CLM_USRDAT -user_mods_dir \$MYDATADIR/$MYSITE -mach yellowstone \ -case ~/cases/Day2UMB -compset ICLM45BGC # go into the case you just created in the last step cd ~/casesDay2UMB # (2) invoke cesm_setup ./cesm_setup # (3) build the executable ./Day2UMB.build # (4) submit your run to the batch queue ./Day2UMB.submit

Exercise III
1. Run PTCLMmkdata for the US-UMB site 2. Create a case from it 3. Try out the informational options to
PTCLMmkdata (-help etc.) Extra Credit
1. How many sites is PTCLM currently setup for? 2. In what subdirectory beneath the PTCLM tool directory would you add new
sites to work on? 3. What files in that subdirectory would you need to edit to add a new site? 4. What options to PTCLMmkdata will result in changes to your surface
dataset you create? 5. What options to PTCLMmkdata will change how your case is setup (but not
change datasets)?

Exercise III 1. Run PTCLMmkdata for the US-UMB site 2. Create a case from it 3. Try out the informational options to PTCLMmkdata (--help
etc.) • Try the options: --help, --list, and --version
Extra Credit 1. How many sites is PTCLM currently setup for? • 38 2. In what subdirectory beneath the PTCLM tool directory would you add new sites to
work on? • PTCLM_sitedata 3. What files in that subdirectory would you need to edit to add a new site? • PTCLMDATA_pftdata.txt PTCLMDATA_sitedata.txt PTCLMDATA_soildata.txt 4. What options to PTCLMmkdata will result in changes to your surface dataset you
create? • --site, --phys, --pftgrid, --soilgrid, --mksurfdata_opts 5. What options to PTCLMmkdata will change how your case is setup (but not change
datasets)? • --cycle_forcing, --donot_use_tower_yrs, --clmnmlusecase, and –phys (changes both)
CESM1 Tutorial: Single Point / Regional Cases
Have a Singularly Fun Time!!!
The more you become familiar with these tools by playing around with them the more
you’ll be able to use them.


