Download - CLASSIC QUILTS - AccuQuilt
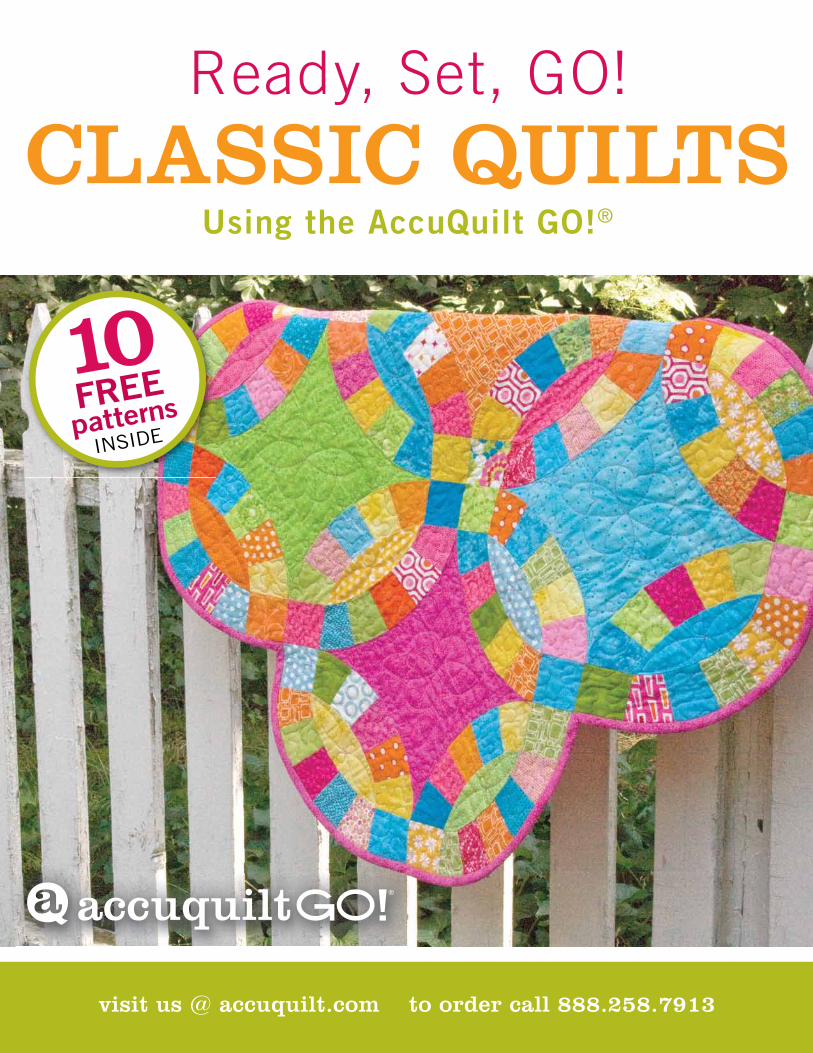
Ready, Set, GO!
CLASSIC QUILTSUsing the AccuQuilt GO!®
visit us @ accuquilt.com to order call 888.258.7913
FREEpatterns
INSIDE
10
freeideaproject
FABRIC REQUIREMENTS• Fabric 1—2¼ yards
• Fabric 2—25⁄8 yards (includes binding)
• Backing Fabric—2½ yards
• Batting—45" x 54"
CUTTING DIRECTIONSFabric 1:
• Cut 50 —Apple Core shapes
Fabric 2:
• Cut 49—Apple Core shapes
• Cut 5—2½" strips across the width of fabric for binding
to order call 888.258.7913 more project ideas @ accuquilt.com©2010 AccuQuilt
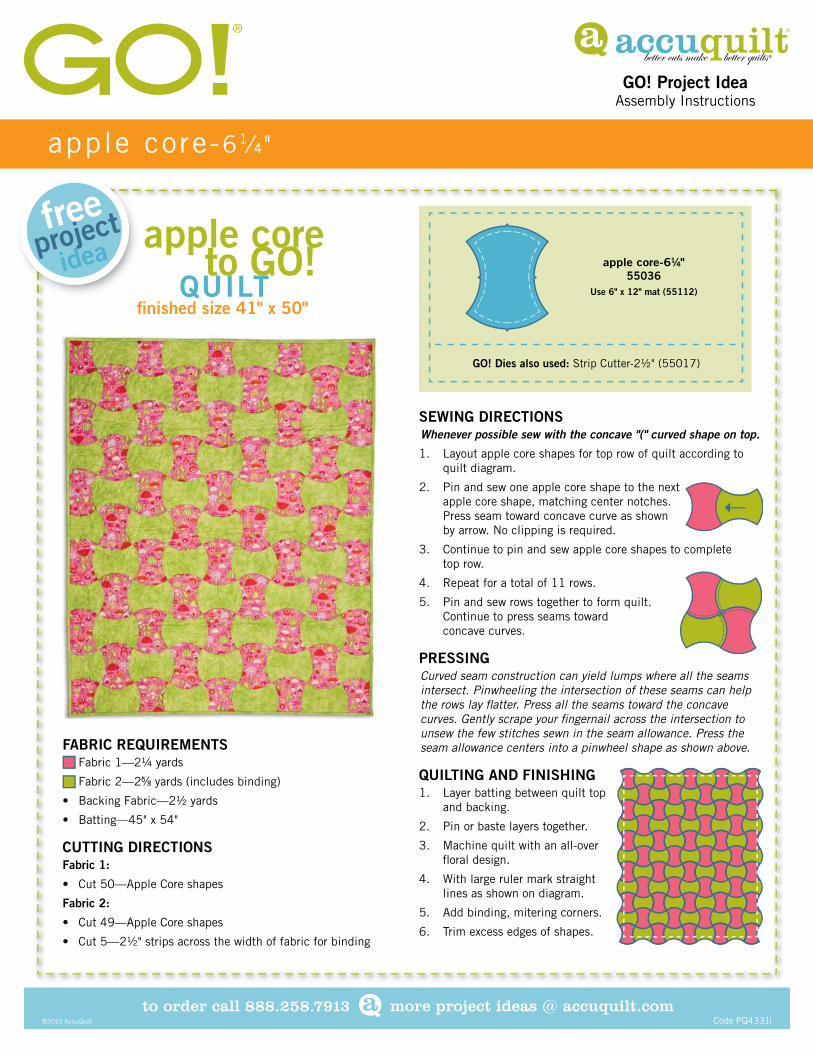
apple core-61⁄4"
apple core-61⁄4"55036
Use 6" x 12" mat (55112)
Code PQ4331i
apple core to GO! QUILTfi nished size 41" x 50"
GO! Project IdeaAssembly Instructions
SEWING DIRECTIONSWhenever possible sew with the concave "(" curved shape on top.
1. Layout apple core shapes for top row of quilt according to quilt diagram.
2. Pin and sew one apple core shape to the next apple core shape, matching center notches. Press seam toward concave curve as shownby arrow. No clipping is required.
3. Continue to pin and sew apple core shapes to completetop row.
4. Repeat for a total of 11 rows.
5. Pin and sew rows together to form quilt. Continue to press seams towardconcave curves.
PRESSING Curved seam construction can yield lumps where all the seams intersect. Pinwheeling the intersection of these seams can help the rows lay fl atter. Press all the seams toward the concave curves. Gently scrape your fi ngernail across the intersection to unsew the few stitches sewn in the seam allowance. Press the seam allowance centers into a pinwheel shape as shown above.
QUILTING AND FINISHING 1. Layer batting between quilt top
and backing.
2. Pin or baste layers together.
3. Machine quilt with an all-overfl oral design.
4. With large ruler mark straightlines as shown on diagram.
5. Add binding, mitering corners.
6. Trim excess edges of shapes.
GO! Dies also used: Strip Cutter-2½" (55017)
freeideaproject
GO! Project IdeaAssembly Instructions
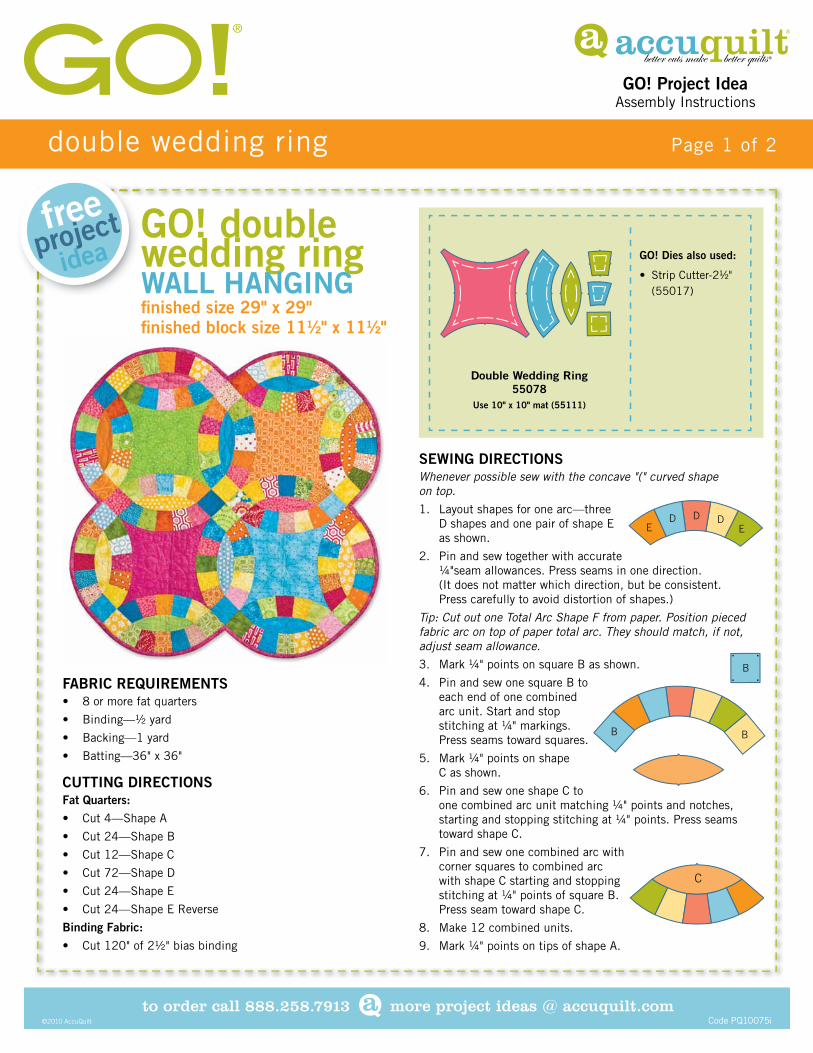
SEWING DIRECTIONSWhenever possible sew with the concave "(" curved shapeon top.
1. Layout shapes for one arc—threeD shapes and one pair of shape E as shown.
2. Pin and sew together with accurate ¼" seam allowances. Press seams in one direction.(It does not matter which direction, but be consistent. Press carefully to avoid distortion of shapes.)
Tip: Cut out one Total Arc Shape F from paper. Position pieced fabric arc on top of paper total arc. They should match, if not, adjust seam allowance.
3. Mark ¼" points on square B as shown.
4. Pin and sew one square B to each end of one combined arc unit. Start and stop stitching at ¼" markings. Press seams toward squares.
5. Mark ¼" points on shapeC as shown.
6. Pin and sew one shape C to one combined arc unit matching ¼" points and notches, starting and stopping stitching at ¼" points. Press seams toward shape C.
7. Pin and sew one combined arc with corner squares to combined arc with shape C starting and stopping stitching at ¼" points of square B. Press seam toward shape C.
8. Make 12 combined units.
9. Mark ¼" points on tips of shape A.
FABRIC REQUIREMENTS• 8 or more fat quarters
• Binding—½ yard
• Backing—1 yard
• Batting—36" x 36"
CUTTING DIRECTIONSFat Quarters:
• Cut 4—Shape A
• Cut 24—Shape B
• Cut 12—Shape C
• Cut 72—Shape D
• Cut 24—Shape E
• Cut 24—Shape E Reverse
Binding Fabric:
• Cut 120" of 2½" bias binding
to order call 888.258.7913 more project ideas @ accuquilt.com©2010 AccuQuilt
double wedding ring Page 1 of 2
GO! double wedding ringWALL HANGINGfi nished size 29" x 29" fi nished block size 111⁄2" x 111⁄2"
Code PQ10075i
Double Wedding Ring55078
Use 10" x 10" mat (55111)
GO! Dies also used:
• Strip Cutter-21⁄2" (55017)
ED D D
E
B
B B
C
GO! Project IdeaAssembly Instructions
to order call 888.258.7913 more project ideas @ accuquilt.com©2010 AccuQuilt
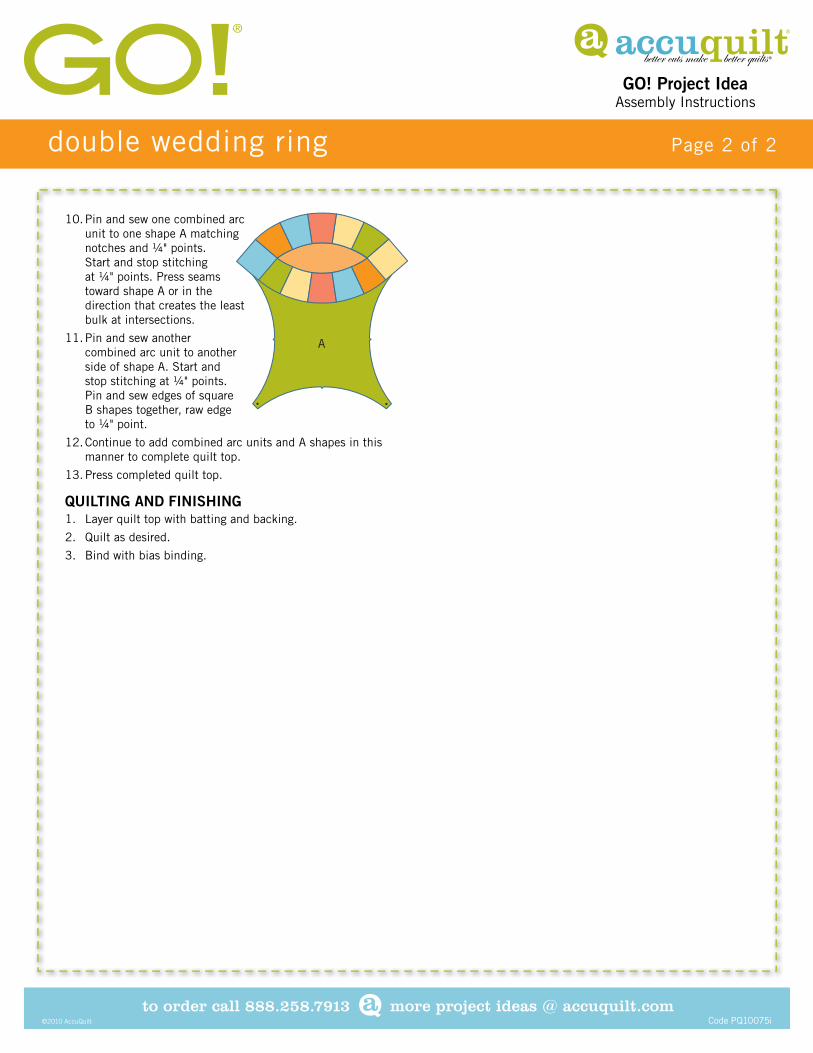
double wedding ring Page 2 of 2
Code PQ10075i
10. Pin and sew one combined arc unit to one shape A matching notches and ¼" points.Start and stop stitchingat ¼" points. Press seams toward shape A or in the direction that creates the least bulk at intersections.
11. Pin and sew another combined arc unit to another side of shape A. Start and stop stitching at ¼" points. Pin and sew edges of square B shapes together, raw edge to ¼" point.
12. Continue to add combined arc units and A shapes in this manner to complete quilt top.
13. Press completed quilt top.
QUILTING AND FINISHING1. Layer quilt top with batting and backing.
2. Quilt as desired.
3. Bind with bias binding.
A
freeideaproject
GO! Project IdeaAssembly Instructions
Fabric 2:
• Cut 5—8" squares
• Cut 5—pointed petal shapes
Petal Fabrics:
• Cut 5 pointed and 5 rounded petal shapes from each fabric for a total of 20 pointed and 20 rounded petal shapes
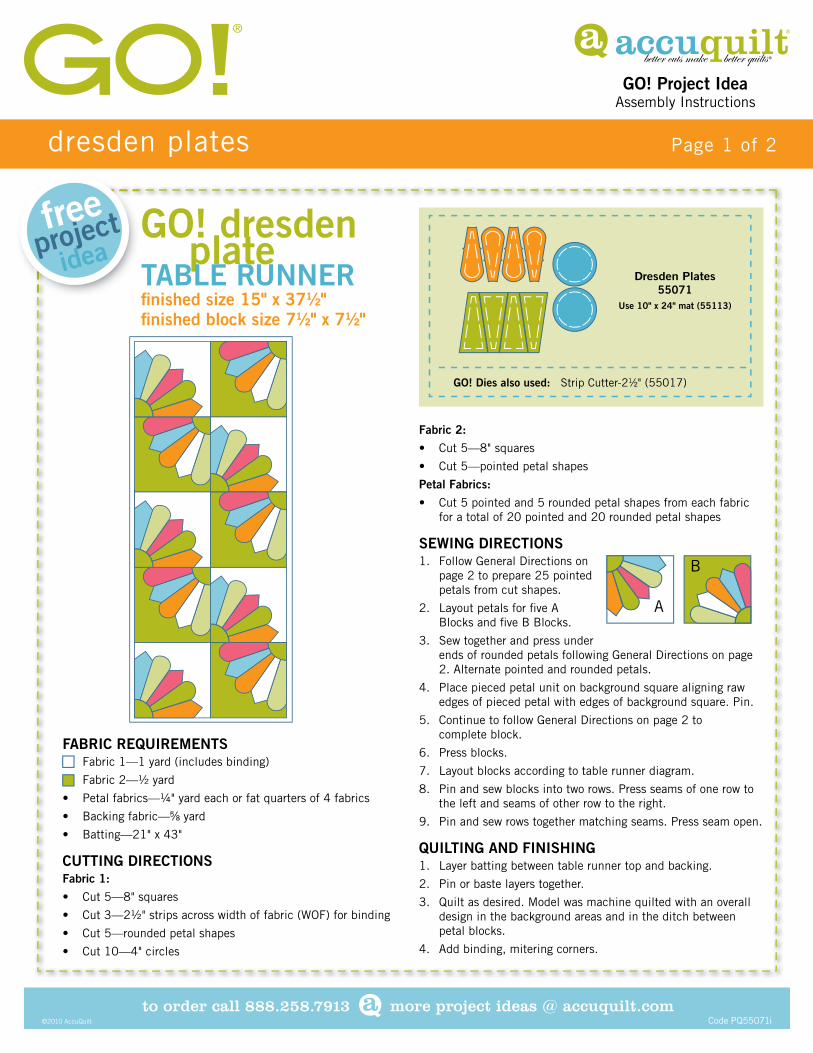
SEWING DIRECTIONS1. Follow General Directions on
page 2 to prepare 25 pointed petals from cut shapes.
2. Layout petals for fi ve A Blocks and fi ve B Blocks.
3. Sew together and press under ends of rounded petals following General Directions on page 2. Alternate pointed and rounded petals.
4. Place pieced petal unit on background square aligning raw edges of pieced petal with edges of background square. Pin.
5. Continue to follow General Directions on page 2 tocomplete block.
6. Press blocks.
7. Layout blocks according to table runner diagram.
8. Pin and sew blocks into two rows. Press seams of one row to the left and seams of other row to the right.
9. Pin and sew rows together matching seams. Press seam open.
QUILTING AND FINISHING1. Layer batting between table runner top and backing.
2. Pin or baste layers together.
3. Quilt as desired. Model was machine quilted with an overall design in the background areas and in the ditch betweenpetal blocks.
4. Add binding, mitering corners.
FABRIC REQUIREMENTS• Fabric 1—1 yard (includes binding)
• Fabric 2—½ yard
• Petal fabrics—¼" yard each or fat quarters of 4 fabrics
• Backing fabric—5⁄8 yard
• Batting—21" x 43"
CUTTING DIRECTIONSFabric 1:
• Cut 5—8" squares
• Cut 3—2½" strips across width of fabric (WOF) for binding
• Cut 5—rounded petal shapes
• Cut 10—4" circles
to order call 888.258.7913 more project ideas @ accuquilt.com©2010 AccuQuilt
dresden plates Page 1 of 2
GO! dresden plateTABLE RUNNERfi nished size 15" x 371⁄2" fi nished block size 71⁄2" x 71⁄2"
Code PQ55071i
Dresden Plates55071
Use 10" x 24" mat (55113)
GO! Dies also used: Strip Cutter-21⁄2" (55017)
A
B
GO! Project IdeaAssembly Instructions
to order call 888.258.7913 more project ideas @ accuquilt.com©2010 AccuQuilt
dresden plates Page 2 of 2
Code PQ55071i
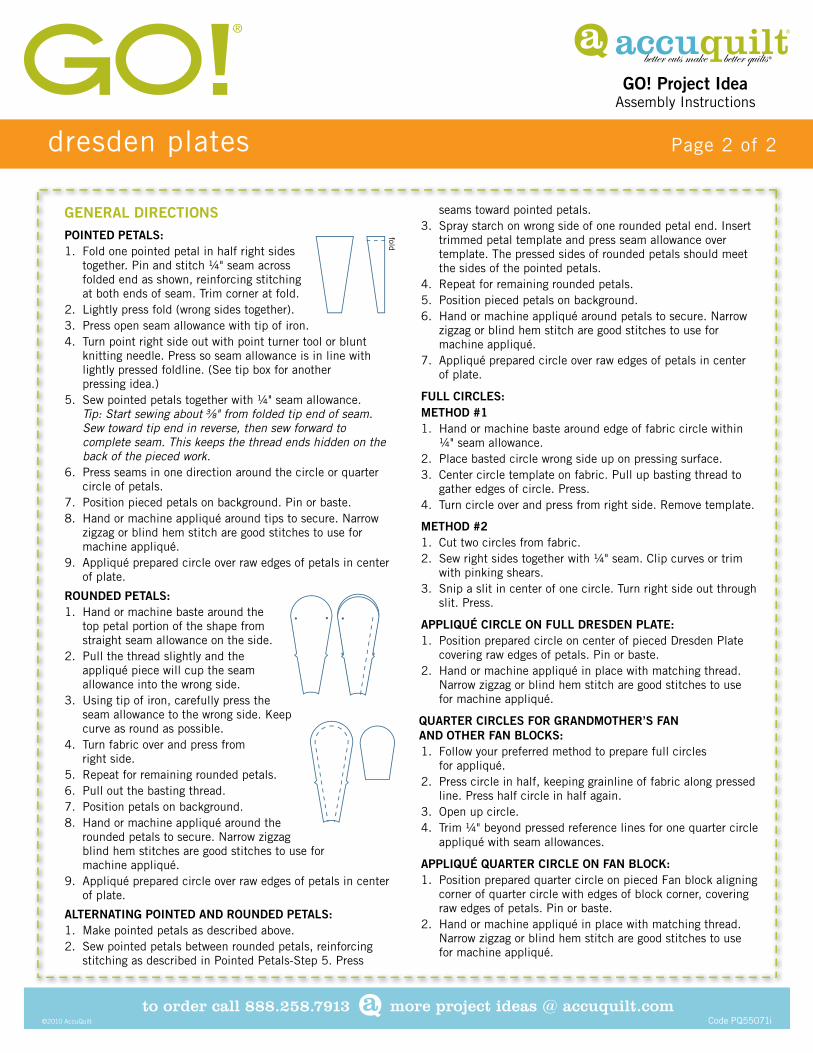
GENERAL DIRECTIONS POINTED PETALS:1. Fold one pointed petal in half right sides
together. Pin and stitch ¼" seam across folded end as shown, reinforcing stitching at both ends of seam. Trim corner at fold.
2. Lightly press fold (wrong sides together).3. Press open seam allowance with tip of iron.4. Turn point right side out with point turner tool or blunt
knitting needle. Press so seam allowance is in line with lightly pressed foldline. (See tip box for anotherpressing idea.)
5. Sew pointed petals together with ¼" seam allowance.Tip: Start sewing about 3⁄8" from folded tip end of seam. Sew toward tip end in reverse, then sew forward to complete seam. This keeps the thread ends hidden on the back of the pieced work.
6. Press seams in one direction around the circle or quarter circle of petals.
7. Position pieced petals on background. Pin or baste.8. Hand or machine appliqué around tips to secure. Narrow
zigzag or blind hem stitch are good stitches to use for machine appliqué.
9. Appliqué prepared circle over raw edges of petals in center of plate.
ROUNDED PETALS:1. Hand or machine baste around the
top petal portion of the shape from straight seam allowance on the side.
2. Pull the thread slightly and the appliqué piece will cup the seam allowance into the wrong side.
3. Using tip of iron, carefully press the seam allowance to the wrong side. Keep curve as round as possible.
4. Turn fabric over and press fromright side.
5. Repeat for remaining rounded petals.6. Pull out the basting thread. 7. Position petals on background. 8. Hand or machine appliqué around the
rounded petals to secure. Narrow zigzag blind hem stitches are good stitches to use for machine appliqué.
9. Appliqué prepared circle over raw edges of petals in center of plate.
ALTERNATING POINTED AND ROUNDED PETALS:1. Make pointed petals as described above.2. Sew pointed petals between rounded petals, reinforcing
stitching as described in Pointed Petals-Step 5. Press
seams toward pointed petals.3. Spray starch on wrong side of one rounded petal end. Insert
trimmed petal template and press seam allowance over template. The pressed sides of rounded petals should meet the sides of the pointed petals.
4. Repeat for remaining rounded petals.5. Position pieced petals on background.6. Hand or machine appliqué around petals to secure. Narrow
zigzag or blind hem stitch are good stitches to use for machine appliqué.
7. Appliqué prepared circle over raw edges of petals in center of plate.
FULL CIRCLES:METHOD #11. Hand or machine baste around edge of fabric circle within
¼" seam allowance.2. Place basted circle wrong side up on pressing surface.3. Center circle template on fabric. Pull up basting thread to
gather edges of circle. Press.4. Turn circle over and press from right side. Remove template.
METHOD #21. Cut two circles from fabric.2. Sew right sides together with ¼" seam. Clip curves or trim
with pinking shears.3. Snip a slit in center of one circle. Turn right side out through
slit. Press.
APPLIQUÉ CIRCLE ON FULL DRESDEN PLATE:1. Position prepared circle on center of pieced Dresden Plate
covering raw edges of petals. Pin or baste.2. Hand or machine appliqué in place with matching thread.
Narrow zigzag or blind hem stitch are good stitches to use for machine appliqué.
QUARTER CIRCLES FOR GRANDMOTHER’S FANAND OTHER FAN BLOCKS:1. Follow your preferred method to prepare full circles
for appliqué.2. Press circle in half, keeping grainline of fabric along pressed
line. Press half circle in half again.3. Open up circle.4. Trim ¼" beyond pressed reference lines for one quarter circle
appliqué with seam allowances.
APPLIQUÉ QUARTER CIRCLE ON FAN BLOCK:1. Position prepared quarter circle on pieced Fan block aligning
corner of quarter circle with edges of block corner, covering raw edges of petals. Pin or baste.
2. Hand or machine appliqué in place with matching thread. Narrow zigzag or blind hem stitch are good stitches to use for machine appliqué.
fold
freeideaproject
GO! Dies also used:
• Strip Cutter-3½" (55032)
• Square-3½" (55006)
• Strip Cutter-2½" (55017)
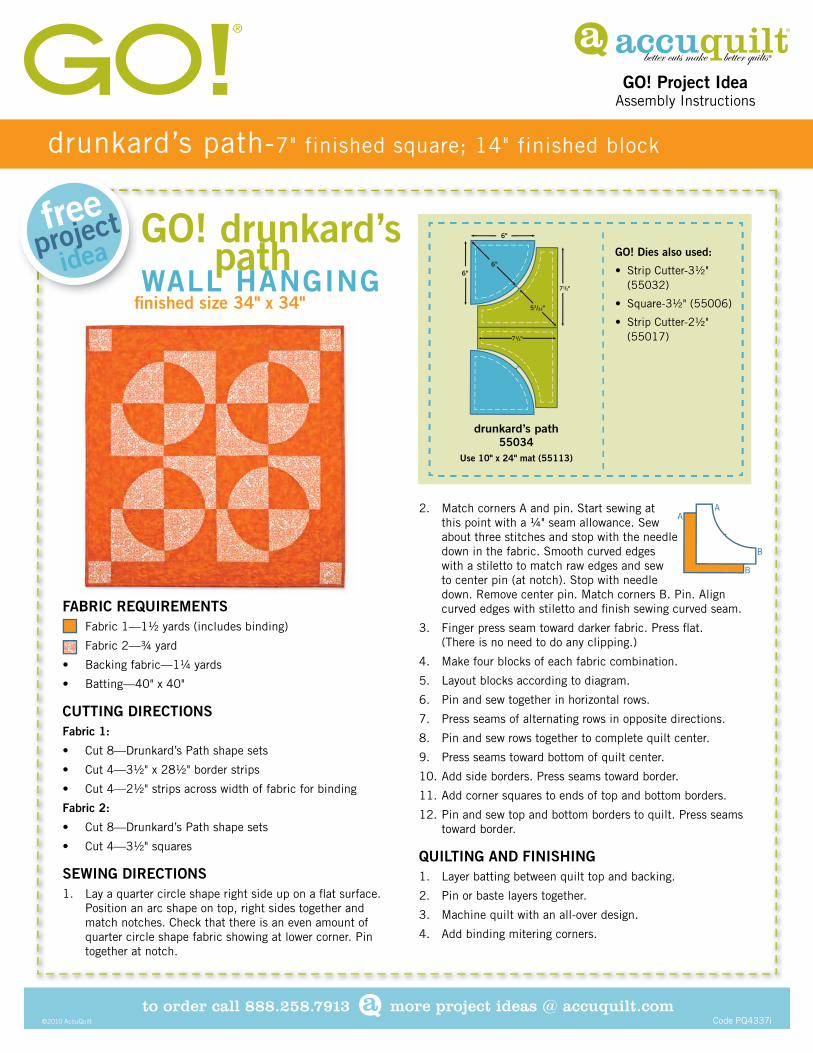
FABRIC REQUIREMENTS • Fabric 1—1½ yards (includes binding)
• Fabric 2—¾ yard
• Backing fabric—1¼ yards
• Batting—40" x 40"
CUTTING DIRECTIONSFabric 1:
• Cut 8—Drunkard’s Path shape sets
• Cut 4—3½" x 28½" border strips
• Cut 4—2½" strips across width of fabric for binding
Fabric 2:
• Cut 8—Drunkard’s Path shape sets
• Cut 4—3½" squares
SEWING DIRECTIONS1. Lay a quarter circle shape right side up on a fl at surface.
Position an arc shape on top, right sides together and match notches. Check that there is an even amount of quarter circle shape fabric showing at lower corner. Pin together at notch.
to order call 888.258.7913 more project ideas @ accuquilt.com©2010 AccuQuilt
drunkard’s path-7" finished square; 14" finished block
drunkard’s path55034
Use 10" x 24" mat (55113)
Code PQ4337i
GO! drunkard’s path WALL HANGING fi nished size 34" x 34"
GO! Project IdeaAssembly Instructions
2. Match corners A and pin. Start sewing at this point with a ¼" seam allowance. Sew about three stitches and stop with the needle down in the fabric. Smooth curved edges with a stiletto to match raw edges and sew to center pin (at notch). Stop with needle down. Remove center pin. Match corners B. Pin. Align curved edges with stiletto and fi nish sewing curved seam.
3. Finger press seam toward darker fabric. Press fl at. (There is no need to do any clipping.)
4. Make four blocks of each fabric combination.
5. Layout blocks according to diagram.
6. Pin and sew together in horizontal rows.
7. Press seams of alternating rows in opposite directions.
8. Pin and sew rows together to complete quilt center.
9. Press seams toward bottom of quilt center.
10. Add side borders. Press seams toward border.
11. Add corner squares to ends of top and bottom borders.
12. Pin and sew top and bottom borders to quilt. Press seams toward border.
QUILTING AND FINISHING1. Layer batting between quilt top and backing.
2. Pin or baste layers together.
3. Machine quilt with an all-over design.
4. Add binding mitering corners.
6"
6"6"
53/32"
71/2"
71/2"
AA
B
B
freeideaproject
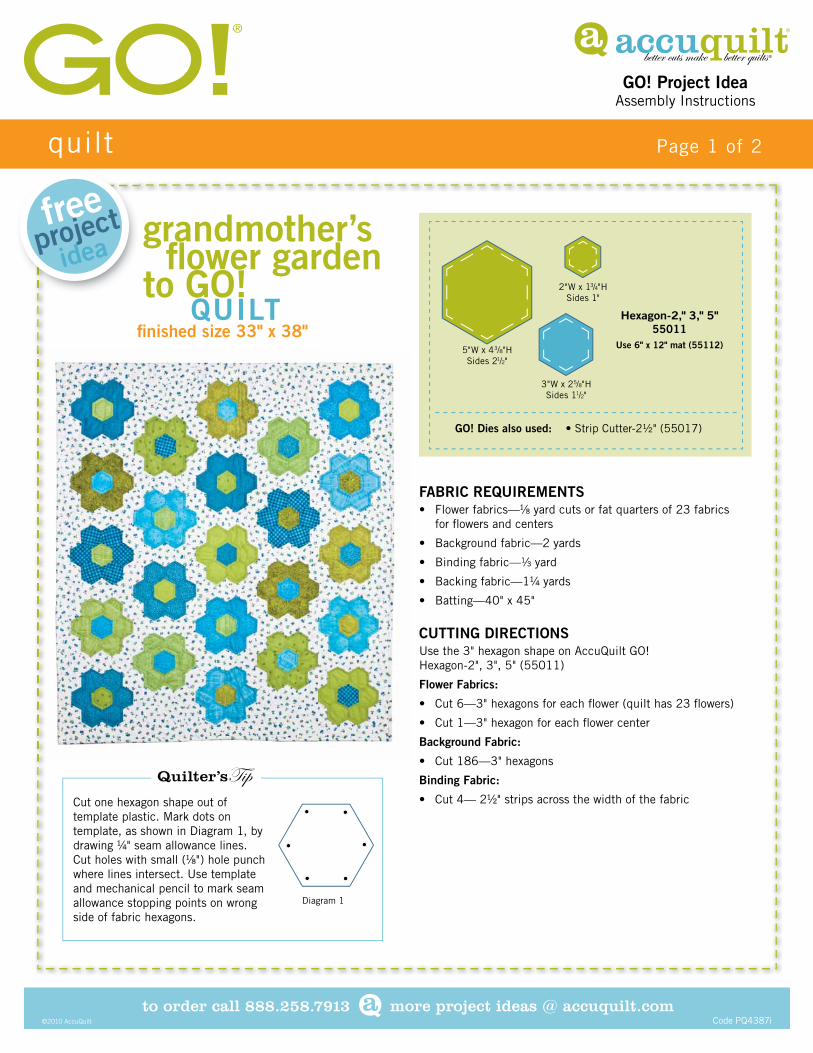
FABRIC REQUIREMENTS• Flower fabrics —1⁄8 yard cuts or fat quarters of 23 fabrics
for fl owers and centers
• Background fabric—2 yards
• Binding fabric—1⁄3 yard
• Backing fabric—11⁄4 yards
• Batting—40" x 45"
CUTTING DIRECTIONSUse the 3" hexagon shape on AccuQuilt GO!Hexagon-2", 3", 5" (55011)
Flower Fabrics:
• Cut 6—3" hexagons for each fl ower (quilt has 23 fl owers)
• Cut 1—3" hexagon for each fl ower center
Background Fabric:
• Cut 186—3" hexagons
Binding Fabric:
• Cut 4— 21⁄2" strips across the width of the fabric
to order call 888.258.7913 more project ideas @ accuquilt.com©2010 AccuQuilt
quilt Page 1 of 2
Code PQ4387i
grandmother’s fl ower garden to GO! QUILTfi nished size 33" x 38"
GO! Project IdeaAssembly Instructions
5"W x 43/8"HSides 21/2"
3"W x 25/8"HSides 11/2"
2"W x 13/4"HSides 1"
Hexagon-2," 3," 5" 55011
Use 6" x 12" mat (55112)
GO! Dies also used: • Strip Cutter-2½" (55017)
Cut one hexagon shape out of template plastic. Mark dots on template, as shown in Diagram 1, by drawing 1⁄4" seam allowance lines. Cut holes with small (1⁄8") hole punch where lines intersect. Use template and mechanical pencil to mark seam allowance stopping points on wrong side of fabric hexagons.
Quilter’sTip
Diagram 1
to order call 888.258.7913 more project ideas @ accuquilt.com©2010 AccuQuilt
quilt Page 2 of 2
Code PQ4387i
GO! Project IdeaAssembly Instructions
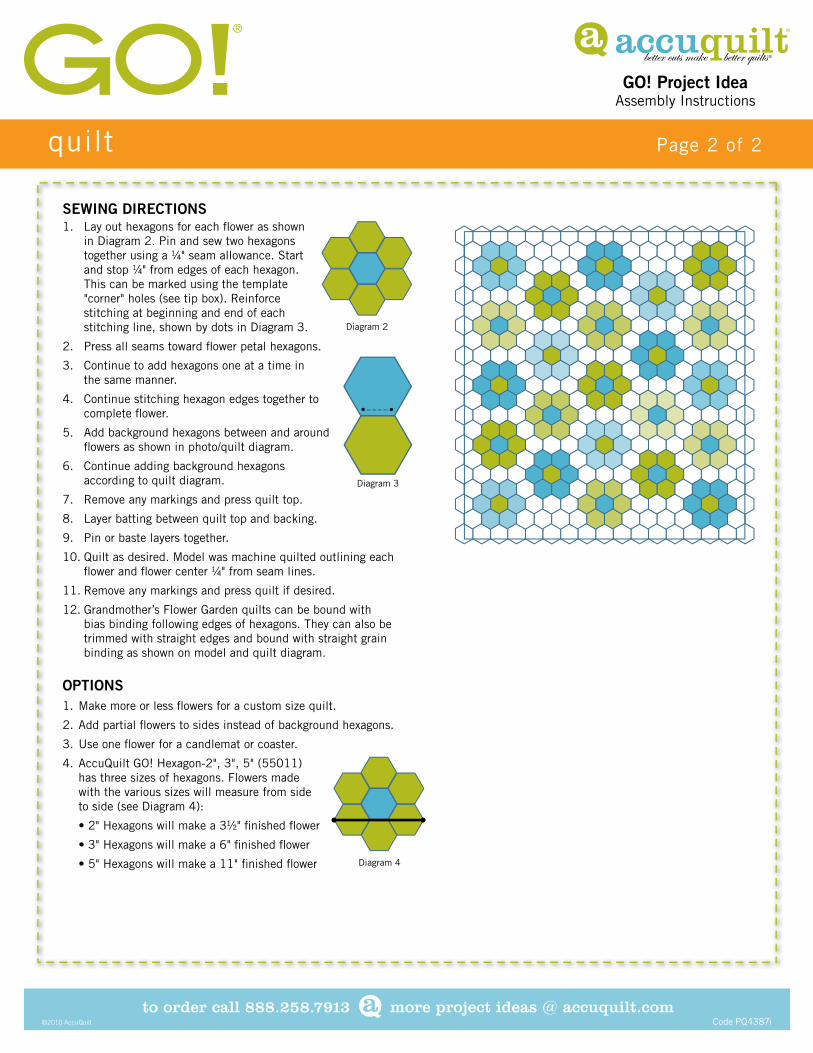
SEWING DIRECTIONS1. Lay out hexagons for each fl ower as shown
in Diagram 2. Pin and sew two hexagons together using a 1⁄4" seam allowance. Start and stop 1⁄4" from edges of each hexagon. This can be marked using the template "corner" holes (see tip box). Reinforce stitching at beginning and end of each stitching line, shown by dots in Diagram 3.
2. Press all seams toward fl ower petal hexagons.
3. Continue to add hexagons one at a time inthe same manner.
4. Continue stitching hexagon edges together to complete fl ower.
5. Add background hexagons between and around fl owers as shown in photo/quilt diagram.
6. Continue adding background hexagonsaccording to quilt diagram.
7. Remove any markings and press quilt top.
8. Layer batting between quilt top and backing.
9. Pin or baste layers together.
10. Quilt as desired. Model was machine quilted outlining each fl ower and fl ower center 1⁄4" from seam lines.
11. Remove any markings and press quilt if desired.
12. Grandmother’s Flower Garden quilts can be bound with bias binding following edges of hexagons. They can also be trimmed with straight edges and bound with straight grain binding as shown on model and quilt diagram.
OPTIONS1. Make more or less fl owers for a custom size quilt.
2. Add partial fl owers to sides instead of background hexagons.
3. Use one fl ower for a candlemat or coaster.
4. AccuQuilt GO! Hexagon-2", 3", 5" (55011) has three sizes of hexagons. Flowers made with the various sizes will measure from side to side (see Diagram 4):
• 2" Hexagons will make a 31⁄2" fi nished fl ower
• 3" Hexagons will make a 6" fi nished fl ower
• 5" Hexagons will make a 11" fi nished fl ower
Diagram 2
Diagram 4
Diagram 3
freeideaproject
GO! Project IdeaAssembly Instructions
FABRIC REQUIREMENTS• Background fabric—fat quarter
• Appliqué fabrics—fat quarters or scraps
• Block frame fabrics—fat quarters or scraps
• Fusible web product—½ yard
Optional: Embellishments
CUTTING DIRECTIONSApply fusible web to the wrong side of appliqué fabrics, following manufacturer’s instructions, before cutting.
Background Fabric:
• Cut 1—10½" square
• Cut 4—2½" squares for block frame
Appliqué Fabrics:
• Cut one of each Sunbonnet Sue shape (facing left) with fusible web backing
Block Frame Fabrics:
• Cut 4—2½" x 10½" rectangles for block frame
to order call 888.258.7913 more project ideas @ accuquilt.com©2010 AccuQuilt
sunbonnet sue
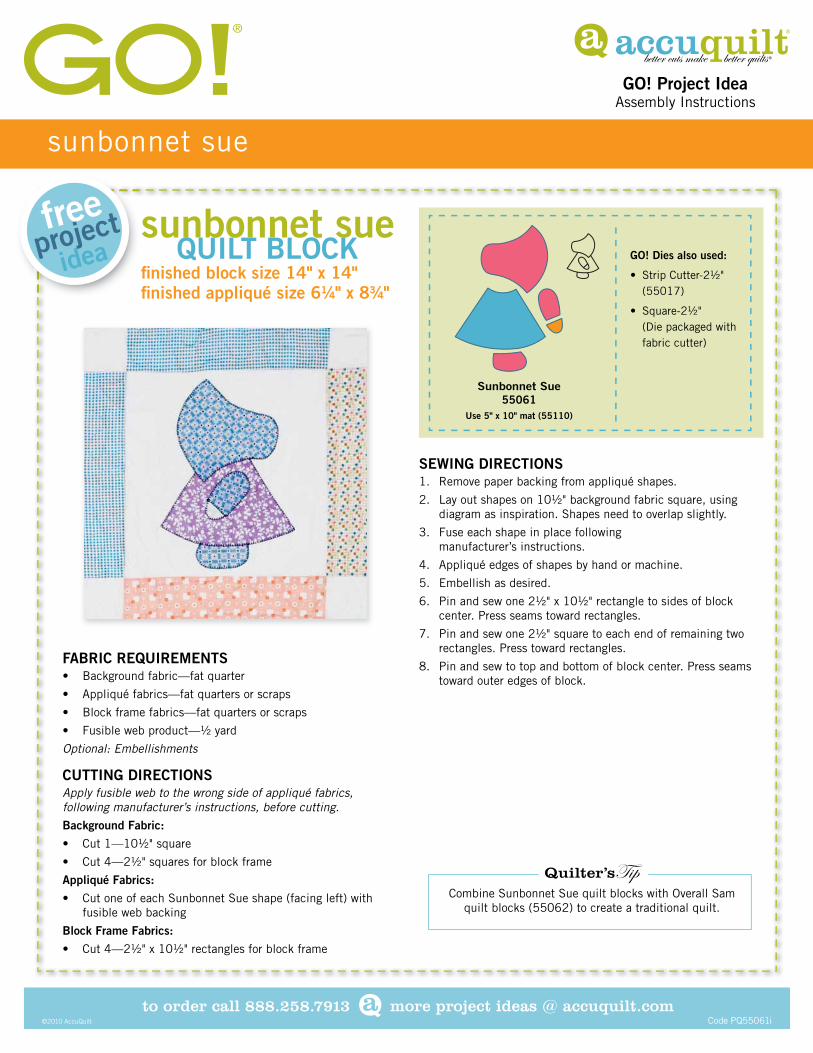
sunbonnet sue QUILT BLOCKfi nished block size 14" x 14" fi nished appliqué size 61⁄4" x 83⁄4"
Code PQ55061i
SEWING DIRECTIONS1. Remove paper backing from appliqué shapes.
2. Lay out shapes on 10½" background fabric square, using diagram as inspiration. Shapes need to overlap slightly.
3. Fuse each shape in place following manufacturer’s instructions.
4. Appliqué edges of shapes by hand or machine.
5. Embellish as desired.
6. Pin and sew one 2½" x 10½" rectangle to sides of block center. Press seams toward rectangles.
7. Pin and sew one 2½" square to each end of remaining two rectangles. Press toward rectangles.
8. Pin and sew to top and bottom of block center. Press seams toward outer edges of block.
Sunbonnet Sue55061
Use 5" x 10" mat (55110)
GO! Dies also used:
• Strip Cutter-2½" (55017)
• Square-2½" (Die packaged with fabric cutter)
Combine Sunbonnet Sue quilt blocks with Overall Sam quilt blocks (55062) to create a traditional quilt.
Quilter’sTip
freeideaproject
GO! Project IdeaAssembly Instructions
FABRIC REQUIREMENTS (cont.)• Fabric 4—7⁄8 yard (includes binding)
• Backing—11⁄4 yard
• Batting—36" x 42"
CUTTING DIRECTIONSFabric 1:
• Cut 20—5" hexagons
Fabric 2:
• Cut 38—5" hexagons
Fabric 3:
• Cut 4—11⁄2" strips across the width of fabric (WOF) for inner border
Fabric 4:
• Cut 88—21⁄2" equilateral triangles
• Cut 4—21⁄2" strips across the WOF for outer border
• Cut 4—21⁄2" strips across the WOF for binding
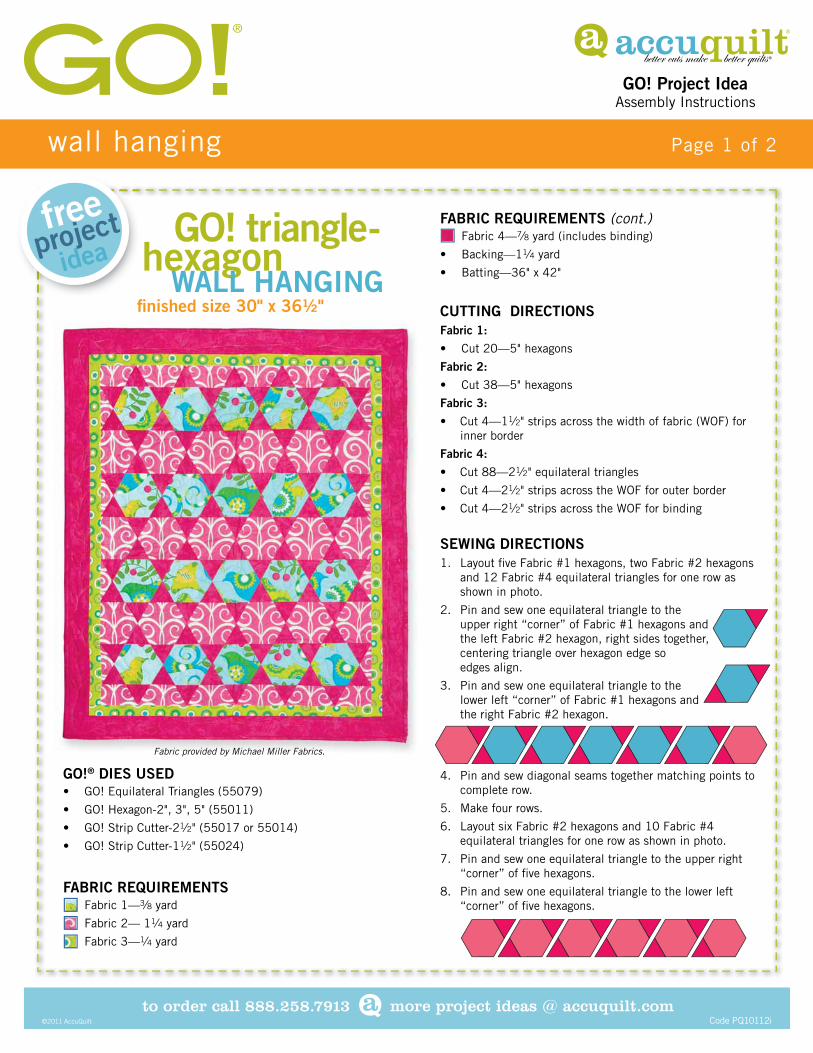
SEWING DIRECTIONS1. Layout fi ve Fabric #1 hexagons, two Fabric #2 hexagons
and 12 Fabric #4 equilateral triangles for one row as shown in photo.
2. Pin and sew one equilateral triangle to the upper right “corner” of Fabric #1 hexagons and the left Fabric #2 hexagon, right sides together, centering triangle over hexagon edge soedges align.
3. Pin and sew one equilateral triangle to the lower left “corner” of Fabric #1 hexagons and the right Fabric #2 hexagon.
4. Pin and sew diagonal seams together matching points to complete row.
5. Make four rows.
6. Layout six Fabric #2 hexagons and 10 Fabric #4 equilateral triangles for one row as shown in photo.
7. Pin and sew one equilateral triangle to the upper right “corner” of fi ve hexagons.
8. Pin and sew one equilateral triangle to the lower left “corner” of fi ve hexagons.
GO!® DIES USED• GO! Equilateral Triangles (55079)
• GO! Hexagon-2", 3", 5" (55011)
• GO! Strip Cutter-21⁄2" (55017 or 55014)
• GO! Strip Cutter-11⁄2" (55024)
FABRIC REQUIREMENTS• Fabric 1—3⁄8 yard
• Fabric 2— 11⁄4 yard
• Fabric 3—1⁄4 yard
to order call 888.258.7913 more project ideas @ accuquilt.com©2011 AccuQuilt
wall hanging Page 1 of 2
GO! triangle- hexagon WALL HANGING fi nished size 30" x 36½"
Code PQ10112i
Fabric provided by Michael Miller Fabrics.
GO! Project IdeaAssembly Instructions
to order call 888.258.7913 more project ideas @ accuquilt.com©2011 AccuQuilt
wall hanging Page 2 of 2
Code PQ10112i
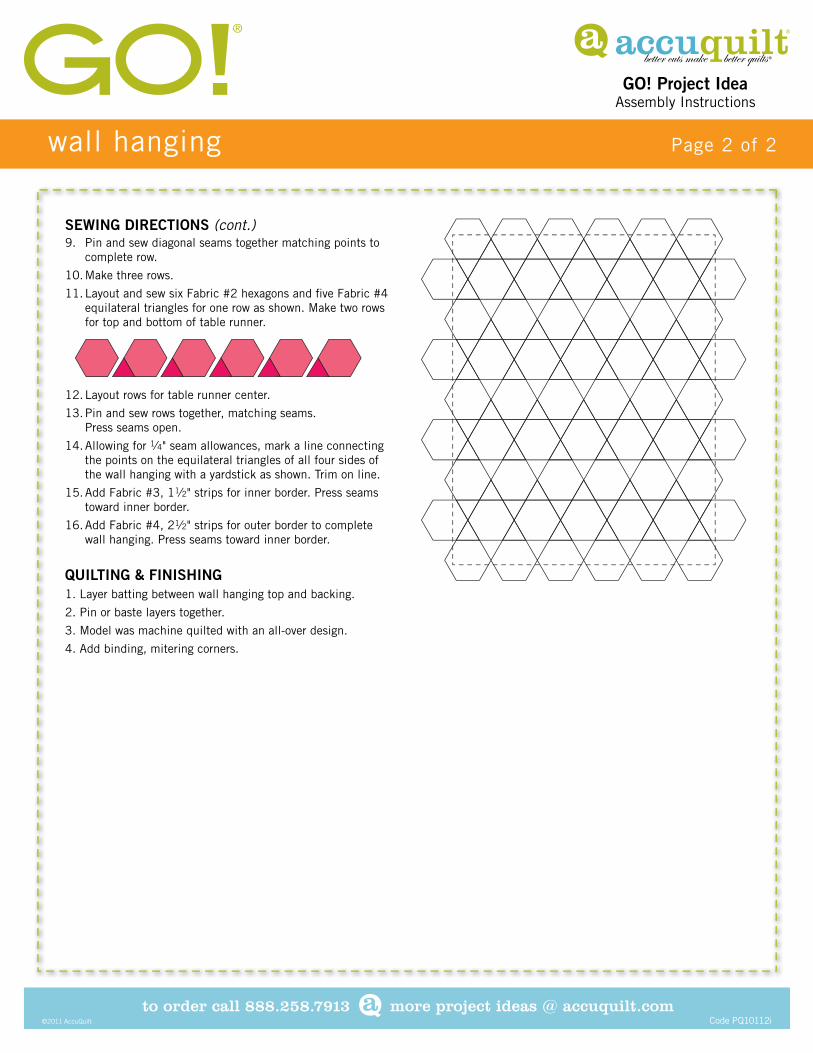
SEWING DIRECTIONS (cont.)9. Pin and sew diagonal seams together matching points to
complete row.
10. Make three rows.
11. Layout and sew six Fabric #2 hexagons and fi ve Fabric #4 equilateral triangles for one row as shown. Make two rows for top and bottom of table runner.
12. Layout rows for table runner center.
13. Pin and sew rows together, matching seams.Press seams open.
14. Allowing for 1⁄4" seam allowances, mark a line connecting the points on the equilateral triangles of all four sides of the wall hanging with a yardstick as shown. Trim on line.
15. Add Fabric #3, 11⁄2" strips for inner border. Press seams toward inner border.
16. Add Fabric #4, 21⁄2" strips for outer border to complete wall hanging. Press seams toward inner border.
QUILTING & FINISHING1. Layer batting between wall hanging top and backing.
2. Pin or baste layers together.
3. Model was machine quilted with an all-over design.
4. Add binding, mitering corners.
freeideaproject
GO! Dies also used: Strip Cutter-2½" (55017)
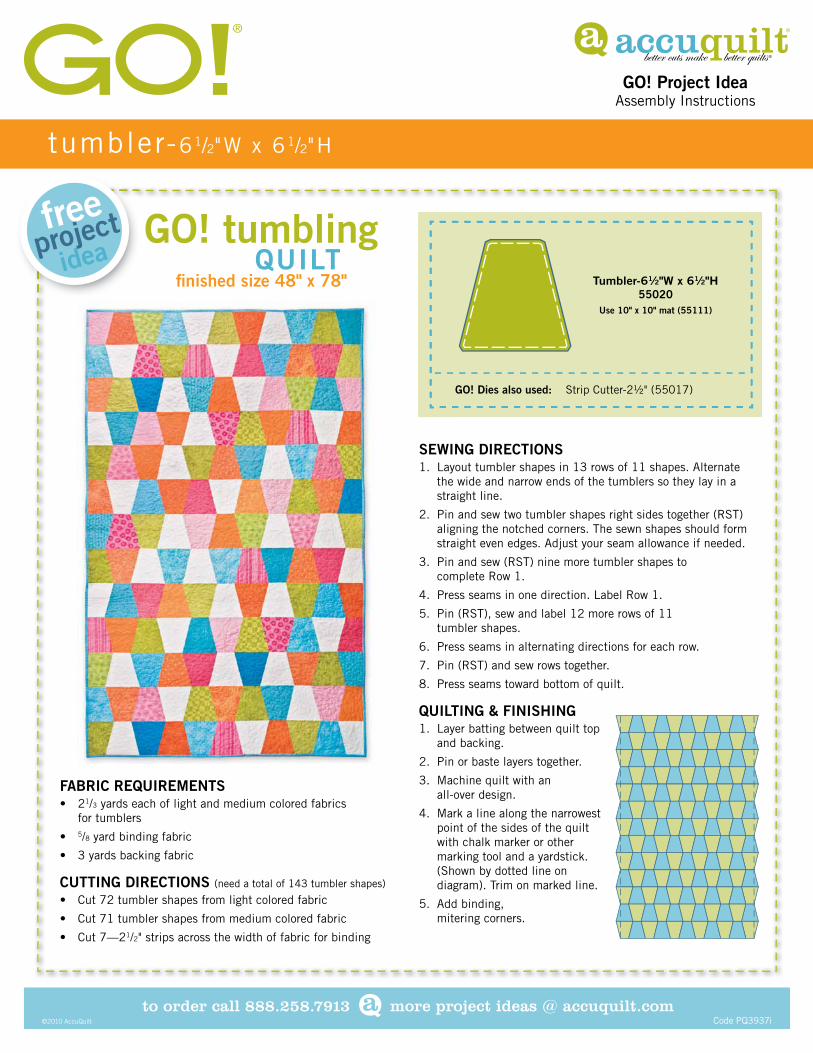
SEWING DIRECTIONS1. Layout tumbler shapes in 13 rows of 11 shapes. Alternate
the wide and narrow ends of the tumblers so they lay in a straight line.
2. Pin and sew two tumbler shapes right sides together (RST) aligning the notched corners. The sewn shapes should form straight even edges. Adjust your seam allowance if needed.
3. Pin and sew (RST) nine more tumbler shapes tocomplete Row 1.
4. Press seams in one direction. Label Row 1.
5. Pin (RST), sew and label 12 more rows of 11tumbler shapes.
6. Press seams in alternating directions for each row.
7. Pin (RST) and sew rows together.
8. Press seams toward bottom of quilt.
QUILTING & FINISHING1. Layer batting between quilt top and backing.
2. Pin or baste layers together.
3. Machine quilt with an all-over design.
4. Mark a line along the narrowest point of the sides of the quilt with chalk marker or other marking tool and a yardstick. (Shown by dotted line on diagram). Trim on marked line.
5. Add binding, mitering corners.
to order call 888.258.7913 more project ideas @ accuquilt.com©2010 AccuQuilt
tumbler-61/2"W x 61/2"H
GO! tumbling QUILT fi nished size 48" x 78"
FABRIC REQUIREMENTS• 21/3 yards each of light and medium colored fabrics
for tumblers
• 5/8 yard binding fabric
• 3 yards backing fabric
CUTTING DIRECTIONS (need a total of 143 tumbler shapes)
• Cut 72 tumbler shapes from light colored fabric
• Cut 71 tumbler shapes from medium colored fabric
• Cut 7—21/2" strips across the width of fabric for binding
Tumbler-61⁄2"W x 61⁄2"H55020
Use 10" x 10" mat (55111)
Code PQ3937i
GO! Project IdeaAssembly Instructions
freeideaproject
GO! Project IdeaAssembly Instructions
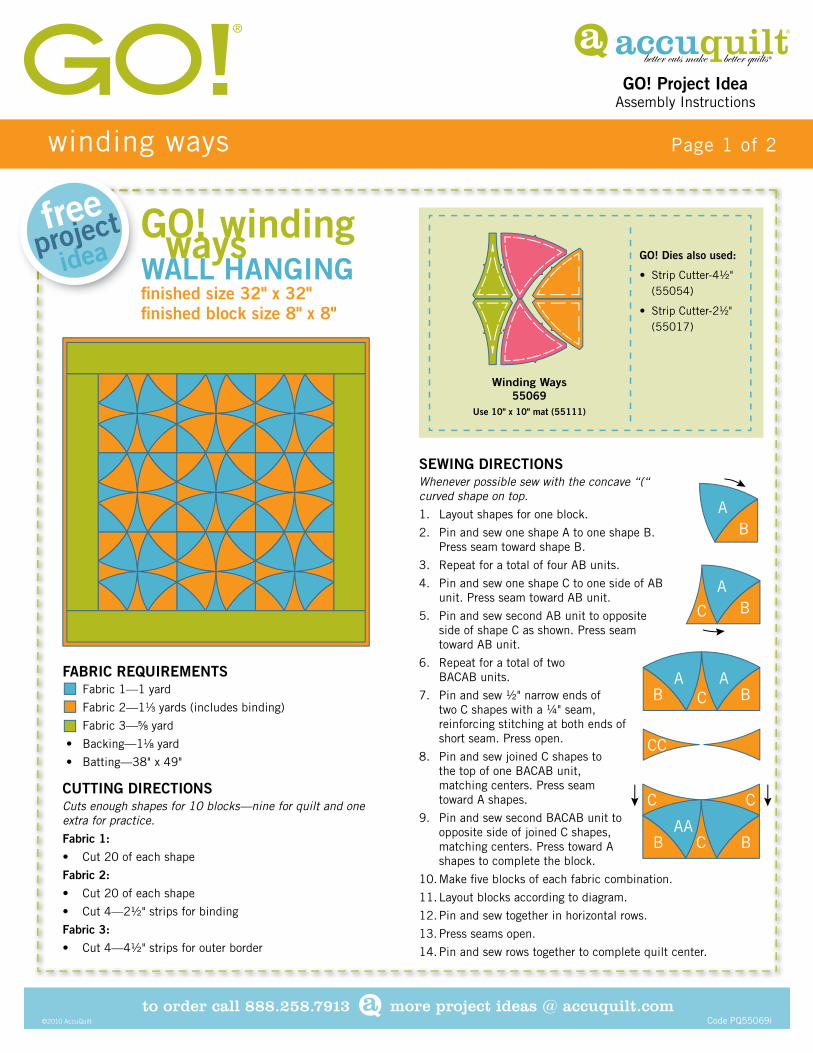
FABRIC REQUIREMENTS • Fabric 1—1 yard
• Fabric 2—11⁄3 yards (includes binding)
• Fabric 3—5⁄8 yard
• Backing—11⁄8 yard
• Batting—38" x 49"
CUTTING DIRECTIONSCuts enough shapes for 10 blocks —nine for quilt and oneextra for practice.
Fabric 1:
• Cut 20 of each shape
Fabric 2:
• Cut 20 of each shape
• Cut 4—2½" strips for binding
Fabric 3:
• Cut 4—4½" strips for outer border
to order call 888.258.7913 more project ideas @ accuquilt.com©2010 AccuQuilt
winding ways Page 1 of 2
GO! winding waysWALL HANGINGfi nished size 32" x 32" fi nished block size 8" x 8"
Code PQ55069i
SEWING DIRECTIONSWhenever possible sew with the concave “(“ curved shape on top.
1. Layout shapes for one block.
2. Pin and sew one shape A to one shape B. Press seam toward shape B.
3. Repeat for a total of four AB units.
4. Pin and sew one shape C to one side of AB unit. Press seam toward AB unit.
5. Pin and sew second AB unit to oppositeside of shape C as shown. Press seamtoward AB unit.
6. Repeat for a total of twoBACAB units.
7. Pin and sew ½" narrow ends of two C shapes with a ¼" seam, reinforcing stitching at both ends of short seam. Press open.
8. Pin and sew joined C shapes tothe top of one BACAB unit, matching centers. Press seam toward A shapes.
9. Pin and sew second BACAB unit to opposite side of joined C shapes, matching centers. Press toward A shapes to complete the block.
10. Make fi ve blocks of each fabric combination.
11. Layout blocks according to diagram.
12. Pin and sew together in horizontal rows.
13. Press seams open.
14. Pin and sew rows together to complete quilt center.
Winding Ways55069
Use 10" x 10" mat (55111)
GO! Dies also used:
• Strip Cutter-4½" (55054)
• Strip Cutter-21⁄2" (55017)
CC
AC
ABB
AB
A
C B
C
C
C
AABB
GO! Project IdeaAssembly Instructions
to order call 888.258.7913 more project ideas @ accuquilt.com©2010 AccuQuilt
winding ways Page 2 of 2
Code PQ55069i
15. Press seams open.
16. Add side border strips. Press seams toward border.
17. Add top and bottom border strips. Press seamstoward border.
QUILTING AND FINISHING1. Layer batting between quilt top and backing.
2. Pin or baste layers together.
3. Machine quilt with an all-over design.
4. Add binding, mitering corners.
to order call 888.258.7913 more project ideas @ accuquilt.com©2011 AccuQuilt Code MMQD-GO-REV1
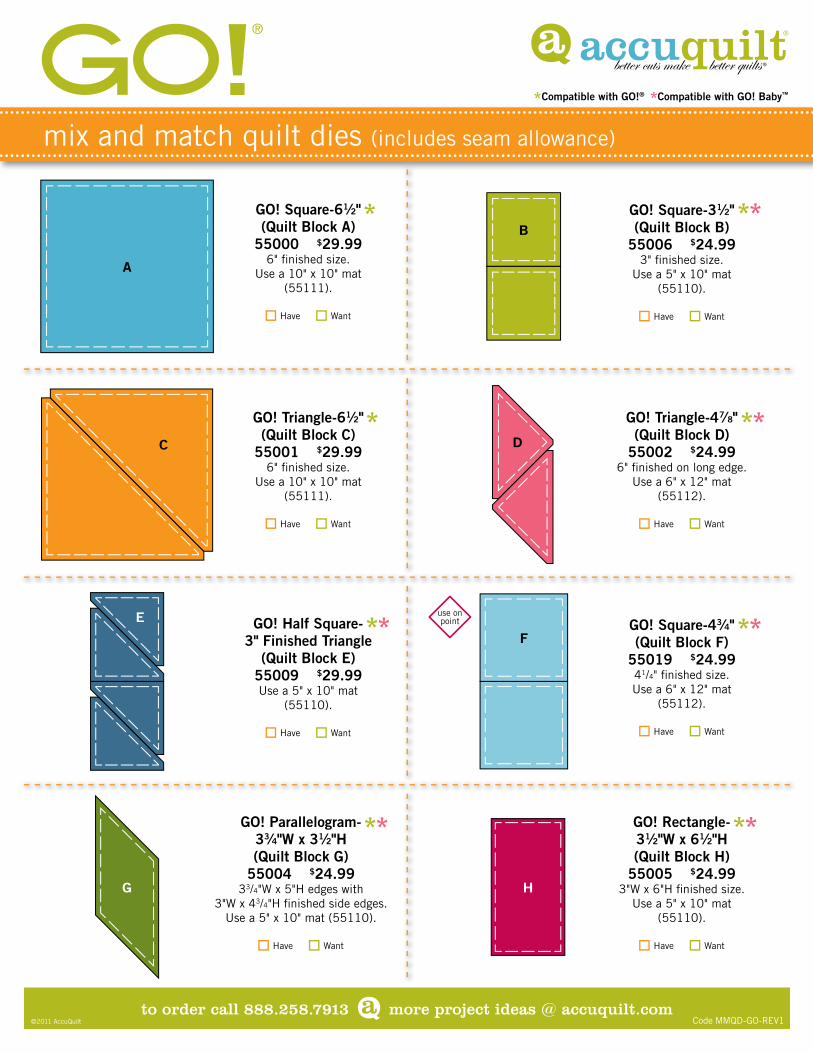
mix and match quilt dies (includes seam allowance)
Compatible with GO!® Compatible with GO! Baby™
GO! Square-61⁄2"(Quilt Block A)
55000 $29.99 6" fi nished size.
Use a 10" x 10" mat (55111).
Have Want
GO! Square-31⁄2"(Quilt Block B)
55006 $24.99 3" fi nished size.
Use a 5" x 10" mat(55110).
Have Want
A
B
GO! Triangle-47⁄8"(Quilt Block D)
55002 $24.99 6" fi nished on long edge.
Use a 6" x 12" mat(55112).
Have Want
GO! Triangle-61⁄2"(Quilt Block C)
55001 $29.99 6" fi nished size.
Use a 10" x 10" mat(55111).
Have Want
DC
GO! Half Square-3" Finished Triangle
(Quilt Block E)55009 $29.99Use a 5" x 10" mat
(55110).
Have Want
GO! Square-43⁄4"(Quilt Block F)
55019 $24.99 41/4" fi nished size.Use a 6" x 12" mat
(55112).
Have Want
use on pointE
F
GO! Parallelogram-33⁄4"W x 31⁄2"H(Quilt Block G)
55004 $24.9933/4"W x 5"H edges with
3"W x 43/4"H fi nished side edges.Use a 5" x 10" mat (55110).
Have Want
GO! Rectangle-31⁄2"W x 61⁄2"H(Quilt Block H)
55005 $24.993"W x 6"H fi nished size.
Use a 5" x 10" mat (55110).
Have Want
HG
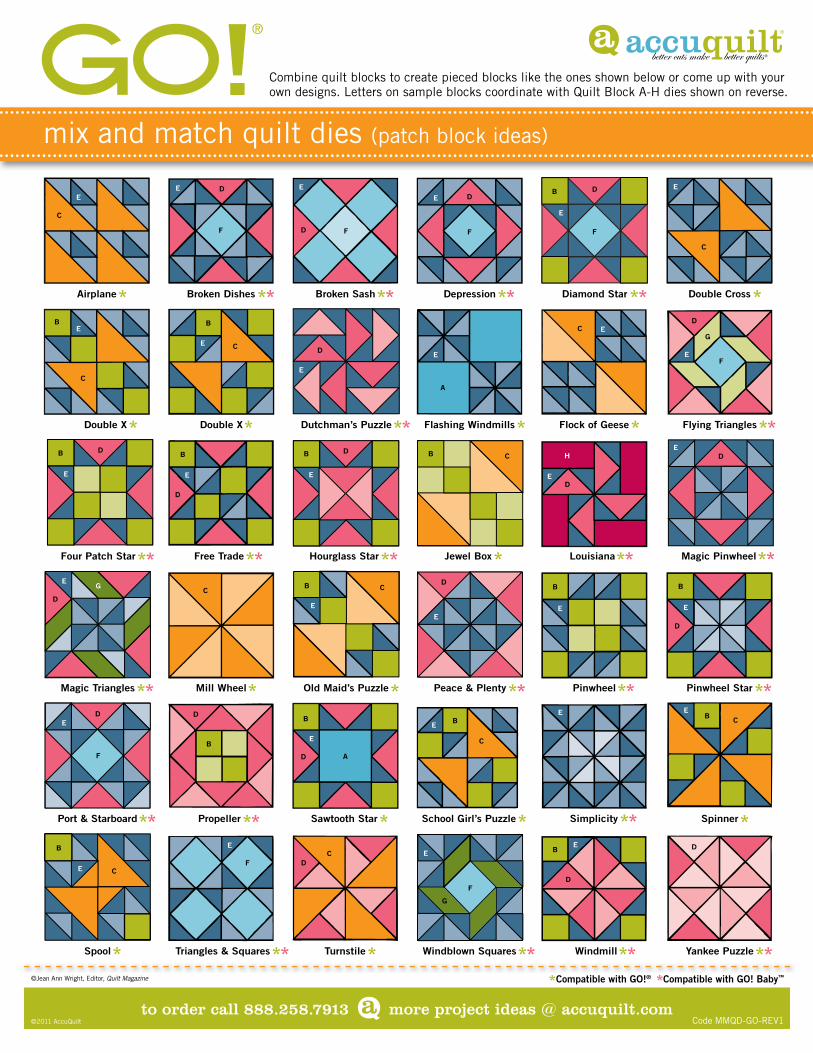
mix and match quilt dies (patch block ideas)
Compatible with GO!® Compatible with GO! Baby™
Combine quilt blocks to create pieced blocks like the ones shown below or come up with your own designs. Letters on sample blocks coordinate with Quilt Block A-H dies shown on reverse.
©Jean Ann Wright, Editor, Quilt Magazine
to order call 888.258.7913 more project ideas @ accuquilt.com©2011 AccuQuilt Code MMQD-GO-REV1
Airplane
C
E
Broken Dishes
DE
F
Broken Sash
FD
E
Depression
D
F
E
Diamond Star
B D
F
E
Double Cross
C
E
Double X
E
C
B
Double X
B
E C
Dutchman’s Puzzle
D
E
Flashing Windmills
A
E
Flock of Geese
C E
Flying Triangles
D
E
G
F
Four Patch Star
E
DB
Free Trade
E
B
D
Hourglass Star
E
BD
Jewel Box
BB C
Louisiana
ED
H
Magic Pinwheel
ED
Magic Triangles
D
EG
Mill Wheel
C
Old Maid’s Puzzle
E
B C
Peace & Plenty
D
E
Pinwheel
B
E
Pinwheel Star
E
B
D
Port & Starboard
D
F
E
Propeller
B
D
Sawtooth Star
A
B
D
E
School Girl’s Puzzle
EB
C
Simplicity
E
Spinner
EB
C
Spool
B
E C
Triangles & Squares
F
E
Turnstile
CD
Windblown Squares
E
F
G
Windmill
BE
D
Yankee Puzzle
D


