
Carbon BrushesA Comprehensive Guide,
for Industrial and Railway Technology
Specifications • Installation • Troubleshooting

The name “brushes” comes from
bundles of tiny copper wires, which
were used as elastic contacts at
the starting period of the electrical
engineering industry.
The term “carbon brush” appeared
with the change to materials made
out of graphite and carbon. Carbon
brushes have been developed for
several decades; they are also
indispensable hardware for
electrical machines in the
microelectronic era.
The production parameters permit
a wide variation of the physical
characteristics and the application
possibilities. Following DIN
EN60276 we subdivide our carbon
brush grades into 5 main groups:
• Electrographite brushes
• Metal graphite brushes
• Resin bonded graphite brushes
• Carbon graphite brushes
• Graphite brushes
Carbon Brushes—Very Important Functional Parts
of Carrying Current in Electrical Machines
2
Information in this handbook courtesy of E-Carbon Partner
Pantrac GmbH, Berlin, Germany

Standards for carbon brushes, material and accessories
Below are given the most important standards for industrial and
traction carbon brushes.
DIN IEC 60136-3 Dimensions of brushes and brush holders
for electrical machinery.
DIN EN 60276 Definitions and nomenclature for carbon
brushes, brush holders, commutators and
sliprings.
DIN IEC 60413 Test procedures for determining physical
properties of brush materials used for
electrical machines.
DIN IEC 60467 Test procedures for determining physical
properties of carbon brushes for electrical
machines.
DIN 43021 Carbon brushes for traction motors.
Dimensions and tolerances.
DIN 46224 Stamped cable sockets for flexibles of
carbon brushes.
DIN IEC 60760 Flat plug contacts.
DIN 46438 Copper flexibles.
3

t = tangential Brush dimension in direction of rotation of
commutator or slipring
a = axial Brush dimension parallel to the axis of
rotation
r = radial Brush dimension perpendicular to the axis of
rotation
Dimensions of carbon brushes are
specified according to DIN IEC
60136-3 in the sequence
t x a x r. In order to avoid
misinterpretation, we suggest
specifying the dimensions in this
sequence.
The cross section of the flexible
is determined according to a.m.
norm and DIN 46438.
The length (l) of the flexible is the
distance between the top of the
brush and the center of the
terminal (see sketch).
When ordering brushes with
special terminals (e.g., plug-
contact) the length (l) of the
flexible should be measured in
the accordance to the sketch.
In standard DIN 46224 are given
recommendations for basic types
and standards for dimensioning
of plug types.
Dimensions and Design of Carbon Brushes
commutator brush slipring brush
4
rr
a at t
- - -

1. Solid brushes
The simplest type of brush used on
basic machines without electrical
and/or mechanical (challenges).
2. Split brushes
Split brushes are formed by
assembling 2, 3, or more carbon
sections into one unit to create
better electrical and mechanical
contact conditions.
First, the (splitting) of the brush
leads to a large number of
electrical contact points between
the brush surface and the
commutator; it also increases the
resistance in the transverse circuit
of the brush because of the
additional contact resistance
between the brush parts. The
cutting of the brush causes smaller
acceleration forces over the brush
parts which enables better dynamic
properties.
Split brushes give satisfactory
results (mainly) on machines with
reversing operations, since there is
a faster adaptation to the running
surface. In addition, tops made of
rubber, laminate, or both cause a
uniform pressure distribution, as
well as a bigger damping ability.
The tangential dimension of the
brush sections must not be less
than 4 mm for mechanical
reasons.
5
cushioningelement
cushioningelement
P
P
P
1
2a
2b

3. Spread brushes
The spread brush is a special
type of split brush in which the
tops of both sections are
chamfered at a certain angle
towards their dividing line.
Pressure to the brush is applied
via a top piece with an
accordingly chamfered bottom
face. The top pieces are generally
made from brush or insulation
material that has a cushioning
effect.
4. Tandem brushes
Tandem brushes are special pairs
of brushes, where each brush
has its own box within the
tandem brush holder, pressed
against the commutator by
separate pressure fingers. The
result is a symmetrical brush
pressure and current distribution.
P3
4 P P
6
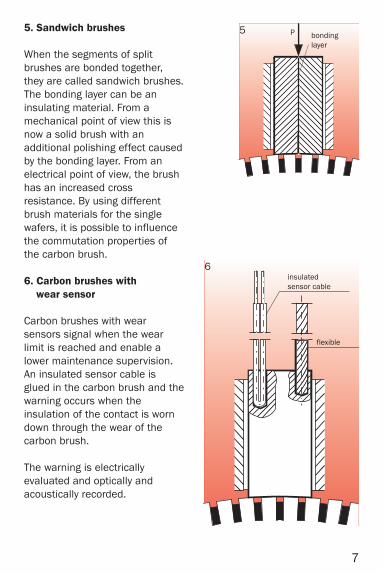
5. Sandwich brushes
When the segments of split
brushes are bonded together,
they are called sandwich brushes.
The bonding layer can be an
insulating material. From a
mechanical point of view this is
now a solid brush with an
additional polishing effect caused
by the bonding layer. From an
electrical point of view, the brush
has an increased cross
resistance. By using different
brush materials for the single
wafers, it is possible to influence
the commutation properties of
the carbon brush.
6. Carbon brushes with
wear sensor
Carbon brushes with wear
sensors signal when the wear
limit is reached and enable a
lower maintenance supervision.
An insulated sensor cable is
glued in the carbon brush and the
warning occurs when the
insulation of the contact is worn
down through the wear of the
carbon brush.
The warning is electrically
evaluated and optically and
acoustically recorded.
5
6
P bonding
layer
flexible
insulated
sensor cable
7
Here are the required conditions
for perfect carrying and for black
commutation:
• good roundness of the
commutator
• no lamination protrusions
• no flat points on the
commutator
• a symmetrical undercutting of
the commutator insulation, and
chamfered laminate edges
• very slight roughness of the
commutator or slipring surface
• uniform brush pressure
• good seating of the brushes to
the commutator/slipring
surface.
Commutator and slipring
machining
A new or reconditioned
commutator should have an out
of roundness of not more than
.001" (0.02 mm). Lamination
protrusions between neighboring
laminates over .0001" (0.002
mm) and the flat points must be
eliminated. Depending on the
application conditions and the
carbon brush material, generally
the rotors should be
reconditioned if there is long-wave
unroundness of more than .012"
(0.30 mm) and short-wave
Directions for Installation and Operation
Undercut to the correct
width and depth
Undercut and
beveled correctly
Offset undercut
(wrong)
Too thin an undercut
(wrong)
90
0,2...0,4
.008"-.016"
8

roundness of more than .006"
(0.15 mm).
Commutators with flush mica
against the copper segments
require very hard brush material
with the consequence of high
commutator wear. For a better
lifetime, it is necessary to
undercut the insulation (see
sketches).
A new commutator should have
a surface of roughness Rz
between .0001" and .0003"
(4 and 8 µm).
Brush pressure
The brush pressure must be
set to the operating conditions.
It must also represent a
compromise between the
mechanical and electrical wear.
M
X Y
TOTALBRUSHWEAR
TOTAL
MECHANICALMINIMUMWEAR
IDEAL RANGE
ELECTRICAL
SPRING PRESSURE
brush pressure
bru
sh
we
ar
Recommendations for brush pressure
Brush pressure in PSI Type of machine(kPa) mounting
stable swing frame
DC machines up to 1500 r.p.m. 2.0-3.0 (15-20) 3.0-4.5 (20-30)
DC machines over 1500 r.p.m. 3.0-4.0 (20-25) 3.5-5.0 (25-35)
Three-phase commutator machines 2.5-3.0 (18-20) 3.5-4.5 (25-30)
Slipring motors 3.0-3.5 (20-25) 3.5-5.0 (25-35)
Turbo generators 2.0-3.5 (15-25) -
Traction motors - 4.5-7.5 (30-50)
The tolerance of the brush should be limited to ± 10%
9

Seating in of the carbon
brushes
The interface of brushes to the
slipring or commutator surface
occurs with the seating in the
brushes. Here are several
techniques used:
1. The carbon brushes are
placed in the brush holder. A
strip of abrasive linen
(recommend garnet paper of
80-100 granulation) is pushed
between the brush and the
surface of the commutator or
slipring. This strip is then drawn
in a tangential direction.
After the running surface has
approximately taken the shape
of the commutator’s or slipring’s
surface, the contact mean is
drawn in the direction of rotation
of the machine to finish the
grinding. In order to withdraw the
abrasive linen, the brushes have
to be raised. In this way, it is
guaranteed that the brushes
take the same position in the
brush holder as in the future
operation of the machine.
2. A strip of abrasive linen is
fitted around the commutator or
slipring, and fixed with adhesive
tape. Then, the brushes are
placed in the holder and the
rotor of the machine is turned
over in the operating direction
(particularly at smaller
machines).
3. The machine is completely
equipped with carbon brushes,
and it is put into operation in
idle running (possibly with a
reduced speed of rotation). A
pumice stone is pressed in front
of the brushes on the
commutator. The dust of the
pumice stone which results
reaches the brushes and grinds
them in.This method of grinding
is particularly suited to large DC
machines.
The seating in can be finished
when about 70% of the running
surface has contacted with the
commutator/slipring. After the
seating in, the carbon brushes
have to be taken away from the
holder, and the machine has to
be cleaned by means of oil free
compressed air.
abrasive linen
Figure to 1
10

Attention, the dust must not
reach the coils or the machine
bearing.
The carbon brushes have to be
cleaned with a clean rag (without
oil or fat), and their running
surface must be cleaned by
means of a glass brush in order
to avoid infiltrated grains.
Mounting of the brush holders
and brushes
To ensure correct operation of
brushes, the holders and
brushes must be fitted exactly
geometrically on the commutator
in accordance with the design of
armature and windings. For
instance, the distance between
brushes of different polarities
must be equal. To make certain
that this is the case, a strip of
paper is put around the
commutator under the brushes,
and the distance between the
impressions of the brushes of
each pole can then be
measured correctly. This strip of
paper can be used as a record
for checking the positions at a
later stage. A variation of as
little as .020" (0.5 mm)
between the brushes of different
polarities can cause
considerable problems with
regard to commutation and
current distribution.
pumice stone
Figure to 3
11

The distance between the
commutator and the lower edge
of the brush box should be set
at between .06" and .08" (1.5
and 2.0 mm). If the commutator
has been remachined, the brush
holders will have to be reset to
maintain this distance. The
setting of the brush holders
should be done with a distance
piece.
If the distance between the
brush holder and commutator is
too high, this can lead to brush
vibration, because the brush will
be tilted at a greater angle. On
the DC machines, brushes
should be installed in the same
track for each pole pair. This
insures that the patina/film
being built is not adversely
affected by the brushes on the
plus and on the minus poles.
distance piece
b
b
b
b
12

On machines with high number
of poles, the brushes will be
staggered across the
commutator axially so that there
is even wear across the
commutator.
If the commutator is long
enough, the best stagger
arrangement would be as
follows:
v = z = a/(p-1)
v = Stagger
z = Distance between brush pair
of same polarity
a = Axial brush dimension
p = Number of brush pole pairs,
i.e., half the number of
poles of the machines
The fitting of brushes on the
commutator must be carried out
either exactly radial or at a
certain angle, which is then
called either a trailing or a
reaction position, according to
the direction in which the
commutator rotates.
The trailing and reaction
position are used in order to
reduce vibrations.
v
a
z
trailing
position
radial
position
reaction
position
13

The following pictures show
typical brush-sliding faces. For
easy identification, we suggest
you use the symbols S1, S3 etc.
S1, S3 and S5 are satisfactory
sliding faces, indicating that
there are no mechanical or
electrical problems. Depending
S1 - Dense, shining sliding face
S3 - Slight porous sliding face
S5 - Fine hairlining
S7 - Hairlining
S9 - Tracking with hairlining
and grooves
14
Assessment of Performance of Carbon Brushes
Appearance of the brush sliding face
S1
S3
S5
S7
S9

on the carbon material, the
sliding surface appears dense
or porous, and shiny, dull or
matte. If there is dust in the
circulating air, fine hairlining
may occur, as shown in S5.
Normal operation
Normal operation
Normal operation, slight dust influence
Causes: Underload, influence of dust, oil, or grease, weak spring pressure
Causes: Like S7, but stronger
15

S11 - Ghostmarks, difficult commutation
S13 - Burning edge of the leaving or trailing edge
S15 - Eroded brush face
S17 - Lamination of sliding face
S19 - Double facing here for a twin brush
S21 - Copper nests
S23 - Broken edges
16
S11
S13
S15
S19
S21
S23
S17

Causes: Commutation problems, e.g., false or incorrect
position of the neutral zone or interpole
Causes: Difficult commutation, heavy sparking, interruption of
contact due to out of round of commutator or insufficient
brush holder spring pressure
Causes: Electrical overload, interruption of contact
Causes: Burned segments of the sliding face, caused by a
winding fault giving voltage surge during commutation
Causes: Tilting of the brush in dual direction machine
Causes: Pick up of copper particles, often following copper drag
Causes: High raised lamination, commutator seriously out of
round, brush chatter by low load and idle running
17

Commutator
appearance
In addition to the
physical appearance
of the surface of the
commutator, the skin
or patina/(film) is of
equal importance for
the good running of
the carbon brushes.
Each carbon brush
builds a characteristic
patina/(film) which is
affected by operating
and ambient
conditions.
The patina/(film)
consists mainly of
copper oxides,
graphite deposits and
absorbed water, and
its appearance is of
importance for the
assessment of the
running behavior of
the commutation set.
The following pictures
are used by carbon
brush manufacturers
and users of brushes
as a guide to assist in
judging the operation
of carbon brushes.
P2
18
P4 P6
P12 P14 P16

P2, P4 and P6 are examples
of normal skin or patina/film
formation. When a machine
runs well, the patina/film or
skin on a commutator will be
even, slightly shiny and coppery
brown to black in color.
Electrical, mechanical and
atmospheric influences on the
patina/film appearance.
P12 - Streaky patina/film
having some wide and narrow
tracks of different color. No
commutator wear.
P14 - Torn patina/film, general
appearance as in P12, but with
commutator wear.
P16 - Smutty patina/film,
uneven skin having patchy
colors and random spots.
There may be appearance of
greyish, blueish and reddish
hues, but of importance is the
evenness of the skin formation
and not its color.
Causes: High humidity, oil
vapor, aggressive gases in
the atmosphere, low electrical
load on the brushes
Causes: As in P12, but the
conditions have been
maintained for a longer period,
causing commutator damage
Causes: Uneven commutator
or unclean operating
conditions
19

20
P22 P24
P26 P28
P42 P46

P22 - Patina/film with dark areas,
regular or irregular patches
covering one or more commutator
segments.
P24 - Dark patchy patina/film
having definite edges as in T12
and T14.
P26/P28 - Commutator
segments having patches in the
middle or at the edges.
P42 - Alternating light and dark
bar markings.
P46 - Mat patches in double pole
patches.
Causes: Out of round
commutator, vibrations of the
motor caused by badly adjusted
shaft or damaged bearings
Causes: Raised segment or
group of segment causing the
brush to bounce
Causes: Often due to faulty
grinding of the commutator
or commutating problems
Causes: Uneven current
distribution over two parallel
windings caused by double
windings crossing in the same
slot
Causes: Usually by faulty
soldering of the risers or
segment connections
21

22
B2 B6 B8
B10
T10 T12 T14

B2, B6, B8 - Burning at the edge
or in the middle of bar.
B10 - Perforated patina/film,
light, dense or distributed
build-up spots.
T10 - Dark patches at edges of
bars in direction of rotation.
T12 - Burning of a trailing edge
and the next leading edge of a
bar.
T14 - Dark markings.
Causes: Sparking caused by
commutation problems
Causes: Patina/film destruction
caused by too large electrical
resistance
Causes: Frequently caused by
long periods with the motor
being stationary without power
or short stationary periods
under load
Causes: Caused by protruding
segment, as in L2
Causes: Sign of a low segment,
could also be caused by a flat
spot on the commutator
23

24
T16 T18
R2 R4

T16 - Clearly defined dark
markings together with segment
edges burnt.
T18 - Dark markings.
Commutator wear
R2 - Top view of a commutator.
R4 - Commutator bar showing
abnormal metal abrasion.
Causes: Raised mica (see L6)
Causes: Badly undercut
segment edges (see L8)
Causes: Trackwise normal
metal abrasion after long
period of operation with
correctly positioned brushes
Causes: Abnormal abrasion is
caused by incorrect brush
alignment, incorrect brush
material or contamination, etc.
25

26
L2L4
L6
L8
L10
L2 L4
L6
L8
L10

L2 - Protruding segment
L4 - Low segment
L6 - Raised mica
L8 - Ridge on the segment edge
L10 - Copper drag
Causes: Faulty commutator
segments
Causes: Bumps or vibrations
with various causes
27

Cause
Out of round commutator or
slipring
Insufficient brush pressure
Carbon brushes are stuck in
holder
Oil or dirt between segments
Carbon brushes (not seated in)
Brush holder too far from the
commutator or slipring
Protruding insulation segments
Machine vibrating or chattering
Wrong positioning of brush
bridge
Faulty installation of brush arms
Interpole too strong or too weak
Incorrect brush grade
Corrective measures
Turning or grinding (see
“Directions for Installation and
Operation”)
Increase brush pressure (see
recommendations for brush
pressure, page 9)
Carefully remove foreign bodies
and dust from brush holder.
Dust grooves are recommended
Clean segments, filter cooling
air, and possibly seal bearings
Repeat the seating in process
Adjust distance between holder
and commutator to 2 mm
Undercut insulation and chamfer
segments
If it is not possible to reduce
the vibration of the machine,
increase brush pressures or use
a brush design fitted with fiber
and rubber top
Establish neutral position and
adjust brush arms accordingly
Adjust brush arms correctly
Machine manufacturer to correct
fault, or install another brush
grade to compensate
Please, contact our technical
service
Instructions in Case of Operating Difficulties
Strong brush sparking
28

Cause
Producing or low segments
(L2,L4)
Raised mica insulation
(T16, P24)
Out of round commutator or sliprings,
i.e., badly out of balance
(P16)
Bad soldering of risers
(P42, P46)
Electrolytic deposit from brush
to steel on stationary steel
sliprings (galv. element)
Corrective measures
Retighten and turn the
commutator
Turning the commutator,
undercut mica and possibly
retighten commutator
Rebalance and/or remachine
commutator or slipring
Resolder risers
In case of long standstill
periods, insert insulating strip
under the carbon brush
Patches or burn marks
29

Cause
Overload on brush track due to
uneven current distribution
Dusty environment
(P14)
Aggressive gases or vapors
(P12)
Grooving caused by low
electrical load on brushes(P14)
Grooving caused by oil film on
commutator or sliprings
Material loss by anodic when
using sliprings with DC current
Copper drag
(L10)
Development of flat spots
Corrective measures
Adjust brush pressures to the
correct level. Possibly use
brushes with a higher polishing
effect
Blow in clean air by installing a
filter
Blow in clean air and use
brushes with a stronger
polishing effect
Reduce number of brushes per
pole or change brush grade
Seal bearings and avoid oil
vapor
Change polarity of sliprings from
time to time
Because of complex nature of
potential causes, please contact
our Technical Service
Department
Install starting current limits
Excessive wear of commutator
and sliprings
30
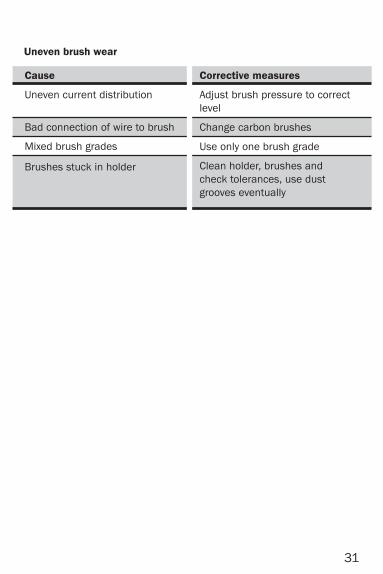
Cause
Uneven current distribution
Bad connection of wire to brush
Mixed brush grades
Brushes stuck in holder
Corrective measures
Adjust brush pressure to correct
level
Change carbon brushes
Use only one brush grade
Clean holder, brushes and
check tolerances, use dust
grooves eventually
Uneven brush wear
31

8900 W. Tower Ave., Milwaukee, WI 53224-2849
Customer Service: 800-962-4851 Fax: 800-365-3113
www.helwigcarbon.com
The First Name in Carbon Brush Technology
Carbon Brushes
Brush Holders
Spring Assemblies
Mechanical Carbons
Major OEM approvals
98% on-time delivery
Fast turnaround on custom manufactured parts
Over 1,000 different items in stock
Reliable product performance for longer brush life
On-site field service and support
ISO certified
Best overall value
HC
Po
cke
t G
uid
e 1
0/2
01
3


![Scanned by CamScanner · 14-02-1999 (ein) b com ca-ii a mano] kumar b com ca-ii a manq kumar b com ca-ii (tim) a manoj kumar b com ca-ii (tim) a manoj kumar b.com a kumar b.com g-l](https://cdn.vdocuments.us/doc/165x107/5f15f87ae203b629cc4ab2af/scanned-by-camscanner-14-02-1999-ein-b-com-ca-ii-a-mano-kumar-b-com-ca-ii-a-manq.jpg)
