
Basic Suturing Basic Suturing
ObjectivesObjectives Describe the principles of wound healing Identify the various types and sizes of suture material. Choose the proper instruments for suturing. Identify the different injectable anesthetic agents and correct
dosages. Demonstrate different types of closure techniques: simple
interrupted, continuous, subcuticular, vertical and horizontal mattress, dermal
Demonstrate two-handed, one-handed, instrument ties Recommend appropriate wound care and follow-up.
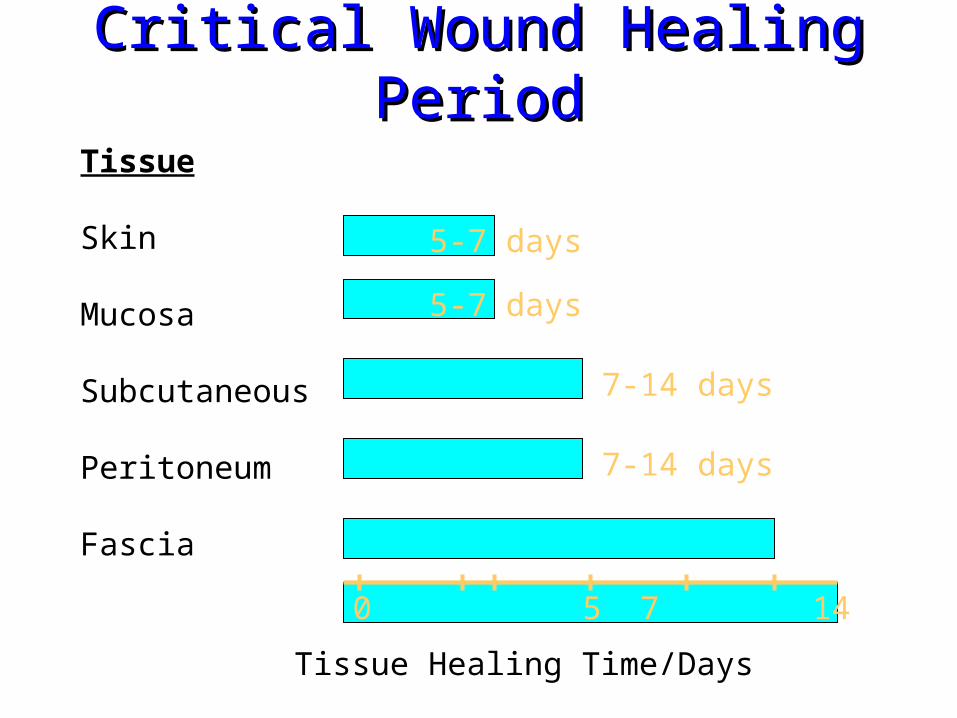
Critical Wound Healing PeriodCritical Wound Healing Period
Tissue
Skin
Mucosa
Subcutaneous
Peritoneum
Fascia
5-7 days
5-7 days
7-14 days
7-14 days
14-28 days
0 5 7 14 21 28
Tissue Healing Time/Days

Model of Wound HealingModel of Wound Healing (1) Hemostasis: within minutes post-injury, platelets aggregate at the
injury site to form a fibrin clot. (2) Inflammatory: bacteria and debris are phagocytosed and removed,
and factors are released that cause the migration and division of cells involved in the proliferative phase.
(3) Proliferative: angiogenesis, collagen deposition, granulation tissue formation, epithelialization, and wound contraction
(4) Remodeling: collagen is remodeled and realigned along tension lines and cells that are no longer needed are removed by apoptosis.

Types of SuturesTypes of Sutures Absorbable or non-absorbable (natural or synthetic) Monofilament or multifilament (braided) Dyed or undyed Sizes 3 to 12-0 (numbers alone indicate progressively
larger sutures, whereas numbers followed by 0 indicate progressively smaller)
New antibacterial sutures

Non-absorbableNon-absorbable Not biodegradable
and permanent– Nylon– Prolene– Stainless steel– Silk (natural, can
break down over years)
Degraded via inflammatory response– Vicryl– Monocryl– Chromic– Cat gut (natural)
AbsorbableAbsorbable

Natural SutureNatural Suture
Biological Cause inflammatory
reaction– Catgut (connective
from cow or sheep)– Silk (from silkworm
fibers)– Chromic catgut
SyntheticSynthetic
Synthetic polymers Do not cause
inflammatory response– Nylon– Vicryl– Monocryl– Prolene

MonofilamentMonofilament Single strand of suture
material Minimal tissue trauma Smooth tying but more
knots needed Harder to handle due to
memory Examples: nylon, monocryl,
prolene,
Multifilament (braided)Multifilament (braided) Fibers are braided or twisted
together More tissue resistance Easier to handle Fewer knots needed Examples: vicryl, silk,
chromic

Suture SelectionSuture Selection
Do not use dyed sutures on the skin Use monofilament on the skin as multifilament
harbor BACTERIA Non-absorbable cause less scarring but must be
removed Plus sutures (staph, monocryl for E. coli,
Klebsiella) Location and layer, patient factors, strength,
healing, site and availability

Suture SelectionSuture Selection
Absorbable for GI, urinary or biliaryNon-absorbable or extended for up to 6 mos
for skin, tendons, fasciaCosmetics = monofilament or subcuticularLigatures usually absorbable

Surgical NeedlesSurgical Needles
Wide variety with different company’s naming systems
2 basic configurations for curved needles
– Cutting: cutting edge can cut through tough tissue, such as skin
– Tapered: no cutting edge. For softer tissue inside the body

Surgical NeedlesSurgical Needles

Surgical InstrumentsSurgical Instruments

Anesthetic SolutionsAnesthetic Solutions Lidocaine (Xylocaine®)
– Most commonly used– Rapid onset – Strength: 0.5%, 1.0%, &
2.0% – Maximum dose:
5 mg / kg, or 300 mg
– 1.0% lidocaine = 1 g lidocaine / 100 cc = 1,000mg/100cc
– 300 mg = 0.03 liter = 30 ml
Lidocaine (Xylocaine®) with epinephrine– Vasoconstriction– Decreased bleeding– Prolongs duration – Strength: 0.5% & 1.0%– Maximum individual
dose: 7mg/kg, or 500mg

Anesthetic SolutionsAnesthetic Solutions
CAUTIONS: due to its vasoconstriction properties never use Lidocaine with epinephrine on: – Eyes, Ears, Nose – Fingers, Toes– Penis, Scrotum

Anesthetic SolutionsAnesthetic Solutions
BUPIVACAINE (MARCAINE):– Slow onset– Long duration– Strength: 0.25%– DOSE: maximum individual dose 3mg/kg

Injection TechniquesInjection Techniques
25, 27, or 30-gauge needle
6 or 10 cc syringe Check for allergies Insert the needle at the
inner wound edge
Aspirate Inject agent into tissue
SLOWLY Wait… After anesthesia has
taken effect, suturing may begin

Wound EvaluationWound Evaluation
Time of incidentSize of woundDepth of woundTendon / nerve involvementBleeding at site

When to ReferWhen to Refer
Deep wounds of hands or feet, or unknown depth of penetration
Full thickness lacerations of eyelids, lips or ears Injuries involving nerves, larger arteries, bones,
joints or tendons Crush injuries Markedly contaminated wounds requiring
drainage Concern about cosmesis

Contraindications to SuturingContraindications to Suturing
Redness Edema of the wound margins Infection Fever Puncture wounds Animal bites Tendon, nerve, or vessel involvement Wound more than 12 hours old (body) and 24 hrs
(face)

Closure TypesClosure Types Primary closure (primary intention)
– Wound edges are brought together so that they are adjacent to each other (re-approximated)
– Examples: well-repaired lacerations, well reduced bone fractures, healing after flap surgery
Secondary closure (secondary intention)– Wound is left open and closes naturally (granulation)– Examples: gingivectomy, gingivoplasty,tooth extraction sockets, poorly
reduced fractures
Tertiary closure (delayed primary closure)– Wound is left open for a number of days and then closed if it is found to be
clean– Examples: healing of wounds by use of tissue grafts.

Wound PreparationWound Preparation
Most important step for reducing the risk of wound infection.
Remove all contaminants and devitalized tissue before wound closure.– IRRIGATE w/ NS or TAP WATER (AVOID H2O2,
POVIDONE-IODINE)– CUT OUT DEAD, FRAGMENTED TISSUE
If not, the risk of infection and of a cosmetically poor scar are greatly increased
Personal Precautions

Principles And TechniquesPrinciples And Techniques Minimize trauma in skin
handling Gentle apposition with slight
eversion of wound edges– Visualization
Make yourself comfortable– Adjust the chair and the
light Change the laceration
– Debride crushed tissue

Simple Interrupted SuturingSimple Interrupted Suturing
Apply the needle to the needle driver– Clasp needle 1/2 to 2/3 back from tip
Rule of halves:– Matches wound edges better; avoids dog ears– Vary from rule when too much tension across
wound

Simple Interrupted SuturingSimple Interrupted Suturing
Rule of halves

Simple Interrupted SuturingSimple Interrupted Suturing
Rule of halves
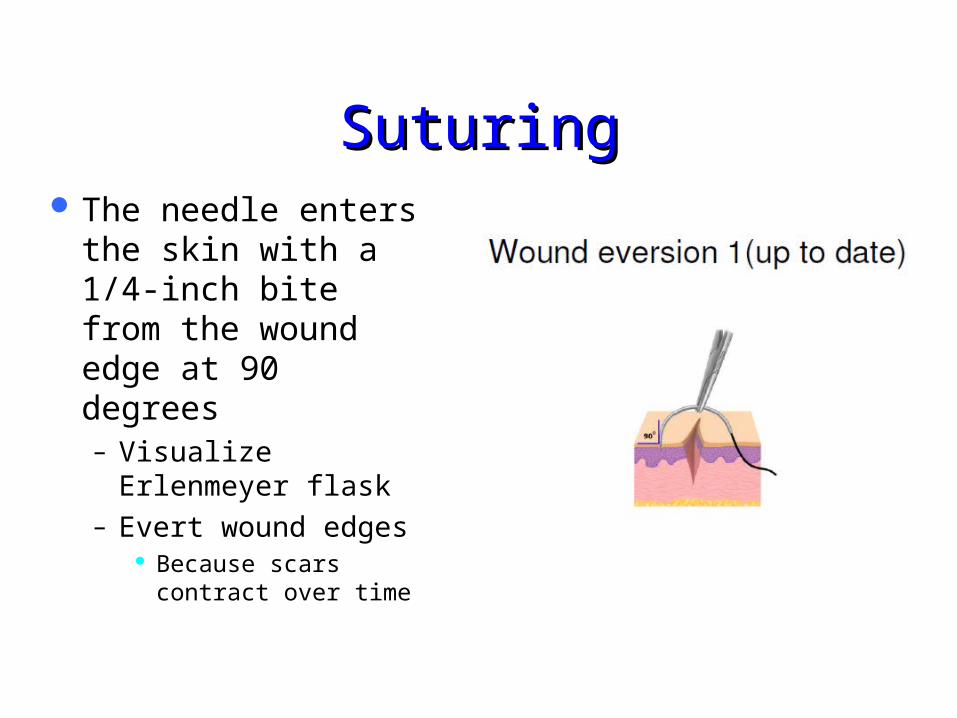
SuturingSuturing The needle enters the
skin with a 1/4-inch bite from the wound edge at 90 degrees– Visualize Erlenmeyer
flask– Evert wound edges
Because scars contract over time

SuturingSuturing Release the needle from the needle driver, reach into the wound
and grasp the needle with the needle driver. Pull it free to give enough suture material to enter the opposite side of the wound.
Use the forceps and lightly grasp the skin edge and arc the needle through the opposite edge inside the wound edge taking equal bites.
Rotate your wrist to follow the arc of the needle.
Principle: minimize trauma to the skin, and don’t bend the needle. Follow the path of least resistance.

SuturingSuturing
Release the needle and grasp the portion of the needle protruding from the skin with the needle driver. Pull the needle through the skin until you have approximately 1 to 1/2-inch suture strand protruding form the bites site.
Release the needle from the needle driver and wrap the suture around the needle driver two times.


Simple Interrupted SuturingSimple Interrupted Suturing Grasp the end of the suture material with the needle driver and
pull the two lines across the wound site in opposite direction (this is one throw).
Do not position the knot directly over the wound edge.
Repeat 3-4 throws to ensuring knot security. On each throw reverse the order of wrap.
Cut the ends of the suture 1/4-inch from the knot.
The remaining sutures are inserted in the same manner

Simple, InterruptedSimple, Interrupted
http://www.youtube.com/watch?v=PFQ5-tquFqY

The trick to an instrument tieThe trick to an instrument tie
Always place the suture holder parallel to the wound’s direction.
Hold the longer side of the suture (with the needle) and wrap OVER the suture holder.
With each tie, move your suture-holding hand to the OTHER side.
By always wrapping OVER and moving the hand to the OTHER side = square knots!!

Two Handed TieTwo Handed Tie

Two Handed TieTwo Handed Tie

Suturing - finishingSuturing - finishing
After sutures placed, clean the site with normal saline.
Apply a small amount of Bacitracin or white petroleum and cover with a sterile non-adherent compression dressing (Tefla).

Patient instructions and follow up carePatient instructions and follow up care
Wound care – After the first 24-48 hours, patients should gently wash
the wound with soap and water, dry it carefully, apply topical antibiotic ointment, and replace the dressing/bandages.
– Facial wounds generally only need topical antibiotic ointment without bandaging.
.

Suture RemovalSuture Removal
Average time frame is 7 – 10 days– FACE: 3 – 5 d– NECK: 5 – 7 d– SCALP: 7 – 12 days– UPPER EXTREMITY, TRUNK: 10 – 14 days– LOWER EXTREMITY: 14 – 28 days– SOLES, PALMS, BACK OR OVER JOINTS: 10 days
Any suture with pus or signs of infections should be removed immediately.

Suture RemovalSuture Removal
Clean with hydrogen peroxide to remove any crusting or dried blood
Using the tweezers, grasp the knot and snip the suture below the knot, close to the skin
Pull the suture line through the tissue- in the direction that keeps the wound closed - and place on a 4x4. Count them.
Most wounds have < 15% of final wound strength after 2 wks, so steri-strips should be applied afterwards.

ReferencesReferences
http://depts.washington.edu/uwemig/media_files/EMIG%20Suture%20Handout.pdf Thomsen, T. Basic Laceration Repair. The New England Journal of Medicine. Oct.
355: 17. Edgerton, M. The Art of Surgical Technique. Baltimore, Williams & Wilkins, 1988. www.uptodateonline.com; 2009, topic lacerations, etc. http://dermnetnz.org/procedures/pdf/suturing-dermnetnz.pdf http://www.mnpa.us/handouts/Session%2005%20%20-%20%20Basic%20Suturing
%20%202010%20MNPA.pdf http://www.practicalplasticsurgery.org/docs/Practical_01.pdf http://health.usf.edu/NR/rdonlyres/ABB54A41-80A1-4E2B-8AE8-
7EB5D06CE8DF/0/wound_healing_manual.pdf Jackson, E. Wound Care – Suture, Laceration, Dressing: Essentials for Family
Physicians. AAFP Scientific Assembly. 2010. http://www.aafp.org/online/etc/medialib/aafp_org/documents/cme/courses/conf/assembly/2010handouts/071.Par.0001.File.tmp/071-072.pdf


