Basic Audio Recording
Ryan Perry
Digital Collections Librarian
Central NY Library Resources Council
February 26, 2016
image: techzono.net
All attributed images are property of their respective copyright holders
Agenda
1. Basics of Sound Recording
2. Planning a Recording Session
3. Demonstration of Recording Process (Laptop & TASCAM)
4. Audio Transfers (Digitization)
5. Recording on Mobile Devices
a. Android App
b. iOS App
6. Editing Audio Recordings
7. Storage Considerations
8. Hands-on Experience
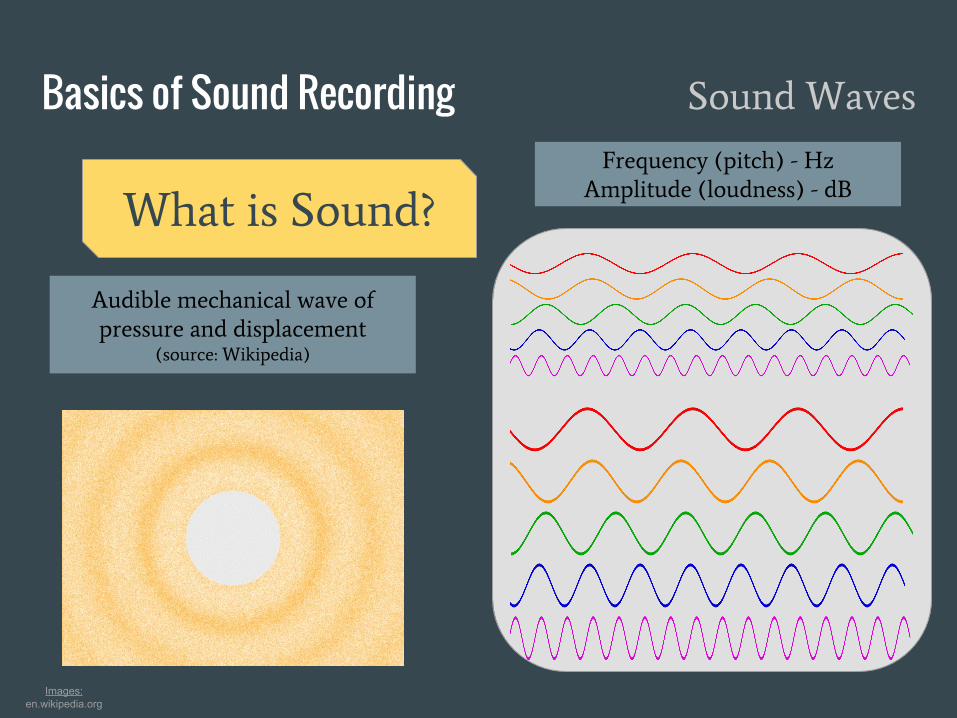
Basics of Sound Recording Sound Waves
Images:en.wikipedia.org
Audible mechanical wave of
pressure and displacement
(source: Wikipedia)
Frequency (pitch) - Hz
Amplitude (loudness) - dB
What is Sound?
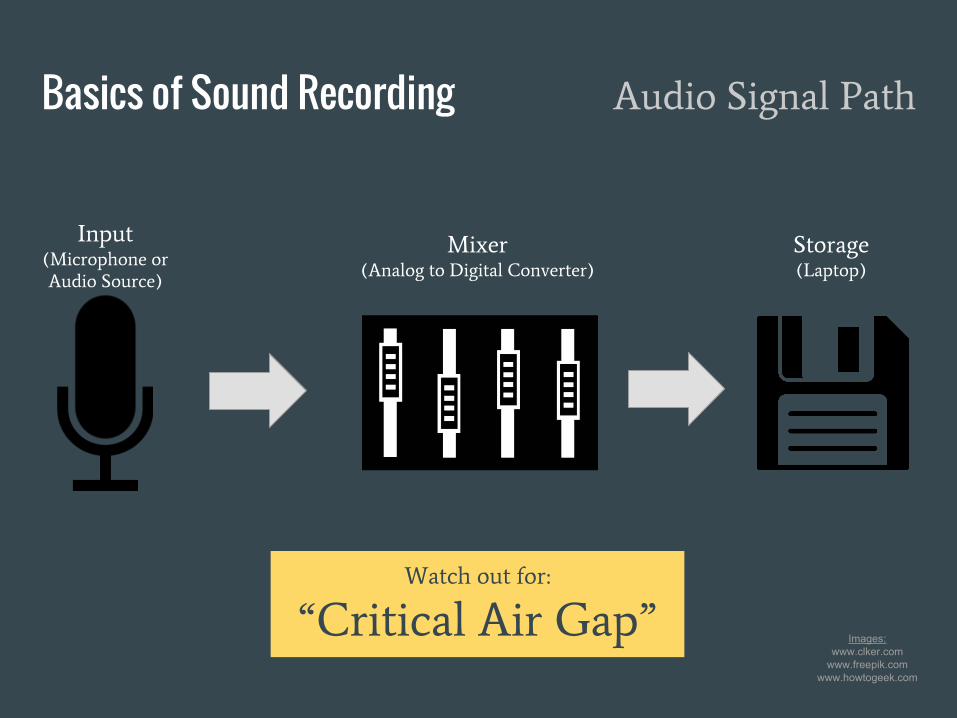
Basics of Sound Recording Audio Signal Path
Images:www.clker.com
www.freepik.comwww.howtogeek.com
Input
(Microphone or
Audio Source)
Mixer
(Analog to Digital Converter)
Storage
(Laptop)
Watch out for:
“Critical Air Gap”
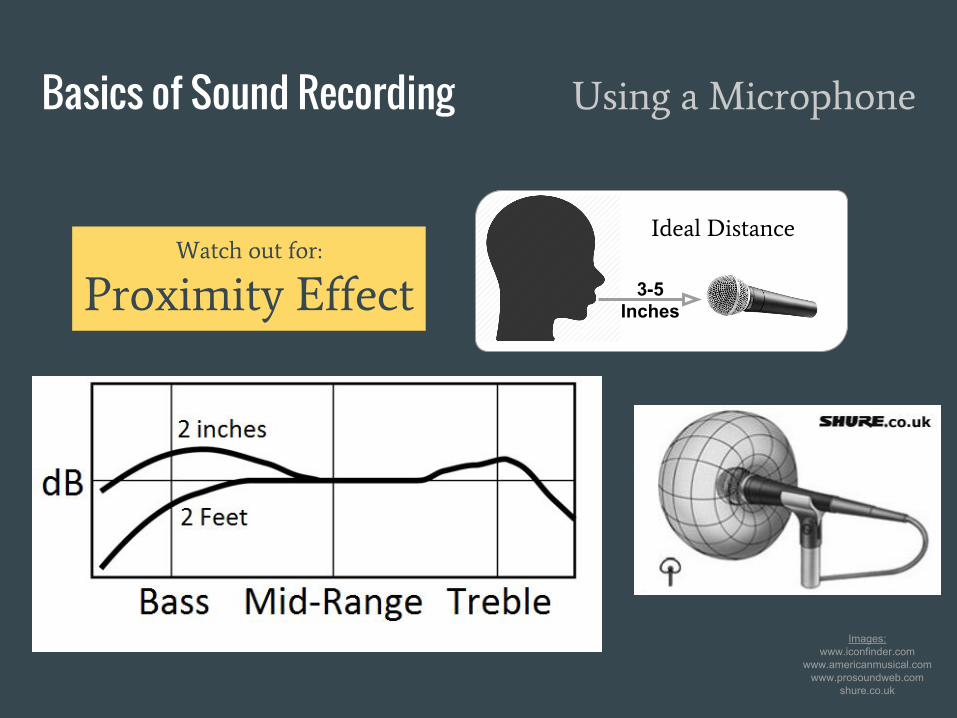
Basics of Sound Recording Using a Microphone
Images:www.iconfinder.com
www.americanmusical.comwww.prosoundweb.com
shure.co.uk
Watch out for:
Proximity Effect
3-5 Inches
Ideal Distance
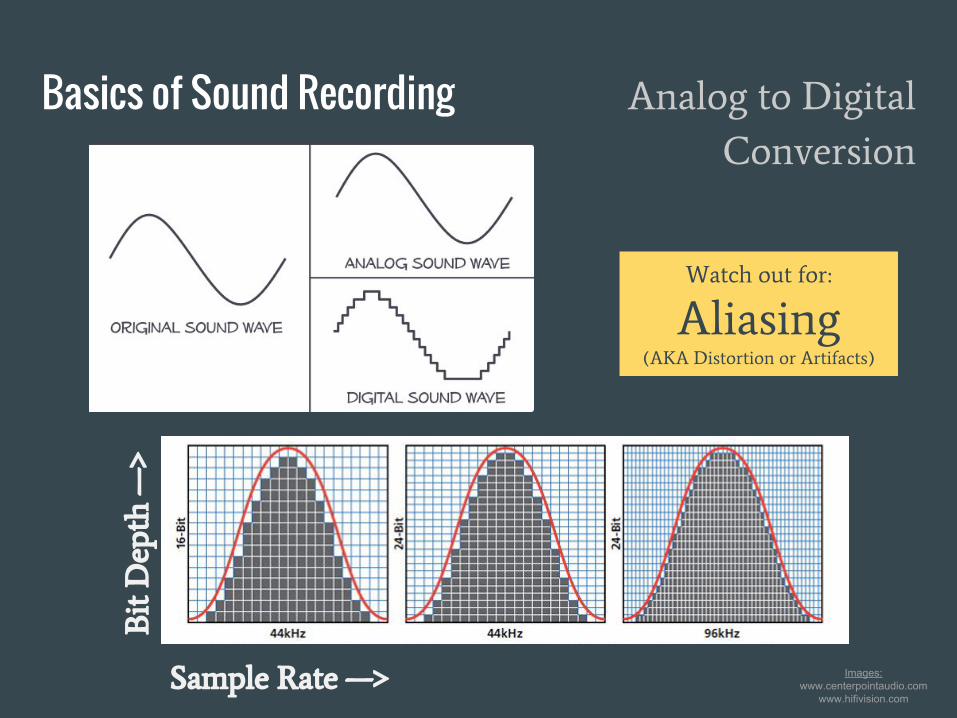
Basics of Sound Recording Analog to Digital
Conversion
Images:www.centerpointaudio.com
www.hifivision.com
Bit D
ep
th
—
>
Sample Rate —>
Watch out for:
Aliasing
(AKA Distortion or Artifacts)
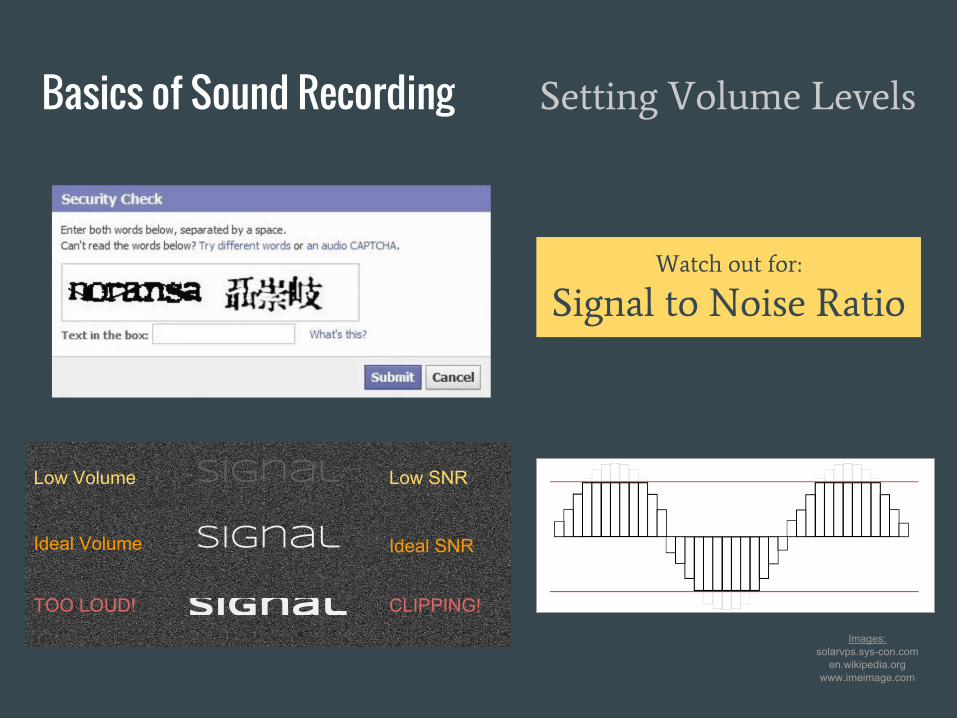
Basics of Sound Recording Setting Volume Levels
Images:solarvps.sys-con.com
en.wikipedia.orgwww.imeimage.com
Signal
Signal
Signal
Low SNR
Ideal SNR
CLIPPING!
Low Volume
Ideal Volume
TOO LOUD!
Watch out for:
Signal to Noise Ratio
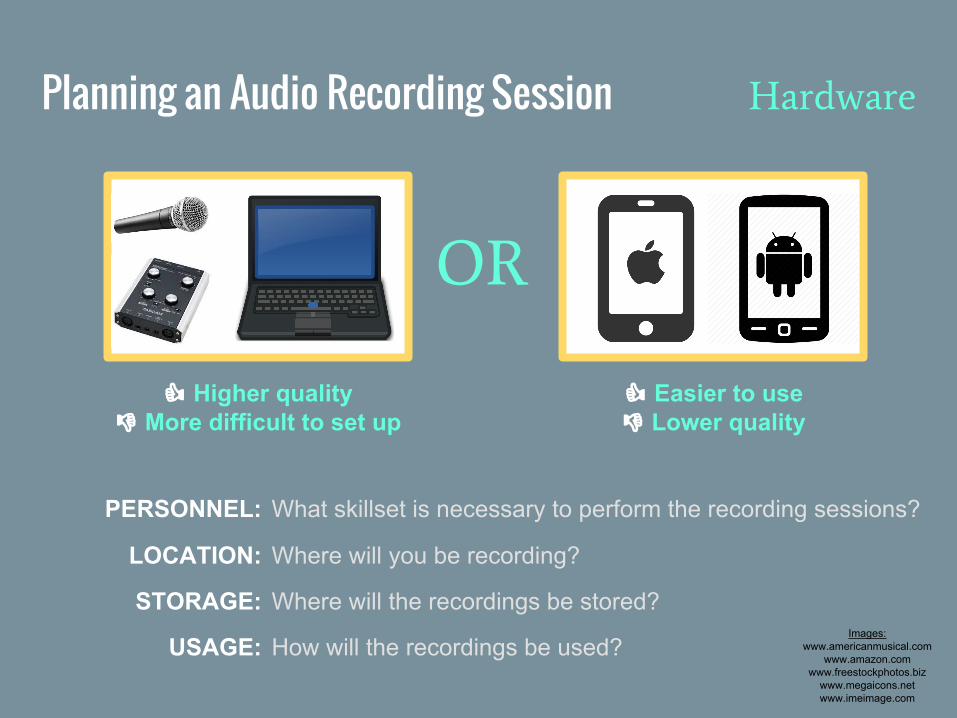
Planning an Audio Recording Session
Images:www.americanmusical.com
www.amazon.comwww.freestockphotos.biz
www.megaicons.netwww.imeimage.com
What skillset is necessary to perform the recording sessions?
Where will you be recording?
Where will the recordings be stored?
How will the recordings be used?
PERSONNEL:
LOCATION:
STORAGE:
USAGE:
OR
Higher quality More difficult to set up
Easier to use Lower quality
Hardware
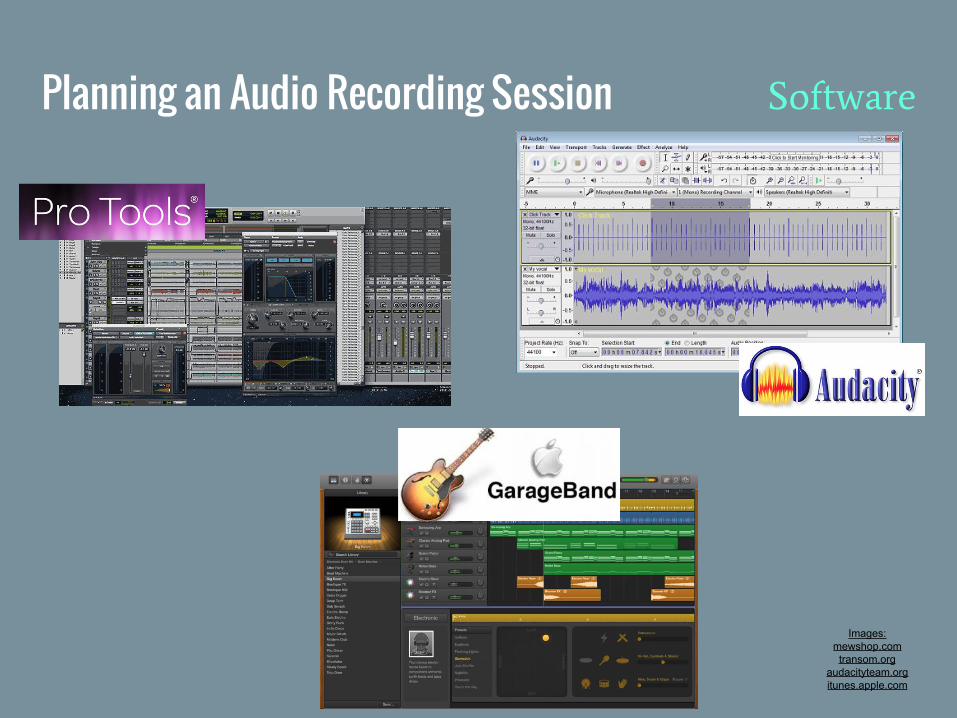
Planning an Audio Recording Session Software
Images:mewshop.com
transom.orgaudacityteam.orgitunes.apple.com
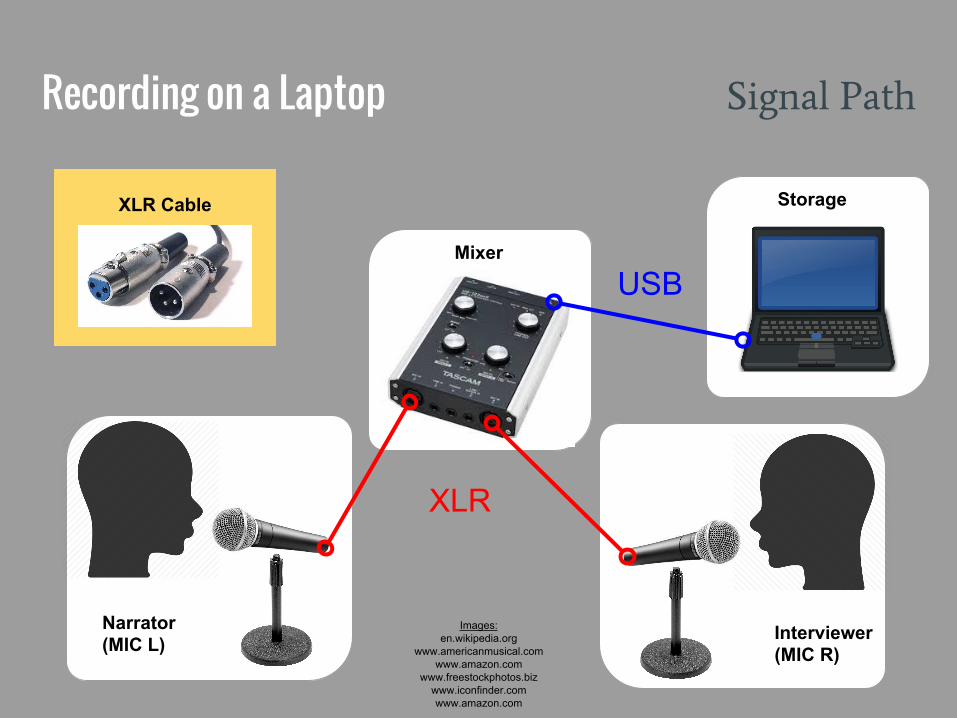
Recording on a Laptop Signal Path
Images:en.wikipedia.org
www.americanmusical.comwww.amazon.com
www.freestockphotos.bizwww.iconfinder.comwww.amazon.com
USB
XLR
Narrator(MIC L) Interviewer
(MIC R)
Mixer
StorageXLR Cable
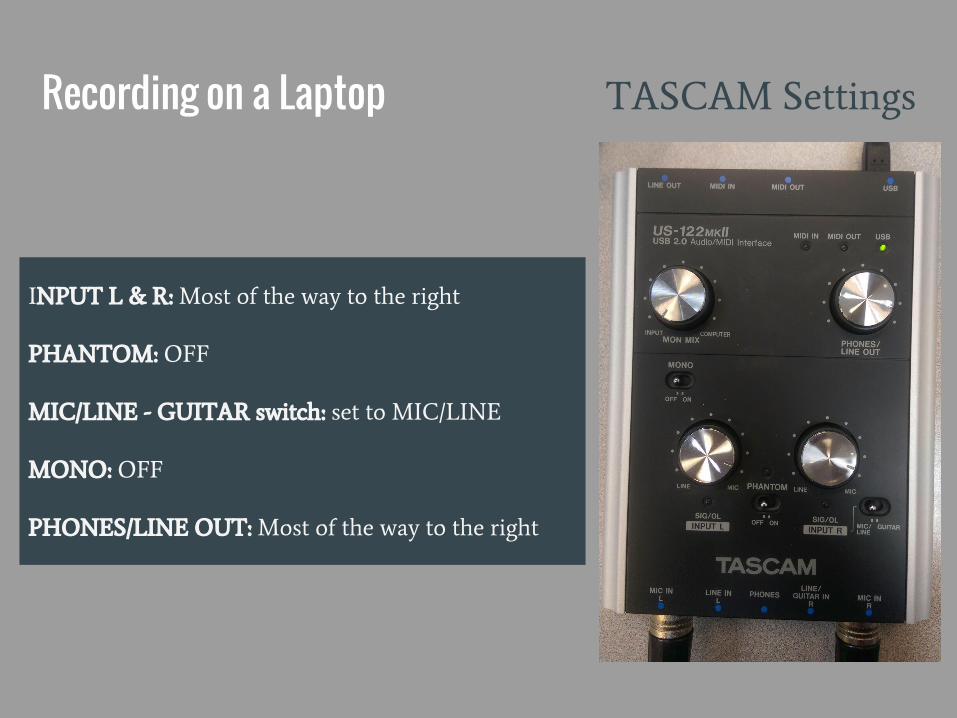
Recording on a Laptop TASCAM Settings
INPUT L & R: Most of the way to the right
PHANTOM: OFF
MIC/LINE - GUITAR switch: set to MIC/LINE
MONO: OFF
PHONES/LINE OUT: Most of the way to the right
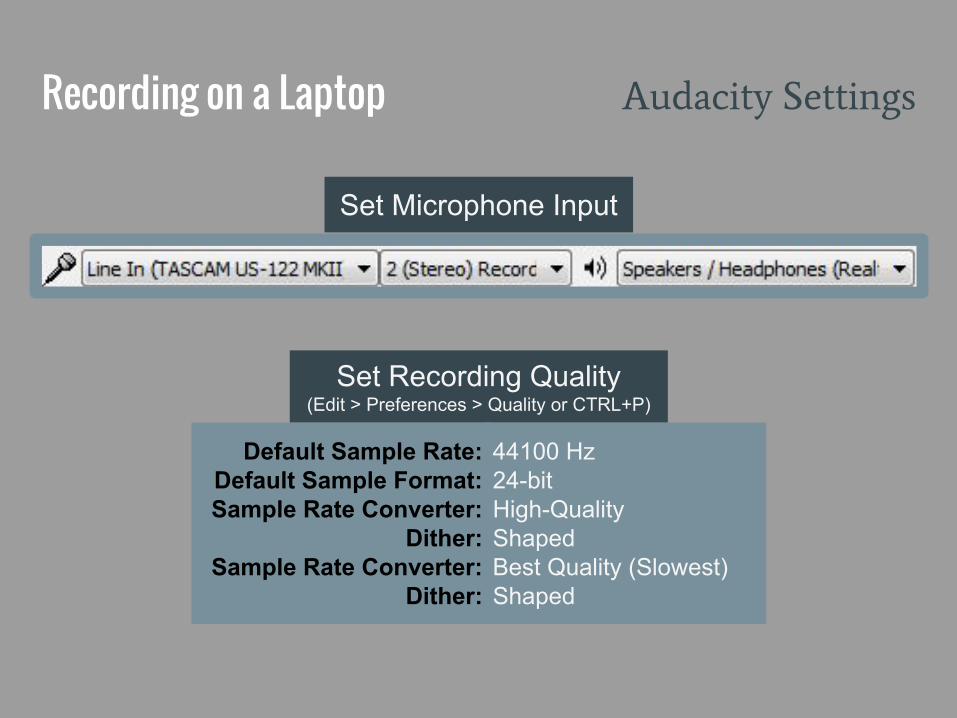
Recording on a Laptop Audacity Settings
Set Microphone Input
Set Recording Quality (Edit > Preferences > Quality or CTRL+P)
44100 Hz24-bitHigh-QualityShapedBest Quality (Slowest)Shaped
Default Sample Rate: Default Sample Format:Sample Rate Converter:
Dither:Sample Rate Converter:
Dither:
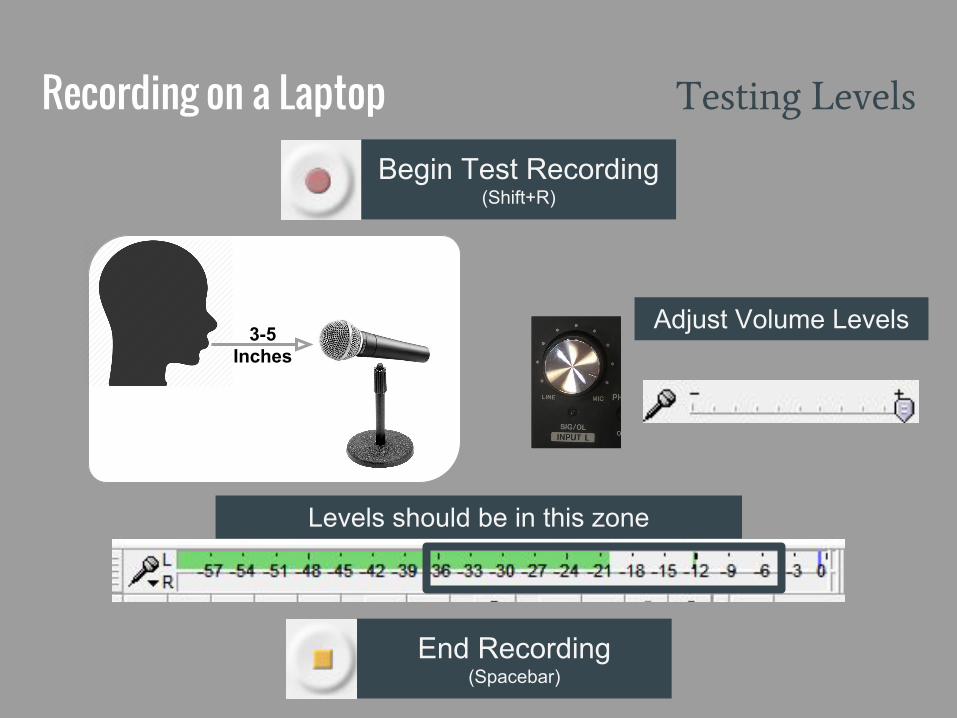
Recording on a Laptop Testing Levels
Begin Test Recording(Shift+R)
3-5 Inches
Levels should be in this zone
End Recording(Spacebar)
Adjust Volume Levels
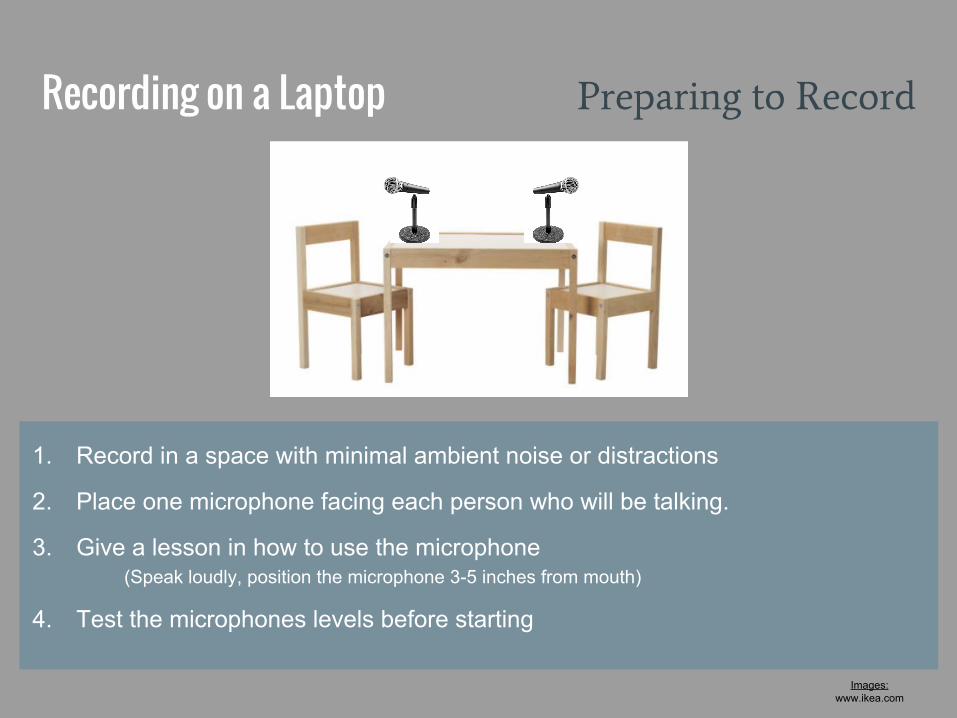
Recording on a Laptop Preparing to Record
1. Record in a space with minimal ambient noise or distractions
2. Place one microphone facing each person who will be talking.
3. Give a lesson in how to use the microphone (Speak loudly, position the microphone 3-5 inches from mouth)
4. Test the microphones levels before starting
Images:www.ikea.com
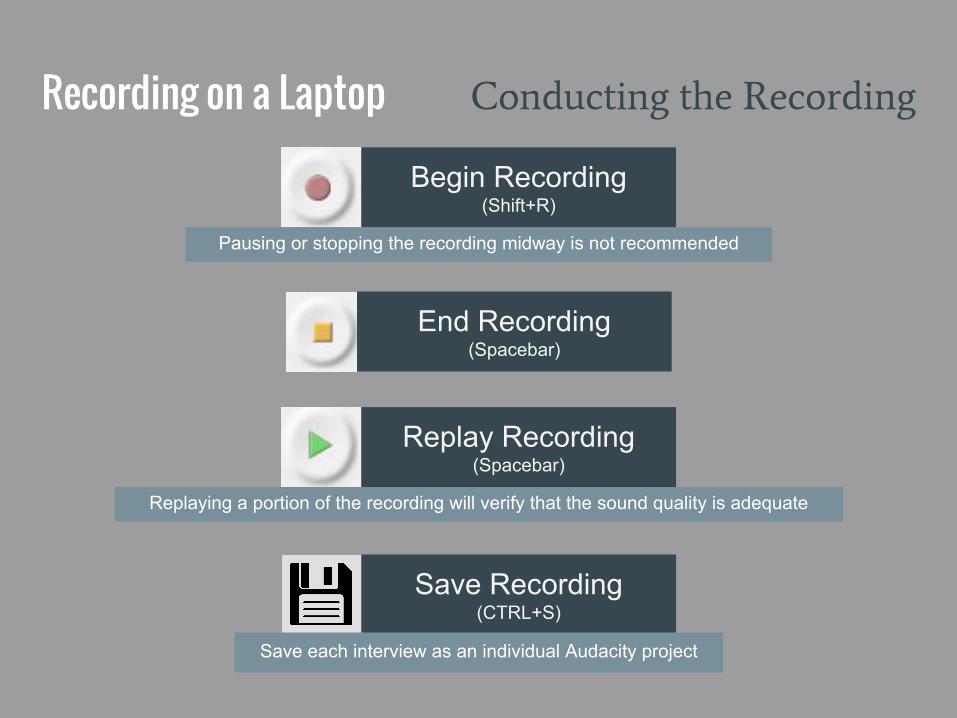
Recording on a Laptop Conducting the Recording
Begin Recording(Shift+R)
End Recording(Spacebar)
Pausing or stopping the recording midway is not recommended
Replay Recording(Spacebar)
Save Recording(CTRL+S)
Save each interview as an individual Audacity project
Replaying a portion of the recording will verify that the sound quality is adequate
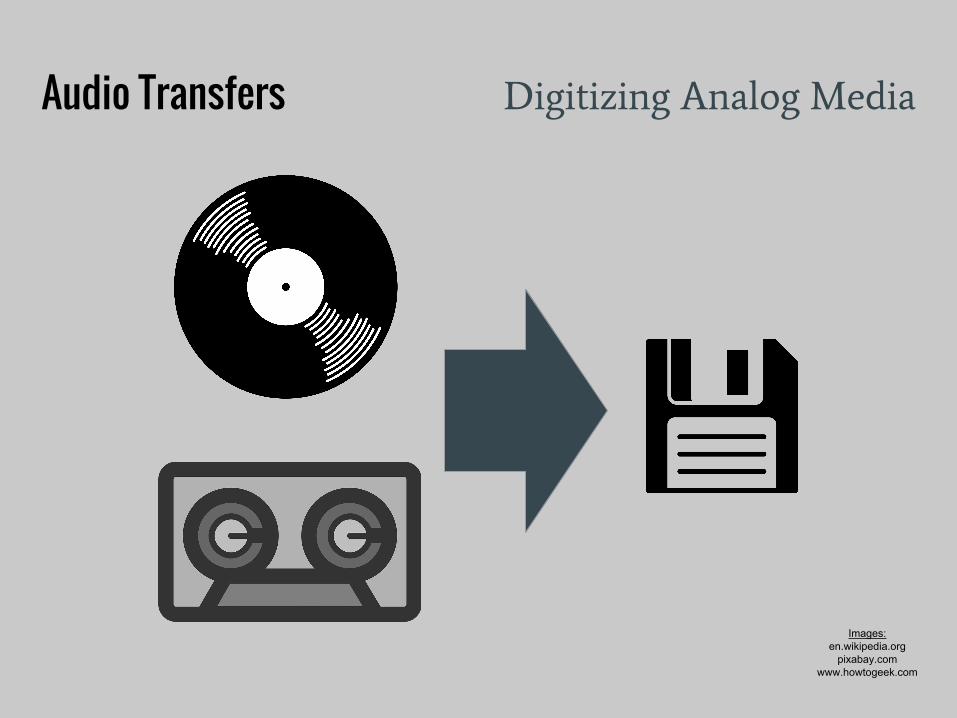
Audio Transfers Digitizing Analog Media
Images:en.wikipedia.org
pixabay.comwww.howtogeek.com

Audio Transfers Review: Signal Path
Images:www.clker.com
www.freepik.comwww.howtogeek.com
Input
(Audio Source)
Mixer
(Analog to Digital Converter)
Storage
(Laptop)
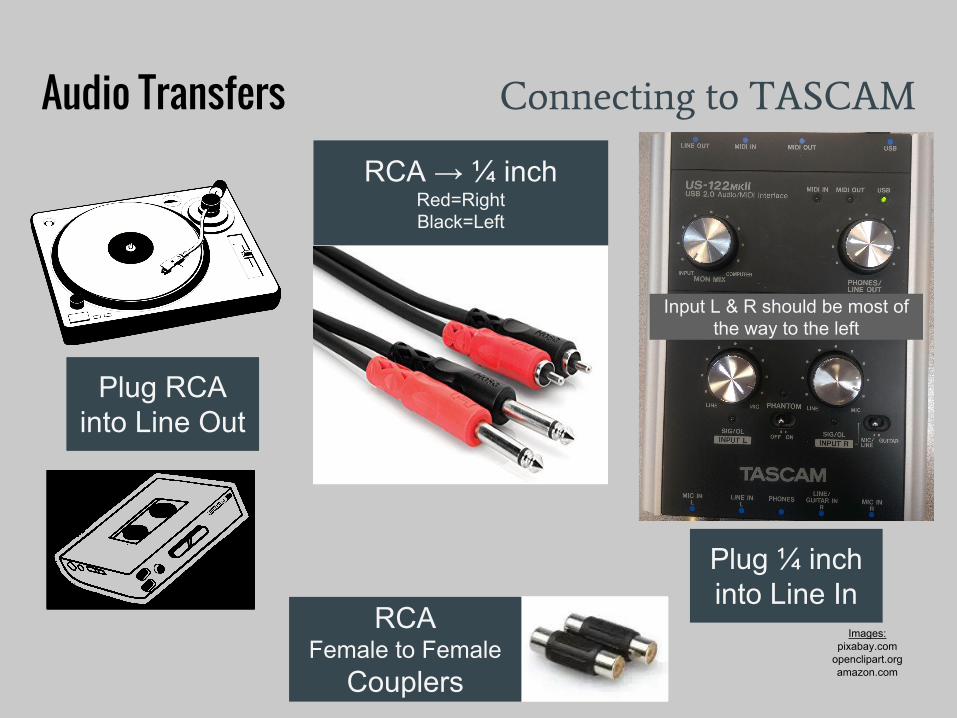
Audio Transfers Connecting to TASCAM
Images:pixabay.com
openclipart.orgamazon.com
RCA → ¼ inchRed=RightBlack=Left
RCA Female to Female
Couplers
Plug RCA into Line Out
Plug ¼ inch into Line In
Input L & R should be most of the way to the left
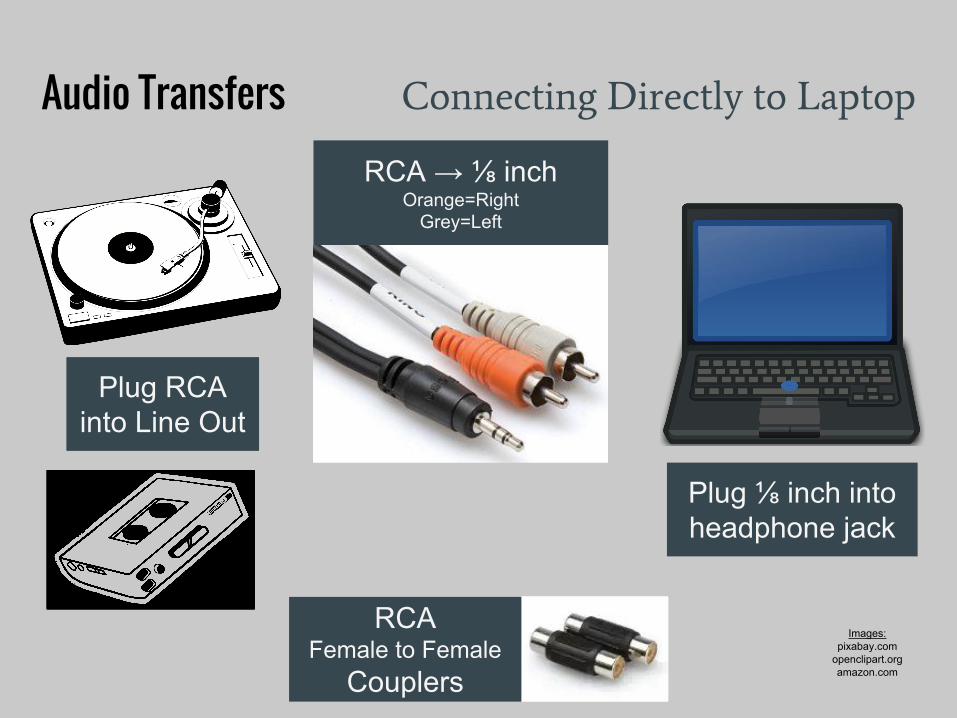
Audio Transfers Connecting Directly to Laptop
Images:pixabay.com
openclipart.orgamazon.com
RCA → ⅛ inchOrange=Right
Grey=Left
RCA Female to Female
Couplers
Plug RCA into Line Out
Plug ⅛ inch into headphone jack

Audio Transfers Audacity Settings
Set Microphone Input
Set Recording Quality (Edit > Preferences > Quality or CTRL+P)
44000 Hz24-bitHigh-QualityShapedBest Quality (Slowest)Shaped
Default Sample Rate: Default Sample Format:Sample Rate Converter:
Dither:Sample Rate Converter:
Dither:
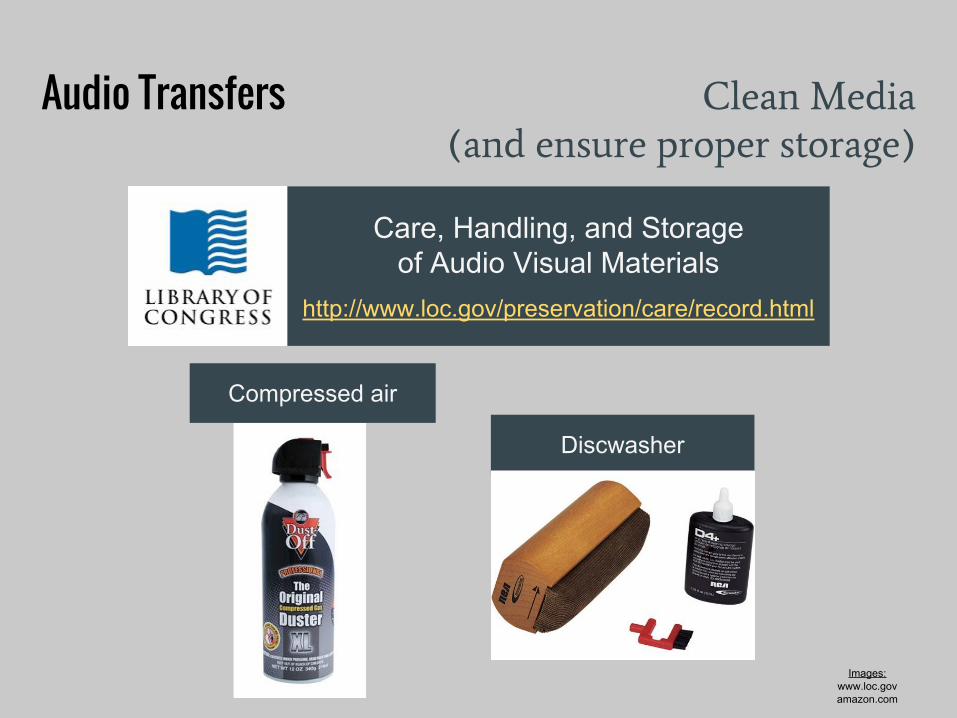
Audio Transfers Clean Media
(and ensure proper storage)
Care, Handling, and Storage of Audio Visual Materials
http://www.loc.gov/preservation/care/record.html
Compressed air
Discwasher
Images:www.loc.govamazon.com
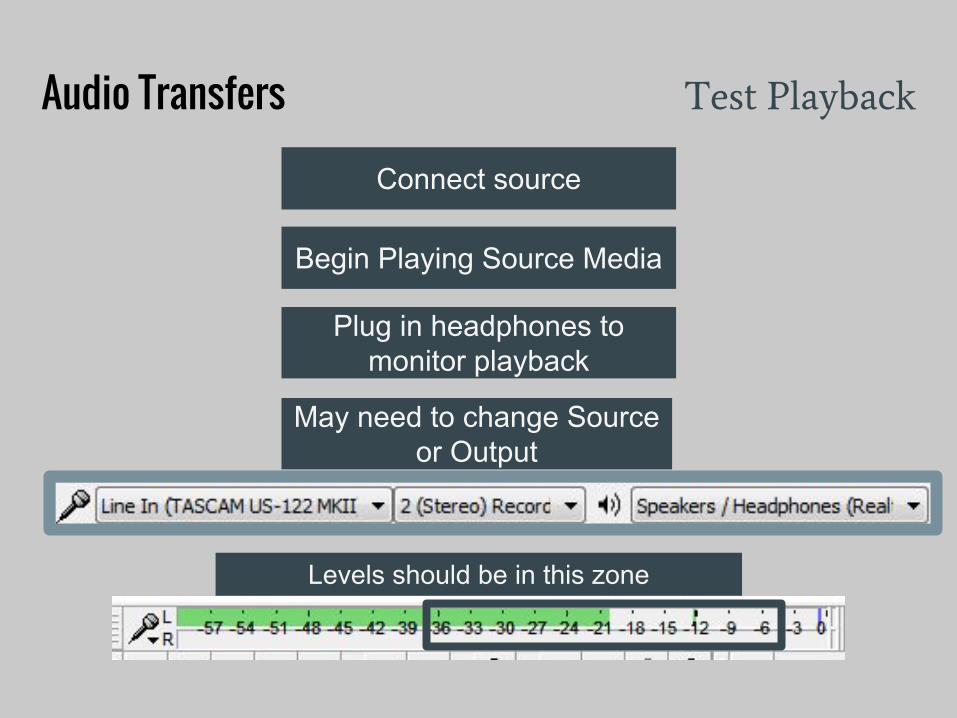
Audio Transfers Test Playback
Levels should be in this zone
Begin Playing Source Media
Connect source
Plug in headphones to monitor playback
May need to change Source or Output
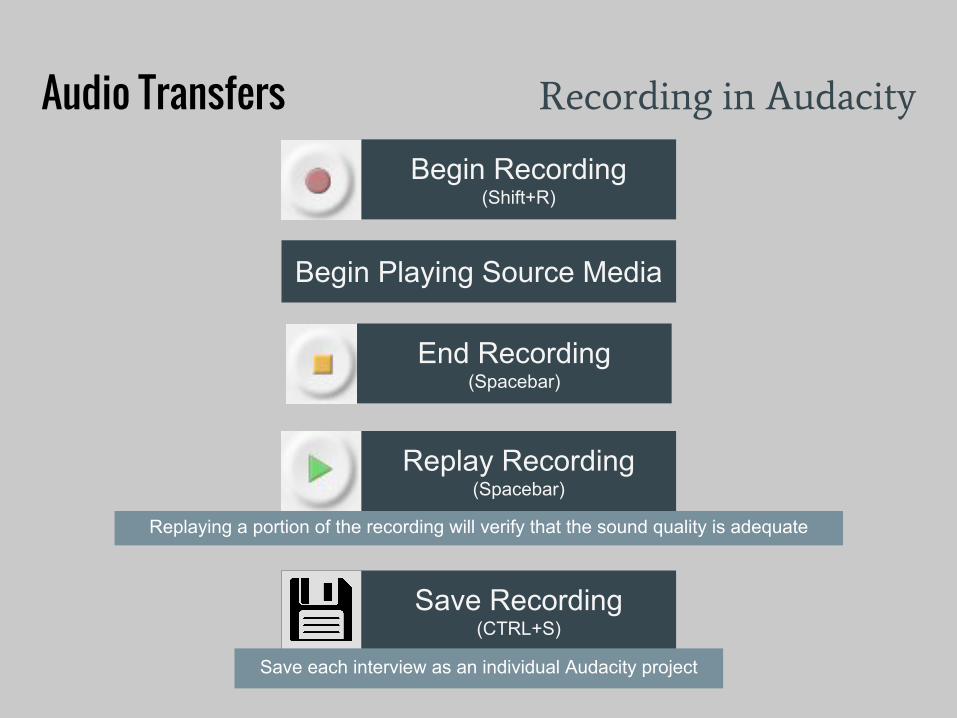
Audio TransfersBegin Recording
(Shift+R)
End Recording(Spacebar)
Replay Recording(Spacebar)
Save Recording(CTRL+S)
Save each interview as an individual Audacity project
Replaying a portion of the recording will verify that the sound quality is adequate
Begin Playing Source Media
Recording in Audacity
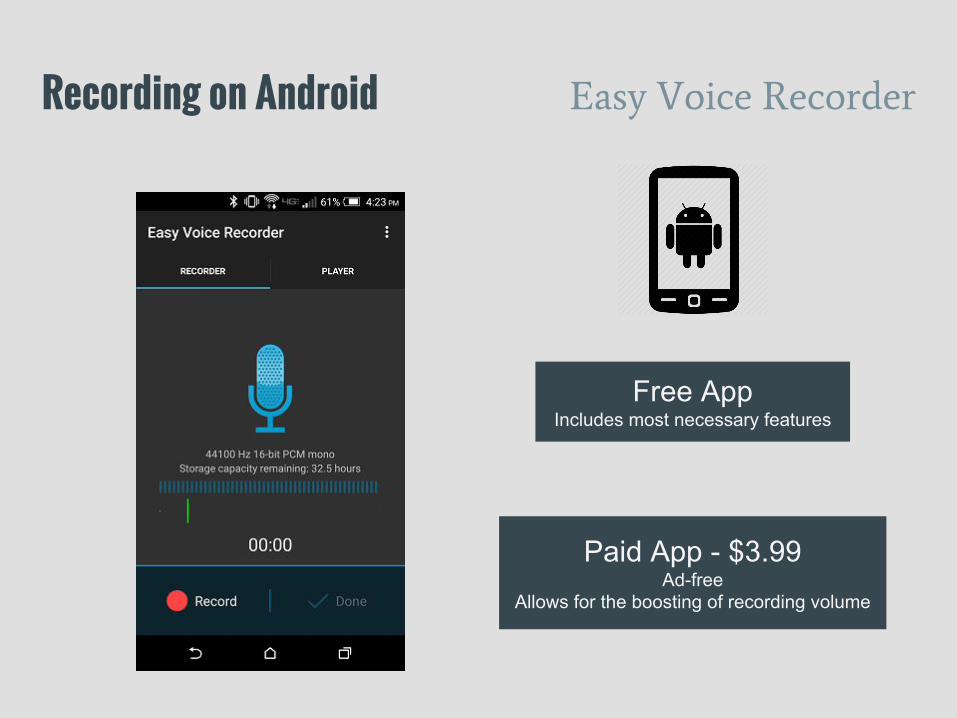
Recording on Android Easy Voice Recorder
Free AppIncludes most necessary features
Paid App - $3.99Ad-free
Allows for the boosting of recording volume
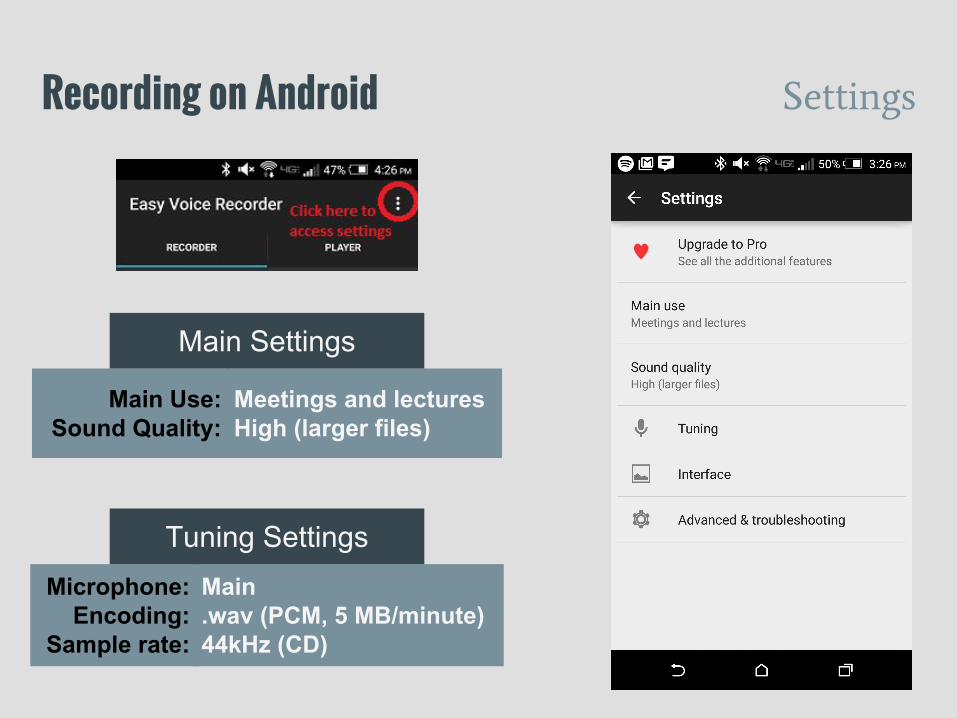
Recording on Android Settings
Meetings and lectures High (larger files)
Main Use: Sound Quality:
Main.wav (PCM, 5 MB/minute)44kHz (CD)
Microphone: Encoding:
Sample rate:
Main Settings
Tuning Settings
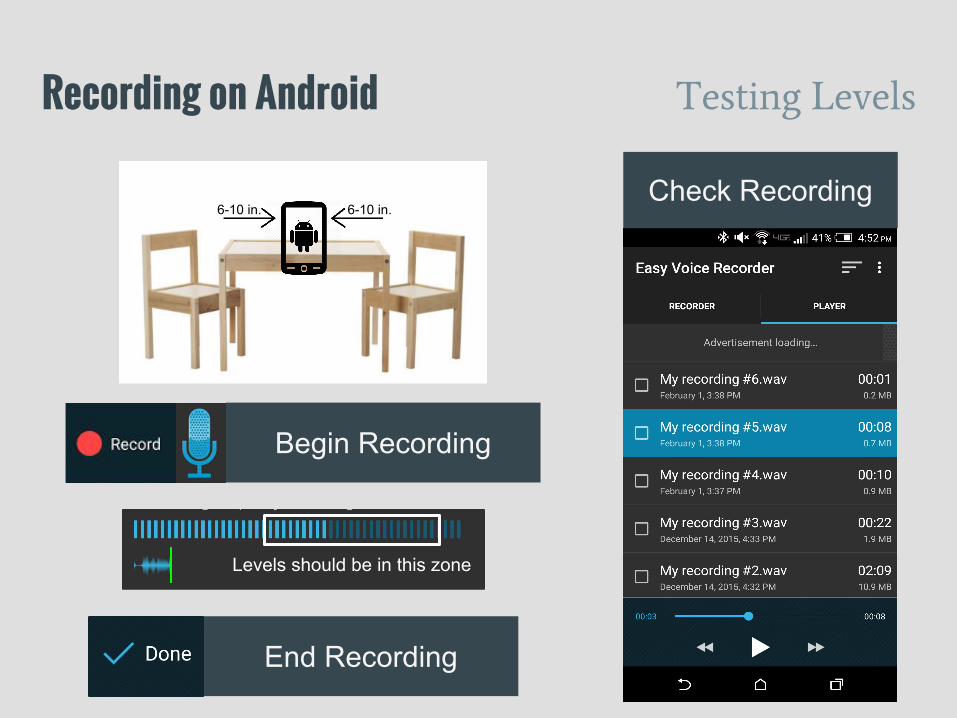
Recording on Android Testing Levels
Begin Recording
End Recording
Levels should be in this zone
Check Recording6-10 in. 6-10 in.
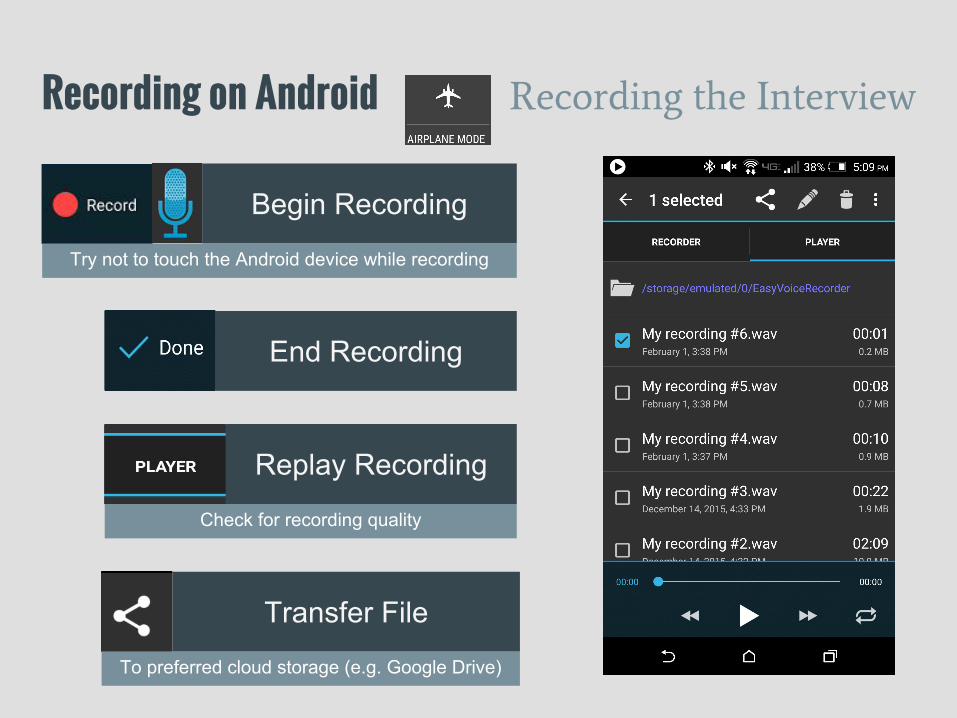
Recording on Android Recording the Interview
Begin Recording
End Recording
Try not to touch the Android device while recording
Transfer File
Replay Recording
Check for recording quality
To preferred cloud storage (e.g. Google Drive)
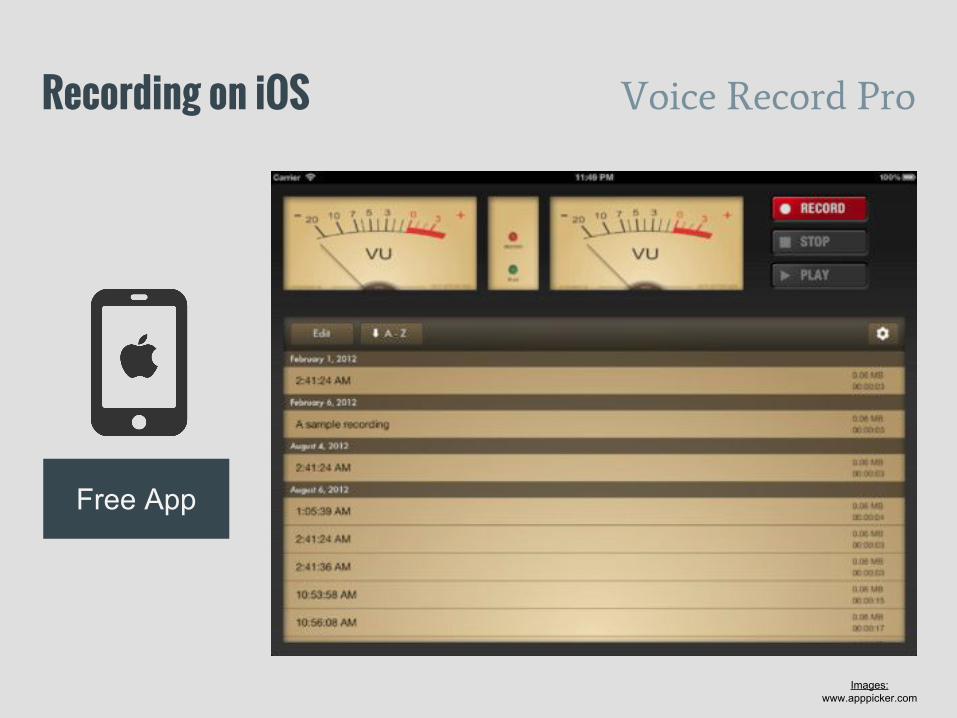
Recording on iOS Voice Record Pro
Free App
Images:www.apppicker.com
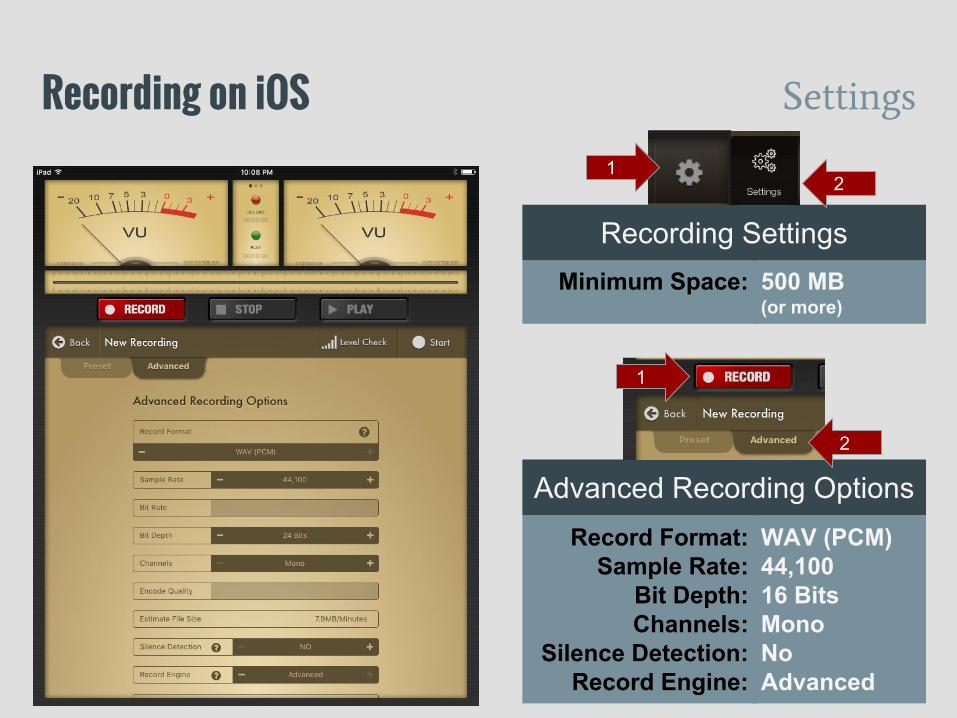
Recording on iOS Settings
WAV (PCM)44,10016 BitsMonoNoAdvanced
Record Format:Sample Rate:
Bit Depth:Channels:
Silence Detection:Record Engine:
Advanced Recording Options
500 MB(or more)
Minimum Space:
Recording Settings
1
2
1
2
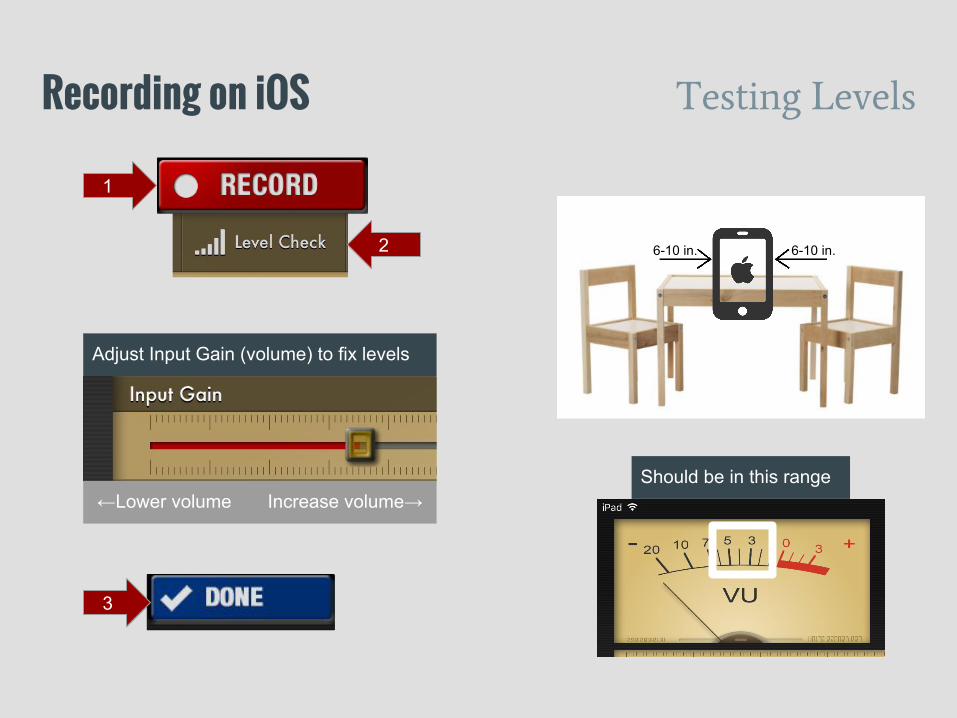
Recording on iOS Testing Levels
Should be in this range
Adjust Input Gain (volume) to fix levels
←Lower volume Increase volume→
1
2
3
6-10 in. 6-10 in.
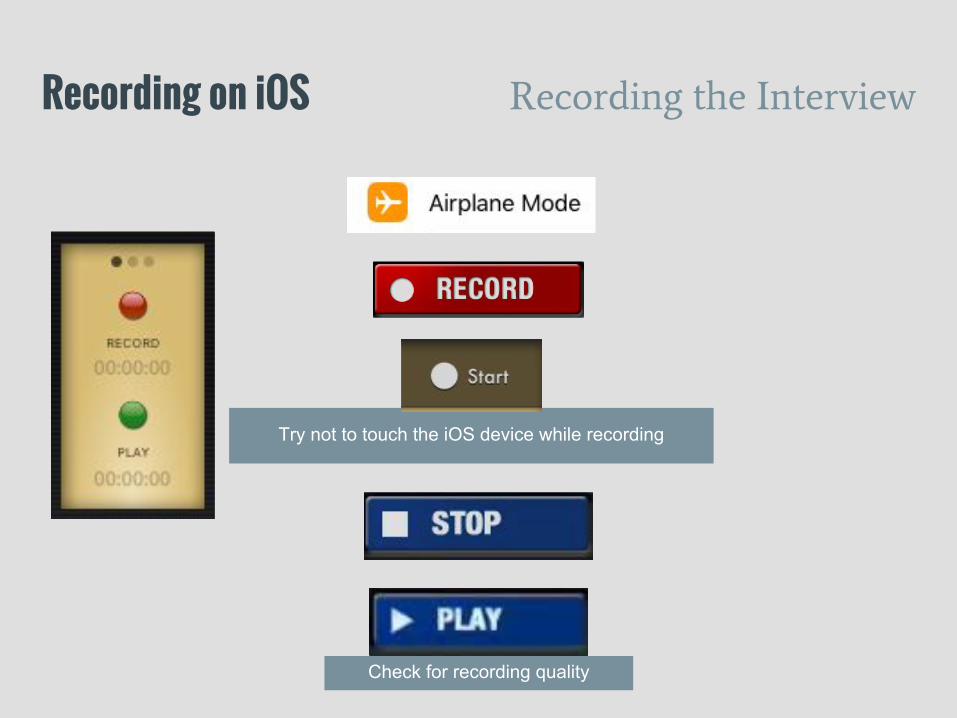
Recording on iOS Recording the Interview
Try not to touch the iOS device while recording
Check for recording quality
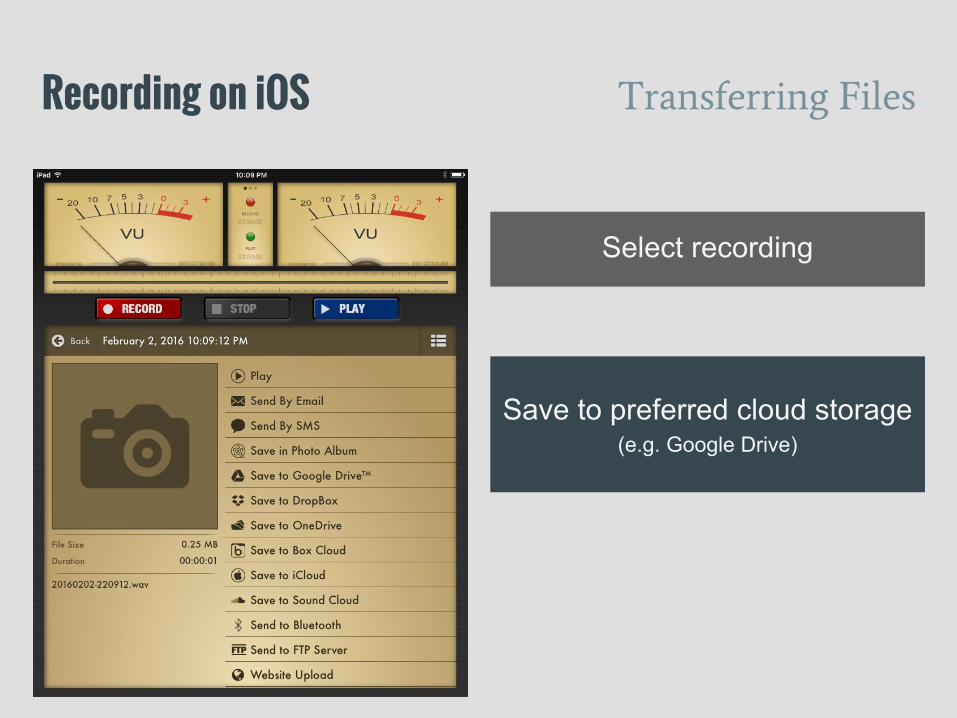
Recording on iOS Transferring Files
Save to preferred cloud storage(e.g. Google Drive)
Select recording
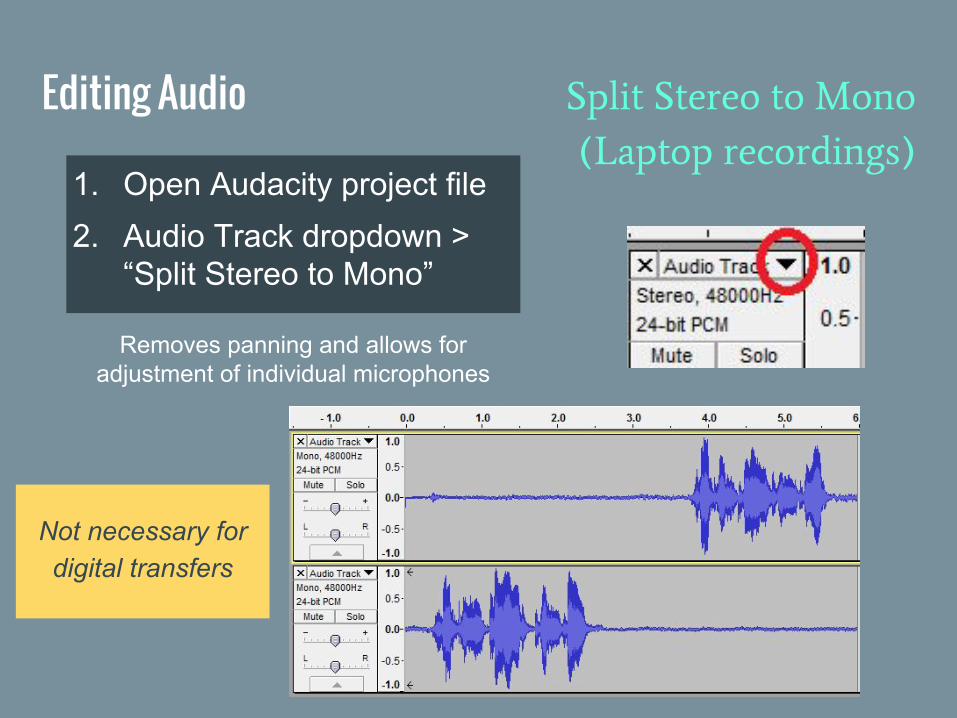
Editing Audio Split Stereo to Mono
(Laptop recordings)
1. Open Audacity project file2. Audio Track dropdown >
“Split Stereo to Mono”
Removes panning and allows for adjustment of individual microphones
Not necessary for digital transfers
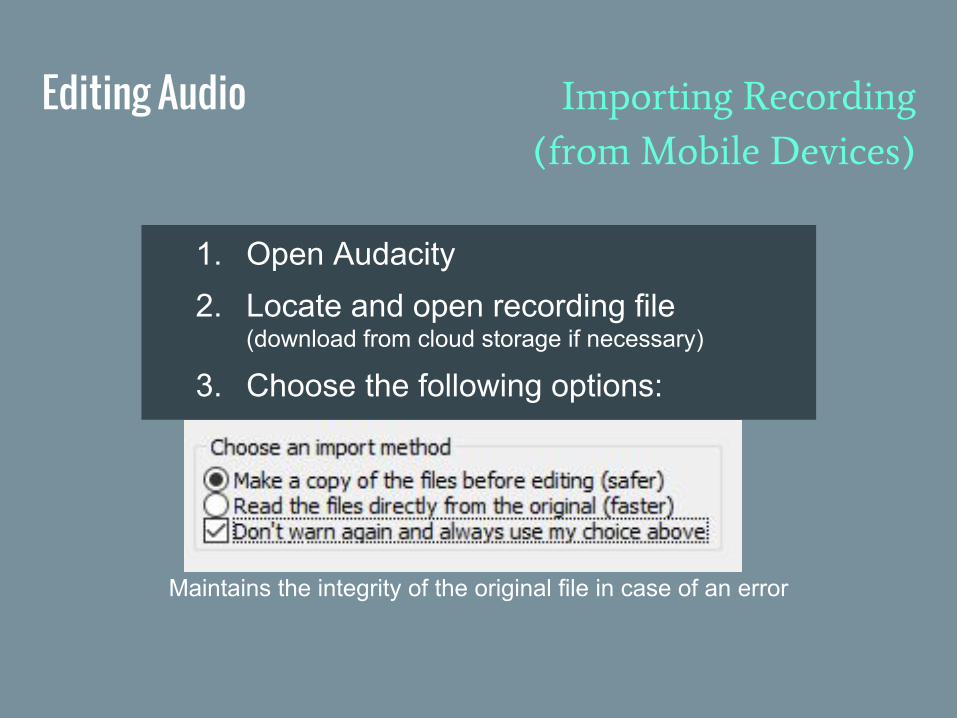
1. Open Audacity2. Locate and open recording file
(download from cloud storage if necessary)
3. Choose the following options:
Maintains the integrity of the original file in case of an error
Editing Audio Importing Recording
(from Mobile Devices)
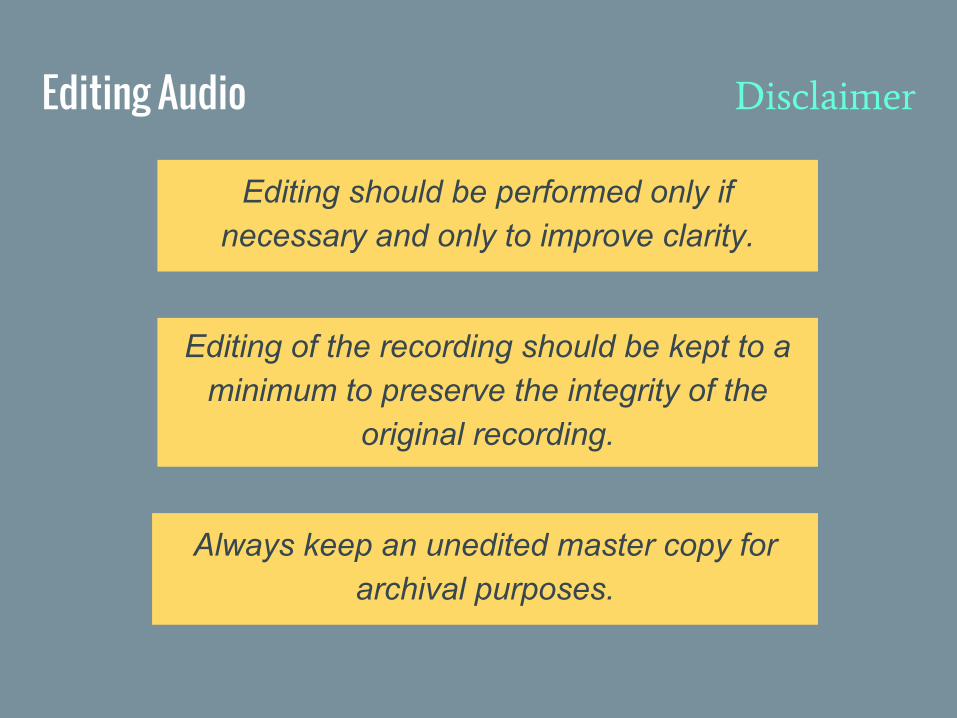
Editing Audio Disclaimer
Editing should be performed only if necessary and only to improve clarity.
Always keep an unedited master copy for archival purposes.
Editing of the recording should be kept to a minimum to preserve the integrity of the
original recording.
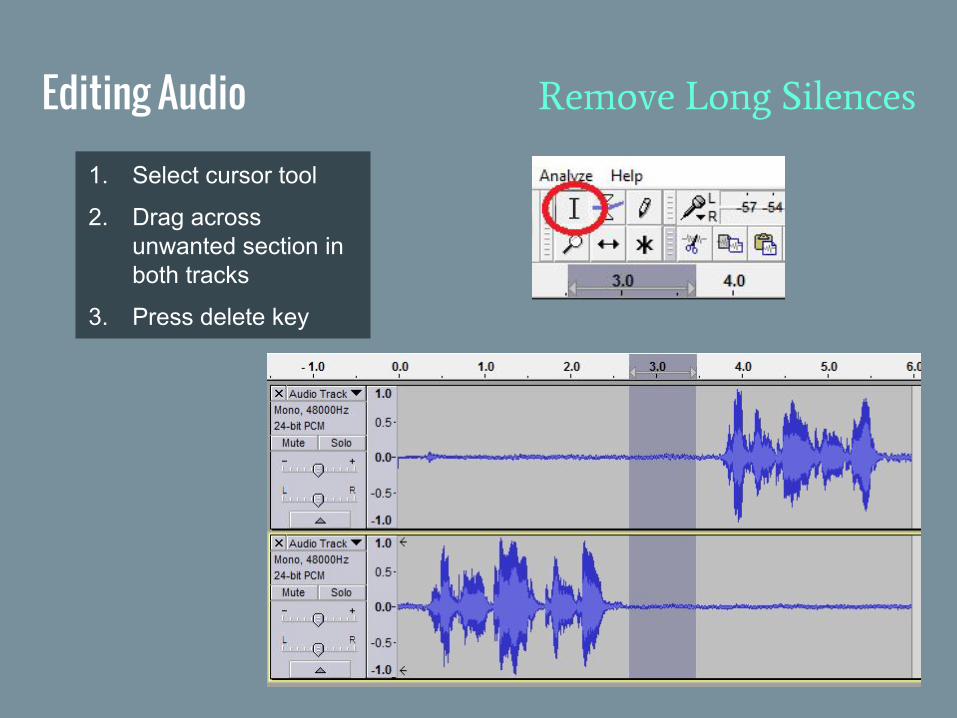
Editing Audio Remove Long Silences
1. Select cursor tool
2. Drag across unwanted section in both tracks
3. Press delete key
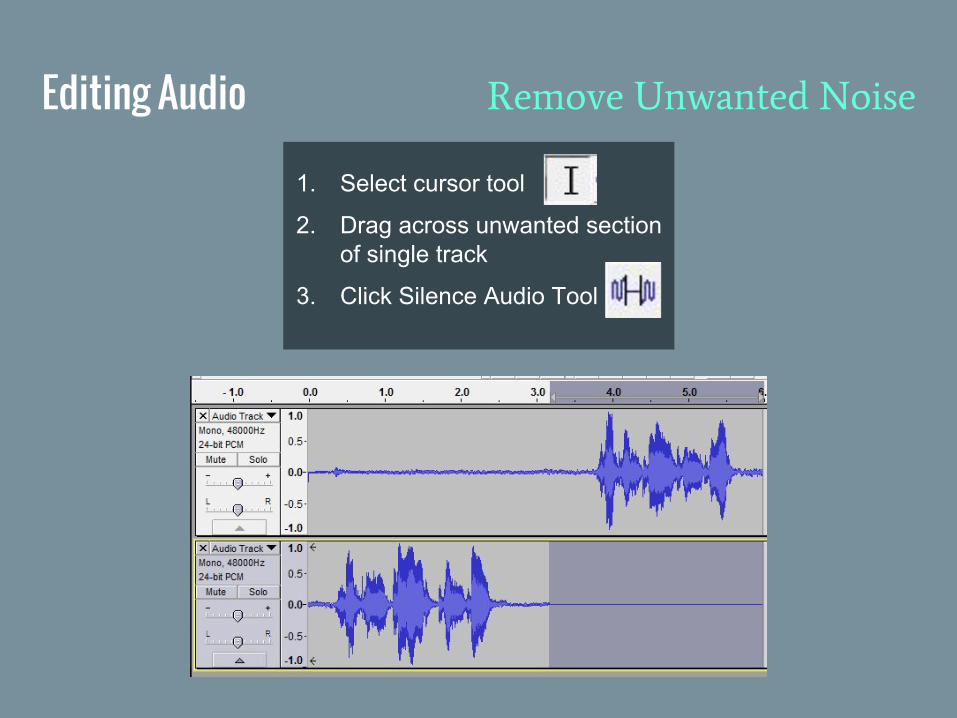
Editing Audio Remove Unwanted Noise
1. Select cursor tool
2. Drag across unwanted section of single track
3. Click Silence Audio Tool
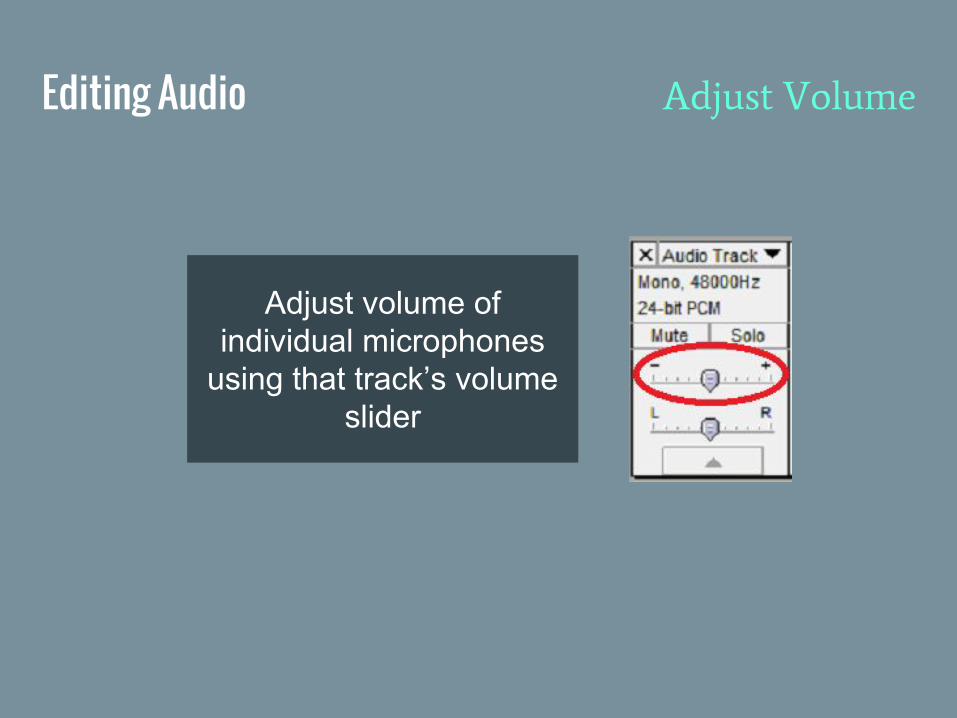
Editing Audio Adjust Volume
Adjust volume of individual microphones
using that track’s volume slider

Editing Audio Amplify Sections
1. Select cursor tool
2. Drag across section to be amplified
3. Select “Amplify” from the Effect menu
4. Drag the amplification to desired level (New Peak Amplitude should never exceed 0.0)
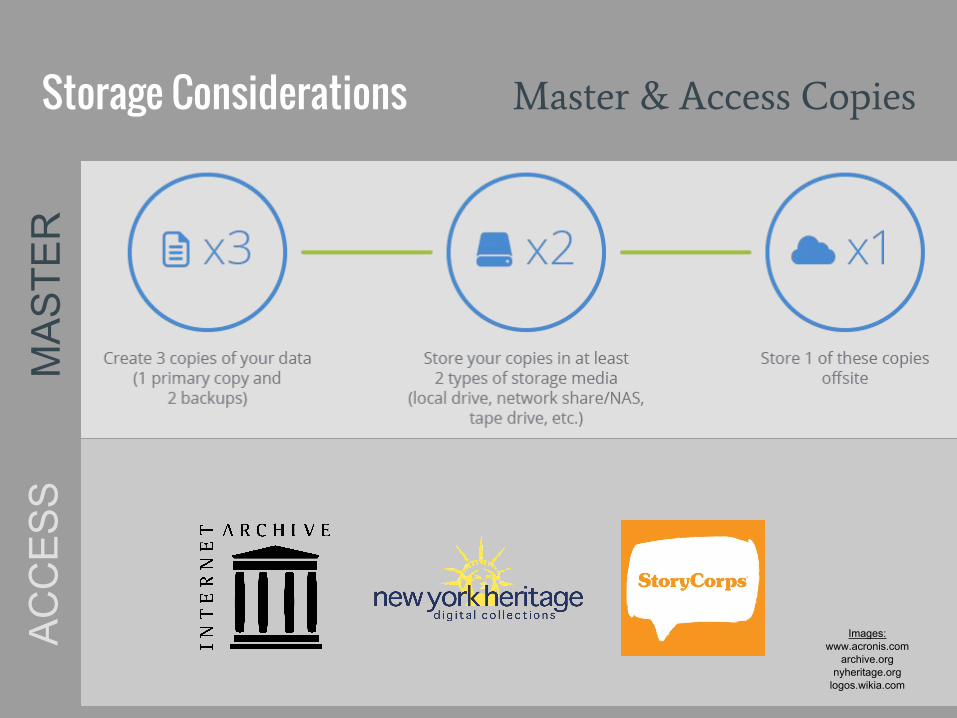
Storage Considerations Master & Access Copies
Images:www.acronis.com
archive.orgnyheritage.org
logos.wikia.com
MA
STE
RA
CC
ES
S
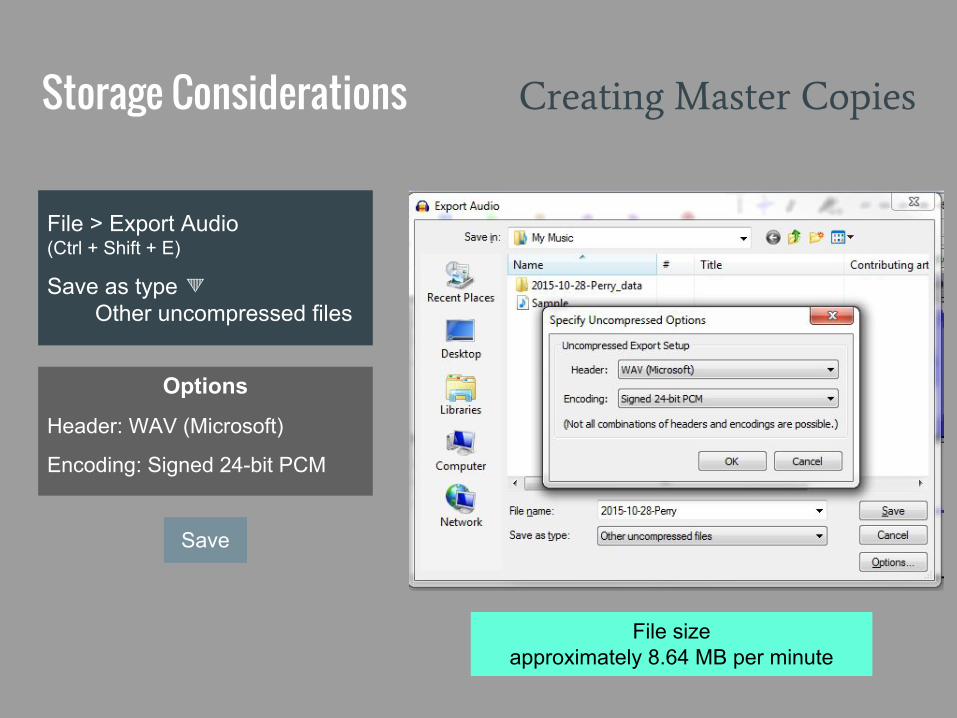
Storage Considerations Creating Master Copies
File > Export Audio (Ctrl + Shift + E)
Save as type Other uncompressed files
Options
Header: WAV (Microsoft)
Encoding: Signed 24-bit PCM
Save
File size approximately 8.64 MB per minute
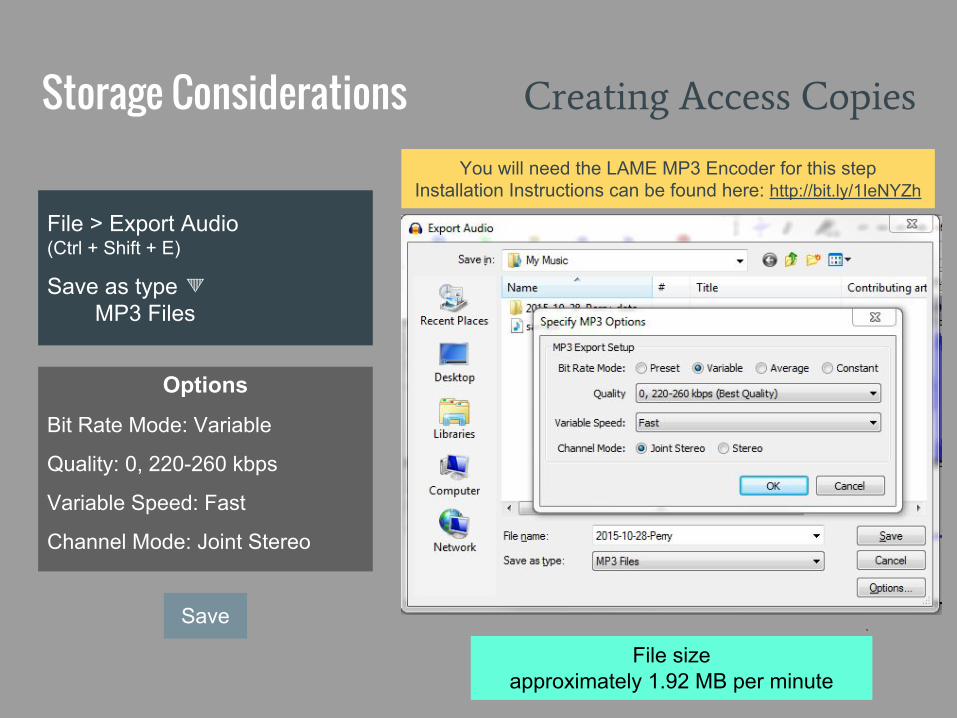
Creating Access CopiesStorage Considerations
`
File > Export Audio (Ctrl + Shift + E)
Save as type MP3 Files
Options
Bit Rate Mode: Variable
Quality: 0, 220-260 kbps
Variable Speed: Fast
Channel Mode: Joint Stereo
Save
File size approximately 1.92 MB per minute
You will need the LAME MP3 Encoder for this stepInstallation Instructions can be found here: http://bit.ly/1IeNYZh
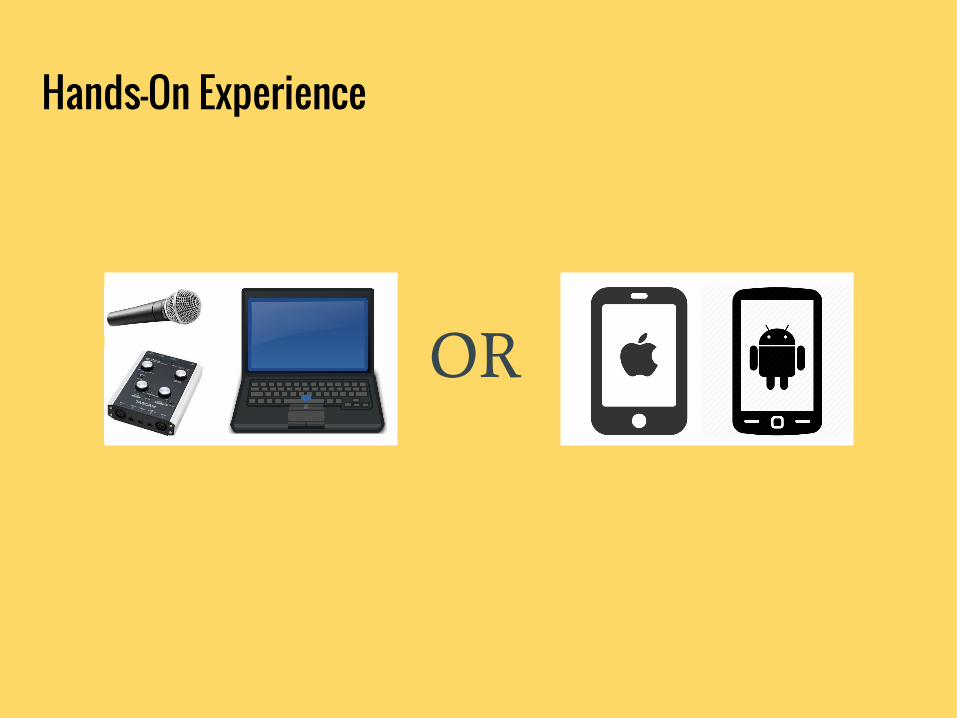
Hands-On Experience
OR