Download - Avaya SBC for IOS.pdf

ABM; Reviewed:
SPOC 10/9/2014
Solution & Interoperability Test Lab Application Notes
©2014 Avaya Inc. All Rights Reserved
1 of 77
ASBCAESIPIOS
Avaya Solution & Interoperability Test Lab
Configuring Avaya one-X® Mobile SIP for iOS 6.2 as a
Remote User with SRTP to Avaya Session Border Controller
Advanced for Enterprise 6.2 Server with Avaya Aura®
Midsize Enterprise 6.2 Server & Avaya Aura® Messaging
6.2 Server – Issue 1.1
Abstract
These Application Notes describe the configuration steps required to register the Avaya one-
X® Mobile SIP for IOS as a Remote User with SRTP to the Avaya Session Border Controller
Advanced for Enterprise Server with Avaya Aura® Solution for Midsize Enterprise Server and
Avaya Aura® Messaging Server. The Application Notes also identifies how to configure
SRTP from the Avaya one-X® Mobile SIP for IOS as a Remote User to the outside interface
of the Avaya Session Border Controller Advanced for Enterprise Server and configure SRTP
from the inside interface of the Avaya Session Border Controller Advanced for Enterprise
Server to the Avaya Aura® Solution for Midsize Enterprise Server. The Application Note also
describes how to administer Avaya Aura® Messaging Server to function with SRTP with the
Avaya one-X® Mobile SIP for IOS as a Remote User with the Avaya Session Border
Controller Advanced for Enterprise Server.

ABM; Reviewed:
SPOC 10/9/2014
Solution & Interoperability Test Lab Application Notes
©2014 Avaya Inc. All Rights Reserved
2 of 77
ASBCAESIPIOS
Table of Contents
1. Introduction ............................................................................................................................. 4
2. Interoperability Tests .............................................................................................................. 4 2.1. Test Description and Coverage ........................................................................................ 4
2.1.1. Basic IP Telephony Features .................................................................................... 4 2.1.2. Supplementary Features ............................................................................................ 4 2.1.3. Messaging ................................................................................................................. 4
2.1.4. Test Results ............................................................................................................... 5 3. Reference Configuration ......................................................................................................... 6 4. Equipment and Software Validated ........................................................................................ 8 5. Administer Avaya Aura® Communication Manager Server .................................................. 9
5.1. Verify OPS Capacity ........................................................................................................ 9 5.2. Administer Dial Plan ...................................................................................................... 10 5.3. Administer IP Node-Name ............................................................................................. 10
5.4. Administer Signaling Group .......................................................................................... 11 5.5. Administer Trunk Group ................................................................................................ 12
5.6. Administer Calling Party Number Information ............................................................. 12 5.7. Administer Route Selection ........................................................................................... 12 5.8. Administer IP Network Region ...................................................................................... 13
5.9. Administer IP Codec Set ................................................................................................ 14 5.10. Verify Off PBX Telephone Station Mapping ............................................................. 14
5.11. Administer Hunt Group .............................................................................................. 15 5.12. Administer Coverage Path .......................................................................................... 16 5.13. Administer Station Screen .......................................................................................... 17
5.14. Administer SRTP on Communication Manager ......................................................... 18
5.15. Save Translations ........................................................................................................ 19 6. Administer Avaya Aura® Session Manager ......................................................................... 20
6.1. Access Avaya Aura® System Manager ......................................................................... 20
6.2. Administer SIP Domain ................................................................................................. 21 6.3. Administer Location ....................................................................................................... 22 6.4. Administer Avaya Aura® Session Manager SIP Entity ................................................ 23
6.5. Administer Avaya Aura® Communication Manager Server SIP Entity ....................... 24 6.6. Administer Avaya Aura® Messaging SIP Entity .......................................................... 25 6.7. Administer SIP Entity Link ............................................................................................ 25 6.8. Administer Regular Expression ..................................................................................... 27 6.9. Administer Routing Policy ............................................................................................. 28
6.10. Administer Avaya Aura® Communication Manager as a Managed Element ........... 29 6.11. Administer Avaya Aura® Communication Manager Server Application ................. 31
6.12. Administer Avaya Aura® Communication Manager Server Application Sequence . 32 6.13. Synchronize Avaya Aura® Communication Manager Data ...................................... 34 6.14. Administer SIP User ................................................................................................... 35
7. Administer Avaya Aura® Messaging Server ....................................................................... 39 7.1. Access Avaya Aura® Messaging ................................................................................... 39
ABM; Reviewed:
SPOC 10/9/2014
Solution & Interoperability Test Lab Application Notes
©2014 Avaya Inc. All Rights Reserved
3 of 77
ASBCAESIPIOS
7.2. Administer Telephony Integration with SRTP............................................................... 39
7.3. Administer Subscriber .................................................................................................... 41 8. Administer Avaya Session Border Controller Advanced for Enterprise .............................. 43
8.1. Access Avaya Session Border Controller Advanced for Enterprise .............................. 43
8.2. Enable Interfaces on the Avaya Session Border Controller Advanced for Enterprise ... 45 8.3. Administer User Agent................................................................................................... 45 8.4. Administer Server Interworking..................................................................................... 46 8.5. Administer Phone Interworking ..................................................................................... 47 8.6. Verify TLS Client Profile ............................................................................................... 48
8.7. Verify TLS Server Profile .............................................................................................. 49 8.8. Administer Topology Hiding for Subscriber and Server Flow ...................................... 49 8.9. Administer Session Manager Server Configuration....................................................... 50 8.10. Administer External Signaling Interface Toward Remote User ................................. 52
8.11. Administer Internal Signaling Interface toward Session Manager ............................. 53 8.12. Administer External Media Interface Toward Remote User ...................................... 53
8.13. Administer Internal Media Interface Toward Session Manager ................................ 54 8.14. Administer SIP Cluster ............................................................................................... 55
8.15. Administer Routing Profile Toward Session Manager for Subscriber Flow.............. 58 8.16. Administer SRTP Media Rule for the End Point Policy Group for Subscriber Flow
and Server Flow ........................................................................................................................ 60
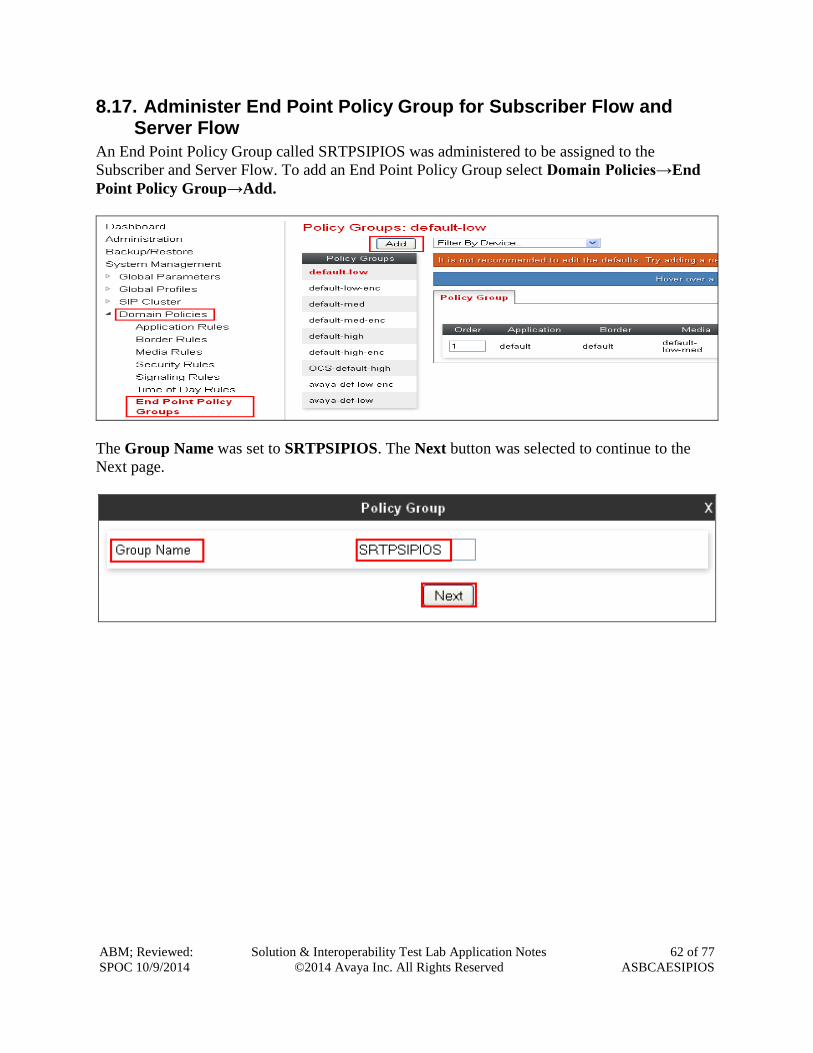
8.17. Administer End Point Policy Group for Subscriber Flow and Server Flow .............. 62 8.18. Administer End Point Flow with Subscriber Flow ..................................................... 63
8.19. Administer Routing Profile Toward Remote User for Server Flow ........................... 66 8.20. Administer End Point Flow with Server Flow ........................................................... 66
9. Administer Avaya one-X® Mobile SIP for IOS ................................................................... 68
9.1. Access Wireless Network............................................................................................... 68
9.2. Administering Avaya one-X® Mobile SIP Communicator for iOS .............................. 69 10. Verification Steps............................................................................................................... 72 11. Conclusion ......................................................................................................................... 75
12. Additional References ........................................................................................................ 76

ABM; Reviewed:
SPOC 10/9/2014
Solution & Interoperability Test Lab Application Notes
©2014 Avaya Inc. All Rights Reserved
4 of 77
ASBCAESIPIOS
1. Introduction These Application Notes describe the configuration steps required to register the Avaya one-X®
Mobile SIP for IOS 6.2.2.702 as a Remote User with SRTP to the Avaya Session Border
Controller Advanced for Enterprise Server 6.2.0.Q40 with Avaya Aura® Solution for Midsize
Enterprise Server 6.2 and Avaya Aura® Messaging Server 6.2. These Application Notes also
identify how to configure SRTP from the Avaya one-X® Mobile SIP for IOS as a Remote User
to the outside interface of the Avaya Session Border Controller Advanced for Enterprise Server
and configure SRTP from the inside interface of the Avaya Session Border Controller Advanced
for Enterprise Server to the Avaya Aura® Solution for Midsize Enterprise Server and Avaya
Aura® Messaging Server. These Application Note also describe how to administer Avaya
Aura® Messaging Server to function with SRTP with the Avaya one-X® Mobile SIP for IOS as
a Remote User with the Avaya Session Border Controller Advanced for Enterprise Server.
2. Interoperability Tests The following sections describe the test scenario used to verify the functionality of the Avaya
one-X Mobile SIP for IOS with SRTP as a Remote User with SRTP with the Avaya Session
Border Controller Advanced for Enterprise Server.
2.1. Test Description and Coverage
This section provides an overview of the test cases performed after the installation and
configuration of the Avaya one-X Mobile SIP for IOS as a Remote User with SRTP with the
Avaya Session Border Controller Advanced for Enterprise Server.
2.1.1. Basic IP Telephony Features
The following Basic IP Telephony Features were tested:
Basic Calls
Codec Negotiation
Direct IP-IP Media Shuffling
PPM Download
Hold
Drop
2.1.2. Supplementary Features
The following Supplementary Features were tested:
Call Forwarding
Bridged Call Appearance
Call Pickup with FAC
TLS
2.1.3. Messaging
Following Messaging Features were verified for Remote Users with SRTP with Avaya Aura®
Messaging 6.2 SP1

ABM; Reviewed:
SPOC 10/9/2014
Solution & Interoperability Test Lab Application Notes
©2014 Avaya Inc. All Rights Reserved
5 of 77
ASBCAESIPIOS
Login and access to mailbox
Leave/Retrieve Voice Mail Messages with proper MWI operation
Call Sender
Reply
Forward Message
2.1.4. Test Results
All test cases passed. The following are the observations for the Avaya one-X Mobile SIP for
IOS as a Remote User with SRTP registered to the Avaya Session Border Controller Advanced
for Enterprise Server:
Avaya one-X Mobile SIP for IOS as Remote User registered to the Avaya Session Border
Controller Advanced for Enterprise Server uses SRTP for secure encryption of the audio.
Avaya one-X Mobile SIP for IOS as Remote User registered to the Avaya Session Border
Controller Advanced for Enterprise Server has added security as all communication uses
TLS.
The Avaya Session Border Controller Advanced for Enterprise Server is supported as an
alternative to VPN in an untrusted network. The Avaya one-X Mobile SIP for IOS
connects to Session Manager Server through the Avaya Session Border Controller
Advanced for Enterprise Server thus making communication secure.

ABM; Reviewed:
SPOC 10/9/2014
Solution & Interoperability Test Lab Application Notes
©2014 Avaya Inc. All Rights Reserved
6 of 77
ASBCAESIPIOS
3. Reference Configuration The configuration used in these Application Notes is shown in Figure 1. The Avaya Aura®
Solution for Midsize Enterprise is installed on Avaya System Platform on a S8800 Server. Avaya
Aura® Solution for Midsize Enterprise contains Avaya Aura® System Manager, Avaya Aura®
Session Manager and Avaya Aura® Communication Manager as virtual machines running with
the Avaya Aura® Solution for Midsize Enterprise. Avaya Aura® Communication Manager
running as an Evolution Server is used for Off-PBX Station Mapping (OPS). Avaya Aura®
Messaging is a template installed on Avaya System Platform on an S8800 Server. The Avaya
Session Border Controller Advanced for Enterprise software is installed and configured on Red
Hat Linux 5.6 Operating System on an S8800 Server. The diagram indicates logical signaling
connections. All components in the Corporate LAN are physically connected to a single Avaya
Ethernet Routing Switch (ERS) 2550T-PWR, and are administered in subnet range 192.168.1.x.
The Avaya one-X Mobile SIP for IOS Application was obtained from the iTunes App Store and
installed on an Apple IPhone 4S. The Avaya one-X Mobile SIP for IOS with SRTP as a Remote
User registers to the B1 external interface of the Avaya Session Border Controller Advanced for
Enterprise Server.

ABM; Reviewed:
SPOC 10/9/2014
Solution & Interoperability Test Lab Application Notes
©2014 Avaya Inc. All Rights Reserved
7 of 77
ASBCAESIPIOS
Figure 1 Avaya one-X Mobile SIP for IOS Remote User
Avaya Aura® Communication Manager
192.168.1.82

ABM; Reviewed:
SPOC 10/9/2014
Solution & Interoperability Test Lab Application Notes
©2014 Avaya Inc. All Rights Reserved
8 of 77
ASBCAESIPIOS
4. Equipment and Software Validated The following equipment and software were used for the sample configuration provided:
Avaya Aura® Software
Avaya S8800 Server Avaya Aura® Solution for Midsize Enterprise R6.2
Release 6.2.0.0.3105 Update: Service Pack 4
Avaya Aura® System Manager R6.2
Release 6.2.16.1.1993 Update: Service Pack 4
Avaya Aura® Session Manager R6.2
R6.2.4.0.624005 Update: Service Pack 4
Avaya Aura® Communication Manager
R16x.02.0.823.0.20199 Update: Service Pack 4
Avaya G450 Media Gateway Avaya G450 Media Gateway
Release 32.24.0
Avaya S8800 Server Avaya Aura® Messaging R6.2
MSG 02.0.823.0-109_0102 Update: Service Pack 1
Avaya S8800 Server Avaya Session Border Controller Advanced for
Enterprise
Release 6.2.0.Q40
Avaya one-X Mobile SIP iOS Avaya one-X Mobile SIP iOS R6.2 App
Release 6.2.2.702

ABM; Reviewed:
SPOC 10/9/2014
Solution & Interoperability Test Lab Application Notes
©2014 Avaya Inc. All Rights Reserved
9 of 77
ASBCAESIPIOS
5. Administer Avaya Aura® Communication Manager Server This section highlights the important commands for defining the Avaya one-X Mobile SIP for
IOS as a Remote User as an Off-PBX Station (OPS) and administering a SIP Trunk and
Signaling Group to carry calls between the Avaya one-X Mobile SIP for IOS as a Remote User
and the SIP endpoints registered to Session Manager on the Corporate LAN in Communication
Manager Server. This section will also explain how to administer SRTP on Communication
Manager so that SRTP can be used from the inside interface on the Session Border Controller
Server to the Communication Manager Server on the Corporate LAN.
5.1. Verify OPS Capacity
Use the display system-parameters customer-options command to verify that Maximum Off-
PBX Telephones – OPS has been set to the value that has been licensed, and that this value will
accommodate addition of the SIP telephones. If a required feature is not enabled or there is
insufficient capacity, contact an authorized Avaya sales representative to obtain additional
capacity.
display system-parameters customer-options Page 1 of 11
OPTIONAL FEATURES
G3 Version: V15 Software Package: Standard
Location: 2 RFA System ID (SID): 1
Platform: 25 RFA Module ID (MID): 1
USED
Platform Maximum Ports: 44000 181
Maximum Stations: 2400 9
Maximum XMOBILE Stations: 2400 0
Maximum Off-PBX Telephones - EC500: 2400 2
Maximum Off-PBX Telephones - OPS: 2400 5
Maximum Off-PBX Telephones - PBFMC: 2400 2
Maximum Off-PBX Telephones - PVFMC: 2400 0
Verify that there are sufficient licenses to administer the SIP Trunk. This is the Maximum
Administered SIP Trunk value on Page 2 of System Parameter Customer-Options.
display system-parameters customer-options Page 2 of 11
OPTIONAL FEATURES
IP PORT CAPACITIES USED
Maximum Administered H.323 Trunks: 8000 12
Maximum Concurrently Registered IP Stations: 18000 3
Maximum Administered Remote Office Trunks: 8000 0
Maximum Concurrently Registered Remote Office Stations: 18000 0
Maximum Concurrently Registered IP eCons: 128 0
Max Concur Registered Unauthenticated H.323 Stations: 100 0
Maximum Video Capable Stations: 2400 0
Maximum Video Capable IP Softphones: 100 3
Maximum Administered SIP Trunks: 5000 160
Maximum Administered Ad-hoc Video Conferencing Ports: 8000 0
Maximum Number of DS1 Boards with Echo Cancellation: 522 0

ABM; Reviewed:
SPOC 10/9/2014
Solution & Interoperability Test Lab Application Notes
©2014 Avaya Inc. All Rights Reserved
10 of 77
ASBCAESIPIOS
5.2. Administer Dial Plan
This section describes the Dial Plan Analysis screen. This is Communication Manager’s way of
translating digits dialed by the user. The user can determine the beginning digits and total length
for each type of call that Communication Manager needs to interpret. The Dialed String
beginning with the number 4 and with a Total Length of 5 digits will be used to administer the
extension range used for the one-X Mobile SIP for IOS device.
display dialplan analysis Page 1 of 12
DIAL PLAN ANALYSIS TABLE
Location: all Percent Full: 1
Dialed Total Call Dialed Total Call Dialed Total Call
String Length Type String Length Type String Length Type
1 3 dac
2 5 aar
3 5 ext
35 5 aar
4 5 ext
60 4 aar
7 5 aar
8 6 aar
* 2 fac
5.3. Administer IP Node-Name
This section describes IP Node-Name. This is where Communication Manager assigns the IP
Address and node-name to Session Manager. The node-name is SM and the IP Address is
192.168.1.87 within Communication Manager Server. The Communication Manager Server
automatically populates a processor node name to the IP Address of Communication Manager
Server. This node name is procr with IP Address 192.168.1.82.
list node-names all
NODE NAMES
Type Name IP Address
IP EnterpriseCM 192.168.1.6
IP SM 192.168.1.87
IP SessionM2 192.168.1.60
IP BSM 192.168.1.157
IP default 0.0.0.0
IP procr 192.168.1.82

ABM; Reviewed:
SPOC 10/9/2014
Solution & Interoperability Test Lab Application Notes
©2014 Avaya Inc. All Rights Reserved
11 of 77
ASBCAESIPIOS
5.4. Administer Signaling Group
This section describes the Signaling Group screen. The Group Type was set to sip and the
Transport Method was set to tls. Since the Avaya one-X Mobile SIP for IOS as a Remote User
is using a Communication Manager Evolution Server for Off Pbx Station Mapping the IMS
Enabled setting must be set to n. Since the SIP trunk is between Communication Manager
Evolution Server and Session Manager the Near-end Node Name is the node name of the
“procr” of the Communication Manager Server. The Far-end Node Name is the node name of
the Session Manager Server. This is SM. The Near-end Listen Port and Far-end Listen Port
are both set to port number 5061. The Far-end Network-Region was set to 1.
display signaling-group 120
SIGNALING GROUP
Group Number: 120 Group Type: sip
IMS Enabled? n Transport Method: tls
Q-SIP? n
IP Video? y Priority Video? n Enforce SIPS URI for SRTP? y
Peer Detection Enabled? y Peer Server: SM
Near-end Node Name: procr Far-end Node Name: SM
Near-end Listen Port: 5061 Far-end Listen Port: 5061
Far-end Network Region: 1
Far-end Domain:
Bypass If IP Threshold Exceeded? n
Incoming Dialog Loopbacks: eliminate RFC 3389 Comfort Noise? n
DTMF over IP: rtp-payload Direct IP-IP Audio Connections? y
Session Establishment Timer(min): 3 IP Audio Hairpinning? n
Enable Layer 3 Test? n Initial IP-IP Direct Media? y
H.323 Station Outgoing Direct Media? n Alternate Route Timer(sec): 6

ABM; Reviewed:
SPOC 10/9/2014
Solution & Interoperability Test Lab Application Notes
©2014 Avaya Inc. All Rights Reserved
12 of 77
ASBCAESIPIOS
5.5. Administer Trunk Group
This section describes the Trunk Group used to carry calls between the Avaya one-X Mobile
SIP IOS as a Remote User. Trunk Group 120 was configured as a SIP Trunk with the Group
Type set as sip. The trunk Group Name was set to To SM. The Direction of the calls was set to
two-way as there will be calls to and from the Remote SIP Users registered to the Avaya Session
Border Controller. The Service Type was set to tie as the trunk is an internal trunk between
Communication Manager Evolution Server and Session Manager. The Signaling Group number
assigned to this trunk is 120. The Number of Members assigned to this trunk group is 100. All
other fields on this page are left as default.
display trunk-group 120 Page 1 of 21
TRUNK GROUP
Group Number: 120 Group Type: sip CDR Reports: y
Group Name: To SM COR: 1 TN: 1 TAC: 120
Direction: two-way Outgoing Display? n
Dial Access? n Night Service:
Queue Length: 0
Service Type: tie Auth Code? N
Member Assignment Method: auto
Signaling Group: 120
Number of Members: 100
5.6. Administer Calling Party Number Information
Use the change private-numbering 0 to add an Extension Length of 5 with Extension code of
4. The Total Length of the CPN number was 5. The change private-numbering 0 command
was also used to add an Extension Code of 8 for the Messaging hunt group number.
change private-numbering 0 Page 1 of 2
NUMBERING - PRIVATE FORMAT
Ext Ext Trk Private Total
Len Code Grp(s) Prefix Len
5 4 5 Total Administered: 2
5 8 5
5.7. Administer Route Selection
Use the change aar a 5 to administer the automatic alternate route selection to route calls
between via the SIP trunk to Session Manager. Calls to the number beginning with 5 that are a
minimum of 5 digits and a maximum of 5 digits in length are sent to routing pattern 120. The
Call Type was set to unku.
change aar analysis 4 Page 1 of 2
AAR DIGIT ANALYSIS TABLE
Location: all Percent Full: 1
Dialed Total Route Call Node ANI
String Min Max Pattern Type Num Reqd
4 5 5 120 unku n

ABM; Reviewed:
SPOC 10/9/2014
Solution & Interoperability Test Lab Application Notes
©2014 Avaya Inc. All Rights Reserved
13 of 77
ASBCAESIPIOS
Use the change route-pattern 120 to add trunk group 120 to route pattern 120. Ensure the
Sesure SIP value was set to No.
change route-pattern 120 Page 1 of 3
Pattern Number: 120 Pattern Name:
SCCAN? n Secure SIP? n
Grp FRL NPA Pfx Hop Toll No. Inserted DCS/ IXC
No Mrk Lmt List Del Digits QSIG
Dgts Intw
1: 120 0 n user
2: n user
5.8. Administer IP Network Region
This section describes IP Network Region screen. It was decided to place the Avaya one-X
Mobile SIP for iOS as a Remote User in network region 1. The Authoritative Domain must
mirror the domain name of Session Manager. This was silstack.com. The codec used on the SIP
endpoints were placed in Codec Set 1. IP Shuffling was turned on so both Intra-region IP-IP
Direct Audio and Inter-region IP-IP Direct Audio were set to yes.
display ip-network-region 1 Page 1 of 19
IP NETWORK REGION
Region: 1
Location: 1 Authoritative Domain: silstack.com
Name:
MEDIA PARAMETERS Intra-region IP-IP Direct Audio: yes
Codec Set: 1 Inter-region IP-IP Direct Audio: yes
UDP Port Min: 2048 IP Audio Hairpinning? n
UDP Port Max: 3329
DIFFSERV/TOS PARAMETERS RTCP Reporting Enabled? y
Call Control PHB Value: 46 RTCP MONITOR SERVER PARAMETERS
Audio PHB Value: 46 Use Default Server Parameters? y
Video PHB Value: 26
802.1P/Q PARAMETERS
Call Control 802.1p Priority: 6
Audio 802.1p Priority: 6
Video 802.1p Priority: 5 AUDIO RESOURCE RESERVATION PARAMETERS
H.323 IP ENDPOINTS RSVP Enabled? n
H.323 Link Bounce Recovery? y
Idle Traffic Interval (sec): 20
Keep-Alive Interval (sec): 5

ABM; Reviewed:
SPOC 10/9/2014
Solution & Interoperability Test Lab Application Notes
©2014 Avaya Inc. All Rights Reserved
14 of 77
ASBCAESIPIOS
5.9. Administer IP Codec Set
This section describes the IP Codec Set screen. IP Codec G.711MU, G.711A and G.729 were
used for testing purposes with the Remote User SIP endpoints.
display ip-codec-set 1 Page 1 of 2
IP Codec Set
Codec Set: 1
Audio Silence Frames Packet
Codec Suppression Per Pkt Size(ms)
1: G.711MU n 2 20
2: G.711A n 2 20
3: G.729 n 2 20
5.10. Verify Off PBX Telephone Station Mapping
This section show the off-pbx-telephone station-mapping. The Avaya one-X Mobile SIP for
IOS as a Remote User extension 40040 uses off pbx Application OPS which is used for SIP
enabled telephones. This information is populated in Communication Manager when the Avaya
one-X Mobile SIP for IOS as a Remote User is administered in User Management in System
Manager. The SIP Trunk Selection is set to aar. The Config Set which is the desired call
treatment was set to 1.
display off-pbx-telephone station-mapping 53177 Page 1 of 3
STATIONS WITH OFF-PBX TELEPHONE INTEGRATION
Station Appl CC Phone Number Config Trunk Mapping Calls
Extension Set Select Mode Allowed
40040 OPS 40040 1 / aar both all
40050 OPS 40050 1 / aar both all
40060 OPS 40060 1 / aar both all
The Call Limit is set to 6 as shown below. This is the maximum amount of simultaneous calls
for extension 40040. The Mapping Mode field was set to both in this configuration setup. This
is used to control the degree of integration between the Remote User SIP telephones. The Calls
Allowed field was set to all. This identifies the call filter type for a SIP Phone. The Bridged
Calls field was set to none as it was not needed for testing purposes.
display off-pbx-telephone station-mapping 53177 Page 2 of 3
STATIONS WITH OFF-PBX TELEPHONE INTEGRATION
Station Appl Call Mapping Calls Bridged Location
Extension Name Limit Mode Allowed Calls
40040 OPS 6 both all none
40050 OPS 4 both all both

ABM; Reviewed:
SPOC 10/9/2014
Solution & Interoperability Test Lab Application Notes
©2014 Avaya Inc. All Rights Reserved
15 of 77
ASBCAESIPIOS
5.11. Administer Hunt Group
Hunt Group number 1 was administered and was assigned Group Name Mango. Group
Extension 80960 was assigned to hunt group 1. ucd-mia was assigned as the Group Type.
display hunt-group 1 Page 1 of 60
HUNT GROUP
Group Number: 1 ACD? n
Group Name: Mango Queue? n
Group Extension: 80960 Vector? n
Group Type: ucd-mia Coverage Path: 1
TN: 1 Night Service Destination:
COR: 1 MM Early Answer? n
Security Code: Local Agent Preference? n
ISDN/SIP Caller Display: mbr-name
Select sip-adjunct for Message Center. The Voice Mail Handle was set to 80960 the same
value as the Group Extension on Page 1. The Voice Mail Handle was set to 80960. The
Routing Digits *08 is used in the Voice Mail Number field as a Feature Access Code to access
the SIP trunk the hunt group number goes out across.
display hunt-group 1 Page 2 of 60
HUNT GROUP
Message Center: sip-adjunct
Voice Mail Number Voice Mail Handle Routing Digits
(e.g., AAR/ARS Access Code)
80960 80960 *08

ABM; Reviewed:
SPOC 10/9/2014
Solution & Interoperability Test Lab Application Notes
©2014 Avaya Inc. All Rights Reserved
16 of 77
ASBCAESIPIOS
5.12. Administer Coverage Path
Configure a coverage path for the Message Application Subscriber. Use the command add
coverage path n where n is the coverage path number to be assigned. Configure a coverage
point, using value hx where x is the hunt group number defined in Section 5.11. In this case its
hunt-group 1 or h1 as shown below.
add coverage path n
COVERAGE PATH
Coverage Path Number: 3
Cvg Enabled for VDN Route-To Party? n Hunt after Coverage? n
Next Path Number: Linkage
COVERAGE CRITERIA
Station/Group Status Inside Call Outside Call
Active? n n
Busy? y y
Don't Answer? y y Number of Rings: 2
All? n n
DND/SAC/Goto Cover? y y
Holiday Coverage? n n
COVERAGE POINTS
Terminate to Coverage Pts. with Bridged Appearances? n
Point1: h1 Rng: Point2:
Point3: Point4:
Point5: Point6:

ABM; Reviewed:
SPOC 10/9/2014
Solution & Interoperability Test Lab Application Notes
©2014 Avaya Inc. All Rights Reserved
17 of 77
ASBCAESIPIOS
5.13. Administer Station Screen
This screen describes the station form setup for the Avaya one-X Mobile SIP IOS as a Remote
User on Communication Manager. This information is populated on Communication Manager
when user 40040 is administered in User Management in System Manager in Section 6.14 The
Extension used was 40040 with phone Type 9640SIP. Coverage Path 1 was set to 1 as
described in Section 5.12. The Name of the phone was set to 40040, 40040 and all other values
on Page 1 of the station form were left as default.
display station 40040 Page 1 of 5
STATION
Extension: 40040 Lock Messages? n BCC: 0
Type: 9640SIP Security Code: TN: 1
Port: S00010 Coverage Path 1: 1 COR: 1
Name: 40040,40040 Coverage Path 2: COS: 1
Hunt-to Station:
STATION OPTIONS
Time of Day Lock Table:
Loss Group: 19 Personalized Ringing Pattern: 1
Message Lamp Ext: 40040
Speakerphone: 2-way Mute Button Enabled? y
Display Language: english Expansion Module? n
Survivable GK Node Name:
Survivable COR: internal Media Complex Ext:
Survivable Trunk Dest? y IP SoftPhone? n
IP Video? n
The SIP Trunk value was set to aar on Page 6 of the station form.
add station 40040 Page 6 of 6
STATION
SIP FEATURE OPTIONS
Type of 3PCC Enabled: None
SIP Trunk: aar

ABM; Reviewed:
SPOC 10/9/2014
Solution & Interoperability Test Lab Application Notes
©2014 Avaya Inc. All Rights Reserved
18 of 77
ASBCAESIPIOS
5.14. Administer SRTP on Communication Manager
It was decided that SRTP would be administered from the inside interface of the Session Border
controller to the Communication Manager Server. There are a number of settings on
Communication Manager that need to be set in order for SRTP to function correctly. The
change system-parameters customer-option command was used to set the set media
encryption over IP setting on Page 4 to YES.
change system-parameters customer-options Page 4 of 11
OPTIONAL FEATURES
Emergency Access to Attendant? y IP Stations? y
Enable 'dadmin' Login? y
Enhanced Conferencing? y ISDN Feature Plus? n
Enhanced EC500? y ISDN/SIP Network Call Redirection? y
Enterprise Survivable Server? n ISDN-BRI Trunks? y
Enterprise Wide Licensing? n ISDN-PRI? y
ESS Administration? y Local Survivable Processor? n
Extended Cvg/Fwd Admin? y Malicious Call Trace? y
External Device Alarm Admin? y Media Encryption Over IP? y
Five Port Networks Max Per MCC? n Mode Code for Centralized Voice Mail? n
Flexible Billing? n
The change system-parameters ip-options command was used to set the Override ip-codec-set
for SIP direct-media connections setting on Page 4 to NO.
change system-parameters ip-options Page 4 of 4
IP-OPTIONS SYSTEM PARAMETERS
SYSLOG FROM TN BOARDS
Local Facility #: local4
Dest #1 IP address: Port #: 514
Dest #2 IP address: Port #: 514
Dest #3 IP address: Port #: 514
Override ip-codec-set for SIP direct-media connections? n
The change system-parameters features command was used to set the SDP Capability
Negotiation for SRTP setting on Page 19 to YES.
change system-parameters features Page 19 of 19
FEATURE-RELATED SYSTEM PARAMETERS
IP PARAMETERS
Direct IP-IP Audio Connections? y
IP Audio Hairpinning? n
Synchronization over IP? n
SDP Capability Negotiation for SRTP? y
SIP Endpoint Managed Transfer? y

ABM; Reviewed:
SPOC 10/9/2014
Solution & Interoperability Test Lab Application Notes
©2014 Avaya Inc. All Rights Reserved
19 of 77
ASBCAESIPIOS
The change ip-codec 1 command was used to set the Media Encryption setting on Page 1 of
the ip-codec setting to 1-srtp-aescm128-hmac80.
change ip-codec-set 1 Page 1 of 2
IP Codec Set
Codec Set: 1
Audio Silence Frames Packet
Codec Suppression Per Pkt Size(ms)
1: G.711MU n 2 20
2: G.711A n 2 20
3: G.729 n 2 20
4:
5:
6:
7:
Media Encryption
1: 1-srtp-aescm128-hmac80
2:
3:
5.15. Save Translations
Use the save translation command to save these changes.
save translation
SAVE TRANSLATION
Command Completion Status Error Code
Success 0

ABM; Reviewed:
SPOC 10/9/2014
Solution & Interoperability Test Lab Application Notes
©2014 Avaya Inc. All Rights Reserved
20 of 77
ASBCAESIPIOS
6. Administer Avaya Aura® Session Manager The following steps describe configuration of the Avaya one-X Mobile SIP for IOS as a Remote
User with Session Manager. This section describes administering SIP Entities between Session
Manager and the Communication Manager Server in order to establish a SIP Entity link between
Session Manager and the Communication Manager Server. It also discusses administering the
SIP Entities between Session Manager and the Messaging Server. Administering the Avaya one-
X Mobile SIP for IOS as a Remote User in User Management to register to the Avaya Session
Border Controller Advanced Enterprise Server with Session Manager is also discussed.
6.1. Access Avaya Aura® System Manager
Access the System Manager web interface, by entering http://<ip-addr>/SMGR as the URL in
an Internet browser, where <ip-addr> is the IP address of the server running System Manager
graphical user interface. Log in with the appropriate User ID and Password and press the Log
On button to access System Manager.

ABM; Reviewed:
SPOC 10/9/2014
Solution & Interoperability Test Lab Application Notes
©2014 Avaya Inc. All Rights Reserved
21 of 77
ASBCAESIPIOS
The main menu of the System Manager Graphical User Interface is displayed in the
following screenshot.
6.2. Administer SIP Domain
The following screenshot shows the configuration used to add a SIP Domain. Under the heading
Routing on the left hand side of the system management interface of System Manager, access
the sub heading Domains. The name of the SIP Domain used in Session Manager silstack.com
was added. The Type was set to sip. Press the Commit button to add the SIP Domain.
ABM; Reviewed:
SPOC 10/9/2014
Solution & Interoperability Test Lab Application Notes
©2014 Avaya Inc. All Rights Reserved
22 of 77
ASBCAESIPIOS
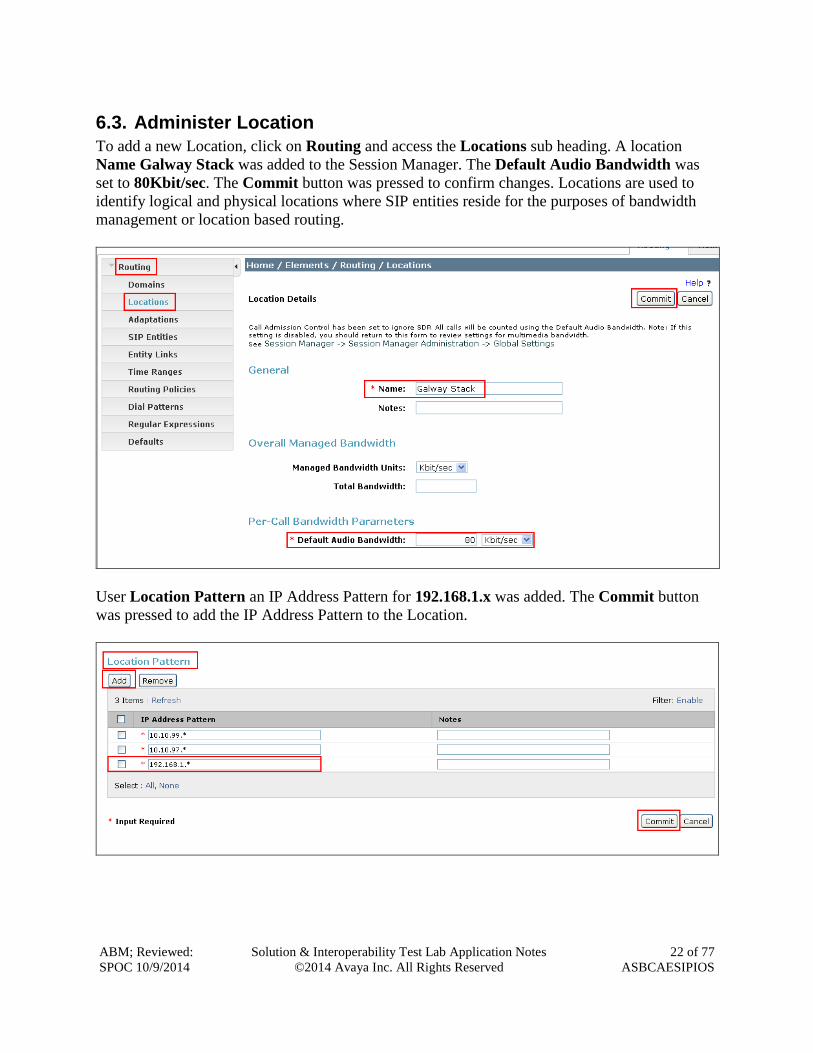
6.3. Administer Location
To add a new Location, click on Routing and access the Locations sub heading. A location
Name Galway Stack was added to the Session Manager. The Default Audio Bandwidth was
set to 80Kbit/sec. The Commit button was pressed to confirm changes. Locations are used to
identify logical and physical locations where SIP entities reside for the purposes of bandwidth
management or location based routing.
User Location Pattern an IP Address Pattern for 192.168.1.x was added. The Commit button
was pressed to add the IP Address Pattern to the Location.
ABM; Reviewed:
SPOC 10/9/2014
Solution & Interoperability Test Lab Application Notes
©2014 Avaya Inc. All Rights Reserved
23 of 77
ASBCAESIPIOS
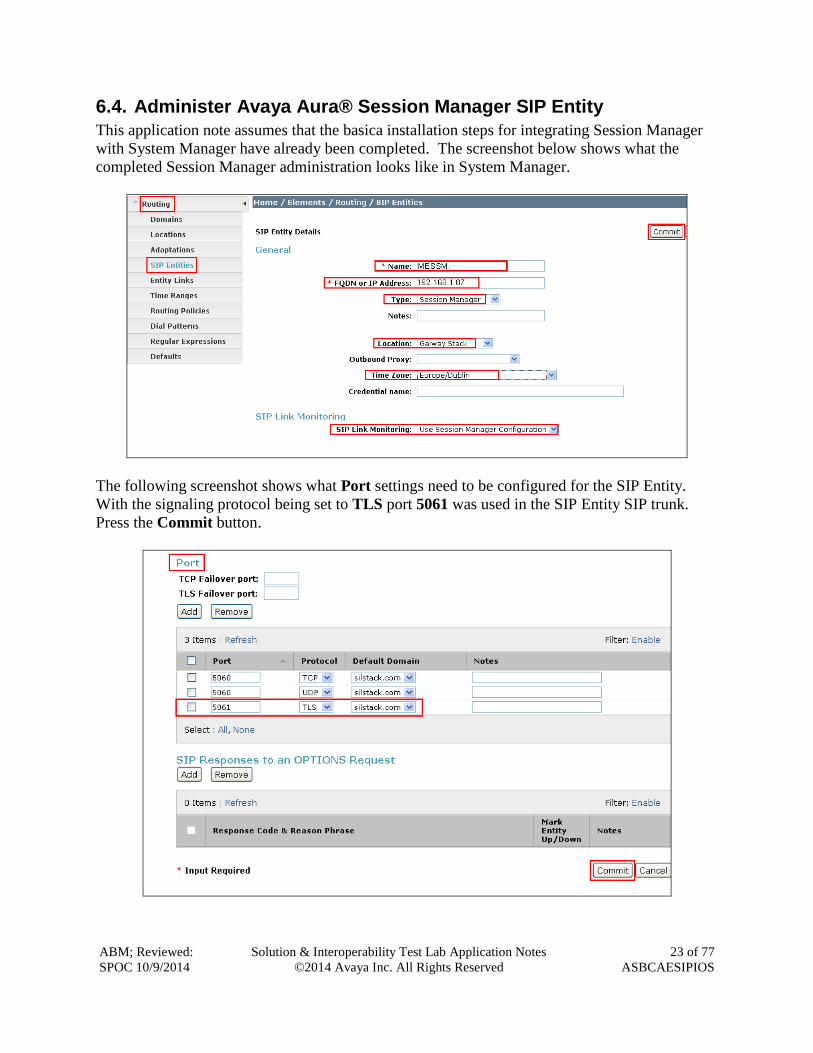
6.4. Administer Avaya Aura® Session Manager SIP Entity
This application note assumes that the basica installation steps for integrating Session Manager
with System Manager have already been completed. The screenshot below shows what the
completed Session Manager administration looks like in System Manager.
The following screenshot shows what Port settings need to be configured for the SIP Entity.
With the signaling protocol being set to TLS port 5061 was used in the SIP Entity SIP trunk.
Press the Commit button.

ABM; Reviewed:
SPOC 10/9/2014
Solution & Interoperability Test Lab Application Notes
©2014 Avaya Inc. All Rights Reserved
24 of 77
ASBCAESIPIOS
6.5. Administer Avaya Aura® Communication Manager Server SIP Entity
The Communication Server SIP Entity is the second part of the link between the Session
Manager and the Communication Manager Server. The Name of the SIP Entity was MESCM.
The FQDN or IP Address was set to 192.168.1.82 which was the IP Address of the
Communication Manager Server. The Type was set to CM for Communication Manager. The
Location was set to Galway Stack and the SIP Link Monitoring was set to Use Session
Manager Configuration. Press the Commit button.

ABM; Reviewed:
SPOC 10/9/2014
Solution & Interoperability Test Lab Application Notes
©2014 Avaya Inc. All Rights Reserved
25 of 77
ASBCAESIPIOS
6.6. Administer Avaya Aura® Messaging SIP Entity
The following describes the Messaging SIP Entity to the Session Manager. The Name of the SIP
Entity was MANGO. The FQDN or IP Address was set to 192.168.1.133 which was the IP
Address of the Messaging Server. The Type was set to Modular Messaging for Messaging. The
Location was set to Galway Stack and the SIP Link Monitoring was set to Use Session
Manager Configuration. Press the Commit button.
6.7. Administer SIP Entity Link
To administer the SIP Entity link access the sub heading Routing Entity Links on the left
hand side of the Session Manager GUI. Select the New button.

ABM; Reviewed:
SPOC 10/9/2014
Solution & Interoperability Test Lab Application Notes
©2014 Avaya Inc. All Rights Reserved
26 of 77
ASBCAESIPIOS
The SIP Entity Link shown below is the link between Session Manager and the Communication
Manager Server. The Name of the Entity Link was SMONE-MESCM. The SIP Entity 1 was
set to Session Manager One. The Protocol was TLS and the Port was 5061. The SIP Entity 2
was set to MESSM.
The SIP Entity Link shown below is the link between Session Manager and the Messaging
Server. The Name of the Entity Link was SMONE-MANGO. The SIP Entity 1 was set to
Session Manager One. The Protocol was TLS and the Port was 5061. The SIP Entity 2 was
set to MANGO.
MESCM

ABM; Reviewed:
SPOC 10/9/2014
Solution & Interoperability Test Lab Application Notes
©2014 Avaya Inc. All Rights Reserved
27 of 77
ASBCAESIPIOS
6.8. Administer Regular Expression
Select Routing Regular Expressions. Under the Regular Expressions field select the New
button.
The Pattern was set to [email protected]. The Rank Order was set to 0. The Commit
button was pressed to save the changes. This matches the Hunt Group Extension configured in
Section 5.11.
ABM; Reviewed:
SPOC 10/9/2014
Solution & Interoperability Test Lab Application Notes
©2014 Avaya Inc. All Rights Reserved
28 of 77
ASBCAESIPIOS
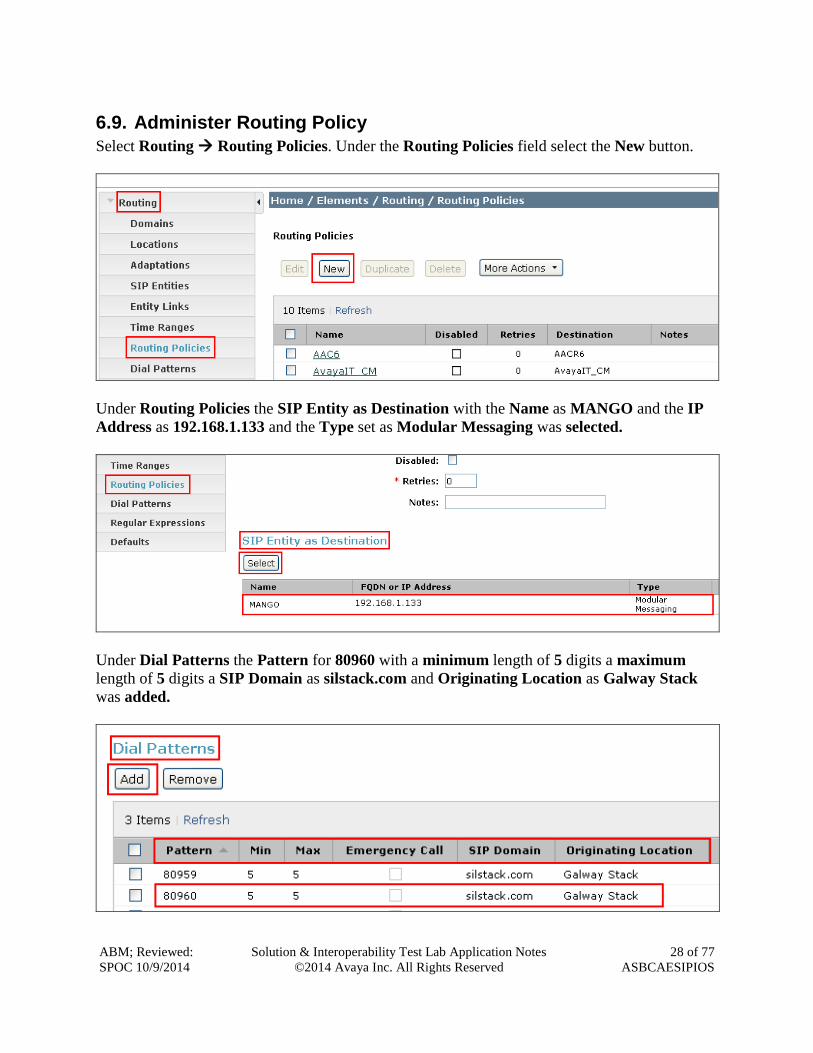
6.9. Administer Routing Policy
Select Routing Routing Policies. Under the Routing Policies field select the New button.
Under Routing Policies the SIP Entity as Destination with the Name as MANGO and the IP
Address as 192.168.1.133 and the Type set as Modular Messaging was selected.
Under Dial Patterns the Pattern for 80960 with a minimum length of 5 digits a maximum
length of 5 digits a SIP Domain as silstack.com and Originating Location as Galway Stack
was added.
ABM; Reviewed:
SPOC 10/9/2014
Solution & Interoperability Test Lab Application Notes
©2014 Avaya Inc. All Rights Reserved
29 of 77
ASBCAESIPIOS
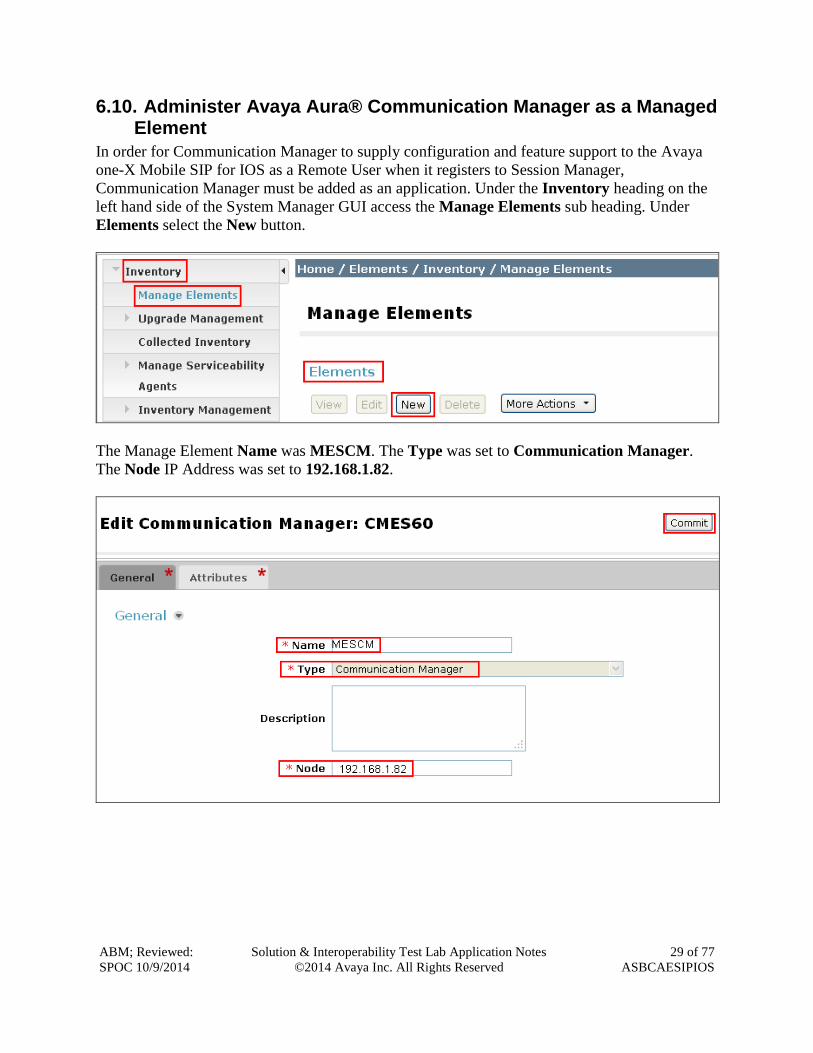
6.10. Administer Avaya Aura® Communication Manager as a Managed Element
In order for Communication Manager to supply configuration and feature support to the Avaya
one-X Mobile SIP for IOS as a Remote User when it registers to Session Manager,
Communication Manager must be added as an application. Under the Inventory heading on the
left hand side of the System Manager GUI access the Manage Elements sub heading. Under
Elements select the New button.
The Manage Element Name was MESCM. The Type was set to Communication Manager.
The Node IP Address was set to 192.168.1.82.

ABM; Reviewed:
SPOC 10/9/2014
Solution & Interoperability Test Lab Application Notes
©2014 Avaya Inc. All Rights Reserved
30 of 77
ASBCAESIPIOS
Access the Attributes section and set the Login. This was the login used to access the
Communication Manager Evolution Server. The Password was set to the password used to
access the Communication Manager Evolution Server. The Port was set to 5022.

ABM; Reviewed:
SPOC 10/9/2014
Solution & Interoperability Test Lab Application Notes
©2014 Avaya Inc. All Rights Reserved
31 of 77
ASBCAESIPIOS
6.11. Administer Avaya Aura® Communication Manager Server Application
To configure the Communication Manager Evolution Server Application access Session
Manager Application Configuration Applications. Under Application Entries, select
the New button.
The Name of the Application was MESCM. The SIP Entity used was MESCM. The CM
System for SIP Entity used was MESCM. The Description of the Application was MESCM.

ABM; Reviewed:
SPOC 10/9/2014
Solution & Interoperability Test Lab Application Notes
©2014 Avaya Inc. All Rights Reserved
32 of 77
ASBCAESIPIOS
6.12. Administer Avaya Aura® Communication Manager Server Application Sequence
To configure the Communication Manager Evolution Server Application Sequence access the
Session Manager heading on the left hand side System Manager GUI. Access the sub heading
Application Configuration Application Sequences.
ABM; Reviewed:
SPOC 10/9/2014
Solution & Interoperability Test Lab Application Notes
©2014 Avaya Inc. All Rights Reserved
33 of 77
ASBCAESIPIOS
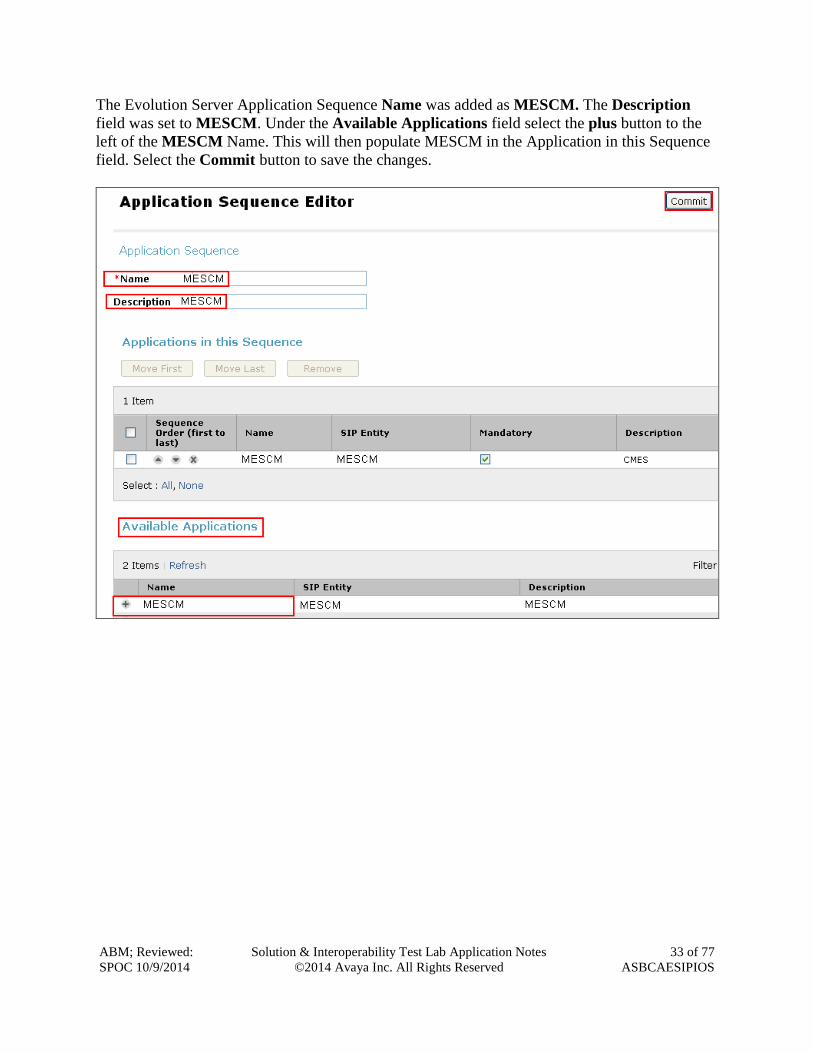
The Evolution Server Application Sequence Name was added as MESCM. The Description
field was set to MESCM. Under the Available Applications field select the plus button to the
left of the MESCM Name. This will then populate MESCM in the Application in this Sequence
field. Select the Commit button to save the changes.

ABM; Reviewed:
SPOC 10/9/2014
Solution & Interoperability Test Lab Application Notes
©2014 Avaya Inc. All Rights Reserved
34 of 77
ASBCAESIPIOS
6.13. Synchronize Avaya Aura® Communication Manager Data
To synchronize the Communication Manager Data access Inventory Synchronization
Communication System heading on the left hand side of the System Manager GUI. Access the
sub heading Communication System. The following screenshot shows the MESCM, the
Communication Manager Evolution Server synchronized to the Session Manager by highlighting
the Initialize data for the selected devices option and selecting the Now key.

ABM; Reviewed:
SPOC 10/9/2014
Solution & Interoperability Test Lab Application Notes
©2014 Avaya Inc. All Rights Reserved
35 of 77
ASBCAESIPIOS
6.14. Administer SIP User
To add a SIP User to Session Manager, access the User Management Manage Users
heading on the left hand side of the System Manager GUI. Select the New button to add a new
SIP User to Session Manager.
Select the Identity sub heading. The Last Name was set to 40040 and First Name was set to
40040. The Login Name was set to [email protected]. The Authentication Type was set to
Basic.

ABM; Reviewed:
SPOC 10/9/2014
Solution & Interoperability Test Lab Application Notes
©2014 Avaya Inc. All Rights Reserved
36 of 77
ASBCAESIPIOS
Next, click on the Communication Profile Tab. Select the Communication Profile sub
heading. The Communication Profile Password was set. Select the Done button to save the
changes.
Select the Communication Address heading. The Type was set to Avaya E.164.The Fully
Qualified Address was set to [email protected]. The Add button was pressed to
save the changes.

ABM; Reviewed:
SPOC 10/9/2014
Solution & Interoperability Test Lab Application Notes
©2014 Avaya Inc. All Rights Reserved
37 of 77
ASBCAESIPIOS
Select Session Manager Profile heading was selected. The Primary Session Manager was set
to MESSM. This equates to the Session Manager SIP entity. The Origination Application
Sequence was set to MESCM. The Termination Application Sequence was set to MESCM.
The Home Location was set to Galway Stack.
In order for the Station Profile template information to be pushed from the Session Manager
down to the Communication Manager Evolution Server, enable the CM Endpoint Profile box.
The System was set to MESCM. This is the Communication Manager Server Element Name.
The Extension was set to 40040 and the Template and Set Type was set to 9640SIP.

ABM; Reviewed:
SPOC 10/9/2014
Solution & Interoperability Test Lab Application Notes
©2014 Avaya Inc. All Rights Reserved
38 of 77
ASBCAESIPIOS
Click on Endpoint Editor and under Feature Options the settings were left as default.
Within Button Assignments a value of 5 call-appr buttons were set. A call-fwd button and a
call-pkup button were also assigned. The Done button was pressed
Press the Commit button to save the changes.

ABM; Reviewed:
SPOC 10/9/2014
Solution & Interoperability Test Lab Application Notes
©2014 Avaya Inc. All Rights Reserved
39 of 77
ASBCAESIPIOS
7. Administer Avaya Aura® Messaging Server This section highlights the important commands for administering Avaya Aura Messaging to
function correctly with SRTP and adding a subscriber for the Avaya one-X Mobile SIP for IOS
as a Remote User to the Messaging Server.
7.1. Access Avaya Aura® Messaging
Access the Messaging web interface, by entering http://<ip-addr> as the URL in an Internet
browser, where <ip-addr> is the IP address of the server running the Messaging graphical user
interface. Log in with the appropriate Login ID and Password and press the Logon button to
access the Messaging Server.
Under the Administration heading select Messaging.
7.2. Administer Telephony Integration with SRTP
Select Telephony Integration under the Telephony Settings heading on the left hand side of the
Messaging Graphical User Interface. Under BASIC CONFIGURATION the Switch
Integration Type was set to SIP. Under SIP SPECIFIC CONFIGURATION the Transport

ABM; Reviewed:
SPOC 10/9/2014
Solution & Interoperability Test Lab Application Notes
©2014 Avaya Inc. All Rights Reserved
40 of 77
ASBCAESIPIOS
Method was set to TLS. The Connection 1 setting was set to 192.168.1.87, the IP Address of
the Session Manager. The Port was set to 5061. The Messaging Address was set to
192.168.1.133. The SIP Domain was set to silstack.com. The Save button was selected to save
the changes.
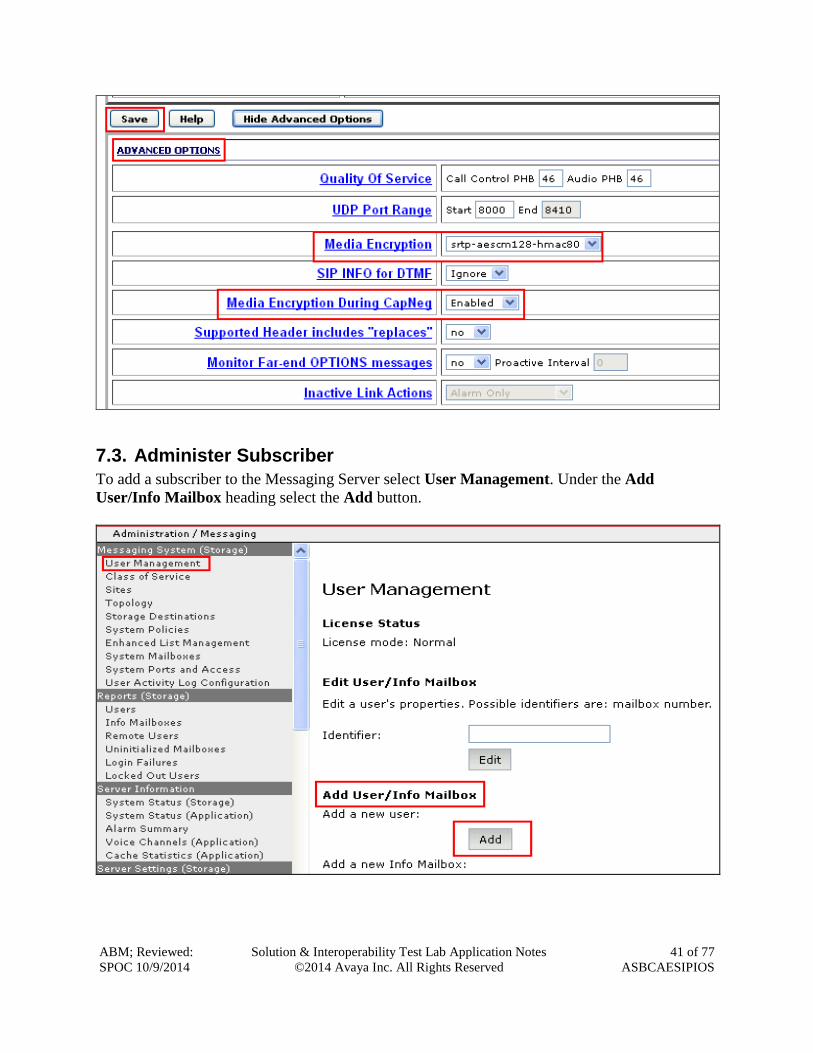
The Show Advanced Options setting was selected.
Under the Advanced Options settings the Media Encryption setting was set to srtp-aescm128-
hmac80. The Media Encryption During CapNeg setting was Enabled. The Save button was
selected to save these changes to the Messaging Server. Note that the Messaging Server needed
to be stopped and started for these SRTP changes to take effect on the Messaging Server.
ABM; Reviewed:
SPOC 10/9/2014
Solution & Interoperability Test Lab Application Notes
©2014 Avaya Inc. All Rights Reserved
41 of 77
ASBCAESIPIOS
7.3. Administer Subscriber
To add a subscriber to the Messaging Server select User Management. Under the Add
User/Info Mailbox heading select the Add button.

ABM; Reviewed:
SPOC 10/9/2014
Solution & Interoperability Test Lab Application Notes
©2014 Avaya Inc. All Rights Reserved
42 of 77
ASBCAESIPIOS
The First Name was set to 40040. The Last Name was set to 40040. The Mailbox Number was
set to 40040. The Extension was set to 40040. The Class of Service was set to Standard.
The MWI enabled setting was set to Yes. The New password was set to the password of the
subscriber mailbox for the Avaya one-X Mobile SIP for IOS as a Remote User. The User must
change voice messaging password on next logon setting was enabled. The Save button was
pressed to save these changes.

ABM; Reviewed:
SPOC 10/9/2014
Solution & Interoperability Test Lab Application Notes
©2014 Avaya Inc. All Rights Reserved
43 of 77
ASBCAESIPIOS
8. Administer Avaya Session Border Controller Advanced for Enterprise
This section highlights the important steps for administering Avaya one-X Mobile SIP for IOS as
a Remote User with SRTP to register to the Session Border Controller Server. It was decided that
the Avaya one-X Mobile SIP for IOS as a Remote User would be administered with SRTP from
the remote endpoint to the outside interface on the Session Border Controller and with SRTP
from the inside interface to the Communication Manager Server. This section will document
administering the media rule with SRTP to be used on the outside and inside interfaces on the
Session Border Controller. It will also document the steps needed to administer signaling and
media interfaces to the Session Manager and Remote User. It will highlight the steps required to
configure Routing Profiles and End Point Policy Groups needed to be assigned to Subscriber and
Server Flows within an End Point Flow. An asterisk (*) used in the option field for this section
indicates that any or all choices for that parameter are acceptable. It is assumed that IP Addresses
for all ports have been assigned during installation.
8.1. Access Avaya Session Border Controller Advanced for Enterprise
Access the Avaya Session Border Controller Advanced web interface, by entering https://<ip-
addr> as the URL in an Internet browser, where <ip-addr> is the Management IP address of the
server running the Avaya Avaya Session Border Controller Advanced graphical user interface.
Log in with the appropriate Username and Password and press the Log In button to access the
server.
The following page is displayed.

ABM; Reviewed:
SPOC 10/9/2014
Solution & Interoperability Test Lab Application Notes
©2014 Avaya Inc. All Rights Reserved
44 of 77
ASBCAESIPIOS
Select Device Specific Settings→Network Management→Add to add the IP Address of the
Session Border Controller Server interfaces.
The IP Address of the A1 inside interface was set to 192.168.1.16. The IP Address of the B1
outside interface was set to 10.10.25.15.

ABM; Reviewed:
SPOC 10/9/2014
Solution & Interoperability Test Lab Application Notes
©2014 Avaya Inc. All Rights Reserved
45 of 77
ASBCAESIPIOS
8.2. Enable Interfaces on the Avaya Session Border Controller Advanced for Enterprise
Select Device Specific Settings→Network Management→Interface Configuration. The A1
internal interface was Enabled by selecting the Toggle State button. The B1 external interface
was also Enabled by selecting the Toggle State button.
8.3. Administer User Agent
A User Agent was added for Avaya one-X Mobile SIP for IOS to allow the Avaya one-X Mobile
SIP for IOS remote user access the network. To administer a User Agent for Avaya one-X
Mobile SIP for IOS under Global Parameters select the User Agents heading. Select the Add
button.
The Name was set to SIPIOS and the Regular Expression was set to Avaya SIP
Communicator*. The Finish button was selected to save the changes.

ABM; Reviewed:
SPOC 10/9/2014
Solution & Interoperability Test Lab Application Notes
©2014 Avaya Inc. All Rights Reserved
46 of 77
ASBCAESIPIOS
8.4. Administer Server Interworking
An Interworking Profile was used to manipulate headers for compatibility purposes. It was
decided to use an existing Server Interworking Profile named avaya-ru and clone this Server
Interworking Profile. To clone the Server Interworking select Global Profiles→Server
Interworking→avaya-ru→Clone.
The Profile Name selected was avaya-ru. The Clone Name was set to avaya-ruSIPIOS. The
Finish button was selected to save the changes.
All values for the Server Interworking Profile were left as default.
ABM; Reviewed:
SPOC 10/9/2014
Solution & Interoperability Test Lab Application Notes
©2014 Avaya Inc. All Rights Reserved
47 of 77
ASBCAESIPIOS
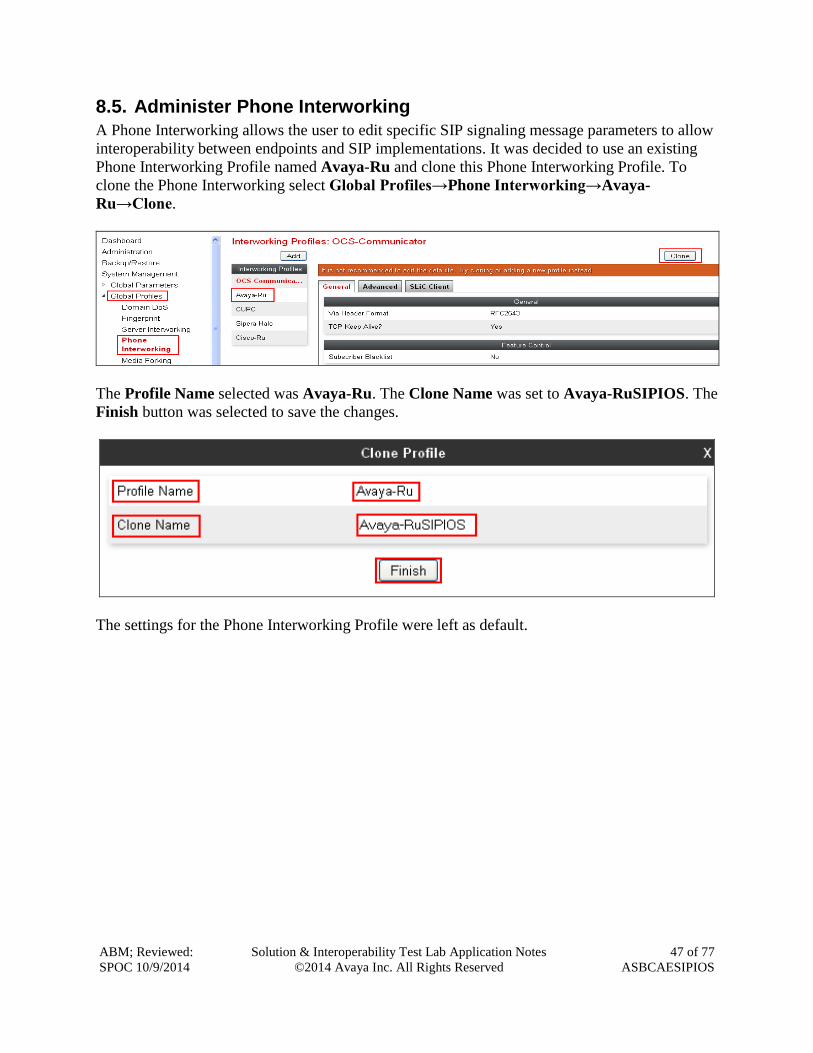
8.5. Administer Phone Interworking
A Phone Interworking allows the user to edit specific SIP signaling message parameters to allow
interoperability between endpoints and SIP implementations. It was decided to use an existing
Phone Interworking Profile named Avaya-Ru and clone this Phone Interworking Profile. To
clone the Phone Interworking select Global Profiles→Phone Interworking→Avaya-
Ru→Clone.
The Profile Name selected was Avaya-Ru. The Clone Name was set to Avaya-RuSIPIOS. The
Finish button was selected to save the changes.
The settings for the Phone Interworking Profile were left as default.

ABM; Reviewed:
SPOC 10/9/2014
Solution & Interoperability Test Lab Application Notes
©2014 Avaya Inc. All Rights Reserved
48 of 77
ASBCAESIPIOS
8.6. Verify TLS Client Profile
A Client Profile is needed to allow the Avaya one-X Mobile SIP for IOS as a Remote User to
participate in a secure TLS session. The Session Border Controller has a pre installed Avaya
client profile as part of the Session Border Controller software named AvayaSBCClient. It was
decided to use this pre installed Avaya client profile for configuration purposes. Select TLS
Management→Client Profiles→AvayaSBCClient. The Profile Name was AvayaSBCClient.
The AvayaSBCClient profile contained the Certificate named AvayaSBC.crt. The
AvayaSBCClient profile also contained the Peer Certificate Autorities root CA certificate
named AvayaSBCCA.crt. These certificates are all Avaya signed certificates and trusted by
other Avaya Servers.

ABM; Reviewed:
SPOC 10/9/2014
Solution & Interoperability Test Lab Application Notes
©2014 Avaya Inc. All Rights Reserved
49 of 77
ASBCAESIPIOS
8.7. Verify TLS Server Profile
To allow the Avaya one-X Mobile SIP for IOS as a Remote User to participate in a secure TLS
session a TLS Server Profile was also used. The Session Border Controller has a pre installed
Avaya server profile as part of the Session Border Controller software. It was decided to use this
pre installed Avaya server profile for configuration purposes. Select TLS
Management→Server Profiles→AvayaSBCServer. The Profile Name was
AvayaSBCServer. The AvayaSBCServer profile contained the Certificate named
AvayaSBC.crt.
8.8. Administer Topology Hiding for Subscriber and Server Flow
Topology Hiding is a UC-Sec security feature which allows the user to change certain key SIP
messages parameters to hide how the enterprise network map appears to the outside world. The
Topology Hiding created will be applied to the Subscriber and Server flow. It was decided to use
an existing topology hiding named default and clone this Topology hiding Profile. To clone the
Topology Hiding Profile select Global Profiles→Topology Hiding→default→Clone.

ABM; Reviewed:
SPOC 10/9/2014
Solution & Interoperability Test Lab Application Notes
©2014 Avaya Inc. All Rights Reserved
50 of 77
ASBCAESIPIOS
The Profile Name was set to default. The Clone Name was set to defaultSIPIOS. The Finish
button was selected to save the changes.
8.9. Administer Session Manager Server Configuration
This section describes creating a Call Server Profile for the Avaya Session Manager Server on
the Avaya Session Border Controller. Select Global Profiles→Server Configuration→Add.
The Profile Name was set to Server_SM. The Next button was selected to continue to the next
page.
The Server Configuration Server_SM was administered in this section. The Server Type was set
to Call Server. The IP address was set to 192.168.1.87. This was the Signaling Interface of the

ABM; Reviewed:
SPOC 10/9/2014
Solution & Interoperability Test Lab Application Notes
©2014 Avaya Inc. All Rights Reserved
51 of 77
ASBCAESIPIOS
Session Manager. The Supported Transports was set to TLS. The TLS Port was set to 5061.
The Next button was selected to continue to the next page.
The Enable Grooming setting was also Enabled. The Interworking Profile value was set to
avaya-ruSIPIOS. The TLS Client Profile was set to AvayaSBCClient. The TLS Connection
Type was set to SUBID. The Finish button was selected.

ABM; Reviewed:
SPOC 10/9/2014
Solution & Interoperability Test Lab Application Notes
©2014 Avaya Inc. All Rights Reserved
52 of 77
ASBCAESIPIOS
8.10. Administer External Signaling Interface Toward Remote User
The section explains administering a signaling interface to the Avaya one-X Mobile SIP for IOS
as a Remote User endpoint. Select Device Specific Settings→Signaling Interface→Add.
The Name was set to Ext_Sig_intf_Remote _Phone. The IP Address was set to 10.10.25.15.
This was the IP Address of the B1 external interface of the Avaya Avaya Session Border
Controller. The TLS Port was set to 5061. The TLS Profile was set to AvayaSBCServer. The
Finish button was pressed to save the changes.

ABM; Reviewed:
SPOC 10/9/2014
Solution & Interoperability Test Lab Application Notes
©2014 Avaya Inc. All Rights Reserved
53 of 77
ASBCAESIPIOS
8.11. Administer Internal Signaling Interface toward Session Manager
This section explains administering a signaling interface to the Session Manager Server. Select
Device Specific Settings→Signaling Interface→Add. The Name was set to Int_Sig_intf_Call
_Srv. The IP Address was set to 192.168.1.16. This was the IP Address of the A1 internal
interface of the Avaya Session Border Controller The TLS Port was set to 5061. The TLS
Profile was set to AvayaSBCServer. The Finish button was pressed to save the changes.
8.12. Administer External Media Interface Toward Remote User
The section explains administering a media interface to the Avaya one-X Mobile SIP for IOS as
a Remote User. Select Device Specific Settings→Media Interface→Add.

ABM; Reviewed:
SPOC 10/9/2014
Solution & Interoperability Test Lab Application Notes
©2014 Avaya Inc. All Rights Reserved
54 of 77
ASBCAESIPIOS
The Name was set to Ext_Med_intr_Remote_Phone. The IP Address was set to 10.10.25.15.
The Port Range was set to 35000 – 40000. The Finish button was selected to save the changes.
8.13. Administer Internal Media Interface Toward Session Manager
This section explains administering a media interface to the Session Manager Server. Select
Device Specific Settings→Media Interface→Add Media. The Name was set to
Int_Med_intr_Call_Srv. The IP Address was set to 192.168.1.16. The Port Range was set to
35000 – 40000. The Finish button was selected to save the changes.

ABM; Reviewed:
SPOC 10/9/2014
Solution & Interoperability Test Lab Application Notes
©2014 Avaya Inc. All Rights Reserved
55 of 77
ASBCAESIPIOS
8.14. Administer SIP Cluster
This section describes creating a SIP Cluster. The SIP Cluster will be administered with secure
mode to use TLS for SIP. This allows the user to use https for the endpoint configuration
download. A TLS Server Profile will be created to allow the user to download PPM information
to the Avaya one-X Mobile SIP for IOS as a Remote User. Select SIP Cluster→Cluster
Proxy→Add.
The Cluster Name was set to AvayaCluster. The Callserver Type was set to Avaya. The Next
button was selected to continue to the next page.

ABM; Reviewed:
SPOC 10/9/2014
Solution & Interoperability Test Lab Application Notes
©2014 Avaya Inc. All Rights Reserved
56 of 77
ASBCAESIPIOS
The Secure Mode was Enabled to allow TLS for SIP. The Domain Name was set to
silstack.com. The Finish button was selected to save the changes.
The Device Name was set to MCS. The Device IP was set to 10.10.25.15. This was the B1
external interface of the Avaya Avaya Session Border Controller. The Configuration Server
Client Address was set to 192.168.1.16. This was the A1 internal interface of the Avaya Session
Border Controller. The Next button was selected to continue to the next page.

ABM; Reviewed:
SPOC 10/9/2014
Solution & Interoperability Test Lab Application Notes
©2014 Avaya Inc. All Rights Reserved
57 of 77
ASBCAESIPIOS
The Server Type was set to HTTPS. The Real Server Type was set to HTTPS. The UC-Sec
Port was set to 443. The Real Server IP was set to 192.168.1.87. This is the IP Address of
Session Manager . The Real Server Port was set to 443. The Server TLS Profile was set to
AvayaSBCServer. The Finish button was selected to save the changes.
The Session Manager Server Configuration Profile was set to Server_SM. The End Point
Signaling Interface was set to Ext_Sig_intf_Remote_Phone. The Session Policy Group was
set to default. The Finish button was selected to save the changes.

ABM; Reviewed:
SPOC 10/9/2014
Solution & Interoperability Test Lab Application Notes
©2014 Avaya Inc. All Rights Reserved
58 of 77
ASBCAESIPIOS
8.15. Administer Routing Profile Toward Session Manager for Subscriber Flow
A Routing Profile is administered to the Session Manager and must be assigned to the Subscriber
Flow. Select Global Profiles→Routing→Add.
The Profile Name was set to Route_To_SM. The Next button was selected to continue to the
next page.

ABM; Reviewed:
SPOC 10/9/2014
Solution & Interoperability Test Lab Application Notes
©2014 Avaya Inc. All Rights Reserved
59 of 77
ASBCAESIPIOS
The URI Group was set to * to indicate all URI groups were acceptable. The Next Hop Server
1 was set to 192.168.1.87. This was the IP Address of the Signaling Interface of the Session
Manager. The Routing Priority based on Next Hop Server value was Enabled. The Outgoing
Transport was set to TLS. The Finish button was selected to save the changes.

ABM; Reviewed:
SPOC 10/9/2014
Solution & Interoperability Test Lab Application Notes
©2014 Avaya Inc. All Rights Reserved
60 of 77
ASBCAESIPIOS
8.16. Administer SRTP Media Rule for the End Point Policy Group for Subscriber Flow and Server Flow
A specific Media Rule is administered and assigned to the End Point Policy Group which will be
assigned to the Subscriber and Server Flows. Since the Avaya one-X Mobile SIP for iOS as a
Remote User is registering to the Avaya Session Border Controller using TLS, it was decided
that the Avaya one-X Mobile SIP for IOS as a Remote User would be administered to use SRTP.
It was also decided that SRTP would be administered from inside interface of the Session Border
controller to the Communication Manager Server. Therefore a media rule called SRTPSIP is
administered with SRTP and assigned to the End Point Policy Group and then assigned to the
Subscriber and Server Flows. This ensures the B1 outside interface to the Avaya one-X Mobile
SIP for IOS as a Remote User will use SRTP media encryption and the A1 inside interface to the
Session Manager and Communication Manager Servers will also use SRTP media encryption.
To add a Media rule select Domain Policies→Media Rules→Add.
The Rule Name was set to SIPIOS. The Next button was selected to continue to the next page.

ABM; Reviewed:
SPOC 10/9/2014
Solution & Interoperability Test Lab Application Notes
©2014 Avaya Inc. All Rights Reserved
61 of 77
ASBCAESIPIOS
The Media Nat value had the Learn Media IP dynamically setting Enabled. The Next button
was selected to continue to the next page.
The Preferred Format #1 value was set to SRTP_AES_CM_128_HMAC_SHA1_80. The
Interworking setting was Enabled. The Capability Negotiation setting was also Enabled. The
Next button was selected to proceed to the next page.
The Media Anomaly, the Media Silencing and the Media QoS settings were all disabled on the
Media Rule. The Finish was selected to save the changes.
ABM; Reviewed:
SPOC 10/9/2014
Solution & Interoperability Test Lab Application Notes
©2014 Avaya Inc. All Rights Reserved
62 of 77
ASBCAESIPIOS
8.17. Administer End Point Policy Group for Subscriber Flow and Server Flow
An End Point Policy Group called SRTPSIPIOS was administered to be assigned to the
Subscriber and Server Flow. To add an End Point Policy Group select Domain Policies→End
Point Policy Group→Add.
The Group Name was set to SRTPSIPIOS. The Next button was selected to continue to the
Next page.

ABM; Reviewed:
SPOC 10/9/2014
Solution & Interoperability Test Lab Application Notes
©2014 Avaya Inc. All Rights Reserved
63 of 77
ASBCAESIPIOS
The Media Rule called SIPIOS was assigned to the End Point Policy Group called
SRTPSIPIOS. All other settings where set as default. The Finish button was selected to save the
changes.
8.18. Administer End Point Flow with Subscriber Flow
The End Point Flow allows the user to determine how calls will be handled on the Session
Border Controller. Select Device Specific Settings→End Point Flow→Subscriber
Flow→Add.

ABM; Reviewed:
SPOC 10/9/2014
Solution & Interoperability Test Lab Application Notes
©2014 Avaya Inc. All Rights Reserved
64 of 77
ASBCAESIPIOS
The Flow Name was set to SIPIOS. The URI Group was set to *. The User Agent was set to
SIPIOS. The Signaling Interface was set to Ext_Sig_intf_Remote_Phone. The Next button
was selected to continue to the next page.

ABM; Reviewed:
SPOC 10/9/2014
Solution & Interoperability Test Lab Application Notes
©2014 Avaya Inc. All Rights Reserved
65 of 77
ASBCAESIPIOS
The Media Interface was set to Ext_Med_intf_Remote_Phone. The End Point Policy Group
was set to SRTPSIPIOS. The Routing Profile was set to Route_To_SM. The Topology
Hiding Profile was set to defaultSIPIOS. The Phone Interworking Profile was set to
Avaya_RuSIPIOS. The TLS Client Profile was set to AvayaSBCClient. The Finish button
was selected to save the changes.

ABM; Reviewed:
SPOC 10/9/2014
Solution & Interoperability Test Lab Application Notes
©2014 Avaya Inc. All Rights Reserved
66 of 77
ASBCAESIPIOS
8.19. Administer Routing Profile Toward Remote User for Server Flow
A Routing Profile is administered to the Remote User and must be assigned to the Server Flow.
It was decided to use an existing Routing Profile called default and clone this Routing Profile.
To clone the Routing Profile select Global Profiles→Routing→default→Clone.
The Profile Name selected was default. The Clone Name was set to defaultSIPIOS. The
Finish button was selected to save the changes.
All values for the Routing Profile were left as default.
8.20. Administer End Point Flow with Server Flow
To administer the Server Flow to the End Point Flow select Device Specific Settings→End
Point Flow→Server Flow→Add.

ABM; Reviewed:
SPOC 10/9/2014
Solution & Interoperability Test Lab Application Notes
©2014 Avaya Inc. All Rights Reserved
67 of 77
ASBCAESIPIOS
The Flow Name was set to SIPIOS. The Server Configuration was set to Server_SM. The
URI Group was set to *. The Received Interface was set to Ext_Sig_intf_Remote _Phone.
The Signaling Interface was set to Int_sig_intf_Call_Srv. The Media Interface was set to
Int_Med_intf_Call_Srv. The End Point Policy Group was set to SRTPSIPIOS. The Routing
Policy was set to defaultSIPIOS. The Topology Hiding Profile was set to defaultSIPIOS. The
Finish button was selected to save the changes.

ABM; Reviewed:
SPOC 10/9/2014
Solution & Interoperability Test Lab Application Notes
©2014 Avaya Inc. All Rights Reserved
68 of 77
ASBCAESIPIOS
9. Administer Avaya one-X® Mobile SIP for IOS This section highlights the important commands for administering Avaya one-X® Mobile SIP
for IOS to set up a sip account and register to the Session Border Controller Advanced for
Enterprise Server. It also describes configuring the Avaya one-X® Mobile SIP for IOS to
connect to the SILsecure$ wireless network. This Application Notes assumes that the Avaya one-
X® Mobile SIP for IOS App has already been downloaded to an IPhone 4S handset.
9.1. Access Wireless Network
Access the Settings heading on the IPhone4S handset.
Under the Wi-Fi Networks and select the Choose a Network heading.
The SILsecure$ wireless network was selected.

ABM; Reviewed:
SPOC 10/9/2014
Solution & Interoperability Test Lab Application Notes
©2014 Avaya Inc. All Rights Reserved
69 of 77
ASBCAESIPIOS
The Username and Password was entered and the Join button was selected.
The Avaya one-X Mobile SIP for IOS had joined the SILsecure$ wireless network.
9.2. Administering Avaya one-X® Mobile SIP Communicator for iOS
It is assumed that the Avaya one-X® Mobile SIP for IOS has already been downloaded to an
IPhone 4S handset. Select the Avaya one-X® Mobile SIP for IOS heading on the IPhone 4S.

ABM; Reviewed:
SPOC 10/9/2014
Solution & Interoperability Test Lab Application Notes
©2014 Avaya Inc. All Rights Reserved
70 of 77
ASBCAESIPIOS
Select the Settings heading at the button of the screen.
Select the heading SIP Settings.
The Domain was set to silstack.com. Under the Primary Server Details the Server was set to
10.10.25.15. The Port was set to 5061 and the protocol was set to TLS.

ABM; Reviewed:
SPOC 10/9/2014
Solution & Interoperability Test Lab Application Notes
©2014 Avaya Inc. All Rights Reserved
71 of 77
ASBCAESIPIOS
The Done button was selected.
The Login / Logout heading was selected.
The Extension was set to 40040 and the Password was set. The Login button was selected.

ABM; Reviewed:
SPOC 10/9/2014
Solution & Interoperability Test Lab Application Notes
©2014 Avaya Inc. All Rights Reserved
72 of 77
ASBCAESIPIOS
The Avaya one-X Mobile SIP for IOS was seen to register to the Session Border Controller
Server.
10. Verification Steps The following six verification steps were tested using the sample configuration. The following
steps can be used to verify installation in the field.
1. Verified the Avaya one-X Mobile SIP for IOS as a Remote User with SRTP obtained an
IP Address from the SILsecure$ wireless network.
2. Verified the Avaya one-X Mobile SIP for IOS as a Remote User with SRTP was
registered to the Avaya Session Border Controller Advanced for Enterprise Server.
3. Verified the Avaya one-X Mobile SIP for IOS as a Remote User with SRTP registered to
the Avaya Session Border Controller Advanced for Enterprise Server was seen to use
SRTP from the Remote User to the outside interface of the Avaya Session Border
Controller Advanced for Enterprise Server.
4. Verified the Avaya one-X Mobile SIP for IOS as a Remote User with SRTP registered to
the Avaya Session Border Controller Advanced for Enterprise Server was seen to use
SRTP from the inside interface of the Avaya Session Border Controller Advanced for
Enterprise Server to the Avaya Communication Manager Server.
5. Verified that a message could be left on the Avaya one-X Mobile SIP for IOS as a
Remote User with SRTP registered to the Avaya Session Border Controller Advanced for
Enterprise Server and that the MWI was seen to function correctly for Basic Messaging.
6. Verified the PPM button information was seen on the Avaya one-X Mobile SIP for IOS
as a Remote User with SRTP registered to the Avaya Session Border Controller
Advanced for Enterprise Server.

ABM; Reviewed:
SPOC 10/9/2014
Solution & Interoperability Test Lab Application Notes
©2014 Avaya Inc. All Rights Reserved
73 of 77
ASBCAESIPIOS
Verified the Avaya one-X Mobile SIP for IOS as a Remote User with SRTP obtained an IP
Address from the SILsecure$ wireless network.
Verified that extension 40040 was seen to register to the Avaya Session Border Controller
Advanced for Enterprise Server.

ABM; Reviewed:
SPOC 10/9/2014
Solution & Interoperability Test Lab Application Notes
©2014 Avaya Inc. All Rights Reserved
74 of 77
ASBCAESIPIOS
Verified the Avaya one-X Mobile SIP for IOS as a Remote User with SRTP registered to the
Avaya Session Border Controller Advanced for Enterprise Server was seen to use SRTP from the
Remote User to the outside interface IP Address 10.10.25.15 of the Avaya Session Border
Controller Server.
Verified the Avaya one-X Mobile SIP for IOS as a Remote User with SRTP registered to the
Avaya Session Border Controller Advanced for Enterprise Server was seen to use SRTP from the
inside interface IP Address 192.168.1.16 of the Avaya Session Border Controller Server to the
Avaya Communication Manager Server.
status trunk 120/113 Page 3 of 3
SRC PORT TO DEST PORT TALKPATH
src port: T00155
T00155:TX:192.168.1.16:35134/g722-64/20ms/1-srtp-aescm128-hmac80
T00291:RX:192.168.1.16:35132/g722-64/20ms/1-srtp-aescm128-hmac80

ABM; Reviewed:
SPOC 10/9/2014
Solution & Interoperability Test Lab Application Notes
©2014 Avaya Inc. All Rights Reserved
75 of 77
ASBCAESIPIOS
Verified that a message could be left on the Avaya one-X Mobile SIP for IOS as a Remote User
with SRTP registered to the Avaya Session Border Controller Advanced for Enterprise Server
and that the MWI was seen to function correctly for Basic Messaging.
Verified the PPM button information was seen on the Avaya one-X Mobile SIP for IOS as a
Remote User with SRTP registered to the Avaya Session Border Controller Advanced for
Enterprise Server.
11. Conclusion These Application Notes describe the configuration steps required to register the Avaya one-X®
Mobile SIP for IOS as a Remote User with SRTP to the Avaya Session Border Controller
Advanced for Enterprise Server with Avaya Aura® Solution for Midsize Enterprise Server and
Avaya Aura® Messaging Server. These Application Notes also identify how to configure SRTP
from the Avaya one-X® Mobile SIP for IOS as a Remote User to the outside interface of the
Avaya Session Border Controller Advanced for Enterprise Server and configure SRTP from the
inside interface of the Avaya Session Border Controller Advanced for Enterprise Server to the
Avaya Aura® Solution for Midsize Enterprise Server and Avaya Aura® Messaging Server.

ABM; Reviewed:
SPOC 10/9/2014
Solution & Interoperability Test Lab Application Notes
©2014 Avaya Inc. All Rights Reserved
76 of 77
ASBCAESIPIOS
These Application Notes also describe how to administer Avaya Aura® Messaging Server to
function with SRTP with the Avaya one-X® Mobile SIP for IOS as a Remote User with the
Avaya Session Border Controller Advanced for Enterprise Server. Please refer to Section 2.1.4
for the observations associated with Avaya one-X Mobile SIP for IOS as a Remote User with
SRTP registered to the Avaya Session Border Controller Advanced for Enterprise Server.
12. Additional References This section references Avaya documentation relevant to these Application Notes. Additional
Avaya product documentation is available at http://support.avaya.com. [1] Administering Avaya Session Border Controller for Enterprise, January 2013, Release
6.2, Issue 2.
[2] Administering Avaya one-X® Mobile SIP for IOS, November 2012, Release 6.2, Issue 1.
[3] Administering Avaya Aura® System Manager, July 2012 Issue 2.0
[4] Administering Avaya Aura® Session Manager, February 2012, Document Number 03-
603324
[5] Administering Avaya Aura® Communication Manager, February 2012, Document
Number 03-603479
[6] Administering Avaya Aura® Messaging, December 2011

ABM; Reviewed:
SPOC 10/9/2014
Solution & Interoperability Test Lab Application Notes
©2014 Avaya Inc. All Rights Reserved
77 of 77
ASBCAESIPIOS
©2014 Avaya Inc. All Rights Reserved.
Avaya and the Avaya Logo are trademarks of Avaya Inc. All trademarks identified by ® and
™ are registered trademarks or trademarks, respectively, of Avaya Inc. All other trademarks
are the property of their respective owners. The information provided in these Application
Notes is subject to change without notice. The configurations, technical data, and
recommendations provided in these Application Notes are believed to be accurate and
dependable, but are presented without express or implied warranty. Users are responsible for
their application of any products specified in these Application Notes.
Please e-mail any questions or comments pertaining to these Application Notes along with the
full title name and filename, located in the lower right corner, directly to the Avaya Solution &
Interoperability Test Lab at [email protected]


