
1
𝐴𝑅𝐸𝑆™
“Endless Mobility”
By: Jessica Johnson, Luke Partridge, Brian Reilly, and Sergei Dines

2
𝐴𝑅𝐸𝑆™
Endless Mobility
Introduction
Artemis™ was founded by Jessica Johnson, Luke Partridge, Brian Reilly, and Sergei Dines in the year 2050 to meet the growing need for a digital vehicle package. And with the population of the Earth at about 9 Billion in the year 2050, the Ares™ digital vehicle package arrived at just the right time. No need to worry about parking, damage incurred during a collision, or vehicle maintenance. And you can now carry all your vehicles within a slender yet tough titanium Ares™ Staff.
Imagine being able to venture anywhere using any type of land, sea, or air vehicle. Ares™ is a unit that allows you to do just that by taking a digital blueprint and creating a physical fabrication. The Ares™ unit consists of an Ares™ Staff, Fabrication Ares™ Disk, and Charging Station. The Ares™ Staff houses the power supply and a hologram user interface. The Fabrication Ares™ Disk has digital fabrication abilities. The disk creates a projection dome which is a force field that houses the digital to physical fabrication.
Artemis™ continues to provide the largest vehicle database and customization parts on the digital market. Ares™ is perfect for adventure seekers wishing to harness “Endless Mobility” at the swipe of a finger.

3
What To Expect From Ares™
o The Perfect Getaway-Unparalleled vehicle mobility
o Customized vehicles that fit your lifestyle
o Long term savings
After Reading This Manual You Should Be Able To
o Calibrate up to 5 people on Ares™ using our unique Calibration sequence
o Activate a purchased vehicle
o Drive all purchased vehicles
o End use of purchased vehicles
o Purchase additional vehicles
o Customize Vehicles

4
Table of Contents SPECIFICATIONS ............................................................................................................................................ 5
DISCLAIMERS & WARRANTY ........................................................................................................................ 7
INSTRUCTIONS .............................................................................................................................................. 8
CALIBRATION ............................................................................................................................................ 8
EDIT SETTINGS .......................................................................................................................................... 9
LAUNCH VEHICLE ...................................................................................................................................... 9
MANUALLY THROW ARES™ DISK ........................................................................................................... 10
DRIVE VEHICLE ........................................................................................................................................ 10
DRIVE WATER VEHICLE ........................................................................................................................... 11
CREATING A BRIDGE TO ANY VEHICLE ................................................................................................... 11
END VEHICLE USE.................................................................................................................................... 12
PURCHASE OTHER VEHICLES .................................................................................................................. 12
CUSTOMIZE PERFORMANCE, VISUAL, AND BODY PARTS ..................................................................... 12
CHARGE ARES™ STAFF ........................................................................................................................... 13
TROUBLESHOOTING ................................................................................................................................... 14

5
SPECIFICATIONS
Ares™
AUTHOR : Artemis™ Founders
APPROVED BY: Artemis™ Engineering Managers
ISSUING AUTHORITY: Artemis™ Site Managers
REVIEW DATE: 3 March 2055
Ares™
Ares™ Disk Specifications
Model # 0001-MML-DJPR
Serial # 100110011001100110011001100110011001100110011001100110011001
Dimensions
Radius 1.3 inch
Height ≈.25 inch
Colors
Standard Colors Black, White, Silver
Premium Colors 360 Spectrum Options
Sensor
Pyro electric Detector
DNA Scan
Foreign Object Scan
Water Scan 360 Degrees
Land Scan 180 Degrees
Attachment Mechanism
Human Sensitive Magnet
Material Carbon Fiber

6
Ares™ Ares™ Staff Specifications
Model # 0001-MML-DJPR Serial # 100110011001100110011001100110011001
Dimensions
Height 12 inch
Radius 1.5 inch
Colors
Standard Colors Black, White, Silver
Premium Colors 360 Spectrum Options
Weight 5.3 ounces
Touch I.D Hand Print Sensor Biometric Sensor
GPS Triplanetary Coordinates
Hologram Display A1 Hologram Display
Power Source Solar Power Located opposite side of opening
Quantum Batteries Internal and rechargeable
Expected Operation Time 31 days (without solar power)
Hand Size Serves All Users
Holster ( Sold Separately) Belt Magnet
Materials Titanium Inner Cylinder
Carbon Fiber Slider Lining

7
DISCLAIMERS & WARRANTY The following guidelines are for all vehicles. Failure to abide by these guidelines will void the warranty.
NOTE: The word User entails the person(s) who purchased the Ares™ Unit. Ares includes Ares™ Staff, Ares™ Disk, and charger.
Purchase:
Once Ares is calibrated, each User contents to: 1) a database examination and identification of both fingerprints and palm scans and 2) routine database examinations by legal personal.
Legal Disclaimers:
Users are responsible for knowing government regulations and choosing to abide thereby. Artemis is not responsible for any violations of the law involving the Ares.
Artemis™ is not responsible for any injuries occurring entering, exiting, moving within, or without the vehicle. Artemis™ recommends that all operations are done while being properly secured within the vehicle.
Hardware & Software Malfunction:
DANGER: Tampering with Ares™ may result in bodily harm, including but not limited to electric shock, loss of extremities, death.
Our Life-Time Hardware Warranty is guaranteed unless:
Product shows signs of severe neglect, unauthorized breaches or unauthorized alterations to hardware, power fluctuation caused by unauthorized charging methods or accidents.
Our Life-Time Software Warranty is guaranteed unless:
User hacks Artemis™ software or downloads unauthorized programs.
Accessories:
Only use authorized Artemis™ accessories with Ares™. Any damage of Ares™ or malfunction caused by or in conjunction with the use of unauthorized accessories will void warranty.
8
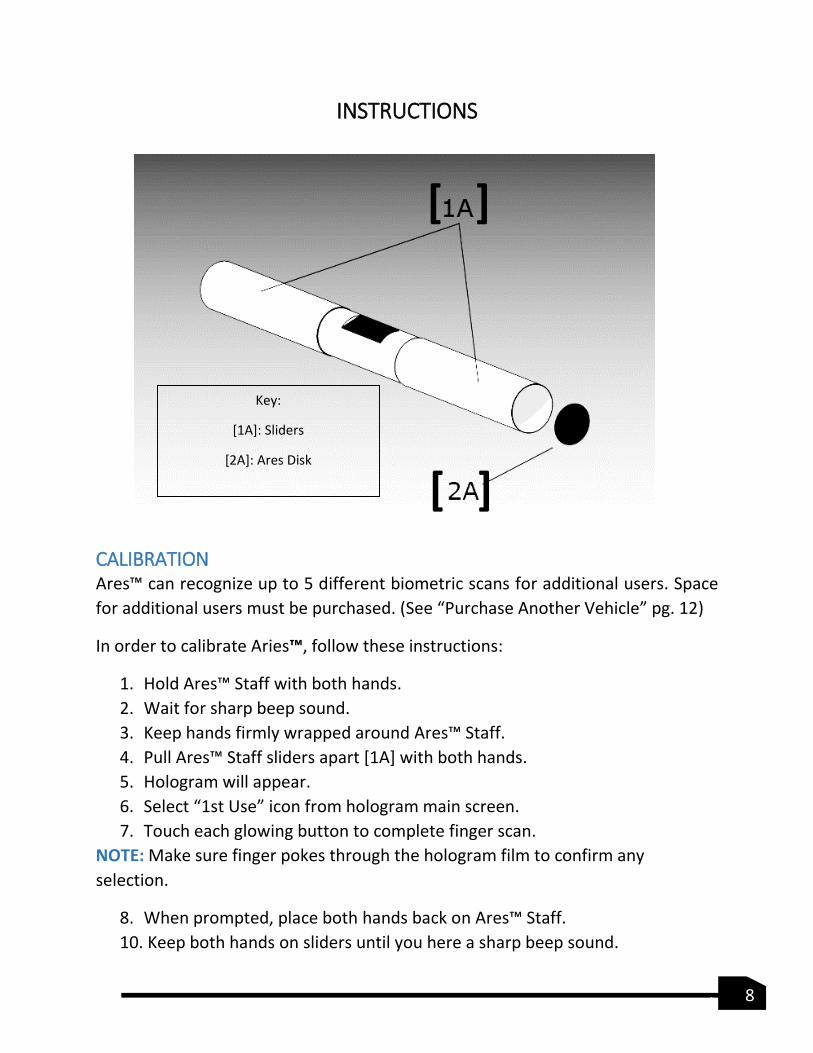
INSTRUCTIONS
CALIBRATION Ares™ can recognize up to 5 different biometric scans for additional users. Space
for additional users must be purchased. (See “Purchase Another Vehicle” pg. 12)
In order to calibrate Aries™, follow these instructions:
1. Hold Ares™ Staff with both hands.
2. Wait for sharp beep sound.
3. Keep hands firmly wrapped around Ares™ Staff.
4. Pull Ares™ Staff sliders apart [1A] with both hands.
5. Hologram will appear.
6. Select “1st Use” icon from hologram main screen.
7. Touch each glowing button to complete finger scan.
NOTE: Make sure finger pokes through the hologram film to confirm any
selection.
8. When prompted, place both hands back on Ares™ Staff.
10. Keep both hands on sliders until you here a sharp beep sound.
Key:
[1A]: Sliders
[2A]: Ares Disk
[2A]: Ares™ Fabrication Ares™
Disk
[ ]
[ ]

9
11. Hand calibration is complete.
12. Push sliders back together.
After the calibration is complete, repeat steps 1 – 4. This process will allow you to
access the hologram main screen display consisting of three folders named Test
Drive, My Vehicles and Home.
EDIT SETTINGS To personalize your display, launch settings, or any default settings, follow these
steps:
1. Access Hologram Main Screen.
2. Select “Home” Folder Left Corner.
3. Select “Settings”.
LAUNCH VEHICLE Now that we have established your initial setup, let’s go through the everyday
steps you will need to know to launch vehicle.
Access the hologram main screen by repeating Steps 1 - 5 of the Calibration
process.
1. Access “Vehicles” folder.
2. Access Vehicle Type folder. (Options are Land, Sea, Air)
3. Swipe hand to left or right to view other vehicles.
4. Select vehicle by poking through hologram film.
NOTE : Denying the confirmation will bring you back to “My Vehicles” folder.

10
5. Confirm selection by pressing “Launch”.
6. Hologram will disappear.
7. Ares™ Disk will make slight buzzing sound.
8. Ares™ Disk will project outward from right side of the Ares™ Staff [2A].
9. Projection Dome appears from Ares™ Disk.
NOTE: Ares™ Disk may plant itself far away to calibrate vehicle.
In the case the Ares™ Disk does not eject or the projection dome is not emitted,
review the following troubleshooting option:
MANUALLY THROW ARES™ DISK 1. Hologram will disappear.
2. When you feel the Ares™ Staff begin to vibrate, place hand over the Ares™
Disk opening.
3. Ares™ Disk will exit the Ares™ Staff, slow and then stop at your hand via
DNA scan
4. Throw Ares™ Disk to desired location.
NOTE: Processes will proceed as normal from here.
DRIVE VEHICLE Once the Ares™ Disk is ejected or thrown, the Ares™ Disk will emit the Projection
Dome. This dome is anywhere between 5 to 50 feet in diameter, depending on
the size of the desired vehicle.
NOTE: Chosen Vehicle will not be synthesized if a person is within the projection
dome. A countdown timer will initiate if enough human DNA is detected. Once
the timer is complete, the chosen vehicle cancels and the user must reselect the
desired vehicle (using the steps outlined in the Launch Vehicle section pg. 9).
DANGER :Do not attempt to obstruct your calibration Ares™ Disk. This will void the warranty
as detailed on pg 7.
After Ares™ Disk is projected or thrown outward :
1. Projection dome appears.
2. Ares™ Disk will start digital fabrication.

11
3. Center light turns green.
4. If center light happens to be red, reposition Ares™ Disk on level surface
until green light appears.
5. Digital fabrication complete when there is no center light emitted.
6. Material fabrication will begin (completion time ≈30 seconds)
NOTE: The dome projection will push all foreign bodies out of the dome. It is
impossible for foreign objects to compromise the mechanics of the vehicle.
7. Projection dome will disappear once vehicle is fully materialized.
8. Ares™ Disk will attach into Ares™ Staff opening.
NOTE: Ares™ Disk will not attach back into the Ares™ Staff if enough human DNA
is detected between the Ares™ Staff opening and the Ares™ Disk.
9. Enter & Engage your vehicle.
NOTE: Push sliders back together to cover hologram plate.
10. Drive Responsibly and with Endless Mobility.
DRIVE WATER VEHICLE 1. Access “My Vehicles” folder by poking through hologram film.
2. Access “Sea Vehicle” folder.
3. Repeat steps 3-9 of “Launch Vehicle”.
4. Repeat steps 1-7 of “Drive Vehicle”.
NOTE: Your calibration Ares™ Disk is buoyant. The Ares™ Disk will launch far
enough into the water to fabricate desired vehicle. The Ares™ Disk will project a
360° dome if the proper amount of water is identified. The calibration Ares™ Disk
will only calibrate water compatible vehicles on water. Also, Ares™ Disk will
automatically repel itself to proper clearance once launched from the Ares™ Staff
should manual launch be used.
5. Stay still while Ares™ Disk returns to Ares™ Staff.
CREATING A BRIDGE TO ANY VEHICLE If needed, a bridge from the vehicle to you can be created.
1. Once Ares™ Disk is returned to the Ares™ Staff, access hologram main
screen.

12
2. Access My Vehicle, select Vehicle type.
3. Select Create Bridge.
4. Follow the on-screen instructions.
END VEHICLE USE 1. Exit Vehicle.
2. Step 5 feet away from vehicle to begin deterioration.
3. Vehicle will deteriorate within 10 seconds.
4. Unit is powered down.
PURCHASE OTHER VEHICLES If you wish to purchase another vehicle you may do so by accessing the home
selection in the bottom left corner of the hologram main screen. From there our
database will launch and you may purchase vehicle(s).
NOTE: Internet access will be required for purchasing additional vehicles and
customization parts.
1. Access Hologram main screen.
2. Select “ Home “, “ Search Vehicles”.
3. Select vehicle type.
4. Swipe or search different models.
5. Confirm download.
6. Exit online portal or continue to browse products. (Downloads take 1 -5
minutes)
CUSTOMIZE PERFORMANCE, VISUAL, AND BODY PARTS
1. Access Hologram main screen.
2. Select “Home” Folder.
3. Select “Customize”.
4. Choose a vehicle type.
5. Choose a vehicle.
Follow on-screen instructions.

13
CHARGE ARES™ STAFF The average battery life is about 31 days. However, battery life may be influenced
by the number of downloads, customization sessions, and solar charging (or lack
of ). Hologram rings will pulse red when charging of Ares Ares™ Staff™ is needed.
To Charge The Ares™ Staff:
1. Attach Charging Block to power source.
2. Make sure Ares™ Disk is attached within Ares™ Staff.
3. Insert Ares™ Staff into opening.
4. Black Solar Panel Should be visible when Ares™ Staff is inserted.
5. You will hear sharp beep sound.
6. Charging indicator light will pulse green.
7. Charging indicator light will be solid green when charge complete.
8. Push down on indicator light to eject Ares™ Staff.
NOTE : Ares™ Staff will not eject entirely, only about half way.
Ares™ Staff
Charging Block
Ares™ Staff Charging

14
TROUBLESHOOTING
Symptom Cause Solution More info
Ares™ Disk did not return to Ares™ Staff
Human DNA blocking attachment magnet
clear path between Ares™ Disk and Ares™ Staff
pg. 9
Hologram displays
“Unauthorized
Driver”
Recent illegal activity
Unapproved driver
See regional legal department
You must be 18 years or older
Or
see regional vehicle
department
pg. 7
Unsuccessful calibration
Follow steps to set calibration again
pg. 8
Water vehicle won’t
launch
Object(s) larger than vehicle blocking
fabrication
Wait for Ares™ Disk to repel
away from large object(s).
pg. 11
Hologram indicating
it needs charged
even though it
recently was
Unit needs charged every 31 days
Ares™ Disk not inserted during charging session
Charge Unit
Insert Ares™ Disk into Ares™
Staff, then charge Unit
pg. 13


