Download - Application Manual - Res-Tec Roofing
Page 1 of 32
Application Manual
01-2021

Page 2 of 32
Contents
1. Introduction ................................................................................................................................................. 3
2. Before You Start ......................................................................................................................................... 4
3. Flat Roof Detailing Guidance ...................................................................................................................... 6
4. Preparation of Existing Roof Surfaces ........................................................................................................ 6
5. Fitting New OSB3 Decks (Where Required) ............................................................................................ 10
6. Fixing ResTrims ........................................................................................................................................ 12
7. Priming with Flexitec 2020 Primer ............................................................................................................ 16
8. Taping Joints, Details & Other Local Reinforcements .............................................................................. 18
9. Flexitec 2020 Resin Application ................................................................................................................ 19
10. Cleaning Tools ...................................................................................................................................... 25
11. Repairs .................................................................................................................................................. 25
12. Day Work Joints .................................................................................................................................... 25
13. Troubleshooting .................................................................................................................................... 26
14. Safety Precautions ................................................................................................................................ 28
15. Appendices ........................................................................................................................................... 28
Appendix A – Performing Core Tests
Appendix B – Performing Adhesion Tests
Appendix C – Important Notes on Powder Hardener Levels
Appendix D – Low Temperature Applications: Using Accelerators
Appendix E – High Temperature Applications: Using Inhibitor
Appendix F – Warm Roof Design Guidance
Appendix G – Cold Roof Design Guidance
….……..……………………………………………28
..………………………………………..……..28
…………………….………29
………….…………29
………….………………30
….…………………………….……………31
..………………………….…………………..31
Not sure if you’ve got the current version of the Flexitec 2020 Manual? If in doubt you
can download the latest version from our website at www.restecroofing.co.uk

Page 3 of 32
1. Introduction
The Flexitec 2020 System by Res-Tec is a flexible, single resin GRP system with full overlay and new deck
capabilities. Combining the best elements of fibreglass with the versatility of overlay systems, no other flat roof
solution performs at this level across so many applications. The illustration below shows a typical installation:
Key Benefits
• Can be applied to almost any roof surface including felt, asphalt, concrete, GRP, PVC single-ply, OSB3 TG4 and metals
• Totally seamless and highly flexible membrane that is suitable for any size or shape roof
• Fully fire tested achieving BS 476-3 Rating: F.AA and EN 13501-5(4) Rating: BROOF(t4) – the highest rating a flat roof system can achieve and allowing for unrestricted use under UK regs.
• LABC Registered Detail certified (Cert No.EW1000), ensuring compliance with latest building regs.
• Highly resistant to rainfall – once consolidated, the resin will cure through – no more scraping off uncured resins!
• Extremely rapid installation with walk-on times of 30-60 minutes
• Uses 225g/m2 fibreglass CSM for even application and an extra tough membrane that lasts decades
• Installations by trained installers are supported by Res-Tec’s trusted 20 year materials guarantee
• Anti-slip finish available for balconies and walkways
• Suitable for application in temperatures as low as 1°C (with accelerator) or as high as 30°C
• Manufactured to ISO 9001 and ISO 14001 standards for consistent quality
• Cold applied for maximum safety – no risks from open flames and other hot works
• Single resin system that can be repaired / overcoated without grinding down
1
2
3
4
1
1
Prepared roof surface
Flexitec 2020 Primer (where required)
1st Coat Flexitec 2020 Resin with 225g/m2 Res-Tec
Fibreglass CSM reinforcement
2nd Coat Flexitec 2020 Resin
2
3
4
Need a BBA Approved system? Ask
your distributor about Flexitec Platinum

Page 4 of 32
2. Before You Start
Component Checklist
Before you start check that you have all the items you need. If in doubt consult your distributor.
Essential System Components
❑ Flexitec 2020 Resin (consider Accelerator for Low Temp Applications)
❑ Flexitec 2020 Primer (for certain substrates only – see page 16) (consider Accelerator for Low Temp
Applications)
❑ Powder Hardener (for Flexitec 2020 Resin and Primer)
❑ Fibreglass chopped strand mat (CSM) reinforcement (225g/m2)
❑ Taping mat (for trim joints and other local reinforcements)
❑ Acetone (preparation of some surfaces, wiping trims before coating, reactivating membrane if over-
coating 7 days later, and cleaning tools)
Overlay Applications - Additional Components
❑ Powerwasher to clean roof surfaces (where required)
❑ Drying equipment - Industrial wet and dry vacs, clean mops, rags, sponges etc.
❑ Fungicidal wash to treat areas of fungal growth or moss
New Deck Applications - Additional Components
❑ Flexitec 2020 Primer and Taping Mat for timber joints
❑ OSB3 TG4 deck
❑ Treated timber battens (for rigidity to edge trims)
❑ Fixings for OSB TG4 deck (suitable flat roofing fasteners)
❑ ResTrims (for new deck applications or where existing edge detailing requires replacement)
❑ MS Polymer adhesive, such as Soudal Fix All (High Tack), for bonding trims.
❑ Treated timber battens (for rigidity to edge trims)
❑ Fixings for trims (20mm large headed galvanised clout nails)
Application Tools & Ancillaries
❑ Res-Tec solvent-resistant, blue striped nylon application rollers
❑ Stirrer
❑ Application brushes (for difficult to reach areas)
❑ Calibrated buckets (for measuring resin quantities and mixing in hardener) or scales for weighing
❑ Res-Tec Infra-Red Laser Thermometer (for measuring resin and deck temperatures)
❑ Personal protective equipment (latex gloves, respiratory/dust mask and safety goggles)
❑ Medium grit sand paper
❑ Cloths / rags
❑ Protimeter Moisture Meter to measure moisture content of the roof surface

Page 5 of 32
Assessing the Existing Roof
Determining Suitability for Over-Coating – Existing Roof Condition
The existing roof build up should be inspected for defects, made good where required and retained. Core
samples should always be taken to confirm the exact roof build-up and its condition (see Appendix A, page 27
for further details). If any wet or saturated insulation or decking is found, careful consideration should be given
to a complete strip or the installation of permanent roof ventilation. Areas where the insulation or underlying
substrate has collapsed or is defective or decayed, should be cut out, repaired and reinstated on a like-for-like
basis to provide a good solid base for the coating system. For guidance regarding the preparation of existing
roof surfaces refer to pages 7-9. For guidance regarding the fitting of new decks refer to Section 4 starting on
page 10.
Determining Suitability for Over-Coating – Substrate Compatibility
Flexitec 2020 is a highly versatile system that can coat a wide range of common roof surfaces that include felt,
asphalt, concrete/screed, GRP and PVC single-ply. If the substrate is not described here, or if you are unsure,
then you should carry out an adhesion test as described in Appendix B page 28.
Ponding Water
Remember – if you’re overlaying a roof then there will be no improvements to falls or drainage and existing
problems with standing water will remain. Although standing water is not detrimental to the Flexitec 2020
system it could be hazardous to foot traffic in icy conditions. If you’re not the end user we strongly recommend
discussing this with your client before you start.
Compliance with Building Regulations
You should ensure that the design of the roof to which the Flexitec 2020 is to be applied is in accordance with
current regulations, codes and good practice. For further guidance consult BS6229 (Code of Practice for flat
roofs with continuously supported coverings), BS5250 (Control of Condensation in Buildings), Local Authority
Building Control regarding compliance with regulations or seek professional advice.
Measuring Your Roof
It is important to accurately measure your roof to determine the amounts of materials required. The roof area
should include all areas to be coated including upstands and perimeter details e.g. welted drips and trims.
Storage
Ideally the resins should be protected from extremes of temperature before use. Storing the resin at around 15°C
for 24-48 hours before use will ensure optimum performance. For further details on storage consult the product
labels.
Plan Your Installation
It is recommended that you familiarise yourself with the installation procedure before you start. The next
sections of this manual will cover in detail all you need to know to carry out the works.
Uses Advised Against
The Flexitec 2020 System is not for consumer use and should only be installed by professionals.

Page 6 of 32
3. Flat Roof Detailing Guidance
• Any redundant roof details are to be removed prior to the commencement of works. The roof area
underneath is to be made good as required, ensuring that it matches the build-up of the surrounding roof
area.
• Termination details should have a minimum 150mm upstand height above the finished surface of the roof
and should be terminated into a chase or have a suitable cover flashing or weathering flange. Any details
where this cannot be achieved should be periodically inspected and may require occasional maintenance.
• All detailing surfaces to be coated on and are fully prepared and primed as required.
• The Flexitec 2020 System should be dressed as far as possible into all outlets.
• Care should be taken to ensure all roof details comply with BS 6229 Guidance (Flat Roofs with
Continuously Supported Membranes), NHBC and any other relevant regulations.
4. Preparation of Existing Roof Surfaces
Drying the Roof
It is important when applying products that the substrate or intermediate layers to which they are being applied
are not wet. Application onto wet substrates is likely to cause a loss of adhesion that could lead to either
localised or catastrophic failure.
The substrate should be visibly dry, and when measured with a “Protimeter” moisture meter a maximum
moisture content of 20% w.m.e. is allowable for application of the Flexitec 2020 system.
If the moisture content is greater than this the substrate should either be left to dry naturally or alternatively
dying may be aided by using any of the following means.
• Wet and dry vacs
• Squeegees
• Mops
• Rags, towels, and sponges
• Specialised no flame, low heat driers and blowers
When water has been removed by any of the above means it is still possible that the moisture content may be
too high to allow application. Rechecks with the “Protimeter” should be carried out. The above methods are
equally suitable for drying the substrate and removing moisture between coats.

Page 7 of 32
Roof chippings
Solar reflective paint
Loose / poorly adhered material
Moss / vegetative growth
Smooth felt with mineral felt to
edges
Blister
Gas torches and normal electric driers should not be used as they can damage the substrate and the applied
system. These types of heaters can also create a significant fire hazard. Providing the substrate is surface dry
the system applied will adhere well to the substrate however the following should be noted.
For wet or saturated insulation or decking, careful consideration should be given to the installation of permanent
roof ventilation. Areas where the insulation or underlying substrate has collapsed or is defective or decayed,
should be cut out, repaired and reinstated to provide a good solid base for the coating system.
All Surfaces to be Coated
• Remove any chippings from roof surface and any embedded
chippings should be removed by a mechanical scabbling device or
other means as necessary. Ensure the roof is able to carry the
weight of any equipment.
• Special attention should be given to any solar reflective (especially
aluminium pigmented) coatings, repair areas or other types of
coating. Adhesion tests may be required for these areas (see
Appendix B, page 28)
• Thoroughly clean down all areas to be treated, removing any dirt
and debris, surface lying water, mould growth, moss, etc.
• Inspect all surfaces to assess soundness of existing substrates
including any existing coatings, repairs and any test areas. This is
to verify compatibility for the proposed coating system and to
assess the need for priming.
• Remove any existing loose or poorly adhering materials and repair
where appropriate. Repair, replace and reinstate any defective
fixtures and fittings.
• Treat any areas of fungal growth or moss with a fungicidal wash to
ensure all spores are destroyed. Powerwash to remove any residues.
• Ensure all surfaces to be coated are suitably
Felt
• Areas of badly damaged or decayed felt should be replaced to
provide a sound substrate for the system.
• Loose or dis-bonded felt must be re-bonded to the substrate.
• Any blisters should be made good by star cutting and re-bonding
to the substrate. Allow to dry out before re-fixing.
• Brush off any loose sand before coating.
• Primer Required: Flexitec 2020 Primer (Recommended)

Page 8 of 32
Asphalt
• Any blow holes in asphalt are to be smoothed out or removed and
levelled off using a suitable repair compound, i.e. sand cement mix
with a suitable hardener.
• All large non-structural cracks and voids should be cleaned out and made good using a suitable repair compound.
• Allow repairs to cure prior to coating (check manufacturer’s
recommendations).
• Primer Required: Flexitec 2020 Primer (Recommended)
GRP
• Mechanically abrade (grind) any loose and flaking GRP topcoat
materials back to the base layer to provide a sound firm edge.
• Aged / weathered GRP with a sound topcoat layer will not require
abrading, however for GRP with a top coat less than 12 months
old, mechanical abrasion will be required to the roof edges.
• Ensure all GRP surfaces are thoroughly scrubbed with clean
Acetone prior to coating
• Note - Existing GRP Trims should always be included in any
refurbishment and must be waterproofed with reinforced Flexitec
2020 resin (not just painted)
• Primer Required: No
Concrete / Screed & Brickwork
• Any spalled, loose, unsound concrete or brickwork should be
broken out and repaired using a suitable repair mortar.
• All smooth concrete surfaces to be treated should be lightly
abraded with suitable equipment (e.g. vacu-blast, diamond disc
grind etc) where necessary to remove laitance and/or remove
other impervious matter, concrete curing membranes etc, until a
clean, dry and open surface is attained.
• All large non-structural cracks and voids should be cleaned out
and made good using a suitable repair compound.
• Wet or saturated substrates should be allowed to thoroughly dry
out before any products are applied.
• For newly laid concrete/screed, follow general guidelines allowing
a curing time of at least 28 days or one week per 25mm, or
preferably follow manufacturer’s instructions. In the case of
polymer modified material, refer to manufacturer’s instructions.
• Primer Required: Flexitec 2020 Primer (Essential)
Cracks
Flaking top coat
Existing GRP trims
Spalled brickwork
Smooth concrete
Wet concrete roof
Blowholes

Page 9 of 32
PVC Single Ply Membranes
• Note – adhesion tests will be required to determine suitability for
over-coating (see page 28 for further details)
• Any localised damage should be repaired or made good as
appropriate.
• Ensure all single ply surfaces are thoroughly scrubbed with clean
Acetone prior to coating
• Primer Required: Res-Tec SP Primer (dependent on adhesion
tests results). Note some PVC Single-Ply membranes may
alternatively be primed using standard Flexitec 2020 Primer
dependent on adhesion test results.
Metals
• Flexitec 2020 should be used to coat small areas of metal (such
as detailing work) or where the metal is a small part of an overall
roof area. Flexitec 2020 should not normally be used for coating
major areas of metal, and in particular areas where significant
movement of joints may take place.
• All rust, loose and flaking materials are to be removed by wire
brush or other means and all debris removed. Any areas of
significant rusting which cannot be removed should be treated with
a suitable proprietary rust converter and allowed to cure prior to
final priming.
• To all cleaned and degreased, non-oxidised galvanized steel
surfaces, apply by brush Mordant solution and allow to react. A
black deposit will indicate surface conversion. After conversion,
wash with clean water and allow to dry
• Abrade aluminium surfaces to be coated to get back to bright
metal.
• Wet-abrade all lead to be coated to remove oxidation and
patination. Dispose of the residues in accordance with current
HSE guidelines prior to wiping with acetone
• Abrade all copper surfaces to be coated to get back to bright
metal.
• Thoroughly clean all surfaces with acetone prior to application of
main system.
• Primer Required: Res-Tec Metal Detailing Primer or Res-Tec
Twin-Pack Epoxy Metal Primer. IMPORTANT- Refer to primer
technical data sheets before use.
PVC Single-ply roof
Defects require remedying
Typical rust converter
Un-weathered galvanised steel
Aluminium roof trims
Lead outlet

Page 10 of 32
5. Fitting New OSB3 Decks (Where Required)
Introduction Please note that the following is for guidance and this document should be read in conjunction with the relevant
OSB3 board manufacturer’s technical data sheets. Particular attention should be given to the board
manufacturers recommendations regarding storage, conditioning, moisture content, fixing and protection of
boards prior to application of the Flexitec 2020 System. Important Note – A two coat (20 year) application must
be installed when coating OSB3 or any other new deck or porous surface.
Top Tip - To avoid contamination of the OSB3 and resin, cut flashing chase before re-decking.
Preparation
The existing roof should be inspected to assess its condition. If the substrate is found to be unsuitable for over-
decking (e.g. defective, decayed or structurally unsound) then it will need to be stripped and removed. The
timber joists should also be inspected for defects including any wet/dry rot and made good where required.
Standing water should be avoided and if you think there is a potential for this to be a problem then you should
consider incorporating falls (ideally a min. 1 in 80). This is normally achieved through the installation of timber
firrings above the joists. If the roof is to be walked on then extra consideration should be given to improving the
falls as standing water could be hazardous to foot traffic.
Recommended OSB3 Type & Grade
This guidance covers 18mm OSB3 TG4 (Tongue and Groove). These boards have 4 tongue and groove edges
and are 2400mm x 600mm and are the recommended board to use. OSB3 square edge boards can be used
but these require additional reinforcements to the board joints. Refer to page 11 and page 18 for further details.

Page 11 of 32
Installation Instructions
1. 18mm x 2400mm x 600mm OSB3 T&G4 Boards should be
fixed at max 200mm centres (4 fixings across the board
width) and into every joist, penetrating the joist by a minimum
40mm. A minimum of 20 fixings per board will be required.
Use suitable flat roofing fasteners in accordance
manufacturer’s recommendations.
2. Boards can be cut as required to fit the roof area. Care should be taken to not affect the tongue & groove
joints – if square edges are present then they will need to be taped later (see Section 7)
3. Boards should be laid staggered (see typical pattern right)
with the larger gap in the T&G joint face up. This will usually
be the writing side up on most boards. Ensure boards are
pushed tight to be properly butted together.
4. The minimum expansion gap is 25mm at all abutments. This includes walls, chimneys, rooflights and the
like. Flashings to the wall must be kept independent of the roof to allow movement and wall fillet trims must
be used.
5. For large roofs (roofs over 50m2 or roofs in excess of 10m in length) special expansion trims will be required.
A gap of 25mm should be allowed between the OSB3 boards where expansion trims are to be fitted.
6. Fixings should be minimum 75mm annular ring shank nails when fixing directly to the joists or equivalent
screws. For warm roof constructions, specialist warm roof fixings will be required, penetrating the joists by
a minimum 40mm. Please consult your Flexitec 2020 Distributor for advice.
7. TREATING OSB3 TG4 BOARD JOINTS: Add the required amount of Powder Hardener to decanted
Flexitec 2020 Primer (see page 16-18 for guidance), stir thoroughly and apply by brush to all OSB3 TG4
board joints ensuring that primer fills the board joints entirely. This stripe priming process is critical when
applying to OSB3 TG4 board joints.
• IMPORTANT: All OSB3 Square Edge Board joints must be locally reinforcing with Flexitec 2020
Primer and taping mat. Refer to page 18 for details.
8. Boards should be made waterproof as soon as possible, ideally the same day. If this cannot be achieved then
they must be suitably protected from the weather at all times to avoid the possibility of becoming wet.
An Alternative System for Waterproofing OSB3 Decks
When applying the Flexitec 2020 System to OSB3 TG4 decks, it is
necessary to prime the board joints first with Flexitec 2020 Primer
before applying the reinforced Flexitec 2020 Resin. If you’re
installing a 20 year system, you can use GRP Roof 1010 Base Resin
with 450g/m2 fibreglass CSM as an alternative to both priming and
the Flexitec 2020 first coat. Once cured, you can then overcoat the
GRP Roof 1010 Base Coat with unreinforced Flexitec 2020 Resin at
a coverage rate of 0.5 Litres/m2 (0.7 kg/m2)
Download
the GRP
Roof 1010
Manual from
the Res-Tec
website

Page 12 of 32
6. Fixing ResTrims
Introduction ResTrims are required for any new deck application and can be used to replace existing defective detailing.
ResTrims trims should be installed at all new deck roof perimeters including exposed edges, wall abutments
and at joints to adjacent pitched roofs. The table below details the type of trims available and where they need
to be installed.
Trim Name Drawing Where they are fixed
Drip
Installed to any perimeter edge where water runs off into a gutter.
Upstand Fascia
Installed to edges where water does not run off
Corner Piece
Installed at external corners of the roof
Wall Fillet
Installed to any perimeters that abut a wall
Cover Flashing
Used to provide weathering protection for wall abutment details
Flat Sheet
Installed beneath slates/tiles at perimeters that abut a pitched roof
Expansion
Installed for any timber deck roofs over 50m2 or greater than 10m over a 25mm gap between boards

Page 13 of 32
Trim Installation Instructions
General Guidance
• Treated timber battens (19mm x 38mm) should be installed as required to the perimeters of the roof (refer
to individual trim for batten requirements).
• It is recommended that MS Polymer adhesive (such as Soudal Fix All (High Tack) adhesive or equivalent)
is applied to the timber battens to provide additional security for the trims to protect against wind uplift
damage. Ensure the trims are pushed against the adhesive to achieve optimum bonding.
• Trims must be mechanically fixed into the OSB3 deck using 20mm large headed galvanised clout nails at
150mm centres.
• When joining two lengths of trims together, ensure there is a minimum overlap of 50mm and use MS
Polymer adhesive to secure in place prior to mechanically fixing.
• All joints in the trims and the junction between the trims and the OSB3 deck will need to be locally
reinforced with Res-Tec Taping Mat and Flexitec 2020 resin.

Page 14 of 32
Drip Trims
• It will be necessary to install two timber 19mm x 38mm battens at these edges to ensure that the drip trim
is located in the centre of the gutter. The second batten should be fixed approximately 10mm lower than
the first
• If there is a potential for standing water issues, the gutter side of the OSB3 should be marked with the back
of the drip trim and carefully rebated before it is nailed. The OSB3 can then by nailed and the drip trim
fitted so that it finishes level with the top of the OSB3 (i.e. the drip trim is in fact "countersunk" flush with
the top of the OSB3).
Upstand Fascia Trims aka Raised Edge
• Because there is no gutter present at these edges, only one 19mm x 38mm batten will be required which
should be installed to be level with the adjacent fascia board/OSB3 deck.
Corner Pieces
• Corner pieces should be trimmed to size so that they exactly match the adjacent edge trims.

Page 15 of 32
Wall Fillet
• Ensure the vertical face of the trim sits parallel to the wall. DO NOT fix the
vertical section to the wall.
• These trims should also be installed at any other right angle abutments.
Cover Flashings
• The flashing trims should be fixed AFTER the application of the Flexitec 2020
system.
• Before re-decking, a chase should be cut into the mortar of the brickwork
using a suitable grinder into which the trim will be slotted in.
• Before placing the trim into the chase, apply a continuous bead of MS
Polymer adhesive to the rear of the trim so that it becomes bonded in place.
• Once in place apply clear silicone sealant across the length of chase/trim joint to provide a
weatherproof seal.
• NB - If there is already cover flashing in place (such as lead or similar) in sound condition it may not
be necessary to install cover flashing trims.
Flat Trims to Pitched Roof Abutments
• The first two courses of slates/tiles should be removed as
required and lift under-slating felt prior to installing the flat sheet
trim at pitched roof abutments.
• The trim must only be fixed to the OSB3 deck so that the section
of the trim resting against the pitched roof is free to move during
building expansion/contraction movements.
• When applying the first coat of Flexitec 2020 Resin, ensure that
the nailed section is covered with reinforcement. Flexitec 2020
Resin should be extended to cover the whole trim.
• Replace the under-slating felt and slates/tiles upon completion of
works after the system has fully cured.
Expansion Trims (Only for Timber Deck Roofs over 50m2 or Roofs in Excess of 10m in Length)
• Expansion joint trims should be placed centrally over a 25mm expansion gap
between the OSB3 boards and mechanically fixed either side.
• When joining two lengths of trims together, ensure there is a minimum
overlap of 50mm and use MS Polymer adhesive to secure in place prior to
mechanically fixing.
• The joint and the fixings should then be locally reinforced and then the full reinforced Base Coat
laminate can be applied over the trim.
Coating and Reinforcing the Trim Joints
Trims should be thoroughly wiped with acetone before applying the Flexitec 2020 system. All trim joints and
the joint between trims and the substrate will require local reinforcement with two layers of Res-Tec taping mat
(refer to Section 8 details). Trims are then to be encapsulated with Flexitec 2020 resin (NB: the reinforcement
within the first coat can be stopped on the horizontal part of the trim).

Page 16 of 32
7. Priming with Flexitec 2020 Primer
Important Notes
When to Prime
Flexitec 2020 Primer is recommended for all porous, bituminous, cementitious, timber and PVC single ply
substrates. IMPORTANT - Failure to prime porous surfaces, such as concrete, brickwork, tissue-faced
insulation or plywood may result in an under-cure of the Flexitec 2020 resin and potential system failure. GRP
surfaces, including ResTrims, do not require priming.
Application Conditions
Flexitec 2020 Primer should be applied in dry conditions between 5°C and 30°C ambient air temperature. Do
not begin if conditions could fall outside of the temperature range and/or if rain appears likely.
Coverage Rates & Quantities
Flexitec 2020 Primer is applied at a coverage rate of 4-6m2/Litre (3.5 – 5.3m2 / kg) depending on surface
roughness. Rough or highly porous surfaces will significantly reduce the coverage rate. All coverage rates are
indicative only and it is your responsibility to ascertain the exact coverage rates on site. IMPORTANT – A
recommended additional 10% wastage should be factored into the figures below.
The table below shows typical quantities of Flexitec 2020 Primer for various roof area sizes.
Roof Area
Amount of Flexitec 2020 Primer Required
Smooth Surfaces Medium Surfaces Rough Surfaces
Approx. Weight
Volume Approx. Weight
Volume Approx. Weight
Volume
5 m2 0.9 kg 0.8 ltrs 1.1 kg 1.0 ltrs 1.4 kg 1.3 ltrs
10 m2 1.9 kg 1.7 ltrs 2.3 kg 2.0 ltrs 2.9 kg 2.5 ltrs
15 m2 2.8 kg 2.5 ltrs 3.4 kg 3.0 ltrs 4.3 kg 3.8 ltrs
20 m2 3.8 kg 3.3 ltrs 4.6 kg 4.0 ltrs 5.7 kg 5.0 ltrs
25 m2 4.7 kg 4.2 ltrs 5.7 kg 5.0 ltrs 7.1 kg 6.3 ltrs
30 m2 5.7 kg 5.0 ltrs 6.8 kg 6.0 ltrs 8.6 kg 7.5 ltrs
40 m2 7.6 kg 6.7 ltrs 9.1 kg 8.0 ltrs 11.4 kg 10.0 ltrs
50 m2 9.5 kg 8.3 ltrs 11.4 kg 10.0 ltrs 14.3 kg 12.5 ltrs
70 m2 13.3 kg 11.7 ltrs 16.0 kg 14.0 ltrs 20.0 kg 17.5 ltrs
100 m2 19.0 kg 16.7 ltrs 22.8 kg 20.0 ltrs 28.5 kg 25.0 ltrs
Page 17 of 32
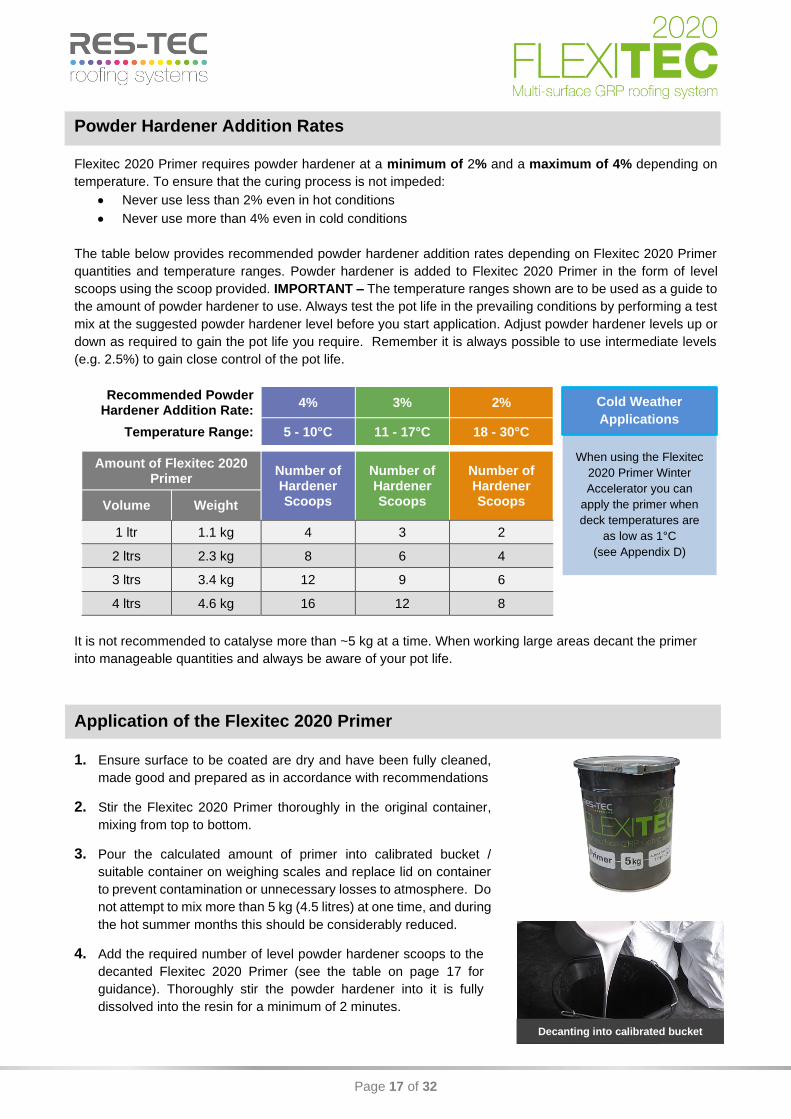
Powder Hardener Addition Rates
Flexitec 2020 Primer requires powder hardener at a minimum of 2% and a maximum of 4% depending on
temperature. To ensure that the curing process is not impeded:
• Never use less than 2% even in hot conditions
• Never use more than 4% even in cold conditions
The table below provides recommended powder hardener addition rates depending on Flexitec 2020 Primer
quantities and temperature ranges. Powder hardener is added to Flexitec 2020 Primer in the form of level
scoops using the scoop provided. IMPORTANT – The temperature ranges shown are to be used as a guide to
the amount of powder hardener to use. Always test the pot life in the prevailing conditions by performing a test
mix at the suggested powder hardener level before you start application. Adjust powder hardener levels up or
down as required to gain the pot life you require. Remember it is always possible to use intermediate levels
(e.g. 2.5%) to gain close control of the pot life.
Recommended Powder Hardener Addition Rate:
4% 3% 2%
Temperature Range: 5 - 10°C 11 - 17°C 18 - 30°C
Amount of Flexitec 2020 Primer
Number of Hardener Scoops
Number of Hardener Scoops
Number of Hardener Scoops Volume Weight
1 ltr 1.1 kg 4 3 2
2 ltrs 2.3 kg 8 6 4
3 ltrs 3.4 kg 12 9 6
4 ltrs 4.6 kg 16 12 8
It is not recommended to catalyse more than ~5 kg at a time. When working large areas decant the primer
into manageable quantities and always be aware of your pot life.
Application of the Flexitec 2020 Primer
1. Ensure surface to be coated are dry and have been fully cleaned,
made good and prepared as in accordance with recommendations
2. Stir the Flexitec 2020 Primer thoroughly in the original container,
mixing from top to bottom.
3. Pour the calculated amount of primer into calibrated bucket /
suitable container on weighing scales and replace lid on container
to prevent contamination or unnecessary losses to atmosphere. Do
not attempt to mix more than 5 kg (4.5 litres) at one time, and during
the hot summer months this should be considerably reduced.
4. Add the required number of level powder hardener scoops to the
decanted Flexitec 2020 Primer (see the table on page 17 for
guidance). Thoroughly stir the powder hardener into it is fully
dissolved into the resin for a minimum of 2 minutes.
Decanting into calibrated bucket
When using the Flexitec
2020 Primer Winter
Accelerator you can
apply the primer when
deck temperatures are
as low as 1°C
(see Appendix D)
Cold Weather
Applications

Page 18 of 32
5. Once hardener has been stirred in apply the Flexitec 2020 Primer
by roller (or brush if access restricted) to the prepared surface at
the required coverage rate within the range of 4-6m2/Litre (3.5 –
5.3m2 / kg). Ensure an even, uniform application across all
surfaces. Important – If coating OSB3 TG4 boards, the primer
should be applied to the board joints by brush ensuring that
the primer fully fills the gaps.
6. Touch in any suspect areas where necessary and then allow to dry
before over-coating. The cure time is approximately 30 – 60
minutes depending on application conditions.
7. Ensure the primer is over-coated within 7 days. After this period
consult your distributor for advice.
8. Taping Joints, Details & Other Local Reinforcements
ResTrim Joints
Add powder hardener at the required rate to decanted Flexitec 2020 resin and thoroughly wet in two layers of
Res-Tec Taping Mat prior to application of Flexitec 2020 resin. NB: New ResTrims should be thoroughly wiped
with acetone prior to coating.
Local Reinforcements to Roof Details
To all upstands, internal outlets, protrusions, stepped joints, cracks/splits, dissimilar adjoining substrates or any other
detail requiring local reinforcement add powder hardener at the required rate to decanted Flexitec 2020 resin and
thoroughly wet and consolidate in Taping Mat prior to application of the main Flexitec 2020 system.
Important – to any joints/roof details subject to expansion movements apply 75mm dis-bondment tape (masking
tape or similar) to any joints subject to movement. Any joints subject to extreme movement e.g. metal sheet
laps, metal gutters, vibrating protrusions and the like must be treated with caution. If in doubt consult your
distributor for further advice.
IMPORTANT: Any OSB3 square edge board joints should be locally reinforced with Flexitec 2020
Primer consolidated into taping mat at an approximate coverage rate of 0.25 kg/m2 (0.25 litres/m2). Do
not use Flexitec 2020 resin for reinforcing timber square edge board joints.
Adding the powder hardener
Local reinforcement to stanchion Double reinforced trim joint Square edge OSB3 joints
reinforced with primer and taping
mat

Page 19 of 32
9. Flexitec 2020 Resin Application
Important Notes
Application Conditions
Flexitec 2020 Resin should be applied in dry conditions between 5°C and 30°C ambient air temperature. Do
not begin if conditions could fall outside of the temperature range and/or if rain appears likely.
Coverage Rates
• IMPORTANT - The following coverage rates are indicative only and it is your responsibility to ascertain
the exact coverage rates on site.
• The amount of Flexitec 2020 Resin required varies on the roughness of the substrate. Rough or highly
porous surfaces will significantly reduce the coverage rate.
• All coverage rates shown below are based on reinforcing the system with 225g/m2 fibreglass CSM
reinforcement. If using 450g/m2 fibreglass CSM reinforcement then an additional 0.5 Litres/m2 (0.7
kg/m2) will be required to the first coat application.
Typical Roof Surfaces Approximate Flexitec 2020 Resin Coverage per Square Metre
1st Coat Coverage Rate 2nd Coat Coverage Rate
Asphalt - Smooth 0.85 Litres/m2 (1.2 kg/m2) 0.5 Litres/m2 (0.7 kg/m2)
Asphalt - Medium 1.0 Litres/m2 (1.4 kg/m2) 0.5 Litres/m2 (0.7 kg/m2)
Asphalt – Rough/De-Chipped 1.4 Litres/m2 (2.0 kg/m2) 0.5 Litres/m2 (0.7 kg/m2)
Concrete / Screed* 1.0 Litres/m2 (1.4 kg/m2) 0.5 Litres/m2 (0.7 kg/m2)
Felt - Sanded / Smooth 0.85 Litres/m2 (1.2 kg/m2) 0.5 Litres/m2 (0.7 kg/m2)
Felt - Mineral 1.15 Litres/m2 (1.6 kg/m2) 0.5 Litres/m2 (0.7 kg/m2)
GRP 0.85 Litres/m2 (1.2 kg/m2) 0.5 Litres/m2 (0.7 kg/m2)
OSB3 TG4* 0.85 Litres/m2 (1.2 kg/m2) 0.5 Litres/m2 (0.7 kg/m2)
PVC Single-Ply 0.85 Litres/m2 (1.2 kg/m2) 0.5 Litres/m2 (0.7 kg/m2)
Quantities
The table overleaf shows typical quantities of Flexitec 2020 Resin for various roof area sizes when using
225g/m2 fibreglass CSM. IMPORTANT – A recommended 10% wastage allowance should be made in
addition to the quantities shown overleaf. Remember, vertical detailing work should be covered here.
Page 20 of 32
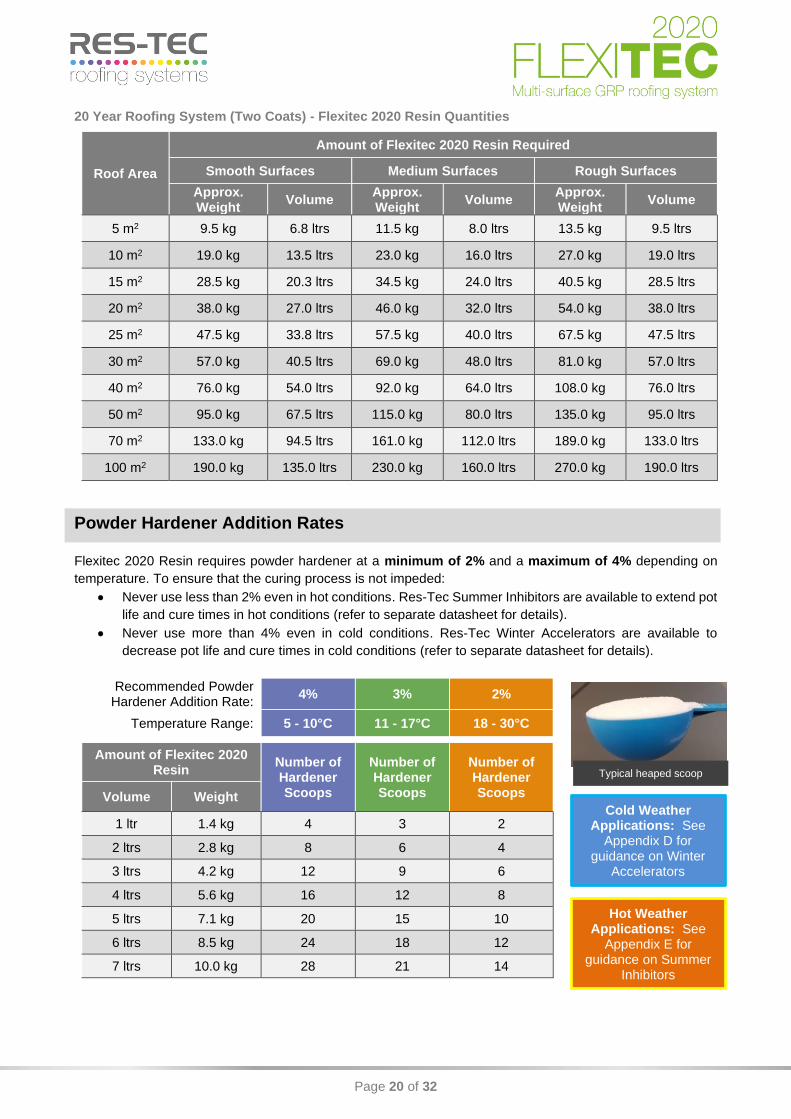
20 Year Roofing System (Two Coats) - Flexitec 2020 Resin Quantities
Roof Area
Amount of Flexitec 2020 Resin Required
Smooth Surfaces Medium Surfaces Rough Surfaces
Approx. Weight
Volume Approx. Weight
Volume Approx. Weight
Volume
5 m2 9.5 kg 6.8 ltrs 11.5 kg 8.0 ltrs 13.5 kg 9.5 ltrs
10 m2 19.0 kg 13.5 ltrs 23.0 kg 16.0 ltrs 27.0 kg 19.0 ltrs
15 m2 28.5 kg 20.3 ltrs 34.5 kg 24.0 ltrs 40.5 kg 28.5 ltrs
20 m2 38.0 kg 27.0 ltrs 46.0 kg 32.0 ltrs 54.0 kg 38.0 ltrs
25 m2 47.5 kg 33.8 ltrs 57.5 kg 40.0 ltrs 67.5 kg 47.5 ltrs
30 m2 57.0 kg 40.5 ltrs 69.0 kg 48.0 ltrs 81.0 kg 57.0 ltrs
40 m2 76.0 kg 54.0 ltrs 92.0 kg 64.0 ltrs 108.0 kg 76.0 ltrs
50 m2 95.0 kg 67.5 ltrs 115.0 kg 80.0 ltrs 135.0 kg 95.0 ltrs
70 m2 133.0 kg 94.5 ltrs 161.0 kg 112.0 ltrs 189.0 kg 133.0 ltrs
100 m2 190.0 kg 135.0 ltrs 230.0 kg 160.0 ltrs 270.0 kg 190.0 ltrs
Powder Hardener Addition Rates
Flexitec 2020 Resin requires powder hardener at a minimum of 2% and a maximum of 4% depending on
temperature. To ensure that the curing process is not impeded:
• Never use less than 2% even in hot conditions. Res-Tec Summer Inhibitors are available to extend pot
life and cure times in hot conditions (refer to separate datasheet for details).
• Never use more than 4% even in cold conditions. Res-Tec Winter Accelerators are available to
decrease pot life and cure times in cold conditions (refer to separate datasheet for details).
Recommended Powder Hardener Addition Rate:
4% 3% 2%
Temperature Range: 5 - 10°C 11 - 17°C 18 - 30°C
Amount of Flexitec 2020 Resin
Number of Hardener Scoops
Number of Hardener Scoops
Number of Hardener Scoops Volume Weight
1 ltr 1.4 kg 4 3 2
2 ltrs 2.8 kg 8 6 4
3 ltrs 4.2 kg 12 9 6
4 ltrs 5.6 kg 16 12 8
5 ltrs 7.1 kg 20 15 10
6 ltrs 8.5 kg 24 18 12
7 ltrs 10.0 kg 28 21 14
Typical heaped scoop
Cold Weather Applications: See
Appendix D for guidance on Winter
Accelerators
Hot Weather Applications: See
Appendix E for guidance on Summer
Inhibitors
Page 21 of 32
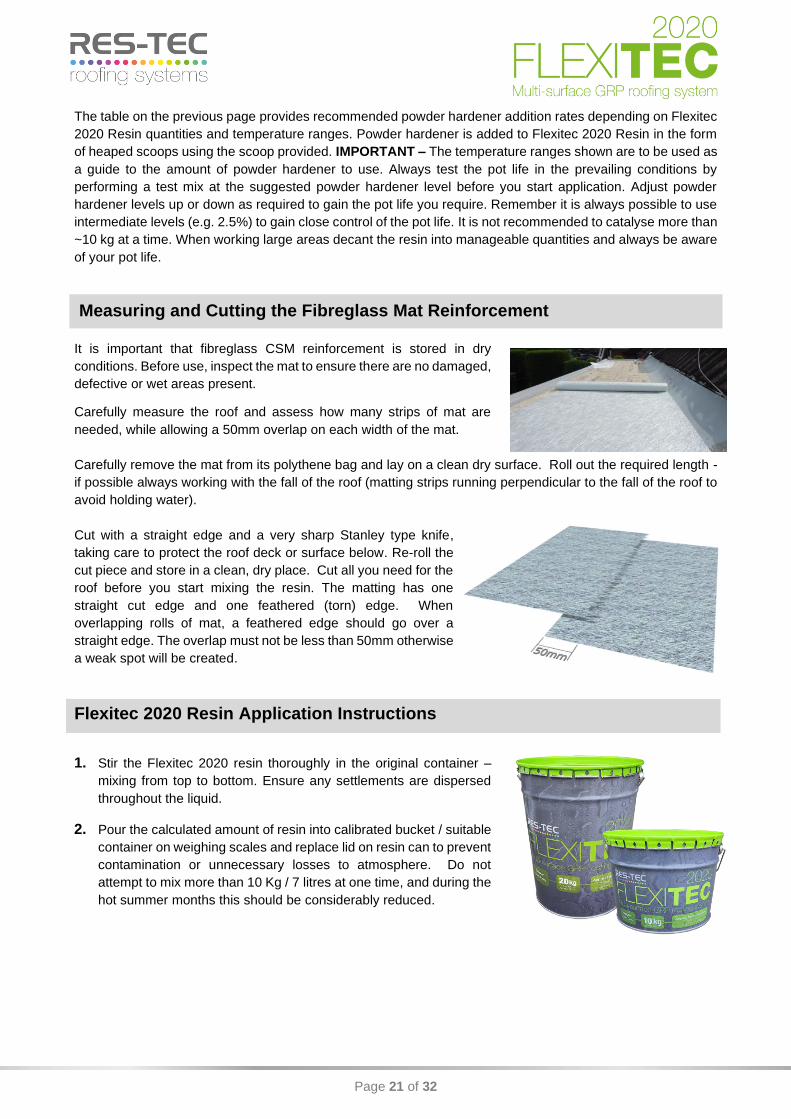
The table on the previous page provides recommended powder hardener addition rates depending on Flexitec
2020 Resin quantities and temperature ranges. Powder hardener is added to Flexitec 2020 Resin in the form
of heaped scoops using the scoop provided. IMPORTANT – The temperature ranges shown are to be used as
a guide to the amount of powder hardener to use. Always test the pot life in the prevailing conditions by
performing a test mix at the suggested powder hardener level before you start application. Adjust powder
hardener levels up or down as required to gain the pot life you require. Remember it is always possible to use
intermediate levels (e.g. 2.5%) to gain close control of the pot life. It is not recommended to catalyse more than
~10 kg at a time. When working large areas decant the resin into manageable quantities and always be aware
of your pot life.
Measuring and Cutting the Fibreglass Mat Reinforcement
It is important that fibreglass CSM reinforcement is stored in dry
conditions. Before use, inspect the mat to ensure there are no damaged,
defective or wet areas present.
Carefully measure the roof and assess how many strips of mat are
needed, while allowing a 50mm overlap on each width of the mat.
Carefully remove the mat from its polythene bag and lay on a clean dry surface. Roll out the required length -
if possible always working with the fall of the roof (matting strips running perpendicular to the fall of the roof to
avoid holding water).
Cut with a straight edge and a very sharp Stanley type knife,
taking care to protect the roof deck or surface below. Re-roll the
cut piece and store in a clean, dry place. Cut all you need for the
roof before you start mixing the resin. The matting has one
straight cut edge and one feathered (torn) edge. When
overlapping rolls of mat, a feathered edge should go over a
straight edge. The overlap must not be less than 50mm otherwise
a weak spot will be created.
Flexitec 2020 Resin Application Instructions
1. Stir the Flexitec 2020 resin thoroughly in the original container –
mixing from top to bottom. Ensure any settlements are dispersed
throughout the liquid.
2. Pour the calculated amount of resin into calibrated bucket / suitable
container on weighing scales and replace lid on resin can to prevent
contamination or unnecessary losses to atmosphere. Do not
attempt to mix more than 10 Kg / 7 litres at one time, and during the
hot summer months this should be considerably reduced.

Page 22 of 32
3. Add the required amount of powder hardener (see table on page 20
for further details) direct into the measured out resin and mix
thoroughly, stirring for a minimum 1.5 minutes. Ensure the powder
is thoroughly dissolved into the resin.
4. Apply by roller approximately two thirds of the required amount of
resin onto the roof surface. Roll out the fibreglass CSM over the
resin, ensuring the mat is correctly orientated so the straight cut
edge is overlapped by the feathered edge of the next strip. Work the
CSM fibres into the Flexitec 2020 resin before applying the
remaining one third of resin. Leave matting to soften for 2 minutes
and consolidate with the roller until the matting appears “swirly” and
no straight fibres remain. Ensure a closed, pinhole-free surface is
achieved.
5. Inspect thoroughly and if there appear to be any areas with
insufficient resin (voids, prominent fibres or spots remaining white)
apply extra resin as required. Allow to cure (30 – 60 minutes
depending on conditions) before walking over the membrane.
6. A second coat of Flexitec 2020 resin should be applied at a
minimum coverage rate of 0.5 Litres/m2 (0.7 kg/m2). Decant and add
powder hardener as previously described, applying by roller
ensuring an even and uniform thickness. Allow to cure and then
check for pinholes / misses and rectify accordingly. Important – The
second coat should be applied as soon as possible, there is a
maximum over coating time of up to 7 days. After this period
cleaning with acetone will be required which will allow another 7
days over coating time. If left for longer than 14 days consult your
distributor for advice.
Hardener added and stirred into
resin
Wetting through the fibreglass CSM
Ensure a pinhole-free surface
Second coat applied
First coat applied at the correct coverage, with the
matting fully consolidated and “swirly” in appearance
The first coat applied with too little resin or the matting
not worked enough, with fibres still straight in
appearance

Page 23 of 32
Anti-Slip Finishes
Heavy Duty Foot Traffic – Using Flexitec Balcony Sealer
Flexitec Balcony Sealer is an MMA resin used in conjunction with quartz sand and the Flexitec
2020 System to provide a tough balcony surface suitable for regular foot traffic. The following
should be carried out upon completion of the application of the Flexitec 2020 waterproofing
system. The Flexitec Balcony Sealer resin is available in Light Grey, Dark Grey and Clear
versions and is designed for use with Res-Tec Quartz Sand anti-slip aggregate:
Std Quartz Sand with Flexitec Balcony Sealer (Light Grey)
Std Quartz Sand with Flexitec Balcony Sealer (Dark Grey)
Barnowl Blend Quartz Sand with Flexitec Balcony Sealer (Clear)
Bayside Blend Quartz Sand with Flexitec Balcony Sealer (Clear)
Harvest Blend Quartz Sand with Flexitec Balcony Sealer (Clear)
Mist Blend Quartz Sand with Flexitec Balcony Sealer (Clear)
Vineyard Blend Quartz Sand with Flexitec Balcony Sealer (Clear)
Hillside Blend Quartz Sand with Flexitec Balcony Sealer (Clear)
1. Mask off areas that are not to be trafficked. These areas could include trims and upstands. In the instance
where a maintenance pathway is being formed, you should use masking tape to create the designated
walkway area.
2. To areas where grit will be required, apply an additional third coat of Flexitec 2020 resin at a coverage rate
of 0.5 Litres/m2 (0.7 kg/m2).
3. Whilst wet broadcast dry & clean Quartz Sand aggregate grit at a minimum coverage rate of 4.0kg/m2.
IMPORTANT – remove masking tape before the third coat of Flexitec 2020 resin has cured.
4. Once cured remove loose sand. Approximate finished coverage rate of sand will be 2.5kg/m2 and the
remaining 1.5kg may be recovered for future use. Reapply the masking tape around the edges of the sand.
5. Thoroughly mix Flexitec Balcony Sealer liquid in its original container before decanting. Add in the required
amount of catalyst (refer to Catalyst Addition Chart table on the tin’s label) and stir thoroughly for at least 2
minutes.
6. Apply Flexitec Balcony Sealer Resin using a 225mm Medium Pile Roller at a minimum coverage rate of
0.6Litres/m2 (1.67m2/Litre). Remove masking tape and then allow to cure.
Occasional Foot Traffic – Using Mineral Slate Grit
1. Mask off areas as described above.
2. To areas where grit will be required, apply an additional third coat of Flexitec
2020 resin at a coverage rate of 0.5 Litres/m2 (0.7 kg/m2).
3. Whilst wet broadcast dry & clean mineral slate grit at a minimum coverage
rate of 2.5kg/m2. IMPORTANT – remove masking tape before the third coat
of Flexitec 2020 resin has cured.
4. Once the Flexitec 2020 resin has cured remove loose grit. Approximate retained grit will be 1.5kg/m2 and the
remaining grit may be recovered for future use
Typical Green Mineral Slate Finish

Page 24 of 32
Applying Flexitec 2020 - Do’s and Don’ts
DO
✓ Remember the 4 C’s to a successful installation:
1. Coverage: know how much material you should use
2. Catalyst: how much powder hardener you need to use
3. Consolidation: ensure matting is fully worked into resin to achieve a “swirly” appearance
4. Care: take time to follow guidance to ensure a high quality finish to the job
✓ Protect nearby surfaces from drips and splashes.
✓ For larger roof areas you should consider “gridding out” the roof with chalk. Work out how many square
metres a tin of Flexitec 2020 resin will cover at the correct coverage rate. Mark out a grid with areas equal
to the coverage of a tin to help ensure the correct application volumes.
✓ Tape underside of the any non-T&G board joints with masking tape to ensure that no resin can drip
through the board gaps onto the floor area or equipment in the room below and close any up and over
garage doors.
✓ If the roof gets wet between coats, use a brush/mop to remove any large pools of water. Use a twin motor
vacuum available from most hire shops, accompanied by a wet suction head to remove any remaining
water. Note: A wet suction head is far more effective than a standard squeegee head. Once the roof is dry,
use an acetone wipe* whenever the first coat has been rained upon.
* To acetone wipe: Pour a quantity of acetone into a bucket, soak a clean rag in the acetone, squeeze out
any excess until not dripping, and then wipe each area of the first coat with the acetone rag. Change the
rag for a clean one frequently to avoid transferring contamination. Work in small areas. Allow the acetone
to vaporise off completely before progressing (around 5 minutes) and apply a second coat within 15
minutes of acetone wiping for best effect. Note – Acetone is a highly flammable liquid. Observe all safety
precautions.
DO NOT
Apply the a one coat system (without a top coat) to new decks (e.g. OSB3 or concrete/screed) or porous
surfaces. You must use the 20 Year System (two coat) application for these surfaces.
Fail to carry out a thorough inspection of the membrane after each coat to ensure a closed, pinhole-free
surface has been achieved.
Overlay an old roof without assessing whether it is sound, dry and free from defects. You should always
carry out core tests to determine the existing construction and its condition (see Appendix A).
Coat a single-ply roof or an unidentified roof surface without confirming adhesion can be achieved. You
should carry out adhesion tests to check this (see Appendix B)
Use a gas torch or any form of heat to dry the membrane.
Pour acetone directly onto the membrane.

Page 25 of 32
10. Cleaning Tools
Acetone is the normal solvent for cleaning rollers and tools and for removing spills. Health and Safety
information regarding acetone should be noted. Hands should be cleaned with a suitable hand cleaner such
as Swarfega or Deb Resinega.
Note – Acetone is a highly flammable liquid. Observe all safety precautions. Do not use Acetone close to any
naked lights or electrical equipment. Wear appropriate PPE (minimum rubber gloves and safety goggles).
Take appropriate precautions when disposing of Acetone soaked rags - remember - flammable vapours can
build up in confined spaces and present a fire risk
11. Repairs
Repairs to the completed Flexitec 2020 system are straightforward. Simply clean the surface then acetone
wipe before reapplying a one or two coat system (as per Section 8) including fibreglass CSM reinforcement
12. Day Work Joints
Primer Application
Flexitec 2020 Primer application may be continued by applying further product, ensuring an overlap of
approximately 50 mm onto the previously primed area. If there has been precipitation ensure that all surfaces
including the overlap area are dried before commencing. If the primed area has become contaminated it should
be thoroughly cleaned prior to application of further primer. Any contamination of the uncoated surface may
mean that the surface will need to be prepared again. The primer should ideally be over-coated by Flexitec
2020 Resin within 48 hrs in order to achieve the maximum adhesion.
First Coat Application
Ensure on completion of a day’s work that any mat that has been laid is completely embedded in Flexitec 2020
Resin by extending the application by at least 50mm beyond the edge of the mat. The overlap area should be
prepared by cleaning and drying the previously applied Flexitec 2020 Resin and wiping down with acetone to
ensure maximum adhesion. Subsequent application will generally occur by simply applying the Flexitec 2020
Resin over the top of the existing cured product ensuring that the mat overlaps the existing mat by at least 50
mm. Use masking tape to produce a neat joint and do not attempt to “feather” the application as applying thinly
on the edge can result in under-cure.
Second Coat Application
The overlap area should be prepared by cleaning and drying the previously applied Flexitec 2020 Resin and
wiping down with acetone to ensure maximum adhesion. Subsequent application will generally occur by simply
applying the Flexitec 2020 Resin over the top of the existing cured product. Use masking tape to produce a
neat joint and do not attempt to feather” the application as applying thinly on the edge can result in under-cure.
Page 26 of 32
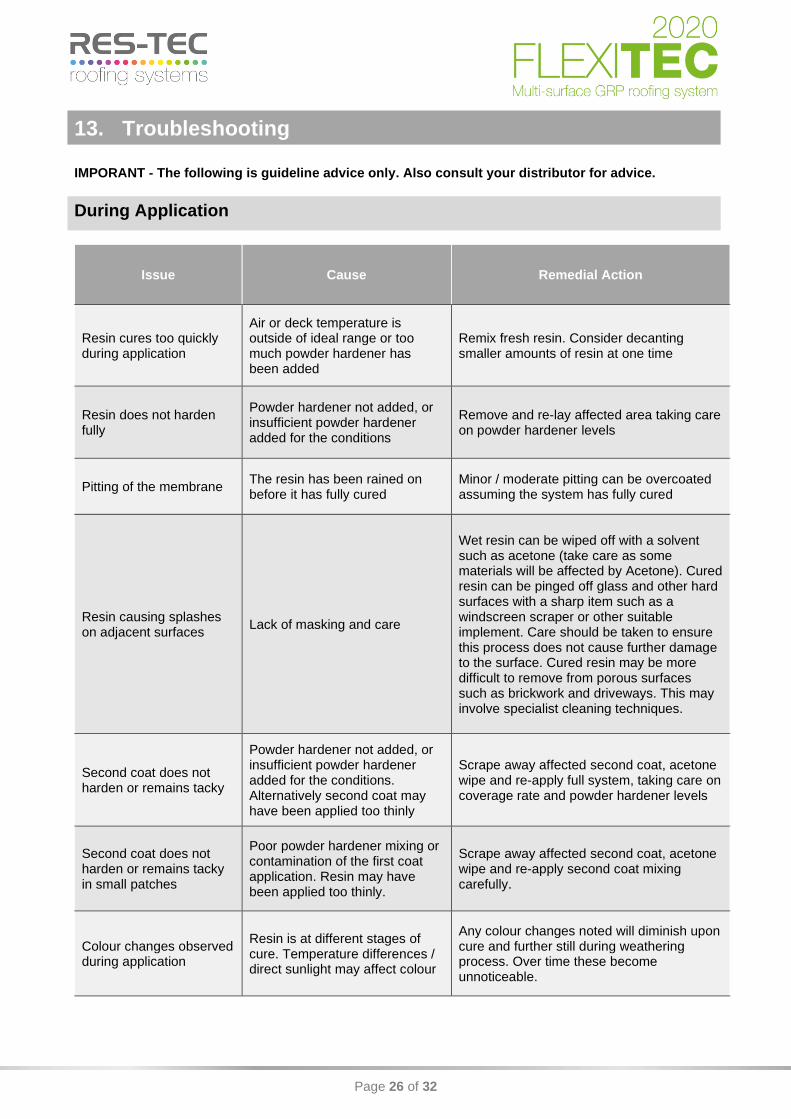
13. Troubleshooting
IMPORANT - The following is guideline advice only. Also consult your distributor for advice.
During Application
Issue Cause Remedial Action
Resin cures too quickly during application
Air or deck temperature is outside of ideal range or too much powder hardener has been added
Remix fresh resin. Consider decanting smaller amounts of resin at one time
Resin does not harden fully
Powder hardener not added, or insufficient powder hardener added for the conditions
Remove and re-lay affected area taking care on powder hardener levels
Pitting of the membrane The resin has been rained on before it has fully cured
Minor / moderate pitting can be overcoated assuming the system has fully cured
Resin causing splashes on adjacent surfaces
Lack of masking and care
Wet resin can be wiped off with a solvent such as acetone (take care as some materials will be affected by Acetone). Cured resin can be pinged off glass and other hard surfaces with a sharp item such as a windscreen scraper or other suitable implement. Care should be taken to ensure this process does not cause further damage to the surface. Cured resin may be more difficult to remove from porous surfaces such as brickwork and driveways. This may involve specialist cleaning techniques.
Second coat does not harden or remains tacky
Powder hardener not added, or insufficient powder hardener added for the conditions. Alternatively second coat may have been applied too thinly
Scrape away affected second coat, acetone wipe and re-apply full system, taking care on coverage rate and powder hardener levels
Second coat does not harden or remains tacky in small patches
Poor powder hardener mixing or contamination of the first coat application. Resin may have been applied too thinly.
Scrape away affected second coat, acetone wipe and re-apply second coat mixing carefully.
Colour changes observed during application
Resin is at different stages of cure. Temperature differences / direct sunlight may affect colour
Any colour changes noted will diminish upon cure and further still during weathering process. Over time these become unnoticeable.

Page 27 of 32
After Installation
Issue Cause Remedial Action
Full system has separated from the decking
Decking was dirty, wet or of poor quality
Remove affected area and relay full system including the deck
The second coat is flaking away from the base
First coat was dirty or wet. Alternatively first coat may have been left more than 7 days prior to over-coating and not acetone wiped
Scrape away affected second coat, abrade, acetone wipe and relay system complete
Pinholes within the cured second coat
The first coat has not been properly consolidated or has been applied too thinly
Acetone wipe affected area and relay system complete
Cracking within the second coat
Second coat applied too thick Acetone wipe and relay system complete, taking care to observe correct second coat application rate
Ponding Deck has not been laid with sufficient falls or structure has deflection
If this is an issue then strip and re-deck roof with correct falls, Do not attempt to level roof by building up resin.
Discolouration of membrane
Bitumen leaching / lack of primer
Performance of system not affected. If aesthetics is a problem, reapply full system. To prevent issue ensure bituminous surfaces are fully primed.
Membrane delaminates / lifts away from surface
Adhesion tests not performed / incorrect surface preparation / unsuitable substrate / absence or improper use of primer
Remove the membrane, re-assess the surface for suitability of coating (use adhesion tests where necessary). If appropriate reapply system complete as per method identified through adhesion tests.
Surface of membrane feels tacky after curing
Applied outside of recommended temperature / incorrect catalyst levels / inadequate stirring of catalyst / cure contaminated with precipitation (rain or dew) / insufficient material applied / “over-rolling” (rolling the resin after cuing process has begun)
Usually no significant detrimental effect on the waterproofing characteristics or expected lifespan. If left untreated tackiness will typically diminish over time. However, membrane will attract dirt and if aesthetics is an issue then acetone wipe affected areas and relay the full system. Important – with severe tackiness beyond the surface, must acetone wipe and relay full system.
Colour variation
Different batches of resin used for top coat application / accelerated resin used alongside non-accelerated resin for top coat application
As you would with paint, always ensure the same batch number is used to avoid any potential differences in colour. If intending to use Winter accelerators, all top coat resin should be accelerated to reduce risk of colour variation. Note - colour difference will diminish over time as the membrane “chalks”.

Page 28 of 32
14. Safety Precautions
Material Safety Data Sheets
You must ensure that the information contained within the MSDS sheets is followed at all times. Material Safety
Data Sheets are available from your Flexitec 2020 Distributor and provide full health and safety precautions for
each product. These sheets should be kept on site at all times. Very important information is contained within
these sheets for applicators including First Aid, Accidental Release (Spillage), Disposal Considerations, Fire,
Transport, Exposure Limits and Personal Protective Equipment.
The use of appropriate PPE is required at all times when working with Res-Tec Flexitec 2020 resins (goggles,
gloves, overalls, vapour mask for any enclosed areas and dust mask when grinding). It is recommended to
have a first aid kit available, as well as eye wash bottles in case of splashes in the eyes.
Acetone is particularly hazardous and highly flammable and must not be used near to any potential sources of
ignition (e.g. naked flames or electrical equipment) or where concentrations of vapours could build up. Store
resin and powder hardener in closed containers in well-ventilated areas. Store under dry conditions between
5°C and 25°C, away from direct sunlight. Empty tins containing uncured Flexitec 2020 Resin or primer are
classed as hazardous waste and should be disposed of in accordance with relevant regulations.
15. Appendices
Appendix A – Performing a Core Test
Core tests should be carried out prior to any overlay application to ensure
that the full roof build-up is in a sound, dry condition and of a proper design
in accordance with BS 5250 Guidelines. A hole approximately 75mm wide
should be bored through the roof. The tools required to create the hole
will vary depending on the roof build-up, e.g. Stanley knife for cutting
through felt, hammer and chisel for asphalt or concrete, a core bit drill for
timber or a pad saw for insulation.
Once complete, the sample should be removed for inspection to determine whether all layers are totally dry and
free from any signs of deterioration or rot. Any wet or defective roof areas are not suitable for over-coating and
should be removed and replaced on a like for like basis. Once the sample has been assessed, return it into the
hole and apply a one-coat application of Flexitec 2020 Resin with fibreglass CSM reinforcement to a minimum
area of 300mm by 300mm around the centre of the hole, ensuring a fully weatherproof seal has been achieved.
Appendix B – Performing an Adhesion Test
Adhesion test methodology will vary depending on the surface to be
coated. The following is typical guidance that would be applicable for a
single ply or unidentified coating.
Thoroughly clean an area to be tested approximately 300mm x 300mm. Scrub
half the sample with acetone and wait until it fully evaporates. Next, decant
and add powder hardener at the required amount of Flexitec 2020 Primer and
apply to half the sample in the opposite orientation to the acetone wipe. Once
the primer has cured, add powder hardener at the required rate to decanted FLEXITEC 2020 PRIMER
AC
ET
ON
E W
IPE

Page 29 of 32
Flexitec 2020 Resin and apply by roller over the sample and embed cut-to-size fibreglass CSM, which should
be fully consolidated with resin. IMPORTANT – Make sure to take a sketch, photo or clearly mark around the
samples in order to record what preparation has been carried out
Return to the sample 7 days later with a Stanley knife and attempt to dislodge the membrane from the surface,
assessing each of the four areas for level of adhesion. If the surface is suitable for over-coating, you will not
be able to lift the membrane from at least one of the four areas. If more than one area shows excellent adhesion,
chose your preferred surface preparation.
Appendix C - Important Notes on Powder Hardener Levels
Temperature has a significant impact on the pot life (working time) and cure time of the resins and primers. Be
sure to accurately measure the temperature of the deck, air and resin to ensure that you are catalysing at a
suitable rate.
Varying powder hardener levels can increase or decrease the pot life (working time) of the product. It is very
important not to exceed the maximum recommended levels. Doing so has no effect on reactivity and may reduce
the final cured properties of the system. Similarly, never add less than the recommended amount of powder
hardener as this may result in under cure and reduced performance will result. Where conditions are extremely
warm it may be necessary to decant smaller quantities at one time to avoid excessive waste.
Appendix D – Low Temp Applications: Using Winter Accelerators
Introduction
Before working with Res-Tec Flexitec 2020 Accelerators it is vital to read and understand the separate
technical datasheet for full details. Most importantly the accelerator must be thoroughly mixed into the
resin before Powder Hardener is added. Accelerator and Powder Hardener must never be allowed to
come directly into contact with each other.
When to use Winter Accelerators
The winter accelerator is used to speed up the curing of the Flexitec 2020 Resin or Primer to allow faster working
times in cold conditions and to allow the use of materials at deck temperatures as low as 1°C. Accelerator is used
in addition to the normal powder hardener – not as a replacement. Without accelerator the Flexitec 2020 Resin or
Primer should not be used below 5°C or where the temperature may fall below 5°C before the resin is cured.
Usable Temperature
Refer to the full datasheet for further information on temperature ranges and equipment required.:
• Surface Temperature - Surfaces should be between 1⁰C and 10⁰C.
• Resin Temperature - Ideally if possible the resin should be kept between 5⁰C and 10⁰C prior to use.
This may not always be possible but you should try and avoid storing at room temperature prior to
adding accelerator to avoid a too short working time.
Method
Add the whole Accelerator pack to the opened and stirred product in its original container at:
• 10kg Flexitec 2020 Resin = 1x Flexitec 2020 Resin Accelerator
• 20kg Flexitec 2020 Resin = 2x Flexitec 2020 Resin Accelerator
• 5kg Flexitec 2020 Primer = 1x Flexitec 2020 Primer Accelerator
IMPORTANT: Winter accelerators are not a replacement for the powder hardener. After the Accelerator has
been thoroughly stirred into the main products, add the powder hardener as described in page 17 (primer) or
20 (resin).

Page 30 of 32
Important Notes:
• There may be a minor colour difference evident when accelerator is added. For this reason, accelerated and
un-accelerated product should not be used side by side on the same job if such colour difference is likely to
be undesirable for the client.
• The accelerator should not be added to products other than Flexitec 2020 Resin or Primer
• The accelerator must be mixed completely into the resin or primer before adding Powder Hardener
• Store the accelerator well away from Flexitec 2020 Powder Hardener and other organic peroxides
• Never allow the accelerator to come into direct contact with Flexitec 2020 Powder Hardener or other organic
peroxides
• Read and familiarise yourselves with the TDS and MSDS for each part of the Flexitec 2020 System
Appendix E – High Temp Applications: Using Summer Inhibitors
Introduction
Before working with Res-Tec Flexitec 2020 Inhibitors it is vital to read and understand the separate
technical datasheet for full details. Most importantly the inhibitor must be thoroughly mixed into the
resin before Powder Hardener is added.
When to use Winter Accelerators
Flexitec 2020 Summer Inhibitor extends the pot-life of the Flexitec 2020 Resin which is invaluable when
temperatures are high during the summer months. The Flexitec 2020 Summer Inhibitor can be added to Flexitec
2020 Resin on site prior to use. It should only be added as temperature ranges permit. IMPORTANT: Flexitec
2020 Summer Inhibitor is not designed as a replacement for the powder hardener. After the Flexitec 2020
Summer Inhibitor has been added you will still need to add the powder hardener (at the minimum rate of 2%)
before you use the product.
Usable Temperature
Refer to the full datasheet for further information on temperature ranges and equipment required.:
• Surface Temperature - Surfaces should be between 15⁰C and 40⁰C.
• Resin Temperature - The resin in which you will be adding Flexitec 2020 Summer Inhibitor should not
be overly warm. To measure this you will require a good quality probe thermometer. Ideally, if possible
the resin should be kept between 15⁰C and 25⁰C prior to use.
Method
Add a full tin of Flexitec 2020 Summer Inhibitor top Flexitec 2020 Resin as follows:
• Add 1 pot of Summer Inhibitor to 10kg Flexitec 2020 Resin
• Add 2 pots of Summer Inhibitor to 20kg Flexitec 2020 Resin
IMPORTANT: Summer Inhibitors are not a replacement for the powder hardener. After the Inhibitor has been
thoroughly stirred into the main products, add the powder hardener as described in page 20
Important Notes:
• It is advisable to work with smaller mixes in hot weather. The less material you use to make a mix, the less
chance there will be product that cures to quickly and goes to waste.
• There may be a minor colour difference evident when inhibitor is added. For this reason, inhibited and un-
inhibited product should not be used side by side on the same job if such colour difference is likely to be
undesirable for the client.
• The inhibitor should not be added to products other than Flexitec 2020 Resin
• The inhibitor must be mixed completely into the resin before adding Flexitec 2020 Powder Hardener
• Store the accelerator well away from Flexitec 2020 Powder Hardener and other organic peroxides
• Read and familiarise yourselves with the TDS and MSDS for each part of the Flexitec 2020 System
Page 31 of 32
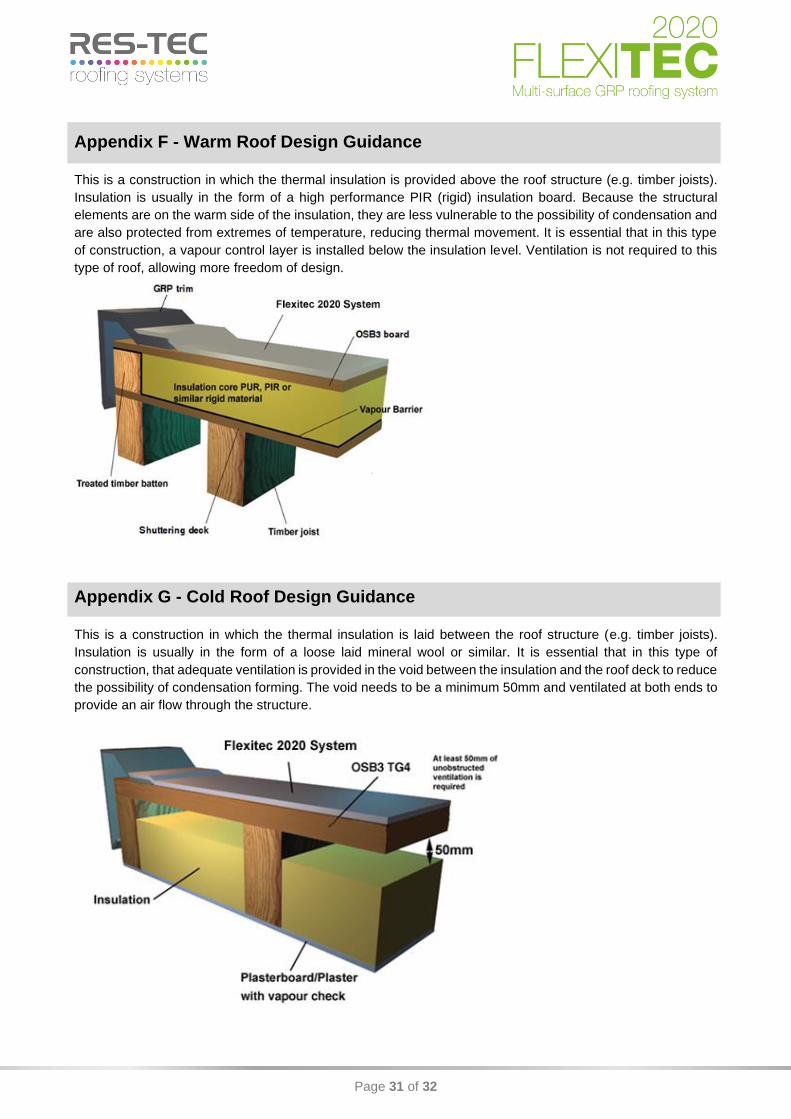
Appendix F - Warm Roof Design Guidance
This is a construction in which the thermal insulation is provided above the roof structure (e.g. timber joists).
Insulation is usually in the form of a high performance PIR (rigid) insulation board. Because the structural
elements are on the warm side of the insulation, they are less vulnerable to the possibility of condensation and
are also protected from extremes of temperature, reducing thermal movement. It is essential that in this type
of construction, a vapour control layer is installed below the insulation level. Ventilation is not required to this
type of roof, allowing more freedom of design.
Appendix G - Cold Roof Design Guidance
This is a construction in which the thermal insulation is laid between the roof structure (e.g. timber joists).
Insulation is usually in the form of a loose laid mineral wool or similar. It is essential that in this type of
construction, that adequate ventilation is provided in the void between the insulation and the roof deck to reduce
the possibility of condensation forming. The void needs to be a minimum 50mm and ventilated at both ends to
provide an air flow through the structure.

Page 32 of 32
Res-Tec Limited, Unit 25, Castle Park Industrial Estate, Flint, Flintshire, CH6 5XA
Further information is available at: www.restecroofing.co.uk


