
Adobe Photoshop CS Design Professional
LAYER FUNCTIONSWORKING WITH SPECIAL

2Working with Special Layer Functions Chapter G
Use a layer mask with a selectionWork with layer masks and layer contentControl pixels to blend colorsEliminate a layer maskUse an adjustment layerCreate a clipping mask
Chapter Lessons

3Working with Special Layer Functions Chapter G
Use special layer features to modify an entire image or an entire layer
Define the precise area to manipulate in each layer
Adjust the appearance of each layer without altering the original image
Using Special Layer Features
4Working with Special Layer Functions Chapter G
Layer Functions
Turn changes on or offAlign imagesBlend and adjust colorCombine elements to enhance an image
5Working with Special Layer Functions Chapter G
Use a Layer Mask with a Selection Understanding Layer Masks
Layer masks can cover an entire layer or specific areas within a layer
Masks are flexible: – Hide their effect when viewing the
image or change the masks
Add an unlimited number of masks to an image:– One mask per layer

6Working with Special Layer Functions Chapter G
Creating a Layer MaskUse tools on the toolbox to create the area to mask
Apply the mask to the selection or to everything except the selection
Feather the edges of the selection, if required

7Working with Special Layer Functions Chapter G
Traditional Definition of Mask
The term Mask comes from printing:– A mask was
opaque material or tape used to block off an area of the artwork that would not be printed
MASK

8Working with Special Layer Functions Chapter G
Painting a Layer MaskAdd a layer mask to a layer
Reshape the layer mask with the Brush tool and a specific brush size or tip

9Working with Special Layer Functions Chapter G
Painting on a Black Foreground
If the image is painted with a black foreground, the size of the mask increases:– Each brush stroke hides pixels on the
image layer– Paint with black to hide pixels

10Working with Special Layer Functions Chapter G
Layer Mask Example
Layer mask thumbnail
Layer mask is black to hide
pixels
School Bus layer

11Working with Special Layer Functions Chapter G
Painting on a White Foreground
If the image is painted with white as the foreground, the size of the mask decreases:– Each brush stroke restores pixels of the
layer object– Paint with white to reveal pixels

12Working with Special Layer Functions Chapter G
Correcting a MaskSwitch the foreground and background colors and paint over the mistake
The Layer mask thumbnail on the Layer palette updates itself to reflect changes made to the mask

13Working with Special Layer Functions Chapter G
Work with Layer Masks and Layer Content Understanding Layers and Masks
The layer mask is a powerful editing tool:– Allows repeated editing of an image
without ever disturbing the original pixels that make up the image
By default, the mask is linked to the layer:– When the layer is moved, the mask
moves as well

14Working with Special Layer Functions Chapter G
Understanding the Link Icon
The Link icon appears when a layer mask is created and when layers or layer sets are linked
When creating a layer mask, the link icon appears between the layer thumbnail and the layer mask thumbnail

15Working with Special Layer Functions Chapter G
Linking Layers
Group or link layers to make multiple layers into one layer
To link layers, the layer (not the layer mask) must be active – Link the active layer to other layers,
even those in different layer sets– Link entire layer sets to a single
layer or to other layer sets

16Working with Special Layer Functions Chapter G
Using Linked Layers
After linking layers, perform actions that affect the linked group; for example:– Moving the content of linked layers
as a single unit
Unlink layers by clicking the Indicates if layer is linked button for each layer to unlink
17Working with Special Layer Functions Chapter G
Aligning Linked Layers
To align multiple layers:– Link the layers on the Layers palette– Select one of the six options from
the Align Linked command on the Layer menu

18Working with Special Layer Functions Chapter G
Aligned Layers
Centers of the Bananas, Nuts, and
Blueberries layers are aligned

19Working with Special Layer Functions Chapter G
Distributing Linked Layers
To distribute means to evenly space contentDistributing procedure:– Link three or more layers– Verify opacity settings are 50% or
greater– Select one of the six options from
the Distribute Linked command on the Layer menu

20Working with Special Layer Functions Chapter G
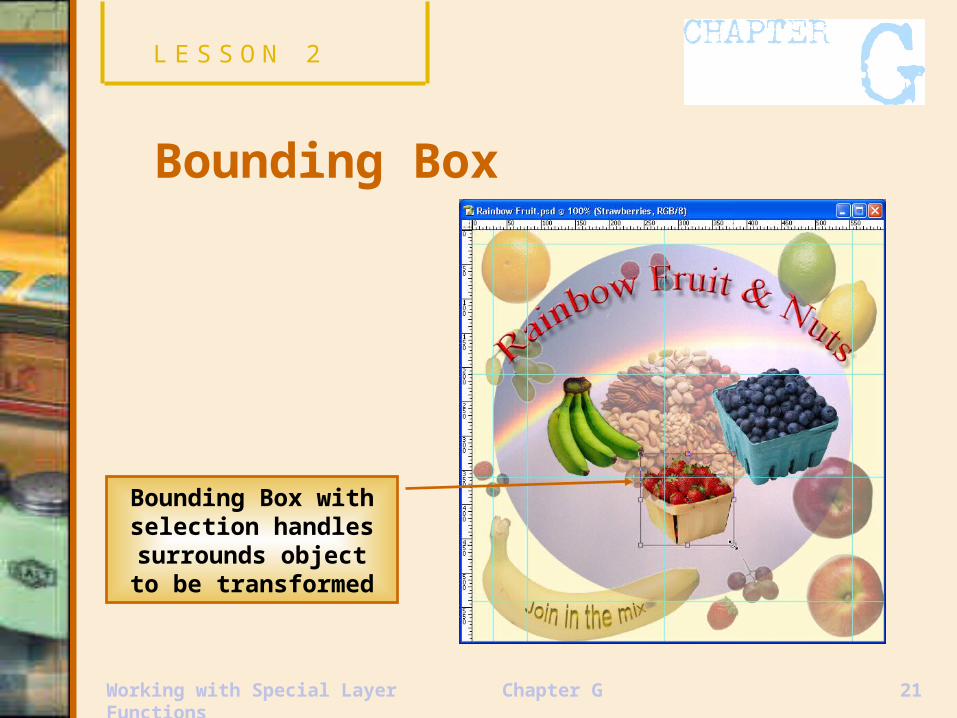
Transforming Objects
Use 1 of 10 transform commands on the Edit menu to transform an objectChoose a transforming command:– A bounding box appears around the
object to be transformed– A bounding box is a rectangle that
surrounds an image and contains handles used to change dimensions
21Working with Special Layer Functions Chapter G
Bounding Box
Bounding Box with selection handles
surrounds object to be transformed

22Working with Special Layer Functions Chapter G
Transforming Sequence
Select the object
Choose a transform command or a sequence of transform commands
Apply changes by clicking the Commit transform button on the tool options bar

23Working with Special Layer Functions Chapter G
Transforming Examples
Strawberries scaled
Nuts rotatedBefore After

24Working with Special Layer Functions Chapter G
Control Pixels to Blend Colors Blending Pixels
Control the colors and form of an image by blending pixels on one layer with pixels on another layer
Blending options are located in the Layer Style dialog box

25Working with Special Layer Functions Chapter G
Layer Style Dialog Box

26Working with Special Layer Functions Chapter G
Controlling Blending
Control how pixels are blended by choosing a color as the Blend If color– The Blend If color determines the
color range for the pixels to blend
Use the This Layer and Underlying Layer sliders

27Working with Special Layer Functions Chapter G
Blending ExampleBefore Pixels
Blended
After Pixels
Blended

28Working with Special Layer Functions Chapter G
Sliders
This Layer sliders– Specify the range of pixels that will
be blended on the active layer
Underlying Layer sliders– Specify the range of pixels that will
be blended on all the lower—but still visible—layers

29Working with Special Layer Functions Chapter G
Using Duplicate Layers
Create interesting effects by duplicating layers:– Click the layer to duplicate– Click the Layers palette list arrow– Click Duplicate Layer, then click OK

30Working with Special Layer Functions Chapter G
Eliminate a Layer Mask Disabling Layer Masks
Disable a layer mask to:– Create duplicate layers and layer masks– Apply different styles and affects to
layer masks– Show and hide layer masks individually
to find the mask that gives the desired look

31Working with Special Layer Functions Chapter G
Removing Layer Masks
Options for removing layer masks:– Apply the mask to the layer so that it
becomes a permanent part of the layer– Discard the mask and its effect
completely

32Working with Special Layer Functions Chapter G
Use an Adjustment Layer Understanding Adjustment Layers
A special layer that acts as a color filter for all the layers beneath
Create an adjustment layer to adjust color and tone
Color changes made to the adjust-ment layer exist only in the adjustment layer, leaving the original layer unchanged

33Working with Special Layer Functions Chapter G
Creating an Adjustment Layer
Select the layer to adjust
Use the Layer menu to click a new adjustments layer command or by clicking the Create new fill or adjustment layer button on the Layers palette
Specify which of the 11 color adjustments are required

34Working with Special Layer Functions Chapter G
Sample Adjustment Layer
New Adjustment Layer added to the
Layers palette

35Working with Special Layer Functions Chapter G
Color Adjustments Selective Color
Channel Mixer
Gradient Map
Invert
Threshold
Posterize
Levels
Curves
Color Balance
Brightness/Contrast
Hue/Saturation

36Working with Special Layer Functions Chapter G
Working with Adjustment Layers
Modify an adjustment layer by double-clicking the layer thumbnail on the adjustment layerUse as many adjustment layers as required, but create each layer individuallyMerge adjustment layers with any visible layers in the image, including linked layers

37Working with Special Layer Functions Chapter G
Create a Clipping Mask Understanding Clipping Masks
Group of two or more contiguous layersUsed when one layer is to act as the mask for other layers or if the adjustment layer is to affect only the layer directly beneath itBottom layer of a clipping group is called the base layer and serves as the group’s mask

38Working with Special Layer Functions Chapter G
Creating a Clipping Mask
Two layers are required: – One to create the shape of the mask – One to supply the content for the mask
Either a type or an image layer can be used to create the clipping group shape

39Working with Special Layer Functions Chapter G
Clipping Mask Sample
Clipped texture appeared in the
layer
40Working with Special Layer Functions Chapter G
Removing a Clipping Group
Layers in a clipping group are grouped together
Ungroup the layers to remove the clipping group

41Working with Special Layer Functions Chapter G
Chapter G TasksUnderstand layer masks
Create a layer mask
Link layers
Align and distribute linked layers
Transform objects

42Working with Special Layer Functions Chapter G
Chapter G TasksBlend pixels
Eliminate a layer mask
Create and use an adjustment layer
Create a clipping mask


