Download - A Clarinet Players Companion

A Clarinet Players Companion
1
A Clarinet Players Companion (A supplemental guide to be used in addition to a method book)
Practical Application #2
3/31/2012
Matthew Symes American Band College at
Sam Houston State University

A Clarinet Players Companion
2
Contents Introduction and about the Author 3
History of the Clarinet and Timeline 4
The Anatomy of the Clarinet 7
Basics of a Reed 8
Cork Grease 10
Putting it all Together 11
Putting the Reed on 15
Putting it All Away 17
Daily Care of your Clarinet 17
Holding the Clarinet 19
Posture Check 24
Making the First Sound 24
Marking Your Reed 27
Creating the First Tone 29
Clarinet Tone Quality 30
Tone and Range 34
The Break 38
Articulations 41
Dynamics 44
Basic Fingering Guide 47
Trills and Tremolos 49
Trill Fingering Guide 50
Tuning and Pitch Tendencies 51
Famous Clarinetists and Recordings 55
Pitch Tendency Chart 57
Practice Log 58
Tips for Parents 59
References 60

A Clarinet Players Companion
3
About the Author
Matthew Symes is originally from Sioux Falls, South Dakota. He received a Bachelor’s degree in
Music Education from the University of South Dakota. He taught band for 3 years at Lake
Havasu High School in Lake Havasu City, Arizona. He has been teaching middle school band for
the past three years in Las Vegas, Nevada. He is currently the Band Director at Jim Bridger
Middle School in Las Vegas, Nevada.
Introduction
This book was written in part for the American Band College of Sam Houston State University as
a Practical Application assignment and in partial fulfillment of the American Band College
Masters Degree Program. This book was also written as an additional teaching aid for
instructing Beginning and Intermediate level middle school band. The goal of this book was to
cover key areas of clarinet technique not covered extensively enough in our method book.
These areas such as tone, intonation, fingerings, and embouchure are addressed more in depth
in this book.
Although there are a variety of methods and resources for teaching the clarinet, this book is a
compilation of materials I had for teaching the clarinet, and may differ from other resources.
You can take and use what you like and disregard what you don’t. Many of the materials in this
book are items I have made or adapted for teaching in my band room.
Matt Symes
Good Luck and Happy Teaching!!!!

A Clarinet Players Companion
4
Brief History of the Clarinet
What is the Clarinet?
The clarinet is an instrument in the woodwind family. The first clarinets had a strident tone similar to that of a trumpet. The instrument has a cylindrical opening, and uses a single reed. A person who plays the clarinet is called a clarinetist. Johann Christoph Denner is thought to have invented the clarinet in Nuremburg Germany.
The Beginning of the Clarinet
After having experimented with the chalumeau for a long time, the instrument maker C. H. Denner of Nuremberg, Germany, finally was able to build an instrument. This Instrument would not only play the lower register but also the upper one, without sacrificing intonation. This modified Chalumeau would be the beginning of the clarinet.
Clarinet Timeline
1100
The word "chalumeau" was used in
French from the twelfth century to
refer to various sorts of pipes, some
of which were made of cane and
featured a single "reed" cut into the
side of the cane itself. This instrument
was the predecessor to the clarinet.
Today it is believed that the ancestors of
the modern woodwind instruments were
developed in the Middle East. They
reached Europe via Turkey. Double reed
instruments like the Aulos in the Etruscan
picture were already known in old Egypt
and Greece.
1600
In the late seventeenth century, an improved
form of the chalumeau was developed. This
baroque chalumeau signifies the link
between the recorder and the clarinet. It
was basically a cylinder shaped recorder with
a mouthpiece like a clarinet. It had two
additional keys controlling notes at the top
of its range.

A Clarinet Players Companion
5
Around the 1700’s, the chalumeau was
modified by converting one of its keys into a
register key. This produced the first clarinet.
This was accomplished by a German
instrument maker named Johann Christoph
Denner.
In about 1770 the bass clarinet was first
produced.
Around 1758 Mannheim was the first court orchestra to have separate clarinet players. Before this, clarinets were played by the orchestra's oboists.
1700
The Earliest known orchestra use of the
clarinet was in Vivaldi's oratorio "Juditha
Triumphans” in 1716
1800
The earliest (1712-1715) known works calling for the clarinet was an anonymous set of duets for chalumeau, trumpets, oboes, violins, flutes, clarinets, or horns published in Amsterdam by the Frenchman Estienne Roger.
Between 1790 to 1820 the Flute, Oboe,
Clarinet, Horn and Bassoon instrumentation
became standard for the woodwind
quintet.
At the beginning of the Romantic era
clarinets and horns were connected in
orchestra music with very romantic and
expressive sounds.
By 1760 the clarinet was established in
Paris.
By 1780 most orchestras had a pair of
clarinetists in their membership.
After the 1730’s other style characteristics
become popular: a lyrical style of melodic
writing as well as scale passages with leaps of
an octave or more became frequent, along
with use of the lower notes.

A Clarinet Players Companion
6
1800
1900
Around 1824 Iwan Müller changes
the placement of the clarinet reed by
having it face the lower lip. This was
a change from the earlier reed-up
position. This allowed better
articulation with the tongue.
By 1800 the clarinet was used more
than the oboe in wind bands.
In 1844 Berlioz wrote his book "Treatise on
Instrumentation." This influenced composers
with its writing on range, difficult and easy
passages written for the clarinet and the quality
of the different registers. Berlioz also gave
attention to the ability of the clarinet to play
very softly.
In 1831 The Paris Conservatory officially
changes to the reed-below orientation. Reed-
above continues to be popular in England due
to clarinetist Thomas Lindsay Willman.
Iwan Müller develops the 13-keyed
clarinet in 1812.
Up to the mid-19th century changes in clarinet
technique were the result of the clarinet's solo
music. By mid-century concerto writing for
winds practically stopped until the 1900's. The
clarinet literature of this period was developed
through symphony and opera writing. Richard
Wagner’s "Ring of the Nibelungen" was the first
composer to call for more than a pair of
clarinets in his orchestra. Wagner composed
for three clarinets plus bass clarinet. This
established the complete clarinet family of
instruments as standard for orchestra use.
In the 1870's, Boehm clarinet became
more and more popular in Italy, Belgium
and U.S. Almost no other type of clarinet
was used in France.

A Clarinet Players Companion
7
The Anatomy of the Clarinet
The Anatomy of the Clarinet Mouthpiece
A Clarinet Players Companion
8
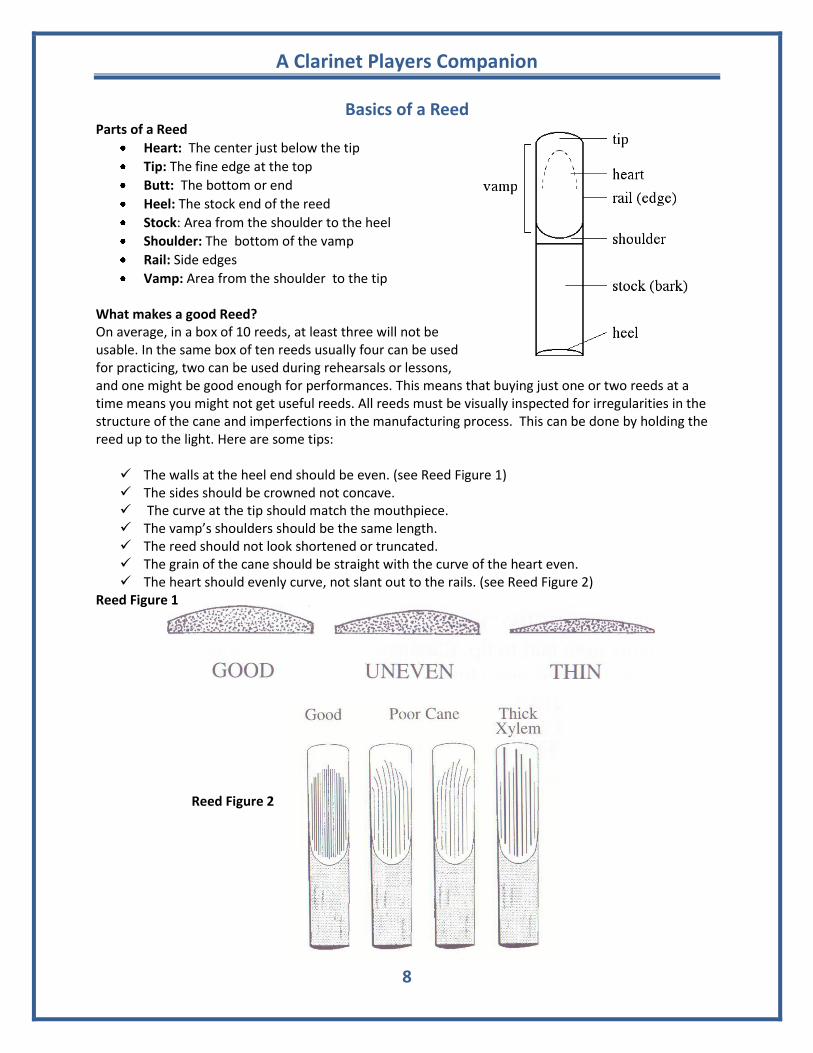
Basics of a Reed Parts of a Reed
Heart: The center just below the tip
Tip: The fine edge at the top
Butt: The bottom or end
Heel: The stock end of the reed
Stock: Area from the shoulder to the heel
Shoulder: The bottom of the vamp
Rail: Side edges
Vamp: Area from the shoulder to the tip What makes a good Reed? On average, in a box of 10 reeds, at least three will not be usable. In the same box of ten reeds usually four can be used for practicing, two can be used during rehearsals or lessons, and one might be good enough for performances. This means that buying just one or two reeds at a time means you might not get useful reeds. All reeds must be visually inspected for irregularities in the structure of the cane and imperfections in the manufacturing process. This can be done by holding the reed up to the light. Here are some tips:
The walls at the heel end should be even. (see Reed Figure 1) The sides should be crowned not concave. The curve at the tip should match the mouthpiece. The vamp’s shoulders should be the same length. The reed should not look shortened or truncated. The grain of the cane should be straight with the curve of the heart even. The heart should evenly curve, not slant out to the rails. (see Reed Figure 2)
Reed Figure 1
Reed Figure 2

A Clarinet Players Companion
9
Reed Life Expectancy A properly treated and maintained reed will play for about 20 hours. A reed will peak somewhere between half and two thirds of its life. A reed can be “promoted” or “demoted” during its life. For example a reed can be promoted
from practice to rehearsal, or from rehearsal to performance, and back down again. A reed should be replaced if:
the tip is chipped or split. it sounds bad or is hard to play several rotations in a row. it is more than three months old.
Reed Rotation To keep reeds rotated and in use number the slots of the holder. Each time you rehearse or practice, use the next reed in the holder. For lessons, auditions, or performances, use your best reed. Replace one reed at a time in your rotation rather than all of them at once. Always keep new, extra reeds in a safe place. The time to buy more reeds is when the supply of extras runs low. Reed Usage and storage
Before playing, soak the reed for no more than 30 seconds. The reed should be moist but not water logged!
In order to keep reeds from warping they should be stored against a hard, flat surface with light but even pressure and at a relative humidity between 60% and 80%.
Reed guards or holders are great for storage as they are cheap and protect reeds from damage.
When finished playing, always put the reed gently between your fingers to remove excess surface moisture before putting it into the reed holder.
Breaking in a reed A reed must be broken in over a period of several days if it is to eventually become dependable and usable for a period of time. Reeds are considered "played-out" when they are no longer playable. This happens with reeds that are used constantly without a rest period when they are new will most likely have a severely shortened life expectancy. Here are a set of steps to help you break in a new reed:
1. Soak for 15 seconds. Play for only 5 minutes. Play only in the low register (octave) and at mf. 2. Rest the reed for one or two days. 3. Repeat steps one and two but add some play in the upper register (octave). 4. Soak for 30 seconds. Play for 10 minutes. Use both upper and lower registers and some
altissimo register. Pay both p and ff. 5. Rest the reed for one or two days 6. Repeat steps 4 and 5
Final Reminders
Once the break-in period is over, a reed should not be played more than two hours in any one session.
Always allow a reed to rest several days before using it again.
Remember that Performance reeds should be played occasionally for short sessions (30 minutes) to ensure and maintain their condition.
Always store the reed properly and rotate them for quality.

A Clarinet Players Companion
10
Cork Grease
Start by putting Cork Grease on all the cork joints including your mouthpiece cork. Spread it around with your fingers so that you cover the whole cork surface with grease. You should only apply grease to the joints when the instrument is hard to put together not every time you play it. If the instrument is still hard to put together with grease then the corks will need to be sanded down at a repair shop. Clarinet joints should not be too loose either as it is better to have a slightly tight fitting clarinet as the corks will compress as you use the instrument. Warning: If the corks are too loose your instrument may wiggle or fall apart in a few months. If your cork joints are too loose, you will need to have new corks installed.

A Clarinet Players Companion
11
Putting It All Together
The most frequent cause of damage to a clarinet is improper assembly and disassembly. This is because the keys on the clarinet are made of soft metal and bend very easily. If the keys are bent, the pads in the keys will no longer cover the holes with an airtight seal. If the seal is broken then the clarinet can play poorly or not at all. So take the time to learn how to do it correctly.
1. First pick up the Lower Joint. This is the biggest piece in the case. Always pick up the parts at the
edge, not by the keys. Remember you don't want to bend any keys. After picking it up turn the
Upper Joint around so that the two large keys and the key cluster faces you.
2. Put the palm of your hand directly over these two big keys so that the keys are pressed down by
the fleshy part of your palm just below the thumb. As long as you are pressing straight down on
the keys you will not hurt them no matter how hard you press. Keep your thumb on top to avoid
bending any of the keys. If your thumb is on top, even if your hand slips, you will not be able to
bend any keys.

A Clarinet Players Companion
12
3. While holding the Lower Joint extend your fingers and pick up the Upper Joint the same way as you picked up the Lower Joint.
4. Wrap your left fingers on the Upper Joint around the Larger Ring Key. If you depress the large ring key on the Upper Joint, the bridge key will lift. The larger ring key and the bridge key are the same key. This Upper Joint Ring Key must be depressed in order to raise the Bridge Key.

A Clarinet Players Companion
13
5. Now that you have both of your hands in the correct position, you are ready to assemble the Upper and Lower Joints. The Upper Joint ring key should still be lifted, so the Lower Joint bridge key will just slide underneath it without hitting it. The reason it is so important to raise the bridge key is because the other key on the Lower Joint must slide underneath the Bridge Key. Now place the Upper and Lower Joints together by twisting back and forth. Move your hands in opposite directions as you twist. Start by placing the two pieces together with the Lower Joint Bridge Key being away from you. Always push and twist back and forth as you assemble the two joints. This picture shows the correct position of the left hand as it is wrapped around the larger Ring Key pressing it down, therefore lifting the Bridge Key.
6. In the picture below you will see the assembled Lower and Upper joints. Notice that for perfect alignment the two posts should be aligned in a straight line. If you align these two posts the Upper and Lower Bridge keys will automatically be aligned as well.
7. In the next you will attach the Bell. You do this by holding the clarinet in your LEFT hand and you put the Bell on with your Right hand. Your thumb can wrap around the lower joint because this part of the instrument will not be damaged. You will hold the lower section stationary while your right hand twists the Bell into position. Below you will see several pictures demonstrating the correct hand position when putting on the Bell.

A Clarinet Players Companion
14
8. In this step you will attach the Barrel. First hold the instrument in your left hand in the exact same position that you had when assembling the Upper and Lower joints. Make sure you push the Barrel all the way down before tuning it.
9. Now we will assemble the Mouthpiece. First turn the clarinet so that the Register Key faces you. You must do this so that the Mouthpiece aligns correctly. Hold the clarinet so that you are holding both the Upper Joint and the Barrel at the same time. This will keep the barrel and the upper joint from moving while assembling the mouthpiece. Remember to hold the clarinet in your LEFT Hand and the Mouthpiece in your RIGHT Hand.

A Clarinet Players Companion
15
10. Twist on the mouthpiece the same way you did the other parts. The Mouthpiece will be properly aligned when the Table (flat part of the Mouthpiece) lines up with the Register Key on the Upper Joint. Remember the Table must line up with the Register Key. It’s now time to install the Reed.
Reed Preparation and Placement
1. The reed should be moistened by holding it in the mouth until the thin tip is perfectly flat. If the tip
doesn’t flatten out properly after soaking for a short time place the reed between your lips and press down. If this does not work it should be held against the flat side of the mouthpiece and pressed firmly with the thumb until the ruffles in the tip have disappeared.
A Clarinet Players Companion
16
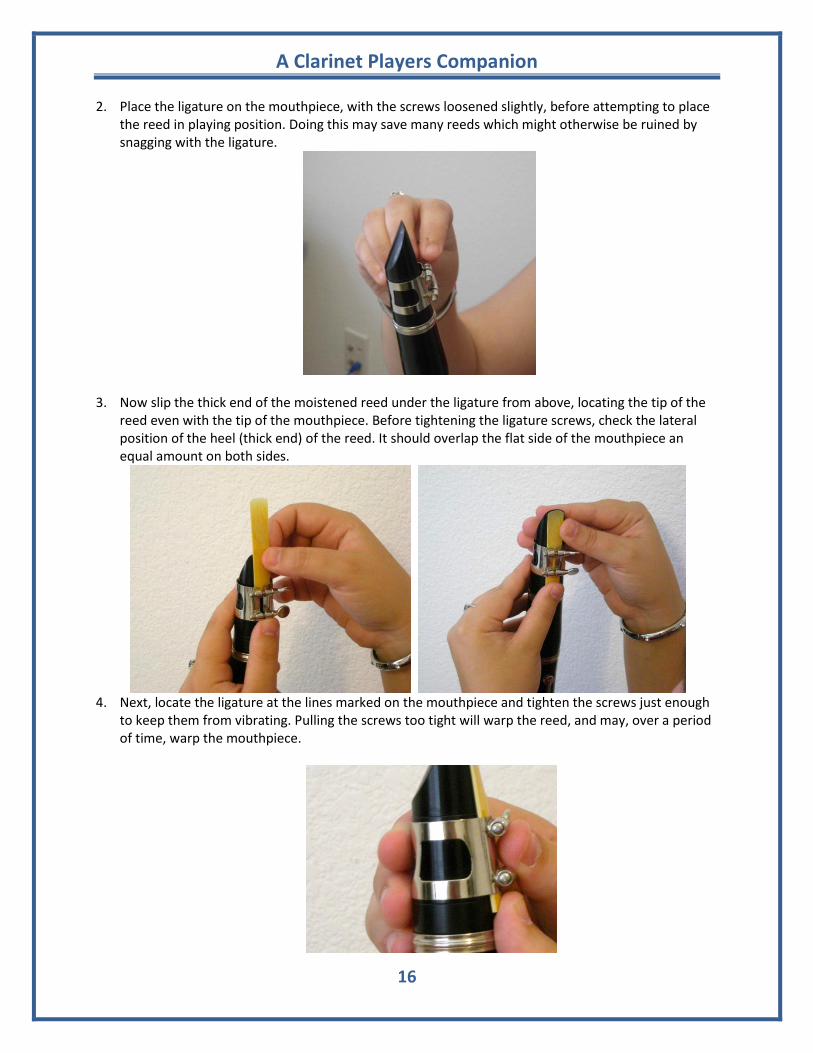
2. Place the ligature on the mouthpiece, with the screws loosened slightly, before attempting to place the reed in playing position. Doing this may save many reeds which might otherwise be ruined by snagging with the ligature.
3. Now slip the thick end of the moistened reed under the ligature from above, locating the tip of the reed even with the tip of the mouthpiece. Before tightening the ligature screws, check the lateral position of the heel (thick end) of the reed. It should overlap the flat side of the mouthpiece an equal amount on both sides.
4. Next, locate the ligature at the lines marked on the mouthpiece and tighten the screws just enough
to keep them from vibrating. Pulling the screws too tight will warp the reed, and may, over a period of time, warp the mouthpiece.

A Clarinet Players Companion
17
Putting It All Away
Appropriate care when assembling and taking the instrument apart, will ensure a long life and quality sound for your clarinet.
1. Take the Clarinet apart exactly the same way as you have assembled it, but in reverse order. Reverse order means that whatever you did last, you now do first. Remember not to grab the instrument with your thumb wrapped around the rods and keys to prevent damage to the keys.
2. Always store the reed in its plastic protective case to prevent damage and to prolong the life of the reed. Never leave the reed on the mouthpiece.
3. Each piece should be placed directly into the case when it is disassembled from the instrument. 4. Always be sure to swab out your Clarinet before putting it away. Congratulations!! Now, practice
this a million times and you will become an expert!
Daily Care of Your Clarinet
1. Always keep your instrument in its case when you are not using it.
2. Swabbing out your instrument is the same as Drying it. Clarinets do not like moisture. Pads will
deteriorate sooner if they are wet and the clarinet will get moldy after a while. It is especially a
bad idea to place a wet clarinet into a closed case as it cannot breathe or dry out. The best way
to dry a clarinet is to let it air dry. If you have a safe place to put it, then just leave the lid of the
case open and let the clarinet dry overnight. Many times you do not have the opportunity to air
dry your instrument when you are at school, so you must use a swab. There are many different
types of Pull Through Swabs but they all do the same thin, they remove the moisture from the
instrument.
A Clarinet Players Companion
18
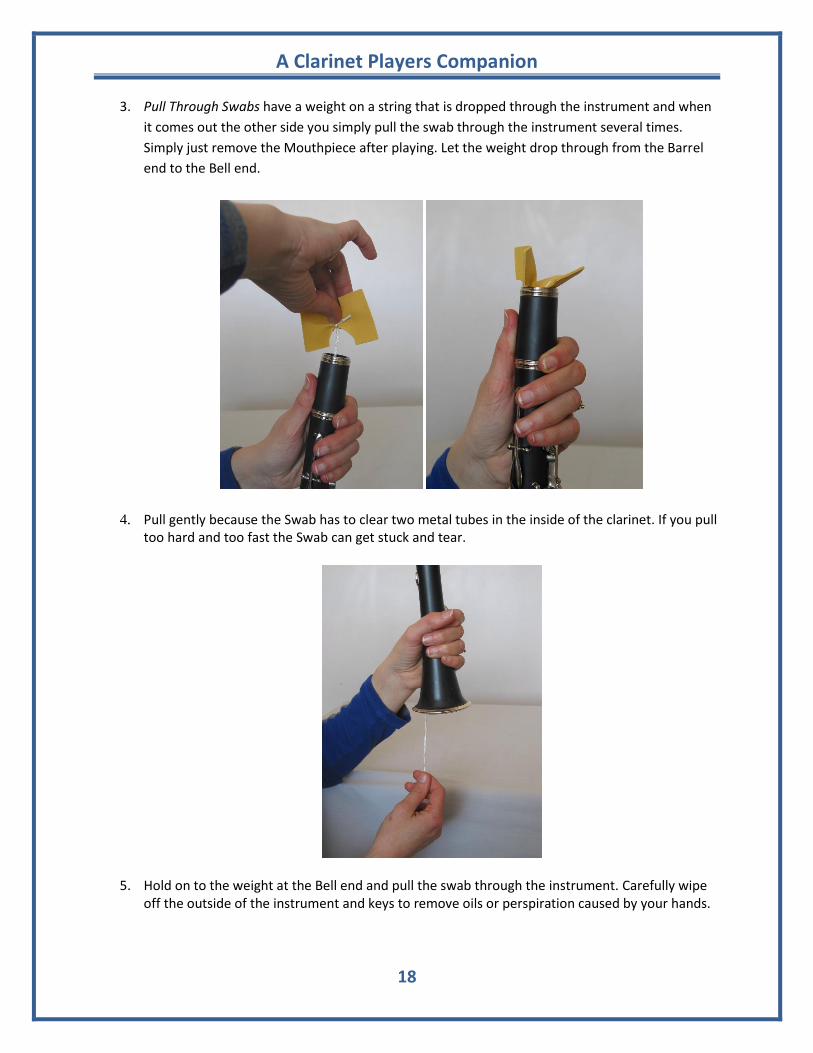
3. Pull Through Swabs have a weight on a string that is dropped through the instrument and when
it comes out the other side you simply pull the swab through the instrument several times.
Simply just remove the Mouthpiece after playing. Let the weight drop through from the Barrel
end to the Bell end.
4. Pull gently because the Swab has to clear two metal tubes in the inside of the clarinet. If you pull too hard and too fast the Swab can get stuck and tear.
5. Hold on to the weight at the Bell end and pull the swab through the instrument. Carefully wipe off the outside of the instrument and keys to remove oils or perspiration caused by your hands.

A Clarinet Players Companion
19
Advanced Maintenance
If the tenons do not fit together easily, wipe them clean with a soft cloth inside and outside of the two connecting joints. Only use cork grease on tenons if they do not fit together easily.
If a key sticks, you may need to oil the screws of the clarinet. This may need to be done several times a year with key oil. To oil the pivot screw of each key, use a small drop of oil on the end of a toothpick or needle and place the oil on the screw. Move the keys to let the oil enter the mechanism. Do this carefully and do not allow the oil to drip on the pads.
It you notice a screw is coming loose or that a key is not working, tell your teacher immediately to prevent damage to the instrument.
Dust can build up under mechanisms and in places where you are unable to reach with regular care. This dust can be removed with a soft watercolor brush, pipe cleaner, or a clarinet brush that you can purchase from any instrument shop. Be careful when dusting underneath the keys to avoid snagging or bending the springs.
Sticking pads can be prevented by swabbing out your instrument every day. To fix sticking, dirty pads, use end papers (used for hair permanents) to gently clean sticky pads. Close the key with the paper in between the pad and key, then open the key, taking out the paper. Be careful not to tear the pad's skin covering, which will cause it to leak. Try a few times, if this does not work, then pad may have to be replaced.
Do not put anything (including sheet music) inside the case with your instrument. Closing the case with extra contents can cause damage to the delicate keys as well as damages the latches and hinges on your case. Also, make sure that all the latches are securely closed before transporting your instrument.
It is recommended that you have your instrument checked and adjusted, if needed, by a repair shop. The shop may find adjustments or worn pads that are effecting the optimal performance of your instrument.
Holding the Clarinet Right Hand
1. Thumb: The right hand is positioned on the lower section of the clarinet. The weight of the clarinet is supported mainly by the right thumb. The side of the thumb touches the thumb rest near the base of the thumb nail and the ball or pad of your thumb is against the body of the clarinet. Do not place the thumb too far under the rest. This will cause a poor position for your other fingers in the right hand.

A Clarinet Players Companion
20
2. The index finger of the right hand will curve slightly at each joint and points downward to the first ring or the B b - F ring (top ring of the lower section). The finger is an inch above the hole.
3. The second and third fingers are in a similar position on their individual rings and are no more than an inch above their tone holes.
4. The little finger is virtually straight as it contacts the F-C and Ab-E b keys (or the lower keys).
Be careful of the two common faults: (1) “riding” the rod that connects the finger rings, and (2) hooking the side of the index finger under the side E b-B b key. Remember: the thumb nail must be located below the thumb rest for proper playing.

A Clarinet Players Companion
21
Left Hand
1. Thumb: The left hand is positioned in the upper section of the clarinet. The thumb operates the thumb ring by overlapping it slightly and is in close contact with the register key. The thumb should not shift its position to open the register key. Only the first joint of the thumb will operate the register key. The angle of the thumb is about thirty degrees above horizontal in relation to the body of the instrument.
2. The index finger will curve slightly at each joint and points downward to the E-B ring (top ring of upper joint). The first joint of this finger is in close contact with the A key, and the second joint is barely above the Ab key. The left hand should not shift its position in operating the A and Ab keys.
3. The second and third fingers assume a similar position on the D-A (middle) ring and on the C-G (Lower) hole.
4. The little finger is virtually straight as it contacts the E-B and F#-C# keys.
Note: None of your fingers should be perpendicular to the body of the instrument. This is especially important as figure 1 below demonstrates.

A Clarinet Players Companion
22
Figure 1
The natural pads of the fingers (not the fingertips) are used to close the holes. A quick, precise action in raising and lowering the fingers is important. The fingers must not be lifted too far above the holes or keys. The fingers must cover the holes by press hard enough to close the hole and attached keys. Remember the fingers should be an inch above the holes when note using them.
Clarinet Angle
The clarinet should be held with your head up and the clarinet out form your body at about a 30 degree
angle. The clarinet should also be in the center of your body and your elbows should be free of your
body.

A Clarinet Players Companion
23
Resting position
When not playing, your clarinet should be in resting position. The clarinet is placed across your legs with the keys up.

A Clarinet Players Companion
24
Posture Check List Sitting
Sit on the edge of the chair
Back is straight and tall
Shoulders should be relaxed and back
Feet should be flat on the floor
Music stand should be easily viewable
Standing
Feet should be flat on the floor
Back is straight and tall
Shoulders should be relaxed and back
Your weight should be balanced
between both feet
Creating a Sound Embouchure: This is the position your mouth should form on the mouthpiece of your instrument to play
it. Follow these steps carefully to successfully form a good embouchure.
1. The lower lip is stretched firmly over the lower teeth. Only a small portion of the red part of your lip is turned in and about half of the red portion should show externally. Do not turn too much of your lower lip under as this will cause you to contact too much of the reed. This will not allow proper vibration.
2. The corners of your mouth should be turned upward slightly without stretching your mouth sideways. You can do this by shaping your mouth as if saying “whee-too.” Hold the mouth in the “whee” position while saying “too.”

A Clarinet Players Companion
25
3. The upper teeth must rest lightly on the top of the mouthpiece, approximately 1⁄2 inch from the tip.
4. Your head should be held upright. 5. Insert the mouthpiece into your mouth at about a 30 degree angle from a vertical position. Both
lips are drawn firmly around the mouthpiece, exerting a steady grip which controls the vibration of the reed. Controlling the reed vibration is done with your muscles. If you excessively bite down with your teeth it will hinder the reeds vibration. This will cause a pinched tone, or no sound at all.

A Clarinet Players Companion
26
6. Pull your chin downward, so that the skin is held firmly against the bony structure. Some call this the “pointing the chin” and others describe it as a “flat” chin. Do not wrinkle or bunching your chin as this will usually cause the wrong muscles to be used. See the Embouchure Figure below.
Embouchure Figure

A Clarinet Players Companion
27
Marking Your Reed By Bruce Pearson
Ensure a good formation of the embouchure by having each student do the following: 1. Put the mouthpiece and the barrel together and secure the reed with the ligature.
Slip a piece of paper between the reed and the mouthpiece and slide the paper down toward the barrel until it stops.
2. With a pencil, draw a light line on the reed connecting the two sides of the paper. This line will indicate where the lower lip should be placed.
3. Hold the assembled mouthpiece and barrel in one hand and place the tip of the thumb just under the line that was drawn on the reed.
4. Remove the paper from behind the reed with the other hand and shape the mouth as if saying “whee-too.” Hold the mouth in the “whee” position while saying “too.”
5. Cover the bottom teeth with a small amount of the lower lip. 6. Place the mouthpiece in the mouth so that the lower lip touches the thumb that
was placed just below the line. The thumb should serve as a “stop” allowing just the right amount of mouthpiece in the mouth. Too much mouthpiece in the mouth will cause a harsh, raucous tone. Too little mouthpiece in the mouth will cause a tight, constricted tone.
7. Rest the top teeth directly on the mouthpiece. Close the mouth in a drawstring fashion with equal support on all sides of the reed. The chin should be flat and pointed. Using the mirror, check to see that the embouchure is formed properly.
8. Firm-up the top lip. This will open the back of the throat. 9. Take a full breath of air (filling the back of the throat) and play a long, steady
tone. If the embouchure is formed properly, an F# pitch should sound:

A Clarinet Players Companion
28
This first exercise requires the use of only a mouthpiece.

A Clarinet Players Companion
29
Creating the First Tone
At this point it will be beneficial to refer to your class method book to review first notes, fingerings, and
etudes. The next exercise is to help beginning students develop a full tone using the first few notes
learned in our method book. You will notice that each measure has a breath mark reminding us to take a
large breath so that we can play with a large sound. Make sure to tongue every note and count your
rests. The dynamic is marked loud, so use lots of air. The tempo is slow. Make sure that you take a deep
breath in and expell all your air.

A Clarinet Players Companion
30
Good Clarinet Tone
The Tone Quality of on an instrument refers to how well your instrument sounds. Clarinet players
generally strive for a full, warm sound. The only way to know what a good clarinet is supposed to sound
like is to listen to recordings of great clarinet players. There are many great clarinet players to listen to
and you will find a small list of just a few of the many recordings made of great clarinet players on pages
55-56. Listen to as many clarinetists as you can and pick what you like best about each players sound.
Registers and Range: The clarinet is divided in to four registers of playing. The lowest notes on the
clarinet up to E on the staff are called the chalumeau register named after the instrument that preceded
the clarinet. The Throat pitches for notes between F and B flat are labeled because early clarinet players
controlled the pitch by their throats. The Clarion register is the name for the upper range above the B
natural to a high C. The High range is for the highest notes on the clarinet above High C. See the Clarinet
Registers and Range Figure below.
Clarinet Registers and Range Figure

A Clarinet Players Companion
31
Breathing and Air Stream are a very important and also a natural thing we do every day. Breathing
correctly helps create a full and complete sound. Here is a basic breathing exercise:
Place the palm of your hand near your mouth
Inhale deeply through the corners of your mouth, keeping your shoulders steady. Your waist
should expand like a balloon.
Slowly whisper “too” as you gradually exhale air into your palm.
The air you feel is the airstream. It produces sound through the instrument.
A Breath Mark is comma symbol found in clarinet music telling use when and where to breath. Always
breathe on a breath mark and take as big a breath as possible. This will expand the quality and the
length of your sound. Always take a big breath at the beginning of a song to ensure a full and clean first
note. Always breathe on rests, taking a big breath for a strong entrance.

A Clarinet Players Companion
32

A Clarinet Players Companion
33
Tone and Range Exercises The Throat tones usually sound stuffy than other tones on the clarinet. Practice playing these tones with
full air support, and work on developing a full, solid, and round tone. Also remember to take big deep
breaths and to use all your air when playing this study. Start at the softest possible volume and gradually
increase to the loudest possible volume before decrescendo down to the softest volume. You can try
putting your fingerings down on your right handed keys to add a solid body and warmth to the sound.
The curved line above or below two or more notes of different pitches are called Slurs. In other words
we tongue the first note of a slur, but we do not tongue the rest of the notes in the slur.
The Chalumeau Register notes are sometimes the hardest notes to play, and easily forgettable as most
would rather play higher notes on a clarinet. The next exercises are designed for more advanced
students who already know the lower range fingerings in the Bb concert scale. In this exercise there are
no dynamic markings or tempo markings so start with soft and slow then steadily increase both as you
improve. Remember to take big deep breaths and to use all your air when playing this study.
Chalumeau Exercise #1

A Clarinet Players Companion
34
Chalumeau Exercise #2
Chalumeau Exercise #3
Chalumeau Exercise #4

A Clarinet Players Companion
35
The Clarion and the High Register, also called Altissimo, notes are sometimes the hardest notes to play
in tune. You will want to aim for a solid, full, and rounded tone. The next exercises are designed for
more advanced students who already know the higher range fingerings in the clarinet. Start at the
softest possible volume and gradually increase to the loudest possible volume before decrescendo down
to the softest volume. Also remember to take big deep breaths and to use all your air when playing this
study.
These upper register notes will require a more focused sound and are very likely to have intonation
problems. These may need to be practiced with a tuner. Work toward getting a clear, consistent tone,
with good intonation. Remember to take big deep breaths and to use all your air when playing this
study.
Clarion Exercise
High Range Exercise
A Clarinet Players Companion
36

A Clarinet Players Companion
37
The Break
Crossing the break is a major step in learning the clarinet. The break is going from the chalumeau or
throat tone registers up to the clarion register by operating the “register” key with the left thumb. The
first thing a clarinet player must do is to know the notes on both sides of the break. The “break” is a
nickname for an interval that is commonly “broken” on clarinet. If you wonder how an interval is broken,
think of it as "not smooth" or as a gap in the sound.
Using a mirror is helpful for taking a look at your embouchure while you are learning the break. Play a
nice, long-tone low G focusing only on this note for now. Make sure it is a solid, full, clarinet sound. Try
not to change dynamics and prevent any waves in the air and tone. For beginning students, make sure
you are covering all of the tone holes completely with the fleshy part of the fingers.
Now that you’ve established a nice sound, do the following: Play a long low G and then push the register
key and play the D (fourth line on treble clef staff). Hold the D out for a whole note as well.
What happened? Did the D come out smoothly or did the transition from the G to D break the sound?
Both notes should sound like they belong together. Your Air should be steady, embouchure steady, and
the thumb (already positioned and ready on the register key) pivots to open the key efficiently. Usually,
a big “break” in the sound occurs. Hence the name, “break” or, a big bump to the upper D is heard.
Sometimes a “squeak” can happen to you. Squeaks are no fun for you or your audience. From low G to
fourth line D is a large interval.
Common Problems: When you play up to the D again blow through the notes and pay close attention to
your chin. Are you doing the following?
1. Making Chin movements
2. Biting down harder 3. Forming a “Strawberry” chin. A “strawberry or raspberry” chin is pushing your chin up onto the reed. Playing the clarinet has a correct
chin and an incorrect chin. The “strawberry” chin pushes up toward the reed and presents a “mushy”
embouchure. Since you bite down more to make the register change smoothly, the strawberry chin
becomes more pronounced (and probably a little more red).

A Clarinet Players Companion
38
Other problems with Crossing the Break Include:
1. Not enough air support. 2. Thumb is not positioned over the key and has to move “wildly” to open it. This movement sometimes takes the thumb off of the left tone hole (creating a break or squeak). 3. You concentrate so hard on operating one key, you depress other keys as well (the side G# key is often the culprit). 4. Sometimes the fingers come off of the tone holes slightly to create air leaks.
When you play the lower G and blow over the break and depress the register key to go to D, your chin will want to scrunch and your teeth will bite to get the higher note out. Your body is saying, “I need a firmer embouchure to get into the higher register.”
Descending over the break: Start on the same D. Play it as a whole note and then slur down to OPEN G. Keep the right hand down. Concentrate more on the chin and embouchure than the fingers.
Once again use a mirror if possible to help see what your mouth is doing. Now play a D and slur down to open G. Most often, the chin DROPS with a descending passage below “the break.” So, watch yourself. Play the D then slur to G. WATCH YOUR CHIN. ATTEMPT TO SLUR TO THE LOWER NOTE WITHOUT DROPPING THE CHIN. Keeping your embouchure steady, picking the fingers up efficiently and blowing through the interval change should sound really smooth and beautiful.
Play D, pick your fingers up to play open G, put your fingers back down to return to the D. WATCH THE CHIN. If you can play this interval nice and smooth and NOT move the chin, you accomplished your mission. If your chin is perfectly stable and the interval is “broken,” perhaps all of your fingers are not closing down all at the same time. Practicing Crossing the Break correctly takes time both on the part of keeping a stable chin, having proper air support, a good clarinet embouchure and moving all of the fingers at the same time. Work on the following exercise very slowly taking your time to concentrate on one thing at a time. For instance, play a system of notes and look at the chin only. Or, look at the fingers only.

A Clarinet Players Companion
39

A Clarinet Players Companion
40

A Clarinet Players Companion
41
Articulation
Articulation is the way you start, play, and end a note. Tonguing is one way to articulate a note. Your
tongue is like a faucet or valve that releases the airstream. Tonguing means to use your tongue to start
your sound. Here are some steps to help you learn articulation by tonguing.
Be sure you set your embouchure before playing
Place the tip of your tongue slightly (millimeters) below the tip of your reed. With your tongue
in this position no sound should be produces by your air and the reed.
Breath in through the corners of your mouth
Build up air pressure against your tongue by using air support from your lungs before releasing
the tongue.
Now, while the air is moving, release the air over the reed by dropping the tip of the tongue
downward only millimeters away from the reed. Make sure this motion is down (toward the
bottom of the mouth NOT backward toward your throat).
Release the air with movement of the tongue, to produce a sound as if you were saying the
word “doo” or “dah.” Your tongue should not make you sound suddenly louder.
Repeat this process when playing notes that follow rests.
Keep the tip of the tongue as close to the reed as possible for more articulations
Do not allow your cheeks to puff out. Keep your cheeks in while playing.
Here are some terms and symbols we use for articulation:
Tenuto: a line above or below a note telling us to play a note for full value with very little
separation between it and the next note.
Staccato: is the dot above or below a note telling us to put a space between notes or in other
words separate/detach the notes with space.

A Clarinet Players Companion
42
Accent: is a small arrow like symbol above or below a note that looks like a small decrescendo.
This does not mean to tongue a note harder. This symbol tells us to play a note slightly louder
with more air and is similar to a little one note decrescendo.
Slur: is a curved line above or below two or more notes of different pitch. They tell us not to
separate notes but to connect them. In other words we tongue the first note of a slur, but we do
not tongue the rest of the notes in the slur.
Play each of the exercises as written the first time. Then play each exercise four more times with the
first time tenuto, the second time staccato, third time accent the notes on beat one and three. The
fourth time play accents on counts two and four.
Lip Slur Exercise
Rhythmic Articulation Exercise 1
Rhythmic Articulation Exercise 2

A Clarinet Players Companion
43
Rhythmic Articulation Exercise 3

A Clarinet Players Companion
44
Dynamics
Dynamics are symbols that tell us how loud or soft to play something. Here is some vocabulary and
symbols we use for playing dynamics.
Crescendo-Gradually growing louder
Decrescendo or Diminuendo -Gradually getting softer
Fortissimo-Very Loud
Forte-Loud
Mezzo Forte-Moderately Loud
Mezzo Piano-Moderately Soft
Piano-Soft
Pianissimo- Very Soft

A Clarinet Players Companion
45
Intonation and Dynamics
It is important to be able to play in tune as you change dynamics on the clarinet. The following is a
simple concept to help understand dynamic-to-intonation relationship.
Crescendos may tend to blow flat. To overcome flatness on crescendos: drop the lower jaw
slightly, Maintain breath support while increasing the velocity of air stream. Increase lower lip
pressure slightly
Decrescendos/Diminuendo may tend to blow sharp. To overcome sharpness on diminuendos,
maintain your breath support while decreasing the velocity of the air stream. Relax the
embouchure slightly in your lower jaw and lower lip.
Make all dynamic changes by blowing air fast and slower.

A Clarinet Players Companion
46

A Clarinet Players Companion
47
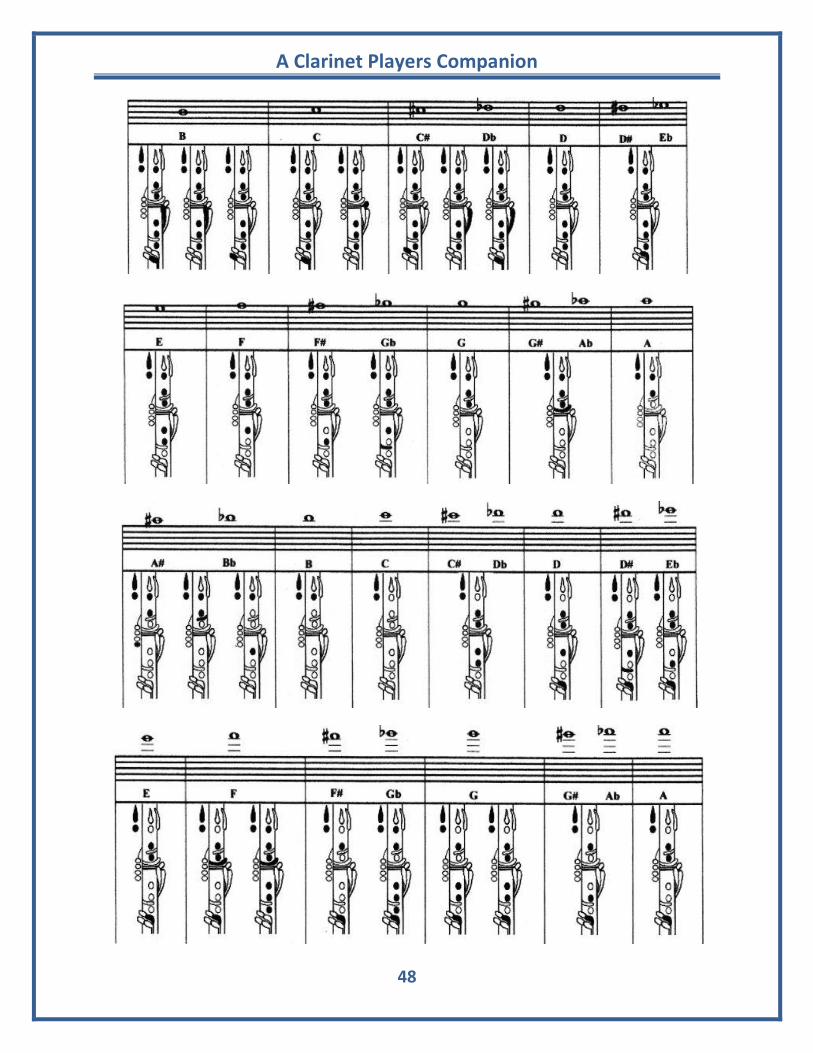
Fingering Basics
This chart tells you the standard code used in most clarinet fingering charts and diagrams. Illustrated with the fingers of your right and left hands — those keys that are to be pressed are in red or in other diagrams black. Those that are not shaded, mean that those keys are open or not pressed down. The right-hand thumb isn’t listed because its job is solely to balance the clarinet, not to press any of the clarinet’s keys. Keep in mind some notes have multiple fingerings with different levels of intonation.
A Clarinet Players Companion
48

A Clarinet Players Companion
49
Trills and Tremolos
The trill is a musical ornament or decoration consisting of rapid alternation between
two adjacent notes. In most modern music, it is indicated with a “tr” abbreviation or
with a wavy line above the note and sometimes with both. To play a trill you have to
rapidly alternate between the note indicated and the note directly above it in the
given key signature. There are special fingerings for each type of trill and they are
listed on the following page. The key that is rapidly pushed and released is shaded in red on the
following chart.
A Tremolo is a musical term that describes a sort of trembling effect and is very similar
to a trill. The difference between a tremolo and a trill is that trill notes are adjacent
notes and tremolo notes are not adjacent. Many tremolos can be played with the
normal fingerings but some of them may require an alternate fingering if the original
fingering does not work. In music, tremolos are indicated by strokes through the
stems of the notes. The bars are drawn above or below the note, where the stem would be if there was
one. Generally, there are three strokes, except on eighth notes, which have two, and sixteenth notes,
which have one. Play the following exercise below starting the alterations slowly and then gradually
speeding them up. Once you have this trill mastered pick a different set of trill notes or even tremolo
notes and repeat the same process as below. Make sure your trills sound even before moving on to the
next trill.

A Clarinet Players Companion
50
Trill Fingerings
The fingering that is rapidly pushed and released is shaded in red below for trills. Although the word trill
is used to describe these fingerings they also serve another purpose. Trill fingerings can and sometimes
are even mandatory to play a piece of music smoothly and to accommodate other types of ornaments
like turns and grace notes. Warning: These are not substitutes for regular fingerings so beware of poor
intonation on these fingerings.
A Clarinet Players Companion
51
Tuning Basics
Intonation in band refers to how accurate a pitch is on your instrument. Tuning an instrument is
checking and fixing a pitch to make sure it is accurate. A clarinets intonation can be adjusted mostly by
the barrel. As you become more developed as a player you will eventually learn how to adjust your
intonation more accurately by your embouchure. To start push the barrel in all the way and then pull it
out about a 1/8 of an inch. There are two ways to tune an instrument one is by using your ears and
listening to your instruments pitch and then comparing it to a reference pitch. The other is by using an
electric tuner to show you if your pitch is accurately in tune. Every note on your instrument can be
played three ways:
In tune: This means your instrument is in tune or right on pitch. Your pitch is neither too high nor too
low.
Sharp: This means that your instruments pitch sounds above or higher than it is supposed to be.
Flat: This means that your instruments pitch sounds below or lower than it is supposed to be.
Today we have standard for pitch to refer to when tuning. The standard pitch for tuning is A = 440 hertz
(Hz= cycles per second.) That means that A is at the frequency of 440 hertz and any one sounding above
the note is sharp and any one sounding below that is flat.
Tuning by Ear
1. The first thing you need to know about playing in tune is that you have to hear the difference
between notes that are out of tune, and notes that are in tune. When notes are out of tune,
there is a pulsing sound. It sounds sort of like a “Wah, Wah, Wah” sound that occurs at a
constant speed. The faster the pulsing or “Wah Wah”, the further the notes are from being in
tune. The slower the pulsing or “Wah Wah”, the closer the notes are to being in tune. When two
notes are in tune, there is no pulsing. They sound very smooth, as if only one musician was
playing.
2. The next thing to know about playing in tune is learning to adjust your pitch so that it is in tune
You will learn more about fixing intonation on the following pages. There are two different ways
to adjust the pitch you are playing, one is mechanical and the other is physical.
Mechanical adjustments are the ways you can adjust your instrument by changing its
length by adjusting the barrel or by using a different reed.
Physical adjustments are adjusting the way you play the instrument in order to adjust
the pitch. This includes: adjusting your embouchure, using alternate fingerings, , or
changing the air speed.
A Clarinet Players Companion
52
Tuning by Tuner
Every musician should have an electronic tuner. Smartmusic comes with a great tuner built in. Be sure
that your tuner is calibrated to A=440. Most tuners have a needle that moves when you play a note into
the tuner to show you your pitch.
It also has a display that shows you what pitch is being “heard” by the tuner and often times the tuner
will show these notes in concert pitch. The scientific unit used to calculate how sharp or flat pitch may
be is called “cent”. You will be using cents to determine how sharp or
flat you are if you are out of tune.
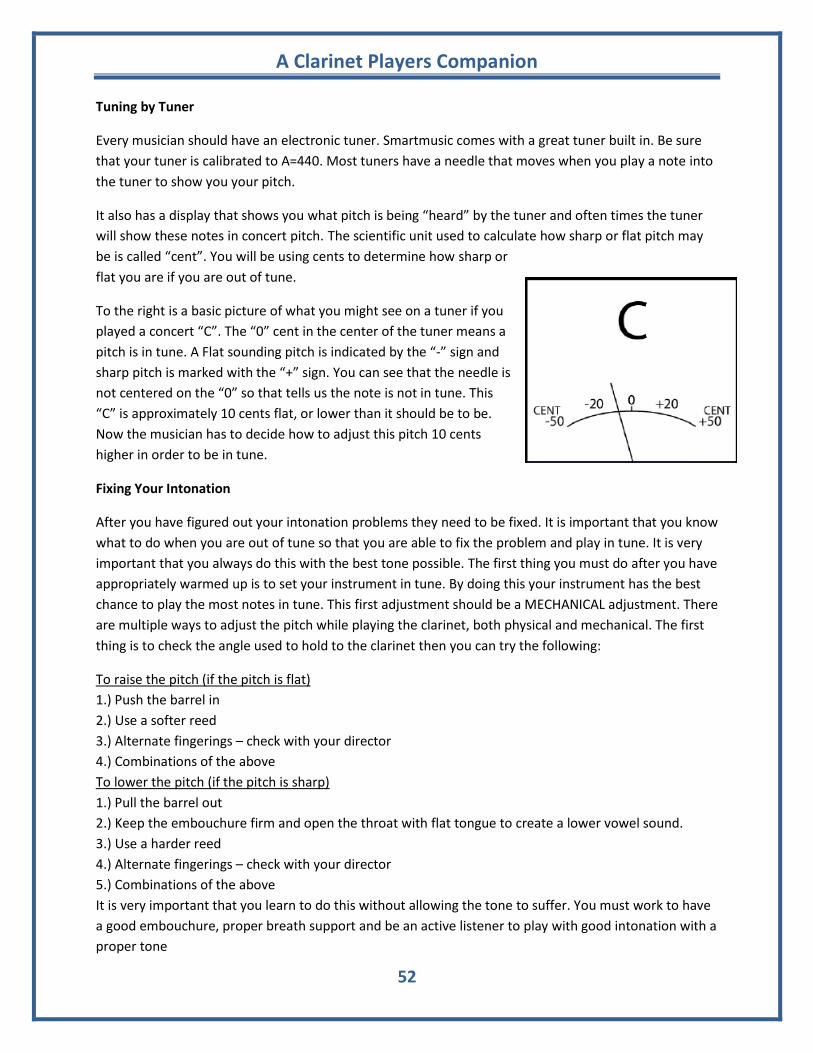
To the right is a basic picture of what you might see on a tuner if you
played a concert “C”. The “0” cent in the center of the tuner means a
pitch is in tune. A Flat sounding pitch is indicated by the “-” sign and
sharp pitch is marked with the “+” sign. You can see that the needle is
not centered on the “0” so that tells us the note is not in tune. This
“C” is approximately 10 cents flat, or lower than it should be to be.
Now the musician has to decide how to adjust this pitch 10 cents
higher in order to be in tune.
Fixing Your Intonation
After you have figured out your intonation problems they need to be fixed. It is important that you know
what to do when you are out of tune so that you are able to fix the problem and play in tune. It is very
important that you always do this with the best tone possible. The first thing you must do after you have
appropriately warmed up is to set your instrument in tune. By doing this your instrument has the best
chance to play the most notes in tune. This first adjustment should be a MECHANICAL adjustment. There
are multiple ways to adjust the pitch while playing the clarinet, both physical and mechanical. The first
thing is to check the angle used to hold to the clarinet then you can try the following:
To raise the pitch (if the pitch is flat)
1.) Push the barrel in
2.) Use a softer reed
3.) Alternate fingerings – check with your director
4.) Combinations of the above
To lower the pitch (if the pitch is sharp)
1.) Pull the barrel out
2.) Keep the embouchure firm and open the throat with flat tongue to create a lower vowel sound.
3.) Use a harder reed
4.) Alternate fingerings – check with your director
5.) Combinations of the above
It is very important that you learn to do this without allowing the tone to suffer. You must work to have
a good embouchure, proper breath support and be an active listener to play with good intonation with a
proper tone

A Clarinet Players Companion
53
Tips for Accurate Tuning
1.) Warm up thoroughly before tuning the clarinet
2.) Tune at a comfortable volume level (mf), with a smooth tone. No vibrato.
3.) Tune to a reliable pitch (electronic tuner, keyboard, etc.) using the recommended tuning note(s)
below.
4.) Do not “humor” the tuning note by making physical adjustments. Play it straight. Adjust the head
joint if the pitch is sharp or flat.
5.) Recheck the tuning note with the reliable pitch until it is in tune
Pitch Tendencies
Musicians have an important job while playing their instruments when it comes to playing in tune. Good
musicians constantly monitor their pitch and make adjustments when needed. A musician must monitor
and adjust pitch at all times. You can often predict intonation problems that might occur by getting to
know your instrument better. When your instrument was built, it was made to play every note as close
to in tune as possible; but, some notes will always tend to be sharp and some notes will always tend to
be flat. In general opening the tone holes will raise the pitch and closing tone holes will lower the pitch.
The following is a list of notes that tend to be out of tune on a clarinet. The list also includes remedies
that you can use to fix those notes.
WRITTEN PITCH TENDENCY POSSIBLE SOLUTIONs
Flat No fingering adjustments
Flat T 123|1-B- use the small B key between the lower tone holes in the lower section
Flat Use the T 1--|1--
Occasionally Flat
T 1--|---adjust the fingering by opening the right hand bottom side key to raise the pitch
Flat T ---|34--- or add the lower side key on the upper section
Sharp ---|--- add 4,5,6 to lower the pitch
Sharp G#---|--- add 4,5,6 to lower the pitch

A Clarinet Players Companion
54
Sharp --3|456F
Very Sharp Use the A and top side key on the upper section
--3|4--F
Sharp Keep the embouchure firm and open the throat with flat tongue to create a lower a vowel sound.
Sharp Use the A key and top side key on the upper section
1--|4--
Keep the embouchure firm and open the throat with flat tongue to create a lower a vowel sound
Sharp Keep the embouchure firm and open the throat with flat tongue to create a lower a vowel sound.
Sharp Keep the embouchure firm and open the throat with flat tongue to create a lower a vowel sound.
Sharp RT ½H123|1--G# Half Hole Right hand 1
RT -23|1—with out G# key
Sharp RT -23|--3G#
Use in combination with lower clarion notes.
RT ½H123|-2-G#
Half hole 1 and use for facility, trill fingering with C#5.
Very Flat RT 123C#|123 Use for slurring with lower registers and for pp.
Very Flat RT 12-|123G#
Accurate pitch. Speaks easily in all dynamics. Good for wide skips.
RT 12-|4---G#
Use for slurs with lower registers, more stable, good for pp and ff.
Flat T12-|12-G#
T 1--C#|1--G#
T ---|---G#

A Clarinet Players Companion
55
Clarinetists and Recordings
The best way to learn what a Clarinet should sound like is to listen to good Clarinet players. This way you can get an idea of how the tone quality, the articulations, the dynamics, and the musicianship sounds like by a professional clarinet player. This is just a small list of current recordings that exist for the Clarinet.
Famous clarinet Players Benny Goodman
Artie Shaw
Woody Herman
Julian Bliss
Sabine Meyer
Richard Stoltzman
Dieter Klöcker
Karl Leister
Jack Brymer
Anton Stadler
Johann Simon Hermstedt
Martin Fröst
Sharon Kam
Heinrich Baermann
Richard Mühlfeld
Charles Neidich
Fountain, Pete
Jimmie Noone
Eddie Daniels,
Acker Bilk,
Buddy DeFranco
Famous Clarinet Composers and Compositions
1. Carl Philipp Emanuel Bach (1714 - 1788)
Duet for Two Clarinets, H. 638. 2. Johann Stamitz (1717-1757) 3. Wolfgang Amadeus Mozart (1756 - 1791)
Clarinet Concerto in A
Clarinet quintet in A: KV 581 4. Louis Spohr (1784 - 1859)
Clarinet Concerto No.2
Clarinet Concerto No. 4 in A Minor 5. Karl M. v. Weber (1786 - 1826)
Clarinet Concerto No. 1 F-major 6. Johannes Brahms (1833 - 1897)
Sonata No. 1 in F Major
Sonata No. 2 in E-flat Minot
Clarinet trio op. 114 7. George Gershwin (1898 - 1937)
Rhapsody in Blue 8. Sergej Prokofieff (1891 - 1953)
Peter and the Wolf 9. Bela Bartok (1881 - 1945)
Romanian Folk Dances 10. Aaron Copland (1900 - 1990)
Concerto for Clarinet and String Orchestra

A Clarinet Players Companion
56
Classical Clarinet Recordings
1. French Portraits by Andre Messager 2. Robert Schumann: Clarinet Works by Karina Wisniewska 3. Mozart: Clarinet Concerto; Clarinet Quintet by Gerard Schwarz and Mostly Mozart Festival Orchestra 4. Mozart: Serenade in B-flat Major, "Gran Partita" by Zubin Mehta Berliner Philharmoniker 5. Copland - Sonata for Clarinet and Piano and Clarinet Music by 'Les Six' 6. Copland: Clarinet Concerto; Bernstein, Gershwin performed by Stoltzman 7. Mozart: Concertos for Clarinet, Oboe & Bassoon, K. 191,314,622, performed by Berlin Philharmonic
Orchestra and Karl Leister
8. Brahms: Clarinet Sonatas and Trio by Karl Leister 9. French Clarinet Art by Paul Meyer 10. Night at the Opera by Sabine Meyer's 11. Balkanology by Ivo Papasov, 12. Mozart clarinet concerto with Robert Marcellus and Cleveland orchestra 13. Richard Strauss Duet Concertino Manfred Weise clarinet 14. Charles Neidich: Clarinet Concertos Rossini - Introduction, Theme and Variations 15. Brahms: Clarinet Quintet, Op.115, String Quartet, Op.51,2
16. The American Clarinet. Robert Alemany
17. Carl Stamitz: Clarinet Concertos Vol 1. Kálmán Berkes, Tomoko Takashima
18. Carl Stamitz: Clarinet Concertos Vol 2. Kálmán Berkes
19. Spohr Clarinet Concertos 1 & 2. Michael Collins with the Swedish Chamber Orchestra
20. Clarinet Concertos. Yona Ettlinger
21. Mozart. Martin Fröst
22. Fröst & Friends. Martin Fröst
23. The Romantic Clarinet. Sharon Kam
24. Clarinet Trios: Beethoven - Lannoy - Archduke Rudolph. Dieter Klöcker
Jazz Clarinet Recordings
1. Art Tatum - Buddy DeFranco Quartet (Verve 8229, 1956) 2. John Carter/Horace Tapscott: West Coast Hot (Novus 3107-2-N, 1991) Reissue of 1969 recordings 3. Kenny Davern: My Inspiration (Music Masters) 4. Eddie Daniels: To Bird With Love (GRP 9544, 1987) 5. Marty Ehrlich and the Dark Woods Ensemble: Live Wood (Music and Arts, 1997) 6. Benny Goodman Live at Carnegie Hall 7. Jimmy Hamilton with Duke Ellington: The Far East Suite (RCA, 1966) 8. Tony Scott: Sung Heroes (Sunnyside, 1959) with Bill Evans, Scott LaFaro, Paul Motian 9. Artie Shaw: The Last Recordings 10. Barney Bigard, The Barney Bigard Story, 1929-1945 11. Irving Fazola, Faz, Living Era Records 12. George Lewis, Doctor Jazz, Good Time Jazz Records 13. Jimmie Noone, Apex of New Orleans Jazz, ASV Records 14. Sidney Bechet/Mezz Mezzrow King Jazz Story, Vol. 2: Really The Blues Storyville Records 15. Edmund Hall, At Club Hangover 1954, Storyville Records 16. Benny Goodman Collector’s Edition. Benny Goodman

A Clarinet Players Companion
57

A Clarinet Players Companion
58
Name Practice Log
What do you want to accomplish during your practice time?
Start with a warm up that helps you get ready to focus physically and mentally. What is your warm-up routine? Be specific
What are your goals during your practice time? Set several goals that you want to accomplish for the month. Your goals should focus on important areas that you want to get better on, so be specific. 1.
2.
3.
What are you going to do to accomplish the goals you have set? Be specific about what you are going to do to accomplish your goals. 4.
5.
6.
In the spaces provided in the calendar fill in the amount of time you spend each day practicing. You
should practice at least 30 minutes a day. The total minutes of this months’ practice log should at least
equal 250 minutes for an A, at least 200 min. for a B, at least 150 min. for a C and at least 100 min. for a
D. Anything below 100 is an F. Total your minutes at the bottom of the log and have your parents sign
it. This is due the last day of the month.
Practice Calendar due
Sunday Monday Tuesday Wednesday Thursday Friday Saturday
Total Minutes
Parents Signature Date
A Clarinet Players Companion
59
Tips for Band Parents How You Fit In You can help your child to succeed in band by supporting him in his efforts. Parental support is a crucial element in success, not only in band, but in all school activities. Please contact your child's band director if you have questions or concerns. These guidelines are designed to assist you in giving your child the best support possible for his or her musical endeavors. Music achievement requires effort over a period of time, and like any skill, interest counts far more than talent. With the right support from you, playing music will become a natural part of your child's life. We strongly believe that music study has numerous benefits for your son or daughter. These include; a lifelong love of music, problem solving, teamwork, goal setting, self-expression, coordination, memory skills, self-confidence, concentration, poise, self-discipline, and much, much more. Things You Can Help Do Music achievement requires effort over a period of time. You can help your child by:
finding a regular time and place to practice. providing a quiet place in which to practice remaining nearby during practice times as often as possible listening to your child practice and acknowledge improvement, effort, and achievements. helping your child keep a daily record of his/her practice (in the front of the EXCELLENCE book) following the Band Course assignment and test schedule to ensure that your child is always
“looking ahead” when practicing. encouraging your child to play for family and friends if they are comfortable with it. exposing your child to a wide variety of music, including concerts and recitals. encouraging your child to talk with you about his or her lessons.
a) Ask your child what they did in band today. b) Ask him/her to name the notes for you c) Ask him/her to show you the fingerings d) Ask him/her to count or clap the rhythms for you
making sure your child's instrument is always in good working condition. making sure your child has all the necessary supplies. attending all school band events. allowing your child to play many types of music, not just study pieces. helping your child build a personal music library. taking your child to band concerts at the middle school, high school, in the community,
and professional groups, such as the symphony. looking into the possibility of private lessons on his/her instrument when they get older. trying to get your child to make a minimum two-year commitment to his or her music studies
Things that can discourage your child
Don't use practice as punishment. Don’t take away band rehearsals or activities, this is a commitment your child made and it is a
team activity, their involvement affects others. Don't insist that your child play for others when he or she doesn't want to. Don't ridicule or make fun of mistakes or less than perfect playing. Don't start your child on an instrument that's in poor working condition. Don't expect rapid progress and development in the beginning.

A Clarinet Players Companion
60
References Shackleton, Nicholas. "Clarinet." From The New Grove Dictionary of Musical Instruments 3 volumes, ed. Stanley Sadie. London: Macmillan, 1984 Rice, Albert. The Baroque Clarinet. Oxford: Clarendon Press, 1992. Page 1-3, 39-63, 79-96 Mazzeo, Rosario. The Clarinet: Excellence and Artistry Sherman Oaks, California: Alfred Publishing Co, 1981.
Rendall, F. Geoffrey. The Clarinet. Third edition revised with some additional material by Philip Bate. London: Ernest Benn 1954, 1971. Lawson, Colin. The Cambridge Companion to the Clarinet, ed. New York: Cambridge U. Press, 1995 Ridenour, Thomas. The Educator's Guide to the Clarinet, Second Edition, Duncanville, TX Ridenour Clarinet Products, 2010 Gibson, John. Advanced Intonation Technique for Clarinets, JB Linear Music, 2003 Flute Care and Maintenance Manual by Zachery Music
http://www.zacharymusic.com/Zachary_Music/FLcarePics.htm Windsor, Ontario, Canada 2003
Midgley, Ruth. Musical Instruments of the World Sterling Publishing Company New York, NY 1997
Hovey, N. W. Rubank Elementary Method Clarinet Revised Edition Hal Leonard Milwaukee, WI. 1992
Skornicka, J.E. and Miller, Robert. Intermediate Method Clarinet Revised Edition Hal Leonard Milwaukee, WI.
1989
Westphal, Fredrick. Guide to Teaching Woodwinds Fifth Edition Mcgraw-Hill Company San Francisco CA. 1999
pages 52-113
Hovey, Nilo. Clarinet Teachers Guide Selmer Paris France. 1999 Corley, Paula Clarinet Emergency Room: Solving Performance Problems in Your Clarinet Section Presented in the 2004 Midwest Clinic, published by The Music Group. Woodwind Fingering Guide http://www.wfg.woodwind.org/ Guy, Larry. Embouchure Building for Clarinetists. River note Press, Fifth Edition, Stony Point, NY.2004. Gingras, Michele. Clarinet Secrets - 52 Strategies for the Advanced Clarinetist Scarecrow Press New York, NY. 2006 Pearson, Bruce. Teaching the Clarinet Embouchure Published in Kjos Band News, Fall 2000, Volume 2 2009 Neil A. Kjos Music Company


