
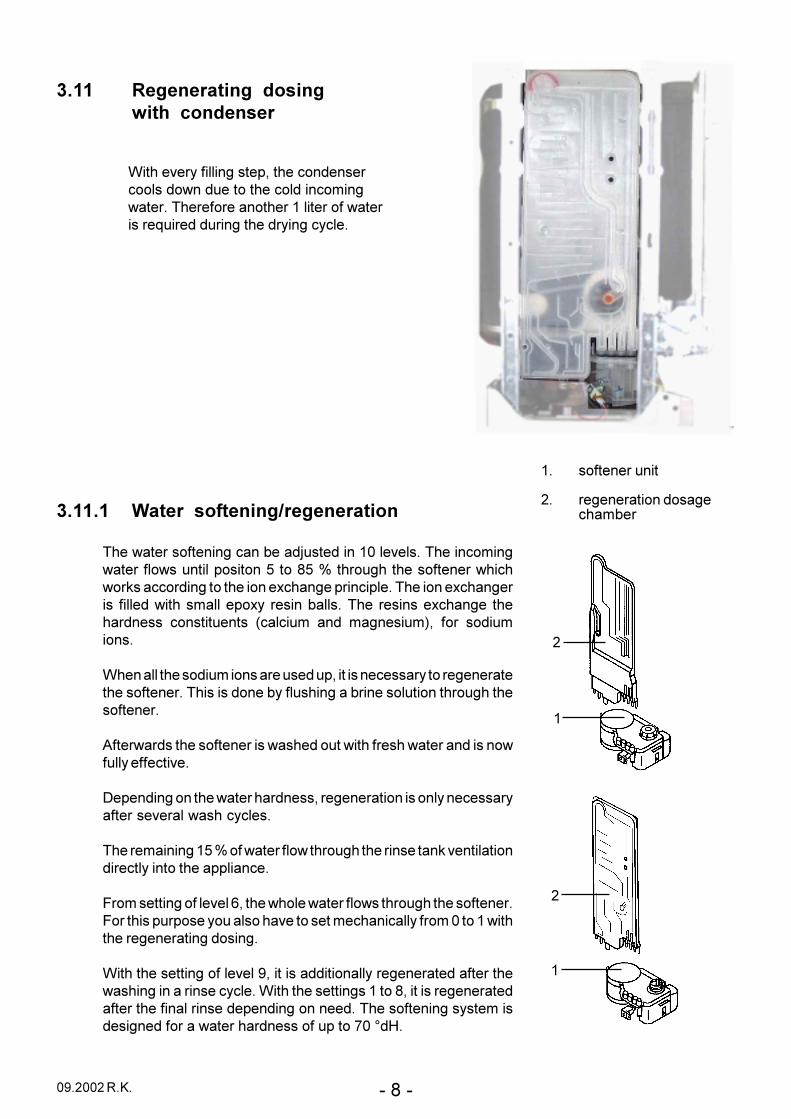
� ������������ ��������������������������� ���� ��!� "
#��$���%�&������������
�'���(�)'����*�
+��,���,-�����������
��,��.,/�01�
2(����-
��
�����������
����������
������
����������
��� ������
� ��
�������,�������.,/, ����������3 ��
� ���
�� ����������� �����������������������������������������������������������������������������������
�� ���������� �������������������������������������������������������������������������������������
� ��������� ������������������������������������������������������������������������������������ � �� ���������� ����������������������������������������������������������������������������������������� � ��� ������������������������������������������������������������������������������������������� � � ������� �������������������������������������������������������������������������������������� � �� ���������� �������������������������������������������������������������������������������������� � �� ����������������� ������������������������������������������������������������������������ � �� ��� ������������� ������������������������������������������������������������������������ � �! "������� ������������������������������������������������������������������������������������� � �# $����%������%����� ������������������������������������������������������������������������������ � �& '��(���� �������������������������������������������������������������������������������������� ! ��) ��(��� ���������������������������������������������������������������������������������������������� ! ��� *������������������������������ ���������������������������������������������� # ����� +������%������,������������ ���������������������������������������������������������� #
�� *������%��������� ������������������������������������������������������������������������� &��� -������������ ���������������������������������������������������������������������������� &��� "��������%������������ ������������������������������������������������������������� �) ��
�� +����������'����� �������������������������������������������������������������������� � ��� .�� .�����+����"��������� ������������������������������������������������������������ ����� +��������/� ������������������������������������������������������������������������������������ ������� +������������ ����������������������������������������������������������������������������� �� �!�� �������� ������������������������������������������������������������������������������������������� �# �&
�� ������������� $� ���-������������ ������������������������������������������������������������������ �)��� 0��������%�������� ������������������������������������������������������������������������� ���� $��� �������(1"��������������������������������������������������������������� ������� $��� �������(1'��������������2.3 ��������������������������������������������� � ����� $��� �������(1'��������������243 ��������������������������������������������� ����� $��� �������(1"��������� ��������������������������������������������������������� ����� $��� �������(1������������ ���������������������������������������������������� ����!�� $��� �������(1.���������� ������������������������������������������������������� �!��!�� $��� �������(1.���������� ������������������������������������������������������� �#��# $��� �������(1$������������� ������������������������������������������������� �&��&�� $��� �������(1�����(�2����3 �������������������������������������������������� )��&�� $��� �������(1�����(�2����3 �������������������������������������������������� ����) -5��5����%���5�������������������%�������� ��������������������� ����� '�������%������������� ���������������������������������������������������������������� ���� ������5������%����� ����������� ����������������������������������������������������� ���� ������5������%����������� ������������������������������������������������������������ ������� '��5���%�������1����������(,����������������������� ������������� ������� '��5���%�������1����������(,����������������������� ������������� !���� '��5���%�������16������ ��������������������������������������������������������������� #���� '��5���%�������17���%������������������� ������������������������������������ &
���& -5��5����%����������(� ��������������������������������������������������������������� �)
!� +������!�� �������������� �������������������������������������������������������������������������������� ��!�� +������������� ������������������������������������������������������������������������������ ��

�������,�������.,/, ����������3 ��
�� ������� ����
����� � ���������
������ ���������� ����� � �� ������
�� ����� ���
��� ���������������������������������������
��� �������
8 .�������������������9����:��%���
� ����������� ������ ����� ����� ���� ������ ����������������������������������������� ������ �������������������������������� ����
��� ��������������������� ����������������
��� �������
��������������������������������������
������ !�"�#���� $%�"���&�� $%�"�
���������������'��&�����(��� )�"��������*�������+�"�
�������,�����.,/,
�� ����� � ��
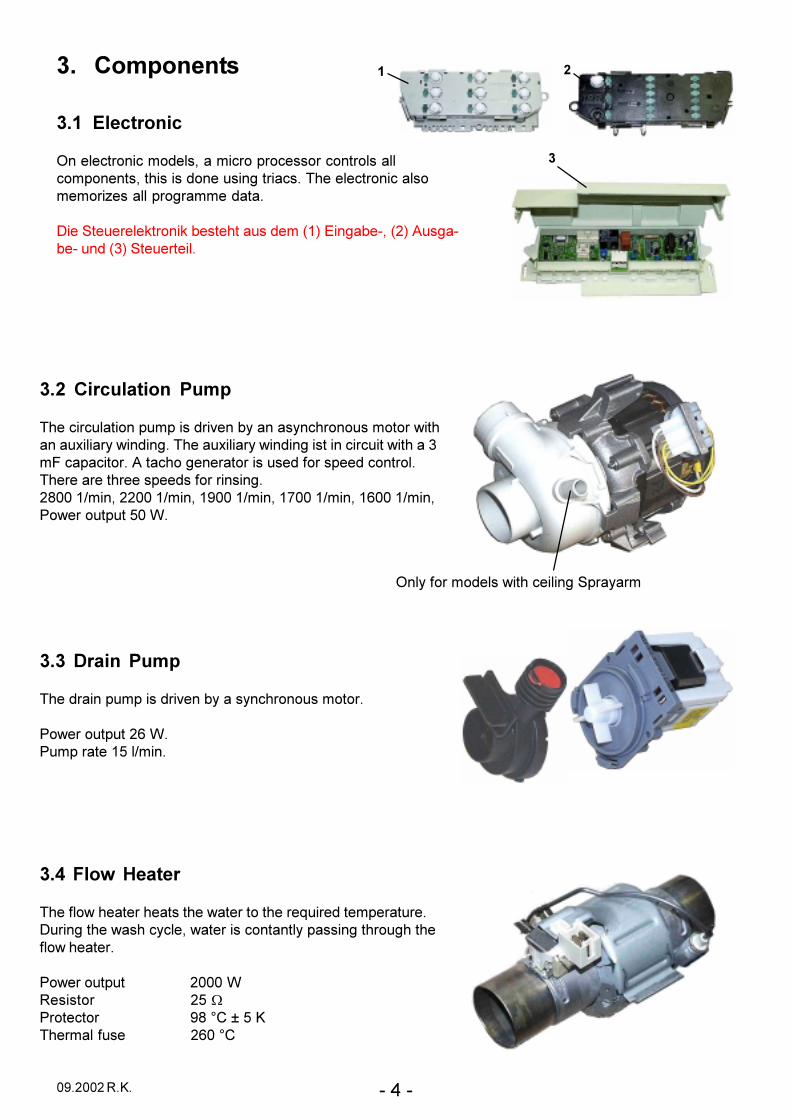
��� ����������
-�����������������;����������������������������������;���������������������������������������������<������������������
���'��������/�����/:������������2�3�����:� ;2�3.���� :� ���2 3'����������
� �
�
��� ����������� ���
���������������������5��:(����(����������������������=�����(�������������=�����(������������������������ �����������.��������������������%��������������������������������%�����������#))�,���;��))�,���;�&))�,���;�!))�,���;��))�,���;"���������>�)+�
�����������
���������������5��:(��(���������������
"�����������+�"���������,����
�������������
���%�����������������������������?������������������������������(���;���������������(����������������%����������
"��������� �)))+*������� ���"�������� &#@�A�B�������%��� ��)@�
-��(%�������������������'��(���

�������,�����.,/,
��� ��������� �� �� ��
������������������������� �)������ �) )����������������������������� � ��� !��,�&�"��-��)��
������������� �����������
�������� � ���������
�������� ������������
�������� � ���������
���������� ����
���������� ����� ��� ���� ����
�����
��������
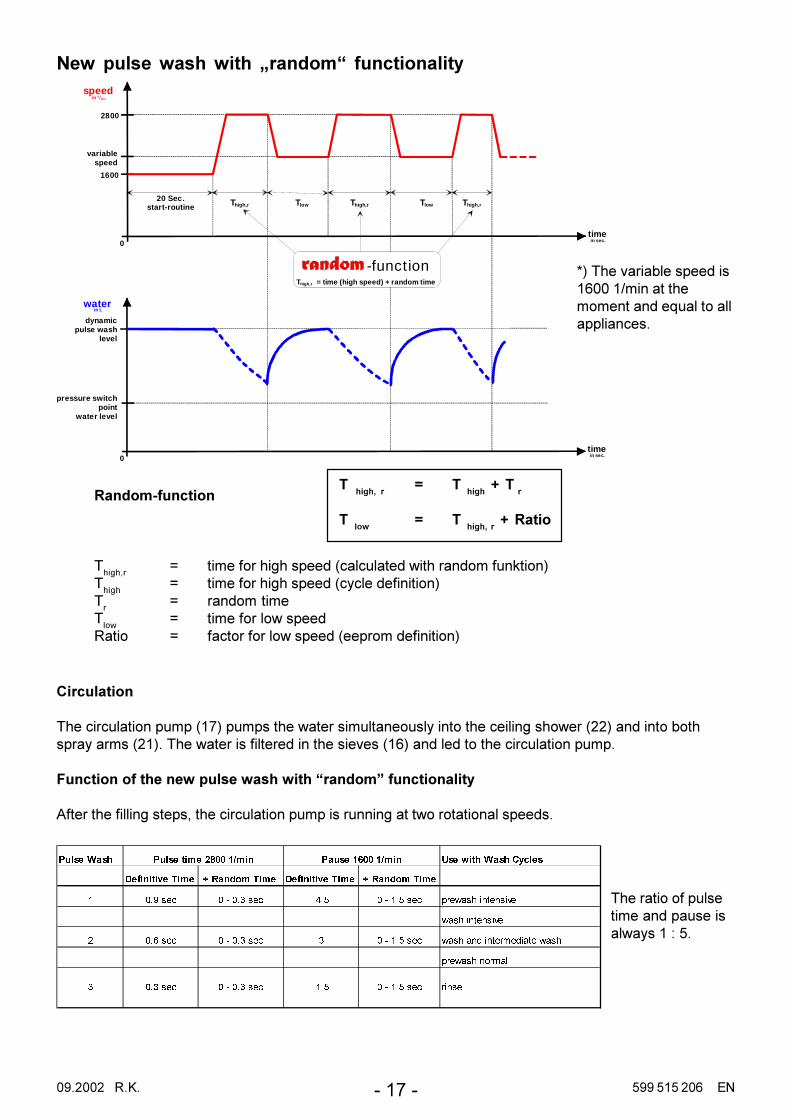
���������������������������%��������������������������������?������(�����������������"����:�(�=����������� �������������������� %����:��/�����������������/�%�������� �������������������(����%������������������:����������������������%������������:�������������������������������������������������5���
�����������������(�������������������������������������������������5������������������������������� ���%����%������������������������������
.%�������������%%�������;�������� ���%����%���������������������������� �
���������������(���;�����������:������������������������������������������ �������%������������� ���������������/�.������������;����������������� ���2��C3����%������������������������������
+�������������������%%;�������� ���%����%���������������������������� �
���������������(���;�������������(�����������������+������������������������������;����������������� ���%�������������������/�
������
��
������
��
������
��
������
��
������
��
����
�������,�����.,/,
��� ��� ��� �����
����������������������������������5���+�����������;��������� �����������
%� '���������������5�� ����+�*��������������5�� ����+�
�����������������������9����:���
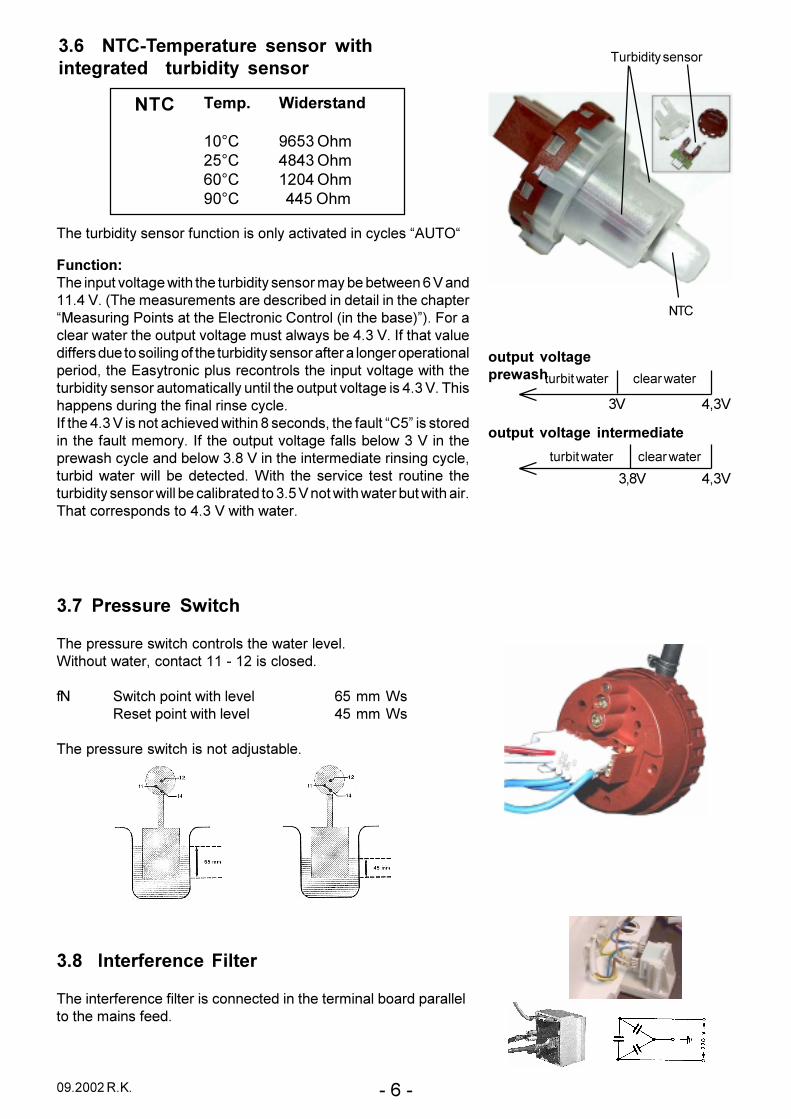
��! "����#������������
��������%������%�����������������������������:���������������������%����
��$ %&�'&��������� �� �� ��� ���������� ���(����) �� ��
�45
4��*6*�"�(� (��
������:����(������%������������(����5�������(����D.E�-D
��"����.�������5����������������:����(��������(:�:�������F�������F�2������������������������:���������������������D7��������"���������������������������2�����:���3G3�����������������������5��������������(�:��� F�$%����5������%%����������������%������:����(�������%�������������������������;������(��������������������������5����������������:����(������������������(�������������5���������� F�������������������%����������(����$%����� F����������5��������#�������;���%����D��G�������������%���������(�$%��������5������%����:���� F������������(������:���� �#F�������������������������(���;���:����������� :����������+��� ������5��� ���� ������� ������:����(����������:�����:������� ��F������������:���������������������������� F����������
�; F
��&�� (������� ������������
�; F F
��&�� (������&���������*��7���� ������7����
;#F
����� ������ �
���� ������ ��� ���������� � �������� �����
%&�
���*��7���� ������7����
�������,�����.,/,
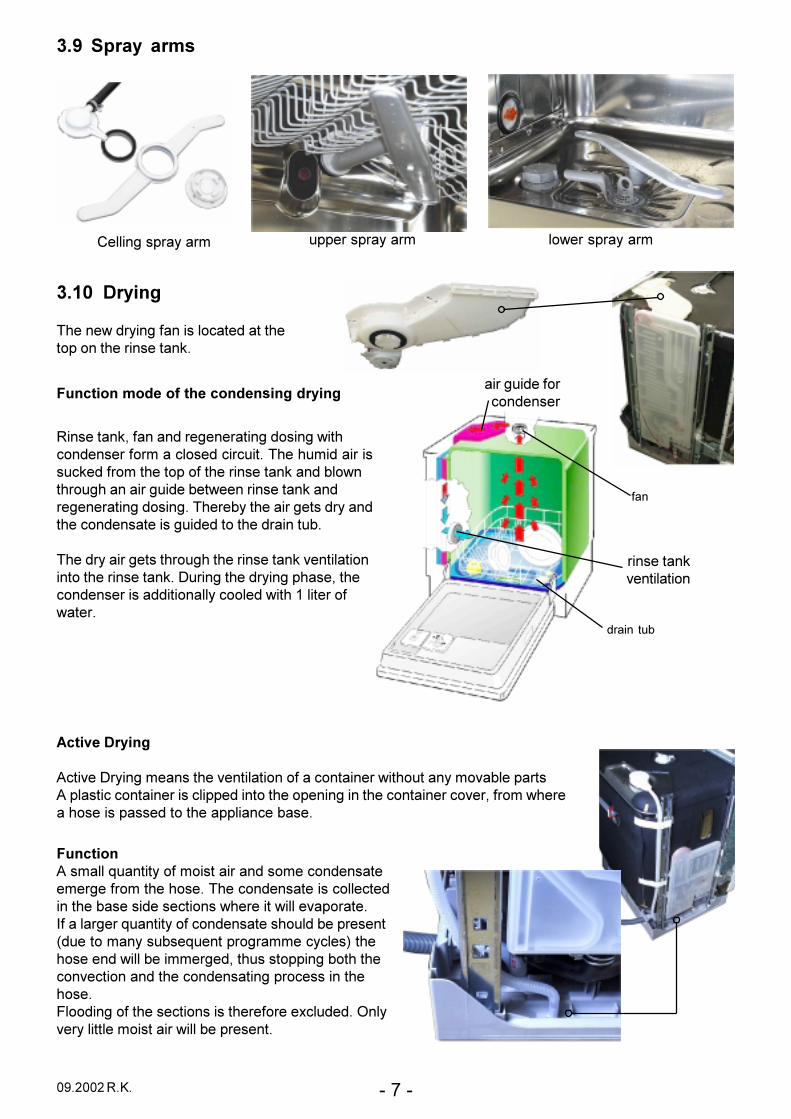
��* ���) ���
��"�����������������"������������-���
*�������/;%������������������������������������%����������������������������������/��%���������%�����������/���:���������������������:��������������/���������������������������:(������������(������������������������������������:�
�����(�������������������������/5�������������������������/������������(�������;�������������������������(�����������������%������
���
��������%�����������
��������/5����������
������ �
���+ ��)���
��������(���%�������������������������������/�
����������(��� ������(��� ��������(���
�"��(����-���
.���5���(�����������5�����������%�������������������(��5�:������
.���������������������������������������������������5��;%��������������������������������:����
��"����.�����?������(�%�������������������������������%����������������������������������������:���������������������������5�������$%�������?������(�%����������������:�������2��������(��:��?�������������(����3��������������:���������;����������:���������5�������������������������������������������������%������������������%����=�������-��(5��(������������������:��������
�� ����,�����.,/,
������ ,���� �#������-������������
�
�
�
�
�� ��%���������
�� ����������������������:��
���� .����������� �� ������ ������ ��
����������%���������:���9��������)��5��������������������%������������������#�C������������%�������������/�������������������=���������������������=��������� %����������������=( �����:���������������=������ ����������� ������������ 2������� ��� ���������3; %�� �����������
+���������������������������;������������(�����������������%����������������:(%��������:������������������������%������
.%�������������%��������������������%�����������������%���(�%%����5��
��������������������������;�����������������(��������(�%�����5���������(�����
��������������C�%�����%���������������������/5�����������������(���������������
������������%��5���;�������������%����������������%������������������(��������5�����������������(%���)�����������������������������
+��������������%��5��&;���������������(������������%����������������������(����+�����������������#;����������������%������%�����������������������������%�������(��������������%�����������������%���!)@�H�
+����5��(%���������;����������������������������������������������������%�����������������%���������?����������������(����(����
��!����,�����.,/,
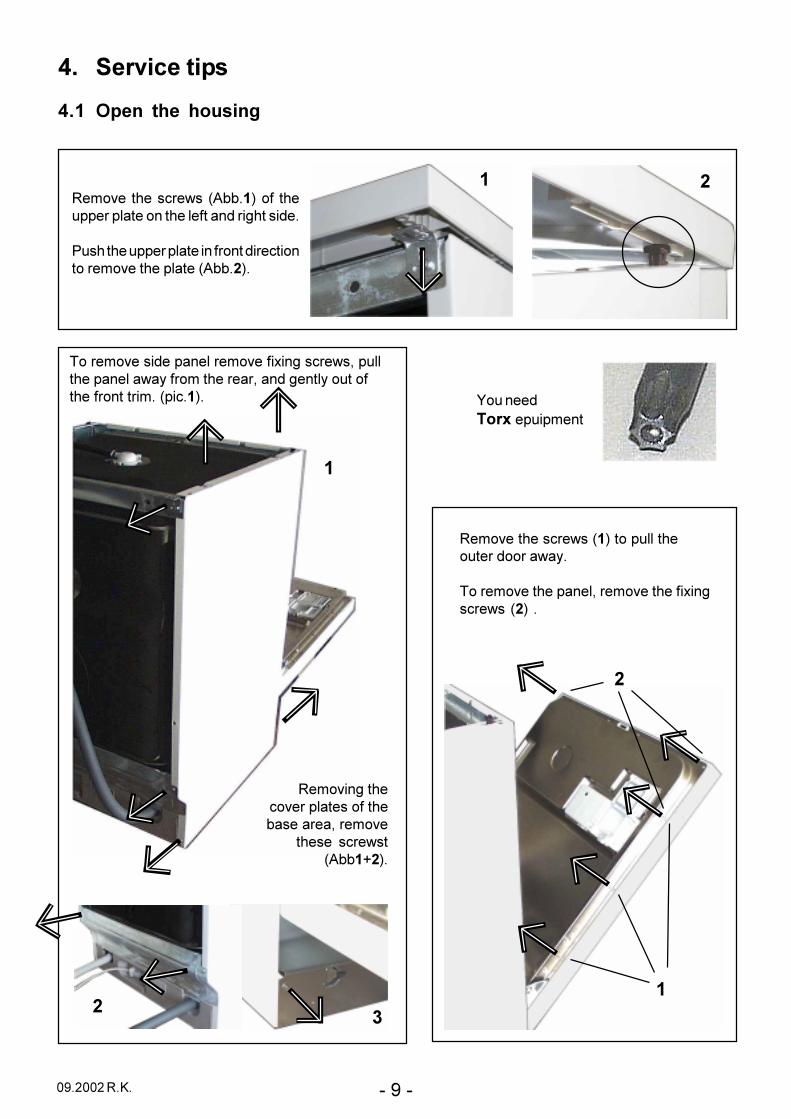
�� ������������
��� /�� � � �� ���
*���5����������2.::�+3�%�����������������%��������������
"���������������%�������������������5��������2.::�)3�
� �
�
��
�
�
������5�������������5�%�=���������;�������������(%����������;��������(����%���%���������2���+3�
*���5��������5��������%���:�������;����5�
����� �������2.::+I)3�
*���5����������2+3��������������������(�
������5��������;����5����%�=���������2)3�
J�����������������

��"#����,�����.,/,
�����������������2/3
�������������2!3�������2$3"�������������203
�
� $ �
����������2����32+3�������������2�����(32)3�������������/�����/2����3213�����:����������
�
�
�
��� �� ����� �# ��������
�����������������2+3'��(����2)3*��% �������������213'������������2/3������2!3
�(�����2$3 �
�
�
� �
$

��""����,�����.,/,
0��1 ��� 2���
����������2+3 ��������:�=2)3
$��������213 ���������2/3
+���������%���:�5����(���2!3
.���2��� � � ��������� �� ��� � ��(��3
������������/�����:�2+3;���������������2)3 �������������%�������:��;��������������������
��%��������%������
.���2���� � �#��������� 3
����5������������������������������������� ������%�����2+3�����������5�������������%����
%������:������� �.E�$-��%�������:��������������������
�
� �
�
�
�
�
�

��"�����,�����.,/,
.���2��� � �(� � 3
����5����������;�������������������� �����(�������:���%�=��������������������5��2%�����3 ��/��%%:�������%���(�����������������������;
�����������������������( �������������%����������
�
�
�
� �
+���:�������5��;%���������������������������:��1 �������2�3 �������������2�3 ����������2 3 ����������������,���:����(������2�3 "�������������2�3

�������������������� ��������� ��
� ���������� �� �� ��� ������ ����� ��� � ������ ��� ����������������� ��������� ����� ������ ������ � � ��� ����� ����������
!"��� # ������ ����� ������ !"��� $ �������
% ���� !������ �& '��( ��� �����������!������ �� ������ ����� ����� ������������"����� )���� ��� *���� ����!"�� + ���� �� ����!"�� *����
�# ,� !������� �� �$ *����"��� �% - ��� �� & '��( ��� ������� � �� �� ����(�������� �"��� � .�������� ��� � �������
�� ����������� �����
����������������������������
��������������������������� �������
��
��
��
����
��
�
�
��
��
�
�
��
��
�� ��
��
�$
���%
�
�
�������������������� ��������� ��
��� ��������� ����� ���������
����������� ��������
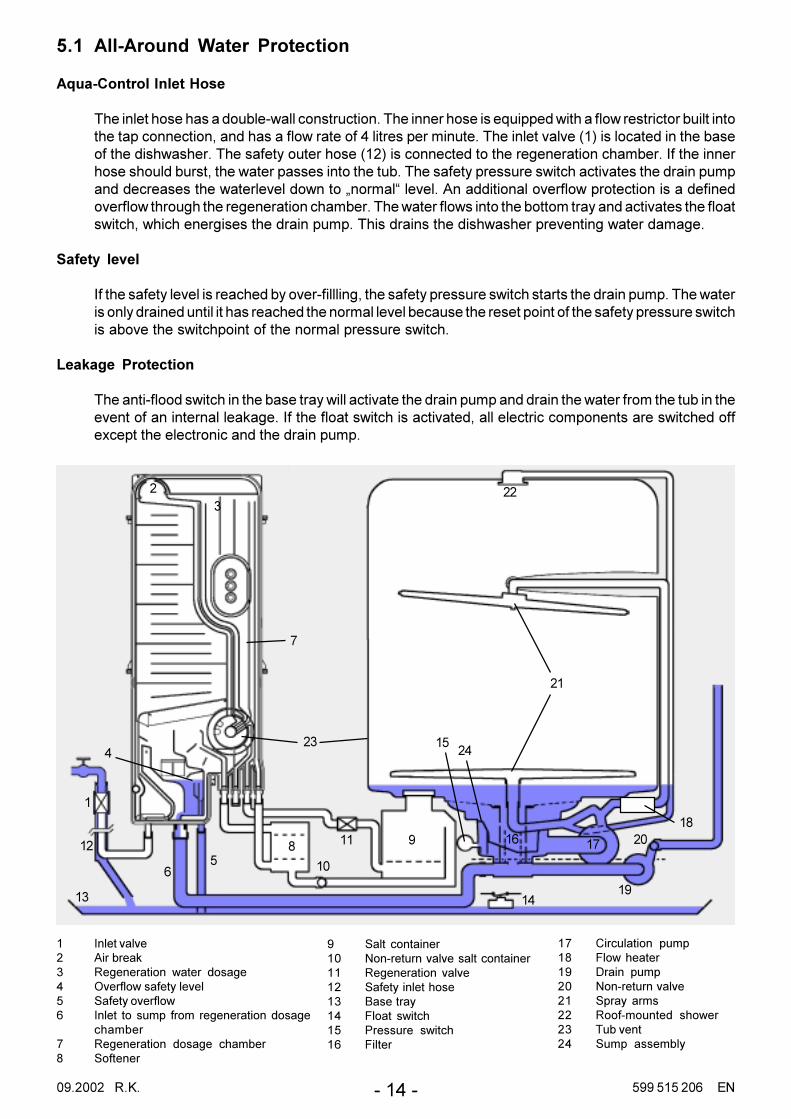
������������������� ������������� ����������������������� ��������������������������� ������������������������������������������������������������ ��������������������������������������������������������������������� ������������������������������� ������������������!��������������� ���� ��������������������������� ���������������� ����������������������������� �����������������������������������"�����#��������$������������������������������������������������� �������� ���������������������������������������������������������������������������������������� �������������� ������������������������������������ ����������� ��
������ �����
!������������������������������������������ ��������������� ������������������������� ��������������������������� ��������������������������������������� ������������������������������� �������������������������������������������� ���������
�������� �������
������������������������������������������������������������ �������������������������������� �������������������������������%� ���!������������������������������������������������������������������&���������������������������������� ���
� ���������� �� �� ��� ������ ����� ��� � ������ ��� ����������������� ��������� ����� ������ ������ � � ��� ����� ����������
!"��� # ������ ����� ������ !"��� $ �������
% ���� !������ �& '��( ��� �����������!������ �� ������ ����� ����� ������������"����� )���� ��� *���� ����!"�� + ���� �� ����!"�� *����
�# ,� !������� �� �$ *����"��� �% - ��� �� & '��( ��� ������� � �� �� ����(�������� �"��� � .�������� ��� � �������
��
�
�
�
�
�
�
� �
�
�
�
��
�
��
����
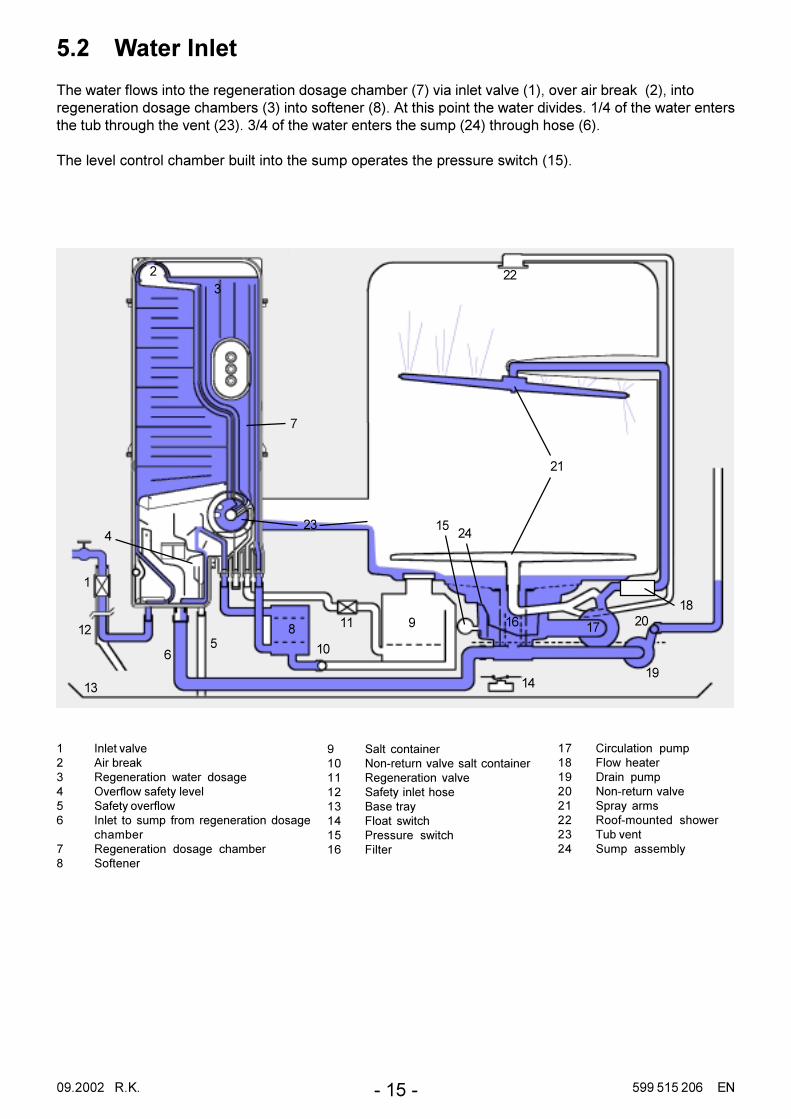
�������������������� ��������� ��
��� ������������
�������������� ����������������� ����������������������� �� �������������������� �������������� ������������ ����������������������� ���������������������� �� � �������������� � ������!"������������������������#������#�������������������!"�������������������������#� ���"������#���������$��
������������������������# �� ���������#� �� ����������� ����#����� ������%��
� ���������� �� �� ��� ������ ����� ��� � ������ ��� ����������������� ��������� ����� ������ ������ � � ��� ����� ����������
!"��� # ������ ����� ������ !"��� $ �������
% ���� !������ �& '��( ��� �����������!������ �� ������ ����� ����� ������������"����� )���� ��� *���� ����!"�� + ���� �� ����!"�� *����
�# ,� !������� �� �$ *����"��� �% - ��� �� & '��( ��� ������� � �� �� ����(�������� �"��� � .�������� ��� � �������
��
�
�
�
�
�
�
� �
�
�
�
��
�
��
����

��"�����,�������.,/, ����������3 ��
����� ,���� ���� �� 5�6����7
3����"��������
'�����%�����������������������������%����������1$%��������������������%�����=���������2��������3;�%�����������������(����������������������������������������(""� 6��6�&��:���/����
�-����"��������
�)�������%�������������������������������� ������������ �)�������%�������������������������������� %��������������������������������������.����������������
�������:����������;����%����������������������������������������1$%�����(������������������L���������������������������2��������3;����(�����%���������:�������� ������-��(�%������ �������%���������� �����;�%�����������������(�������������������������""� 6��6�&��:���/����
6�&6��)6���
6�&6��)6���
83 ������������������������������:��?�������������
T imeout 1
T imeout 2
s tatic waterload to level
dynamic waterload
with level control
max. 4repetitions
valve
off
on
waterin L
0
dynamicwater load
speed in U/min
0
10 Sek.
timein S ek.
target-speed
�20 Sek.
timein Sek.
time in S ek.
filing filling is possible
level check:water fai lure displayed
if level not reached!
ca. 1,6
3,6 - 4
s tatic water load
level check:water fai lure displayed
if level not r eached!
5 S ek.
1600
5 S ek.
��������� ���������� ���� ������ ���� ���� �������������������������������� ������� ����� ������� ��� ������� ����� ������� ��� ������� ������ ������� ��
��"�����,�������.,/, ����������3 ��
%���� ��� ��� 8������9 #�����������)
83���5����:����������))�,������������������?�����������������
������ ��"����
������� M ����%����������2��������������������%��/����3����� M ����%����������2�(�����%�������3�� M �������������� M ����%���������*���� M %�����%���������2�������%�������3
,��"������
����������������2�!3������������������������(��������������������2��3�������:������(����2��3�����������%���������������5��2��3�������������������������
��"����������������&��������������6������7���"��������-
.%������%����������;����������������������������������������������
���������%���������������������(��1��
�� ������ � 8 �� �����9��� �
�� �� 8 �� ������ ��9������
water in L
0
20 Sec.s tar t-routine
time in sec.
pressure switchpoint
water level
dynamicpulse wash
level
speed in U/min
0timein sec.
2800
var iablespeed
1600
Thigh,r Thigh,rT low T low T high,r
-functionThigh,r = time (high speed) + random time
3XOVH�:DVK 8VH�ZLWK�:DVK�&\FOHV
'HILQLWLYH�7LPH ���5DQGRP�7LPH 'HILQLWLYH�7LPH ���5DQGRP�7LPH
� ����VHF ��������VHF ���� ��������VHF SUHZDVK�LQWHQVLYH
ZDVK�LQWHQVLYH
� ����VHF ��������VHF � ��������VHF ZDVK�DQG�LQWHUPHGLDWH�ZDVK
SUHZDVK�QRUPDO
� ����VHF ��������VHF ���� ��������VHF ULQVH
3XOVH�WLPH��������PLQ 3DXVH��������PLQ
�������������������� ��������� ��
��� �������
����������� �������������� �������������������� � ��� ����� ���������������������� ������� �������������� ����������������������������� ����� �������������� ������ ��������������� ������������������� !����������������������������������������"����� ����������� �������
� ���������� �� �� ��� ������ ����� ��� � ������ ��� ����������������� ��������� ����� ������ ������ � � ��� ����� ����������
!"��� # ������ ����� ������ !"��� $ �������
% ���� !������ �& '��( ��� �����������!������ �� ������ ����� ����� ������������"����� )���� ��� *���� ����!"�� + ���� �� ����!"�� *����
�# ,� !������� �� �$ *����"��� �% - ��� �� & '��( ��� ������� � �� �� ����(�������� �"��� � .�������� ��� � �������
��
�
�
�
�
�
�
� �
�
�
�
��
�
��
����
��"!����,�������.,/, ����������3 ��
��:����� ����������� �� ��� ���� ��2�� � ��1
on
off
drain pump
T 2 (var iable) T 3 (var iable)T 1 (var iable)
1 dr aining s equencewith var iable timing
level check!
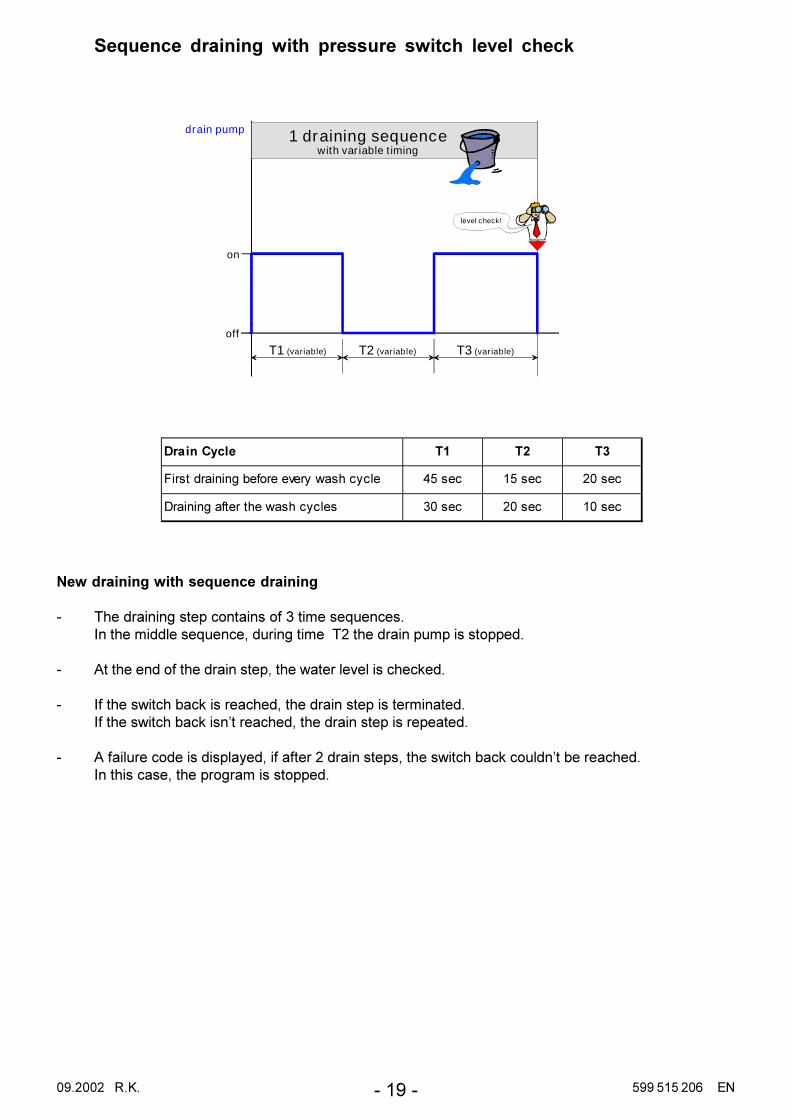
��������� � �� ��
�������������� �������������������� ������ ������ ������
������� ������������������� ������ ������ ������
:�������������������2��"����������
�����������������������% ������?�������$������������?�����;������������������������������
.��������%�����������;����������5��������/���
$%���������:��/���������;������������������������$%���������:��/���L��������;���������������������
.%�����������������(��;�%�%�������������;���������:��/������L�:���������$���������;�����������������
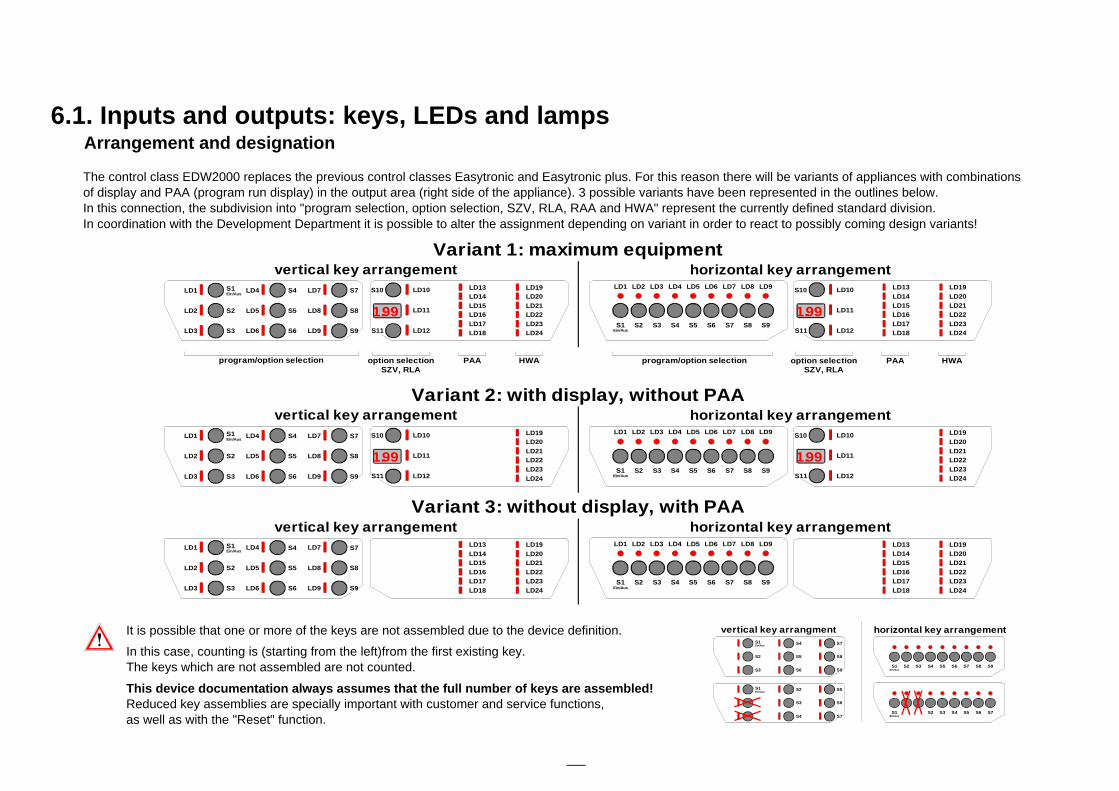
6.1. Inputs and outputs: keys, LEDs and lampsArrangement and designation
The control class EDW2000 replaces the previous control classes Easytronic and Easytronic plus. For this reason there will be variants of appliances with combinations of display and PAA (program run display) in the output area (right side of the appliance). 3 possible variants have been represented in the outlines below.In this connection, the subdivision into "program selection, option selection, SZV, RLA, RAA and HWA" represent the currently defined standard division.In coordination with the Development Department it is possible to alter the assignment depending on variant in order to react to possibly coming design variants!
It is possible that one or more of the keys are not assembled due to the device definition.
In this case, counting is (starting from the left)from the first existing key. The keys which are not assembled are not counted.
This device documentation always assumes that the full number of keys are assembled! Reduced key assemblies are specially important with customer and service functions, as well as with the "Reset" function.
S1Ein/Aus
LD1
S2LD2
LD3 S3
S4LD4
S5LD5
LD6 S6
S7LD7
S8LD8
LD9 S9S1
Ein/Aus
LD1
S2
LD2
S3
LD3
S4
LD4
S5
LD5
S6
LD6
S7
LD7
S8
LD8
S9
LD9S10 LD10
LD11
LD12S11
1.99
LD13LD14LD15LD16LD17LD18
LD19LD20LD21LD22LD23LD24
S10 LD10
LD11
LD12S11
1.99
LD13LD14LD15LD16LD17LD18
LD19LD20LD21LD22LD23LD24
vertical key arrangement horizontal key arrangementVariant 1: maximum equipment
S1Ein/Aus
LD1
S2LD2
LD3 S3
S4LD4
S5LD5
LD6 S6
S7LD7
S8LD8
LD9 S9S1
Ein/Aus
LD1
S2
LD2
S3
LD3
S4
LD4
S5
LD5
S6
LD6
S7
LD7
S8
LD8
S9
LD9S10 LD10
LD11
LD12S11
1.99
LD19LD20LD21LD22LD23LD24
S10 LD10
LD11
LD12S11
1.99
LD19LD20LD21LD22LD23LD24
vertical key arrangement horizontal key arrangementVariant 2: with display, without PAA
S1Ein/Aus
LD1
S2LD2
LD3 S3
S4LD4
S5LD5
LD6 S6
S7LD7
S8LD8
LD9 S9S1
Ein/Aus
LD1
S2
LD2
S3
LD3
S4
LD4
S5
LD5
S6
LD6
S7
LD7
S8
LD8
S9
LD9LD13LD14LD15LD16LD17LD18
LD19LD20LD21LD22LD23LD24
LD13LD14LD15LD16LD17LD18
LD19LD20LD21LD22LD23LD24
vertical key arrangement horizontal key arrangementVariant 3: without display, with PAA
program/option selection option selectionSZV, RLA
PAA HWA program/option selection option selectionSZV, RLA
PAA HWA
S1Ein/Aus
S2
S3
S4
S5
S6
S7
S8
S9S1
Ein/AusS2 S3 S4 S5 S6 S7 S8 S9
vertical key arrangment horizontal key arrangement
S1Ein/Aus
S2
S3
S4
S5
S6
S7S1
Ein/AusS2 S3 S4 S5 S6 S7

6.2. General information
l Equipment in the panel area(see description page B 1)
l Variant-depending existing equipment:w Up to 10 keys (S2 to S11) for the selection of programs or options with the corresponding LEDs. The
alternatively available "SZV" key can only be programmed to the two keys (S10 or S11) of theoutput module.
w Start-time preselection by 2.5-digit display with the corresponding confirmation LED.Indication between 1 and 19 hours (in steps of 1h)
w Indication of remaining run time by 2.5-digit display with the maximum run time display "199"w Information displays (LD19 to LD24 are currently defined for that)w LED display for saltw LED display for rinse-aidw LED display for waterw LED display for spraying armw LED display for doorw LED display for sieve
w Program run time display (LD13 to LD18 are currently defined for that)w maximum 6-level display by LEDs possible
e.g. prewash - washing - rinsing - final rinse - drying - end
All information LEDs resp. program run time LEDs are freely selectable depending on variant inagreement with the Development Department in order to react to possibly coming design variants.
Positively necessary minimum equipment: You always need, besides key S1 (ON/OFF), at least 3 program or option keys with pertinent LEDs in order to select all customer or service functions, e.g., adjustment of hardness range.You also absolutely need for output the display or the End LED.
l Functions which can be adjusted variably by the customer via the control panel:(see description page B 11-13)w Indication and alteration of water hardness.w Activation/deactivation of rinse-aid addition.w Activation/deactivation of signal sound for end.
Indication by means of display or "end" LED, depending on the equipment variant.
l Miscellaneous:w regeneration depending on needw manufacturing test routinew various service functions (fault memory, single actuator selection, LED test)w design of appliance for max. energy label AAAw alternatively with or without fan dryingw aqua control system in different versions
depending on electrical and mechanical components and the corresponding variant programming
l Possible selectable program options:w start-time preselectionw half load "small quantity" as automatic system or with keyw additional washing cyclew 3 in 1 (special tablet program)w sanitize
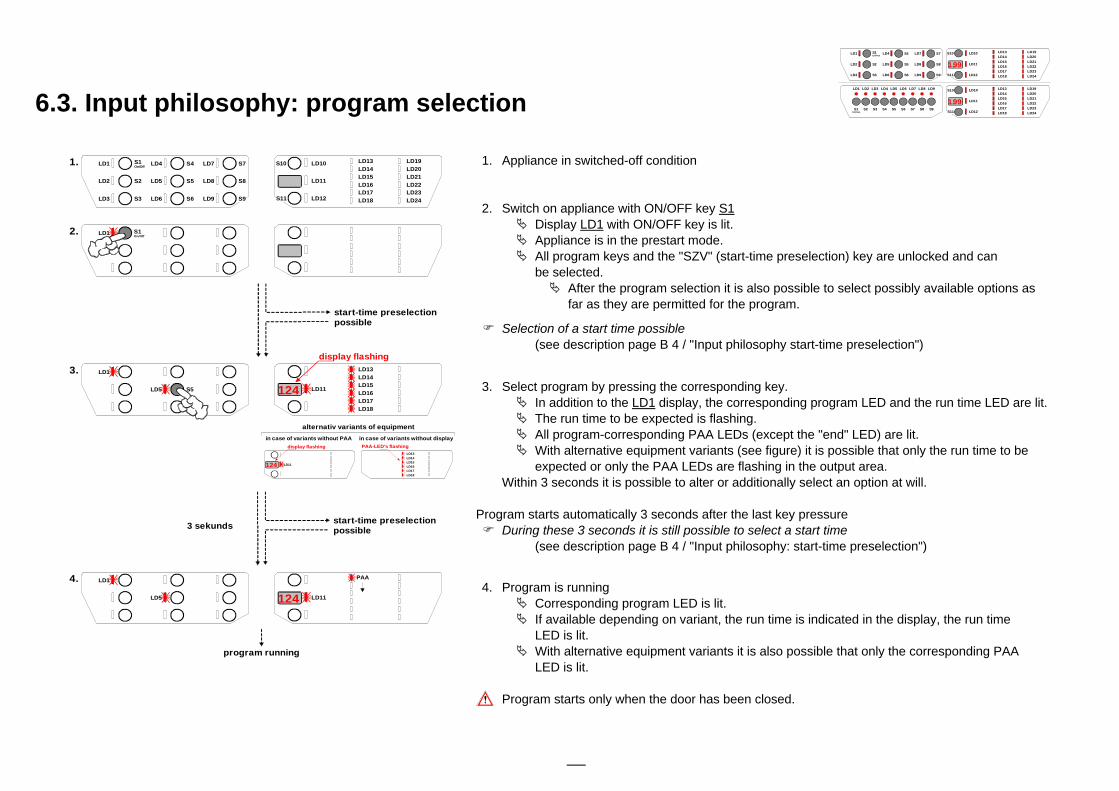
6.3. Input philosophy: program selection
1. Appliance in switched-off condition
2. Switch on appliance with ON/OFF key S1Ä Display LD1 with ON/OFF key is lit.Ä Appliance is in the prestart mode.Ä All program keys and the "SZV" (start-time preselection) key are unlocked and can
be selected.Ä After the program selection it is also possible to select possibly available options as
far as they are permitted for the program.
F Selection of a start time possible(see description page B 4 / "Input philosophy start-time preselection")
3. Select program by pressing the corresponding key.Ä In addition to the LD1 display, the corresponding program LED and the run time LED are lit.Ä The run time to be expected is flashing.Ä All program-corresponding PAA LEDs (except the "end" LED) are lit.Ä With alternative equipment variants (see figure) it is possible that only the run time to be
expected or only the PAA LEDs are flashing in the output area.Within 3 seconds it is possible to alter or additionally select an option at will.
Program starts automatically 3 seconds after the last key pressureF During these 3 seconds it is still possible to select a start time
(see description page B 4 / "Input philosophy: start-time preselection")
4. Program is runningÄ Corresponding program LED is lit.Ä If available depending on variant, the run time is indicated in the display, the run time
LED is lit.Ä With alternative equipment variants it is also possible that only the corresponding PAA
LED is lit.
Program starts only when the door has been closed.
S1Ein/Aus
LD1
S2LD2
LD3 S3
S4LD4
S5LD5
LD6 S6
S7LD7
S8LD8
LD9 S9
S1Ein/Aus
LD1
S2
LD2
S3
LD3
S4
LD4
S5
LD5
S6
LD6
S7
LD7
S8
LD8
S9
LD9
S10 LD10
LD11
LD12S11
1.99
LD13LD14LD15LD16LD17LD18
LD19LD20LD21LD22LD23LD24
S10 LD10
LD11
LD12S11
1.99
LD13LD14LD15LD16LD17LD18
LD19LD20LD21LD22LD23LD24
S1On/Off
LD1
S2LD2
LD3 S3
S4LD4
S5LD5
LD6 S6
S7LD7
S8LD8
LD9 S9
S1On/Off
LD1
LD1
S5LD5
S6
LD11124
1.
2.
3.display flashing
LD5 LD11124
4.
start-time preselectionpossible
start-time preselectionpossible3 sekunds
S10 LD10
LD11
LD12S11
LD13LD14LD15LD16LD17LD18
LD19LD20LD21LD22LD23LD24
LD1
program running
LD13LD14LD15LD16LD17LD18
PAA-LED's flashingLD13LD14LD15LD16LD17LD18
in case of variants without display
LD11124
display flashing
in case of variants without PAA
alternativ variants of equipment
PAA

6.4.1. Input philosophy: select start time(Variant A: time preselection after program selection
1. Switch on appliance with ON/OFF key S1Ä Display LD1 with the ON/OFF key is lit.Ä Appliance is in the "prestart" mode.Ä All program keys and the "SZV" key are unlocked and can be selected.
Ä After the program has been selected you can also select possibly availableoptions as far as they are permitted for the program.
2. Select program by pressing the corresponding key.Ä In addition to the LD1 display the corresponding program LED and the run time
LED are lit. The run time to be expected is flashing in the display, all program-corresponding PAA LEDs (except the "end" LED) are lit.
Ä With alternative variants of equipment it is possible that only the run time to beexpected or only the PAA LEDs are flashing in the output area.
3./4. Actuate the start-time preselection key within 3 seconds.Ä Display LD1 with ON/OFF key, program LED and "SZV" LED are litÄ Set start time is flashing in the display.Ä All program-corresponding PAA LEDs (except the "end" LED) are lit.Ä With alternative variants of equipment (see figure) it is possible that only the run
time to be expected or only the PAA LEDs are flashing in the output area.Any additional key pressure causes the start time scrolling by 1 hour
1h - 2h - ... - 19h - indication of remaining run time (SZV=0h) - 1h - 2h - ...
5. 3 seconds after the last actuation of the "SZV" key the set start time gets active and is running downÄ In addition to the LD1 display the corresponding program LED and "SZV" LED are
lit. The start time is lit in the display.
Start-time preselection gets only active when the door has been closed!
S1Ein/Aus
LD1
S2LD2
LD3 S3
S4LD4
S5LD5
LD6 S6
S7LD7
S8LD8
LD9 S9
S1Ein/Aus
LD1
S2
LD2
S3
LD3
S4
LD4
S5
LD5
S6
LD6
S7
LD7
S8
LD8
S9
LD9
S10 LD10
LD11
LD12S11
1.99
LD13LD14LD15LD16LD17LD18
LD19LD20LD21LD22LD23LD24
S10 LD10
LD11
LD12S11
1.99
LD13LD14LD15LD16LD17LD18
LD19LD20LD21LD22LD23LD24
S1On/OffLD1
S2LD2
LD3 S3
S4LD4
S5LD5
LD6 S6
S7LD7
S8LD8
LD9 S9
1.
LD5 1h
5.
S10 LD10
LD11
LD12S11
LD13LD14LD15LD16LD17LD18
LD19LD20LD21LD22LD23LD24
LD1
start-time preselection running down.
per key pressure+ 1 hour
LD1
S5LD5
S6
Prog.time124
2.display flashing
PAADelay timer
LD1
LD5 Prog.time1h
3.
display flashing
PAADelay timer
LD1
LD5 Prog.time1h
4.
display flashing
PAADelay timer
Prog.time
Delay timer
aprox. 3 secunds
display flashing Prog.time
Delay timer
2h
3h
19h
124
PAA
display flashing Prog.time
Delay timer
display flashing Prog.time
Delay timer
display flashing Prog.time
Delay timer

6.4.2. Input philosophy: select start time(Variant B: time preselection before program selection)
1. Switch on appliance with ON/OFF key S1.Ä Display LD1 with the ON/OFF key is lit.Ä Appliance is in the "prestart" mode.Ä All program keys and the "SZV" key are unlocked and can be selected
Ä After the program has been selected you can also select possibly availableoptions, as far as they are permitted for the program.
2. Actuate the start-time preselection key.Ä Display LD1 with the ON/OFF key is lit.Ä "SZV" LED is litÄ set start time is flashing in the display.
Any additional key pressure causes the start time scrolling by 1 hour1h - 2h - 3h - ... - 19h - display off (SZV=0h) - 1h - 2h - ...
3. Indication of "SZV" is flashing in the display until an additional washing cycle will beselected. The selected start time is not active until that time!
4. Select desired program by pressing the corresponding key.Ä In addition to the LD1 display, the corresponding program LED is lit.Ä The LEDs of the start time key and the run time LED are lit.Ä The run time to be expected is flashing in the display.Ä All program-corresponding PAA LEDs (except the "end" LED) are lit.
5. 3 seconds after the last key actuation the set start time gets active and is runningdownÄ In addition to the LD1 display the corresponding program LED and the "SZV" key
are lit. The start time is indicated in the display.
Start-time preselection gets active only when the door has been closed!
S1Ein/Aus
LD1
S2LD2
LD3 S3
S4LD4
S5LD5
LD6 S6
S7LD7
S8LD8
LD9 S9
S1Ein/Aus
LD1
S2
LD2
S3
LD3
S4
LD4
S5
LD5
S6
LD6
S7
LD7
S8
LD8
S9
LD9
S10 LD10
LD11
LD12S11
1.99
LD13LD14LD15LD16LD17LD18
LD19LD20LD21LD22LD23LD24
S10 LD10
LD11
LD12S11
1.99
LD13LD14LD15LD16LD17LD18
LD19LD20LD21LD22LD23LD24
S1On/OffLD1
S2LD2
LD3 S3
S4LD4
S5LD5
LD6 S6
S7LD7
S8LD8
LD9 S9
1.
LD5 1h
5.
S10 LD10
LD11
LD12S11
LD13LD14LD15LD16LD17LD18
LD19LD20LD21LD22LD23LD24
LD1
start-time preselection running down.
LD1
Prog.time1h
2.
display flashing
PAADelay timer
LD1
LAUFZEIT1h
3.
display flashing
PAAZeitvorwahl
Prog.time
Delay timer
start time gets only active when theprogram has been selected!
LD1
S5LD5 Prog.time124
4. PAADelay timer
display flashing
aprox. 3 seconds
per key pressure+ 1 hour
display flashing Prog.time
Delay timer
2h
3h
19h
124
display flashing Prog.time
Delay timer
display flashing Prog.time
Delay timer
display flashing Prog.time
Delay timer
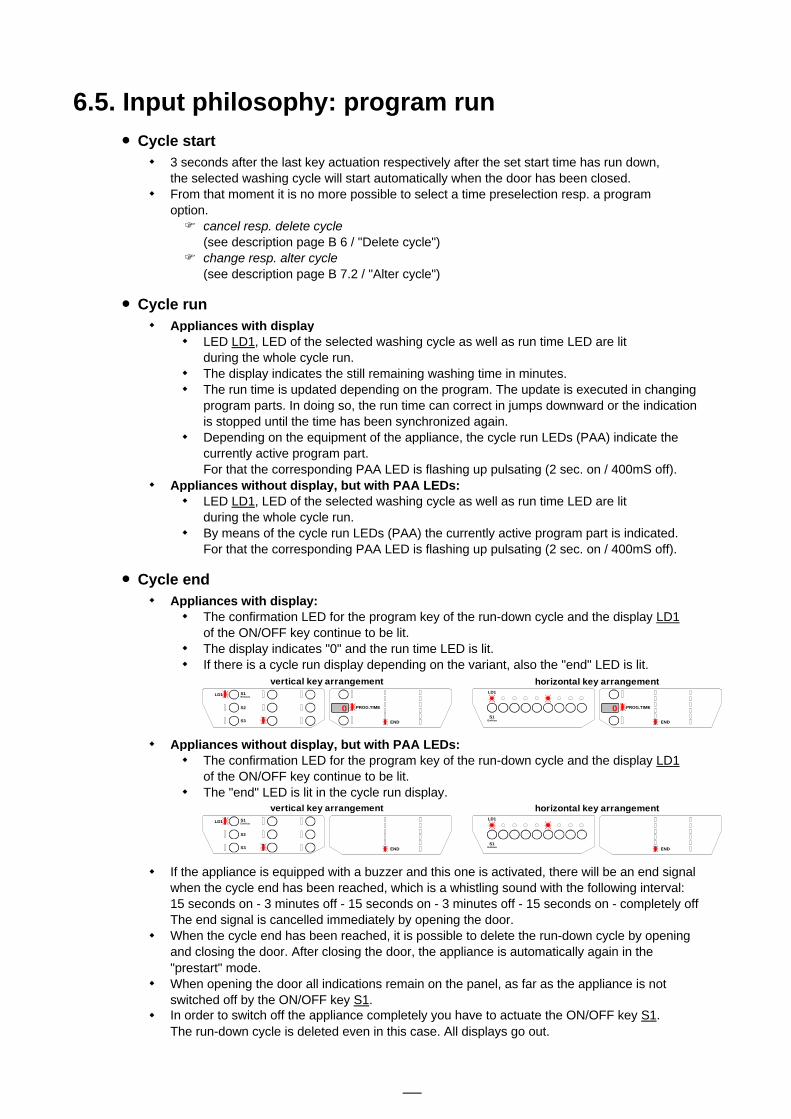
6.5. Input philosophy: program runl Cycle start
w 3 seconds after the last key actuation respectively after the set start time has run down,the selected washing cycle will start automatically when the door has been closed.
w From that moment it is no more possible to select a time preselection resp. a programoption.F cancel resp. delete cycle
(see description page B 6 / "Delete cycle") F change resp. alter cycle
(see description page B 7.2 / "Alter cycle")
l Cycle runw Appliances with display
w LED LD1, LED of the selected washing cycle as well as run time LED are litduring the whole cycle run.
w The display indicates the still remaining washing time in minutes.w The run time is updated depending on the program. The update is executed in changing
program parts. In doing so, the run time can correct in jumps downward or the indicationis stopped until the time has been synchronized again.
w Depending on the equipment of the appliance, the cycle run LEDs (PAA) indicate thecurrently active program part.For that the corresponding PAA LED is flashing up pulsating (2 sec. on / 400mS off).
w Appliances without display, but with PAA LEDs:w LED LD1, LED of the selected washing cycle as well as run time LED are lit
during the whole cycle run.w By means of the cycle run LEDs (PAA) the currently active program part is indicated.
For that the corresponding PAA LED is flashing up pulsating (2 sec. on / 400mS off).
l Cycle endw Appliances with display:
w The confirmation LED for the program key of the run-down cycle and the display LD1of the ON/OFF key continue to be lit.
w The display indicates "0" and the run time LED is lit.w If there is a cycle run display depending on the variant, also the "end" LED is lit.
w Appliances without display, but with PAA LEDs:w The confirmation LED for the program key of the run-down cycle and the display LD1
of the ON/OFF key continue to be lit.w The "end" LED is lit in the cycle run display.
w If the appliance is equipped with a buzzer and this one is activated, there will be an end signalwhen the cycle end has been reached, which is a whistling sound with the following interval:15 seconds on - 3 minutes off - 15 seconds on - 3 minutes off - 15 seconds on - completely offThe end signal is cancelled immediately by opening the door.
w When the cycle end has been reached, it is possible to delete the run-down cycle by opening and closing the door. After closing the door, the appliance is automatically again in the"prestart" mode.
w When opening the door all indications remain on the panel, as far as the appliance is notswitched off by the ON/OFF key S1.
w In order to switch off the appliance completely you have to actuate the ON/OFF key S1.The run-down cycle is deleted even in this case. All displays go out.
S1Ein/Aus
LD1
S2
S3S1
Ein/Aus
LD1
PROG.TIME0
END
vertical key arrangement horizontal key arrangement
PROG.TIME0
END
S1Ein/AusLD1
S2
S3S1
Ein/Aus
LD1
END
vertical key arrangement horizontal key arrangement
END

6.6. Input philosophy: delete programA selected or already started washing cycle can be deleted during normal operation at any time.
l Delete program (using the reset function)
Reset function always with keys S2 and S3
1. Cycle running
2. Actuate reset keys S2 and S3 for about 2 secondsÄ Display LD1 with ON/OFF key and run time LED are lit.Ä Display LED of the running cycle starts flashing.
3. After about 2 seconds all displays, except LED LD1 of the ON/OFF key, go out.The program has been deleted.
ATTENTION!In case of reduced key assemblies be sure to observe Description Page B 1.
S1Ein/Aus
LD1
S2LD2
LD3 S3
S4LD4
S5LD5
LD6 S6
S7LD7
S8LD8
LD9 S9
S1Ein/Aus
LD1
S2
LD2
S3
LD3
S4
LD4
S5
LD5
S6
LD6
S7
LD7
S8
LD8
S9
LD9
S10 LD10
LD11
LD12S11
1.99
LD13LD14LD15LD16LD17LD18
LD19LD20LD21LD22LD23LD24
S10 LD10
LD11
LD12S11
1.99
LD13LD14LD15LD16LD17LD18
LD19LD20LD21LD22LD23LD24
LD1
2.
3.
LD7
PROG.TIME76
1. LD1
in case of variants without displayin case of variants without PAA
alternative variants of equipment
PAA
S1On/Off
LD1 LD7
S3
76
PAA
PAA
PROG.TIME
S1On/Off
S1On/Off
S2
flashing
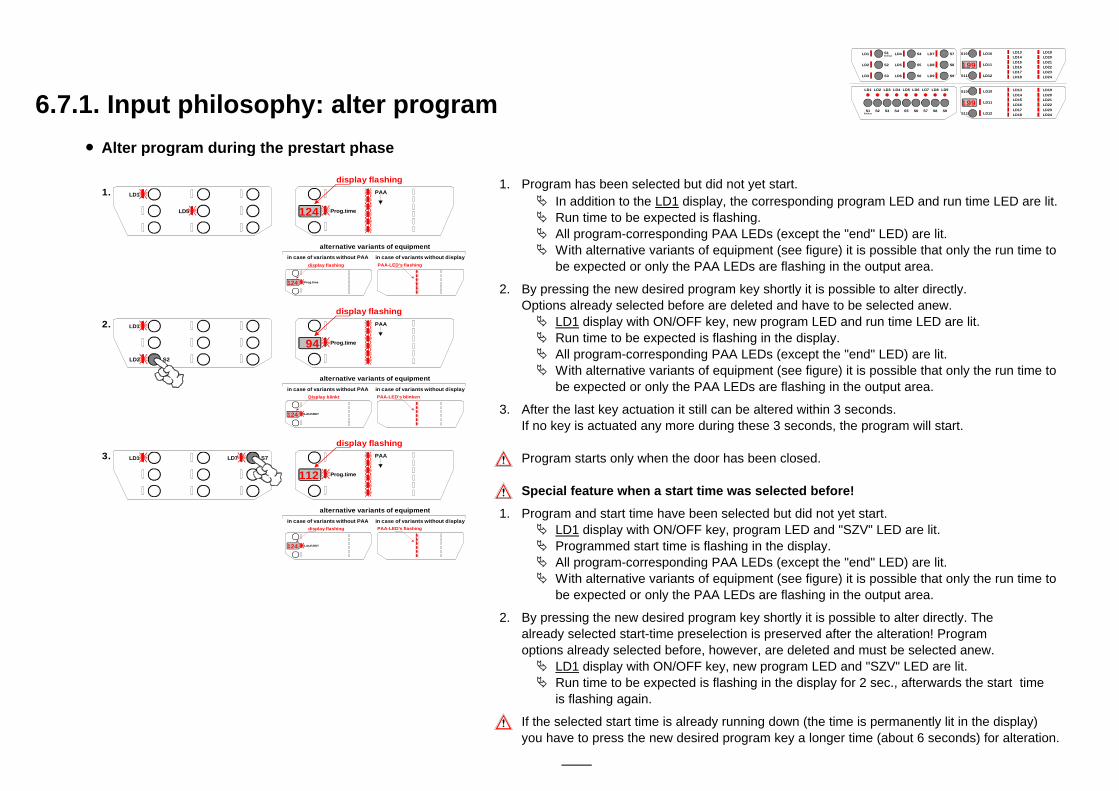
6.7.1. Input philosophy: alter programl Alter program during the prestart phase
1. Program has been selected but did not yet start.Ä In addition to the LD1 display, the corresponding program LED and run time LED are lit.Ä Run time to be expected is flashing.Ä All program-corresponding PAA LEDs (except the "end" LED) are lit.Ä With alternative variants of equipment (see figure) it is possible that only the run time to
be expected or only the PAA LEDs are flashing in the output area.
2. By pressing the new desired program key shortly it is possible to alter directly.Options already selected before are deleted and have to be selected anew.Ä LD1 display with ON/OFF key, new program LED and run time LED are lit.Ä Run time to be expected is flashing in the display.Ä All program-corresponding PAA LEDs (except the "end" LED) are lit.Ä With alternative variants of equipment (see figure) it is possible that only the run time to
be expected or only the PAA LEDs are flashing in the output area.
3. After the last key actuation it still can be altered within 3 seconds.If no key is actuated any more during these 3 seconds, the program will start.
Program starts only when the door has been closed.
Special feature when a start time was selected before!
1. Program and start time have been selected but did not yet start.Ä LD1 display with ON/OFF key, program LED and "SZV" LED are lit.Ä Programmed start time is flashing in the display.Ä All program-corresponding PAA LEDs (except the "end" LED) are lit.Ä With alternative variants of equipment (see figure) it is possible that only the run time to
be expected or only the PAA LEDs are flashing in the output area.
2. By pressing the new desired program key shortly it is possible to alter directly. Thealready selected start-time preselection is preserved after the alteration! Programoptions already selected before, however, are deleted and must be selected anew.Ä LD1 display with ON/OFF key, new program LED and "SZV" LED are lit.Ä Run time to be expected is flashing in the display for 2 sec., afterwards the start time
is flashing again.
If the selected start time is already running down (the time is permanently lit in the display)you have to press the new desired program key a longer time (about 6 seconds) for alteration.
S1Ein/Aus
LD1
S2LD2
LD3 S3
S4LD4
S5LD5
LD6 S6
S7LD7
S8LD8
LD9 S9
S1Ein/Aus
LD1
S2
LD2
S3
LD3
S4
LD4
S5
LD5
S6
LD6
S7
LD7
S8
LD8
S9
LD9
S10 LD10
LD11
LD12S11
1.99
LD13LD14LD15LD16LD17LD18
LD19LD20LD21LD22LD23LD24
S10 LD10
LD11
LD12S11
1.99
LD13LD14LD15LD16LD17LD18
LD19LD20LD21LD22LD23LD24
1. LD1
LD5 Prog.time124
PAA
PAA-LED's flashing
in case of variants without display
Prog.time124
display flashing
in case of variants without PAA
alternative variants of equipment
display flashing
2. LD1
S2LD2
Prog.time94
PAA
PAA-LED's blinken
LAUFZEIT124
Display blinkt
display flashing
3. LD1 S7LD7
Prog.time112
PAA
PAA-LED's flashing
LAUFZEIT124
display flashing
display flashing
in case of variants without displayin case of variants without PAA
alternative variants of equipment
in case of variants without displayin case of variants without PAA
alternative variants of equipment

6.7.2. Input philosophy: alter programl Alter program after started cycle
1. Cycle runningÄ LD1 display with the ON/OFF key and the corresponding program LED are lit.Ä Depending on the appliance variant, the run time LED is lit and the run timeÄ and/or by means of the program run LEDs (PAA) the active program part is/are
indicated in the display.
2. Actuate the new desired program key (in our example S3) for about 6 seconds.Ä The displays remain as described under 1., but now the LED of the running
program starts flashing.
3. After about 6 seconds the previous program LED goes out and the program LEDof the new selected program is lit.Ä In addition to the LD1 display, the run time LED is lit.Ä The display indicates the run time to be expected anew.Ä Depending on the appliance variant, the corresponding program LED (PAA)
indicates the currently active program part.
If a program is altered after an already selected cycle the new cycle starts generally from the beginning!This is also indicated by the run time in the display by an increase of the run time.Options already selected before will be deleted.
S1Ein/Aus
LD1
S2LD2
LD3 S3
S4LD4
S5LD5
LD6 S6
S7LD7
S8LD8
LD9 S9
S1Ein/Aus
LD1
S2
LD2
S3
LD3
S4
LD4
S5
LD5
S6
LD6
S7
LD7
S8
LD8
S9
LD9
S10 LD10
LD11
LD12S11
1.99
LD13LD14LD15LD16LD17LD18
LD19LD20LD21LD22LD23LD24
S10 LD10
LD11
LD12S11
1.99
LD13LD14LD15LD16LD17LD18
LD19LD20LD21LD22LD23LD24
1. LD1
LD5 Prog.time93
PAA
Prog.time124
in case of variants without displayin case of variants without PAA
alternativ variants of equipment
2. LD1
S2LD2
Prog.time94
PAA
Prog.time124
3. LD1
Prog.time120
PAA
Prog.time124
actuate for 3 seconds
flashingLD5
S2LD2
in case of variants without displayin case of variants without PAA
alternativ variants of equipment
in case of variants without displayin case of variants without PAA
alternativ variants of equipment
6.8. Input philosophy - interrupt program
l Interrupt program
w Using the ON/OFF key S1 you can interrupt the program as long as you want.The same is valid for an interruption by opening the door.
w There is no deleting function integrated in the ON/OFF key S1.w If the cycle is interrupted by using the ON/OFF key, all displays go out.w The cycle run will be continued by switching on again using the ON/OFF key S1 resp.
by closing the door, without that another key actuation becomes necessary.Information: The cycle will be continued with a short time delay.
w All displays and confirmations appear in the same condition as before the interruption.
l What happens when opening and closing the door?
w The appliance is switched on and is in the "prestart" modew After opening the door all indications keep to be displayed on the panel. The power
supply of the electronic is fully guaranteed as long as the appliance remainsswitched on.
w The door is opened during the running cyclew After opening the door all indications keep to be displayed on the panel as long as
the appliance remains switched on using the ON/OFF key S1.w After closing the door the appliance will start automatically and the cycle run
will be continued.
Attention:w When the 1st regeneration has been reached in the program part "drying" the following is valid:
w When the door is open longer than 30 seconds, the program will be deleted.After closing the door, the appliance will be automatically again in the"prestart" mode. A new program could be selected again immediately.
w Switching off the appliance by pressing the ON/OFF key S1 also deletes thecurrent program from that moment.
(see description page B 3 / "Input philosophy program selection")
l What happens in case of resp. after a power failure?
w In case of a power failure the appliance behaves as when switched off using theON/OFF key.(see description above / under "Interrupt program")
w After the mains have returned the appliance behaves as after being switched on usingthe ON/OFF key S1.
w After a power failure the cycle will continue without any necessary key actuations.
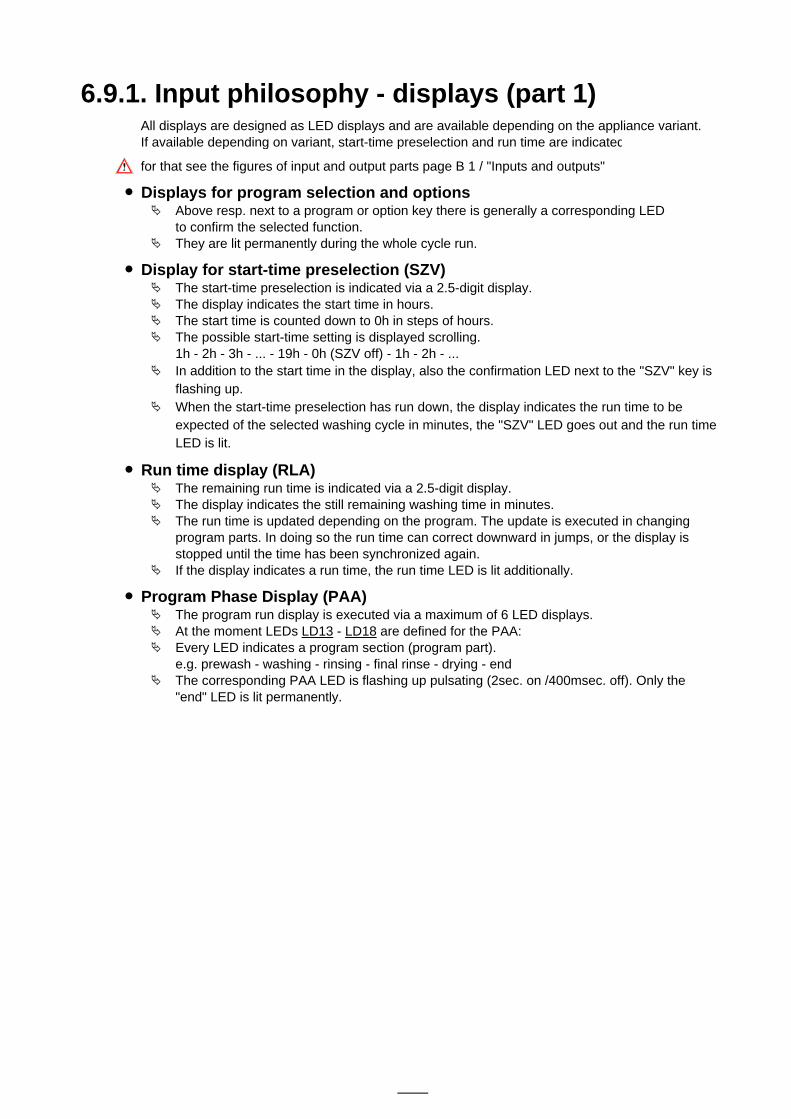
6.9.1. Input philosophy - displays (part 1)All displays are designed as LED displays and are available depending on the appliance variant.If available depending on variant, start-time preselection and run time are indicated via a display.
for that see the figures of input and output parts page B 1 / "Inputs and outputs"
l Displays for program selection and optionsÄ Above resp. next to a program or option key there is generally a corresponding LED
to confirm the selected function.Ä They are lit permanently during the whole cycle run.
l Display for start-time preselection (SZV)Ä The start-time preselection is indicated via a 2.5-digit display.Ä The display indicates the start time in hours.Ä The start time is counted down to 0h in steps of hours.Ä The possible start-time setting is displayed scrolling.
1h - 2h - 3h - ... - 19h - 0h (SZV off) - 1h - 2h - ...Ä In addition to the start time in the display, also the confirmation LED next to the "SZV" key is
flashing up.Ä When the start-time preselection has run down, the display indicates the run time to be
expected of the selected washing cycle in minutes, the "SZV" LED goes out and the run timeLED is lit.
l Run time display (RLA)Ä The remaining run time is indicated via a 2.5-digit display.Ä The display indicates the still remaining washing time in minutes.Ä The run time is updated depending on the program. The update is executed in changing
program parts. In doing so the run time can correct downward in jumps, or the display isstopped until the time has been synchronized again.
Ä If the display indicates a run time, the run time LED is lit additionally.
l Program Phase Display (PAA)Ä The program run display is executed via a maximum of 6 LED displays.Ä At the moment LEDs LD13 - LD18 are defined for the PAA:Ä Every LED indicates a program section (program part).
e.g. prewash - washing - rinsing - final rinse - drying - endÄ The corresponding PAA LED is flashing up pulsating (2sec. on /400msec. off). Only the
"end" LED is lit permanently.

6.9.2. Input philosophy - displays (part 2)All displays are designed as LED displays and are available depending on the appliance variant.
for that see the figures of the input resp. output parts page B 1 / "Inputs and outputs"
l Information displaysÄ The LED position is depending on the programming of the variant.
They can be programmed to any LED which is not programmed with a program or anoption key.
Ä The LEDs are lit permanently from switching on the appliance by the ON/OFF key S0,until the moment of the successful program start. Furthermore, the LEDs are lit whenthe cycle end has been reached until the appliance is switched off.
Ä The display LEDs go out during the whole cycle run!w LED display "salt"
Ä LED is lit in case of a lack of saltÄ LED goes out when salt has been refilled
(Depending on the salt dissolution it can take some time until the LED goes out.)
Information: The LED display "salt" goes out with hardness range setting 1(no regeneration necessary - indication in the display "1 L")
w LED display "rinse-aid"Ä LED is lit in case of a lack of rinse-aidÄ LED goes out after rinse-aid has been refilled
Information: The rinse-aid addition can be deactivated completely by thecustomer depending on the variant. This also deactivates theLED display "rinse-aid".(see description page B 13 / "Deactivation of rinse-aid addition")
When the option 3 in 1 has been selected (special tablet option), neither the "salt" LEDnor the "rinse-aid" LED is selected.
w LED display "water"Ä LED is lit when there is no or too less water filling into the appliance.
A reason for that can be, for example, a closed water tap.Ä The program is stopped and can be continued when the fault has been eliminated
by actuating the program key.(see also description page B 19 / "Survey of fault displays - fault 10")
w LED display "spraying arm"Ä LED is lit with a blocked middle spraying arm.Ä additionally acoustic signal
(see description page B 19 / "Survey of fault displays - fault A0") w LED display "door"
Ä LED is lit when the door is openÄ Goes out automatically when door will be closed.
w LED display "sieve"Ä This LED is selected automatically after 20 washing cycles.Ä LED is lit when the internal counter has reached 20 at the cycle end.Ä Goes out when a new program has started - internal counter is reset to 0.
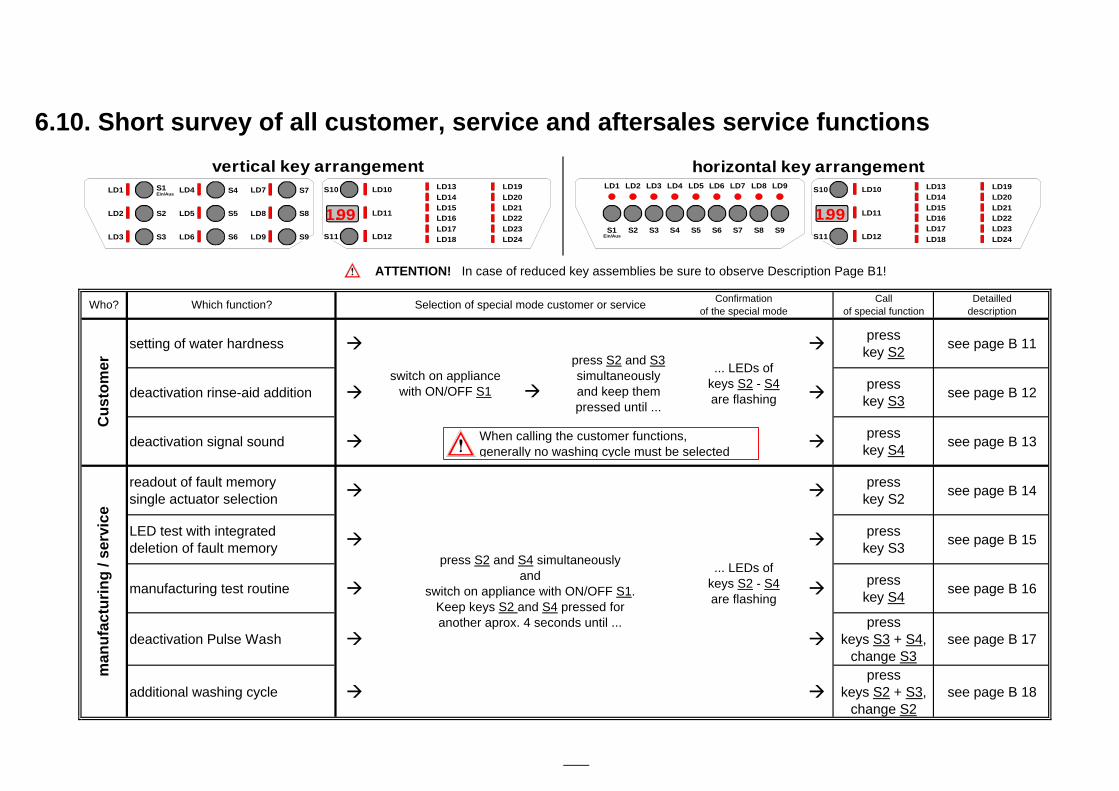
6.10. Short survey of all customer, service and aftersales service functions
ATTENTION! In case of reduced key assemblies be sure to observe Description Page B1!
Who? Which function? Selection of special mode customer or service Confirmationof the special mode
Callof special function
Detailleddescription
setting of water hardness à à presskey S2
see page B 11
deactivation rinse-aid addition à à presskey S3
see page B 12
deactivation signal sound à à presskey S4
see page B 13
readout of fault memorysingle actuator selection à à press
key S2see page B 14
LED test with integrateddeletion of fault memory à à press
key S3see page B 15
manufacturing test routine à à press key S4
see page B 16
deactivation Pulse Wash à àpress
keys S3 + S4,change S3
see page B 17
additional washing cycle à àpress
keys S2 + S3,change S2
see page B 18
... LEDs ofkeys S2 - S4are flashing
man
ufa
ctu
rin
g /
serv
ice
press S2 and S4 simultaneouslyand
switch on appliance with ON/OFF S1.Keep keys S2 and S4 pressed foranother aprox. 4 seconds until ...
... LEDs ofkeys S2 - S4are flashing
Cu
sto
mer
switch on appliancewith ON/OFF S1 à
press S2 and S3simultaneouslyand keep thempressed until ...
S1Ein/Aus
LD1
S2LD2
LD3 S3
S4LD4
S5LD5
LD6 S6
S7LD7
S8LD8
LD9 S9S1
Ein/Aus
LD1
S2
LD2
S3
LD3
S4
LD4
S5
LD5
S6
LD6
S7
LD7
S8
LD8
S9
LD9S10 LD10
LD11
LD12S11
1.99
LD13LD14LD15LD16LD17LD18
LD19LD20LD21LD22LD23LD24
S10 LD10
LD11
LD12S11
1.99
LD13LD14LD15LD16LD17LD18
LD19LD20LD21LD22LD23LD24
vertical key arrangement horizontal key arrangement
When calling the customer functions,generally no washing cycle must be selected

6.11. Service function / setting of water hardness:General information Calling / changing / saving the "electronic" hardness range valuew Setting and changing the water hardness range is executed in Calling the function "set water hardness"
all designs resp. key arrangements analogously. 1. Switch on appliance with ON/OFF key S1w For that you always have to use keys S1, S2 and S3 LD1 display with ON/OFF key is lit.
independent of their variant-depending program load.w Key S2 is ALWAYS the "water hardness range key" 2. Press keys S2 and S3 simultaneously until thew The water hardness range value 4 is preset by the manufacturer. confirmation LEDs LD2, LD3 and LD4 are flashingw With setting "1L" it is generally not regenerated. LD1 display with ON/OFF key is lit.w A salt addition is not necessary.w A possibly existing "salt" LED is not selected. 3. By actuating the function key S2 you now can call the
water hardness function. The confirmation LED LD2Electronic and mechanical setting with the appliance: continues flashing, LEDs LD3 and LD4 go out.w In addition to the "electronic" setting on the control panel The set hardness range is indicated in the display.
described on the right you also have to pay attention to the If there is no display existing depending on variant, themechanical setting in the appliance by the 2-step blending value is indicated by a coded flashing of the "end" LED.switch. (see for that the table for hardness range values) (see for that the table on the left side of this page!)
Changing the set hardnessBy any other actuation of the function key S2 you canchange the hardness range. This increases the valuescrolling.( 4L - 5L - 6L - ... - 10L - 1L - 2L - ... )
Leaving the function4. After the last key pressure of function key S2 you can
Table for hardness range values: leave the special program as follows.After 60 seconds all displays go out automatically, except LD1 of the ON/OFF keyorthe appliance is switched off by the ON/OFF key S1.
Saving the set water hardnessThe selected hardness range is saved directly afterany entry.
Generally, no wash cycle may be selected when calling the customer functions! ATTENTION: In case of reduced key assemblies be sure to observe Description Page B 1.
blending-switch
S1On/OffLD1
S2LD2
LD3 S3
S4LD4
S1On/Off
LD1
S2
LD2
S3
LD3
S4
LD4
1.99
END
1.99
END
vertical key arrangement
horizontal key arrangement
indicationdisplay
displayEnd-LED
water hardness comment
flashing acustic elektronic mechanic in dH in mmol/L area
1L 1 time 1 bis 4 bis 0,7 I no regeneration
2L 2 times 2 4 bis 10 0,7 bis 1,8 I / II
3L 3 times 3 11 bis 14 1,9 bis 2,5 II
4L 4 times 4 15 bis 18 2,6 bis 3,2
5L 5 times 5 19 bis 22 3,3 bis 3,9
6L 6 times 6 23 bis 28 4,0 bis 5,0
7L 7 times 7 29 bis 36 5,1 bis 6,4
8L 8 times 8 37 bis 42 6,5 bis 7,5
9L 9 times 9 43 bis 50 7,6 bis 8,9
10L 10 times 10 51 bis 70 9,0 bis 12,5 double regeneration
setting of hardness
0III
IV1
S1On/Off
LD1
S2LD2
LD3S3
LD4
1.
2.
S1On/Off
LD1
S2LD2
LD3 S3
S4LD4
END
S4
S1On/Off
LD1
S2LD2
LD3 S3
LD4
4L
3. S4
S1On/Off
LD1
S2LD2
LD3 S3
LD4
3L
4. S4
S1On/Off
LD1
S2LD2
LD3 S3
LD4 S4
S1On/Off
LD1
S2LD2
LD3 S3
LD4 S4
END
END
LD1 is lit / LD2 - LD4 flashing
LD1 is lit / LD2 flashing if no displayavailable:
coded flashing
... automatically Off after 60 sec
... Off by actuating On/Off manually
perkey pressure
+ 1 step
flashing 5L6L
10L1L2L
S2LD2
if no display abailable:coded flasching of
"END" LED
END
if no displayavailable:
coded flashing
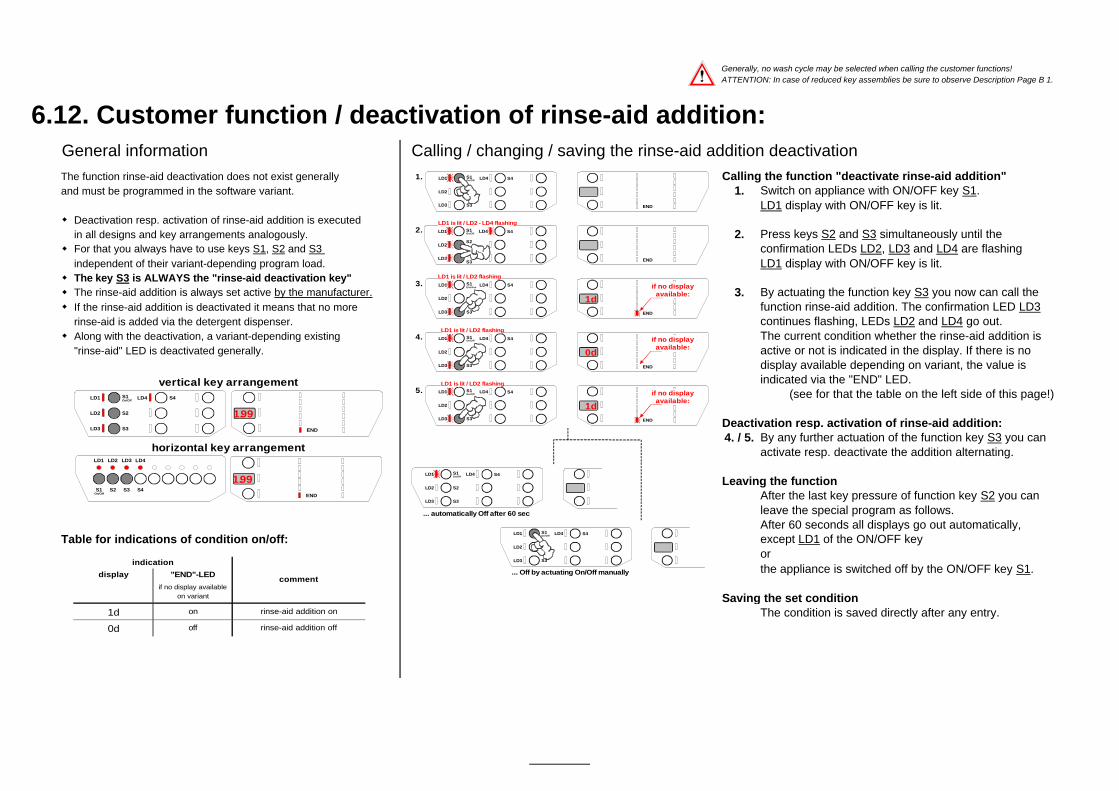
6.12. Customer function / deactivation of rinse-aid addition:General information Calling / changing / saving the rinse-aid addition deactivationThe function rinse-aid deactivation does not exist generally Calling the function "deactivate rinse-aid addition"and must be programmed in the software variant. 1. Switch on appliance with ON/OFF key S1.
LD1 display with ON/OFF key is lit.w Deactivation resp. activation of rinse-aid addition is executed
in all designs and key arrangements analogously. 2. Press keys S2 and S3 simultaneously until thew For that you always have to use keys S1, S2 and S3 confirmation LEDs LD2, LD3 and LD4 are flashing
independent of their variant-depending program load. LD1 display with ON/OFF key is lit.w The key S3 is ALWAYS the "rinse-aid deactivation key"w The rinse-aid addition is always set active by the manufacturer. 3. By actuating the function key S3 you now can call thew If the rinse-aid addition is deactivated it means that no more function rinse-aid addition. The confirmation LED LD3
rinse-aid is added via the detergent dispenser. continues flashing, LEDs LD2 and LD4 go out.w Along with the deactivation, a variant-depending existing The current condition whether the rinse-aid addition is
"rinse-aid" LED is deactivated generally. active or not is indicated in the display. If there is nodisplay available depending on variant, the value is indicated via the "END" LED.
(see for that the table on the left side of this page!)
Deactivation resp. activation of rinse-aid addition:4. / 5. By any further actuation of the function key S3 you can
activate resp. deactivate the addition alternating.
Leaving the functionAfter the last key pressure of function key S2 you canleave the special program as follows.After 60 seconds all displays go out automatically,
Table for indications of condition on/off: except LD1 of the ON/OFF keyorthe appliance is switched off by the ON/OFF key S1.
Saving the set conditionThe condition is saved directly after any entry.
Generally, no wash cycle may be selected when calling the customer functions! ATTENTION: In case of reduced key assemblies be sure to observe Description Page B 1.
S1On/Off
LD1
S2LD2
LD3 S3
S4LD4
S1On/Off
LD1
S2
LD2
S3
LD3
S4
LD4
1.99
END
1.99
END
vertical key arrangement
horizontal key arrangement
display "END"-LED
if no display availableon variant
1d on rinse-aid addition on
0d off rinse-aid addition off
indication
comment
1.
2.
S1On/Off
LD1
S2LD2
LD3 S3
S4LD4
END
S1Ein/Aus
LD1
S2LD2
LD3 S3
LD4
1d
3. S4
S1On/Off
LD1
S2LD2
LD3 S3
LD4 S4
S1On/Off
LD1
S2LD2
LD3 S3
LD4 S4
END
END
LD1 is lit / LD2 flashing
if no displayavailable:
... automatically Off after 60 sec
... Off by actuating On/Off manually
S1On/Off
LD1
S2LD2
LD3 S3
LD4
0d
4. S4
END
LD1 is lit / LD2 flashing
S1On/Off
LD1
S2LD2
LD3 S3
LD4
1d
5. S4
END
LD1 is lit / LD2 flashing
S1On/Off
LD1
S2LD2
LD3S3
LD4 S4
LD1 is lit / LD2 - LD4 flashing
if no displayavailable:
if no displayavailable:

6.13. Customer function / deactivation of signal sound:General information Calling / changing / saving the signal sound deactivationThe function deactivation of the signal sound does not exist Calling the function "deactive signal sound"generally and must be programmed in the software 1. Switch on appliance with ON/OFF key S1variant. LD1 display with ON/OFF key is lit.
w Deactivation resp. activation of the signal sound is executed 2. Press keys S2 and S3 simultaneously until thein all designs and key arrangements analogously. confirmation LEDs LD2, LD3 and LD4 are flashing
w For that you always have to use keys S1, S2, S3 and S4 LD1 display with ON/OFF key is lit.independent of their variant-depending program load.
w The key S4 is ALWAYS the "signal sound deactivation key" 3. By actuating the function key S4 you now can callw The signal sound at the cycle end is always set active the function signal sound deactivation. The confirmation
by the manufacturer. LED LD4 continues flashing, LEDs LD2 and LD3 go out.w If the signal sound is deactivated it means that in general The current condition whether the signal sound is active
no acoustic end signal will sound any more. or not is indicated in the display.The acoustic fault signals also cannot be heard any more! If there is no display available depending on variant, the
value is indicated by the "END" LED.(see for that the table on the left side of this page!)
Deactivation resp. activation of the signal sound:4. / 5. By any further actuation of the function key S4 you can
activate resp. deactivate the signal sound alternating.
Leaving the functionAfter the last key pressure of function key S4 you canleave the special program as follows.After 60 seconds all displays go out automatically, except LD1 of the ON/OFF key
Table for indication of condition on/off: orthe appliance is switched off by the ON/OFF key S1.
Saving the set conditionThe condition is saved directly after any entry.
Generally, no wash cycle may be selected when calling the customer functions! ATTENTION: In case of reduced key assemblies be sure to observe Description Page B 1.
S1On/Off
LD1
S2LD2
LD3 S3
S4LD4
S1On/Off
LD1
S2
LD2
S3
LD3
S4
LD4
1.99
END
1.99
END
vertical key arrangement
horizontal key arrangement
display "END"-LED
if no display availabledepending on variant
1b on signal sound (buzzer) on
0b off signal sound (buzzer) off
indication
comment
1.
2.
S1On/Off
LD1
S2LD2
LD3 S3
S4LD4
END
S1On/Off
LD1
S2LD2
LD3 S3
LD4
1b
3. S4
S1On/Off
LD1
S2LD2
LD3 S3
LD4 S4
S1On/Off
LD1
S2LD2
LD3 S3
LD4 S4
END
END
LD1 is lit / LD2 flashing
if no displayavailable:
... automatically Off after 60 seco
... Off by actuating On/Off manually
0b
4.
END
1b
5.
END
S1On/Off
LD1
S2LD2
LD3 S3
LD4 S4
LD1 is lit / LD2 flashing
S1On/Off
LD1
S2LD2
LD3 S3
LD4 S4
LD1 is lit / LD2 flashing
S1On/Off
LD1
S2LD2
LD3S3
LD4 S4
LD1 is lit / LD2 - LD4 flashing
if no displayavailable:
if no displayavailable:
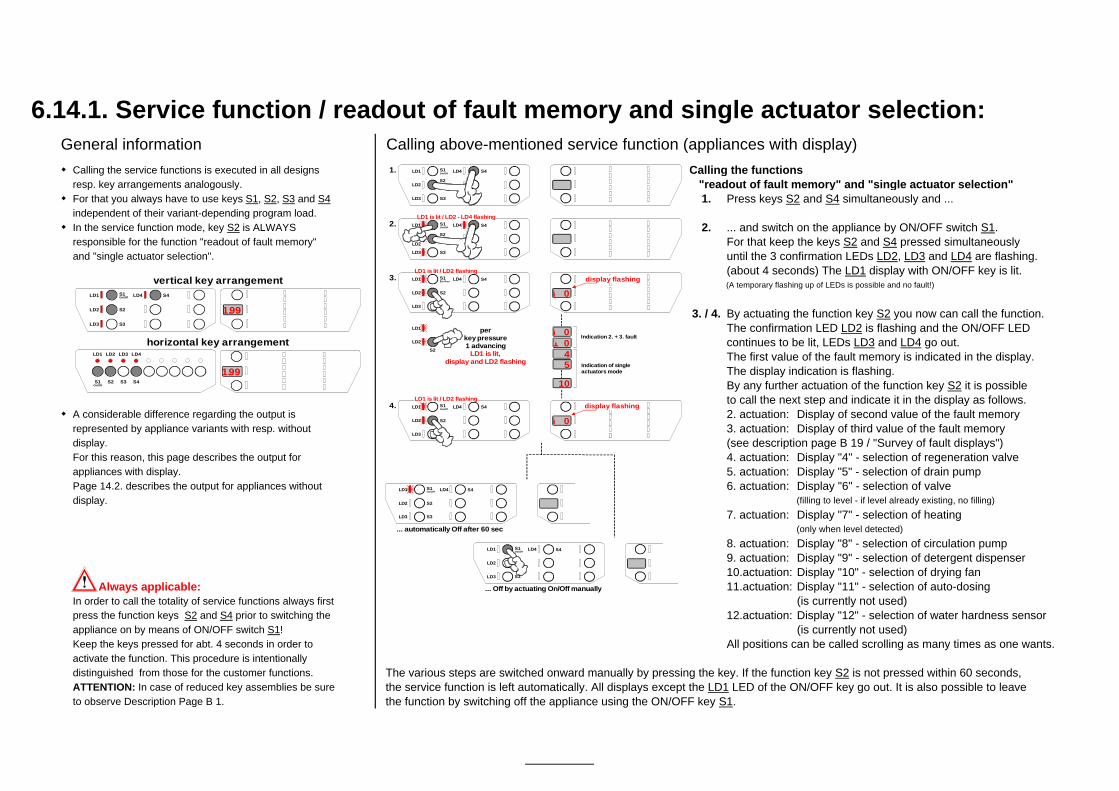
6.14.1. Service function / readout of fault memory and single actuator selection:General information Calling above-mentioned service function (appliances with display)w Calling the service functions is executed in all designs Calling the functions
resp. key arrangements analogously. "readout of fault memory" and "single actuator selection"w For that you always have to use keys S1, S2, S3 and S4 1. Press keys S2 and S4 simultaneously and ...
independent of their variant-depending program load.w In the service function mode, key S2 is ALWAYS 2. ... and switch on the appliance by ON/OFF switch S1.
responsible for the function "readout of fault memory" For that keep the keys S2 and S4 pressed simultaneouslyand "single actuator selection". until the 3 confirmation LEDs LD2, LD3 and LD4 are flashing.
(about 4 seconds) The LD1 display with ON/OFF key is lit.(A temporary flashing up of LEDs is possible and no fault!)
3. / 4. By actuating the function key S2 you now can call the function.The confirmation LED LD2 is flashing and the ON/OFF LEDcontinues to be lit, LEDs LD3 and LD4 go out.The first value of the fault memory is indicated in the display.The display indication is flashing.By any further actuation of the function key S2 it is possibleto call the next step and indicate it in the display as follows.
w A considerable difference regarding the output is 2. actuation: Display of second value of the fault memoryrepresented by appliance variants with resp. without 3. actuation: Display of third value of the fault memorydisplay. (see description page B 19 / "Survey of fault displays")For this reason, this page describes the output for 4. actuation: Display "4" - selection of regeneration valveappliances with display. 5. actuation: Display "5" - selection of drain pumpPage 14.2. describes the output for appliances without 6. actuation: Display "6" - selection of valvedisplay. (filling to level - if level already existing, no filling)
7. actuation: Display "7" - selection of heating(only when level detected)
8. actuation: Display "8" - selection of circulation pump9. actuation: Display "9" - selection of detergent dispenser10.actuation: Display "10" - selection of drying fan
Always applicable: 11.actuation: Display "11" - selection of auto-dosingIn order to call the totality of service functions always first (is currently not used)press the function keys S2 and S4 prior to switching the 12.actuation: Display "12" - selection of water hardness sensorappliance on by means of ON/OFF switch S1! (is currently not used)Keep the keys pressed for abt. 4 seconds in order to All positions can be called scrolling as many times as one wants.activate the function. This procedure is intentionally distinguished from those for the customer functions. The various steps are switched onward manually by pressing the key. If the function key S2 is not pressed within 60 seconds,ATTENTION: In case of reduced key assemblies be sure the service function is left automatically. All displays except the LD1 LED of the ON/OFF key go out. It is also possible to leave to observe Description Page B 1. the function by switching off the appliance using the ON/OFF key S1.
S1On/OffLD1
S2LD2
LD3 S3
S4LD4
S1On/Off
LD1
S2
LD2
S3
LD3
S4
LD4
1.99
1.99
vertical key arrangement
horizontal key arrangement
S1On/Off
LD1
LD2
LD3
LD4
1.
2.
S1On/Off
LD1
S2LD2
LD3 S3
S4LD4
S1Ein/Aus
LD1
S2LD2
LD3 S3
LD4
I 0
3. S4
S1On/Off
LD1
LD2
LD3 S3
LD4
i 0
4. S4
S1On/OffLD1
S2LD2
LD3 S3
LD4 S4
S1On/Off
LD1
S2LD2
LD3 S3
LD4 S4
LD1 is lit / LD2 - LD4 flashing
LD1 is lit / LD2 flashing
display flashing
... automatically Off after 60 sec
... Off by actuating On/Off manually
perkey pressure1 advancing
LD1 is lit,display and LD2 flashing
10
S2
S2
S3
S4
1 045
I 0Indication 2. + 3. fault
Indication of singleactuators mode
display flashing
S2
LD1 is lit / LD2 flashing
LD1
LD2

6.14.2. Service function / readout of fault memory and single actuator selection:General information Calling above-mentioned service function (appliances without display)w Calling the service functions is executed in all designs Calling the functions
resp. key arrangements analogously. "readout of fault memory" and "single actuator selection"w For that you always have to use keys S1, S2, S3 and S4 1. Press keys S2 and S4 simultaneously and ...
indepedent of their variant-depending program load.w In the service function mode, key S2 is ALWAYS 2. ... and switch on the appliance by ON/OFF switch S1.
responsible for the functions "readout of fault memory" For that keep the keys S2 and S4 pressed simultaneously and "single actuator selection". until the 3 confirmation LEDs LD2, LD3 and LD4 are flashing.
(about 4 seconds). The LD1 display with ON/OFF key is lit.( A temporary flashing up of LEDs is possible and no fault!)
3. / 4. By actuating the function key S2 you now can call the function.The confirmation LED LD2 is flashing and the ON/OFF LEDcontinues flashing, LEDs LD3 and LD4 go out.The first pressure on key S2 is indicated by the "END" LED.By the second and third key pressure on S2 it is possible to read out the second and third value of the fault memory.(see description page B 19 / "Survey of fault displays")
w A considerable difference regarding the output is From the 4. key pressure onward on key S2 the LED LD2 goesrepresented by appliance variants with resp. without display. out and the LD3 starts flashing.For this reason, this page describes the output for Now you can call the single actuators one after the other.appliances without display. 4. actuation: selection of regeneration valvePage 14.1. describes the output for appliances with 5. actuation: selection of drain pumpdisplay. 6. actuation: selection of the valve
(filling to level - if leavel already existing, no filling)
7. actuation: selection of heating(only when level detected)
8. actuation: selection of circulation pump9. actuation: selection of detergent dispenser10.actuation: selection of drying fan
Always applicable: 11.actuation: selection of auto-dosingIn order to call the totality of service functions always first (is currently not used)press the function keys S2 and S4 prior to switching the 12.actuation: selection of water hardness sensorappliance on by means of ON/OFF switch S1! (is currently not used)Keep the keys pressed for abt. 4 seconds in order to All positions can be called scrolling as many times as one wants.activate the function. This procedure is intentionally distinguished from those for the customer functions. The various steps are switched onward manually. If the function key S2 is not pressed within 60 seconds, the service functionATTENTION: In case of reduced key assemblies be sure is left automatically. All displays go out except the LD1 LED of the ON/OFF key. It is also possible to leave the function byto observe Description Page B 1. switching off the appliance using the ON/OFF key S1.
S1On/OffLD1
S2LD2
LD3 S3
S4LD4
S1On/Off
LD1
S2
LD2
S3
LD3
S4
LD4
vertical key arrangement
horizontal key arrangement
END
END
S1On/Off
LD1
LD2
LD3
LD4
1.
2.
S1On/Off
LD1
S2LD2
LD3 S3
S4LD4
END
S1On/Off
LD1
S2LD2
LD3 S3
LD43. S4
END
END
LD1 is lit / LD2 - LD4 flashing
LD1 is lit / LD2 flashing
S2
S3
S4
Indication 2. + 3. fault
Indication of singleactuators mode
S1On/Off
LD1
S2LD2
LD3 S3
LD4 S4per key pressure
1 advancingLD1 is lit, LD2 flashing
S1On/Off
LD1
S2LD2
LD3 S3
LD4 S4per key pressure
1 advancingLD1 is lit, LD3 flashing
END
S1On/Off
LD1
LD2
LD3 S3
LD44. S4
S2
LD1 is lit / LD2 flashing
S1On/Off
LD1
S2LD2
LD3 S3
LD4 S4
S1On/Off
LD1
S2LD2
LD3 S3
LD4 S4
... automatically Off after 60 sec
... Off by actuating On/Off manually

6.15. Service function / LED test with integrated deletion of the fault memory:General information Calling above-mentioned service functionw Calling the service functions is executed in all designs Calling the functions
resp. key arrangements analogously. "LED test with integrated deletion of the fault memory"w For that you always have to use keys S1, S2, S3 and S4
independent of their variant-depending program load. 1. Press keys S2 and S4 simultaneously and ...w In the service function mode, key S3 is ALWAYS
responsible for the function "LED test with integrated 2. ... and switch on the appliance by ON/OFF switch S1.deletion of the fault memory". For that keep the keys S2 and S4 pressed simultaneously
until the 3 confirmation LEDs LD2, LD3 and LD4 are flashing.(about 4 seconds) The LD1 display with ON/OFF key is lit.(A temporary flashing up of LEDs is possible and no fault!)
3. By actuating the function key S3 you now can call thefunction.All LEDs (except LD1) and "188" in the display are flashingabout 30 seconds.Furthermore, if available depending on variant and if active,the signal sound is indicated during the whole flashing time.
Leaving the function / deletion of the fault memory
When all above-mentioned LEDs resp. the display have beenflashing for about 30 seconds, the function will be leftautomatically. The appliance is in the "prestart" mode again.The function can be left even earlier by switching off theappliance by the ON/OFF key S1.
In any case, the service fault memory is deleted.
Always applicable:In order to call the totality of service functions always firstpress the function keys S2 and S4 prior to switching the appliance on by means of ON/OFF switch S1! Keep the keys pressed for abt. 4 seconds in order to activate the function. This procedure is intentionally distinguished from those for the customer functions. ATTENTION: In case of reduced key assemblies be sure to observe Description Page B 1.
S1On/OffLD1
S2LD2
LD3 S3
S4LD4
S5LD5
LD6 S6
LD7
LD8
LD9
S1On/Off
LD1
S2
LD2
S3
LD3
S4
LD4 LD5 LD6 LD7 LD8 LD9
LD10
LD11
LD12
1.99
LD13LD14LD15LD16LD17LD18
LD19LD20LD21LD22LD23LD24
LD10
LD11
LD12
1.99
LD13LD14LD15LD16LD17LD18
LD19LD20LD21LD22LD23LD24
vertical key arrangement
horizontal key arrangement
S1On/OffLD1
LD2
LD3
LD4
1.
2.
S1On/OffLD1
S2LD2
LD3 S3
S4LD4
S1On/OffLD1
S2LD2
LD3 S3
LD4
I88
3. S4
S1Ein/AusLD1
S2LD2
LD3 S3
LD4 S4
S1On/OffLD1
S2LD2
LD3 S3
LD4 S4
LD1 is lit / LD2 - LD4 flashing
LD1 is lit / all other LEDs and display flashing
... automatically Off after 30 sec
... Off by actuating On/Off manually
S2
S3
S4

6.16. Service function / manufacturing test routine:General information Calling above-mentioned service functionw Calling the service functions is executed in all designs Calling the function "manufacturing test routine"
resp. key arrangements analogously.w For that you always have to use keys S1, S2, S3 and S4 1. Press keys S2 and S4 simultaneously and ...
independent of their variant-depending program load.w In the service function mode, key S4 is ALWAYS 2. ... and switch on the appliance with ON/OFF switch S1.
responsible for calling the "manufacturing test routine" For that keep the keys S2 and S4 pressed simultaneouslyuntil the 3 confirmation LEDs LD2, LD3 and LD4 are flashing.(about 4 seconds) The LD1 display with ON/OFF key is lit.(A temporary flashing up of LEDs is possible and no fault!)
3. By actuating the function key S4 you now can call themanufacturing test routine. The confirmation LED LD4 isflashing and the ON/OFF LED continues to be lit, LEDsLD2 and LD3 go out.
4. The test routine starts automatically.Following displays are available depending on the variant ofequipment.
The run time LED is flashing up.The display indicates the presumable run time.The corresponding PAA LEDs are lit.
From that moment the same input philosophy is valid for the manu-facturing test routine as for normal washing cycles, but the programLED LD4 is flashing until the end of the manufacturing test routine.
F cycle run and cycle end(see description page B 5 )
Always applicable: F delete cycle in advanceIn order to call the totality of service functions always first (see description page B 6 )press the function keys S2 and S4 prior to switching the F interrupt programappliance on by means of ON/OFF switch S1! (see description page B 8 )Keep the keys pressed for abt. 4 seconds in order to activate the function. This procedure is intentionally distinguished from those for the customer functions. ATTENTION: In case of reduced key assemblies be sure to observe Description Page B 1.
S1On/OffLD1
S2LD2
LD3 S3
S4LD4
S1On/Off
LD1
S2
LD2
S3
LD3
S4
LD4
1.99
1.99
vertical key arrangement
horizontal key arrangement
S1On/OffLD1
LD2
LD3
LD4
1.
2.
S1On/Off
LD1
S2LD2
LD3 S3
S4LD4
S1On/Off
LD1
S2LD2
LD3 S3
LD43. S4
LD1 is lit / LD2 - LD4 flashing
LD1 is lit / LD4 flashing
S2
S3
S4
S1On/Off
LD1
S2LD2
LD3 S3
LD4
21
4. S4
LD1 is lit / LD4 flashing
manufacturing test routine running.
Prog.time
PAA

6.17. Service function / disconnection pulse washGeneral information Calling above-mentioned service functionw Calling the Service Functions is similar with all designs Calling the function "Switch OFF Pulse Wash"
or key arrangements.w Always use the keys S1, S2, S3 and S4 independently 1. Simultaneously press S2 and S4 and ...
from their program assignment depending on the model. w In service function mode, you can ALWAYS call the Pulse 2. ... switch on the appliance with ON/OFF switch S1.
Wash function by using keys S3 and S4. Use key S3 to Keep keys S2 and S4 pressed simultaneouslymodify the setting. until the 3 acknowledging LEDs LD2, LD3 and LD4 are flashing. (for abt. 4 seconds). Indicator LD1 at ON/OFF key lights up.
w From works settings, Pulse Wash is always set to be active. ( Short-time illumination of LEDs is possible and does not constitute any fault)
3. Simultaneously press S3 and S4 until the acknowledging LED LD3 is flashing. LEDs LD2 and LD4 will go dark.Indicator LD1 at ON/OFF key is lit.The current status whether Pulse Wash is active or notis indicated in the display. If there is no display available on themodel, the value is indicated by means of LED "End" (also refer to Table left on this page)
w If you deselect Pulse Wash the rot.speeds of the cir-cul. pump are always increased to "High Pulse Speed".Water consumption slightly increases. Extension Switching the Pulse Wash Function on or off:of time is possible depending on the temperature. 4. / 5. Any further activation of function key S3 will
w Table for the indication of on/off status: switch the addition alternately on or off.
Abandoning the functionAfter the last activation of function key S3you can leave the special program as follows:After 60 seconds automatically all indications will go dark, except for the LD1 of the ON/OFF key or
Always applicable: you switch the appliance off by means of ON/OFF key S1.In order to call the totality of service functions always firstpress the function keys S2 and S4 prior to switching the Saving the status settingsappliance on by means of ON/OFF switch S1! Immediately after each input of data, the currently valid statusKeep the keys pressed for abt. 4 seconds in order to will be saved.activate the function. This procedure is intentionally distinguished from those for the customer functions. ATTENTION: In case of reduced key assemblies be sure to observe Description Page B 1.
S1On/OffLD1
S2LD2
LD3 S3
S4LD4
S1On/Off
LD1
S2
LD2
S3
LD3
S4
LD4
1.99
1.99
vertical key arrangement
horizontal key arrangement
display "End"-LEDif no display availabledepending on variant
1P on Pulse Wash is activ
0P off Pulse Wash is switched off
indication
comment
S1On/OffLD1
LD2
LD3
LD4
1.
2.
S1On/OffLD1
S2LD2
LD3 S3
S4LD4
LD1 is lit / LD2 - LD4 flashingS4
S1On/Off
LD1
S2LD2
LD3S3
1P
3.
S1On/OffLD1
S2LD2
LD3 S3
LD4 S4
S1On/OffLD1
S2LD2
LD3 S3
LD4 S4
END
LD1 is lit / LD3 flashing
if no displayavailable:
... automatically Off after 60 sec.
... Off by actuating On/Off manually
0P
4.
END
1P
5.
END
S1On/OffLD1
S2LD2
LD1 is lit / LD3 flashing
LD3S3
S1On/OffLD1
S2LD2
LD1 is lit / LD3 flashing
LD3S3
S2
S3
LD4 S4
if no displayavailable:
if no displayavailable:
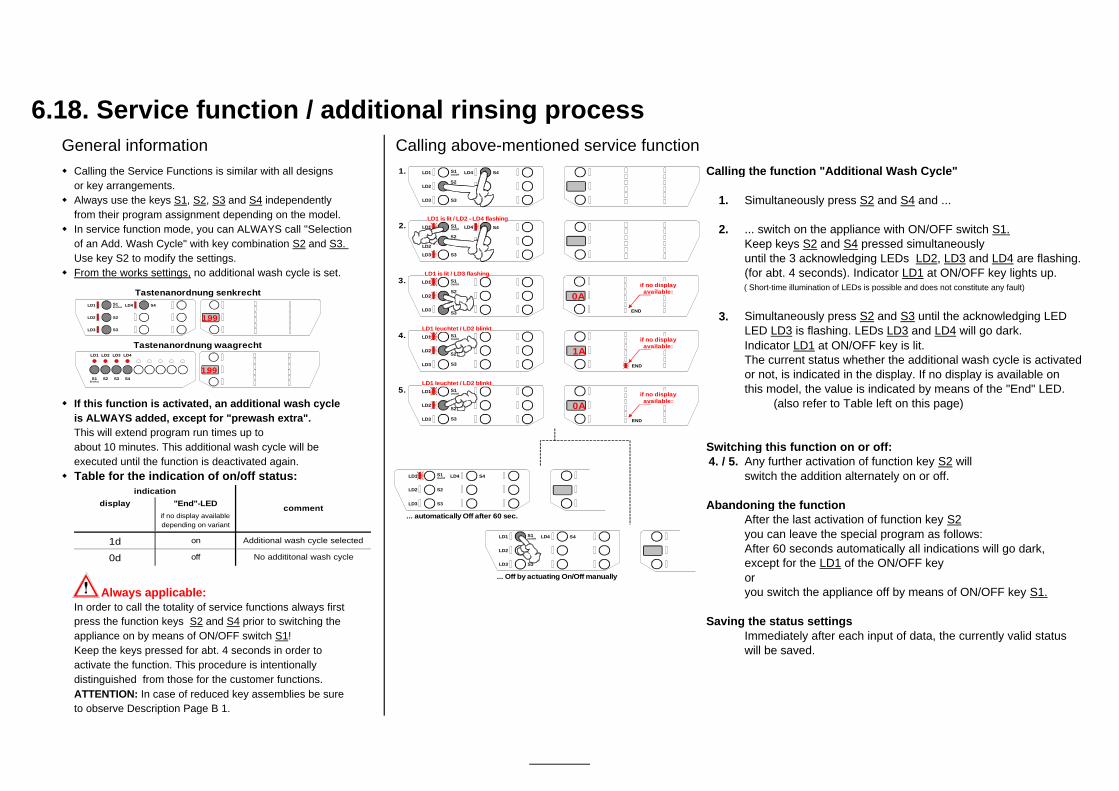
6.18. Service function / additional rinsing processGeneral information Calling above-mentioned service functionw Calling the Service Functions is similar with all designs Calling the function "Additional Wash Cycle"
or key arrangements.w Always use the keys S1, S2, S3 and S4 independently 1. Simultaneously press S2 and S4 and ...
from their program assignment depending on the model. w In service function mode, you can ALWAYS call "Selection 2. ... switch on the appliance with ON/OFF switch S1.
of an Add. Wash Cycle" with key combination S2 and S3. Keep keys S2 and S4 pressed simultaneouslyUse key S2 to modify the settings. until the 3 acknowledging LEDs LD2, LD3 and LD4 are flashing.
w From the works settings, no additional wash cycle is set. (for abt. 4 seconds). Indicator LD1 at ON/OFF key lights up.( Short-time illumination of LEDs is possible and does not constitute any fault)
3. Simultaneously press S2 and S3 until the acknowledging LED LED LD3 is flashing. LEDs LD3 and LD4 will go dark.Indicator LD1 at ON/OFF key is lit.The current status whether the additional wash cycle is activatedor not, is indicated in the display. If no display is available on this model, the value is indicated by means of the "End" LED.
w If this function is activated, an additional wash cycle (also refer to Table left on this page)is ALWAYS added, except for "prewash extra".This will extend program run times up to about 10 minutes. This additional wash cycle will be Switching this function on or off:executed until the function is deactivated again. 4. / 5. Any further activation of function key S2 will
w Table for the indication of on/off status: switch the addition alternately on or off.
Abandoning the functionAfter the last activation of function key S2you can leave the special program as follows:After 60 seconds automatically all indications will go dark, except for the LD1 of the ON/OFF key or
Always applicable: you switch the appliance off by means of ON/OFF key S1.In order to call the totality of service functions always firstpress the function keys S2 and S4 prior to switching the Saving the status settingsappliance on by means of ON/OFF switch S1! Immediately after each input of data, the currently valid status Keep the keys pressed for abt. 4 seconds in order to will be saved.activate the function. This procedure is intentionally distinguished from those for the customer functions. ATTENTION: In case of reduced key assemblies be sure to observe Description Page B 1.
S1Ein/AusLD1
S2LD2
LD3 S3
S4LD4
S1Ein/Aus
LD1
S2
LD2
S3
LD3
S4
LD4
1.99
1.99
Tastenanordnung senkrecht
Tastenanordnung waagrecht
display "End"-LEDif no display availabledepending on variant
1d on Additional wash cycle selected
0d off No addititonal wash cycle
indication
comment
S1On/OffLD1
LD2
LD3
LD4
1.
2.
S1On/OffLD1
S2LD2
LD3 S3
S4LD4
LD1 is lit / LD2 - LD4 flashing
S2
S3
S4
S1On/Off
LD1
S2LD2
LD3S3
1A
3.
S1On/OffLD1
S2LD2
LD3 S3
LD4 S4
S1On/OffLD1
S2LD2
LD3 S3
LD4 S4
END
LD1 is lit / LD3 flashing
... automatically Off after 60 sec.
... Off by actuating On/Off manually
0A
4.
END
5.
S1On/OffLD1
S2LD2
LD1 leuchtet / LD2 blinkt
LD3 S3
S1On/OffLD1
LD1 leuchtet / LD2 blinkt
S2LD2
LD3 S3
0A
END
if no displayavailable:
if no displayavailable:
if no displayavailable:
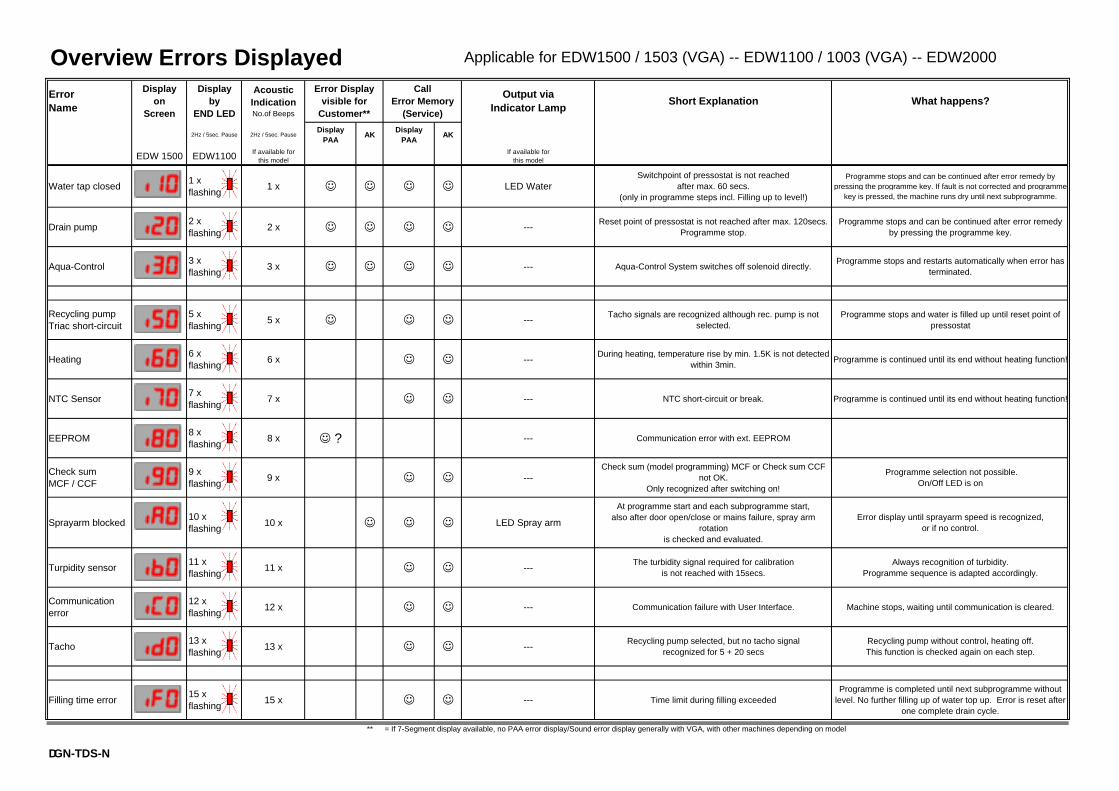
Overview Errors Displayed Applicable for EDW1500 / 1503 (VGA) -- EDW1100 / 1003 (VGA) -- EDW2000
ErrorName
Displayon
Screen
Displayby
END LED
AcousticIndicationNo.of Beeps
Error Displayvisible for
Customer**
CallError Memory
(Service)
Output viaIndicator Lamp
Short Explanation What happens?
2Hz / 5sec. Pause 2Hz / 5sec. PauseDisplay
PAAAK
DisplayPAA
AK
EDW 1500 EDW1100 If available forthis model
If available forthis model
Water tap closed1 xflashing
1 x ☺ ☺ ☺ ☺ LED WaterSwitchpoint of pressostat is not reached
after max. 60 secs.(only in programme steps incl. Filling up to level!)
Programme stops and can be continued after error remedy by pressing the programme key. If fault is not corrected and programme
key is pressed, the machine runs dry until next subprogramme.
Drain pump2 xflashing
2 x ☺ ☺ ☺ ☺ ---Reset point of pressostat is not reached after max. 120secs.
Programme stop.Programme stops and can be continued after error remedy
by pressing the programme key.
Aqua-Control3 xflashing
3 x ☺ ☺ ☺ ☺ --- Aqua-Control System switches off solenoid directly.Programme stops and restarts automatically when error has
terminated.
Recycling pumpTriac short-circuit
5 xflashing
5 x ☺ ☺ ☺ ---Tacho signals are recognized although rec. pump is not
selected. Programme stops and water is filled up until reset point of
pressostat
Heating6 xflashing
6 x ☺ ☺ ---During heating, temperature rise by min. 1.5K is not detected
within 3min. Programme is continued until its end without heating function!
NTC Sensor7 xflashing
7 x ☺ ☺ --- NTC short-circuit or break. Programme is continued until its end without heating function!
EEPROM8 xflashing
8 x ☺ ? --- Communication error with ext. EEPROM
Check sumMCF / CCF
9 xflashing
9 x ☺ ☺ ---Check sum (model programming) MCF or Check sum CCF
not OK.Only recognized after switching on!
Programme selection not possible.On/Off LED is on
Sprayarm blocked10 xflashing
10 x ☺ ☺ ☺ LED Spray arm
At programme start and each subprogramme start,also after door open/close or mains failure, spray arm
rotationis checked and evaluated.
Error display until sprayarm speed is recognized, or if no control.
Turpidity sensor11 xflashing
11 x ☺ ☺ ---The turbidity signal required for calibration
is not reached with 15secs.Always recognition of turbidity.
Programme sequence is adapted accordingly.
Communication error
12 xflashing
12 x ☺ ☺ --- Communication failure with User Interface. Machine stops, waiting until communication is cleared.
Tacho13 xflashing
13 x ☺ ☺ ---Recycling pump selected, but no tacho signal
recognized for 5 + 20 secs Recycling pump without control, heating off. This function is checked again on each step.
Filling time error 15 xflashing
15 x ☺ ☺ --- Time limit during filling exceededProgramme is completed until next subprogramme without
level. No further filling up of water top up. Error is reset after one complete drain cycle.
** = If 7-Segment display available, no PAA error display/Sound error display generally with VGA, with other machines depending on model
DGN-TDS-N

List of Possible Error Causes
Code Possible error causes
Water tap is closed or faultyNo water pressure, pressure too low or changingScreen in front of inlet valve cloggedFlow governor at inlet valve faultyInlet valve faultyInlet valve deenergized (faulty wiring or no activation by electronics) Inlet hose bentSoftener system clogged (by filling detergent into salt compartment, for instance) Upright installation without upright assembly kitConnection height of the discharge hose is lower than 30cm above appliance base Connection w/o siphon or air chamberPressure controller faultyPressure controller hose obstructed, bent or leakingPressure controller wiring is faultyScreens in the appliance clogged (also check spray arm nozzles for clogging)Fault with discharge pumpDischarge pump deenergized (faulty wiring or no activation by electronics)
Obstruction/blocking (filters in the appliance, discharge opening in discharge trough, discharge pump, discharge hose, siphon, cover plug at siphon connection not removed during first commissioning)
Discharge hose bent or connection height above 100cm Ball valve in discharge trough glued / blocked (discharge pump does not aerate)Pressure controller faultyPressure controller hose obstructed or bent Insulation fault with heating element
Leakage Leakage at recipient, discharge trough, hose system (e.g., Y-type hose), regeneration dosage etc. Inlet valve faulty (does not close) Water inlet too high (faulty flow governor at inlet valve)Connecting hose regenerating dosing to discharge trough blocked Water inlet channels in regeneration dosing unit blockedScreens in the appliance clogged (also check spray arm nozzles for clogging)Pressure controller faultyPressure controller hose obstructed, bent or leakingPressure controller wiring is faultyFoam production in the appliance (splashed rinsing liquid / leaking dosing unit or con-compatible detergent / rinsing agent used)
Base trough is dry Inlet valve or wiring electrically interrupted
i50 Motor triac short-circuit Faulty electronics
Heating element faultyHeating element deenergized (faulty wiring or no activation by electronics)Thermal sensor defectWiring faulty (e.g. short-circuit or interruption)Mains filter defectFaulty electronics EMC problem
i90 Check sum error model programmation
Faulty electronics
Blocking by dishes or cutlery basketNozzles clogged (drive nozzles at spray arm extremities) Spray arm leaking (welding seam)Spray arm bearing blocked (dirt, foreign bodies) Screens in the appliance cloggedBellows at connecting pipe not sealed at recipient rear wall (bellows not contacting/glued together) Circulating pump does not reach full power (nominal speed is not reached due to winding influence) Too little water in appliance - for possible causes see Error codes i10 and iF0 Foam production in the appliance (splashed rinsing liquid / leaking dosing unit or con-compatible detergent / rinsing agent used) No magnet in spray armSpray arm detection sensor faultyWiring faulty turbidity sensor defectWiring faulty turbidity sensor dirtyFoam production in the appliance (splashed rinsing liquid / leaking dosing unit or con-compatible detergent / rinsing agent used) Faulty electronics Wiring faulty Circulating pump / capacitor defectCirculating pump deenergized (faulty wiring or no activation by electronics)Tachometer generator defectWiring faulty Problem with water inlet in general - see Error code i10, pipette effect in particular (also look for an error memory entry i10)
Problem by incomplete pumping in previous program cycle (remaining water) - see Error code i20 (also look for an error memory entry i20)
Improper loading, e.g. big item (pot, bowl is reversed and fills with water)Foam production in the appliance (splashed rinsing liquid / leaking dosing unit or con-compatible detergent / rinsing agent used)
ic0
id0
iF0
communication faulty
Circulation pump no function
No tacho signal recognized
Time limit during filling exceeded
iA0
Upper spray arm does not rotate
No spray arm detection
turbidity signal faultyib0
i60
i70
i80
No rise in temperature
NTC signal faulty
Check sum error EEPROM
Water is not pumped off
Water level inside appliance is not detected
i20
OverflowWater remains in base troughi30
i10
No or not enough water let in
Machine runs dry (Siphon effect)
Water level inside appliance is not detected
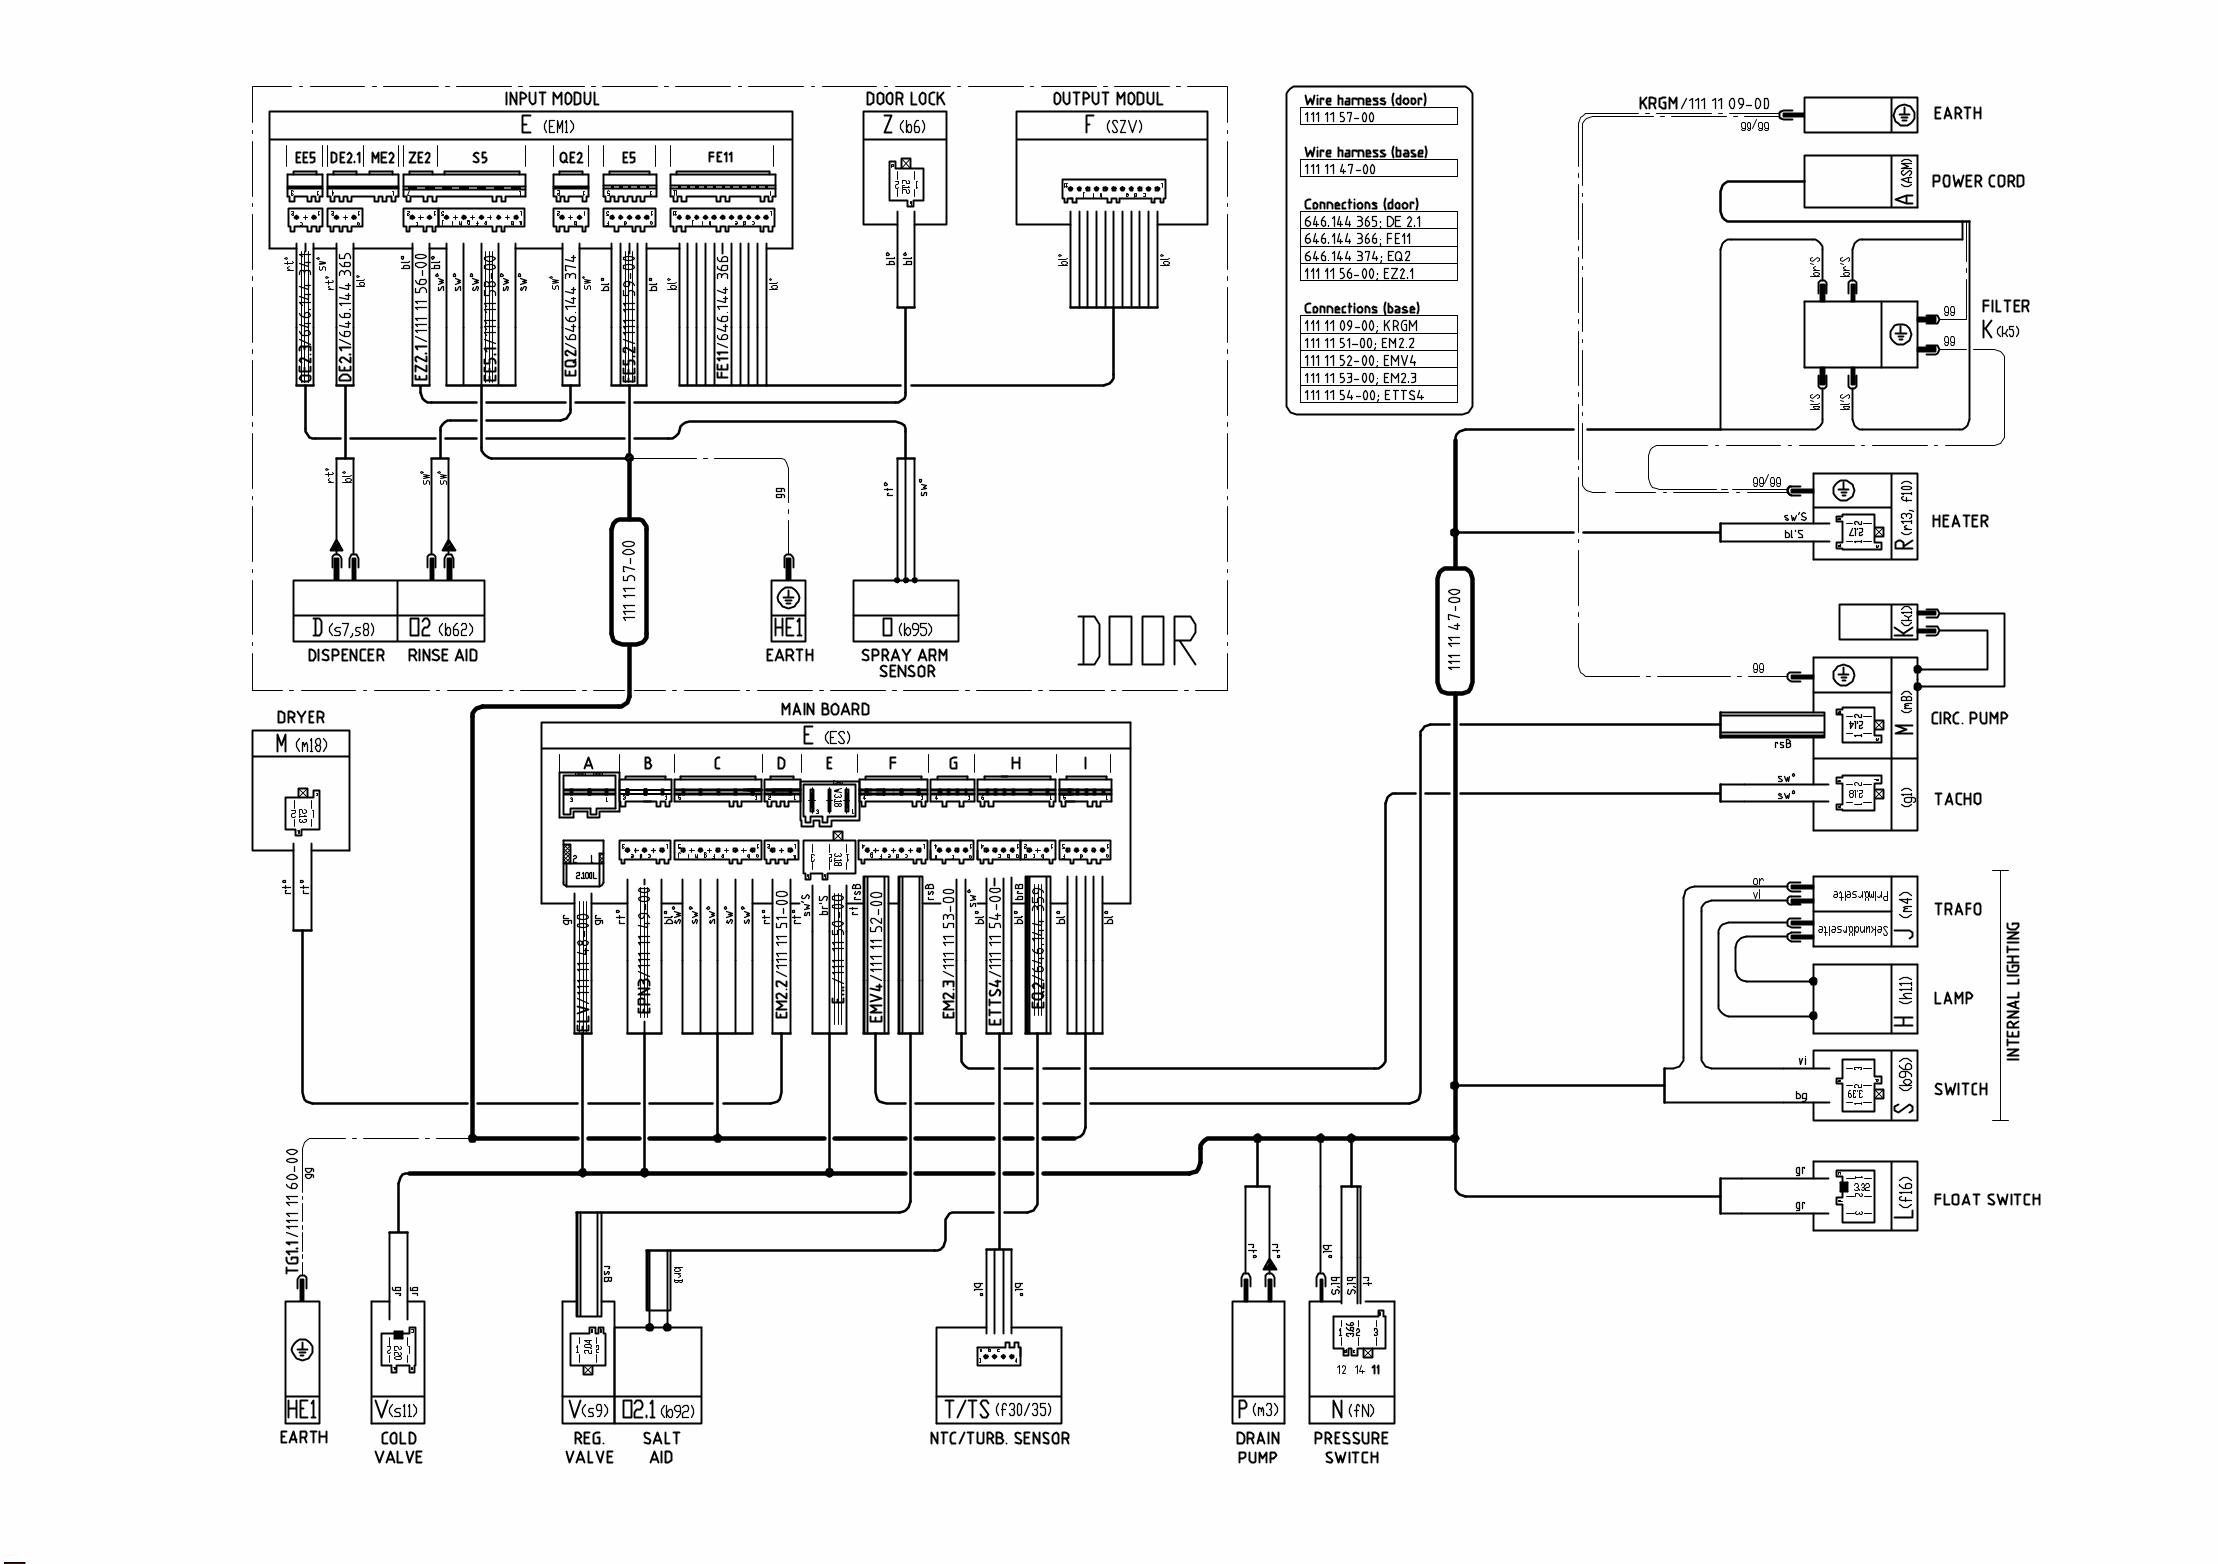
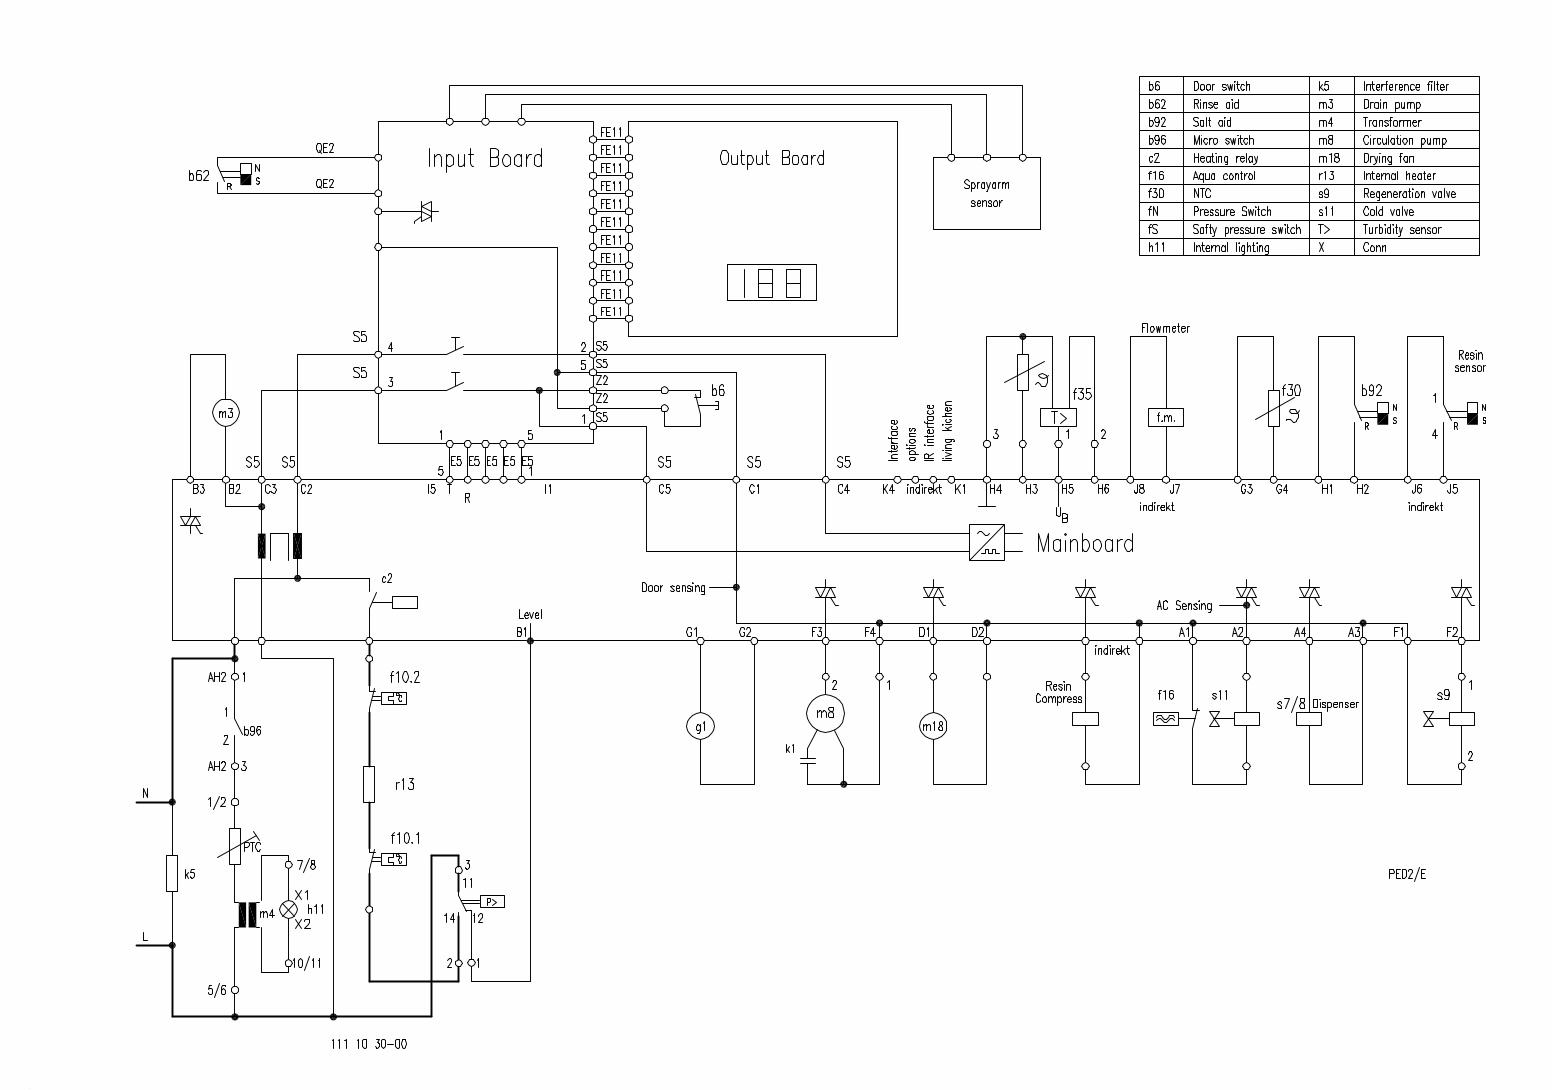
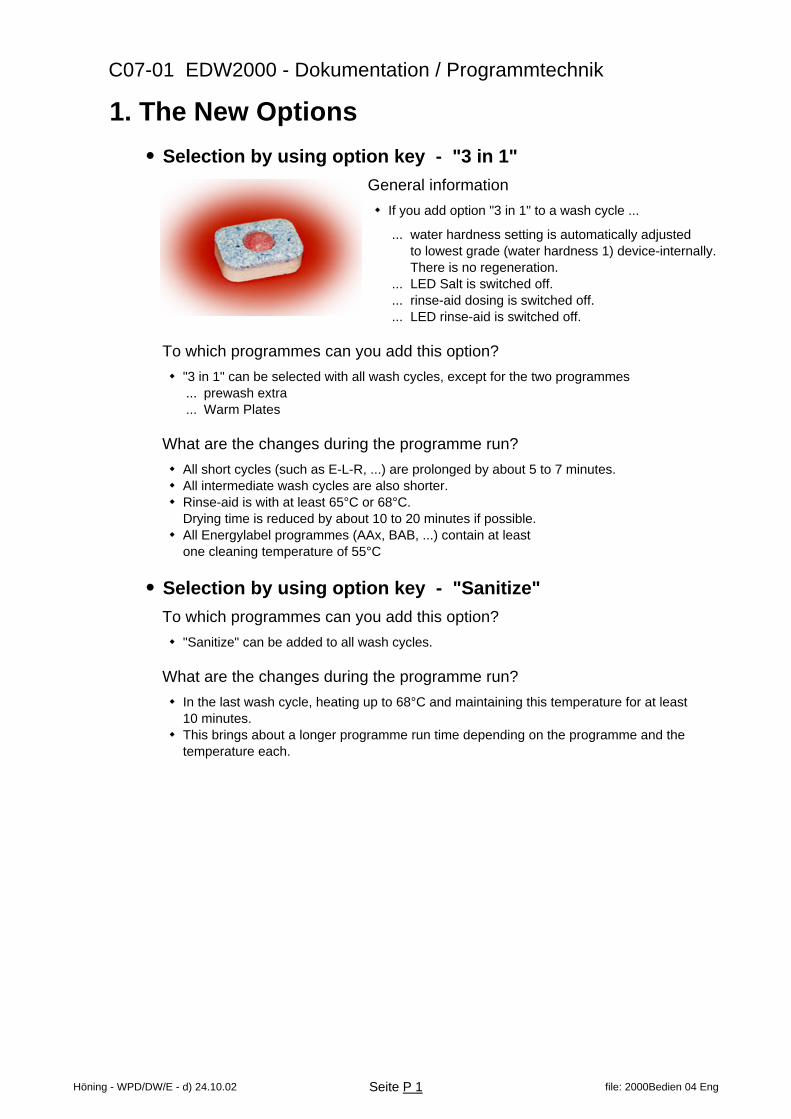
C07-01 EDW2000 - Dokumentation / Programmtechnik
1. The New Optionsl Selection by using option key - "3 in 1"
General informationw If you add option "3 in 1" to a wash cycle ...
... water hardness setting is automatically adjusted to lowest grade (water hardness 1) device-internally. There is no regeneration.
... LED Salt is switched off.
... rinse-aid dosing is switched off.
... LED rinse-aid is switched off.
To which programmes can you add this option?w "3 in 1" can be selected with all wash cycles, except for the two programmes
... prewash extra
... Warm Plates
What are the changes during the programme run? w All short cycles (such as E-L-R, ...) are prolonged by about 5 to 7 minutes.w All intermediate wash cycles are also shorter. w Rinse-aid is with at least 65°C or 68°C.
Drying time is reduced by about 10 to 20 minutes if possible. w All Energylabel programmes (AAx, BAB, ...) contain at least
one cleaning temperature of 55°C
l Selection by using option key - "Sanitize"To which programmes can you add this option?w "Sanitize" can be added to all wash cycles.
What are the changes during the programme run? w In the last wash cycle, heating up to 68°C and maintaining this temperature for at least
10 minutes.w This brings about a longer programme run time depending on the programme and the
temperature each.
Höning - WPD/DW/E - d) 24.10.02 Seite P 1 file: 2000Bedien 04 Eng


![Texel Shading - AMDdeveloper.amd.com/wordpress/.../TexelShading_EG2016... · These stages are very similar to those of decoupled deferred shading [LD12]. Although they mention the](https://cdn.vdocuments.us/doc/165x107/5ff9588fb26b3a7b3d2bff94/texel-shading-these-stages-are-very-similar-to-those-of-decoupled-deferred-shading.jpg)


