
Employee Kiosk
Staff Manual
2/7/2011 Page 2 of 20
TABLE OF CONTENTS
TABLE OF CONTENTS ...................................................................................................................... 2
LOGGING IN ....................................................................................................................................... 3
EMPLOYEE KIOSK DOCUMENTATION ........................................................................................ 4
KIOSK ANNOUNCEMENT BOARD................................................................................................. 4
OTHER LINKS .................................................................................................................................... 4
PROFILE .............................................................................................................................................. 5
POSITION DETAILS ........................................................................................................................... 6
PERFORMANCE REVIEWS .............................................................................................................. 6
PAYSLIP .............................................................................................................................................. 7
VIEW/PRINT W-2 ............................................................................................................................... 9
LEAVE BALANCES ......................................................................................................................... 10
LEAVE REQUEST ............................................................................................................................ 11
Create New Leave Request ....................................................................................................... 11
My Request(s) in Process.......................................................................................................... 15
My Processed Request(s) .......................................................................................................... 17
Set Leave Starting & Ending Time Preference ......................................................................... 19
CHANGE PASSWORD ..................................................................................................................... 19
CORRESPONDENCE ........................................................................................................................ 20
2/7/2011 Page 3 of 20
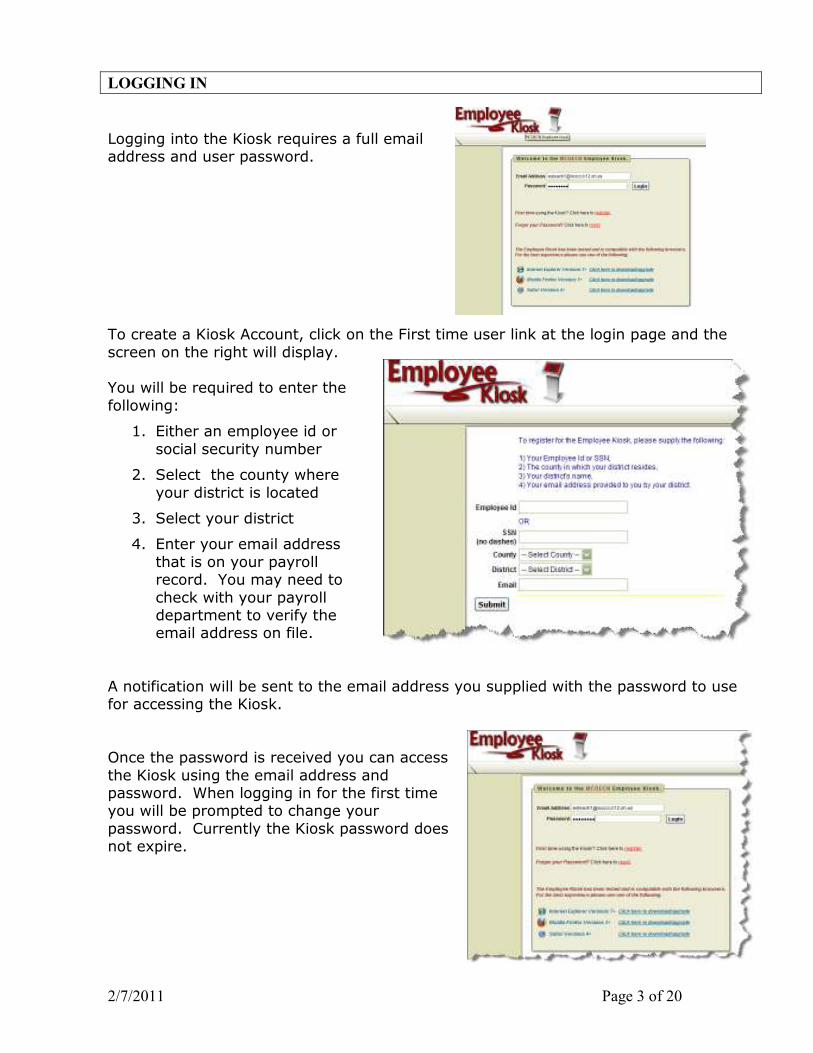
LOGGING IN
Logging into the Kiosk requires a full email address and user password.
To create a Kiosk Account, click on the First time user link at the login page and the
screen on the right will display. You will be required to enter the
following:
1. Either an employee id or
social security number
2. Select the county where
your district is located
3. Select your district
4. Enter your email address
that is on your payroll record. You may need to
check with your payroll department to verify the email address on file.
A notification will be sent to the email address you supplied with the password to use for accessing the Kiosk.
Once the password is received you can access
the Kiosk using the email address and password. When logging in for the first time you will be prompted to change your
password. Currently the Kiosk password does not expire.

2/7/2011 Page 4 of 20
EMPLOYEE KIOSK DOCUMENTATION
This link will take you to the Kiosk website where you can find documentation, see
weekly summaries, enhancements suggestions and other information related to the Kiosk software.
KIOSK ANNOUNCEMENT BOARD
Announcements for staff from administrators will be placed in the Kiosk Announcement Board. To see the full announcement, click (+) symbol next to the announcement
title.
Clicking the (–) symbol will close the announcement.
OTHER LINKS
If your district is using the Other Links functionality of the Kiosk you will see links to other websites on your horizontal bar that have been placed there by district
administrators. You can click on these links at anytime to go to that website.

2/7/2011 Page 5 of 20
PROFILE
The profile page gives the user the personal information drawn from USPS (Uniform School Payroll
System).
If the information is in error you may Request Profile Data changes by clicking on the link in the top right hand corner. You can then enter your change in the white box
next to that field that needs the correction and then click Submit Change Request. A request is sent to the payroll staff and they will manually update the payroll system.
2/7/2011 Page 6 of 20
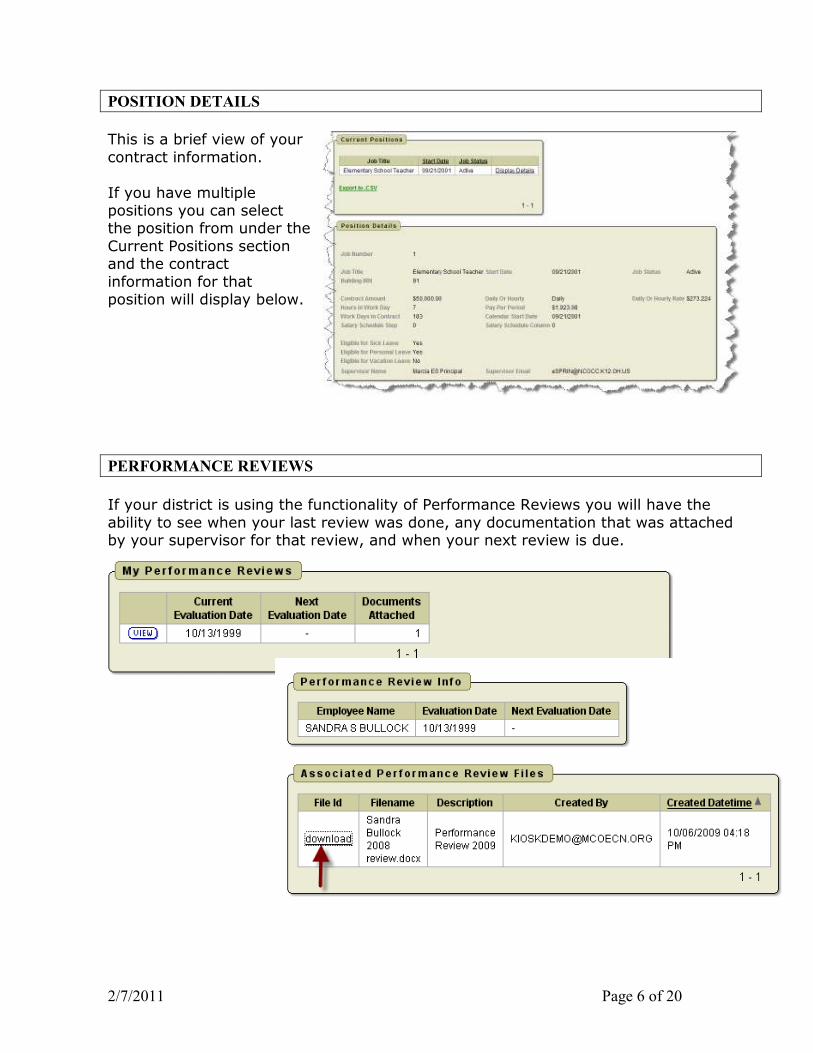
POSITION DETAILS
This is a brief view of your
contract information.
If you have multiple positions you can select the position from under the
Current Positions section and the contract
information for that position will display below.
PERFORMANCE REVIEWS
If your district is using the functionality of Performance Reviews you will have the
ability to see when your last review was done, any documentation that was attached by your supervisor for that review, and when your next review is due.
2/7/2011 Page 7 of 20
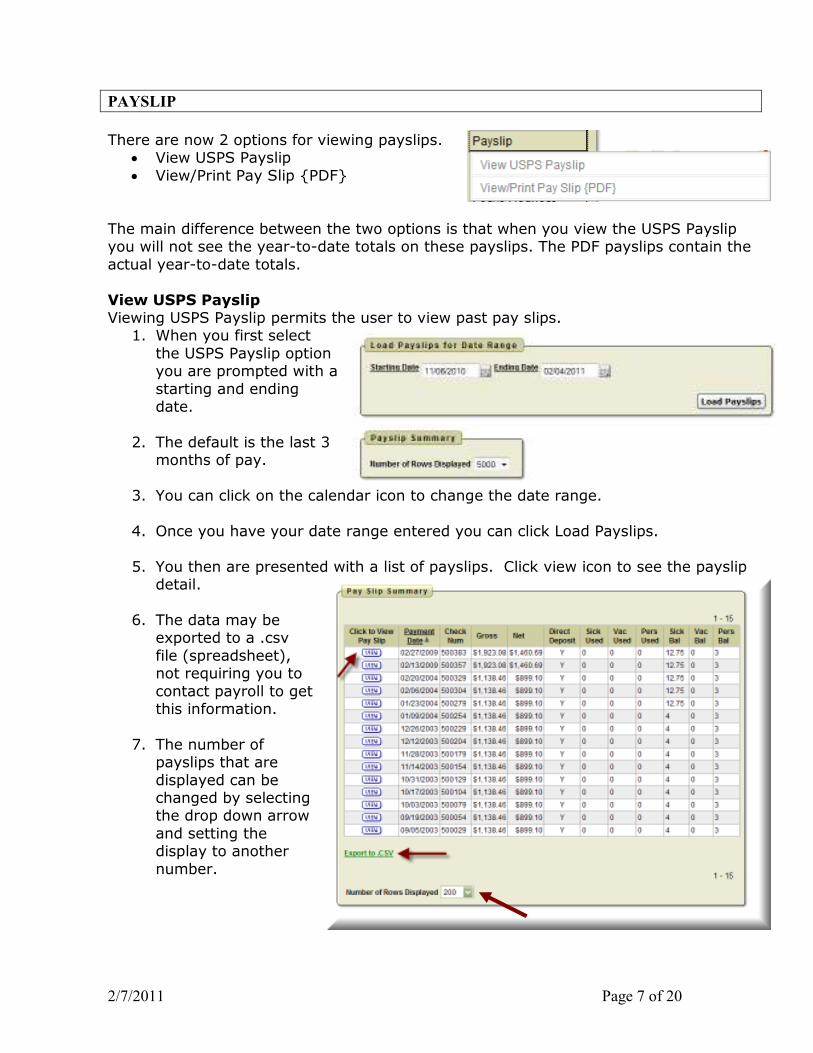
PAYSLIP
There are now 2 options for viewing payslips. • View USPS Payslip
• View/Print Pay Slip {PDF}
The main difference between the two options is that when you view the USPS Payslip you will not see the year-to-date totals on these payslips. The PDF payslips contain the
actual year-to-date totals.
View USPS Payslip Viewing USPS Payslip permits the user to view past pay slips.
1. When you first select
the USPS Payslip option you are prompted with a
starting and ending date.
2. The default is the last 3 months of pay.
3. You can click on the calendar icon to change the date range.
4. Once you have your date range entered you can click Load Payslips.
5. You then are presented with a list of payslips. Click view icon to see the payslip detail.
6. The data may be
exported to a .csv
file (spreadsheet), not requiring you to
contact payroll to get this information.
7. The number of payslips that are
displayed can be changed by selecting the drop down arrow
and setting the display to another
number.
2/7/2011 Page 8 of 20
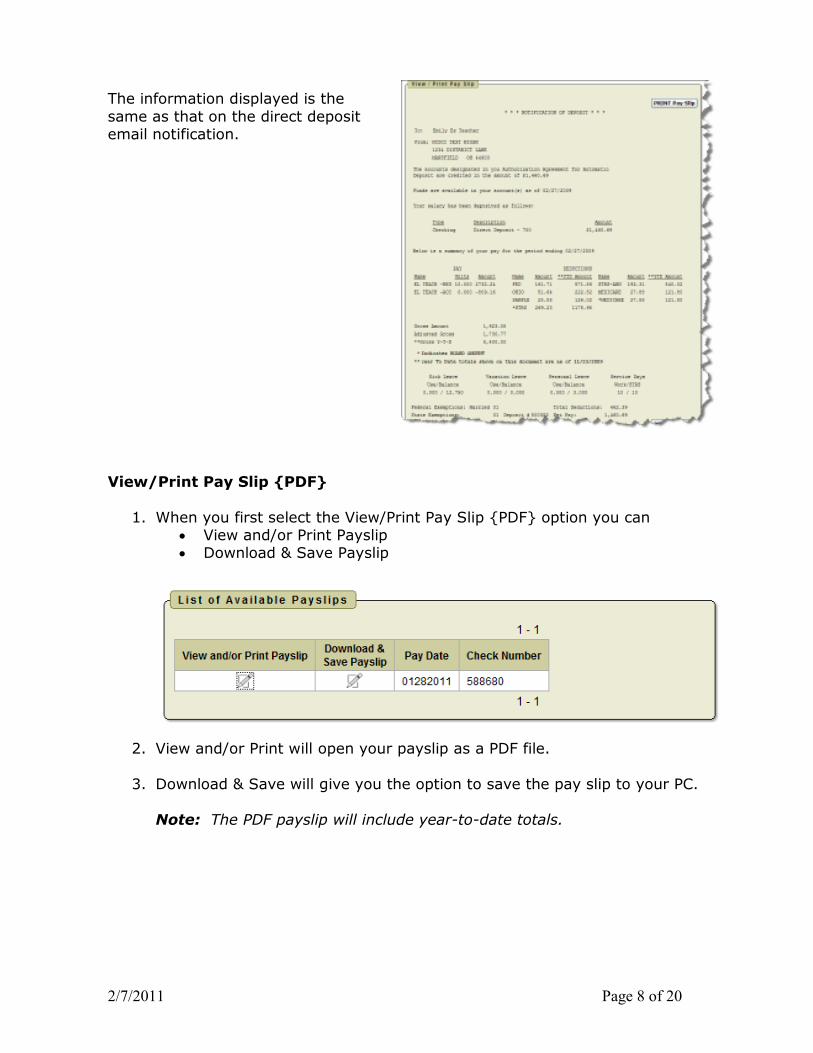
The information displayed is the
same as that on the direct deposit email notification.
View/Print Pay Slip {PDF}
1. When you first select the View/Print Pay Slip {PDF} option you can • View and/or Print Payslip • Download & Save Payslip
2. View and/or Print will open your payslip as a PDF file.
3. Download & Save will give you the option to save the pay slip to your PC.
Note: The PDF payslip will include year-to-date totals.

2/7/2011 Page 9 of 20
VIEW/PRINT W-2
If your district is using the W2 functionality within Kiosk you will see your W2 information that can be viewed or printed.
The tax years that are available will display on the screen. When you click on View and/or Print for a specific W2 your W2 will display on the screen as a PDF.

2/7/2011 Page 10 of 20
LEAVE BALANCES
At this screen the user can see the types of leave they have and a quick balance of each. This balance reflects just the leave requests that have been exported into USPS.
You can also see detailed information of absences and accumulations for available leave types. You can filter the information to only display information based on
Category (Leave Types which could include sick,
personal, vacation, etc.), Job Number, Transaction Type
(Either Absence or Accumulation), and Start/End Date. Once you
have selected how you want the information filtered you
must press the Go icon to initiate your filter.
Each column that is
underlined gives you the ability to sort the
information based on that column. To sort on Activity Date so that the most recent
dates are at the top click on the Activity Date.

2/7/2011 Page 11 of 20
LEAVE REQUEST
There are 4 areas under Leave Request: � Create New Request
� My Request(s) in Process � My Processed Request(s)
� Set Leave Starting & Ending Time Preferences
Create New Leave Request.
1. Make sure your job that is eligible for
leave is selected.
2. Select your leave
type. If your district requires an additional
reason for a specific leave type (sub-category) another box
will display to select additional reasons for
the leave request. Once you have selected your leave
type a balance of that leave type will display
and you will have an icon to click on to see additional leave
requests that have been requested but
not subtracted from the balance for that
leave type.
3. You will need to enter
a reason for the request. Some
districts require a reason for specific leave types. If your district requires a reason you will receive an error if you
leave the field blank.
4. Start and End Date are both required – if you forget the date, you will be prompted to add it upon a submitting your request. You can click on the calendar icon to display a calendar to use to select your date.

2/7/2011 Page 12 of 20
5. Start and End Times are both required – if you forget the time, you will be
prompted to add it upon submitting your request. This can be set as a preference. See Set Leave Starting & Ending Time Preferences section.
6. Enter amount of time
you are requesting off. If your district uses
hours you will enter your time in hours. If your district uses days
you will enter your request in increments of
.25.
7. Your phone number will
be populated from your Profile information.
8. Place a check mark in
the box if you want to receive an email every time action is taken on
your request. If you do not place a check mark
in this box you will receive an email message when the
request is initiated and when it has received
final approval.
9. Enter any comments
you want your supervisor to be aware of.
10. If you need a substitute you will need to check the box and then the comment box will be available for you to type a comment in. This information will then be displayed to anyone who has access to view your request.
NOTE: Some districts may have configured Substitute Needed box to already
be checked for you when you create a request. If the box is checked to show you need a substitute then you will be able to click in the comment box to type your comment for this request.
11.You have the ability to attach a
document to your leave request. You may need to attach a doctor’s excuse, an agenda or
registration form for a meeting. Click on Select File(s) to attach.
2/7/2011 Page 13 of 20
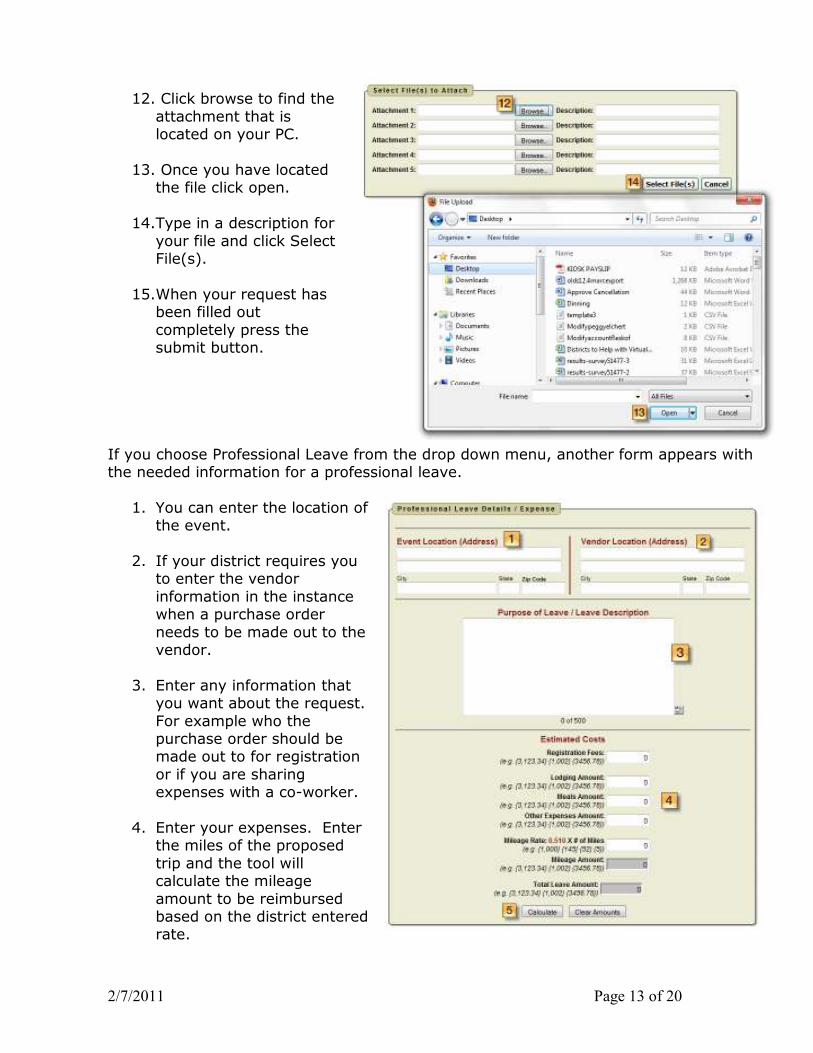
12. Click browse to find the
attachment that is located on your PC.
13. Once you have located
the file click open.
14.Type in a description for
your file and click Select File(s).
15.When your request has been filled out
completely press the submit button.
If you choose Professional Leave from the drop down menu, another form appears with the needed information for a professional leave.
1. You can enter the location of the event.
2. If your district requires you
to enter the vendor
information in the instance when a purchase order
needs to be made out to the vendor.
3. Enter any information that you want about the request.
For example who the purchase order should be made out to for registration
or if you are sharing expenses with a co-worker.
4. Enter your expenses. Enter
the miles of the proposed
trip and the tool will calculate the mileage
amount to be reimbursed based on the district entered rate.
2/7/2011 Page 14 of 20
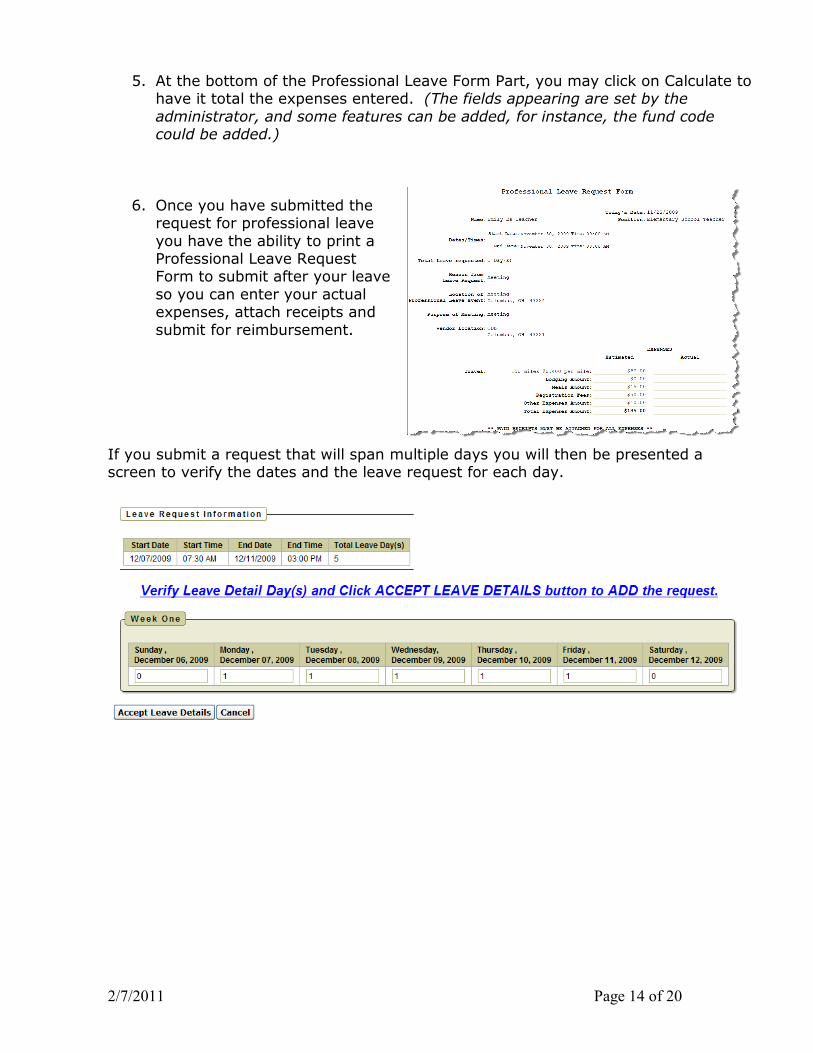
5. At the bottom of the Professional Leave Form Part, you may click on Calculate to have it total the expenses entered. (The fields appearing are set by the
administrator, and some features can be added, for instance, the fund code could be added.)
6. Once you have submitted the request for professional leave
you have the ability to print a Professional Leave Request Form to submit after your leave
so you can enter your actual expenses, attach receipts and
submit for reimbursement.
If you submit a request that will span multiple days you will then be presented a screen to verify the dates and the leave request for each day.
2/7/2011 Page 15 of 20
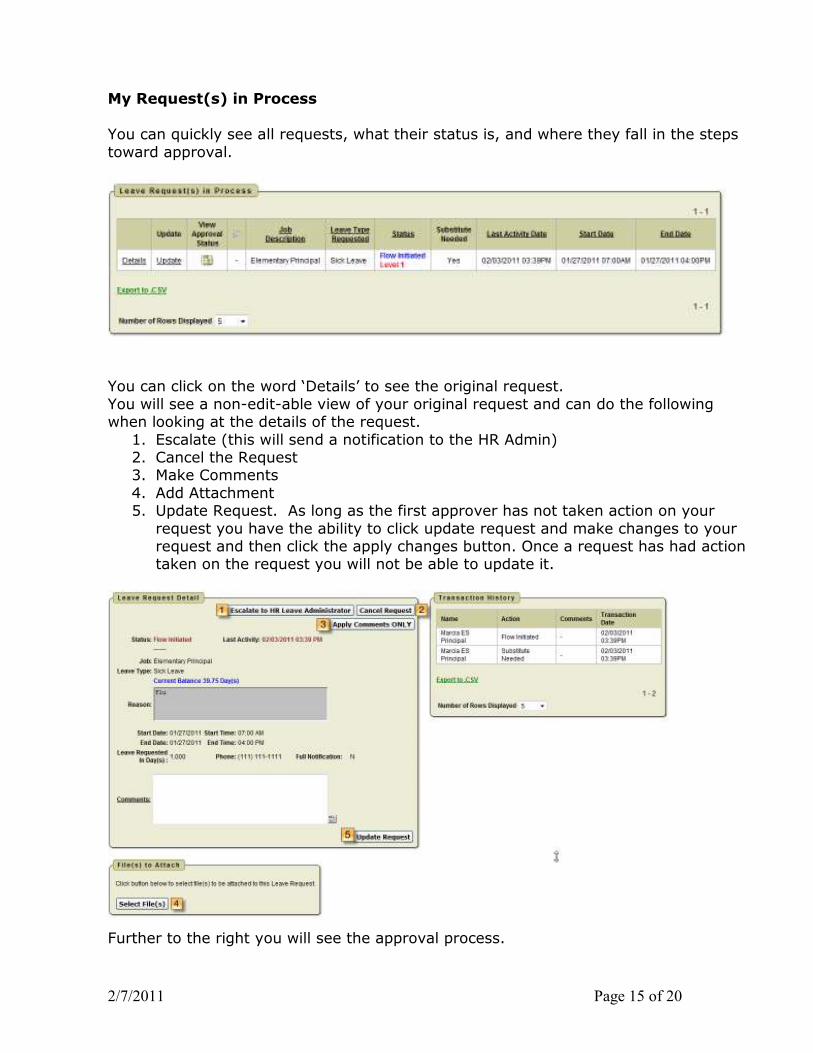
My Request(s) in Process
You can quickly see all requests, what their status is, and where they fall in the steps
toward approval.
You can click on the word ‘Details’ to see the original request.
You will see a non-edit-able view of your original request and can do the following when looking at the details of the request.
1. Escalate (this will send a notification to the HR Admin) 2. Cancel the Request 3. Make Comments
4. Add Attachment 5. Update Request. As long as the first approver has not taken action on your
request you have the ability to click update request and make changes to your request and then click the apply changes button. Once a request has had action taken on the request you will not be able to update it.
Further to the right you will see the approval process.
2/7/2011 Page 16 of 20
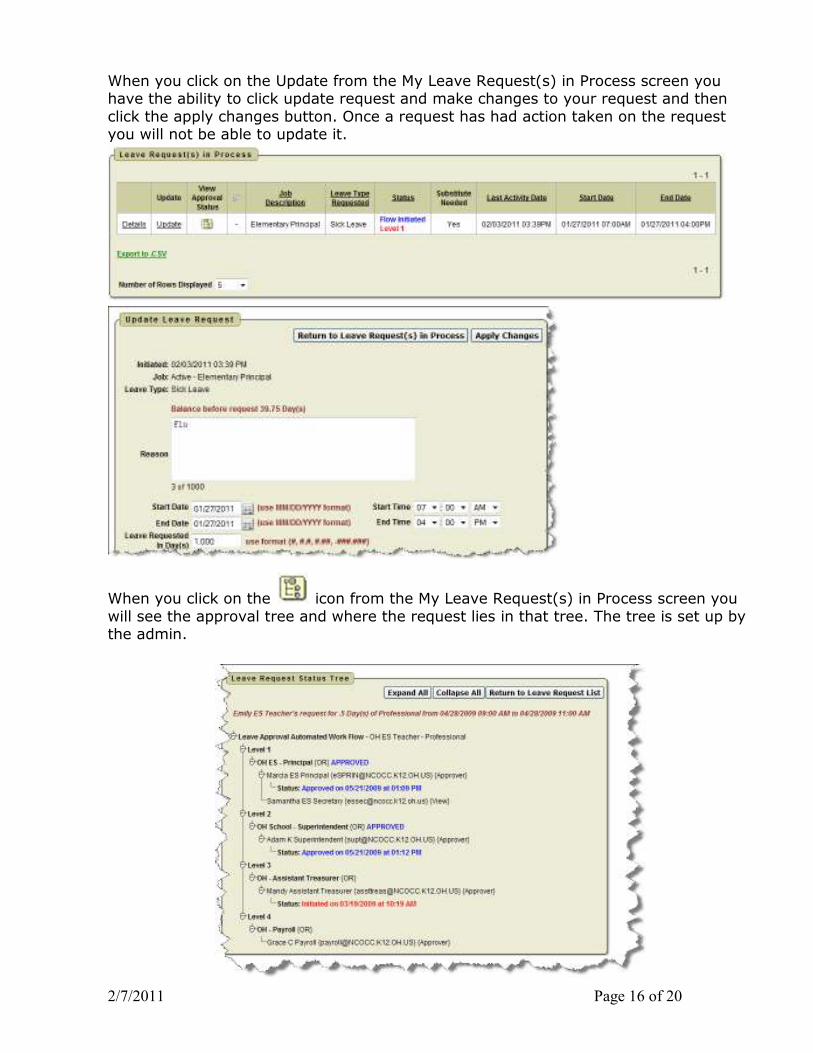
When you click on the Update from the My Leave Request(s) in Process screen you have the ability to click update request and make changes to your request and then
click the apply changes button. Once a request has had action taken on the request you will not be able to update it.
When you click on the icon from the My Leave Request(s) in Process screen you
will see the approval tree and where the request lies in that tree. The tree is set up by the admin.
2/7/2011 Page 17 of 20
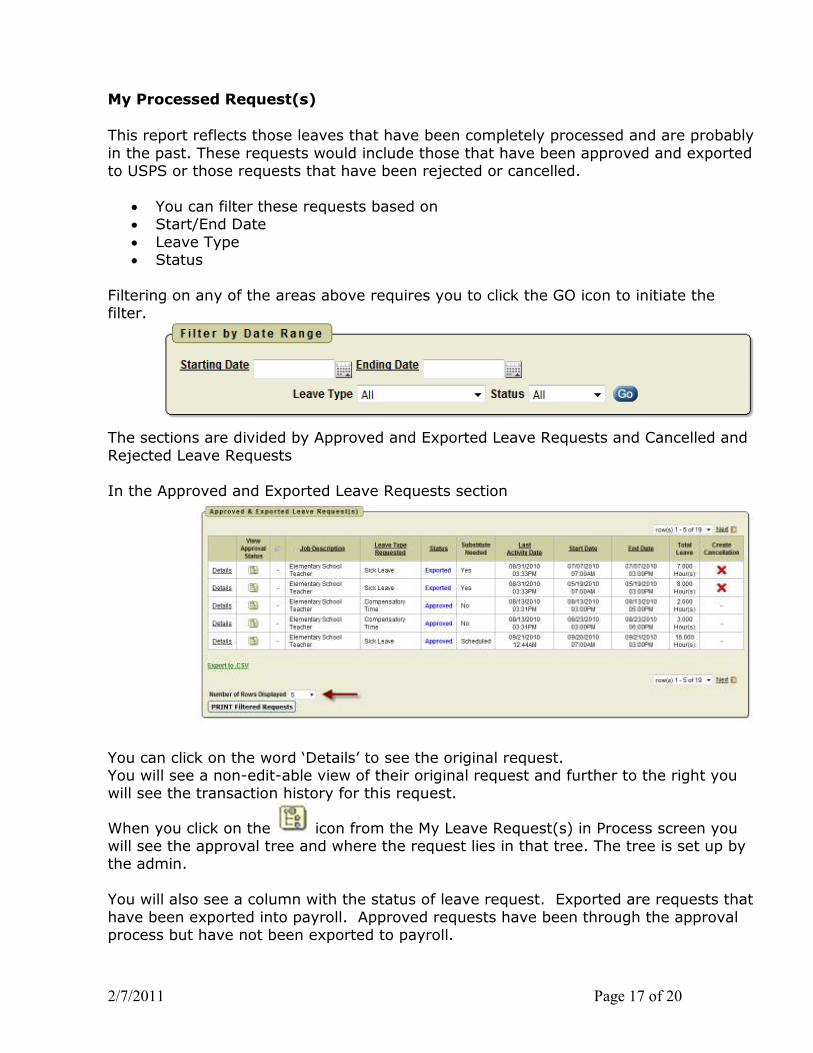
My Processed Request(s)
This report reflects those leaves that have been completely processed and are probably
in the past. These requests would include those that have been approved and exported to USPS or those requests that have been rejected or cancelled.
• You can filter these requests based on • Start/End Date
• Leave Type • Status
Filtering on any of the areas above requires you to click the GO icon to initiate the filter.
The sections are divided by Approved and Exported Leave Requests and Cancelled and
Rejected Leave Requests In the Approved and Exported Leave Requests section
You can click on the word ‘Details’ to see the original request. You will see a non-edit-able view of their original request and further to the right you will see the transaction history for this request.
When you click on the icon from the My Leave Request(s) in Process screen you will see the approval tree and where the request lies in that tree. The tree is set up by the admin.
You will also see a column with the status of leave request. Exported are requests that
have been exported into payroll. Approved requests have been through the approval process but have not been exported to payroll.

2/7/2011 Page 18 of 20
If your request has the status of Exported you have the option to cancel the request by
clicking on the red X in the Create Cancellation column.
When you click the red X a leave request will be created and automatically populated
with the correct information for the leave cancellation. You can enter comments in the request as to why the request is being cancelled.
Click Submit to create the cancellation request and send it through the approval
process.
You may choose how many rows to view by
clicking on the drop down arrow next to Number of Rows Displayed.
2/7/2011 Page 19 of 20
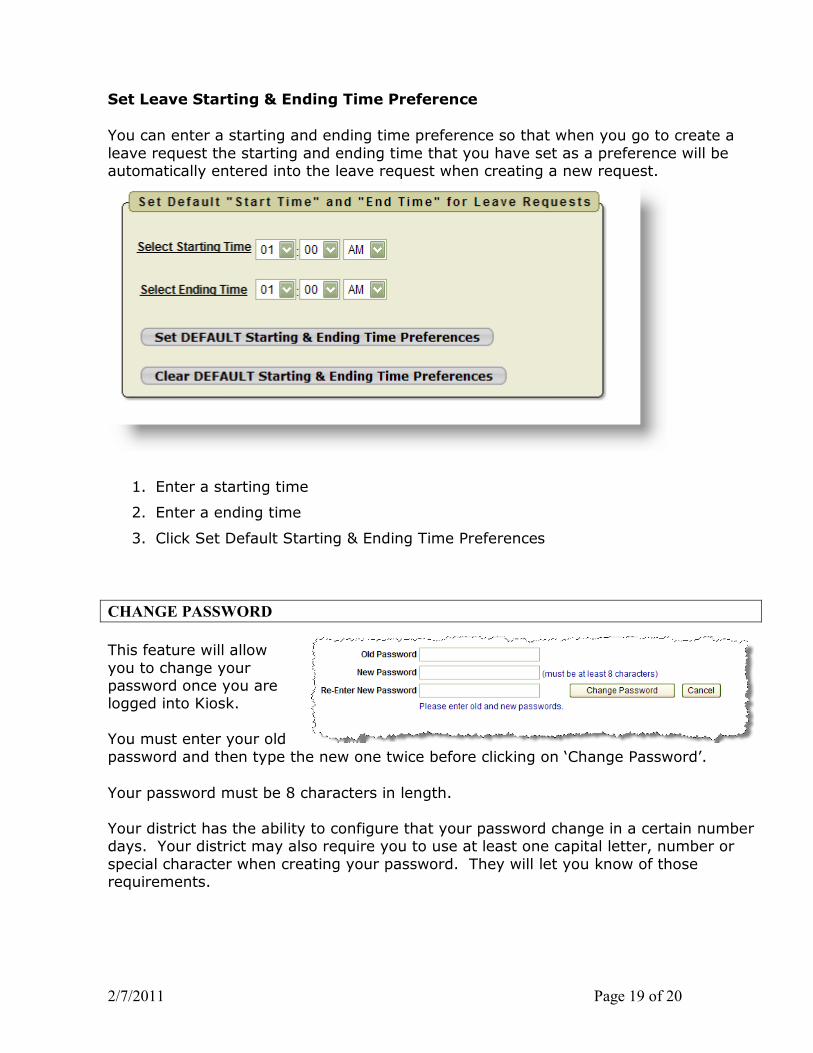
Set Leave Starting & Ending Time Preference
You can enter a starting and ending time preference so that when you go to create a
leave request the starting and ending time that you have set as a preference will be automatically entered into the leave request when creating a new request.
1. Enter a starting time
2. Enter a ending time
3. Click Set Default Starting & Ending Time Preferences
CHANGE PASSWORD
This feature will allow
you to change your password once you are logged into Kiosk.
You must enter your old
password and then type the new one twice before clicking on ‘Change Password’.
Your password must be 8 characters in length.
Your district has the ability to configure that your password change in a certain number days. Your district may also require you to use at least one capital letter, number or
special character when creating your password. They will let you know of those requirements.
2/7/2011 Page 20 of 20
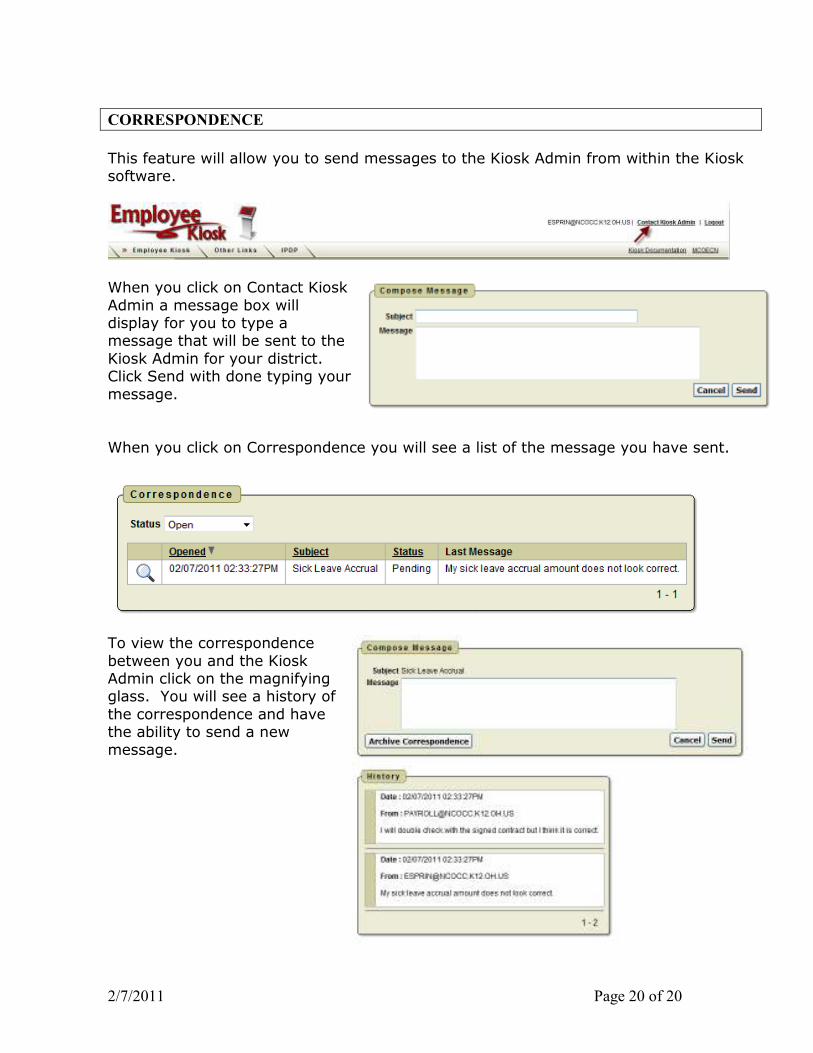
CORRESPONDENCE
This feature will allow you to send messages to the Kiosk Admin from within the Kiosk software.
When you click on Contact Kiosk
Admin a message box will display for you to type a message that will be sent to the
Kiosk Admin for your district. Click Send with done typing your
message.
When you click on Correspondence you will see a list of the message you have sent.
To view the correspondence
between you and the Kiosk Admin click on the magnifying glass. You will see a history of
the correspondence and have the ability to send a new
message.


