
S-6800TOUCHPAD DIGITAL
DOOR LOCK
USER MANUAL
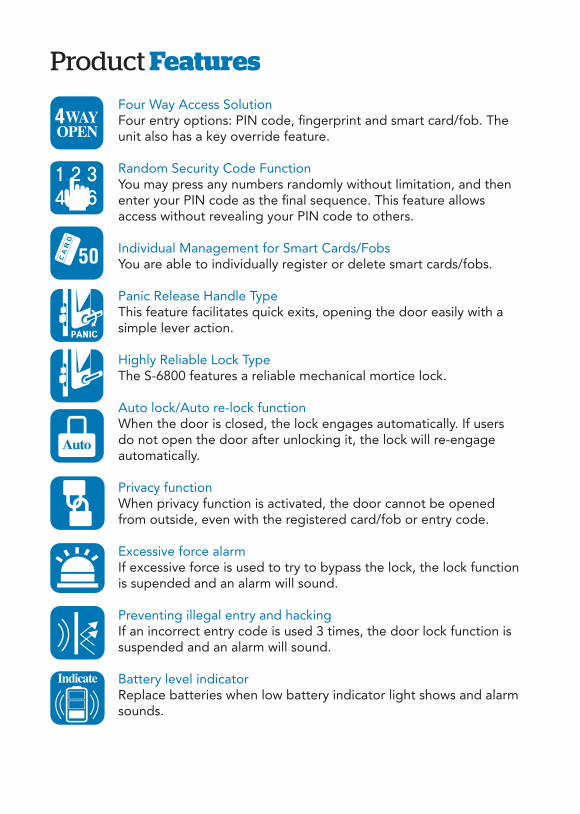
Four Way Access SolutionFour entry options: PIN code, fi ngerprint and smart card/fob. The unit also has a key override feature.
Random Security Code FunctionYou may press any numbers randomly without limitation, and then enter your PIN code as the fi nal sequence. This feature allows access without revealing your PIN code to others.
Individual Management for Smart Cards/FobsYou are able to individually register or delete smart cards/fobs.
Panic Release Handle TypeThis feature facilitates quick exits, opening the door easily with a simple lever action.
Highly Reliable Lock TypeThe S-6800 features a reliable mechanical mortice lock.
Auto lock/Auto re-lock function When the door is closed, the lock engages automatically. If users do not open the door after unlocking it, the lock will re-engage automatically.
Privacy function When privacy function is activated, the door cannot be opened from outside, even with the registered card/fob or entry code.
Excessive force alarmIf excessive force is used to try to bypass the lock, the lock function is supended and an alarm will sound.
Preventing illegal entry and hacking If an incorrect entry code is used 3 times, the door lock function is suspended and an alarm will sound.
Battery level indicator Replace batteries when low battery indicator light shows and alarm sounds.
Product Features
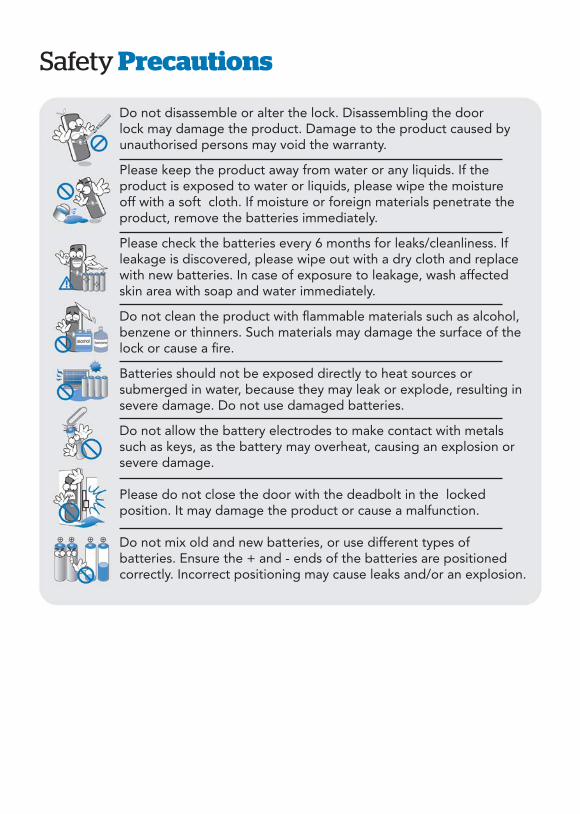
Safety Precautions
Do not disassemble or alter the lock. Disassembling the door lock may damage the product. Damage to the product caused by unauthorised persons may void the warranty. Please keep the product away from water or any liquids. If the product is exposed to water or liquids, please wipe the moisture off with a soft cloth. If moisture or foreign materials penetrate the product, remove the batteries immediately.
Please check the batteries every 6 months for leaks/cleanliness. If leakage is discovered, please wipe out with a dry cloth and replace with new batteries. In case of exposure to leakage, wash affected skin area with soap and water immediately. Do not clean the product with fl ammable materials such as alcohol, benzene or thinners. Such materials may damage the surface of the lock or cause a fi re.
Batteries should not be exposed directly to heat sources or submerged in water, because they may leak or explode, resulting in severe damage. Do not use damaged batteries.
Do not allow the battery electrodes to make contact with metals such as keys, as the battery may overheat, causing an explosion or severe damage.
Please do not close the door with the deadbolt in the locked position. It may damage the product or cause a malfunction.
Do not mix old and new batteries, or use different types of batteries. Ensure the + and - ends of the batteries are positioned correctly. Incorrect positioning may cause leaks and/or an explosion.
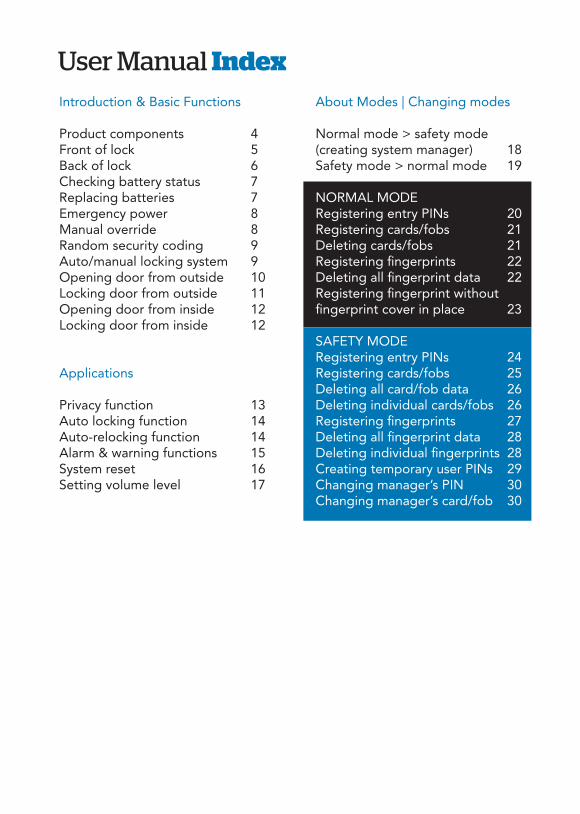
Introduction & Basic Functions
Product components 4Front of lock 5Back of lock 6Checking battery status 7Replacing batteries 7Emergency power 8Manual override 8Random security coding 9Auto/manual locking system 9Opening door from outside 10Locking door from outside 11Opening door from inside 12Locking door from inside 12
Applications
Privacy function 13Auto locking function 14Auto-relocking function 14Alarm & warning functions 15System reset 16Setting volume level 17
User Manual IndexAbout Modes | Changing modes Normal mode > safety mode (creating system manager) 18Safety mode > normal mode 19
NORMAL MODERegistering entry PINs 20Registering cards/fobs 21Deleting cards/fobs 21Registering fi ngerprints 22Deleting all fi ngerprint data 22Registering fi ngerprint without fi ngerprint cover in place 23
SAFETY MODERegistering entry PINs 24Registering cards/fobs 25Deleting all card/fob data 26Deleting individual cards/fobs 26Registering fi ngerprints 27Deleting all fi ngerprint data 28Deleting individual fi ngerprints 28Creating temporary user PINs 29Changing manager’s PIN 30Changing manager’s card/fob 30

4.
Product Components
Name Specifi cation/DetailFront assembly 76mm (W) x306mm (H) x28mm (D) Back assembly 71mm (W) x298.6mm (H) x30.7mm (D)Back cover 76mm (W) x303.6mm (H) x7.9mm (D)Mortice Lock 123mm (W) x 109.5mm (H) x 24.5mm (D)Strike plate 36mm (W) x 106mm (H) x 1.5mm (D)Strike housing 24mm (W) x 102mm (H) x 18mm (D)Card/fob 2x card, 2x fob, 2x patchKey 3xUser manual Includes warranty formInstallation template For door preparationBatteries 8 pieces (1.5v, AA, LR6 alkaline) Handle shaft (40-50mm thick door) 89(W) X 12(H) X 12(D)mm + stop-ringHandle shaft (50-90mm thick door) 126.9(W) X 12(H) X 12(D)mm + stop-ringScrews 5 x 30mm - 4 of each for back cover 5 x 24mm - 2 of each for inner lower part 5 x 8mm - 2 of each for inner upper part 3/16” x 1/2” - 4ea. for mortice and strike 4 x 19mm - 4ea. for front/back plate
1. 2. 4.3.
5.
6. 7. 8.
10.
9.
11.12.
14.13.
1.2.3.4.5.6.7.8.9.
10.11.12.13.14.
5.
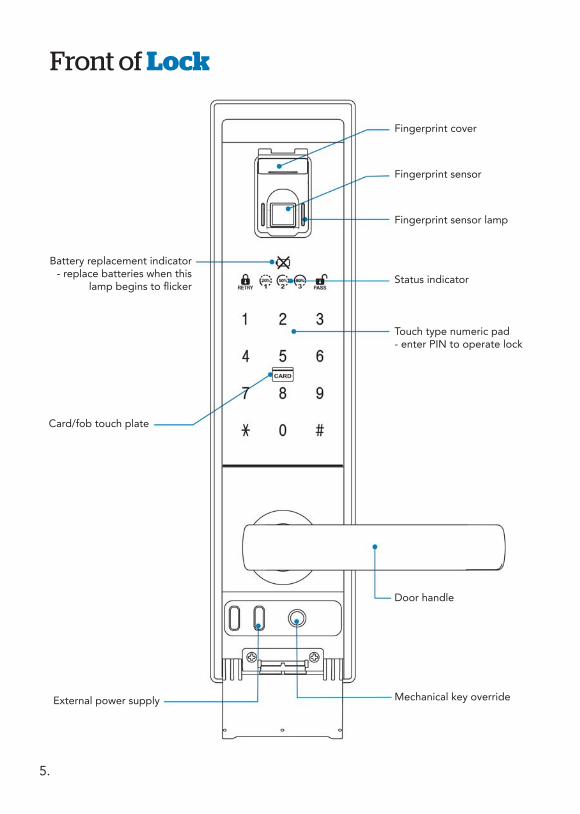
Front of Lock
Fingerprint cover
Fingerprint sensor
Fingerprint sensor lamp
Status indicator
Touch type numeric pad- enter PIN to operate lock
Door handle
Mechanical key override
Battery replacement indicator- replace batteries when this
lamp begins to fl icker
Card/fob touch plate
External power supply

6.
Back of Lock
Battery cover
10 key button- used to set normal mode- registration of PIN, card/fob, fi ngerprint
LED indicator (locking status)- fl ickering (locked correctly)- fl ickering with alarm sound (abnormal locking status)
Manual locking button- locks the door manually in manual locking mode
Fixing screwDoor handle- panic release type- can be used at any time
Privacy switch- to set privacy mode
Low voltage indicator- when the lamp fl ickersand alarm sounds batteries should be replaced
R/C button- used to set safety mode- registration of PIN, card/fob, fi ngerprint
Batteries- 8 pieces- 1.5v, AA, LR6 alkaline
7.
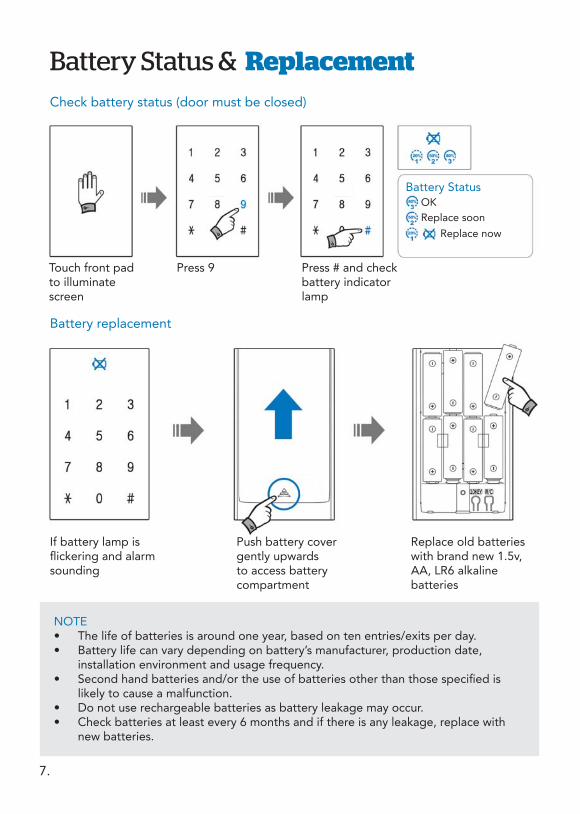
Battery Status & ReplacementCheck battery status (door must be closed)
Battery replacement
Battery Status OK Replace soon
Replace now
Touch front padto illuminate screen
Press 9 Press # and checkbattery indicator lamp
If battery lamp is fl ickering and alarm sounding
Push battery cover gently upwards to access battery compartment
Replace old batteries with brand new 1.5v, AA, LR6 alkaline batteries
NOTE• The life of batteries is around one year, based on ten entries/exits per day.• Battery life can vary depending on battery’s manufacturer, production date,
installation environment and usage frequency.• Second hand batteries and/or the use of batteries other than those specifi ed is
likely to cause a malfunction.• Do not use rechargeable batteries as battery leakage may occur.• Check batteries at least every 6 months and if there is any leakage, replace with
new batteries.

8.
Emergency Power & Manual OverrideHow to apply external power if batteries run out
How to use mechanical override key
When the batteries are entirely exhausted, a 9V battery can be used on the emergency power terminals to allow access. Once the door lock has been reactivated by the 9V battery, access can be gained via PIN, card/fob or fi ngerprint. The batteries in the back of the lock can then be replaced (see p.7).
Front pad will not illuminate when batteries are exhausted
Open cover directly beneath front door handle
Touch terminals with 9V battery (place + and - on either terminal)
Access via PIN, card/fob or fi ngerprint
Open cover directly beneath front door handle
Insert manual override key and rotate
Door handle can now be rotated for access
NOTE• Please keep manual override key in a safe, separate place for use in emergencies.
9.
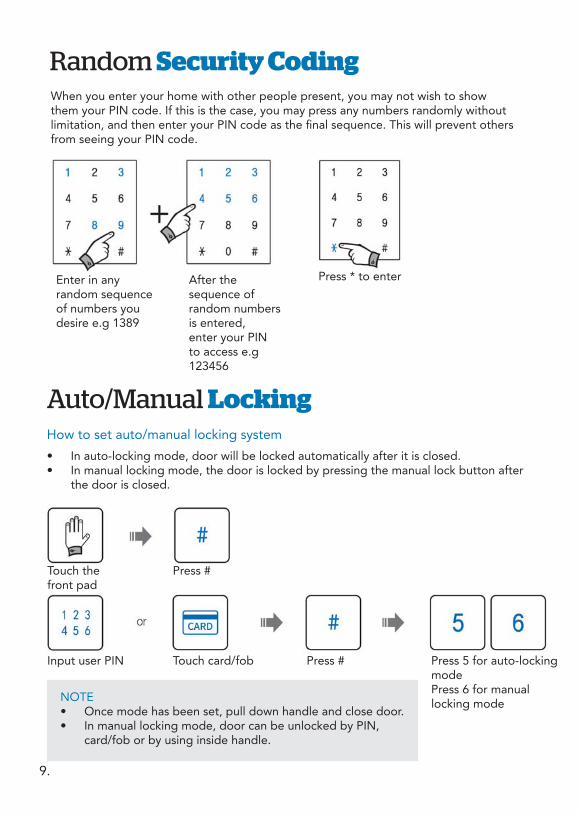
Random Security Coding
Enter in any random sequence of numbers you desire e.g 1389
After the sequence of random numbers is entered, enter your PIN to access e.g 123456
When you enter your home with other people present, you may not wish to show them your PIN code. If this is the case, you may press any numbers randomly without limitation, and then enter your PIN code as the fi nal sequence. This will prevent others from seeing your PIN code.
Press * to enter
Auto/Manual Locking How to set auto/manual locking system
• In auto-locking mode, door will be locked automatically after it is closed.• In manual locking mode, the door is locked by pressing the manual lock button after
the door is closed.
Touch the front pad
Press #
Input user PIN Touch card/fob Press # Press 5 for auto-locking modePress 6 for manual locking modeNOTE
• Once mode has been set, pull down handle and close door. • In manual locking mode, door can be unlocked by PIN,
card/fob or by using inside handle.

10.
Opening the Door From the OutsideOpening the door using a PIN
NOTE• Mute mode is sustained for 10 seconds.• If the door handle is not used after applying one of the entry methods listed
above, the unit will emit a sound and automatically re-lock after 7 seconds. This feature cannot be de-activated.
Touch the front pad
Enter PIN code e.g. 123456
Press * Pull down the handle and open
Opening the door using card/fob
1. Touch the registered card/fob to contact point in centre of keypad
2. Pull down the handle and open the door
Opening the door using the fi ngerprint
1. Open the fi ngerprint cover and place your fi nger on the sensor (fi ngerprint must be registered fi rst see p.22)2. Pull down the handle and open the door
Open the door with the sound muted
Press the front pad with fi nger tip for 3 seconds
The keypad will illuminate
Enter PIN code e.g. 123456. Card/fob or fi ngerprint can also be used
Press * and the door will unlock. Pull down the handle and open the door
11.
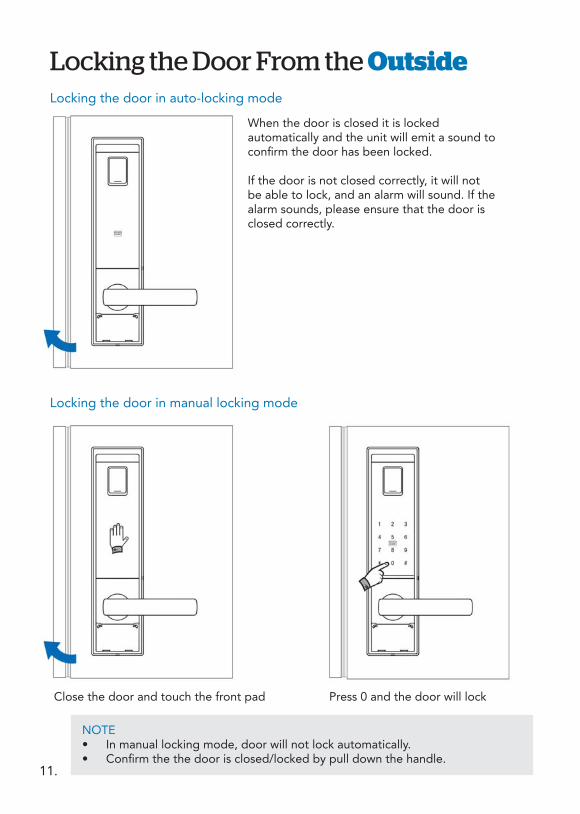
Locking the Door From the OutsideLocking the door in auto-locking mode
When the door is closed it is locked automatically and the unit will emit a sound to confi rm the door has been locked.
If the door is not closed correctly, it will not be able to lock, and an alarm will sound. If the alarm sounds, please ensure that the door is closed correctly.
Locking the door in manual locking mode
Close the door and touch the front pad Press 0 and the door will lock
NOTE• In manual locking mode, door will not lock automatically.• Confi rm the the door is closed/locked by pull down the handle.

12.
Opening/Locking Door From the InsideOpening the door from the inside
Panic Release Feature
The door can be opened from the inside at any time by simply pulling down the handle.
This feature allows easy escape in case of an emergency.
Locking the door from the inside
Auto-locking mode Manual locking modeWhen the door is closed, the door will lock and the unit will emit a sound
After closing the door, press manual lock button and the door will lock. The lock will emit a sound
Flickering blue lamp shows lock is activated
Flickering blue lamp shows lock is activated
NOTE• Before closing the door, make sure that the deadbolt is not extended.• If the door is not closed/locked correctly, a warning sound will be emitted.

13.
Privacy FunctionActivating privacy mode so lock cannot be unlocked from the outside
NOTE• Privacy mode can only be activated when the door is locked.• Even in privacy mode the door handle is still able to be used from the inside.
When the door handle is used from the inside, privacy mode is deactivated.• The lock can be unlocked from the outside with the mechanical key, even when
privacy mode is on.
Privacy mode ON Privacy mode OFFDoor cannot be unlocked from the outside
Normal operation. Door can be unlocked from the outside
Red Green
14.
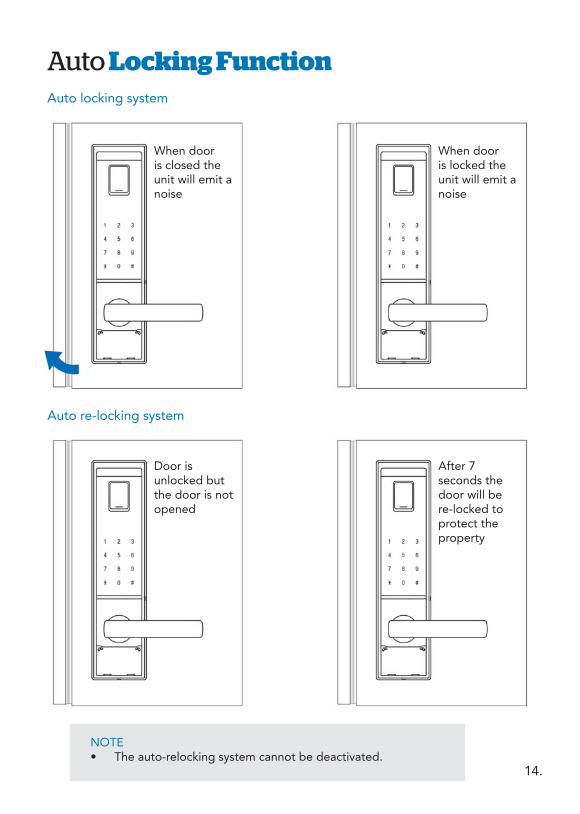
Auto Locking FunctionAuto locking system
When door is closed the unit will emit a noise
When door is locked the unit will emit a noise
Auto re-locking system
Door is unlocked but the door is not opened
After 7 seconds the door will be re-locked to protect the property
NOTE• The auto-relocking system cannot be deactivated.

15.NOTE Manual lock button will stop the alarm sounding.
Alarm & Warning FunctionsPreventing illegal entry and hacking
The unit will emit a strong alarm sound for three minutes in the following situations:
3 incorrect PIN entries
3 unregisteredcard/fob swipes
5 unregisteredfi ngerprint applications
10 fi ngerprint cover movements
Alarm will cease to sound after three minutes
Preventing forced entry
If an attempt is made to force the door or lock open, the unit will emit a strong alarm sound for three minutes. Follow the instructions below to stop the alarm sounding:
1. Touch card/fob
2. Apply fi ngerprint
3. Enter PIN
Press * Enter PIN code e.g. 123456
Press *
NOTE Fingerprint(s) must be registered for fi ngerprint alarms to sound.

16.
System ResetThe unit can be reset to its factory settings by following these steps
Open battery cover
Remove batteries 1 and 2
Press open button to remove remaining charge
While holding down both the 10KEY and R/C buttons, insert battery 1,followed by battery 2
Input manager code e.g. 456789, or touch manager card
Press #
Factory settingsManager code DeletedManager card/fob DeletedPIN codes DeletedCards/fobs DeletedFingerprints DeletedSound volume 7Auto/manual locking ManualSuspend code/card/fi ngerprint Released
NOTETo reset the system, the unit must be in safety mode (see p.18).

17.
Setting VolumeHow to control volume level
There are eight sound volume levels to choose from, ranging from mute to maximum
Touch the front pad
Press #
Input user PIN Touch card/fob Press # Press 2 - Volume downPress 3 - Volume upPress 1 - Max. volumePress 0 - Mute
NOTE• In mute status, keypad lamp will fl icker when PIN is entered. • Once volume has been set, pull down handle and close the
door.
18.
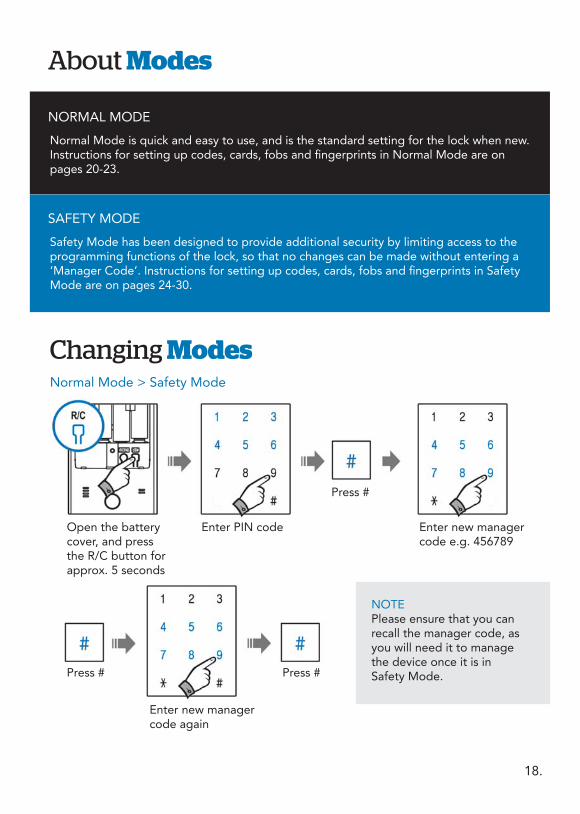
Changing ModesNormal Mode > Safety Mode
Open the battery cover, and press the R/C button for approx. 5 seconds
Enter PIN code
Press #
Enter new managercode e.g. 456789
Press # Press #
Enter new managercode again
About Modes
NORMAL MODE
SAFETY MODE
Normal Mode is quick and easy to use, and is the standard setting for the lock when new.Instructions for setting up codes, cards, fobs and fi ngerprints in Normal Mode are on pages 20-23.
Safety Mode has been designed to provide additional security by limiting access to the programming functions of the lock, so that no changes can be made without entering a ‘Manager Code’. Instructions for setting up codes, cards, fobs and fi ngerprints in Safety Mode are on pages 24-30.
NOTEPlease ensure that you can recall the manager code, as you will need it to manage the device once it is in Safety Mode.

19.
NOTE• Manager code and manager card should be controlled by authorised persons only
for security reasons.• Existing PIN, card/fob and fi ngerprint data is deleted automatically after
registration of new manager code.• Only one manager code can be registered, using 6 - 12 digits.• After the manager code which was used in safety mode is entered and # is
pressed, all existing PIN code/card/fi ngerprint data will be deleted. The newly registered code is for use in normal mode.
• To register multiple codes, input new user codes and press * successively. • Make mode changes and the set-up of new codes when the door is open to
prevent unintentional locking.• After changing an entry code, verify it by unlocking the door with the new entry
code.
Safety Mode > Normal Mode
Open the battery cover, and press the 10KEY button for approx. 5 seconds
Enter managercode
Press #
Enter new PINcode
Press # Press #
Enter new PINcode again

20.
Registering Entry PINsRegistering entry PINs in normal mode
Open battery cover and press 10KEY
Enter new entry PIN e.g. 123456
Press * button - Unit will emit sound to confi rm PIN has been set
NOTE• Factory setting PIN code in normal mode is 123456.• A maximum of 10 PIN codes can be registered with 6 to 12 digits each. • Previous PIN code(s) are deleted automatically with registration of new PIN
code(s)• Set-up or delete new PIN codes when the door is open to prevent
unintentional locking.• After changing a PIN code or entering a new PIN code, verify it by unlocking
the door with the new PIN code.
OPTIONALAdd additional PIN codes if required (one at a time)
Press * to add another PIN, or press * twice to exit programming
NO
RM
AL
MO
DE

21.
Registering and Deleting Cards & FobsHow to register cards and fobs in normal mode
Open battery cover and press 10KEY
Touch the cards/fobs one by one.A maximum of 50 can be registered
Press * button to complete registration
How to delete cards and fobs in normal mode
Open battery cover and press 10KEY
Press # Enter registered entry PIN e.g. 123456
Press #
Press 5 Press #
Unit will emit sound to confi rm deletion
NOTE• Previous card/fob memory is deleted automatically after registration of new
card(s)/fobs(s). • Max. 50 cards/fobs can be registered. • For higher security, please use cards/fobs which are supplied by Schlage.
NO
RM
AL M
OD
E

22.
Registering and Deleting FingerprintsRegistering fi ngerprints in normal mode
Open battery cover and press 10KEY
Touch your fi nger on sensor (LED will illuminate)
First LED scan (unit will emit one sound)
Touch your fi nger on sensor again
Second LED scan (unit will emit one sound)
Touch your fi nger on sensor again
Third LED scan (unit will emit one sound)
Unit will emit two sounds to indicate registration is complete
Press *
Deleting all fi ngerprint data in normal mode
Open battery cover and press 10KEY
Press # Enter registered entry PIN e.g. 123456
Press #
Press #Press 6 Unit will emit sound to indicate deletion complete
NO
RM
AL
MO
DE

23.
NOTE• Max. 100 fi ngerprints can be registered. • Previous fi ngerprint data is not deleted when new fi ngerprint is registered.
Registering and Deleting FingerprintsRegistering fi ngerprints without the fi ngerprint cover in place
Open battery cover and press 10KEY
Press 3 Press #
First LED scan (unit will emit one sound)
Touch your fi nger on sensor (LED will illuminate)
Touch your fi nger on sensor again
Second LED scan (unit will emit one sound)
Touch your fi nger on sensor again
Third LED scan (unit will emit one sound)
Unit will emit two sounds to indicate registration is complete
NO
RM
AL M
OD
E
24.
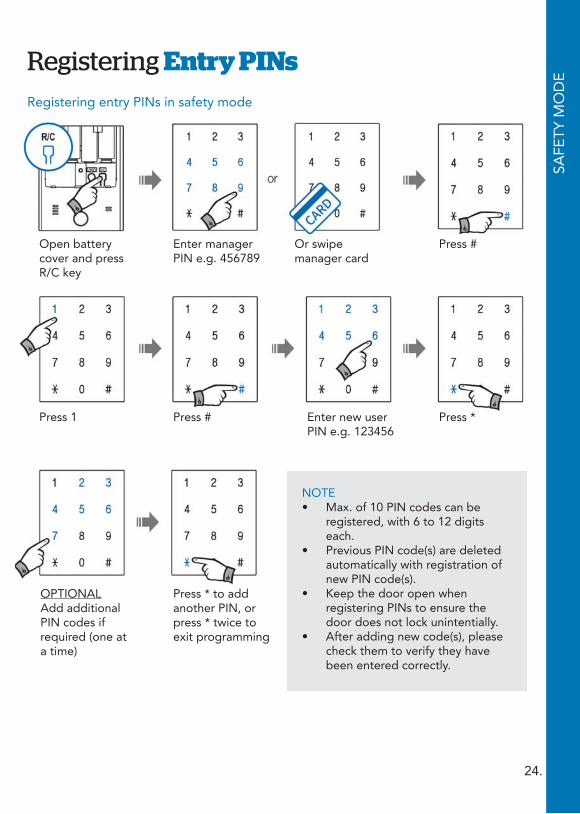
Registering Entry PINsRegistering entry PINs in safety mode
Open battery cover and press R/C key
Enter manager PIN e.g. 456789
Or swipe manager card
Press #
Press 1 Press # Enter new user PIN e.g. 123456
Press *
OPTIONALAdd additional PIN codes if required (one at a time)
Press * to add another PIN, or press * twice to exit programming
NOTE• Max. of 10 PIN codes can be
registered, with 6 to 12 digits each.
• Previous PIN code(s) are deleted automatically with registration of new PIN code(s).
• Keep the door open when registering PINs to ensure the door does not lock unintentially.
• After adding new code(s), please check them to verify they have been entered correctly.
SAFE
TY M
OD
E

25.
NOTEThe registration number(s) should be two digits between 01 and 50.
Registering Cards & FobsRegistering cards and fobs in safety mode
Open battery cover and press R/C key
Enter manager PIN e.g. 456789
Or swipe manager card
Press # Press 2
Press # Enter card registration number
2 digits
Press # Touch the card/fob
Repeat previous three steps to enter multiple cards/fobs
Press * to complete registration process. Unit will emit sound uponregistration
SAFE
TY M
OD
E

26.
Deleting Cards & FobsDeleting ALL card and fob data in safety mode
Open battery cover and press R/C key
Enter manager PIN e.g. 456789
Or swipe manager card
Press #
Press 5 Press #
Open battery cover and press R/C key
Enter manager PIN e.g. 456789
Or swipe manager card
Press # Press 8
Press #
Select 2 digit card registration number
Press # Press * to complete deletion. Unit will emit sound
Deleting individual card and fob data in safety mode
NOTEWarning will sound if no card data exists for a registration number.
SAFE
TY M
OD
E

27.
NOTE• The registration number(s) should be three
digits between 001 and 100.• Warning will sound if the number is not
three digits.
Registering Fingerprints Registering fi ngerprints in safety mode
Open battery cover and press R/C key
Enter manager PIN e.g. 456789
Or swipe manager card
Press # Press 3
Press # Select 3 digit card registration number
Press # First LED scan (unit will emit one sound)
Touch your fi nger on sensor (LED will illuminate)
Second LED scan (unit will emit one sound)
Touch your fi nger on sensor (LED will illuminate)
Third LED scan (unit will emit one sound)
Touch your fi nger on sensor (LED will illuminate)
Unit will emit two sounds to confi rm registration. Repeat from the blue box step to add more fi ngerprints
Press * twice to exit programming
SAFE
TY M
OD
E
28.
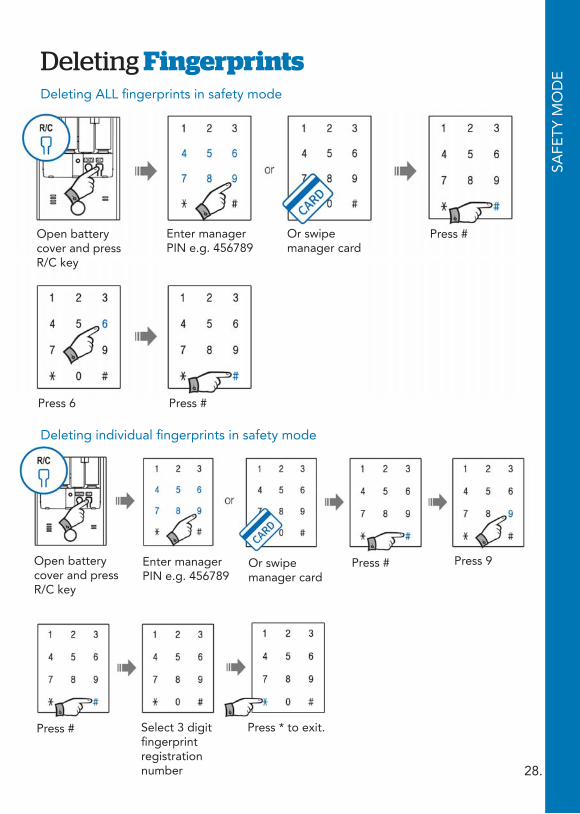
Deleting FingerprintsDeleting ALL fi ngerprints in safety mode
Open battery cover and press R/C key
Enter manager PIN e.g. 456789
Or swipe manager card
Press #
Press 6 Press #
Open battery cover and press R/C key
Enter manager PIN e.g. 456789
Or swipe manager card
Press # Press 9
Press # Press * to exit.
Deleting individual fi ngerprints in safety mode
Select 3 digit fi ngerprintregistration number
SAFE
TY M
OD
E

29.
Creating Temporary User PINs Registering temporary user PINs in safety mode
NOTE• Temporary PIN will be deleted after one use.• Temporary PIN can only be used in safety mode.• Only one temporary PIN can be registered.
Touch the front pad
Press # Enter manager PIN e.g. 456789
Or swipe manager card
Press #
Press 9 Enter temporary PIN e.g. 123456(6 - 12 digits)
Press # Enter temporary PIN e.g. 123456(6 - 12 digits)
Press #
SAFE
TY M
OD
E

30.
Changing Manager PIN or Card/FobChanging manager PIN code in safety mode (Note: see page 18 to change from normal mode to safety mode)
Open battery cover and press R/C key
Enter manager PIN e.g. 456789
Press *
Press #
Re-enter new PIN
Press #
Open battery cover and press R/C key
Press # Press # Press 1
Press #
Changing manager card/fob in safety mode
Touch new manager card or fob. Previous manager card/fob will be deleted
Press # Press 0
Enter new manager PIN e.g. 567890
Press # Press #
Enter manager PIN e.g. 456789
Maximum of 3 cards can be registered
Press * to exit programming
NOTE Only one manager PIN code can be registered
NOTE Changing manager card/fob deletes all existing manager card(s)/fob(s)
SAFE
TY M
OD
E

Allegion (Australia) Pty LtdPhone 1800 098 094www.allegion.com.au
Allegion (New Zealand) LimitedPhone 0800 477 869www.allegion.co.nz
Allegion South East AsiaPhone +65 6488 2562www.allegion.com
S-6800 USER MANUAL 03/17


