
���������
���� �������
��������� ������ ������������
����������������� ����� ! �""

© Siemens AG 2011
Safety Guidelines: Warning notices must be observed to ensure personal safety as well as that of others, and to protect the product and the connected equipment. These warning notices are accompanied by a clarification of the level of caution to be observed.
Qualified Personnel: This device/system may only be set up and operated in conjunction with this manual. Qualified personnel are only authorized to install and operate this equipment in accordance with established safety practices and standards.
Unit Repair and Excluded Liability:
• The user is responsible for all changes and repairs made to the device by the user or the user’s agent.
• All new components are to be provided by Siemens Milltronics Process Instruments. • Restrict repair to faulty components only. • Do not reuse faulty components.
Warning: Cardboard shipping package provides limited humidity and moisture protection. This product can only function properly and safely if it is correctly transported, stored, installed, set up, operated, and maintained. This product is intended for use in industrial areas. Operation of this equipment in a residential area may cause interference to several frequency based communications.
Note: Always use product in accordance with specifications.
Copyright Siemens AG 2011. All Rights Reserved
Disclaimer of Liability
This document is available in bound version and in electronic version. We encourage users to purchase authorized bound manuals, or to view electronic versions as designed and authored by Siemens Milltronics Process Instruments. Siemens Milltronics Process Instruments will not be responsible for the contents of partial or whole reproductions of either bound or electronic versions.
While we have verified the contents of this manual for agreement with the instrumentation described, variations remain possible. Thus we cannot guarantee full agreement. The contents of this manual are regularly reviewed and corrections are included in subsequent editions. We welcome all suggestions for improvement.
Technical data subject to change. MILLTRONICS®is a registered trademark of Siemens Milltronics Process Instruments. Contact SMPI Technical Publications European Authorized Representative at the following address: Technical Publications Siemens AG Siemens AG Industry Sector Siemens Milltronics Process Instruments 76181 Karlsruhe 1954 Technology Drive, P.O. Box 4225 Deutschland Peterborough, Ontario, Canada, K9J 7B1 Email: [email protected] • For a selection of Siemens Milltronics level measurement manuals, go to:
www. siemens.com/processautomation. Under Process Instrumentation, select Level Measurement and then go to the manual archive listed under the product family.
• For a selection of Siemens Milltronics weighing manuals, go to: www. siemens.com/processautomation. Under Weighing Technology, select Continuous Weighing Systems and then go to the manual archive listed under the product family.

mm
mm
m
Table of Contents
Table of Contents
Safety Notes............................................................................................................................................1The Manual .............................................................................................................................................1Technical Support..................................................................................................................................2
SmartLinx PROFIBUS DP ..................................................................................................3
Specifications .....................................................................................................................4
Installation...........................................................................................................................5Compatibility............................................................................................................................................5
Software Compatibility................................................................................................................5Hardware Compatibility ..............................................................................................................6
Cable Connector.....................................................................................................................................8Termination Switch .............................................................................................................................10
Operation ...........................................................................................................................11Error Status LEDs.................................................................................................................................11
Error Conditions of the Red Diagnostics Light ....................................................................12Operation LED.......................................................................................................................................12
Communication Setup .....................................................................................................13GSD Files................................................................................................................................................13Baud Rate ..............................................................................................................................................13Bus Address..........................................................................................................................................13Configuring the Slave Device............................................................................................................14Map Element Selection ......................................................................................................................15
P762 Map Element Selection parameter..............................................................................15Module Identification ..........................................................................................................................17
P794 SmartLinx Module Type..................................................................................................17P795 SmartLinx Protocol ..........................................................................................................17
P634: Communication Totalizer Resolution....................................................................................18
Application Layer .............................................................................................................19Parameter Indexes ..............................................................................................................................19
Primary Index ..............................................................................................................................19Secondary Index ........................................................................................................................20
Data Access Methods ........................................................................................................................20Direct Access..............................................................................................................................20Multiple Parameter Access (MPA) .......................................................................................21Single Parameter Access (SPA).............................................................................................22
Data Map: Level Products .................................................................................................................24Write Block ..................................................................................................................................24Read Block...................................................................................................................................27
Data Map: Mass Dynamic Products ...............................................................................................30Write Block ..................................................................................................................................30Read Block...................................................................................................................................34
i

mm
mm
m
Tabl
e of
Con
tent
s
Data Types.............................................................................................................................................40Integer...........................................................................................................................................40Bit Values .....................................................................................................................................40Unsigned Double Precision Integer (UINT32) .....................................................................41Split Values ..................................................................................................................................41Text Messages ...........................................................................................................................42Relay Function Codes (P111 in Level Products Only) .......................................................43
Troubleshooting ...............................................................................................................45Generally ................................................................................................................................................45Technical Support or Product Feedback........................................................................................45
Appendix A – Reducing the amount of data being transferred over the Bus .......46Level Products ......................................................................................................................................46
Write Block ..................................................................................................................................47Read Block...................................................................................................................................49
Mass Dynamics Products..................................................................................................................51Write Block ..................................................................................................................................52Read Block...................................................................................................................................54
Index .................................................................................................................................. 57
ii

mm
mm
m
SmartLinx PRO
FIBU
S DP
Safety NotesSpecial attention must be paid to warnings and notes highlighted from the rest of the text by grey boxes.
The Manual
This manual will help you install and connect a Siemens Milltronics SmartLinx PROFIBUS DP module, and set it up for communication with a master device on a PROFIBUS DP network. The manual is targeted at a technical audience in the industrial communications field with a sound working knowledge of PROFIBUS DP.
We always welcome questions, comments, or suggestions about manual content, design, and accessibility.
Please direct your questions or comments to [email protected]. For the complete library of Siemens Milltronics manuals, go to www.siemens.com/processautomation.
WARNING: relates to a caution symbol on the product, and means that failure to observe the necessary precautions can result in death, serious injury, and/or considerable material damage.
WARNING: means that failure to observe the necessary precautions can result in death, serious injury, and/or considerable material damage.
CAUTION: means that failure to observe the necessary precautions can result in considerable material damage.
Note: means important information about the product or that part of the operating manual.
Note:• Please follow the installation and operating procedures for a quick, trouble-free
installation and to ensure the maximum accuracy and reliability of your Siemens Milltronics SmartLinx PROFIBUS DP module.
• This manual applies to the SmartLinx PROFIBUS DP module only.
7ML19981AQ03 SmartLinx PROFIBUS DP – INSTRUCTION MANUAL Page 1

mm
mm
m
Smar
ttLin
x PR
OFI
BU
S D
P
Technical SupportSupport is available 24 hours a day.To find your local Siemens Automation Office address, phone number and fax number go to:
www.siemens.com/automation/partner
• Click on the tab Contacts by Product then drill down to find your product group (+Process Automation > +Process Instrumentation > +Level Measuring Instruments).
• Select the team Technical Support. Click on Next.• Click on the appropriate continent, then select the country followed by the city.
Click on Next.
For on-line technical support go to:
www.siemens.com/automation/support-request
• Enter the device name or order number, then click on Search, and select the appropriate product type. Click on Next.
• You will be prompted to enter a keyword describing your issue. Then either browse the relevant documentation, or click on Next to email a detailed description of your issue to Siemens Technical Support staff.
Siemens IA/DT Technical Support Center: phone +49 (0)911 895 7222
Page 2 SmartLinx PROFIBUS DP – INSTRUCTION MANUAL 7ML19981AQ03

mm
mm
m
SmartLinx PRO
FIBU
S DP
7ML19981AQ3.3.fm Page 3 Monday, February 7, 2011 9:05 AM
SmartLinx PROFIBUS DP
The Siemens Milltronics SmartLinx1 PROFIBUS DP module is a plug-in communications card designed to interface a Siemens Milltronics SmartLinx-compatible instrument to a PROFIBUS DP network.
Only those instruments which support the PROFIBUS DP protocol can use this card. See Compatible Instruments: on page 4 for a list of SmartLinx-compatible Siemens Milltronics instruments.
PROFIBUS is an open standard controlled by PROFIBUS industry groups worldwide. More information is available on the web site at www.profibus.com.
Note: This product is intended for use in industrial areas. Operation of this equipment in a residential area may cause interference to several frequency based communications.
1. SmartLinx® is a registered trademark of Siemens Milltronics Process Instruments Inc.
Note: Siemens Milltronics does not own the PROFIBUS DP protocol. All information regarding that protocol is subject to change without notice.
ENTERC LEARRESETTOTAL
A LTDI SP
RUN PAR ZER O SPA N
M
A
m A5
9
C
P P
6
0
7 8
1 2 3 4
SIMATIC
CPU 314
3 1 4 - 1 AE 0 0 -OA B O 3 21 - 1 BH0 0- OAAO 3 2 1 - 1BH 00 - OAAO 3 2 2 - 1HE00 - OAAO
S7 - 300
2 4 5 6
X 2
MC
951
/16
KB
43
X 243
X 243
X 243
X 243
6ES
7 9
51-
OFD
OO
-OA
AO
RUN-PRUN
STOPMRES
SFBAFDC 5VFRCERUNSTOP
PLC master
PROFIBUS DP at 9.6 Kbaud to 12 Mbaud
Siemens Milltronics instrument
monitored process
7ML19981AQ03 SmartLinx PROFIBUS DP – INSTRUCTION MANUAL Page 3

mm
mm
m
Spec
ifica
tions
Specifications
Application:• compatible with a master device on a PROFIBUS bus
Compatible Instruments:• AiRanger XPL Plus / SITRANS LU 10• AiRanger DPL Plus / SITRANS LU 02• AiRanger SPL / SITRANS LU 01• CraneRanger• InterRanger DPS 300• EnviroRanger ERS 500• Milltronics BW500• Milltronics BW500/L• Milltronics SF500• MultiRanger 100/200• HydroRanger 200
Communication Settings:• baud rate: 9.6 Kbaud to 12 Mbaud, automatically detected
Connection:
• varies by Siemens Milltronics SmartLinx® instrument, (see page 8)
Termination:• switch selectable, open or special active termination as per PROFIBUS specification
(see Termination Switch on page 10)
Cable:• Belden PROFIBUS cable 3079A, or equivalent
Page 4 SmartLinx PROFIBUS DP – INSTRUCTION MANUAL 7ML19981AQ03

mm
mm
m
Installation
7ML19981AQ3.3.fm Page 5 Friday, February 4, 2011 11:51 AM
Installation
The SmartLinx module is either shipped already installed in the Siemens Milltronics instrument or separately for on-site installation. Refer to the manual of your Siemens Milltronics instrument for details on module location and physical installation.
CompatibilityFor the SmartLinx PROFIBUS card there are different hardware and software configurations available depending on the equipment used.
Software CompatibilityIf a device is SmartLinx ready, it will work with the correct SmartLinx card for that device. However, if the firmware version is a lower number than the one listed below, the Map Element Selection Parameter (P762) will not be available. Also, for the BW500, BW500/L, and SF500, the read block will be a smaller size.
RetrofitsIf you are replacing an older SmartLinx device with a new SmartLinx device, and you are using any product other than the BW500, BW500/L, or SF500, then you can use the default values for P762.
If you are replacing a BW500, BW500/L, or SF500 with a new device, then set P762 primary index 15 = 0, and P762 primary index 16 = 0.
Product Software Rev. Product Software Rev.AiRanger XPL Plus / SITRANS LU 10
5.23
Milltronics BW500/L 3.13
AiRanger DPL Plus / SITRANS LU 02
Milltronics BW5003.05
Milltronics SF500AiRanger SPL / SITRANS LU 01
MultiRanger 100 1.04
InterRanger DPS 300MultiRanger 200
1.03HydroRanger 200
EnviroRanger ERS 500 5.06
7ML19981AQ03 SmartLinx PROFIBUS DP – INSTRUCTION MANUAL Page 5

mm
mm
m
Inst
alla
tion
Hardware CompatibilityAll available SmartLinx card configurations are shown here for reference.
The card shown below is compatible with the following Siemens Milltronics units:
• AiRanger XPL Plus / SITRANS LU 10• AiRanger DPL Plus / SITRANS LU 02• AiRanger SPL / SITRANS LU 01• CraneRanger• InterRanger DPS 300
terminal block, removable
mounting hole
address switches
status LEDs
module connector (underside, 32-pin) to Siemens Milltronics host
mounting hole
termination switch
Page 6 SmartLinx PROFIBUS DP – INSTRUCTION MANUAL 7ML19981AQ03

mm
mm
m
Installation
The card shown below is compatible with the following Siemens Milltronics units:
Note: • Install the SmartLinx card so that the mounting holes align and the pin connectors
will mate correctly.• Correct cable routing is important for electromagnetic noise suppression. Follow
the routing instructions contained your unit’s instruction manual.
• EnviroRanger ERS 500 (Wall Mount)
• Milltronics BW500• Milltronics BW500/L
• Milltronics SF500• MultiRanger 100/200• HydroRanger 200
address switches
mounting hole
status LEDs
operation LED
termination switch
mounting holemodule connector (underside, 34-pin) to Siemens Milltronics host
terminal block, removable
7ML19981AQ03 SmartLinx PROFIBUS DP – INSTRUCTION MANUAL Page 7

mm
mm
m
Inst
alla
tion
The card shown below is compatible with EnviroRanger ERS 500 (Rack or Panel Mount)
Cable ConnectorConnect using Belden PROFIBUS cable 3079A or equivalent and terminate according to PROFIBUS DP specification and conventions.
AiRanger / SITRANS LU Series, CraneRanger, InterRanger DPS 300
Note: To daisy-chain devices, connect both the outgoing and the incoming wires to terminals 3 and 4. Then if you have to remove the connector, the bus will still be active.
mounting hole
status LEDstermination switch
module connector (underside, 10-pin)
module connector (underside, 34-pin) to Siemens Milltronics host
address switches
mounting hole operation LED
bus
grou
nd (G
ND)
A-lin
e
B-lin
e
A-lin
e
B-lin
e
bus
shie
ld
bus
cabl
e sh
ield
bus
+5V
(Vcc
)
Page 8 SmartLinx PROFIBUS DP – INSTRUCTION MANUAL 7ML19981AQ03
mm
mm
m
Installation
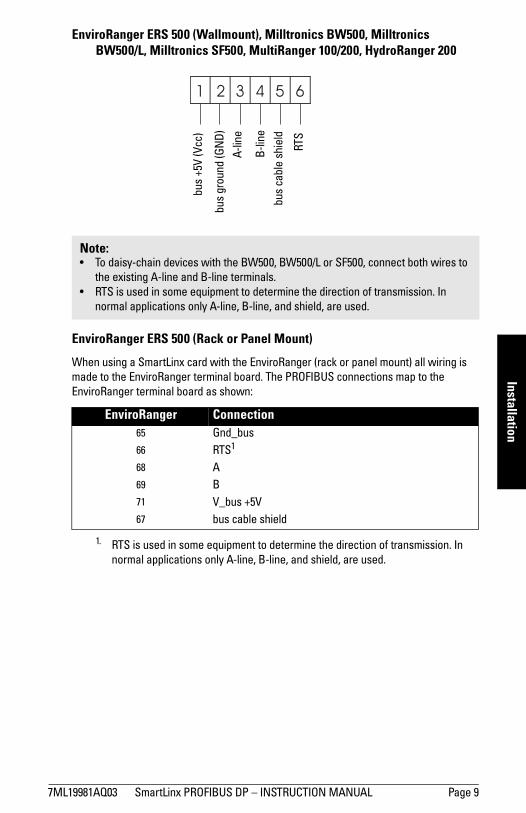
EnviroRanger ERS 500 (Wallmount), Milltronics BW500, Milltronics BW500/L, Milltronics SF500, MultiRanger 100/200, HydroRanger 200
EnviroRanger ERS 500 (Rack or Panel Mount)
When using a SmartLinx card with the EnviroRanger (rack or panel mount) all wiring is made to the EnviroRanger terminal board. The PROFIBUS connections map to the EnviroRanger terminal board as shown:
Note: • To daisy-chain devices with the BW500, BW500/L or SF500, connect both wires to
the existing A-line and B-line terminals.• RTS is used in some equipment to determine the direction of transmission. In
normal applications only A-line, B-line, and shield, are used.
EnviroRanger Connection65 Gnd_bus66 RTS1
1. RTS is used in some equipment to determine the direction of transmission. In normal applications only A-line, B-line, and shield, are used.
68 A69 B71 V_bus +5V67 bus cable shield
bus
cabl
e sh
ield
bus
grou
nd (G
ND)
A-lin
e
bus
+5V
(Vcc
)
B-lin
e
RTS
7ML19981AQ03 SmartLinx PROFIBUS DP – INSTRUCTION MANUAL Page 9

mm
mm
m
Inst
alla
tion
Termination Switch1
PROFIBUS DP requires termination of the bus at both end points. See the PROFIBUS DP specifications for details.
Termination Setting Switch Position
open (not used) off
390Ω
220Ω
390Ω
on
1. The termination switch is not present on all cards.
GND
+5V
Line A
Line
Page 10 SmartLinx PROFIBUS DP – INSTRUCTION MANUAL 7ML19981AQ03

mm
mm
m
Operation
Operation
Communication on the PROFIBUS DP link is indicated by the SmartLinx LEDs.
Error Status LEDsAiRanger / SITRANS LU Series, CraneRanger, InterRanger DPS 300
EnviroRanger ERS 500, Milltronics BW500, Milltronics BW500/L, Milltronics SF500, MultiRanger 100/ 200, HydroRanger 200
Green LEDON module is operational
Amber LEDON data is being exchangedOFF data is not being exchanged
Red LEDON no communication between bus and module / Bus errorOFF normal operation
Not used OnlineGreen module is online
DiagnosticsOff: Module is ok
Red(blinking):
Module is in an error state. See the error descriptions (page 12) and use the master to solve the problem.
OfflineRed Module is offline and
no communication is possible.
7ML19981AQ03 SmartLinx PROFIBUS DP – INSTRUCTION MANUAL Page 11

mm
mm
m
Ope
ratio
n
Error Conditions of the Red Diagnostics Light
1Hz – Error in Configuration
Indicates that the I/O length variable set during initialization is not equal to the length set during configuration of the network. See Configuring the Slave Device on page 14 for lengths supported by the SmartLinx module, and see your PLC documentation for setting the I/O length variable.
2Hz – Error in User Parameter Data
Indicates that the length and / or contents of the user parameter data set during initialization of the module is greater than the length and/or contents set during configuration of the network. See Configuring the Slave Device on page 14 for supported lengths.
4Hz – Error in Initialization
Consult your Siemens Milltronics representative.
Operation LEDEnviroRanger ERS 500, Milltronics BW500, Milltronics BW500/L, Milltronics
SF500, MultiRanger 100/200, HydroRanger 200
LED• blinks orange as the module is initialized• blinks green during normal operation
Page 12 SmartLinx PROFIBUS DP – INSTRUCTION MANUAL 7ML19981AQ03

mm
mm
m
Comm
unications Setup
Communication Setup
The SmartLinx PROFIBUS DP module is a slave on the bus, and does not use any Siemens Milltronics instrument parameters for configuration. Set the rotary switches on the module to the desired slave address: other settings are provided in the GSD file or are automatically detected.
GSD FilesPROFIBUS master devices require a configuration file for each slave device on the network. This file configures the master for the capabilities and limitations of the slave. For the SmartLinx PROFIBUS DP module these files are:
• AiRanger / SITRANS LU Series hms_1002.gsd
• BW500, BW500/L, SF500, hms1003.gsdHydroRanger 200,MultiRanger 100/200, and ERS 500
Both files are supplied on the floppy disk that is shipped with the module.
The file hms_1002.gsd uses the manufacturer’s I.D. number of 1002 hexadecimal (4,098 decimal). The file hms1003.gsd uses the manufacturer’s I.D. number 1003 hexadecimal (4,099 decimal).
Baud RateThe SmartLinx PROFIBUS module automatically configures itself to the correct baud rate for the PROFIBUS DP network. Follow the PROFIBUS guidelines with regards to bus length and baud rate.
Bus Address
Set the two rotary switches to the address for this slave.
Use a slave address switch in the range 03 to 99. This example shows the value “06”.
7ML19981AQ03 SmartLinx PROFIBUS DP – INSTRUCTION MANUAL Page 13

mm
mm
m
Com
mun
icat
ions
Set
up
Configuring the Slave DeviceUse the configuration software (or any equivalent master commands) to configure the slave. Refer to the information that came with the PROFIBUS master. The Siemens Milltronics instrument appears as a modular type slave, and should be configured as shown below.
After you import the GSD file, you can find the hardware in the hardware catalogue. If you are using Step 7, go to PROFIBUS DP > Additional Field Devices > General.
• For AiRanger / SITRANS LU products, select AB-DT-PDP.• For all other products, select Anybus-S_PDP.
Then define two universal modules: one input module and one output module.
The data size of the input and output modules is dependent on P762, and on the type of unit the module is plugged into, (either Level or Mass Dynamics). (The following instructions assume that P762 is set to the default values shown in the chart on page 16.)
Level Products (includes AiRanger / SITRANS LU Series, ERS 500, MultiRanger 100/200, HydroRanger 200)
• 42 words input (see Write Block on page 24)• 13 words output (see Read Block on page 27)• read and write data as 16-bit words (see Data Types on page 40)
Mass Dynamics Products (includes BW500, SF500)
• 341 words input (see Write Block on page 30)• 19 words output (see Read Block on page 34)• read and write data as 16-bit words (see Data Types on page 40)
Mass Dynamics Products (BW500/L)
• 23 words input (see Write Block on page 30)• 10 words output (see Read Block on page 34)• read and write data as 16-bit words (see Data Types on page 40)
If your PROFIBUS master is not capable of handling the block sizes listed above then use multiple smaller blocks. (See next page for examples.)
1. 34 is the correct value for BW500/SF500 units that have firmware V 3.05 or greater and have all the values of P762 turned on. For older units, the input size is 31 words.
Page 14 SmartLinx PROFIBUS DP – INSTRUCTION MANUAL 7ML19981AQ03

mm
mm
m
Comm
unications Setup
Example:An S5-115U with an IM 308C master would use the following:
For Level products:Inputs: 3 address blocks of 16, 16, and 10 words
Outputs: 1address block of 13 words
For Mass Dynamics products: Inputs: 3 address blocks of 16 words, 16 words, and 2 words1
Outputs: 2 address blocks of 16 and 3 words
Map Element Selection
P762 Map Element Selection parameter
P762 allows you to select what elements to include in the Input and Output Tables. By selecting only the data required, you can reduce the amount of data being transferred over the bus.
The chart on page 16 gives the default values for this parameter. If the default values are used then the configuration and Data Maps (see pages 24 and 30) in the main body of this manual remain correct. If any of these values is changed, then the Data Maps will be shortened and the configuration will change. Please see Appendix A on page 46 for details on how to use P762.
1. This applies to BW500/SF500 units that have firmware V 3.05 or greater and have all the values of P762 turned on--it does not apply to older units.
Notes:• Data is read and written with the most significant byte (MSB) first. • The address and size of the Reads and Writes in the PLC must match the Siemens
Milltronics device (see above). If the PLC size is smaller than the Siemens Milltronics size, an error will be displayed and only the first portion of the data will be read.
• PROFIBUS DP diagnostic bytes are not supported, however, some diagnostic information can be accessed via reading and writing the data areas. See Application Layer on page 19.
Nots: • P762 should only be modified by an advanced user who wants to limit the amount
of data being transferred. See Appendix A – Reducing the amount of data being transferred over the Bus on page 46 for more details.
• Changes do not take effect until after a power cycle.
7ML19981AQ03 SmartLinx PROFIBUS DP – INSTRUCTION MANUAL Page 15

mm
mm
m
Com
mun
icat
ions
Set
up
7ML19981AQ3.3.fm Page 16 Monday, February 7, 2011 2:41 PM
AiRanger / SITRANS LU, EnviroRanger, MultiRanger BW500, BW500/L, SF500
P762 Index
Name of area
Default value
Range Name of area
Default value Range
SF500 , BW500 BW500/L
1 Instrument status 1 0 = No
1 = YesInstrument status 1 1 0 = No
1 = Yes
2 Reading 10
0 = No1…10 = include that number of items
Rate 1 1 0 = No 1 = Yes
3 Alarm 10
0 = No1…10 = include that number of items
Load 1 1 0 = No 1 = Yes
4 Point-on-priority 1 0 = No
1 = Yes Speed 1 1 0 = No 1 = Yes
5 MPA 1 0 = No1 = Yes Total 1 1 0 = No
1 = Yes
6 SPA 1 0 = No1 = Yes
Relay Status 1 1 0 = No
1 = Yes
7 Operating Mode 1 0 = No
1 = Yes DI Status 1 1 0 = No1 = Yes
8 SPA 1 1 0 = No 1 = Yes
9 Command Control 1 1 0 = No
1 = Yes
10 MultiSpan 1 0 0 = No 1 = Yes
11 PID 1 0 0 = No 1 = Yes
12 Batch 1 0 0 = No 1 = Yes
13 BatchPrewarn 1 0 0 = No
1 = Yes
14 Word Order 1 1 0 = No 1 = Yes
15 Status 2 11
1. For firmware V 3.05, the default is 0. For all higher ersions, the default is 1.
1 0 = No 1 = Yes
16 Batch Total 11 0 0 = No 1 = Yes
Page 16 SmartLinx PROFIBUS DP – INSTRUCTION MANUAL 7ML19981AQ03

mm
mm
m
Comm
unications Setup
7ML19981AQ3.3.fm Page 17 Monday, February 7, 2011 2:52 PM
Module IdentificationParameters P794 and P795 are used together to identify the module type and protocol used.
P794 SmartLinx Module Type (Read only)
Identifies the module used.
P795 SmartLinx Protocol (Read only)
Identifies the protocol used: the value varies according to the module, and whether it is a type 1 or type 2.
Value Module0 No module present1 Anybus DT module2 Anybus S module
Siemens Milltronics Instrument Card P794 value P795 value
ERS 500,BW500, BW500/L, SF500,MultiRanger 100/200
AB RIO 1 72
PROFIBUS DP 2 1
DeviceNet 2 37
AiRanger, SITRANS LU
AB RIO 1 72
PROFIBUS DP 1 0
DeviceNet 1 24
Modbus RTU 1 57
Modem Card 1 133
7ML19981AQ03 SmartLinx PROFIBUS DP – INSTRUCTION MANUAL Page 17

mm
mm
m
Com
mun
icat
ions
Set
up
P634: Communication Totalizer ResolutionParameter P634 is used to set the number of fixed decimal places for Total 1 and Total 2 for SmartLinx communication.
* Factory setting
Note: P634 applies only to Milltronics BW500, Milltronics BW500/L and Milltronics SF500.
P634 Index Description Value # of decimal placesPrimary Index 1 Total 1 for SmartLinx
communication 3 * 3
2 2
1 1
0 0
Primary Index 2 Total 2 for SmartLinx communication
3 * 3
2 2
1 1
0 0
Page 18 SmartLinx PROFIBUS DP – INSTRUCTION MANUAL 7ML19981AQ03

mm
mm
m
Application Layer
Application Layer
This section describes the meaning of data read from and written to the Siemens Milltronics SmartLinx instrument slave memory. The output words (PLC master Write operation) and input words (PLC master Read operation) are described in the Data Map for Level Products on page 24 and the Data Map for Mass Dynamic Products on page 30.
Parameter IndexesMost parameters used on Siemens Milltronics SmartLinx instruments are indexed. Indexing allows a parameter to relate to more than one input or output. For example, many parameters are indexed by measurement point while others are indexed by relay output or discrete input.
The way that indexes are handled in the memory map depends on the data access method used.
Primary IndexAn index that relates to an input or output is called a Primary Index. (On some older Siemens Milltronics products the primary index is called a point.)
Example:
P111[3] = 52
means P111 (Relay Control Function) for relay 3 is set to value 52.
P111
[1] [2] [3] [4] [5]
52
7ML19981AQ03 SmartLinx PROFIBUS DP – INSTRUCTION MANUAL Page 19

mm
mm
m
App
licat
on L
ayer
Secondary IndexSometimes a parameter requires a second index to allow for multiple values on an indexed input or output. For example a measurement point which calculates a reading on volume can require characterization breakpoints. These breakpoints are given on a secondary index (the primary index relates to the transducer input).
An index that relates to a previously indexed parameter is called a secondary index. (On some older Siemens Milltronics products the secondary index is called a mark.)
Example:
P054[1,3] = 1.6m
means P054 (Breakpoint Levels) for breakpoint 3 on transducer 1 is set to 1.6m
Data Access MethodsThere are three different methods used in the memory mapping to give access to the SmartLinx Instrument parameter table. They are:
• Direct Access• Multiple Parameter Access (MPA) • Single Parameter Access (SPA)
Direct AccessCertain values are mapped directly into words. These words can be monitored continuously but they are not configurable.
P054
[1] [2] [3] [4] [5]
[1]
[2]
[3]
[4]
1.6m
Page 20 SmartLinx PROFIBUS DP – INSTRUCTION MANUAL 7ML19981AQ03

mm
mm
m
Application Layer
Multiple Parameter Access (MPA)
This is a hand-shaking method where the user specifies the parameter number, secondary index, decimal place, and format, then the SmartLinx writes into a certain area all 10 primary indexes of that parameter.
Using Multiple Parameter Access (MPA)1. In the output table of the PLC (Write Block) write the values for the parameter num-
ber, secondary Index, decimal place and format in the correct location.2. Monitor the Input table of the PLC (Read Block), and watch for the values you wrote
to appear in the appropriate locations of the Read block, then go to Step 3.3. Read the requested values in the appropriate location of the Read Block. These
values are continuously updated. Continue reading from these words until values for another parameter are required. At that time, go to step 1.
Parameter Indexing with MPA
Primary Index
The primary index is implicit in the memory address. MPA values are returned through words 21 to 30 of the Read block (see page 27).
Secondary Index
The secondary index is nearly always left at zero. See the Siemens Milltronics SmartLinx-compatible instrument manual for information on parameters, including those which require a secondary index.
Note: • MPA is used on Level products only.• In Siemens Milltronics’ products, the memory is arranged as Parameter number,
Primary Index, Secondary Index.
Note: MPA values are only updated in Run mode (word 12 = 0).
7ML19981AQ03 SmartLinx PROFIBUS DP – INSTRUCTION MANUAL Page 21

mm
mm
m
App
licat
on L
ayer
Single Parameter Access (SPA)
This is a hand-shaking method where the PLC specifies:
• parameter number• primary index• secondary index• decimal place• format• read/write flag• value
With this method any value in the Siemens Milltronics product can be read or written.
Using Single Parameter Access (SPA)SPA allows continuous monitoring or demand programming of a parameter.
Reading a Parameter1. Set the Read/Write flag in the output table (Write Block) to 0, “Read”.2. Write the Parameter Number, Primary Index, Secondary Index, Decimal Place, and
Format in the correct locations.
3. Monitor the Input table of the PLC (Read Block) and watch for the values you wrote to appear in the appropriate locations, then go to Step 4.
4. Read the requested parameter value in the Input table (Read Block). These values are continuously updated. Continue reading from these words until values for other parameters are required. At that time, go back to step 1.
Note: SPA is used on both Level and Mass Dynamics products.
Note: Parameter P999 (Master Reset) is not accessible via the SmartLinx interface on Level products.
Note: If there is no secondary index, then place a 0 in this location.
Page 22 SmartLinx PROFIBUS DP – INSTRUCTION MANUAL 7ML19981AQ03
mm
mm
m
Application Layer
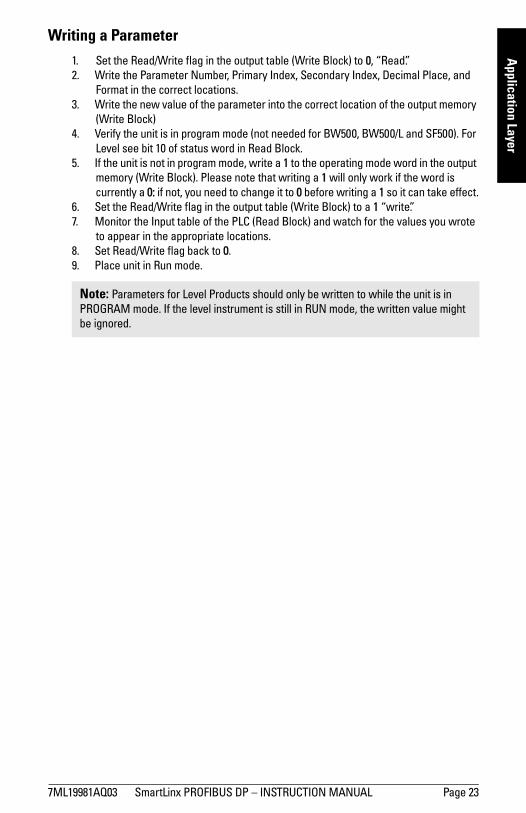
Writing a Parameter1. Set the Read/Write flag in the output table (Write Block) to 0, “Read”.2. Write the Parameter Number, Primary Index, Secondary Index, Decimal Place, and
Format in the correct locations.3. Write the new value of the parameter into the correct location of the output memory
(Write Block)4. Verify the unit is in program mode (not needed for BW500, BW500/L and SF500). For
Level see bit 10 of status word in Read Block.5. If the unit is not in program mode, write a 1 to the operating mode word in the output
memory (Write Block). Please note that writing a 1 will only work if the word is currently a 0: if not, you need to change it to 0 before writing a 1 so it can take effect.
6. Set the Read/Write flag in the output table (Write Block) to a 1 “write”.7. Monitor the Input table of the PLC (Read Block) and watch for the values you wrote
to appear in the appropriate locations.8. Set Read/Write flag back to 0.9. Place unit in Run mode.
Note: Parameters for Level Products should only be written to while the unit is in PROGRAM mode. If the level instrument is still in RUN mode, the written value might be ignored.
7ML19981AQ03 SmartLinx PROFIBUS DP – INSTRUCTION MANUAL Page 23

mm
mm
m
App
licat
on L
ayer
Data Map: Level Products
This section describes the meaning of the data read from and written to the Siemens Milltronics SmartLinx instrument.
Write Block
Word 0: Point-on-Priority
Bits 00-09 set the priority status of corresponding indexed points 1 to 10.
bit status 0 = normal 1 = priority
For example, if bits 00 and 02 are set to 1, then points 3 and 1 are on priority scan. All other bits are reserved and contain 0.
Note: The data maps shown for the Write and Read Blocks apply if P762 is set to the default values (see page 15). If any of these values is changed, the data map will be shortened and the configuration will change. (See Appendix A – Reducing the amount of data being transferred over the Bus, on page 46.)
Word Description Access Data Type0 measurement point-on-priority direct bitmapped1 parameter number
MPA
integer2 secondary index (mark) integer3 decimal place integer4 format 0/15 parameter number
SPA
integer6 primary index (point) integer7 secondary index (mark) integer8 new value integer9 decimal place integer10 format 0/111 read/write flag 0/112 operating mode direct 0/1
bit 09 08 07 06 05 04 03 02 01 00
index 10 9 8 7 6 5 4 3 2 1
bit 09 08 07 06 05 04 03 02 01 00
index 0 0 0 0 0 0 0 1 0 1
Page 24 SmartLinx PROFIBUS DP – INSTRUCTION MANUAL 7ML19981AQ03

mm
mm
m
Application Layer
The Siemens Milltronics instrument must be configured to use word 0 to control point-on-priority. For each point, set parameter P720 to 1, to permit priority control for that point.Word 1: Parameter Number, MPA
Specifies the parameter number for the returned values in words 21 to 30 (see Read Block on page 27).
Word 2: Secondary Index, MPA
Specifies the secondary index for the parameter specified by word 1. This word is ignored for parameters that don’t use multiple indexes (see Parameter Indexes on page 19 for more information).
Word 3: Decimal Place, MPA
Specifies the number of decimal places to shift the returned values in words 21 to 30 of the Read Block. Positive values indicate that the decimal place shifts to the left, and negative values indicate that the decimal place shifts to the right.
For example:
word 3 = 1:all returned values have the decimal place shifted 1 space to the left and a returned value of 5,213 is interpreted as 521.3
word 3 = –1:a returned value of 5,213 is interpreted as 52,130
Word 4: Format, MPA
Sets the format for the returned values in words 21 to 30.
0 = normal1 = percent
Word 5: Parameter, SPA
Specifies the parameter number for Single Parameter Access (SPA), see page 22.
Word 6: Primary Index, SPA
Specifies the primary index number for the parameter in word 5.
Word 7: Secondary Index, SPA
Specifies the secondary index for the parameter in word 5. This word is ignored for parameters that don’t use multiple indexes (see Parameter Indexes on page 19 for more information).
Note: Point-on-priority only applies to the AiRanger XPL+/SITRANS LU 10.
Note: When the format is selected as “percent” the decimal place value (word 3 of the Write block) is ignored and two decimal places are always used. For example, a value of 5947 represents 59.47%.
7ML19981AQ03 SmartLinx PROFIBUS DP – INSTRUCTION MANUAL Page 25

mm
mm
m
App
licat
on L
ayer
Word 8: New Value, SPA
This word contains the value written to the specified parameter and index. The format of this word is specified by words 9 to 10.
To write a value, ensure word 11 = 1 and word 12 =1 (see also: Data Types on page 40).
Word 9: Decimal Place, SPA
This word specifies the number of decimal places for the value in word 8 of the Write Block, and word 38 of the Read Block. Positive values indicate that the decimal place shifts to the left, and negative values indicate that the decimal place shifts to the right.
For example:
word 9 = 1: all returned values have the decimal place shifted 1 space to the left and a returned value of 5,213 is interpreted as 521.3
word 9 = –1: a returned value of 5,213 is interpreted as 52,130
Word 10: Format, SPA
This word sets the format for the value in word 8 of the Write Block and word 38 of the Read Block.
0 = normal1 = percent
Word 11: Read/Write Flag, SPA
This word instructs the read/write application of word 8.
0 = read parameter as described by words 5, 6, 7, 9, and 10; word 8 ignored1 = set parameter to the value described by words 5 to 10
Word 12: Operating Mode
This word sets the operating mode of the Siemens Milltronics SmartLinx instrument.
The operating mode can get out of sync if the remote instrument resets back to run mode locally. This can happen due to a time-out or through local programming. The mode is always reported correctly through the Read block. (See bit 10 of Word 0: Instrument Status on page 27.)
To reset the instrument to program mode, write 0 to synchronize the SmartLinx module with the instrument and then write 1 to set the instrument to program mode.
0 = run mode1 = program mode
Page 26 SmartLinx PROFIBUS DP – INSTRUCTION MANUAL 7ML19981AQ03

mm
mm
m
Application Layer
Read BlockValues in words 0 to 20, and word 41, are directly available: no write operation is required to request them.
Values in words 21 to 41 are determined by the write operation that requested them, either MPA or SPA (see Write Block on page 24).
Word 0: Instrument Status
Words Description Access Data Type0 instrument status
direct
bitmapped1-10 point reading integer11-20 point alarm and status bitmapped21-30 returned values
MPA
integer31 decimal place integer32 format 0/133 parameter number integer34 secondary index integer35 parameter
SPA
integer36 primary index integer37 secondary index integer38 returned value integer39 decimal place integer40 format 0/141 read/write flag 0/1
Bit Description
00 to 09 Measurement Point Status Indicates the operation of measurement points 1 to 10.bit 09 08 07 06 05 04 03 02 01 00
index10 9 8 7 6 5 4 3 2 1
0 = operational
1 = non-operational
’Non-operational’ means that either the point is not configured or there is an error in the reading. Further information is available in the Point Alarm and Status words (Words 11 to 20).
10 Operating Mode0 = Siemens Milltronics SmartLinx instrument in RUN mode1 = Siemens Milltronics SmartLinx instrument in PROGRAM mode
11 to 15 Reserved.(These bits are reserved and set to 0.)
7ML19981AQ03 SmartLinx PROFIBUS DP – INSTRUCTION MANUAL Page 27

mm
mm
m
App
licat
on L
ayer
Words 1 to 10: Point Reading
These words contain the value of parameter P920 (Reading) for points 1 to 10, respectively. The reading is expressed as a percent of full scale, multiplied by 100, giving a range of –20,000 to 20,000 which corresponds to –200.00% to 200.00%. Refer to the Siemens Milltronics SmartLinx instrument documentation for a definition of “P920”.
Words 11 to 20: Point Alarm and Status
These words contain the corresponding alarm and status bits for indexed measurement points 1 to 10, respectively.
Bit status:0 = false1 = true
Bit description00 point not configured01 point failsafe timer expired02 point failed (cable shorted, open, or transceiver problem)03 point temperature sensor failed04 to 12 reserved for future use13 level emptying14 level filling15 scan mode priority
If the product is an AiRanger/SITRANS LU Version 5.19 or above, only:
These words contain values requested by writing to words 1 to 4 of the Write Block. The type of data and format are specified with that request, and returned in Read words 31 to 34.
Note: These values may contain numeric level data for inoperative or malfunctioning points: refer to read word 0, and read words 11 to 20, for the actual operational status of the measurement points.
Bit Description
04 Low-Low Alarm (1 = ON)
05 Low Alarm (1=ON)
06 High Alarm (1 = ON)
07 High-High Alarm (1 = ON)
Page 28 SmartLinx PROFIBUS DP – INSTRUCTION MANUAL 7ML19981AQ03

mm
mm
m
Application Layer
Words 31 and 32; 33 and 34: Decimal Place, Format, Parameter Number and Sec-ondary Index, MPA
These words contain the last values written to Write block words 1 and 4. These words indicate what information is contained in Read block words 21 to 30. These words are provided since there can be a delay between writing a request via a Write, and the appearance of the requested values.
Use these words as an indicator that the requested information is updated.
Words 35 to 37 and 39 to 41: Parameter Number/Primary Index/Secondary Index and Decimal Place/Format/Read Write Flag, SPA
These words contain the last values written to words 5 to 7 and 9 to 11 of the Write block. They confirm that the parameter value has been written. These words are not updated until the value has been successfully transferred and stored in the Siemens Milltronics SmartLinx instrument.
See Write formats on page 25 for details.
Word 38: Returned Value, SPA
This word contains the current value of the parameter identified by words 35 to 37 and 39 to 40, regardless of the value of word 11 (Write flag).
If this value does not change when a new value is written to word 8 (Parameter Value) then check the following:
1. Words 5 to 7 and 9 to 10 of the Write block should match words 35 to 37 and 39 to 40 of the Read block: if not, then the instrument hasn’t responded yet.
2. If words 5 to 7 and 9 to 10 of the Write block do match words 35 to 37 and 39 to 40, of the Read block, then the parameter value has not been updated. Check that the Siemens Milltronics SmartLinx instrument is in PROGRAM mode and that the program lock (P000) is not on, then try again.
7ML19981AQ03 SmartLinx PROFIBUS DP – INSTRUCTION MANUAL Page 29

mm
mm
m
App
licat
on L
ayer
Data Map: Mass Dynamic Products
This section describes the meaning of the data read from and written to the Siemens Milltronics SmartLinx instrument.
Write Block
BW500 and SF500
Note: The data maps shown for the Write and Read Blocks apply if P762 is set to the default values (see page 15). If any of these values is changed, the data map will be shortened and the configuration will change (see Appendix A – Reducing the amount of data being transferred over the Bus, on page 46).
Description Start End Size Data Typeparameter number, SPA 0 0 1 integerprimary index, SPA 1 1 1 integersecondary index, SPA 2 2 1 integernew value, SPA 3 4 2 UINT32decimal place, SPA 5 5 1 integerformat, SPA 6 6 1 integerread/write flag, SPA 7 7 1 integercommand control 8 8 1 bitmappedmultispan selection 9 9 1 1-4PID 1 setpoint value 10 11 2 UINT32PID 2 setpoint value 12 13 2 UINT32batch setpoint value 14 15 2 UINT32batch prewarn setpoint value 16 17 2 UINT32word order 18 18 1 0/1
Note:• All the 32 bit numbers (except for the SPA numbers) have a fixed decimal place of 3
digits. For example PID 1 setpoint value of 3,245 is a value of 3.245 in the BW500 and the SF500.
• To make a change to any parameter in the BW500 or the SF500 using SmartLinx, P799 Communications Control must be set to 1.
Page 30 SmartLinx PROFIBUS DP – INSTRUCTION MANUAL 7ML19981AQ03

mm
mm
m
Application Layer
7ML19981AQ3.3.fm Page 31 Monday, February 7, 2011 1:03 PM
BW500/L
Parameter, SPA
Specifies the parameter number for Single Parameter Access (SPA), see page 22.
Primary Index, SPA
Specifies the primary index number for the parameter specified by word 0.
Secondary Index, SPA
Specifies the secondary index for the parameter specified by word 0. This word is ignored for parameters that don’t use multiple indexes.
New Value, SPA
The new value of the specified parameter and index.
Decimal Place, SPA
This word specifies the number of decimal places for the value in words 3 and 4. Positive values indicate that the decimal place shifts to the left, and negative values indicate that the decimal place shifts to the right.
For example:
word 5 = 1:all returned values have the decimal place shifted 1 space to the left and a returned value of 5,213 is interpreted as 521.3
word 5 = –1:a returned value of 5,213 is interpreted as 52,130
Format, SPA
This word is always set to 0.
Read/Write Flag, SPA
This word determines whether the instrument will allow parameter values to be written.
0 = Read1 = Write
Description Start End Size Data Typeparameter number, SPA 0 0 1 integerprimary index, SPA 1 1 1 integersecondary index, SPA 2 2 1 integernew value, SPA 3 4 2 UINT32decimal place, SPA 5 5 1 integerformat, SPA 6 6 1 integerread/write flag, SPA 7 7 1 integercommand control 8 8 1 bitmappedword order 9 9 1 0/1
Note: To make a change to any parameter in the BW500/L using SmartLinx, P799 Communications Control must be set to 1.
7ML19981AQ03 SmartLinx PROFIBUS DP – INSTRUCTION MANUAL Page 31

mm
mm
m
App
licat
on L
ayer
7ML19981AQ3.3.fm Page 32 Friday, February 4, 2011 11:39 AM
Command Control, Operational Commands
The command control word is used to control the unit. Each bit gives access to a command or state as if the operator was using the keypad.
Bits initiating a command (6 to 11) must change state in order to cause the command to begin. For example, to reset totalizer 1, Bit 8 must be cleared to 0, then set to 1. It can stay set or clear for any period.
BW500 and SF500
BW500/L
Bit 00 and 03: PID Mode (BW500 and SF500 only)
Sets the mode of PID control to either manual (output determined by P410 – PID Manual) or auto (output determined by PID control in instrument).
Bit # Description Bit Clear (0) Bit Set (1)00 PID 1 mode manual auto
01 PID 1 freeze no yes
02 PID 1 setpoint source local remote
03 PID 2 mode manual auto
04 PID 2 freeze no yes
05 PID 2 setpoint source local remote
06 zero no change start
07 span no change start
08 reset totalizer 1 no change reset
09 reset totalizer 2 no change reset
10 reset batch totalizer no change reset
11 print print
12 reserved
13 reserved
14 reserved
15 reserved
Bit # Description Bit Clear (0) Bit Set (1)06 zero no change start
07 span no change start
08 reset totalizer 1 no change reset
09 reset totalizer 2 no change reset
10 reserved
11 print print
12 reserved
13 reserved
14 reserved
15 reserved
Page 32 SmartLinx PROFIBUS DP – INSTRUCTION MANUAL 7ML19981AQ03

mm
mm
m
Application Layer
Bit 02 and 05 Setpoint Source (BW500 and SF500 only)
Controls the location of the setpoint. If it is set as “local”, then the setpoint used is internal to the BW500 or SF500. If the setpoint source is set to “remote”, then the setpoint is controlled by a mA input.
For setpoint control through communications this must be set to “local.”
Bit 01 and 04: Freeze (BW500 and SF500 only)
Suspends PID function when PID Mode = 1 (auto) and holds the output at the last value. PID functionality resumes when the freeze bit is cleared.
Bit 06: Zero
Sets the zero point for calibration of the belt scale.
This is a momentary setting that must be reset to 0 once the input is accepted. To check that the input was accepted read word 0, bit 7 (zero status) and ensure it shows 1. Once it shows a 1 then reset this bit to 0
Bit 07: Span
Sets the span for calibration of the belt scale.
This is a momentary setting that must be reset to 0 once the input is accepted. To check that the input has been accepted, read word 0, bit 8 (Span Status) and ensure it shows a 1. Once it shows 1 then reset this bit to 0.
Bit 08: Reset Totalizer 1
Causes the internal totalizer 1 to be reset to 0.
This is a momentary setting that must be reset to 0 once the input is accepted. To reset this back to 0, the use of a timer is recommended.
Bit 09: Reset Totalizer 2
Causes the internal totalizer 2 to be reset to 0.
This is a momentary setting that must be reset to 0 once the input is accepted. To reset this back to 0, the use of a timer is recommended.
Bit 10: Reset Batch Totalizer (BW500 and SF500 only)
Causes the batch totalizer to be reset to 0.
This is a momentary setting that must be reset to 0 once the input is accepted. To reset this back to 0, the use of a timer is recommended.
Bit 11: Print
Starts print operation. One of the communications ports on your Milltronics Integrator must be configured for a printer.
This is a momentary setting that must be reset to 0 once the input is accepted. To reset this back to 0, the use of a timer is recommended.
7ML19981AQ03 SmartLinx PROFIBUS DP – INSTRUCTION MANUAL Page 33

mm
mm
m
App
licat
on L
ayer
Multispan Selection (BW500 and SF500)
Sets the current span (1 to 4). Any parameters that relate to span will use this value to determine which span is referenced. See the manual for the BW500 or SF500 for more information on multispan.
PID Setpoints (BW500 and SF500 only)
Contain the current setpoint values as P415 in the Milltronics BW500 or SF500.
To write these setpoints bits 02 and 05 in word 8 - Control must be set to “local.”
Batch Setpoint (BW500 and SF500 only)
Contain the current setpoint value as P564 in the Milltronics BW500 or SF500.
Batch Prewarn Setpoint (BW500 and SF500 only)
Contain the current setpoint value as P567 in the Milltronics BW500 or SF500.
Word Order
This word controls which word comes first in the UINT32 integers. For a value 0, the most significant word is given first. For a value 1, the least significant word is given first.
0 = MSW first1 = LSW first
Read Block Values returned in the words in the Read are in response to the Write to the Siemens Milltronics SmartLinx instrument.
Words 0 through 20 have values with fixed meanings and formats. This means that you do not have to start communications with a Write in order to use Read, the data is always there.
Words 22 through 29 are values returned in response to writing words 0 through 7 for Single Parameter Access (SPA), see Write Block on page 30.
BW500 and SF500
Description Start End Size Typeinstrument status 1 0 0 1 bitmapped
rate 1 2 2 UINT32
load 3 4 2 UINT32
speed 5 6 2 UINT32
total 1 7 8 2 UINT32
total 2 9 10 2 UINT32
relay status 11 11 1 bitmapped
discrete input status 12 12 1 bitmapped
multispan selection 13 13 1 integer
PID 1 setpoint value 14 15 2 UINT32
PID 2 setpoint value 16 17 2 UINT32
Page 34 SmartLinx PROFIBUS DP – INSTRUCTION MANUAL 7ML19981AQ03

mm
mm
m
Application Layer
BW500/L
batch setpoint value 18 19 2 UINT32
batch prewarn setpoint value 20 21 2 UINT32
parameter, SPA 22 22 1 integer
primary index, SPA 23 23 1 integer
secondary index, SPA 24 24 1 integer
new value, SPA 25 26 2 UINT32
decimal place, SPA 27 27 1 integer
format, SPA 28 28 1 integer
read / write flag, SPA 29 29 1 1/0
word order 30 30 1 1/0
Instrument Status 21 31 31 1 bitmapped
batch total1 32 33 2 UINT32
1. This is only available in firmware V 3.05 or higher. In V 3.05, these locations are "turned off" in P762. In higher firmware, they are defaulted on.
Description Start End Size Typeinstrument status 1 0 0 1 bitmapped
rate 1 2 2 UINT32
load 3 4 2 UINT32
speed 5 6 2 UINT32
total 1 7 8 2 UINT32
total 2 9 10 2 UINT32
relay status 11 11 1 bitmapped
discrete input status 12 12 1 bitmapped
parameter, SPA 13 13 1 integer
primary index, SPA 14 14 1 integer
secondary index, SPA 15 15 1 integer
new value, SPA 16 17 2 UINT32
decimal place, SPA 18 18 1 integer
format, SPA 19 19 1 integer
read / write flag, SPA 20 20 1 integer
word order 21 21 1 integer
Instrument Status 21
1. This is only available in firmware V 3.05 or higher. In V 3.05, these locations are "turned off" in P762. In higher firmware, they are defaulted on.
22 22 1 bitmapped
Description Start End Size Type
7ML19981AQ03 SmartLinx PROFIBUS DP – INSTRUCTION MANUAL Page 35

mm
mm
m
App
licat
on L
ayer
Instrument Status 1
This word is used to feed back the current operating state of the product. Each bit gives the state of different parts of the product, some mutually exclusive, others are not. The state should be checked to verify operation.
BW500 and SF500
BW500/L
Bits 0 to 5: PID Status (BW500 and SF500 only)
These bits give the status of the product. For example Bit 0 is the mode of the PID 1 controller (if used). It indicates whether the PID is in manual or auto modes.
Bit 6: Zero Status
Indicates whether the unit is currently performing a Zero calibration.
Bit # Description Bit Clear (0) Bit Set (1)0 PID 1 mode manual auto
1 PID 1 freeze no yes
2 PID 1 setpoint source local remote
3 PID 2 mode manual auto
4 PID 2 freeze no yes
5 PID 2 setpoint source local remote
6 zero no in progress
7 span no in progress
8 reset totalizer 1 no change reset
9 reset totalizer 2 no change reset
10 reset batch totalizer no change reset
11 printing not printing printing
12 write privileges no yes
13 system configured not configured run mode
14 mode calibration mode run mode
15 totalizing not totalizing totalizing
Bit # Description Bit Clear (0) Bit Set (1)6 zero no in progress
7 span no in progress
8 reset totalizer 1 no change reset
9 reset totalizer 2 no change reset
10 reserved
11 printing not printing printing
12 write privileges no yes
13 system configured not configured run mode
14 mode calibration mode run mode
15 totalizing not totalizing totalizing
Page 36 SmartLinx PROFIBUS DP – INSTRUCTION MANUAL 7ML19981AQ03
mm
mm
m
Application Layer
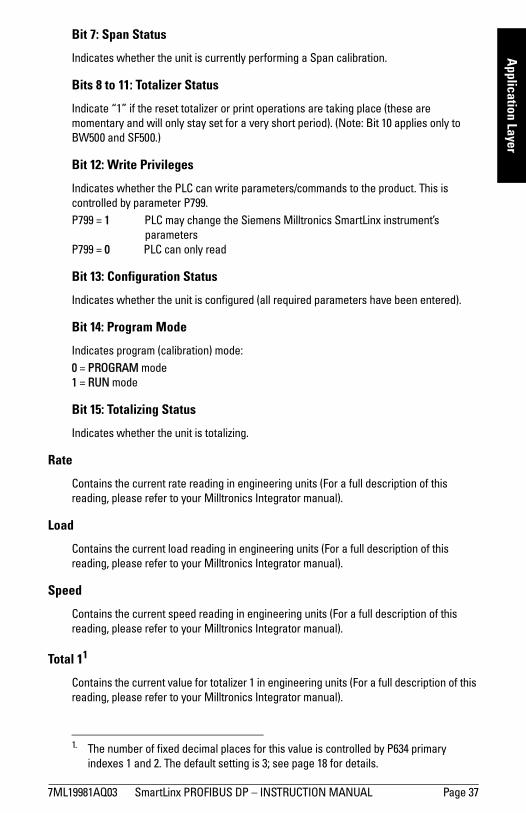
Bit 7: Span Status
Indicates whether the unit is currently performing a Span calibration.
Bits 8 to 11: Totalizer Status
Indicate “1” if the reset totalizer or print operations are taking place (these are momentary and will only stay set for a very short period). (Note: Bit 10 applies only to BW500 and SF500.)
Bit 12: Write Privileges
Indicates whether the PLC can write parameters/commands to the product. This is controlled by parameter P799. P799 = 1 PLC may change the Siemens Milltronics SmartLinx instrument’s
parametersP799 = 0 PLC can only read
Bit 13: Configuration Status
Indicates whether the unit is configured (all required parameters have been entered).
Bit 14: Program Mode
Indicates program (calibration) mode: 0 = PROGRAM mode1 = RUN mode
Bit 15: Totalizing Status
Indicates whether the unit is totalizing.
Rate
Contains the current rate reading in engineering units (For a full description of this reading, please refer to your Milltronics Integrator manual).
Load
Contains the current load reading in engineering units (For a full description of this reading, please refer to your Milltronics Integrator manual).
Speed
Contains the current speed reading in engineering units (For a full description of this reading, please refer to your Milltronics Integrator manual).
Total 11
Contains the current value for totalizer 1 in engineering units (For a full description of this reading, please refer to your Milltronics Integrator manual).
1. The number of fixed decimal places for this value is controlled by P634 primary indexes 1 and 2. The default setting is 3; see page 18 for details.
7ML19981AQ03 SmartLinx PROFIBUS DP – INSTRUCTION MANUAL Page 37

mm
mm
m
App
licat
on L
ayer
Total 21
Contains the current value for totalizer 2 in engineering units. (For a full description of this reading, please refer to your Milltronics Integrator manual).
Relay Status
Shows the current logical status of all relays.
0 = relay not asserted1 = relay asserted“Asserted” indicates that the function controlling the relay is in an active state. Relay contacts can open or close based on this state, see your instrument manual for details.
Discrete Input Status
Shows the current logical status of all discrete inputs.
0 = discrete input open1 = discrete input closed
Multispan Selection (BW500 and SF500 only)
Shows the currently selected span (1 to 4).
PID 1 Setpoint Value (BW500 and SF500 only)
Contains the current setpoint value for PID 1 in engineering units. (For a full description of this reading, please refer to your Milltronics Integrator manual).
PID 2 Setpoint Value (BW500 and SF500 only)
Contains the current setpoint value for PID 2 in engineering units.(For a full description of this reading, please refer to your Milltronics Integrator manual).
Batch Setpoint Value (BW500 and SF500 only)
Contains the value of P564 – Batch Setpoint. (For a full description of this parameter, please refer to your Milltronics Integrator manual).
Batch Prewarn Setpoint Value (BW500 and SF500 only)
Contains the value of P567: Batch Prewarn Setpoint. (For a full description of this parameter, please refer to your Milltronics Integrator manual).
1. The number of fixed decimal places for this value is controlled by P634 primary indexes 1 and 2. The default setting is 3; see page 18 for details.
bit 04 03 02 01 00
relay 05 04 03 02 01
bit 04 03 02 01 00
input 05 04 03 02 01
Page 38 SmartLinx PROFIBUS DP – INSTRUCTION MANUAL 7ML19981AQ03

mm
mm
m
Application Layer
Parameter Number / Primary Index / Secondary Index, SPA; Decimal Place / For-mat / Read/Write flag, SPA
These words contain the last values written to words 0 to 2 and words 5 to 7 of the Write area. They confirm that the parameter value has been written. These words are not updated until the value has been successfully transferred and stored in the Siemens Milltronics SmartLinx instrument.
Use these words as an indicator that the requested information has been updated.
Value, SPA
The returned value of the specified parameter and index.
Word Order
The placement of the most significant word (MSW).0 = MSW first1 = MSW second
Instrument Status 2
This word is used to feed back the current operating state of the product. Each bit gives the state of different parts of the product, some mutually exclusive, others are not. The state should be checked to verify operation.
Bits 0 Totalizer 1 overflowIf Totalizer 1 has overflowed, (that is, has exceeded the spaces available in SmartLinx), this bit is set. The overflow condition can be changed by reducing Communication Totalizer resolution (P634).
Bit 1 Totalizer 2 overflowIf Totalizer 2 has overflowed, (that is, has exceeded the spaces available in SmartLinx), this bit is set. The overflow condition can be changed by reducing Communication Totalizer resolution (P634).
Batch Totalizer (BW500 and SF500 only)
Contains the current value for the Batch Totalizer in engineering units. (For a full description of this reading, please refer to your Milltronics Integrator manual).
Bit # Description Bit Clear (0) Bit Set (1)0 Totalizer 1 overflow no overflow overflow condition1 Totalizer 2 overflow no overflow overflow condition
7ML19981AQ03 SmartLinx PROFIBUS DP – INSTRUCTION MANUAL Page 39

mm
mm
m
App
licat
on L
ayer
Data TypesThe Siemens Milltronics SmartLinx instrument parameters take on many values in various formats, as discussed in the Siemens Milltronics SmartLinx instrument manual. For the convenience of the programmer, those values are converted to and from 16-bit integer numbers, since those are easily handled by most PLCs.
Integer
Level ProductsInteger parameter values are by far the most common. For example, parameter P920 (Reading) returns a number representing the current reading (either level or volume, depending on the Siemens Milltronics SmartLinx instrument configuration).
You can request numeric values in units or percent of span, and you can specify the number of decimal places.
Numeric values must be in the range –20,000 to +20,000 to be valid. If a parameter is requested and its value is more than +20,000, the number 32,767 is returned; if it is less than –20,000, the number –32,768 is returned. If this happens, increase the number of decimal places for that parameter.
If a parameter cannot be expressed in terms of percent (e.g. span), or has no meaningful value, the special number 22,222 is returned. Try requesting the parameter in units, or refer to the Siemens Milltronics SmartLinx instrument manual to understand the format and use of the requested parameter.
Mass Dynamics ProductsIntegers used on the Mass Dynamics products can have any valid value. So, the entire range from –32,768 to 32,767 or 0 to 65,535 is available and no values are used as error conditions.
Bit ValuesBits are packed into registers in groups of 16 bits (1 word). In this manual bits are numbered from 00 to 15, with bit 00 referring to the least significant bit and bit 15 referring to the most significant bit.
15 14 13 12 11 10 09 08 07 06 05 04 03 02 01 00
MSB LSB
Page 40 SmartLinx PROFIBUS DP – INSTRUCTION MANUAL 7ML19981AQ03

mm
mm
m
Application Layer
Unsigned Double Precision Integer (UINT32)
Large numbers are put into unsigned 32-bit integers. By default they are set up so that the first word (register) is the most significant word (MSW) and the second word (register) is the least significant word (LSW) depending on the setting of the word order bit.
For example, when reading words 7 and 8 on the Mass Dynamics block (Total 1), the 32 bits would look as follows:
The whole is read as a 32-bit integer.
Split Values
Certain parameters are actually a pair of numbers separated by a colon, in the format xx:yy.
One example is P807, Transducer Noise, where:
xx = the average noise value in dB.yy = the peak noise in dB.
The number which corresponds to xx:yy, either for reading or setting a parameter, is determined by the following formula:
For storing to the Siemens Milltronics device:
value = (xx + 128) x 256 + (yy + 128)
For reading from the Siemens Milltronics device:
xx = (value / 256) – 128yy = (value % 256) – 128
Where:
% is the modulus operator.
The modulus can be computed by following these steps:
value1 = value / 256value2 = remainder of value1value3 = value2 x 256yy = value3 - 128
Note: Used for Mass Dynamics products only.
word 7 word 8
15 MSW 0 15 LSW 0
31 32-bit integer value (UINT32) 0
Note: Used for Level products only
7ML19981AQ03 SmartLinx PROFIBUS DP – INSTRUCTION MANUAL Page 41

mm
mm
m
App
licat
on L
ayer
It may simplify programming to notice:
xx = (most significant byte of value) – 128yy = (least significant byte of value) – 128
Text Messages
If a Siemens Milltronics device parameter returns a text message, that message is converted to an integer and provided in the register. The numbers are shown in the table below:
Note: Used for Level products only
Number Text Message as displayed on LCD22222 invalid value30000 off30001 on30002 ≡ ≡ ≡ ≡ 30003 (parameter does not exist)30004 err30005 err130006 open30007 shrt30008 pass30009 fail30010 hold30011 lo30012 hi30013 de30014 en30015 - - - - (parameter has not been set)
–32768 value is less than –20,00032767 value is greater than 20,000
Page 42 SmartLinx PROFIBUS DP – INSTRUCTION MANUAL 7ML19981AQ03

mm
mm
m
Application Layer
Relay Function Codes (P111 in Level Products Only)
If a Siemens Milltronics instrument parameter returns a relay function code, that message is converted to a number and provided in the register. The numbers are shown in the table below.
See the Siemens Milltronics SmartLinx instrument manual for full information on P111.
Relay Function Code Number P111off, relay not used 0 0
undesignated level alarm 1 1
low-low level alarm 2 1 – LL
low level alarm 3 1 – L
high level alarm 4 1 – H
high-high level alarm 5 1 – HH
in bounds alarm 6 2
in bounds alarm 7 2 – B1
in bounds alarm 8 2 – B2
out of bounds alarm 9 3
out of bounds alarm 10 3 – B1
out of bounds alarm 11 3 – B2
rate of level change alarm 12 4
rate of level change alarm 13 4 – R1
rate of level change alarm 14 4 – R2
temperature alarm 15 5
loss of echo (LOE) alarm 20 6
transducer cable fault alarm 16 7
pump efficiency alarm 17 8
clock failure alarm 18 9
time of day alarm 19 10
pump failure alarm 21 11
totalizer 22 40
flow sampler 23 41
fixed duty assist 25 50
fixed duty backup 26 51
alternate duty assist 30 52
alternate duty backup 31 53
service ratio duty assist 35 54
service ratio duty backup 36 55
first in first out (FIFO) 40 56
time 45 60
overflow 50 61
aeration 55 62
gate 60 63
7ML19981AQ03 SmartLinx PROFIBUS DP – INSTRUCTION MANUAL Page 43

mm
mm
m
App
licat
on L
ayer
flush valve 65 64
communication 66 65
pump failure alarm 70 11
power failure alarm 71 12
unknown function 200
Relay Function Code Number P111
Page 44 SmartLinx PROFIBUS DP – INSTRUCTION MANUAL 7ML19981AQ03

mm
mm
m
Troubleshooting
Troubleshooting
GenerallyIn all cases, first check P794 and P795, to verify that you have the correct card for your device. Next check that the SmartLinx module has passed its on-going built-in self test (Siemens Milltronics SmartLinx instrument parameter P790). The result should be “pass”.
If “fail” is indicated, either the module is defective, or the module connector on the Siemens Milltronics SmartLinx instrument is defective.
If “err1” is indicated, the Siemens Milltronics software doesn’t recognize the ID number of the installed module. Please contact Siemens Milltronics or your distributor for instructions and/or upgraded Siemens Milltronics SmartLinx instrument software.
Make sure the Siemens Milltronics device is set to a unique address, and does not conflict with any other slave(s) on the bus.
Check the configuration of the scanning master, and make sure it is functioning properly.
1. If you have configured the Siemens Milltronics device in the Master and down-loaded it to the processor, but the device is not coming online:
• Check which GSD file you use, and make sure you used the correct one (see GSD Files on page 13).
• Check the wiring to the card. In particular, check that you have line A and B connected correctly.
• Verify that you set the correct address on the card. Also, please note that the card does not see a charge until the power has been cycled.
• Verify that the Read and Write Block sizes are correct. This is particularly important if you are using P762.
2. If the network was working fine until you connected to the Siemens Milltronics device, at which time other devices dropped out:
• Check the termination switch on the PROFIBUS card. The network cable has to be terminated at both ends of the LAN, but not in between.
• Check your grounding. The PROFIBUS specifications require that all devices be on the same ground. Improper grounding can cause strange effects.
Technical Support or Product FeedbackFor product feedback or technical support, please contact your local Siemens Milltronics representative or e-mail us at www.siemens.com/automation/support-request.
7ML19981AQ03 SmartLinx PROFIBUS DP – INSTRUCTION MANUAL Page 45

mm
mm
m
App
endi
x A
Appendix A – Reducing the amount of data being transferred over the Bus
You can limit the amount of data being transferred over the Bus, and save both bandwidth and memory, by using P762. However, when you reduce the size of the data map, the configuration will change. If the data block sizes in the device do not match what is configured in the master, no communications will occur. Therefore it is critical to calculate the size of the new map. The calculation is different for level applications and for mass dynamics applications.
The following sections provide explanations and examples of the calculation required, together with a worksheet to use as a template. The first section explains how it works with level products, and the second explains how it works with mass dynamics products. In each section, the Write Block map is calculated first, followed by the Read Block.
Level ProductsThe SmartLinx map1 is controlled by the values of the indices of P762. By turning on an index (setting the value to one or more), you activate both the read and write blocks associated with that index. The table below shows which values in the read/write blocks are turned on by each P762 index.
1. For examples of the data maps before modification, see pages 49 and 51.
Name of area P762 Point Value Read area turned
On Write area turned on
Status 1 1 Instrument status -------------------
Reading 2 1 -10 1-10 point readings -------------------
Alarm3 1-10
1-10 point alarm and status
-------------------
Point-on-priority4 1
------------------- Measurement point-on-priority
MPA 5 1
Returned Values (1-10) Parameter number
Decimal place Secondary index
Format Decimal place
Parameter number Format
Secondary index --------------------
Page 46 SmartLinx PROFIBUS DP – INSTRUCTION MANUAL 7ML19981AQ03
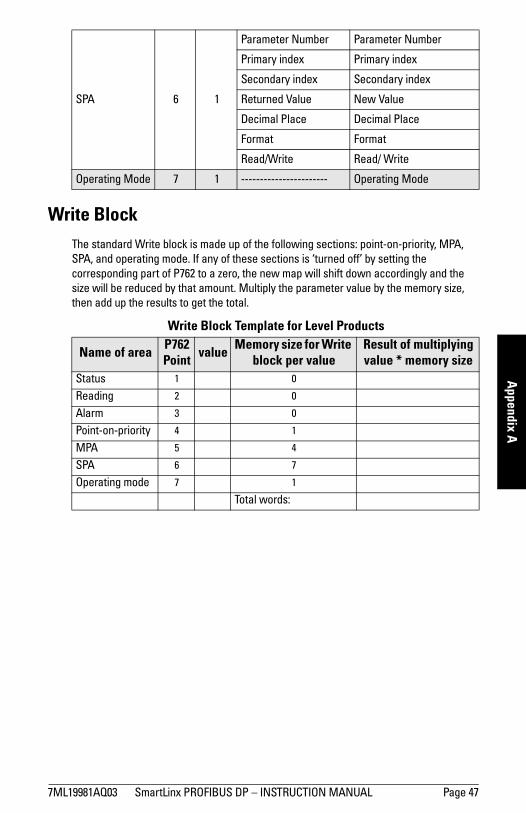
mm
mm
m
Appendix A
Write BlockThe standard Write block is made up of the following sections: point-on-priority, MPA, SPA, and operating mode. If any of these sections is ‘turned off’ by setting the corresponding part of P762 to a zero, the new map will shift down accordingly and the size will be reduced by that amount. Multiply the parameter value by the memory size, then add up the results to get the total.
SPA 6 1
Parameter Number Parameter Number
Primary index Primary index
Secondary index Secondary index
Returned Value New Value
Decimal Place Decimal Place
Format Format
Read/Write Read/ Write
Operating Mode 7 1 ----------------------- Operating Mode
Write Block Template for Level Products
Name of area P762 Point value Memory size for Write
block per valueResult of multiplying value * memory size
Status 1 0
Reading 2 0
Alarm 3 0
Point-on-priority 4 1
MPA 5 4
SPA 6 7
Operating mode 7 1
Total words:
7ML19981AQ03 SmartLinx PROFIBUS DP – INSTRUCTION MANUAL Page 47

mm
mm
m
App
endi
x A
Example 1: If you want only Point status, and to read the first 7 point readings, the chart is:
The output data block (Write block) is now 0 words in size (0 bytes).
No map
Example 2:
If you want only SPA, then the chart is:
The output data block (Write block) is now 7 words in size (14 bytes) and the Word numbers have shifted to a lower value
New Write Block Data Map
Name of area
P762 Point
value
Memory size for Write block per value
value *memory size
Status 1 1 0 0
Reading 2 7 0 0
Alarm 3 0 0 0
Point-on -priority
4 0 1 0
MPA 5 0 4 0
SPA 6 0 7 0
Operating mode
7 0 1 0
Total words: 0
Name of area
P762 Point
value
Memory size for Write block per value
value *memory size
Status 1 0 0 0
Reading 2 0 0 0
Alarm 3 0 0 0
Point-on -priority
4 0 1 0
MPA 5 0 4 0
SPA 6 1 7 7
Operating mode
7 0 1 0
Total words: 7
Word Description0 Parameter number1 Parameter primary index2 Parameter secondary index3 Parameter value4 Decimal place5 Format 6 Read / Write flag
Page 48 SmartLinx PROFIBUS DP – INSTRUCTION MANUAL 7ML19981AQ03

mm
mm
m
Appendix A
Original Write Block Data Map for Level Products
Read BlockThe standard Read block is made up of the following sections: status, reading, alarm, MPA, and SPA. If any of these sections is ‘turned off’ by setting the corresponding part of P762 to a zero, the new map will shift down accordingly and the size will be reduced by that amount for the Read block. Multiply the parameter value by the memory size, then add up the results to get the total.
Words Description Access Data Type0 measurement point-on-priority direct bitmapped1 parameter number
MPA
integer2 parameter secondary index1
1. The primary index is implicit in the address of the returned parameter values.
integer3 decimal place integer4 format 0/15 parameter number
SPA
integer6 parameter primary index integer7 parameter secondary index integer8 parameter value integer9 decimal place integer10 format 0/111 read/write flag 0/112 operating mode direct 0/1
Read Block Template for Level Products
Name of area P762 Point valueMemory size for Read block per
value
Result of multiplying value *
memory sizeStatus 1 1
Reading 2 1
Alarm 3 1
Point-on-priority 4 0
MPA 5 14
SPA 6 7
Operating mode 7 0
Total Words:
7ML19981AQ03 SmartLinx PROFIBUS DP – INSTRUCTION MANUAL Page 49

mm
mm
m
App
endi
x A
Example 1: If you want only Instrument status, and to read the first 7 point readings, then the chart is:
The input data block (Read block) is now 8 words in size (16 bytes), and the Word numbers have shifted to a lower value.
New Read Block Data map:
Example 2: If you want only SPA, then the chart is:
The input data block (Read block) is now 7 words in size (14 bytes), and the Word numbers have shifted to a lower value.
New Read Block Data map:
Name of area
P762 Point
value Memory size for Read block per value
value *memory size
Status 1 1 1 1
Reading 2 7 1 7
Alarm 3 0 1 0
Point-on-priority
4 0 0 0
MPA 5 0 14 0
SPA 6 0 7 0
Operating mode
7 0 0 0
Total words:
8
Word Description0 Instrument status1 Reading for point 12 Reading for point 23 Reading for point 34 Reading for point 45 Reading for point 56 Reading for point 67 Reading for point 7
Name of area
P762 Point
value Memory size for Read block per value
value *memory size
Status 1 0 1 0
Reading 2 0 1 0
Alarm 3 0 1 0
Point-on-priority
4 0 0 0
MPA 5 0 14 0
SPA 6 1 7 7
Operating mode
7 0 0 0
Totalwords:
7
Word Description0 Parameter number1 Parameter primary index2 Parameter secondary index3 Parameter returned value4 Decimal place5 Format 6 Read/Write flag
Page 50 SmartLinx PROFIBUS DP – INSTRUCTION MANUAL 7ML19981AQ03

mm
mm
m
Appendix A
Original Read Block Data map for Level Products
Mass Dynamics ProductsThe SmartLinx map1 is controlled by the values of the indices of P762. By turning on an index (setting the value to one or more), you activate both the read and write blocks associated with that index. The table below shows which values in the read/write blocks are turned on by each P762 index.
Words Description Access Data Type0 instrument status
direct
bitmapped1-10 point reading integer11-20 point alarm and status bitmapped21-30 returned values
MPA
integer31 decimal place integer32 format 0/133 parameter number integer34 parameter secondary index integer35 parameter
SPA
integer36 parameter primary index integer37 parameter secondary index integer38 value integer39 decimal place integer40 format 0/141 read/write flag 0/1
1. For examples of the data maps before modification, see pages 54 and 55
Name of area
P762 Point
ValueRead area turned On
Write area turned onBW500,
SF500BW500/L
status 1 1 1instrument status
-------------------
rate 2 1 1 rate -------------------
load 3 1 1 load -------------------
speed 4 1 1 speed -------------------
total 5 1 1total 1
-------------------total 2
relay status 6 1 1 relay status -------------------
DI status 7 1 1discrete input status
-------------------
7ML19981AQ03 SmartLinx PROFIBUS DP – INSTRUCTION MANUAL Page 51

mm
mm
m
App
endi
x A
Write BlockThe standard Write block is made up of the following sections: SPA, command control, multispan, PID, batch, batch prewarn, word order. If any of these sections is ‘turned off’ by setting the corresponding part of P762 to a zero, the new map will shift down accordingly and the size will be reduced by that amount. Multiply the parameter value by the memory size, then add up the results to get the total
Write Block Template for Mass Dynamic Products
SPA 8 1 1
parameter number
parameter number
primary index primary index
secondary index
secondary index
returned value new value
decimal place decimal place
format format
read/write read/ write
command control
9 1 1 ------------------ command control
multispan 10 1 01 ------------------ multispan selection
PID 11 1 01 ------------------PID 1 setpoint value
PID 2 setpoint value
batch 12 1 01 ------------------batch setpoint value
batch prewarn
13 1 01 ------------------batch prewarn setpoint value
word order 14 1 1 word order word order
status 2 15 1 1instrument status 2
-------------------
batch total 16 1 01 batch total -------------------
1. For the BW500/L, P762 indexes with values shown as 0 cannot be turned on.
Name of area P762 Point value Memory size for
Write block per valueResult of multiplying value * memory size
status 1 0
rate 2 0
load 3 0
speed 4 0
total 5 0
relay status 6 0
Page 52 SmartLinx PROFIBUS DP – INSTRUCTION MANUAL 7ML19981AQ03

mm
mm
m
Appendix A
Example 1:
If you want only rate, load, and batch prewarn, then the chart is:
The input data block (Write block) is now 2 words in size (4 bytes) and the Word numbers have shifted to a lower value:
New Write Block Data Map:
DI status 7 0
SPA 8 8
command control
9 1
multispan 10 1
PID 11 4
batch 12 2
batch prewarn 13 2
word order 14 1
status 2 15 0
batch total 16 0
total words:
Name of area P762 Point
value Memory size for Write block per value
value *memory size
status 1 0 0 0
rate 2 1 0 0
load 3 1 0 0
speed 4 0 0 0
total 5 0 0 0
relay status 6 0 0 0
DI status 7 0 0 0
SPA 8 0 8 0
command control 9 0 1 0
multispan 10 0 1 0
PID 11 0 4 0
batch 12 0 2 0
batch prewarn 13 1 2 2
word order 14 0 1 0
status 2 15 0 0 0
batch total 16 0 0 0
total words: 2
Word Description
0-1 Batch prewarn
Name of area P762 Point value Memory size for
Write block per valueResult of multiplying value * memory size
7ML19981AQ03 SmartLinx PROFIBUS DP – INSTRUCTION MANUAL Page 53
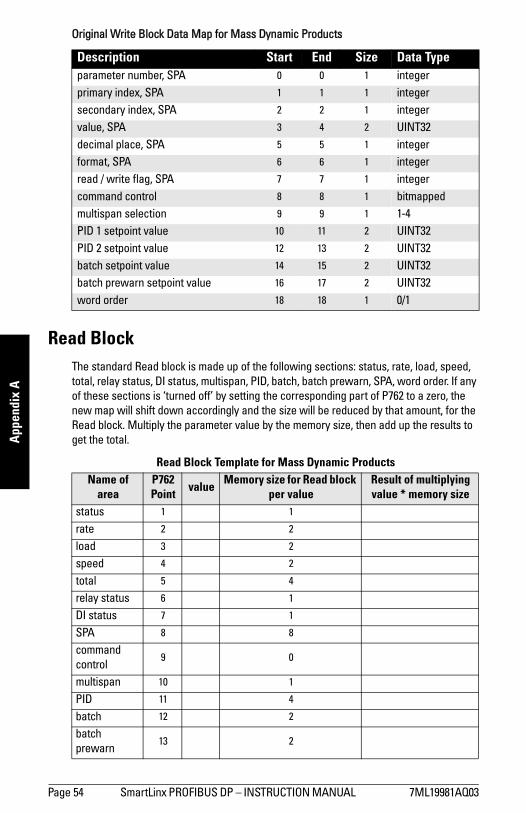
mm
mm
m
App
endi
x A
Original Write Block Data Map for Mass Dynamic ProductsRead BlockThe standard Read block is made up of the following sections: status, rate, load, speed, total, relay status, DI status, multispan, PID, batch, batch prewarn, SPA, word order. If any of these sections is ‘turned off’ by setting the corresponding part of P762 to a zero, the new map will shift down accordingly and the size will be reduced by that amount, for the Read block. Multiply the parameter value by the memory size, then add up the results to get the total.
Description Start End Size Data Typeparameter number, SPA 0 0 1 integerprimary index, SPA 1 1 1 integersecondary index, SPA 2 2 1 integervalue, SPA 3 4 2 UINT32decimal place, SPA 5 5 1 integerformat, SPA 6 6 1 integerread / write flag, SPA 7 7 1 integercommand control 8 8 1 bitmappedmultispan selection 9 9 1 1-4PID 1 setpoint value 10 11 2 UINT32PID 2 setpoint value 12 13 2 UINT32batch setpoint value 14 15 2 UINT32batch prewarn setpoint value 16 17 2 UINT32word order 18 18 1 0/1
Read Block Template for Mass Dynamic ProductsName of
areaP762 Point
valueMemory size for Read block
per valueResult of multiplying value * memory size
status 1 1
rate 2 2
load 3 2
speed 4 2
total 5 4
relay status 6 1
DI status 7 1
SPA 8 8
command control
9 0
multispan 10 1
PID 11 4
batch 12 2
batch prewarn
13 2
Page 54 SmartLinx PROFIBUS DP – INSTRUCTION MANUAL 7ML19981AQ03

mm
mm
m
Appendix A
Example 1If you want only rate, load, and batch prewarn, the chart is:
The input data block (Read block) is now 6 words in size (12 bytes) and the Word numbers have shifted to a lower value:
New Read Block Data Map
Original Read Block Data Map for Mass Dynamic Products
word order 14 1
status 2 15 1
batch total 16 2
Total words:
Name of area P762 Point valueMemory size for Read
block per valuevalue *
memory sizestatus 1 0 1 0
rate 2 1 2 2
load 3 1 2 2
speed 4 0 2 0
total 5 0 4 0
relay status 6 0 1 0
DI status 7 0 1 0
SPA 8 0 8 0
command control
9 0 0 0
multispan 10 0 1 0
PID 11 0 4 0
batch 12 0 2 0
batch prewarn 13 1 2 2
word order 14 0 1 0
status 2 15 0 1 0
batch total 16 0 2 0
total words: 6
Word Description
0-1 rate2-3 load4-5 batch prewarn
Description Start End Size Typeinstrument status 0 0 1 bitmappedrate 1 2 2 UINT32load 3 4 2 UINT32speed 5 6 2 UINT32total 1 7 8 2 UINT32
7ML19981AQ03 SmartLinx PROFIBUS DP – INSTRUCTION MANUAL Page 55

mm
mm
m
App
endi
x A
total 2 9 10 2 UINT32relay status 11 11 1 bitmappeddiscrete input status 12 12 1 bitmappedmultispan selection 13 13 1 integerPID 1 setpoint value 14 15 2 UINT32PID 2 setpoint value 16 17 2 UINT32batch setpoint value 18 19 2 UINT32batch prewarn setpoint value 20 21 2 UINT32parameter, SPA 22 22 1 integerprimary index, SPA 23 23 1 integersecondary index, SPA 24 24 1 integervalue, SPA 25 26 2 UINT32decimal place, SPA 27 27 1 integerformat, SPA 28 28 1 integerread / write flag, SPA 29 29 1 1/0word order 30 30 1 1/0instrument status 21 31 31 1 bitmappedbatch total1 32 33 2 UINT32
1. This is only available in firmware V 3.05 or higher
Description Start End Size Type
Page 56 SmartLinx PROFIBUS DP – INSTRUCTION MANUAL 7ML19981AQ03

mm
mm
m
Index
IndexAAiRanger Series
connection 8operation 11
Alarm and Status 28Application Layer 19BBatch Prewarn Setpoint 34Batch Pre-Warn Setpoint Value 38Batch Setpoint 34Batch Setpoint Value 38Baud Rate 13Bit Values 40Bus Address 13CCable
connector 8routing 7
Command Control, Operational Commands32Communication Setup 13Communication Speed 13Compatibility 5Compatible Instruments 4Configuration
files 13slave device 14
Configuration Status 37CraneRanger
connection 8operation 11
DData Access Methods 20Data Map
level products 24mass dynamics products 30
Data Types 40Bit Values 40integer 40mass dynamic products 40Numeric 40P111 Values 43Split Values 41text messages 42UINT32 41
Decimal Place 25, 26, 29, 31Direct Access 20
Discrete Input Status 38EEnviroRanger ERS 500
Operation 11, 12EnviroRanger ERS 500 (rack and panel)
connection 9EnviroRanger ERS 500 (wall mount)
connection 9Error Conditions 12Error Status LED’s 11FFlag 29Format 25, 26, 29, 31Freeze 33GGSD Files 13IIndex 29
alarm and status 28direct access 20MPA 21point reading 28primary 19secondary 20
Indexed Parameters 19Installation 5Instrument
compatibility 5Instrument Status 36Integer 40InterRanger DPS 300
connection 8operation 11
LLED's
Error state 11LEDs 11level products
data map 24Load 37Mmanual 1
overview 1Mark 20Mass Dynamics
data map 30Master Reset 22Measurement Point Status 27Milltronics BW 500
connection 9
7ML1998IAQ03 SmartLinx Profibus-DP – INSTRUCTION MANUAL Page 57

mm
mm
m
Inde
x
Milltronics BW500Operation 11, 12MPA
overview 21parameter indexing 21using 21
Multiple Parameter Access 20, 21Multispan Selection 34, 38NNetwork Address 13Numeric Values 40OOperating Mode 26Operation 11Operation LED 12PP999 22Parameter 25, 31Parameter Indexes 19parameter indexing 22Parameter Number 25, 29, 39Parameter Number and Secondary Index 29Parameter Secondary Index 25PID 1 Setpoint Value 38PID Mode 32PID Setpoints 34PID Status 36, 39Point 19, 29Point Alarm and Status 28Point Reading 28Point-on-Priority 24Primary Index 19, 25, 31, 39Print 33Print Status 37Program Mode 37RRate 37Read
level products 27mass dynamics products 34
Read/Write Flag 26Reading 28
MPA 21SPA 22
Relay Function Codes 43Relay Status 38Returned Values 28SSecondary Index 20, 25, 31, 39Setpoint Source 33
Setupcommunication 13
Single Parameter Access 22SmartLinx® Profibus DP 1SPA
overview 22reading 22using 22writing 23
Span 33Span Status 37Specifications 4Speed 37Split Values 41Status 11Ttarget audience 1Terminal Block
connector 8Termination Switch 10Text Messages 42Total 1 37Total 2 38Totalizer Reset 33Totalizer Status 37Totalizing Status 37Troubleshooting 45UUINT32 41Unsigned Double Precision Integer 41Using
MPA 21SPA 22
VValue 26, 29, 31, 39WWiring
connector 8Word Order 39Write
level products 24mass dynamics products 30, 31
Write Privileges 37Writing 23ZZero 33Zero Status 36
Page 58 SmartLinx Profibus-DP – INSTRUCTION MANUAL 7ML1998IAQ03

www.siemens.com/processautomation
Printed in Canada
###$������$� �!#���%��
###$������$� �!��&��
� ��� ����' �����
###$������$� �!�� ������� ����
����������� ������������������������������������� �!��""������#��� ��$��%&'�'�'�(�)�* �
� #+���������'����,���� ��-�����������*./���0�123�4����3�3
��'��5�����- #����-�6�����������
7����������"2�� *7ml19981AQ03*


