download ipm manual
TRANSCRIPT
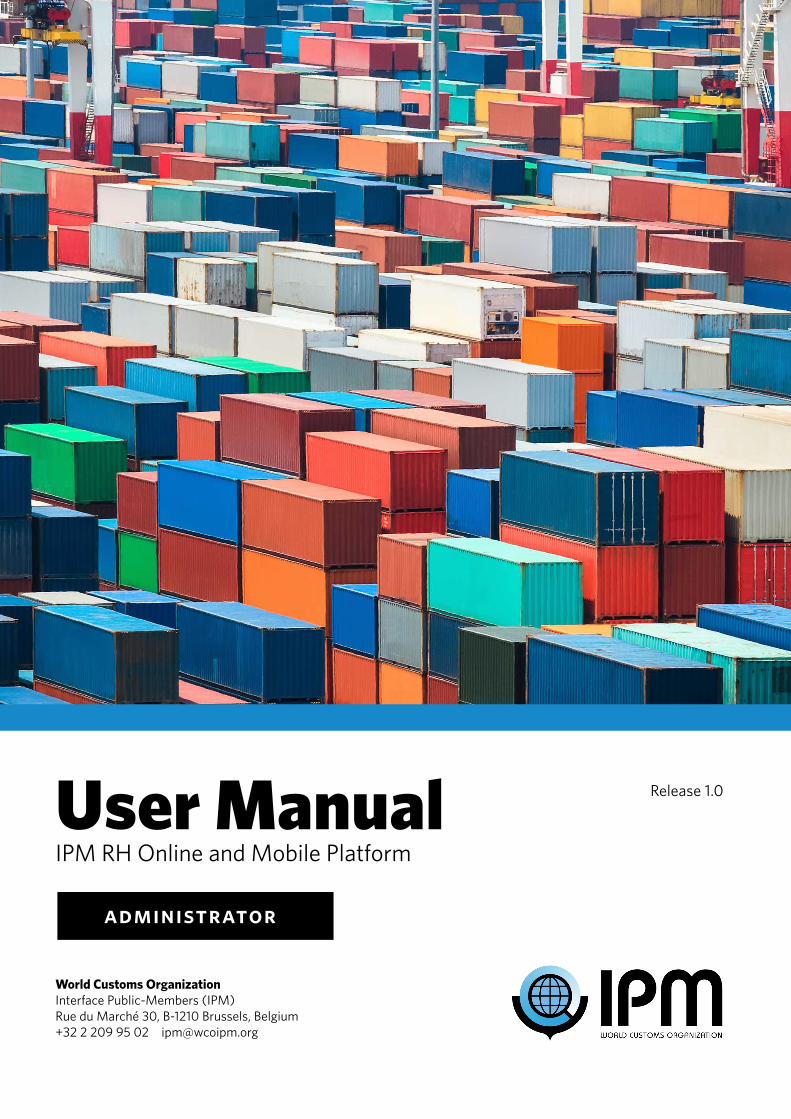
User ManualIPM RH Online and Mobile Platform
World Customs OrganizationInterface Public-Members (IPM)Rue du Marché 30, B-1210 Brussels, Belgium+32 2 209 95 02 � [email protected]
administrator
Release 1.0
list of figures 2welcome 4prelude 5 How does IPM help Customs officers 5 intercept merchandise? How does IPM empower rights holders? 5manual guidelines 6 Recurring references 6 User roles and responsibilities 6ipm at a glance 7how to gain access to the online ipm web platform 8how to use the ipm web-based tool 13 Finding your way around 13 Dashboard 14 Statistical information 15 Users management 19 Creating a brand 21 Creating a category 26 List of pre-defined industries 28creating a product 29 Clues 33 SKU’s 34 Traders 35 Security features 36 Packaging information 37 Routes 38 Characteristics 39creating a contact 40creating a news story 42creating an alert 44additional features and functions 45 Mass upload tool 46 Mass edit tool 47 GDSN Link 49 WCO (IPM) – EUIPO (EDB) link 51how to gain access to the ipm mobile app 52how to use the ipm mobile app 54 Finding your way around 55 Navigation 55 Performance overview 56 Search 57 Scan 59 Product information 60 Alerts 76 News 77 Address Book 78 Contacting the WCO 80 Help function 81 Personal profile 82 Logging out 83afterword 84acronyms 85notes 86
ContentIPM RH Online Platform
administrator
Figure 1 Initial welcome email to RH administrator 8Figure 2 Password reset screen 8Figure 3 Password reset email to RH administrator 9Figure 4 IPM Login screen 10Figure 5 Default Dashboard page 11Figure 6 User Settings page 12Figure 7 IPM Dashboard – Default view upon login 13Figure 8 IPM Navigation pane – Dashboard button 14Figure 9 IPM Navigation pane – Statistics button 15Figure 10 IPM Statistics – Charts view (1) 15Figure 11 IPM Statistics – Charts view (2) 16Figure 12 IPM Statistics – Geographical map view (1) 17Figure 13 IPM Statistics – Geographical map view (2) 18Figure 14 IPM Navigation pane – Statistics button 19Figure 15 IPM User settings – User overview 19Figure 16 IPM User settings – New user screen 20Figure 17 IPM Navigation pane – Brands button 21Figure 18 IPM Brands – Overview page 21Figure 19 IPM Brands – Details page (1) 22Figure 20 IPM Brands – Submit and Save and Publish buttons 23Figure 21 IPM Brands – Details page (2) 24Figure 22 IPM Brands – Details page (3) 25Figure 23 IPM Navigation pane – Categories button 26Figure 24 IPM Categories – Overview page 26Figure 25 IPM Categories – Details page (1) 27Figure 26 IPM Categories – Details page (2) 28Figure 27 IPM Navigation pane – Products button 29Figure 28 IPM Products – 29Figure 29 IPM Products – Details page (1) 31Figure 30 IPM Products – Details page (2) 32Figure 31 IPM Products – Details page (3) – Clues 33Figure 32 IPM Products – Details page (4) – SKUs 34Figure 33 IPM Products – Details page (5) – Traders 35Figure 34 IPM Products – Details page (5) – Traders type 35Figure 35 IPM Products – Details page (6) – Security features 36Figure 36 IPM Products – Details page (7) – Security features type 36Figure 37 IPM Products – Details page (7) – Packaging information 37Figure 38 IPM Products – Details page (8) – Routes 38Figure 39 IPM Products – Details page (9) – Characteristics 39Figure 40 IPM Navigation pane – Contacts button 40Figure 41 IPM Contacts – Overview page 40Figure 42 IPM Contacts – Details page 41Figure 43 IPM Navigation pane – News Stories button 42Figure 44 IPM News Stories – Overview page 42Figure 45 IPM News Stories – Details page 43Figure 46 IPM Navigation pane - Alerts button 44Figure 47 IPM Alerts – Overview page 44Figure 48 IPM Alerts – Details page 44Figure 49 IPM Navigation pane – Brands button 45Figure 50 IPM Brands – New brand page 45Figure 51 Import file button 45Figure 52 Product overview screen 46Figure 53 Product overview screen 48
List of figuresIPM RH Online Platform
administrator

Figure 54 IPM Mobile APP – GDSN information screen (1) 50Figure 55 IPM Mobile APP – GDSN information screen (2) 50Figure 56 Example architecture diagram 51Figure 57 IPM Mobile – App Store download 52Figure 58 IPM Mobile APP – Application icon 52Figure 59 IPM Mobile APP – Example of APP icon on screen 52Figure 60 IPM Mobile APP – Login screen 53Figure 61 IPM Mobile APP – Password reset screen 53Figure 62 IPM Mobile APP – Default IPM Home screen 54Figure 63 IPM Mobile APP – Navigation button 55Figure 64 IPM Mobile APP – Navigation pane 55Figure 65 IPM Mobile APP – User personal performance screen 56Figure 66 IPM Mobile APP – Search button on Home screen 57Figure 67 IPM Mobile APP – Search by entering product name 57Figure 68 IPM Mobile APP – Example of ‘demo’ product search result 58Figure 69 IPM Mobile APP – Scan button on Home screen 59Figure 70 IPM Mobile APP – Search by scanning a product barcode 59Figure 71 IPM Mobile APP – Search results for product without security solution 60Figure 72 IPM Mobile APP – Product information - Report button 61Figure 73 IPM Mobile APP – Reporting a Case of counterfeit goods 61Figure 74 IPM Mobile APP – Confirmation of successful submission of a Reported Case 62Figure 72 IPM Mobile APP – SSP Solution categories 63Figure 76 IPM Mobile APP – Search result for product with security solution 64Figure 77 IPM Mobile APP – Verification details (1) 65Figure 78 IPM Mobile APP – Verification details (2) 66Figure 79 IPM Mobile APP – Verification details (3) 66Figure 80 IPM Mobile APP – Verification details (4) 67Figure 81 Example IPM product verification architecture diagram 68Figure 82 IPM Mobile APP – Verification details (5) 69Figure 83 IPM Mobile APP – Verification details (6) 70Figure 84 IPM Mobile APP – Verification details (7) 70Figure 85 IPM Mobile APP – Information tabs – Traders 71Figure 86 IPM Mobile APP – Information tabs – Clues 71Figure 87 IPM Mobile APP – Information tabs – Routes 72Figure 88 IPM Mobile APP – Information tabs – Packaging 72Figure 89 IPM Mobile APP – Information tabs – Security features 73Figure 90 IPM Mobile APP – Information tabs – Cases 73Figure 91 IPM Mobile APP – Information tabs – Contacts (1) 74Figure 92 IPM Mobile APP – Information tabs – Contacts (2) 75Figure 93 IPM Mobile APP – Alerts screen 76Figure 94 IPM Mobile APP – Example alert details 76Figure 95 IPM Mobile APP – News screen 77Figure 96 IPM Mobile APP – Address Book screen (1) 78Figure 97 IPM Mobile APP – Address Book screen (2) 79Figure 98 IPM Mobile APP – Sending email to WCO 80Figure 99 IPM Mobile App – Option for adding a picture to a message 80Figure 97 IPM Mobile APP – Help Function screens 81Figure 101 IPM Mobile APP – Personal profile 82Figure 102 IPM Mobile App – Changing user name 82Figure 103 IPM Mobile APP – Logout options screen 83
List of figuresIPM RH Online Platform
administrator

WelcomeAdministrator Manual
IPM RH Online Platform
Dear Rights Holders
The World Customs Organization (WCO) and the Interface Public-Member (IPM) Private Sector Team thank you for joining us in the fight against counterfeiting.
The WCO is an independent intergovernmental body whose mission is to enhance the effectiveness and efficiency of Customs Authorities. Today, the WCO represents 180 Customs administrations that collectively process approximately 98% of world trade. Besides the vital role played by the WCO in stimulating the growth of legitimate international trade, its efforts to combat fraudulent activities are also recognized internationally. More than 50% of these countries support IPM and make it available to their local Customs officers in the field.
The WCO IPM tool is the only global anti-counterfeiting platform. IPM consists of a web-based platform and mobile APP allowing rights holders to share relevant product information and a security solution gateway enabling Customs officers to verify the authenticity of products online. IPM is also a real-time communication hub between the private sector and Customs officers on the ground. Connecting IPM to existing authentication and traceability solutions offered by Security Solution Providers (SSP) is a major leap forward, which will help Customs officers to assess more effectively whether or not a product is genuine.
These Track&Trace security solutions include alpha numeric, data matrix, Near Field Communication (NFC) as well as image based solutions.
The WCO IPM team invites all rights holders to become a member and welcomes SSPs to join the WCO in the fight against counterfeit goods.
This manual provides essential information on: 1. how to gain access to the online platform, 2. how to use the IPM web-based tool, 3. how to use the IPM Mobile APP.
We truly appreciate your support and commitment in this fight against counterfeiters.
Sincerely,The WCO IPM Team.
WCO IPM - Manual for RH Administrators 4
PreludeAdministrator Manual
IPM RH Online Platform
How does IPM help Customs officers intercept merchandise?The IPM tool is designed by the WCO to provide a uniform platform where actionable information is made available by the rights holder to the Customs officers to help raise or confirm a suspicion and possibly verify a product thanks to various security features which may be available.
It is up to the rights holder to make actionable information available to the Customs officer, who will consult the IPM database to help him in his decision-process.
Hence, the more information the rights holder enters into IPM, the more likely a Customs officer can verify the authenticity of the inspected product, either via the IPM Online Web Platform or via the IPM Mobile APP. When uploading information into IPM, as a good practice, keep in mind what you as a rights holder would tell Customs officers during a training on how to best identify counterfeit products, for example what specific color your logo should have, font type, specific packaging characteristics … i.e. anything which will help Customs identify and intercept counterfeit products.
For field Customs officers, the IPM Mobile APP is an essential tool.
How does IPM empower rights holders?By enabling Customs officers to review specific product data, the rights holder is already proactively fighting counterfeiters.
Customs officers in the field rely on information available in IPM to make an informed decision and possibly intercept the goods. The more qualitative and actionable the information is in IPM, the better informed the Customs officers.
WCO IPM - Manual for RH Administrators 5

Recurring referencesThroughout the manual, several icons will be repeated. Below is a quick overview of their meaning:
User roles and responsibilitiesThe rights holder will be referred to as RH and can have different types of login: RH Administrator, RH User and RH Agent. The RH Administrator can create users, brands, import files, etc., the RH User can create, edit and view contacts, import files, categories and products. RH Agents can only view information of the RH product portfolio.
Customs officers will be referred to as CO and have one type of login, which is the same as the RH Agent, with only one exception: the CO can obviously see all products within IPM from different RHs.
Below is a brief overview of the available roles and responsibilities per IPM user type.
Manual guidelinesAdministrator Manual
IPM RH Online Platform
WCO IPM - Manual for RH Administrators 6
This icon marks important items to note about IPM
This icon announces a best practice in IPM
This icon indicates an example of use in IPM
functionrh administrator rh user rh agent other customs officer
Create Modify Delete Publish Unpublish Read Create Modify Delete Publish Unpublish Read Read Read Create Read
Brand
Category
Product
Contact
News story
Alert
Case
SSP Report
As soon as a field has been changed, it will be marked with a “*” in the IPM screen, enabling the RH to track the changes that were made in the specific screen.
IPM at a glanceAdministrator Manual
IPM RH Online Platform
AccessTo access the IPM platform, you need to ensure that you’ve enrolled into the appropriate IPM membership. You can request a membership by contacting the WCO IPM Private Sector Team by email: [email protected].
EnrollingOnce the membership details are set, a local administrator will need to be defined within the rights holder and his/her email address and contact details need to be shared with the WCO IPM Private Sector Team. The IPM Private Sector Team will then create an administrator account for the rights holder.
Rights holder’s administratorWith the account created, the administrator will receive an email with his/her login credentials.
The login of a user is his/her email address.
The password that is shared in the initial email from IPM is a temporary password that we recommend to change upon your first login into the IPM web-based tool.
The link to the IPM platform will also be part of the initial email and will point to the following address: https://app.wcoipm.org/login.
Getting startedUpon logging into IPM, the administrator will see the login screen, displaying the Navigation pane on the left and the Dashboard on the right.
From the navigation pane, the administrator can select the different options that are available and which will be explained in more detail later on in this document.
WCO IPM - Manual for RH Administrators 7

How to gain access to the online IPM web platform
Administrator Manual IPM RH Online Platform
Receiving credentialsThe RH admin will receive an email from the IPM platform indicating the following information:
WCO IPM - Manual for RH Administrators 8
Please note the following important elements inside the email:
1. Login: the administrator login is the same as the administrator email address.2. Password: the password that is provided as part of the initial email is a temporary password. We recommend that the administrator change this password upon logging in the IPM platform.3. https://app.wcoipm.org is the hyperlink to the website of the web-based IPM platform. To gain access to the platform, the administrator can click this link or copy the link into any web browser. The page will automatically reflect the login page.
For next steps, please refer to the login section.
Password resetIn case you no longer remember your password or you have lost the initial invitation to the IPM platform, you can request a new password. To do so, please follow these steps:
1. Enter this link into your internet browser or click on it: https://app.wcoipm.org/password-reset. You will then access the password reset page of IPM.
Figure 1 – Initial welcome email to RH administrator
Figure 2 – Password reset screen
Email entry fieldSubmit button
Back button
2. Enter your email address in the field marked “Enter E-mail”.3. Click the “Submit” button.4. Click on “Back to Login”, this will bring you back to the IPM login page.
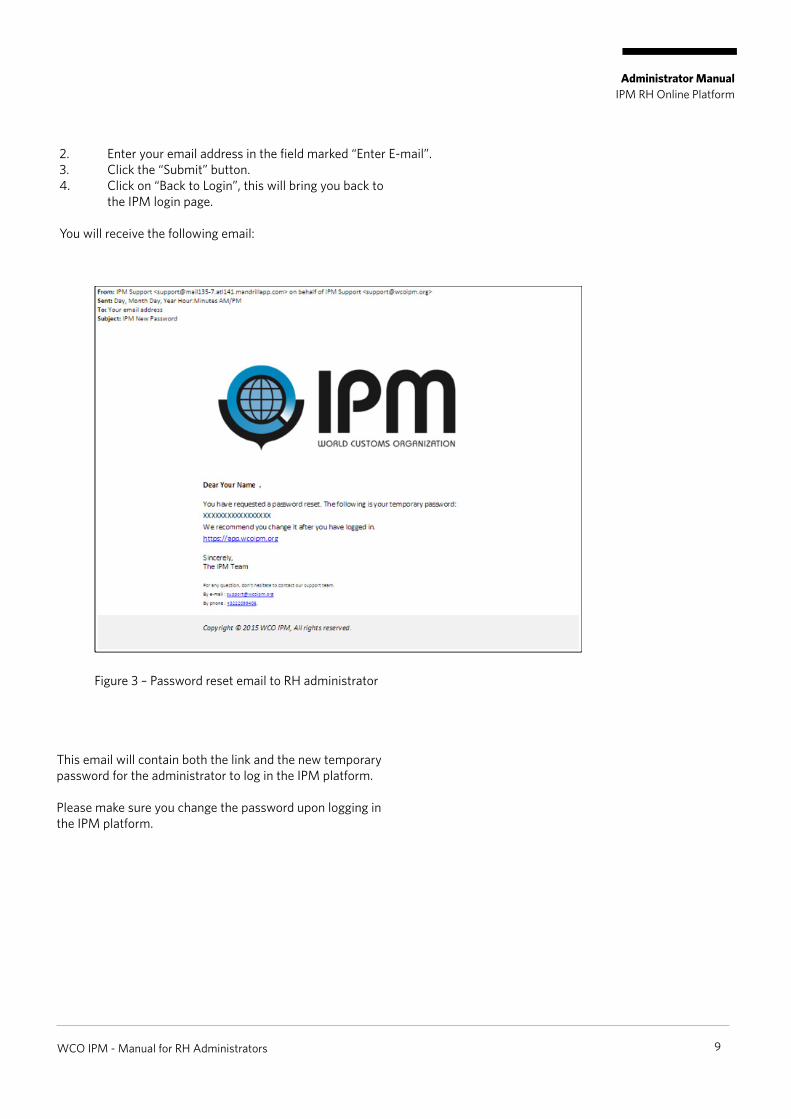
You will receive the following email:
Administrator Manual IPM RH Online Platform
This email will contain both the link and the new temporary password for the administrator to log in the IPM platform.
Please make sure you change the password upon logging in the IPM platform.
Figure 3 – Password reset email to RH administrator
WCO IPM - Manual for RH Administrators 9

Logging in IPMAt the first login, please make sure to enter the correct login and password information from the initial IPM email into the IPM login screen.
You can select different languages for the IPM interface, via the drop-down selection list.
Click on the language you would like to use.
Administrator Manual IPM RH Online Platform
Next click “Sign In” and you will be directed by default to the IPM administrator Dashboard page.
In case you entered the wrong login or password, the system will notify you.
Email entry field
Password entry field
Language selection
Sign-in button
Password reset link
Figure 4 – IPM Login screen
WCO IPM - Manual for RH Administrators 10
Remember that when you login after changing your password, to enter the new password in the field.

Changing your passwordAdministrator Manual
IPM RH Online Platform
Upon first logging in the IPM platform, it is best practice to change your password. To do so, please follow the steps as described in this section.
Below is an example of what your IPM Dashboard may look like. The screen layout may differ a bit, but you will notice two main sections.
On the left you see the navigation pane with on top your Brand logo. Below the image, is your name, which is the link to your profile settings page. Just underneath your name, is the “Logout” button.
On the right you will notice the IPM Dashboard high level overview. We will provide additional details on this screen in the IPM Dashboard section of this manual.
From the Dashboard screen, click on your name (marked with orange arrow in figure 5) in the navigation pane on the left of the screen, to access your profile settings page.
Figure 5 – Default Dashboard page
WCO IPM - Manual for RH Administrators 11

Changing your passwordAdministrator Manual
IPM RH Online Platform
WCO IPM - Manual for RH Administrators 12
The administrator user profile settings page will enable the RH administrator to edit his/her user settings. We will provide additional details on adding new users in the IPM User Management section of this manual.
To change your password, please follow the next steps (marked with orange arrow in figure 6):
1. enter your old password first in the “OLD PASSWORD” field, 2. enter your new password in the “NEW PASSWORD” field,3. confirm your new password by re-entering it in the field “NEW PASSWORD CONFIRMATION”.
Press the “Change” button for the changes to take effect (marked with green arrow in figure 6).
Figure 6 – User Settings page
Note that you can also change your first and last name as well as your language settings for the IPM platform interface in this screen.The RH administrator can also change the RH logo image by dragging and dropping a new image in the image box or by clicking on the image box and selecting an image file from the explorer window that will automatically appear.
Remember to click on “Submit” in order for your changes to be stored and take effect.

How to use the IPM web-based tool
Administrator Manual IPM RH Online Platform
Finding your way around
OverviewThe IPM Dashboard is the home of the IPM web-based platform.
WCO IPM - Manual for RH Administrators 13
Please note that all pictures in the manual are based on a Demo account with products that have been entered for demonstration purpose. Therefore, the information displayed on your screen may differ from the figures in this manual.
The IPM platform displays two sections. On the left of the screen the user has access to the Navigation pane, which hosts a number of selection buttons, such as Stats, Products, Categories, Brands, etc.
On the right of the screen, the large pane will display the corresponding screen to the button selected in the navigation pane. Figure 7 displays the default screen upon logging in the IPM platform.
Logout Name Brand Navigation High-level statistics Product search field
1
2
3
4
5
6
7
8
Figure 7 – IPM Dashboard – Default view upon login

Administrator Manual IPM RH Online Platform
NavigationThe navigation pane on the left provides quick access to several different pages:
1. the IPM Dashboard itself;2. the Statistics page that allows for different views of the statistics, including charts as well as on a map;3. the Brands page allows the administrator to create, edit, modify and delete brands;4. the Users page allows the administrator to manage the users of the IPM platform for his RH account;5. the Contacts page allows the RH to enter local, regional as well as global contacts for his brand(s);6. the Categories pages allows the administrator to create the different categories the products can be divided into;7. the News Stories page allows the RH to publish news stories about his/her products to be shared with Customs officers locally, regionally or globally;8. the (product) Alerts allow the RH to send product specific alerts to COs, locally, regionally or globally.
DashboardThe right hand pane displays the following information as shown in figure 7:
41 Searches: this means that COs have conducted 47 product searches on products that are defined within the RH product portfolio. The product appeared in the product search list.
6 Cases: this reflects the number of counterfeit cases that COs have reported on RH products.
28 Verifications: this is the number of times that a product fitted with an SSP security solution has been verified.
8 SSP Reports: this reflects the number of times COs have made a suggestionto the RH to start using a certain security solution on its packaging or labels.
124 Views: this signifies that COs have viewed the detailed information on different products within the RH portfolio for a total amount of 124 times.
These statistics provide a high level overview. The information on when and where products have been searched, viewed or even verified, is also captured by IPM and made available in the “Stats” section.
WCO IPM - Manual for RH Administrators 14
1
2
3
4
5
6
7
8
Figure 8 – IPM Navigation pane – Dashboard button

Administrator Manual IPM RH Online Platform
Statistical informationThe IPM Statistics provide a concise overview of the number of product views, searches and other interactions with products within the RH’s portfolio.
IPM Statistics can be accessed from anywhere within IPM by clicking on the “Stats” button in the navigation pane, as shown in Figure 9 below.
Clicking the button will display a dropdown selection. IPM Statistics can be displayed in two forms. Either as a chart or on a map.
ChartsIPM Statistics can be displayed based on a timeline, whereby each interaction with the products within the portfolio is carefully logged and this information is gathered and made available to the RH. Only the information pertaining to the RH product portfolio is made available to the RH.
The RH is able to export the information into a .CSV file. Figure 10 below depicts an example of how the information might appear on your screen. Please note that the information on your screen may look different as this is subject to change.
WCO IPM - Manual for RH Administrators 15
Figure 9 – IPM Navigation pane – Statistics button
Figure 10 – IPM Statistics – Charts view (1)

Administrator Manual IPM RH Online Platform
The previous screen shows the unfiltered statistics. The RH can filter the information based on one selected or all RH brands, by entering the brand selection information into the Brand filter field.
The RH can also filter the information based on a specific product, by entering the product name into the Product filtering field.
Given that these are time-based statistics, the RH can also filter the information based on a specific time period, for example if the RH would like to see how many times a specific product was verified by Customs in December 2015, then the RH needs to fill in the product name in the filter and enter the starting date (2015-12-1) and end date (2015-12-31). Note that when entering a date, clicking on the From or To field will display a calendar under the field, from where the RH can select the exact date.
WCO IPM - Manual for RH Administrators 16
Figure 11 – IPM Statistics – Charts view (2)
IPM will automatically provide the correct timeline. The RH can click on Views, Searches, Reports, SSP Reports and Others, to hide those statistics. Now the RH has only one timeline with one line of statistics on the selected products, indicating the number of Verifications for the month of December 2015.
With this selection in place, note that the detailed timeline data below the graph has also been adjusted to reflect the graph, hence the RH can now export this specific data into a .CSV file, by clicking on the “Export As CSV File” button.
By clicking on the colored buttons such as Views, Searches, Reports, etc. you can toggle the display of the graph either on or off. For example, in Figure 11 below, the Reports and Others have been switched off. When switching off a selection, the button will be slightly darkened

Administrator Manual IPM RH Online Platform
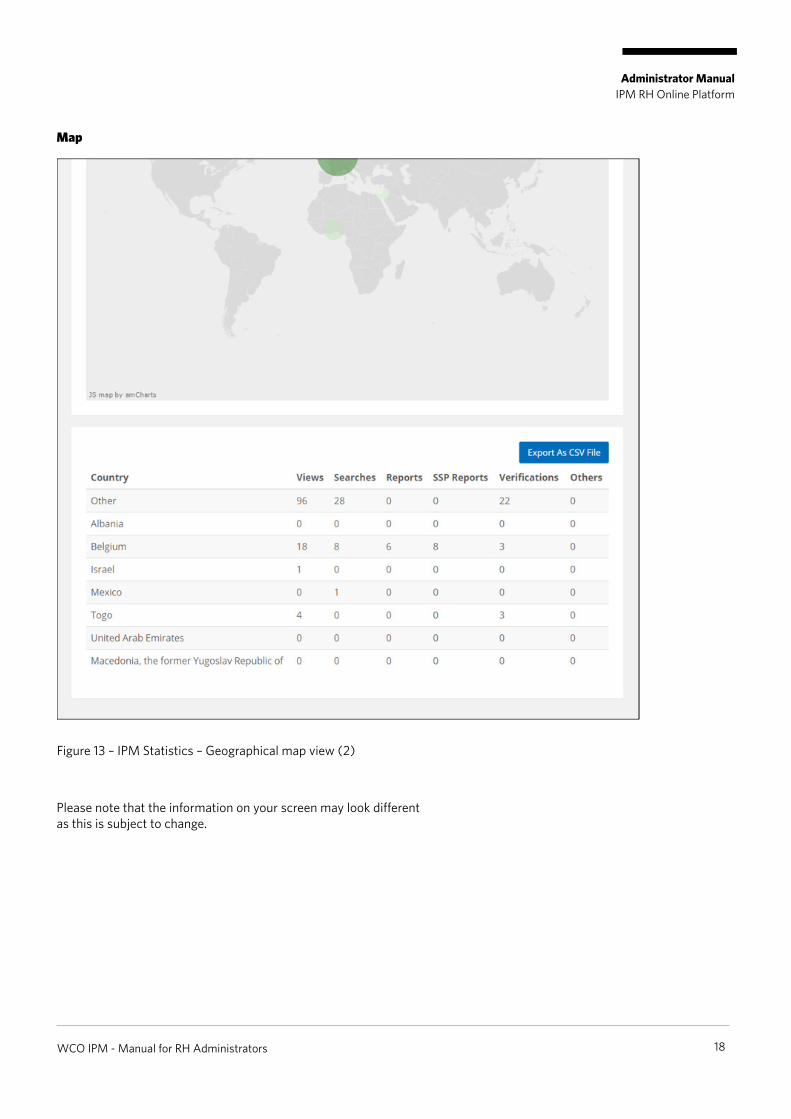
MapIPM Statistics can be displayed on a map, whereby interactions with the products within the portfolio are grouped per country and this information is graphically made available.
You are also able to export the information into a .CSV file. Figure 12 below depicts an example of how the information might appear on your screen.
Please note that the information on your screen may look different as this is subject to change.
As indicated in Figure 12, the information can be filtered based on Brands and even Product level.
In addition to Brand and Product filtering, you can also set a time period filter.
WCO IPM - Manual for RH Administrators 17
Figure 12 – IPM Statistics – Geographical map view (1)
Administrator Manual IPM RH Online Platform
Map
Please note that the information on your screen may look different as this is subject to change.
WCO IPM - Manual for RH Administrators 18
Figure 13 – IPM Statistics – Geographical map view (2)

Administrator Manual IPM RH Online Platform
Users Management
The IPM Users management provides an overview of people in your team who have been granted access to the information in your portfolio.
It enables the administrator to create new users, modify existing user information and access level as well as delete users from the portfolio.
IPM Users management can be accessed from anywhere within IPM by clicking on the “Users” button in the navigation pane, as shown in Figure 14 on the right.
Figure 15 displays the User management screen which by default displays 10 rows of users. This can be modified to display 10, 25, 50 or even 100 rows.
The administrator can look up users via the Search function.
Multiple users can be selected by checking the checkbox.
The administrator can delete multiple users by clicking on the “Delete Selected” button, after selecting multiple users.
When more users are defined, several pages with users can be accessed by scrolling through the pages using the buttons on the bottom right of the page.
WCO IPM - Manual for RH Administrators 19
Figure 14 – IPM Navigation pane – Statistics button
Figure 15 – IPM User settings – Users

Administrator Manual IPM RH Online Platform
Users Management
Clicking the “New User” button brings you to the next screen as displayed in Figure 16 below. To create a new user, enter the first name, last name and email address into the corresponding fields and click on submit.
Clicking on the “Submit” button is required for the entered data to be stored and the account to be activated. Once done, the system will automatically notify the new user of the creation of the account.
There are different types of users that can be created. By default a user will have editing rights for creating, modifying and removing information from the product portfolio.
The administrator can opt to click on “yes” for the question “Is Agent?”. When doing so, the user that is created will only have viewing rights for the information in the portfolio.
WCO IPM - Manual for RH Administrators 20
Figure 16 – IPM User settings – New user screen
Administrator Manual IPM RH Online Platform
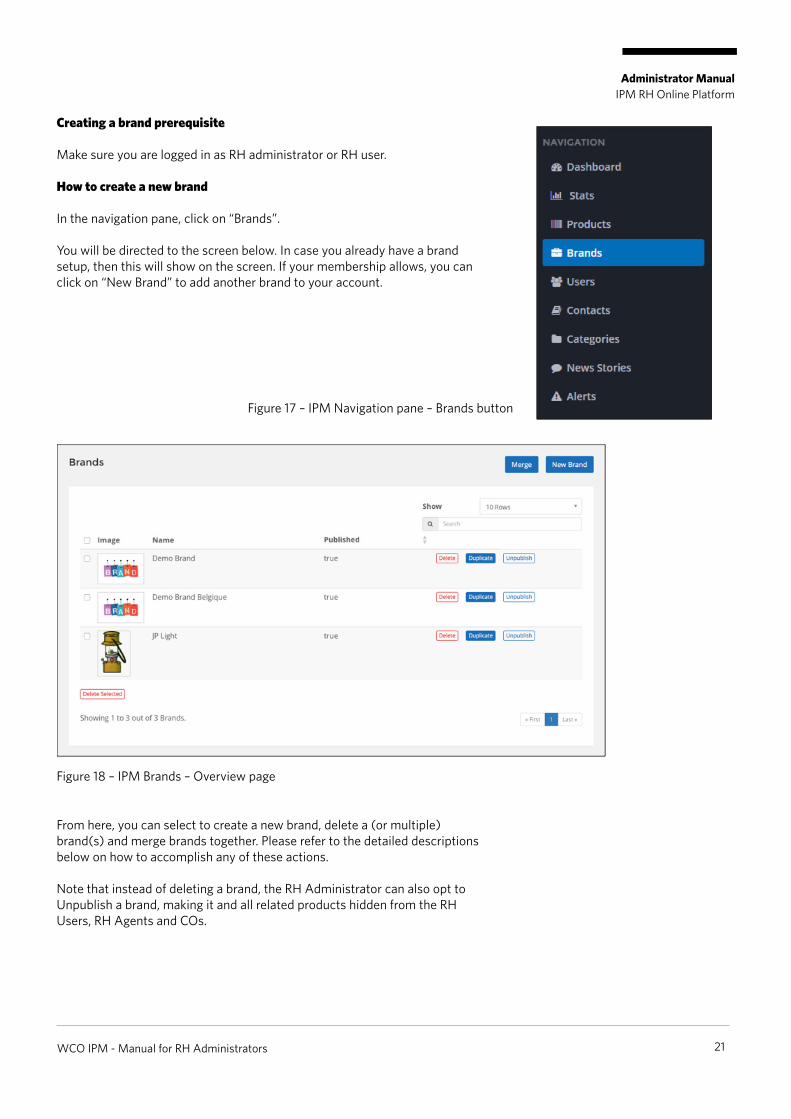
Creating a brand prerequisite
Make sure you are logged in as RH administrator or RH user.
How to create a new brand
In the navigation pane, click on “Brands”.
You will be directed to the screen below. In case you already have a brand setup, then this will show on the screen. If your membership allows, you can click on “New Brand” to add another brand to your account.
From here, you can select to create a new brand, delete a (or multiple) brand(s) and merge brands together. Please refer to the detailed descriptions below on how to accomplish any of these actions.
Note that instead of deleting a brand, the RH Administrator can also opt to Unpublish a brand, making it and all related products hidden from the RH Users, RH Agents and COs.
WCO IPM - Manual for RH Administrators 21
Figure 18 – IPM Brands – Overview page
Figure 17 – IPM Navigation pane – Brands button
Administrator Manual IPM RH Online Platform
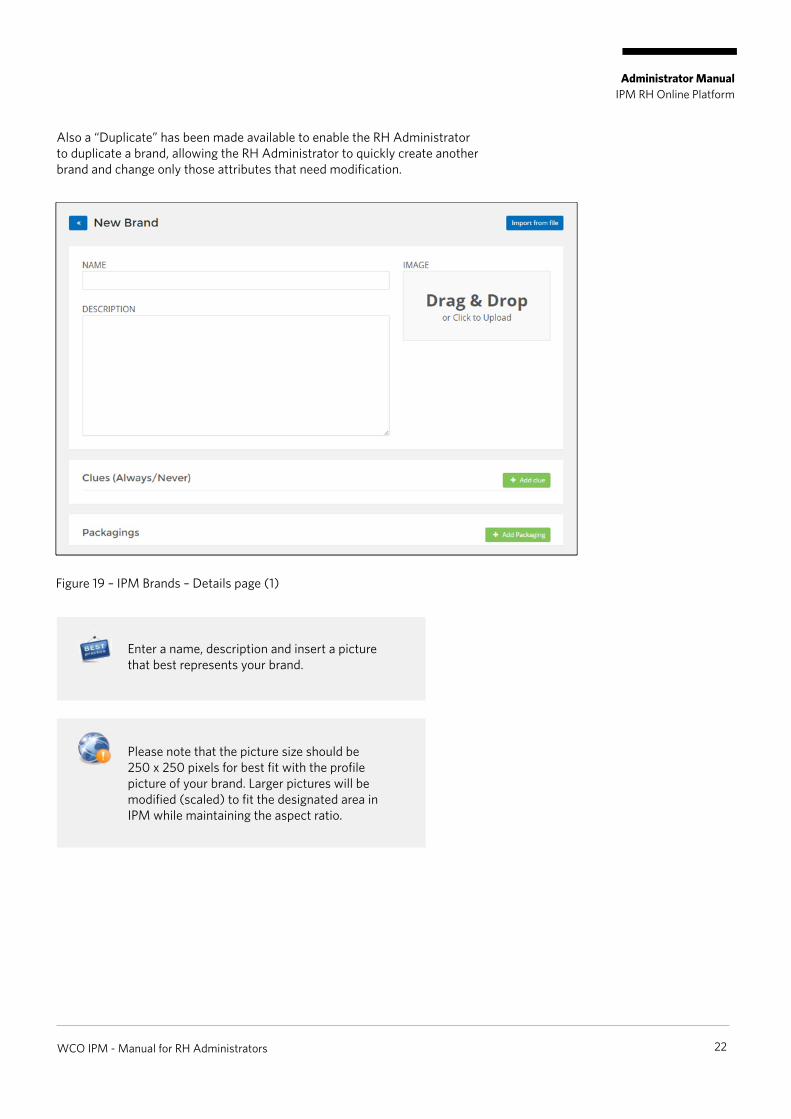
Also a “Duplicate” has been made available to enable the RH Administrator to duplicate a brand, allowing the RH Administrator to quickly create another brand and change only those attributes that need modification.
WCO IPM - Manual for RH Administrators 22
Figure 19 – IPM Brands – Details page (1)
Please note that the picture size should be 250 x 250 pixels for best fit with the profile picture of your brand. Larger pictures will be modified (scaled) to fit the designated area in IPM while maintaining the aspect ratio.
Enter a name, description and insert a picture that best represents your brand.
Administrator Manual IPM RH Online Platform
WCO IPM - Manual for RH Administrators 23
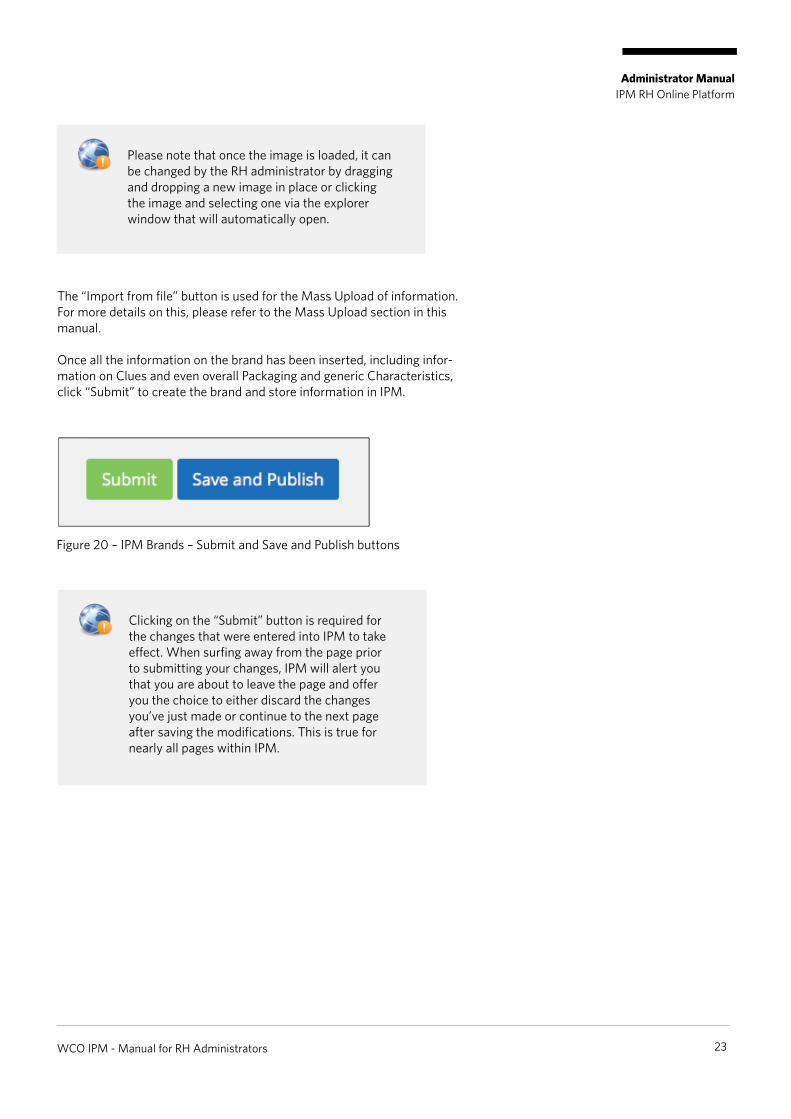
Please note that once the image is loaded, it can be changed by the RH administrator by dragging and dropping a new image in place or clicking the image and selecting one via the explorer window that will automatically open.
Clicking on the “Submit” button is required for the changes that were entered into IPM to take effect. When surfing away from the page prior to submitting your changes, IPM will alert you that you are about to leave the page and offer you the choice to either discard the changes you’ve just made or continue to the next page after saving the modifications. This is true for nearly all pages within IPM.
The “Import from file” button is used for the Mass Upload of information. For more details on this, please refer to the Mass Upload section in this manual.
Once all the information on the brand has been inserted, including infor-mation on Clues and even overall Packaging and generic Characteristics, click “Submit” to create the brand and store information in IPM.
Figure 20 – IPM Brands – Submit and Save and Publish buttons

Administrator Manual IPM RH Online Platform
WCO IPM - Manual for RH Administrators 24
Submitting the changes will store them in the database. When clicking on the “Save and Pub-lish” button, the changes that were made for the Brand or Category or Product that was created will not only be stored in the IPM tool, it will also be made available to the RH Users, RH Agents and COs.
All the information entered under Brand will be linked as an attribute to the products within the Brand portfolio, hence when updating the brand information, this update is automatically linked to all products within the brand.
When creating a new Brand, no products will be available yet. When reviewing an existing brand, the related products will be displayed toward the bottom of the screen, as well as Synonym Brands (or related brands).
Figure 21 – IPM Brands – Details page (2)
Administrator Manual IPM RH Online Platform
WCO IPM - Manual for RH Administrators 25
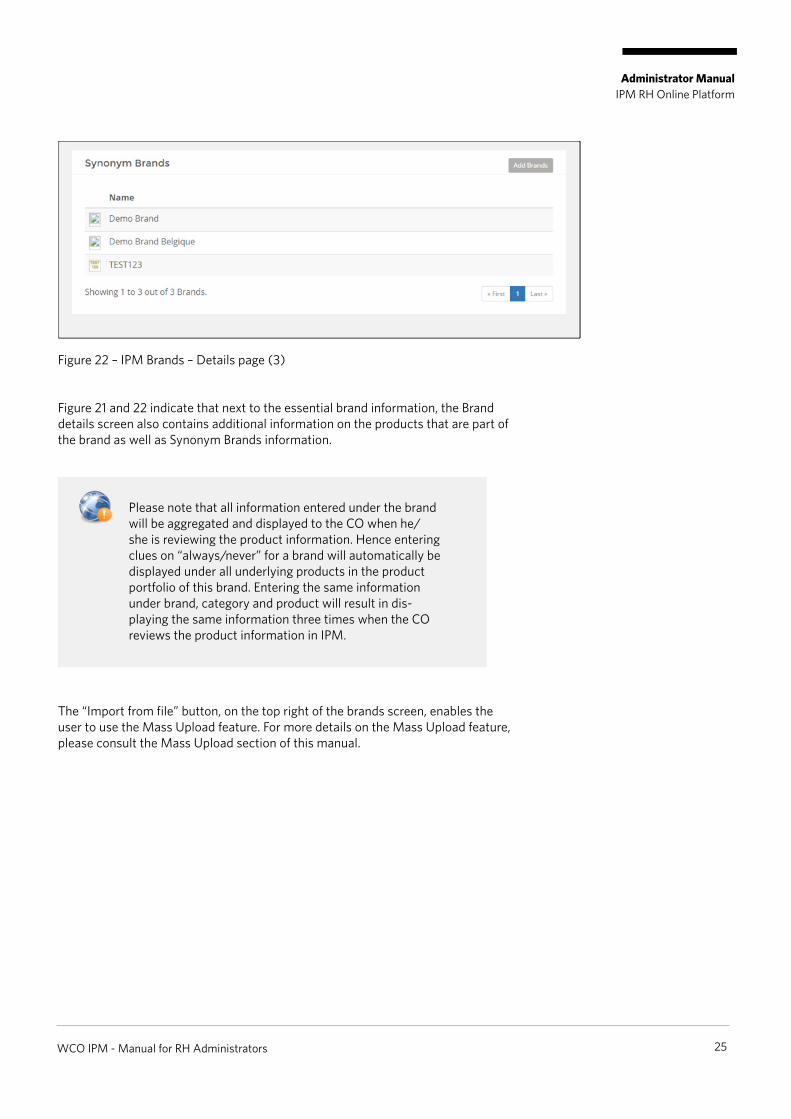
Figure 22 – IPM Brands – Details page (3)
Figure 21 and 22 indicate that next to the essential brand information, the Brand details screen also contains additional information on the products that are part of the brand as well as Synonym Brands information.
The “Import from file” button, on the top right of the brands screen, enables the user to use the Mass Upload feature. For more details on the Mass Upload feature, please consult the Mass Upload section of this manual.
Please note that all information entered under the brand will be aggregated and displayed to the CO when he/she is reviewing the product information. Hence entering clues on “always/never” for a brand will automatically be displayed under all underlying products in the product portfolio of this brand. Entering the same information under brand, category and product will result in dis-playing the same information three times when the CO reviews the product information in IPM.

Administrator Manual IPM RH Online Platform
Creating a category prerequisite
Make sure you are logged in as RH administrator or RH user.
How to create a new category
In the navigation pane, click on “Categories”.
In the following screen, the RH Administrator can create new categories by clicking on the “New Category” button on the top right of the screen.
In case there are already existing categories associated or created within the RH portfolio, then those categories will be displayed on the screen, such as the example in Figure 24.
The RH can select multiple categories and delete them with one click on the “Delete Selected” button on the bottom left of the screen, or one-by-one via the associated “Delete” button on the same line as the category that needs to be deleted.
There is also an “Unpublish” button for each category in the list, which will hide the category from the RH agents and COs, including all underlying products within the category.
WCO IPM - Manual for RH Administrators 26
Figure 23 – IPM Navigation pane – Categories button
Figure 24 – IPM Categories – Overview page

Administrator Manual IPM RH Online Platform
WCO IPM - Manual for RH Administrators 27
Figure 25 – IPM Categories – Details page (1)
All the information entered under a category will be linked as an attribute to the products within the Category. Hence when updating the category information, this update is automatically linked to all products within the category. Please make sure to only enter generic category information that covers all products within the category.
The RH can enter the Name of the category, select the Industry to which it belongs and provide a more detailed description of the category. The information entered should enable the COs to better understand what type of product is under investigation. It also enables the different RH Users to better categorize the different products within the RH product portfolio in IPM.
Please note that all information entered under the category will be aggregated and displayed to the CO when he/she is reviewing your product information. Hence entering clues on “always/never” under a category will automatically be displayed under all products in the product portfolio that belong to this category. Entering the same information under brand, category and product will result in displaying the same information three times when the CO reviews the product information in IPM.

Administrator Manual IPM RH Online Platform
WCO IPM - Manual for RH Administrators 28
Figure 26 – IPM Categories – Details page (2)
The Characteristics field is a field that is used to store information from the previous IPM version, however it has yet to be put into the correct and relevant field in this IPM version. It is up to the RH to update the information in IPM and keep it current, hence this field can only be deleted once information has been put in the right place. There is no option to add information under the Characteristics field.
List of pre-defined industries
Demo Products ClothingTobaccoPharmaceutical productsAccessoriesAlcoholic beveragesSoft drinksComputers and accessoriesElectronic AppliancesFoodstuffFootwearGames and toys
Mobile phones and accessoriesPhonographic productsTextiles other than clothingToiletries/cosmeticsWatchesOtherOther - Labels/tags/stickersOther - PackagingOther - StationeryOther - FurnitureOther - Hand toolsOther - Batteries
Other - Contact lensesOther - Printed matterOther - GolfOther - Mixed goodsOther - Zip fastenersOther - Sports/exercise goodsOther - Chemical ProductsOther - LightersTransportation and spare partsOther - ArtOther - Construct

Creating a productAdministrator Manual
IPM RH Online Platform
WCO IPM - Manual for RH Administrators 29
Figure 27 – IPM Navigation pane – Products button
Finding your way around
Creating a product prerequisite
Make sure you are logged in as RH administrator or RH user.
How to create a new product
In the navigation pane, click on “Products”.
Doing so will bring up the screen as illustrated in Figure 28, whereby the RH can create a new product by clicking on the “New Product” button on the top right of the screen. This method will be explained in detail in this section of the manual. Please note that there are several other ways to enter product information into IPM, whereby multiple products can be entered in bulk, these methods include: Mass Upload, GDSN sync and EUIPO EDB export/import. For more details concerning these methods, please consult the respective section of this manual.
Figure 28 – IPM Products
In this screen, the RH can manage the products in its portfolio, including deleting, duplicating, multi-updating, merging and unpublishing products. These features will be described in more detail later in this section.
Upon clicking the “New Product” button, the screen as shown in Figure 29 will be displayed to the RH. The RH can now enter information into IPM on the product.

Administrator Manual IPM RH Online Platform
WCO IPM - Manual for RH Administrators 30
It is always good for the RH to enter as much information on the product as the RH can share, similarly to a training on how to best identify counterfeit products, such as what specific color the logo should have, angle, font type, specific packaging characteristics…anything to help the CO identify a counterfeit product and initiate an interception.
Note that when entering an SSP, the WCO IPM team needs to be aware of the implementation and integration of the SSP with your products, in order to display the correct type of SSP information that corresponds to your product.
The RH starts by entering the product Name and Brand. Entering the brand information is based on a drop-down list that appears when the first characters of the brand name are entered. This avoids misspelling of the brand name and enables the RH to select the correct brand to be asso-ciated with the product. The same goes for the Category as well as the Security Solution Providers.
In the description field the RH can enter several lines about the product, so that the CO understands what the genuine product is used for, what specific characteristics it should have, etc. This description should only cover specifications of the product that are not entered in later fields in IPM, hence it is best to first review all available fields in IPM, prior to entering information into the description. This way, the RH can see how to best fit the product information in IPM and provide logic and clearly structured product information based on the IPM structure.
In the following screens, (Figures 29 through 39), the different information fields are explained in detail, starting with Clues (always/never type of information), SKU’s (barcode information), Traders (importer/exporter type of information), Security Features, Packaging, Routes and finally Characteristics.

Administrator Manual IPM RH Online Platform
WCO IPM - Manual for RH Administrators 31
Please note that all information entered under the product will be aggregated and displayed to the CO when he/she is reviewing your product information. Hence, entering clues on “always/never” under a product that has already been entered under the Category or Brand, will result in IPM displaying the same information three times when the CO reviews the product information.
Figure 29 – IPM Products – Details page (1)
Mass editing of products
It is important to enter as much information on all of these attributes, however the RH can make use of the Mass Edit function via the Multi-update button in the IPM Product screen. Therefore, when entering product information into IPM, including Name, Brand, Category, Security Solution Providers and Description, the RH can opt to skip entering other information as it might be the same for several products. Hence after creating products that have the same SKU, Traders, etc. the user can select several products from the Products screen and then click the Multi-update button. From there, the informa-tion entered in the attribute fields will automatically be associated with all the selected products.
Administrator Manual IPM RH Online Platform
WCO IPM - Manual for RH Administrators 32
Figure 30 – IPM Products – Details page (2)
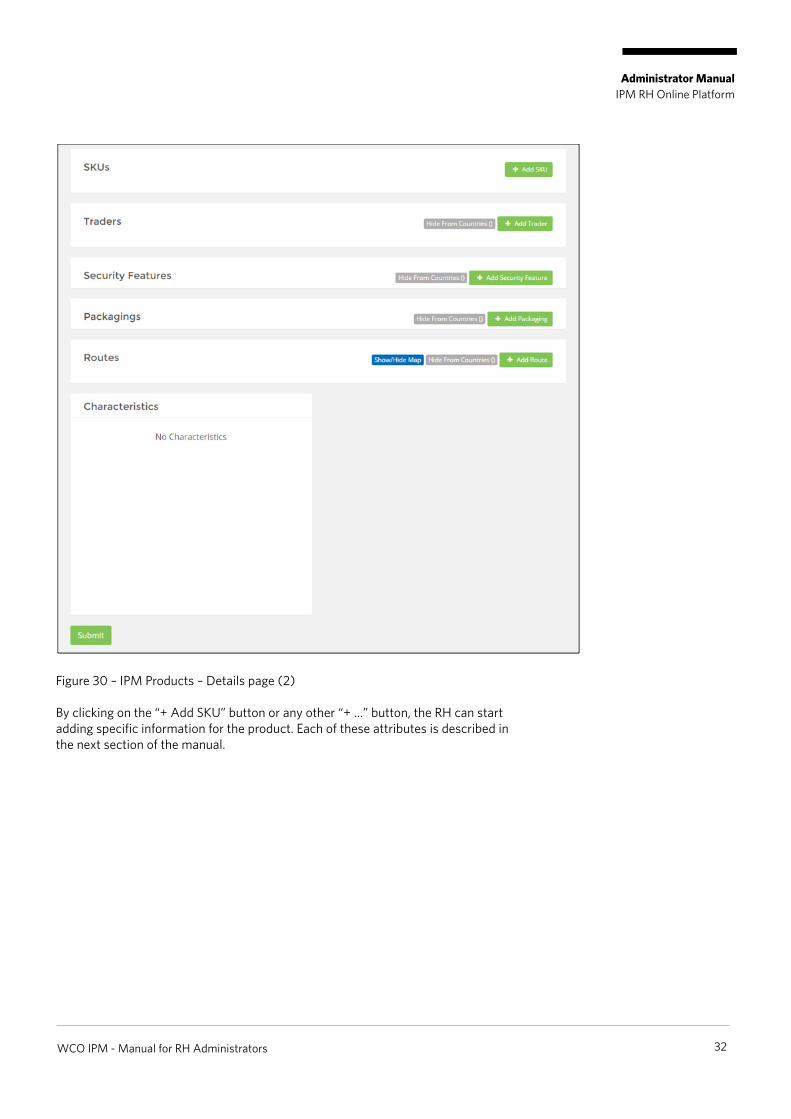
By clicking on the “+ Add SKU” button or any other “+ …” button, the RH can start adding specific information for the product. Each of these attributes is described in the next section of the manual.

Administrator Manual IPM RH Online Platform
WCO IPM - Manual for RH Administrators 33
Entering additional attributes
Clues
Figure 31 – IPM Products – Details page (3) – Clues
First off, the RH should select whether the information that is about to be entered into the text field will be an “Always” or “Never” type of clue. By default the field will mark “Always”; to modify this to “Never”, the RH can click on the “Always” field and select the “Never” option.
The RH can enter multiple clues per product and select which countries the clue applies to. Therefore the same product might have different clues that pertain to the packaging or weight or other features in different markets. This type of information is essential and should be added to IPM, whereby the associated countries of the intended market are specified per clue.
In case the product already exists and the RH might want to update/edit the clue, the RH can modify the text by clicking on the Text field.
To delete a clue, simply click on the red “X” button on the right of the associated clue.
The RH can select to exclude countries from being able to see the Clue. By clicking on the “Hide From Countries ()” button, the RH can define in which country/countries the CO will not see the Clue. Whereas adding countries to the “Empty means all countries.” field will specifically make the Clue available in those countries.
When entering product information, remember to click the “Submit” or “Save and Publish” button for the changes to take effect.

Administrator Manual IPM RH Online Platform
WCO IPM - Manual for RH Administrators 34
When entering product information, remember to click the “Submit” or “Save and Publish” button for the changes to take effect.
SKU’s
Figure 32 – IPM Products – Details page (4) – SKUs
A product can have multiple SKUs or barcodes assigned to it: users of the tool will be able to see the correct product for the country in which it is scanned. It is important to indicate which country the SKU information is applicable to.
Next to information on the barcode and country to which the barcode applies, the RH can also enter information on the price of the product. This is useful as it allows the CO to verify that correct import taxation is applied and corresponds to the value listed on the shipping manifest and or import/export documents.
As a product can have multiple SKU’s associated with it, the RH – when removing SKU information – can opt to only remove the specific SKU number by pressing the red “X” button next to the SKU field or remove the entire SKU entry in IPM by pressing the red “Remove SKU” button.

Administrator Manual IPM RH Online Platform
WCO IPM - Manual for RH Administrators 35
When entering product information, remember to click the “Submit” or “Save and Publish” button for the changes to take effect.
Traders
Figure 33 – IPM Products – Details page (5) – Traders
The RH can add trader information into IPM. As indicated in Figure 34 below, the RH can select between Exporter, Importer, Transporter and Invoicee.
Figure 34 – IPM Products – Details page (5) – Traders type
Once the Trader type has been selected, the RH can enter specific information such as Name, Country, Contact information, Port(s) and Address. This information can be made available to different countries.

Administrator Manual IPM RH Online Platform
WCO IPM - Manual for RH Administrators 36
When ready with entering product information, remember to click the “Submit” or “Save and Publish” button for the changes to take effect.
Security features
Figure 35 – IPM Products – Details page (6) – Security features
The RH can enter information on specific security features that are applied to product packaging. For this, the RH can select different types: Covert, Semi-Covert or Overt; as illustrated in Figure 36 below.
Figure 36 – IPM Products – Details page (7) – Security features type
Next to the Image feature, helping the CO to locate where to look for the security feature on the packaging, the RH can also provide a description as well as select which countries this specific security feature applies to.

Administrator Manual IPM RH Online Platform
WCO IPM - Manual for RH Administrators 37
When ready with entering product information, remember to click the “Submit” or “Save and Publish” button for the changes to take effect.
Packaging information
Figure 37 – IPM Products – Details page (7) – Packaging information
The RH can enter specific information on product packaging, ranging for example from bulk packaging on a pallet down to individual packaging, with images from different angles. Additional details on the type of packaging, the wrapping or bulk container details can be added to the description field. Once again, several different packaging types can be associated to the same product and this information can also be associated to the respective markets that the product is shipped to.

Administrator Manual IPM RH Online Platform
WCO IPM - Manual for RH Administrators 38
Routes
IPM enables the RH to enter specific information on the routes that genuine products follow. Doing so, the RH helps the CO to detect products that deviate from routes indicated in IPM and hence. The WCO encourages RH to enter as many normal shipping routes into IPM as possible, as well as updating the information regularly.
IPM enables the RH to enter detailed shipping route information and specify which countries have access to this information on a per route basis. The IPM user in Africa for example, does not need to see the US shipping routes as this is something the RH can specify in the “Visible to Countries” field.
The information on the country where the product is being scanned is provided back to the RH as real time information, enabling the RH to address grey market issues and or supply chain disruption.
Figure 38 – IPM Products – Details page (8) – Routes
The RH can indicate a route by entering the city of origin of the product and then by selecting the type of transportation. Here the RH can select between the following options from the drop-down box:
Finally, the destination city is entered and then the countries that should be aware of the route can be defined.

Administrator Manual IPM RH Online Platform
Routes
Characteristics
This field does not allow any entry of information in IPM as this field will typically reflect information that stems from the previous IPM version and has to be put into the correct place in the current IPM platform.
Figure 39 – IPM Products – Details page (8) – Characteristics
WCO IPM - Manual for RH Administrators 39
When ready with entering product information, remember to click the “Submit” or “Save and Publish” button for the changes to take effect.
Sometimes it might make sense to define a few extra countries in the “Visible to Countries” field, in case smuggling routes or grey markets have been identified by the RH, hence making the “normal” shipping route information available for those CO outside of the normal shipping route, in order to take appropriate actions.

Creating a contactAdministrator Manual
IPM RH Online Platform
WCO IPM - Manual for RH Administrators 40
Figure 40 – IPM Navigation pane – Contacts button
Finding your way around
Creating a contact prerequisite
Make sure you are logged in as RH administrator or RH user.
How to create a new Contact
In the navigation pane, click on “Contacts”.
The Contacts screen will appear (Figure 41). Here the RH can manage the contacts for the brand(s): creating, editing and deleting contacts.
Figure 41 – IPM Contacts – Overview page
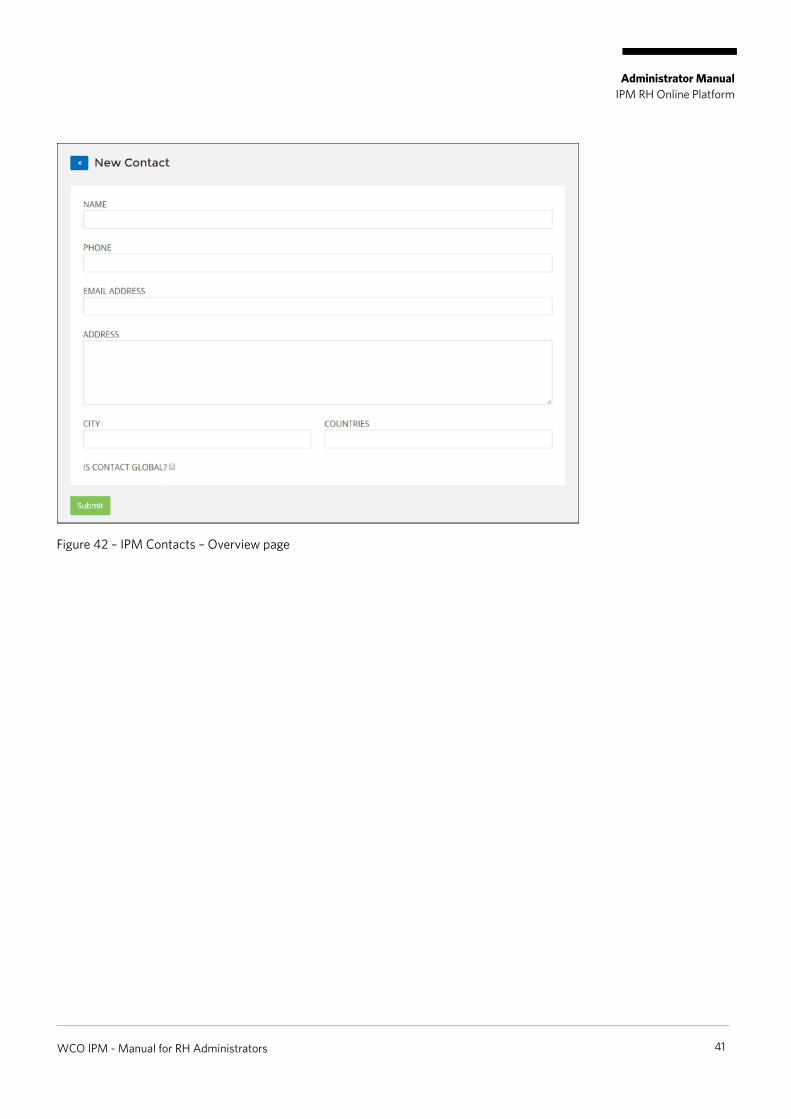
The RH can create a new contact by clicking on the “New Contact” button. This will bring up the screen as illustrated by Figure 42 and allow the RH to enter the following information:
including country code)
Contacts can be allocated to a specific country or set of countries limiting CO’s access.
Given that RHs do not always have contacts for all countries, IPM created the Global RH Contact feature. The RH can identify a person or email address as a global contact for the CO to be able to reach out to. It is recommended that each RH assign at least one global contact within the RH contacts.
Administrator Manual IPM RH Online Platform
WCO IPM - Manual for RH Administrators 41
Figure 42 – IPM Contacts – Overview page

Creating a news storyAdministrator Manual
IPM RH Online Platform
WCO IPM - Manual for RH Administrators 42
Figure 43 – IPM Navigation pane – News Stories button
Finding your way around
Creating a news story prerequisite
Make sure you are logged in as RH administrator or RH user.
How to create a new News Story
In the navigation pane, click on “News Stories”.
Clicking the “News Stories” button in the navigation pane will display the screen as illustrated in Figure 44. Here the RH can enter news stories about its products and industry-related news that is of interest to the CO. This is a first way for the RH to reach out to the CO.
Figure 44 – IPM News Stories – Overview page

Figure 45 – IPM News Stories – Details page
To publish a news story, the RH enters the Name (or Title) of the news story, the content in the Body field and can add related products in the field below so that COs can identify products in relation to the news story. An image can also be added by dragging and dropping it into the field on the top right. These stories can be published towards a specific country or set of countries by adding the countries into the Country field.
Administrator Manual IPM RH Online Platform
How to create a new News Story
WCO IPM - Manual for RH Administrators 43

Creating an alertAdministrator Manual
IPM RH Online Platform
WCO IPM - Manual for RH Administrators 44
Figure 46 – IPM Navigation pane - Alerts button
Finding your way around
Creating an alert prerequisite
Make sure you are logged in as RH administrator or RH user.
How to create a new AlertsIn the navigation pane, click on “Alerts”.
Clicking the “Alerts” button in the navigation pane will display the following screen (Figure 47). Here the RH can enter product specific alerts, helping COs look out for suspicious shipments. This is a second way for the RH to reach out to the CO in a specific country with actionable data.
Figure 47 – IPM Alerts – Overview page
Figure 48 – IPM Alerts – Details page
To publish an alert, the RH enters the Name (or Title) of the alert, the content in the Body field and can then add any related products the alert pertains to in the field below, so that the CO can immediately identify products that are being targeted in the alert. An image can also be added by dragging and dropping it into the field on the top right. These alerts can be published for a specific country or set of countries by adding the countries into the Country field. Furthermore, the RH can also send a notification to the CO in the country that has been entered in the above field. This can be done by checking the box “Send Notification”.
Additional features and functions
Administrator Manual IPM RH Online Platform
Mass upload tool
Feature descriptionThe mass upload tool allows the user to upload a large quantity of products, clues and SKU’s in IPM by using an .xlsx file. To do so, three types of files are available:
and associated attributes
with the products
information This section will provide detailed information on how to structure the information in each of these files as well as how to upload the information into IPM.
PrerequisitesMake sure you are logged in as RH administrator or RH user and you have an existing brand setup. For details on how to create a brand, please refer to the administrator guide, section: creating a brand.
Make sure you have the necessary categories defined in IPM. For details on how to create your own categories, please refer to the administrator guide, section: creating a category.
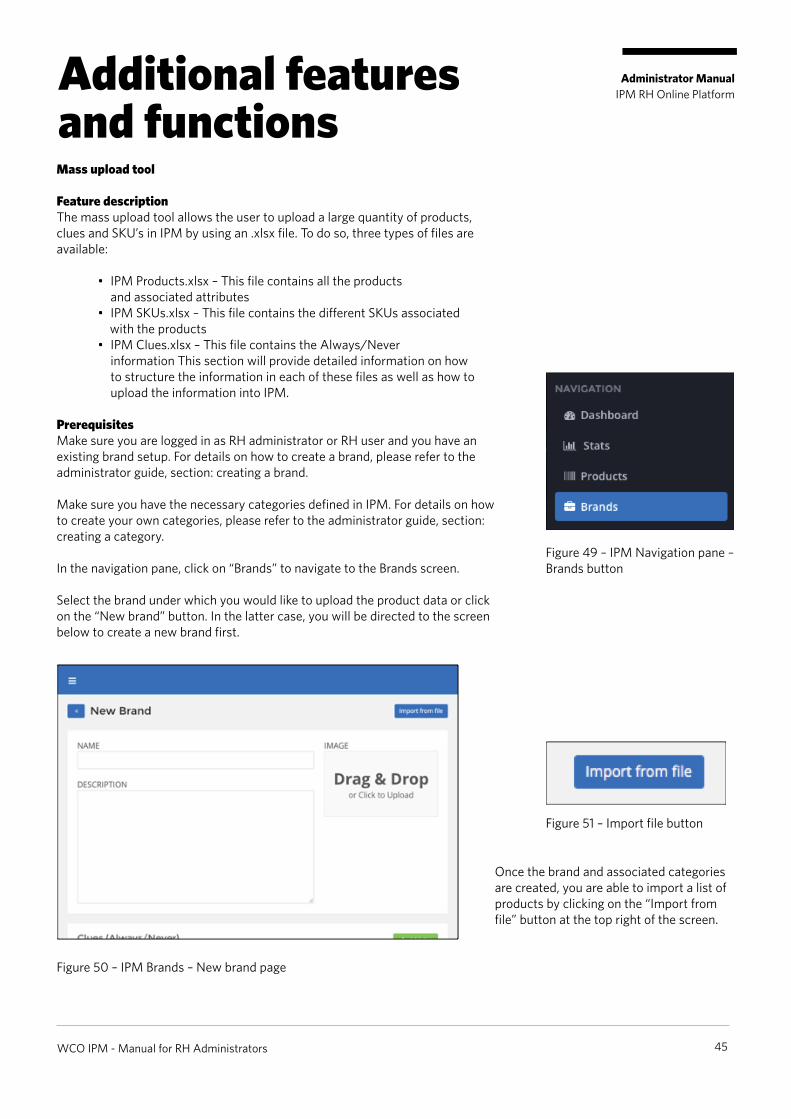
In the navigation pane, click on “Brands” to navigate to the Brands screen.
Select the brand under which you would like to upload the product data or click on the “New brand” button. In the latter case, you will be directed to the screen below to create a new brand first.
Figure 50 – IPM Brands – New brand page
WCO IPM - Manual for RH Administrators 45
Figure 49 – IPM Navigation pane – Brands button
Figure 51 – Import file button
Once the brand and associated categories are created, you are able to import a list of products by clicking on the “Import from file” button at the top right of the screen.

Administrator Manual IPM RH Online Platform
Mass upload tool
Select the .xlsx file from your source that includes the products you would like to upload into IPM and click on “OK” to upload the file.
The .xlsx file is now uploaded into IPM.
Please only load the file once. Loading the file several times will result in several instances or copies of the same products being created as there is no overwrite function for this feature. Should you have imported the same list more than once, you can merge the same products together manually by means of the merge button.
After successful upload of the products and returning to the products screen, you will now see all the products that have been imported into IPM.
Please note that each product can be “unpublished” by pressing the “Unpublish” button on the right of the screen.
WCO IPM - Manual for RH Administrators 46
Figure 52 - Product overview screen
Unpublish button

Administrator Manual IPM RH Online Platform
Mass upload tool
Details on the format and syntax of the .xlsx file
Several items in one cell that belong together in the same type of field in IPM are separated by a semi-colon. For example, the Always items in the table below will show up as individual Always items for the same product.
Industry Category Product Description Always Never Barcode Intended Market
Accessories Category Name
Product Name
Product description
Made in China; In a blue box; Shipped by pallet
Made in India; Shipped by blister; In a green box
4399901726611#999#
FR;UK;BE;CH#AE;DE#
Different SKU’s can be associated to different sets of countries where they are applicable. These SKU’s are separated by a hash-tag (#). For example, the intended markets France, UK, Belgium and Switzerland are associated with the SKU 4399901726611; whereas the United Emirates and Germany are associated with the SKU 999. This can also be used for phrases in the description or clues text fields.
Frequently asked questions
Why do I get an error when uploading my file?Please ensure the correct abbreviations for countries have been used.
Please ensure the correct amount of numbers have been used for barcodes.
Please ensure the correct use of “,” and “;” and “#” in the .xlsx file.
Please ensure the correct abbreviation for countries is used according to ISO 2 norm, i.e. Belgium = BE; Switzerland = CH; United Arab Emirates = AE; United States of America = US, …
Please ensure the correct product category is selected, using the dropdown in IPM list to select from.
Excluded functions
o Workaround: adding bulk attributes via the mass edit functionality is available
o Workaround: adding images via the mass edit functionality is available
For more questions, please contact the IPM Support Team via [email protected].
WCO IPM - Manual for RH Administrators 47

Administrator Manual IPM RH Online Platform
Mass edit tool
PrerequisitesMake sure you are logged in as RH administrator or RH user.
How to use the mass edit functionFrom the product page in IPM (Figure 28), the user can click the “Multi-update” button.
Figure 53 - Product overview screen
As it is important to enter as much information on all product attributes as possible, the RH can make use of the Mass Edit function via the “Multi-update” button in the IPM Product screen. When entering product information into IPM, including Name, Brand, Category, Security Solution Providers and Description, the RH can then skip entering other information as it might be the same for several products. After creating products that have the same SKU, Traders, or other similar attributes, the user can select several products from the Products overview screen and then click the “Multi-update” button. From there, the information entered in the attribute fields will automatically be associated with all selected products.
WCO IPM - Manual for RH Administrators 48
Multi-update button
When ready with entering product information, remember to click the “Submit” or “Save and Publish” button for the changes to take effect.

Administrator Manual IPM RH Online Platform
GDSN LinkThe Global Data Synchronization Network holds information on products via the GS1 barcode.
PrerequisitesMake sure you are logged in as RH administrator or RH user.
Synchronized dataThe following items are synchronized:
How to use the GDSN LinkTo facilitate the automated upload of product information as well as simplify maintaining product information up-to-date in several places, IPM can be connected to the RH’s electronic catalog available in the Global Data Synchronization Network (GDSN).
The RH can automatically have its data in GDSN uploaded to IPM. For this, the RH must grant permission for IPM to subscribe to the RH GLN. Once done, the RH is to provide proof of such authorization to the WCO IPM team and provide its Global Location Number(s) (GLN).
IPM will then be able to subscribe its GLN (5488888005488) to the RH GLN for the Target Market as indicated by the RH.
WCO IPM - Manual for RH Administrators 49
Please note that once the data is in IPM, it remains unpublished until the data quality is reviewed by the RH and approved for publishing. This quality review is required to merge two of the same products, categories or brands together and keep data consistent in IPM. Merging two products can be easily done by selecting the products to merge and clicking on the “Merge” button on the top right of the product screen.
From here on, the data in IPM is maintained up-to-date as new products that are uploaded to the RH GLN in GDSN will be automatically pushed into IPM.
1. Brand Name2. Category3. Description4. Barcode5. Rights Holder
6. Manufacturer7. Target Market(s)8. Country of Origin9. Date released to Market
10. Image (if present)11. Logistics information (weight, size)
It is best to provide the Global Market GLN to IPM, as global data will be uploaded for Customs officers around the world.
The IPM team will internally subscribe to the RH GLN for the Target Market as indicated by the RH.

Administrator Manual IPM RH Online Platform
GDSN Link
WCO IPM - Manual for RH Administrators 50
For example: if the “demo-brand” already exists in IPM and the “demo brand” is added via GDSN, then these can be merged together. The RH is to select which one to set as the base brand. When merging products, there is no need to set a base.
Further editing of information is possible by means of the mass editing tool or via individual product modifications and mergers in the IPM platform. Please refer to the Product and Mass Editing sections respectively in the IPM manual for further detailed instructions.
Figures 54 and 55 below are examples of how the GDSN information is made available in the IPM Mobile APP.
Figure 54 – IPM Mobile APP – GDSN information screen (1)
Figure 55 – IPM Mobile APP – GDSN information screen (2)
When more information is available, IPM can display it on one screen on the smartphone; the user can swipe up to see the rest of the information.
Should there be any further questions on this subject, please contact the IPM Support Team via [email protected].

Administrator Manual IPM RH Online Platform
WCO (IPM) – OHIM (EDB) linkThe link between the WCO IPM platform and the Office for Harmonization in the Internal Market (EUIPO) Enforcement Data Base (EDB) platform enables RHs to manage information more efficiently on both platforms. It also ensures that COs have access to the RH information from either platform. The link is established via an export/import functionality.
PrerequisitesMake sure you are logged in as RH administrator or RH user.
What data is exported/importedThe following items are exported/imported via this tool:
How to use the IPM-EDB LinkCurrently RHs using both IPM and EDB platform are required to enter information into both systems, a redundant and resource consuming task which is prone to errors and inconsistencies due to manual manipulation of the data. This export/import function between IPM and EDB will save the RH time and resources.Benefits include:
enforcement officials.
information in a standardized format in one place, including details such as RH contact information.
product alerts to enforcement officials.
for the Target Market as indicated by the RH.
WCO IPM - Manual for RH Administrators 51
Figure 56 – Example architecture diagram

How to gain access to the IPM mobile APP
Administrator Manual IPM RH
Downloading the APP
The IPM mobile APP is available for both iOS and Android. Please visit the Apple App Store or Google Play on your smartphone and enter “WCO IPM MOBILE” in the search field.
Figure 57 – IPM Mobile – App Store download
Download the WCO IPM Mobile APP to your smartphone. Pending on your internet/WIFI connection, this may take a while as the APP is about 9MB in size.
Once installed, the user can tap on the IPM icon on the screen.
WCO IPM - Manual for RH Administrators 52
Figure 58 – IPM Mobile APP – Application icon
Figure 59 – IPM Mobile APP – Example of APP icon on screen

Administrator Manual IPM RH
Login credentialsTo log into the IPM mobile APP, please use the same login ( email address) and password as for the IPM online platform.
Figure 60 – IPM Mobile APP – Login screen
Tap the “Sign In” button as soon as you have entered your login credentials.
Password resetIn case you have forgotten your password, tap the “Forgot your password?” link. You will be automatically directed to the following screen:
Figure 61 – IPM Mobile APP – Password reset screen
You will receive an email with the link to the IPM Password Reset page.
For more details on how to reset your password, please refer to the “Password reset” section in the “How to gain access to the online IPM web platform” chapter at the start of this manual.
WCO IPM - Manual for RH Administrators 53

Administrator Manual IPM RH
Finding your way around
OverviewThe IPM Home screen is the default page of the IPM Mobile APP for all types of users logging into the APP. RHs administrators, users, agents as well as COs will all have the same IPM Mobile APP screens and functionality.
From the IPM Home screen, the user can select several functions:
o Alerts o News
We will review each screen and its functions in the following pages.
WCO IPM - Manual for RH Administrators 54
Navigation pane
Search button
Scan Barcode button
Tabs
Figure 62 – IPM Mobile APP – Default IPM Home screen
Please note that all pictures in the manual are based on a Demo account with products that have been entered for demonstration purposes only. The information displayed on your screen may differ from the figures in this manual.
How to use the IPM mobile APP

Administrator Manual IPM RH
NavigationBy tapping on the Navigation pane button on the top left of the screen, the following screen is displayed:
WCO IPM - Manual for RH Administrators 55
Figure 63 – IPM Mobile APP – Navigation button
Performance overview
Personal profile Log out button
Figure 64 – IPM Mobile APP – Navigation pane
Home screen
Alerts screen
News screen
Address book screen
WCO email screen
Help function
The Navigation pane hosts different functions. These functions will be reviewed one by one starting from the top of the screen.

Administrator Manual IPM RH
Performance overviewTapping on the top of the screen in the navigation pane will display the user performance.
WCO IPM - Manual for RH Administrators 56
Figure 65 – IPM Mobile APP – User personal performance screen
The user’s personal performance screen provides feedback on usage of the IPM Mobile APP. Ranking is based on the user group the user is part of. A CO’s rank is based on other CO’s usage of IPM in this country.

Administrator Manual IPM RH
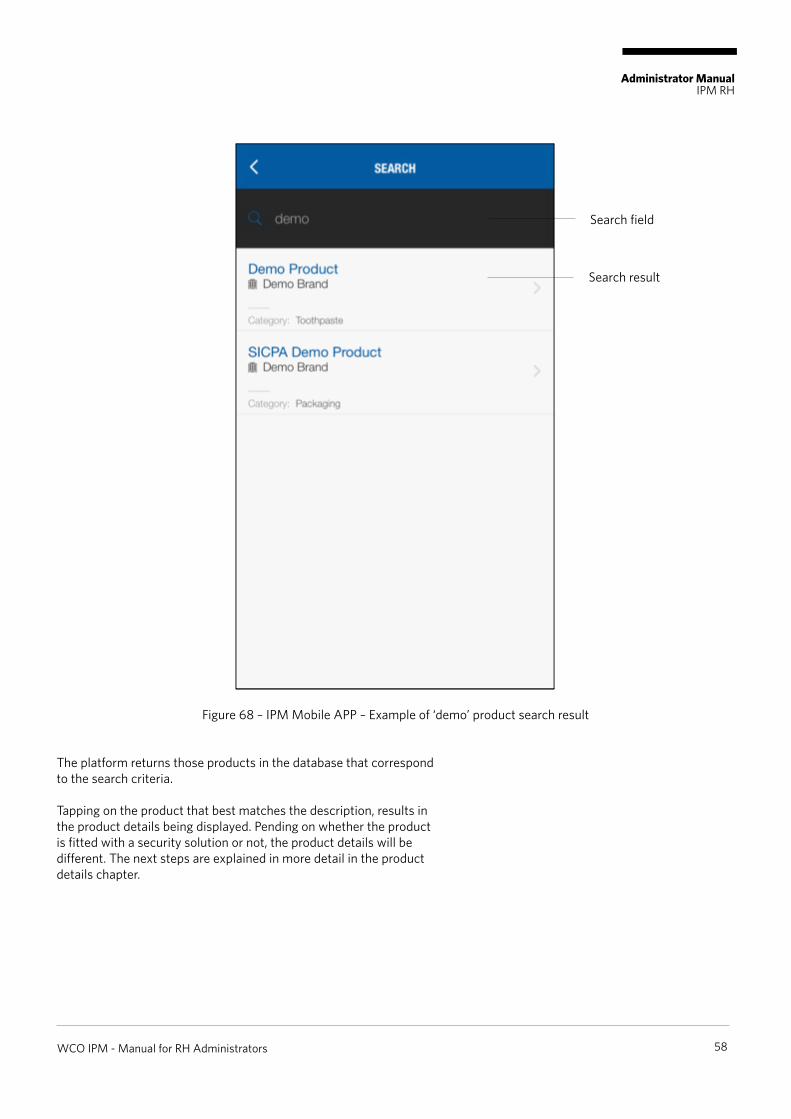
SearchFrom the Home screen as displayed in Figure 58 – IPM Mobile APP – Default IPM Home screen, the user can tap on the blue “Search” button and enter the product name.
WCO IPM - Manual for RH Administrators 57
Figure 67 – IPM Mobile APP – Search by entering product name
As an example, the word “demo” was entered in the search field. This produces the following result as shown in the figure below.
Figure 66 – IPM Mobile APP – Search button on Home screen
Search field
Administrator Manual IPM RH
WCO IPM - Manual for RH Administrators 58
The platform returns those products in the database that correspond to the search criteria.
Tapping on the product that best matches the description, results in the product details being displayed. Pending on whether the product is fitted with a security solution or not, the product details will be different. The next steps are explained in more detail in the product details chapter.
Search field
Search result
Figure 68 – IPM Mobile APP – Example of ‘demo’ product search result

Administrator Manual IPM RH
ScanFrom the Home screen as displayed in Figure 58 – IPM Mobile APP – Default IPM Home screen, the user can tap on the green “Scan” button and point the camera to the barcode found on the product packaging.
WCO IPM - Manual for RH Administrators 59
Figure 69 – IPM Mobile APP – Scan button on Home screen
Figure 70 – IPM Mobile APP – Search by scanning a product barcode
Administrator Manual IPM RH
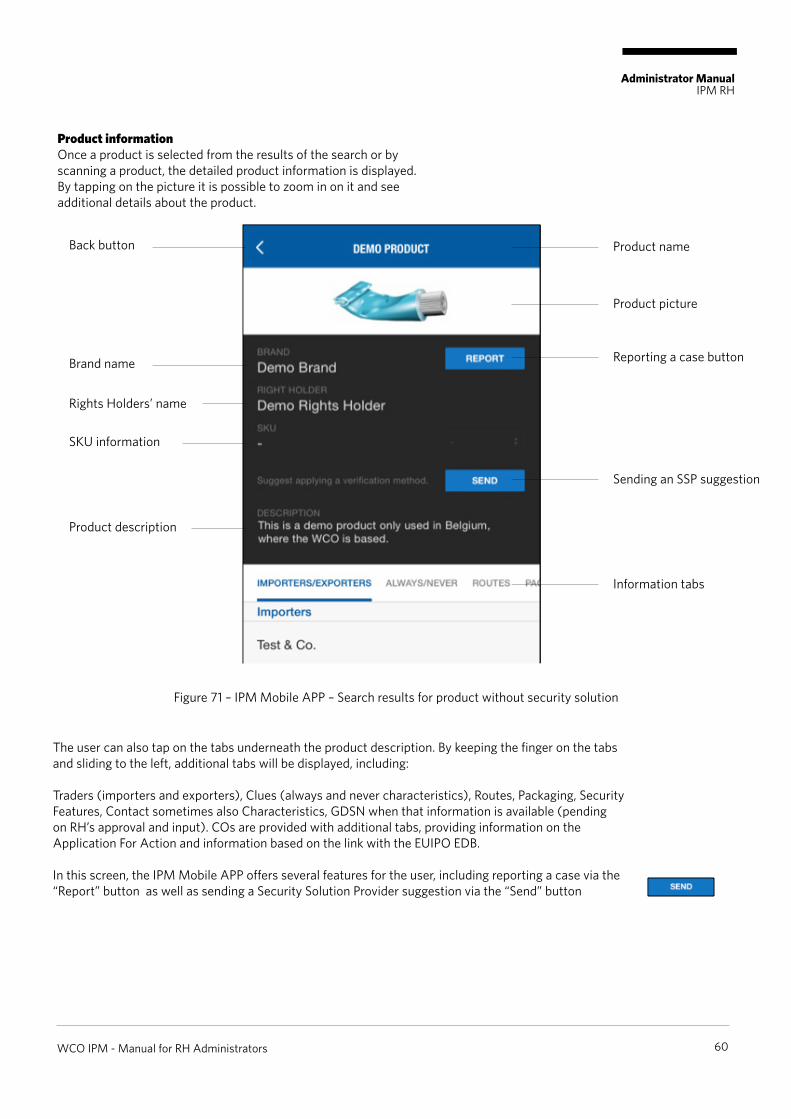
Product informationOnce a product is selected from the results of the search or by scanning a product, the detailed product information is displayed. By tapping on the picture it is possible to zoom in on it and see additional details about the product.
WCO IPM - Manual for RH Administrators 60
Figure 71 – IPM Mobile APP – Search results for product without security solution
Product nameBack button
Brand name
Rights Holders’ name
SKU information
Product description
Product picture
Reporting a case button
Sending an SSP suggestion
Information tabs
The user can also tap on the tabs underneath the product description. By keeping the finger on the tabs and sliding to the left, additional tabs will be displayed, including:
Traders (importers and exporters), Clues (always and never characteristics), Routes, Packaging, Security Features, Contact sometimes also Characteristics, GDSN when that information is available (pending on RH’s approval and input). COs are provided with additional tabs, providing information on the Application For Action and information based on the link with the EUIPO EDB.
In this screen, the IPM Mobile APP offers several features for the user, including reporting a case via the “Report” button as well as sending a Security Solution Provider suggestion via the “Send” button
Administrator Manual IPM RH
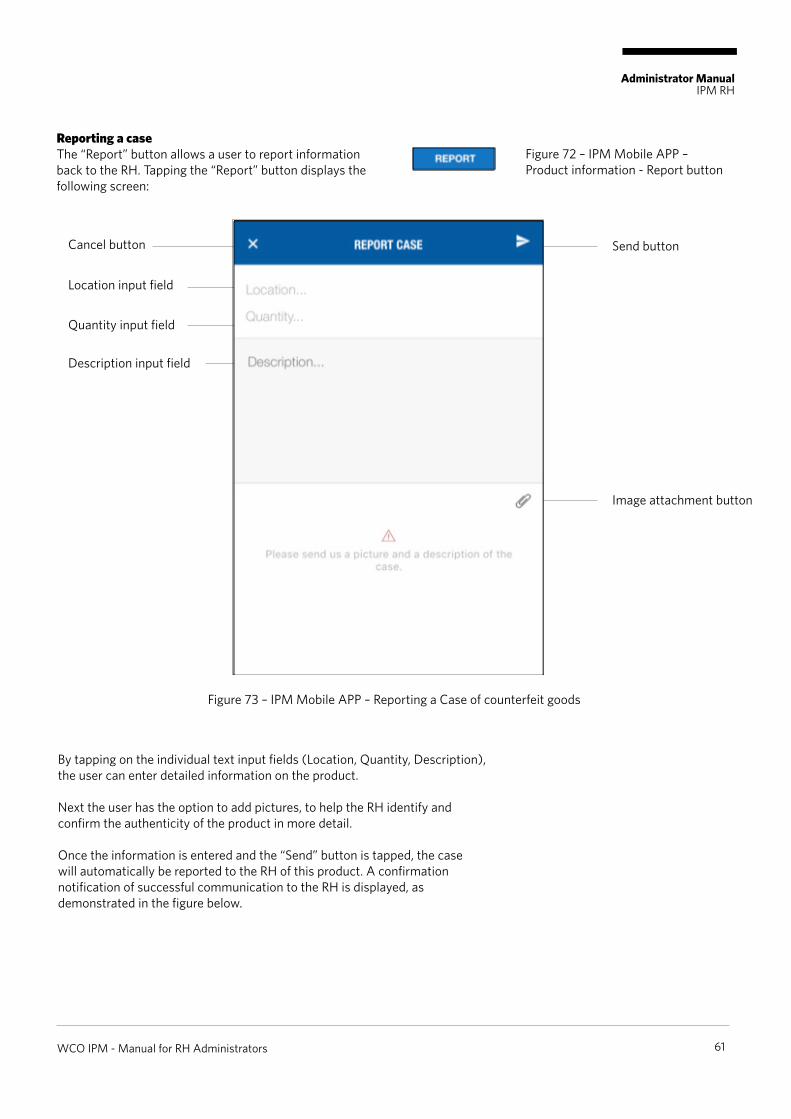
Reporting a caseThe “Report” button allows a user to report information back to the RH. Tapping the “Report” button displays the following screen:
WCO IPM - Manual for RH Administrators 61
Figure 72 – IPM Mobile APP – Product information - Report button
Figure 73 – IPM Mobile APP – Reporting a Case of counterfeit goods
Send buttonCancel button
Location input field
Quantity input field
Description input field
Image attachment button
By tapping on the individual text input fields (Location, Quantity, Description), the user can enter detailed information on the product.
Next the user has the option to add pictures, to help the RH identify and confirm the authenticity of the product in more detail.
Once the information is entered and the “Send” button is tapped, the case will automatically be reported to the RH of this product. A confirmation notification of successful communication to the RH is displayed, as demonstrated in the figure below.

Administrator Manual IPM RH
The user can now go back to the product information screen by tapping the “X” on the top left of the screen, which is the back button or close button for this screen.
The RH can now review the information that has been shared and work with the user to determine next steps.
Back button
Figure 74 – IPM Mobile APP – Confirmation of successful submission of a Reported Case
WCO IPM - Manual for RH Administrators 62

Administrator Manual IPM RH
Verifying a product equipped with a Security Solution
When a product is selected from the search criteria list or once scanned via the barcode, the IPM Mobile APP will automatically alert the user of additional verifications that are available. These Security Solution Provider (SSP) based verification solutions may vary from Overt to Semi-Overt and even Covert solutions and one product may be equipped with several SSP solutions, and IPM will alert the user to this fact.
IPM constantly works with SSPs to add new solutions to IPM. Some of them are integrated and others may require additional tools. If additional tools are required, IPM will indicate this to the user.
There are 4 main categories of SSP solutions that are integrated into IPM:
WCO IPM - Manual for RH Administrators 63
XS11L
alphanumeric data matrix image-based nfc tags
Figure 72 – IPM Mobile APP – SSP Solution categories
Administrator Manual IPM RH
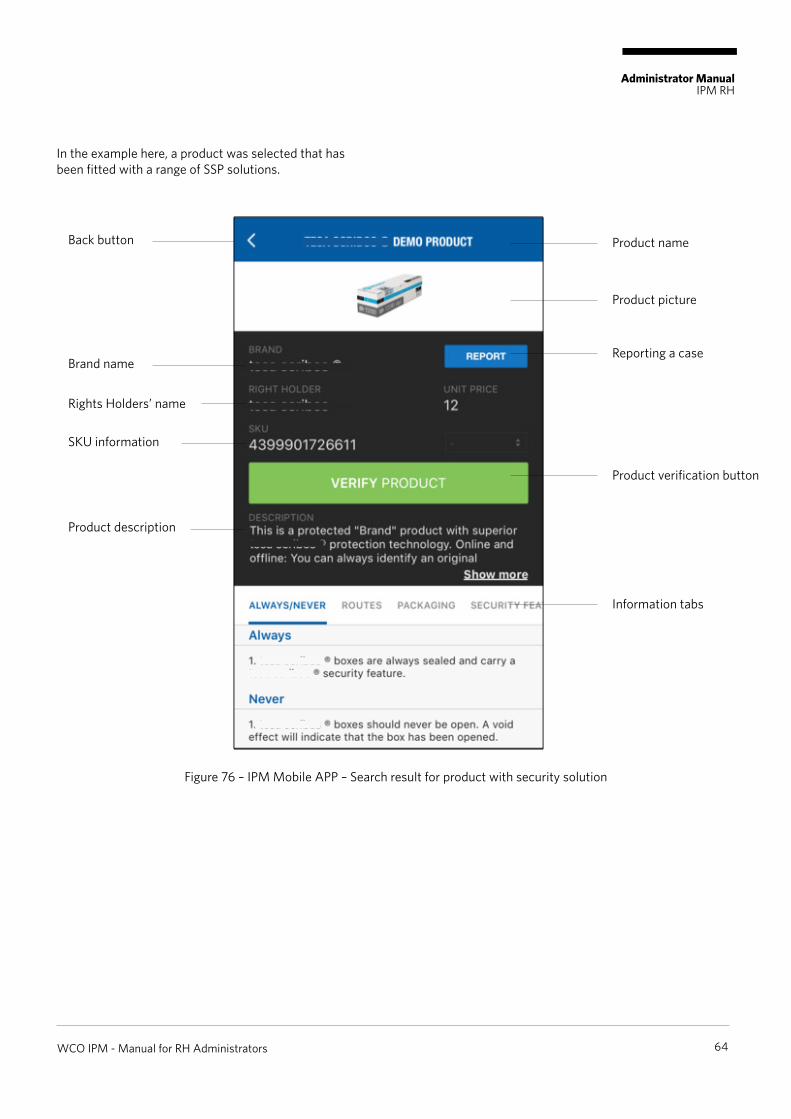
In the example here, a product was selected that has been fitted with a range of SSP solutions.
WCO IPM - Manual for RH Administrators 64
Figure 76 – IPM Mobile APP – Search result for product with security solution
Back button
Brand name
Rights Holders’ name
SKU information
Product description
Product name
Product picture
Reporting a case
Product verification button
Information tabs

Administrator Manual IPM RH
Once the user taps on the green “Verification” button, the detailed information of the SSP solution is displayed, giving the user indications of what additional verification information to look for.
WCO IPM - Manual for RH Administrators 65
Figure 77 – IPM Mobile APP – Verification details (1)
Back button
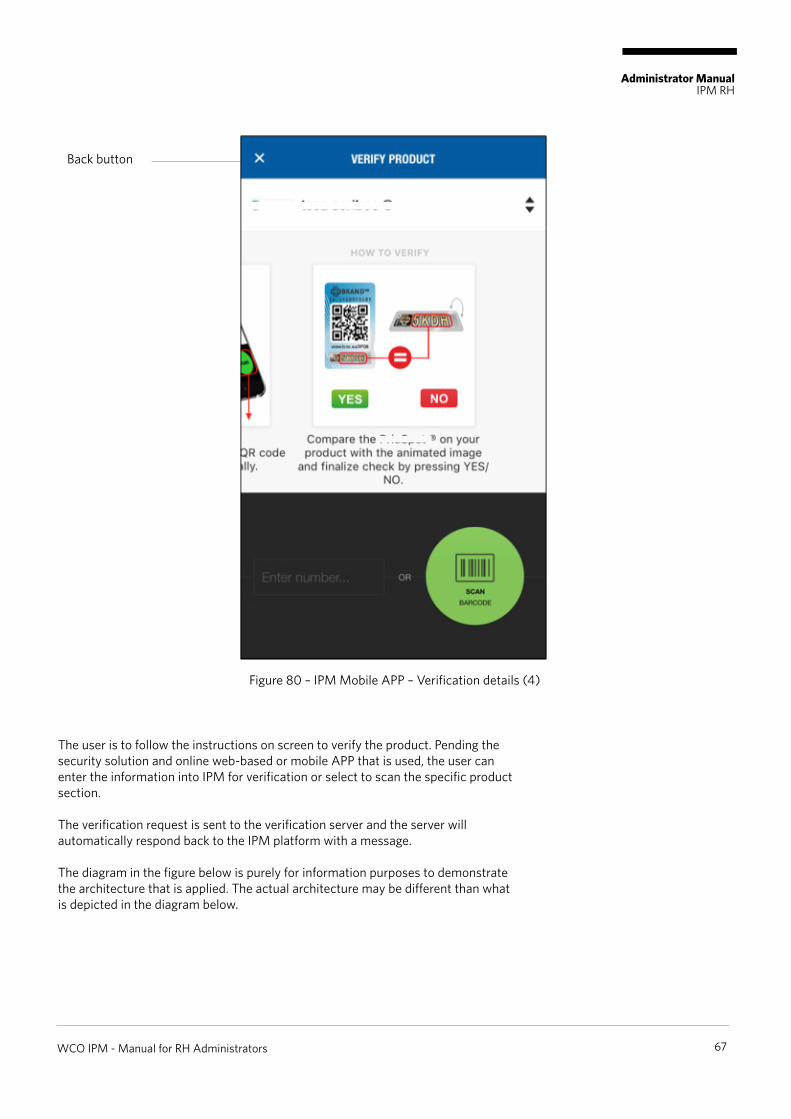
The first option on top – when multiple solutions are present – will be a selection button. This button – when tapped – will display the screen as displayed in the figure below.
IPM will present the user with the different security solutions that are available for this product. Depending on the security solution that is selected, the visual information of the security solution will be different, enabling the user to easily identify the area to focus on for visual verification of the product.
Code entry field
SSP selection field
Visual information
Product verification button
Scan button

Administrator Manual IPM RH
WCO IPM - Manual for RH Administrators 66
Figure 78 – IPM Mobile APP – Verification details (2)
Figure 79 – IPM Mobile APP – Verification details (3)
Back button
The visual information in IPM will direct the user to the correct location on the packaging and/or provide directions on which tool(s) to use for the verification method that has been selected.
The figure below shows an example of information that is to be located by the user. This information is made available in a carrousel type of interface, meaning that the user can swipe through the information by holding his/her finger on the screen and sliding to the left. This will make the next picture and visual identification information available.
Administrator Manual IPM RH
WCO IPM - Manual for RH Administrators 67
Figure 80 – IPM Mobile APP – Verification details (4)
Back button
The user is to follow the instructions on screen to verify the product. Pending the security solution and online web-based or mobile APP that is used, the user can enter the information into IPM for verification or select to scan the specific product section.
The verification request is sent to the verification server and the server will automatically respond back to the IPM platform with a message.
The diagram in the figure below is purely for information purposes to demonstrate the architecture that is applied. The actual architecture may be different than what is depicted in the diagram below.

Administrator Manual IPM RH
WCO IPM - Manual for RH Administrators 68
Figure 81 – Example IPM product verification architecture diagram
The response back from the verification request can be either a “code invalid” or a “code exists” message as shown in the figures below.

Administrator Manual IPM RH
WCO IPM - Manual for RH Administrators 69
Figure 82 – IPM Mobile APP – Verification details (5)
Back button
In case the code exists, additional verification steps can be presented to the user as shown in the figures below.

Administrator Manual IPM RH
Figure 83 – IPM Mobile APP – Verification details (6)
Figure 84 – IPM Mobile APP – Verification details (7)
Back button
WCO IPM - Manual for RH Administrators 70

Administrator Manual IPM RH
Information tabsIPM provides the user with a number of tabs, presenting the information in a consistent and intuitive manner to the user of the platform. These tabs include: Traders, Always/Never, Routes, Packaging, Security Features, Previous Cases and Contacts.
Please note that if no information is available under a specific tab, the tab will be hidden. This allows faster and easier access to the relevant information that is available in the platform.The following figures will display the different tabs one by one.
1. IPM Traders information tab:Here information on the importer, exporter, transporter, etc. can be displayed.
WCO IPM - Manual for RH Administrators 71
Please note that since the RH can assign certain information to specific countries, information may not always be available to the user in a country that has not been associated with the information.
2. IPM Clues (Always/Never) information tab:Here information is shared concerning specific features that are always or never associated with the product.
Figure 85 – IPM Mobile APP – Information tabs – Traders Figure 86 – IPM Mobile APP – Information tabs – Clues
Back button
Administrator Manual IPM RH
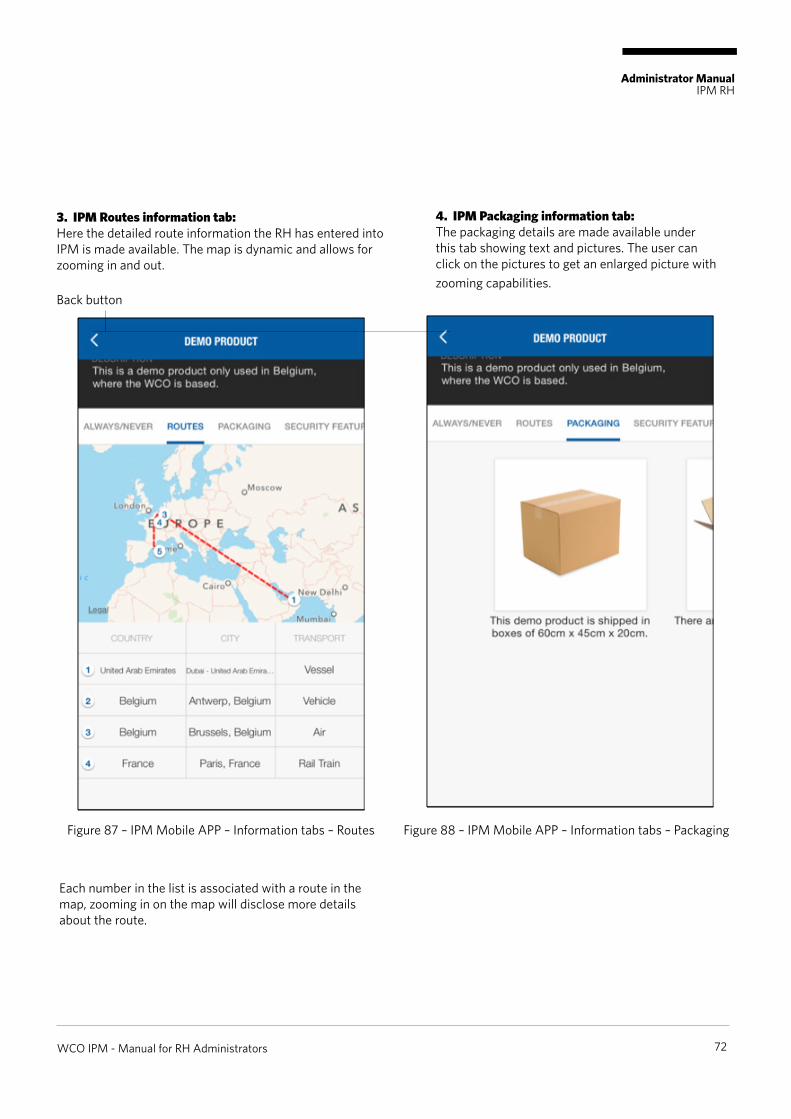
3. IPM Routes information tab:Here the detailed route information the RH has entered into IPM is made available. The map is dynamic and allows for zooming in and out.
WCO IPM - Manual for RH Administrators 72
4. IPM Packaging information tab:The packaging details are made available under this tab showing text and pictures. The user can click on the pictures to get an enlarged picture with zooming capabilities.
Figure 87 – IPM Mobile APP – Information tabs – Routes Figure 88 – IPM Mobile APP – Information tabs – Packaging
Each number in the list is associated with a route in the map, zooming in on the map will disclose more details about the route.
Back button

Administrator Manual IPM RH
5. IPM Security Features information tab:When security features (which are different from SSP solutions) are applied to a product, then they will show up here with a picture and some text associated to it. These are typical visual markings, seals, stickers, shifting color inks, etc.
WCO IPM - Manual for RH Administrators 73
6. IPM Previous Cases information tab:When information is available about COs reporting counterfeit cases on the product, those cases will be displayed in the Previous Cases tab.
Figure 89 – IPM Mobile APP – Information tabs – Security features
Figure 90 – IPM Mobile APP – Information tabs – Cases
Back button

Administrator Manual IPM RH
7. IPM Contacts information tab:RHs can enter contacts in IPM for COs to reach out to. These contacts are often associated with a country (or set of countries) for which they are responsible. Hence it is possible that for some countries, there are multiple contacts and for others there are none. Given that the Global RH Contact feature is made available to the RH, at least one contact should be visible in all countries.
WCO IPM - Manual for RH Administrators 74
Figure 91 – IPM Mobile APP – Information tabs – Contacts (1)
Back button
Please note that while local contacts may have both an email address and phone number associated with the contact information, the Global RH Contact may only have an email address, as there might be a considerable time zone difference between the country where the product is investigated and the RH location. Some RHs may choose to associate an email address with the Global RH Contact that reaches out to a pool of people in different locations.
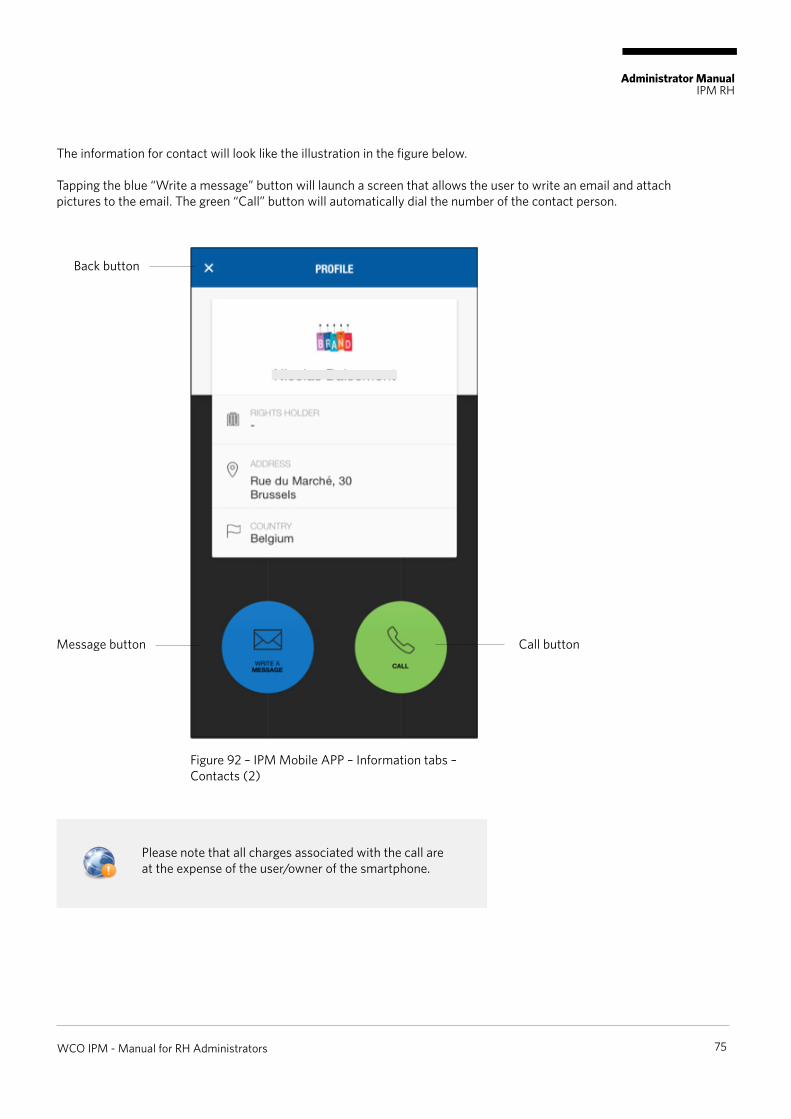
Administrator Manual IPM RH
The information for contact will look like the illustration in the figure below.
Tapping the blue “Write a message” button will launch a screen that allows the user to write an email and attach pictures to the email. The green “Call” button will automatically dial the number of the contact person.
WCO IPM - Manual for RH Administrators 75
Figure 92 – IPM Mobile APP – Information tabs – Contacts (2)
Back button
Message button Call button
Please note that all charges associated with the call are at the expense of the user/owner of the smartphone.
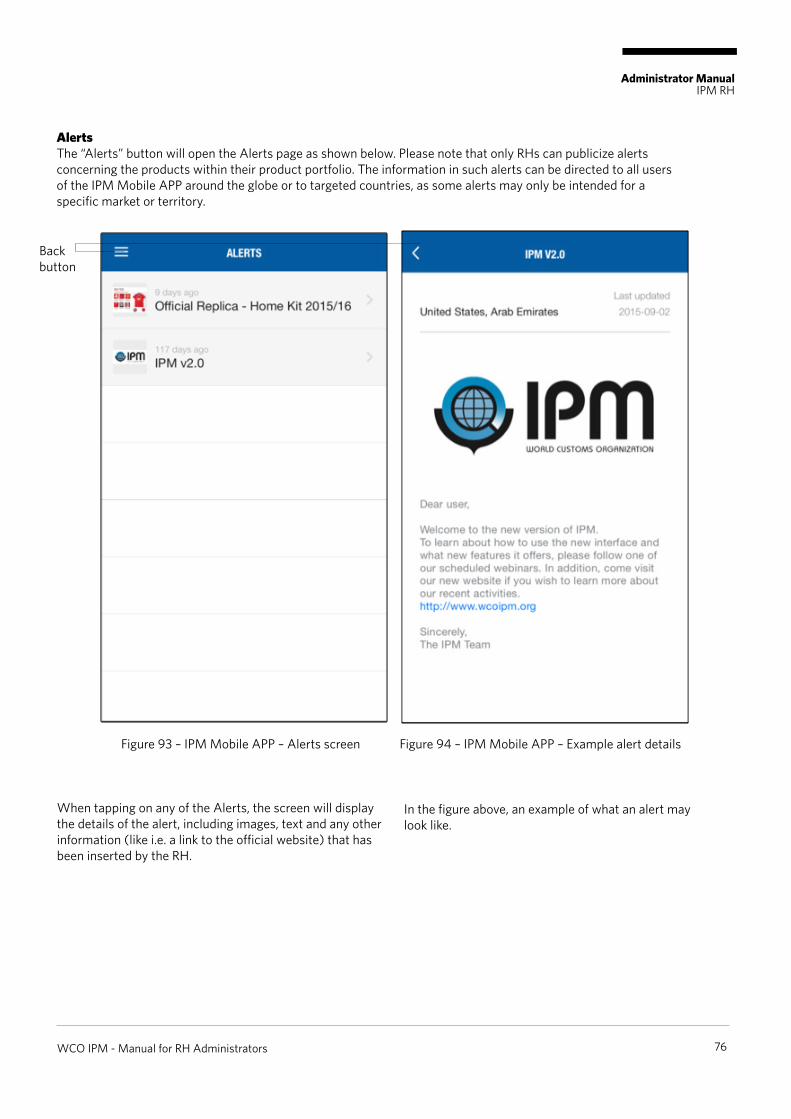
Administrator Manual IPM RH
AlertsThe “Alerts” button will open the Alerts page as shown below. Please note that only RHs can publicize alerts concerning the products within their product portfolio. The information in such alerts can be directed to all users of the IPM Mobile APP around the globe or to targeted countries, as some alerts may only be intended for a specific market or territory.
WCO IPM - Manual for RH Administrators 76
Figure 93 – IPM Mobile APP – Alerts screen
In the figure above, an example of what an alert may look like.
Figure 94 – IPM Mobile APP – Example alert details
When tapping on any of the Alerts, the screen will display the details of the alert, including images, text and any other information (like i.e. a link to the official website) that has been inserted by the RH.
Back button
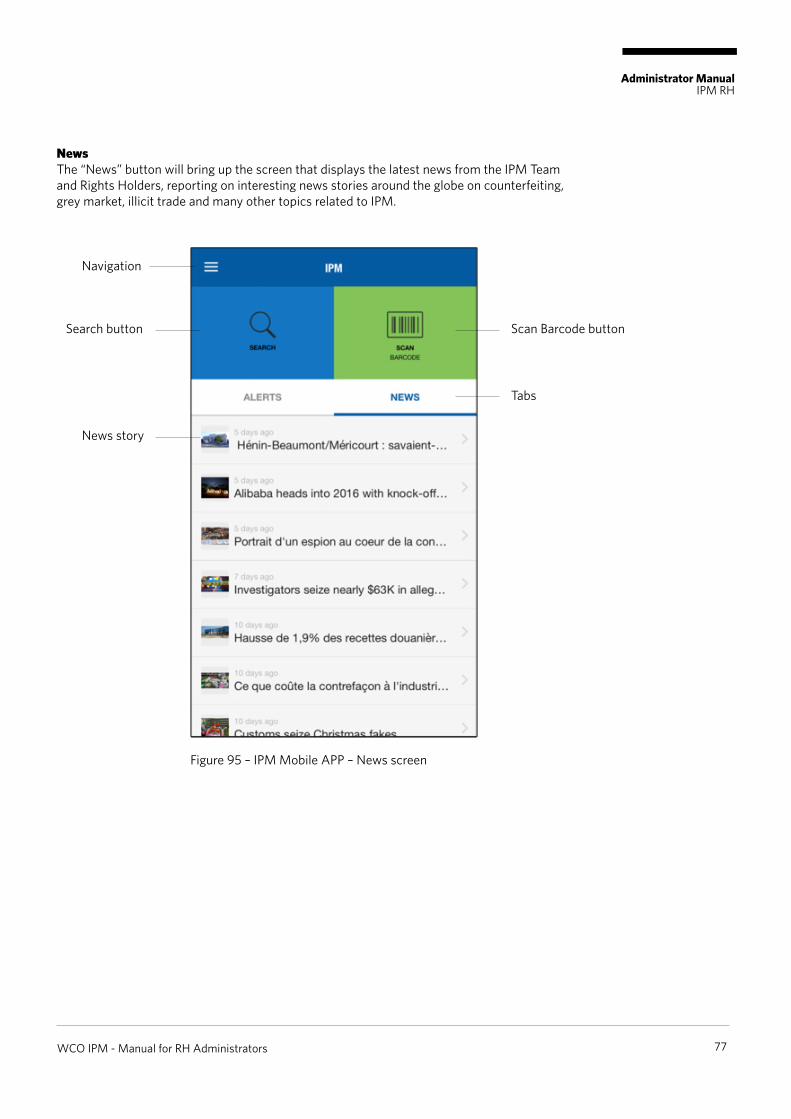
Administrator Manual IPM RH
NewsThe “News” button will bring up the screen that displays the latest news from the IPM Team and Rights Holders, reporting on interesting news stories around the globe on counterfeiting, grey market, illicit trade and many other topics related to IPM.
WCO IPM - Manual for RH Administrators 77
Figure 95 – IPM Mobile APP – News screen
Navigation
Search button
News story
Scan Barcode button
Tabs

Administrator Manual IPM RH
Address BookTapping the “Address Book” button will provide the list of contacts that have been created in IPM by the Rights Holders. These contacts can be reached either by email or phone.
WCO IPM - Manual for RH Administrators 78
Figure 96 – IPM Mobile APP – Address Book screen (1)
Navigation
Search field
Contact reference
Alphabetic shortcut
To find a contact, the user can opt to scroll through the contacts by swiping up or down on the screen.
To quickly go through the contacts, the user can also tap on the alphabetical shortcuts on the right of the screen.
The user can also opt to tap the search field and type in the information on the contact; this may be part of the brand name.
When tapping on the contact the user is presented with the following details:
o “Write a message” to send an email to the contact person o “Call” to initiate a phone call to the contact.
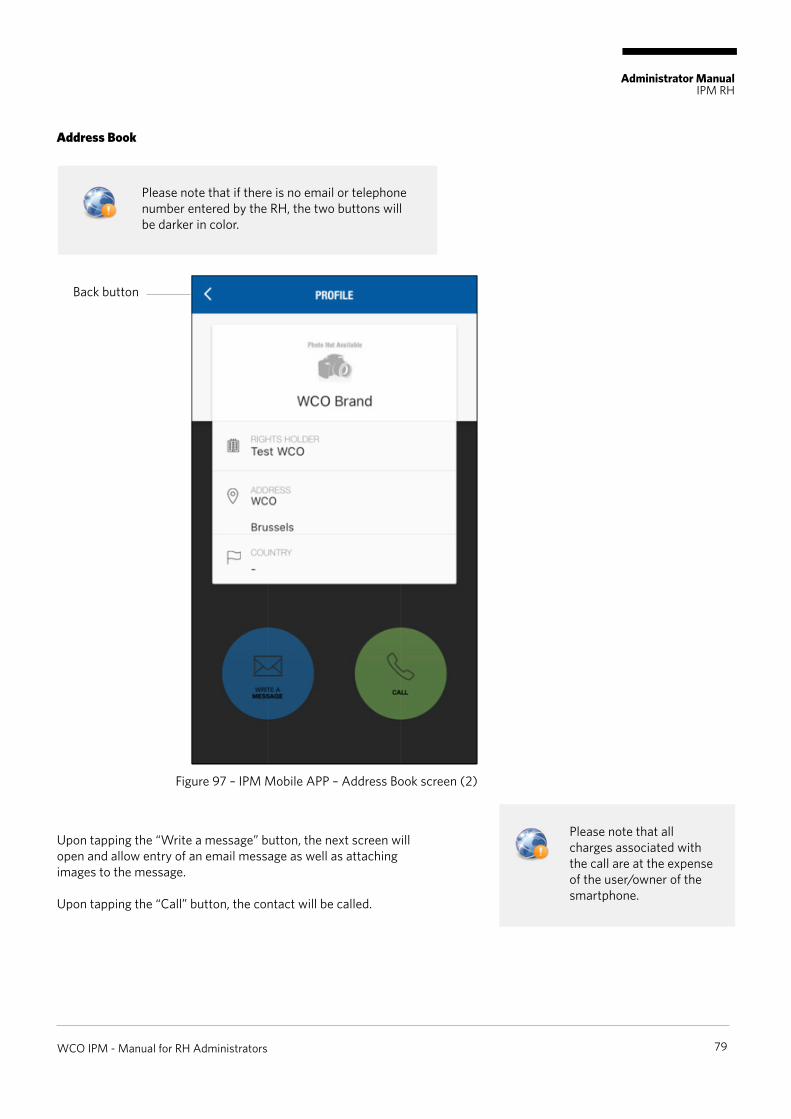
Administrator Manual IPM RH
Address Book
WCO IPM - Manual for RH Administrators 79
Please note that if there is no email or telephone number entered by the RH, the two buttons will be darker in color.
Back button
Figure 97 – IPM Mobile APP – Address Book screen (2)
Upon tapping the “Write a message” button, the next screen will open and allow entry of an email message as well as attaching images to the message.
Upon tapping the “Call” button, the contact will be called.
Please note that all charges associated with the call are at the expense of the user/owner of the smartphone.

Administrator Manual IPM RH
Contacting the WCOTapping the “Contact WCO” button will display the screen as shown in the figure below. This screen allows the user to reach out to the WCO and provide feedback or ask questions.
The user can also add pictures to the message by tapping on the attachment button.
WCO IPM - Manual for RH Administrators 80
Figure 98 – IPM Mobile APP – Sending email to WCO
Figure 99 – IPM Mobile App – Option for adding a picture to a message
Navigation
Description field
Attachment field
Attachment button
Send button
Please note that until the message has content added to the “Write a message …” field, the send button is inactive, indicated by a light blue color. Once information is entered, the send button will be active and indicated by a bright white color.
This message is sent to the WCO IPM Team who will respond to the email at their earliest convenience.
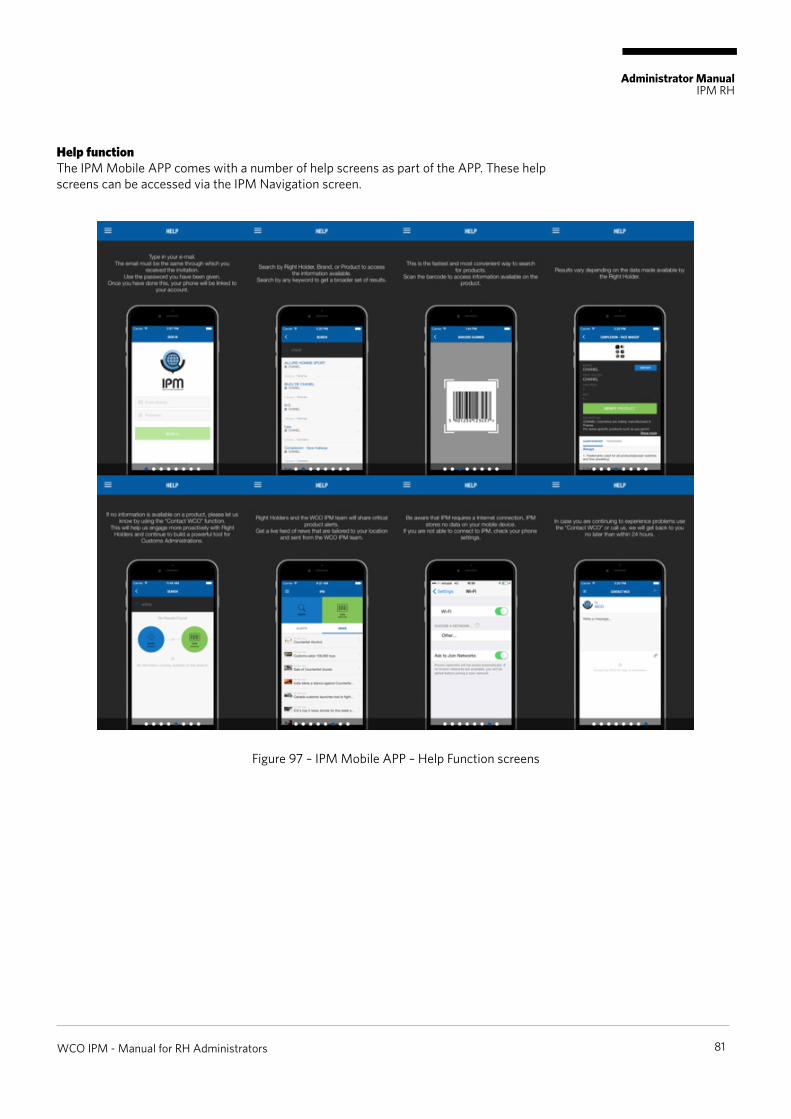
Administrator Manual IPM RH
Help functionThe IPM Mobile APP comes with a number of help screens as part of the APP. These help screens can be accessed via the IPM Navigation screen.
WCO IPM - Manual for RH Administrators 81
Figure 97 – IPM Mobile APP – Help Function screens
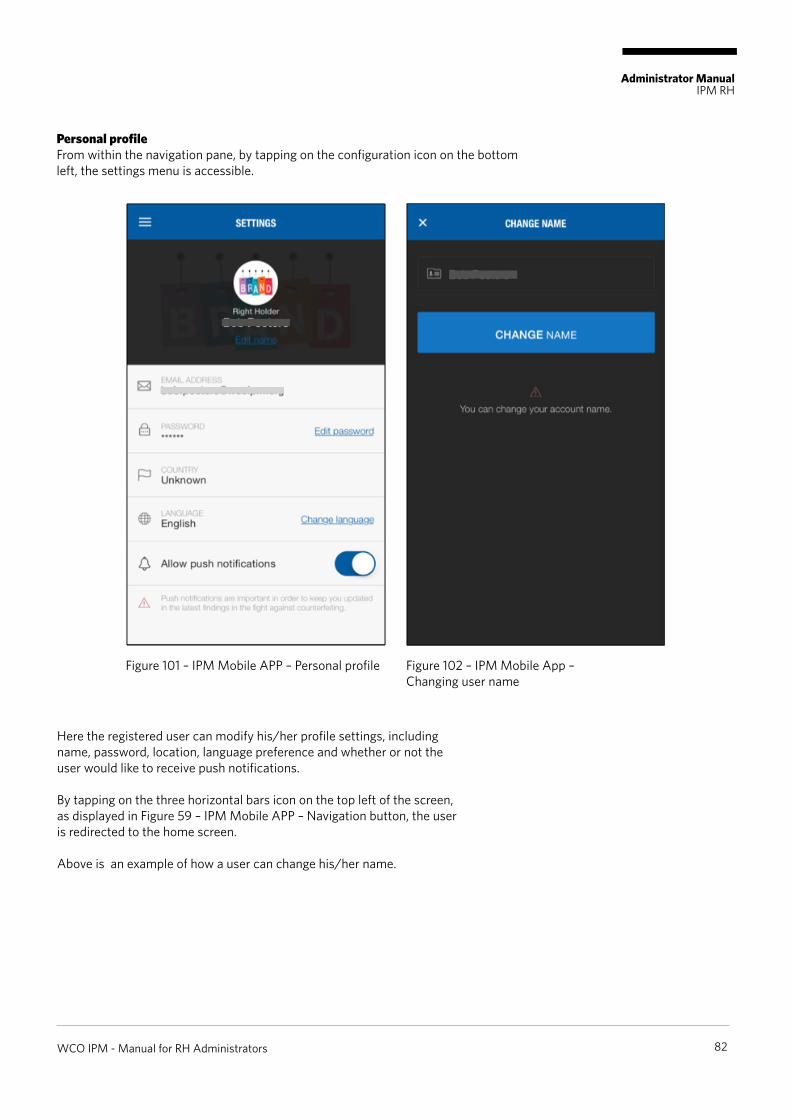
Administrator Manual IPM RH
Personal profileFrom within the navigation pane, by tapping on the configuration icon on the bottom left, the settings menu is accessible.
WCO IPM - Manual for RH Administrators 82
Figure 101 – IPM Mobile APP – Personal profile Figure 102 – IPM Mobile App – Changing user name
Here the registered user can modify his/her profile settings, including name, password, location, language preference and whether or not the user would like to receive push notifications.
By tapping on the three horizontal bars icon on the top left of the screen, as displayed in Figure 59 – IPM Mobile APP – Navigation button, the user is redirected to the home screen.
Above is an example of how a user can change his/her name.
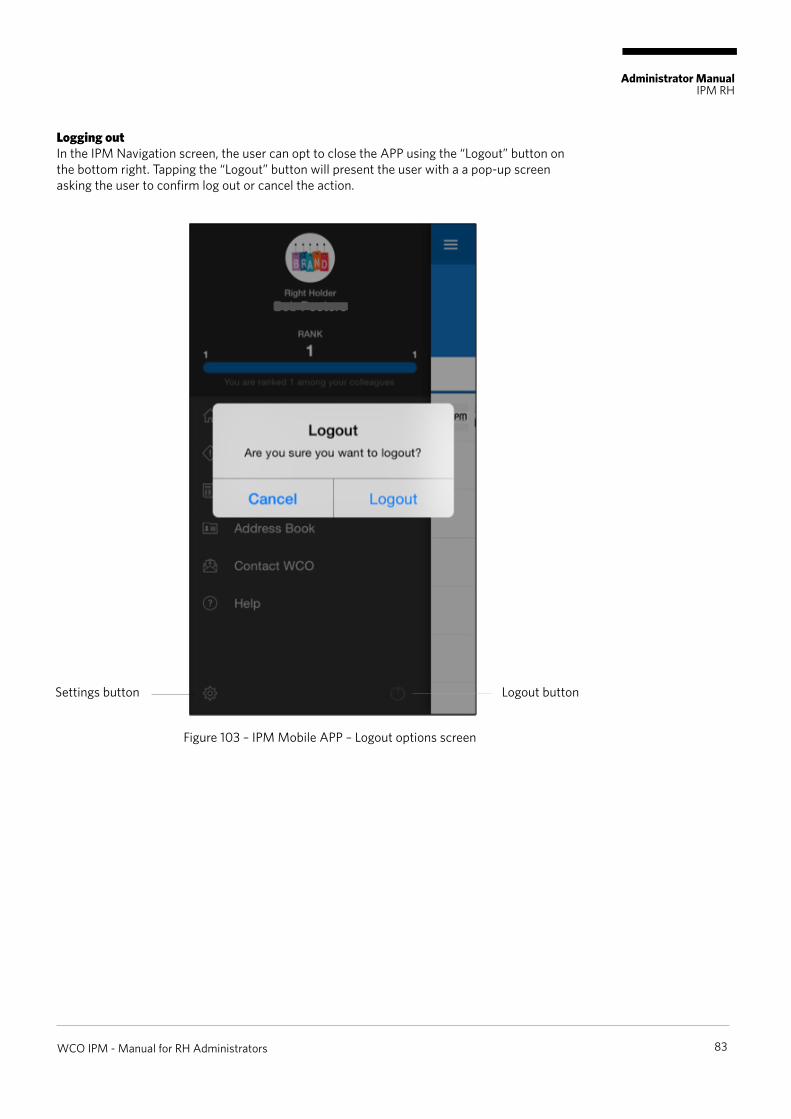
Administrator Manual IPM RH
Logging outIn the IPM Navigation screen, the user can opt to close the APP using the “Logout” button on the bottom right. Tapping the “Logout” button will present the user with a a pop-up screen asking the user to confirm log out or cancel the action.
WCO IPM - Manual for RH Administrators 83
Figure 103 – IPM Mobile APP – Logout options screen
Settings button Logout button
AfterwordAdministrator Manual
IPM RH Online Platform
Thank you for taking the time to read the IPM manual.
Should you have any further questions about IPM, please reach out to our support team via [email protected].
WCO IPM - Manual for RH Administrators 84

AcronymsAdministrator Manual
IPM RH Online Platform
Acronym
APPCSVCODG TAXUDEDBXLSXGDSNGLNGS1GTINIPMIMEINFCEUIPORHSSPSKUWCO
Meaning
ApplicationComma Separated ValueCustoms Officer Directorate-General for Taxation and Customs UnionEnforcement DatabaseExcel SheetGlobal Data Synchronization NetworkGlobal Location NumberGlobal Standard 1Global Trade Item NumberInterface Public-MembersInternational Mobile Equipment IdentityNear Field CommunicationOffices of Harmonization of the Internal MarketRights holderSecurity Solution ProviderStock Keeping UnitWorld Customs Organization
WCO IPM - Manual for RH Administrators 85

NotesAdministrator Manual
IPM RH Online Platform


World Customs OrganizationInterface Public-Members (IPM)Rue du Marché 30, B-1210 Brussels, Belgium+32 2 209 95 02 � [email protected]