dow styrofoam installation guidelines – piping systems · installation guidelines – piping...
TRANSCRIPT

Page1
DOW® STYROFOAM™ Installation Guidelines – Piping Systems
1.0 General
1.1 Scope: This document pertains to installation guidelines for Dow® STYROFOAM™, vapor barriers and jacketing for piping applications, elbows, fittings and valves for the following applications. This document also contains information related to installation on tanks and vessels. More detailed information is available in the DOW® STYROFOAM™ Installation Guidelines – Tanks and Vessels.
1.1.1 Chilled Piping Service (35°F to70°F) 1.1.2 Cold Piping Service (-100°F to 35°F) 1.1.3 Cryogenic Piping Service (-300°F to -100°F)
1.2 Applicable ASTM Standards: 1.2.1 C518 Standard test method for steady – state thermal transmission properties by means of
heat flow meter apparatus 1.2.2 D1621 Standard test method for compressive properties of thermal rigid cellular plastics 1.2.3 D1622 Standard test method for density of thermal rigid cellular plastics 1.2.4 E96 Standard test method for water transmission of cellular plastics 1.2.5 C272 Standard test method for water absorption of cellular plastics 1.2.6 D696 Standard test method for coefficient of linear thermal expansion of plastics between 1.2.7 -30°C and +30°C with a vitreous silica dilatometer 1.2.8 E84 Standard test method for flame spread / smoke developed using tunnel burn test. 1.2.9 C450 Standard practice for fabrication of thermal insulation fitting covers for nps and vessel
lags 1.2.10 C585 Standard practice for inner and outer diameters of thermal insulation for nominal pipe
and tubing
1.3 Related Documents: 1.3.1 Specification 15088 – Pipe Painting 1.3.2 Polyguard / Dow XPS Data Sheet 1.3.3 Dow XPS MSDS
1.4 Definitions: 1.4.1 Rigid STYROFOAM™ PIB Insulation meets ASTM C578 Standard Specification for Rigid Cellular
Polystyrene Thermal Insulation and the standards and tests listed above. 1.4.2 Chilled Service Piping: Refers to below ambient piping in the 35°F to 70°F range 1.4.3 Cold Service Piping: Refers to below ambient piping in the -100°F to 35°F range 1.4.4 Cryogenic Piping: Refers to extremely cold piping in the -300°F to -100°F range 1.4.5 Nominal Insulation Thickness: Refers to the normal thickness that insulation fabricators will
provide based on standard tables, pipe sizes and wall thicknesses 1.4.6 OD: Refers to the outer diameter of the insulation and/or finish covering 1.4.7 R-Value: 1 h·ft²·°F/BTU Is the unit used for thermal resistance 1.4.8 K-Factor: BTU/ft²/°F/hr is the reciprocal or R-Value at a 1 inch thickness. 1.4.9 SSL: Acronym for self-sealing lap. Often found on vapor barrier films and membranes.
1.5 Quality Assurance: 1.5.1 Dow® STYROFOAM™ PIB shall not be produced with, or contain, any of the United States EPA
regulated CFC Compounds listed in the Montreal Protocol of the United Nations Environmental Program.
1.5.2 Installation guidelines and thickness recommendations must be followed by the skilled installer in a manner of good workmanship.
1.6 Delivery, Handling & Storage:
1.6.1 Protect insulation from physical damage and excessive moisture. 1.6.2 Store indoors and keep free from exposure to UV, rain, hail, snow and wind.

Page2
1.6.3 Handle insulation sections carefully so corners are not broken off creating voids. Inspect for lags or gaps in longitudinal and butt joints. Vapor barrier must be intact and free of holes or voids.
2.0 Products 2.1 Insulation:
2.1.1 Insulation Type is Extruded (XPS) – Polystyrene Billet: ASTM C578 with flame spread and smoke developed indexes of 5 / 165, respectively, up to 4” insulation thickness per ASTM E84.
a. Rigid Close Cell Foam Insulation b. Comply with ASTM C578, Type XIII, density 1.6 lb/cu ft, minimum compressive
strength 20 psi at 10 percent deformation (ASTM D1621) c. Thermal resistance: K-Factor of .259 @ 75°F Mean d. Water absorption: Maximum 0.5 % by volume per ASTM C272 e. Surface Burning Characteristics: (ASTM E84) up to 4” i) Flame Spread: 5 ii) Smoke Developed: 165
2.1.2 Pipe sections, fittings, valves and vessels to be fabricated from bun stock by an authorized
fabricator and must adhere to the appropriate standard listed in sections 1.1 and 1.2. 2.1.3 At 90 and 45 degree elbows, valves and fittings, pre-molded 2 piece system shall be installed
that fits snug on the pipe or component. Mitered elbows and fiberglass filled PVC elbows in particular are not recommended for chilled service piping and colder.
2.1.4 Vessels, heads, segments & bodies shall be fabricated to fit the curves and contours of the vessel being insulated. 2.1.4.1 Vessel head segments to be curved and cut to minimize or eliminate voids at the head
section. Two part spray applied polyurethane foam shall be used to fill in voids. 2.1.4.2 Vessel segments shall be fabricated per ASTM C450
2.2 Joint Sealant , Adhesive & Mastic, Vapor Retarder Tape 2.2.1 Joint Sealant for all joints of insulation shall be vapor barrier type, non-hardening, flexible with
service temp range of -50°F to 200°F. 2.2.1.1 Childers, CP-70 2.2.1.2 Boss 368
2.2.2 Adhesive used to apply vapor retarder to insulation shall be one of the following: 2.2.2.1 Childers, 85-50 2.2.2.2 Childers, 85-60
2.2.3 Mastic 2.2.3.1 Childers, CP-35
2.2.4 Vapor Guard Tape: 2.2.4.1 Polyguard 1677 Tape
2.3 Vapor Barrier:
2.3.1 Vapor Barrier should have a maximum permeance of 0.015 after final application. Where vapor barrier tape is required to seal butt and longitudinal joints or for wrapping of fittings, use a compatible tape from the same manufacturer as the vapor barrier.
2.3.2 For Cold & Cryogenic service on outdoor piping, rubberized asphalt based vapor barriers are recommended since they are more puncture resistant and are self-healing. Also, for extreme Cryogenic piping, where triple layers of insulation are required, a rubberized asphalt vapor barrier is recommended for the primary and a film type vapor barrier is recommended as a secondary vapor barrier.
2.3.3 Vapor Barriers are applied to the outside surface of the insulation on pipe covering, valves, fittings and vessels. They are intended to minimize water and moisture migration from the external environment and keep it away from the insulation and piping. Moisture causes a reduction in thermal performance of the insulation and can cause pipe corrosion if trapped between the pipe and insulation. Refer to the following products and links for installation information. Additional information in appendix section.

Page3
2.3.4 Acceptable Vapor Barriers 2.3.4.1 Polyguard Zero Perm and Zero Perm A 2.3.4.2 Dow Saran 2.3.4.3 Polyguard Insulrap 30
2.4 Protective Jacketing:
2.4.1 Cladding: Cladding should have a maximum permeance of 0.000 or better after final application.
2.4.2 Rubberized asphalt based cladding products are recommended for exterior use. These
products have the perm rating of a vapor barrier, yet are UV stable in exterior environments. Products are available in silver or white, smooth or embossed. All products must have a 10 year warranty.
2.4.3 Acceptable Cladding Products: Exterior
2.4.3.1 Polyguard Alumaguard 2.4.3.2 Polyguard Alumaguard All Weather 2.4.3.3 Polyguard Alumaguard Cool Duct
2.4.4 Acceptable Cladding Products: Interior
2.4.4.1 Alumaguard Lite (White or Silver) 2.4.5 PVC Jacketing for Indoor Applications:
2.4.5.1 PVC jacket is not a vapor barrier; it provides some mechanical protection to the insulation and vapor barrier, aesthetics and color coding.
2.4.5.2 30 mil thick PVC is recommended on pipe sections and fittings in standard applications. A 40 mil thickness is recommended in spray or wash down areas.
2.4.5.3 Joints shall be solvent welded with manufacturer recommended product. 2.4.5.4 PVC jacketing for fittings, tees, elbows, valves etc. should be heavy duty fitting
covers. 2.4.5.5 Pipe sections to be covered with PVC sectional pieces. 2.4.5.6 Refer to the PVC Manufacturer for temperature limitations.
2.4.6 Acceptable PVC Manufacturers: 2.4.6.1 PIC Plastics 2.4.6.2 Proto 2.4.6.3 Ceel Co
2.4.7 Metal Jacketing for Outdoor Applications:
2.4.7.1 Metal jacketing is not a vapor barrier, it is designed to protect the insulation and vapor barrier from physical abuse from weather, mechanical wear or other damage. The jacketing shall be Aluminum Alloy 1100 meeting ASTM B209, and must have a polysurlyn moisture barrier on the back side.
2.4.7.2 Material recommendations: 2.4.7.2.1 0.016 inch thick for pipe sections 2.4.7.2.2 0.020, 0.024 or 0.032 should be considered in high abuse areas 2.4.7.2.3 Stucco finish is recommended 2.4.7.2.4 Banding should be stainless steel T304/T316 ½” x 0.020” with stainless
steel wing seal. 2.4.7.3 Recommended Manufacturers:
2.4.7.3.1 RPR Products 2.4.7.3.2 Standard Metal 2.4.7.3.3 Ideal Metal 2.4.7.3.4 ITW Insulation

Page4
2.6 Pipe & Hanger Support Saddles: 2.6.1 Pipe support, load bearing insulation shall be fabricated in 180 degree sections from Dow®
STYROFOAM™ for up to 10” pipe diameter. Saddle length must be adjusted to minimize loading and prevent excessive compression of the insulation.
2.6.2 Load bearing shields shall be provided by the contractor. 2.6.3 Sliding saddles are recommended for use on any type of jacket system. They absorb all of the
abuse from expansion and contraction of the piping system. The jacket will remain in serviceable condition much longer using a sliding saddle. Sliding saddles have enough give for expansion and contraction that they don’t end up on the floor or falling from the roof. They are less expensive than roller hangers.
2.6.4 Recommended Saddles: 2.6.4.1 Polyguard AlumaGlide.
2.7 Pipe Protection:
2.7.1 All piping on cold systems should have a coating to protect against corrosion. With a good vapor barrier and tightly closed cell XPS insulation, the chances of moisture intrusion are reduced significantly. Even with this reduced risk, pipe protection is still recommended. These systems will be in service for a long time, and there will be numerous opportunities for physical damage to the system. If moisture gets trapped between the pipe and insulation, corrosion will occur.
2.7.2 Reactive Gel is recommended for pipe corrosion protection. 2.7.2.1 Reactive Gel provides a moisture and oxygen barrier that expands, contracts and
moves with the entire piping system. 2.7.2.2 Reactive Gel “converts” the surface of ferrous metals to enhance corrosion resistance
and buffers the pH of any moisture that penetrates into the system to minimize corrosion.
2.7.2.3 Apply in 25 mil thickness as recommended by the manufacturer 2.7.3 Recommended Products
2.7.3.1 Polyguard RG-2400LT (Piping and vessels -100°F to 250°F) 2.7.3.2 Polyguard RG-CHW (Piping 33°F to 160°F) 2.7.3.3 Polyguard RG-2400ET (Hot lines up to 350°F)
2.8 Miscellaneous Materials: 2.8.1 Fiber reinforced (strapping) filament tape shall be a minimum ¾ inches wide and shall be used
to secure insulation pipe and fitting sections to the piping system. A minimum of 3 pieces shall be wrapped circumferentially around the insulation for each section of insulation. Tape shall be overlapped 50 percent onto itself.
2.8.2 Spray urethane foam, single component available in aerosol cans shall be used to fill minor gaps between sections of insulation.
2.8.3 Flexible closed cell elastomeric insulation supplied as sheet or preformed pipe covering may be used to form expansion / contraction joints. Note: Use of a non-halogenated elastomeric insulation is recommended when reactive gel is not used to protect the piping system from corrosion.
3.0 Execution 3.1 Preparation
3.1.1 Insulation should not be stored or installed around welding, abrasion, or anything that would likely cause damage to the material. Install insulation after these jobs are complete.
3.1.2 Surface Preparation 3.1.2.1 Before insulation or reactive gel (if applicable) is installed, all pipe surfaces should be free of moisture, dirt, oil, grease, loose scale, rust or other abnormal material. 3.1.2.2 If loose scale or surface corrosion are present, clean using a wire brush (SP-2).
3.2 Pipe Protection (If required by end user) 3.2.1 After preparation steps above are complete, install reactive gel on the pipe. 3.2.2 Brush or glove apply reactive gel to the piping to approximately 30mil wet film thickness (wft). 3.2.3 Use an AccuTrowel to screed the gel to a 25mil finish thickness.

Page5
3.2.4 Apply insulation immediately after reactive gel application is complete. Insulation can be applied within minutes of gel application. For best results apply insulation right behind gel application.
3.3 Insulation Installation (including vapor barrier)
3.3.1 Inspect insulation to make sure it is tightly butted and free of gaps and voids. 3.3.2 Inspect vapor barrier and other jacketing to make sure it is intact and free of damage. 3.3.3 Apply insulation to the piping with longitudinal joints at 3 and 9 o’clock positions and butt
joints staggered. For chilled service, adhesive may be used instead of joint sealant, and staggered butt joints may not be required. Refer to the end user’s specification for specific requirements. For cold and cryogenic service applications, joint sealant is required on the longitudinal and butt joints. Also for these colder applications offset the butt joints as well so that they do not line up. These upper and lower butt joints should be staggered between 6-18 inches. Expansion and contraction material is recommended every 50 ft. Install by leaving a 1” gap between insulation sections and compressing a 2” length of flexible insulation into the gap. Elastomeric Rubber type insulation is often used, and non-halogenated material is available from several manufacturers.
3.3.4 Use joint sealant listed above in section 2.2 for longitudinal and butt joints 3.3.5 Secure each layer of insulation with tape or bands and tighten bands without deforming
insulation materials. Orient longitudinal joints between half sections in 3 and 9 o’clock positions on the pipe.
3.3.6 For maximum performance, a fully adhered vapor barrier film or membrane should be applied on site for cold and cryogenic service work.
3.3.7 Insulation for chilled service piping can have factory applied vapor barrier or the vapor barrier can be installed on site. 3.3.7.1 For Insulation with factory applied jackets with vapor barriers, do not staple
longitudinal tabs. Instead secure tabs using additional adhesive or tape to strengthen SSL bond if needed.
3.3.8 All insulation shall be tightly butted and free of voids and gaps at all joints. 3.3.9 Vapor Stop Application
3.3.9.1 Apply vapor stops every 20-30 feet of straight runs, before and after every exposed valve or fitting and at terminations both around the pipe and over the butt joint of the insulation. Vapor stops must be continuous and tie in to the vapor barrier to minimize moisture penetration. Please see diagram 3 for further detail.
3.3.9.2 Apply either Vapor Guard tape or mastic – fab – mastic application. 3.3.10 Field Applied Vapor Barriers:
3.3.10.1.1 Field applied vapor barriers should be applied without staples or nails. Apply vapor barrier so that longitudinal joint is facing down ward (to shed water) at 4 o’clock position.
3.3.10.1.2 Apply film type vapor barrier with one of the recommended adhesives listed in section 2.2 or with compatible vapor barrier tape. Longitudinal overlap should be 2” for adequate adhesion. Apply SSL to firmly close longitudinal joints. Rubberized asphalt vapor barriers have a peel and stick overlap that is sufficient to seal membrane in installation temperatures above 50°F. For below 50°F installation temperatures, an activator is necessary.
3.3.10.1.3 Apply tape strips at butt joints to secure insulation sections and further hold vapor barrier in place.
3.3.10.1.4 Vapor barrier must be continuous on pipe sections and should be installed in a cigarette fashion.
3.3.11 Insulation Installation on Pipe Flanges: 3.3.11.1 Install preformed pipe insulation to outer diameter of pipe flange. 3.3.11.2 Make width of insulation section same as overall width of flange and bolts, and
make thickness same as adjacent pipe insulation, not to exceed 1.5”. 3.3.11.3 Fill voids between inner circumference of flange insulation and outer circumference
of adjacent straight pipe segments with cut sections of styrene block insulation of same thickness as pipe insulation.
3.3.12 Insulation Installation on Pipe Fittings and Elbows: Install preformed insulation sections of same material as straight segments of pipe insulation. Joints should be consistent with pipe sections if sealant is required.

Page6
Spiral wrap vapor retarder tape with ½” overlap to secure elbow or fitting tightness and seal up joint.
3.3.13 Insulation Installation on Valve and Pipe Specialties Install preformed section of polystyrene insulation to valve body. Arrange insulation to permit access to packing and allow valve operation without disturbing insulation. Install insulation to flanges as specified for flange insulation application.
3.4 Preparation For Double Layered Systems, Cold or Cryogenic systems with more than 2.5” of insulation. 3.4.1 Insulation should not be installed around welding, abrasion, or anything that would likely
cause damage to the material. Install insulation after these jobs are complete. 3.4.2 Surface Preparation
3.4.2.1 Before insulation or anti corrosion gel (if applicable) is installed, all pipe surfaces should be free of dirt, oil, loose scale rust or other abnormal material.
3.5 Pipe Protection (If required by end-user) 3.5.1 After preparations steps above are complete, install pipe protective gel. 3.5.2 Check piping again for loose scale corrosion. If present wire brush (SP-2) existing corrosion 3.5.3 Brush or glove apply gel product to the piping at approximately 30mil wft. 3.5.4 Use the AccuTrowel to screed the reactive gel application to a 25mil finish thickness. 3.5.5 Apply insulation immediately after reactive gel application is complete. Insulation can be
installed within minutes of reactive gel application. For best results apply insulation right behind reactive gel application.
3.6 Insulation Installation (including jacket and vapor barrier)
3.6.1 Inspect insulation to make sure it is tightly butted and free of gaps and voids. 3.6.2 Inspect vapor barrier and outer jacketing to make sure it is intact and free of damage. 3.6.3 Apply inner layer of insulation to the piping with longitudinal joints at 12 and 6 o’clock
positions. Do not apply joint sealant to inner layer unless required by the end user. For cold and cryogenic service applications, joint sealant is required on the longitudinal and butt joints. Stagger the butt joints so that they do not line up. These upper and lower butt joints should be staggered between 6-18 inches.
3.6.4 Secure each layer of insulation with strapping tape or bands and tighten bands without deforming insulation materials.
3.6.5 Stagger the second insulation layer so that butts and longitudinal joints do not line up with the first layer. Orient second or outer layer of insulation between half sections in 3 and 9 o’clock positions on the pipe. Expansion and contraction joint material is recommended every 50 ft, filling a 1” gap with 2” of a flexible insulation material such as elastomeric insulation.
3.6.6 Apply joint sealant to second (outer) layer only unless otherwise specified. Use joint sealant listed above in section 2.2
3.6.7 Vapor barrier film or membrane should be applied on site for cold and cryogenic service work. 3.6.8 All insulation shall be tightly butted and free of voids and gaps at all joints. 3.6.9 Vapor Stop Application:
3.6.9.1 Apply vapor stops every 20-30 feet on straight runs, before and after every exposed valve or fitting and at terminations both around the pipe and over the butt joint of the insulation. Please see diagram 3 for further details.
3.6.9.2 Apply either Vapor Guard tape or mastic – fab – mastic application 3.6.10 Field Applied Vapor Barriers:
3.6.10.1 Field applied vapor barriers should be applied without staples or nails. Apply vapor barrier so that longitudinal joint is facing downward (to shed water) at the 4 o’clock position.
3.6.10.2 Apply film type vapor barrier with one of recommended adhesives listed in section 2.2 or a compatible vapor barrier tape. Longitudinal overlap should be 2” for adequate adhesion.
3.6.10.3 Apply SSL to firmly close longitudinal joints. Rubberized asphalt vapor barriers have a peel and stick overlap that is sufficient to seal membrane in installation temperatures above 50°F. For below 50°F installation temperatures, an activator is necessary.

Page7
3.6.10.4 Apply tape strips at butt joints to secure insulation sections and further hold vapor barrier in place. Vapor barrier must be continuous on pipe sections and should be installed in a cigarette fashion.
3.6.11 Insulation Installation on Pipe Flanges: 3.6.11.1 Install preformed pipe insulation to outer diameter of pipe flange. 3.6.11.2 Make width of insulation section same as overall width of flange and bolts, and
make thickness same as adjacent pipe insulation, not to exceed 1.5” 3.6.11.3 Fill voids between inner circumference of flange insulation and outer circumference
of adjacent straight pipe segments with cut sections of styrene block insulation of same thickness as pipe insulation.
3.6.12 Insulation Installation on Pipe Fittings and Elbows: 3.6.12.1 Install preformed insulation sections of same material as straight segments of pipe
insulation. 3.6.12.2 Joints should be consistent with pipe sections if sealant is required. 3.6.12.3 Spiral wrap vapor retarder tape with ½” overlap to secure elbow or fitting tightness
and seal up joint. 3.6.13 Insulation Installation on Valve and Pipe Specialties:
3.6.13.1 Install preformed section of polystyrene insulation to valve body. 3.6.13.2 Arrange insulation to permit access to packing and allow valve operation without
disturbing insulation. 3.6.13.3 Install insulation to flanges as specified for flange insulation application.
3.7 Tank & Vessel Insulation Installation:
3.7.1 Vessel Walls: 3.7.1.1 Walls of vessels shall be insulated with double layered insulation, unless insulation
thickness is less than 3”. 3.7.1.2 Double layered insulation systems should be staggered by 50% overlap so that no
joints allow for full moisture penetration all the way through to the vessel. 3.7.1.3 Curved wall segments shall be beveled to fit around the tank or vessel smoothly,
segments should be the same size. 3.7.1.4 Vessels with diameters larger than 4 ft. should have additional insulation to support
tops and sidewalls. 3.7.1.5 Joint sealant from section 2.2 should be used to seal all joints. 3.7.1.6 ½ banding is required on 12” centers. 3.7.1.7 Vapor barrier shall cover entire insulation section on walls before protective jacket is
installed. 3.7.2 Vessel Heads:
3.7.2.1 Vessel heads should have joints consistent with the longitudinal sections and walls. 3.7.2.2 For systems requiring more than 4” thickness, vessel heads shall be double layered
and joints should be staggered. 3.7.2.3 Joint sealant from section 2.2 shall be used on all joints. 3.7.2.4 Vapor barrier to cover tank head is important on cold or cryogenic systems and shall
tie into the vapor barrier on the vessel body to create a continuous vapor barrier. 3.7.2.5 Dish type vessel head is preferred. If flat vessel heads are used, joints with the vessel
body insulation shall be staggered, and all cavities shall be filled with spray urethane insulation.
3.7.2.6 Contoured vessel heads may be directly adhered to the vessel if reactive gel is not required. If reactive gel is used, temporary mechanical attachment may be required. Fully adhered vapor barrier is recommended on all vessels.
3.8 Indoor Jacketing Installation:
3.8.1 PVC jacket to be installed directly over the insulation and vapor barrier. 3.8.1.1 Longitudinal PVC slip to overlap 2-3 inches past the insulation longitudinal joint. 3.8.1.2 PVC butt lap slip overlap should be 2-3 inches in to the following section, telescope
format. 3.8.1.3 PVC over lap and bond to be at approximately 4 o’clock. 3.8.1.4 PVC lap to be solvent welded with sealant recommended by manufacturer.

Page8
3.8.1.5 Valves, fittings, tees, elbows and other specialty items to be pre molded or fabricated by a skilled contractor or fabricator.
3.8.1.6 See manufacturer’s guidelines on PVC installation. 3.8.2 If Indoor cladding is desired Alumaguard Lite White is a good choice in low traffic areas not
subject to wash downs. 3.8.2.1 Alumaguard Lite can be applied in place of a vapor barrier and PVC jacket. 3.8.2.2 Spiral wrap elbows and fittings in similar fashion as listed in above vapor barrier
guideline. 3.8.2.3 Overlap longitudinal joints by 6 inches and butt joints by 3 inches, secure with peel
and stick overlap. 3.8.2.4 Connect outer layer insulation sections with Alumaguard Lite tape at the butt joints. 3.8.2.5 In some cases for mild temperatures in the chilled service category, this jacket can
come factory applied. 3.9 Outdoor Jacketing Installation
3.9.1 Metal jacket to be installed directly over the insulation and vapor barrier. 3.9.1.1 Longitudinal metal slip to overlap 2-3 inches past the insulation longitudinal joint. 3.9.1.2 Metal overlap to be at approximately 4 o’clock on horizontal piping. 3.9.1.3 Metal lap to be sealed with sealant recommended by manufacturer to limit moisture
intrusion under the jacket. 3.9.1.4 Valves, fittings, tees, elbows and other specialty items to be preformed up to 12”.
Where preformed is not available, metal gores fabrication by a skilled contractor or fabricator shall be used.
3.9.1.5 Stainless steel strapping bands shall be used to secure metal jacket on pipe sectionals circumferences on 12” centers. No screws or sharp objects that could puncture the vapor barrier are permitted.
3.9.1.6 See manufacturer’s guidelines on metal installation and banding pattern.
3.9.2 If outdoor cladding is desired Alumaguard or Alumaguard All Weather is a good choice. 3.9.2.1 Alumaguard can be applied in place of a vapor barrier and metal jacket. 3.9.2.2 Spiral wrap elbows and fittings in similar fashion as listed in above vapor barrier
guideline. 3.9.2.3 Overlap longitudinal joints by 6 inches and butt joints by 3 inches, secure with peel
and stick overlap. 3.9.2.4 In some cases for mild temperatures in the chilled service category, this jacket can
come factory applied. 3.9.2.5 Stainless steel banding must be used every 18” on center of the insulation section.
Banding shall not crimp or cut the cladding.
3.10 Underground Burial 3.10.1 Polyguard I-50 Vapor Barrier to be installed directly over the insulation. 3.10.2 Longitudinal overlap to be 2-3 inches past the insulation longitudinal joint 3.10.3 Overlap longitudinal joint at approximately 4 o’clock 3.10.4 Overlap butt joint 3 inches 3.10.5 Secure longitudinal and butt joints with peel and stick overlap 3.10.6 Spiral wrap fittings with I-50 tape to cover valve or fitting completely

Page9
4.0 Insulation Diagrams & Thickness Tables
Elbows: Pre molded elbows are highly recommended on a system that is chilled or colder in temperature. As shown in figure 2 the wall thickness on the end of the elbow, there is plenty of insulation thickness. Mitered elbows don’t provide this level of insulation on either end.
Advantages: Longer service life Easy to install Tight fit, no voids Compatible with metal or PVC covers Only 2 seems Less moisture intrusion possibility
Installation (Quick Facts): Line up right & left side of elbow Apply snug fit to elbow Apply joint sealant if required Apply filament tape to both ends and middle Apply vapor barrier tape in spiral fashion Apply metal or PVC cover
Installed Metal Elbow Cover
Page10
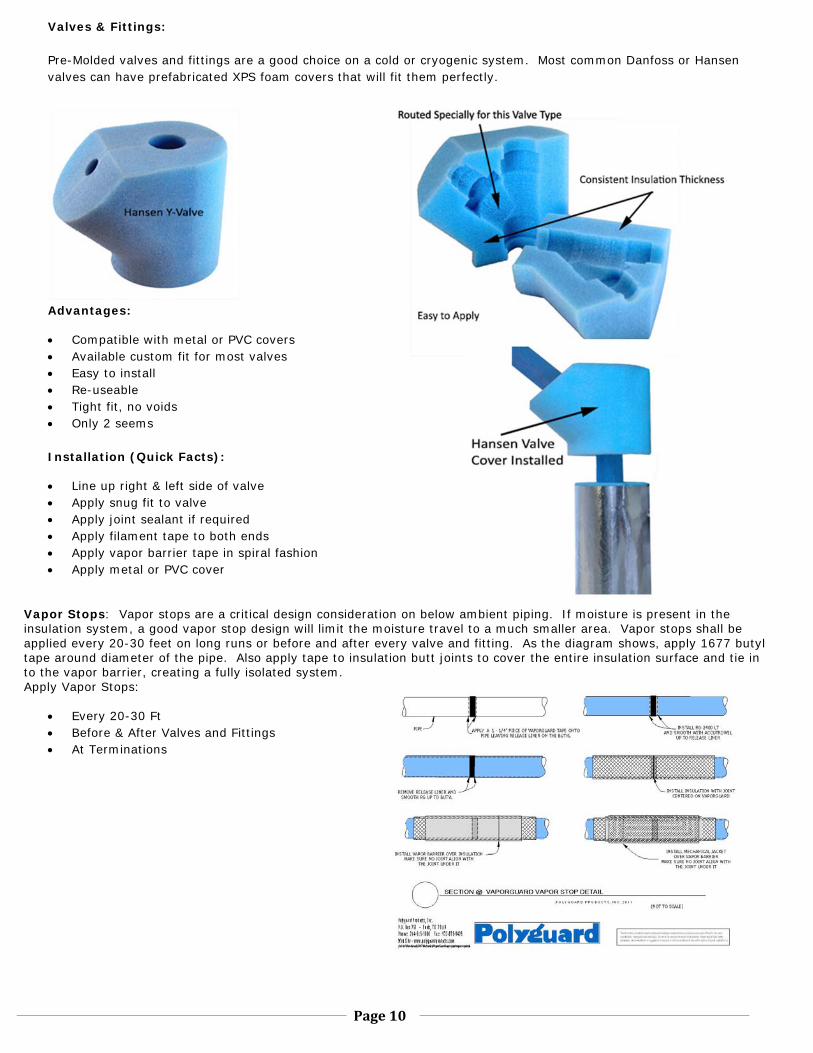
Valves & Fittings: Pre-Molded valves and fittings are a good choice on a cold or cryogenic system. Most common Danfoss or Hansen valves can have prefabricated XPS foam covers that will fit them perfectly.
Advantages: Compatible with metal or PVC covers Available custom fit for most valves Easy to install Re-useable Tight fit, no voids Only 2 seems Installation (Quick Facts): Line up right & left side of valve Apply snug fit to valve Apply joint sealant if required Apply filament tape to both ends Apply vapor barrier tape in spiral fashion Apply metal or PVC cover
Vapor Stops: Vapor stops are a critical design consideration on below ambient piping. If moisture is present in the insulation system, a good vapor stop design will limit the moisture travel to a much smaller area. Vapor stops shall be applied every 20-30 feet on long runs or before and after every valve and fitting. As the diagram shows, apply 1677 butyl tape around diameter of the pipe. Also apply tape to insulation butt joints to cover the entire insulation surface and tie in to the vapor barrier, creating a fully isolated system. Apply Vapor Stops:
Every 20-30 Ft Before & After Valves and Fittings At Terminations
Page11
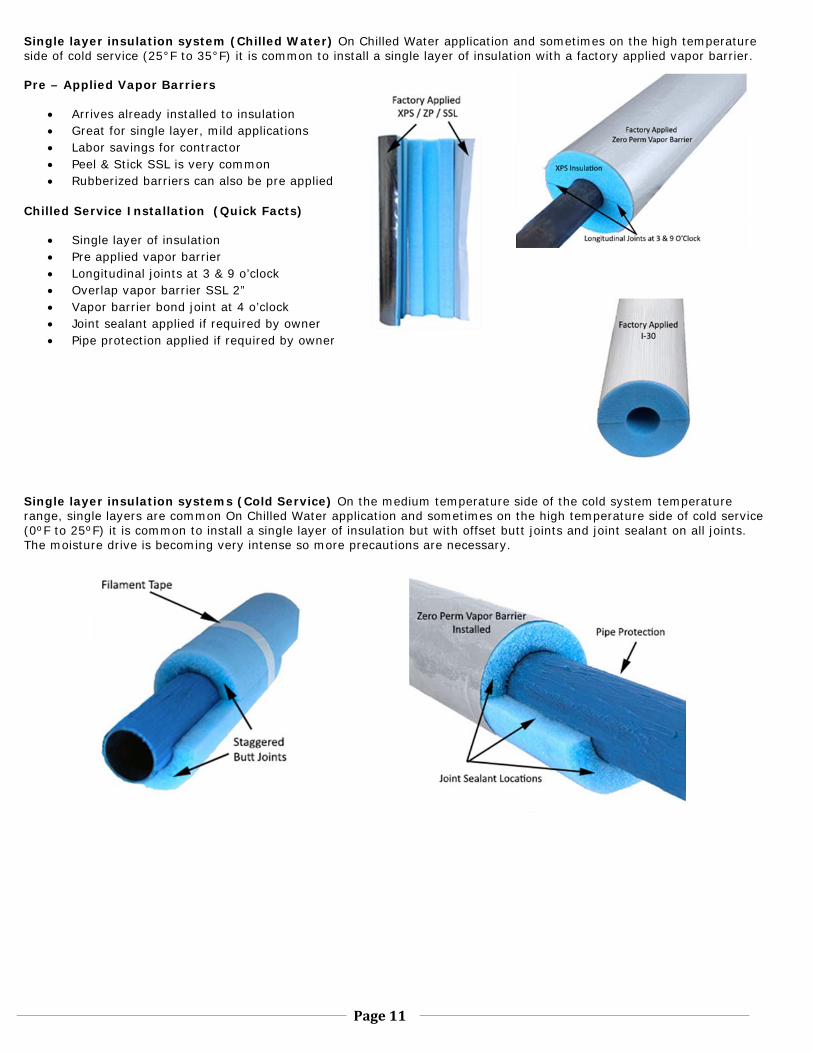
Single layer insulation system (Chilled Water) On Chilled Water application and sometimes on the high temperature side of cold service (25°F to 35°F) it is common to install a single layer of insulation with a factory applied vapor barrier. Pre – Applied Vapor Barriers
Arrives already installed to insulation Great for single layer, mild applications Labor savings for contractor Peel & Stick SSL is very common Rubberized barriers can also be pre applied
Chilled Service Installation (Quick Facts)
Single layer of insulation Pre applied vapor barrier Longitudinal joints at 3 & 9 o’clock Overlap vapor barrier SSL 2” Vapor barrier bond joint at 4 o’clock Joint sealant applied if required by owner Pipe protection applied if required by owner
Single layer insulation systems (Cold Service) On the medium temperature side of the cold system temperature range, single layers are common On Chilled Water application and sometimes on the high temperature side of cold service (0ºF to 25ºF) it is common to install a single layer of insulation but with offset butt joints and joint sealant on all joints. The moisture drive is becoming very intense so more precautions are necessary.

Page12
Cold Service Installation Single Layer (Quick Facts)
Single layer of insulation
Field applied vapor barrier
Longitudinal joints at 3 & 9 o’clock
Overlap vapor barrier lap 2”
Vapor barrier bond joint at 4 o’clock
Joint sealant applied on butt & longitudinal joints
Pipe protection (gel coat) is highly recommended
Double Layer Insulation Systems (Very Cold & Cryogenic) On the very cold and cryogenic side of the cold system temperature range, multiple insulation layers are common. On very cold and cryogenic piping systems, the butt joints are offset in each layer and all seams are staggered between layers. Seam sealant is applied to all seams on the outer layer of insulation, and the inner layer(s) may be sealed with sealant or “dry fit”. A fully adhered vapor barrier is recommended for these systems as the vapor drive is severe.
Cold / Cryogenic Service Installation (Quick Facts)
Field applied vapor barrier
Over lap vapor barrier lap by 2”
Double layered insulation
Inner longitudinal joints at 12 & 6 O’Clock
Outer longitudinal joints at 3 & 9 O’Clock
Joint sealant applied to butt & longitudinal joints on
outer layer only
Pipe gel coat is highly recommended

Page13
Pipe Protection: It is highly recommended on cold systems to install cathodic protection to piping under insulation. No matter how good the insulation and jacketing is, over time moisture will get caught inbetween the pipe and insulation.
In the illustration above (left) moisture got caught inbetween the pipe and insulation. The epoxy paint was not able to prevent corrosion. Rigid paint type coatings can crack as pipes expand and contract. Because it remains flexible, reactive gel is better suited to flow with the pipe and not chip or flake off, allowing corrosion to occur. Pipe Protection Installation (Quick Facts): Remove loose scale rust (SP-2)
Clean pipe of oil, weld flux or dirt
Apply 30 mils of RG by hand or brush
Use AccuTrowel to achieve 25 mil wft
Install insulation immediately following
RG products work by forming a mineralized layer over the metal surface and blocking moisture and oxygen from connecting with the annode and cathode in the metal. This mineralized layer also provides a buffer to the outer surface and alters the ph level to a more basic ph of around 10 – 10.7PH. RG can also be directly applied to valve groups. Valve groups should then be covered with insulation or weather cover jacketing.
Advantages:
Alters Surface PH level of metal piping
Blocks moisture and oxygen from pipe surface
Expands and contracts with piping system
Doesn’t flake or peel off
No sand blasting requred
Less stringent surface prep conditions
Easy to apply

Page14
Tanks & Vessels: Insulating tanks and vessels is similar to piping where single and double layering patterns of insulation should be followed. Joints should be overlapped by 6” on centers. Joint sealant to be applied to the outer layer. Use filament tape or metal banding to hold insulation tightly in place.
Head Installation: Heads to be fabricated and form fitted. To be applied in sections. RG will help adhere insulation to tank heads and bottoms.
Indoor tanks to be finished with Metal, PVC or Alumaguard Lite. Outdoor tanks and vessels to be finished with Metal or Alumaguard jacketing.

Page15
Hangers: Poor hanger system design is often a cause of problems on cold systems. Hanger supports and insulation that supports the piping need to be specified and installed correctly. It is very common for moisture to enter the system at the hangers. Hangers can tear the jacket and vapor barrier if not applied correctly. Sliding saddles are a very good idea on ammonia systems. Piping systems expand and contract a lot and in most cases the abuse is taken by the jacket. In a sliding saddle the abuse is taken by the top side of the saddle which is designed to take the abuse. If a traditional style saddle is used, rounded edges and flared out ends are a good idea so that they can’t puncture the jacket or vapor barrier. The supporting insulation should either be XPS up to 10” pipe diameter or heavy density PIR for larger pipe diameter sizes.
Sliding Saddle Advantages:
Designed to take pipe expansion and contraction
Sliding system takes the abuse
Top part of saddle is adheres to pipe jacket
Sharp edges are rounded and flared to reduce risk of jacket
puncture
Teflon coated to ensure good slide mechanism
Wide variety of sizes available

Page16
Jacketing: Outdoor: Traditionally 0.16 stucco clear coat aluminum with polysurlyn backing is installed on insulation for outdoor / rooftop ammonia refrigeration. It is durable, long lasting and aesthetic.
Pre Molded Elbow Covers
Stainless Steel Banding at Least Every 12”
Longitudinal Joints at 4 O’clock
Butt Joints to be Telescoped
Sealant Applied to all Seams
Metal is not a Vapor Retarder
Alumaguard also acceptable for exterior outer jacketing. Alumaguard can save cost and is self-healing and is both a protective jacket and a vapor barrier.
Jacketing: Indoor: 20-30 mil PVC jacketing is usually installed over insulation as a final jacket for indoor applications. PVC is available in several colors and thicknesses. 20 mil is primarily used, but of extreme cold or heavily abusive areas 30 mil is a good choice.
Pre Molded Elbow Covers
Heat Bonded Adhesives to be used at joints
Butt Joints to be Telescoped
PVC is not a Vapor Retarder
Refer to Manufacturer’s Temperature Limitations
Alumaguard Lite is also acceptable for indoor insulation jacketing. It has a perm rating of 0.000 and is an economical way to provide a jacketing and vapor retarder system. Available in white or silver, smooth or embossed finish.

Page17
Below Ground Insulation: Use Polyguard I-50 for XPS insulation vapor barrier and final jacket for below grade applications. I-50 is ideal for underground applications where sandy, soft non rocky back fill is available. For severe conditions, No Torch 125 and Insul-Shield are recommended to further protect the membrane jacket.
Install XPS single or double layered insulation as shown on pages 11 & 12. Install Polyguard I-50, No torch 125 and Insul-Shield over insulation depending on application.

Page18
Thickness Tables: All Tables Calculated using 3EPlus v4.1. Table lists the greater thickness required to prevent condensation or limit heat gain to a maximum 8 BTU/hr/sq ft
Cold Room Service Temperature, °F
Diameter ‐100 ‐80 ‐60 ‐40 ‐20 ‐10 0 10 20 30 40
½ 3.5 3 3 2.5 2 2 1.5 1.5 1
¾ 4 3.5 3 2.5 2.5 2 2 1.5 1 1 1
1 4 4 3.5 3 2.5 2 1.5 1.5 1 1 1
1 ½ 4.5 4 3.5 3 2.5 2 2 1.5 1 1 1
2 5 4.5 4 3.5 2.5 2.5 2 1.5 1 1 1
2.5 5 4.5 3.5 3 2.5 2 2 1.5 1 1 1
3 5 5 4 3.5 3 2.5 2 1.5 1.5 1.5 1
4 5.5 5 4.5 4 3 2.5 2.5 2 1.5 1.5 1
5 6 5 4.5 4 3 3 2.5 2 1.5 1.5 1
6 6 5.5 5 4 3.5 3 2.5 2 1.5 1.5 1
8 6.5 6 5 4.5 3.5 3 2.5 2 1.5 1.5 1
10 7 6 5.5 4.5 3.5 3 2.5 2 1.5 1.5 1.5
12 7 6.5 5.5 4.5 3.5 3 2.5 2 1.5 1.5 1
14 7.5 6.5 6 5 4 3.5 3 2 1.5 1.5 1.5
16 7.5 6.5 6 5 4 3.5 3 2 1.5 1.5 1.5
18 7.5 7 6 5 4 3.5 3 2 1.5 1.5 1.5
20 8 7 6 5 4 3.5 3 2.5 1.5 1.5 1.5
24 8 7 6 5 4 3.5 3 2.5 1.5 1.5 1.5
30 8.5 7.5 6.5 5.5 4.5 3.5 3 2.5 1.5 1.5 1.5
36 8.5 7.5 6.5 5.5 4.5 3.5 3 2.5 1.5 1.5 1.5
48 9 8 7 5.5 4.5 4 3 2.5 1.5 1.5 1.5
Design Criteria: Ambient Temp: 40°F, Relative Humidity 90%. Dew Point 37.3°F Wind Speed: 0 MPH, Jacket:
(PVC) 0.9 Emissivity
Indoor Service Temperature, °F
Diameter ‐300 ‐200 ‐150 ‐100 ‐80 ‐60 ‐40 ‐20 ‐10 0 10 20 30 40
½ 3 3 2.5 2.5 2.5 2 2 2 1.5 1.5 1.5 1.5 1 1
¾ 3.5 3 3 2.5 2.5 2.5 2 2 2 1.5 1.5 1.5 1.5 1
1 4 3.5 3 2.5 2.5 2.5 2 2 2 1.5 1.5 1.5 1.5 1
1 ½ 4 3.5 3 2.5 2.5 2.5 2 2 2 2 1.5 1.5 1.5 1
2 4.5 4 3.5 3 3 2.5 2.5 2 2 2 1.5 1.5 1.5 1
2.5 4 3.5 3.5 3 2.5 2.5 2 2 2 1.5 1.5 1.5 1.5 1.5
3 5 4 4 3.5 3 3 2.5 2.5 2 2 2 1.5 1.5 1.5
4 5 4.5 4 3.5 3 3 2.5 2.5 2.5 2 2 2 1.5 1.5
5 5 4.5 4 3.5 3.5 3 3 2.5 2.5 2 2 2 1.5 1.5
6 5.5 4.5 4.5 3.5 3.5 3.5 3 2.5 2.5 2.5 2 2 1.5 1.5
8 5.5 5 4.5 4 3.5 3.5 3 2.5 2.5 2.5 2 2 1.5 1.5
10 6 5 4.5 4 4 3.5 3 2.5 2.5 2.5 2 2 1.5 1.5
12 6 5.5 5 4 4 3.5 3 3 2.5 2.5 2 2 1.5 1.5
14 6.5 5.5 5 4.5 4 3.5 3.5 3 2.5 2.5 2.5 2 2 1.5
16 6.5 5.5 5 4.5 4 4 3.5 3 3 2.5 2.5 2 2 1.5
18 6.5 6 5 4.5 4 4 3.5 3 3 2.5 2.5 2 2 1.5
20 7 6 5.5 4.5 4 4 3.5 3 3 2.5 2.5 2 2 1.5
24 7 6 5.5 4.5 4.5 4 3.5 3 3 2.5 2.5 2 2 1.5
30 7 6 5.5 4.5 4.5 4 3.5 3 3 2.5 2.5 2 2 1.5
36 7.5 6.5 5.5 5 4.5 4 3.5 3 3 2.5 2.5 2 2 1.5
48 7.5 6.5 6 5 4.5 4 3.5 3 3 2.5 2.5 2 2 1.5
Design Criteria: Ambient Temp: 90°F, Relative Humidity 80%. Dew Point 83°F Wind Speed: 0 mph, Jacket: (PVC) 0.9 Emissivity
Outdoor Moderate Conditions

Page19
Service Temperature, °F Diameter ‐300 ‐200 ‐150 ‐100 ‐80 ‐60 ‐40 ‐20 ‐10 0 10 20 30 40
½ 3 3 2.5 2.5 2.5 2 2 2 1.5 1.5 1.5 1.5 1.5 1
¾ 3.5 3 3 2.5 2.5 2.5 2 2 2 2 1.5 1.5 1.5 1.5
1 4 3.5 3 2.5 2.5 2.5 2 2 2 1.5 1.5 1.5 1.5 1
1 ½ 4 3.5 3 2.5 2.5 2.5 2 2 2 2 1.5 1.5 1.5 1.5
2 4.5 4 3.5 3 3 2.5 2.5 2 2 2 2 1.5 1.5 1.5
2.5 4.5 3.5 3.5 3 2.5 2.5 2.5 2 2 1.5 1.5 1.5 1.5 1.5
3 5 4 4 3.5 3 3 2.5 2.5 2 2 2 2 1.5 1.5
4 5 4.5 4 3.5 3.5 3 3 2.5 2.5 2 2 2 1.5 1.5
5 5 4.5 4 3.5 3.5 3 3 2.5 2.5 2.5 2 2 1.5 1.5
6 5.5 5 4.5 3.5 3.5 3.5 3 2.5 2.5 2.5 2 2 2 1.5
8 5.5 5 4.5 4 3.5 3.5 3 2.5 2.5 2.5 2 2 2 1.5
10 6 5.5 4.5 4 4 3.5 3 3 2.5 2.5 2 2 1.5 1.5
12 6 5.5 5 4 4 3.5 3 3 2.5 2.5 2 2 2 1.5
14 6.5 5.5 5 4.5 4 3.5 3.5 3 3 2.5 2.5 2 2 1.5
16 6.5 5.5 5 4.5 4 4 3.5 3 3 2.5 2.5 2 2 1.5
18 6.5 6 5.5 4.5 4 4 3.5 3 3 2.5 2.5 2 2 1.5
20 7 6 5.5 4.5 4 4 3.5 3 3 2.5 2.5 2 2 1.5
24 7 6 5.5 4.5 4.5 4 3.5 3 3 2.5 2.5 2 2 1.5
30 7 6 5.5 5 4.5 4 3.5 3 3 2.5 2.5 2 2 1.5
36 7.5 6.5 5.5 5 4.5 4 3.5 3 3 2.5 2.5 2 2 1.5
48 7.5 6.5 6 5 4.5 4 3.5 3 3 3 2.5 2 2 1.5
Design Criteria: Ambient Temp: 90°F, Relative Humidity 80%. Dew Point 83°F Wind Speed: 7.5mph, Jacket: (In Service Aluminum) 0.1
Emissivity
Outdoor Severe Conditions Service Temperature, °F
Diameter ‐300 ‐200 ‐150 ‐100 ‐80 ‐60 ‐40 ‐20 ‐10 0 10 20 30 40
½ 3.5 3 2.5 2.5 2.5 2.5 2 2 2 1.5 1.5 1.5 1.5 1.5
¾ 3.5 3 3 2.5 2.5 2.5 2.5 2 2 2 2 1.5 1.5 1.5
1 4 3.5 3 3 2.5 2.5 2.5 2 2 2 1.5 1.5 1.5 1.5
1 ½ 4 3.5 3.5 3 2.5 2.5 2 2 2 2 2 2 1.5 1.5
2 4.5 4 3.5 3 3 3 2.5 2.5 2 2 2 2 1.5 1.5
2.5 5 4 3.5 3 3 2.5 2.5 2 2 2 1.5 1.5 1.5 1.5
3 5 4.5 4 3.5 3.5 3 3 2.5 2.5 2.5 2 2 2 1.5
4 5 4.5 4 3.5 3.5 3 3 2.5 2.5 2.5 2 2 2 1.5
5 5.5 4.5 4.5 4 3.5 3.5 3 3 2.5 2.5 2.5 2 2 1.5
6 6 5 4.5 4 3.5 3.5 3 3 2.5 2.5 2.5 2 2 2
8 6.5 5.5 5 4 4 3.5 3 3 2.5 2.5 2.5 2 2 2
10 7 6 5.5 4.5 4 4 3.5 3 3 2.5 2.5 2 2 2
12 7.5 6.5 5.5 5 4.5 4 3.5 3 3 3 2.5 2.5 2 2
14 7.5 6.5 6 5 4.5 4.5 4 3.5 3 3 2.5 2.5 2 2
16 8 7 6 5.5 5 4.5 4 3.5 3.5 3 3 2.5 2.5 2
18 8.5 7 6.5 5.5 5 4.5 4 3.5 3.5 3 3 2.5 2.5 2
20 8.5 7.5 6.5 5.5 5.5 5 4.5 4 3.5 3.5 3 3 2.5 2
24 9 8 7 6 5.5 5 4.5 4 4 3.5 3 3 2.5 2.5
30 9.5 8.5 7.5 6.5 6 5.5 5 4.5 4 3.5 3.5 3 3 2.5
36 10 9 8 7 6.5 5.5 5 4.5 4 4 3.5 3 3 2.5
48 11 9.5 8.5 7.5 6.5 6 5.5 5 4.5 4 4 3.5 3 2.5
Design Criteria: Ambient Temp: 100°F, Relative Humidity 90%. Dew Point 96.6°F Wind Speed: 7.5mph, Jacket: (In Service Aluminum)
0.1 Emissivity
X:/Lit/Mech/2014/XPS Installation Guide.doc R 12-22-14