don’t let the world’s stories...
TRANSCRIPT

GettinG Started Guide world archives project

For centuries, key moments in our ancestors lives have been captured
on fragile paper. The world’s stories are disappearing too quickly.
We’ve been working to change that, but we can’t do it alone.
Don’t let the world’s stories disappear.

world archives project
welcome to the ancestry world archives project
The Ancestry World Archives Project is a community-based initiative that preserves historical
records and makes them accessible — free of charge — to people who are researching their
family history.
Here’s how it works:
• Ancestry.com acquires and scans historical records.
• Contributors like you transcribe important facts — such as names, dates and locations —
to create searchable record indexes. Our easy-to-use keying tool lets you
participate at your own convenience, using your home computer.
• To ensure accuracy, two contributors key each record. If their transcription of a certain field
varies, an arbitrator reviews both versions, comparing them to the original record image,
and decides which interpretation is correct.
• The indexes are free for everyone on Ancestry.com, making more family history
information available to people who are searching for their ancestors.

1 Sign into Ancestry.com
Anyone can participate in the World Archives Project. You do not need to have an Ancestry.com
subscription, but you do need to be a registered user of Ancestry.com or a related site such as
Ancestry.ca or Ancestry.co.uk.
• If you are already a registered user of an Ancestry site, sign in with your regular
username and password.
• If you do not have an Ancestry username, you’ll need to register here to create a
free account.
Enter your name and email address and then click the “Continue” button. f
You will be assigned a username and password. You can change your username and/or f
password by clicking the “change to something easier for me to remember” link.
GettinGStarted

world archives project
Download the Keying Tool
The World Archives Project uses a desktop keying tool that you can download onto your own com-
puter. Once you’ve installed the keying tool, you can download a set of record images and key them
at your own convenience. You must be connected to the Internet in order to download a new image
set or submit a completed image set. You do not need to be online while you are keying the records.
• From anywhere on Ancestry.com, click on the Collaborate tab and select “Ancestry World Archives
Project.” You can also go directly to this page by entering this URL into your browser:
www.ancestry.com/worldarchivesproject
It’s a good idea to bookmark this page so that you can easily return to it. Once you’ve joined the Project,
this link will automatically take you to your World Archives Project Dashboard, where you’ll see your
keying statistics, available projects, recent blog and message board posts and more.
• Click the orange “Download” button.
• On the next page you’ll need to click the “Download” button again.
• Click “Run” and then follow the download prompts.
2
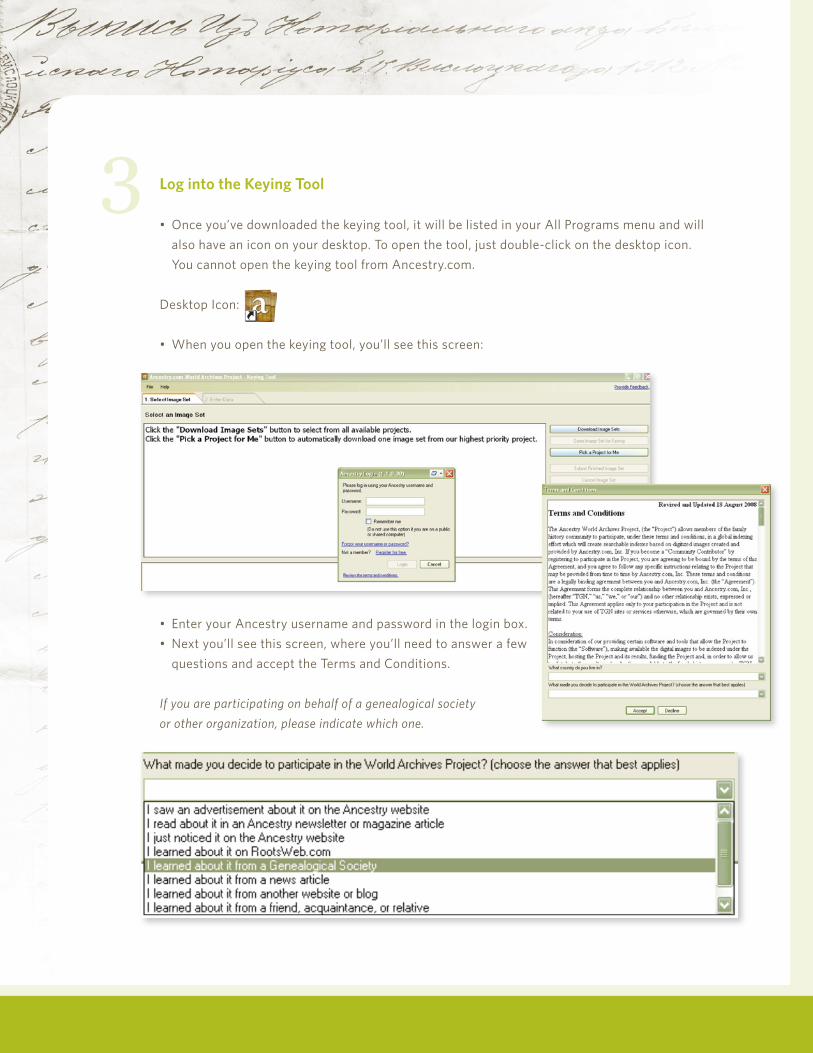
Log into the Keying Tool
•Onceyou’vedownloadedthekeyingtool,itwillbelistedinyourAllProgramsmenuandwill
alsohaveanicononyourdesktop.Toopenthetool,justdouble-clickonthedesktopicon.
YoucannotopenthekeyingtoolfromAncestry.com.
DesktopIcon:
•Whenyouopenthekeyingtool,you’llseethisscreen:
•EnteryourAncestryusernameandpasswordintheloginbox.
•Nextyou’llseethisscreen,whereyou’llneedtoanswerafew
questionsandaccepttheTermsandConditions.
If you are participating on behalf of a genealogical society
or other organization, please indicate which one.
3

world archives project
Download an Image Set
The records you will be keying are bundled into image sets. By design, the image sets are small
enough that you can key a complete set in 15 minutes or less. You can download one image set
at a time or, if you prefer, download several image sets from the same indexing project.
• Click the “Download Image Sets” button to see the list of available indexing projects.
• Select a project and how many image sets you’d like to download,
and then click the “Download” button.
4

Start Keying Records
• To begin keying, double-click on the project or highlight the project and
then click the “Open image set for keying” button.
• Once the project is open you’ll see the Project Instructions. After you’ve read them, click “Close.”
• Start keying the first image. The Field Help instructions, located in the box in the lower left corner,
will tell you what information to enter for each field.
• Once you’ve completed an image, click the “Next: Begin Next Image” button.
5

world archives project
Get Help
• If you have questions as you’re keying records, go to the Help menu in the
top left corner of the keying tool.
• Please pay particular attention to the following Help resources:
View Help – This link provides general information about f
how to use the keying tool.
View Online Help – This link takes you to our knowledge base, where f
you can search for Help articles relating to a specific project.
View More About This Project – This link takes you to a project page, f
which has more information about the collection you’re working on.
• If you can’t find the information you need in the Help section, you can post
a question on the message board or contact our support team at
6

Auto-populating Record Fields As you begin typing a given name, surname or place, you’ll
notice a box appear with suggested names or places. You can
choose which suggestion to enter by using the arrow keys to
navigate up or down, using your mouse or entering the number
to the side of the suggestion. For example, if you begin typing
the word August, you will see August appear as the first option
in the box. You could simply type the number 1 and the word
August would auto-populate the field.
Using Wildcard Symbols If you are unsure of a name or word, you can also use wildcard symbols. Use “?” to
represent a single character, “*” to represent multiple characters, and “$” to indicate
that the unknown character is at the end of the word.
Within the main data entry section there is space to show only 10 suggested entries.
To see more, click on the “more…” option or press F12. This will bring up a window
that will let you see the full list of matching entries. It will also give you a reminder
of the different wildcard symbols available. If you find a good matching entry on the
list, just use your mouse to choose it and click OK.
tipS &trickS

world archives project
To the right of the screen you’ll notice the Field Help box. If you are unsure of what
to enter for a field, refer to the Field Help as it provides specific instruction on what
information from the record should be entered for that field. Clicking on the See
Examples link will bring up a page on Ancestry.com (requires an active Internet
connection) that shows an example of the field in question.
Improving On-screen Readability If you’re having a hard time reading the image, you can increase the contrast of the
image by clicking the High Contrast button at the top of the tool.
Adjusting Image Brightness and Contrast You can click Image Options at the top of the tool to adjust the brightness and con-
trast. You can also click the + or – magnifying glasses at the top of the tool to zoom in
or out of the image.
Viewing Handwriting SamplesClick this button to view handwriting samples that may help you interpret
individual characters.

Deciphering Handwriting When trying to read old handwriting, it is also sometimes very helpful to see ex-
amples of how the same record taker wrote different letters. For example, you may
be looking at a letter and be unsure if it is a W or an M. If you found another word
written by the same person that you know contained a W, this could help. To make
it easier to compare handwriting you can bring up another image in the image set
in a separate window. Right above the image you can see an icon of a document
next to a downward arrow. Clicking one of the image options here will open the
image in another window.
Highlighting Correct Fields If you find that the image highlight isn’t in the right place to highlight the field you are
keying, you can use your mouse to drag the highlight to the right place. The highlights are
set up to coincide with the form type most often encountered in a project so they may not
match the form you are keying. If you find that the highlights are not helpful you can turn
them off by clicking on the Highlights button in the toolbar at the top of the image.

world archives project
• You can easily maneuver from one column to the next by hitting the
Tab or Enter key.
• You can accept a field as correct by
clicking the Accept Field as Correct button or typing F7.
• You can mark a field blank by clicking the Mark Field Blank button
or typing Ctrl + B.
Several shortcut keys and buttons are available to make the process easier:
Adding Multiple Sections to Images Sometimes the document shows that the record taker inserted different information
into the record. For example, a heading of the document might show the record to be
for one county, but halfway through the page the record taker indicated that they were
now recording records for a different county, and began recording those residents
onto the same page as the prior county. In this scenario, you would need to enter new
county information. To do this, you can add a new section on the image by clicking the
Add a New Section Following the Current Section button. This will allow you to enter
new heading information for the new location and begin keying in records for that new
section. Many images consist of two pages, check the project instruction and form
descriptions to see if a new section should be created for each page.
Reconciling Fields for Review You may have fields with information you entered that need
to be reviewed. These could be required fields that were left
blank, or fields in which you entered information that the keying tool didn’t recognize.
You can quickly move to the fields you need to review by using the Last Field to Review
or Next Field to Review buttons.
EnterORTab
Shortcuts

world archives project
• If you can’t read the information in a field, you can mark the
field illegible by clicking the Mark Field Illegible button or typing Ctrl + I.
• Occasionally you will need to mark an entire row blank. In this case,
you can click the Mark Entire Row Blank button or type Ctrl + Shift + B.
• If you need to mark an entire row in the image illegible, you can click
the Mark Entire Row Illegible button or type Ctrl + Shift + I.
As you get used to the keying process, you can usually speed things
up by double-clicking. Here are some areas where that may help:
• Click a downloaded image set twice to open it.
• Click a form type twice to select it and move to the next step.
To make sure the keying tool is set up the way you like, there is also
an Options menu. Simply click File and then Options. This will let
you decide:
• What your language preferences are.
• Whether the keying tool auto-completes words based on what
you enter. If you select this option, the top suggested entry will
automatically fill in as you type. If you press Tab or Enter to go
to the next field, the tool will automatically use the top
suggested entry.
• What font size you prefer to use when entering information
from the image
• What color you want the image highlights to be. The initial color is
red, though you may prefer different highlight colors while working
in other records.
• And if you are an Arbitrator you can select whether you would like
to review all of the fields and/or forms for the image sets you
arbitrate.
x2
Options

world archives project
start saving the world’s stories today.www.ancestry.com/worldarchivesproject