docuprint c1190 fx
TRANSCRIPT

User Guide
DocuPrint C1190 FS
Apple®, Bonjour®, ColorSync®, Macintosh®, and Mac OS® are trademarks of Apple Inc. in the United States and/or other countries.
PCL® is a trademark of Hewlett-Packard Corporation in the United States and/or other countries.
Microsoft®, Windows Vista®, Windows®, and Windows Server® are trademarks of Microsoft Corporation in the United States and/or other countries.
All product/brand names are trademarks or registered trademarks of the respective holders.
In this manual, safety instructions are preceded by the symbol . Always read and follow the instructions before performing the required procedures.
It may be a legal offence to print currency notes, certificates of stocks and securities, or any other documents of similar nature, regardless of whether they will be used.
Fuji Xerox is not responsible for any breakdown of machines due to infection of computer virus or computer hacking.
Important1. This manual is copyrighted with all rights reserved. Under the copyright laws, this manual may not be copied or modified in whole or part, without the written consent of the publisher.2. Parts of this manual are subject to change without prior notice.3. We welcome any comments on ambiguities, errors, omissions, or missing pages.4. Never attempt any procedure on the machine that is not specifically described in this manual. Unauthorized operation can cause faults or accidents. Fuji Xerox is not liable for any problems resulting from unauthorized operation of the equipment.
XEROX, the sphere of connectivity design, and DocuPrint are trademarks or registered trademarks of Xerox Corporation in the U.S. or Fuji Xerox Co., Ltd.
DocuWorks is a trademark of Fuji Xerox Co., Ltd. All Xerox and Fuji Xerox product names are either registered trademarks or trademarks of
Xerox Corporation or Fuji Xerox Co., Ltd.

Preface
3
PrefaceThank you for purchasing the DocuPrint C1190 FS.
This guide is intended for users who use the printer for the first time, and provides all the necessary operating information about the printer, copier, scanner, and facsimile functions.
Please read this guide to achieve the best performance from this printer.
This guide assumes you are familiar with computers and the basics of network operation and configuration.
After reading this guide, keep it safe and handy for future reference.
4
ContentsPreface . . . . . . . . . . . . . . . . . . . . . . . . . . . . . . . . . . . . . . . . . . . . . . . . . . . . . . . . . . . . . . . . . . . . . . . . . . . 3-3
Types of Manuals . . . . . . . . . . . . . . . . . . . . . . . . . . . . . . . . . . . . . . . . . . . . . . . . . . . . . . . . . . . . . . . . . 5-10
Using This Guide . . . . . . . . . . . . . . . . . . . . . . . . . . . . . . . . . . . . . . . . . . . . . . . . . . . . . . . . . . . . . . . . . . 5-11
1 Printer Information
Safety Notes. . . . . . . . . . . . . . . . . . . . . . . . . . . . . . . . . . . . . . . . . . . . . . . . . . . . . . . . . . . . . . . . . . . . . . . 1-2Electrical Safety . . . . . . . . . . . . . . . . . . . . . . . . . . . . . . . . . . . . . . . . . . . . . . . . . . . . . . . . . . . . . . 1-3Machine Installation . . . . . . . . . . . . . . . . . . . . . . . . . . . . . . . . . . . . . . . . . . . . . . . . . . . . . . . . . . . 1-5Operational Safety. . . . . . . . . . . . . . . . . . . . . . . . . . . . . . . . . . . . . . . . . . . . . . . . . . . . . . . . . . . . . 1-7Consumable. . . . . . . . . . . . . . . . . . . . . . . . . . . . . . . . . . . . . . . . . . . . . . . . . . . . . . . . . . . . . . . . . . 1-9Warning and Caution Labels. . . . . . . . . . . . . . . . . . . . . . . . . . . . . . . . . . . . . . . . . . . . . . . . . . . . 1-10
Environment . . . . . . . . . . . . . . . . . . . . . . . . . . . . . . . . . . . . . . . . . . . . . . . . . . . . . . . . . . . . . . . . . . . . . 1-11
Regulation . . . . . . . . . . . . . . . . . . . . . . . . . . . . . . . . . . . . . . . . . . . . . . . . . . . . . . . . . . . . . . . . . . . . . . . 1-12
Illegal Copies and Printouts. . . . . . . . . . . . . . . . . . . . . . . . . . . . . . . . . . . . . . . . . . . . . . . . . . . . . . . . . . 1-13
Printer Specifications. . . . . . . . . . . . . . . . . . . . . . . . . . . . . . . . . . . . . . . . . . . . . . . . . . . . . . . . . . . . . . . 1-14Physical Specifications . . . . . . . . . . . . . . . . . . . . . . . . . . . . . . . . . . . . . . . . . . . . . . . . . . . . . . . . 1-14Environmental Specifications . . . . . . . . . . . . . . . . . . . . . . . . . . . . . . . . . . . . . . . . . . . . . . . . . . . 1-14Electrical Specifications . . . . . . . . . . . . . . . . . . . . . . . . . . . . . . . . . . . . . . . . . . . . . . . . . . . . . . . 1-14Performance Specifications. . . . . . . . . . . . . . . . . . . . . . . . . . . . . . . . . . . . . . . . . . . . . . . . . . . . . 1-15Controller Specifications. . . . . . . . . . . . . . . . . . . . . . . . . . . . . . . . . . . . . . . . . . . . . . . . . . . . . . . 1-16
2 Printer Features
Main Components and Their Functions . . . . . . . . . . . . . . . . . . . . . . . . . . . . . . . . . . . . . . . . . . . . . . . . . 2-2Front View. . . . . . . . . . . . . . . . . . . . . . . . . . . . . . . . . . . . . . . . . . . . . . . . . . . . . . . . . . . . . . . . . . . 2-2Rear View . . . . . . . . . . . . . . . . . . . . . . . . . . . . . . . . . . . . . . . . . . . . . . . . . . . . . . . . . . . . . . . . . . . 2-3Internal View. . . . . . . . . . . . . . . . . . . . . . . . . . . . . . . . . . . . . . . . . . . . . . . . . . . . . . . . . . . . . . . . . 2-4Scanner . . . . . . . . . . . . . . . . . . . . . . . . . . . . . . . . . . . . . . . . . . . . . . . . . . . . . . . . . . . . . . . . . . . . . 2-4
Printer Configurations . . . . . . . . . . . . . . . . . . . . . . . . . . . . . . . . . . . . . . . . . . . . . . . . . . . . . . . . . . . . . . . 2-5
Printer Console . . . . . . . . . . . . . . . . . . . . . . . . . . . . . . . . . . . . . . . . . . . . . . . . . . . . . . . . . . . . . . . . . . . . 2-6Printer Console Layout . . . . . . . . . . . . . . . . . . . . . . . . . . . . . . . . . . . . . . . . . . . . . . . . . . . . . . . . . 2-6
System Settings Page. . . . . . . . . . . . . . . . . . . . . . . . . . . . . . . . . . . . . . . . . . . . . . . . . . . . . . . . . . . . . . . . 2-9Printing a System Settings page . . . . . . . . . . . . . . . . . . . . . . . . . . . . . . . . . . . . . . . . . . . . . . . . . . 2-9
Power Saver Mode. . . . . . . . . . . . . . . . . . . . . . . . . . . . . . . . . . . . . . . . . . . . . . . . . . . . . . . . . . . . . . . . . 2-10Exiting the Power Saver Mode . . . . . . . . . . . . . . . . . . . . . . . . . . . . . . . . . . . . . . . . . . . . . . . . . . 2-10
Checking Status of Print Data . . . . . . . . . . . . . . . . . . . . . . . . . . . . . . . . . . . . . . . . . . . . . . . . . . . . . . . . 2-11Checking Status (Windows) . . . . . . . . . . . . . . . . . . . . . . . . . . . . . . . . . . . . . . . . . . . . . . . . . . . . 2-11Checking Status in CentreWare Internet Services (Windows & Macintosh) . . . . . . . . . . . . . . . 2-11

Contents
5
Displaying Optional Accessory Configuration and Paper Tray Settings . . . . . . . . . . . . . . . . . . . . . . . 2-12
More Information. . . . . . . . . . . . . . . . . . . . . . . . . . . . . . . . . . . . . . . . . . . . . . . . . . . . . . . . . . . . . . . . . . 2-12Sources . . . . . . . . . . . . . . . . . . . . . . . . . . . . . . . . . . . . . . . . . . . . . . . . . . . . . . . . . . . . . . . . . . . . 2-12
3 Printer Management Software
Print and Scan Drivers . . . . . . . . . . . . . . . . . . . . . . . . . . . . . . . . . . . . . . . . . . . . . . . . . . . . . . . . . . . . . . . 3-2
CentreWare Internet Services . . . . . . . . . . . . . . . . . . . . . . . . . . . . . . . . . . . . . . . . . . . . . . . . . . . . . . . . . 3-2Creating an Administrative Password . . . . . . . . . . . . . . . . . . . . . . . . . . . . . . . . . . . . . . . . . . . . . . 3-2
Address Book Editor . . . . . . . . . . . . . . . . . . . . . . . . . . . . . . . . . . . . . . . . . . . . . . . . . . . . . . . . . . . . . . . . 3-3
Express Scan Manager. . . . . . . . . . . . . . . . . . . . . . . . . . . . . . . . . . . . . . . . . . . . . . . . . . . . . . . . . . . . . . . 3-3
SimpleMonitor Software . . . . . . . . . . . . . . . . . . . . . . . . . . . . . . . . . . . . . . . . . . . . . . . . . . . . . . . . . . . . . 3-3
DocuWorks . . . . . . . . . . . . . . . . . . . . . . . . . . . . . . . . . . . . . . . . . . . . . . . . . . . . . . . . . . . . . . . . . . . . . . . 3-3
4 Network Basics
Overview of Network Setup and Configuration . . . . . . . . . . . . . . . . . . . . . . . . . . . . . . . . . . . . . . . . . . . 4-2
Choosing a Connection Method . . . . . . . . . . . . . . . . . . . . . . . . . . . . . . . . . . . . . . . . . . . . . . . . . . . . . . . 4-3Connecting via Ethernet and USB . . . . . . . . . . . . . . . . . . . . . . . . . . . . . . . . . . . . . . . . . . . . . . . . 4-3Connecting via Ethernet . . . . . . . . . . . . . . . . . . . . . . . . . . . . . . . . . . . . . . . . . . . . . . . . . . . . . . . . 4-3Connecting via USB . . . . . . . . . . . . . . . . . . . . . . . . . . . . . . . . . . . . . . . . . . . . . . . . . . . . . . . . . . . 4-4
Configuring the Network Address. . . . . . . . . . . . . . . . . . . . . . . . . . . . . . . . . . . . . . . . . . . . . . . . . . . . . . 4-5TCP/IP and IP Addresses . . . . . . . . . . . . . . . . . . . . . . . . . . . . . . . . . . . . . . . . . . . . . . . . . . . . . . . 4-5Automatically Setting the Printer’s IP Address . . . . . . . . . . . . . . . . . . . . . . . . . . . . . . . . . . . . . . 4-5Dynamic Methods of Setting the Printer’s IP Address . . . . . . . . . . . . . . . . . . . . . . . . . . . . . . . . . 4-6Manually Setting the Printer’s IP Address . . . . . . . . . . . . . . . . . . . . . . . . . . . . . . . . . . . . . . . . . . 4-7
Installing the Print Drivers . . . . . . . . . . . . . . . . . . . . . . . . . . . . . . . . . . . . . . . . . . . . . . . . . . . . . . . . . . . 4-9Available Drivers . . . . . . . . . . . . . . . . . . . . . . . . . . . . . . . . . . . . . . . . . . . . . . . . . . . . . . . . . . . . . 4-9Installation Procedure (Windows 2000 or later) . . . . . . . . . . . . . . . . . . . . . . . . . . . . . . . . . . . . . 4-10Installation Procedure (Mac OS X 10.3.9 - 10.4.11 and 10.5) . . . . . . . . . . . . . . . . . . . . . . . . . . 4-11Adding a Printer (Mac OS X 10.3.9 - 10.4.11) . . . . . . . . . . . . . . . . . . . . . . . . . . . . . . . . . . . . . . 4-12Adding a Printer (Mac OS X 10.5) . . . . . . . . . . . . . . . . . . . . . . . . . . . . . . . . . . . . . . . . . . . . . . . 4-14
5 Printing Basics
Supported Paper and Media. . . . . . . . . . . . . . . . . . . . . . . . . . . . . . . . . . . . . . . . . . . . . . . . . . . . . . . . . . . 5-2Paper Usage Guidelines . . . . . . . . . . . . . . . . . . . . . . . . . . . . . . . . . . . . . . . . . . . . . . . . . . . . . . . . 5-3Automatic Document Feeder Guidelines . . . . . . . . . . . . . . . . . . . . . . . . . . . . . . . . . . . . . . . . . . . 5-4Paper That Can Damage Your Printer. . . . . . . . . . . . . . . . . . . . . . . . . . . . . . . . . . . . . . . . . . . . . . 5-5Paper Storage Guidelines . . . . . . . . . . . . . . . . . . . . . . . . . . . . . . . . . . . . . . . . . . . . . . . . . . . . . . . 5-5
About Paper . . . . . . . . . . . . . . . . . . . . . . . . . . . . . . . . . . . . . . . . . . . . . . . . . . . . . . . . . . . . . . . . . . . . . . . 5-6Usable Paper . . . . . . . . . . . . . . . . . . . . . . . . . . . . . . . . . . . . . . . . . . . . . . . . . . . . . . . . . . . . . . . . . 5-6

Contents
6
Setting Paper Types and Sizes . . . . . . . . . . . . . . . . . . . . . . . . . . . . . . . . . . . . . . . . . . . . . . . . . . . . . . . . . 5-8Setting Paper Tray. . . . . . . . . . . . . . . . . . . . . . . . . . . . . . . . . . . . . . . . . . . . . . . . . . . . . . . . . . . . . 5-8Setting Paper Sizes . . . . . . . . . . . . . . . . . . . . . . . . . . . . . . . . . . . . . . . . . . . . . . . . . . . . . . . . . . . . 5-8Setting Paper Types. . . . . . . . . . . . . . . . . . . . . . . . . . . . . . . . . . . . . . . . . . . . . . . . . . . . . . . . . . . . 5-8
Loading Paper . . . . . . . . . . . . . . . . . . . . . . . . . . . . . . . . . . . . . . . . . . . . . . . . . . . . . . . . . . . . . . . . . . . . . 5-9Loading Paper in the Manual Feeder . . . . . . . . . . . . . . . . . . . . . . . . . . . . . . . . . . . . . . . . . . . . . . 5-9Loading Paper in Tray 1 . . . . . . . . . . . . . . . . . . . . . . . . . . . . . . . . . . . . . . . . . . . . . . . . . . . . . . . 5-11
Selecting Printing Options. . . . . . . . . . . . . . . . . . . . . . . . . . . . . . . . . . . . . . . . . . . . . . . . . . . . . . . . . . . 5-14Selecting Printing Preferences (Windows) . . . . . . . . . . . . . . . . . . . . . . . . . . . . . . . . . . . . . . . . . 5-14Selecting Options for an Individual Job (Windows). . . . . . . . . . . . . . . . . . . . . . . . . . . . . . . . . . 5-15Selecting Options for an Individual Job (Macintosh) . . . . . . . . . . . . . . . . . . . . . . . . . . . . . . . . . 5-17
Selecting 2 sided Printing . . . . . . . . . . . . . . . . . . . . . . . . . . . . . . . . . . . . . . . . . . . . . . . . . . . . . . . . . . . 5-19Performing Manual 2 sided Printing . . . . . . . . . . . . . . . . . . . . . . . . . . . . . . . . . . . . . . . . . . . . . . 5-19Manual 2 sided Printing from the Manual Feeder. . . . . . . . . . . . . . . . . . . . . . . . . . . . . . . . . . . . 5-20Manual 2 sided Printing from Tray 1 . . . . . . . . . . . . . . . . . . . . . . . . . . . . . . . . . . . . . . . . . . . . . 5-22
Printing on Specialty Media . . . . . . . . . . . . . . . . . . . . . . . . . . . . . . . . . . . . . . . . . . . . . . . . . . . . . . . . . 5-24Printing Envelopes . . . . . . . . . . . . . . . . . . . . . . . . . . . . . . . . . . . . . . . . . . . . . . . . . . . . . . . . . . . 5-24Printing Labels . . . . . . . . . . . . . . . . . . . . . . . . . . . . . . . . . . . . . . . . . . . . . . . . . . . . . . . . . . . . . . 5-26Printing Glossy Paper . . . . . . . . . . . . . . . . . . . . . . . . . . . . . . . . . . . . . . . . . . . . . . . . . . . . . . . . . 5-30
Printing Custom Size Paper . . . . . . . . . . . . . . . . . . . . . . . . . . . . . . . . . . . . . . . . . . . . . . . . . . . . . . . . . . 5-33Defining Custom Paper Sizes . . . . . . . . . . . . . . . . . . . . . . . . . . . . . . . . . . . . . . . . . . . . . . . . . . . 5-33Printing on Custom Size Paper . . . . . . . . . . . . . . . . . . . . . . . . . . . . . . . . . . . . . . . . . . . . . . . . . . 5-34
Printing Confidential Document - Secure Print. . . . . . . . . . . . . . . . . . . . . . . . . . . . . . . . . . . . . . . . . . . 5-35About Secure Print . . . . . . . . . . . . . . . . . . . . . . . . . . . . . . . . . . . . . . . . . . . . . . . . . . . . . . . . . . . 5-35Configuring Secure Print. . . . . . . . . . . . . . . . . . . . . . . . . . . . . . . . . . . . . . . . . . . . . . . . . . . . . . . 5-35
Print After Checking Printing Result - Sample Print. . . . . . . . . . . . . . . . . . . . . . . . . . . . . . . . . . . . . . . 5-37About Sample Print . . . . . . . . . . . . . . . . . . . . . . . . . . . . . . . . . . . . . . . . . . . . . . . . . . . . . . . . . . . 5-37Configuring Sample Print . . . . . . . . . . . . . . . . . . . . . . . . . . . . . . . . . . . . . . . . . . . . . . . . . . . . . . 5-37
6 Copying
Basic Copying . . . . . . . . . . . . . . . . . . . . . . . . . . . . . . . . . . . . . . . . . . . . . . . . . . . . . . . . . . . . . . . . . . . . . 6-2
Adjusting Copying Options . . . . . . . . . . . . . . . . . . . . . . . . . . . . . . . . . . . . . . . . . . . . . . . . . . . . . . . . . . . 6-3Basic Settings . . . . . . . . . . . . . . . . . . . . . . . . . . . . . . . . . . . . . . . . . . . . . . . . . . . . . . . . . . . . . . . . 6-3Image Adjustments . . . . . . . . . . . . . . . . . . . . . . . . . . . . . . . . . . . . . . . . . . . . . . . . . . . . . . . . . . . . 6-5Image Placement Adjustments . . . . . . . . . . . . . . . . . . . . . . . . . . . . . . . . . . . . . . . . . . . . . . . . . . . 6-8Output Adjustments. . . . . . . . . . . . . . . . . . . . . . . . . . . . . . . . . . . . . . . . . . . . . . . . . . . . . . . . . . . 6-10
7 Scanning
Scanning Overview . . . . . . . . . . . . . . . . . . . . . . . . . . . . . . . . . . . . . . . . . . . . . . . . . . . . . . . . . . . . . . . . . 7-2
Installing the Scan Driver . . . . . . . . . . . . . . . . . . . . . . . . . . . . . . . . . . . . . . . . . . . . . . . . . . . . . . . . . . . . 7-3Installing the Scan Driver (Windows). . . . . . . . . . . . . . . . . . . . . . . . . . . . . . . . . . . . . . . . . . . . . . 7-3Installing the Scan Driver (Macintosh) . . . . . . . . . . . . . . . . . . . . . . . . . . . . . . . . . . . . . . . . . . . . . 7-4
Contents
7
Loading Documents for Scanning . . . . . . . . . . . . . . . . . . . . . . . . . . . . . . . . . . . . . . . . . . . . . . . . . . . . . . 7-5
Scanning to a USB Connected Computer (Windows). . . . . . . . . . . . . . . . . . . . . . . . . . . . . . . . . . . . . . . 7-6
Scanning to a USB Connected Computer (Macintosh) . . . . . . . . . . . . . . . . . . . . . . . . . . . . . . . . . . . . . . 7-7
Scanning to a Computer on a Network . . . . . . . . . . . . . . . . . . . . . . . . . . . . . . . . . . . . . . . . . . . . . . . . . . 7-8Setting Up Scanning to a Computer . . . . . . . . . . . . . . . . . . . . . . . . . . . . . . . . . . . . . . . . . . . . . . . 7-8Scanning to a Computer on a Network . . . . . . . . . . . . . . . . . . . . . . . . . . . . . . . . . . . . . . . . . . . . 7-12
Scanning to Email . . . . . . . . . . . . . . . . . . . . . . . . . . . . . . . . . . . . . . . . . . . . . . . . . . . . . . . . . . . . . . . . . 7-13Setting Up the SMTP Server. . . . . . . . . . . . . . . . . . . . . . . . . . . . . . . . . . . . . . . . . . . . . . . . . . . . 7-13Using CentreWare IS to Create an Address . . . . . . . . . . . . . . . . . . . . . . . . . . . . . . . . . . . . . . . . 7-13Scanning to Email . . . . . . . . . . . . . . . . . . . . . . . . . . . . . . . . . . . . . . . . . . . . . . . . . . . . . . . . . . . . 7-14
Scanning to a FTP Server . . . . . . . . . . . . . . . . . . . . . . . . . . . . . . . . . . . . . . . . . . . . . . . . . . . . . . . . . . . 7-15Creating an Address for the Scanner. . . . . . . . . . . . . . . . . . . . . . . . . . . . . . . . . . . . . . . . . . . . . . 7-15Scanning to a FTP Server . . . . . . . . . . . . . . . . . . . . . . . . . . . . . . . . . . . . . . . . . . . . . . . . . . . . . . 7-16
Scanning Images into an Application . . . . . . . . . . . . . . . . . . . . . . . . . . . . . . . . . . . . . . . . . . . . . . . . . . 7-17Scanning an Image into a Windows Application (TWAIN) . . . . . . . . . . . . . . . . . . . . . . . . . . . . 7-17Using the WIA Image Manager in a Windows Application . . . . . . . . . . . . . . . . . . . . . . . . . . . . 7-18Scanning an Image into a Mac OS X Application . . . . . . . . . . . . . . . . . . . . . . . . . . . . . . . . . . . 7-18
Adjusting Scanning Options . . . . . . . . . . . . . . . . . . . . . . . . . . . . . . . . . . . . . . . . . . . . . . . . . . . . . . . . . 7-19Adjusting the Default Scan Settings . . . . . . . . . . . . . . . . . . . . . . . . . . . . . . . . . . . . . . . . . . . . . . 7-19Changing the Scan Settings for an Individual Job . . . . . . . . . . . . . . . . . . . . . . . . . . . . . . . . . . . 7-21
8 Faxing
Fax Setup . . . . . . . . . . . . . . . . . . . . . . . . . . . . . . . . . . . . . . . . . . . . . . . . . . . . . . . . . . . . . . . . . . . . . . . . . 8-2Setting up your printer for Fax . . . . . . . . . . . . . . . . . . . . . . . . . . . . . . . . . . . . . . . . . . . . . . . . . . . 8-2Installing the Fax driver (Macintosh user only) . . . . . . . . . . . . . . . . . . . . . . . . . . . . . . . . . . . . . . 8-3
Basic Faxing . . . . . . . . . . . . . . . . . . . . . . . . . . . . . . . . . . . . . . . . . . . . . . . . . . . . . . . . . . . . . . . . . . . . . . 8-4Sending a Fax from the Printer . . . . . . . . . . . . . . . . . . . . . . . . . . . . . . . . . . . . . . . . . . . . . . . . . . . 8-4Sending a Fax from Your Computer (Windows) . . . . . . . . . . . . . . . . . . . . . . . . . . . . . . . . . . . . . 8-5Sending a Fax from Your Computer (Macintosh) . . . . . . . . . . . . . . . . . . . . . . . . . . . . . . . . . . . . 8-6
Using the Address Book When Faxing . . . . . . . . . . . . . . . . . . . . . . . . . . . . . . . . . . . . . . . . . . . . . . . . . . 8-7Faxing to an Individual . . . . . . . . . . . . . . . . . . . . . . . . . . . . . . . . . . . . . . . . . . . . . . . . . . . . . . . . . 8-7Faxing to a Group . . . . . . . . . . . . . . . . . . . . . . . . . . . . . . . . . . . . . . . . . . . . . . . . . . . . . . . . . . . . 8-10
Selecting Fax Options for Individual Jobs. . . . . . . . . . . . . . . . . . . . . . . . . . . . . . . . . . . . . . . . . . . . . . . 8-13Setting the Fax Resolution . . . . . . . . . . . . . . . . . . . . . . . . . . . . . . . . . . . . . . . . . . . . . . . . . . . . . 8-13Making the Image Lighter or Darker . . . . . . . . . . . . . . . . . . . . . . . . . . . . . . . . . . . . . . . . . . . . . 8-13Delay Sending a Fax . . . . . . . . . . . . . . . . . . . . . . . . . . . . . . . . . . . . . . . . . . . . . . . . . . . . . . . . . . 8-13
Changing the Default Fax Job Settings . . . . . . . . . . . . . . . . . . . . . . . . . . . . . . . . . . . . . . . . . . . . . . . . . 8-14
Fax Configuration . . . . . . . . . . . . . . . . . . . . . . . . . . . . . . . . . . . . . . . . . . . . . . . . . . . . . . . . . . . . . . . . . 8-14
Contents
8
Managing Fax Functions . . . . . . . . . . . . . . . . . . . . . . . . . . . . . . . . . . . . . . . . . . . . . . . . . . . . . . . . . . . . 8-15Printing Transmission Reports . . . . . . . . . . . . . . . . . . . . . . . . . . . . . . . . . . . . . . . . . . . . . . . . . . 8-15Enabling or Disabling Secure Faxes . . . . . . . . . . . . . . . . . . . . . . . . . . . . . . . . . . . . . . . . . . . . . . 8-16Limiting Access to Fax and Scan Operations . . . . . . . . . . . . . . . . . . . . . . . . . . . . . . . . . . . . . . . 8-17Limiting Who Can Send Faxes to the Printer . . . . . . . . . . . . . . . . . . . . . . . . . . . . . . . . . . . . . . . 8-17Printing Fax Reports . . . . . . . . . . . . . . . . . . . . . . . . . . . . . . . . . . . . . . . . . . . . . . . . . . . . . . . . . . 8-18Inserting Pauses in Fax Numbers . . . . . . . . . . . . . . . . . . . . . . . . . . . . . . . . . . . . . . . . . . . . . . . . 8-18
Solving Fax Problems . . . . . . . . . . . . . . . . . . . . . . . . . . . . . . . . . . . . . . . . . . . . . . . . . . . . . . . . . . . . . . 8-19Problems Sending Faxes . . . . . . . . . . . . . . . . . . . . . . . . . . . . . . . . . . . . . . . . . . . . . . . . . . . . . . . 8-19Problems Receiving Faxes . . . . . . . . . . . . . . . . . . . . . . . . . . . . . . . . . . . . . . . . . . . . . . . . . . . . . 8-20
9 Using the Printer Console Menus and Keypad
Printer Console Menus . . . . . . . . . . . . . . . . . . . . . . . . . . . . . . . . . . . . . . . . . . . . . . . . . . . . . . . . . . . . . . 9-2Power On Wizard . . . . . . . . . . . . . . . . . . . . . . . . . . . . . . . . . . . . . . . . . . . . . . . . . . . . . . . . . . . . . 9-2Menu Configuration . . . . . . . . . . . . . . . . . . . . . . . . . . . . . . . . . . . . . . . . . . . . . . . . . . . . . . . . . . . 9-2Changing Menu Settings . . . . . . . . . . . . . . . . . . . . . . . . . . . . . . . . . . . . . . . . . . . . . . . . . . . . . . . . 9-3
Description of Menu Items . . . . . . . . . . . . . . . . . . . . . . . . . . . . . . . . . . . . . . . . . . . . . . . . . . . . . . . . . . . 9-4Defaults Settings . . . . . . . . . . . . . . . . . . . . . . . . . . . . . . . . . . . . . . . . . . . . . . . . . . . . . . . . . . . . . . 9-4Tray Settings . . . . . . . . . . . . . . . . . . . . . . . . . . . . . . . . . . . . . . . . . . . . . . . . . . . . . . . . . . . . . . . . . 9-6Report / List. . . . . . . . . . . . . . . . . . . . . . . . . . . . . . . . . . . . . . . . . . . . . . . . . . . . . . . . . . . . . . . . . . 9-6Meter Readings . . . . . . . . . . . . . . . . . . . . . . . . . . . . . . . . . . . . . . . . . . . . . . . . . . . . . . . . . . . . . . . 9-7Admin Menu . . . . . . . . . . . . . . . . . . . . . . . . . . . . . . . . . . . . . . . . . . . . . . . . . . . . . . . . . . . . . . . . . 9-7Panel Language . . . . . . . . . . . . . . . . . . . . . . . . . . . . . . . . . . . . . . . . . . . . . . . . . . . . . . . . . . . . . . 9-16
Entering Text on the Printer Console . . . . . . . . . . . . . . . . . . . . . . . . . . . . . . . . . . . . . . . . . . . . . . . . . . 9-17Correcting Text . . . . . . . . . . . . . . . . . . . . . . . . . . . . . . . . . . . . . . . . . . . . . . . . . . . . . . . . . . . . . . 9-17
10 Troubleshooting
Paper Jams . . . . . . . . . . . . . . . . . . . . . . . . . . . . . . . . . . . . . . . . . . . . . . . . . . . . . . . . . . . . . . . . . . . . . . . 10-2Preventing and Clearing Paper Jams. . . . . . . . . . . . . . . . . . . . . . . . . . . . . . . . . . . . . . . . . . . . . . 10-2Paper Jams in the Manual Feeder . . . . . . . . . . . . . . . . . . . . . . . . . . . . . . . . . . . . . . . . . . . . . . . . 10-2Paper Jams in Tray 1 . . . . . . . . . . . . . . . . . . . . . . . . . . . . . . . . . . . . . . . . . . . . . . . . . . . . . . . . . . 10-5Paper Jams in the Fuser Unit. . . . . . . . . . . . . . . . . . . . . . . . . . . . . . . . . . . . . . . . . . . . . . . . . . . . 10-7Paper Jams at the Automatic Document Feeder . . . . . . . . . . . . . . . . . . . . . . . . . . . . . . . . . . . . . 10-9
Print Quality. . . . . . . . . . . . . . . . . . . . . . . . . . . . . . . . . . . . . . . . . . . . . . . . . . . . . . . . . . . . . . . . . . . . . 10-12Print-Quality Problems . . . . . . . . . . . . . . . . . . . . . . . . . . . . . . . . . . . . . . . . . . . . . . . . . . . . . . . 10-12Copy-Quality Problems. . . . . . . . . . . . . . . . . . . . . . . . . . . . . . . . . . . . . . . . . . . . . . . . . . . . . . . 10-16Color Calibration. . . . . . . . . . . . . . . . . . . . . . . . . . . . . . . . . . . . . . . . . . . . . . . . . . . . . . . . . . . . 10-17
Problems With the Printer . . . . . . . . . . . . . . . . . . . . . . . . . . . . . . . . . . . . . . . . . . . . . . . . . . . . . . . . . . 10-20
Printer Console Error Messages . . . . . . . . . . . . . . . . . . . . . . . . . . . . . . . . . . . . . . . . . . . . . . . . . . . . . 10-23Messages About Supplies . . . . . . . . . . . . . . . . . . . . . . . . . . . . . . . . . . . . . . . . . . . . . . . . . . . . . 10-23Messages About the Printer and Other Items . . . . . . . . . . . . . . . . . . . . . . . . . . . . . . . . . . . . . . 10-24Network Related Errors. . . . . . . . . . . . . . . . . . . . . . . . . . . . . . . . . . . . . . . . . . . . . . . . . . . . . . . 10-26
Contents
9
Getting Help. . . . . . . . . . . . . . . . . . . . . . . . . . . . . . . . . . . . . . . . . . . . . . . . . . . . . . . . . . . . . . . . . . . . . 10-28Printer Console Messages . . . . . . . . . . . . . . . . . . . . . . . . . . . . . . . . . . . . . . . . . . . . . . . . . . . . . 10-28SimpleMonitor Alerts . . . . . . . . . . . . . . . . . . . . . . . . . . . . . . . . . . . . . . . . . . . . . . . . . . . . . . . . 10-28Obtaining the Product Information . . . . . . . . . . . . . . . . . . . . . . . . . . . . . . . . . . . . . . . . . . . . . . 10-29
11 Maintenance
Cleaning the Printer . . . . . . . . . . . . . . . . . . . . . . . . . . . . . . . . . . . . . . . . . . . . . . . . . . . . . . . . . . . . . . . . 11-2Cleaning the Document Glass . . . . . . . . . . . . . . . . . . . . . . . . . . . . . . . . . . . . . . . . . . . . . . . . . . . 11-2Cleaning the Exterior . . . . . . . . . . . . . . . . . . . . . . . . . . . . . . . . . . . . . . . . . . . . . . . . . . . . . . . . . 11-2Cleaning the Interior . . . . . . . . . . . . . . . . . . . . . . . . . . . . . . . . . . . . . . . . . . . . . . . . . . . . . . . . . . 11-2
Replacing the Consumables. . . . . . . . . . . . . . . . . . . . . . . . . . . . . . . . . . . . . . . . . . . . . . . . . . . . . . . . . . 11-3Types of Consumables . . . . . . . . . . . . . . . . . . . . . . . . . . . . . . . . . . . . . . . . . . . . . . . . . . . . . . . . 11-3Replacing the Print Cartridges . . . . . . . . . . . . . . . . . . . . . . . . . . . . . . . . . . . . . . . . . . . . . . . . . . 11-5Replacing the Drum Cartridge . . . . . . . . . . . . . . . . . . . . . . . . . . . . . . . . . . . . . . . . . . . . . . . . . . 11-7Replacing the Fuser Unit. . . . . . . . . . . . . . . . . . . . . . . . . . . . . . . . . . . . . . . . . . . . . . . . . . . . . . 11-11Replacing the Feed Roller . . . . . . . . . . . . . . . . . . . . . . . . . . . . . . . . . . . . . . . . . . . . . . . . . . . . . 11-13Replacing the ADF Roll and ADF Pad . . . . . . . . . . . . . . . . . . . . . . . . . . . . . . . . . . . . . . . . . . . 11-15
Ordering Supplies . . . . . . . . . . . . . . . . . . . . . . . . . . . . . . . . . . . . . . . . . . . . . . . . . . . . . . . . . . . . . . . . 11-18Consumables . . . . . . . . . . . . . . . . . . . . . . . . . . . . . . . . . . . . . . . . . . . . . . . . . . . . . . . . . . . . . . . 11-18Routine Maintenance Items. . . . . . . . . . . . . . . . . . . . . . . . . . . . . . . . . . . . . . . . . . . . . . . . . . . . 11-18When to Order Supplies . . . . . . . . . . . . . . . . . . . . . . . . . . . . . . . . . . . . . . . . . . . . . . . . . . . . . . 11-18Recycling Supplies . . . . . . . . . . . . . . . . . . . . . . . . . . . . . . . . . . . . . . . . . . . . . . . . . . . . . . . . . . 11-19
Managing the Printer . . . . . . . . . . . . . . . . . . . . . . . . . . . . . . . . . . . . . . . . . . . . . . . . . . . . . . . . . . . . . . 11-20Checking or Managing the Printer with CentreWare IS . . . . . . . . . . . . . . . . . . . . . . . . . . . . . . 11-20Checking Printer Status with SimpleMonitor (Windows) . . . . . . . . . . . . . . . . . . . . . . . . . . . . 11-21Checking Printer Status Through E-mail . . . . . . . . . . . . . . . . . . . . . . . . . . . . . . . . . . . . . . . . . 11-21
Checking Page Counts. . . . . . . . . . . . . . . . . . . . . . . . . . . . . . . . . . . . . . . . . . . . . . . . . . . . . . . . . . . . . 11-24
Printer Auditron . . . . . . . . . . . . . . . . . . . . . . . . . . . . . . . . . . . . . . . . . . . . . . . . . . . . . . . . . . . . . . . . . . 11-25Overview of the Authentication and Auditron Administration Features . . . . . . . . . . . . . . . . . 11-25Configuring the Authentication and Auditron Administration Features. . . . . . . . . . . . . . . . . . 11-26Registering Login Information on the Printer . . . . . . . . . . . . . . . . . . . . . . . . . . . . . . . . . . . . . . 11-26Registering the Login Information on the Print Driver (Computer) . . . . . . . . . . . . . . . . . . . . . 11-29
Moving the Printer . . . . . . . . . . . . . . . . . . . . . . . . . . . . . . . . . . . . . . . . . . . . . . . . . . . . . . . . . . . . . . . . 11-30
Index
Types of Manuals
10
Types of Manuals
Safety Guide Describes the information you need to know before using the printer and to operate the printer safely.
Setup Guide Provides step-by-step instructions on how to set up your printer.
Features Setup Guide Describes the steps on how to enable the scan and fax features on your DocuPrint C1190 FS.
Quick Reference Guide Provides information such as how to get ready to print, basic operating instructions (printing/copying/scanning/faxing), and troubleshooting tips. Refer to the ‘User Guide’ for more details and information not covered in this guide.
User Guide (PDF) (this guide)
Describes how to get ready to print and set various features. It also covers the printer console menus, troubleshooting tips, and maintenance information.This guide is on the Software Pack CD-ROM.

Using This Guide
11
Using This GuideOrganization
This guide is organized into the following chapters. The summary of each chapter is as follows:
1 Printer Information Describes the information you need to know to operate the printer safely, and printer specifications.
2 Printer Features Describes the main components of the printer, the Power Saver mode, and the software that allows you to see the status of the printer and print jobs.
3 Printer Management Software Describes the software available for the printer.
4 Network Basics Describes the basic information about how to connect the printer to your computer through a network.
5 Printing Basics Describes the supported paper, how to load paper, and how to print data using various print features including Secure Print and Sample Print.
6 Copying Describes how to copy documents using the ADF and the adjustment features.
7 Scanning Describes how to install a scan driver, and how to set and use the scan features.
8 Faxing Describes how to set and use the fax features, and troubleshooting tips for fax problems.
9 Using the Printer Console Menus and Keypad
Describes the setting items available on the printer console, and their setup procedures.
10 Troubleshooting Describes the troubleshooting tips for printer problems such as paper jams.
11 Maintenance Describes how to clean the printer, how to replace consumables and routine maintenance items, and how to see the printer status.

Using This Guide
12
Conventions
1. In this guide, personal computers and workstations are collectively called “computers”.
2. The following terms are used throughout this guide:Important : Important information that must be read and followed.Note : Additional information that merits emphasis.See also : References within this guide.

1-1
This chapter includes:
■ Safety Notes on page 1-2■ Environment on page 1-11■ Regulation on page 1-12■ Illegal Copies and Printouts on page 1-13■ Printer Specifications on page 1-14
Printer Information 1
Safety Notes
1-2
Safety NotesBefore using this product, read “Safety Notes” carefully for safety use.
This product and recommended supplies have been tested and found to comply with strict safety requirements including safety agency approvals and compliance with environmental standards. Follow the following instructions for safety use.
WARNING• Any unauthorized alteration including an addition of new functions or connection to external devices
may not be covered by the product warranty. Contact your local Fuji Xerox representative for more information.
Follow all warning instructions marked on this product. The warning marks stand for the following.
Used for item that if not followed strictly, can lead death or severe or fatal injuries and the possibility to do it is comparatively high.
Used for items that if not followed strictly, can lead to severe or fatal injuries.
Used for items that if not followed strictly, can cause injuries to user or damages to machine.
A symbol for items to pay attention to when handling machine. Follow instructions carefully to use machine safely.
A symbol for prohibited items. Follow instructions carefully to avoid any dangerous acts.
A symbol for items that must be performed. Follow instructions carefully to carry out these essential tasks.
Caution Flammable Explodable Electricshock
Heatedsurface
Moving object Pinchedfingers
Prohibited No fire Do nottouch
Do not usein bathroom
Do nottear down
Keep awayfrom wet
Never touchwith wet hand
Instructions Unplug Ground/Earth

Safety Notes
1-3
Electrical Safety
This product shall be operated by the power source as indicated on the product's data plate. Consult your local power company to check if your power source meets the requirements.
WARNING: Connect this product to a protective earth circuit.
This product is supplied with a plug that has a protective earth pin. The plug fits only into an earthed electrical outlet. This is a safety feature. If the plug doesn't fit to the outlet, contact an electrician to replace the outlet to avoid risk of electric shock. Never use an earthed adapter plug to connect the product to the electrical outlet that has no earth connection terminal.Improper connection of a grounding conductor may cause electric shock.
This product shall be operated by the electrical supply as indicated on the product's data plate label. Consult your local power company to check if your electrical supply meets the requirements.
WARNING: Connect this product to a protective earth circuit
Improper connection of a grounding conductor may cause electric shock.
Plug the power cord directly into a grounded electrical outlet. To prevent overheat and a fire accident, do not use an extension cord, a multi-plug adaptor or a multiple connector. Consult your local Fuji Xerox representative to check if an outlet is grounded.
Connect this product to a branch circuit or an outlet that has larger capacity than the rated ampere and voltage of this product. See the data plate on the rear panel of this product for its rated ampere and voltage.
Never touch the power cord with wet hands. It may cause electric shock.
Do not place an object on the power cord.
Always keep the plug connection free of dust. The dusty and damp environment may bring about minute electric current in a connector. It may generate heat and eventually cause a fire accident.
To avoid the risk of electric shock and a fire accident, only use the power cord supplied with this product or the ones designated by Fuji Xerox. The power cord is exclusive use for this product. Do not use it for any other product. Do not damage or alter the power cord. Damage and alteration may generate heat and eventually cause electric shock or a fire accident. If the power cord is damaged or insulated wires are exposed, contact your local Fuji Xerox representative for its replacement. Do not use a damaged or uninsulated cord to avoid the risk of electric shock and a fire accident.
Safety Notes
1-4
When cleaning this product, always switch off and unplug it. Access to a live machine interior may cause electric shock.
When cleaning this product, switch off the product and its switchboard (branch circuit). Access to a live machine interior may cause electric shock.
Do not unplug or re-plug this product with the switch on. Plugging and unplugging a live connector may deform the plug and generate heat, and eventually cause a fire accident.
Hold the plug not the cord when unplugging this product, or it may damage the cord and cause electric shock or a fire accident.
Switch off and unplug the product when it (i.e., fax function) is not used over weekends or long holidays. Please note that it cannot receive fax message during switch-off.
Switch off the product and its switchboard (branch circuit) when it is not used over weekends or long holidays. It may cause deterioration of insulations and eventually electric shock or a fire accident.
Once a month, switch off this product and check if
• the power cord is plugged firmly into an electrical outlet;
• the plug is not excessively heated, rusted or bent;
• the plug and electrical outlet are free of dust; and
• the power cord is not cracked or worn down. Once you notice any unusual condition, switch off and unplug this product first and contact your local Fuji Xerox representative.
Safety Notes
1-5
Machine Installation
Do not locate this product where people might step on or trip over the power cord. Friction or excessive pressure may generate heat and eventually cause electric shock or a fire accident.
Never locate this product in the following places:
• Near radiator or any other heat source
• Near volatile, flammable or combustible materials such as curtains
• In a hot, humid, dusty or poorly ventilated environment
• In a place receiving direct sunlight
• Near cookers or humidifiers
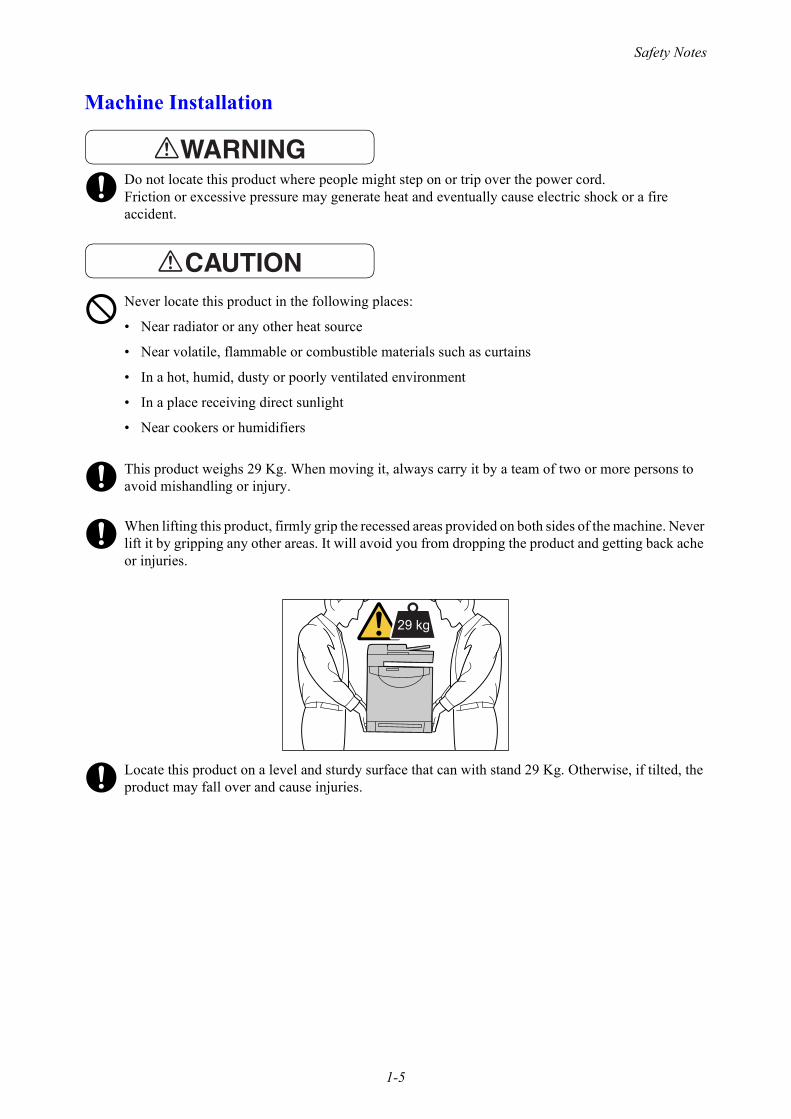
This product weighs 29 Kg. When moving it, always carry it by a team of two or more persons to avoid mishandling or injury.
When lifting this product, firmly grip the recessed areas provided on both sides of the machine. Never lift it by gripping any other areas. It will avoid you from dropping the product and getting back ache or injuries.
Locate this product on a level and sturdy surface that can with stand 29 Kg. Otherwise, if tilted, the product may fall over and cause injuries.

Safety Notes
1-6
Locate this product in a well-ventilated area. Do not obstruct ventilation openings of the product. Keep the minimum clearance as follows for ventilation and an access to the power plug. Unplug the product if an abnormal condition is noted.
Do not incline the product at more than 10 degree angle. Otherwise, it may fall over and cause injuries.
OthersTo keep this product in a good performance and condition, always use it in the following environment:
• Temperature: 10~32 °C
• Humidity: 15~85%
100 mm
100 mm
100 mm
250 mm
600 mm
600 mm
320 mm
775 mm
905 mm
1207 mm

Safety Notes
1-7
When the product is left in a chilly room and the room is rapidly warmed up by heater, dew condensation may form inside the product and cause a partial deletion on printing.
Operational Safety
The operator's product maintenance procedures are described in the customer documentation supplied with this product. Do not carry out any other maintenance procedures not described in the documentation.
This product features safety design not to allow operators access to hazard areas. The hazard areas are isolated from operators by covers or protectors which require a tool to remove. To prevent electric shock and injuries, never remove those covers and protectors.
To avoid the risk of electric shock and a fire accident, switch off and unplug the product promptly in the following conditions, then contact your local Fuji Xerox representative.
• The product emits smoke or its surface is unusually hot.
• The product emits unusual noise or odor.
• The power cord is cracked or worn down.
• A circuit breaker, fuse or any other safety device is activated.
• Any liquid is spilled into the product.
• The product is soaked in water.
• Any part of the product is damaged.
Do not insert any object into slots or openings of this product. Do not place any of the followings on the product:
• Liquid container such as flower vases or coffee cups
• Metal parts such as staples or clips
• Heavy objectIf liquid is spilled over or metal parts are slipped into the product, it may cause electric shock or a fire accident.
Do not use conductive paper such as origami paper, carbonic paper or conductively-coated paper. When paper jam occurs, it may cause short-circuit and eventually a fire accident.
When cleaning this product, use the designated cleaning materials exclusive to it. Other cleaning materials may result in poor performance of the product. Never use aerosol cleaners, or it may catch fire and cause explosion.
Never play the CD-ROM supplied with the product on an audio player. Always use a CD-ROM player. Otherwise, large sound may damage audio players or your ears.

Safety Notes
1-8
Laser Safety CAUTION: Any operations or adjustments not stated in the operation manual may cause hazardous light exposure and eventually burn injuries or loss of eyesight. This product has been tested and found to comply with the Class 1 Laser Equipment requirements defined by the international standard IEC60825 and has no light exposure hazard. The product has no hazardous light emission as it features light protection components and covers to shut in all light beam during operation and maintenance.
Always follow all warning instructions marked on or supplied with this product. To avoid the risk of burn injuries and electric shock, never touch the area with the “High Temperature” or “High Voltage” marks on.
Keep electrical and mechanical safety interlocks active. Keep the safety interlocks away from magnetic materials. Magnetic materials may accidentally activate the product and cause injuries or electric shock.
A ground fault interrupter is embedded in this product. If current leakage occurs, the ground fault interrupter automatically cuts off power circuit to prevent electric shock and a fire accident. The ground fault interrupter is normally ON [(indicated as “|”)]. Check once a month if the ground fault interrupter works properly in accordance with the following procedures:1. Switch off the product.2. Press the <TEST> button located on the rear right side of the product, with a thin stick or similar
object.3. Make sure that the <RESET> button is popped up.4. After the confirmation, press the <RESET> button to exit the test mode.
If the circuit does not work properly, contact your local Fuji Xerox representative.
Do not attempt to remove a paper jammed deeply inside the product, particularly a paper wrapped around a fuser or a heat roller. Otherwise, it may cause injuries or burns. Switch off the product promptly and contact your local Fuji Xerox representative.
Do not apply excessive force to hold thick document on the document glass. It may break the glass and cause injuries.
To move this product to another location, contact your local Fuji Xerox representative.
RESET button
TEST button

Safety Notes
1-9
Ventilate well during extended operation or mass copying. It may affect the office air environment due to odor such as ozone in a poorly ventilated room. Provide proper ventilation to ensure the comfortable and safe environment.
Consumable
Store all consumables in accordance with the instructions given on the package or container.
Do not use a vacuum cleaner for cleaning the spilled toner. Use a broom or a soaked cloth to clean any spills. Vacuumed toner inside the cleaner can ignite or explode by an electric spark of the cleaner and may cause an injury.
Never heat the drum, or scratch its surface. Damage to the drum surface can release uncomfortable fumes which are hazardous to your health.
Keep drum and print cartridges out of reach of children. Should toner be swallowed, spit it out, rinse mouth with water and drink plenty of water. Consult a physician immediately.
When replacing the drum and print cartridges, be careful not to spill the toner. In case of any toner spills, avoid contact with skin and clothing, as well as inhalation and contact with eyes and mouth.
In case of any toner spills onto your skin and clothing, wash with soap and water.Should toner particles get into your eyes, flush with plenty of water for at least 15 minutes until the irritation is gone. If necessary, seek medical treatment from a doctor.If toner particles are inhaled, move to a location with fresh air and gargle with plenty of water.Should toner be swallowed, spit it out, rinse mouth with water and drink plenty of water. Consult a physician immediately.
Fuser Safety:When removing the fuser unit, always switch off first and wait for 40 minutes until it cools off.

Safety Notes
1-10
Warning and Caution LabelsBe sure to follow the warning and caution labels placed on the machine. Do not touch areas with labels indicating high voltage or temperature. This can cause an electric shock or burn.

Environment
1-11
Environment• Emissions of dust, ozone, benzene, total volatile organic compounds (TVOC) and styrene from this
product have been tested and found to comply with the Eco Mark criteria on chemical emission for copiers. According to the test procedures defined by Blue Angel RAL UZ-122: 2006 Appendix 2, the test was performed under the condition of monochrome copying, using the toner type DocuPrint C1190 FS Black Print Cartridge that is recommended for this product.
• For environmental protection and efficient use of resources, Fuji Xerox reuses returned print cartridges and drums to make recycle parts, recycle materials or energy recovery.
• Proper disposal is required for print cartridges and drums no longer needed. Do not open print cartridges and drums containers. Return them to your local Fuji Xerox representative.
Regulation
1-12
RegulationRadio Frequency Emissions (Class B)
This equipment has been tested and found to comply with the limits for a Class B digital device, pursuant to the International Standard for Electromagnetic Interference (CISPR Publ. 22) and Radio communication Act 1992 in Australia/New Zealand. These limits are designed to provide reasonable protection against harmful interference in a residential installation. This equipment generates, uses and can radiate radio frequency energy and, if not installed and used in accordance with the instructions, may cause harmful interference to radio communications. However, there is no guarantee that interference will not occur in a particular installation. If this equipment does cause harmful interference to radio or television reception, which can be determined by turning the equipment off and on, the user is encouraged to try to correct the interference by one or more of the following measures:
• Reorient or relocate the receiving antenna.
• Increase the separation between the equipment and receiver.
• Connect the equipment into an outlet on a circuit different from that to which the receiver is connected.
• Consult the dealer or an experienced radio/TV technician for help.Changes and modifications to this equipment not specifically approved by Fuji Xerox may void the user's authority to operate this equipment.
Product Safety Certification (CB)
This product is certified by the following agency using the safety standards listed. Agency Standard[NEMKO IEC60950-1:ed. 2]

Illegal Copies and Printouts
1-13
Illegal Copies and PrintoutsCopying or printing certain documents may be illegal in your country. Penalties of fines or imprisonment may be imposed on those found guilty. The following are examples of items that may be illegal to copy or print in your country.
• Currency
• Banknotes and checks
• Bank and government bonds and securities
• Passports and identification cards
• Copyright material or trademarks without the consent of the owner
• Postage stamps and other negotiable instruments
This list is not inclusive and no liability is assumed for either its completeness or accuracy. In case of doubt, contact your legal counsel.

Printer Specifications
1-14
Printer Specifications
Physical Specifications■ Width: 425 mm■ Depth: 507 mm■ Height: 585 mm■ Weight: 29 kg including consumables
Environmental SpecificationsTo keep this product in a good performance and condition, always use it in the following environment:
■ Ambient Temperature: 10°C - 32°C ■ Humidity: 15% - 85%
Electrical Specifications
Electrical Specifications■ 110-127 V~, 50/60 Hz, 9 A■ 220-240 V~, 50/60 Hz, 5 A
The power voltage differs depending on the printer specification. Check the data plate located on the back of the printer.
Power Consumption
■ AC 110 V:■ Low Power Mode: 21.5 W■ Sleep Mode: 17 W■ Standby (average): 60W (Ref.) (fuser on)■ Continuous color or monochrome printing average: 250 W (Ref.)
■ AC 220 - 240 V:■ Low Power Mode: 22.5 W■ Sleep Mode: 18 W■ Standby (average): 60 W (Ref.) (fuser on)■ Continuous color or monochrome printing average: 250 W (Ref.)
This printer does not consume electric power when the power switch is turned off even if the printer is connected to an AC outlet.
Warm-Up Time
■ 30 seconds or less (when power is switched on, temperature: 22° C)
Printer Specifications
1-15
Performance Specifications
Resolution
*dpi: dots per inch
*l/mm: lines per millimeter
SpeedThe values shown in the tables below are based on the condition of specifying a print, copy, scan or fax job with A4 size paper.
Print Speed (1-Sided Printing)
*ppm: prints per minute
Copy Speed
*cpm: copies per minute
Scan Speed
*µs/l: microseconds per line
Feature Standard Enhanced
■ Copy / Print 300 x 300 dpi 600 x 600 dpi
■ Scan 600 x 600 dpi 1200 x 1200 dpi9600 x 9600 dpi (Gray and color only in TWAIN)
Feature Standard Fine Super Fine
■ FAX R8 x 3.85 l/mm* R8 x 7.7 l/mm 400 x 400 dpi
Print Mode Color Black&White
■ Standard/High Quality 12 ppm* 16 ppm
Copying from Color Black&White
■ Document glass 12 cpm* or more 16 cpm or more
■ Automatic document feeder 8 cpm or more 16 cpm or more
Scan Mode Color Black&White
■ 600 x 600 dpi 1330 µs/line* 665 µs/line
■ 1200 x 1200 dpi 2660 µs/line 1330 µs/line

Printer Specifications
1-16
FAX Speed
*spp: seconds per page
Controller Specifications
Processor Speed400 MHz processor
Memory■ Printer: 384 MB■ Memory for Fax: 4MB (Flash ROM)
Resident Fonts■ PCL 5/PCL 6
Interfaces■ Ethernet 10 BASE-T/100 BASE-TX■ Universal Serial Bus (USB 2.0)
Faxing from Transmission speed Scanning speed
■ Document glass Approx. 3 spp* Approx. 3 spp(at standard resolution)
■ Automatic document feeder Approx. 3 spp Approx. 5 spp(at standard resolution)
Approx. 7.5 spp(at fine resolution)

2-1
This chapter includes:
■ Main Components and Their Functions on page 2-2■ Printer Configurations on page 2-5■ Printer Console on page 2-6■ System Settings Page on page 2-9■ Power Saver Mode on page 2-10■ Checking Status of Print Data on page 2-11■ Displaying Optional Accessory Configuration and Paper Tray Settings on page 2-12■ More Information on page 2-12
Printer Features 2

Main Components and Their Functions
2-2
Main Components and Their FunctionsThis section includes:
■ Front View on page 2-2■ Rear View on page 2-3■ Internal View on page 2-4■ Scanner on page 2-4
Front View
1. Automatic document feeder tray2. Output tray3. Side button4. Power switch5. Side cover6. Front cover7. Tray 18. Manual feeder9. Printer console
Main Components and Their Functions
2-3
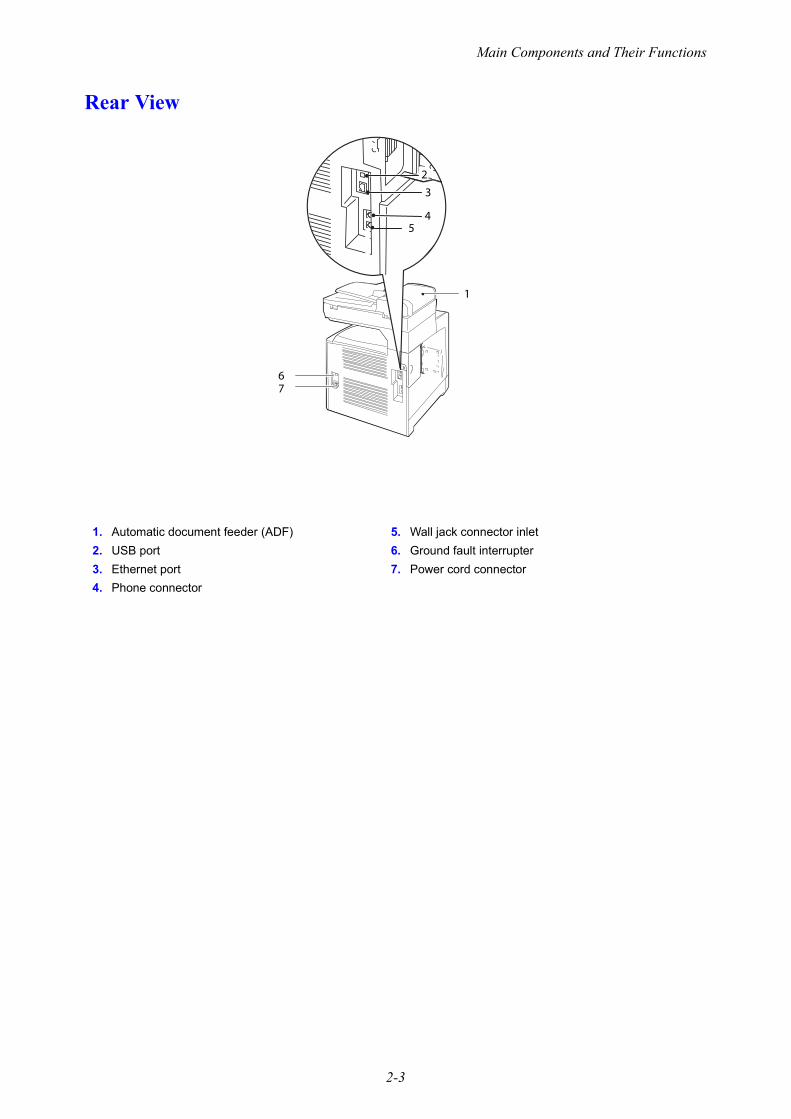
Rear View
1. Automatic document feeder (ADF)2. USB port3. Ethernet port4. Phone connector
5. Wall jack connector inlet6. Ground fault interrupter7. Power cord connector
67
3
45
2
1
Main Components and Their Functions
2-4
Internal View
Scanner
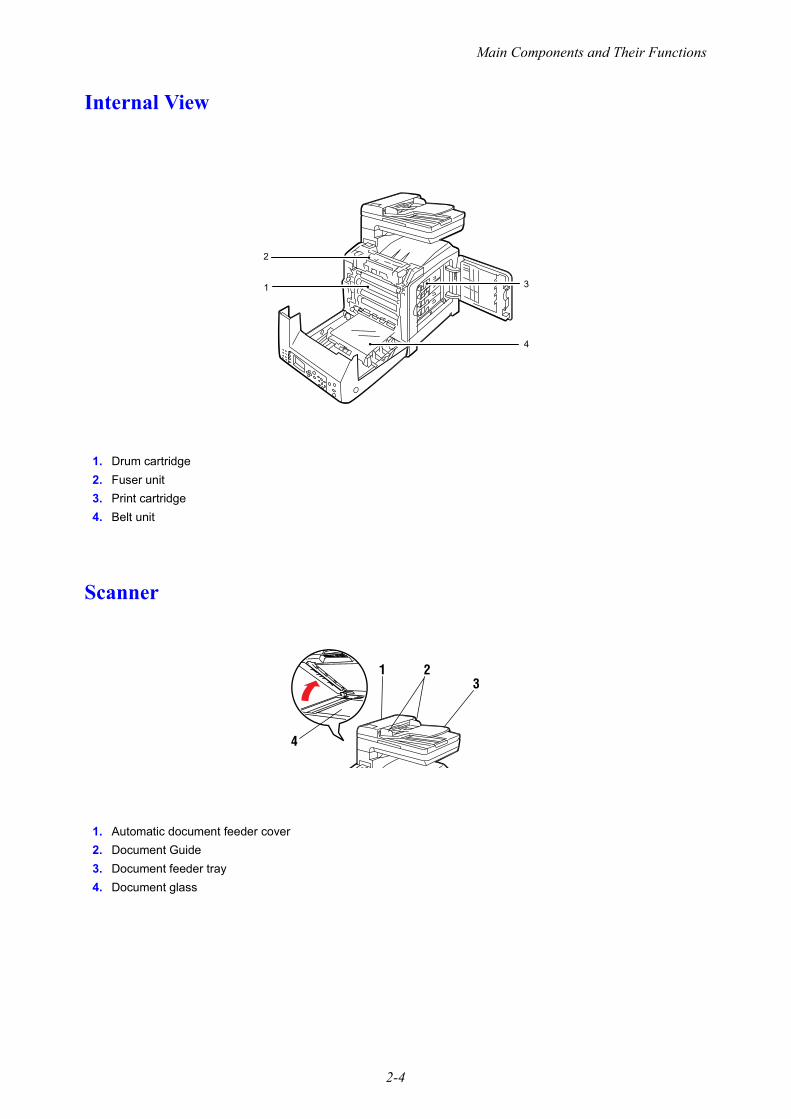
1. Drum cartridge2. Fuser unit3. Print cartridge4. Belt unit
1. Automatic document feeder cover2. Document Guide3. Document feeder tray4. Document glass
13
2
4

Printer Configurations
2-5
Printer Configurations
Features
Printer Configuration
DocuPrint C1190 FS
Memory Configuration 384MB
Resolutions (dpi)
B&W (black and white)Color
maximum 600 x 600 maximum 600 x 600
Ethernet Interface 10 BASE-T/100 BASE-TX
Manual Feeder Standard
Tray 1 (250 sheets) Standard

Printer Console
2-6
Printer ConsoleThis section includes:
■ Printer Console Layout on page 2-6■ System Settings Page on page 2-9
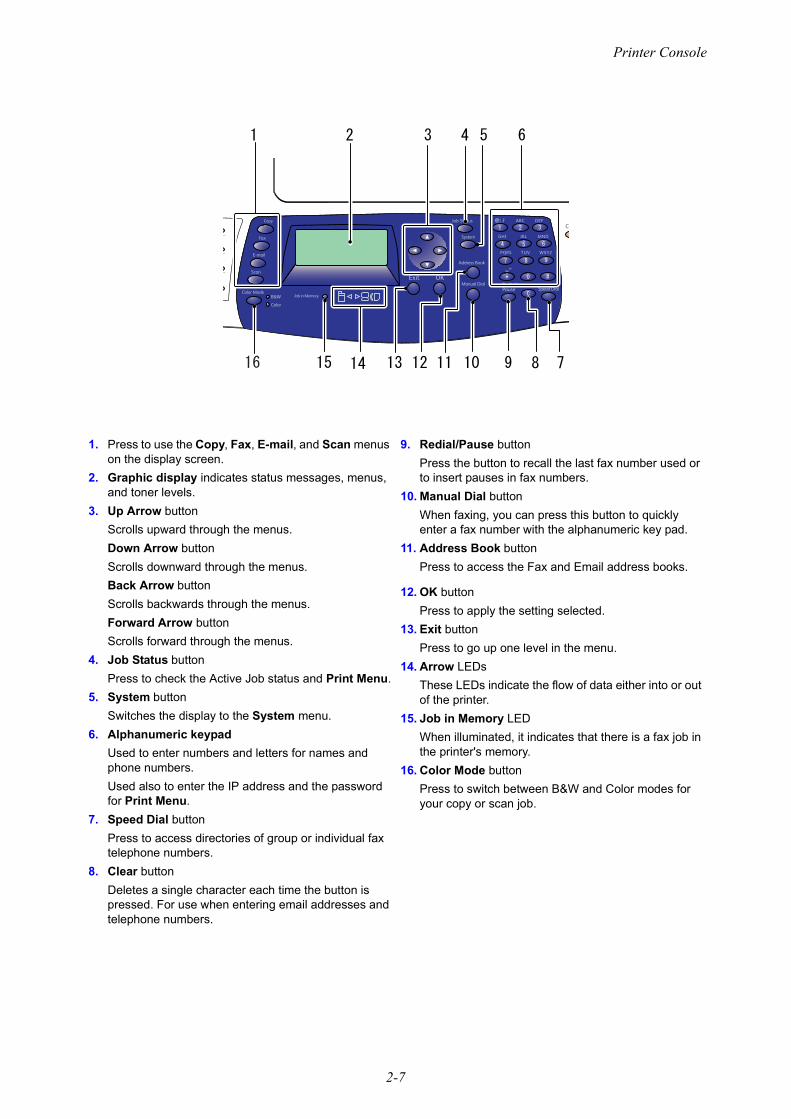
Printer Console Layout
1. One touch buttonsProvides access to the first eight entries in the Fax address book.For example, you can press the Fax button, and then press the upper left <1> button to access the first entry in your address book.
Printer Console
2-7
1. Press to use the Copy, Fax, E-mail, and Scan menus on the display screen.
2. Graphic display indicates status messages, menus, and toner levels.
3. Up Arrow buttonScrolls upward through the menus.Down Arrow buttonScrolls downward through the menus.Back Arrow buttonScrolls backwards through the menus.Forward Arrow buttonScrolls forward through the menus.
4. Job Status buttonPress to check the Active Job status and Print Menu.
5. System buttonSwitches the display to the System menu.
6. Alphanumeric keypadUsed to enter numbers and letters for names and phone numbers. Used also to enter the IP address and the password for Print Menu.
7. Speed Dial buttonPress to access directories of group or individual fax telephone numbers.
8. Clear buttonDeletes a single character each time the button is pressed. For use when entering email addresses and telephone numbers.
9. Redial/Pause buttonPress the button to recall the last fax number used or to insert pauses in fax numbers.
10. Manual Dial buttonWhen faxing, you can press this button to quickly enter a fax number with the alphanumeric key pad.
11. Address Book buttonPress to access the Fax and Email address books.
12. OK buttonPress to apply the setting selected.
13. Exit buttonPress to go up one level in the menu.
14. Arrow LEDsThese LEDs indicate the flow of data either into or out of the printer.
15. Job in Memory LEDWhen illuminated, it indicates that there is a fax job in the printer's memory.
16. Color Mode buttonPress to switch between B&W and Color modes for your copy or scan job.

Printer Console
2-8
1. Clear All buttonPress once to return to the default main menu. All job settings are reset to default.
2. Energy Saver buttonThis light is on in Power Saver mode. Push the button to exit the Power Saver mode.
3. Stop buttonCancels the current print job.
4. Start buttonPress to start a copy, scan, or fax job.
5. ErrorThe red light indicates an error.

System Settings Page
2-9
System Settings PageYour printer comes with a set of information pages to help you obtain the best results from your printer. Access these pages from the printer console.
Printing a System Settings pageTo print the System Settings page to view current information about your printer, do the following:
1. On the printer console, press the System button.2. Select Report/List, and then press the OK button.3. Select System Settings, and then press the OK button to print.

Power Saver Mode
2-10
Power Saver ModeThe printer has a power saving feature which reduces power consumption during periods of inactivity. This feature operates in two modes: the Low Power mode and Sleep mode. As delivered, the printer switches to the Low Power mode 5 minutes after the last print job is printed. The printer then switches to the Sleep mode after another 6 minutes of inactivity. When the printer is in the Low Power mode, the display shows [Ready]. In the Sleep mode, all lamps on the printer console except for the Energy Saver button go out. The display also goes blank and displays nothing.
The factory default settings of 5 minutes (Low Power mode) and 6 minutes (Sleep mode) are changeable within the range of 5 - 60 minutes (Low Power mode) and 1 - 6 minutes (Sleep mode). The printer returns to the ready-to-print state in about 30 seconds when re-activated.
See also: Changing the Power Saver Time on page 9-3.
Exiting the Power Saver ModeThe printer automatically exits the Power Saver mode when it receives a print job from a computer. To manually exit the Low Power mode, press any button on the printer console. To exit the Sleep mode, press the Energy Saver button.
Note: . • Opening and closing a cover will cause the printer to exit the Low Power mode and the Sleep mode.• When the printer is in the Sleep mode, all buttons on the printer console except for the Energy Saver
button do not function. To use the buttons on the printer console, press the Energy Saver button to exit the Sleep mode.
See also: Changing the Power Saver Time on page 9-3.

Checking Status of Print Data
2-11
Checking Status of Print Data
Checking Status (Windows)Printer information and status are displayed on the Status window. Double-click the SimpleMonitor printer icon on the taskbar at the bottom right of the screen. From the displayed window, check the column Status.
You can change the display contents with the button on the left of the Printer Status window.
Status Settings button: Displays the Status Settings screen and allows you to check the printer name, printer connection port, and printer status.
For more information about SimpleMonitor, see Help:
1. From the Start menu, select Programs.2. Select Fuji Xerox.3. Select SimpleMonitor for Asia-Pacific.4. Select SimpleMonitor Help.
See also: SimpleMonitor Software on page 3-3
Checking Status in CentreWare Internet Services (Windows & Macintosh)You can check the status of the print job sent to the printer at the Status tab of CentreWare Internet Services.
See also: Printer Management Software on page 3-1
Displaying Optional Accessory Configuration and Paper Tray Settings
2-12
Displaying Optional Accessory Configuration and Paper Tray SettingsPrint the System Settings page to view the current information about your printer:
1. On the printer console, press the System button. 2. Select Report/List, and then press the OK button.3. Select System Settings, and then press the OK button to print.
More InformationObtain information regarding your printer and its capabilities from the following sources.
Sources
Information Source
Safety Guide Packaged with printer
Setup Guide Packaged with printer
Features Setup Guide Packaged with printer
Quick Reference Guide Packaged with printer
User Guide (PDF) Software Pack CD-ROM
System Settings page Printer console menu

3-1
This chapter includes:
■ Print and Scan Drivers on page 3-2■ CentreWare Internet Services on page 3-2■ Address Book Editor on page 3-3■ Express Scan Manager on page 3-3■ SimpleMonitor Software on page 3-3■ DocuWorks on page 3-3
Printer Management Software 3

Print and Scan Drivers
3-2
Print and Scan DriversTo access all of your printer’s features, install the print and scan drivers from the Software Pack CD-ROM.
■ Print drivers enable your computer and printer to communicate and provide access to your printer features.
■ Scan drivers enable you to scan images directly to your personal computer and place scanned images directly into an application via USB or the network.
See also: Installing the Scan Driver on page 7-3
CentreWare Internet ServicesThis section provides information on CentreWare Internet Services, an HTTP (Hyper Text Transfer Protocol)-based web page service that installs with your print driver and is accessed through your web browser.
These pages give you instant access to printer status, and printer configuration options. Anyone on your network can access the printer using their web browser software. In administrative mode you can change the configuration of the printer, set up your fax directories, and manage your printer settings without leaving your computer.
Note: Users who are not given passwords by the administrator can still view the configuration settings and options in user mode. They will not be able to save or apply any changes to the current configuration.
Creating an Administrative Password1. Launch your web browser.2. Enter the printer’s IP address in the browser’s Address field. 3. Click the Properties tab.4. In the left navigation panel, scroll down to Security and select Administrator Settings.5. Select Enabled for Administrator Mode. 6. In the Administrator Login ID field, type a name for the administrator.
Note: The default ID and password are “11111” and “x-admin” respectively.
7. In the Administrator Password and Re-enter Password fields, type a password for the administrator.8. In the Maximum Login Attempts field, enter the number of login attempts allowed.9. Click Apply. Your new password has been set and anyone with the administrator name and password
can log in and change the printer configuration and settings.
Address Book Editor
3-3
Address Book EditorThe Address Book Editor provides a convenient interface for modifying the printer’s address book entries. With it you can create:
■ Fax entries■ Email entries■ Server entries
When you start the software, if the printer is connected via USB, the Address Book Editor reads the printer’s address book. You can create, edit, and delete entries. After making changes, you can then save the updated address book to the printer or to your computer.
The Address Book Editor can be installed from the Software Pack CD-ROM. It is available for Windows and Macintosh.
Express Scan ManagerThe Express Scan Manager handles scan jobs sent from the printer to your computer via USB. When the scan is sent from the printer to the computer, Express Scan Manager automatically manages the scan job.
Before scanning to your computer, start Express Scan Manager and configure the scan settings. You can specify settings for image type, resolution, paper size, and output destination.
The Express Scan Manager can be installed from the Software Pack CD-ROM. It is available for Windows and Macintosh.
See also: Scanning on page 7-1
SimpleMonitor SoftwareSimpleMonitor automatically checks the printer status when you send a print job. If the printer is unable to print your job, SimpleMonitor automatically displays an alert on your computer screen to let you know that the printer needs attention.
SimpleMonitor can be installed from the Software Pack CD-ROM. It is available only for Windows.
DocuWorksWhen installing DocuWorks, execute “setup.exe” under the following folders in the respective Software Pack CD-ROM:
■ English version: \DW\ENG■ Korean version: \DW\KOR■ Simplified Chinese version: \DW\SC■ Traditional Chinese version: \DW\TC
Windows supports DocuWorks and DocuWorks Viewer Light.
DocuWorks is available only for Windows.

4-1
This chapter includes:
■ Overview of Network Setup and Configuration on page 4-2■ Choosing a Connection Method on page 4-3■ Configuring the Network Address on page 4-5■ Installing the Print Drivers on page 4-9
Network Basics 4
Overview of Network Setup and Configuration
4-2
Overview of Network Setup and ConfigurationTo set up and configure the network:
1. Connect the printer to the network using the recommended hardware and cables.2. Turn on the printer and the computer.3. Print the System Settings page and keep it for referencing network settings. For more information see
Displaying Optional Accessory Configuration and Paper Tray Settings on page 2-12.4. Install the driver software on the computer from the Software Pack CD-ROM. For information on
driver installation, see the section in this chapter for the specific operating system you are using.5. Configure the printer’s TCP/IP address, which is required to identify the printer on the network.
■ Windows operating systems: Run the Installer on the Software Pack CD-ROM to automatically set the printer’s IP address if the printer is connected to an established TCP/IP network. You can also manually set the printer’s IP address on the printer console.
■ Macintosh systems: Manually set the printer’s TCP/IP address on the printer console.6. Print a System Settings page to verify the new settings.
Note: If the Software Pack CD-ROM is not available, you can download the latest driver from the Fuji Xerox Web Site: http://www.fxprinters.com/

Choosing a Connection Method
4-3
Choosing a Connection MethodConnect the printer via Ethernet or USB. A USB connection is a direct connection and is not used for networking. An Ethernet connection is used for networking. Hardware and cabling requirements vary for the different connection methods. Cabling and hardware are generally not included with your printer and must be purchased separately.
This section includes:
■ Connecting via Ethernet and USB on page 4-3■ Connecting via Ethernet on page 4-3■ Connecting via USB on page 4-4
Connecting via Ethernet and USB You can connect your DocuPrint C1190 FS through Ethernet, USB, or both at the same time. The available features for each connection type are shown in the following table.
For information on each connection type, see Connecting via Ethernet on page 4-3 and Connecting via USB on page 4-4.
Connecting via Ethernet Ethernet can be used for one or more computers. It supports many printers and systems on an Ethernet network. An Ethernet connection is recommended because it is faster than a USB connection. It also allows you direct access to CentreWare Internet Services (IS). The CentreWare IS web interface enables you to manage, configure, and monitor networked printers from your desktop.
Connection Type Available Features
USB When connected via USB you can:■ Instruct print jobs from a computer.■ Scan and print an image into an application.■ Scan and print an image to a folder on the computer.■ Use the Address Book Editor to manage address book entries.
Ethernet When connected via Ethernet you can:■ Instruct print jobs from a computer.■ Scan and print to a computer on the network.■ Scan and print to an FTP server.■ Scan to email.■ Use CentreWare IS to manage address book entries.

Choosing a Connection Method
4-4
Network ConnectionDepending on your particular setup, the following hardware and cabling are required for Ethernet.
■ If you are connecting to one computer, an Ethernet RJ-45 crossover cable is required. ■ If you are connecting to one or more computers with an Ethernet hub, or cable or DSL router, two or
more twisted-pair (category 5/RJ-45) cables are required. (One cable for each device.)
If you are connecting to one or more computers with a hub, connect the computer to the hub with one cable, and then connect the printer to the hub with the second cable. Connect to any port on the hub except the uplink port.
See also: Configuring the Network Address on page 4-5 Installing the Print Drivers on page 4-9Scanning to a Computer on a Network on page 7-8Scanning to Email on page 7-13
Connecting via USBIf you are connecting to one computer, a USB connection offers fast data speeds. To use USB, PC users must have Windows 2000, Windows XP, Windows XP x 64 bit, Windows Server 2003, Windows Server 2003 x 64 bit, Windows Vista, Windows Vista x 64 bit, Windows Server 2008, or a newer operating system. Macintosh users must use Mac OS X, version 10.3.9 and higher.
USB ConnectionA USB connection requires a standard A/B USB cable. This cable is not included with your printer and must be purchased separately. Verify that you are using the correct USB cable for your connection (2.0 for best results).
1. Connect one end of the USB cable to the printer and turn it on.2. Connect the other end of the USB cable to the computer.
See also: Address Book Editor on page 3-3Express Scan Manager on page 3-3 Installing the Print Drivers on page 4-9
Configuring the Network Address
4-5
Configuring the Network AddressThis section includes:
■ TCP/IP and IP Addresses on page 4-5■ Automatically Setting the Printer’s IP Address on page 4-5■ Dynamic Methods of Setting the Printer’s IP Address on page 4-6■ Manually Setting the Printer’s IP Address on page 4-7
TCP/IP and IP AddressesIf your computer is on a large network, contact your network administrator for the appropriate TCP/IP addresses and additional System Settings information.
If you are creating your own small Local Area Network or connecting the printer directly to your computer using Ethernet, follow the procedure for automatically setting the printer’s Internet Protocol (IP) address.
PCs and printers primarily use TCP/IP protocols to communicate over an Ethernet network. With TCP/IP protocols, each printer and computer must have a unique IP address. It is important that the addresses are similar, but not the same; only the last digit needs to be different. For example, your printer can have the address 192.168.1.2 while your computer has the address 192.168.1.3. Another device can have the address 192.168.1.4.
Many networks have a Dynamic Host Configuration Protocol (DHCP) server. A DHCP server automatically programs an IP address into every PC and printer on the network that is configured to use DHCP. A DHCP server is built into most cable and DSL routers. If you use a cable or DSL router, see your router’s documentation for information on IP addressing.
Automatically Setting the Printer’s IP AddressIf the printer is connected to a small established TCP/IP network without a DHCP server, use the installer on the Software Pack CD-ROM to detect or assign an IP address to your printer. For further instructions, insert the Software Pack CD-ROM into your computer’s CD-ROM drive. After the Installer launches, follow the prompts for installation.
Note: For the automatic installer to function, the printer must be connected to an established TCP/IP network.

Configuring the Network Address
4-6
Dynamic Methods of Setting the Printer’s IP AddressThere are two protocols available for dynamically setting the printer’s IP address:
■ DHCP (enabled by default)■ AutoIP
You can turn on/off both protocols using the printer console, or use CentreWare IS to turn on/off DHCP.
Note: You can print a report that includes the printer’s IP address. On the printer console, press the System button, select Report/List, press the OK button, select System Settings, and then press the OK button. The IP address is listed on the System Settings page.
Using the Printer ConsoleTo turn on/off either the DHCP or AutoIP protocol:
1. On the printer console, press the System button.2. Select the Admin Menu, and then press the OK button.3. Select the Wired Network menu, and then press the OK button.4. Select the TCP/IP menu, and then press the OK button.5. Select the IPv4 menu, and then press the OK button.6. Select Get IP Address, and then press the OK button.7. Select DHCP/AutoIP, and then press the OK button.
Using CentreWare ISTo turn on/off the DHCP protocol:
1. Launch your web browser.2. Enter the printer’s IP address in the browser’s Address field.3. Select Properties.4. Select the Protocol Settings folder on the left navigation panel.5. Select TCP/IP.6. In the Get IP Address field, select the DHCP/Autonet option.7. Click the Apply button.

Configuring the Network Address
4-7
Manually Setting the Printer’s IP AddressNote: Verify that your computer has a properly configured IP address for your network. Contact your
network administrator for more information.
If you are on a network without a DHCP server, or in an environment where the network administrator assigns printer IP addresses, you can use this method to manually set the IP address. Manually setting the IP address overrides DHCP and AutoIP. Alternatively, if you are in a small office with a single PC and use a dialup modem connection, you can manually set the IP address.
Using the Printer ConsoleTo manually set the IP address:
1. On the printer console, press the System button.2. Select the Admin Menu, and then press the OK button.3. Select the Wired Network menu, and then press the OK button.4. Select the TCP/IP menu, and then press the OK button.5. Select the IPv4 menu, and then press the OK button.6. Select Get IP Address, and then press the OK button.7. Select Panel, and then press the OK button.8. Select IP Address under the IPv4 menu and use the arrows to configure the IP values, and then press
the OK button.
Information Required for Manual IP Addressing
Information Comments
Internet Protocol (IP) address of the printer Format is xxx.xxx.xxx.xxx, where xxx represents a decimal number from 0–255.
Network Mask If you are unsure, leave this blank; the printer chooses an appropriate mask.
Default Router/Gateway address Router address is required to communicate with the host device from anywhere other than the local network segment.

Configuring the Network Address
4-8
Changing or Modifying the IP Address Using CentreWare ISCentreWare IS provides a simple interface that enables you to manage, configure, and monitor networked printers from your desktop using an embedded web server. For complete information about CentreWare IS, click the Help button in CentreWare IS to go to the CentreWare IS Online Help.
After setting the printer’s IP address, you can modify TCP/IP settings using CentreWare IS.
1. Launch your web browser.2. Enter the printer’s IP address in the browser’s Address field. 3. Click Properties. 4. Select the Protocol Settings folder on the left navigation panel. 5. Select TCP/IP.6. Enter or modify the settings, and then click Apply at the bottom of the page.

Installing the Print Drivers
4-9
Installing the Print DriversThis section includes:
■ Available Drivers on page 4-9■ Installation Procedure (Windows 2000 or later) on page 4-10■ Installation Procedure (Mac OS X 10.3.9 - 10.4.11 and 10.5) on page 4-11
Available DriversTo access special printing options, use a Fuji Xerox print driver.
Fuji Xerox provides drivers for a variety of page description languages and operating systems. The following print drivers are available:
* Go to http://www.fxprinters.com/ for the latest print drivers.
Print driver Source* Description
PCL 6 CD-ROM and Web
The Printer Command Language driver can be used for applications requiring PCL.
Mac OS X (version 10.3 - 10.5) Driver CD-ROM and Web
This driver enables printing from a Mac OS X (version10.3.9 - 10.4.11 and 10.5) operating system.
Linux Web Only This driver enables printing from a Linux operating system.
Installing the Print Drivers
4-10
Installation Procedure (Windows 2000 or later)The procedure for installing the print driver differs depending on how DocuPrint C1190 FS and the computer are connected.
■ Installing when connected via TCP/IP■ Installing when connected via USB
Installing when connected via TCP/IPTo install the print driver from the Software Pack CD-ROM:
1. Insert the CD-ROM into the computer’s CD-ROM drive. If the installer does not launch, do the following:a. Click Start, and then click Run.b. In the Run window, enter: <CD drive>:\Launcher.exe.c. Press the Enter button.
2. From the Main tab, select Print Driver.3. Select the installation method you want to use, and then follow the onscreen instructions.
Note: SimpleMonitor is a separate option from the print driver. To install SimpleMonitor, use the Software Pack CD-ROM.
Installing when connected via USB1. Turn off the printer.2. Connect the computer and C1190 SF with a USB cable.3. Turn on the printer.
If a setup screen requests for you to specify the driver's location while new hardware is being detected, insert the Software Pack CD-ROM into the computer's CD-ROM drive. Found New Hardware Wizard is displayed.
Note: If the Driver CD Kit screen starts, press the Exit button to close the screen.
4. Specify by following the example below where the driver to be stored. Never select Search for a suitable driver for my device (recommended).■ For x32 driver: “(CD-ROM drive name):\Eng\FXPS\PCL\Win2000_XP”■ For x64 driver: “(CD-ROM drive name):\Eng\FXPS\PCL\x64”
5. Continue the procedure according to the instructions of the installer.6. Follow the procedure below according to the OS you are using.
■ Windows 2000: Select Start > Settings > Printers.■ Windows XP or Windows Server 2003: Select Start > Printers and Faxes.■ Windows Server 2008: Select Start > Control Panel > Printers.■ Windows Vista: Select Start > Control Panel > Hardware and Sound > Printers.The Printers screen is displayed.Once the print driver has been installed, a printer icon is added on the Printers screen.
7. Right click on the printer icon, and select Properties or Runs as administrator > Properties (Windows Server 2008 or Windows Vista). The Properties dialog box is displayed.
8. Verify that a USB port is specified in Print to the following port(s) or Print to port (Windows XP, Windows Server 2003/2008, or Windows Vista) on the Port tab.

Installing the Print Drivers
4-11
9. In the General tab, click Print Test Page. A dialog box for confirming if printing was done properly is displayed
10. Check the print result, and click Yes if the result is satisfactory.
Installation Procedure (Mac OS X 10.3.9 - 10.4.11 and 10.5)
To install the print driver from the Software Pack CD-ROM:1. Start Macintosh.2. Insert the CD-ROM into the CD-ROM drive.3. Open MacOSX 10.3-10.5.4. Double-click C1190 FS Print Installer.
The installer starts and the Authenticate window opens.
5. Enter the Administrator’s user name and password, then click OK.6. Read through the license agreement carefully and if you have no objections to it, click Continue.7. Click Agree.8. Confirm the Install Type. Click Install.9. When the dialog box showing installation has completed appears, click Quit.
This completes the installation.
Proceed to Adding a Printer (Mac OS X 10.3.9 - 10.4.11) on page 4-12 or Adding a Printer (Mac OS X 10.5) on page 4-14.

Installing the Print Drivers
4-12
Adding a Printer (Mac OS X 10.3.9 - 10.4.11)As an example, this section describes how to add a printer on a Mac OS X 10.4.
1. Start Macintosh.2. Check that the machine’s port is set to Enable.
■ When using IP Printing
Set the LPD port to Enable.
Note: Printers on the IP network can be detected automatically. To enable the discovery function, start Bonjour.
■ When using USB
Set the USB port to Enable.
For the setting of the machine, refer to the manual provided with the machine.
Depending on the model being used, specification of the print mode may be unnecessary.
3. Open the Printer Setup Utility screen. The Printer List screen opens.
Note: For Mac OS X 10.3.9 and 10.4.11, open the Printer Setup Utility in the Utilities folder in the Applications folder.
4. Click Add.5. From the Protocol drop down list, select the protocol to be used to connect the printer.
When using IP Printing■ Mac OSX 10.3.9
1. Select IP Printing in the menu, and enter the IP address of the printer being used in Printer Address.
Note: Select LPD/LPR for Printer Type.
2. Select FX from Printer Model, and select the model to be used.3. Click Add.
■ Mac OSX 10.4.11
1. Click the IP Printer button, and enter the IP address of the printer being used in Address.
Note: Select LPD for Protocol.
2. Select FX from Printer Using, and select the model to be used.3. Click Add.
When using USB1. Select USB from the menu.2. Select FX from Printer Model, and select the printer to be used.3. Click Add.
This completes the addition of a printer.

Installing the Print Drivers
4-13
When using Rendezvous
Note: When automatically detecting the printer on the IP network with Mac OS X v10.4.11, select Bonjour.
1. Select Rendezvous.2. Select FX from Printer Model, and select the printer to be used.3. Click Add.
This completes the addition of a printer.
Installing the Print Drivers
4-14
Adding a Printer (Mac OS X 10.5)1. When using a USB port, execute the following procedure. If not using a USB port, proceed to Step 2.
1) If the USB cable is connected, temporarily disconnect it. 2) Connect the machine and the computer with the USB cable. 3) Turn ON the power of the machine.
2. Check that the machine’s port is set to Enable.■ When using IP Printing
Set the LPD port to Enable.
Note: Printers on the IP network can be detected automatically. To enable the discovery function, start Bonjour.
■ When using USB
Set the USB port to Enable. For the setting of the machine, refer to the manual provided with the machine. Depending on the model being used, specification of the print mode may be unnecessary.
3. Start System Preferences.4. Click Print & Fax.5. Click +.6. Select the protocol to be used to connect the printer.
When using IP Printing1. Click the IP Printer button, and enter the IP address of the printer being used in Address.
Note: Select LPD for Protocol.
2. Select "Select a driver to use..." from Print Using, and select the model to be used.3. Click Add.
When using USB1. Select Default from the menu.2. Select FX from Printer Model, and select the printer to be used.3. Click Add.This completes the addition of a printer.
When using Bonjour1. Select Default from the menu.2. Select FX from Printer Model, and select the printer to be used.3. Click Add.This completes the addition of a printer.

5-1
This chapter includes:
■ Supported Paper and Media on page 5-2 ■ About Paper on page 5-6■ Setting Paper Types and Sizes on page 5-8■ Loading Paper on page 5-9■ Selecting Printing Options on page 5-14■ Selecting 2 sided Printing on page 5-19■ Printing on Specialty Media on page 5-24■ Printing Custom Size Paper on page 5-33■ Printing Confidential Document - Secure Print on page 5-35■ Print After Checking Printing Result - Sample Print on page 5-37
Printing Basics 5
Supported Paper and Media
5-2
Supported Paper and MediaThis section includes:
■ Paper Usage Guidelines on page 5-3■ Automatic Document Feeder Guidelines on page 5-4■ Paper That Can Damage Your Printer on page 5-5■ Paper Storage Guidelines on page 5-5
Using paper that is not appropriate for the printer can cause paper jams, image quality problems, or printer failure. To achieve the best performance from your printer, we recommend you to use only the paper described in this section.
When using paper other than that recommended, contact the Fuji Xerox local representative office or an authorised dealer.

Supported Paper and Media
5-3
Paper Usage GuidelinesThe printer tray accommodate most sizes and types of paper and other specialty media. Follow these guidelines when loading paper and media in the tray:
■ Envelopes can be printed from Tray 1 and the Manual Feeder.■ Fan paper or other specialty media before loading in the paper tray.■ Do not print on label stock once a label has been removed from a sheet.■ Use only paper envelopes. Do not use envelopes with windows, metal clasps, or adhesives with release
strips.■ Print all envelopes single-sided only. ■ Some wrinkling and embossing may occur when printing envelopes.■ Do not overload the paper tray. Do not load paper above the fill line on the inside of the paper guide.■ Adjust the paper guides to fit the paper size. For Tray 1, the paper guides click into place when they are
adjusted correctly.■ If excessive jams occur, use paper or other media from a new package.
See also: Printing Envelopes on page 5-24Printing Labels on page 5-26Printing Glossy Paper on page 5-30Printing Custom Size Paper on page 5-33

Supported Paper and Media
5-4
Automatic Document Feeder GuidelinesThe document feeder accommodates the following original sizes:
■ Width: 139.7 mm (5.5") - 215.9 mm (8.5")■ Length: 139.7 mm (5.5") - 355.6 mm (14")
The weight range includes 50 - 125 gsm.
Follow these guidelines when loading originals into the document feeder:
■ Load originals face up so that the top of the document enters the printer first.■ Place only loose sheets of paper in the document feeder.■ Adjust the paper guides so that they fit against the originals.■ Insert paper in the document feeder only when the ink on the paper is completely dry.■ Do not load originals above the MAX fill line.
Document GlassUse the document glass rather than the document feeder to copy or scan the following types of originals:
■ Paper with paper clips or staples attached■ Paper with wrinkles, curls, folds, tears, or notches■ Coated or carbonless paper, or items other than paper such as cloth or metal■ Envelope
Supported Paper and Media
5-5
Paper That Can Damage Your PrinterYour printer is designed to use a variety of media types for print jobs. However, some media can cause poor output quality, increased paper jams, or damage to your printer.
Unacceptable media includes:
■ Rough or porous media■ Plastic media■ Paper that has been folded or wrinkled■ Paper with staples■ Envelopes with windows or metal clasps■ Padded envelopes■ Non-laser glossy or coated paper■ Perforated media
Paper Storage GuidelinesProviding good storage conditions for your paper and other media contributes to optimum print quality.
■ Store paper in dark, cool, relatively dry locations. Most paper items are susceptible to damage from ultraviolet (UV) and visible light. UV radiation, which is emitted by the sun and fluorescent bulbs, is particularly damaging to paper items. The intensity and length of exposure to visible light on paper items should be reduced as much as possible.
■ Maintain constant temperatures and relative humidity.■ Avoid attics, kitchens, garages, and basements for storing paper. ■ Store paper flat. Paper should be stored on pallets, cartons, shelves, or in cabinets.■ Avoid having food or drinks in the area where paper is stored or handled.■ Do not open sealed packages of paper until you are ready to load them into the printer. Leave paper in
the original packaging. For most commercial cut-size grades, the ream wrapper contains an inner lining that protects the paper from moisture loss or gain.
■ Leave the media inside the bag until you are ready to use it; reinsert unused media in the bag and reseal it for protection. Some specialty media is packaged inside resealable plastic bags.
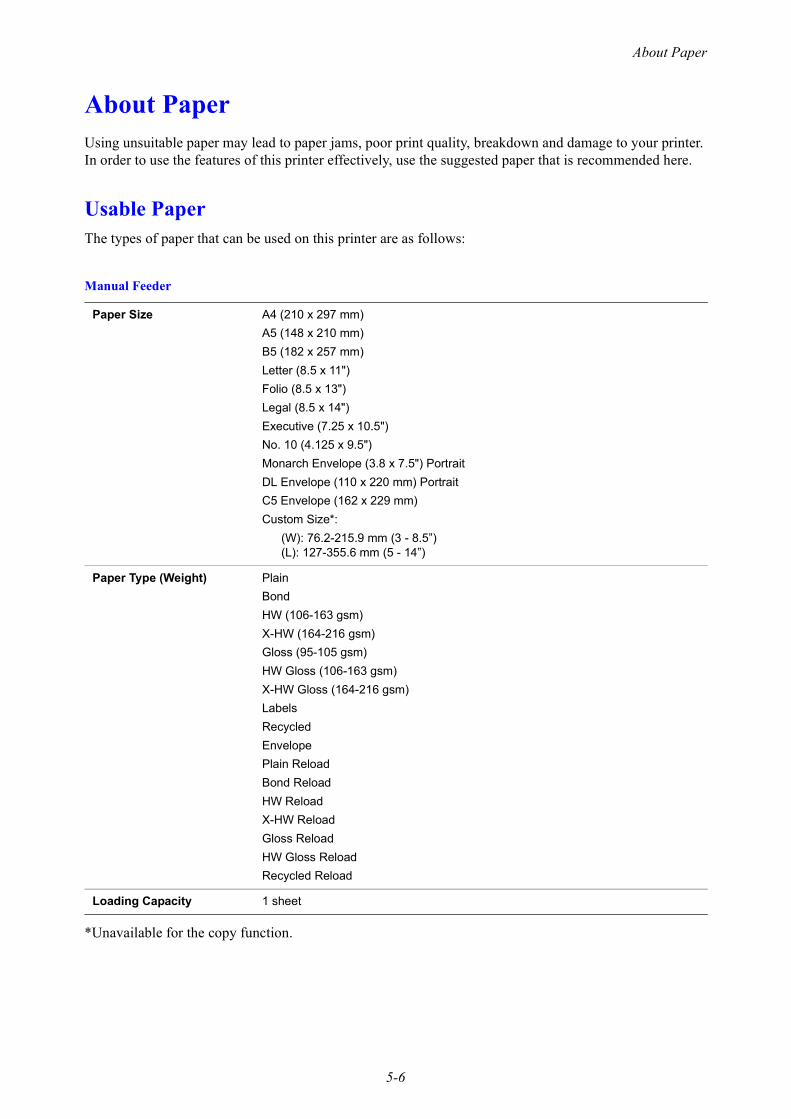
About Paper
5-6
About PaperUsing unsuitable paper may lead to paper jams, poor print quality, breakdown and damage to your printer. In order to use the features of this printer effectively, use the suggested paper that is recommended here.
Usable PaperThe types of paper that can be used on this printer are as follows:
*Unavailable for the copy function.
Manual Feeder
Paper Size A4 (210 x 297 mm)A5 (148 x 210 mm)B5 (182 x 257 mm)Letter (8.5 x 11")Folio (8.5 x 13")Legal (8.5 x 14")Executive (7.25 x 10.5")No. 10 (4.125 x 9.5")Monarch Envelope (3.8 x 7.5") PortraitDL Envelope (110 x 220 mm) PortraitC5 Envelope (162 x 229 mm)Custom Size*:
(W): 76.2-215.9 mm (3 - 8.5”) (L): 127-355.6 mm (5 - 14”)
Paper Type (Weight) Plain BondHW (106-163 gsm)X-HW (164-216 gsm)Gloss (95-105 gsm)HW Gloss (106-163 gsm)X-HW Gloss (164-216 gsm)LabelsRecycledEnvelopePlain ReloadBond ReloadHW ReloadX-HW ReloadGloss ReloadHW Gloss ReloadRecycled Reload
Loading Capacity 1 sheet
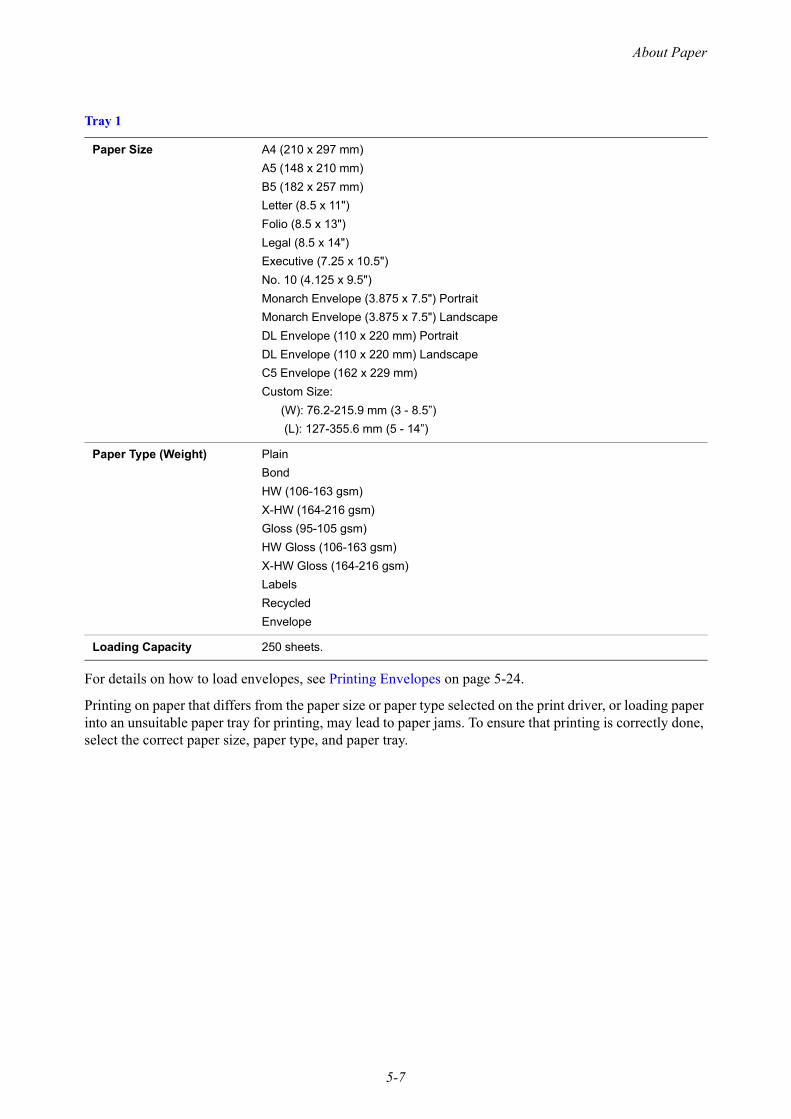
About Paper
5-7
For details on how to load envelopes, see Printing Envelopes on page 5-24.
Printing on paper that differs from the paper size or paper type selected on the print driver, or loading paper into an unsuitable paper tray for printing, may lead to paper jams. To ensure that printing is correctly done, select the correct paper size, paper type, and paper tray.
Tray 1
Paper Size A4 (210 x 297 mm)A5 (148 x 210 mm) B5 (182 x 257 mm)Letter (8.5 x 11")Folio (8.5 x 13")Legal (8.5 x 14")Executive (7.25 x 10.5")No. 10 (4.125 x 9.5")Monarch Envelope (3.875 x 7.5") PortraitMonarch Envelope (3.875 x 7.5") LandscapeDL Envelope (110 x 220 mm) PortraitDL Envelope (110 x 220 mm) LandscapeC5 Envelope (162 x 229 mm)Custom Size:
(W): 76.2-215.9 mm (3 - 8.5”) (L): 127-355.6 mm (5 - 14”)
Paper Type (Weight) PlainBondHW (106-163 gsm)X-HW (164-216 gsm)Gloss (95-105 gsm)HW Gloss (106-163 gsm)X-HW Gloss (164-216 gsm)LabelsRecycledEnvelope
Loading Capacity 250 sheets.
Setting Paper Types and Sizes
5-8
Setting Paper Types and Sizes
Setting Paper TrayWhen loading paper in Tray 1, set the paper size and type on the printer console before printing.
This section describes how to set the paper size and type on the printer console.
See also: Description of Menu Items on page 9-4
Setting Paper Sizes1. On the printer's console, press the System button.2. Select Tray Settings, and then press the OK button.3. Select the tray, and then press the OK button.4. Select Paper Size, and then press the OK button.5. Select the correct paper type for the paper loaded, and then press the OK button.
Setting Paper Types
Important: Paper type settings must match those of the actual paper loaded in the tray. Otherwise, print-quality problems can occur.
1. On the printer's console, press the System button to display the System screen.2. Select Tray Settings, and then press the OK button.3. Confirm that Tray 1 is selected, and then press the OK button.4. Select Paper Type, and then press the OK button.5. Select the correct paper type for the paper loaded, and then press the OK button.

Loading Paper
5-9
Loading PaperThis section includes:
■ Loading Paper in the Manual Feeder on page 5-9■ Loading Paper in Tray 1 on page 5-11
Loading Paper in the Manual FeederYou can print on the following types of media:
■ Plain paper■ Card stock■ Labels■ Envelopes■ Glossy paper■ Specialty media including business cards, postcards, trifold brochures, and weatherproof paper■ Pre-printed paper (paper already printed on one side)■ Custom size paper
See also: About Paper on page 5-6
Loading Paper in the Manual FeederIn addition to plain paper, the Manual Feeder can use various other sizes and types of print media, such as envelopes.
Make sure of the following points when loading paper in the Manual Feeder.
You can load one sheet of the standard paper (60 – 216 gsm) at a time. The minimum size that can be loaded in the Manual Feeder is 76.2 x 127 mm (3 x 5”).
■ The dimensions of print media that the Manual Feeder can handle are:■ Width: 76.2 –215.9 mm■ Length: 127.0 –355.6 mm
Make sure of the following points to avoid any problems during printing:
■ Load paper one by one in the Manual Feeder.■ Use high quality paper for laser printers to print at high quality. See About Paper on page 5-6.■ Do not remove or add paper to the Manual Feeder when printing. Doing so may cause a paper jam.■ Always load paper short-edge feeds.
Note: Depending on the paper size, loading long-edge feed may be available for custom size paper.

Loading Paper
5-10
To load paper in the Manual Feeder:1. Adjust the width guides to the print media's width.
2. Hold both sides of the print media facing down close to the single sheet feeder, and push it into the machine until it automatically feeds.
Note: •Do not force the print media into the Manual Feeder.•Load letterhead face down, with the top of the sheet entering the machine first.•If paper does not feed properly, turn the paper around and feed it from the other end.
Note: Do not force the paper.
To load an Envelope, Envelope#10, Monarch, or DL:
To load an envelope into the Manual Feeder, insert the envelope short edge feed with the flap closed and the print side down. Ensure that the flap comes at the right when you face towards the machine.

Loading Paper
5-11
Loading Paper in Tray 1Use Tray 1 for a wide range of media including:
■ Plain paper■ Thin card stock■ Thick card stock■ Glossy paper■ Thick Glossy paper■ Labels
See also: Printing on Specialty Media on page 5-24
Loading Paper in Tray 1This section describes how to load paper in Tray 1.
Important: Do not remove the tray during printing. It may cause a paper jam.
1. Pull the tray out of the printer until it stops. Hold the tray with both hands, lift the front slightly, and remove it from the printer.
2. Slide the width guides to the edge of the tray. The width guides should be fully extended.
Note: When loading paper that is 210 mm (A4) wide, such as Letter-size or Legal-size paper, set the tab on the side of the tray to the (A4) position.

Loading Paper
5-12
3. Squeeze the blue tab on the length guide, and then slide the guide until the arrow lines up with the appropriate paper size. The guide clicks into place. The length guide extends beyond the edge of the tray for paper that is longer than 297 mm.
4. Before loading the print media, flex the sheets back and forth, and then fan them. Straighten the edges of the stack on a level surface.
5. Place the print media into the tray with the print side face-up.
Note: Do not exceed the maximum fill line in the tray. Overfilling the tray may cause paper jams.
6. Slide the width guides and length guide until they rest lightly against the edge of the print media stack.

Loading Paper
5-13
7. Insert the tray into the printer, and push until it stops.
Important: Do not use excessive force on the tray. Doing so could damage the tray or the inside of the printer.

Selecting Printing Options
5-14
Selecting Printing OptionsThis section includes:
■ Selecting Printing Preferences (Windows) on page 5-14■ Selecting Options for an Individual Job (Windows) on page 5-15■ Selecting Options for an Individual Job (Macintosh) on page 5-17
Selecting Printing Preferences (Windows)
Printer preferences control all of your print jobs, unless you override them specifically for a job. For example, if you want to use 2 sided printing for most jobs, set this option in printer settings.
To select printer preferences:
1. Select one of the following options:■ Windows 2000, Windows Server 2003, Windows Server 2008, and Windows Vista: Click
Start, select Settings, and then click Printers.■ Windows XP: Click Start, Settings, and then select Printers and Faxes.
2. In the Printers folder, right-click the icon for your printer.3. From the pop-up menu, select Printing Preferences or Properties.4. Select the Printing Preference button.
The FX DocuPrint C1190 FS PCL6 Printing Preference screen appears.5. Select the Advanced tab, and then click the Printing Defaults button.6. Make selections on the driver tabs, and then click the OK button to save your selections.
Note: For more information about Windows print driver options, click the Help button on the print driver tab to view the online help.

Selecting Printing Options
5-15
Selecting Options for an Individual Job (Windows)If you want to use special printing options for a particular job, change the driver settings before sending the job to the printer. For example, if you want to use Photo print-quality mode for a particular graphic, select this setting in the driver before printing that job.
1. With the desired document or graphic open in your application, access the Print dialog box.2. Select the DocuPrint C1190 FS and click its Properties button to open the print driver.3. Make selections from the driver tabs. See the following table for specific printing options.
Note: In Windows 2000, Windows XP, Windows Server 2003, Windows Server 2008, and Windows Vista, you can save current printing options with a distinctive name and apply them to other print jobs. Select either the Advanced, Paper/Output, Image Options, or Layout tab, and then select a Saved Setting. Click the Help button for more information.
4. Click the OK button to save your selections.5. Print the job.
See the following table for specific PCL printing options:
PCL Printing Options for Windows
Operating System Driver Tab Printing Options
Windows 2000, Windows XP, Windows XP x 64bit, Windows Server 2003, Windows Server 2003 x 64bit, Windows Vista, Windows Vista x 64bit, or Windows Server 2008
Paper / Output tab ■ Job Type■ Saved Settings■ 2 Sided Print■ Output Color■ Quantity■ Collated■ Paper Summary■ Paper Size■ Paper Tray■ Paper Type■ Manual Feeder Feed Oriention■ Address Book■ Printer Status■ Defaults
Image Options tab ■ Output Color■ Image Quality■ Output Recognition■ Image Adjustment Mode■ Image Types■ Image Auto Correction■ Image Settings■ Color Balance■ Profile Settings■ Defaults

Selecting Printing Options
5-16
Layout tab ■ Image Orientation■ Multiple-Up■ Booklet / Poster / Mixed Document / Rotation ■ Fit to New Paper Size■ Specify Zoom■ Image Shift / Print Position■ Defaults
Watermarks / Forms tab ■ Watermarks■ New Watermark ■ New Watermark (Bitmap)■ Edit Watermark■ Delete Watermark■ Apply to First Page Only
■ Forms■ No Forms■ Create / Resister Forms■ Image Overlay
■ Annotation■ Defaults
Advanced Settings tab ■ Skip Blank Pages■ Draft Mode■ Banner Sheet■ Substitute Tray■ Other Settings (Graphics Settings)
■ Items■ Settings for■ Paper Tray Selection Method
■ Specify Font■ About■ Deraults
PCL Printing Options for Windows
Operating System Driver Tab Printing Options

Selecting Printing Options
5-17
Selecting Options for an Individual Job (Macintosh)To select print settings for a particular job, change the driver settings before sending the job to the printer.
1. With the document open in your application, click File, and then click Print.2. Select the desired printing options from the menus and drop-down lists that are displayed.
Note: In Mac OS X, click Save as... on the Presets menu screen to save the current printer settings. You can create multiple presets and save each with its own distinctive name and printer settings. To print jobs using specific printer settings, click the applicable saved preset in the Presets list.
3. Click Print to print the job.
Macintosh Print Driver Printing Options:
The table shown below uses Macintosh OSX 10.4 TextEdit as an example.
Printing options for Macintosh
Item Printing Options
Copies & Pages ■ Copies■ Collated■ Pages
Layout ■ Pages per sheet■ Layout Direction■ Border■ Two-Sided
Scheduler ■ Print Document■ Priority
Paper Handling ■ Paper Order■ Print■ Destination Paper Size
Cover Page ■ Print Cover Page■ Cover Page Type■ Billing Info
Job Accounting ■ Account Mode
Secure Print / Sample Print ■ Job Type■ User ID■ Password■ Retrieve Document Name■ Document Name
Image Settings ■ Brightness■ Contrast■ Chroma
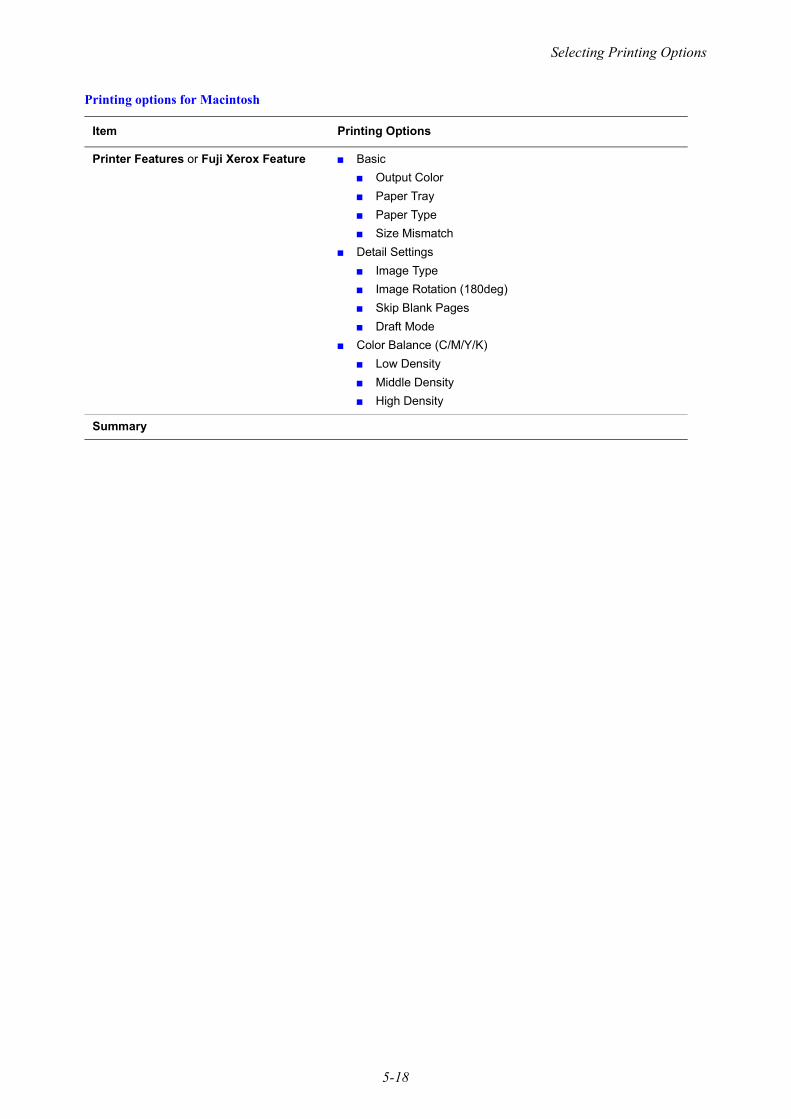
Selecting Printing Options
5-18
Printer Features or Fuji Xerox Feature ■ Basic■ Output Color■ Paper Tray■ Paper Type■ Size Mismatch
■ Detail Settings■ Image Type■ Image Rotation (180deg)■ Skip Blank Pages■ Draft Mode
■ Color Balance (C/M/Y/K)■ Low Density■ Middle Density■ High Density
Summary
Printing options for Macintosh
Item Printing Options

Selecting 2 sided Printing
5-19
Selecting 2 sided PrintingThe manual 2 sided printing (or duplex printing) feature allows you to print on both sides of a sheet of paper. You can use the Manual Feeder or Tray 1 for manual 2 sided printing. When you perform manual 2- sided printing, the printer first prints the even-numbered pages on the front side (side 1) of each sheet. Once the printer finishes printing all the even-numbered pages, remove the printed output from the output tray, and load it in the Manual Feeder or Tray 1. Then, you can instruct the printer to print the odd-numbered pages on the reverse side (side 2) of each sheet.
Performing Manual 2 sided PrintingThe following explains how to perform manual 2 sided printing.
Note: • To use the manual 2 sided printing feature, set Electric Sort to Off under the Advanced Settings tab >
Other Settings on your print driver. Also, if you select either 2 Sided Print, Flip on Short Edge or 2 Sided Print for 2 Sided Print on the print driver, Electric Sort can be set to Off automatically.
• When performing manual 2 sided printing, the Secure Print/Sample Print feature cannot be used.
Operations on Your ComputerThe following procedure uses Windows XP WordPad as an example.
Note: The method of displaying the properties dialog box varies depending on the application being used.
Consult the documentation for your application.
1. On the File menu, click Print.2. Select the printer from the Select Printer list box, and click Preferences.3. The Paper/Output tab appears.
From 2 Sided Print, select either 2 Sided, Flip on Short Edge or 2 Sided Print to define the way 2-sided print pages are bound.
4. From Paper Size, select the size of the document to be printed.5. From Paper Tray, select the tray where you loaded the paper.6. From Paper Type, select the paper type to be used.7. Click OK to close the Printing Properties dialog box.
3456

Selecting 2 sided Printing
5-20
8. Click OK in the Print dialog box to start printing.
Important: When you start manual 2 sided printing, the instruction window appears. If you close this window, you cannot display the window again. Do not close the window until the 2 sided printing has completed.
Manual 2 sided Printing from the Manual FeederThis section explains how to print a 2 sided job using the Manual Feeder. The procedure uses a six-page document as an example.
Note: When printing on curled paper, straighten the paper and then insert it into the Manual Feeder.
1. Print the even-numbered pages (Side 1). Follow the message displayed on the printer console and load the paper into the Manual Feeder, and then press the OK button to start printing straight away.
Note: Without pressing the OK button, printing automatically starts shortly after you insert a sheet of paper into the Manual Feeder.
While printing, the following messages appear.

Selecting 2 sided Printing
5-21
2. Repeat Step 1 to print the rest of the even-numbered pages (page 2, page 4, page 6).
After the even-numbered pages have been printed, the message shown below appears.
3. Print the odd-numbered pages (side 2). Remove the stack of the printed output and flip the stack over. Insert one sheet at a time into the Manual Feeder with the blank side facing down, starting from the sheet on top of the stack that you have flipped over.
Note: Warped or curled prints can cause paper jams. Straighten them before loading them.
4. Follow the instruction displayed on the screen. The printer starts printing odd-numbered pages in the order of page 1 (on the reverse side of page 2), page 3 (on the reverse side of page 4), then page 5 (on the reverse side of page 6).

Selecting 2 sided Printing
5-22
Manual 2 sided Printing from Tray 1This section explains how to print a 2 sided job using Tray 1. The procedure uses a six-page document as an example.
Note: You cannot print on both sides of the paper if the document consists of various sizes of paper. For information on how to load paper in Tray 1, refer to Loading Paper in Tray 1 on page 5-11. If a paper jam occurs when performing 2 sided printing, reload the paper in Tray 1.
1. The even-numbered pages are printed on the front side (side 1) of each sheet in the order of page 6, page 4, then page 2. The messages shown below appear when the even-numbered pages have been printed.
After the even numbered pages have been printed, the message shown below appears.
2. Remove the stack of the printed output, and load it without flipping over with the blank side facing up into Tray 1.

Selecting 2 sided Printing
5-23
3. Push Tray 1 all the way into the printer.
Important: When inserting the tray, be careful not to get your fingers caught between the tray and the printer.
4. Press the OK button to print the odd-numbered pages (side 2). The printer starts printing odd-numbered pages in the order of page 1 (on the reverse side of page 2), page 3 (on the reverse side of page 4), then page 5 (on the reverse side of page 6).
See also: Loading Paper in the Manual Feeder on page 5-9Loading Paper in Tray 1 on page 5-11
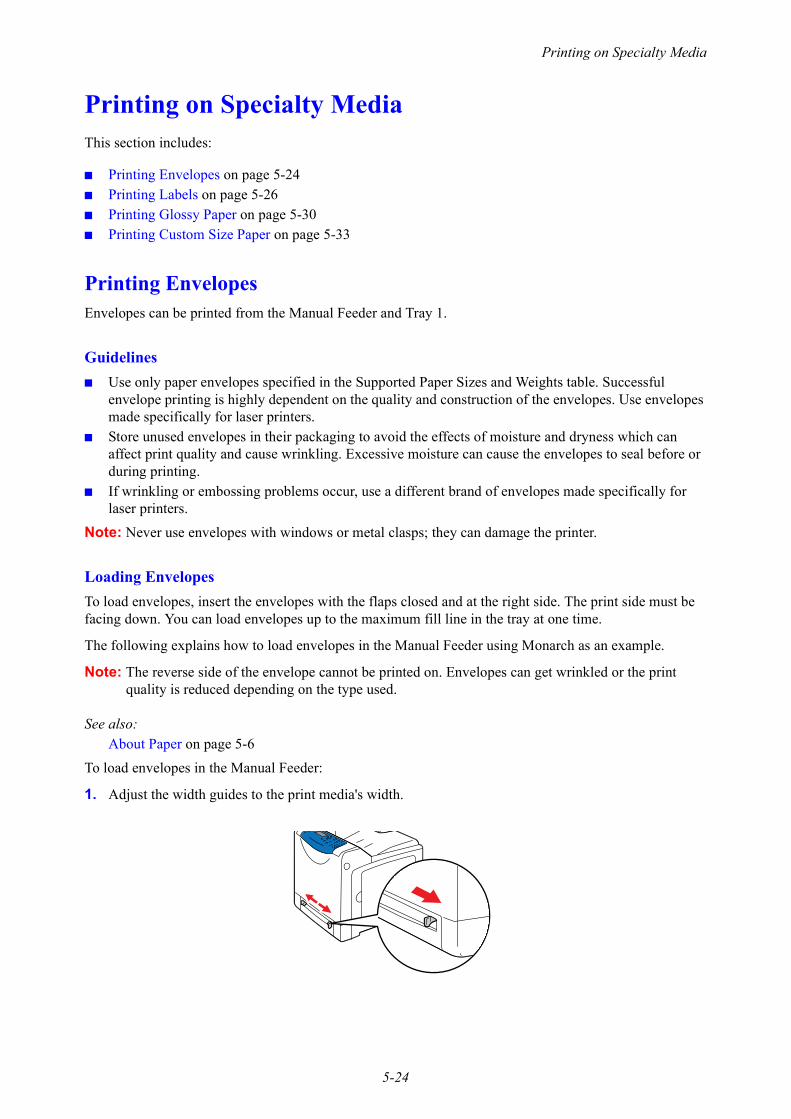
Printing on Specialty Media
5-24
Printing on Specialty MediaThis section includes:
■ Printing Envelopes on page 5-24■ Printing Labels on page 5-26■ Printing Glossy Paper on page 5-30■ Printing Custom Size Paper on page 5-33
Printing EnvelopesEnvelopes can be printed from the Manual Feeder and Tray 1.
Guidelines■ Use only paper envelopes specified in the Supported Paper Sizes and Weights table. Successful
envelope printing is highly dependent on the quality and construction of the envelopes. Use envelopes made specifically for laser printers.
■ Store unused envelopes in their packaging to avoid the effects of moisture and dryness which can affect print quality and cause wrinkling. Excessive moisture can cause the envelopes to seal before or during printing.
■ If wrinkling or embossing problems occur, use a different brand of envelopes made specifically for laser printers.
Note: Never use envelopes with windows or metal clasps; they can damage the printer.
Loading EnvelopesTo load envelopes, insert the envelopes with the flaps closed and at the right side. The print side must be facing down. You can load envelopes up to the maximum fill line in the tray at one time.
The following explains how to load envelopes in the Manual Feeder using Monarch as an example.
Note: The reverse side of the envelope cannot be printed on. Envelopes can get wrinkled or the print quality is reduced depending on the type used.
See also: About Paper on page 5-6
To load envelopes in the Manual Feeder:
1. Adjust the width guides to the print media's width.

Printing on Specialty Media
5-25
2. Hold both sides of the print media facing down close to the single sheet feeder, and push it into the machine until it automatically feeds.
Note: •Do not force the print media into the single sheet feeder.•Load letterhead face-down, with the top of the sheet entering the machine first.•If paper does not feed properly, turn the paper around and feed it from the other end.
Printing on EnvelopesThe way to display the printer Properties dialog box differs according to the application software. Refer to the manual of your respective application software.
Using the Macintosh Print Driver
To print on envelopes using the Macintosh print driver, display the Paper/Output tab.
1. From the File menu, select Print.2. From the drop down list, select Fuji Xerox Feature.3. From the Feature Sets, select Basic.4. From Output Color, select Color or Black and White.5. From Paper Tray, select Manual Feed Slot.6. From Paper Type, select Envelope.7. Click OK, and then Print.
Using the PCL Driver
To print on envelopes using the PCL print driver, display the Paper/Output tab.
1. From the File menu, select Print.2. Select this printer as the printer to be used and click Preferences to display the Properties dialog box.3. Select the Paper/Output tab.4. From Paper Tray, select Manual Feeder.5. Select the appropriate paper type from Paper Type for the Manual Feeder.6. From Paper Size, select the size of the original document.7. Click OK.8. Click Print in the Print dialog box to start printing.
Printing on Specialty Media
5-26
Printing LabelsLabels can be printed from the Manual Feeder and Tray 1.
To order paper or specialty media, contact the Fuji Xerox local representative office or an authorised dealer.
See also: About Paper on page 5-6
Guidelines■ Do not use vinyl labels.■ Print only on one side of the sheet of labels.■ Do not use any sheet where labels are missing; it may damage the printer.■ Store unused labels flat in their original packaging. Leave the sheets of labels inside the original
packaging until ready to use. Return any unused sheets of labels to the original packaging and reseal it.■ Do not store labels in extremely dry or humid surroundings or extremely hot or cold surroundings.
Storing them in extreme temperatures may cause print-quality problems or cause them to jam in the printer.
■ Rotate stock frequently. Long periods of storage in extreme temperatures can cause labels to curl and jam the printer.
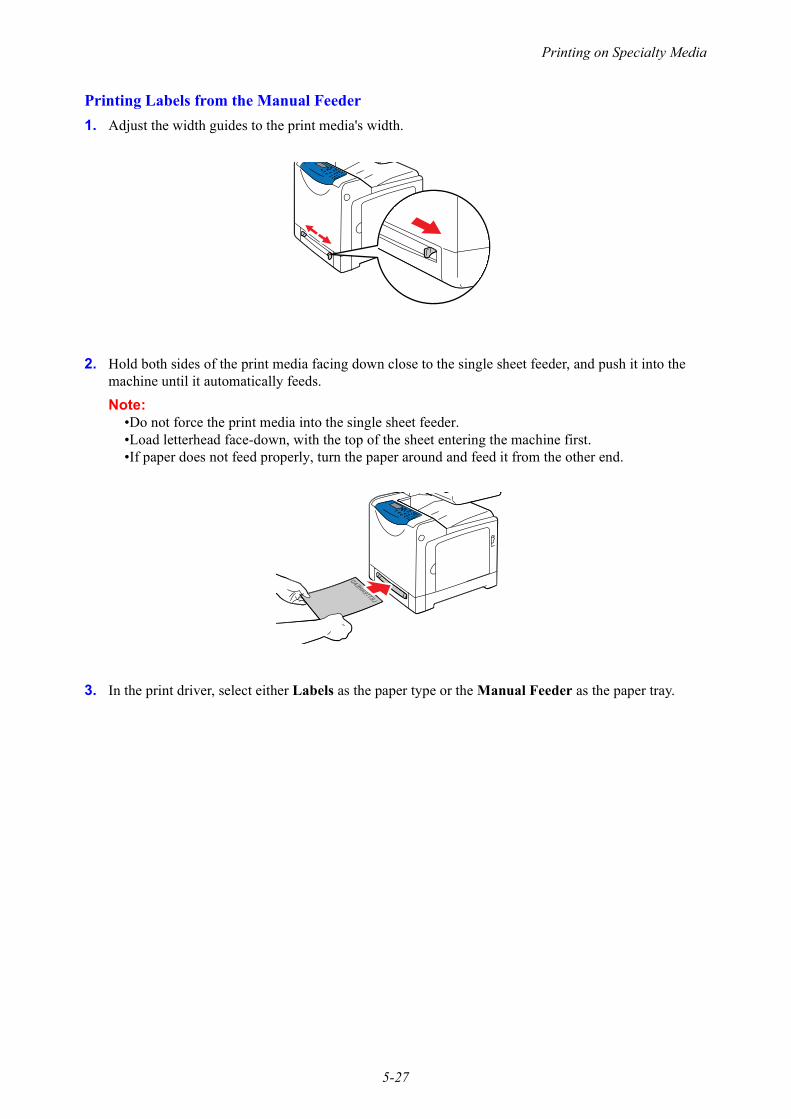
Printing on Specialty Media
5-27
Printing Labels from the Manual Feeder1. Adjust the width guides to the print media's width.
2. Hold both sides of the print media facing down close to the single sheet feeder, and push it into the machine until it automatically feeds.
Note: •Do not force the print media into the single sheet feeder.•Load letterhead face-down, with the top of the sheet entering the machine first.•If paper does not feed properly, turn the paper around and feed it from the other end.
3. In the print driver, select either Labels as the paper type or the Manual Feeder as the paper tray.

Printing on Specialty Media
5-28
Printing Labels from Tray 11. Pull the tray out of the printer.
2. If necessary, open the paper guides:■ Squeeze the tab on the length guide, and then slide it back. The guide clicks into place.■ Slide the side guides outward.
3. Fan the label sheets to release sheets that are stuck together.

Printing on Specialty Media
5-29
4. Insert the label sheets into the tray. Place the side to be printed face up with the top of the page toward the front of the printer.
Note: Do not load the paper above the fill line indicated on the tray. Overloading the tray may cause jams. The following illustration indicates the maximum fill line for labels.
5. If necessary, press the paper guides inward to fit the sheets.
Note: When the paper guides are adjusted correctly, there may be a small space between the labels and the guides.
6. Insert the tray into the tray slot, and push the tray completely into the printer.
7. On the printer console, select the paper type:a. Press the System button.b. Select Tray Settings, and then press the OK button.c. Select Tray 1, and then press the OK button.d. Select Paper Type, and then press the OK button.e. Select Labels, and then press the OK button.
8. In the print driver, select either Labels as the paper type or the appropriate tray as the paper tray.

Printing on Specialty Media
5-30
Printing Glossy PaperGlossy paper can be printed from any tray. It can be printed on both sides.
To order paper or specialty media, contact the Fuji Xerox local representative office or an authorised dealer.
Guidelines■ Do not open sealed packages of glossy paper until you are ready to load them into the printer.■ Leave glossy paper in the original wrapper, and leave the packages in the shipping carton until ready to
use.■ Remove all other paper from the tray before loading glossy paper.■ Load only a single sheet of glossy paper into Tray 1 or the Manual Feeder.
Printing Glossy Paper from the Manual Feeder1. Open the paper guides.
2. Insert the glossy paper into the Manual Feeder, and adjust the paper guides to fit the paper.■ Place the side to be printed face down.
3. In the print driver, select either Gloss, Heavyweight Gloss, or Extra Heavyweight Gloss as the paper type or the Manual Feeder as the paper tray.
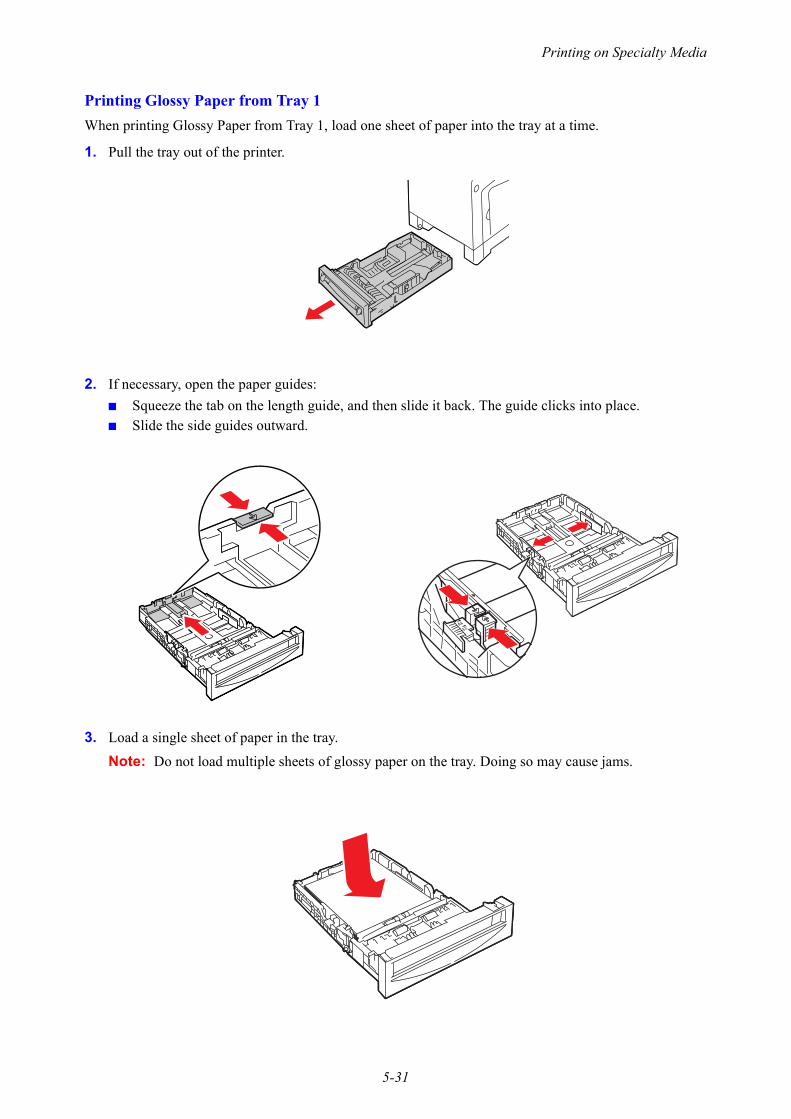
Printing on Specialty Media
5-31
Printing Glossy Paper from Tray 1When printing Glossy Paper from Tray 1, load one sheet of paper into the tray at a time.
1. Pull the tray out of the printer.
2. If necessary, open the paper guides:■ Squeeze the tab on the length guide, and then slide it back. The guide clicks into place.■ Slide the side guides outward.
3. Load a single sheet of paper in the tray.
Note: Do not load multiple sheets of glossy paper on the tray. Doing so may cause jams.

Printing on Specialty Media
5-32
4. If necessary, press the paper guides inward to fit the paper.
Note: When the paper guides are adjusted correctly, there may be a small space between the paper and the guides.
5. Insert the tray into the tray slot, and push the tray completely into the printer.
6. On the printer console, select the glossy paper type:a. Press the System button.b. Select Tray Settings, and then press the OK button.c. Select Tray 1, and then press the OK button.d. Select Paper Type, and then press the OK button.e. Select Gloss, HW Gloss, or X-HW Gloss according to the paper type loaded, and then press the
OK button.
7. In the print driver, select either Gloss, Heavyweight Gloss, or Extra Heavyweight Gloss as the paper type or the appropriate tray as the paper tray.
Printing Custom Size Paper
5-33
Printing Custom Size PaperThis section explains how to print on custom size paper using the PCL print driver.
Custom size paper can be loaded in Tray 1 and the Manual Feeder. The way to load custom size paper in the paper tray is the same as the one to load standard size paper. The way to load custom size paper in the Manual Feeder is the same as the one to load standard size paper.
See also: Loading Paper in Tray 1 on page 5-11Loading Paper in the Manual Feeder on page 5-9Setting Paper Types and Sizes on page 5-8
Defining Custom Paper SizesBefore printing, set the custom size on the print driver.
Note: When setting the paper size on the print driver and the printer console, be sure to specify the same size as the actual paper used. Setting the wrong size for printing can cause printer failure. This is especially true if you configure a bigger size when using a narrow width paper.
Using the PCL DriverOn the PCL print driver, set the custom size in the Custom Paper Size dialog box. This section explains the procedure using Windows XP as an example.
For Windows 2000 or later, an administrator’s password only allows users with administrator rights to change the settings. Users without the rights of administrator can only view the contents.
1. From the Start menu, click Printers and Faxes.2. Right-click the printer, and then select Properties.3. Select the Configuration tab.4. Click Custom Paper Size.5. Use the Details list box to select the custom setup you want to define.6. Specify the length of the short edge and long edge under Settings for. You can specify the values
either by entering them directly or using the Up Arrow and Down Arrow buttons. The length of the short edge cannot be longer than the long edge, even if it is within the specified range. The length of the long edge cannot be shorter than the short edge, even if it is within the specified range.
7. To assign a paper name, select the Name Paper Size check box, and then enter the name in Paper Name. Up to 14 characters can be used for the paper name.
8. If necessary, repeat steps 4 to 6 to define another custom size.9. Click OK twice.
Printing Custom Size Paper
5-34
Printing on Custom Size PaperUse the following procedures to print using either the PCL or Macintosh print drivers.
Using the PCL DriverTo print on custom size paper using the PCL print driver:
Note: The way to display the printer Properties dialog box differs according to the application software. Refer to the manual of your respective application software.
1. From the File menu, select Print.2. Select the printer as the printer to be used and click Preferences.3. Select the Paper/Output tab.4. Select the appropriate paper tray from Paper Tray.5. Select the appropriate paper type from Paper Type. This selection is only available if the paper tray is
set to Auto Select or Tray 1.6. From Paper Size, select the size of the original document.7. Click the Layout tab.8. From Fit to New Paper Size, select Same As Paper Size.9. Click OK.10. Click Print in the Print dialog box to start printing.
Using the Macintosh Print DriverThis section explains the procedure using Text Editor on Macintosh OS X version 10.4 as an example.
1. From the File menu, select Page Setup.2. From Paper Sizes, select Manage Custom Sizes.3. In the Custom Page Sizes window, press +.
A newly created setting “Untitled” is displayed in the list.
4. Press Page Size, enter the size of the original document5. Press the OK button.6. From the File menu, select Print.7. Press Print in the Print dialog box to start printing.
Printing Confidential Document - Secure Print
5-35
Printing Confidential Document - Secure Print
About Secure PrintSecure Print is a feature that allows you to assign a password to a print job from the computer, send it to the printer for temporarily storing, and start printing the data from the printer console. You can also store the print data in the printer without attaching a password. By storing frequently-used data in the printer, you can print the data from the printer without sending the data from the computer repeatedly.
Note: You can select whether to delete secure print data after printing. The secure print jobs stored in the RAM disk is erased when the printer is switched off.
See also: Printing from the Printer Console on page 5-36System Settings on page 9-12
Configuring Secure PrintFollow the steps for the secure print settings at the computer and send data to the printer for printing. Then, follow the steps for the output procedure at the printer to output the printed pages.
Printing from the ComputerThis section explains the procedure using WordPad on Windows XP as an example. The procedure is the same for other operating systems.
The way to display the printer Properties dialog box differs according to the application software. Refer to the manual of your respective application software.
To configure Secure Print using the PCL print driver:
1. From the File menu, select Print and then select the Paper/Output tab.2. In the Job Type field, select Secure Print.3. Click the Setup button.4. In the User ID field, enter your user name.5. In the Secure Print Passcode field, enter a numeric password. 6. If you want to use a specified document name to access the document from the printer console:
a. In the Document Name field, select Enter Document Name.b. In the New Document Name field, enter the name that will appear on the printer console.
7. If you want the printer to automatically name the document using the application's document name, in the Document Name field, select Use Existing Name.
8. Click OK twice to accept the Secure Print settings and to send the job.9. On the Print dialog box click the Print button to send the job to the printer.

Printing Confidential Document - Secure Print
5-36
Printing from the Printer ConsoleTo print data stored in the printer by Secure Print:
Note: You can also delete, without printing, secure print data stored in the printer. See System Settings on page 9-12.
1. On the printer console, press the Job Status button to display Print Menu.2. Select Secure Print, and then press the OK button.3. Select your user name, and then press the OK button.4. Using the alphanumeric keypad, enter the numeric password, and then press the OK button.5. Repeat Step 4 for each digit of the password, and then press the OK button.6. If you submitted more than one secure print job, select the name of the job that you want to print, and
then press the OK button.7. Select Print and Save, Delete after Print, or Delete, and then press the OK button to print the job.8. Using the Up/Down arrow buttons, select the number of copies required.
The displayed user ID (up to 8 characters) is the User ID specified in the Secure Print dialog box of the Paper/Output tab of the print driver.
For the password, enter the Secure Print Passcode set in the Secure Print dialog box of the Paper/Output tab of the print driver. If Secure Print Passcode is not configured, there will be no setting on the printer console.
The document name displayed (up to 12 characters) is the Document Name specified in the Secure Print dialog box of the Paper/Output tab of the print driver.

Print After Checking Printing Result - Sample Print
5-37
Print After Checking Printing Result - Sample Print
About Sample PrintSample Print is a feature that allows you to store the print data of multiple copies in the memory, print out only the first set to check the print result and if satisfactory, print the remaining copies from the printer console.
Note: Sample Print data that has become redundant can be deleted using the printer console. See Printing from the Printer Console on page 5-36. To delete all Sample Print data that has become redundant, see System Settings on page 9-12. The secure print jobs stored in the RAM disk are erased when the printer is switched off.
Configuring Sample PrintSet the Sample Print settings at the computer and send data to the printer for printing. Then, carry out the output procedure at the printer to output the printed pages.
Printing from the ComputerThis section explains the procedure using WordPad on Windows XP as an example.
The way to display the printer Properties dialog box differs according to the application software. Refer to the manual of your application software.
To configure Sample Print using the PCL print driver:
1. In the Job Type field on the Paper/Output tab, select Sample Print.2. Click the Setup button.3. In the User ID field, enter your user name.4. If you want to use a specified document name to access the document from the printer console:
a. In the Document Name field, select Enter Document Name.b. In the New Document Name field, enter the name that will appear on the printer console.
5. If you want the printer to automatically name the document using the application's document name, in the Document Name field, select Use Existing Name.
Note: In order to use the Sample Print feature, the number of copies to be printed must be two copies or more and the collate feature must be enabled.

Print After Checking Printing Result - Sample Print
5-38
Printing from the Printer ConsoleTo print and delete data stored in the printer by Sample Print:
1. On the printer console, press the Job Status button to display the Job Status menu.2. Select Print Menu, and then press the OK button.3. Select Sample Print, and then press the OK button.4. Select your user name, and then press the OK button.5. Select Print and Save, Delete after Print, or Delete, and then press the OK button to print the job.6. Scroll to the desired number of copies, and then press the OK button to print the job.
Note: The user ID displayed (up to 8 characters) is the User ID set in the Sample Print dialog box of the Paper/Output tab of the print driver.
The document name displayed (up to 12 characters) is the Document Name set in the Sample Print dialog box of the Paper/Output tab of the print driver.

6-1
This chapter includes:
■ Basic Copying on page 6-2■ Adjusting Copying Options on page 6-3
Copying 6
Basic Copying
6-2
Basic CopyingUse either the document glass or the document feeder to make copies. Load the originals to be copied and follow the steps below to make copies. To clear the settings from the previous job, press the Clear All button once.
1. On the printer console, press the Copy button.2. Enter the desired number of copies using the printer console keypad. The number of copies appears on
the upper, right corner of the display. To reset the number of copies to 1, press the Clear All button.3. Set copying options. See Adjusting Copying Options on page 6-3.4. Press the Start button.
If you placed originals in the document feeder, copying continues until the document feeder is empty.
Note: Copying cannot be made while printing.
Document GlassLift the document feeder or the document glass cover, and then place the original face down on the back, left corner of the document glass. Gently close the cover.
Document FeederInsert originals face up with the top of the page entering the feeder first. Adjust the paper guides so they fit against the originals.

Adjusting Copying Options
6-3
Adjusting Copying OptionsThis section includes:
■ Basic Settings on page 6-3■ Image Adjustments on page 6-5■ Image Placement Adjustments on page 6-8■ Output Adjustments on page 6-10
Basic SettingsYou can change the following basic settings when making copies:
■ Selecting Black and White or Color Copies on page 6-3■ Selecting a Tray to Use for Copies on page 6-4■ Selecting the Default Copy Settings on page 6-4
Selecting Black and White or Color CopiesYou can create copies in black and white or in color.
1. On the printer console, press the Copy button.2. Press the Color Mode button on the printer console to change the selection to B&W (black and white)
or Color.
Note: The Color Mode will return to the default setting after the Copy job is complete. To set the default behavior permanently, see Selecting the Default Copy Settings on page 6-4.

Adjusting Copying Options
6-4
Selecting a Tray to Use for CopiesIn some cases, you may want to make copies on letterhead or colored paper. After loading the special paper in a tray, select the tray to use for your copies.
To select the tray for copying special paper:
1. On the printer console, press the Copy button.2. Select Paper Supply, and then press the OK button.3. Select one of the following trays to use for the copies, and then press the OK button.
■ Tray 1 ■ Manual Feeder
Note: For best results, specify the size and type of paper if using Tray 1.
Selecting the Document TypeThe scanner optimizes the appearance of the output based on the contents of the original. To set the original type:
1. On the printer console, press the Copy button.2. Select Document Type, and then press the OK button.3. Select the original type, and then press the OK button.
■ Text: For black and white or colored text.■ Mixed (factory default): For both text and photographs, such as magazines or newspapers. ■ Photo: For photograph prints.
Selecting the Default Copy SettingsTo set the default copy settings:
1. On the printer console, press the System button.2. Select Defaults Settings, and then press the OK button.3. Select Copy Defaults, and then press the OK button.4. Press the Down Arrow button until the desired option appears, and then press the OK button.5. Select the desired setting, and then press the OK button.6. Repeat steps 4 and 5 as needed.7. Press the Exit button.

Adjusting Copying Options
6-5
Image AdjustmentsYou can change the following image adjustment settings:
■ Reducing or Enlarging an Image on page 6-5■ Making an Image Lighter or Darker on page 6-5■ Adjusting the Sharpness on page 6-6■ Adjusting the Color Saturation on page 6-6■ Setting Auto Exposure on page 6-7
See also: Selecting the Default Copy Settings on page 6-4
Reducing or Enlarging an ImageYou can reduce an image to 25% of its original size or enlarge it to 400% of its original size.
To reduce or enlarge an image:
1. On the printer console, press the Copy button.2. Select Reduce/Enlarge, and then press the OK button.3. Select one of the following options:
■ Use the Up Arrow or Down Arrow to select a preset image size, and then press the OK button.■ Use the Back Arrow or Forward Arrow buttons to set the copy size, and then press the OK
button.
Note: The factory default is 100%.
Making an Image Lighter or DarkerTo lighten or darken an image:
1. On the printer console, press the Copy button.2. Select Lighten/Darken, and then press the OK button.3. Press the Back Arrow or Forward Arrow button to lighten or darken an image, and then press the
OK button to apply the setting.

Adjusting Copying Options
6-6
Adjusting the SharpnessTo adjust the sharpness of an image:
1. On the printer console, press the Copy button.2. Select Sharpness, and then press the OK button.3. Press the Up Arrow or Down Arrow button to select the sharpness setting.
■ Sharper: Makes the copy softer than the original.■ Normal: Makes the copy sharpness the same as the original.■ Softer: Makes the copy sharper than the original.Note: The factory default is Normal.
4. Press the OK button to apply the setting.
Adjusting the Color SaturationTo deepen or lighten the overall color levels of your copies:
1. On the printer console, press the Copy button.2. Select Color Saturation, and then press the OK button.3. Press the Up Arrow or Down Arrow button to adjust the level of color saturation.
■ Higher: Increases the color saturation to deepen the color of the copy.■ Normal: When set to Normal, the color saturation is the same as the original.■ Lower: Decreases the color saturation to lighten the color of the copy.Note: The factory default is Normal.
4. Press the OK button to apply the setting.
See also: Setting Auto Exposure on page 6-7

Adjusting Copying Options
6-7
Setting Auto ExposurePaper that is less white, like newspaper or ivory-colored paper, can cause the printer to apply toner to a copy of a document or image so that the background matches the original. This function is called Auto Exposure. Auto Exposure is turned on by default.
Turning Auto Exposure On/Off
To turn Auto Exposure on/off:
1. On the printer console, press the System button.2. Select Defaults Settings, and then press the OK button.3. Select Copy Defaults, and then press the OK button.4. Select Auto Exposure, and then press the OK button.5. Press the Up Arrow or Down Arrow button to select On or Off, and then press the OK button.
Setting the Auto Exposure Level
To set the auto exposure level manually:
1. On the printer console, press the System button.2. Select Defaults Settings, and then press the OK button.3. Select Copy Defaults, and then press the OK button.4. Select Auto Expo. Level, and then press the OK button.5. Press the Up Arrow or Down Arrow button to select the Auto Exposure level, and then press the OK
button.■ Normal: Sets the background suppression level to Normal.■ Higher(1): Sets the background suppression level to Higher(1).■ Higher(2): Sets the background suppression level to Higher(2).Note: The factory default is Normal.
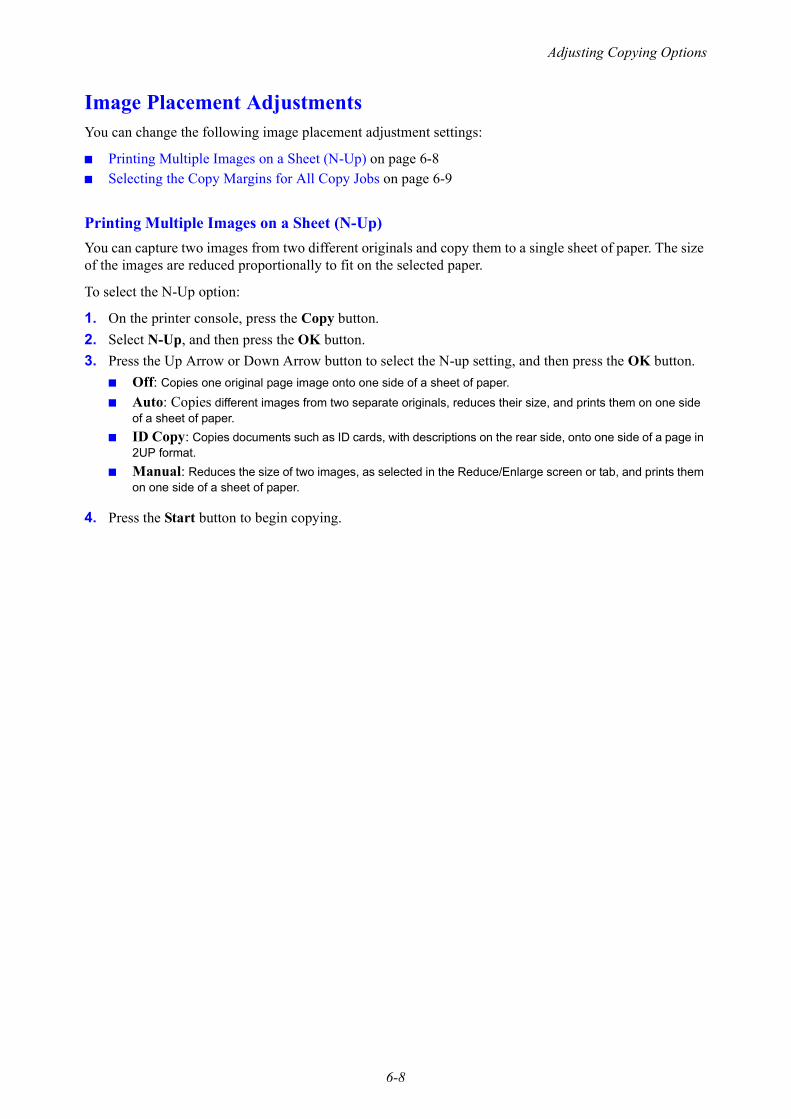
Adjusting Copying Options
6-8
Image Placement AdjustmentsYou can change the following image placement adjustment settings:
■ Printing Multiple Images on a Sheet (N-Up) on page 6-8■ Selecting the Copy Margins for All Copy Jobs on page 6-9
Printing Multiple Images on a Sheet (N-Up)You can capture two images from two different originals and copy them to a single sheet of paper. The size of the images are reduced proportionally to fit on the selected paper.
To select the N-Up option:
1. On the printer console, press the Copy button.2. Select N-Up, and then press the OK button.3. Press the Up Arrow or Down Arrow button to select the N-up setting, and then press the OK button.
■ Off: Copies one original page image onto one side of a sheet of paper.
■ Auto: Copies different images from two separate originals, reduces their size, and prints them on one side of a sheet of paper.
■ ID Copy: Copies documents such as ID cards, with descriptions on the rear side, onto one side of a page in 2UP format.
■ Manual: Reduces the size of two images, as selected in the Reduce/Enlarge screen or tab, and prints them on one side of a sheet of paper.
4. Press the Start button to begin copying.
Adjusting Copying Options
6-9
Selecting the Copy Margins for All Copy JobsThe System settings menu allows you to select the margins for All Copy Jobs, or individual jobs.To select the margins for individual jobs, see Selecting the Margins for Individual Jobs on page 6-9.
Selecting the Top/Bottom Margins
1. On the printer console, press the System button.2. Select Defaults Settings, and then press the OK button.3. Select Copy Defaults, and then press the OK button.4. Select Margin Top/Bottom, and then press the OK button.5. Select the margin that you want to change, and then press the OK button.6. Use the Up Arrow or Down Arrow button to adjust the margins, and then press the OK button.
Selecting the Left/Right Margins
1. On the printer console, press the System button.2. Select Defaults Settings, and then press the OK button.3. Select Copy Defaults, and then press the OK button.4. Select Margin Left/Right, and then press the OK button.5. Select the margin that you want to change, and then press the OK button.6. Use the Up Arrow or Down Arrow button to adjust the margins, and then press the OK button.
Selecting the Center Margin of the Paper
1. On the printer console, press the System button.2. Select Defaults Settings, and then press the OK button.3. Select Copy Defaults, and then press the OK button.4. Select Margin Middle, and then press the OK button.5. Select the margin that you want change, and then press the OK button.6. Use the Up Arrow or Down Arrow button to adjust the center margin, and then press the OK button.
Note: The margin width is only enabled when copying from the document glass.
Selecting the Margins for Individual Jobs1. Place the document to be copied on the document glass.2. On the printer console, press the Copy button.3. Select the margin setting from Margin Top/Bottom, Margin Left/Right, or Margin Middle, and
then press the OK button. 4. Use the Up/Down Arrow button to adjust the margin, and then press the OK button.5. Repeat the steps 3 and 4 if necessary, and then press the Exit button.6. Press the Start button to begin copying.

Adjusting Copying Options
6-10
Output AdjustmentsYou can change the following output adjustment settings:
■ Collating Copies on page 6-10
Collating CopiesWhen you make several copies of a multi-page document, you can collate the output. For example, if you are making three single-sided copies of a six-page document, the copies are printed in the following order.
When selecting On:
1, 2, 3, 4, 5, 6, 1, 2, 3, 4, 5, 6, 1, 2, 3, 4, 5, 6.
When selecting Off:
1, 1, 1, 2, 2, 2, 3, 3, 3, 4, 4, 4, 5, 5, 5, 6, 6, 6.
When selecting Auto, the operation differs as follows depending on the document loading location.
When loading the document in the ADF: Collating becomes active and the copies are printed in the order of 1, 2, 3, 4, 5, 6, 1, 2, 3, 4, 5, 6, 1, 2, 3, 4, 5, 6.
When placing the document on the Platen glass: Collating becomes inactive and the copies are printed in the order of 1, 1, 1, 2, 2, 2, 3, 3, 3, 4, 4, 4, 5, 5, 5, 6, 6, 6.
To select a collating option:
1. On the printer console, press the Copy button.2. Select Collated, and then press the OK button.3. Select Off, On, or Auto, and then press the OK button.
Note: • The factory default is Auto.• The collating setting is cancelled if memory is not sufficient.

7-1
This chapter includes:
■ Scanning Overview on page 7-2■ Installing the Scan Driver on page 7-3■ Loading Documents for Scanning on page 7-5■ Scanning to a USB Connected Computer (Windows) on page 7-6■ Scanning to a Computer on a Network on page 7-8■ Scanning to Email on page 7-13■ Scanning to a FTP Server on page 7-15■ Scanning Images into an Application on page 7-17■ Adjusting Scanning Options on page 7-19
See also: Printer Management Software on page 3-1
Scanning 7

Scanning Overview
7-2
Scanning OverviewYou can connect your DocuPrint C1190 FS to a computer via Ethernet, USB, or both at the same time. The scanning features available for USB or Ethernet are listed in the following table.
See also: Printer Management Software on page 3-1
Connection Type Available Scanning Features
USB When connected via USB you can:■ Scan an image into an application.■ Scan an image to a folder on the computer.
Ethernet When connected via Ethernet you can:■ Scan to a computer on the network.■ Scan to an FTP server.■ Scan to email.

Installing the Scan Driver
7-3
Installing the Scan DriverIf you plan to import scanned images directly into an application (such as Photoshop or Word), or scan images directly to your computer, you must install a scan driver.
Installing the Scan Driver (Windows)
To install the scan driver from the Software Pack CD-ROM:
1. Turn off the printer.2. Connect the computer and C1190 FS with a USB cable.3. Turn on the printer.
If a setup screen requests for you to specify the driver's location while new hardware is being detected, insert the Software Pack CD-ROM into the computer's CD-ROM drive. Found New Hardware Wizard is displayed.
Note: If the Driver CD Kit screen starts, press the Exit button to close the screen.
4. Specify by following the example below where the driver to be stored. Never select Search for a suitable driver for my device (recommended).
■ “(CD-ROM drive name):\Common\Scan”
5. Continue the procedure according to the instructions of the installer.6. Confirm that the icon for C1190 FS is displayed on the Scanners and Cameras screen.
The method of displaying the Scanners and Cameras screen differs depending on the OS, as described below.
■ Windows 2000: Select Start>Settings>Control Panel>Scanner and Cameras.■ Windows XP: Select Start>Control Panel>Printers and Other Hardware>Scanner and
Cameras.■ Windows Server 2003: Select Start>Control Panel>Scanner and Cameras.■ Windows Server 2008: Select Start>Control Panel>Hardware and Sound>Scanner and
Cameras.■ Windows Vista: Select Start > Control Panel > Hardware and Sound > Scanner and
Cameras.
If the icon for C1190 FS is displayed, installation of the scan driver is completed.If the icon is not displayed, execute the procedure again from Step 1.
See also: Express Scan Manager on page 3-3

Installing the Scan Driver
7-4
Installing the Scan Driver (Macintosh)To install the Scan driver from the Software Pack CD-ROM:
1. Start Macintosh.2. Insert the CD-ROM into the CD-ROM drive.3. Open MacOSX 10.3-10.5 folder.4. Double-click C1190 FS Scan Installer.5. The installer starts and the Authenticate window opens.6. Enter the Administrator’s user name and password, then click OK.7. Read through the license agreement carefully and if you have no objections to it, click Continue.8. Click Agree.9. Confirm the Install Type. Click Install.10. When the dialog box showing installation has completed appears, click Quit.
This completes the installation.

Loading Documents for Scanning
7-5
Loading Documents for ScanningPosition the original document to be scanned as shown below.
Document FeederInsert originals face up with the top of the page entering the feeder first. Adjust the paper guides so they fit against the originals.Note: Do not load originals above the MAX fill line.
Document GlassLift the document feeder or the document glass cover, and then place the original face down on the back, left corner of the document glass.

Scanning to a USB Connected Computer (Windows)
7-6
Scanning to a USB Connected Computer (Windows)Note: This procedure assumes you have Express Scan Manager installed on your computer. For more
information on Express Scan Manager, see Express Scan Manager on page 3-3.
1. On the printer console, click the Scan button.2. Select Scan to, and then press the OK button. 3. Use the Up Arrow to select Computer (USB), and then press the OK button.4. Select File Format:
a. Press the OK button.b. Press the Up Arrow or Down Arrow button to select a format.c. Press the OK button.
5. Press the Start button.
A DocuPrint C1190 FS dialog box will appear on your computer asking you to launch to manage the scanned file.
6. Select DocuPrint C1190 FS Express Scan Manager, and then click OK.
The printer scans your documents to the output destination specified in Express Scan Manager.
See also: Adjusting Scanning Options on page 7-19

Scanning to a USB Connected Computer (Macintosh)
7-7
Scanning to a USB Connected Computer (Macintosh)The following procedure explains how to scan a document from a Macintosh computer by using Macintosh OSX 10.4 Image Capture as an example:
Note: The procedure differs depending on the version of Mac OSX.
1. Start Macintosh.2. Access the application’s Image Capture.3. From File Menu, select Device.4. Select Browse Device.
The Image Capture Devices screen appears.5. From TWAIN device, select FX DocuPrint C1190 FS.
Note: If you register FX DocuPrint C1190 FS, it is displayed under Browse Device from the next time you scan.
6. Select Use TWAIN software.7. Click the Connect button.
The FUJI XEROX DocuPrint C1190 FS screen appears.8. Select the following settings:
■ Download to: Select a folder to which to save the file.■ Name: Enter a name with which to save the file.■ Format: Select a format with which to save the file.■ Automatic Task: Select an application with which to open the file after saving it.
9. Click Scan. The TWAIN driver screen appears.
10. Set the SCAN parameters as required, and press the Scan button.
Note: You can confirm the setting method of the TWAIN driver with Help of the driver screen.

Scanning to a Computer on a Network
7-8
Scanning to a Computer on a NetworkThis section includes:
■ Setting Up Scanning to a Computer on page 7-8■ Scanning to a Computer on a Network on page 7-12
Setting Up Scanning to a ComputerBefore using the printer as a scanner on a network, you must do the following:
■ Create a shared folder on the computer■ Create a new address pointing the scanner to the computer
Creating a Shared FolderBefore scanning, you need to create a shared folder on the computer for the printer to send scanned images to. You can either create a new folder to scan to, or navigate to an existing folder that you want scan to.
Creating a Shared Folder on Windows
To create a share folder:
1. Open Windows Explorer.2. Right-click the folder you want to share, and then select Properties.3. Click the Sharing tab, and then click Share this folder.4. Click the Permissions button.5. Select the Everyone group, and verify that all permissions are enabled.6. Click OK. Write down the Share name; you will need it later.7. Click OK again.8. Open a DOS Command Prompt window and type ipconfig, and then press the Enter key.
Record your IP address. You will need it when creating the address book entry.9. Close the DOS Command Prompt window.
The folder is ready. Now you need to set up an address to scan to.
Scanning to a Computer on a Network
7-9
Creating a Shared Folder on a Macintosh
To share a folder:
1. Open System Preferences.2. Click the Sharing icon.3. Enable Windows Sharing.4. Click the Enable Accounts button, and then enable your account. 5. Follow the onscreen prompts for entering your password.6. Click Done.7. Click Show All, and then click the Network icon.8. On the Show drop-down list, select Built-in Ethernet.9. Record your IP address. You will need it when creating the address book entry.10. Click Show All, and then click Accounts.11. Record your Short Name. You will need it when creating the address book entry.12. Close System Preferences.13. Create a folder in your Public folder. The scanner will place scanned images in this folder.14. In the Finder window, click the folder you just created.15. On the File menu, click Get Info, and then Ownership & Permissions.16. Click Details to expand the window.17. Set permissions for Group to have Read and Write access, and then click Apply to enclosed items.
The folder is ready. Now you need to set up an address to scan to.
Creating an AddressBefore scanning, you must create an address for your printer to scan to. There are two ways to create the address:
■ Create the address with CentreWare IS (requires Ethernet connection).■ Create the address with Xerox Address Book Editor (requires USB connection).
Using CentreWare IS to Create an Address
To configure the address using CentreWare IS:
1. Launch your web browser.2. Enter your printer’s IP address in the browser’s Address field. 3. Select the Address Book tab. 4. In the Address Book, under Network Scan (Comp./Serv.), click Computer/Server Address Book.
Note: The default User ID and password are “11111” and “x-admin” respectively.
5. In the Directory Listing, click the Add button of any address that is not in use.6. Fill in the information for your computer:
a. In the Name (Displayed on Printer) field of the Add Network Scan Address dialog box, enter the name that you want this address to appear under in the Address Book.
b. On the Network Type drop-down list, select Computer (SMB).c. In the Host Address (IP Address or DNS Name) field, enter the IP address of your computer.d. The port number only needs to be specified if the server is not using the default port.e. In the Login Name (if required by host) fields, enter the name and password that you login with.
Scanning to a Computer on a Network
7-10
f. In the Login Password field, enter the password that you login with.g. In the Re-enter Password field, re-enter the password to verify.h. Windows: In the Name of Shared Directory field, type the share name of the folder that you
shared previously. Macintosh: In the Name of Shared Directory field, type your short name.
i. Windows: The Subdirectory Path (optional) field is used to specify subfolders of your shared folder. For instance, say that you have a shared Scans folder that has a ColorScans subfolder. To place scans in the subfolder, set the Subdirectory Path (optional) field to \ColorScans. Macintosh: In the Subdirectory Path (optional) field, type Public\foldername. where foldername is the folder that you created and set permissions on.
7. Click the Apply button to create the new address.
Using the Address Book Editor to Create an Address
Note: To use the Address Book Editor, your computer must be connected to the printer with a USB cable.
For Windows:
1. On the Start menu, select Programs > Fuji Xerox > DocuPrint C1190 FS > Address Book Editor.2. In the left-pane of the Address Book Editor, right-click the Server icon and then select New.
The Server Address dialog box appears.
3. Click the Computer (SMB) option button.4. Click the Computer Settings Wizard button.5. Click the Browse button for the Save In Folder option, and then select the shared folder that you
previously configured for sharing. See Creating a Shared Folder on page 7-8.6. Click OK, and then Next.7. Enter the name and password that you login with, and then click Next.8. Confirm the settings, and then click Finish.
The Computer Settings Wizard closes.
9. In the Name field of the Server Address dialog box, enter the name that you want this address to appear under in the Address Book.
10. Click OK.11. On the File menu, select Save all.
The Address Book is saved with the new entry for your computer.
You are now ready to scan images to the network computer.

Scanning to a Computer on a Network
7-11
For Macintosh:
1. Open the Applications folder, and then select Fuji Xerox/DocuPrint C1190 FS/Address Book Editor.
2. In the left-hand pane of the Address Book Editor, double-click the Server icon.
The Server Address dialog box opens.
3. In the Name field of the Server Address dialog box, enter the name that you want this address to appear under in the Address Book.
4. Click the Computer (SMB) option button.5. Type your IP address in the Server Name / IP Address field.6. Type your short name in Share Name field.7. Type the name and password that you login with in the Login fields.8. Type your password in the Confirm Login Password field.9. If you are using the default port number, select the Use Default Port Number check box.
If you are not using the default port number, type the port number in the Port Number field. 10. Confirm the settings, and then click OK.11. On the File menu, select Save.
The Address Book is saved with the new entry for your computer.
You are now ready to scan images to the network computer.
Scanning to a Computer on a Network
7-12
Scanning to a Computer on a NetworkIf you haven’t created a shared folder and an address for the printer to use, see Setting Up Scanning to a Computer on page 7-8.
To scan to a computer on a network:
1. On the printer console, click the Scan button.2. Select Scan to, and then press the OK button.3. Select Computer (Network), and then press the OK button.4. Press the Up Arrow or Down Arrow button to select the address that points to your computer, and
then press the OK button.5. If you want to change any other scan settings, press the Up Arrow or Down Arrow button to select
the setting and make your changes. 6. Press the Start button.
The printer begins scanning your documents to the shared folder on your computer.
See also: Adjusting Scanning Options on page 7-19

Scanning to Email
7-13
Scanning to EmailThis section includes:
■ Setting Up the SMTP Server on page 7-13■ Using CentreWare IS to Create an Address on page 7-13■ Scanning to Email on page 7-14
Setting Up the SMTP ServerTo use the scan to email feature you first need to set up your SMTP server information. SMTP (Simple Mail Transfer Protocol) is a protocol for sending email.
This protocol was originally used to send email between servers; however, currently client email software uses it to send email to servers using POP.
To use CentreWare IS to configure the email settings:
1. Launch your web browser.2. Enter the printer’s IP address in the browser’s Address field. 3. Select Email Server from the Protocols list.4. Enter your email settings, and then click Apply.
Note: For information on the email settings in CentreWare IS, click the Help button.
Using CentreWare IS to Create an AddressTo configure the address using CentreWare IS:
1. Launch your web browser.2. Enter your printer’s IP address in the browser’s Address field. 3. Click the Address Book tab. 4. Under Scan to E-mail, click E-mail Address Book.5. In the Directory Listing, click the Add button of any blank address.6. In the Name field, enter the name that you want this address to appear under in the Address Book.7. In the E-mail Address field, enter the email address of the recipient.8. Click the Apply button to create the new address.

Scanning to Email
7-14
Scanning to EmailTo scan to email:
1. On the printer console, click the Email button.2. Select Email to, and then press the OK button.3. Choose the method for selecting the recipient:
■ To manually enter the email address, select Keypad to enter the E-mail address, and then press OK. If entering the email address manually, use the keypad to enter the address. For details see Entering Text on the Printer Console on page 9-17.
■ To select an email address in the Address Book, select Address Book, and then press OK.■ To select a group email address in the Address Book, select Email Group, and then press the OK
button. When using the Address Book, press the Up Arrow or Down Arrow button to select the address that points to the desired recipient, and then press the Forward Arrow button to select the address. When finished selecting addresses, and then press the OK button.
4. Press the Start button.
The printer begins scanning your documents.
See also: Adjusting Scanning Options on page 7-19
Scanning to a FTP Server
7-15
Scanning to a FTP ServerThe printer can scan an image, and then send it to an FTP server using FTP.
This section includes:
■ Creating an Address for the Scanner on page 7-15■ Scanning to a FTP Server on page 7-16
Creating an Address for the ScannerBefore scanning, you must create an address for your printer to scan to. There are two ways to create the address:
■ Using CentreWare IS to create the address■ Using the Xerox Address Book Editor to create the address
Using CentreWare IS to Create an AddressTo configure the address using CentreWare IS:
1. Launch your web browser.2. Enter your printer’s IP address in the browser’s Address field. 3. Click the Address Book tab.
Note: The default User ID and password are “11111” and “x-admin” respectively.
4. Under Network Scan (Comp./Serv.), click Computer/Server Address Book.5. In the Directory Listing, click the Add button of any blank address.6. Fill in the rest of the information for the FTP server:
a. In the Name (Displayed on Printer) field, enter the name that you want this address to appear under in the Address Book.
b. On the Network type drop-down list, select Server (FTP).c. In the Host Address (IP Address or DNS Name) field, enter the IP address of the FTP server.d. The port number only needs to be specified if the FTP server is not using the default port.e. If the FTP server requires you to login, enter the name and password in the appropriate fields.f. Leave the Name of Shared Directory and Subdirectory Path (optional) fields blank.
7. Click the Apply button to create the new address.
Scanning to a FTP Server
7-16
Using the Address Book Editor to Create an Address
Note: To use the Address Book Editor, your computer must be connected to the printer with a USB cable.
1. Windows: On the Start menu, select Programs > Fuji Xerox > DocuPrint C1190 FS > Address Book Editor.
Macintosh: Open the Applications folder, and then select Fuji Xerox/DocuPrint C1190 FS/Address Book Editor.
2. In the left-pane, right-click the Server icon, and then select New.
The Server Address dialog box appears.
3. In the Name field of the Server Address dialog box, enter the name that you want this address to appear under in the Address Book.
4. Click the Server (FTP) option button.5. Fill in the remaining information for the FTP server:
a. In the Server Name/IP Address field, enter the IP address for the FTP Server.b. In the Path field, enter the path to the folder you want the images placed in.c. If the FTP server requires you to log in, enter the name and password that you log in with.
6. Click OK.7. On the File menu, select Save all.
The Address Book is saved with the new entry for the FTP server.
You are now ready to scan images to the FTP server.
Scanning to a FTP ServerIf you haven’t created an address for the printer to use, then see Setting Up Scanning to a Computer on page 7-8. To scan to a FTP server:
1. On the printer console, click the Scan button.2. Select Scan to, and then press the OK button.3. Select Server (FTP), and then press the OK button.4. Press the Up Arrow or Down Arrow button to select the address that points to your computer, and
then press the OK button.5. Press the Start button.
The printer scans your documents, and then places it on the FTP server
See also: Adjusting Scanning Options on page 7-19

Scanning Images into an Application
7-17
Scanning Images into an ApplicationYou can import images directly from the scanner into Windows or Macintosh applications on your computer.
Note: The printer must be connected to the computer with a USB cable.
This section includes:
■ Scanning an Image into a Windows Application (TWAIN) on page 7-17■ Using the WIA Image Manager in a Windows Application on page 7-18■ Scanning an Image into a Mac OS X Application on page 7-18
Scanning an Image into a Windows Application (TWAIN)To import images into an application on Windows 2000, Windows XP, Windows XP64 bit, Windows Server 2003, Windows Server 2008, Windows Vista, and Windows Vista 64 bit:
1. Open the file in which you want to place the image.2. Select the application’s menu item to acquire the image. For example, if you are using Word to place
an image in a document:a. Select Insert. b. Select Picture. c. Select From Scanner or Camera. d. Select the scanner, and then click the Custom Insert button.
3. Specify the paper source in the Paper source drop-down menu: Document Glass or Document Feeder.
4. Specify the other scanner driver settings as desired.
Note: For more information, click the Help button to view the online help.
5. Click the Scan button.
The printer scans the document and the image is placed in your application.

Scanning Images into an Application
7-18
Using the WIA Image Manager in a Windows ApplicationYou can scan and import images into an application using the WIA Image Manager on Windows XP, Windows Server 2003, Windows Vista, and Windows Server 2008.
Note: The printer must be connected to the computer with a USB cable.
To import scanned images into an application:
1. Open the file in which you want to place the image.2. Select the application’s menu item to acquire the image. For example, if you are using Microsoft Word
to place an image in a document:a. Select Insert. b. Select Picture. c. Select From Scanner or Camera. d. Select the scanner, and then click the Custom Insert button.
3. Select the paper source in the Paper source drop-down menu, either Flatbed or Document Feeder.4. Specify any other scanner driver settings.5. Click the Scan button.
The printer scans the document and the image is placed in your application.
Scanning an Image into a Mac OS X Application
Note: The printer must be connected to the computer with a USB cable.
To import images into an application:
1. Open the file you want to place the image in.2. Select the application’s menu item to acquire the image. For example, if you are using Word to place
an image in a document:a. Select Insert. b. Select Picture. c. Select From Scanner or Camera. d. Select the scanner, and then click the Acquire button.
3. Specify the paper source in the Scan from drop-down menu: Document Glass or Document Feeder.4. Specify the other scanner driver settings as desired.
Note: For more information, click the Help button to view the online help.
5. Click the Scan button.
The printer scans the document and the image is placed in your application.

Adjusting Scanning Options
7-19
Adjusting Scanning OptionsThis section includes:
■ Adjusting the Default Scan Settings on page 7-19■ Changing the Scan Settings for an Individual Job on page 7-21
Adjusting the Default Scan SettingsThis section includes:
■ Setting the Color Mode on page 7-19■ Setting the Scan Resolution on page 7-20■ Setting the Original Size on page 7-20■ Setting the Scanned Image File Type on page 7-20■ Automatically Suppressing Background Variations on page 7-21
For a complete list of all of the defaults settings, see Defaults Settings on page 9-4.
Setting the Color ModeYou can scan an image in color or in black and white. Selecting black and white significantly reduces the file size of the scanned images. An image scanned in color will have a larger file size than the same image scanned in black and white.
1. Press the System button.2. Select Defaults Settings, and then press the OK button.3. Select Scan Defaults, and then press the OK button.4. Select Color, and then press the OK button.5. Change the color setting to either B&W (black and white) or Color, and then press the OK button.
To change the color mode temporarily, press the Color Mode button on the printer console.
Color Mode Button

Adjusting Scanning Options
7-20
Setting the Scan ResolutionYou may want to change the scan resolution depending on the way you plan to use the scanned image. Scan resolution affects both the size and image quality of the scanned image file. The higher the scan resolution, the larger the file size.
To select the scan resolution:
1. Press the System button.2. Select Defaults Settings, and then press the OK button.3. Select Scan Defaults, and then press the OK button.4. Select Resolution, and then press the OK button.5. Select one of the following options, and then press the OK button:
■ 200 x 200 dpi: (factory default) Produces the lowest resolution and smallest file size.■ 300 x 300 dpi: Produces medium resolution and a medium file size.
■ 400 x 400 dpi: Produces high resolution and a large file size.■ 600 x 600 dpi: Produces the highest resolution and largest file size.
Setting the Original SizeTo specify the size of the original:
1. Press the System button.2. Select Defaults Settings, and then press the OK button.3. Select Scan Defaults, and then press the OK button.4. Select Document Size, and then press the OK button.5. Select a specific paper size to determine the area to be scanned, and then press the OK button. The
factory default setting is A4.
Setting the Scanned Image File TypeTo specify the file type of the scanned image:
1. Press the System button.2. Select Defaults Settings, and then press the OK button.3. Select Scan Defaults, and then press the OK button.4. Select File Format, and then press the OK button.5. Select the type, and then press the OK button.
Available types:
■ PDF (factory default)■ MultiPageTIFF■ TIFF■ JPEG■ XDW
Adjusting Scanning Options
7-21
Automatically Suppressing Background VariationsWhen scanning documents with a dark background such as newspapers, the printer automatically can detect the background and whiten it when outputting the image.
To turn on/off automatic suppression:
1. Press the System button.2. Select Defaults Settings, and then press the OK button.3. Select Scan Defaults, and then press the OK button.4. Select Auto Exposure, and then press the OK button.5. Select either On or Off, and then press the OK button.
The factory default setting is On.
Changing the Scan Settings for an Individual JobTo temporarily change a scan setting when emailing the scanned image:
1. Press the E-mail button.2. Press the Down Arrow or the Up Arrow button to scroll through the menu of settings.3. Change the selected setting, and then press the OK button.4. Press the Start button to begin the scan.
To temporarily change a scan setting when scanning to a computer:
1. Press the Scan button.2. Select the scan to destination, and then press the OK button.3. Press the Down Arrow or the Up Arrow button to scroll through the menu of settings.4. Change the selected setting, and then press the OK button.5. Press the Start button to begin the scan.

8-1
This chapter includes:
■ Fax Setup on page 8-2■ Basic Faxing on page 8-4■ Using the Address Book When Faxing on page 8-7■ Selecting Fax Options for Individual Jobs on page 8-13■ Changing the Default Fax Job Settings on page 8-14■ Fax Configuration on page 8-14■ Managing Fax Functions on page 8-15■ Solving Fax Problems on page 8-19
See also: Printer Management Software on page 3-1
Faxing 8
Fax Setup
8-2
Fax SetupThis section includes:
■ Setting up your printer for Fax on page 8-2■ Installing the Fax driver (Macintosh user only) on page 8-3
Setting up your printer for FaxBefore faxing, you need only to ensure that the telephone line is plugged in, and select a country and telephone number for the printer. To prepare the printer for faxing:
1. If necessary, plug the telephone line from the wall into the FAX connector on the rear panel of the printer.
You can also connect a telephone line out to a telephone if you wish.
2. On the printer console, press the System button, and then select Admin Menu, Fax Settings, Country, and then press the OK button.
3. Press the Up Arrow or Down Arrow button to select the country, and then press the OK button.
Note: If you set your country in Power On Wizard, you do not need step 2 to 4.
4. Select Yes when asked to restart the printer.5. On the printer console, press the System button, and then select Admin Menu, Fax Settings, Your
Fax Number, and then press the OK button.6. Use the alphanumeric keypad to enter the printer’s fax number, and then press the OK button.
Your printer is now ready to fax.
See also: Entering Text on the Printer Console on page 9-17Fax Settings on page 9-9

Fax Setup
8-3
Installing the Fax driver (Macintosh user only)To use the Fax feature, Macintosh users must install the Fax driver onto their computer from the Software Pack CD-ROM. Follow the procedure below to have your computer ready for Fax.
Installation Procedure (Mac OS 10.3.9 - 10.4.11 and 10.5)1. Start Macintosh.2. Insert the CD-ROM into the CD-ROM drive.3. Open MacOSX 10.3-10.5 folder.4. Double-click C1190 FS FAX Installer.
The installer starts and the Authenticate window opens.5. Enter the Administrator’s user name and password, then click OK.6. Read through the license agreement carefully and if you have no objections to it, click Continue.7. Click Agree.8. Confirm the Install Type. Click Install.9. When the dialog box showing installation has completed appears, click Quit.
This completes the installation.10. Proceed to the following procedure “Adding the Fax driver (Macintosh OSX 10.3.9 - 10.4.11)” or
“Adding the Fax driver (Macintosh OSX 10.5)”.
Adding the Fax driver (Macintosh OSX 10.3.9 - 10.4.11)1. Start Macintosh.2. Open Printer Setup Utility window.
The Printer List screen opens.
Note: For Mac OS X 10.3.9 and 10.4.11, open the Printer Setup Utility in the Utilities folder in the Applications folder.
3. Click Add.4. From the Protocol drop down list, select Line Printer Protocol-LPD.5. Enter the printer’s IP address in the Address entry box.6. When using Mac OSX 10.3.9, from the Printer Model drop down list, select FX.
When using Mac OSX 10.4.11, from the Print using drop down list, select FX.7. From the Printer List, select FX DocuPrint C1190 FS FAX driver.8. Press the Add button.9. Close the Printer List.
Adding the Fax driver (Macintosh OSX 10.5)1. From Apple Menu, select System Preference.2. Select Print & Fax.3. Press +.4. From the Protocol drop down list, select Line Printer Daemon-LPD.5. Enter the printer’s IP address in the Address entry box.6. From the Print using drop down list, select FX DocuPrint C1190 FS FAX driver.7. Press the Add button.8. Close the Print & Fax screen.
Basic Faxing
8-4
Basic FaxingThis section includes:
■ Sending a Fax from the Printer on page 8-4■ Sending a Fax from Your Computer (Windows) on page 8-5■ Sending a Fax from Your Computer (Macintosh) on page 8-6
Note: Before faxing you must set the country code and fax number for the printer. See Fax Setup on page 8-2.
Sending a Fax from the PrinterTo send a fax from the printer to a single recipient using factory defaults:
1. Select one of the following methods: ■ Document Glass: Place the first page of the document you are faxing face down on the document
glass with the top of the page toward the left side of the printer.■ Document Feeder: Remove any staples and paper clips from pages and insert them face up in the
document feeder with the top of the page entering the document feeder first. For information on paper that can be used with the automatic document feeder, see Automatic Document Feeder Guidelines on page 5-4.
2. On the printer console, press the Fax button.3. Select Fax to, and then press the OK button.4. Select Keypad, and then press the OK button.5. Using the alphanumeric keypad, enter the fax telephone number, and then press the Start button.6. If you use the document feeder, the printer scans the pages and transmits the fax. If you use the
document glass, the printer scans the first page and then prompts you to Another Page? Select one of the following options:
■ If you want to scan another fax page, select Yes, and then press the OK button. Remove the first scanned fax page, and then place the next page on the document glass. Select Continue, and then press the OK button.
■ If you have no other pages to fax, select No, and then press the OK button.
The printer transmits the fax.
Note: To print a confirmation page displaying the fax transmission status, turn on the transmission report option.
See also: Using the Address Book When Faxing on page 8-7Managing Fax Functions on page 8-15Printing Transmission Reports on page 8-15Inserting Pauses in Fax Numbers on page 8-18

Basic Faxing
8-5
Sending a Fax from Your Computer (Windows)You can send a fax to the printer from an application on your Windows computer. To use the Fax function you need to have the PCL driver installed. See Installing the Print Drivers on page 4-9.
To send a fax from a Windows 2000, Windows XP, Windows Server 2003, Windows Server 2008,or Windows Vista application:
1. Access the application’s Print dialog box, select your DocuPrint C1190 FS, and then click the Properties button to open the print driver. In some applications, the Properties button may instead be the Preferences button.
2. On the Paper/Output tab, select Fax from the Job Type drop-down list.3. On the Transmission image quality drop-down list, select a quality setting.4. On the Transmission Report drop-down list, select when you’d like the printer to produce a fax
report. The choices are:■ Output Regularly: A transmission report is generated regularly.■ Output for error in transmission only: A transmission report is generated only when an error
occurs.■ Do not output: A transmission report is not generated.
5. To have a header containing information about the fax sender included on the fax, click Fax Cover Page Settings, and configure the settings.
6. Click OK.7. In the Print window, click OK.
A new dialog opens displaying Set/Check Fax Transmission.
8. Add recipients to the Recipient List. For more information, click the Help button to view online help.9. To delay sending the fax, click Delayed Send, and then adjust the delay time.10. Click Start Sending to send the fax.
Note: •To stop a fax from sending, press the Stop button.•When setting FAX Lock for the printer console, you must enter a Password for Authorization of the Set/Check Transmission screen. The Set/Check Transmission screen is displayed when pressing the Print button on the print driver screen.
Basic Faxing
8-6
Sending a Fax from Your Computer (Macintosh)You can send a fax to the printer from an application on your Macintosh computer. To use the LAN Fax function you need to have the Macintosh Fax driver installed. For information about the installation procedure, see Installing the Fax driver (Macintosh user only) on page 8-3.
The following procedure explains how to send a fax from a Macintosh computer by using Macintosh OSX 10.4 TextEditor as an example:
1. Access the application’s Print dialog box, select your Fax driver.2. From the drop down list, select Fax Setting.
The Fax Settings screen is displayed.3. On the Transmission Image Quality drop-down list, select a quality setting.4. On the Transmission Report drop-down list, select when you want the printer to produce a fax report.
The choices are:■ Output Regularly: A transmission report is generated regularly.■ Output for error in transmission only: A transmission report is generated only when an error
occurs.■ Do not output: A transmission report is not generated.
5. To have a header containing information about the fax sender included on the fax, click Fax Cover Page Settings, and configure the settings.
6. Click OK.7. In the Print window, click OK.
A new dialog opens displaying Set / Check Fax Transmission.8. Add recipients to the Recipient List. For more information, click the Help button to view the online
help.9. To delay sending the fax, click Delayed Send, and then adjust the delay time.10. Click Start Sending to send the fax.
Note: •To stop a fax from sending, press the Stop Sending button.•When the Fax Lock option is enabled, enter the password to send a fax from your computer to the
printer.
Using the Address Book When Faxing
8-7
Using the Address Book When FaxingYou can create and save fax information for individuals or groups to whom you often send faxes. This saves time so that you can quickly select saved names and numbers without having to re-enter them each time you want to send a fax.
This section includes:
■ Faxing to an Individual on page 8-7■ Faxing to a Group on page 8-10
Faxing to an IndividualSet up and save individual names and fax numbers to easily access them when you want to send a fax.
This section includes:
■ Adding an Address Book Entry on page 8-7■ Faxing to an Individual in the Address Book on page 8-9
Adding an Address Book EntryThere are two ways to create address book entries:
■ Create the address with CentreWare IS (requires Ethernet connection).■ Create the address with Address Book Editor (requires USB connection).■ Create the address with printer console.
Using CentreWare IS to Add an Individual
To configure the address using CentreWare IS (CWIS):
1. Launch your web browser.2. Enter your printer’s IP address in the browser’s Address field. 3. Click the Address Book tab.
Note: The default User ID and password are “11111” and “x-admin” respectively.
4. In the Address Book, under FAX, click FAX Address Book.5. In the Directory Listing, click the Add button of any entry that is not in use.
Note: The first eight addresses registered in the address book are registered in one touch buttons.
6. Type the information for the individual.7. Click the Apply button to create the new address.
The new individual is saved to the printer’s address book.

Using the Address Book When Faxing
8-8
Using the Address Book Editor to Add an Individual
Note: To use the Address Book Editor, your computer must be connected to the printer with a USB cable.
1. Windows: On the Start menu, select Programs > Fuji Xerox > DocuPrint C1190 FS > Address Book Editor, and then click OK.
Macintosh: Open the Applications folder, and then select Fuji Xerox/DocuPrint C1190 FS/Address Book Editor, and then click OK.
2. In the left pane, right-click the Fax icon, and then select New and New Entry.
The Speed Dial dialog box appears.
3. The Address Book Editor automatically assigns the speed dial number to the first empty entry. To manually specify the speed dial number, click Specify an Address Number, and then enter a value from 1 to 200 for the speed dial number.
Note: The first eight addresses registered in the address book are registered in one touch buttons.
4. Type in a value for Name and Phone Number.5. To add this entry to an existing group:
a. Click Group Membership.b. Select the group(s) to add this entry to, and then click OK.
6. Confirm the group members, and click OK.7. On the File menu, select Save all.
The address book is saved with the new fax entry.
Using the Printer Console to Add an Individual
1. On the printer console, press System button.2. Select Admin Menu, and then press the OK button.3. Select Phone Book, and then press the OK button.4. Select Speed Dial, and then press the OK button.5. Use the Up Arrow and Down Arrow to scroll through the Speed Dial list, and then click the OK
button of any entry that is not in use.6. Select Name, and then press the OK button.7. Use Alphanumeric keypad to enter Name, and then press the OK button.8. Select Fax Number, and then press the OK button.9. Use Alphanumeric keypad to enter Fax Number, and then press the OK button.10. Select Apply Settings button and then Yes to create the new address. The new individual is saved to
the printer’s address book.

Using the Address Book When Faxing
8-9
Faxing to an Individual in the Address BookTo fax to an individual in the address book:
1. On the printer console, press the Fax button.2. Select Fax to, and then press the Forward Arrow button.3. Select Phone Book, and then press the Forward Arrow button.
Note: In this step, you can select Keypad, Speed Dial, Group, or Search Phone Book, other than Phone Book. Select Keypad to enter the fax number directly. Select Search Phone Book to search for a name registered in the Phone Book.■ Phone Book: Displays a list screen. To display the fax number of a name, select the name and then
press the # key.■ Speed Dial: Recalls the names and numbers registered. Enter a corresponding abbreviated number
to recall the name and FAX number to send to.■ Group: Displays a list screen. To display the members registered in a group, select the group and
then press the # key.4. Use the Up Arrow and Down Arrow to scroll through the phone book list, and then press the
Forward Arrow button to select the recipient.
Note: •You can select more than one recipient.•You can add to or delete from the recipients selected in step 4.
To delete, select Fax to and then Select Phone Book. Select the name to delete and press the C (clear) button. Press OK to confirm.To add, press the Address Book button and select the name you want to add, and then press the OK button.
5. Press the OK button after selecting the recipients.6. Press the Start button.
The printer starts the fax job.
Note: To stop a fax from sending, press the Stop button.
Using the Address Book When Faxing
8-10
Faxing to a GroupSet up and save group names to easily access them when you want to send a fax to a group. Groups can include both individual and group entries once they have been set up.
Note: Individual entries must be set up before groups can be defined.
This section includes:
■ Creating a Fax Group on page 8-10■ Editing Address Book Fax Groups on page 8-11■ Faxing to an Address Book Group on page 8-12
Creating a Fax GroupThere are two ways to create group address book entries:
■ Using CentreWare IS to create the group (requires Ethernet connection)■ Using the Address Book Editor (requires USB connection)■ Using printer console to create the group.
Using CentreWare IS to Create a Group
To create a fax group using CentreWare IS:
1. Launch your web browser.2. Enter your printer’s IP address in the browser’s Address field. 3. Select the Address Book tab.
Note: The default User ID and password are “11111” and “x-admin” respectively.
4. In the Address Book, under Fax, click FAX Groups.5. In the Directory Listing, click the Add button of any group that is not in use.6. Type a group name, and then click the Apply button.7. Click the Return button when you receive a “Request Acknowledged No Errors were reported.”
message.8. Click the Edit button for the group you created.9. Select the check box of individuals that you want to be in the group.
Note: Use the Additional Entries links, found at the bottom of the screen, to see additional Fax Groups entries. You can also add existing groups to this group.
10. Click the Return button when you receive a “Request Acknowledged No Errors were reported.” message.
The address book is saved on the printer with the new group.
Using Address Book Editor to Create a Group
To create a fax group with the Address Book Editor:
1. Windows: On the Start menu, select Programs > Fuji Xerox > DocuPrint C1190 FS > Address Book Editor, and then click OK.
Macintosh: Open the Applications folder, and then select Fuji Xerox/DocuPrint C1190 FS/Address Book Editor, and then click OK.
2. In the left-hand panel, right-click the Fax icon, and then select New and New Group.
Using the Address Book When Faxing
8-11
The Group Dial dialog box appears.
3. The Address Book Editor automatically assigns the Group ID to the first empty entry. To manually specify the Group ID, click Specify an Address Number, and then type a value from 1 to 6.
4. Type a group name.5. Click Group Membership button.6. Select group members from the list on the left side of the screen, and then click the Add button to add
them to the group.
Note: To select multiple group members, press and hold the Ctrl keyboard key while making selections.
7. Click OK when you have finished adding group members.8. Click OK a second time to create the group.9. Confirm the group members, and then click OK.10. On the File menu, select Save all.
The address book is saved with the new fax group.
Using the Printer Console to Create the Group
1. On the printer console, press System button.2. Select Admin Menu, and then press the OK button.3. Select Phone Book, and then press the OK button.4. Select Group Dial, and then press the OK button.5. Use the Up Arrow and Down Arrow to scroll through the Group Dial list, and then click the OK
button of any entry that is not in use.6. Select Name, and then press the OK button.7. Use Alphanumeric keypad to enter Fax Number, and then press the OK button.8. Use the Forward Arrow button to select the name to add to the new fax group. To move between the
entries, use the Up Arrow and Down Arrow buttons.
Note: To deselect, select the name to delete and then press the Forward Arrow button.
9. Select Apply Settings button and then Yes to create the new address. The address book is saved with the new fax group.
Editing Address Book Fax GroupsThere are two ways to edit address book entries:
■ Using CentreWare IS to create the group■ Using the Address Book Editor
Editing Group Entries with CentreWare IS
To edit an existing fax group with CentreWare IS:
1. Launch your web browser.2. Enter your printer’s IP address in the browser’s Address field. 3. Select the Address Book tab.
Note: The default User ID and password are “11111” and “x-admin“ respectively.
4. In the Address Book, under Fax, click Fax Groups.5. Click the Edit button of the group you want to edit.

Using the Address Book When Faxing
8-12
6. Select the check box of individuals that you want to be in the group. Deselect the check box of individuals you want removed from the group.
Note: Use the Additional Entries links at the bottom of the screen to see additional Fax Address Book entries.
7. Click Apply when you have finished editing the group.
The address book is saved with the edited group.
Editing Group Entries with the Address Book Editor
To edit an existing fax group with the Address Book Editor:
1. Windows: On the Start menu, select Programs > Fuji Xerox > DocuPrint C1190 FS > Address Book Editor, and then click OK.
Macintosh: Open the Applications folder, and then select Fuji Xerox/DocuPrint C1190 FS/Address Book Editor, and then click OK.
2. In the left pane, click the Fax icon.3. On the upper right pane, right-click the group you want to edit, and then select Edit.4. Click the Group Membership button.5. Use the Add and Delete buttons to edit the group.6. Press the OK button.7. Press the OK button again.8. Confirm the group members, and then click OK.9. On the File menu, select Save all.
The address book is saved with the edited fax group.
Faxing to an Address Book GroupTo fax to a group:
1. On the printer console, press the Fax button.2. Select Fax to, and then press the Forward Arrow button.3. Select Group Dial, and then press the Forward Arrow button.4. Press the Up Arrow or Down Arrow to scroll through the address book list, and then press the
Forward Arrow button to select the group. To deselect a group, select the group and then press the Forward Arrow button again.
Note: You can select more than one group.
5. Press the OK button after selecting the group(s).6. Press the Start button.
The printer starts the fax job.
Selecting Fax Options for Individual Jobs
8-13
Selecting Fax Options for Individual JobsThis section includes:
■ Setting the Fax Resolution on page 8-13■ Making the Image Lighter or Darker on page 8-13■ Delay Sending a Fax on page 8-13■ Changing the Default Fax Job Settings on page 8-14
Setting the Fax ResolutionTo set the fax resolution:
1. On the printer console, press the Fax button.2. Select Resolution, and then press the OK button.3. Select an option from the list displayed, and then press the OK button.
■ Standard: Select this for documents with normal sized characters.■ Fine: Select this for documents containing small characters or thin lines or documents printed
using a dot-matrix printer.■ Super Fine: Select this for documents containing extremely fine detail.The super fine mode is
enabled only if the remote machine also supports the Super Fine resolution.■ Photo: Select this for documents containing photographic images.
Note: The factory default is Standard.
Making the Image Lighter or DarkerTo lighten or darken an image before it is faxed:
1. On the printer console, press the Fax button.2. Select Lighten/Darken, and then press the OK button.3. Press the Forward Arrow or Back Arrow to lighten or darken the fax, and then press the OK button. Note: The factory default is Normal.
Delay Sending a FaxTo send a fax at a specified time (within 24 hours):
1. On the printer console, press the Fax button.2. Select Delayed Start, and then press the OK button.3. Select On, and then press the OK button.4. Select the time to send the fax:
■ Select a number from 0 to 23 for the hour, and then press the Forward Arrow or Back Arrow button to select minutes.
■ Select a number from 0 to 59 for minutes, and then press the OK button.5. Press the Start button.
The fax is scanned and saved to be sent at the time you specified.
Note: If the printer is turned Off with a Delayed Start job stored, the job will be processed immediately after the printer is turned back On.

Changing the Default Fax Job Settings
8-14
Changing the Default Fax Job SettingsTo change the default fax settings:
1. Press the System button.2. Select Defaults Settings, and then press the OK button.3. Select Fax Defaults, and then press the OK button.4. Press the Up Arrow or Down Arrow button to select the setting you want to change.5. Change the settings, and when finished press the Exit button.
Fax ConfigurationTo access settings for configuring the printer for faxing:
1. On the printer console, press the System button.2. Select Admin Menu, and press the OK button.3. Select Fax Settings, and press the OK button.4. Edit the fax settings as desired.
For information on the Fax Settings menu items, see Fax Settings on page 9-9.

Managing Fax Functions
8-15
Managing Fax FunctionsThis section includes:
■ Printing Transmission Reports on page 8-15■ Enabling or Disabling Secure Faxes on page 8-16■ Limiting Access to Fax and Scan Operations on page 8-17■ Limiting Who Can Send Faxes to the Printer on page 8-17■ Printing Fax Reports on page 8-18■ Inserting Pauses in Fax Numbers on page 8-18
Printing Transmission ReportsTo select a default option for printing fax transmission reports:
1. On the printer console, press the System button.2. Select Admin Menu, and then press the OK button.3. Select System Settings, and then press the OK button.4. Select Fax Transmit, and then press the OK button.5. Select one of the following options, and then press the OK button:
■ Print Always: A transmission report is always printed.■ Print at Error: A transmission report is only printed when an error occurs with the fax
transmission.■ Not Print: A transmission report is never printed.
Note: The factory default is Print at Error.
Printing a Transmission Report for a Group FaxTo select a default option for printing group fax transmission reports:
1. On the printer console, press the System button.2. Select Admin Menu, and then press the OK button.3. Select System Settings, and then press the OK button.4. Select Fax Broadcast, and then press the OK button.5. Select one of the following options, and then press the OK button:
■ Print Always: A transmission report is always printed.■ Print at Error: A transmission report is only printed when an error occurs with the fax
transmission.■ Not Print: A transmission report is never printed.
Note: The factory default is Print Always.
Managing Fax Functions
8-16
Enabling or Disabling Secure FaxesWhen the Secure Receive Lock option is enabled, a password is required before faxes can be printed or removed.
To enable or disable Secure Receive Lock:
1. On the printer console, press the System button.2. Select Admin Menu, and then press the OK button.3. Select Secure Settings, and then press the OK button.4. Select Panel Lock, and then press the OK button twice.5. Select Enable, and then press the OK button.6. Press the Exit button one time.7. Select Secure Receive, and then press the OK button twice.8. Select one of the following options, and then press the OK button:
■ Disable: This option turns off the Secure Receive Lock option if it is on. ■ Enable: This option turns on the Secure Receive Lock option if it is off.
9. If you want to change your password, select Change Password, and then press the OK button. 10. Enter a new four digit password, and then press the OK button.
Note: The default password is 0000.
Printing Secure FaxesIf the Secure Receive Lock option is enabled, you must enter your numeric password to print a received fax.
To print or clear all secure faxes:
1. On the printer console, press the Job Status button.2. Select Print Menu, and then press the OK button.3. Select Secure Receive, and then press the OK button.4. When prompted, enter your four-digit password, and then press the OK button.
The received faxes are printed.
Managing Fax Functions
8-17
Limiting Access to Fax and Scan OperationsEnabling the Scan Lock and Fax Lock option limits access to fax and scan operations by requiring a password to be entered before faxing or scanning.
Taking Fax Lock as an example, the following procedure explains how to enable or disable the option. Use the same procedure to enable or disable Scan Lock.
1. On the printer console, press the System button.2. Select Admin, and then press the OK button.3. Select Secure Settings, and then press the OK button.4. Select Panel Lock, and then press the OK button twice.5. Select Enable, and then press the OK button.6. Press Exit.7. As necessary, select Change Password, and change the Password using the Alphanumeric Keypad.
Then, press the OK button.
Note: The default password is 0000.
8. Select FAX, and then press the OK button.9. Select Service Lock, and then press the OK button.10. Select one of the following option, and then press the OK button.
■ Unlock■ Locked■ Password Locked
Limiting Who Can Send Faxes to the PrinterWhen the Junk Fax Filter setting is enabled, the printer only prints faxes received from phone numbers in the address book.
To turn off/on the Junk Fax Filter option:
1. On the printer console, press the System button.2. Select Admin Menu, and press the OK button.3. Select Fax Settings, and press the OK button.4. Select Junk Fax Filter, and press the OK button.5. Select one of the following options, and then press the OK button:
■ Off: When off, anybody can send you a fax.■ On: When on, faxes are only received from phone numbers in the printer’s address book.
Note: When using the Junk Fax Filter option, you must register Your Fax Number on the printer (page 9-10). When receiving a fax document on your printer from another fax machine, the sender must register their own phone number on their fax machine correctly as well. Otherwise, your printer may not recognize the sender's phone number even if it is in the address book of your printer.

Managing Fax Functions
8-18
Printing Fax ReportsSeveral fax reports are available to provide information about faxing activities, directories, and pending jobs. The Speed Dial report and the Address Book report display information about fax numbers, individual, or group recipients. The Fax Activity report provides information about completed fax jobs. The Fax Pending report provides a list of faxes waiting to be sent.
To print a fax report:
1. On the printer console, press the System button.2. Select Admin Menu, and press the OK button.3. Select Admin Reports, and then press the OK button.4. Select one of the following reports, and then press the OK button to print the report:
■ Speed Dial■ Address Book■ Server Address■ Fax Activity■ Fax Pending■ Printer Meter
Inserting Pauses in Fax NumbersSome fax numbers require one or more pauses during the dialing sequence.
To insert pauses in a fax number:
1. On the printer console, press the Fax button.2. Select Fax To, and then press the OK button.3. Use the alphanumeric keypad to enter the fax number.
When entering a fax number using the alphanumeric keypad, press the Redial/Pause button to insert a pause (represented by a hyphen, “-”) in the fax number where appropriate.
Note: Pressing the Redial/Pause button multiple times adds additional pauses.
4. Press the Start button to send the fax.

Solving Fax Problems
8-19
Solving Fax ProblemsIf the fax cannot be sent correctly, refer to the following table, and then perform the indicated operation. If the fax still cannot be sent correctly, even after performing the described operations, contact your service representative.
This section includes:
■ Problems Sending Faxes on page 8-19■ Problems Receiving Faxes on page 8-20
Problems Sending Faxes
Symptom Cause Solution
The document is not scanned. The document is too thick, too thin, or too small.
Use the original glass to send the fax.
The document is scanned at an angle.
The document guides are not adjusted to the width of the document.
Slide the document guides to fit the width of the document.
The fax received by the recipient is blurry.
The document is incorrectly positioned.
Position the document correctly.
The original glass is dirty. Clean the original glass.
The text in the document is written too faint.
Adjust the resolution.
There may be a problem with the telephone connection.
Check the telephone line, and then try sending the fax again.
There may be a problem with the recipient’s fax machine.
Make a copy to check that this machine is operating correctly, and then, if the copy was printed correctly, have the recipient check the condition of their fax machine.
The fax received by the recipient is blank.
The document was sent with the front side facing down (when the ADF is used).
Load the document to be faxed facing up.
Transmission is not possible. The transmission procedure may have been performed incorrectly.
Check the transmission procedure, and then try sending the fax again.
The fax number may be wrong. Check the fax number.
The one-touch dial key or speed dial may be incorrectly programmed.
Check that the keys were correctly programmed.
The telephone line may be incorrectly connected.
Check the telephone line connection. If it is disconnected, connect it.
There may be a problem with the recipient’s fax machine.
Contact the recipient.
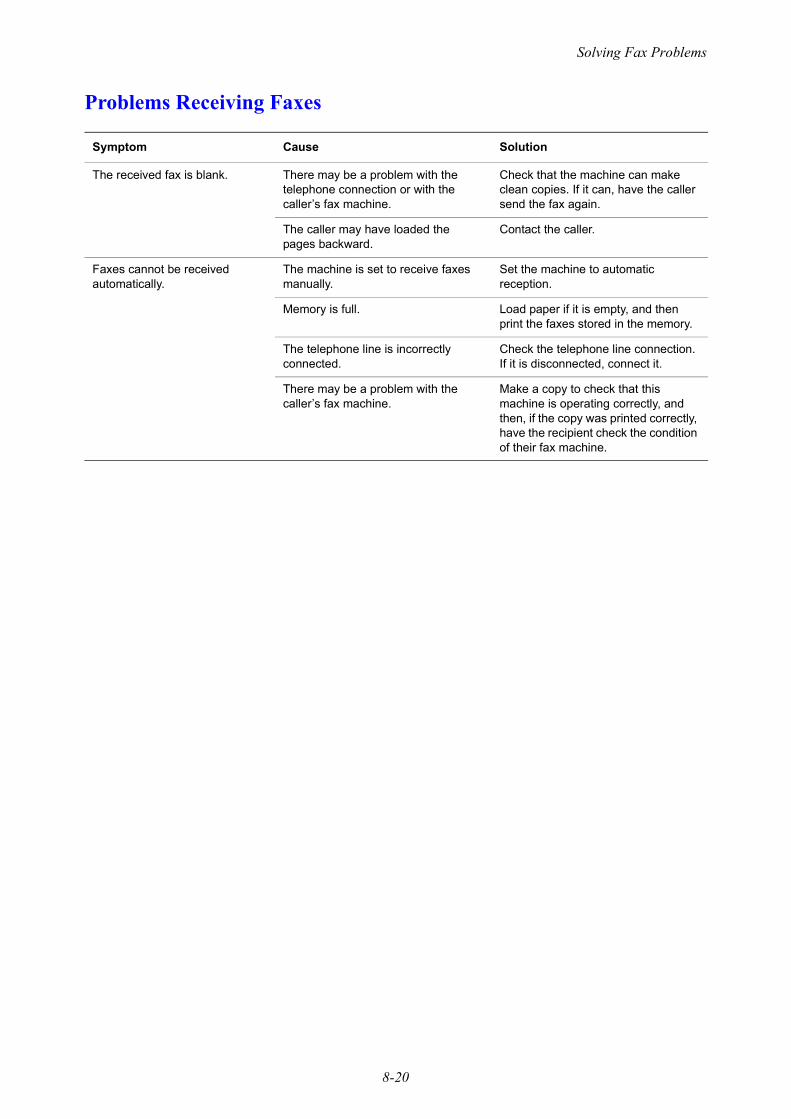
Solving Fax Problems
8-20
Problems Receiving Faxes
Symptom Cause Solution
The received fax is blank. There may be a problem with the telephone connection or with the caller’s fax machine.
Check that the machine can make clean copies. If it can, have the caller send the fax again.
The caller may have loaded the pages backward.
Contact the caller.
Faxes cannot be received automatically.
The machine is set to receive faxes manually.
Set the machine to automatic reception.
Memory is full. Load paper if it is empty, and then print the faxes stored in the memory.
The telephone line is incorrectly connected.
Check the telephone line connection. If it is disconnected, connect it.
There may be a problem with the caller’s fax machine.
Make a copy to check that this machine is operating correctly, and then, if the copy was printed correctly, have the recipient check the condition of their fax machine.

9-1
This chapter includes:
■ Printer Console Menus on page 9-2■ Description of Menu Items on page 9-4■ Entering Text on the Printer Console on page 9-17
Using the Printer Console Menus and Keypad
9

Printer Console Menus
9-2
Printer Console MenusThis section includes:
■ Power On Wizard on page 9-2■ Menu Configuration on page 9-2■ Changing Menu Settings on page 9-3
Power On WizardWhen first turning on the power of the printer, the initial settings menu is displayed on the panel. You can set the following items with the initial settings.
■ Panel Language: Use the Panel Language menu to set the language displayed on the printer console.■ Date■ Time■ Networks Setting: Set the following items to connect the printer to the network when you select
Panel.■ Method of setting IP address■ IP address of printer■ Network Mask■ Gateway Address
■ Set FAX (Basic)?: Set the following items:■ the name of the country where the printer is used■ the language to use■ Fax number
■ Set FAX (Advanced)?: Set the following items:■ Language■ Line Type■ Dialing Type■ Answer mode■ Company Name■ Fax Transmit Report
■ Default Paper Size: Specifies the default paper size.
Menu ConfigurationThe menus that can be accessed by pressing the System button on the printer console are as follows:
■ Defaults Settings: Use this Defaults Settings menu to define the default Copy, Fax, and Scan settings.■ Tray Settings: Use the Tray Settings menu to define the print media loaded in each tray.■ Report/List: Use the Report/List menu to print various types of reports and lists.■ Meter Readings: Use this menu to display the printed paper counts on the printer console.■ Admin Menu
■ Phone Book: Use this menu to create/delete address book entries.■ Print Language: Use this menu to set the print language to PCL print driver.■ Wired Network: Use this menu to configure the network settings for the printer.■ Fax Settings: Use this menu to configure default fax settings.

Printer Console Menus
9-3
■ System Settings: Use this menu to configure the printer operation settings, such as for alarm tones and Power Saver Mode.
■ Maintenance: Use this menu to perform maintenance tasks.■ Secure Settings: Use this menu to set printer security settings such as locking the printer console.■ Admin Reports: Use this menu to print various types of reports and lists regarding printer usage.■ Scan To Email: Use this menu to disable/enable Scan to Email functionality.
■ Panel Language: Use the Panel Language menu to set the language displayed on the printer console.
See also: Description of Menu Items on page 9-4
Changing Menu Settings
Changing the Power Saver TimeUse the following procedure to set a value on the printer console. In this example, we will set [Low Power Timer] (an interval at which the printer switches to the Low Power mode) to [60 Minutes].
1. Press the System button to display the menu screen.2. Press the Down Arrow button until Admin Menu is displayed.
Note: If you went past the desired item, return to the item by pressing the Up Arrow button.
3. Press the Forward Arrow or OK button to accept the selection. Move on to the lower hierarchy.
Note: •If you pressed the Forward Arrow button on the wrong item, return to the previous screen by pressing the Back Arrow button.•To start over from the beginning, press the System button.
4. Press the Down Arrow button until System Settings is displayed, and then press the OK button.5. Select Power Saver Timer, and then press the OK button. 6. Select Low Power Timer, and then press the OK button.
The current set value appears.7. Press the Up Arrow or Down Arrow button to display [60 Minutes].
Note: Holding down the Up Arrow or Down Arrow button scrolls through the options in a circular fashion.
8. Press the OK button to accept the value. The setting is now complete.

Description of Menu Items
9-4
Description of Menu ItemsThis section includes:
■ Defaults Settings on page 9-4■ Tray Settings on page 9-6■ Report / List on page 9-6■ Meter Readings on page 9-7■ Admin Menu on page 9-7■ Panel Language on page 9-16
Defaults SettingsThere are three submenus under the Defaults Settings menu: Copy Defaults, Scan Defaults, and Fax Defaults. Use these menus to set default behaviors.
The following gives a brief description of each menu item. For more information, see Copying on page 6-1, Scanning on page 7-1, or Faxing on page 8-1.
Copy Defaults Menu■ Color: Specifies B&W (black and white) or Color copies.■ Paper Supply: Specifies the paper tray that copies are printed from.■ M.F.Paper Size: Specifies the paper size setting of the Manual Feeder.■ M.F.Paper Type: Specifies the paper type setting of the Manual Feeder.■ Collated: Turns on and off collation.■ Reduce/Enlarge: Reduces or enlarges the copies.■ Document Size: Specifies the size of the original.■ Document Type: Specifies the type of the original.■ Lighten/Darken: Lightens or darkens copies.■ Sharpness: Specifies the sharpness of the copies.■ Color Saturation: Deepens or lightens the overall color levels of your copies.■ Auto Exposure: Turns Auto Exposure on and off when copying. Auto Exposure suppresses the
document background of off-white colored paper. It also helps suppress show-through when copying double-sided thin paper.
■ Auto Expo. Level: Adjusts the Auto Exposure level.■ Color Balance: Adjusts the color levels of your copies.■ N-Up: Use this menu to copy two original page images onto one side of a sheet of paper. The ID Copy
setting is for use when copying ID cards. It is a 2 to 1 copy with 100% zoom for both sides.■ Margin Top/Bottom: Specifies the value of the top and bottom margins.■ Margin Left/Right: Specifies the value of the left and right margins■ Margin Middle: Specifies the value of the middle margin.

Description of Menu Items
9-5
Scan Defaults Menu■ Scan to Network: Selects the scan destination.■ File Format: Selects the file type of the scanned image.■ Color: Selects the color mode, either color or black and white.■ Color Button Set: Changes the setting of the Color button of the panel.■ Resolution: Selects the scan resolution.■ Document Size: Specifies the size of the original document.■ Lighten/Darken: Lightens or darkens the scanned image.■ Sharpness: Specifies the sharpness of the scanned image.■ Contrast: Specifies the contrast of the scanned image.■ Auto Exposure: Turns Auto Exposure on and off when scanning. Auto Exposure suppresses the
document background of off-white colored paper. It also helps suppress show-through when copying double-sided thin paper.
■ Auto Expo. Level: Adjusts the level of the auto exposure functionality.■ Margin Top/Bottom: Specifies the value of the top and bottom margins.■ Margin Left/Right: Specifies the value of the left and right margins■ Margin Middle: Specifies the value of the middle margin.■ TIFF File Format: Sets the TIFF file format: TIFF V6 or TTN2.■ Image Compression: Specifies the amount of image compression: Lower, Normal, or Higher.■ Max Email Size: Sets limits on the size of attachments that can be emailed. The range is selectable
from 50 to 16384 kb.
Fax Defaults Menu■ Resolution: Specifies the resolution of the fax.■ Lighten/Darken: Lightens or darkens the scanned image.■ Delayed Start: Specifies the time delay before sending a fax job. Up to 23 hours and 59 minutes can
be specified for the delay.
Description of Menu Items
9-6
Tray SettingsYou can set paper size and paper type for Tray 1 under these menus.
■ Paper Size■ Paper Type■ Display Screen: Specifies whether or not to display the message that prompts you to set the paper size
and type every time you load paper in Tray 1.When you select On, the message that prompts you to set the paper size and type is not displayed. The default is Off.
Report / ListPrints various types of reports and lists. For the procedure for printing reports and lists, refer to Printing Reports and Lists on page 9-6.
■ System Settings: Prints status of the printer, such as hardware configuration and network information. Print this report to check whether optional accessories have been correctly installed.
■ Panel Settings: Prints status of the panel setting.■ PCL Fonts List: Prints information on PCL fonts and samples of these fonts.■ PCL Macro List: Prints a list of PCL macros.■ Job History: Prints information on printing result, such as whether data from the computer has been
printed correctly. The status of a maximum of 22 jobs can be printed on the Job History Report. Use the printer console to set whether to print the Job History Report automatically for every 22 jobs completed. For details, refer to System Settings on page 9-12.
■ Error History: Prints information of up to the latest 42 errors that occurred in this printer.■ Protocol Monitor: Provides information about the previous fax job as an aid in determining fax
protocol problems.■ Stored Documents: Prints the list of Secure Print jobs or Sample Print jobs stored in the printer.■ Demo Page: Prints a test page.
Printing Reports and ListsReports and lists are printed from the printer console.
1. Press the System button to display the System screen.2. Press the Up Arrow or Down Arrow button until Report/List appears, and then press the Forward
Arrow or OK button.3. Press the Up Arrow or Down Arrow button until the desired report/list is appears, and then press the
OK button. The selected information page is printed.

Description of Menu Items
9-7
Meter ReadingsDisplays the number of processed print jobs on the printer console. The meter is divided according to the color modes.
■ Meter 1: Displays the total number of color prints.■ Meter 2: Displays the total number of monochrome prints.■ Meter 3: Displays the total number of large size color prints.■ Meter 4: Displays the total number of color and monochrome prints (Meter 1 + Meter 2).
See also: Checking Page Counts on page 11-24
Admin MenuThis menu contains eight submenus:
■ Phone Book■ Print Language■ Wired Network■ Fax Settings■ System Settings■ Maintenance ■ Secure Settings■ Admin Reports■ Scan to E-Mail
Phone BookUse this menu to create and delete speed dial and group dial numbers.
■ Speed Dial: Use the Speed Dial menu to edit speed dial address book entries.■ Group Dial: Use the Group Dial menu to create speed dial groups.
Important: If you change the registered speed dial fax number while a fax job is stored in the printer, the stored fax is sent to the set fax number that you just changed.
Note: After creating or deleting speed-dial or group-dial numbers, select Apply Settings and then press the OK button to save the settings.
Description of Menu Items
9-8
Print LanguageUse this menu to specify PCL settings.
PCL Settings
■ Output Size: Specifies the default paper size.■ Orientation: The paper printing direction can be selected from Portrait and Landscape. The default is
Portrait.■ Font: Specifies the font used. The default is Courier.■ Symbol Set: Specifies the font for symbols. The default is ROMAN-8.■ Font Size: Specifies the default font size. Available only for typographic fonts.■ Font Pitch: Specifies the character spacing. The default is 10.00. You can specify a value between
6.00 and 24.00 in increments of 0.01.■ Form Line: Specifies the form line (the number of lines per form). The default is 64. You can specify
a value between 5 and 128 in increments of 1.■ Quantity: Specifies the copies to be printed. You can specify a value between 1 to 999. The default is
1.■ Image Enhance: Selects whether to perform image enhancement.
Image enhancement is a feature that makes the boundary line between black and white smoother in order to decrease jags and enhance the visual appearance. The default is On.
■ Hex Dump: Specifies whether to print the data sent from a computer in the ASCII code corresponding to the hexadecimal notation format in order to check the data contents. The default is Disable.
■ Draft Mode: Specifies whether to print in draft mode. The default is Disable.■ Line Termination: Specifies line termination.
■ Off: Line termination commands are not added.■ Add-LF: The Line Feed command is added.■ Add-CR: The Carriage Return command is added.■ CR-XX: The Line Feed and Carriage Return commands are both added.
■ Output Color: Specifies the default color mode.

Description of Menu Items
9-9
Wired NetworkSpecifies printer settings affecting jobs sent to the printer through a network port.
The settings in the Network Settings menu cannot be set when entering this menu during printing.
You need to restart the printer to activate the new settings. After making the settings, turn off the printer, and then turn it back on again.
■ Ethernet: Specifies the communication speed and the modes of Ethernet.■ Auto (default): Automatically detects 10Base Half, 10Base Full, 100Base Half, and 100Base Full.■ 10 BASE-T Half: Uses 10base-T half-duplex.■ 10 BASE-T Full: Uses 10base-T full-duplex.■ 100 BASE-TX Half: Uses 100base-TX half-duplex.■ 100 BASE-TX Full: Uses 100base-TX full-duplex.
■ TCP/IP: Specifies the TCP/IP settings for the network.■ Get IP Address: Specifies whether to automatically or manually retrieve the IP address.
■ DHCP/AutoIP (default): Automatically sets the IP address.■ BOOTP: Uses BOOTP to set the IP address automatically.■ RARP: Uses RARP to set the IP address automatically.■ DHCP: Uses DHCP to set the IP address automatically.■ Panel: You can set the IP address manually by entering it on the printer console.
■ IP Address, Subnet Mask, and Gateway Address: These items are used to check the addresses that have been obtained automatically or to specify addresses manually. Enter the address in the format of xxx.xxx.xxx.xxx. You can specify values in the range of 0 to 255 for xxx. To set addresses manually, set Get IP Address to Panel. IP addresses are managed in the entire network. An incorrect IP address may affect the whole network. For the addresses you need to set manually, contact your network administrator.
■ Protocol
Set Enable when using the protocol. When Disable is selected, the protocol cannot be activated.
■ LPD (default: Enable)■ Port 9100 (default: Enable)■ FTP (default: Enable)■ SNMP (default: Enable)■ StatusMessenger (default: Enable)■ InternetServices (default: Enable)■ Bonjour [mDNS] (default: Enable)
■ IP Filter: Specifies blocking the reception of data from certain IP addresses. You can block up to five IP addresses. The change becomes effective after the printer is turned off and then on again.
Note: This feature is only available when using LPD or Port9100.
■ Initialize NVM: Initializes network data stored in NVM. After executing this function and rebooting the printer, all network settings are reset to their default values.
Fax SettingsThe Fax Settings menu contains the following items:
■ Interval Timer: Specifies the interval time between resent attempts.

Description of Menu Items
9-10
■ Number of Redial: Specifies the number of redial attempts. ■ Int. of Redial: Specifies the time between redial attempts.■ Ans Select: Specifies the receiving mode:
■ TEL Mode: Automatic fax reception is turned off. You can receive a fax by picking up the handset of the external phone and then pressing the remote receive code, or by setting OnHook to On (you can hear voice or fax tones from the remote machine) and then pressing Start.
Note: Before turning the printer off and on, if the TEL Mode is selected among the FAX Mode, TEL/FAX Mode, the printer does not retain the TEL Mode after turning back on. It will go back to whatever the mode previously selected before switching to the TEL Mode (either Fax Mode or TEL/FAX Mode).
■ FAX Mode: A fax is automatically received.■ TEL/FAX Mode: When the printer receives an incoming fax, the external telephone rings for the
time specified by Auto Ans. TEL/FAX, and then the printer automatically receives the fax. If incoming data is not a fax, the printer beeps the internal speaker.
■ Ans/FAX Mode: The printer can share one telephone line with an answering machine. In this mode, the printer will monitor the fax signal and pick up the line if there are fax tones. If the phone communication in your country is serial, this mode is not available.
■ DRPD Mode: Before using the Distinctive Ring Pattern Detection (DRPD) option, distinctive ring service must be installed on your telephone line by the telephone company. After the telephone company has provided a separate number for faxing with a distinctive ring pattern, configure the fax setup to monitor for that specific ring pattern. See DRPD Pattern on page 9-11.
■ Auto Answer Fax: When FAX Mode is enabled, specifies how long the printer waits before answering an incoming call. Values range from 0 to 255 seconds.
■ Auto Ans. TEL/FAX: When TEL/FAX Mode is enabled, specifies how long the printer waits before answering an incoming call. Values range from 0 to 255 seconds.
■ Auto Ans. Ans/FAX: When ANS/FAX Mode is enabled, specifies how long the printer waits before answering an incoming call. Values range from 0 to 255 seconds.
■ Line Monitor: Specifies the volume of the external phone (line monitor).■ Ring Tone Volume: Specifies the volume for the incoming faxes.■ Line Type: Specifies the default line type. ■ Dialing Type: Specifies the dialing type.■ Junk Fax Filter: When set to On, incoming faxes are only accepted from numbers registered in the
Address Book. ■ Remote Receive: Specifies whether to receive a fax by pressing the remote receive code on the
external telephone after picking up the handset of the telephone. When set to On, a fax can be received by pressing the remote receive code on the external telephone.
■ Remote Rcv Tone: Specifies the tone in two digits (00-99) when Remote Receive is set to On.■ Send Header: When set to On, the sender record is printed at the head of the fax.■ Company Name: Specifies the sender name to be recorded in the sender report.■ Your Fax Number: Specifies your telephone number, which is printed at the top of each page sent
from your printer.■ Fax Cover Page: Specifies whether or not to send the fax header page.
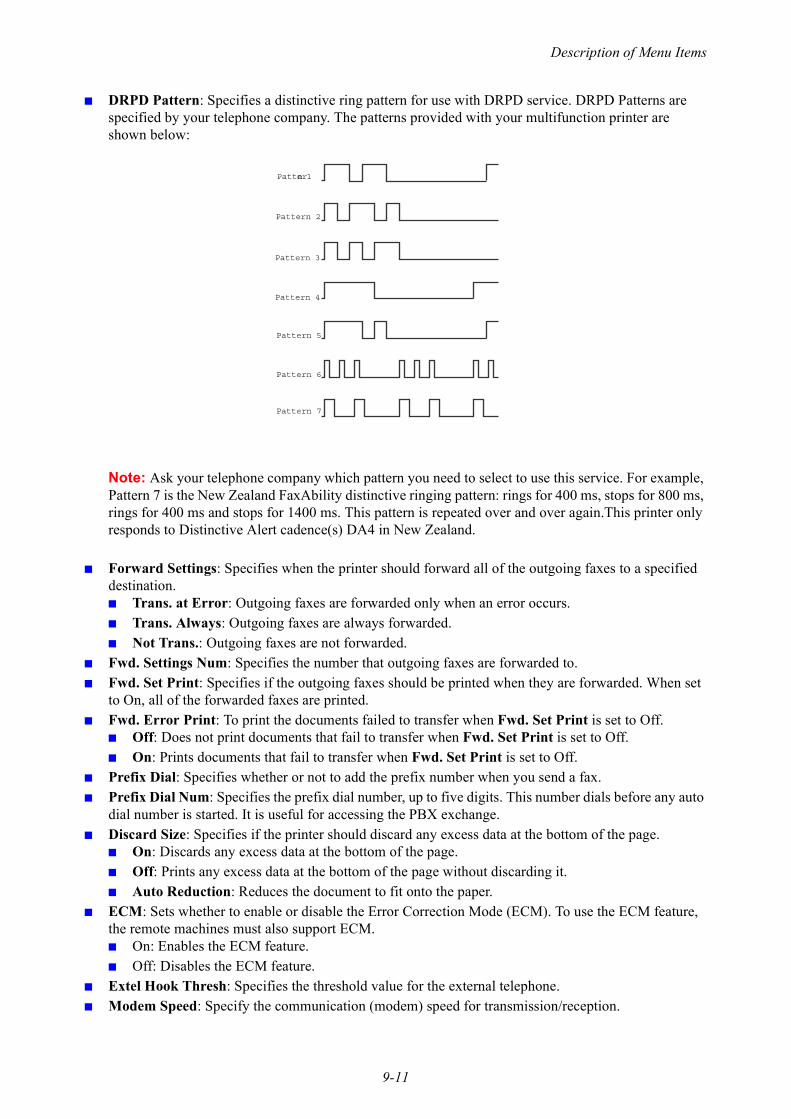
Description of Menu Items
9-11
■ DRPD Pattern: Specifies a distinctive ring pattern for use with DRPD service. DRPD Patterns are specified by your telephone company. The patterns provided with your multifunction printer are shown below:
Note: Ask your telephone company which pattern you need to select to use this service. For example, Pattern 7 is the New Zealand FaxAbility distinctive ringing pattern: rings for 400 ms, stops for 800 ms, rings for 400 ms and stops for 1400 ms. This pattern is repeated over and over again.This printer only responds to Distinctive Alert cadence(s) DA4 in New Zealand.
■ Forward Settings: Specifies when the printer should forward all of the outgoing faxes to a specified destination. ■ Trans. at Error: Outgoing faxes are forwarded only when an error occurs.■ Trans. Always: Outgoing faxes are always forwarded.■ Not Trans.: Outgoing faxes are not forwarded.
■ Fwd. Settings Num: Specifies the number that outgoing faxes are forwarded to.■ Fwd. Set Print: Specifies if the outgoing faxes should be printed when they are forwarded. When set
to On, all of the forwarded faxes are printed.■ Fwd. Error Print: To print the documents failed to transfer when Fwd. Set Print is set to Off.
■ Off: Does not print documents that fail to transfer when Fwd. Set Print is set to Off.■ On: Prints documents that fail to transfer when Fwd. Set Print is set to Off.
■ Prefix Dial: Specifies whether or not to add the prefix number when you send a fax.■ Prefix Dial Num: Specifies the prefix dial number, up to five digits. This number dials before any auto
dial number is started. It is useful for accessing the PBX exchange.■ Discard Size: Specifies if the printer should discard any excess data at the bottom of the page.
■ On: Discards any excess data at the bottom of the page.■ Off: Prints any excess data at the bottom of the page without discarding it.■ Auto Reduction: Reduces the document to fit onto the paper.
■ ECM: Sets whether to enable or disable the Error Correction Mode (ECM). To use the ECM feature, the remote machines must also support ECM. ■ On: Enables the ECM feature.■ Off: Disables the ECM feature.
■ Extel Hook Thresh: Specifies the threshold value for the external telephone.■ Modem Speed: Specify the communication (modem) speed for transmission/reception.
Pattern 1
Pattern 2
Pattern 3
Pattern 4
Pattern 5
Pattern 6
Pattern 7

Description of Menu Items
9-12
■ Country: Specifies the country where the printer is used.
Note: Country must be set before faxes can be sent.
System SettingsThe System Settings menu is used to configure basic printer settings, such as for alarm and Power Saver mode.
■ Power Saver Timer: Specifies the transitional time of Low Power Timer and Sleep Timer in increments of 1 minute.■ Low Power Timer: 5 min. to 60 min. (default is 5 min.)■ Sleep Timer: 1 min. to 6 min. (default is 6 min.)
For details, refer to Power Saver Mode on page 2-10.
■ Power Saver Wake Up: Specifies whether or not the printer exits Power Saver mode when the external telephone rings.■ OffHook WakeUp
■ On (default): The printer exits Power Saver mode.■ Off: Select this if you want to have the printer kept in Power Saver mode.
■ Auto Reset: Specifies the time the printer waits for further console input before automatically resetting the settings for COPY, SCAN, or FAX and returning to the standby mode.
■ Fault Time-out: Specify the time for an automatic timeout for a job fault. ■ Job Time-Out: You can cancel a printing process when it goes beyond a set time period. Set the time
until the print job is canceled. When this timeout expires, the print job is canceled.■ On: 5 sec. to 300 sec. (default: 30 sec.): Specifies the amount of time in increments of 1 second the
printer waits for additional data before it cancels the job.■ Off: Cannot cancel.
■ Clock Settings: Specifies the date and time.■ Set Date■ Set Time■ Date Format: Select either yy/mm/dd, mm/dd/yy, or dd/mm/yy.■ Time Format: 12 or 24 hour formats are available.■ Time Zone: Set the time zone based on Coordinated Universal Time (UTC) for your location.
■ Alert Tone: Specifies whether to turn on the alarm when an error occurs in the printer. ■ Panel Select Tone (default: Normal)■ Panel Alert Tone (default: Off)■ Machine Ready Tone (default: Normal)■ Copy Job Tone (default: Normal)■ Non-Copy Job Tone (default: Normal)■ Fault Tone (default: Normal)■ Alert Tone (default: Normal)■ Out of Paper (default: Normal)■ Low Toner (default: Off)■ Auto Clear Alert (default: Off)■ Base Tone (default: Off)■ All Tones
■ mm / inch: Set the units for the custom paper size to millimeters or inches.■ Millimeter (mm) (default): The paper size is displayed in millimeters.■ Inch (“): The paper size is displayed in inches.
Description of Menu Items
9-13
■ Def.PrintPaperSize: Sets the default paper size setting for print and reports.■ A4 (210 x 297 mm): (default)■ Letter (8.5 x 11”)
■ Auto Job History: Specifies whether to automatically print information about the printed data that has been processed in the printer (Job History Report).■ Off (default): Select this if you do not want to print the Job History Report automatically even if
the number of print jobs exceeds 22.■ On: Automatically prints a report when the number of print jobs reaches 22.
You cannot set this during printing.
You can print the Job History Report from the Report/List menu.
You need to restart the printer to activate the new settings. After making the settings, turn off the printer and then turn it on again.
■ Print ID: Select this to print the user ID at a selected position.■ Off (default): User ID is not printed.■ Top Left: Prints the user ID on the top left of the sheet of paper.■ Top Right: Prints the user ID on the top right of the sheet of paper.■ Bottom Left: Prints the user ID on the bottom left of the sheet of paper.■ Bottom Right: Prints the user ID on the bottom right of the sheet of paper.
■ Print Text: Specifies whether the printer outputs PDL data, which is not supported by the printer, as text when the printer receives it. Text data is printed on A4- or Letter-size paper.■ Off (default): Does not print the received data.■ On: Prints the received data as text data.
■ Fax Activity: The printer can be set to print a report on faxes sent and received.■ Auto Print: When set to Auto Print, the printer automatically prints a report every 50 fax jobs.■ No Auto Print (default): No report is automatically printed.
■ Fax Transmit: Specifies when a fax transmission report is printed.■ Print Always: Prints a transmission report for every single recipient fax job.■ Print at Error (default): Prints a transmission report only when an error occurs.■ Not Print: No transmission reports are printed.
■ Fax Broadcast: Specifies when a fax transmission report is printed for group jobs.■ Print Always (default): Prints a transmission report for every group fax job.■ Print at Error: Prints a transmission report only when an error occurs during a group job.■ Not print: Transmission reports are not printed.
■ Protocol Monitor: Specifies the protocol monitor report to detect the cause of the communication trouble.■ Print Always: Prints a report for every fax job.■ Print at Error: Prints the report only when a communication error occurs.■ Not print (default): The report is not printed.
■ RAM Disk: Allocates memory to the RAM Disk file system for the secure print, collating jobs, and Sample print features. ■ Disable: Does not allocate memory for using the secure print and sample print features.■ 50MB■ 100MB (default)■ 150MB
■ Substitute Tray: Specifies whether or not to use another size paper when the paper that is loaded in the specified tray does not match the paper size settings for the current job.■ Off (default): Prints are made on the paper loaded in the specified paper tray or feeder.

Description of Menu Items
9-14
■ Longer Size: Select this when you want to have your jobs printed on the paper longer than the paper size specified.
■ Nearest Size: Select this when you want to have your jobs printed on the paper nearest to the paper size specified.
■ Power On Wizard: Displays items to be specified when the printer is powered on for the first time. ■ Yes: Restarts the printer system and displays the Power On Wizard screen.■ No: (default)
MaintenanceUse this menu to initialize the NVM, to configure security setting, or to adjust the configurations for each type of paper.
■ Adjust PaperType: Sets the paper type of plain paper and labels.■ Plain Paper
■ Lightweight■ Heavyweight (default)
■ Labels■ Lightweight■ Heavyweight (default)
■ Adjust BTR: Specifies the transfer roller voltage adjustment for the paper type selected.■ Plain: (default)■ Bond■ HW (106-163 gsm)■ X-HW (164-216 gsm)■ Gloss (95-105 gsm)■ HW Gloss (106-163 gsm)■ X-HW Gloss (164-216 gsm)■ Labels■ Recycled■ Envelope
■ Adjust Fuser: Adjusts the fuser temperature setting for the paper type selected.■ Plain: (default)■ Bond■ HW (106-163 gsm)■ X-HW (164-216 gsm)■ Gloss (95-105 gsm)■ HW Gloss (106-163 gsm)■ X-HW Gloss (164-216 gsm)■ Labels■ Recycled■ Envelope
■ Auto Regi Adjust: Adjusts color automatically. Selecting On adjusts the color automatically. The default is On.
■ Adjust ColorRegi: Correct color manually. For details, refer to Color Calibration on page 10-17.■ Auto Adjust: Corrects color automatically.■ Color Regi Chart: Prints the correction chart.■ Enter Number: Enter the number to correct the registration.
Description of Menu Items
9-15
■ Clean Developer: Stirs the toner in a new toner cartridge. Select Yes when the toner needs stirring. The default setting is No.
■ Toner Refresh: Cleans the toner in the toner cartridge.■ Yellow: Select Yes when the yellow toner cartridge needs cleaning. The default setting is No.■ Magenta: Select Yes when the magenta toner cartridge needs cleaning. The default setting is No.■ Cyan: Select Yes when the cyan toner cartridge needs cleaning. The default setting is No.■ Black: Select Yes when the black toner cartridge needs cleaning. The default setting is No.
■ Drum Refresh: Cleans the surface of the PHD unit.■ Yes: Select this when the surface of the PHD unit needs cleaning.■ No: (default)
■ Initialize NVM: Initializes the settings stored in the NVM except for the network settings. The NVM is a nonvolatile memory that stores the printer settings even after the power is turned off. After executing this function and restarting the printer, all the menu parameters are reset to their default values.■ You cannot initialize the NVM during printing.■ You need to restart the printer to activate this setting. After making the setting, turn off the printer,
and then turn it on again.■ Init PrintMeter: Initializes the print meter.■ Reset Fuser: Resets the counter reading after installing a new fuser.
■ Yes: Select this to reset the counter reading after installing a new fuser.■ No: (default)
■ Custom: Specifies whether to use non-genuine print cartridges.■ Off: (default)■ On
Important: •Toner not recommended by Fuji Xerox may seriously damage the printer. Damage caused by such toner may not be covered by your warranty.•Unless all the copy jobs that are stored in the printer are completed, this setting cannot be changed.
■ Adjust Altitude: The altitude of the location where the machine is installed affects the performance of the printer. Specify the altitude.■ 0 m: (default)■ 1000 m■ 2000 m■ 3000 m
Secure SettingsUse the Secure Settings menu to set a password to limit access to the menus.
■ Panel Lock: When enabled, access to the Admin Menu requires a password.■ Service Lock: When enabled, access to the scanner and fax requires a password. Panel Lock must be
enabled before enabling Scan Lock and Fax Lock.■ Secure Receive: When enabled, incoming faxes require a password to print them. Panel Lock must be
enabled before enabling Secure Receive Lock.

Description of Menu Items
9-16
Admin ReportsUse this menu to print various types of reports and lists regarding printer usage.
■ Speed Dial: Prints a report of the speed dial numbers.■ Address Book: Prints a report of the address book email addresses.■ Server Address: Prints a report of the address book server addresses.■ Fax Activity: Prints a report summarizing sent and received faxes.■ Fax Pending: Prints a report of the pending faxes.■ Printer Meter: Prints a report summarizing printing activity.
Scan to E-MailUse this menu to enable or disable the Scan to E-mail function.
■ Edit From Field: When using Scan to E-mail, specify whether to enable editing of the transmission source. The default setting is Enable.■ Enable: Enables editing of the transmission source.■ Disable: Disables editing of the transmission source.
Panel LanguageUse the Panel Language menu to set the language displayed on the printer console.
■ English■ Simplified Chinese■ Traditional Chinese■ Korean
Entering Text on the Printer Console
9-17
Entering Text on the Printer ConsoleThe programming of recipient names, letters, accented characters, numbers and symbols can be entered much like using your cell phone keypad.
Correcting Text■ To erase all entered text, press and hold down the Cancel button.■ To delete a specific character, use the Forward Arrow or Back Arrow button to move the cursor to
the character you want to delete, and then press the Cancel button.■ If the same key is to be used to enter two or more characters in a row, press the Forward Arrow
button after selecting the first character.
The following table lists the characters available with each key on the keypad.
Note: Entering a hyphen (-) inserts a pause when dialing.
Keypad Button Available Characters (in order)
1 @ : . / 1
2 a b c A B C 2
3 d e f D E F 3
4 g h i G H I 4
5 j k l J K L 5
6 m n o M N O 6
7 p q r s P Q R S 7
8 t u v T U V 8
9 w x y z W X Y Z 9
0 0
* @ . \ _ ! “ # $ % & ‘ ~ ^ | ‘ ; : ? (space) + - * / = ( ) [ ] { } < > !
# - _ ~
10-1
This chapter includes:
■ Paper Jams on page 10-2■ Print Quality on page 10-12■ Problems With the Printer on page 10-20■ Printer Console Error Messages on page 10-23■ Getting Help on page 10-28
Troubleshooting 10

Paper Jams
10-2
Paper JamsThis section includes:
■ Preventing and Clearing Paper Jams on page 10-2■ Paper Jams in the Manual Feeder on page 10-2■ Paper Jams in Tray 1 on page 10-5■ Paper Jams in the Fuser Unit on page 10-7■ Paper Jams at the Automatic Document Feeder on page 10-9
See also: Safety Notes on page 1-2
Preventing and Clearing Paper JamsTo reduce the occurrence of paper jams, follow the guidelines and instructions in Printing Basics on page 5-1. It includes information about supported paper and media, guides for usage, and instructions for properly loading paper in the tray.
CAUTION: When removing jammed paper, do not try to remove paper or paper piece deep inside the machine. Also, do not try to remove paper wrapped around the heat roller. It can cause injury or burn.
Switch off the machine immediately and contact the Fuji Xerox local representative office or an authorised dealer.
Important: Fuser is hot. Do not touch areas with labels indicating high temperature and the surrounding areas. Otherwise, you can get burnt.
Paper Jams in the Manual FeederUse the following procedure to clear an error displayed on the printer console.
The error will not clear unless you open and close the front cover.
1. Pull the jammed paper out of the Manual Feeder. If no jammed paper can be found or it is hard to remove the paper, go on to the next step.
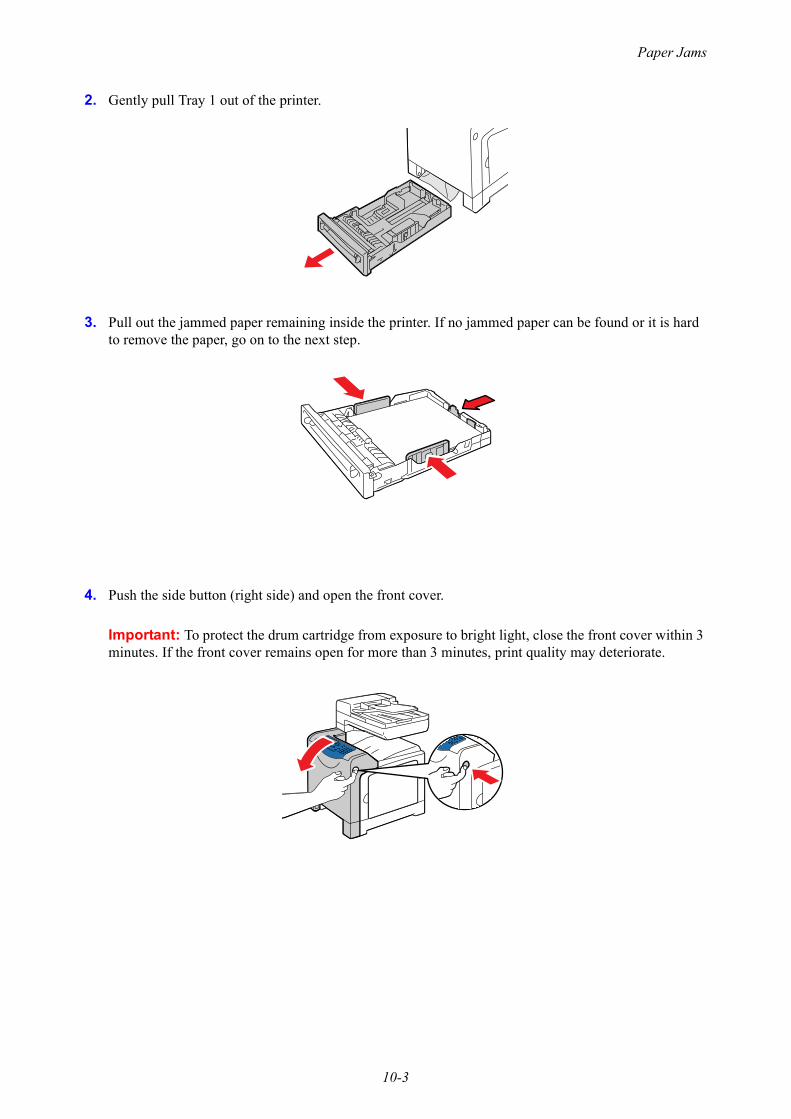
Paper Jams
10-3
2. Gently pull Tray 1 out of the printer.
3. Pull out the jammed paper remaining inside the printer. If no jammed paper can be found or it is hard to remove the paper, go on to the next step.
4. Push the side button (right side) and open the front cover.
Important: To protect the drum cartridge from exposure to bright light, close the front cover within 3 minutes. If the front cover remains open for more than 3 minutes, print quality may deteriorate.

Paper Jams
10-4
5. Remove any jammed paper. Make sure no torn pieces remain inside.
6. Close the front cover.
Caution: When closing the front cover, be careful not to get your fingers caught between (the left, right, top, or bottom edge of) the cover and the printer.
7. Push the tray all the way into the printer.
Caution: When inserting the tray, be careful not to get your fingers caught between the tray and the printer.

Paper Jams
10-5
Paper Jams in Tray 1Use the following procedure to clear an error displayed on the printer console.
The error will not clear unless you open and close the front cover.
1. Gently pull Tray 1 out of the printer.
2. Remove the jammed paper and any paper that is wrinkled.
3. If paper is jammed in the printer, gently remove the paper carefully without tearing. If it is still hard to remove the paper, go onto the next step.
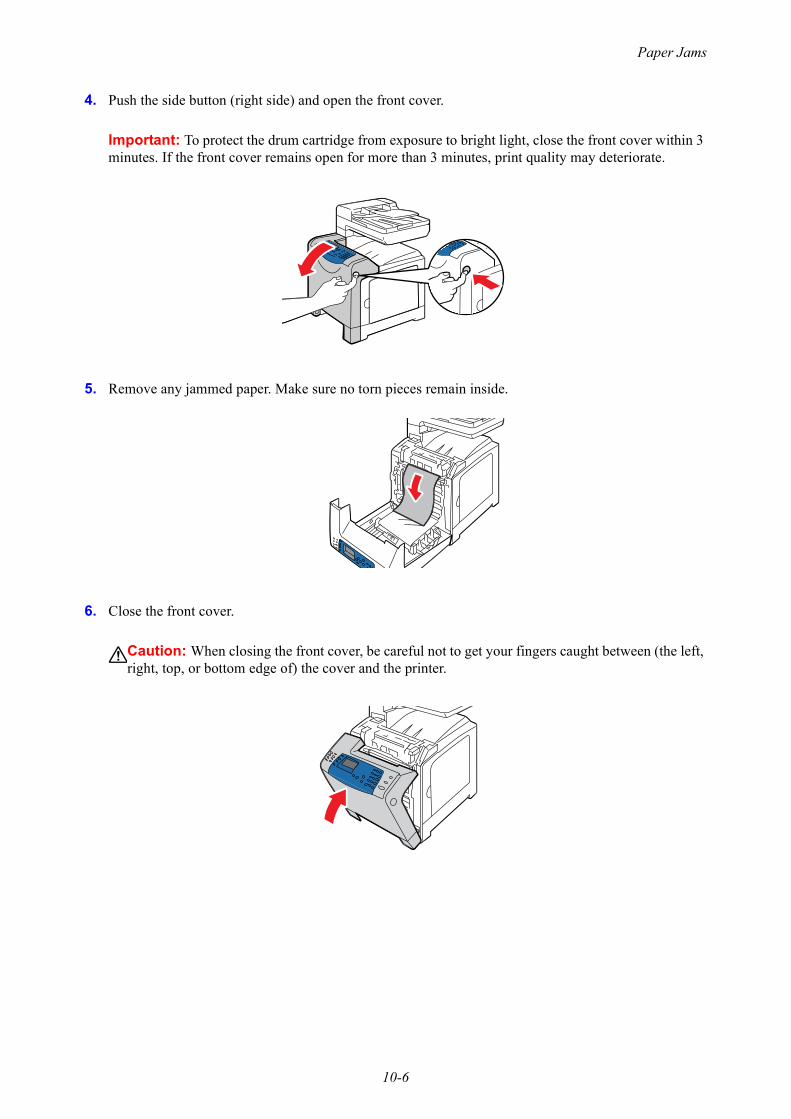
Paper Jams
10-6
4. Push the side button (right side) and open the front cover.
Important: To protect the drum cartridge from exposure to bright light, close the front cover within 3 minutes. If the front cover remains open for more than 3 minutes, print quality may deteriorate.
5. Remove any jammed paper. Make sure no torn pieces remain inside.
6. Close the front cover.
Caution: When closing the front cover, be careful not to get your fingers caught between (the left, right, top, or bottom edge of) the cover and the printer.
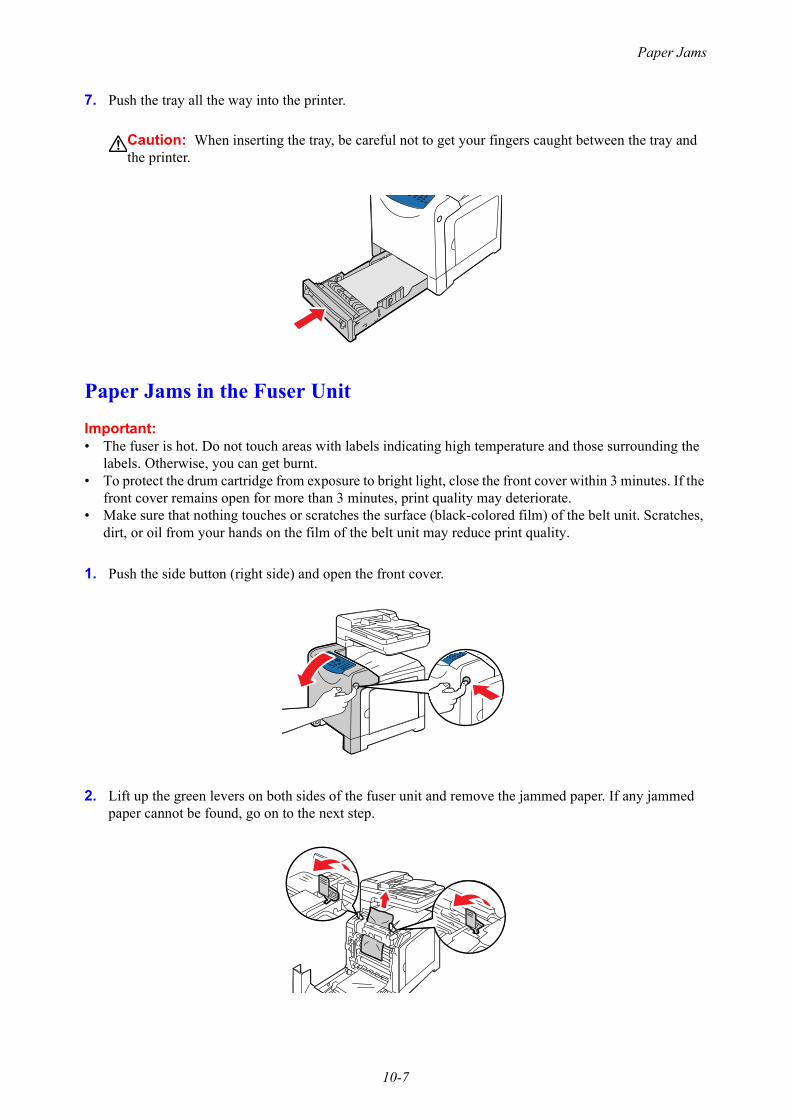
Paper Jams
10-7
7. Push the tray all the way into the printer.
Caution: When inserting the tray, be careful not to get your fingers caught between the tray and the printer.
Paper Jams in the Fuser Unit
Important: • The fuser is hot. Do not touch areas with labels indicating high temperature and those surrounding the
labels. Otherwise, you can get burnt.• To protect the drum cartridge from exposure to bright light, close the front cover within 3 minutes. If the
front cover remains open for more than 3 minutes, print quality may deteriorate.• Make sure that nothing touches or scratches the surface (black-colored film) of the belt unit. Scratches,
dirt, or oil from your hands on the film of the belt unit may reduce print quality.
1. Push the side button (right side) and open the front cover.
2. Lift up the green levers on both sides of the fuser unit and remove the jammed paper. If any jammed paper cannot be found, go on to the next step.
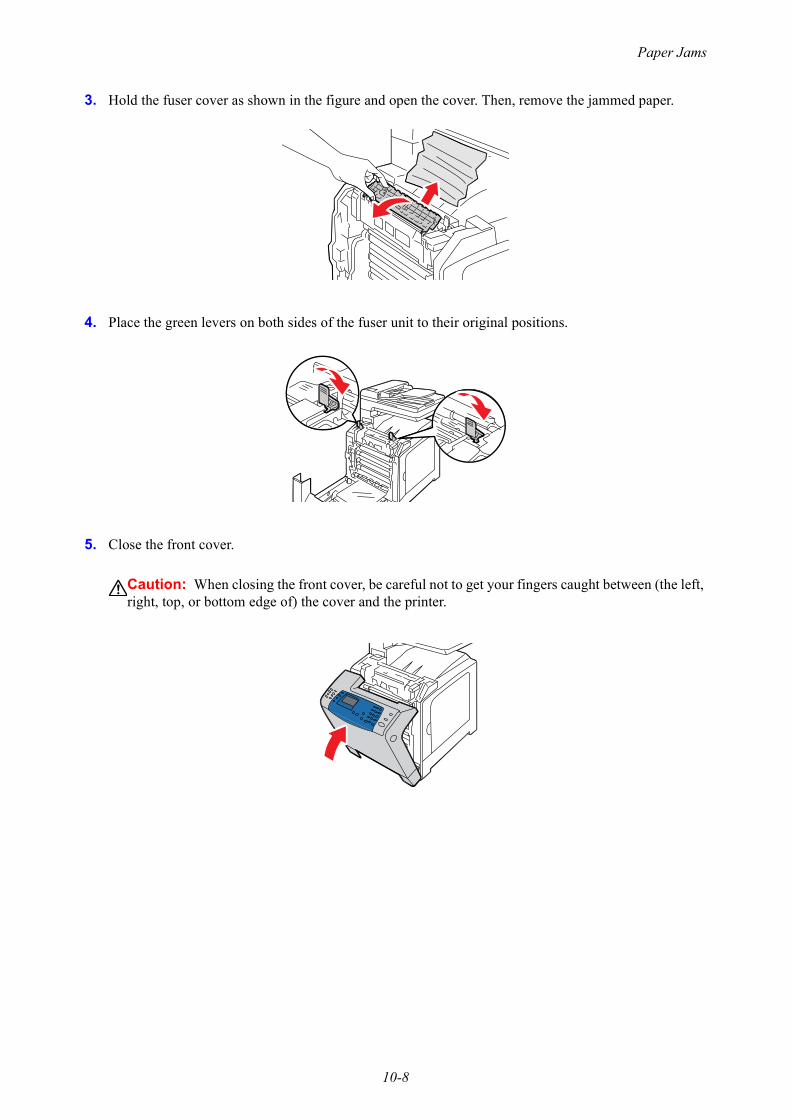
Paper Jams
10-8
3. Hold the fuser cover as shown in the figure and open the cover. Then, remove the jammed paper.
4. Place the green levers on both sides of the fuser unit to their original positions.
5. Close the front cover.
Caution: When closing the front cover, be careful not to get your fingers caught between (the left, right, top, or bottom edge of) the cover and the printer.

Paper Jams
10-9
Paper Jams at the Automatic Document FeederNote: Paper can jam in the ADF if the document feed tray is overfilled. Fill the document feed tray only
up to the MAX line indicated on the tray.
The procedure differs depending on the location of the paper. Remove paper in the ADF according to the following procedures.
■ If the paper jam is in the paper feed area:a. Open the ADF cover.
b. Remove the paper by carefully pulling it up.

Paper Jams
10-10
c. Close the ADF cover.
If you cannot remove the paper in Step b), do as follows.
Open the document cover, and gently remove any jammed paper.
■ If the paper jam is at the paper exit area:a. Open the ADF cover.
b. Unlock the lever and pull out the paper to remove it.

Paper Jams
10-11
c. Close the ADF cover.
Print Quality
10-12
Print Quality This section includes:
■ Print-Quality Problems on page 10-12■ Copy-Quality Problems on page 10-16■ Color Calibration on page 10-17
Print-Quality ProblemsWhen the print quality is poor, select the closest symptom from the following table to correct the problem.
If the print quality does not improve after carrying out the appropriate action, contact the Fuji Xerox local representative office or an authorised dealer.
Symptom Reason/Action
Faded printouts Multiple colors faded:■ The print cartridges are not genuine print cartridges.
Verify that the print cartridges (C/M/Y/K) are genuine cartridges, and replace if necessary.
■ The paper is outside the recommended specification range.Replace the media with a recommend size and type, and confirm that your printer console settings are correct. See About Paper on page 5-6.
■ The paper is damp.Replace the paper with the one properly stored. See Paper Storage Guidelines on page 5-5 and About Paper on page 5-6.
■ The transfer unit is old or damaged.Replace the transfer unit.
■ The high-voltage supply is defective.contact the Fuji Xerox local representative office or an authorised dealer.
Only one color faded:Check the condition of the print cartridge, and replace as necessary.

Print Quality
10-13
Stray black dots or white areas (drop outs)
The paper is outside the recommended specification range.Replace the paper with a recommended type, and confirm that the printer console settings are correct. See About Paper on page 5-6.
The transfer unit is old or damaged.Replace the transfer unit.
The print cartridges are not genuine print cartridges.■ Check the condition of the print cartridge, and replace as necessary.■ Verify that the print cartridges (C/M/Y/K) are genuine cartridges, and replace if
necessary.
Vertical black or color streaks
Multiple colored streaks or lines:■ The transfer unit, or fuser, is old or damaged.
Check the condition of the transfer unit and fuser, and replace if necessary.■ The print cartridges are not genuine print cartridges.
Verify that the print cartridges (C/M/Y/K) are genuine cartridges, and replace if necessary.
Streak in only one color:Check the condition of the print cartridge, and replace as necessary.Verify that the print cartridges (C/M/Y/K) are genuine cartridges, and replace if necessary.
Recurring smudges Dirt in the paper path.Print several blank sheets.
The paper is outside the recommended specification range.Replace the paper with a recommended type, and confirm that the printer console settings are correct. See About Paper on page 5-6.
The transfer unit, or fuser, is old or damaged.Check the condition of the transfer unit and fuser, and replace as necessary.
Toner smears when rubbed
The paper is damp.Replace the paper with the one properly stored. See Paper Usage Guidelines on page 5-3. See About Paper on page 5-6.
The paper is outside the recommended specification range.Replace the paper with a recommend type, and confirm that your print driver settings are correct. See About Paper on page 5-6.
The print cartridges are not genuine print cartridges.Verify that the print cartridges (C/M/Y/K) are genuine cartridges, and replace if necessary.
The fuser is old or damaged.Replace the fuser.
Symptom Reason/Action

Print Quality
10-14
Blank pages Two or more sheets may be feeding at once.Remove the paper stack from the tray, fan it, and reinsert it.
The print cartridges are not genuine print cartridges.Verify that the print cartridges (C/M/Y/K) are genuine cartridges, and replace if necessary.
The transfer unit is old or damaged.Replace the transfer unit.
The high-voltage supply is defective.contact the Fuji Xerox local representative office or an authorised dealer.
Hair-like marks appear in or around black halftone printing. / Shadows appear around areas of dense black printing
The paper was left unwrapped for a long time (especially in a dry environment).Replace the paper with the one properly stored. See Paper Storage Guidelines on page 5-5.
The paper is outside the recommended specification range.Replace the paper with a recommended size and type, and confirm that your print driver settings are correct. See About Paper on page 5-6.
The transfer unit is old or damaged.Replace the transfer unit.
Color around the edge of printing is incorrect
The color calibration is incorrect.Adjust the color. See Color Calibration on page 10-17.
Colored dots are printed at regular intervals (about 70 mm)
The drum cartridge is dirty.Clean the print cartridge.
Partial blanks, creased paper, or blotted printing
The paper is damp.Replace the paper with the one properly stored. See Paper Usage Guidelines on page 5-3.
The paper is outside the recommended specification range.Replace the paper with a recommended size and type. See About Paper on page 5-6.
The transfer unit, or fuser, is not installed correctly.Reinstall the transfer unit and/or fuser.
The print cartridges are not genuine print cartridges.Verify that the print cartridges (C/M/Y/K) are genuine cartridges, and replace if necessary.
Condensation inside the printer causes partial blanks or creased paper.Turn the printer on, and leave it on, for at least one hour to get rid of the condensation. If the problems still occurs, contact the Fuji Xerox local representative office or an authorised dealer.
Symptom Reason/Action

Print Quality
10-15
Vertical blanks The laser is being blocked. Remove the drum cartridges and clean all debris from the laser len(s) with a lint free cloth.■ Do not expose the drum cartridge to direct sunlight or strong light.■ To protect the drum cartridge against bright light, close the front cover within 3
minutes. If the front cover remains open for more than 3 minutes, print quality may deteriorate.
■ Make sure that nothing touches or scratches the surface (black-colored film) of the belt unit. Scratches, dirt, or oil from your hands on the film of the belt unit may reduce print quality.
The drum unit or fuser unit is old or damaged.Check the condition of the drum unit and fuser unit, and replace as necessary.■ Do not expose the drum cartridge to direct sunlight or strong light.■ To protect the drum cartridge against bright light, close the front cover within 3
minutes. If the front cover remains open for more than 3 minutes, print quality may deteriorate.
■ Make sure that nothing touches or scratches the surface (black-colored film) of the belt unit. Scratches, dirt, or oil from your hands on the film of the belt unit may reduce print quality.
The print cartridges are not genuine print cartridges.■ Check the condition of the print cartridge, and replace as necessary.■ Verify that the print cartridges (C/M/Y/K) are genuine cartridges, and replace if
necessary.
Slanted printing The paper guides in the Manual Feeder or Tray 1 is not set correctly.Reset the paper guides in the Manual Feeder or Tray 1. See Loading Paper in the Manual Feeder on page 5-9 and Loading Paper in Tray 1 on page 5-11.
Horizontal bands, approximately 22 mm wide, appear vertically every 73 mm
The drum cartridge has been exposed to too much light; possibly from leaving the front door open too long. Replace the drum cartridge.
Colors are blurry or there is white area around objects
Color to color alignment is not correctUse the automatic color calibration. See Color Calibration on page 10-17.
Symptom Reason/Action

Print Quality
10-16
Copy-Quality ProblemsWhen the copy quality is poor, select the closest symptom from the following table to correct the problem.
If the copy quality does not improve after carrying out the appropriate action, contact the Fuji Xerox local representative office or an authorised dealer.
Symptom Reason/Action
Lines or streaks only present in copies made from the ADF
There is debris on the document glass. When scanning, the paper from the ADF passes over the debris creating lines or streaks. Clean the glass with a lint free cloth.
Spots present in copies taken from the document glass
There is debris on the document glass. When scanning, the debris creates a spot on the image.Clean the glass with a lint free cloth.
The reverse side of the original is showing on the copy
On the Copy menu, enable Auto Exposure.For information on turning Auto Exposure on and off, see Setting Auto Exposure on page 6-7.
Light colors are washed out or white on the copy
Auto Exposure is enabled.
On the Copy menu, enable Auto Exposure.For information on turning Auto Exposure on and off, see Setting Auto Exposure on page 6-7.
Image is too light or dark If the copied image is too light or dark, use the Lighten/Darken option on the Copy menu.For information on making the image lighter or darker, see Making an Image Lighter or Darker on page 6-5

Print Quality
10-17
Color CalibrationYou can set up the printer to have it calibrate color automatically, or adjust it manually. Always calibrate the color when you relocate the printer.
Calibrating the Color AutomaticallyUse the following procedure to calibrate color automatically for your printer.
1. Press the System button to display the System screen.2. Press the Up Arrow or Down Arrow button until Admin Menu appears, and then press the OK
button.3. Press the Up Arrow or Down Arrow button until Maintenance appears, and then press the OK
button.4. Press the Up Arrow or Down Arrow button until Adjust ColorRegi appears and then press the OK
button.5. Select Auto Adjust, and then press the OK button.6. Select Yes, and then press the OK button.
Adjusting the Color ManuallyYou can fine-tune the color manually too. Print the Color RegiChart to see the current color reproducibility of the printer, and determine the best values.
Printing the Color RegiChart
1. Press the System button to display the System screen.2. Press the Up Arrow or Down Arrow button until Admin Menu appears, and then press the OK
button.3. Press the Up Arrow or Down Arrow button until Maintenance appears, and then press the OK
button.4. Press the Up Arrow or Down Arrow button until Adjust ColorRegi appears, and then press the OK
button.5. Select Color RegiChart, then press the OK button.6. Press the OK button again to print the Color Registration Chart.
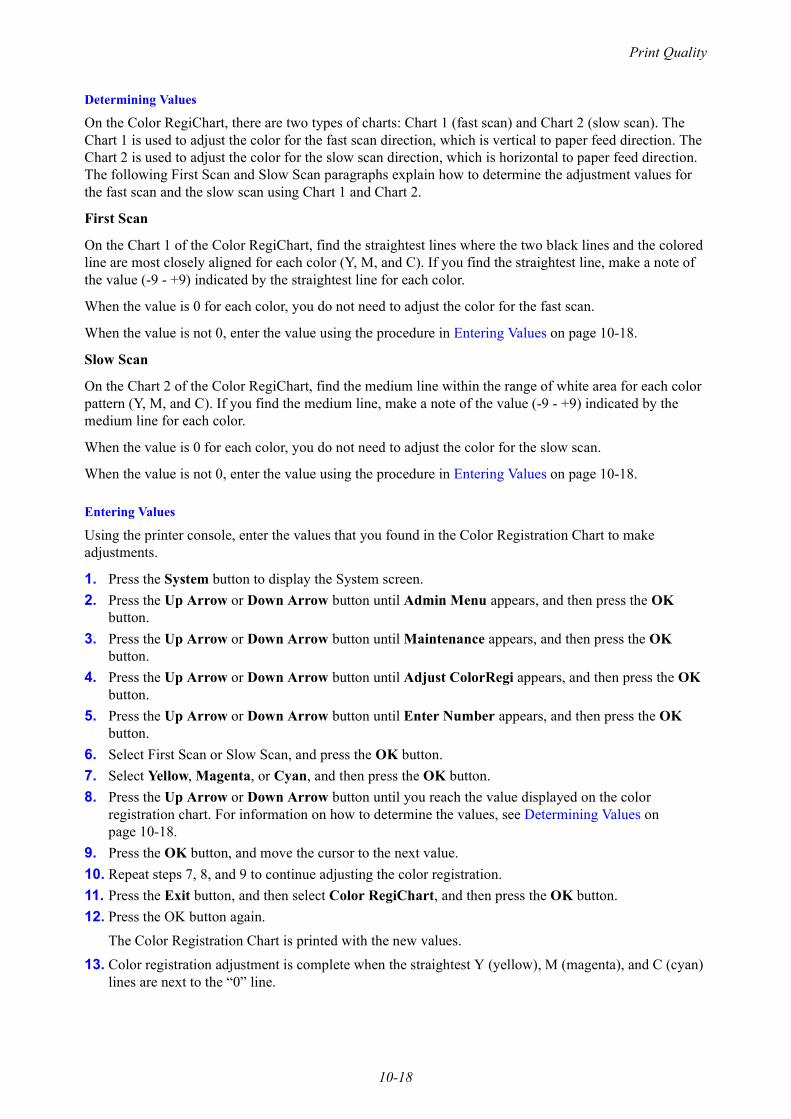
Print Quality
10-18
Determining Values
On the Color RegiChart, there are two types of charts: Chart 1 (fast scan) and Chart 2 (slow scan). The Chart 1 is used to adjust the color for the fast scan direction, which is vertical to paper feed direction. The Chart 2 is used to adjust the color for the slow scan direction, which is horizontal to paper feed direction. The following First Scan and Slow Scan paragraphs explain how to determine the adjustment values for the fast scan and the slow scan using Chart 1 and Chart 2.
First Scan
On the Chart 1 of the Color RegiChart, find the straightest lines where the two black lines and the colored line are most closely aligned for each color (Y, M, and C). If you find the straightest line, make a note of the value (-9 - +9) indicated by the straightest line for each color.
When the value is 0 for each color, you do not need to adjust the color for the fast scan.
When the value is not 0, enter the value using the procedure in Entering Values on page 10-18.
Slow Scan
On the Chart 2 of the Color RegiChart, find the medium line within the range of white area for each color pattern (Y, M, and C). If you find the medium line, make a note of the value (-9 - +9) indicated by the medium line for each color.
When the value is 0 for each color, you do not need to adjust the color for the slow scan.
When the value is not 0, enter the value using the procedure in Entering Values on page 10-18.
Entering Values
Using the printer console, enter the values that you found in the Color Registration Chart to make adjustments.
1. Press the System button to display the System screen.2. Press the Up Arrow or Down Arrow button until Admin Menu appears, and then press the OK
button.3. Press the Up Arrow or Down Arrow button until Maintenance appears, and then press the OK
button.4. Press the Up Arrow or Down Arrow button until Adjust ColorRegi appears, and then press the OK
button.5. Press the Up Arrow or Down Arrow button until Enter Number appears, and then press the OK
button.6. Select First Scan or Slow Scan, and press the OK button.7. Select Yellow, Magenta, or Cyan, and then press the OK button.8. Press the Up Arrow or Down Arrow button until you reach the value displayed on the color
registration chart. For information on how to determine the values, see Determining Values on page 10-18.
9. Press the OK button, and move the cursor to the next value.10. Repeat steps 7, 8, and 9 to continue adjusting the color registration.11. Press the Exit button, and then select Color RegiChart, and then press the OK button. 12. Press the OK button again.
The Color Registration Chart is printed with the new values.
13. Color registration adjustment is complete when the straightest Y (yellow), M (magenta), and C (cyan) lines are next to the “0” line.

Print Quality
10-19
If “0” is not next to the straightest lines, determine the values and adjust again.
Note: After printing the Color Registration Chart, do not turn off the printer until the printer motor has stopped running.
Enabling Automatic Color Calibration Use the following procedure to automatically calibrate the color when installing a new drum cartridge.
1. Press the System button to display the System screen.2. Press the Up Arrow or Down Arrow button until Admin Menu appears, and then press the OK
button.3. Press the Up Arrow or Down Arrow button until Maintenance appears, and then press the OK
button.4. Press the Up Arrow or Down Arrow button until Auto Regi Adjust appears, and then press the OK
button.5. Select Auto Adjust and press the OK button.6. Select Yes to turn automatic color registration on, and then press the OK button.
Problems With the Printer
10-20
Problems With the PrinterIf you encounter a problem with your printer, use the following table to troubleshoot and fix the problem. For additional troubleshooting information, see Print Quality on page 10-12.
WARNING: This equipment has been designed to restrict operator access to safe areas only. Operator access to hazardous areas is restricted with covers or guards, which would require a tool to remove. Never remove these covers or guards.
Important: Probable causes of trouble are that the printer, computer, server or other hardware is not correctly set for the network environment you are using.
Symptom Reason/Action
No power Is the power to the printer turned off?Press the power button to the On position to turn on the power.
Is the power cord disconnected or not securely connected? Turn off the power to the printer, and connect the power cord to the power outlet again. Then, turn on the power to the printer.
Is the power cord connected to a power outlet with the correct voltage?Connect the printer exclusively to a power outlet with a suitable voltage and current rating.
Is the printer connected to an uninterrupted power supply?Turn off the power to the printer, and connect the power cord to a suitable power outlet.
Is the printer connected to a power strip shared with other high-power devices?Connect the printer to a power strip that is not shared with other high-power devices.
Cannot print Is there a message displayed on the printer console?Follow the message to correct the problem. See Printer Console Error Messages on page 10-23.
When you are using a Macintosh computer on a network environment and cannot print a heavy print job such as image data, changing the Connection Time-Out setting to a larger value may solve the problem.To change the value for Connection Time-Out, launch CentreWare IS, and select the Properties tab and the Protocol Setting being used.
Cannot scan from computer
Is the printer connected to the computer with a USB cable?Connect a USB cable between the computer and printer.
Is the scan driver installed?Install the scan driver.

Problems With the Printer
10-21
Cannot scan to computer Is the printer connected to the network?Connect the printer to the network for Computer (Network) and Server (FTP) scanning.When connecting via USB by using the Windows version of Express Scan Manager, do so as follows according to the OS being used.[Windows XP]Confirm whether the Windows Image Acquisition (WIA) service of the OS is started.If the service is not started, start it.After uninstalling the Windows scanning utilities, re-install them.■ Service: Start > Settings > Control Panel > Administrative Tools > Service[Windows 2000] Confirm whether the Still Image Service of the OS is started.If the service is not started, start it.After uninstalling the Windows scanning utilities, re-install them.■ Service: Start > Settings > Control Panel > Administrative Tools > Service
Is the user name and password set correctly?Verify that the user name and password are correctly defined in the Address Book.
Is the correct folder name specified?Check that the shared folder name and computer IP address are correctly defined in the Address Book.
Cannot send or receive fax Is the printer connected to an analog phone outlet?If not, connect the printer to a known good analog phone outlet.
Are the fax parameters configured properly?Verify that the fax parameters have been set correctly.
Error indicator is on Is there an error message displayed on the printer console?Check the displayed message and correct the error.
Error indicator is blinking An error that you cannot correct by yourself has occurred.Record the displayed error message or error code, turn off the power, pull out the power plug from the outlet. contact the Fuji Xerox local representative office or an authorised dealer.
Top section of printed document is missing. The top and side margins are incorrect.
Are the paper tray guides in the correct positions?Set the length guide and the width guides to the correct positions. See Loading Paper in Tray 1 on page 5-11.
Check that the paper size on the print driver or the printer console is correctly set.See the Online Help for the print driver. See Setting Paper Types and Sizes on page 5-8.
Check that the margin setting is correct on the print driver. (PCL only)See the Online Help for the print driver.
Condensation has occurred inside the printer
Turn the printer on, and leave it on, for at least one hour to get rid of the condensation. If the problem continues, contact the Fuji Xerox local representative office or an authorised dealer.
Symptom Reason/Action

Problems With the Printer
10-22
Paper cannot be fed. Paper jams. Multiple paper are fed. Paper is fed at an angle. Paper is wrinkled.
Is the paper correctly loaded?Load the paper correctly. For labels, transparencies, or envelopes, fan them well to allow air to enter between each sheet before loading. See Loading Paper in Tray 1 on page 5-11.
Is the paper damp?Replace with paper from a new ream. See Loading Paper in Tray 1 on page 5-11.
The paper used is not suitable. Load the correct type of paper. See About Paper on page 5-6.
Is the paper tray set correctly? Push the paper tray completely into the printer.
Is the printer placed on a flat location? Place the printer on a stable flat surface.
Are the paper tray guides set in the correct positions? Set the guides to the correct positions. See Loading Paper in Tray 1 on page 5-11.
Paper is fed more than 1 sheet at a time.Multiple feeding of paper may occur before the sheets of paper loaded in the tray are used up. Remove the paper, fan it, and load again. Replenish paper only when all the sheets of the paper loaded are used up.
Unusual noises The printer is not level.Reposition the printer on a flat, stable surface.
The paper tray is not inserted properly.Push the paper tray completely into the printer.
There is a foreign object inside the printer.Turn off the printer and remove the foreign object. contact the Fuji Xerox local representative office or an authorised dealer.
Symptom Reason/Action
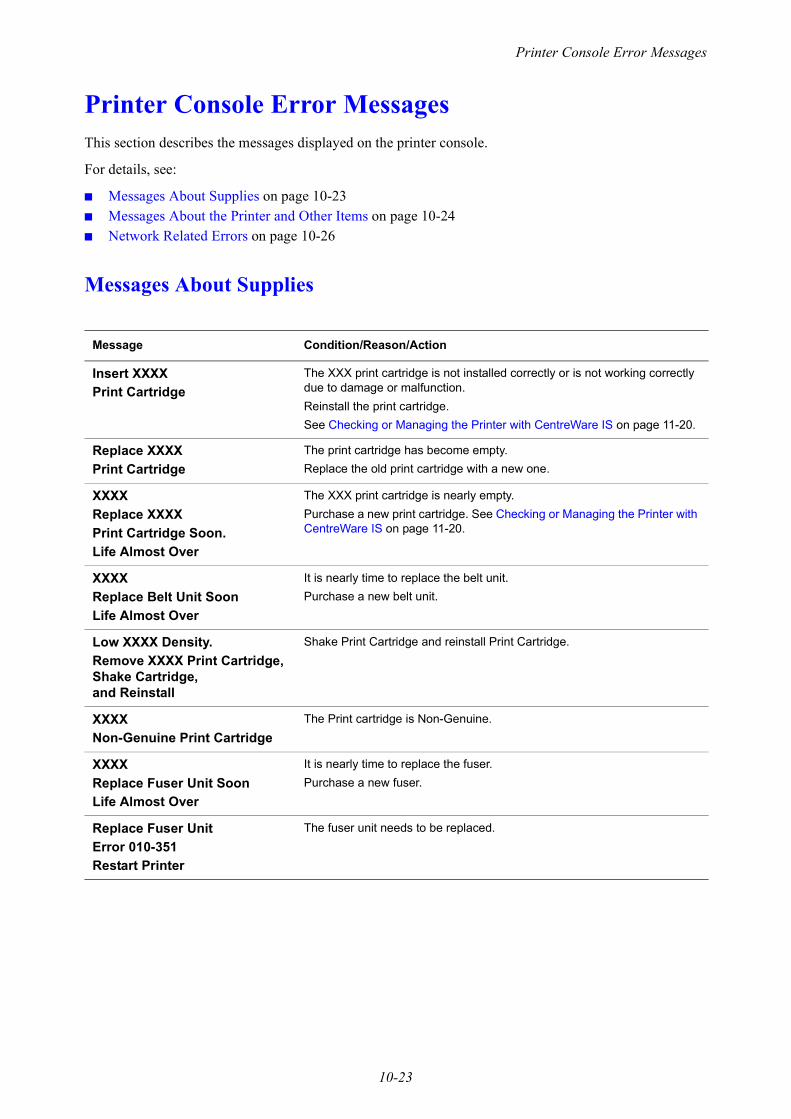
Printer Console Error Messages
10-23
Printer Console Error MessagesThis section describes the messages displayed on the printer console.
For details, see:
■ Messages About Supplies on page 10-23■ Messages About the Printer and Other Items on page 10-24■ Network Related Errors on page 10-26
Messages About Supplies
Message Condition/Reason/Action
Insert XXXX Print Cartridge
The XXX print cartridge is not installed correctly or is not working correctly due to damage or malfunction. Reinstall the print cartridge. See Checking or Managing the Printer with CentreWare IS on page 11-20.
Replace XXXXPrint Cartridge
The print cartridge has become empty.Replace the old print cartridge with a new one.
XXXXReplace XXXXPrint Cartridge Soon.Life Almost Over
The XXX print cartridge is nearly empty. Purchase a new print cartridge. See Checking or Managing the Printer with CentreWare IS on page 11-20.
XXXXReplace Belt Unit SoonLife Almost Over
It is nearly time to replace the belt unit.Purchase a new belt unit.
Low XXXX Density. Remove XXXX Print Cartridge, Shake Cartridge, and Reinstall
Shake Print Cartridge and reinstall Print Cartridge.
XXXXNon-Genuine Print Cartridge
The Print cartridge is Non-Genuine.
XXXXReplace Fuser Unit Soon Life Almost Over
It is nearly time to replace the fuser.Purchase a new fuser.
Replace Fuser UnitError 010-351Restart Printer
The fuser unit needs to be replaced.

Printer Console Error Messages
10-24
Messages About the Printer and Other Items
Message Condition/Reason/Action
Controller ErrorError 116-XXXRestart Printer
An internal controller error occurred.Restart the printer.
Disabled FunctionError 016-758Press Ok Button
The function that you are trying to access has been disabled.Enable the function through the printer console menus, or contact your printer administrator. See Using the Printer Console Menus and Keypad on page 9-1.
Front Cover Open.Close Front Cover
The front cover is open. Close the front cover.
Fan Motor ErrorError 042-358Restart Printer
An error has occurred with the fan.Restart the printer. If the error continues, contact the Fuji Xerox local representative office or an authorised dealer.
Fuser Unit ErrorError 010-397Error Code:xxxxxxxxRestart Printer
A fuser error has occurred.Restart the printer.If the error continues, contact the Fuji Xerox local representative office or an authorised dealer.
Invalid JobError 016-799Press OK Button
When the system settings of the printer on the print driver does not conform to the printer you are using, this message appears.Press the Stop button to cancel the print driver.Make sure that the system settings of the printer on the print driver conforms to the printer you are using.
Jam at Manual FeederRemove Paper fromManual Feeder.Open/Close Front Cover
Paper is jammed inside the Manual Feeder.Remove the jammed paper. Open and close the front cover. See Paper Jams on page 10-2.
Jam at Tray 1Check Tray 1.Open/Close Front Cover
Paper is jammed inside Tray 1.Remove the jammed paper. Open and close the front cover. See Paper Jams on page 10-2.
Limit ExceededError 016-759Press OK Button
The user has exceeded the limit on the number of pages that can be printed when using an authentication function. Contact the administrator.
MCU Firmware ErrorError 024-340Error Code:xxxxxxxxRestart Printer
A firmware error has occurred. Restart the printer. If the problem persists, contact the Fuji Xerox local representative office or an authorised dealer.
MCU NVRAM ErrorError 041-340Error Code:xxxxxxxxRestart Printer
A NVRAM error has occurred. Restart the printer, and if the problem persists contact the Fuji Xerox local representative office or an authorised dealer.
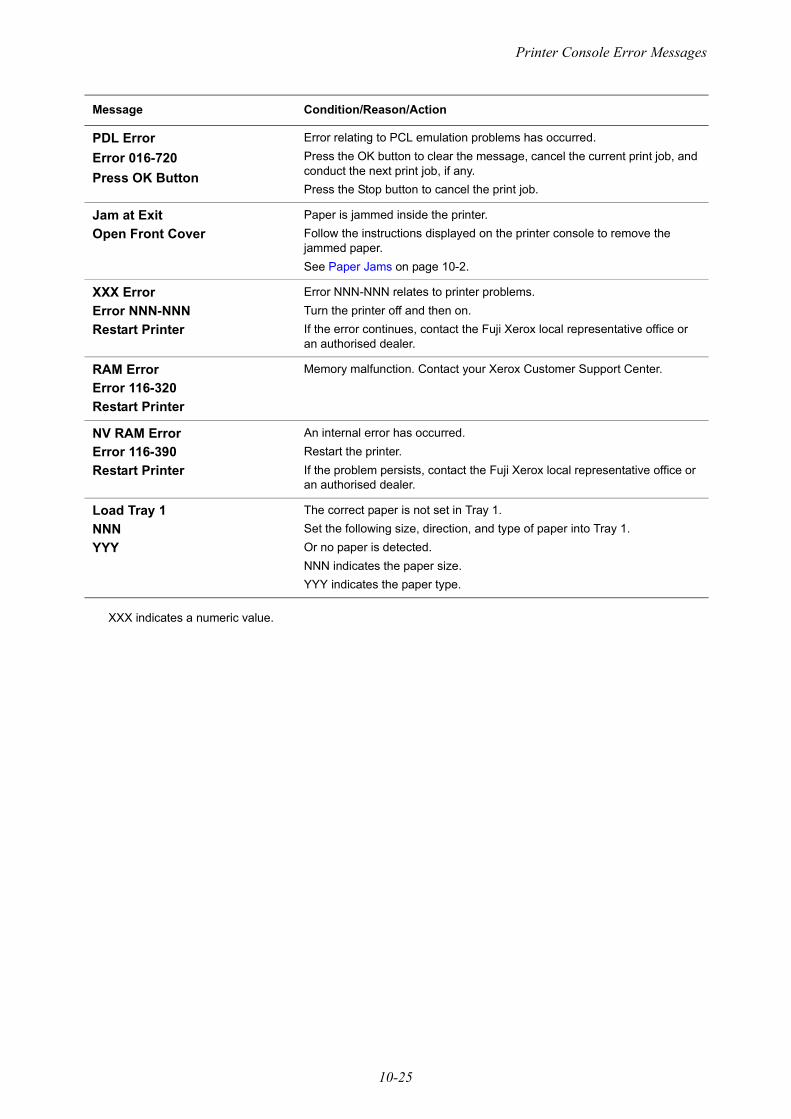
Printer Console Error Messages
10-25
XXX indicates a numeric value.
PDL ErrorError 016-720 Press OK Button
Error relating to PCL emulation problems has occurred.Press the OK button to clear the message, cancel the current print job, and conduct the next print job, if any.Press the Stop button to cancel the print job.
Jam at ExitOpen Front Cover
Paper is jammed inside the printer.Follow the instructions displayed on the printer console to remove the jammed paper. See Paper Jams on page 10-2.
XXX ErrorError NNN-NNNRestart Printer
Error NNN-NNN relates to printer problems.Turn the printer off and then on.If the error continues, contact the Fuji Xerox local representative office or an authorised dealer.
RAM ErrorError 116-320Restart Printer
Memory malfunction. Contact your Xerox Customer Support Center.
NV RAM ErrorError 116-390Restart Printer
An internal error has occurred.Restart the printer. If the problem persists, contact the Fuji Xerox local representative office or an authorised dealer.
Load Tray 1NNNYYY
The correct paper is not set in Tray 1.Set the following size, direction, and type of paper into Tray 1. Or no paper is detected.NNN indicates the paper size. YYY indicates the paper type.
Message Condition/Reason/Action

Printer Console Error Messages
10-26
Network Related Errors
Message Condition/Reason/Action
Email ErrorInvalid SMTP ServerError 016-503Press OK Button
The SMTP server was not found.Use CWIS to verify that the address for the server is correct.
Email Error Invalid POP3 ServerError 016-504Press OK Button
The POP3 server was not found.Use CWIS to verify that the address for the server is correct.
Email Login ErrorPOP3 Login FailedError 016-505Press OK Button
Failed to login to the POP3 server.Use CWIS to verify that the user name and password settings are correct.
Email Login ErrorError 016-506Press OK Button
Failed to login to the SMTP server.Use CWIS to verify that the user name and password settings are correct.
Email Login ErrorSMTP Login FailedError 016-507Press OK Button
Failed to login to the SMTP server.Use CWIS to verify that the user name and password settings are correct.
Email Size LimitError 016-985Press OK Button
The email maximum file size limit was exceeded.Decrease the resolution of the scan, or reduce the scan dimensions.
Network Scan ErrorEmail Server FullError 016-765Press OK Button
The disk on the SMTP server is full.Make space available on the server’s disk.
Network Scan ErrorSMTP Connection FailedError 016-764Press OK Button
The location you are scanning to has a file with the same name.Specify a different name and then resend the file.
Network Scan ErrorCommunication TimeoutError 016-786Press OK Button
Can not connect to the SMB/FTP server.Check that the printer is physically connected to the network.
SMTP Server ErrorError 016-766Press OK Button
An error occurred on the SMTP server.Attempt the operation again. Consult your system administrator if the operation fails again.

Printer Console Error Messages
10-27
Scan ErrorError 116-396 or 116-987Restart Printer
A fatal error occurred.Restart the printer.If the error occurs again, contact the Fuji Xerox local representative office or an authorised dealer.
Message Condition/Reason/Action
Getting Help
10-28
Getting HelpThis section includes:
■ Printer Console Error Messages on page 10-23■ SimpleMonitor Alerts on page 10-28■ Obtaining the Product Information on page 10-29
Fuji Xerox provides several automatic diagnostic tools to help you produce and maintain print quality.
Printer Console MessagesThe printer console provides you with information and troubleshooting help. When an error or warning condition occurs, the printer console displays a message informing you of the problem. For more information, see Printer Console Error Messages on page 10-23.
SimpleMonitor AlertsSimpleMonitor is a tool that is included on the Software Pack CD-ROM. It automatically checks the printer status when you send a print job. If the printer is unable to print your job, SimpleMonitor automatically displays an alert on your computer screen to let you know that the printer needs attention.

Getting Help
10-29
Obtaining the Product Information
Obtaining the Latest Print DriverThe latest print driver can be obtained by downloading it from our web site.
Note: The communication fee shall be borne by users.
1. In your print driver's Properties dialog box, click Detailed Settings tab and then About.2. Click Fuji Xerox Web Site. Your web browser launches and our web site is displayed.3. Follow the instructions on the web site and download an appropriate print driver.
Note: • You can browse our web site also on the Software Pack CD-ROM included with the printer. To access
the web site, click Fuji Xerox Web Site on the startup window of the CD-ROM.• The URL of the driver download service page is as follows: http://www.fxprinters.com/• For the latest information about the print driver features, refer to the online help provided for the print
driver.
Updating the Printer's FirmwareOur web site also provides a tool that allows you to update the printer's firmware (software embedded within the printer) from your computer.
The latest firmware and updating tool can be downloaded from the following URL.
Follow the instructions on the web site and download the correct firmware update.
http://www.fxprinters.com/
Note: The communication fee shall be borne by users.

11-1
This chapter includes:
■ Cleaning the Printer on page 11-2■ Replacing the Consumables on page 11-3■ Ordering Supplies on page 11-18■ Managing the Printer on page 11-20■ Checking Page Counts on page 11-24■ Printer Auditron on page 11-25■ Moving the Printer on page 11-30
Maintenance 11

Cleaning the Printer
11-2
Cleaning the PrinterThis section describes how to clean the printer in order to maintain it in good condition and print clean printouts all the time.
WARNING: Before cleaning this product, turn off the machine and remove the power cord from the electrical outlet. Access to a live machine interior can cause electric shocks.
Cleaning the Document GlassThe document glass can be cleaned with a moistened lint-free cloth only. Do not use any kind of cleaning agent to clean the glass.
Cleaning the ExteriorClean the exterior of the printer about once a month. Wipe the parts with a moistened lint-free cloth. Then wipe with another dry lint-free cloth. For stubborn stains, apply a small amount of neutral detergent, and gently wipe the stain off.
Note: Do not spray the detergent directly on the printer. The liquid detergent may enter the printer through a gap and cause problems. Never use cleaning agents other than water or neutral detergent.
Cleaning the InteriorAfter clearing paper jams or replacing the print cartridge, inspect the inside of the printer before closing the printer covers.
CAUTION: • Always follow all warnings and instructions that are marked on or supplied with the equipment.• Remove any remaining pieces of paper.• Remove any dust or stains with a dry clean cloth.

Replacing the Consumables
11-3
Replacing the ConsumablesThis section includes:
■ Types of Consumables on page 11-3■ Replacing the Print Cartridges on page 11-5■ Replacing the Drum Cartridge on page 11-7■ Replacing the Fuser Unit on page 11-11■ Replacing the Feed Roller on page 11-13■ Replacing the ADF Roll and ADF Pad on page 11-15
Types of ConsumablesThe following consumables are provided for the printer. To order them, contact the dealer where you purchased the printer. For more information, see Ordering Supplies on page 11-18.
Print CartridgesThe printer has print cartridges of four colors; black (K), yellow (Y), magenta (M), and cyan (C). For information on how to replace the print cartridges, refer to Replacing the Print Cartridges on page 11-5.
Drum CartridgeThe drum cartridge consists of a photosensitive drum (drum) and a development unit. An electric charge is first projected to the drum and develops a print image on the drum's surface. For information on how to replace the drum cartridge, refer to Replacing the Drum Cartridge on page 11-7.
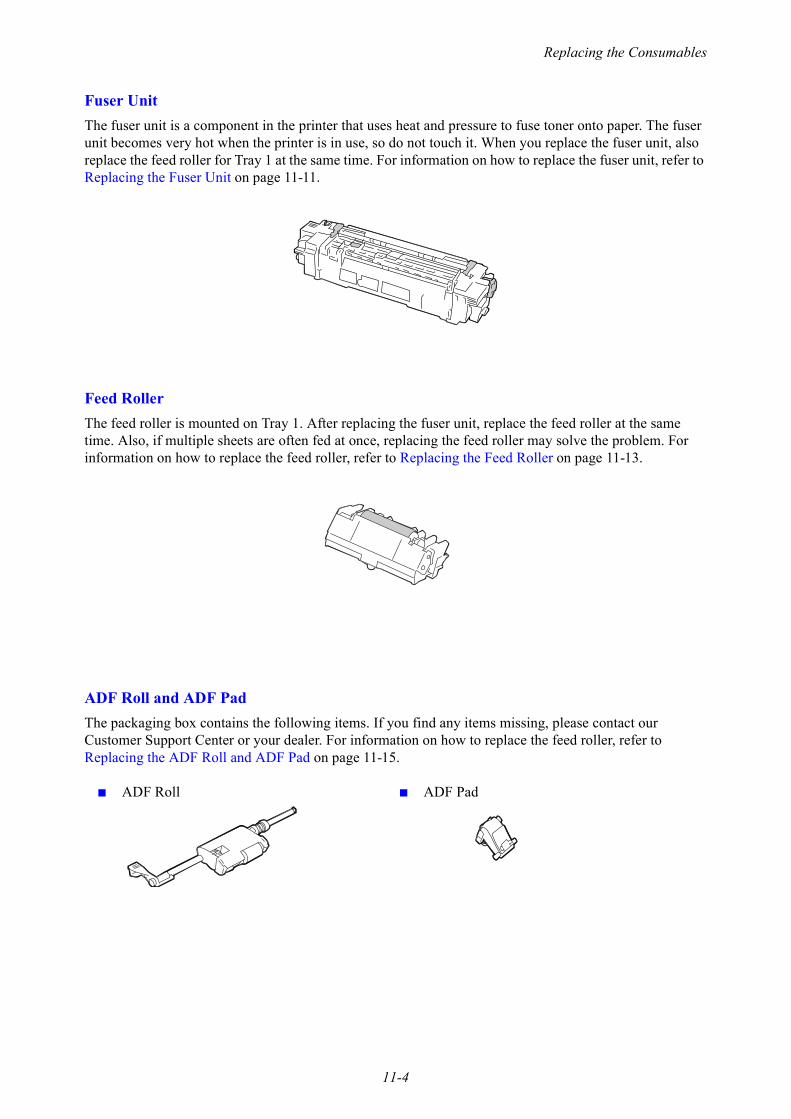
Replacing the Consumables
11-4
Fuser UnitThe fuser unit is a component in the printer that uses heat and pressure to fuse toner onto paper. The fuser unit becomes very hot when the printer is in use, so do not touch it. When you replace the fuser unit, also replace the feed roller for Tray 1 at the same time. For information on how to replace the fuser unit, refer to Replacing the Fuser Unit on page 11-11.
Feed RollerThe feed roller is mounted on Tray 1. After replacing the fuser unit, replace the feed roller at the same time. Also, if multiple sheets are often fed at once, replacing the feed roller may solve the problem. For information on how to replace the feed roller, refer to Replacing the Feed Roller on page 11-13.
ADF Roll and ADF PadThe packaging box contains the following items. If you find any items missing, please contact our Customer Support Center or your dealer. For information on how to replace the feed roller, refer to Replacing the ADF Roll and ADF Pad on page 11-15.
■ ADF Roll ■ ADF Pad
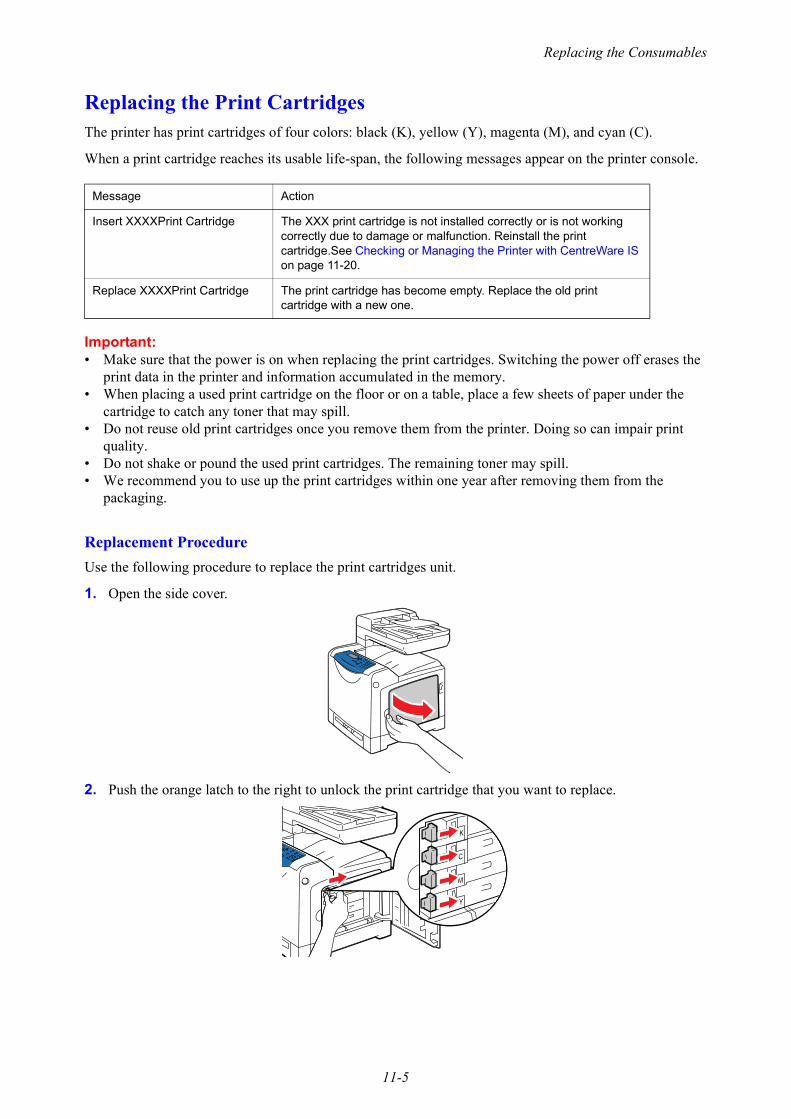
Replacing the Consumables
11-5
Replacing the Print CartridgesThe printer has print cartridges of four colors: black (K), yellow (Y), magenta (M), and cyan (C).
When a print cartridge reaches its usable life-span, the following messages appear on the printer console.
Important: • Make sure that the power is on when replacing the print cartridges. Switching the power off erases the
print data in the printer and information accumulated in the memory.• When placing a used print cartridge on the floor or on a table, place a few sheets of paper under the
cartridge to catch any toner that may spill.• Do not reuse old print cartridges once you remove them from the printer. Doing so can impair print
quality.• Do not shake or pound the used print cartridges. The remaining toner may spill.• We recommend you to use up the print cartridges within one year after removing them from the
packaging.
Replacement ProcedureUse the following procedure to replace the print cartridges unit.
1. Open the side cover.
2. Push the orange latch to the right to unlock the print cartridge that you want to replace.
Message Action
Insert XXXXPrint Cartridge The XXX print cartridge is not installed correctly or is not working correctly due to damage or malfunction. Reinstall the print cartridge.See Checking or Managing the Printer with CentreWare IS on page 11-20.
Replace XXXXPrint Cartridge The print cartridge has become empty. Replace the old print cartridge with a new one.

Replacing the Consumables
11-6
3. Pull out the cartridge holder until it stops, and then pull out the print cartridge.
Important: Be careful not to get your hands or clothes dirty with toner. If toner gets on your hands or clothes, wash it off immediately.
4. Remove a new print cartridge from the box. Make sure that the color of the new print cartridge matches the color on the label of the cartridge holder before replacing it. Shake the print cartridge five or six times to even out the toner inside.
5. Insert the print cartridge into the associated cartridge holder.
6. Place the cartridge holder back into its original position, and pull the latch of the print cartridge towards the front of the printer.
7. Close the side cover.

Replacing the Consumables
11-7
Replacing the Drum CartridgeThe drum cartridge consists of a photosensitive drum (drum) and a development unit. An electric charge is first projected to the drum and develops a print image on the drum's surface.
When the drum cartridge reaches its usable life-span, the following messages appear on the printer console.
Important: • Make sure that the power is on when replacing the drum cartridge. Switching the power off erases the
print data in the printer and information accumulated in the memory.• Do not expose the drum cartridge to direct sunlight or strong light.• To protect the drum cartridge against bright light, close the front cover within 3 minutes. If the front
cover remains open for more than 3 minutes, print quality may deteriorate.• Make sure that nothing touches or scratches the surface (black-colored film) of the belt unit. Scratches,
dirt, or oil from your hands on the film of the belt unit may reduce print quality.
Replacement ProcedureUse the following procedure to replace the drum cartridge unit.
1. Push the side button (right side) and open the front cover.
2. Turn the four lock levers of the drum cartridge counterclockwise by 90 degrees.
Important: •Do not turn the lock levers by more than 90 degrees with an excessive force.•Make sure that nothing touches or scratches the surface (black-colored film) of the belt unit.
Scratches, dirt, or oil from your hands on the film of the belt unit may reduce print quality.
Message Action
Replace Drum Cartridge Soon. Life Almost Over
The drum cartridge needs to be replaced soon. Have a new cartridge ready.

Replacing the Consumables
11-8
3. Hold the drum cartridge by the tabs at both ends, and slide the cartridge toward the front of the printer. Then, firmly hold the cartridge by both ends, and lift the cartridge out of the printer.
Important: Make sure to firmly hold the drum cartridge to prevent it from falling on the belt unit.
4. Open the new drum cartridge packaging.
5. Remove the new drum cartridge out of its packaging.

Replacing the Consumables
11-9
6. Place the drum cartridge on a flat surface, and completely pull out the eight strips of yellow ribbons from the side of the drum cartridge.
Important: Make sure to pull the yellow ribbons straight out horizontally. If pulled out diagonally, the ribbons may rip.
7. Hold the rear protective cover by the tab on top, and remove the cover from the drum cartridge.
Important: The front protective cover should be removed after installing the drum cartridge to the printer. Do not remove the cover in this step.
8. Hold the drum cartridge by both ends as shown in the figure, and then slide the cartridge along the guides inside the printer until it stops.
Note: Make sure to insert the drum cartridge into the printer until the lines on the cartridge and the printer match.
1
2

Replacing the Consumables
11-10
9. Turn the four lock levers clockwise by 90 degrees to lock the drum cartridge.
Important: Do not turn the lock levers by more than 90 degrees with an excessive force.
10. Hold the front protective cover by the tab on top, and carefully remove the cover from the drum cartridge.
Important: Make sure that nothing touches or scratches the surface (black-colored film) of the belt unit. Scratches, dirt, or oil from your hands on the film of the belt unit may reduce print quality.
11. Close the front cover.
Caution: •When closing the front cover, be careful not to get your fingers caught between (the left, right, top,
or bottom edge of) the cover and the printer.

Replacing the Consumables
11-11
Replacing the Fuser Unit
The fuser unit is a component in the printer that uses heat and pressure to fuse toner onto paper. The fuser unit becomes very hot when the printer is in use, so do not touch it. When you replace the fuser unit, also replace the feed roller for Tray 1 at the same time.
When the fuser unit reaches its usable life-span, the following messages appear on the printer console.
Caution: Fuser Safety
When removing the fuser unit, always switch off first and wait for 40 minutes until it cools off.
Important: To protect the drum cartridge from exposure to bright light, close the front cover within 3 minutes. If the front cover remains open for more than 3 minutes, print quality may deteriorate.
Replacement ProcedureUse the following procedure to replace the fuser unit.
1. Switch off the printer and wait for 40 minutes for the fuser to cool down before removal.2. Push the side button (right side) and open the front cover.
3. Hold the gray tab on the right side of the fuser unit, and the turn the right side of the fuser unit toward the front of the printer.
Message Action
Replace Fuser Unit Soon.Life Almost Over.
It is time to replace the fuser unit.Replace the fuser unit.
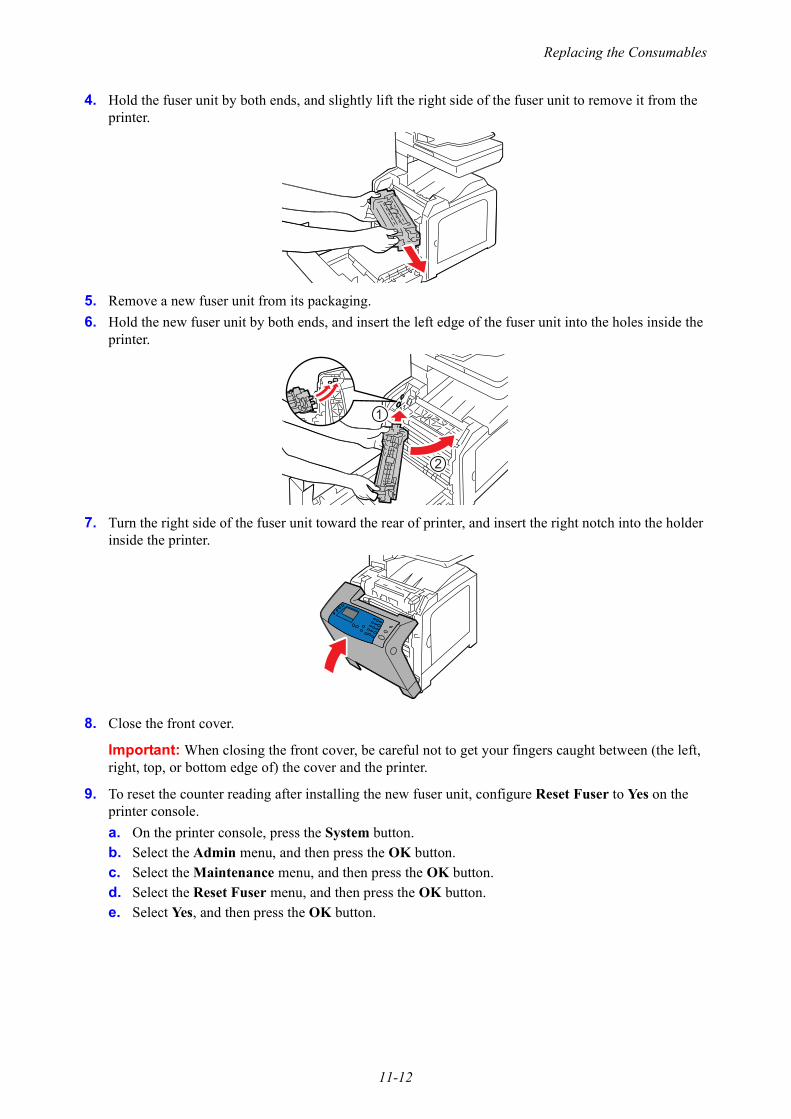
Replacing the Consumables
11-12
4. Hold the fuser unit by both ends, and slightly lift the right side of the fuser unit to remove it from the printer.
5. Remove a new fuser unit from its packaging.6. Hold the new fuser unit by both ends, and insert the left edge of the fuser unit into the holes inside the
printer.
7. Turn the right side of the fuser unit toward the rear of printer, and insert the right notch into the holder inside the printer.
8. Close the front cover.
Important: When closing the front cover, be careful not to get your fingers caught between (the left, right, top, or bottom edge of) the cover and the printer.
9. To reset the counter reading after installing the new fuser unit, configure Reset Fuser to Yes on the printer console.a. On the printer console, press the System button.b. Select the Admin menu, and then press the OK button.c. Select the Maintenance menu, and then press the OK button. d. Select the Reset Fuser menu, and then press the OK button. e. Select Yes, and then press the OK button.

Replacing the Consumables
11-13
Replacing the Feed RollerThe feed roller is mounted on Tray 1. After replacing the fuser unit, replace the feed roller at the same time. Also, if multiple sheets are often fed at once, replacing the feed roller may solve the problem.
Important: Switch off the printer and wait for 40 minutes for the fuser to cool down before removal.
Replacement ProcedureUse the following procedure to replace the Feed Roller.
1. Pull Tray 1 out of the printer.
2. Remove all the paper from Tray 1.3. While pushing the feed roller by the tabs at both ends in the inward directions, pull the roller out of the
groove in the axle.
4. Align the new feed roller to the groove in the axle.
11
2

Replacing the Consumables
11-14
5. Insert the feed roller into the axle until it clicks into place. Make sure that the projections fit completely into the slots and the roller hook resets into the groove in the axle.
6. Load the paper removed in Step 2 into Tray 1.7. Push the tray all the way into the printer.
Caution: When inserting the tray, be careful not to get your fingers caught between the tray and the printer.
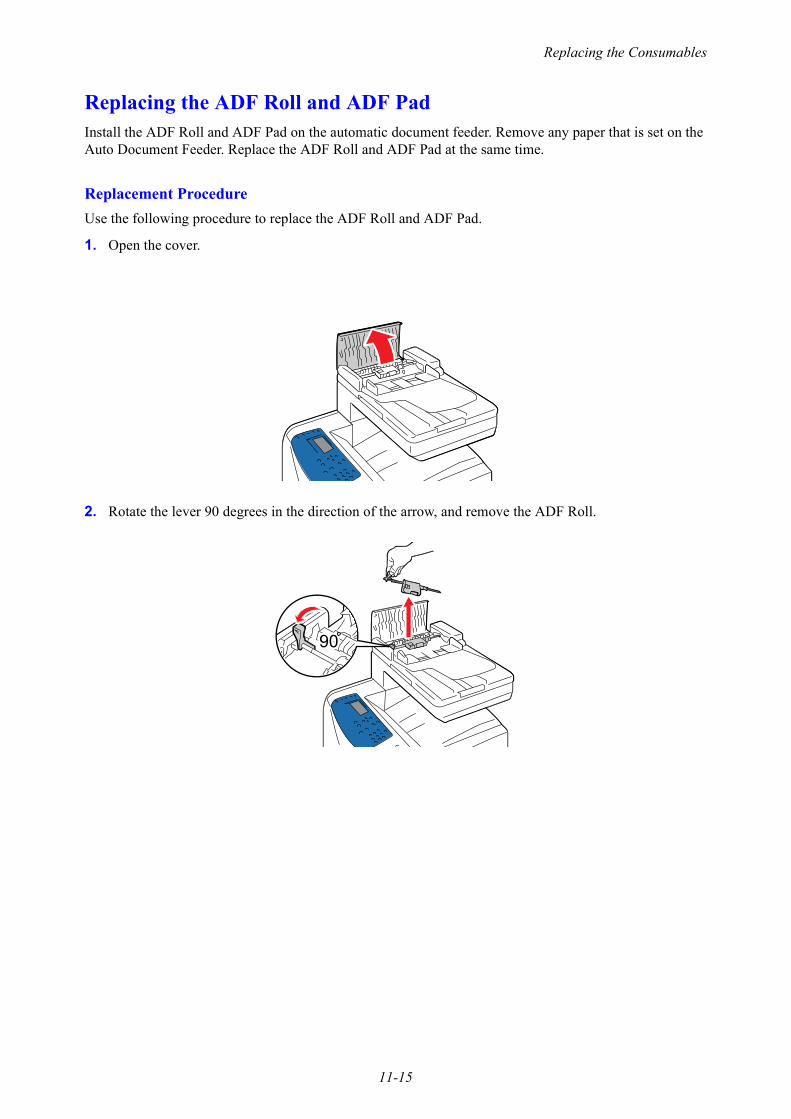
Replacing the Consumables
11-15
Replacing the ADF Roll and ADF PadInstall the ADF Roll and ADF Pad on the automatic document feeder. Remove any paper that is set on the Auto Document Feeder. Replace the ADF Roll and ADF Pad at the same time.
Replacement ProcedureUse the following procedure to replace the ADF Roll and ADF Pad.
1. Open the cover.
2. Rotate the lever 90 degrees in the direction of the arrow, and remove the ADF Roll.

Replacing the Consumables
11-16
3. Pinch the claws on both sides of the ADF Pad.
4. Pull out the ADF Pad.
5. Insert and align the leading edge of the ADF Pad in the bearings.
Important: A spring is attached to the rear side of the ADF Pad. When inserting the ADF Pad, do not dislocate the spring.
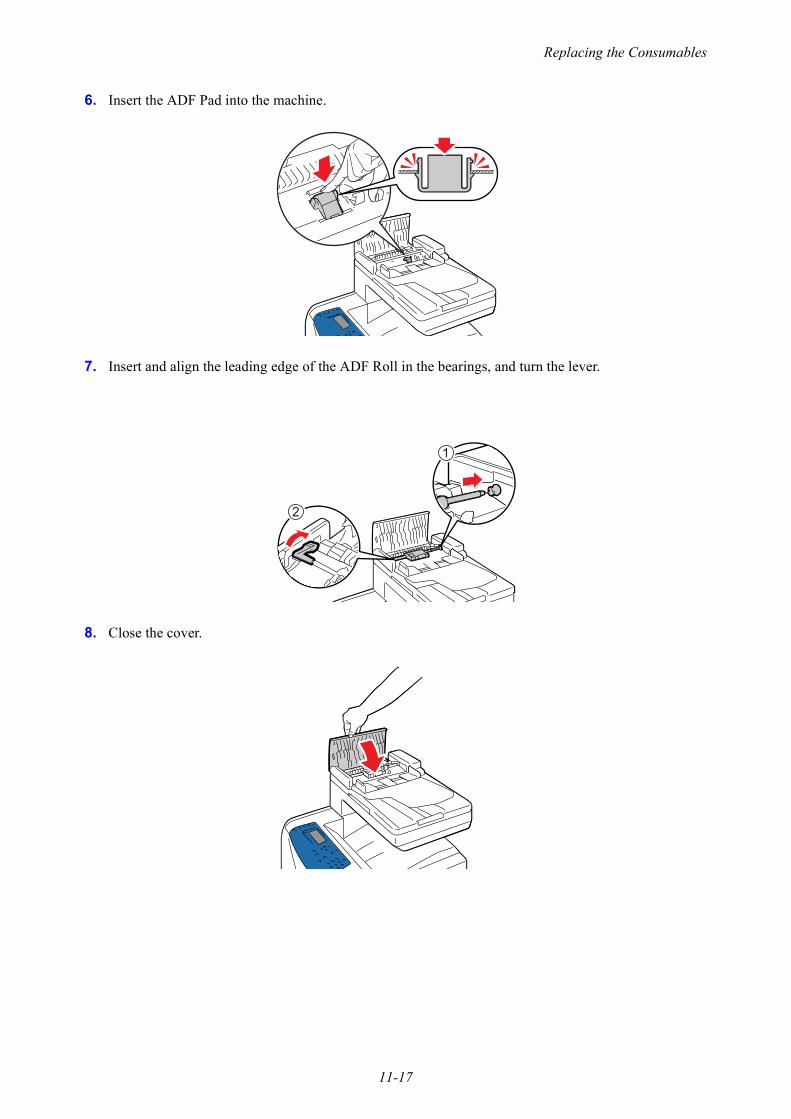
Replacing the Consumables
11-17
6. Insert the ADF Pad into the machine.
7. Insert and align the leading edge of the ADF Roll in the bearings, and turn the lever.
8. Close the cover.
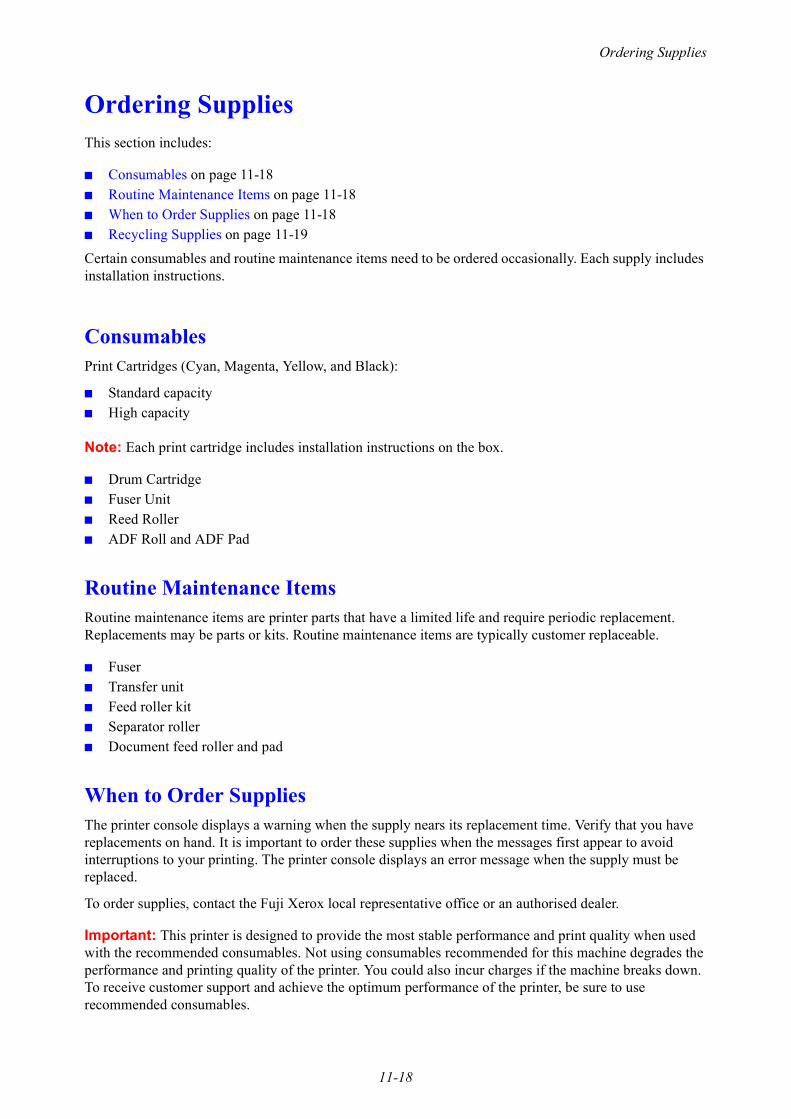
Ordering Supplies
11-18
Ordering SuppliesThis section includes:
■ Consumables on page 11-18■ Routine Maintenance Items on page 11-18■ When to Order Supplies on page 11-18■ Recycling Supplies on page 11-19
Certain consumables and routine maintenance items need to be ordered occasionally. Each supply includes installation instructions.
ConsumablesPrint Cartridges (Cyan, Magenta, Yellow, and Black):
■ Standard capacity■ High capacity
Note: Each print cartridge includes installation instructions on the box.
■ Drum Cartridge■ Fuser Unit■ Reed Roller■ ADF Roll and ADF Pad
Routine Maintenance ItemsRoutine maintenance items are printer parts that have a limited life and require periodic replacement. Replacements may be parts or kits. Routine maintenance items are typically customer replaceable.
■ Fuser■ Transfer unit■ Feed roller kit■ Separator roller ■ Document feed roller and pad
When to Order SuppliesThe printer console displays a warning when the supply nears its replacement time. Verify that you have replacements on hand. It is important to order these supplies when the messages first appear to avoid interruptions to your printing. The printer console displays an error message when the supply must be replaced.
To order supplies, contact the Fuji Xerox local representative office or an authorised dealer.
Important: This printer is designed to provide the most stable performance and print quality when used with the recommended consumables. Not using consumables recommended for this machine degrades the performance and printing quality of the printer. You could also incur charges if the machine breaks down. To receive customer support and achieve the optimum performance of the printer, be sure to use recommended consumables.

Ordering Supplies
11-19
Recycling Supplies■ For environmental protection and efficient use of resources, returned print cartridges are reused as
parts, recycled materials, or reused for energy generation.■ Proper disposal of unwanted drum and print cartridges is required. Drum and toner cartridge containers
should not be opened with force and must be returned to our Customer Support Center.■ To recover scarce resources, rechargeable batteries used in the returned machines are recycled as
materials or reused for energy generation.
Managing the Printer
11-20
Managing the PrinterThis section includes:
■ Checking or Managing the Printer with CentreWare IS on page 11-20■ Checking Printer Status with SimpleMonitor (Windows) on page 11-21■ Checking Printer Status Through E-mail on page 11-21
Checking or Managing the Printer with CentreWare ISWhen the printer is installed in a TCP/IP environment, you can check printer status and configure settings using a web browser on a network computer. You can also use CentreWare IS to check the remaining volume of consumables and the paper loaded in this printer.
Note: When using the printer as a local printer, you cannot use CentreWare IS. For details about checking the status of a local printer, refer to Checking Printer Status with SimpleMonitor (Windows) on page 11-21.
Starting CentreWare ISUse the following procedure to start CentreWare IS.
1. Launch your web browser.2. Enter the printer’s IP address in the browser’s Address field.
The CentreWare IS screen appears.
Using Online Help
For details regarding the items that can be set in each CentreWare IS screen, click the Help button to display the Online Help.
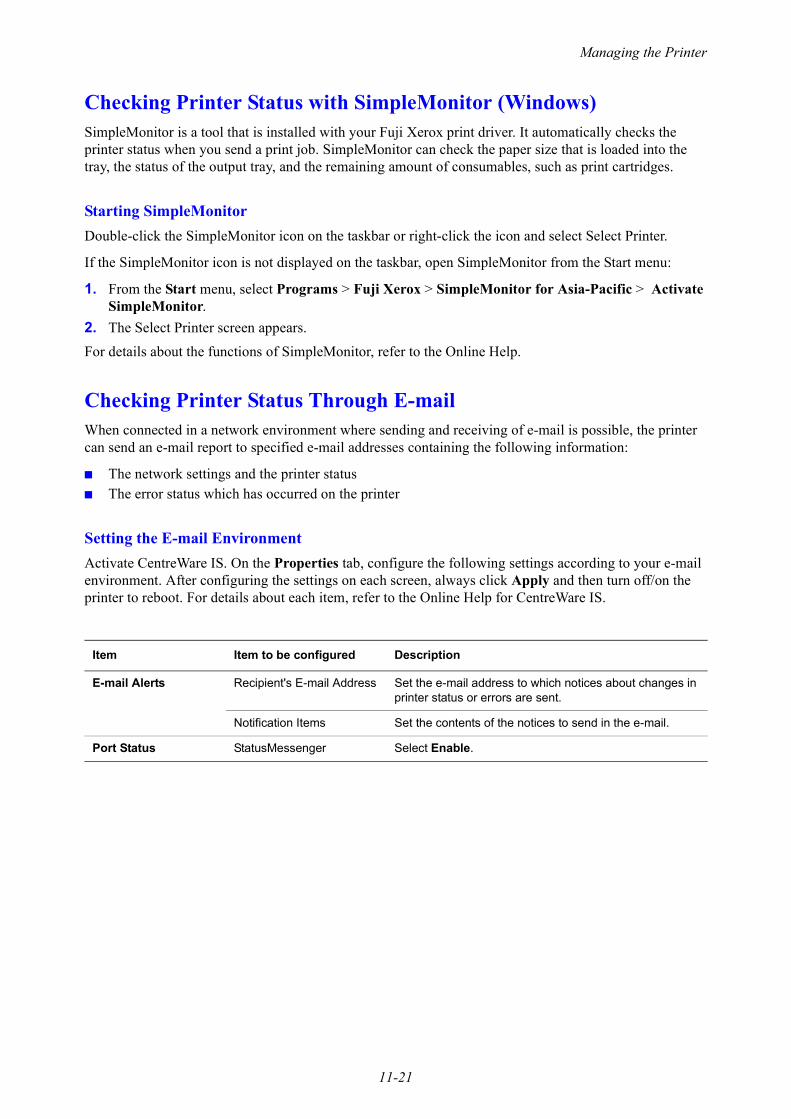
Managing the Printer
11-21
Checking Printer Status with SimpleMonitor (Windows)SimpleMonitor is a tool that is installed with your Fuji Xerox print driver. It automatically checks the printer status when you send a print job. SimpleMonitor can check the paper size that is loaded into the tray, the status of the output tray, and the remaining amount of consumables, such as print cartridges.
Starting SimpleMonitorDouble-click the SimpleMonitor icon on the taskbar or right-click the icon and select Select Printer.
If the SimpleMonitor icon is not displayed on the taskbar, open SimpleMonitor from the Start menu:
1. From the Start menu, select Programs > Fuji Xerox > SimpleMonitor for Asia-Pacific > Activate SimpleMonitor.
2. The Select Printer screen appears.
For details about the functions of SimpleMonitor, refer to the Online Help.
Checking Printer Status Through E-mailWhen connected in a network environment where sending and receiving of e-mail is possible, the printer can send an e-mail report to specified e-mail addresses containing the following information:
■ The network settings and the printer status■ The error status which has occurred on the printer
Setting the E-mail EnvironmentActivate CentreWare IS. On the Properties tab, configure the following settings according to your e-mail environment. After configuring the settings on each screen, always click Apply and then turn off/on the printer to reboot. For details about each item, refer to the Online Help for CentreWare IS.
Item Item to be configured Description
E-mail Alerts Recipient's E-mail Address Set the e-mail address to which notices about changes in printer status or errors are sent.
Notification Items Set the contents of the notices to send in the e-mail.
Port Status StatusMessenger Select Enable.

Managing the Printer
11-22
Checking the Printer Status with E-mailThis section describes cautions when sending e-mail to the printer to check the printer status.
■ You can specify any title for the e-mail when checking the printer status or changing the printer settings.
■ Use the commands described in the next section to create the text of the e-mail.
Protocol Settings > E-mail
Printer's E-mail Address, SMTP Server Address,SMTP Server Port Number, E-mail Send Authentication,Login Name, Password, SMTP Server Connection Status,POP3 Server Address,POP3 Server Port Number, Login Name,Password,POP3 Server Check Interval,APOP Settings,POP3 Server Connection Status
Select appropriate settings for sending and receiving e-mail.
Permitted E-mail Address When setting the permission for checking information and changing the settings for an e-mail address, input the e-mail address that is permitted to receive the e-mail. If no address is input here, the printer receives e-mails from all users.
Password When setting the password for access to the printer (both read only and read/write), check the Use Password check box to set the password.
Item Item to be configured Description

Managing the Printer
11-23
Commands That Can Be Used in E-mail Text
Use each command according to the following rules:
■ Prefix all commands with “#”, and specify the #Password command at the top of the e-mail.■ Command lines without “#” are ignored.■ Write one command on each line and separate each command and parameter with a space or a tab.
When the same command is written two or more times in one e-mail, the second and subsequent commands are ignored.
Example of Commands
■ When the read only password is “ronly”, and to check the printer status:
#Password ronly
#Status
#Network Info
Command Parameter Description
#Password Password Use this command at the top of the e-mail when a password for read only is set. You can omit this command when the password is not set.
#NetworkInfo Set this when you want to check information on the network settings list.
#Status Set this when you want to check the printer status.

Checking Page Counts
11-24
Checking Page CountsThe total number of printed pages can be checked at the printer console. Four meters are available: Meter 1, Meter 2, Meter 3, and Meter 4.
The Meater Readings counts the number of pages printed properly. Single side color print (including N-up) is counted as one job, and 2-sided print (including N-up) is counted as two. During 2-sided printing, if an error occurs after one side is printed properly, it is counted as one.
When printing color data, that has been converted by using ICC profile on an application, with the Color (Auto) setting, the data is printed by color even if it seems to be black and white data on the monitor. In that case, Meter 1 and Meter 4 is increased.
When doing 2-sided printing, a blank page may be inserted automatically depending on the settings of the application. In this case, the blank page is counted as one page.
For information about the individual meter, see Meter Readings on page 9-7
Use the following procedure to check a meter:
1. Press the System button.2. Press either the Up Arrow or Down Arrow button until Meter Readings is displayed, and then press
the Forward Arrow or OK button.3. Press the Up Arrow or Down Arrow button until the desired meter is displayed.

Printer Auditron
11-25
Printer AuditronThe printer provides Authentication and Auditron Administration features. The Authentication feature controls access to the printer's other features. Whereas the Auditron Administration feature manages the use of each feature of the printer.
This section briefly explains the Authentication and Auditron Administration features and the settings required for both features. The information in this section is intended for system administrators.
This section includes:
■ Overview of the Authentication and Auditron Administration Features on page 11-25■ Configuring the Authentication and Auditron Administration Features on page 11-26■ Registering Login Information on the Printer on page 11-26■ Registering the Login Information on the Print Driver (Computer) on page 11-29
Overview of the Authentication and Auditron Administration FeaturesEnabling the Authentication and Auditron Administration features allows you to limit user access to the printer and manage and count the number of sheets printed by each user.
Printing from ComputersDepending on your type of print job, the use of the following features is restricted.
Auditron Administration FeatureThe Meter Report lists the number of monochrome and color pages/sheets printed to date by each user.
Note: • The meter counts listed on this report begin from the time when the Authentication and Auditron
Administration features were enabled.• Disabling the Authentication and Auditron Administration features initializes the meter counts.
Job Type Restricted Features
Printing using a print driver You must set the login information such as your user ID and
password on your print driver. Only jobs with login information
that matches the information registered on the printer can be
printed.
When you are prohibited to print in color, you can print only in
monochrome.
When you are permitted to print only a certain number of
pages, you are not allowed to print if the number has reached
the maximum.
Printing without using a print driver You are allowed to print only when the [Non-account Print]
setting on CentreWare Internet Services is set to [Enabled].
This setting is disabled by default.

Printer Auditron
11-26
Configuring the Authentication and Auditron Administration Features
Enabling User AuthenticationOn CentreWare Internet Services, register the login information of users who are granted access to the printer. The printer allows or denies access based on the user IDs and passwords registered on CentreWare Internet Services.
Registering Login Information on the PrinterThis section briefly explains how to enable the Authentication feature on CentreWare Internet Services and register users who are permitted to use the printer. For details about each setting item, refer to the online help for CentreWare Internet Services.
1. Launch your web browser.2. Enter your printer’s IP address in the browser’s Address field.3. Click the Print tab.
The Print Auditron screen is displayed.
4. Select the Enabled check box under Print Auditron.5. When you want to permit printing without using a print driver, select the Enabled check box under
Non-account Print.6. Click the Apply button.7. A window that prompts you to reboot the printer appears. On the window, click Reboot Machine.8. When the printer is rebooted, refresh the web browser.

Printer Auditron
11-27
9. Verify that User Account is displayed on the Print Auditron page.
10. Click Edit User Account.11. On the Edit User Account page, enter User Account Number and click Edit.
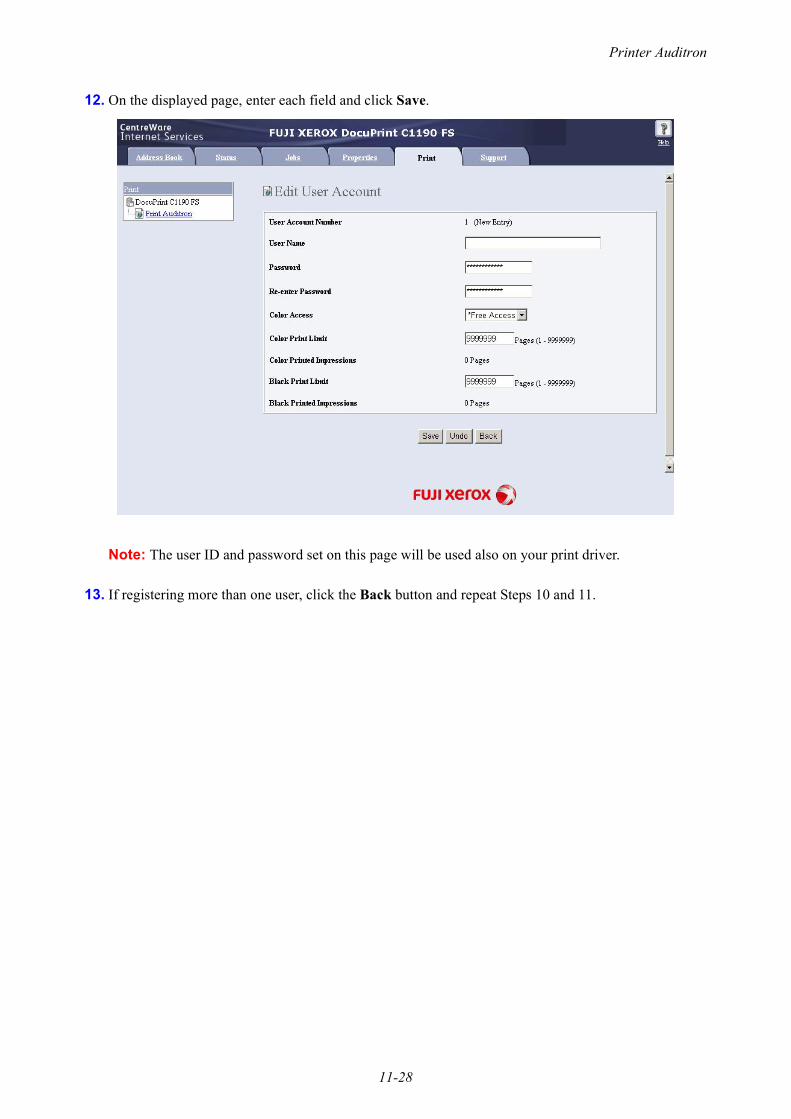
Printer Auditron
11-28
12. On the displayed page, enter each field and click Save.
Note: The user ID and password set on this page will be used also on your print driver.
13. If registering more than one user, click the Back button and repeat Steps 10 and 11.
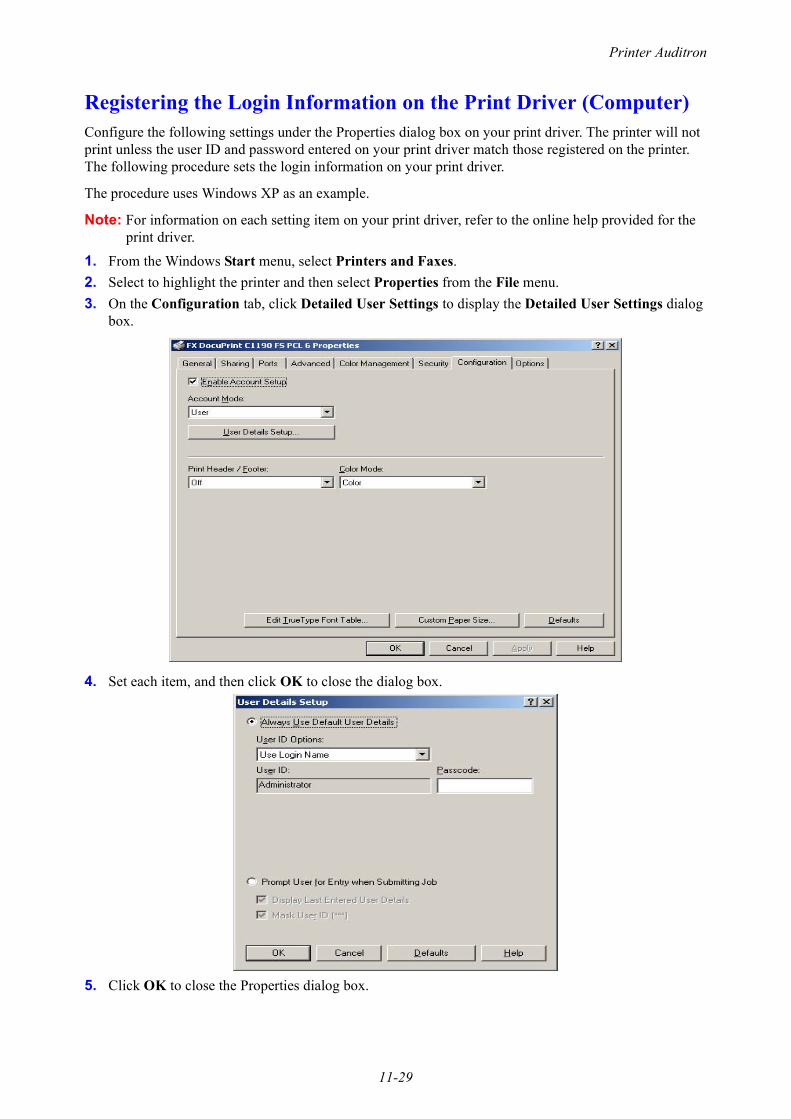
Printer Auditron
11-29
Registering the Login Information on the Print Driver (Computer)Configure the following settings under the Properties dialog box on your print driver. The printer will not print unless the user ID and password entered on your print driver match those registered on the printer. The following procedure sets the login information on your print driver.
The procedure uses Windows XP as an example.
Note: For information on each setting item on your print driver, refer to the online help provided for the print driver.
1. From the Windows Start menu, select Printers and Faxes.2. Select to highlight the printer and then select Properties from the File menu.3. On the Configuration tab, click Detailed User Settings to display the Detailed User Settings dialog
box.
4. Set each item, and then click OK to close the dialog box.
5. Click OK to close the Properties dialog box.

Moving the Printer
11-30
Moving the PrinterCAUTION:
• The machine (only the main unit including consumables) weighs 29kg. Make sure to carry the equipment by three or more persons.
• When lifting the machine, face the front panel and firmly grip the recessed areas provided on both sides of the machine. Never try to lift the machine by gripping any other areas. Lifting the machine by gripping any other areas can cause the machine to fall and result in injuries.
Note: The front side of this printer is heavier than the rear. Take note of this difference in weight when moving the printer.
1. Turn off the printer.

Moving the Printer
11-31
2. Disconnect the power cord, interface cable, and any other cables.
Warning: Never touch a power cord with wet hands. Danger of electric shock exist. It can cause electric shocks.
3. Remove any paper in the output tray and return the paper stopper to its original position.
4. Pull out the paper tray from the printer and remove any paper in the tray, and then reinstall the tray. Keep the paper wrapped and away from humidity and dirt.

Moving the Printer
11-32
5. Lift the printer and move it gently.
Note: If the printer is to be moved over a long distance, the print cartridges should be removed to prevent toner from spilling and the printer should be packed inside a box.
6. After transporting the printer:■ Adjust color before using it.
See also: Color Calibration on page 10-17
Index-1
IndexNumerics2 sided printing
selecting, 5-19
Aactivity report, 8-18adding
an individual, 8-7individual speed dial entry, 8-7
address bookcreating fax group, 8-10editing groups, 8-11
Address Book Editor, 3-3ADF pad, 11-15ADF roll, 11-15adjusting
copies, 6-10admin menu
address book, 9-7admin reports, 9-16fax settings, 9-9maintenance, 9-14network, 9-9print language, 9-8scan to e-mail, 9-16secure settings, 9-15system settings, 9-12
administratorpassword, 3-2
alphanumeric keypad, 8-4, 9-17alphanumeric keypad symbols, 9-17applications
importing scanned images, 7-17AutoIP
manually setting the printer’s IP address, 4-7
setting the printer’s IP address dynamically, 4-6
available printer drivers, 4-9
Bbackground
color
see images through thin paper originals, 7-21
basiccopying, 6-2
black-and-whiteselecting for scanning, 7-19
buttons, 2-7entering pauses in phone numbers, 8-4inserting characters, 8-4one touch, 2-6using the Pause control panel button, 8-4
CCentreWare IS
changing or modifying the printer’s IP address, 4-8
checking status, 2-11creating password, 3-2enabling DHCP, 4-6managing printer, 11-20online help for, 11-20overview, 3-2password, 3-2setting the printer’s IP address
dynamically, 4-6starting, 11-20
changing the IP address using CentreWare IS, 4-8
charactersinserting in names and numbers, 8-4
checking printed pageshow to check the meter, 11-24
choosing a network connection, 4-3cleaning
printer, 11-2printer exterior, 11-2printer interior, 11-2
clearingfaxes, 8-16
collating, 6-2copies, 6-10
coloradjusting for thin paper originals, 7-21selecting for scanning, 7-19

Index
Index-2
color calibrationadjusting, 10-17automatic adjustment, 10-17determining values, 10-18enabling/disabling automatic
adjustment, 10-19manual adjustment, 10-17printing the Color Registration
chart, 10-17color calibrationn
entering values, 10-18color saturation
adjusting, 6-6computer
sending faxes from, 8-5configuring the network address, 4-5connection
Ethernet, 4-3, 4-4Ethernet and USB, 4-3USB, 4-4
consumables, 11-18ADF pad, 11-15ADF roll, 11-15drum cartridge, 11-7error messages, 10-23feed roller, 11-13fuser unit, 11-11print cartridges, 11-5
copybasic settings, 6-3basics, 6-2black-and-white, 6-3collating copies, 6-10color, 6-3default settings, 9-4image adjustments, 6-5image placement adjustment, 6-8lighten or darken an image, 6-5options, 6-3output adjustments, 6-10printing multiple pages on a sheet, 6-8selecting a tray to use, 6-4selecting color or black-and-white
copies, 6-3setting default copy tray, 6-3setting default settings, 6-4specifying document type, 6-4
copy margins
setting, 6-9copy quality
problems, 10-16copying
adjusting color saturation, 6-6creating
individual speed dial entry, 8-7creating an administrator password, 3-2custom paper
defining sizewith PCL driver, 5-33
custom size paper, 5-33printing from Tray 1, 5-34supported for Tray 1, 5-33
Ddefault settings, 9-4
copy, 9-4fax, 9-5scan, 9-5
delay sending a fax, 8-13DHCP
enabled by default, 4-6enabling on the control panel, 4-6enabling with CentreWare IS, 4-6manually setting the printer’s IP
address, 4-7setting the printer’s IP address
dynamically, 4-6dial directory
report, 8-18dialing fax numbers
inserting characters, 8-4inserting letters or numbers, 8-4inserting pauses, 8-4, 8-18
directoryindividual, 8-7
documentfeeder, 6-2, 8-4glass, 6-2, 8-4
document glass, 5-4document type
selecting, 6-4drivers
available, 4-9description, 4-9installing, 4-9

Index
Index-3
installing scan driver, 7-3Macintosh, 4-9PCL, 4-9print and scan, 3-2selecting 2 sided printing, 5-19UNIX/Linux, 4-9Windows 2000 or later, 4-10
drum cartridge, 11-7dynamically setting the printer’s IP
address, 4-6
Eelectrical safety, 1-3e-mail
commands for, 11-23enabling AutoIP on the printer, 4-6enabling DHCP on the printer, 4-6envelopes, 5-24
guidelines, 5-24printing from Tray 1, 5-25
error and warning messages, 10-28error messages
about consumables, 10-23printer console, 10-23
Ethernetscanning features, 7-2
Ethernet connection, 4-3Express Scan Manager, 3-3
Ffax
configuration, 8-14default settings, 9-5limiting access to, 8-17setup, 8-2troubleshooting, 8-19
fax address bookadding individual and group entries, 8-7
fax numberinserting pauses, 8-18
faxesenabling secure faxes, 8-16inserting pauses in fax numbers, 8-18limiting junk faxes, 8-17managing functions, 8-15printing or clearing, 8-16printing secure faxes, 8-16
reports, 8-18sending a fax from your computer, 8-5sending a fax to a single recipient, 8-4sending from the printer, 8-4transmission report, 8-15
faxingbasic, 8-4changing default settings, 8-14delay sending, 8-13lightening/darkening the image, 8-13problems receiving, 8-20quick method, 8-4selecting options, 8-13setting resolution, 8-13solving fax problems, 8-19to group, 8-10using address book, 8-7
feed roller, 11-13FTP
scanning to server, 7-15fuser unit, 11-11
Ggetting help, 10-28
SimpleMonitor alerts, 10-28technical support, 2-12
glossy paper, 5-30printing from Tray 1, 5-30printing guidelines, 5-30
groupfax directory, 8-10
group directoryreport, 8-18
guidelinesenvelopes, 5-24glossy paper, 5-30labels, 5-26paper storage, 5-5paper usage, 5-3using the document glass, 5-4

Index
Index-4
Hhelp
resources, 2-12how to check the meter, 11-24
Iimages
adjusting, 6-5adjusting placement, 6-8importing into an application, 7-17lightening or darkening, 6-5placing several on one page, 6-8setting color mode, 7-19
individualadding a speed dial entry, 8-7fax directory, 8-7
informationabout your printer, 2-12Installation Guide, 2-12printer management tools, 2-12Quick Use Guide, 2-12resources, 2-12system settings, 2-12technical support, 2-12
information pagesprinter console menu, 9-6
installing printer drivers, 4-9Windows 2000 or later, 4-10
IP addresschanging or modifying using
CentreWare IS, 4-8dynamically setting, 4-6setting automatically (Windows
only), 4-5setting manually, 4-7
Jjob
individual printing optionsMacintosh, 5-17Windows, 5-15
selecting printing optionsWindows, 5-15
Llabels, 5-26
guidelines, 5-26printing from Tray 1, 5-27
lettersselecting using the alphanumeric
keypad, 8-4loading paper
Tray 1, 5-11Local Area Network (LAN), 4-5long paper, 5-33
MMacintosh
importing scanned images into an application, 7-18
scanning images to a Macintosh application, 7-18
selecting printing options for an individual job, 5-17
maintenanceordering supplies, 11-18routine maintenance items, 11-18
managingfax functions, 8-15printer, 11-20
manually setting the printer’s IP address, 4-7overrides AutoIP, 4-7overrides DHCP, 4-7
mediasupported, 5-2unacceptable types, 5-5
menu settingschanging, 9-3
menus, 9-2admin menu, 9-7default settings, 9-4descriptions of, 9-4tray settings, 9-6
messagesnetwork related, 10-26printer console, 10-28SimpleMonitor, 10-28
meter readings, 9-7total printed pages, 11-24
meterstotal page counts, 11-24
Index
Index-5
modifying the IP address using CentreWare IS, 4-8
movingprinter, 11-30
multiple images on a page, 6-8
Nnetwork
choosing a network connection, 4-3configuring the network address, 4-5creating a Local Area Network
(LAN), 4-5settings, 9-9setup and configuration, 4-2TCP/IP and IP addresses, 4-5
network connection, 4-4Ethernet, 4-3
numbersselecting using the alphanumeric
keypad, 8-4N-Up
placing multiple images on a page, 6-8
Ooperating systems
printer drivers, 4-9options
printing, 5-14ordering supplies, 11-18original size
setting for scanning, 7-20originals
printed on thin paper, 7-21output
adjusting copies, 6-10
Ppaper
custom sizes, 5-33damaging to the printer, 5-5envelopes, 5-24glossy, 5-30labels, 5-26loading in the paper trays, 5-9printing on specialty media, 5-24setting sizes, 5-8
setting trays, 5-8setting types, 5-8storage guidelines, 5-5supported, 5-2thin originals, 7-21types, 5-2unacceptable media types, 5-5usage guidelines, 5-3
paper jamsautomatic document feeder, 10-9fuser unit, 10-7Manual Feeder, 10-2paper tray, 10-5
passwordenabling secure faxes, 8-16printing or clearing secure faxes, 8-16
pausesinserting in fax numbers, 8-4, 8-18
PCL, 4-9print cartridges, 11-5print quality
problems, 10-12print status
checking, 2-11printer
address bookAddress Book Editor, 3-3
changing or modifying the IP address using CentreWare IS, 4-8
cleaning, 11-2cleaning the exterior, 11-2cleaning the interior, 11-2configurations, 2-5driver, 3-2drivers, 4-9enabling AutoIP, 4-6enabling DHCP, 4-6front view, 2-2information resources, 2-12internal parts, 2-4main parts, 2-2managing, 11-20moving, 11-30parts of scanner, 2-4
Index
Index-6
problems, 10-20rear view, 2-3setting the IP address, 4-5
printer console, 2-6entering text with, 9-17error messages, 10-23layout, 2-6menus, 9-2messages, 10-28report/list, 2-9
printer console menuschanging settings, 9-3description of, 9-4information pages, 9-6system settings, 9-12tray settings, 9-6
printer driveravailable, 4-9installing, 4-9Layout tab, 5-15Macintosh, 4-9operating systems, 4-9Output Options tab, 5-15page description languages, 4-9Paper/Quality tab, 5-15PCL, 4-9UNIX/Linux, 4-9Windows 2000 or later, 4-10
printer statuschecking via e-mail, 11-22Status Messenger, 11-21
printing2 sided, 5-19custom paper
with Macintosh driver, 5-34with PCL driver, 5-34
custom size, 5-33envelopes, 5-24
with PCL driver, 5-25faxes, 8-16glossy paper, 5-30labels, 5-26Layout tab, 5-15multiple images on a page, 6-8N-Up images, 6-8options
Macintosh, 5-17selecting, 5-15, 5-17
Windows, 5-15Output Options tab, 5-15Paper Quality tab, 5-15secure faxes, 8-16selecting 2 sided, 5-19selecting individual job printing options
Macintosh, 5-17Windows, 5-15
selecting options, 5-14selecting printing preferences
(Windows), 5-14printing confidential document
secure print, 5-35problems receiving faxes, 8-20problems sending faxes, 8-19
Rrecycling supplies, 11-19report
activity report, 8-18dial directory report, 8-18fax transmission report, 8-15group directory report, 8-18pending jobs report, 8-18printing a fax report, 8-18
report/list, 2-9resolution
setting for faxes, 8-13setting for scanning, 7-20
resourcesinformation, 2-12
routine maintenance items, 11-18
Ssafety
electrical, 1-3operational, 1-7
sample print, 5-37scanned images
placing in Windows or Macintosh applications, 7-17
scannerdriver, 3-2installing driver, 7-3parts, 2-4
scanning

Index
Index-7
black-and-white images, 7-19changing settings for a single job, 7-21color images, 7-19default settings, 9-5Express Scan Manager, 3-3importing images into a Windows
application, 7-17importing scanned images into a
Macintosh application, 7-18into application, 7-17limiting access to, 8-17loading documents, 7-5loading documents for, 7-5loading originals in the document
feeder, 6-2loading originals on the document
glass, 6-2options, 7-19over network, 7-8overview, 7-2scan resolution, 7-20setting color mode, 7-19setting image file type, 7-20specifying original size, 7-20suppress background color, 7-21to email, 7-13to FTP server, 7-15using the WIA manager, 7-18via USB, 7-6, 7-7
secure print, 5-35security
enabling secure faxes, 8-16printing secure faxes, 8-16
selecting2 sided printing, 5-19printing options, 5-14printing options for an individual job
Macintosh, 5-17Windows, 5-15
printing preferences (Windows), 5-14setting
printer’s IP address dynamically, 4-6printer’s IP address manually, 4-7
setting up the network, 4-2settings
fax, 9-9network, 9-9secure, 9-15
system, 9-12setup
scan to email, 7-13SMTP, 7-13
SimpleMonitor, 3-3alerts, 10-28
specialty media, 5-24custom size paper, 5-33envelopes, 5-24glossy paper, 5-30labels, 5-26
specificationscontroller, 1-16electrical, 1-14environmental, 1-14performance, 1-15physical, 1-14
speed dialadding an individual entry, 8-7
Status Messengerchecking printer status, 11-21commands, 11-23configuring, 11-21
suppliesordering, 11-18recycling, 11-19when to order, 11-18
supported paper and media, 5-2supported paper sizes and weights
Tray 1, 5-6symbols
inserting in names and numbers, 8-4system settings, 9-12
TTCP/IP addresses, 4-5technical support, 2-12transmission
print fax report, 8-15Tray 1, 5-31
printing custom size paper, 5-34printing envelopes, 5-25printing glossy paper, 5-30printing labels, 5-27
troubleshootingfax problems, 8-19receiving faxes, 8-20sending faxes, 8-19technical support, 2-12
Index
Index-8
TWAIN driverMacintosh
importing scanned images into applications, 7-18
Windowsscanning images into
applications, 7-17two sided printing
selecting, 5-19
Uunacceptable paper and media, 5-5usage guidelines
paper, 5-3USB, 4-4
scanning features, 7-2scanning over, 7-6, 7-7
Wwarning and error messages, 10-28WIA image manager, 7-18Windows
importing scanned images into an application, 7-17
install printer drivers for Windows 2000 or later, 4-10
printing options, 5-15selecting printing options for an
individual job, 5-15WIA image manager, 7-18

DocuPrint C1190 FS User GuideME4326E2-1 (Edition 1)
December 2008 Fuji Xerox Co., Ltd. Copyright © 2008 by Fuji Xerox Co., Ltd.