documentation - kalagaan.com · documentation hair designer what is hair designer.....2
TRANSCRIPT

DocumentationHair Designer
What is Hair Designer......................................................................................................................2How to start......................................................................................................................................2Layers...............................................................................................................................................3Layer : Short hair & fur...................................................................................................................4
Polygons tab................................................................................................................................4Material tab.................................................................................................................................6Motion tab...................................................................................................................................7
Layer : Long hair.............................................................................................................................8Polygons tab................................................................................................................................8Motion tab.................................................................................................................................10
Layer : fur......................................................................................................................................11Material tab...............................................................................................................................11Polygons tab..............................................................................................................................12LOD system..............................................................................................................................12Painting tools : Fur mask..........................................................................................................13Painting tools : Fur brush..........................................................................................................14Painting tools : Fur color...........................................................................................................14Motion tab.................................................................................................................................14
Texture generator...........................................................................................................................15Atlas parameters :......................................................................................................................15Texture parameters :..................................................................................................................16Save & Apply :..........................................................................................................................16
Hair shaders...................................................................................................................................17Custom Shader...............................................................................................................................18Runtime API..................................................................................................................................19
1/19

What is Hair DesignerHair Designer is a new way for creating hair cut or fur within unity engine.You can paint hair strands on the mesh and control the design.Hair & fur are dynamic, motion and the gravity effects are computed by a compatible shader.
Timelaps video : https://www.youtube.com/watch?v=eLUjmbSEZwMForum : http://forum.unity3d.com/threads/hair-designer-dynamic-hair-fur-tool.431393/
How to start
First, select the gameobject with one of these components : MeshFilter or SkinMeshRenderer.The mesh will be the base for the hair creation.
Add the HairDesigner component to the gameObject, from the menu :Menu → Component → Hair Designer → Hair Designer
2/19

Layers
The Hair Designer extension is based on a layer system, each layer will generate a mesh including all the hair strands. A layer can be enable or disable with the checkbox.
Click on the layer for opening the edition mode.In this mode, the name is editable and the delete button is available.
Each Layer is defined by a type :• 'Short Hair/fur' : paint strand on the mesh surface.• 'Long hair' : create hair using a curve tool.• 'fur' : generate shells.
3/19
The edition mode is divided in 3 tabs : Polygons, Material and Motion.
A layer must be locked when the design is over. Lockingthe layer allow you to save all the meshes to the project.If you need to create a prefab or to duplicate thegameObject, you must save the layers.
For locking/unlocking a layer, go to the Polygons tab.
If one of the layer has been modified, the 'save layer' panel will be displayed.

Layer : Short hair & fur
Polygons tab
The polygons tab contains the modeling options of the tool, and a panel is available in the sceneview with the painting tools.
• Global scale : the scale of the hair strands for the current layer.• Min spacing : the minimum space between strands, this value is modulated by the Intensity
of the paint brush.• Taper : the taper value for the bottom(x) and the top (y) of the strands.• Strand subdivision : each strand is defined by a quad mesh. Increasing subdivision set a
better look and feel, but add more triangles to the overall hair cut. • Random : a random amplitude factor for each strand.• Length : the length of the hair strands• Normal switch : switch normal from the normal of the face (0) to the tangent of
the curve (1). Use this parameter to change how the light react on the hair.• Gravity : the gravity factor• Strand curve : the curve fo the hair strands.• Clear layer : remove all strand from the layer.• Lock Layer : lock the polygon creation and compute the final mesh.
4/19

Paint tool :This is the tool for creating hair strand on the target surface.Strand spacing is defined by 'Min spacing' parameter and the intensity of the brush.
Ctrl : Remove the hair strands .
Brush tool :This tool set the hair strand direction.
Ctrl : Raise the hair strands.Shift : Smooth the hair strands' orientation.
Scale tool :Scale up the hair strands.
Ctrl : Scale down.Shift : Smooth the hair strands.
5/19

Material tab
The material tab define the material used for the mesh and all the instance parameters defined in the shader.The default material is 'HD_TextureAtlas' with the 'HairDesigner/Atlas' shader.Any material can be used, but only a compatible shaders will have instance parameters.The compatible materials are lacated in the folder 'hairDesigner/Materials'.
Drag & drop a material in the 'Material' field, and the 'Instance parameters' panel will be available for the compatible shaders ( 'Hair Shader' section).
The instance parameters of the material define a unnique settings for the layer, all theses settings can be modified at runtime (see the 'Runtime API' section)
Tips : Switch between Polygon tab and Material tab for tuning the haircut design, then lock the layer.
6/19

Motion tab
Hair Designer is a dynamic hair system, the motion system requires a motion zone. The motionzone encapsulates the hair mesh and is attached to a gameObject. For SkinMeshRenderer, motionzones have to be attached to a bone. The motion zone detect the motion of its parent and apply itto all the hair strands in its range. You can add many motion zones ( up to 50 ) for a more complexeffect.
7/19
Position & hierarchy :
Drag & drop the parent transform or chooseit in the bone list (SkinMesh renderer only)
Offset and Radius are defined by movingthe zone in the scene view.
Motion parameters :
The motion is defined by a curve, definedby the damping and the bouncingparameters.
The limit parameter fix the motionamplitude.
Note : a section on the curve represent 1 second.

Layer : Long hair
Polygons tab
This layer is composed of polygons defined by curves with procedural parameters.Each curve can be modified in the sceneview.
The tools functions are :• Ctrl : Add hair curve to the model.• Shift : show hair selection buttons in the scene view .• Ctrl + Shift : show delete buttons for each curve.• Alt : move all node of the current curve.• Alt+ Shift : show the duplicate buttons.
Note : the selection button of an unselected curve is hidden when a curve is on the back, change the camera view to see them.
When several curves are selected, you can change their global settings in the scene view, or change each parameter individually in the inspector tab.
8/19

Curve parameters :
• Scale : the scale of the polygons on the curve.
• Start angle: Start angle of the strands.
• End angle : End angle of the strands.
• stand count : number of strands following the curve.
• subdivision X : subdivision for the width.
• subdivision Y : subdivisions along the curve.
• Folding : use this parameter for wavy hair, acording to the 'wave' and 'wave power' parameters in the material tab.
• Wave amplitude : amplitude of the wave along curve.
• Wave period : period of the wave along curve.
• Start offset : Start offset in a circle at the start of the curve.
• End offset : End offset in a circle at the end ot the curve.
• Rnd seed : Random seed of the hair strand, use this to change the look of the strands.
• Normal switch : switch normal from the normal of the face (0) to the tangent ofthe curve (1). Use this parameter to change how the light react on the hair.
• UV X : duplicate the UV,x for simulating more strands on the same strand.
• Parent Bone : lock the curve on a specific bone. Try to lock to the closest one.
• Dynamic : if checked, the curve will move acording to its parent's motion.
• Gravity : how gravity will be applied on the bones, from 0 to 1.
• Root rigidity: how the root of the strand will react to motion. 0 → full motion / 1 → static
• Rigidity : how the base of the hair (start tangent) react to motion.0 → full motion / 1 → static
note: gravity, root rigidity and rigidity are multiplied by the global parameters in the motion tab, you should modify them only if the strand doesn't react like the others.
9/19

Motion tab
The motion tab is similar to the short hair motion tab, there's some additionnals settings for the bones and cloth motion.
• Gravity : how gravity (Physics.gravity) will be applied on the bones.
• Root rigidity : how the strand root react to motion.
• Root rigidity : how the strand react to motion.
• Elasticity : how long the hair length can be deformed.
• Smooth : a smooth parameter applied on the current stand pos and the last computed.
• Accurate bone rotation : enable a more accurate algorithm, this could use more CPU, it canbe activated/deactivated at runtime.
note: gravity, root rigidity and rigidity are multiplied by the strand parameters in the polygons tab.
Colliders :
a list of capsule colliders that will react with the hair bones and the Physics cloth component.
Cloth Physics :
Generate a cloth component for the layer.
10/19

Layer : furThe fur layer is a powerfull and easy tool for generating an amazing fur effect to your characters.
Material tab
11/19
The material slot enable or disable the fur effect foreach material of the renderer.
Main texture : the fur texture, it could be the originalmesh texture, or another one.
Density texture : this texture generate the furimplantation, the tiling defined the thickness of eachstrand.Mask texture : this texture contains the length and thedirection of each strand on the mesh. The texture isgenerated by the painting tools.
Color texture : this texture contains additionnal colors.The texture is generated by the painting tools.
Fur length : he maximum fur length.
Thickness : extra thickness
Gravity : gravity factor
Smoothness : PBR smoothness factor
Metallic : PBR Metallic factor
Emission : Emission factor
AO : ambiant occlusion for the root of the strands
Rim color & Rm power : settings for Rim effect.

Polygons tabThis layer use the shell technic, so you can change the shell count to increase fur quality.A high shell count will use more ressources, try to set it to the lower as possible.
The casting mode defined if the type of shadows for the fur, it could impact the FPS depending ofyour lighting settings.
LOD systemWhen the camera is far from the gameobject, the shell count can be decrease to improveperformances. The fur width can be upscaled for keeping the look of the entire fur with a lowershell count. When the LOD is enabled, the parameters are defined according to the distance of thecamera. The current LOD (red) depend of the sceneview camera, you can adjust each LOD group byzooming the camera in the sceneview.
The '+' button add a new LOD group, each LODparameters can be edited and are linked to the lastsceneview rendered.
Note : If the original mesh cast shadows, you don't need to enable shadows for the fur when thecamera is too far.
The 'recalculate normal' parameter can be checked if there's some problem with the original mesh normals.
12/19
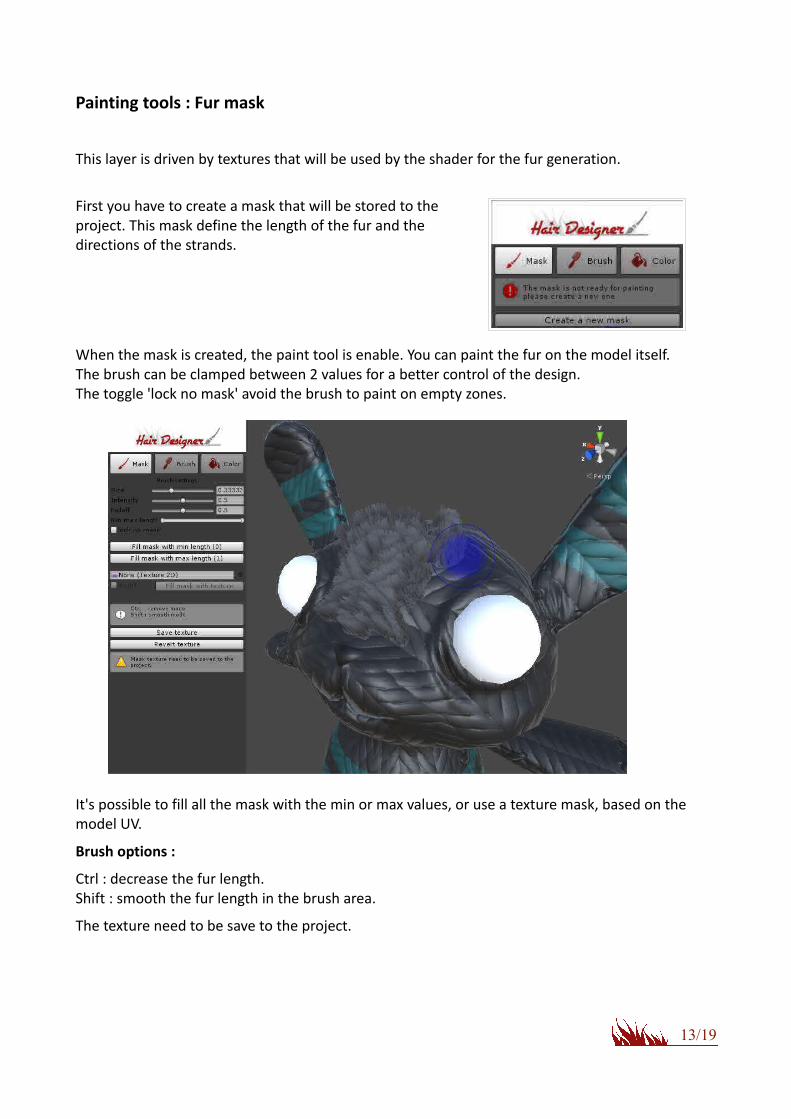
Painting tools : Fur mask
This layer is driven by textures that will be used by the shader for the fur generation.
First you have to create a mask that will be stored to theproject. This mask define the length of the fur and thedirections of the strands.
When the mask is created, the paint tool is enable. You can paint the fur on the model itself.The brush can be clamped between 2 values for a better control of the design.The toggle 'lock no mask' avoid the brush to paint on empty zones.
It's possible to fill all the mask with the min or max values, or use a texture mask, based on the model UV.
Brush options :
Ctrl : decrease the fur length.Shift : smooth the fur length in the brush area.
The texture need to be save to the project.
13/19

Painting tools : Fur brush The brush tool move fur direction.
Brush options :
Ctrl : raise the fur.Shift : smooth the fur direction in the brush area.
Note : The brush tool works with the model geometry, so it would be more precise on a high poly mesh.
Painting tools : Fur color
Fur color is fully customizable, the 'Replace/Mix' parameter define how the color is combine with the main texture, you can mix with it or override it.Ctrl : back to the original texture.Shift : smooth the colorin the brush area.
Motion tab
The motion tab is similar to the short hair motion tab
14/19

Texture generatorThe texture generator is a usefull tool for generating hair textures atlas.The Texture generator is available in the material tab of a compatible shader( ex : 'HD_TextureAtlas' ) or from the unity menu : Window->HairDesigner->Texture Generator.When the tool is opened from the material tab, all the settings are stored into the hair layer, andthe generated texture will be assigned to the textures slots of the material.
Atlas parameters :
Texture grid : the size of the texture gridAtlas size : the size of each generated texture
The texture generator can create the following textures :- Diffuse : the main color of the hair. - Normal : the normal shape for each hair.- AO : the ambiant occulsion for self shadowing.- Secular/Aniso : the texture conatian the lignthing parameters for the specularity.
15/19

Texture parameters :
Each hair texture can be edited and previewed in the tool. Tthe texture parameters of the currenttexture can be copied to all the others with a different random parameter. So the main workflow isto set the global look of the haircut by duplicating the same parameters (with a random factor),and then add some modifications on each texture.
Global panel:Hair count : the number of hair to draw.Random : the random parameter for all the min/max parameters.Root offset : the min and max value of the root offset (0 : bottom / 1:top )Length : the min/max length of the hair.Scale : the scale of the strand (height, root width and tip width )Hair width : the width for each hair.
Shape panel:The wave parameters are defined by the amplitude, the period and a min/max value.Strand : wave amplitude and period for the strand.Hair 1 : first wave applied on each hair.Hair 2 : second wave applied on each hair.
Diffuse / AO panel:Noise : a scaled noise applied on the diffuse and the AO textures.Color : 3 colors can be defined, the gradient is defined by the root color, the tip color and the bias.AO : the AO contrast, this value will be multiplied by the shader AO parameter.
Specular / Aniso panel:Specular : the specularity gradient for the root and tip.Aniso shift : the anisotropic texture define the reflection according to the light direction and the camera view. This parameter is defined for the 2 specular settings of the atlas shader.Aniso Mask : This mask is applied on the second specular settings of the atlas shader.
Save & Apply :
When the textures edition is done, you have to click on the 'Save & Apply' button. All the textures will e saved in the project folder and assigned to the material slots of the HairDesigner layer.You can easily adjust the settings and see the result on the mesh by one click.
16/19

Hair shaders
Atlas ShaderThis shader uses the texture generator ouptputs and provide per instance parameters. This is the fastest hair shader of the package and the more realistic.
Procedural & Procedural V2All the hair are generated by the shader, the Hair density should be as small as possible for better performances. You can use the parameters 'UVX' and 'Hair per pass' for simulate more hair and maximize the performances.
FurShellThis shader is required fur the fur layer. This is a specific shader using the shell technic to simulate the fur.
FireThis is a procedural shader, a flame is generated on each strand.
StandardThis is a cutout version of the standard shader. There's no instance parameter, so a new material must be use for each variations.
17/19

Custom ShaderThe compatible shaders uses the Hair Designer vertex program function.
Here a way to include it in your custom shader :1. Change the name to 'HairDesigner/shaderName'2. Add the include file : 'HairDesigner.cginc'3. Add the vertex program function :
void vert (inout appdata_full v, out Input o){
HairDesigner(v);}
or include the function in your existing vertex function.
How to include instance parameter to the Hair Designer UI :
1. Create a class with the name : HairDesignerShader + ShaderName public class HairDesignerShaderFire : HairDesignerShader
{//HERE THE MEMBERS
public float _NbFlame = 5f; public Color _Color1 = Color.yellow;
public override void UpdatePropertyBlock(ref MaterialPropertyBlock pb) {
//HERE THE PROPERTY BLOCK UPDATE pb.SetColor("_Color1", _Color1); pb.SetFloat("_NbFlame", _NbFlame); } }
2. Create the associated Editor class : HairDesignerShader + ShaderName + Editor
[CustomEditor(typeof(HairDesignerShaderFire))] public class HairDesignerShaderFireEditor : Editor { public override void OnInspectorGUI() { HairDesignerShaderFire s = target as HairDesignerShaderFire;
GUILayout.Label("Render", EditorStyles.boldLabel); s._NbFlame = EditorGUILayout.Slider("Details", s._NbFlame, 1, 50); s._Color1 = EditorGUILayout.ColorField("_Color1", s._Color1); } }
18/19

Runtime APIAll the shader parameters can be modified at runtime.Here a code sample :
using System.Collections;using System.Collections.Generic;using UnityEngine;using Kalagaan.HairDesignerExtension; // use the namespace
public class ChangeHairColor : MonoBehaviour {
public HairDesigner m_hair; // this is the reference of the hairDesigner instance
void Update() { HairDesignerGenerator layer = m_hair.GetLayer(0); //get the layer by id or by name
//the shader parameters have to be casted into the shader class used by the layer //All the shader classes can be found in the folder "HairDesigner/scripts/" HairDesignerShaderAtlas shader = layer.GetShaderParams() as HairDesignerShaderAtlas;
//all the shader parameters can be modified shader.m_tipColor = Color.white; shader.m_rootColor = Color.red; shader.m_length = .5f; shader.m_alphaCutoff = .8f; //... }}
19/19