document resume ac 010 752 title firefighting … · the office of civil defense wishes to express...
TRANSCRIPT

DOCUMENT RESUME
ED 054 435 AC 010 752TITLE Firefighting for Civil Defense E ergencies; Support
Assistants for Fire Emergencies. InstructorGuide--Part B.
INSTITUTION International Association of Fire Chiefs, New York,N.Y.
SPONS AGENCY Office of Civil Defense (DOF ) , Washington, D.C.PUB DATE Jul 71NOTE 54p.
EDRS PRICEDESCRIPTORS
ABSTRACT
AF-$0.65 HC-$3.29*Civil Defense; *Emergency Programs; Films;Firefighters; *Fire Science Education; Instructional
Aids; *Lesson Plans; Reference Materials; TeachingGuides
This guide has been developed for use in presentingpart "B" of the course of instruction for Support Assistance for FireEmergencies. It is arranged by class sessions of three hours each.Some of the sessions are divided into two or more sections coveringspecific subject areas. The intention is to include instruction whichwill extend the trainees capabilities; make him generally moreuseful; and qualify him to lead small groups of citizens to suppresssmall fires stemming from nuclear attack. Each of the eight lessonplans follows the same format: Course Title and Number; Objectives;Instructional Aids; Selected References; Suggested Films; Main Topic;and Teaching Points. (DB)

LC%
re% FIREFIGHTING
LIN For4=1
CIVIL DEFENSE EMERGENCIES
SUPPORT ASSISTAIM FOR FIRE EMERGENCIES
INSTRUCTOR GUIDE-PART B
IG--9.2BJuiy 1971
Developed for the Office of Civil Defenseby the
International Association of Fire ChiefsDevelopment Committee

ACKNOWLEDGMENTS
The Office of Civil Defense wishes to express its appreciation to the members ofthe International Association of Fire Chiefs Development Committee for their capableguidance and assistance in developing the training course for Support Assistants forFire Emergencies.
Review Committee Members and the organizations they represent are:John CloughertyFire Chief, RetiredBoston, Massachusetts
David B. GratzFire ChiefSilver Spring, Maryland
Ja es M. HalloranDirector of Fire and Civil DefenseKansas City, Missouri
T. A. McGaughey (Deceased)Fire ChiefWichita, Kansas
G. A. MitchellFire ChiefOpelika, Alabama
Donald M. O'BrienGeneral ManagerInternational Association of Fire
Chiefs
Lester R. SchickFire Chief, RetiredD- -nport, IowaPi President, International
Association of Fire ChiefsJohn Fred ShreveConsultantInternational Association of
Fire ChiefsNew York, New York
Gordon VickeryFire ChiefSeattle, Washington
Curtis VolkamerChief Fire Marso...1Chicago, Illinois
International Association of Fire Chiefs Work Group :Keith RoyerSupervisorFire Service ExtensionIowa State University
Floyd W. NelsonChief InstructorFire Service ExtensionIowa State University
Ii
William E. Clark, ChiefBureau of Fire InstructionState of FloridaOcala, Florida

INTRODUCTION
GeneralThis guide has been developed for use in presenting part "B" of the course of instruction
for Support Assistance for Fire Emergencies. It is arranged by class sessions of three hourseach. Some of the sessions are divided into two or more sections covering specific subjectareas. The coverage given each lesson is not exhaustive, but is meant to serve only a basicfoundation for the class sessions.
The intention is to include in part "B" instruction which will extend the trainees caps-bilif:es, make him generally more useful, and qualify him to lead small groups of citizens tosuppress small fires stemming from nuclear attack.
Firefighting terms and practices vary somewhat across the nation. Where there are localor area variation in terms and practices the instructor should bring this to the attention ofthe students.
It is suggested that, where at all possible, this course be supplemented by further train-ing in radiation detection instruments and fall out, also, by additional training in first aid.
It is further suggested that regular firefighters can profit from instruction in the subjectmatter covered in the lessons on "The Role of the Fire Service in Civil Defense," "ModernWeapons and Radioactive Fallout," and "Shelter Duties" in both the A and B courses.
Selection af InstructorsArrangements should be made to have qualified fire service training officers serve as
instructors. Other qualified personnel, such as radiological monitor instructors, can be ofassistance in presenting certain lessons. Personnel selected as instructors should not only bequalified in a particular skill, but should also know how to instruct others.
Training Auxiliary PersonnelThe quality of training resulting from this course will depend upon (1) the number and
caliber of people receiving the training; (2) the ability of the instructor to maintain theirinterest and enthusiasm ; and (3) the support given to the course by local fire officials.
This guide has been designed to serve as a guide to the instructor in a relatively widerange situation. In no instance should this guid e serve as a sole source of information for theinstructor, nor should it be used, or quoted, as a sole authorag in any given subject area.
The instructor should carefully review each lesson plan in this guide to understand itsexact objective as well as the source of its material. He should supplement each lesson withappropriate reference materials, and suitable examples appropriate to his particular locality.Local organizational charts, staffing patterns, operational procedures, and forms should hemade a part of the lessons. The instructor should be constantly alert for subject matterwhich may need revision due to advances in firefighting practices, as well as changes in CivilDefense requirements.
At various places throughout the Lesson Plans notes are given in parenthesis for theguidance of the instructor. They should not be used as part of the presentation to the class.
iii
Also, suggested visual and other aids to be use d with corresponding lecture materials will benoted under the main topic headings where necessary.
For each section of the Lesson Plans a time period has been suggested. These time per-iods may vary with the individual instructor, the amount of local information added, and thesize of the class where skills development is suggested. No breaks have been specified, but itis suggested that where the sessions are mainly lecture, the students be given a ten minutebreak each hour.
Students should be given the opportunity to participate in the course as much as possibleto enhance their interest. They should be encouraged to ask questions and express ideas. Theinstructor, however, should be alert and diplomatically cut off the long-winded relating of per-sonal experiences which have little hearing on the subject matter. Class discussions can bevery fruitful when they are carefully guided by the instructor.
Teaching aids and EquipmentTraining aids, references, and suggested handout materials are listed in the instructor's
guide. The local or state Civil Defense office can provide current Civil Defense publications,and the local fire department may provide the r2ference sources listed.
A number of large illustrations are included at the back of the instructor's guide. If theinstructor has an overhead projector available, he may make transparencies from these illus-trations, or he may use them with an opaque projector. Sets of 2 X 2 slides may be availableof these same illustrations.
For the sections of the class "Fire Behavior" the instructor should plan to include smalltable demonstrations. Wherever the lesson includes discussion of fire department tools orequipment, these should be available as teaching aids.
iv

LESSON PLAN NO. 1
COURSE TITLE AND NUMBER : Firefighting f or Civil Defense EmergencyPART BSection IIntroduction.Section IIAlert and Fire Operations.Section IIIRadioactive fallout.
TIME : 3 hours
OBJECTIVES:1. To give the student an understanding of civil defense and fire service operational planning
to cope with nuclear fire emergencies.2. To develop further the ability of the student to use a dos" eter and increase his under-
standing of protective measures for fallout.
INSTRUCTIONAL AIDS :Chalkboara, chalk, and eraserOverhead, opaque or slide projectorDosimeters, 1 per trainee, as available :
1. CDV-138. 2. CDV-730. 3. CDV-740 or CDV-742,CDV-750, Dosimeter Charger, one per 2 trai nees, as available.Survey meters, one per class as available :
1. CDV-700. 2. CDV 710 or CDV-715.State and local fire operations plans, and list ing of local shelters.Student : Student ManualFirefighting for Civil Defcnse Emergency- -Part A (SAFE A)
SELECTED REFERENCESInstructor's:
The Effects of Nuclear WeaponsDA Pam 39-3, 1962, ARC and DOD, Chapter XI, for saleby the Superintendent of Documents, USGPO, Washington, D.C.
Timc of EmergencyOCD H-14 March, 1968.Manufacturers' instruction and maintenance manuals, as appropriate.Fire Prevention and Control in CD EmergenciesFederal CD Guide, Part E, Chapter 10 with
Appendices 1 & 2, June 1969.
SUGGESTED FILM:"Abo t Fallout," DOD/CD 3-220-24 minutes.
1

MAIN TOPIC TEACHING POINTS
I. SESSION INTRO-DUCTION-20 min.
A. Welcome to the course Support Assistant for Fire EmergencyPart B1. Relation to "Support Assistant" Part A
a. To increase understanding of problems.b. Develop some operational skills.c. Qualify for leadership of small groups of citizens during
nuclear emergency.2. Class schedule.
a. Time. b. Place.
B. Purpose of Civil Defense.1. Provide shelter protection.
a. Survey.b. Licensing.c. Stocking.
2. Issue emergency warnings.a. National warning.b. State system.c. Local system.Coordinate Emergency Operations.a. Emergency operating centers.b. Operational planning.
4. Establish Emergency Communications,a. Importance of communication.b. Importance of dependability of system.
5. Develop Radiological Monitoring Systems.a. For area plotting of fallout.b. For operational personnel.
C. Objectives of B Course.
1. Train personnel to augment and assist fire fighters.a. Shelter fire protertion.b. Suppression of nuclear weapon caused fires.c. Other major disasters.
2. Train personnel to .instruct other citizens in emergency proce-du res during periods of increased tension ( Cuba).a. Fire prevention.b. Attack warning.c. Fallout protection.d. Fire suppression "Support Assistants".
3. Train to supervise small groups of citizens.a. In absence of regular fire fighting personnel.b. Neighborhood fires.c. Shelter fire protection.
2

MAIN TOPIC TEACHING POINTS
IL ALERT AND FIREOPERATIONSPLAN-50 min.
Section A. This lesson deals with the following :Introduction 1. Importance of subject matter.
2. Emergency standard operating procedure for "Support As-sistant" personnel.
3. Local fire operations plan.Importance of B. The "Support Assistant" must know how to conduct and protectSubject Matter himself in case of an alert and what immediate action he should
take as a "Support Assistant."C. The "Support Assistant" must have some idea of the local civil
defenbe and fire plans and his probable assinment in case of anuclear emergency.
Emergency Proce- D. Alert Warning.dures for "Support 1. Aet as individual citizens unless activated.Assistants" 2. If away from regular addresscheck on possible activation
with planned contact points.E. Attack Warning.
1. Report to assigned shelter if feasible.2. Take cover in best available shelter when it is not feasible to
go to assigned shelter.3. Report to shelter manager.
(demonstrate) F. No Warning.1. Dive behind best available cover.2. Position.
a. Face down.b. Fetal position.c. Cover head with arms.
3. After, flash, heat.a. Wait in position for blast.b. Flash travels at speed of light, blast at approximately same
speed as sound (about the same relationship as betweenlightning and thunder).
c. Take action as suggested under alert and attack warning.Local Fire G. Fire Defense Plan.Operations Plan 1. State.
2. Local Organization.H. Control Points (Emergency Operating Centers).
1 Civil Defense.2. Fire Operations.
I. Mutual Aid Arrangements.

KAIN TOPIC TEACHING POINTS
(use visuals ofplans and locations
as available)
III. RADIOACTIVEFALLOUTTime 90 n:M.
SectionIntroduction
Importance ofSubject Matter
Review of "SupportAssistant"Part A
J. Important Geographic Locations_1. Fire Equipment_2. Shelters.3. Critical Facilities.
K. Communication Methods.1. Telephone.2. Public radio announcements.3. Others_
L. Station Assignment.1_ Telephone number list.2. Reporting procedures.
(INSTRUCTOR'S NOTE Methods of v.,lerting or activating "SupportAssistant" personnel should be planned ocally and should be discussedin some detail at this point.)
(INSTRUCTOR'S NOTE: The purpose of this section in the "Sup-port Assistant" B course is to review and update the material taught_in the radiological section of Support Assistant"Part A. Additionalinformation may be given on fallout distribution, radioactive decay, andshielding. The student should use his "Support Assistant" A Manua:,'as a reference on this subject. If it is possible the instructor shouldhave a guest instructor licensed to use civil defense radiation sourcespresent 'with a radiation source. There is no substitute for actualexercise with rate meters and dosimeters to give the student an under-standing of radiation measurement.)A. This lesson deals with.
1. Importance of subject matter.2. Review of "Support Assistant"Part ARadiation section.3. Fallout distribution, shielding from radiation, and radioactive
decay.4. Demonstration of survey meters.5. Actual practice with dosimeters.
B. The effects a radioactivity from a nuclear attar. k are misunder-stood by many individuals as presenting a fearful, almost hopelesssituation, while others tend to ignore it with a fatalistic attitude.If the "Support Assistant" is to be effective in the event a anuclear attack, he must understand the problems presented byradioactive fallout. He must learn to respect radioactivity, not tofear it.
C. The "Support Assistant" must have an understanding a radio-logical survey meters and sufficient proficiency in the use of adosimeter for self confidence and protection.
4

MAIN TOPIC TEACHING POINTS
(show instruments)
Fallout
D. The effects of nuclear radiation.1. Symptoms.2. Short-term effects
E. Detection of nuclear radiation.1. Units of measurement.2. Rate meters.3. The dosimeter.
F. Dose rates and dose.1. Short-term dose.2. Permissahle dose.
G. Protective measures.1. Exposure record.2. Limit activity.3. Decontamination.
H. Distribution depends on.1. Altitude of bomb burst.2. Power and design of bomb.3. Size, shape and density of particles.4. Atmospheric conditions, such as air currents and the direction
and velocity of the winds.5. Snow and rain.6. Nature of the ground surface (the deposit of fallout can be
compared to the drifting of snow).L Shielding.
Radiation can be attenuated by placing mass, (weight) betweenthe source and the individual. Exact thickness of materials neces-sary to give a good protection factor cannot be quoted. The densityof concrete or earth ; the energy of the radiation ; the distance fromthe radiation source to the shielding material, and the distancebetween the shield and the individual all vary ; but between 12 to18 inches of concrete, or 2 to 3 feet of earth will stop 99 percentof the gamma radiation. This would give a protection factor of 100.
J. Decay.1. Radioactivity from fallout decays quite rapidly in the first few
hours following the burst.2. 7-10 Rule of Thumb.
For every seven fold increase in time, radioactivity drops by afactor of 10 ;1 hour after bursty activity 100%7 hours after burst activity 10%49 hours after burst activity 1%2 weeks after burst activity .1%

MAIN TOPIC TEACHING POINTS
Survey Meters
Dosimeters
This Rule of Thumb holds only when figured from the time ofthe burst, not from the time of arrival of the fallout in a givenarea. For example, fallout might be complete in a given areaseven hours after the burst and readings taken. These read-ings would not drop by a factor of 10 in an additional 7 hoursit would require 49 hours for the factor of 10 drop in this case.
K. Identify and review types and uses of survey meters.1. CDV 700.2. CDV 715.
L. If sufficient CDV 700 meters are available, let the student examinethem and take measurements if a radioactive source is available.
M. Discuss with the students local Civil Defense plans concerning ratemeters.1. Monitoring stations.2. Instruments for emergency services.
N. The Personnel Dosimeter.(NOTE : Let the trainee examine the dosimeter (s) prior to ex-plaining operation.)1. Description and function. Briefly describe and explain how the
dosimeter functions. Demonstrate with the model (s) you have.As the firefighter performs his task in a radiation area,nuclear radiation will penetrate his body and the dosimeterhe wears. The resulting hairline movement of the dosimeteris a measure of the dosimeter's exposure. So that if a personwears the dosimeter during exposure, it is assumed that hisdose is the same as that measured by the dosimeter.
2. Types of dosimeters recommended by OCD:a. For training ; the CDV-138 measures dosages from 0 to 200
mr.b. For operations.
(1) CDV-730, measures dosages from 0 to 20 r. It is usedby civil defense workers generally.
(2) CDV-740, measures dosages from 0 to 100 r. It is usedby emergency service personnelpolice, fire, rescue.
3) CDV-742, measures dosages from 0 to 200 r. an opera-tional dosimeter.
(4) The CDV-730 and CDV-740 are no longer being pro-cured by OCD. However, they should be used wherethey have been issued as operational equipment.
O. Dosimeter Charger, CDV-750.1. Description and function.
a. Show the CDV-750.
6

MAIN TOPIC TEACHING POINTS
b. Some method is neces ary to charge (zero) dosimeters priorto use.
c. That is the purpose of this instrumentto permit us to re-charge the dosimeters.
d. Here is how we use it.(1) A dosimeter charger is used to place an electrical charge
on the indicating mechanism inside the dosimeter. Thiscontrols the movement of the hairline. When the hair-line is on zero, the dosimeter is "zeroed."
(2) The CDV450 dosimeter charger is used to zLro all CivilDefense dosimeters. It has a charging receptacle anddownscale-upscale control. The charger is powered bya single 1.5-volt flashlight battery, which operates thecharging circuit and provides the light for illuminatingthe dosimeter scale. There are no internal adjustmentsto be made on the charger.
(3) To charge the dosimeter, remove the dust covLr on thecharging receptacle, press the dosimeter completely tothe bottom of the receptacle and rotate the control knobuntil the dosimeter reads zero.
(NOTE : Allow sufficient time for each student to charge one ofeach type dosimeter available to become thoroughly familiar withthe charging operations. The instructor should check each traineeindividually to assure that he knows how to charge a dosimeter.Refer to the instruction manual for directions on how to operatepulse-type chargers, if the transistorized models are not available.)
(4) All Civil Defense dosimeters are read by holding themabout one-half inch from the eye and pointing themtoward any light source sufficient to see the hairline.
(5) If an adequate light source is not available, a dosimetercharger may be used to read the dosimeter. Touch itgently to the charging receptacle until the light turnson. If the dosimeter is pressed down too far, it maycontact with the charging circuit and the reading couldbe changed or lost.
(6) A dosimeter need not read exactly zero for it to measureexposure. It is possible to determine the dose for anyselected period of time by subtracting the reading atthe beginning of the exposure period from the readingat the end of the period. This, if a dosimeter read 20rat the beginning of a mission and 50r at the end, theindividual exposure was 30r. A dosimeter should berezeroed after each use if it reads more than 25% offull scale.
7

MAIN TOPIC TEACHING POINTS
IV. SESSION REVIEW
2. Checking the 1.5-volt cell. When installing the battery, observethe polarity markings on the battery compartment.
P. (INSTRUCTOR'S NOTE : Have trainees take an initial reading ona dosimeter and place it near the radioactive source if one isavailable.)Advise them of the time that the dosimeters will be exposed andthe distance they should be placed from the source to obtain goodreading in that time or let the student estimate the necessary dis-tance from the reading taken earlier with the CDV-700. Continuewith the lesson while the dosimeters are exposed.
Q. Exposure records.1. Exposure records on individuals may be kept by personnel
assigned by the shelter manager for this purpose.2. It will be desirable and in some cases a necessity for the in-
dividual to keep his own total dose record.3. The individual should be responsible for keeping his own ex-
posure record -for each mission.4. For each mission he should record :
a. Namedate.b. Time of day, dosimeter serial number, where he went on
mission, and duration of mission.These items under b. are important if it is suspected that adosimeter is not recording properly. They enable a check to bemade on the probable accuracy of a particular dosimeter.c. Initial reading, final reading, mission dose.d. Have students pick up the exposed dosimeters, take the final
reading, and figure the dose.
R. Availability of dosimeters.1. Source.2. Number.
(INSTRUCTOR'S NOTE: There might not be enough dosimetersavailable at all locations for each individual of a group on an emer-gency mission. Discuss how this might be handled and what extraprecautions would need to be taken.)
A. Emergency Procures for "Support Assistants."B. Fallout.C. Exposure records.D. Distribute "Support Assistant" Part B Manuals.E. Announce next session.
LESSON PLAN NO. 2
COURSE TITLE AND NUMBER : Firefighting for Civil Defense EmergencyPART BSection IFire Behavior.Section IIVentilation.
TIME : hours
OBJECTIVE :Section IFire Behavior To give the student an understanding of the principles of combus-
tion and how fires start and spread.
INSTRUCTIONAL AIDS :Overhead, opaque or slide projector.Selected visuals.Chalkboard, chalk, and eraser.Demonstration materials as available.
SELECTED REFERENCES :a. Local and state fire tr- ,ning manuals as available.
International Fire Service Training Association manuals as available.b. Student ManualFirefighting for Civil Defense EmergencyPart A
"Support Assistant" (student manual).
SUGGESTED FILMS :Short version of "Design for Disaster."Los Angeles Fire Department film "Ventilation."
MAIN TOPIC TEACHING POINTS
SESSION INSTRUC-TION-25 min.
(INSTRUCTOR'S NOTE: Hold a class discussion to review theprevious session. The following questions may be used to stimulatethe discussion.)
A. Review of previous session.I. Why is the fallout shelter program important?2. How would the public be warned of a nuclear attack?3. Why are communications important in emergency operations?4. What might be some of the duties of a "Support Assistant"
following a nuclear attack?5. Where are some of the shelters located in the local area?6. Would the radiation level from fallout be the same at all loca-
tions in a city?7. How fast does radiation from fallout decay?8. Would everyone in a group of five men on a mission together
need a dosimeter ?
1 4
9
MAIN TOPIC TEACHING POINTS
9. How can radiation detection instruments be compared to thespeedometer and ode meter on a car ?
10. What questions would arise if a "Support Assistant" returnsfrom a mission and finds his dosimeter has gone off scale ?How might some of these questions be resolved?
B. This session will deal with :1. Review of previous session.2. Fire behavior.3. Ventilation.
FME BEHAVIOR-60 min.
Section Introduction I A.
Importance ofSubject Matter
Fire Components
(demons ate)
(demonstrate)
IL VENTILATION-60 min.
This lesson deals with the following:1. Importance of subject matter.2. Fire components.3. Fire buildup.4. Fire spread.
B. The trainee needs a good understanding of the various phases afire goes through from ignition to full involvement of a buildingor several buildings. He needs to understand the factors that con-tribute to the spread of fire build-up in order to evaluate his chancesof controlling a given fire and avoid being trapped.
C. Fire triangle.1. Solidly connected.
(Explosion)2. Weak connectionsIllustrate the tenuous nature of fire using
kitchen wood) matches.
D. Review products of combustion from 'Support Assistan Part A.1. Fuel.
a. Carbon.b. Oxygen.
2. Products.a. Water.b. CO.c. CO2.
E. Oxygen.Perform experiment suggested in Figure 2 in "Support Assistant"B student manual.
To impress the trainees with the importance of prompt and properventilation in fire fighting, and show how ventilation can be accom-plished at fires in buildings, ships, and other enclosures.
10
15 4

MAIN TOPIC TEACHING POINTS
Section Introduction
Importance ofSubject Matter
What
Why
When
Where
A. This lesson deals with :1. Import& ice of subject matter.2. Tile what, why, when, where(s) of ventilation.3. Some how (s) and precautions in ventilating.
B. Most fires and all incipient fires are quite easily extinguished ifthe base or seat of the fire can be seen and approached. Ventilationis necessary in many fires to make this possible.
C. What is ventilation?Ventilation as applied to firefighting means the planned, systematicremoval of heat, smoke and gases from a structure.
D. Why is it done?Because it :
1. Aids lifesaving:a. Aids trapped and unconscious occupants.b. Expedites search.c. Conditions safer for firemen.
2. Aids attack by enabling firemen to :a. Locate fire quicker.b. Determine path of travel.c. Reduce water damage.d. Expedite salvage operations.
3. Reduces the danger of "Back Drafa. Explain stages of burning.b. Explain characteristics of CO.c. Emphasize venting above fire first.
4. Controls spread of fire.a. Draws fire to a desired point.b. Avoid drawing fire through uninvolved parts of structure.
5. Reduces accumulation of heat and smoke at upper levels.a. Explain "mushrooming."b. Life hazard on top floor.c. Extension of fire to top floor or attic.
E. When should ventilation be performed ?At fires in buildings, ships, or other enclosures where smoke, heator gases are present.
F. When should ventilation start?1. When water is up to the nozzle and not before.2. When exposures are covered. EXCEPTION : To save a life,
by opening at top of stairwell to prevent mushrooming.G. Where to ventilate?
1. At roof.a. Open skylights.
11

MAIN TOPIC
Basement Fires
Ventilation ofEntire Building
Ship Fires
MechanicalVentilation
TEACHING POINTS
b. Remove scuttle cover.c. Open elevator penthouse.d. Light wells.e. Cut hole in roofif necessary.
2. At windows.a. Open 2/3 from top, 1/3 from bottom.b. Cross ventilationopen from top on leeward side, open from
bottom on windward side.c. Explain different types of windows and how to operate.d. Remove curtains, drapes, etc.e. Windows that cannot be opened must be brokenExplain
how.f. When to break glass.
3. At doorways.
H. Ventilation at basement fires.1. Use vertical shafts where ever possible.2. Open doors and windows.3. Remove dead lights.4. Open coal and delivery chutes.5. Remove store front lower panels.6. Cut hole in floor near a window.7. Push down hot air register.
I. Ventilation of entire building.1. Start at top and work downward, floor by floor.2. Open at roofif necessary.3. Open doors and windows.4. Do not open below men working abrwe.
J. Ventilation at ship fires.1. Trimming ventilatorstu n away from wind.2. Removing hatch covers.3. Additional hatch covers tweendeek level.4. Skylights over engine rooms.
K. Mechanical ventilation.1. Smoke ejector.
a. 5000 to 15,000 cu. ft/min, capacity.b. Not to be used in place of conventional ventilation, but as
a supplement to same.c. Care must be taken in placement not to spread fire.
2. Fog nozzle.a. 10,000-30,000 cu. ft/min. capacity.b. Best results are obtained :
(1) held inside of window.
12
oi 17

MAIN TOPIC TEACHING POINTS
Precau ions
REVIEW-15 min.
(2) widest fog angle.(3) largest flow.
(taken inside and aimed out)L. Precautions.
1. Hose streams directed into doorways, windows, skylights, orother openings nullifying ventilation. Could injure men work-ing within by driving heat and smoke at them.
2. Openings should not be made in a way to jeopardize nearbystructures.
3. Holes cut out in floors should be near a window.4. Not desirable to cut holes in path of travel. Firemen may step
into these openings.5. Whenever a hole is cut in a roof or floor, skylight, or scuttle
cover removed, opening should be probed with tool to find ifthere are any obstructions.6. When breaking windows care should be taken to make sure no
one will be struck by falling glass.
M. Lesson review.1. Fire behavior.2. Flash over.3. Back draft.4. Ventilation.5. Announce next session.
1813

LESSON PLAN NO. 3
COURSE TITLE AND NUMBER : Firefighting for Civil Defense EmergencyPART BSection IForceable Entry.Section IIRopes and Knots.Section IIIPortable Extinguishe
TIME : 3 hours.
OBJECTIVES :1. To give trainees a knowledge of forcible entry techniques and practices to gain access to
the interior of locked structures for fire control or rescue purposes.2. To teach trainees what knots are used, some proficiency in tying knots, how to judge the
condition of rope and how to care for rope.3. To increase the trainees' understanding of portable extinguishers and develop some ability
to use the various types.
INSTRUCTIONAL AIDS :Chalkboard, chalk and eraser.Overhead, opatiue or slide projector.Forcible entry :
One or more, ax, claw-tool, Halligan tool, huxbar, Kelly tool, etc., as avaPable.Locations, examples, overhead transpar encies, or slides, of doors, windows, locks, etas available.
Ropes :One or more Fire Department regulation ropes : one ten foot length of rope for eachtrainee.
ExtinguisherAs many types of portable extinguishers as are available.Location and fuel for Class A and B fires for student practice.
SELECTED REFERENCES :a. Instructor's :
Local and State Fire Training manuals as available.International Fire Service Training Association manuals as available.N.F.P.A. Pamphlet 10 and 10A.
b. Student's: "Support Assistant" Part B manual. Firefighting for CivilgencyPart B. Enter-
SUGGESTED FILMS:"Portable Extinguishers," Fire Service Extension, Iowa State University. Other films relatedto the subject matter as available.
15
19

MAIN TOPIC TEACHING POINTS
SESSION INTRO-DUCTION-20 min.
Importance ofSubject Matter
Types of Tools
(demonstrate)
A. Review.(INSTRUCTOR'S NOTE : Hold class discussion to review pre-vious class session: The following questions may be used to stimu-late the discussion.)
1. Can ordinary combustion take place without oxygen ?2. What is the importance of the "flash point" of a fuel to a fire
fighter ?3. What are the two best means a fire has to spread its heat to
involve more fuel?4. What is "flash-over ?"5. What is a "hack-draft?"6. Why do we sometimes have to ventilate fire buildings .7. When is ventilation performed?8. Where do we usually ventilate first: Top or bottom?9. What are some of the precautions to take in ventilating?
10. Will hose streams or individuals standing in doorways inter-fere with ventilation? How ?
B. This session deals with :1 Forcible entry.2. Ropes and knots.3. Portable extinguishers.
C. Good fire departments force entry quickly, with little damage.Poor fire departments take a long time to force entry and do asloppy job.
D. Types of hand tools.1. Ax
a. Types(1) Pike (or pick-head).(2) Flat-head.
b. SizesUsually 4 pound or 6 pound head.
c. Useswill be covered as they occur in subsequent classeson forcible entry, ventilation, overhauling.
d. Correct and safe methods of carrying the ax.e. Care
(1) Keep free of rust (use emery cloth, then coat slightlywith oil).
(2) Keep sharpuse file or whet-stone don't use emerywheel, it removes temper.
(3) Handles should not be painted.(a) Paint covers cracks and defects.(b) Paint may cause blister on user's hands.(c) Handles should be cleaned with wet sand and canvas.
16
0

MAIN TOPIC TEACHING POINTS
Entry Points andPrinciples
2. Hook (or pike pole).a. Typesgenerally all the samesome have metal handles,
some have woodthere are some patented hooks that differ.b. Sizes referred to by length of handle in feet (6', 8', etc.)c. Useswill be covered later under ventilation, forcible entry,
overhauling, etc.INSTRUCTOR'S NOTE : Emphasize strongly the need for 6foot handles. Most small departments have no handles less than10 feet which is far too long for normal use inside a buildingespecially a residence. The most common use is pulling ceilingsa 6 foot handle is ideal for this.3. Claw-tool.a. A metal bar about 30 inches long with a curved hook with
fulcrum knob at one end and a fork at other end.b. An excellent all-purpose tool for forcing doors and windows,
padlocks, etc. ; for opening walls and floors, and for manyother purposes.
c. Requires no care other than to be kept free of rust.4. Kelly tool(also called door opener or lock breaker).
a. A bar about 30 inches long with an "adz" head at one endand tapered blade at other end.
b. Used principally for door forcingespecially the "adz" headon doors that open outward.
5. Halligan tool.a. A combination of the features of both claw and Kelly tools
has adz head, hook, and claw or fork.b. Usesmany useswill do all the claw and Kelly tools can do.
6. There are several other types of door forcers and overhaulingtools, but the above mentioned are the common typesif youhave others, discuss them.
E. Points of Entry.1. Doorsentry is commonly made thru doors.2. Windowssometimes entry by window is necessary or desirable.3. Wallsusually the last resort since entry is difficult, takes
time, and causes great damage.F. Factors in Entry.
1. Type and construction of doors or windows.2. Location and extent of fire.3. Purpose of the entry.
G. "Life" Principle.1. When human life is endangered, the fastest means of forcible
entry must be employed, regardless of property damage.2. Same applies when urgent to ebter quickly for other reasons.
17
21

MAIN TOPIC TEACHING POINTS
Opening Doors(demonstrate andexplain each step)
(have students opendoor under supervisionof instructor orsimulate same)
(demonstrate usingentry tool)
(have students removepins under supervisionof instructor)
Hinged Doors
H. "Property" Principle.1. Entry is forced with as little damage as possible when human
life is not a factor or immediate entry not urgent.2. Breaking thru window or door glass.
a. Since replacement of glass is inexpensive, it may be brokenwithout hesitation rather than damaging window or doorframes.
b. Caution is advised in breaking certain types since value maybe greater than window or door frame.
Examples :(1) leaded glass.(2) insulating glass.(3) tempered glass.
WHAT IS FIRST STEP ?Always try doors or windows to see if locked or not.
I. Hinged doors that swing out (with pick head, ax, or entry tool).1. Force blade of ax or entry tool between door and jamb just
above or below locking device.a. The crosshead (explain).b. The adz blade (explain).c. These are preferable.
2. Drive head in to get good "bite" (see figure 1).3. With one hand on pick of ax or on entry tool handle and other
hand near end of handle, apply force and pry handle to oneside away from door and thus spring door and jamb apart tolet lock slip past catch.
J. Hinged doors that swing out (removing hinge pins).1. Force blade of ax or entry tool under hinge pin head.2. Pry up head by pressing down on ax or entry tool.3. Remove pins from all hinges.4. Pry out door with blade of ax or entry tool.
K. Hinged doors that swing out (removing door hinges).1. Drive ax or entry tool between hinge and door cutting or forcing
out screws. It may be necessary to strike tool used as wedgewith another tool to force hinge free).
2. Repeat on remaining hinges and pry door free.
L. Hinged door that swings in (stopped frame) Figure 2.1. Force blade between stop strip and jamb and pry away.2. Drive tool past strip between door and jamb.3. Apply force against tool forcing door away from jamb.4. Locking device is released and door is pushed in.
M. Hinged double doors that swing in or out.
18
22

MAIN TOPIC TEACHING POINTS
Sliding Doors
Vertical OpeningDoors
Rabbeted Frames
Padlocked Doors
I. Remove any weathershrip attached to one of doors which coverscrack between the doors, with blade of ax or entry tool.
2. Wedge blade of ax or entry tool between doors and pry themapart.
N. Sliding doors (single).The quickest way to open this type is to remove a panel of the doorse that a man can get inside to release fastenings.
0. Sliding doors (double).I. Remove weatherstrip.2. Drive blade of ax or entry tool in just below fastening and pry
apart.
P. Vertical opening doors.I. Vertical opening doors that are locked at the threshold may be
opened by forcing blade of ax or tool under door at lock andeither raising or pressing on handle to force lock out of threshold.
2. Doors locked at side may require removal of panel or glass nearlock mechanism to permit access to mechanism.
3. Electrically operated vertical opening doors require one or morepanels to be removed so man can enter building to operate motorswitch. This door will completely jamb if forced.
Q. Hinged door that swings in (rabbeted frame).I. Insert blade of tool between door and frame, drive in.2. Drive in to force tool between door and jamb.3. Apply force to tool forcing door away from jamb, releasing
locking devices.4. Push door in.
R. Hinged door that swings in (using Detroit or similar door opener).(Give this only if they have such a tool.)I. This method is becoming obsolete.2. Lay handle flat on ground or floor after fulcrum point has been
set from 6 inches to 10 inches from the door.3. Withdraw center rod until compression piece rests under lock.4. Lock center rod in position with lock pin.5. Lift on handle until door gives.
S. Padlocked doors (using claw or similar tool).1. Slip hook in bow of lock (figure 3).2. Apply pressure to handle and spring lock open.3. If lock staple will not admit hook, it may be placed in hasp
staple and complete assembly torn off.4. Fork end of tool may be placed over bow of lock (figure 4).5. Tool is then turned in circle. Parallel door.
2319

MAIN TOPIC
Forcing a Door
Tempered Glass
Opening Windows(if this type ofwindow is in theroom, demonstrate themethod of forcing en-try. Do not damagethe window limitdemonstration to thesteps and actions)
Breaching Wa Is
TEACHING POINTS
6. Somewhere along the circle, lock will open or hasp will pull out.7. Latter method is especially good on gates where there is no
backing such as door frame to place fulcrum against for prying.T. Using ladder to force door.
1. Place heel of ladder against door sash.2. One beam above lock, one under, rungs vertical.3. Men space out along ladder.4. Apply steady push---Den't Ram.
U. Tempered Glass Doors.1. They can be forced.2. Lock is a pin that fits in socket in sill.3. Put fork end of one tool under door at lock side.4. Put another under at hinge side.5. Pry together to raise door.6. Force in with ladder or claw tool (if door opens in).7. Force out with halligan or kelly tool (if door opens out) .B. In some cases bronze lock pin can be cut with ax blade.9. In some cases "horn" on halligan tool can drive out lock
mechanism.
V. Opening double hung windows.EMPHASIZEIn opening all windows having small panes of glass it is morepractical to break out a pane near the lock. Clean all glass frompane frame ; reach in and unlock window manually.1. Force blade of ax or tool between lower sill and frame in line
with lock.2. Apply leverage to force window, thus breaking lock.
W. Opening casement windows.1. Modern casement windows are securely locked.2. Pane near the lock should be removed.S. Reach inside and hand operate machanism.
X. Opening wired glass windows.1. Wire glass should be removed from the sash.2. Cut glass with ax blade down each side of frame allowing glass
to fold out or in.
Y. Opening windows from above.1. Reach down with pike.2. Force upper sash down with point end of pole.
Z. Breathing Brick Walls.1. Remove first brick by means of pick-ax, sledge-hammer,
other such tool.2. Two men on either side of ram grasp handles so that forked
20 . 24

MAIN TOPIC TEACHING POINTS
II. ROPES ANDKNOTS-30 min.
Importance ofSubject Matter
Care
Tying Knots(demonstrate andhave trainees tieeach knot)Measuring RopeHitches
Bowline
Becket Bend
end is toward building. Do not grasp handles next to forked endas they are for protection of the hands.
3. Swing ram back together at arms length then swing towardwall quickly.
4. Just before point reaches building, it should be raised so asto give a lifting motion to the point as it strikes.
5. Repeat operation until hole is of desired size.
A. When and why rope is used in fire service.Ropes are used in many ways in fire service. Knots must be tiedquickly and securely. Often times the fire fighter's life or that ofthe person being rescued will depend on the security of the knot.
B. Characteristics of ropes.1. Diameters and lengths.2. Materials rope is made of.3. Strength.
C. Care of rope.1. Drying.2. Inspection.
a. External.b. Internal.
D. Knots, hitches and bends.1. Measuring the rope (3 foot lengths, from nose to hand2. Bight.3. Half-hitch.4. Clove-hitch.
a. Actually two half-hitches.b. Uses.
(1) To make fast to an object.(2) To hold or hoist hose.(3) Stretcher lashings.
c. May be used at any part of rope.d. Easily untied.e. Safety binder knot may be desirable also.
5. Bowline.a. Never slips.b. Uses.
1,1) Loop in end of rope.(2) Tying a lifeline.
c. Easily untied.6. Sheet-bend (becket bend).
a. Used for tying two opes together (especially those of differ-ent diameters).
21
25

MAIN TOPIC TEACHING POINTS
M. OPERATINGCHARACTERIS-TICS OFPORTABLEEXTINGUISHERS60 min.
Section Introduction
"Support Assist nt"Part A Review
OperatingCharacteristics
b.C.
d.e.
Will not slip.More secure than square knot.Secure when wet.Easily untied.
( INSTRUCTOR'S NOTE : Use student manual ("Support Assistant"Part B) for reference. Also advise students to practice at home andrefer to the student manual when doing so.)
(INSTRUCTOR'S NOTE: This section should be mainly a workingsession to develop the students skill in handling portable extin-guishers.
The amount of time devoted to actual extinguishment of fire by thestudents will depend on available facilities and to some extent theamount of time devoted to this practice in the "Support Assistant"Part A class).This class will deal with :
1. Review of portable extinguishers from "Support Assistant"'Part A.
2. Operating characteristics of individual extinguishers.3. Actual practice with extinguishers.
A. Classification of Fires.1. A.2. B.3. C.4. D.
B. Extinguishing Agents.1. Water base.2. Inert gas.3. Dry powders.
C. Means of Expulsion.1. Chemical reaction,2. Stored pressure.3. Cartridge operated.4. Hand pump.
D. Underwriters listings.E. Chemical Reaction Type.
1. Soda acid.2. Foam.
F. Stored Pressure.1. Pressurized water.2. Loaded stream.
2226
MAIN TOPIC TEACHING POINTS
Practice Session
Review
SESSION SUMMARY-10 min.
3. Carbon dioxide.4. Dry powders.5. a. B-C dry chemicals.
b. ABC dry chemicals.G. Cartridge operated.
1. Water.2. Dry powders.
a. B-C dry chemicals.b. ABC dry chemicals.
H. Water pump tanksTake group outside for actual practice.I. Stress.
1. Proper methods of carrying and putting into operation.2. Calm deliberate actions.3. Proper direction of extinguishing agent.4. Conservation of extinguishing agent.5. Careful overhaul of fires.
J. Bring group inside for a critique of the practice.
A. Review of session.1. Forcible entry.2. Ropes and knots.3. Extinguishers.
B. Time and place for next session.
2723

LESSON PLAN NO. 4
COURSE TITLE AND NUMBER : Firefighting for Civil Defense Emergency PART B.Fire Hose and Its Use
TIME : 3 hours
OBJECTIVES :To give trainees an understanding of the care and use of fire hose and related equipment, and
to develop some proficiency in the handling of hose.
INSTRUCTIONAL AIDS :Chalkboard, chalk, eraserHose, nozzles, fittings, appliances, and pumping engineNOTE : This is a working session. Trainee s should handle and work iv ith hose and appli-ances.
SELECTED REFERENCES :a. Instructor
Local Drill Manual.State Training Manuals as available.International Fire Service Training Manuals as- available.
b. Student ManualFirefighting for Civil Defense EmergencyPart B.
SUGGESTED FILMS :Selected training films appropriate to subject ma ter as available.
MAIN TOPIC TEACHING POINTS
Review of PreviousSession
Importance ofSubject Matter
Hose Sizes andConstruction
A. Review of previous session.(INSTRUCTOR'S NOTE : Have some of the tools used in theprevious session available. Have trainees identify them and givesome of their uses.)1. Forcible entry.
3. Portable extinguisheB. Hose is the life line of most fire control efforts. Water must be
delivered to the seat of the fire. Any delay in laying or couplinghose means delay in fire control. A hose that bursts during anattack can be a matter of life or death to the men on the nozzle.
C. Hose characteristics.1. Sizes (inside diameter).
a. booster ( 3/4"-1").
25
2S

MAIN TOPIC TEACHING POINTS
(show examples)
Care
b.C.d. 3" (used by many departments).e. (also 31/2" and 4" used by some departments) 2" is available
alsobut few departments use it).f. 50' lengths are standard, but 100' lengths are available.
2. Construction.a. liningrubber.b. jacket.
(1 ) cotton.(2) cotton and polyester.(3) all polyester.Synthetic hose is lighter in weight, needs less space, foldseasier, and does not mildew.
c. single jacketfor industrial use.d. double jacketfor fire department use (outer jacket does
not add strength, but protects inner jacket from wear).e. unlined linen hosefor forest service and building stand-
pipes. Not for fire departments ! Too porous k leaks untilfibers swell), too weak, hard to care for and won't last longif used.
f. hose should be at least Underwriter's approved.(1) 400 psi, or 600 psi, pressure test for twist and elonga-
tion under pressure.3. Couplings (also called "butts").
a. screw threadone maleone female on each length.b. national standard (and others).c. lugs.
(1) rocker.(2) pin.
d. gaskets and washers.e. point out that male couplings always point toward nozzle or
direction of flowfemale toward pump.4. Care of hose and couplings.
a. causes of damage(show sample of damaged hose).(1) oil, gasoline, grease dissolve rubber.(2) mildew causes cotton to rot.(3) acid burns cotton.(4) heat affects rubberweakens it.(5) driving over hose injures it.(6) dragging hose over rough surface causes abrasions or
cuts of jacket.(7) sudden closing of nozzle may cause water hammer to
burst hose.(3) dropping couplings may knock them out of round or
injure threads.
21/2"). (most common)
26 2 9

MAIN TOPIC TEACHING POINTS
Hose Fittings(show examples andhave trainees handlewhere practical)
(show examples)
(use examples asavailable and lettrainees examine)
b. Hose should be :(1) brushed clean or washed clean after use.(2) properly dried
(a) in dryer.(b) in tower.(c) on rack.
c. do not oil or grease couplings. Powdered graphite may beused. Stuck couplings may be freed by soapy water.
d. check gaskets when coupling and placing hose on trucks.e. hose should be tested at least annually (give test pressure).f. with good care, hose should last many years.
5. Hose fittings.a. Double maleto connect two female couplings.b. Double femaleto connect two male coupling (one side must
swivel).c. Reducers
(1) 21/2" to 11/2".(2) 3" to 21/2".(3) 41/2" to 21/2" (usually double female swivel).
d. Adaptersto connect a coupling of one type thread (such asnational standard) to a coupling of another typesamediameter.Note : Each engine should carry two of each type fitting(except 3" to 21/2" reducer not needed if they don't have 3"hose) (except adapter not needed if they have nationalstandard threads).
e. Siamese connectionto connect two or more lines into one(not one into two). Has two or more female inlets and onemale outlet. Females are equipped with clapper valves (checkvalves) to keep water from backing out an unused inlet.(There are still some old ones without clappers.)
f. "Y" or wye connectionto divide one line into two. Hasone female inlettwo male outlets.
g. 2-way gate (or gated wye)a "V' equipped with gate valveon each outlet(most common size is 21/2" female, 11/2"male, but 21/2" all around has advantageswhat are they) ?You can put a reducer on one side for 11/2" line and take21/2" off other. (MAKE SURE THEY KNOW A "Y" FROMA SIAMESE, some catalogs don't).
h. There are also three and four-way gates (used on hydrantsor large diameter hose-31/2" or 4").
i. Single gate valvesused with distributors, cellar pipes, etc.j. Water thiefnne 21/2" female to two 11/2" male and one
21/2" male(don't try to use all three at once).Note : The above are common fittings. There are others. Ifthey have any others, discuss them.
27
30

MAIN TOPIC TEACHING POINTS
Hose Appliances
Suction Hose
6. Hose appliances.a. Hose clampto shut off water by clamping hose.
(I) level type.(2) screw type.(3) hydraulic type.
b. Burst hose jacketto place over burst in hose and can beused to connect lengths of different threads if other meansnot available. They come in sizes according to hose diameter.
c. Pipe holdersUsed to hold nozzle in position when heavystream (over 11/4" tip) is used. There are many types(Perfection, Eureka, Paradox and several othersdon't gointo detail).
d. Hose roller (sometimes called hose hoist) a wooden rollerwith metal guides, used to roll hose over edge of roof with-out chafing.
7. Suction hose(hard).a. Sizesinside diameter.
(1) 21/2".(2) 3".(3) 41/2".(4) 5".(5) 6".
b. Lengths-8' up to 20'.c. Construction.
(I) rubber lining.(2) rubber jacket.(3) made rigid to prevent collapse (usually by metal rings
between lining and jacket) because if it collapsed undervacuum, drafting would not be possible.d. Uses
(I) to draft water.(2) to connect pamper to hydrant.
8. Hydrant connection(soft)(sometimes erroneously called "soft suction").a. Comes in all sizes from 21/2" to 6" (21/2", 3", 1/2", 4", 5",
and 6").b. Comes in any length (usually 12 ft.).c. Is just the same as double jacket, rubber lined hose.
9. limas. To connect pumper to hydrant.b. To connect one pumgar to another for parallel pumping.Note : Most suction sleeves and hydrant connections have fe-male coupling at each end although some have a male on one end,
28
3 1

MAIN TOPIC TEACHING POINTS
Stretches
Hose Handling(divide men)
(Practice use ofdouble male anddouble female connec-tions. Have everypair use each once.)
SESSION REVIEW
D. Laying or stretching hose lines.Explain and show how hose should be removed from apparatus.1. Reverse lay (back stretch).2. Straight lay (running stretch).Note : Emphasize that they must pull off sufficient hose to reach
all parts of the fire. Better to have too much than too little.How would you estimate amount of hose needed ? Fromfront door of building, allow one length for each floor plusone extra. (50 foot lengths)ExampleFire on third floor, three plus one, or i:our lengths.Why ? Because Imes may have to be taken to back of buildingor to floor or floors above fire.
3. Hand stretch.Have them pull off and stretch by hand about ten lengthsone man to each length. Advance dry line to point of operation.Walk rapidly, don't run (leave line laid out).
4. Making and breaking coupling connections.Divide men into pairs. First tell and show, then have eachpair practice nisconnecting and reconnecting coupling connec-tions. (Spread them out and have a pair at end of each length.Have them make and break connections twice each, or until theyget it down pat. Have them switch so that they all handle bothmale and female). Next, demonstrate and then have them allpractice one man making and breaking coupliiv connections.Have each do it twice or until proficient.
5. Using double male and double female connections.
6. Rolling hose.Have each pair make a doughnut roll. Have enough men makeone man roll to get all hose picked up.
7. Repack hose on apparatus.Explain, supervise, and correct mistakes as they repack hoseinto hose bed. Mention why it should not be repacked if wet.Show how to pick up a dry line with truck.
A. Hold a discussion regarding the important points of the lesson.B. Announce next session.
292

LESSON PLAN NO. 5
COURSE TITLE AND NUMBER : Firefighting f or Civil Defense EmergencyPART BLadder Practices
TIME 3 hoursOBJECTIVES :
To give trainees an understanding of the care and use of ladders, and develop some profici-ency in basic handling, raising, and using ladders.
INSTRUCTIONAL AIDS :Chalkboard, chalk, and eraser.Overhead, opaque or slide projector.Various types and sizes of ladders as available.Hose and selected hose appliances.Regulation fire department rope.
SELECTED REFERENCES :a. Instructor's
Local drill manual.State training manuals as available.International Fire Service Training manuals as available.Instructor's Note : Although most fire departments now have metal ladders, it is impor-
tant that the "Support Assistants" know something about wood ladders. In a nuclearemergency he may have to use whatever ladders are available to him.
b. Student ManualFirefighting for Civil Defense ElnergencyPart B.
SUGGESTED FILMS:Selected training films appropriate to the subject matter as available.
MAIN TOPIC TEACHING POINTS
Importance ofSubject Matter
Uses
A. When ladders are needed there is no substitiute procedure. Theymust be raised quickly and safely if people are to be rescued, thebuilding ventilated, and the fire controlled.
B. Review of the previous session can be incorporated into this classby using some hose and appliances in connection with tha ladderwork.
C. Ladders : Uses and construction1. Uses of ladders : Ladders can be used to gain access to higher or
lower levels ; to span spaces ; to force entry ; and as tarpaulinsupports.
31
MAIN TOPIC TEACHING POINTS
Construction
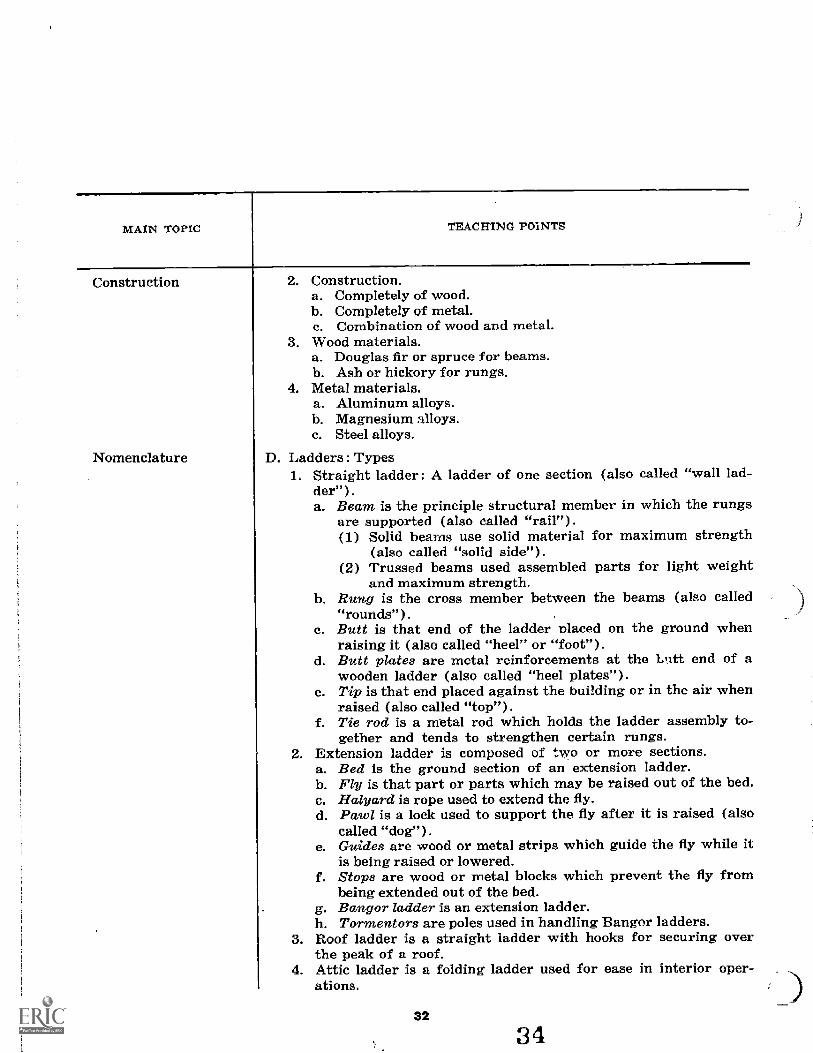
Nomenclature
2. Construction.a. Completely of wood.b. Completely of metal.c. Combination of wood and metal.
3. Wood materials.a. Douglas fir or spruce for beams.b. Ash or hickory for rungs.
4. Metal materials.a. Aluminum alloys.b. Magnesium alloys.e. Steel alloys.
D. Ladders : Types1. Straight ladder : A ladder of one section (also called "wall lad-
der").a. Beam is the principle structural member in which the rungs
are supported (also called "rail").(1) Solid beams use solid material for maximum strength
(also called "solid side").(2) Trussed beams used assembled parts for light weight
and maximum strength.b. Rung is the cross member between the beams (also called
"rounds").c. Butt is that end of the ladder nlaced on the ground when
raising it (also called "heel" or "foot").d. Butt plates are metal reinforcements at tl e Lutt end of a
wooden ladder (also called "heel plates").e. Tip is that end placed against the builiding or in the air when
raised (also called "top").f. Tie rod is a metal rod which holds the ladder assembly to-
gether and tends to strengthen certain rungs.2. Extension ladder is composed of two or more sections.
a. Bed is the ground section of an extension ladder.b. Fly is that part or parts which may be raised out of the bed.c. Halyard is rope used to extend the fly.d. Pawl is a lock used to support the fly after it is raised (also
called "dog").e. Guides are wood or metal strips which guide the fly while it
is being raised or lowered.f. Stops are wood or metal blocks which prevent the fly from
being extended out of the bed.g. Bangor ladder is an extension ladder.h. Tormentors are poles used in handling Bangor ladders.
3. Roof ladder is a straight ladder with hooks for securing overthe peak of a roof.
4. Attic ladder is a folding ladder used for ease in interior oper-ations.
32
3 4

MAIN TOPIC TEACHING POINTS
5. An aerial ladder is one that is permanently mounted on a laddertruck and raised or lowered mechanically.
6. Pompier or scaling ladder is a single beam ladder, with a large"goose-neck" hook at top.They vary in length from 10' to 14'used to scale outside ofbuilding from floor to floor by putting hook in window above,usually to get where other ladders are not available.
Inspection E. Inspection of ladders.1. Wood.
a. Should be done after each time used and at least once amonth.
b. Examine rungs for :(1) Looseness.(2) Cracks.(3) Splinters.(4) Rot.(5) Wear.(6) Other weakness.(7) Need for varnish.
c. Inspect beams for same and also for warping.2. Metal.
a. Should be done after each time used and at least once amonth.
b. Examine rungs and beams for :(1) Looseness.(2) Weakness at welds.(3) Deformity.(4) Rainbow hued discoloration which indicates ladder may
have been weakened by heat.3. Both wood ladders and metal t.....itension ladders.
a. Check halyards for weakness, wear, rot_b. Check pawls, guides and stops.
Care F. Care of ladders.1. Wood.
a. When dirty, wash with plain cold water.b. Scrape and varnish when needed.c. Handle carefullydon't drop !
2. Metal.a. When dirty, wash with plain water.b. Lubricate.c. Don't raise on one beam only (beam raise).d. Handle carefullydon't drop Ie. Don't expose to flamemetal loses strength quickly when
heated.
33
MAIN TOPIC TEACHING POINTS
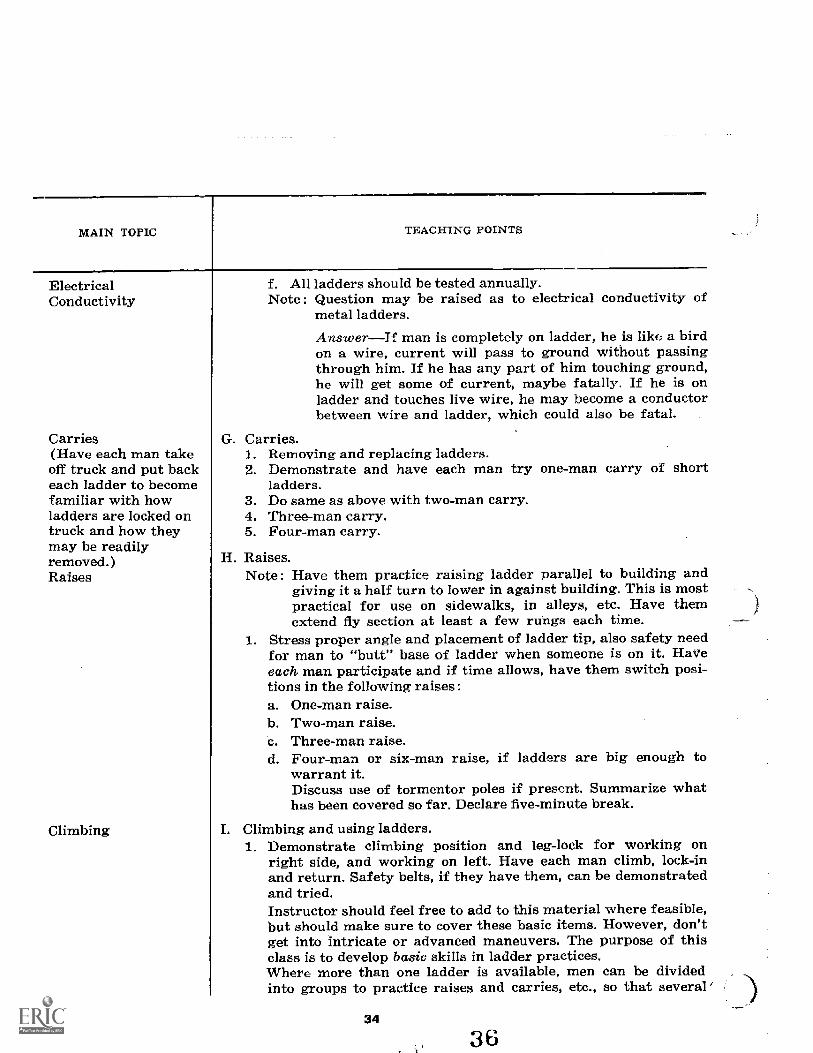
ElectricalConductivity
Carries(Have each man takeoff truck and put backeach ladder to becomefamiliar with howladders are locked ontruck and how theymay be readilyremoved.)Raises
Climbing
G.
f. All ladders should be tested annually.Note : Question may be raised as to electrical conductivity of
metal ladders.AnswerIf man is completely on ladder, he is like a birdon a wire, current will pass to ground without passingthrough him. If he has any part of him touching ground,he will get some of current, maybe fatally. If he is onladder and touches live wire, he may become a conductorbetween wire and ladder, which could also be fatal.
Carries.I. Removing and replacing ladders.2. Demonstrate and have each man try one-man carry of short
ladders.3. Do same as above with two-man carry.4. Three-man carry.5. Four-man carry.
H. Raises.Note : Have them practice raising ladder parallel to building and
giving it a half turn to lower in against building. This is mostpractical for use on sidewalks, in alleys, etc. Have themextend fly section at least a few rungs each time.
1. Stress proper angle and placement of ladder tip, also safety needfor man to "butt" base of ladder when someone is on it. Haveeach man participate and if time allows, have them switch posi-tions in the following raises :a. One-man raise.b. Two-man raise.c. Three-man raise.d. Four-man or six-man raise, if ladders are big enough to
warrant it.Discuss use of tormentor poles if present. Summarize whathas been covered so far. Declare eve-minute break.
I. Climbing and using ladders.1. Demonstrate climbing position and leg-lock for working on
right side, and working on left. Have each man climb, lock-inand return. Safety belts, if they have them, can be demonstratedand tried.Instructor should feel free to add to this material where feasible,but should make sure to cover these basic items. However, don'tget into intricate or advanced maneuvers. The purpose of thisclass is to develop basic skills in ladder practices.Where more than one ladder is available, men can be dividedinto groups to practice raises and carries, etc., so that several '
34
3 6

MAIN TOPIC TEACHING POINTS
(demonstrate localprocedures forpositioning laddersat windows)
groups are practicing at once. Their own officers can be used tosupervise some of these groups.
Note Some men may ask to be excused because of fear of height.Don't force them, but make sure proper officer knows aboutit.
2. Have each man carry a tool of some kind up ladder to learn howto climb using only one hand.
3. Have each m an or pair of men take roof ladder up, put it inplace, and get up on it_
4_ Have each man take hose line up ladder, (preferably 21/2", ifavailable), lock-in, attach hose strap. Correct mistakes. An addi-tional strap in place at base of ladder is desirable.
5. If possible, have them practice entering a window from a lad-der_ Thia is not frequently practiced and is not always as easyas may be thuught.
6. Demonstrate how to carry an unconscious person down ladder.Have each practice this. It would be advisable to have a dummyweighing about 100 pounds for this purpose.
J. Using hose on ladders.1. Have class do some simple hose evolutions on the ladder.2. Show uses of ropes in connection with ladder work.
K. Review of session.
Announce next class session.

LESSON PLAN NO. 6
COURSE TITLE AND NUMBER : Firefighting for Civil Defense EmergencyPart BSection Iprotective Breathing EquipmentSection HOverhauling After A Fire
OBJECTIVES :To acquaint trainees with various types and care of breathing equipment, and to give
trainees some proficiency in using breathing equipment properly and safely.
INSTRUCTIONAL AIDS :Chalkboard, chalk and eraser.Overhead, opaque or slide projector.Types of breathing equipment as av ailable an d used by the local department.Ax, claw, Halligan or similar tools as available ; 6 foot pike pole.
SUGGESTED FILMS :Training films appropriate to the subject matter as available.
MAIN TOPIC
I. REVIEW
Introduction
Importance ofSubject Matter
Types a Masks
TEACHING POINTS
A. Review of previous session. Hold as class discussion to review theprevious session using appropriate questions to stimulate the dis-cussion.
B. This class deals with :I. Protective breathing equipment.2. Overhauling after a fire.
C. There are many tasks in rescue and fire control that simply cannotbe done without protective breathing equipment. "Smoke eating" isdangerous and injurious to the health of the individual on a long-term basis.
D. Purpose of breathing equipment.1. Protection against toxic smoke and fumes.2. Allows firemen to work better and stay longer in smoke.
E. Types.1. Filter-Canister.
a. Characteristics.(1) Protects by filtering contaminants.(2) Does not provide oxygen.(3) Filter capacity limited (see label).(4 Carbon monoxide may get through a depleted canister.
378
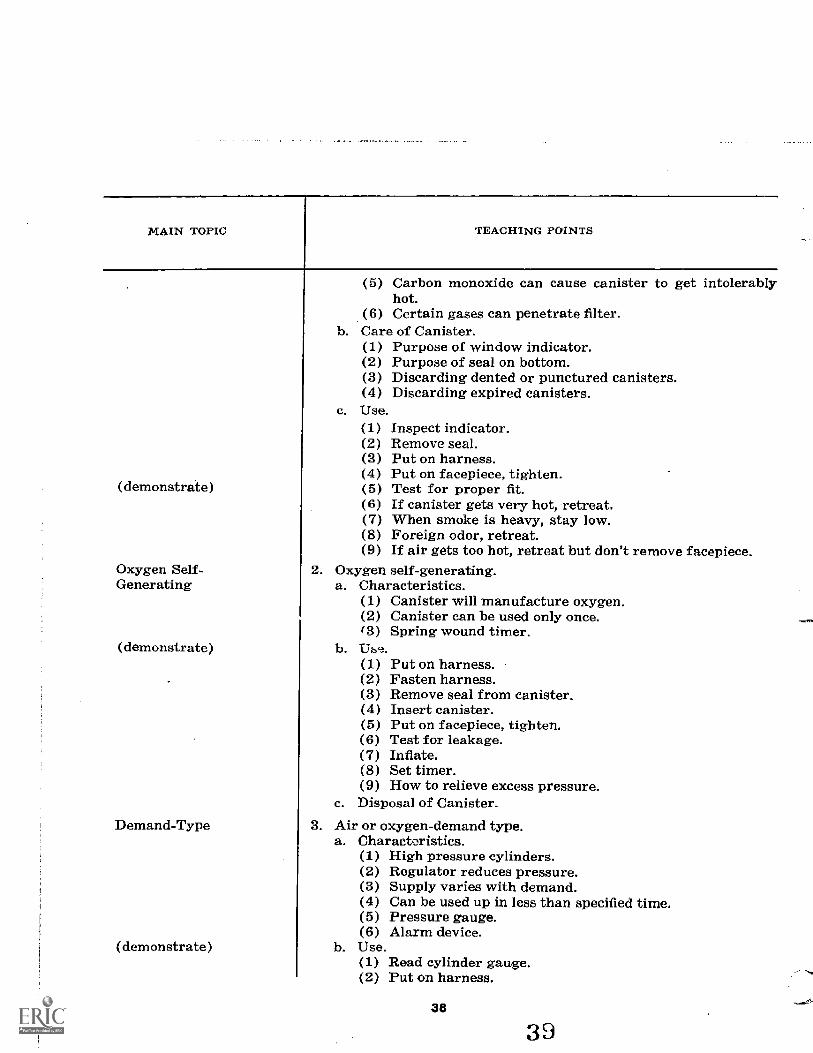
MAIN TOPIC TEACHING POINTS
(demon ate)
Oxygen Self-Generating
(demonstra
Demand-Type
(demons ate)
(5) Carbon monoxide can cause canis er to get intolerablyhot.
(6) Certain gases can penetrate filter.b. Care of Canister.
(1) Purpose of window indicator.(2) Purpose of seal on bottom.(3) Discarding dented or punctured canis(4) Discarding expired canisters.
c. Use.(1) Inspect indicator.(2) Remove seal.(3) Put on harness.(4) Put on facepiece, tighten.(5) Test for proper fit.(6) If canister gets very hot, retreat.(7) When smoke is heavy, stay low.(8) Foreign odor, retreat.(9) If air gets too hot, retreat but don't remove facepiece.
2. Oxygen self-generating.a. Characteristics.
(1) Canister will manufacture oxygen.(2) Canister can be used only once.(3) Spring wound timer.
b. Usc3.(1) Put on harness.(2) Fasten harness.(3) Remove seal from canister.(4) Insert canister.(5) Put on facepiece, tighten.(6) Test for leakage.(7) Inflate.(8) Set timer.(9) How to relieve excess pressure.
c. Disposal of Canister.3. Air or oxygen-demand type.
a. Characteristics.(1) High pressure cylinders.(2) Regulator reduces pressure.(3) Supply varies with demand.(4) Can be used up in less than specified time.(5) Pressure gauge.(6) Alarm device.
b. Use.(1) Read cylinder gauge.(2) Put on harness.
38
3 9

MAIN TOkIC TEACHING POINTS
Rebreather-Type
Precautions
Trainee Practice
(3) Put on facepiece.(4) Test for leakage.(5) Cylinder valve opened.(6) Yellow knob.(7) Open and close red knob.(8) Read regulator gauge.(9) When ready to use, connect tube.
(10) If breathing becomes difficult, open red knob.(11) Read gauge frequently.
4. Oxygen-rebreathing.a. Characteristics.
(1) Re-uses oxygen in exhaled breath.(2) Adds fresh oxygen.(3) Removes carbon dioxide.
b. Use.(I) Put on harness.(2) Put on facepiece.(3) Test for leakage.(4) Purge nitrogen.(5) Read gauge frequently.
F. Precautions for all units.1. Don't put on immediately after heavy exertion.2. Keep calm.
"Buddy" system.4. Life-line.5. Some gases can be absorbed.
G. Have trainees put on and activate protective breathing equipmentas available.
H. Use "smoke house" if available and prac ical.I. Review
1. Purposes.2. Limitations.3. Precautions.
II. OVERHAULINGAFTER A FIRE
Introduction
To develop an appreciation of the need for proper search for hiddenfire, and to develop an understanding of the techniques used in propersearch. Many fires become large losses due to rekindle because of pooror insufficient overhauling. Excessive overhauling also causes muchdamage.
A. This lesson deals with :1. Importance of subject matter.2. Need for overhauling.3. Procedures for overhauling.4. Precautions in overhauling.
39
40

MAIN TOPIC TEACHING POINTS
Importance ofSubject Matter
What
Why
Planning
Procedure
B. Leaving a small fire smouldering can negate the entire fire controloperation and can make the Fire Department or the "Support As-sistants" look and feel very foolish.
C. What is overhauling?1. The search for hidden fire to make sure that no sparks or embers
remain.2. The extinguishment of remaining fires.
D. Necessity for overhaulingfire tends to remain unnoticed in-1. Concealed spaces.2. Behind walls.3. Under floors.4. In cracks.5. In upholstered furniture.6. In mattresses.7. In rugs.8. In clothing.9. In rubbish.
10. In paper piles.11. In cloth stocks.
E. When to overhaul.1. When visible fire is extinguished.2. Hasty start usually not necessary.
F. Planning of overhaul.1. Take time to plan.
a. Be careful.b. Be systematicdetermine starting and finishing points, as-
sign work, bring tools to scene.c. Be thoroughconsider every place where fire could re ain
or have extended above, below and around the fire.2. Base plan on following:
a. Locationusing hearing, sight, touch and smell to find hid-den fire.
b. Intensity of fireconsider conduction of heat to other loca-tionsexamine where fire was most intense.Construction involvedof what materials, and how con-structedrooms, passages, vertical and horizontal openings,concealed spaces.
G-. Interior overhaul.1. Overhaul of door and window frameshidden fire probably
found here most oftenremove casing or trim.2. Overhaul a walls.
a. Feel for heat.b. Open where fire was most intense, or at existing openings.
40
41

MAIN TOPIC TEACzHNC POINTS
c. Easier, more effective, and less damaging to open side wallsfrom inside.
3. Overhaul of wall and room above fireremove baseboard andpuncture previously covered plaster.
4. Overhaul of floorboards cut along side the joists.H. Exterior overhaul.
1. Opening roof.a_ Roefboards removed similarly to floor boardsroofing ma-
terial removed first to expose boards.b. Tin and built-up reofscut and peel back.c. Shingle roofsremove with shovel or spadepry loose with
pick of ax, claw, or similar tool.d. Sky lights, roof hatches, and other roof openingscut diag-
onally from each corner, and peel back from corners.2. Opening exterior walls.
I. Furniture overhaul.Remove to safe place, pull apart burnt materials and examinethoroughlyuse "west water" if available, but still pull apart.
J. Burned clothing overhaul.Separate unburnt clothing, examine thoroughly, submerge burningclothes in water, put valuables found in clothing in a safe place.
K. Combustible stock overhaul.Separate from unburned, examine thoroughly, wet down or sub-merge in water basin made of salvage covers.
L. Lumberyard overhaul.Move all burned lumber.
M. Coal, hay, rubbish pile overhaulremove and examine thoroughly.N. Automobile overhaul.
1. If electrical causedisconnect battery, examine burned wires.2. Burned seat cushionsremove and examine thoroughly.3. Open trunk to check, inspect underside of floor mats, examine
underside oi auto.
O. Scraping char and "washing down"char scraping not necessary,possibility of re-ignition is very remote"washing down" fre-quently overdone, use water sparingly. If fire may be in crevicesthat are difficult to uncover or to examine, direct small stream intothem.
P. Safety precautions.1. Structural stability of building.
a. Floorsburned out joists and postsoverloaded floors.b. Wallsburned out supports, cracks, bulging warped steel
beams.
41
A '7

MAIN TOPIC TEACHING POINTS
c. Roofsburned out rafters, warped steel beams.d. Space between end floor boards and sidewall is danger signale. Water loads should be removed from lowest floor first.
2. Causes of injuries.a. Fallsstepping into holes, slipping on wet or icy surfaces,
tripping over debris.b. Cutsbroken glass, metal.c. Foreign bodies in eyescharcoal, plaster, etc.look away
from work when pulling down ceilingdon't crowd together.d. Strains from liftinglift with legs, not back alone.e. Injuries from falling objectsdon't work too close together
look before dropping or throwing anything out ot upperlevels.
f. Struck by tools wielded by othersdon't work too close to-getherhold axe shortlook around before using a tool.
g. Presence of dangerous materialsacids, other chemicalsspecial care needed in handling because containers may beweakened.
h. Combustible dusthdanger of dust explosion during over-hauling.
3. Officers should supervise, not join in the work.
Q. Use of "watch lines."Small crew of men with charged hose line left to guard againstrekindle.
R. Value of overhaul in public relations.Expiain to occupant or owner the need for overhaulconsider oc-cupant's feelingsbe neat in overhaulingremove debris.
S. ApplicationDescribe some cases you have personally experienced where over-hauling uncovered hidden fire, unusual travel of fire, etc.
T. Test or Cheek-up.1. Have student define overhauling as applied to fire service.2. Have student discuss planning of overhaul.3. Have student review some of the methods used in overhaul.4. Have student explain some of the precautions to take while
overhauling.5. Have student demonstratepulling ceiling, opening wall etc.6. Correct mistakes and explain why.
Session A. Protective Breathing Equipment.Summary B. Importance of Overhaul.
C. Announce next class session.
42
43

LESSON PLAN NO. 7
COURSE TITLE AND NUMBER : Firefighting f or Civil Defense EmergencyPart BHose Streams And Their Use
TIME : 3 hours
OBJECTIVES :To enable trainees to identify all types of nozzles and appliances ; and to develop an under-
standing of the effective use of hose streams an d some skills in handling them.
INSTRUCTIONAL AIDS :Chalkboard, chalk, and eraser.Overhead, opaque or slide projector.Pumper, hose, all types of nozzles used by department.Pitot tube and gauges.Hose appliances used by department.NOTE : This session includes a "wet" drill , water should be used.
SELECTED REFERENCES :a. Instructor's :
Local Drill Manual.State Training Manuals, as available.International Fire Service Training Association Manuals, as available.
b. Student ManualFirefighting for Civil Defense EmergencyPart B.
SUGGESTED FILMS :"The Nozzleman"---Fire Service ExtensionIowa State University.Other films appropriate to the subject matter as available.
MAIN TOPIC TEACHING POINTS
Introduction A. Review.I. Remind the trainees that previous sessions have led up to this
one, the use of hose streams. They will be practicing some ofthe skills learned in previous sessions as well as developing newskills.
2. Review some of the key points regarding hose handling :a. Care in handling.b. Laying hose.c. Hose rolls.
B. This lesson will include :I. The importance of the subject matter.
43

MAIN TOPIC TEACHING POINTS
Importance ofSubject Matter
Nozzles
2. Types of nozzles.3. Tactical considerations.4. Use of hose streams.5. /sTozAe handling.6. Fire pumps.7. Pumping and practice in handling lines.
C. Getting water from the source to the seat of a fire is a chain ofpractices. A chain is no stronger than its weakest link and theproper use of hose streams is most important in delivering waterto the seat of the fire. The improper use of hose streams can negatethe other links in the chain.
.D. Nozzles.1. Two major types .
a. Solid stream.b. Fog.
2. Sizes.a. Various types to fit every size hose from booster to 31/2".b. Solid stream nozzles are referred to by inside the diameter
of tip(i.e.-1" nozzle means that it has a tip 1" in diameternot that it fits 1" hose).
c. Fog nozles are referred to by discharge capacity in gallonsper minute (i.e.-60 gals., 100 gals., etc.).
3. Types of solid stream nozzles.a. Open(no shut off or control valveb. Controlling(also called shut off).c. Underwriters' playpipea long open nozzle with no shut
off. These were once used by fire departments, but now arefound usually only in hose houses at industrial plants wherethey are still in common use.
4. Fog nozzles.a. Impinging stream(also called Navy type) fog head has
several small holes drilled at angles so that streams impinge(strike one another) to break into fine spray. It also has asolid stream orifice.
Handle forwardclosed.Handle straight upfog.Handle all the way backsolid stream.
Fog button (head) may be removed and replaced by an ap-plicator.Applicator is a long tube bent at far end, which has a foghead on it. It is suitable for flammable liquid firesespeciallyin tanks.Fog is fixed patternnot adjustable.
b. Periphery jetSpray pattern is adjustable from straight
44

MAIN TOPIC TEACHING POINTS
stream to wide angle fog, by turning movable head. Oldertypes have no handleare shut off by turning. Newer typeshave shut off handle.
c. There are several makes and models differing slightly inoperation.
(show and let trainees d. Shut off handle advantageshandle available nozzle (1) Fog pattern may be selected in advance.equipment) (2) There is no need to pass through straight stream when
opening or closing which may cause unnecessary waterdamage and increased reaction which could wrest noz-zle from control.
e. Special features of some periphery fog nozzles.(1) Variable flowgpm may be changed by moving a selec-
tor.(2) Constant gallonagesame gpm regardless of fog pat-
tern.(3) Self-cleaning device to remove pebbles or other obstruc-
tions without removing nozzle.Note : Students should be impressed that periphery fog noz-
zles vary considerably in discharge. Two nozzles maylook exactly alike yet one may discharge twice asmuch water as the other (at same pressure).Unless nozzle is constant gallonage type, it will dis-charge much more water in wide fog than narrow fogor straight stream.
5. Pumpers should be equipped with nozzles of sufficient size tofully utilize capacity. A 750 gpm pumper can supply threestreams totaling 750 gallons. It should have three nozzles with atotal capacity of 750 gallons per minute. A good combinationwould consist cf two solid stream nozzles with 11/8" tips (250gpm fog nozzle ; another good combination would be one solidstream 11/2", one 11/4" (320 gpm ) and one 160 gpm fog nozzle.PlaypipesA term sometimes used to describe a pipe withhandles to which nozzle is attached. Althcugh still popular, it'sa hold-,over from the old days. There is really no need for it andit adds considerable weight.
7. Cellar nozzles.a. Types.
(1) Distributorshave retating heads with several orificesto discharge water in coarse spray (several types,Bresnan is most common).
(2) Hart cellar pipenozzle may be directed up and downand from side to sidefrom above.
(3) Bakersimilar to Hart, but has long handle.
45
46

MAIN TOPIC TEACHING POINTS
TacticalConsiderations
(4) Bent cellar pipea long pipe with two right anglesnozzle on end. (There are several other types.)
b. UseCellar nozzle is lowered through hole cut in floor abovefireusually from first floor into basement, but can be usedelsewhere, as from roof into cockloft, attic, or top floor.
8. Deluge "gun" (Deluge set) (or portable "monitor").a. A large nozzle mounted on a portable platform equipped with
two or three siamesed inlets.b. May be operated from truck or moved to any suitable loca-
tion.e. Barrel swivels in a circle and may be raised or lowered.d. Has removable tops of various sizes (11/2", 11/4", 13/4", 2 ).e. May be left unattended, if necessary.f. Recommended for use on large fires when sufficient water
supply is available, (300 gpmup, depending on tip used).g. Usually requires two or three lines depending on tip size and
distance from pumper.9. Deck pipeA deluge or monitor gun permanently mounted on
truck or apparatus.10. Ladder pipeA large pipe similar to deluge gun mounted on an
aerial ladder (removable).E. Confining the fire-
1. A good fire department will confine 95% of its fires to the roomor area involved when the department arrives.
2. Remember fire travels upward because heat rises. It may travelupward via :a. Stairways.b. Chutes.e. Light and air shafts.d. Elevator shafts.e. Ducts (heating, ventilating, airconditioning).f. Concealed wall spaces.These vertical arteries should be protected with hose lines whennecessary.
3. Fire can skip intervening floors and jump to topmost pointssuch as attic, cook-loft, top floor because the rising, heated gases,unable to escapt., will build up there until wood, and other com-bustible materials present, are heated to ignition point.
4. Ventilation at the top helps hot gases to escape and reduceschance of mushrooming.
5. Remember also that fire may travel by radiation and conduction.Examine all sides of fire area and above and below it.Pay particular attention to ceilings and sidewalls. Open them ifthere is a chance fire may have spread there.
46
4 7

MAIN TOPIC TEACHING POI TS
Nozzle Selection
Use of Hose Streams
6. Have tools handy.*There should be at leastone man with an axeonk. man with a pike pole (six foot handle)one man with a claw (or similar) tool ready to use the tools
when neededDon't leave these esse ial tools behind on the truck. Have themon hand.
F. Extinguishing the fire.1. Select the proper size and type of nozzle.2. Select the proper size hose.3. An adequate discharge (gallons per minute) is essential.
a. A common mistake is starting attack with a discharge toosmall.
b. The discharge must be sufficient to absorb heat faster thanit is being produced.
c. It is safer to apply too much rather than too little.d. The amount can be controlled by the length of time the noz-
zle is open.4. Placement of hose streams.
a. Streams should be placed to cut-off spread of fire, not topush it through the building.
b. Hose streams cause strong air currents which push smokeand heat in direction of stream.
c. Hose streams from opposite directions push smoke and heattoward each other, making advance difficult.
d. Outside streams (through windows) should never be di-rected into same floor as men are in or trying to get in. Thesestreams push heat and smoke back into building; firemeninside may get burned.
e. The same as (d) occurs when streams are directed throughholes in roof.
f. Rememberin order for water to extinguish fire, it mustcontact burning material. If it doesn't fire will continue toburn.Nozzle must be brought to where water will hit the burning.material and cool it.Putting water on smoke or flame will not extinguish fire.
Note: Instructor can usually give good example at this time bypointing out how a fire in a part of the room that could notbe reached by a stream aimed in window would continue toburn no matter how much water was poured through thatwindow.He can then point out how a stream brought in through thedoorway could reach the fro.
47
48

MAIN TOPIC TEACHING POINTS
Nozzle Handling
Fire Pumps
Friction Loss
5. Handling the nozzle.a. Nozzle should be advanced to where the fire can be seen
before it is opened.b. Nozzle should be opened slowlysudden release of pressure
may wrest it from grasp.c. Nozzle should tic aimed at floor until all air is discharged,
to keep air from striking fire and accelerating it.d. Nozzle should be aimed to have stream hit ceiling.e. Nozzle should be moved rap: ily back and forth, left to right
or in a circle, to cover all the fire.f. Nozzle should be closed slowlyrapid closing causes "water
hammer" that may burst hose.g. In hot smoky condition, nozzleman, and others, should get
down low.h. In hot smoky condition, men on nozzle should be relieved by
others after a short spell.6. Advancing the line.
a. Men should not "bunch up" near nozzle, but ehould be spreadout along the hose line.
b. One man should back up nozzleman to take up the "kick-back" strain.
c. Hose line should not be held by others except when beingmovedleave it on floor when not moving.
d. When nozzle is to be advanced, officer or nozzleman calls"more line" and the men pick up and move line forward.
e. As soon as fire is darkened, line should be moved to nextpoint from which fire Can be hit.
f. Nozzle should be closed as soon as fire is darkened and re-opened only wher e more fire is seen.
G. Why pumps are used.1. To give velocity to water to reach fire.2. To pick up water from static source.
H. Types of pumping apparatus.1. Double combination.2. "Triple".3. "Quad".4. "Quint".
I. Capacity.1. "GPM".2. Pressure.3. Capacities vary from 500 to 1750 gpm Try to demonstrate the
following using gauges.
J. Friction loss rtinciples.1. Longer the line, the greater the loss.

MAIN TOPIC
Elevation Loss
Actual 1='ractice("Wet Drill")
Sessioh Review
TEACHING POINTS
2. Greater the flow, the grea er the loss.3. The smaller the hose diameter, the greater the loss.
K. Friction loss example.L. Elevation loss (and gain).
1. About 1/2psi per foot of height2. Roughly 5 psi per story.
M. Nozzle pressure is proportionate to pump pressure.N. Hose stream practice.
1. Have them lay a 21/2" line to point where water can be used fromnozzle. Start water ; then get second line into operation close tofirst one.
2. Have each man operate each type of nozzle for 21/2" hose. Showhow to hold and maneuver nozzle and hose. Only one manback-up, not an army.
3. Use whatever appliances they have for 21/2" hose. Explain pur-pose of each and how used.
O. Review of session.1. Importdnce of fire streams.2. Safety in handling.3. Get water to seat of fire.
P. Announce next class session.
49
50

LESSON PLAN NO. 8
COURSE TITLE AND NUMBER : Firefighting for Civil Defense EmergencyPart BSection IEmergency Water SuppliesSection IIRescue Under Fire Conditions
TIME : 3 hours
OBJECTIVESSection ITo develop an apprr-Aation of the
supplies might te obtained.Section IITo give trainees an understanding
endangered by fire and give trainees some skill i n
need and some idea of how emergency water
of techniques for finding and rescuing personsperforming certain drags and carries.
INSTRUCTIONAL AIDS :Chalkboard, chalk, and eraser.Overhead, opaque or slide projector.Short ladder and regulation rope.Clean floor or rug to practice drags.
SELECTED REFERENCES :a. Instructor :
State Rescue Training Manuals as available.International Fire Service Rescue Training Manual.
b. Student ManualFirefighting for Civil D efense EmergencyPart Bc. Large map of local area.
STTGGESTED FILMS :Training films appropriate to subject matter, as available.
MAIN TOPIC
I. EMERGENCYWATER SUPPLIES
Importance ofSubject Matter
TEACH' NG POINTS
A. This lesson will include :I. Importance of subject matter.2. Why emergency supplies may be needed.3. Water sources.4. Water transportation.5. Local sources.
B. Water is the most used and most necessary resource for fire control.Without it the labor of controlling fire becomes very difficult ; sodifficult that fire departments that respond to rural areas devote amajor portion of their effort toward bringing or getting water tothe fire.
51
51

MAIN TOPIC TEACHING POINTS
Why EmergencySupplies
lat EmergencySupplies
Transportationof Water
Other Tactics
IL RESCUE UNDERFIRE CONDITIONSTime 1 hour
Importance ofSubject Matter
C. What can happen from air attack ?1. Broken dams.2. Burst mains.3. No pumping station power.4. Many broken pipes.5. Example of Nagasaki.
D. What can be used ?1. Swimming pools,2. Gravity tanks.3. Industrial water supplies.4. Cisterns.5. Sewers.6. Drafting from mains.
E. Water transportation.1. Fire department tankers.2. Privately owned vehicles.
a. Milk tankers.b. Other tankers.c. Cement mixers.d. Pink-up trucks with cattle tank.
3. Portable folding tanks.4. Improvised tanks.
F. Other tactics.1. Overcoming incompatible threads.
a. Adapters.b. Cooper hose-jacket.c. Putting hose into suction.
2. Emergency storage.a. Temporary dams.
(1) Creeks.(2) Storm sewers.
b. Plugging basement drains.G. Local emergency sources.
Use large map of local area.Have class discussion of possible sources for emergency water sup-plies in ":he area.
A. This lesson will include :1. Impo ,..ance of subject matter.2. Rescue procedures.3. Rescue techniques.4. Actual practice.
B. The know how of a person attempting a rescue under fire conditionsis vital to both the rescuer and the person being rescued.
52

MAIN TOPIC TEACHING POINTS
Problems
Procedures
(Note : Explain,demohstrate and havetrainees try variousdrags, carries, androp rescue methods.)
C. Limitations imposed by fire conditions.1. Heavy smoke.
a. Toxic.b. Little or no visibility.
2. High temperatures.D. Stay low.
1. Safer from heat.2. Safer from smoke.3. Better visibility.
E. Search.1. For unconscious or trapped victims.2. To make sure everyone has escaped.3. Perform search systernatiL.ally.4. Don't rely on information of bystanders.5. How to search.
a. Crawl on floor.b. Sweep arms out to feel.c. Search under beds and in closets.d. Listen for heavy breathing.e. If victims body locks door, take door off hinges.f. If door chain locked or bolted, someone is inside.
F. Removal.1. Ambuatory.2. Unconscious.
a. Drags.(1) Head first.(2) Face up.(3) If dragged by one leg, other leg may catch on obstacles.
b. Carries.(1) Fireman's carry.(2) 'Two man seat carry.(3) Chair carry.
(4) Fore and aft carry.(5) Three man carry.
c. Rope rescue.(1) Single slide.(2) Double slide.(3) Bowline-on-bight on rescuer.(4) Bowline-on-bight on victim.
d. Net rescue.(1) How to open net.(2) How to hold net.(3) Moving the net.(4) Removing jumper from net.(5) How to jump.

MAIN TOPIC TEACHING POINTS
Course Summary A. The huclear fire threat.B. Fallout.C. Shelter.D. The need for "Support Assistants".E. How "Support Assistants" would be used (Under '7:rect control of
regular fire forces).F. Announce possible followup steps or courses for "Support Assist-
ants".G. Award "Support Assistants" art B card.
Note : Have Civil Defense or Government Official present awardcards.
54
ERIC Clearinghouse
0 CT 2 7 1971
on Adult Education