docmail: data intelligence - cfhdocmail.com · docmail® data intelligence docmail is capable of...
TRANSCRIPT

1
DOCMAIL: DATA INTELLIGENCEAdding Data-driver styles and images

Docmail® DATA INTELLIGENCE
Docmail is capable of far more than simply mail-merging address data and adding names within content.
In this Tutorial we’ll show how to create a stylish, dynamic mailer using Word® that targets two different sets of customers using the same document, by adding extra tags into the Address list to select the appropriate copy, styles and images for each.
We’ll show you:
● HowtocreatetheWorddocument.
● HowtoadddynamictagstoyourExcelAddresslist.
● HowtocombinebothwithinDocmailtotargeteachsetofcustomerswithinasingle mailing!
Let’s start by setting up and preparing the Word® document.

3
We are going to look at how Docmail uses data intelligence to add variable data, styles and images.
Firstly we need to create a new A4 document in Word. This will carry the content variations we want to use.Adjustthemarginstofitourbackgroundasshownbelow:
Create a simple two row table the full width of the page with just one column. Docmail uses table cells to contain copy variations. This will be our greeting variation.
Drag the table into position leaving enough space at the top for the Docmail address panel (see Docmail A4 template) and adjust the point size and font to one we want.
1 Setting up and preparing the WORD® FILE
4
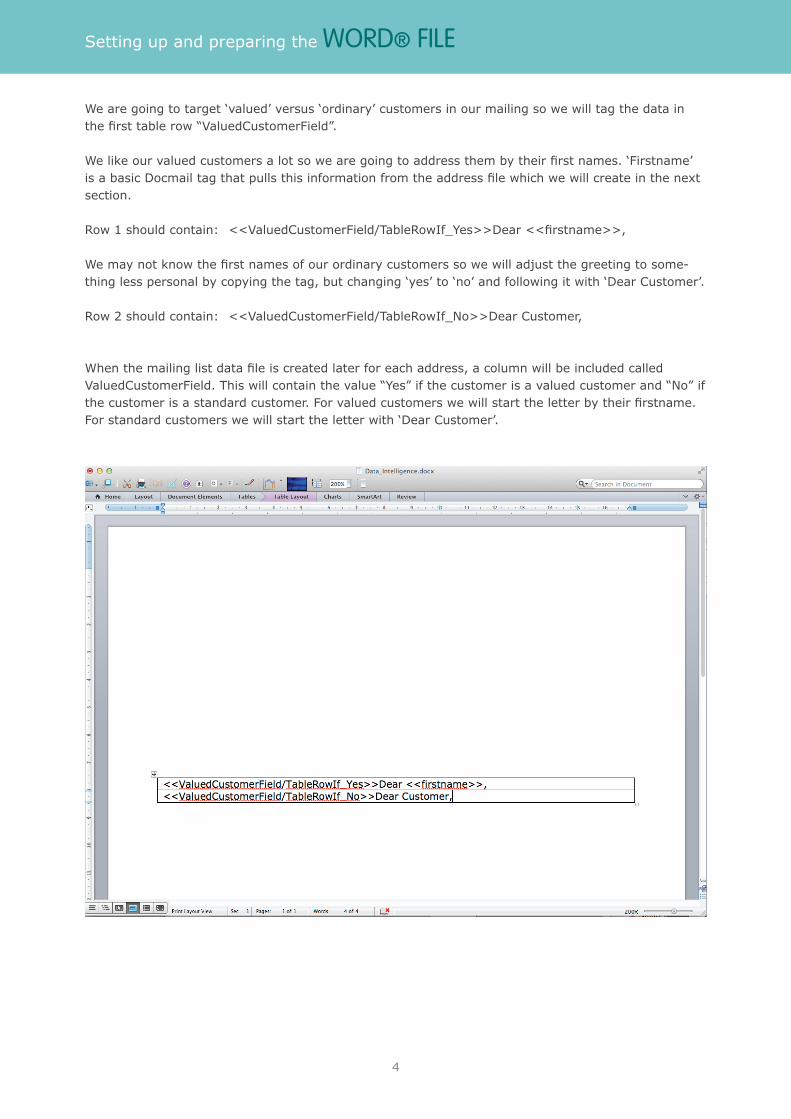
We are going to target ‘valued’ versus ‘ordinary’ customers in our mailing so we will tag the data in thefirsttablerow“ValuedCustomerField”.
Welikeourvaluedcustomersalotsowearegoingtoaddressthembytheirfirstnames.‘Firstname’isabasicDocmailtagthatpullsthisinformationfromtheaddressfilewhichwewillcreateinthenextsection.
Row1shouldcontain: <<ValuedCustomerField/TableRowIf_Yes>>Dear<<firstname>>,
Wemaynotknowthefirstnamesofourordinarycustomerssowewilladjustthegreetingtosome-thing less personal by copying the tag, but changing ‘yes’ to ‘no’ and following it with ‘Dear Customer’.
Row2shouldcontain: <<ValuedCustomerField/TableRowIf_No>>DearCustomer,
Whenthemailinglistdatafileiscreatedlaterforeachaddress,acolumnwillbeincludedcalledValuedCustomerField.Thiswillcontainthevalue“Yes”ifthecustomerisavaluedcustomerand“No”ifthecustomerisastandardcustomer.Forvaluedcustomerswewillstarttheletterbytheirfirstname.For standard customers we will start the letter with ‘Dear Customer’.
Setting up and preparing the WORD® FILE

5
Nowwewantaheading.WearegoingtopullboththevariablecontentANDthevisualstyleoftheheading from our address database.
Create a single row, single cell table and position it below the greeting table. Type in the following tag:
<<DataDrivenStyleField/style>>
When docmail comes across this tag it will pull the data as usual from the spreadsheet but it will noticethatthe/styleisaspecialcommand.Itwillprocessanythingcontainedinthedatafield“DataDrivenStyleField”ashtml.Thisallowschangesinfontcolour/size/decorationetc.Onlybasichtmlformatting can be used right now.
Setting up and preparing the WORD® FILE

6
Nowweneedatworowsinglecolumntabletocontainourmessage.Positionthisunderneaththeheading table and type in the same tags we used in the greeting table.
Row1: <<ValuedCustomerField/TableRowIf_Yes>>Row2: <<ValuedCustomerField/TableRowIf_No>>
Wherecustomervaluedfieldtagis“Yes”,pasteinthemessageyouwishtogiveyourvaluedcustomersdirectlyafterthetag.Wherethecustomervaluedfieldtagis“No”,followitwiththemessage for ordinary customers as shown in the example below:
Setting up and preparing the WORD® FILE
7
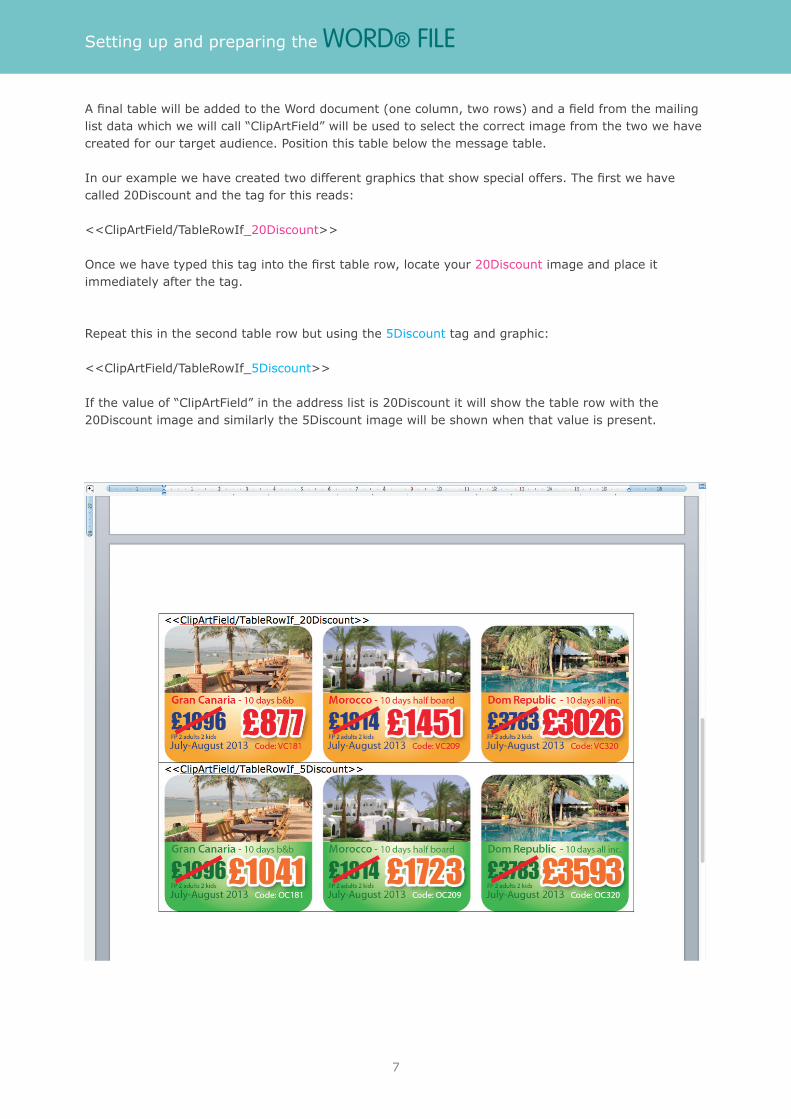
AfinaltablewillbeaddedtotheWorddocument(onecolumn,tworows)andafieldfromthemailinglistdatawhichwewillcall“ClipArtField”willbeusedtoselectthecorrectimagefromthetwowehavecreatedforourtargetaudience.Positionthistablebelowthemessagetable.
Inourexamplewehavecreatedtwodifferentgraphicsthatshowspecialoffers.Thefirstwehavecalled 20Discount and the tag for this reads:
<<ClipArtField/TableRowIf_20Discount>>
Oncewehavetypedthistagintothefirsttablerow,locateyour 20Discount image and place it immediately after the tag.
Repeat this in the second table row but using the 5Discount tag and graphic:
<<ClipArtField/TableRowIf_5Discount>>
Ifthevalueof“ClipArtField”intheaddresslistis20Discountitwillshowthetablerowwiththe20Discount image and similarly the 5Discount image will be shown when that value is present.
Setting up and preparing the WORD® FILE
8
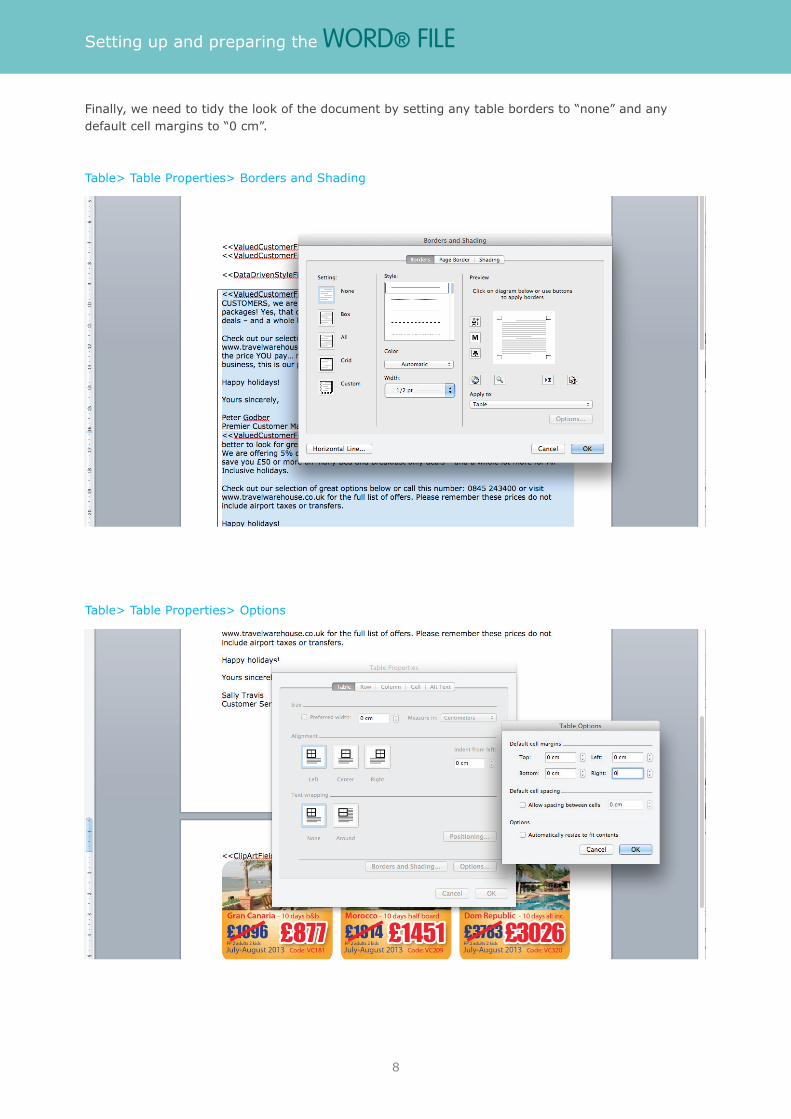
Finally,weneedtotidythelookofthedocumentbysettinganytablebordersto“none”andanydefaultcellmarginsto“0cm”.
Table>TableProperties>BordersandShading
Table>TableProperties>Options
Setting up and preparing the WORD® FILE

9
In order to deploy the intelligent features we have created within our mailing document, we need to create and address database of customers - or modify and existing one - and add the relevant tags and style elements.
Tostartwith,typeinorpastethecommonheadingsfirst(Firstname,Surname,Address1,Address2,Address3, Address4, Address5, Address6, etc).
Next,typeinthefieldnameswecreatedinourWorddocumentintothenextthreecellsonthefirstrow:
ValuedCustomerField ClipArtField DataDrivenStyleField
Docmail uses the top row to identify the information in the following rows, making sure it goes into the right place in our document. In the case of Data Intelligence, these are the instructions to pick the appropriate table cell containing our copy.
So now we have our headings, let’s add two customers - one who spends a lot fairly frequently and one who doesn’t!
IntheValuedCustomerfield,you’llrememberthatwehavetwovariables,“yes”and“no”.Add“yes”tothefirstvaluedcustomerand“no”tothesecond.
IntheClipArtfieldwecalledonevariable“20Discount”andone“5Discount”.Add“20Discount”toourfirstvaluedcustomerand“5Discount”tothesecond.
2 Creating the EXCEL® FILE
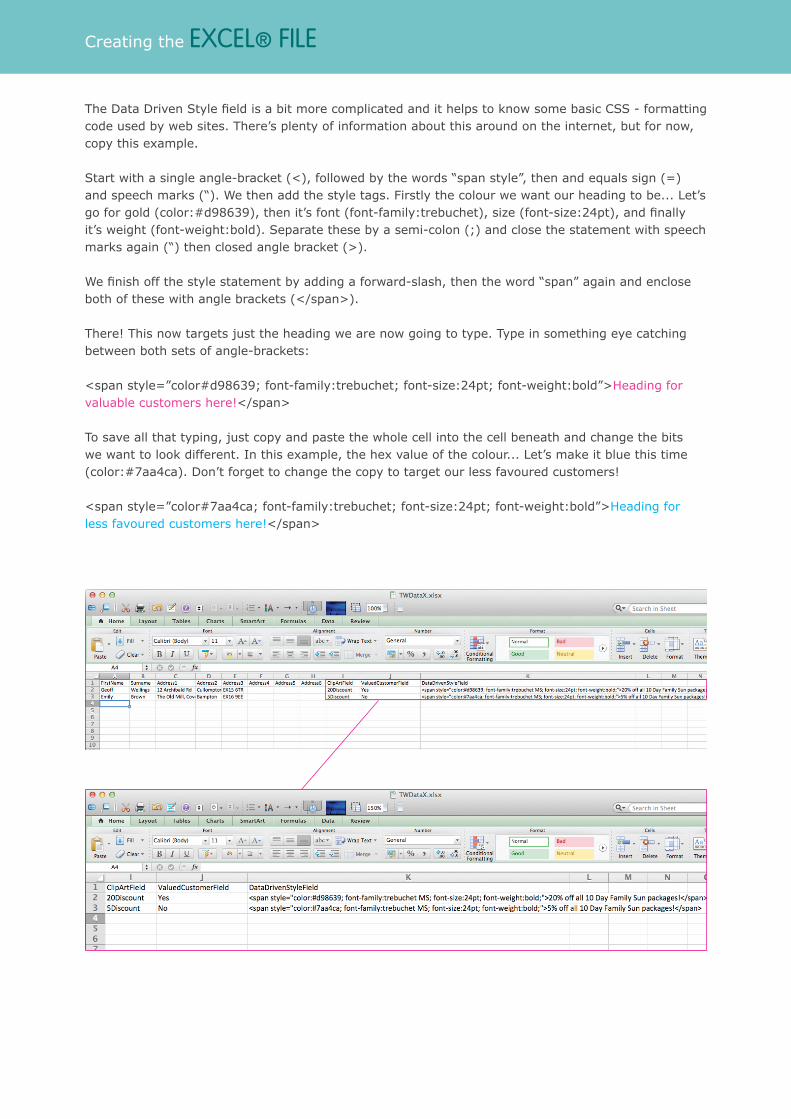
TheDataDrivenStylefieldisabitmorecomplicatedandithelpstoknowsomebasicCSS-formattingcode used by web sites. There’s plenty of information about this around on the internet, but for now, copy this example.
Startwithasingleangle-bracket(<),followedbythewords“spanstyle”,thenandequalssign(=)andspeechmarks(“).Wethenaddthestyletags.Firstlythecolourwewantourheadingtobe...Let’sgoforgold(color:#d98639),thenit’sfont(font-family:trebuchet),size(font-size:24pt),andfinallyit’s weight (font-weight:bold). Separate these by a semi-colon (;) and close the statement with speech marksagain(“)thenclosedanglebracket(>).
Wefinishoffthestylestatementbyaddingaforward-slash,thentheword“span”againandenclosebothofthesewithanglebrackets(</span>).
There! This now targets just the heading we are now going to type. Type in something eye catching between both sets of angle-brackets:
<spanstyle=”color#d98639;font-family:trebuchet;font-size:24pt;font-weight:bold”>Headingforvaluable customers here!</span>
To save all that typing, just copy and paste the whole cell into the cell beneath and change the bits we want to look different. In this example, the hex value of the colour... Let’s make it blue this time (color:#7aa4ca). Don’t forget to change the copy to target our less favoured customers!
<spanstyle=”color#7aa4ca;font-family:trebuchet;font-size:24pt;font-weight:bold”>Headingforless favoured customers here!</span>
Creating the EXCEL® FILE
11
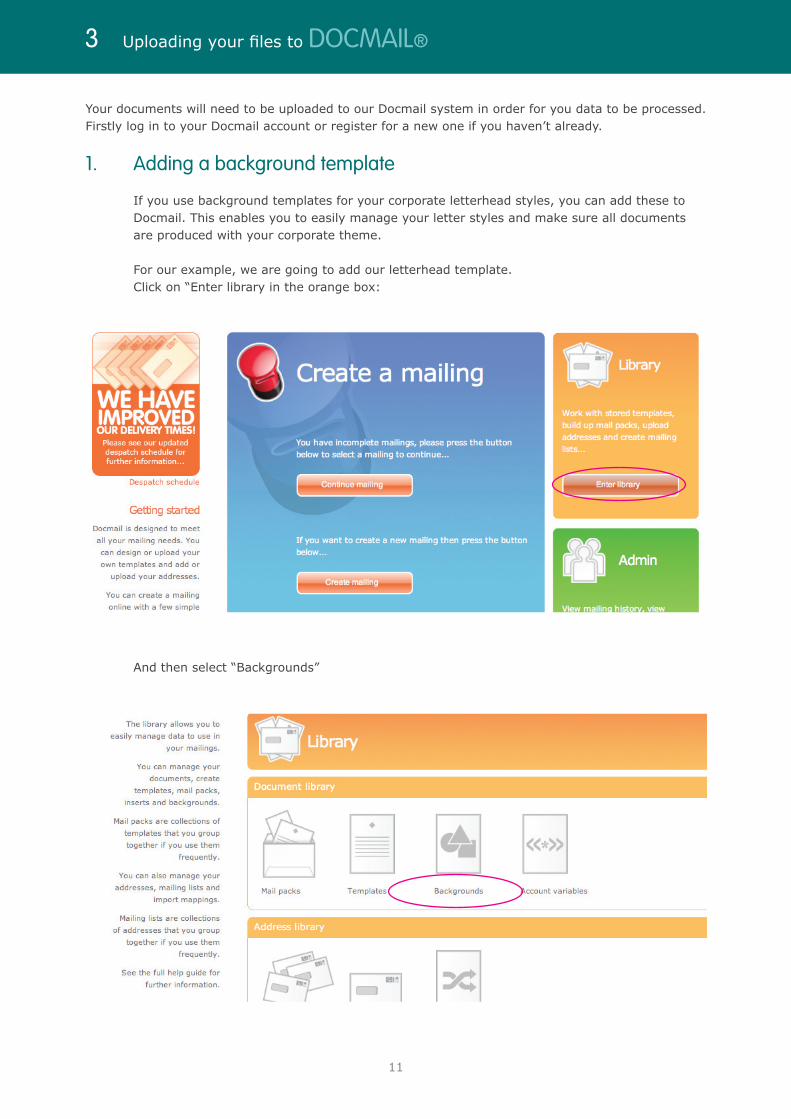
YourdocumentswillneedtobeuploadedtoourDocmailsysteminorderforyoudatatobeprocessed.Firstly log in to your Docmail account or register for a new one if you haven’t already.
1. Adding a background template
If you use background templates for your corporate letterhead styles, you can add these to Docmail. This enables you to easily manage your letter styles and make sure all documents are produced with your corporate theme.
For our example, we are going to add our letterhead template. Clickon“Enterlibraryintheorangebox:
Andthenselect“Backgrounds”
3 Uploadingyourfilesto DOCMAIL®

12
Wethenneedtoselectthelink“ADDNEWBACKGROUND”:
Thisallowsustoselectourbackgroundtemplateforuploading(inourexamplethefileiscalledTW_LHBackground.docx).
YoucannameyourbackgroundtemplateinDocmail(wehavenamedoursTWLetterBackground):
Uploadingyourfilesto DOCMAIL®

13
2. Uploading your intelligent Word® File Nowwehaveuploadedourbackgroundtemplate,wecancreateourmailing.Clickon“Create
Mailing”:
Select your product type (we are creating a letter in our example):
Uploadingyourfilesto DOCMAIL®

14
SwitchtoDocmailadvancedmodeandselecttheoptiontoturn“Dataintelligenceon”.Proceedtonameanddescribeyourmailingfileifrequired:
Onthenextscreen,click“UPLOADTEMPLATE”toaddanewfiletoourmailpack:
Uploadingyourfilesto DOCMAIL®

15
WecannowselectanduploadourintelligentWord®file(ourfileiscalledTW_LHContent.docx) to create our mail pack.
We also want to select the corporate letterhead background template we uploaded earlier to useasabackgroundforthefinishedfile(TWLetterBackground):
Nowwehaveourmailpacksetup,wecanclick“Next”tomoveontoourdata:
Uploadingyourfilesto DOCMAIL®

16
3. Uploading your intelligent Excel® File Nowit’stimetouploadourintelligentExcel®datafiletoDocmail.Clickthe“UPLOAD”linkin
theEditmailinglistwindow:
Herewecanselectourdatafile(oursiscalledTWData.xlsx),andclick“Next”toupload:
Uploadingyourfilesto DOCMAIL®
17
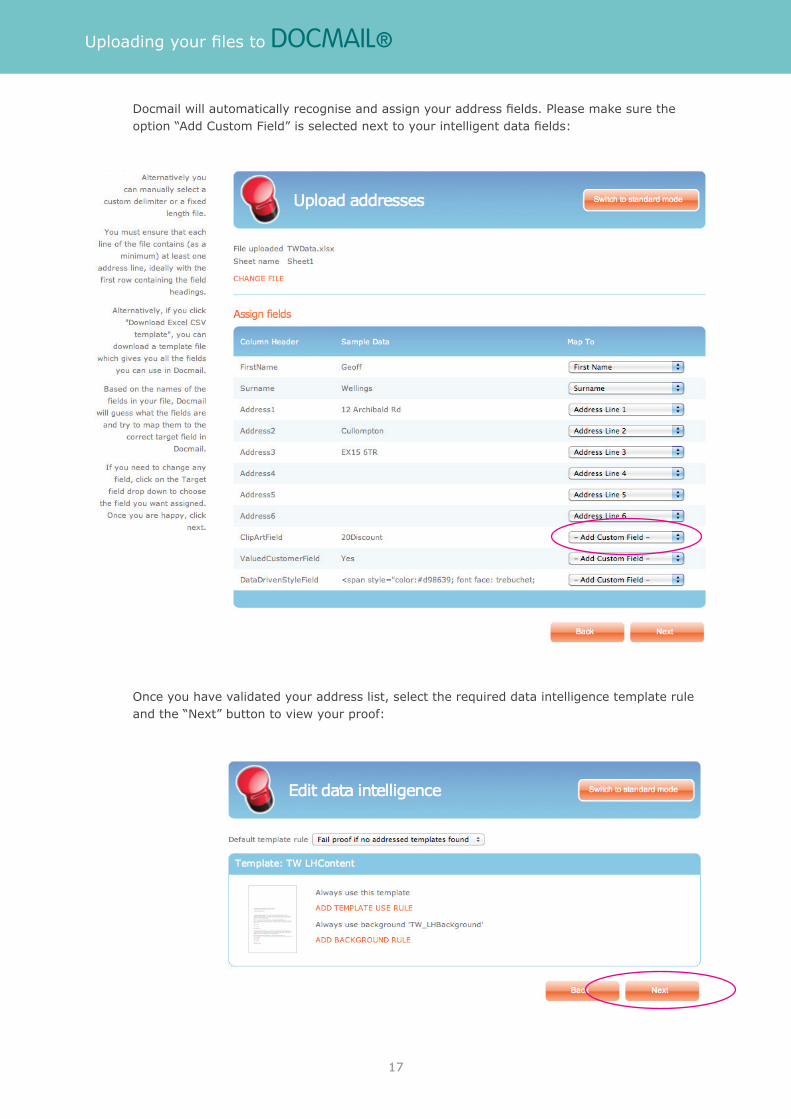
Docmailwillautomaticallyrecogniseandassignyouraddressfields.Pleasemakesuretheoption“AddCustomField”isselectednexttoyourintelligentdatafields:
Onceyouhavevalidatedyouraddresslist,selecttherequireddataintelligencetemplateruleandthe“Next”buttontoviewyourproof:
Uploadingyourfilesto DOCMAIL®

18
4. Proof approval
Youcaneitherviewyourproofonline,ordownloadaPDFversion:
Onceyouarehappywithyourproof,clickon“Approve”andcontinuewithourpaymentinstructions.
Uploadingyourfilesto DOCMAIL®

19
Thisiswhatourprooflookslikeforeachaddressusingoursamplefiles.
4 Example PROOFS

CFHLtdStPeter’sPark,WellsRd,RadstockBA33UPTelephone:01761409701/409702Email:[email protected], www.cfh.com