doc-to-help standard template - idealpos - idealpos
TRANSCRIPT
Update History
Build 54
Update Details:
** Enhancements
* [IP-1436] - Option to print POS Description on Kitchen Print from terminal where order is taken
* [IP-1699] - Import Promotions - support for Scan_Code field
* [IP-1935] - Hourly Sales Dashboard display in chronological order
* [IP-1976] - Yes/No Option - Show Tender Spend Limit on Receipts
* [IP-1977] - Aristocrat Gaming - option to Combine Accounts into One Total
* [IP-1987] - Assembly Payments EFTPOS - Support for Cash-Out functionality
* [IP-1988] - Export Stock Items by Range - added Webstore Field
* [IP-1995] - Journal Enquiry - Search by Table Range
* [IP-1996] - Table Summary - Item view shows Paid/Partially Paid Items
* [IP-1998] - POS Grids - Support for Chinese characters
* [IP-2008] - "Admin" User - Inhibit ability to Override Permissions with other Users
* [IP-2009] - Assembly Payments EFTPOS - Support for Settlement Enquiry functionality
* [IP-2018] - Handheld - option to Force Bills to print to specific Network Printer
* [IP-2025] - Table Alert minutes support for 3 digit values
* [IP-2026] - Bill Prints - option to show Discounts White on Black
* [IP-2027] - Ability to view Bar Tab/Table Items from POS Screen
* [IP-2034] - Kitchen Docket - option to Print Stock Items Above Header
* [IP-2042] - Speed Improvement in POS Screen with large number of Promotions
* [IP-2055] - Table Map Setups - added Shortcut Functionality

Back Office – Dashboard
Hourly Sales Dashboard display in chronological order
This function updates the order which the hourly sales are displayed on the Dashboard.
Previously, the hourly sales were ordered by quantity of sales per hour, meaning that the hours which had the most
sales would be displayed at the top and the sales which had the least sales would be displayed at the bottom.
This function updates the hourly sales dashboard so that hours are displayed in chronological order.
I.e. The order in which the hours occur during the day.
Note that this change will only affect recent monthly periods.
This means that previous periods may still be ordered by the quantity of sales per hour, with the hours that have the
most sales displayed at the top and hours with least sales displayed at the bottom.
Previous periods can be cleared if desired which will be explained further below.
If the dashboard isn’t displayed on the main Idealpos screen, search for “Dashboard” in Setup > Yes/No Options and
ensure that it is enabled for the POS terminal you are using.
Also ensure that the logged on user has access to the Dashboard: go to Setup > Users > Select the logged on User >
Modify > enter Dashboard into the Search field and ensure that it is enabled.
Go to the Idealpos main screen and select “Hours” from the first dropdown option and select the month/period which
you are interested in from the second dropdown box. You can also compare the hourly sales to a previous period by
selecting “Hours” from the third dropdown box and select the period from the fourth dropdown box.
The following example shows Hours from the “Last Financial Year” compared to the Hours of “This Year”:
To delete dashboard data and rebuild (this will remove previous periods from the dashboard and can’t be undone), go
to: Setup > Global Options > Miscellaneous > Dashboard > Delete Dashboard Data and Rebuild

Update History
Discounts
Hide Item Discount Percentage on the POS Screen, Bill and Receipt
This function enables the ability to hide the percentage on the POS Screen, Bill and Receipt when using specific item
discount buttons on the POS screen used to apply a discount. Note that this feature only applies to the Item Discount
function and is not available for the Sub Total Discount function.
To enable this feature, go to: Setup > POS Screen > POS Screen Setup > Select POS Screen Layout > Buttons
Select an existing Item Discount button or create a new discount button.
When creating the Item Discount button, enter [HIDEPERCENT] into the Automatic Text field, enter the discount
percentage into the Automatic % field.
Select the Item Discount from the Item Discount dropdown box. Idealpos has a total of four Item Discount types that
can be selected. By default, the Item Discount 1 description is set to Item Discount and Item Discounts 1 – 4 are set to
Item Disc 1 – Item Disc 4. The description of the selected Item Discount type will be displayed on the POS Screen, Bill
and Receipt when a discount is applied using the discount.

Once you have configured the button, press the “Save” button to save the change then close the POS Screen Setup
windows.
Should you wish to update the Discount Description, go to:
Setup > Function Descriptors > Select: Item Discount 1 – Item Discount 4 > Modify > Description: Enter the updated
Description
Once the description has been updated, press the “Save” button then close the Function Descriptors screen.
Open the Idealpos POS screen.
The discount can be applied in one of two ways. You can either add all the desired items to the sale, then individually
select an item and press the Item Discount button. The other option is to press the Item Discount button after adding
an item to the sale. The discount will then apply to the item that was added to the sale.
The discount text will appear and will not include the discount percentage amount.

Update History
After saving the sale to a table and viewing the Table Details, the discount percentage will also be hidden.
The discount percentage is also hidden from the bill as well as final receipt.
EFTPOS
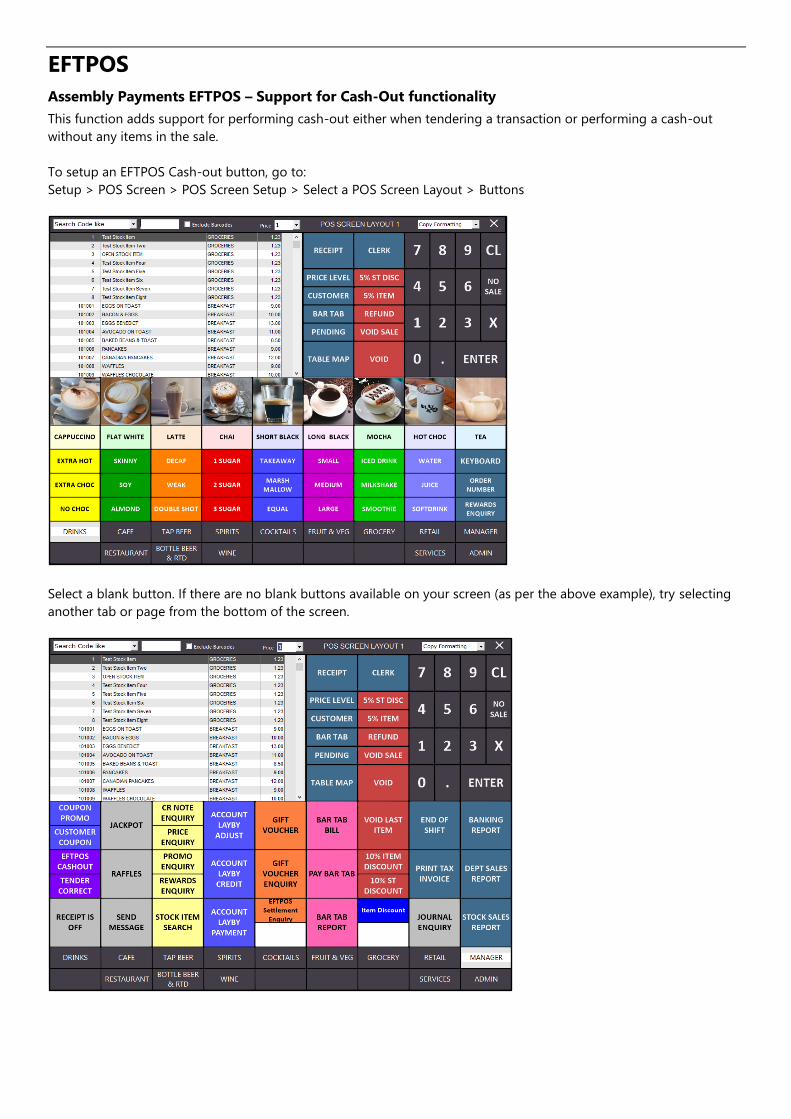
Assembly Payments EFTPOS – Support for Cash-Out functionality
This function adds support for performing cash-out either when tendering a transaction or performing a cash-out
without any items in the sale.
To setup an EFTPOS Cash-out button, go to:
Setup > POS Screen > POS Screen Setup > Select a POS Screen Layout > Buttons
Select a blank button. If there are no blank buttons available on your screen (as per the above example), try selecting
another tab or page from the bottom of the screen.

Update History
After selecting a blank button, set the Set the function to EFTPOS CashOut, Tender Function as EFTPOS and enter a
Button Caption of EFTPOS CASHOUT or another caption of your preference.
To use the EFTPOS Cashout function during a sale, add items as you normally would to the sale, then press the Enter
button to go to the Tender screen then select the EFTPOS option

Enter the Cash-Out amount desired then press OK.
In the below example, the Purchase Amount for the transaction is $7.00 and a Cash Out amount of $10.00, bringing
the total amount to $17.00
The following screen will be displayed in Idealpos and the Assembly Payments Pinpad will prompt for the card to be
inserted
Update History
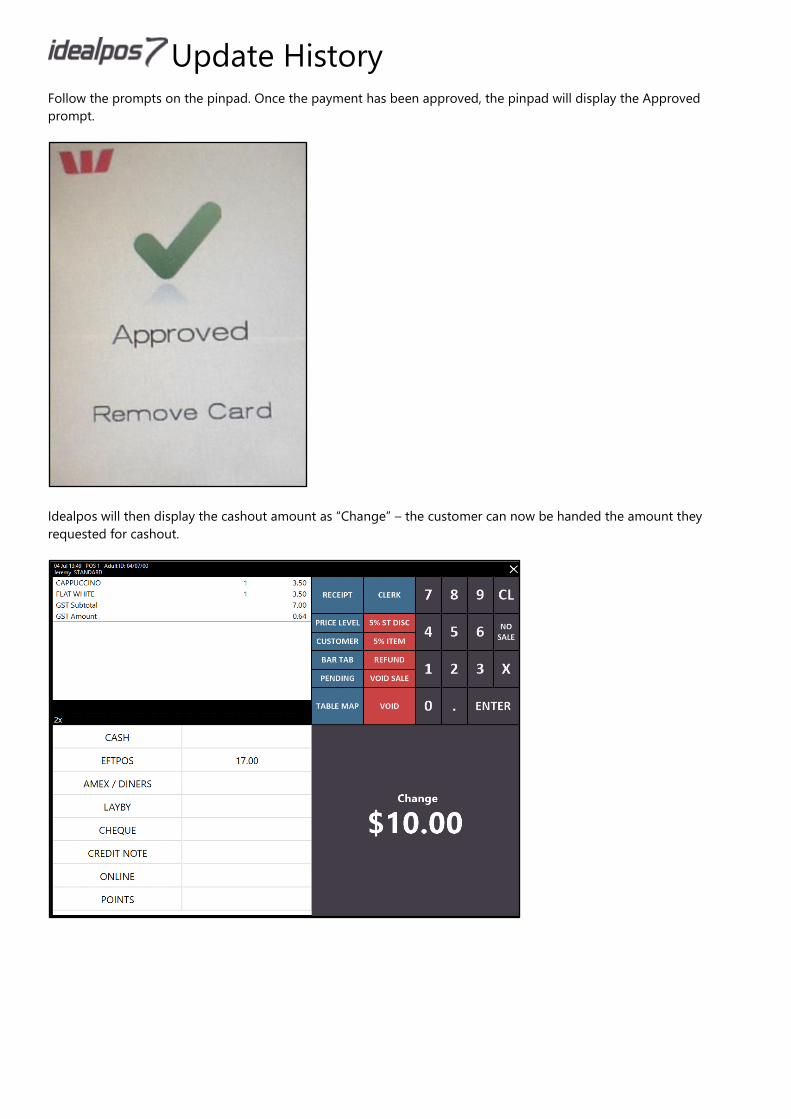
Follow the prompts on the pinpad. Once the payment has been approved, the pinpad will display the Approved
prompt.
Idealpos will then display the cashout amount as “Change” – the customer can now be handed the amount they
requested for cashout.

A cash-out transaction can also be completed without having to add any items to the sale.
Go to the page/tab where the EFTPOS cash-out button was created as configured in the previous steps outlined
above.
Press the EFTPOS CASHOUT button.
The Enter Cash-Out Amount screen will be displayed.
Enter the desired Cash-Out amount and press OK.

Update History
Follow the instructions on the pinpad, then once the pinpad has approved the transaction, Idealpos will show the
cashout amount as Change as per the below. You may now hand the customer their cash-out.

Assembly Payments EFTPOS – Support for Settlement Enquiry Functionality
This function adds the ability to perform an EFTPOS Settlement Enquiry without triggering the EFTPOS Settlement to
occur. This function is configured by setting up a button on the POS Screen which enables the Settlement Enquiry to
occur.
To setup the Settlement Enquiry button, go to Setup > POS Screen > POS Screen Setup > Select: POS Screen Layout >
Buttons

Update History
Select a desired location for the button. If there are no available spaces for a button on the initial screen, try selecting
another department or option (e.g. Admin, Manager, etc.).
E.g. In the below example, the Manager screen contains a few empty locations where a new button can be created
next to the Bar Tab Report button. You may want to rearrange your buttons so that similar functions are grouped
together. For more in-depth information on programming POS Screen buttons, visit our Idealpos website, click on
Support, then click on the User Guide link then enter a search term of “POS Screen Programming” for more
information about programming the POS Screen.
To create an EFTPOS Settlement Enquiry button, select an empty button by clicking on it, then select the “EFTPOS
Settlement” function. Enter the text ENQUIRY into the Automatic Text field, update the Button Caption to reflect the
enquiry function and adjust the colour of the button as desired.
The new button will now appear on the POS Screen.

Close the POS Screen Setup windows and open the Idealpos POS screen.
Press the EFTPOS Settlement Enquiry button.
An EFTPOS Settlement Enquiry will be performed and the resulting enquiry will be printed to the receipt printer.
If you don’t already have an EFTPOS Settlement button on your POS Screen to perform the EFTPOS Settlement, you
may want to create one.
Simply follow the above process, select another blank button and choose the EFTPOS Settlement function.
Note that when creating the EFTPOS Settlement button, ensure that you leave the Automatic Text field as blank.
Update History
Enquiry
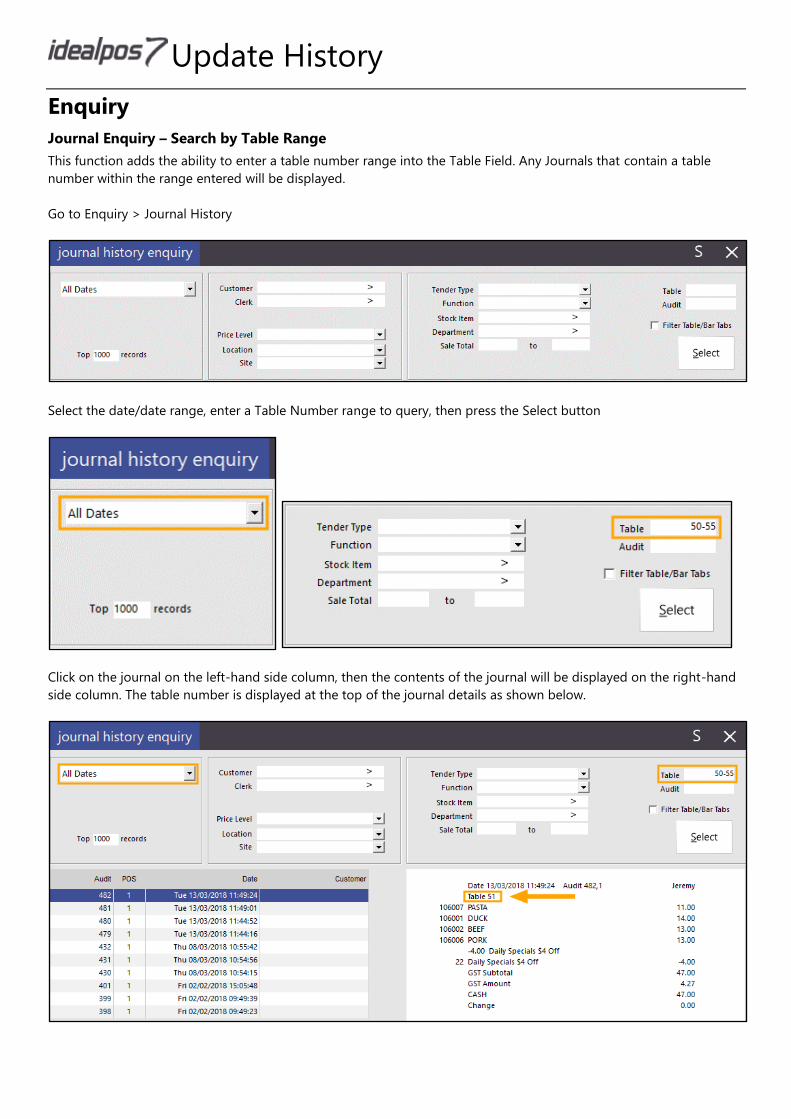
Journal Enquiry – Search by Table Range
This function adds the ability to enter a table number range into the Table Field. Any Journals that contain a table
number within the range entered will be displayed.
Go to Enquiry > Journal History
Select the date/date range, enter a Table Number range to query, then press the Select button
Click on the journal on the left-hand side column, then the contents of the journal will be displayed on the right-hand
side column. The table number is displayed at the top of the journal details as shown below.
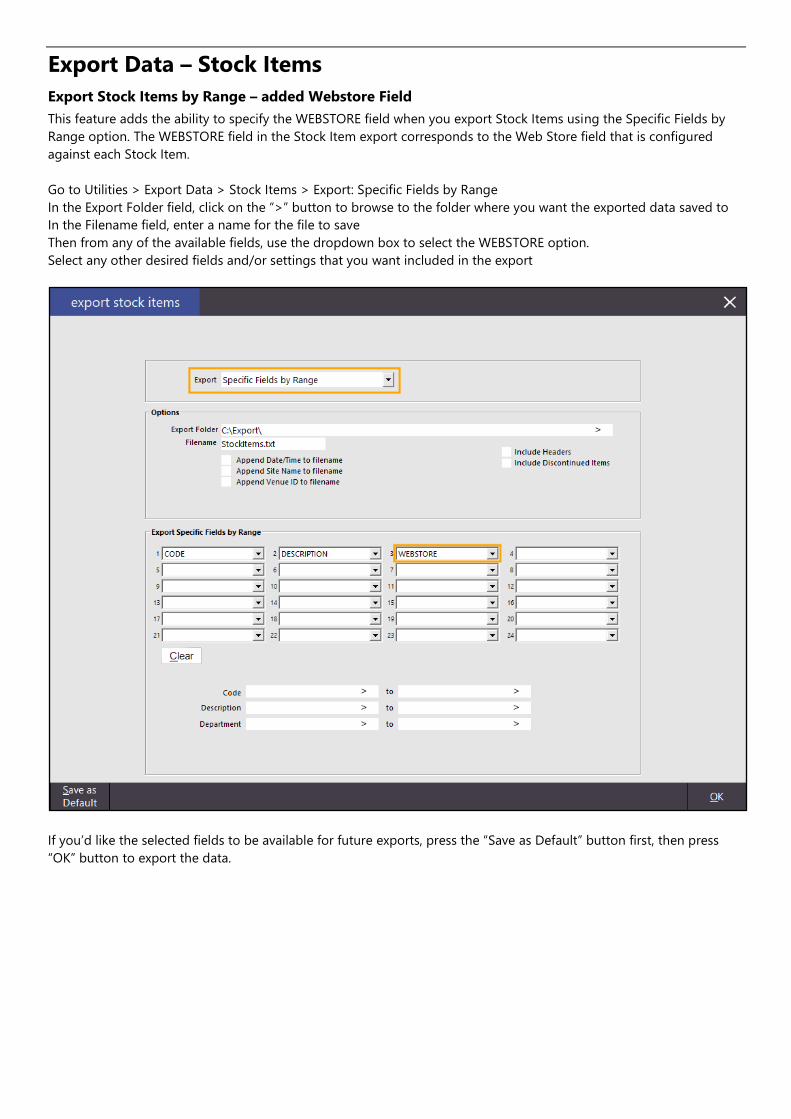
Export Data – Stock Items
Export Stock Items by Range – added Webstore Field
This feature adds the ability to specify the WEBSTORE field when you export Stock Items using the Specific Fields by
Range option. The WEBSTORE field in the Stock Item export corresponds to the Web Store field that is configured
against each Stock Item.
Go to Utilities > Export Data > Stock Items > Export: Specific Fields by Range
In the Export Folder field, click on the “>” button to browse to the folder where you want the exported data saved to
In the Filename field, enter a name for the file to save
Then from any of the available fields, use the dropdown box to select the WEBSTORE option.
Select any other desired fields and/or settings that you want included in the export
If you’d like the selected fields to be available for future exports, press the “Save as Default” button first, then press
“OK” button to export the data.

Update History
When the data is exported, the value of the WEBSTORE field will be included in the export.
If the field is unticked for a Stock Item, the value displayed will be “False”, if the field is ticked, the value displayed will
be “True”.

Gaming
Aristocrat Gaming – Option to combine accounts into one total
This function adds the ability to combine accounts into one redeemable total for use with Aristocrat Gaming.
The way this works is that when multiple points balances are configured for redemption within Idealpos and the
Combine Accounts into one Redeemable Total is ticked, Idealpos will display the points as one total at the top of the
POS Screen when added to the sale.
Then when a redemption occurs, the prompt to select the points account will no longer be displayed.
The system will draw from the POS Points first, with the remainder points being pulled from the Gaming Points if there
are insufficient POS points available.
To setup, go to:
Setup > Global Options > Gaming > Gaming Points

Update History
Global Options – Printing
Bill Prints – Option to show Discounts White on Black
This function adds the ability for discounts to be printed as white text on a black background when a bill is printed.
This feature applies to % Item Discounts as well as % Subtotal Discounts.
To enable this function, go to: Setup > Global Options > Printing > Bill Format > Print Discounts White on Black.
Note that the Print Discounts White on Black setting is available for all radio button selections above it (e.g. Standard,
Order by Print Group, Order by Seat / Print Group, Order by Print Group / Seat).

To use this function, add items to a sale, perform a discount on the sale, then save the sale to a table.
In this example, we’ll perform a 5% ST Disc. Add Items to the sale, press the “5% ST DISC” button, then press the Table
Map button. Items can be discounted in a similar manner by selecting the item from the list of items added to the sale,
then pressing the “5% ITEM” button which will discount the item.
Select a table from the Table Map
If prompted, enter the number of Covers then press OK

Update History
Select the table from the Table Map then press the “Bill” button
The Bill which is printed will show the Discount using White on Black.
In the below example, the Bill Format is Order by Print Group and a 5% ST Discount was applied – the discount is
displayed using White on Black.
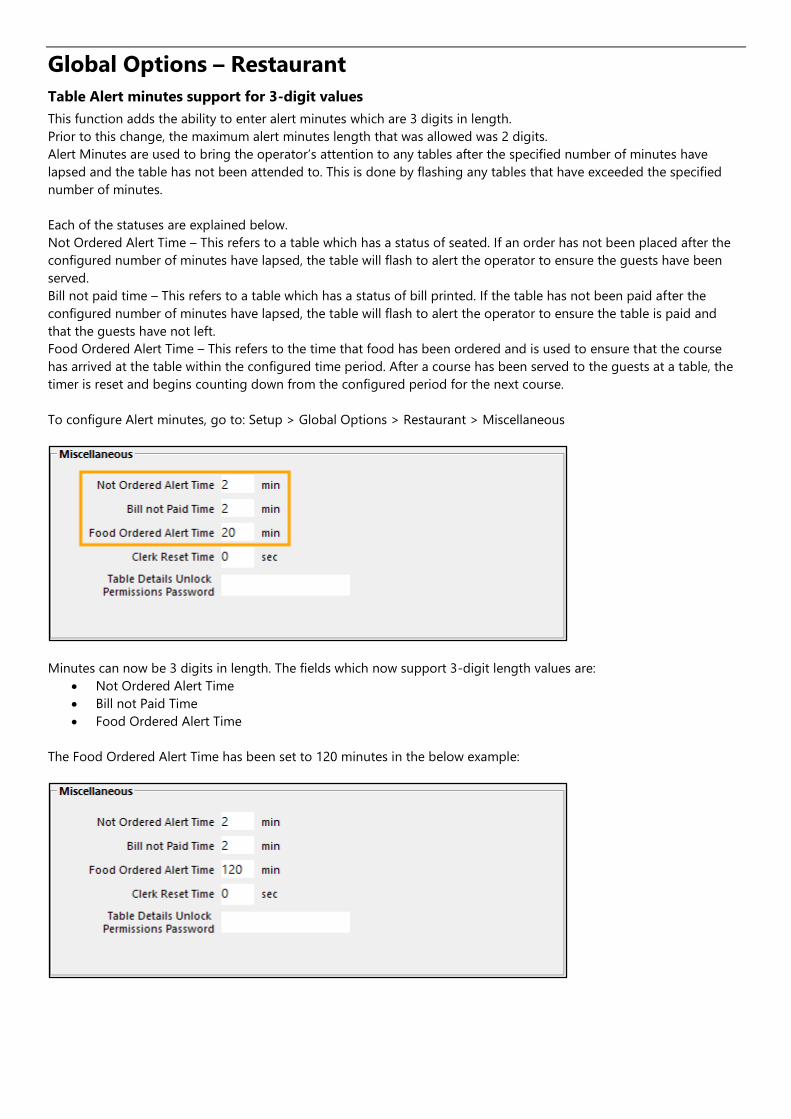
Global Options – Restaurant
Table Alert minutes support for 3-digit values
This function adds the ability to enter alert minutes which are 3 digits in length.
Prior to this change, the maximum alert minutes length that was allowed was 2 digits.
Alert Minutes are used to bring the operator’s attention to any tables after the specified number of minutes have
lapsed and the table has not been attended to. This is done by flashing any tables that have exceeded the specified
number of minutes.
Each of the statuses are explained below.
Not Ordered Alert Time – This refers to a table which has a status of seated. If an order has not been placed after the
configured number of minutes have lapsed, the table will flash to alert the operator to ensure the guests have been
served.
Bill not paid time – This refers to a table which has a status of bill printed. If the table has not been paid after the
configured number of minutes have lapsed, the table will flash to alert the operator to ensure the table is paid and
that the guests have not left.
Food Ordered Alert Time – This refers to the time that food has been ordered and is used to ensure that the course
has arrived at the table within the configured time period. After a course has been served to the guests at a table, the
timer is reset and begins counting down from the configured period for the next course.
To configure Alert minutes, go to: Setup > Global Options > Restaurant > Miscellaneous
Minutes can now be 3 digits in length. The fields which now support 3-digit length values are:
• Not Ordered Alert Time
• Bill not Paid Time
• Food Ordered Alert Time
The Food Ordered Alert Time has been set to 120 minutes in the below example:

Update History
After any of the above periods have lapsed, the table will flash between black and the colour of the table status.
In the below example, the Bill Print status colour is purple (as per the Idealpos demo database) and the table had a
status of Bill Printed. The colour of the table will be reflective of the table status and the colour used will be as per
Table Status colour that has been configured in Idealpos:

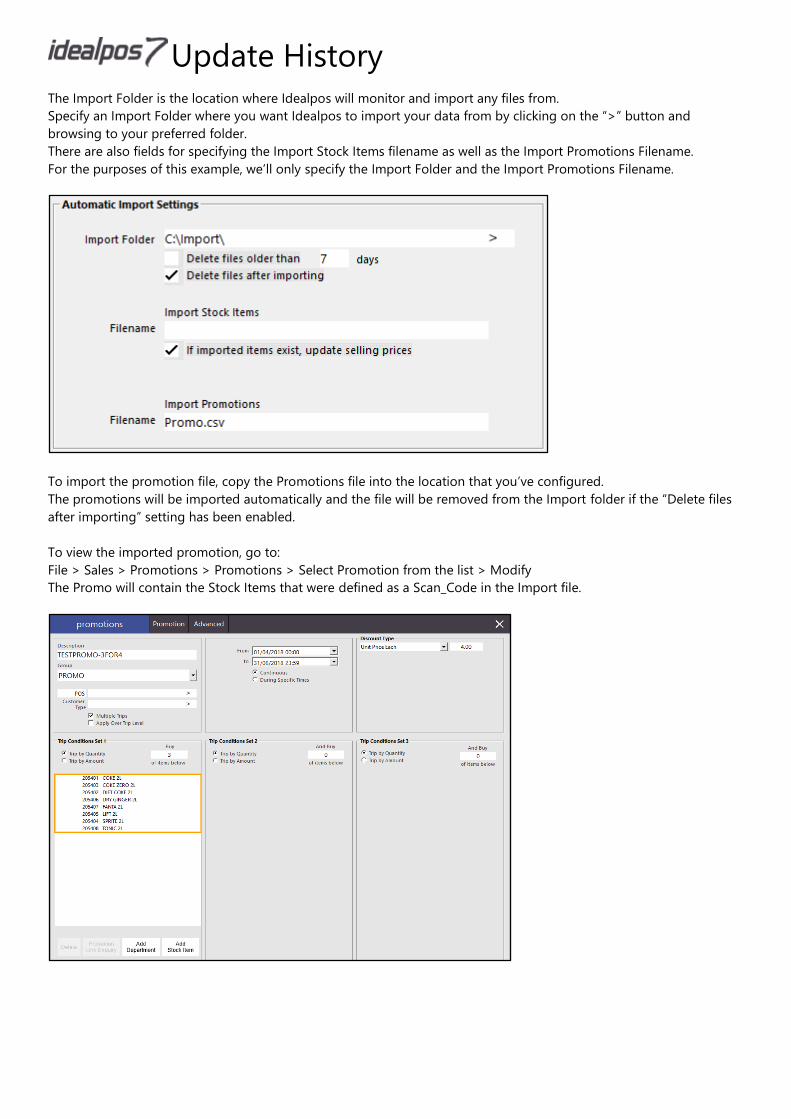
Import Promotions
Import Promotions – Support for Scan_Code field
This function adds the ability to specify and use the Stock Item Scan Code when importing a promotion into Idealpos.
To use this function, include a Header of SCAN_CODE in the import file.
Specify the Stock Item Scan Code under the SCAN_CODE header. If the Item_Code is blank, it will attempt to find the
Stock Item using the Scan_Code.
The below example includes a promotion called TESTPROMO-3FOR4, Trip Quantity set to 3 items and the Promo Price
is 4 (i.e. $4.00). The Item_Code is blank and the Scan_Code contains the Scan Code of the Stock Item to be included in
the Promotion.
Promotion Imports occur automatically by copying the Promotion file into a pre-configured location which is
constantly checked for the specified filename.
Go to Setup > POS Terminals > Select: POS Terminal > Import/Export > Automatic Import Settings
Update History
The Import Folder is the location where Idealpos will monitor and import any files from.
Specify an Import Folder where you want Idealpos to import your data from by clicking on the “>” button and
browsing to your preferred folder.
There are also fields for specifying the Import Stock Items filename as well as the Import Promotions Filename.
For the purposes of this example, we’ll only specify the Import Folder and the Import Promotions Filename.
To import the promotion file, copy the Promotions file into the location that you’ve configured.
The promotions will be imported automatically and the file will be removed from the Import folder if the “Delete files
after importing” setting has been enabled.
To view the imported promotion, go to:
File > Sales > Promotions > Promotions > Select Promotion from the list > Modify
The Promo will contain the Stock Items that were defined as a Scan_Code in the Import file.

POS Screen
Ability to view Bar Tab/Table Items from POS Screen
This function adds the ability to view all the items that have been saved to a table or Bar Tab while on the POS Screen.
To use this function to view items that have been saved to a table, go to:
POS Screen > Table Map
From the table map, select a table which contains items that have been ordered, then select the POS button

Update History
After selecting the POS button, the POS screen will be displayed and will show the Table number along with the
number of covers on the table just below the white area where items are displayed when added to a sale.
Press/click on this table number text to view the table items.
After pressing on the table number text, the items which are currently saved to the table will be displayed
Press X to close the screen and return to the POS screen
The same function can also be accessed to view items that have been saved to a bar tab.
From the POS screen, press the “BAR TAB” button, then select a Bar Tab.

The POS screen will be displayed and will show the bar tab name just below the white area where items are displayed
when added to a sale. Click/press on the Bar Tab name.
After selecting the bar tab name from the POS screen, the items which have been saved to the bar tab will be
displayed.
Press X to close the screen and return to the POS screen

Update History
POS Terminals – Miscellaneous Settings
Handheld – Option to Force Bills to print to specific Network Printer
This function adds the ability to force bills to print to a specific network printer when printing a bill from the Handheld
app. When the Force Bills Printer setting is left as blank, any Bills printed from the Handheld app will print to the
Receipt printer configured on the POS terminal which acts as the POSServer. When the Force Bills Printer setting has
been configured, any bills printed from the Handheld app will print to the specified printer.
In the event that printer that’s set in the Force Bills Printer setting is unavailable, the POS terminal will display a
standard printer error message allowing the print job to be retried or redirected to another printer.
Go to: Setup > POS Terminals > Select: POS Terminal which is the POS terminal acting as the POS Server > Modify >
Miscellaneous Settings
Select the name of the Printer that you want bills to be printed from the “Force Bills Printer” dropdown box
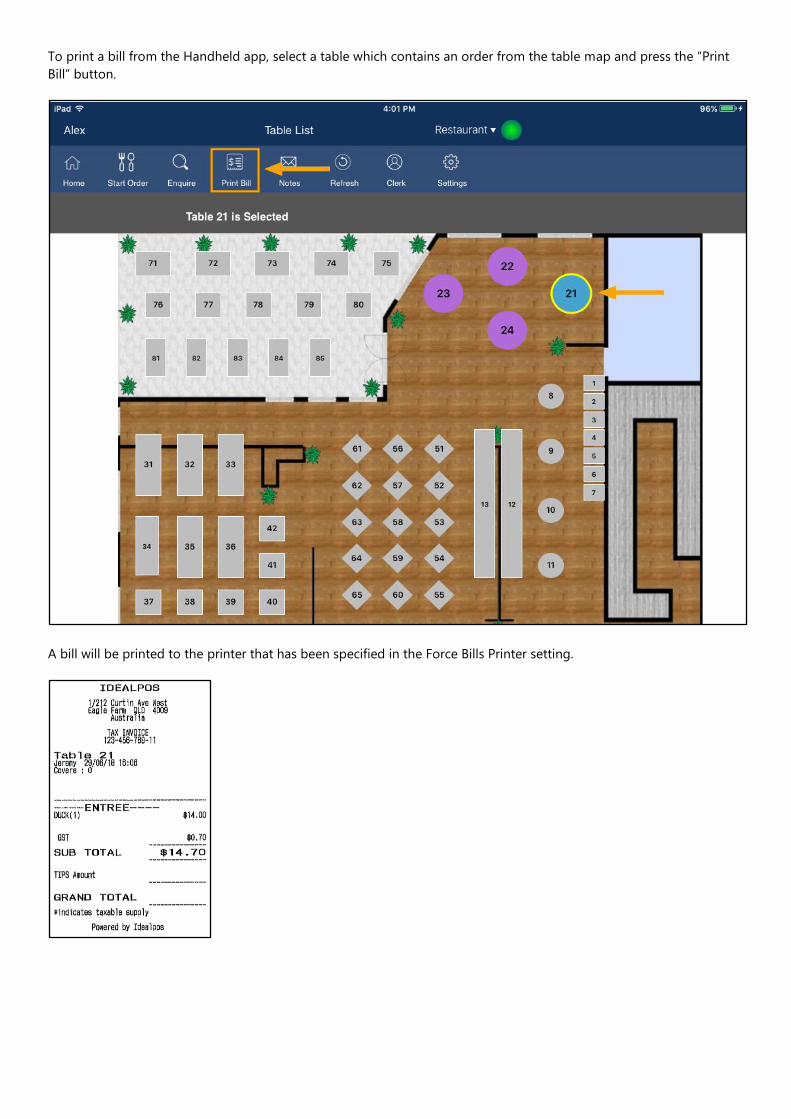
To print a bill from the Handheld app, select a table which contains an order from the table map and press the “Print
Bill” button.
A bill will be printed to the printer that has been specified in the Force Bills Printer setting.

Update History
Kitchen Docket – Option to Print Stock Items Above Header
This function adds the ability to print the Stock Items above the header on the Kitchen Docket.
To enable and configure this function, go to:
Setup > POS Terminals > Select POS Terminal: Modify > Kitchen Printers
Select the Kitchen Printer that you want the setting to apply to, then enable the option “Stock Items Print Above
Header”
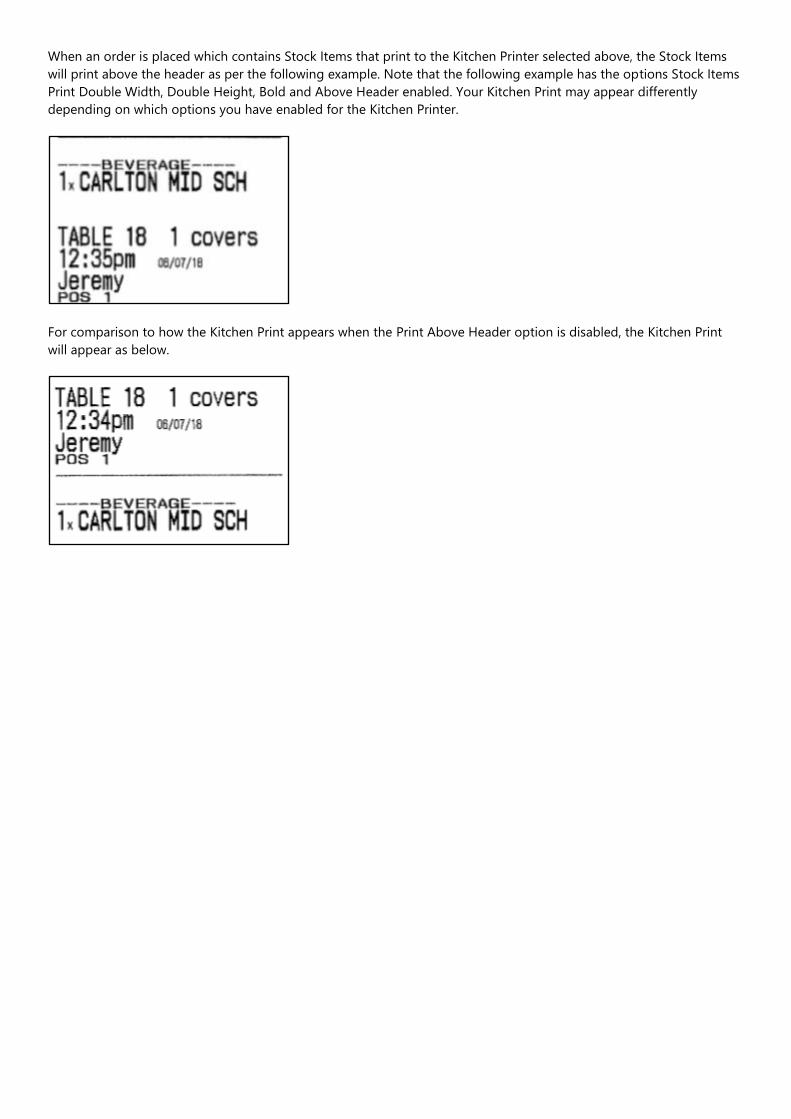
When an order is placed which contains Stock Items that print to the Kitchen Printer selected above, the Stock Items
will print above the header as per the following example. Note that the following example has the options Stock Items
Print Double Width, Double Height, Bold and Above Header enabled. Your Kitchen Print may appear differently
depending on which options you have enabled for the Kitchen Printer.
For comparison to how the Kitchen Print appears when the Print Above Header option is disabled, the Kitchen Print
will appear as below.

Update History
Restaurant & Table Map
Table Map Setups – Added Shortcut Functionality
This function adds the ability to create a shortcut to the Table Map setup screen on the main Idealpos screen.
To create a shortcut, go to:
Setup > Restaurant > Table Maps > S
The Shortcut to the Table Maps screen will be created under Functions section on the main Idealpos screen which is
located on the left-hand side of the main Idealpos screen.
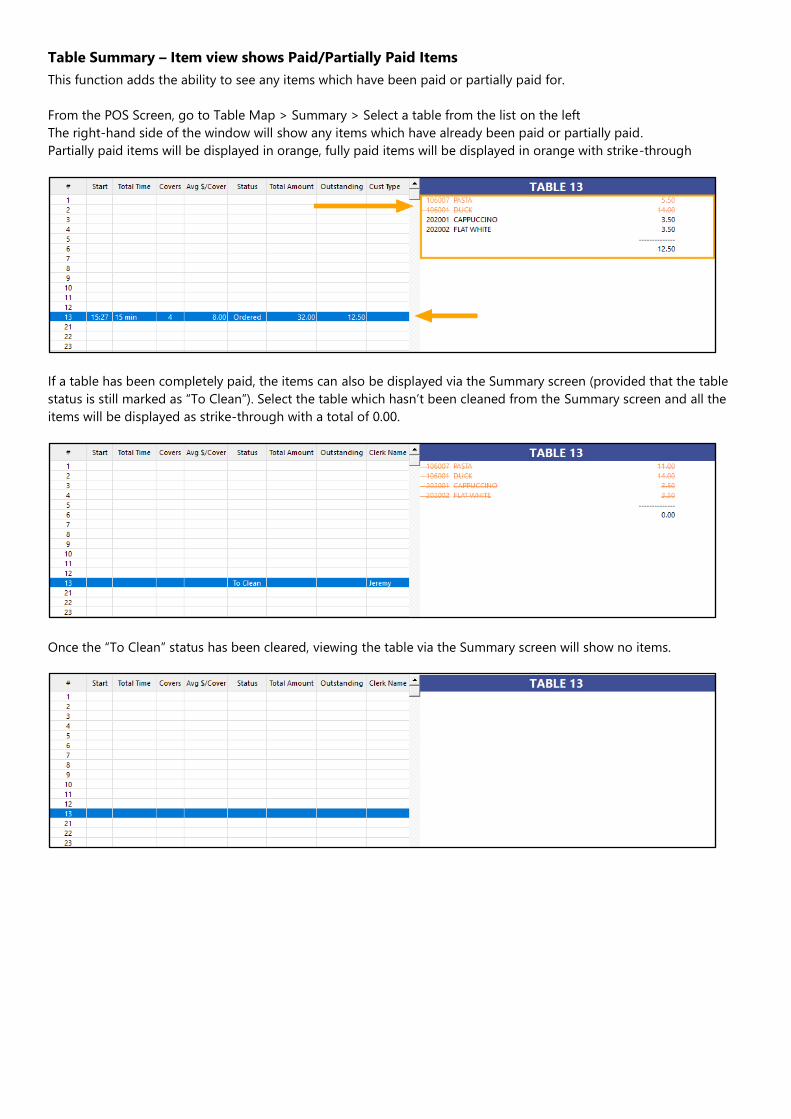
Table Summary – Item view shows Paid/Partially Paid Items
This function adds the ability to see any items which have been paid or partially paid for.
From the POS Screen, go to Table Map > Summary > Select a table from the list on the left
The right-hand side of the window will show any items which have already been paid or partially paid.
Partially paid items will be displayed in orange, fully paid items will be displayed in orange with strike-through
If a table has been completely paid, the items can also be displayed via the Summary screen (provided that the table
status is still marked as “To Clean”). Select the table which hasn’t been cleaned from the Summary screen and all the
items will be displayed as strike-through with a total of 0.00.
Once the “To Clean” status has been cleared, viewing the table via the Summary screen will show no items.

Update History
Users
“Admin” User – Inhibit ability to Override Permissions with other Users
This function prevents the Admin User from having their permissions overridden with another User’s permissions.
Previously, the Users screen would display the option “Override Permissions from Other User” when modifying the
“Admin” user’s permissions and using this function could result in the Admin User from being locked out of functions
in Idealpos.
Idealpos has been updated so that the “Override Permissions from Other User” option is not displayed when
modifying the Admin User’s permissions. The “Override Permissions from Other User” is still displayed when modifying
other user types.
Go to Setup > Users > Select: Admin > Modify
The Override Permissions from Other User option is no longer displayed for the Admin User
When modifying other user types (e.g. Manager or Staff), the “Override Permissions from Other User” option is still
available

Yes/No Options
Option to print POS Description on Kitchen Print from terminal where order is taken
This function updates the behaviour of the POS Description that is printed on the Kitchen Print when using Ideal
Kitchen Monitor to print a runner docket. The runner docket will now show the POS terminal from where the order was
placed.
Previously, the POS Description that was printed on the Kitchen docket was the description of the POS terminal which
printed the order.
After this change, the Kitchen Print will show the POS terminal from where the order was placed.
Setting this up involves setting up Idealpos and Kitchen Monitor as summarised below:
• Enable a Yes/No option in Idealpos (Print POS Description on Kitchen Print)
• Configure printers if not setup already
• Enable runner docket in Ideal Kitchen Monitor
To enable the required Yes/No option in Idealpos, go to:
Setup > Yes/No options > Receipt/Kitchen > Enable: Print POS Description on Kitchen Print
Close the Yes/No options, then confirm your printers exist and are configured correctly by going to:
Setup > Network Printers
Ensure that your receipt printers have been configured correctly for all your POS terminals.

Update History
If required, select the printer from the list and press the “Test” button to ensure that the printer can successfully print a
receipt.
To setup Ideal Kitchen Monitor, open Kitchen Monitor and close the main IKM monitor screen, then go to:
Setup > Options
Set the Runner Docket setting to True
Set the Runner Docket POS Terminal setting to reflect the POS terminal number where you’d like the Runner Docket
Printed to

Once you have configured the above settings, close the Options window in Ideal Kitchen Monitor.
In order for the Runner Docket to print automatically when the order is done, you must define this for each POS
Terminal in Kitchen Monitor. In Kitchen Monitor, go to Setup > POS Terminals, add or modify an entry and set the
code to the POS Terminal number, and then set Order Printing > Print on Done to True.
While you are enabling the Print on Done setting, now is also good time to ensure that your POS Terminal names are
correct, as these names will be used when printing the IKM Runner Docket. If the names need adjusting, just select
POS terminal from the list, press Modify, then update the terminal name that’s displayed in the Terminal Name field.
Once the Print on Done setting has been configured and any terminal name adjustments completed, open the Ideal
Kitchen Monitor screen to show any orders that have been placed.
Place an order from a POS terminal by adding items which are configured to print to IKM, then either save the sale to a
table or tender the sale. Any items that are ordered and configured to print to IKM will be displayed on the Ideal
Kitchen Monitor screen.

Update History
To print the runner docket, press the ‘Done’ button at the bottom left corner of the IKM screen.
The Runner Docket that is printed to the printer will contain the items that were ordered. The name of the terminal
from where the order was placed will be printed at the top of the runner docket.
Show Tender Spend Limit on Receipts
Idealpos contains existing functionality which allows Tender Spend Limits to be imposed on customers and also
contains functionality that allows the Tender Spend Limits to be either reset after a pre-set period of time or reset
manually.
This particular feature introduces the ability to show the remaining balance of the Tender Spend Limit for the customer
as well as the frequency that the spend limit is reset on the customer receipt. This way the customer will see the
remaining spend limit on their receipt as well as the period of time that they need to wait until before the spend limit
is reset.
To enable this function, go to:
Setup > Yes/No Options > Receipt/Kitchen > Show Tender Spend Limit on Receipt
In order for this function to be applied, you must have a Tender Spend Limit configured.
Tender Spend Limits are configured on a per-customer basis.
Configuring the Customer Spend Limit involves two steps.
The first step is configuring the Tender Spend Limit settings in Global Options and the second step involves setting up
a Tender Spend Limit for each customer.
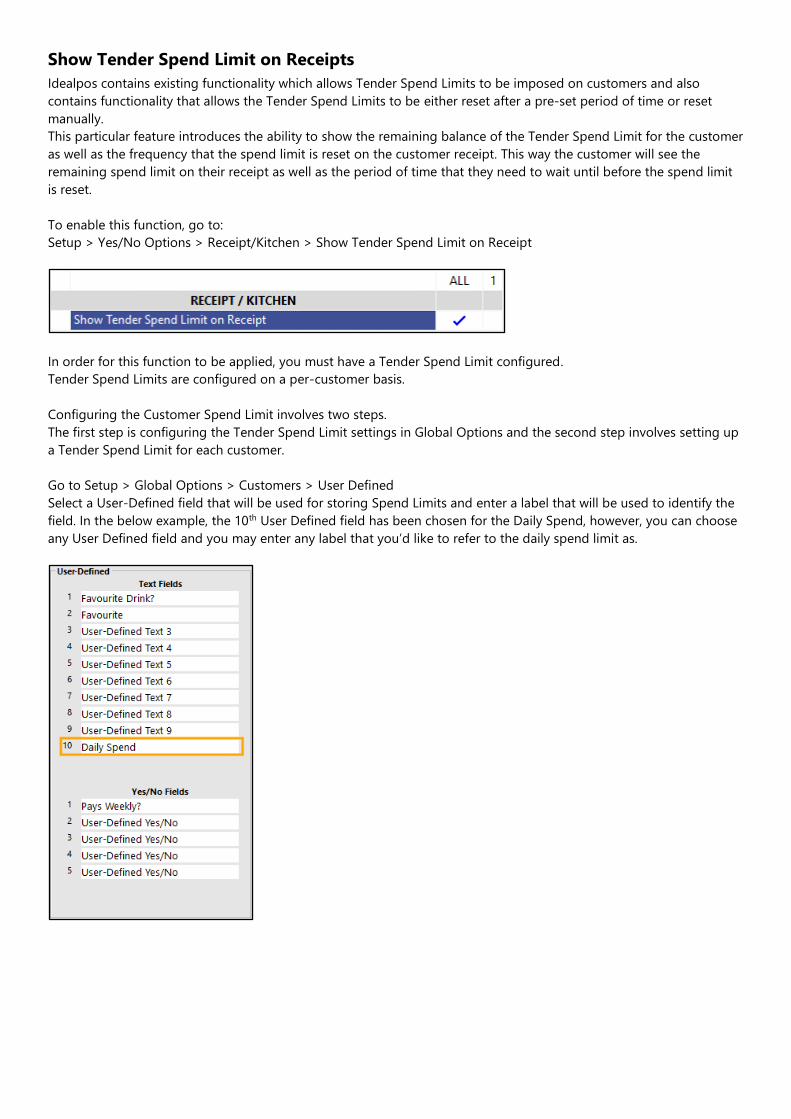
Go to Setup > Global Options > Customers > User Defined
Select a User-Defined field that will be used for storing Spend Limits and enter a label that will be used to identify the
field. In the below example, the 10th User Defined field has been chosen for the Daily Spend, however, you can choose
any User Defined field and you may enter any label that you’d like to refer to the daily spend limit as.
Update History
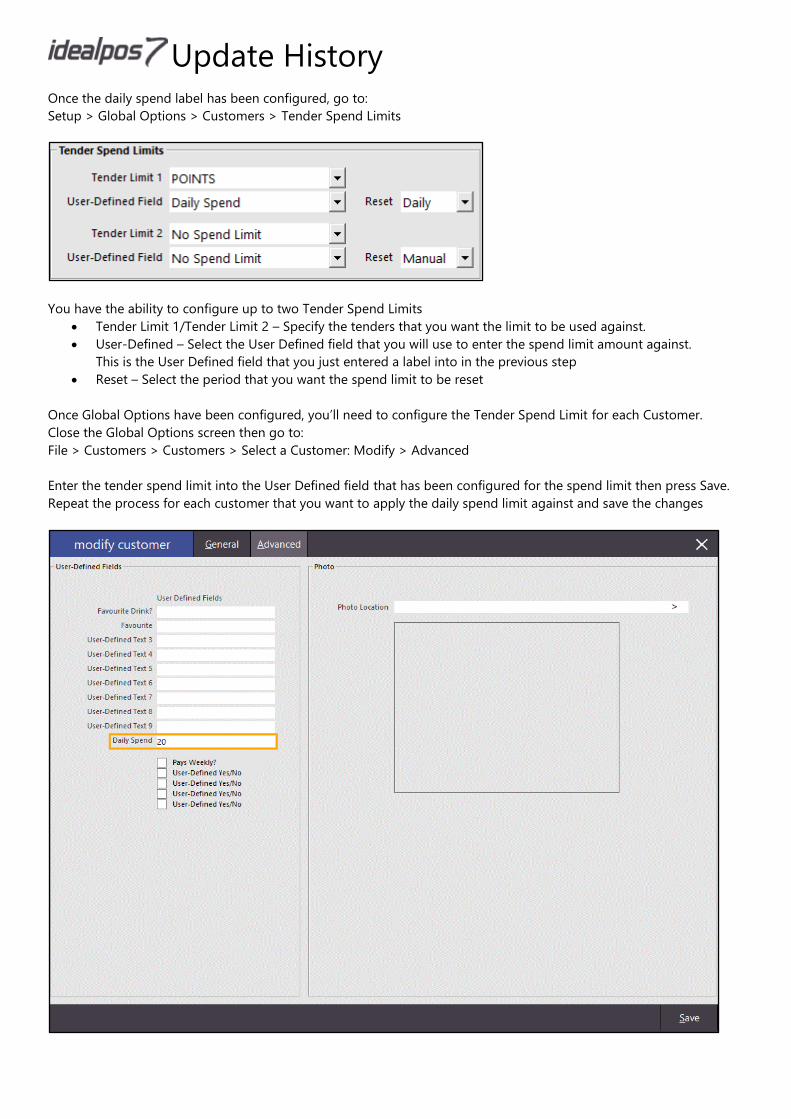
Once the daily spend label has been configured, go to:
Setup > Global Options > Customers > Tender Spend Limits
You have the ability to configure up to two Tender Spend Limits
• Tender Limit 1/Tender Limit 2 – Specify the tenders that you want the limit to be used against.
• User-Defined – Select the User Defined field that you will use to enter the spend limit amount against.
This is the User Defined field that you just entered a label into in the previous step
• Reset – Select the period that you want the spend limit to be reset
Once Global Options have been configured, you’ll need to configure the Tender Spend Limit for each Customer.
Close the Global Options screen then go to:
File > Customers > Customers > Select a Customer: Modify > Advanced
Enter the tender spend limit into the User Defined field that has been configured for the spend limit then press Save.
Repeat the process for each customer that you want to apply the daily spend limit against and save the changes
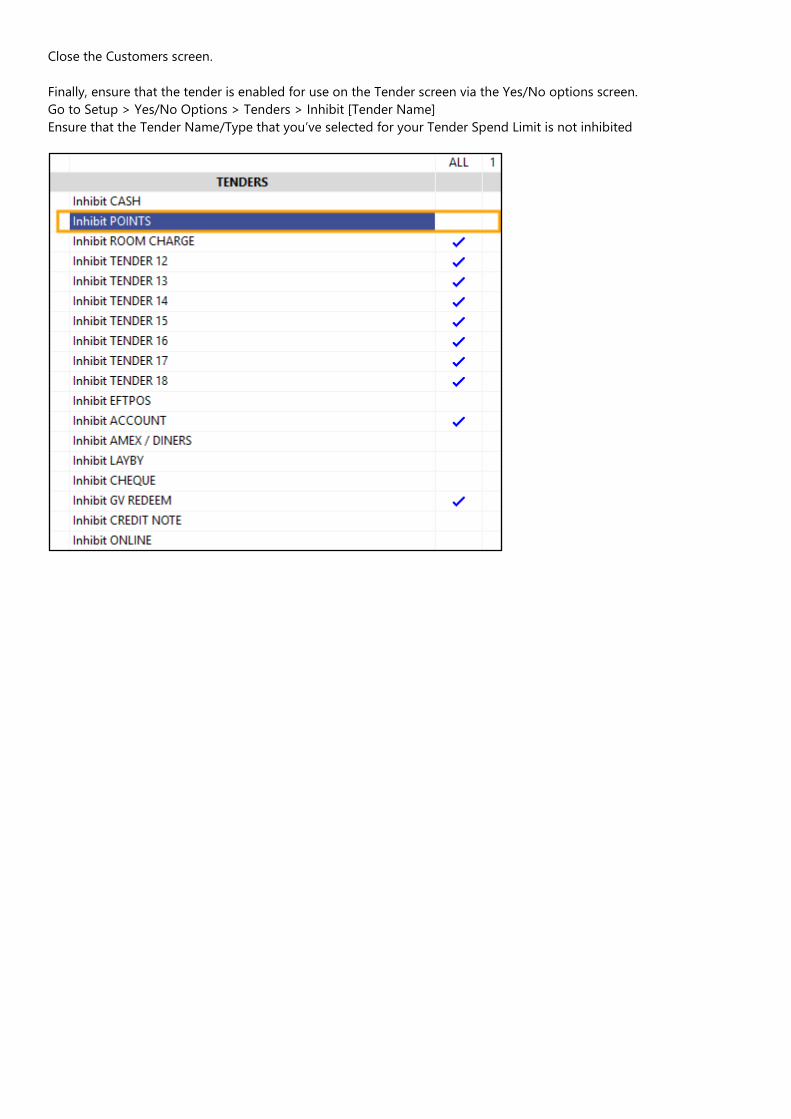
Close the Customers screen.
Finally, ensure that the tender is enabled for use on the Tender screen via the Yes/No options screen.
Go to Setup > Yes/No Options > Tenders > Inhibit [Tender Name]
Ensure that the Tender Name/Type that you’ve selected for your Tender Spend Limit is not inhibited
Update History
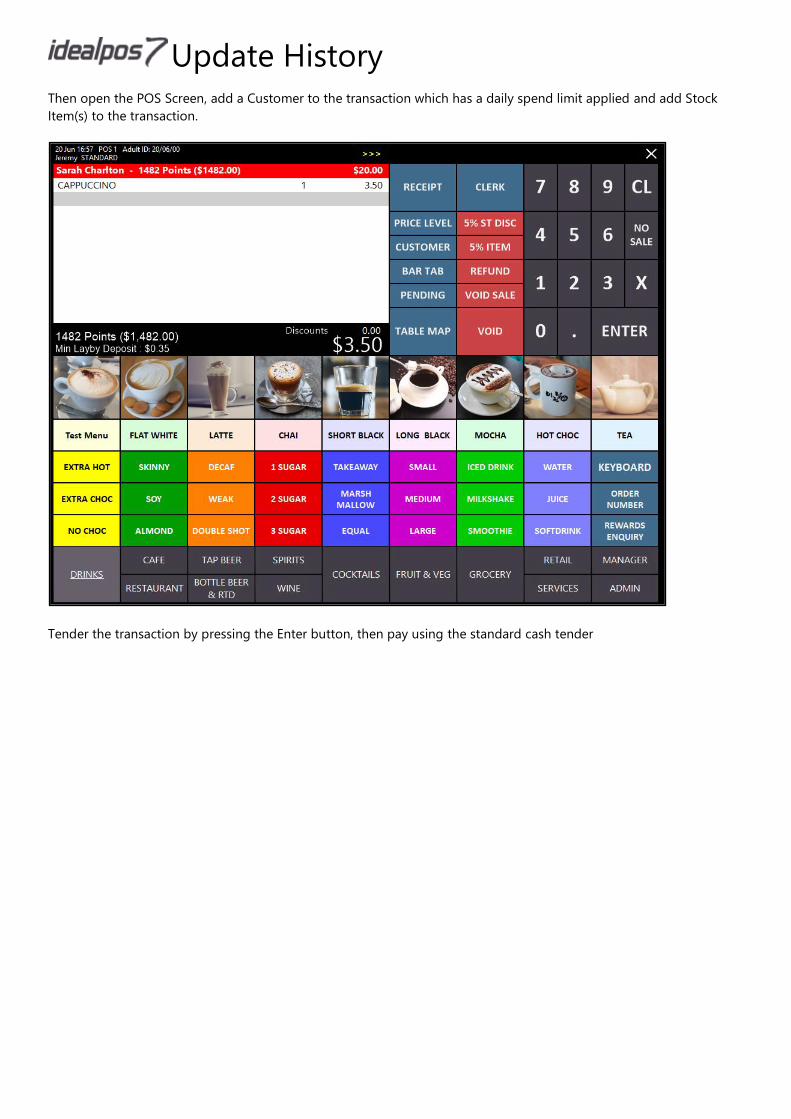
Then open the POS Screen, add a Customer to the transaction which has a daily spend limit applied and add Stock
Item(s) to the transaction.
Tender the transaction by pressing the Enter button, then pay using the standard cash tender

The receipt printed will contain the Daily Spend Balance and the reset type (Daily, Weekly, Monthly, etc.)
In this particular example, the Daily Spend user-defined option has been associated with the Points tender.
This means that when the customer spends their Points, they’ll be limited to spending $20.00 worth of points daily.

Update History
Perform another transaction, this time tender off the transaction using a tender which has been configured with a
Tender Limit. In the below example, the daily spend balance has reduced down to $6.00 after spending $14.00 out of
the $20.00 limit.
When the spend limit has been exceeded, the POS will display a prompt similar to the below showing the “Exceeded
Spend Limit!” message along with the spend limit remaining