dk p9-0157-q quick guide mini crosser m2 ver 202 · quick guide p9-0157-q 14 of 20 version...
TRANSCRIPT

P9-0157-Q ver. 2.0.0 - September 2013 GB
Qui
ck g
uide
Min
i Cro
sser
M2
medemagroup
Quick guide P9-0157-Q 2 of 20 Version 2.0.0/2013
Medema Production A/S

Quick guide P9-0157-Q 3 of 20 Version 2.0.0/2013
Medema Production A/S
Contents
Introduction ................................................................................................4Control panel .............................................................................................5User menu ..................................................................................................6Steering column ......................................................................................10Seat rotation ............................................................................................. 11Driving the Mini Crosser M2 ...................................................................12
Getting in and out .................................................................................12When driving in traffi c... ........................................................................13Electromagnetic compatibility ...............................................................13Braking systems ...................................................................................14
Charging ...................................................................................................15Serial number...........................................................................................16Specifi c driving situations ......................................................................17Long hills/diffi cult ground ......................................................................19

Quick guide P9-0157-Q 4 of 20 Version 2.0.0/2013
Medema Production A/S
Introduction
Congratulations on your new Mini Crosser M2 electric mobility scooter. You have now taken possession of an electric mobility scooter developed for outdoor driving by active users. It is what is called a Class C vehicle in accordance with the European classifi cation of electric scooters.
For optimum enjoyment of this vehicle - and to avoid breakdowns and accidents - we recommend that you read the User Manual carefully. As a new user, you should pay particular attention to the section entitled “Driving the Mini Crosser M2”.
Note:This Quick Guide is to be regarded as a supplement to the User Manual. The information in the Quick Guide cannot, therefore, be expected to be complete.
NB: Errors and omissions excepted. Specifi cations subject to change.We reserve the right to update this guide as required.
Warning!The vehicle must not be lent to persons who are not completely familiar with it.
The vehicle is designed for one person only.
Max. user weight 175 kg. Can be supplied in a HD version as standard for a max person weight of 250 kg.
Medema Production A/S is not responsible for any damage or injuries caused by inappropriate or unsafe use of the Mini Crosser.

Quick guide P9-0157-Q 5 of 20 Version 2.0.0/2013
Medema Production A/S
Control panel
Avoid subjecting the control panel to jarring and knocks. Take care when driving and avoid hitting obstacles.
The manufacturer accepts no liability in respect of the unauthorised opening, adjustment or modifi cation of the control panel.
Indicator lights, R/L
Horn
Indicator lights, R/L
Horn
Speed selector
Hazard warning lightsBattery indicator
Handbrake
Light switch
Actual speed
Accelerator(four-fi nger control)
Speed regulation
Menu / information
Trip meter
Mileage
Light sensor
Extra SwitchCan be used for optional functions.
anti-theft alarm
Quick guide P9-0157-Q 6 of 20 Version 2.0.0/2013
Medema Production A/S
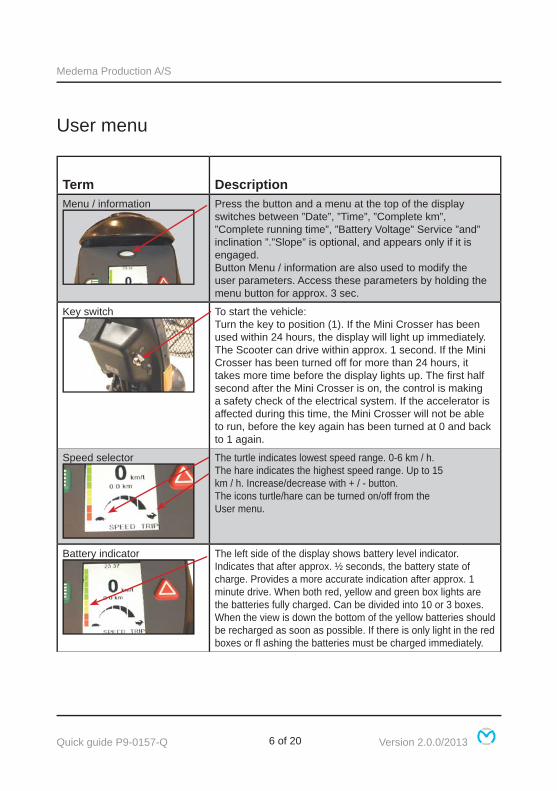
User menu
Term DescriptionMenu / information Press the button and a menu at the top of the display
switches between ”Date”, ”Time”, ”Complete km”, ”Complete running time”, ”Battery Voltage” Service ”and” inclination ”.”Slope” is optional, and appears only if it is engaged.Button Menu / information are also used to modify theuser parameters. Access these parameters by holding the menu button for approx. 3 sec.
Key switch To start the vehicle:Turn the key to position (1). If the Mini Crosser has been used within 24 hours, the display will light up immediately. The Scooter can drive within approx. 1 second. If the Mini Crosser has been turned off for more than 24 hours, it takes more time before the display lights up. The fi rst half second after the Mini Crosser is on, the control is making a safety check of the electrical system. If the accelerator is affected during this time, the Mini Crosser will not be able to run, before the key again has been turned at 0 and back to 1 again.
Speed selector The turtle indicates lowest speed range. 0-6 km / h.The hare indicates the highest speed range. Up to 15km / h. Increase/decrease with + / - button.The icons turtle/hare can be turned on/off from theUser menu.
Battery indicator The left side of the display shows battery level indicator.Indicates that after approx. ½ seconds, the battery state ofcharge. Provides a more accurate indication after approx. 1minute drive. When both red, yellow and green box lights are the batteries fully charged. Can be divided into 10 or 3 boxes. When the view is down the bottom of the yellow batteries should be recharged as soon as possible. If there is only light in the red boxes or fl ashing the batteries must be charged immediately.
Quick guide P9-0157-Q 7 of 20 Version 2.0.0/2013
Medema Production A/S
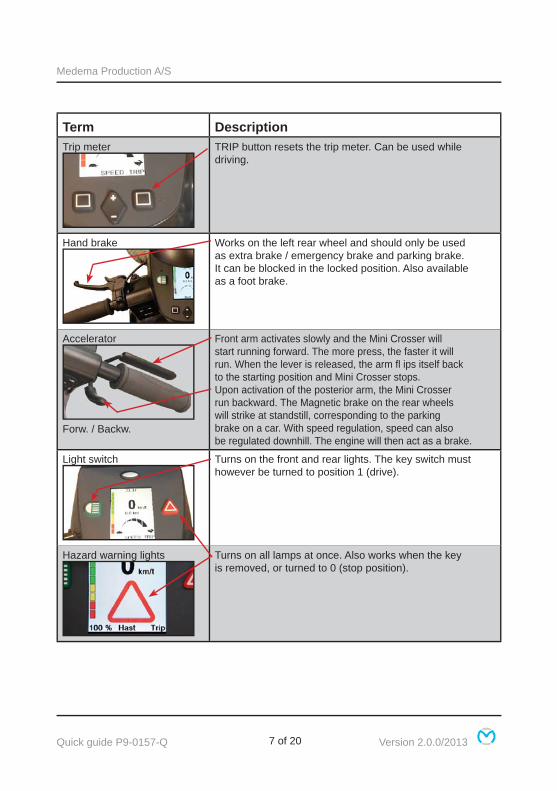
Term DescriptionTrip meter TRIP button resets the trip meter. Can be used while
driving.
Hand brake Works on the left rear wheel and should only be usedas extra brake / emergency brake and parking brake.It can be blocked in the locked position. Also availableas a foot brake.
Accelerator
Forw. / Backw.
Front arm activates slowly and the Mini Crosser willstart running forward. The more press, the faster it willrun. When the lever is released, the arm fl ips itself backto the starting position and Mini Crosser stops.Upon activation of the posterior arm, the Mini Crosserrun backward. The Magnetic brake on the rear wheelswill strike at standstill, corresponding to the parkingbrake on a car. With speed regulation, speed can alsobe regulated downhill. The engine will then act as a brake.
Light switch Turns on the front and rear lights. The key switch musthowever be turned to position 1 (drive).
Hazard warning lights Turns on all lamps at once. Also works when the keyis removed, or turned to 0 (stop position).

Quick guide P9-0157-Q 8 of 20 Version 2.0.0/2013
Medema Production A/S
Term DescriptionIndicator lights switch Arrow left: lamp left side. Arrow Right: lamp right side.
Activate the same button again to turn off fl ashinglights.
Horn Electric horn which can be programmed in volume inthe User Menu. Activated by pressing the horn button.
Charging socket Turn off the Mini Crosser (key in position 0) duringcharging. Note that it is not possible to run while thebatteries recharge. See also the section ”Batteriesand Charging.”
Extras
Anti-theft alarm (Extra) With this parameter set to ON, the anti-theftalarm is turned on every time you turn off the MiniCrosser. An activated alarm is turned off by turning thekey to 1 (drive). If you have no opportunity to get to the Mini Crosserwith the key, the alarm will stop after approx. 20seconds. Shake the scooter again, the alarm will beactivated again.
Inclination Inclination-symbols.

Quick guide P9-0157-Q 9 of 20 Version 2.0.0/2013
Medema Production A/S
Term DescriptionInclination Alarm sideways By exceeding the preset value, the symbol fl ashes and the
horn hoots, if the parameter is enabled.
Inclination Alarm forw./backw. By exceeding the preset value, the symbol illuminate and the horn hoots, if the parameter is enabled.
Overheating step 1 Step 1: The symbol fl ashes and the speed is reduced to half power. Wait for 3-5 min and start again.
Overheating step 2 Step 2: The symbol will illuminate and Mini Crosser stops. Wait 3-5 minutes and start again.

Quick guide P9-0157-Q 10 of 20 Version 2.0.0/2013
Medema Production A/S
Adjusting the height of the handlebars. Applies to both the 3W and the 4W model.
Lever for adjusting the angle of the handlebars
Adjusting the height of the handlebars. Applies to both the 3W and the 4W model.
Allen screw for height adjustment
Steering column
Can be adjusted forward/back with the release lever. Pull down on the lever and pull the handlebars closer for a good driving position. Use the lever again and push the steering column forward to make it easier to get out.
The height of the steering column can be adjusted approx. 11 cm up/down. First remove the rubber plug covering the Allen screw. Adjust the height using a 4 mm Allen key.

Quick guide P9-0157-Q 11 of 20 Version 2.0.0/2013
Medema Production A/S
Seat rotation
Pull the release lever back. The seat can be rotated 90° to either side. When the lever is released, it engages with the seat and holds it in place at 45° intervals.
Other seats that can be supplied for the Mini Crosser work on similar principles. The release lever is normally mounted on the right, but can be put on the left if so wished.
IMPORTANT!The Mini Crosser is most stable when the seat is in its lowest position. Always drive carefully when the seat is raised. Never use the seat adjustment when driving on an uneven surface or in hilly terrain.
Take extra care when lowering the seat on a Mini Crosser using electric seat adjustment. Make sure that nothing is trapped in the space between the seat and the chassis.
Release lever for seat rotation. Release lever for seat forward/back.

Quick guide P9-0157-Q 12 of 20 Version 2.0.0/2013
Medema Production A/S
Driving the Mini Crosser M2
Getting in and out
It is important to learn a safe technique for getting in and out of the Mini Crosser.
In general the following method should be followed:
• Make sure that the Mini Crosser M2 is off (switch turned to 0) when getting in and out, otherwise the Mini Crosser could start if the accelerator was touched inadvertently.
• Make sure that the brake is on. (Lever for disengaging motor in top position.)• Put the steering column in vertical position.• If necessary, turn the seat through 45° or 90° and make sure that it is locked in
position (clicked into place).• If necessary, raise the armrest.
IMPORTANT!The Mini Crosser will turn itself off automatically after it has been stationary for 10 minutes even if the key has been turned to driving position. The battery indicator fl ashes with 6 lamps at a rate of about 3 seconds.
To restart the vehicle, the key must be turned to stop position (0) and then to driving position (1).

Quick guide P9-0157-Q 13 of 20 Version 2.0.0/2013
Medema Production A/S
When driving in traffi c...
Be particularly aware of the following when driving in traffi c:
• The Mini Crosser is a low vehicle and not always easy for other road users to see. Make quite sure that other road users have seen you before driving onto the highway.
• Keep an eye on traffi c behind you. Keep well over to the side of the road when driving on busy roads.
• Turning right and left at crossroads. Be aware of cyclists and pedestrians. Follow the rules of the road for cyclists.
• How quickly things are happening. How long do the lights stay green? How quickly are cars approaching? etc.
Electromagnetic compatibility
If the Mini Crosser starts making involuntary movements or if the brakes are released, turn the Mini Crosser off as soon as it is safe to do so. In certain circumstances a Mini Crosser can set off shop alarms.
The Mini Crosser satisfi es the requirements for the use of scooters in an environment with electromagnetic noise. There may, however, be rare situations in which electromagnetic noise can affect the Mini Crosser. Sources of such noise include radio and television stations, amateur radio transmitters and mobile phones.
If such equipment is being used close by, it is recommended that the Mini Crosser is switched off. Mobile phones should not be used while driving.

Quick guide P9-0157-Q 14 of 20 Version 2.0.0/2013
Medema Production A/S
Braking systems
There are three braking systems on the Mini Crosser:
• Motor brake - adjusts vehicle speed also when going downhill.• • Magnetic brake - the magnetic brake is automatic and engages when the
Mini Crosser stops. In an emergency, the Mini Crosser can be stopped instantaneously by turning the key switch. Please note that this will cause very sharp braking.The brake must never be disengaged mechanically using the disengagement lever on a slope. This function is only designed for use when pushing the Mini Crosser on a fl at road.
• Electric safety brake - if the brake is somehow disengaged on a slope/hill, the Mini Crosser will brake automatically when it reaches a certain speed. There is an electric safety feature in the control system, which works even if the battery is disconnected. This is also the reason why the Mini Crosser cannot be towed at more than 5 km/h. See the section about towing.
• Handbrake - intended as an emergency brake and parking brake. It must be operated with caution when driving in slippery conditions and downhill.
When using the handbrake as a parking brake, lock it in braking position by pressing the button in while applying the brake.To release the brake, press the button again.
Handbrake lock
ALWAYS switch the scooter off when it is not in use. Turn the key to 0.

Quick guide P9-0157-Q 15 of 20 Version 2.0.0/2013
Medema Production A/S
Charging
The Mini Crosser should be charged while not in use. The charger supplied from the factory switches to trickle charging (very low power consumption) automatically when the batteries are fully charged. You can therefore leave the charger connected until the Mini Crosser is next used. The charger cannot overcharge the batteries.
The charger will fl ash until charging is complete. Then it will show a steady light.
IMPORTANT!The charger must not be placed on the seat during charging.
IMPORTANT! Never use charging devices other than those supplied from the factory without fi rst contacting the dealer.
For further information see the User Manual.
Note!The Mini Crosser uses a little power even when it is turned of and the key is turned to 0. It is therefore recommended to connect it to the charger whenever it is not used.
Connect the charging plug to the 3-pin socket on the steering column. The charging socket is located under the protective cover.

Quick guide P9-0157-Q 16 of 20 Version 2.0.0/2013
Medema Production A/S
Serial number
All vehicles have a serial number plate showing the year of production and serial number. The same serial number can also be found on the front of the User Manual.
Please quote this number when making inquiries about servicing, spare parts, etc.
Maximum user weight
Vehicle’s unladen weight inc. batteries and seat
Position of serial number plate on vehicle.
Serial number
Model description
Year of production Max. speed
Quick guide P9-0157-Q 17 of 20 Version 2.0.0/2013
Medema Production A/S
Specifi c driving situations
Up kerbs
• Stop at right angles to the kerbstone about 5-10 cm away from it. Keep an eye on other road users.
• Lean forwards.• Accelerate moderately so that your vehicle can overcome the obstacle. Do not
stop halfway, but reduce speed once the vehicle is up.• If the kerb is too high, do not try again, but fi nd an alternative route.
Down kerbs
• Lean back.• If you are driving onto a road with traffi c, keep an eye on other road users.• Drive forwards and down the kerb at low speed. Make sure that your anti-tilt
wheels (if fi tted) do not catch on the edge.
Up a ramp/hill
• There is a risk of tipping over backwards if the seat is pushed back when you start driving up a slope, e.g. a ramp.
• Pull the seat forward! Check that any ramp is stable.• Lean forwards.• Accelerate moderately so that your vehicle can overcome the obstacle. Do not
stop halfway. Reduce speed once the vehicle is up. If you need to start on a hill, accelerate slowly so as not to tip over backwards.

Quick guide P9-0157-Q 18 of 20 Version 2.0.0/2013
Medema Production A/S
Down a ramp/hill
• Check that any ramp is stable.• Lean back.• Drive slowly down. Avoid stopping midway on short, steep slopes. On long hills,
it is advisable to stop every now and again if you feel your speed is getting too high.
Across a slope
• Lean into the slope.• Avoid sudden and sharp movements. This is particularly relevant when
reversing.• Always drive at low speed.

Quick guide P9-0157-Q 19 of 20 Version 2.0.0/2013
Medema Production A/S
Long hills/diffi cult ground
The Mini Crosser is at risk of overheating on very long and steep hills or on very soft ground, possibly also combined with high user weight.
To protect the Mini Crosser motor from overheating, there is a built-in thermoswitch, which initially sets the Mini Crosser to half speed.
However, if you carry on moving over diffi cult ground, the Mini Crosser will at some stage stop completely, and the battery indicator will fl ash with 6 lamps. The Mini Crosser must be left to cool down for 3-5 minutes before it can start again.
To reset the fault, switch off the Mini Crosser then turn it on again.
If the Mini Crosser has not had long enough to cool down when it is restarted, it will initially only run at half speed.
Note:The situation described above will never happen in normal use. It only happens if the conditions are extremely challenging.

medemagroup