dk business solutionsskjol.dk.is/manuals/dkbs quick setup of general ledger.pdf · the quick setup...
TRANSCRIPT
Page 1
dk Business Solutions
- First Steps -
Quick Setup of General ledger
20. January 2012

Page 2
Copyright notice
Copyright © 2011, dk Software Ltd. All rights reserved.
Trademarks
dk Business Solutions, dk and dkBS have been registered as or are under
registration as trademarks of dk Software Ltd.
Microsoft, Windows XP and Windows 7 are registered trademark of Microsoft
Corporation.
All other product names are trademarks or registered trademarks of their
respective owners.
Your use of this documentation is subject to dk Software Ltd International
Program License Agreement that you have read and accepted in connection with
your purchase of a license to use the dk Business Solutions.
Software release
This documentation accompanies the software version 3.1 of dk Business
Solutions.
Reader comments
Any comments or suggestions regarding this publication are welcomed and should
be forwarded to the attention of:

Page 3
Table of contents
Table of contents ........................................................................................ 2 Introduction ............................................................................................... 4 The Quick Setup.......................................................................................... 6
The Chart of accounts structure ................................................................. 6 Accounting periods ................................................................................... 6 Journals .................................................................................................. 6 Next 17 steps .......................................................................................... 8
Appendix .................................................................................................. 55 Closing an Accounting period ................................................................... 55 Opening balances ................................................................................... 56 Currencies ............................................................................................. 58

Page 4
Introduction
The Quick Setup of the General ledger (Nominal ledger) module tells you how to
set up the Chart of accounts, VAT, dimensions, journals, budgets and enter
transactions quickly and perform the basic tasks you need to run your business.
More detailed information can be found in the various manuals that come along
with dkBS.
The General ledger module is the centralized location for data. Information is
posted from various journals to the indivitdual accounts in the General ledger.
The General ledger is central to most processes in dkBS – all parts of dkBS are
linked to their general ledger accounts. In General ledger, the ledger is set up,
which includes the chart of accounts and journals, as well as VAT, currencies,
accounting periods and other dimensions. All of the company‘s financial activity
resides in General ledger.
Debits and credits are entered for each transaction in a journal and journal
entries are posted to the General ledger. All transactions are recorded in a
journal that appears in the journal table, which is accessed in the module.
Ledgers are populated by entries made in any associated journal from a module
other than the General ledger module. Entries made, such as sales orders,
purchase orders and payments, also populate the associated accounts
automatically.
The features explained in the following are dependent of the licence key setting in
your system. Because of this you do not necessarily have access to all of the
fields and/or features explained.
The main features of the General ledger module are:

Page 5
Chart of accounts structure creation, including dimensions (Departments,
Cost centres, Subjects, Funds and References)
setting up budgets
registration of transactions in journals, with help of Recurring journals and
automatic reversals
autmatically maintain an audit trail for each financial transaction
data presentation through reports, statements, inquiry grids and analysis
trees

Page 6
The Quick Setup
The Chart of accounts structure
The chart of accounts, the central collection location for daily financial
transactions, is the heart of the General ledger module. It provides information
on the company‘s financial state. The chart of accounts is used to create
accounts, set standard parameters, access transactions and view company‘s
financial state.
When creating the chart of accounts, similar accounts types should be listed
together and group revenues, costs and balance accounts together by type. For
example, group all balance accounts such as liquidity, customer balances, vendor
balances, owed taxes and so on. The system‘s automatic postings to the ledger
can also be used from other modules. The following accounts for posting are
necessary:
Sales revenue and consumption from invoices
Invoice totals to customer and vendor summary accounts
Taxes, charges and discounts from invoices
Realized and unrealized losses and profits when using foreign currency
Interests from interest notes
Inventory transactions from sales, purchases, losses and gains
Transactions to system accounts
Payments on customers and vendors
Add accounts to the chart of accounts while setting up the system and decide how
the transactions from other modules are going to be posted. If the transaction
types are separated, you will have a simple and effective system that will help
also in reconciling the ledger and the modules.
Accounting periods
Define the accounting period by entering the start and end date of the accounting
year. Once a period is closed, you cannot post any transactions to it.
Before posting in a new accounting year, first create the period for that year. It
is not necessary to close the previous year, because more than one accounting
year can stay open in dk Business solution.
Journals
The journals for daily use are set up using the General ledger. Some of these are
for example:
Daily journal
Invoice register
Approval journal
Customer payment journal
Recurring journal

Page 7
Before we go on, let’s take a quick look at what you need to do:
Step/Task Location in dkBS
1. Create the chart of accounts General ledger – Chart of accounts
2. Setup (look at) VAT categories on
accounts (S1,…, P1,…). Check whether all
P/L accounts have the right VAT category
General ledger – Chart of Accounts -
Accounts
3. Setup (look at) VAT categories General ledger – VAT – VAT categories
4. Create accounting periods General ledger – Setup – Accounting
period
5. Create dimensions General ledger – Setup – Dimensions
6. Create references General ledger – Setup – References
7. Create journals General ledger – Journal
8. View posted transactions General ledger – Chart of accounts – F5
Menu or General ledger – Inquiries
9. Adjusting transactions General ledger – Inquiries – Account
transactins – F5 Menu – Adjust
transactions
10. Setup (look at) General ledger
parameters
General ledger – Setup – General
settings
11. Setup (look at) Bank accounts and run
a Bank reconciliation
General ledger – Bank accounts – Bank
accounts
12. Run a VAT return report General ledger – VAT – VAT return
13. Setting up Financial budgets General ledger – Financial budget –
Financial budget
14. Setup (look at) Financial statements General ledger – Financial statements
15. Working with reports General ledger – Reports
16. Working with inquiries General ledger – Inquiries
17. Working with analysis General ledger – Financial analysis
Page 8
Next 17 steps
1. Create the chart of accounts
The chart of accounts is the heart of General ledger module. It provides
information on the company’s financial state. The Financial statements and the
financial analysis are based on the structure of the Chart of accounts
The chart of accounts is created by:
Setting up the accounts one by one.
Pulling in the “Company template” information when the company is set up.
These so called “Company templates” come with dkBS and include fully set
up chart of accounts.
For more information about company templates, see “dkBS Quick Setup of
Company”.
Considerations
Before creating the chart of accounts, consider the following factors:
Factor Consideration Numbering the chart of accounts Number the accounts in a meaningful order during set up
because the accounts are sorted in numerical order when they appear in a window or report. For example, the
numbering can suggest grouped operations, or balance accounts that synchronize the debit and credit values.
Leaving room between the accounts Leave numerical intervals between accounts because the company might grow, or change structure. To allow for new accounts to be added, separate the accounts by naming every last account in a series with a distinguishing character, such as zero (0).
Understanding local accounting laws Familiarize yourself with the locally required format for financial statements.
Setting up a chart of accounts
The Chart of accounts is the main table in the General Ledger module. It is used
as the basis for all economic reporting. The account numbers from the Chart of
accounts are used throughout dkBS. The values in each field are mostly used
when entering transactions in journals.
To create new account select from the General Ledger menu, Chart of accounts

Page 9
Press Insert key on the keyboard, or select the [INS New ] button to create a new
account in the chart of accounts table.
On the General tab, enter information in the applicable fields. Fields that are
completed automatically are populated either from values entered on other tabs,
or the first values from a list of choice.
Page 10
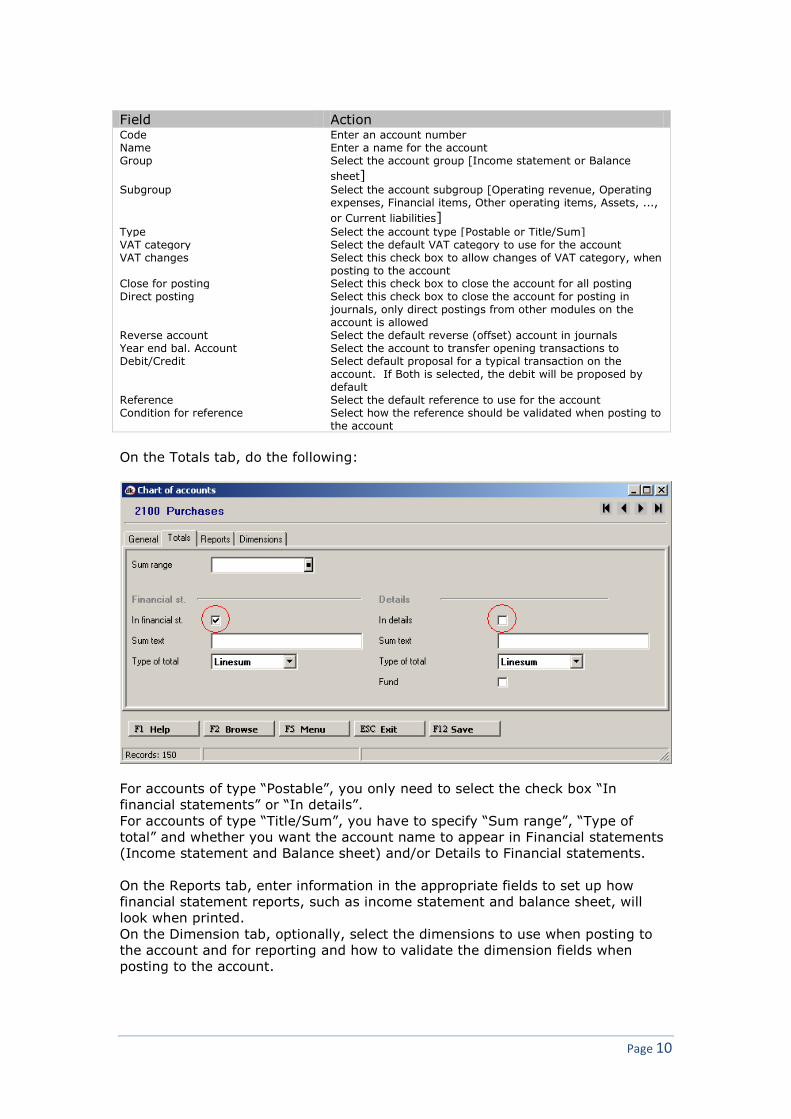
Field Action Code Enter an account number Name Enter a name for the account Group Select the account group [Income statement or Balance
sheet]
Subgroup Select the account subgroup [Operating revenue, Operating expenses, Financial items, Other operating items, Assets, ...,
or Current liabilities]
Type Select the account type [Postable or Title/Sum] VAT category Select the default VAT category to use for the account VAT changes Select this check box to allow changes of VAT category, when
posting to the account Close for posting Select this check box to close the account for all posting Direct posting Select this check box to close the account for posting in
journals, only direct postings from other modules on the account is allowed
Reverse account Select the default reverse (offset) account in journals Year end bal. Account Select the account to transfer opening transactions to Debit/Credit Select default proposal for a typical transaction on the
account. If Both is selected, the debit will be proposed by default
Reference Select the default reference to use for the account Condition for reference Select how the reference should be validated when posting to
the account
On the Totals tab, do the following:
For accounts of type “Postable”, you only need to select the check box “In
financial statements” or “In details”.
For accounts of type “Title/Sum”, you have to specify “Sum range”, “Type of
total” and whether you want the account name to appear in Financial statements
(Income statement and Balance sheet) and/or Details to Financial statements.
On the Reports tab, enter information in the appropriate fields to set up how
financial statement reports, such as income statement and balance sheet, will
look when printed.
On the Dimension tab, optionally, select the dimensions to use when posting to
the account and for reporting and how to validate the dimension fields when
posting to the account.

Page 11
Fields that are completed automatically are populated either from values entered
on other tabs, or the first values from a list of choices.
Optionally, click on the [F5 Menu ] button:
Click on To... Report – Chart of accounts Print a list of all your accounts. Account transactions View all transactions for the selected account. Balances View trial balance. Information tree Ctrl+T View various information regarding the account on a tree like
form.
Chart of accounts mapping To set up a table for mapping of another systems accounts to dkBS accounts.
Notebook Set up or view additional account information in a notebook. Attached files Attache files or folders to the account. The files can be of
any type, i.e. doc, xls, pdf and jpg.
Shortcut key:
Alt + Insert To copy information from an existing account, with all attached
information into a new one with the same information.
Setting up title/sum accounts
Sum accounts can be set up to show the total of any number of accounts. For
example, you may want to set up a title/sum account for all VAT accounts to
check the total tax liabilities at any given time.
From the General ledger menu, select Chart of accounts.
The title account is also a sum account, therefore you only need to create one
account of type Title/sum and then you create as many postable accounts as
needed.
On the Totals tab, do the following:

Page 12
Let’s look at Financial statements, to see how this account appears in the balance
sheet and details to the balance sheet.
You see one line in the Balance sheet (because the “Type of total” was Linesum)
and in Details to the Balance sheet you see the breakdown (because the “Type of
total” was Group sum).
Control accounts (system accounts)
Control accounts (System accounts) based on the Chart of accounts, are used
throughout dk Business Solutions for miscellaneous automatic posting. When dk
Business Solutions are installed, a list of account types, selected from available
company templates is included and accounts such as VAT accounts, Trade debtors
account and Penny difference (Round off) can be chosen.
The Penny difference account is used to record minor difference, such as a few
pennies difference between the purchase invoice total amount and accumulated
lines amount or a few pennies difference between the invoice amount and
payment amount when transactions are settled.
These control accounts are specified in the posting groups that are setup in each
sub-module, such as Customer posting groups and Vendor posting groups.

Page 13
2. VAT categories on accounts in General ledger
VAT amounts are calculated by way of categories (S1, P1, S0, P0, etc.) which
specify the rate that is to be applied. These categories can also specify an earlier
rate which can be applied up to a particular date in circumstances where the
Government alters the VAT rate in force.
Go to General ledger – Chart of accounts
In the VAT column you see the VAT category code. You must make sure that
each account has the right VAT category code. By pressing Enter key on the
keyboard, or selecting the [ENT Modify ] button you can modify the VAT category
code on the account.
Page 14
In VAT category you select the appropriate code and if you click the box VAT
changes, then you can change the VAT category code when you enter
transactions to this account in a journal.
3. VAT categories
When you set up a company, dkBS asks you for your VAT registration number
and the first accounting period. Once you do this, dkBS automatically sets up a
VAT category table and a VAT control accounts and starts tracking VAT in your
transactions.
There are currently three rates of VAT, depending on the goods or services the
business provides. The rates are:
Standard – 20 per cent
Reduced – 5 per cent
Zero – 0 per cent
There are also some goods and services that are:
Exempt from VAT
Outside the UK VAT system altogether
To ensure that dkBS calculates VAT the way you want; you need to check and if
necessary modify dkBS VAT setup.
To check the VAT categories, go to General ledger – VAT – VAT categories
Press Insert key on the keyboard, or select the [INS New ] button to create a new
line in the VAT categories table.
On the General information tab you must enter a unique code for the current VAT
category, enter the description, type, rate (VAT percentage), control account, and
complete entering the information in the applicable fields.
VAT amounts are calculated by way of categories (S1, P1, S0, P0, etc.) which
specify the rate that is to be applied. These categories can also specify an earlier
rate which can be applied up to a particular date in circumstances where the
Government alters the VAT rate in force. The categories also specify which GL
account the system will post these VAT transactions to. It is important that input
VAT and output VAT transactions are posted to different control accounts.

Page 15
Note. If you modify the VAT setup, dkBS does not alter transactions you have
already entered. The new rates only apply to any new transactions you enter.
VAT setup
Before you start entering transactions in journals, you should check the VAT
setup.
Go to General ledger – VAT – VAT setup
You can choose to have a separate voucher series and you must enter the VAT
settlement account. The VAT settlement account is for balancing all output VAT
accounts (VAT on purchases) and all input VAT accounts (VAT on sales).
On the VAT period tab, indicate how often you pay VAT, so dkBS knows how to
set up your VAT reports.
The Mixed activity tab is for those with both VAT and none VAT activity.
Note. The VAT registration number is held in the company information. To
change it, go to General – Company and select the VAT / Bank tab.
Each time you record a transaction, dkBS keeps track of the VAT amount
involved. It does this by transferring the VAT amount to the VAT Control
account. VAT outputs (VAT on sales) are recorded as increase in your liability
and VAT inputs (VAT on purchases) are recorded as decrease. With all your
business transactions recorded in this way, you can use reports to show your VAT
figures for each VAT period.

Page 16
4. Create accounting period
Define the accounting period by entering the start and end date of the accounting
year.
Go to General ledger – Setup – Accounting period
Press Insert key on the keyboard, or select the [INS New ] button to create a new
line in the Accounting period table.
Before posting in a new accounting year, first create the period for that year. It
is not necessary to close the previous year, because more than one accounting
year can stay open in dk Business solution.
Once a period is closed, you cannot post any transactions to it. It is possible to
close either a whole year (click Period closed) or indivitual months (select the tab
Closed for registration and then click those months you want to close for posting)
within dkBS in order to prevent any unauthorised postings and hence to protect
the existing account balances from unwanted changes. These periods can be re-
opened and re-closed at any time.
For more information about closing a period and opening balances, see Appendix.

Page 17
5. Create dimensions
Dimensions define the Department, Cost centre and Subject codes. These are
the 3 standard dimensions in dkBS. Dimensions (properties) can be used to
categorize ledger transactions – when specifying the ledger account, more than
one dimension can be specified. Associating dimensions with entries allows the
creation of many different types of analysis for a single account.
Because the dimensions are independent of each other, dkBS allows the use of
any combination of dimensions in connection with ledger accounts, transactions
and budgets. Other modules in the system can also be marked with dimensions
that are automatically entered for relevant transactions.
Before you can start creating dimensions you must activate them, by going to
General – Company – General settings... and click “Use dimensions” and then
click those dimensions you want to use.
NOTE. There is a difference between those 3 dimensions. Cost centres and
Subjects are more optional, but Departments are mandatory, that means if you
activate departments, you have to use them in all modules in dkBS, every
transaction has to have a department code and every posting group has to have
a department code.
To access the 3 dimension tables, from the main menu, go to General ledger –
Setup, expand Dimensions and double-click the Department table, Cost centre
table or Subject table.
To create departments
Go to General ledger – Setup – Dimensions – Departments
Press Insert key on the keyboard, or select the [INS New ] button to create a new
line in the Department table.
Page 18
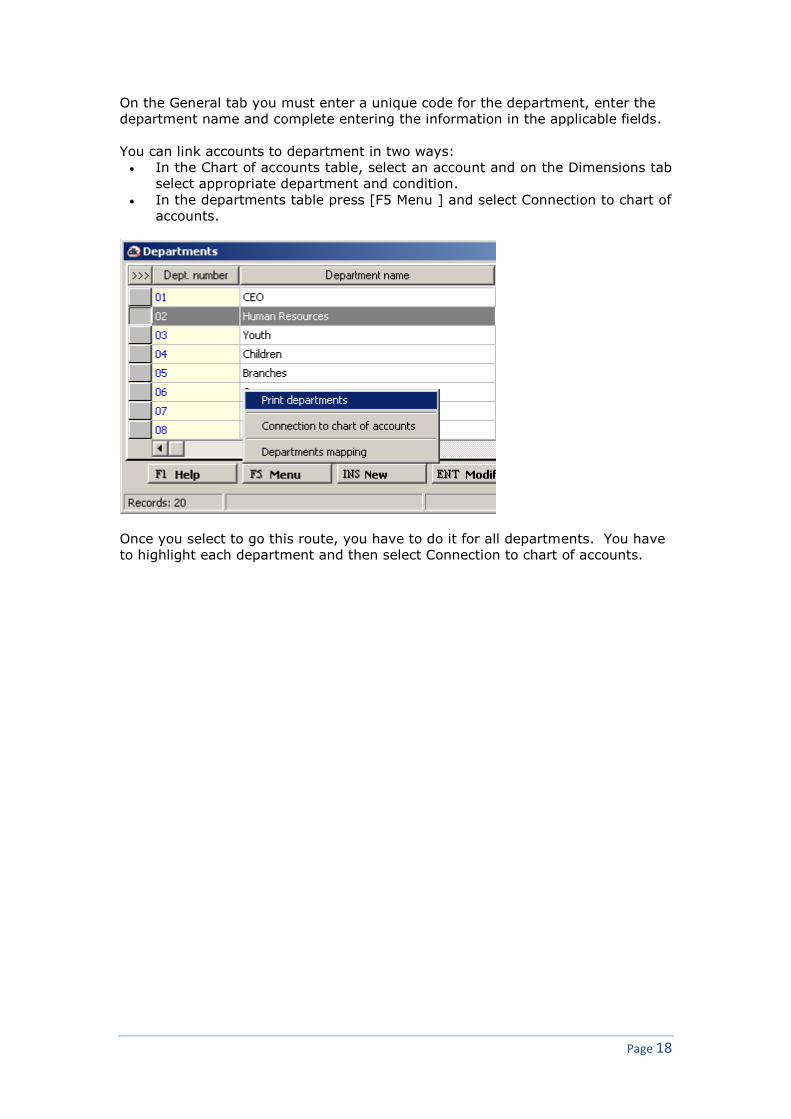
On the General tab you must enter a unique code for the department, enter the
department name and complete entering the information in the applicable fields.
You can link accounts to department in two ways:
In the Chart of accounts table, select an account and on the Dimensions tab
select appropriate department and condition.
In the departments table press [F5 Menu ] and select Connection to chart of
accounts.
Once you select to go this route, you have to do it for all departments. You have
to highlight each department and then select Connection to chart of accounts.

Page 19
Those accounts not marked are not accessible in that particular department.
To create cost centres
Go to General ledger – Setup – Dimensions – Cost centres
Press Insert key on the keyboard, or select the [INS New ] button to create a new
line in the Cost centre table.

Page 20
On the General tab you must enter a unique code for the cost centre, enter the
cost centre name and complete entering the information in the applicable fields.
To create subjects
Go to General ledger – Setup – Dimensions – Subjects
Press Insert key on the keyboard, or select the [INS New ] button to create a new
line in the Subject table.
Working with dimensions
If you have dimensions activated, you will see them everywhere, in main tables,
in journals, in inquiries, in reports, in statements, in analysis.
Page 21
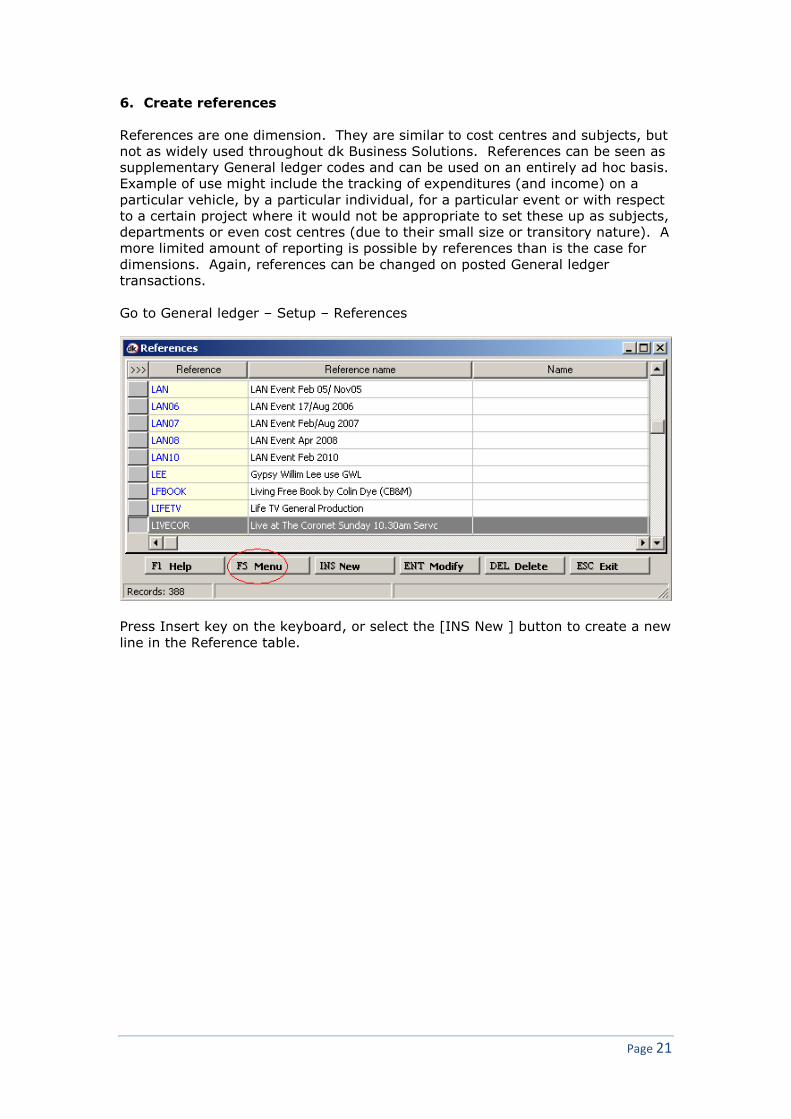
6. Create references
References are one dimension. They are similar to cost centres and subjects, but
not as widely used throughout dk Business Solutions. References can be seen as
supplementary General ledger codes and can be used on an entirely ad hoc basis.
Example of use might include the tracking of expenditures (and income) on a
particular vehicle, by a particular individual, for a particular event or with respect
to a certain project where it would not be appropriate to set these up as subjects,
departments or even cost centres (due to their small size or transitory nature). A
more limited amount of reporting is possible by references than is the case for
dimensions. Again, references can be changed on posted General ledger
transactions.
Go to General ledger – Setup – References
Press Insert key on the keyboard, or select the [INS New ] button to create a new
line in the Reference table.

Page 22
7. Start entering transactions in journals
Entering transactions is mainly done through journals. You can enter
transactions through journals in General ledger and they will go to sub-ledgers
when appropriate.
You can also enter transactions in every sub-ledger, i.e. Accounts receivable and
Accounts payable. Journals in sub-ledgers are more advanced and complicated
than journals in General ledger. For small companies it might be best to enter
most transactions through journals in General ledger, i.e. purchase transactions,
payments transactions and cash book transactions.
Journal for purchase transactions
Go to General ledger – Journal
Press Insert key on the keyboard, or select the [INS New ] button to create a new
line in the journal table.
In the journal header you must enter a description and select an accounting
period. You can, optionally enter an identity code for the journal. Press [F12
Confirm ] to go to the lines.

Page 23
When entering the first transaction you must enter a voucher number and after
that the system automatically raises the number, when the difference, seen at
the bottom is 0.00. For purchase invoices a voucher series like PI0001 to PI9999
is very appropriate.
The system automatically creates the VAT transaction, you must enter the total
amount (incl. VAT).
When you have entered the amount, you get a pop up screen where you can
enter the invoice number and the due date.
It is recommended that you create at least one journal for each month. You can
of course create a journal and enter as many transactions as you choose.
When you have enter all transactions, say for one month, you must exit out of a
new line (by pressing the [ESC Exit ] button) and go to F5 Menu.
Select: Check registration, Print registration and Post registration.
Page 24
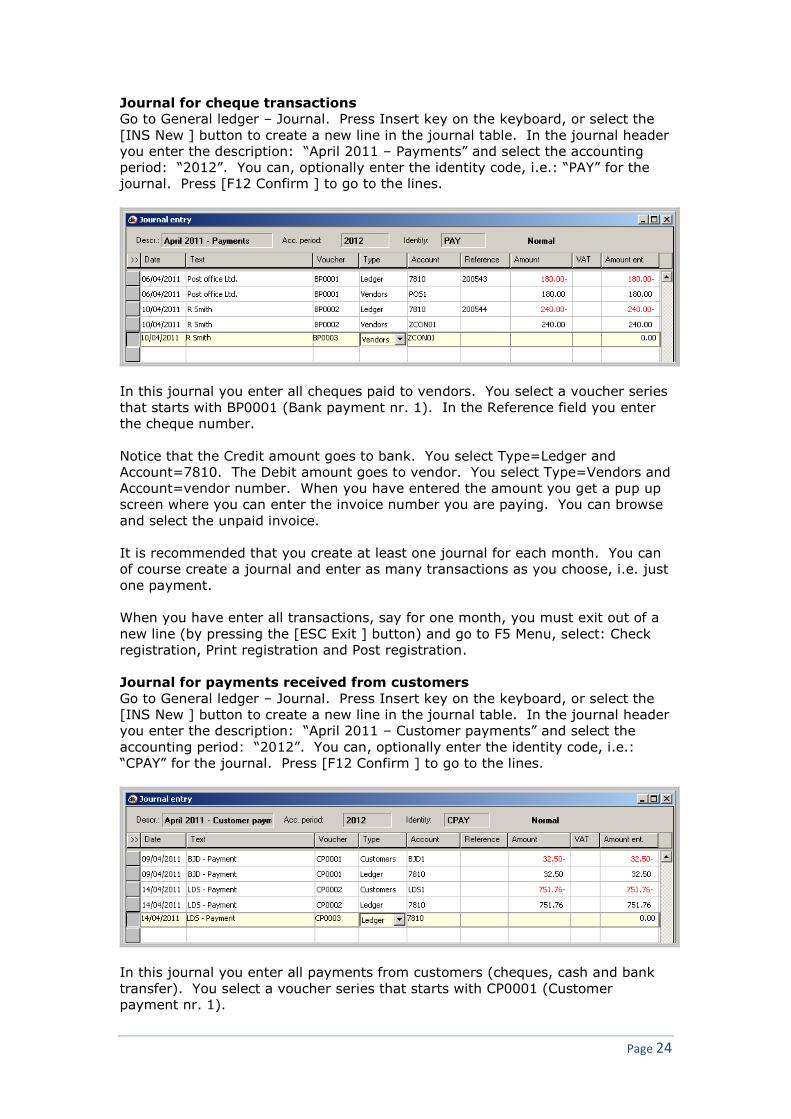
Journal for cheque transactions
Go to General ledger – Journal. Press Insert key on the keyboard, or select the
[INS New ] button to create a new line in the journal table. In the journal header
you enter the description: “April 2011 – Payments” and select the accounting
period: “2012”. You can, optionally enter the identity code, i.e.: “PAY” for the
journal. Press [F12 Confirm ] to go to the lines.
In this journal you enter all cheques paid to vendors. You select a voucher series
that starts with BP0001 (Bank payment nr. 1). In the Reference field you enter
the cheque number.
Notice that the Credit amount goes to bank. You select Type=Ledger and
Account=7810. The Debit amount goes to vendor. You select Type=Vendors and
Account=vendor number. When you have entered the amount you get a pup up
screen where you can enter the invoice number you are paying. You can browse
and select the unpaid invoice.
It is recommended that you create at least one journal for each month. You can
of course create a journal and enter as many transactions as you choose, i.e. just
one payment.
When you have enter all transactions, say for one month, you must exit out of a
new line (by pressing the [ESC Exit ] button) and go to F5 Menu, select: Check
registration, Print registration and Post registration.
Journal for payments received from customers
Go to General ledger – Journal. Press Insert key on the keyboard, or select the
[INS New ] button to create a new line in the journal table. In the journal header
you enter the description: “April 2011 – Customer payments” and select the
accounting period: “2012”. You can, optionally enter the identity code, i.e.:
“CPAY” for the journal. Press [F12 Confirm ] to go to the lines.
In this journal you enter all payments from customers (cheques, cash and bank
transfer). You select a voucher series that starts with CP0001 (Customer
payment nr. 1).

Page 25
Notice that the Debit amount goes to bank. You select Type=Ledger and
Account=7810. The Credit amount goes to customer. You select
Type=Customers and Account=customer number and after you have entered the
amount, you enter the invoice number the customer is paying.
It is recommended that you create at least one journal for each month. You can
of course create a journal and enter as many transactions as you choose, i.e. just
one payment.
When you have enter all transactions, say for one month, you must exit out of a
new line (by pressing the [ESC Exit ] button) and go to F5 Menu: Check
registration, Print registration and Post registration.
Cash book journal
The cash book journal is a simpler version of the General ledger journal, were you
can register payments from the bank and deposits (receipts). In this simpler
version you are not able to enter transactions going to the customer ledger and
the vendor ledger, only involving the nominal ledger accounts.
Recurring journals
You can set up recurring journal entries which are used in all periods, for
example, depreciation, prepayments and other accruals. Amounts can be fixed,
or entered in a template each period. The transactions can be set to
automatically reverse the next period, if needed. This minimizes data re-entry
and the risk of errors.
To set up the recurring journal templates, go to General ledger – Setup –
Recurring journals
Press Insert key on the keyboard, or select the [INS New ] button to create a new
line in the journal table.

Page 26
To set properties for each line, highlight a line and from the [F5 Menu ] select
Line properties.
To select a recurring journal template in a new journal
Create a new journal and fill out the header. When in lines press [F5 Menu ] and
select Recurring journals
1. Select a template to work with
2. Complete entering information in the template
3. Select [F5 Menu ] – Post to journal
4. Enter date and Voucher for the transactions that will be updated to the
journal

Page 27
8. View posted transactions
Inquiries show the transactions of selected period, account, voucher, or
dimension. The transactions are shown in windows, very similar to one another.
To view posted transaction go to the chart of account table, highlight the
appropriate account and from the F5 Menu select Account transactions.
You see all transactions, black transactions are from posted journals and blue are
from unposted journals. You can filter, group, sort and drill down (click the
arrow). Press F5 Menu for more functionality, like Change dimensions on
transaction (Edit transaction).
If you want to see transactions from unposted journals, then from the F5 Menu
select Transactions from unposted journals.
To print out the inquiry, press [F7 Print ] or select from the F5 Menu other print
options.

Page 28
Drill down
By clicking the black arrow button on the column you can drill down or open up a
new window showing more information.
By highlighting a particular transaction and then pressing the Vouchers arrow
button, you get a window showing the full voucher.
Similarly, if you press the Sub-accounts arrow button, you get a window showing
all transactions on particular vendor.
Similarly, if you press F5 Menu and select: View invoice: PI891, you get the
vendor invoice, as registered in the Accounts payable module.

Page 29
9. Adjusting transactions
When you have posted transactions from i.e. journals, sales and purchases you
can only change the dimensions (department, cost centre, subject and
reference).
To adjust transaction, go to the chart of accounts table and select an account.
Then click [F5 Menu ] – Account transactions, and then again click [F5 Menu ]
and select Change dimensions on transaction.
The following transaction characteristic can be changed.
When finished making the adjustment, click [F12 Confirm ] to post the update.
10. General ledger parameters
Parameters for the General ledger are defined in following places:
General ledger – Setup – General settings.
General ledger – VAT – Setup.
General ledger – Bank accounts – Setup – Setup.
General ledger – Finanacial analysis – Setup.
General ledger – Financial statements – Financial statement setup.
General ledger – Financial statements – Cash flow setup.
General ledger – Processes – Exchange rate difference – Setup.
General – Company – General settings.

Page 30
11. Bank accounts
Bank management includes administration of payments by check, deposits,
management of check printing and reconciliation of bank account statements.
Bank management is used in connection with customer payment receipt, vendor
payments and various postings from the daily journal.
A company’s bank account is the most important piece of information in bank
management. Daily use of various parts of the application updates the bank
account with postings.
Creating a bank account
To access the Bank accounts table, go to General ledger – Bank accounts – Bank
accounts
Press Insert key on the keyboard, or select the [INS New ] button to create a new
line in the Bank account table.
On the General tab you must enter the bank account number and name and
complete entering the information in the applicable fields. The GL account links
the bank account to the nominal ledger.
On the Balancing tab, you can decide whether you are going to reconcile with or
without imported bank transactions.
Daily work with bank management
The following is a description of some of the daily routines in the bank
management. Most of the routines are centred on the bank account and the
facilities that are offered from here.
Page 31
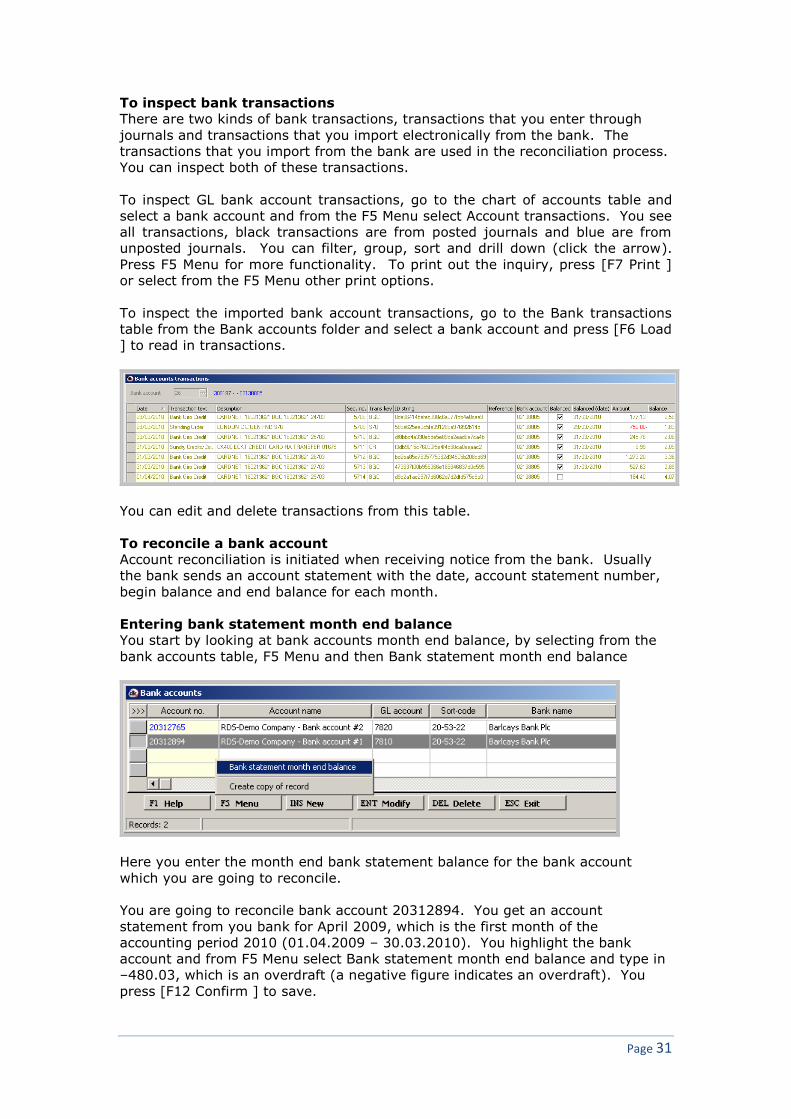
To inspect bank transactions
There are two kinds of bank transactions, transactions that you enter through
journals and transactions that you import electronically from the bank. The
transactions that you import from the bank are used in the reconciliation process.
You can inspect both of these transactions.
To inspect GL bank account transactions, go to the chart of accounts table and
select a bank account and from the F5 Menu select Account transactions. You see
all transactions, black transactions are from posted journals and blue are from
unposted journals. You can filter, group, sort and drill down (click the arrow).
Press F5 Menu for more functionality. To print out the inquiry, press [F7 Print ]
or select from the F5 Menu other print options.
To inspect the imported bank account transactions, go to the Bank transactions
table from the Bank accounts folder and select a bank account and press [F6 Load
] to read in transactions.
You can edit and delete transactions from this table.
To reconcile a bank account
Account reconciliation is initiated when receiving notice from the bank. Usually
the bank sends an account statement with the date, account statement number,
begin balance and end balance for each month.
Entering bank statement month end balance
You start by looking at bank accounts month end balance, by selecting from the
bank accounts table, F5 Menu and then Bank statement month end balance
Here you enter the month end bank statement balance for the bank account
which you are going to reconcile.
You are going to reconcile bank account 20312894. You get an account
statement from you bank for April 2009, which is the first month of the
accounting period 2010 (01.04.2009 – 30.03.2010). You highlight the bank
account and from F5 Menu select Bank statement month end balance and type in
–480.03, which is an overdraft (a negative figure indicates an overdraft). You
press [F12 Confirm ] to save.

Page 32
The begin balance on the bank statement you got must match the March monthly
end balance in accounting period 2009, which is the last month of that accounting
period.
Matching transactions
From the bank accounts folder, select Matching transactions and highlight the
bank account and from the F5 Menu, select Get transactions
You select April and click Unmatched.
Normally you will only click the Unmatched box. You can click the Matched box if
you have previously matched transactions and you wish to release the matching.

Page 33
You can see that you have 42 unmatched transactions.
To match a transaction, two steps are needed:
Mark each line which has cleared the bank statement by the reconciliation
date by pressing the space bar on the keyboard (pressing the space bar
again un-marks a line)
Update the matching by pressing F12 button (or by selecting Update
matching from the F5 Menu)
Repeat this process until all transactions which have cleared the bank statement
by the reconciliation date have been marked and matched.
Print bank reconciliation report
From the bank accounts folder, select Reports – Bank reconciliation. Select April
and the bank account
This report shows a standard bank reconciliation report. If the figures are correct
and the difference is zero then you may proceed with the next month. If the

Page 34
difference is not zero then you must investigate this and correct it before
proceeding on to the next month.
Possible causes of difference can be:
Lines which are showing as outstanding on the above bank reconciliation
report may, in fact, have cleared the bank and not be outstanding. This can
be corrected by repeating the Matching transactions process described
above
Perhaps certain transactions have been left in Unposted GL journals. This
can be rectified by posting the journals and repeating the Matching
transactions process again
Certain items (lines from the bank statement) may not have been entered in
to the General ledger at all (entered in to journal). Clearly these need to be
entered and then matched
Certain transactions may have been entered incorrectly or may have cleared
the bank account as a different amount to the original leger entry.
Correcting entries will need to be processed and then matched. This may
involve um-matching cetain transactioins and then re-matching them along
with their correcting counterparts. In the case of a bank error where the
bank post a correction in a following month the bank reconciliation can be
left as it is, it will „correct itself“ when the bank post the correcting
adjustment in the later month
Bank reconciliations involving imported bank data
Another way to reconcile bank accounts is to read in (import) transactions from
the bank into the bank transactions table in the Bank account folder and then run
an automatic bank reconciliation process.
The first step is to open up your bank link and save the bank transactions from
the bank (e.g. one month) to a text file and then you import the text file to dkBS.
To import (read in) bank transactions from a text file, select Get bank
transactions from the Bank accounts folder.
You enter the name of the saved text file and select the right bank.
Step two is matching bank transactions to General ledger bank transactions.
From the bank accounts folder, select Matching transactions and highlight the
bank account and from the F5 Menu, select Get transactions

Page 35
Here you want to read in unmatched General ledger transactions and unmatched
bank transactions.
The matching process is basically the same as done above but you can let dkBS
to the matching by selecting, Reconcile from F5 Menu in the Matching
transactions window.
You can start by letting dkBS try to match transactions by comparing date,
reference and amount. dkBS automatically marks each line that matches the
selected conditions. You must look at the transactions that have been marked
and if the difference amount at the bottom is 0.00 you update the matching by
pressing F12 button (or by selecting Update matching from the F5 Menu).
Repeat this process by selecting the next condition (compares date and amount).
If there are still transactions that have not been marked and matched, you must
manually try to match them (you mark each transaction by pressing the space
bar on the keyboard).

Page 36
12. Run a VAT return report
dkBS is designed to make tracking VAT easy for you. Once you’ve entered all
your transactions into dkBS accounts, dkBS can create complete and useful
reports to show your VAT situation.
There are basically three types of VAT reports:
VAT transactions report. This shows a complete of all your VAT-related
transactions. It includes the VAT and net amounts for each item recorded
with a VAT code in any account. You can use this report to substantiate
your VAT figures if you receive a VAT inspection.
VAT summary report. This summarises your business and VAT figures for
VAT period.
VAT return (VAT 100) report. This show you the figures you need for your
VAT return.
The VAT transactions report (detail report) is an exploded version of the VAT
summary report. If you receive a VAT inspection, your VAT inspector will
probably want to see the VAT summary report first. You can then cross-refer to
the VAT transactions report to investigate specific transactions if necessary.
To print out the VAT return report, go to General ledger – VAT – VAT return
report and select the right VAT period.
You see the net VAT to pay (or reclaim if negative), shown in box 5.
Once the final VAT return report has been run and printed the VAT return can be
submitted. It is currently not possible to file this directly from dkBS. Instead,
however, the totals from the report should be keyed in to the relevant page on
the HMRC website.
VAT clear-down
Once the VAT return has been finalised and/or submitted to HMRC, it is important
to mark all of the underlying transactions as having been included on the VAT
return so that they can be excluded from any further VAT returns. This is done
by running the “Registration of VAT settlement” process from the VAT folder.

Page 37
The dialogue box allows the selection of the relevant period and, if required, to
limit the transactions to be handled to one or more departments. The period will
normally be the quarter relating to the VAT return being submitted. However, if
back-dated transactions from an earlier quarter within the current accounting
period have been included in the VAT return then the start date used in the date
range should be the date of the earliest back-dated transaction. In most case,
the VAT return will relate to the whole organisation and hence the department
field will be left blank.
The VAT settlement process also creates a journal in the General ledger so the
dialogue box allows the entry of a suitable voucher number (VAT-11/09, for
example, being for the VAT return for the quartered ended 30th September
2011). This journal will bring to zero the balance on the VAT control accounts
(those accounts to which transactions of a “V” type have been posted by the
system) and post the net difference to a single VAT account (e.g. “VAT settlement
account” or “Amount due to/(from) HMRC”, etc.) showing the net amount due to
or from HMRC.
The journal created will comprise 3 lines:
a) a credit to the input VAT control account to bring to zero the balance on
that account;
b) a debit to the output VAT control account to bring to zero the balance on
that account also; and
c) a third entry being the difference between the values in a) and b) above.
The value in c) should equal the amount in “Box 6” of the VAT return and will be
the amount due to / from HMRC.
The journal should then be checked and posted in the usual manner. The entries
on the journal will each be dated on the last day in the VAT quarter. If the last
month in the quarter has been closed for posting then it will be necessary to
temporarily re-open to allow this journal to be posted.
By following this process the input and output VAT control accounts will be
allowed to accumulate VAT transactions during a VAT quarter and will then be set
to zero at the end of each quarter in an orderly fashion, with the resulting
amount due to/from HMRC being shown clearly in a single account containing just
a few accounting entries each year.
Posting the VAT payment/receipt
The payment made to (or received from) HMRC should subsequently be posted to
this single VAT settlement account once the amount has been paid or the
remittance received. By confining these summary quarter-end transactions to
this dedicated VAT settlement account, any under/over payments can be easily
identified and followed-up with HMRC.
Page 38
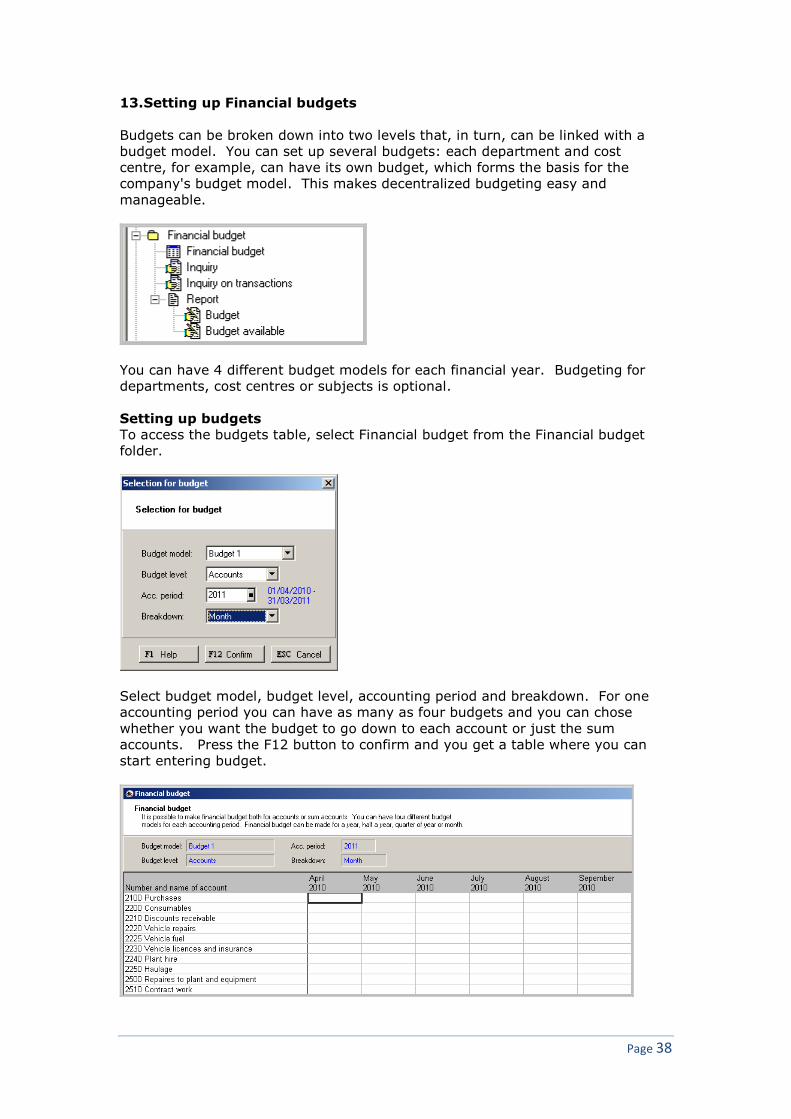
13. Setting up Financial budgets
Budgets can be broken down into two levels that, in turn, can be linked with a
budget model. You can set up several budgets: each department and cost
centre, for example, can have its own budget, which forms the basis for the
company's budget model. This makes decentralized budgeting easy and
manageable.
You can have 4 different budget models for each financial year. Budgeting for
departments, cost centres or subjects is optional.
Setting up budgets
To access the budgets table, select Financial budget from the Financial budget
folder.
Select budget model, budget level, accounting period and breakdown. For one
accounting period you can have as many as four budgets and you can chose
whether you want the budget to go down to each account or just the sum
accounts. Press the F12 button to confirm and you get a table where you can
start entering budget.

Page 39
When entering the budget amount, enter a negative number for credit amount
(e.g. for sales and liabilities).
By pressing the [F3 Get actls ] button, you can read in actual figures from e.g.
previous year and increase or decrease by a factor each month.
When you have finished setting up budgets, press the F12 Button to save the
budgets.
Budgeting for dimensions: departments, cost centres or subjects
Budgeting for dimensions: departments, cost centres or subjects is optional.
Many people set up budgets just for accounts.
To create a budget for dimension, select Financial budget
Click [ ] Delimit by dimension and select appropriate dimension type:
Department, Cost centre or Subject and then the appropriate dimension.
Changing budgets
You can always change an existing budget by returning to the Financial budget
window or selecting Inquiries on transactions from the Financial budget folder.
Pre-set budget reports
There are several pre-set budget reports you can choose from. From the
Financial budget folder select Reports – Budget to see an overview of your
budget. Other budget reports are:
Income statement (P&L) and/or Balance sheet overview report. Go to
Financial analysis folder, select Analysis tree and then create a new analysis and
create columns for Budgeted amounts for each month.

Page 40
This analysis (report) does not compare budgeted amounts with actuals. To do
so, just create a new column with actuals by the side of each budget column.
You can print this analysis or send it to Excel.
Income statement (P&L) and/or Balance sheet budget vs. actual report.
Go to Financial statements folder, select Financial statements and then in
Compare with, select Budget 1, 2, 3 or 4 and in Type of comparison, select None,
Percentage, Percentage and amount or Percentage to base. This report has
column for actual amount, budgeted amount and, if selected, shows difference in
pounds and actual amount as a percentage of budgeted amount.
Income statement (P&L) and/or Balance sheet budget by dimension
overview report. Go to Financial analysis folder, select Analysis tree and then
create a new analysis and create columns for Budgeted amounts for each month
and delimit by dimensions.
Income statement (P&L) and/or Balance sheet budget vs. actual by
dimension report. Go to Financial statements folder, select Financial
statements and then in Compare with, select Budget 1, 2, 3 or 4 and in Type of
comparison, select None, Percentage, Percentage and amount or Percentage to
base. On the Dimensions tab select appropriate dimension (department, cost
centre and/or subject). This report has column for actual amount, budgeted
amount and, if selected, shows difference in pounds and actual amount as a
percentage of budgeted amount.
Transferring budgets to MS-Excel
From the Financial budget folder select Inquiry on transactions – F5 Menu –
Export to Excel. You can change the budget and read it back into dk by selecting
from the F5 Menu, Import from Excel.

Page 41
14. Setup (look at) Financial statements
These provide, in a single report, an Income Statement, a Balance Sheet and a
series of related “Details” (detailed breakdowns) flowing directly from the Chart of
accounts with a variety of options to make the report flexible, including the ability
to include or exclude un-posted transactions.
Before you run the Financial statements for the first time, you need to set up
some parameters.
From the Financial statements folder, select Financial statements setup
Complete entering the information in the applicable fields and click the [F12
Confirm ] to save the set up. Now you can run the Financial statements.
There are several Financial statements reports you can select:
Standard. Standard income statement, balance sheet and details for
selected period, e.g. month(s), quarter, year(s) or YTD.
YTD comparison. Like standard, but with columns for this year to date, last
year to date, change amount and % change.
Prev Year Comparison. Like standard, but with columns for selected months
this year, same period last year, change amount and % change
By Dimension. Like standard and YTD comparison, but with column for
selected dimension (range of departments, range of cost centres or range of
subjects). Amounts are for selected period, e.g. month(s), quarter, year(s)
or YTD.
Budget Overview. Shows budgeted amounts for selected period, e.g.
month(s) or YTD for each income, expense and balance sheet account for
which you have set up a budget.
Budget vs. Actual. Shows income statement, balance sheet and details for
selected period, e.g. month(s), quarter, year(s) or YTD, compared to

Page 42
budgeted amounts. If selected, shows difference in pounds and actual
amount as a percentage of budgeted amount.
Budget by Dimension. Compares actual income, expenses and balance
sheet for selected dimension (range of departments, range of cost centres
or range of subjects) with budgeted amounts. Shows difference in pounds
and actual amount as a percentage of budgeted amount.
Example of financial statements reports
Go to General ledger – Financial statements – Financial statements
You can select to print Income statement (Profit and loss statement), Balance
sheet and details, compare actuals with other accounting period or budgets and
select columns for difference in pounds and actual amounts as a percentage of
budgeted amounts.
To create a standard profit and loss statement with balance sheet and details,
choose Inc. statement, Balance sheet and Details, Compare with: Nothing and
Type of comparison: Nothing.
On the Selection tab, select one year.
On the Miscellaneous tab, select Automatic allocation of numbers on details and
Skip items with zero balance.
Page 43
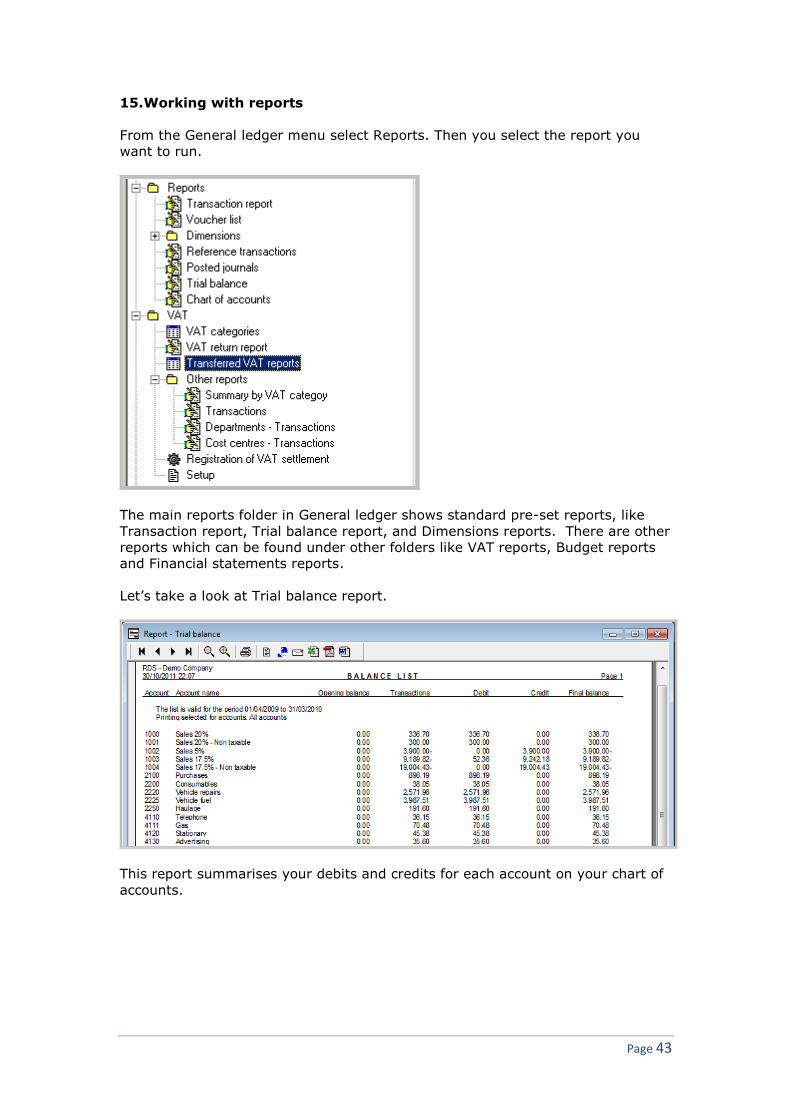
15. Working with reports
From the General ledger menu select Reports. Then you select the report you
want to run.
The main reports folder in General ledger shows standard pre-set reports, like
Transaction report, Trial balance report, and Dimensions reports. There are other
reports which can be found under other folders like VAT reports, Budget reports
and Financial statements reports.
Let’s take a look at Trial balance report.
This report summarises your debits and credits for each account on your chart of
accounts.

Page 44
16. Working with inquiries
From the General ledger menu select Inquiries. Then you select the inquiry
(lookup/query) you want to use.
The main inquiries folder in General ledger shows inquiries, like Accounts
transactions inquiry, Transactions inquiry, Vouchers inquiry, References inquiry,
Dimensions inquiry and Balances inquiry.
Let’s take a look at Transactions inquiry. This inquiry will bring up all
transactions in a specific period.
You select the period and press [F6 Load ] to read in transactions.
Now you have all transactions for the period 01/04/2009 – 31/03/2010. Let’s
take a look at what you can do now.
Group transactions

Page 45
The dark grey area is what we call a grouping area. You can drag a column
header to that area or right click with the mouse on a column header and select
Group By This Field.
Example:
Let’s say you want to group all transactions by account and then by date, you
drag these two columns to the grouping area.
If this grouping area is not visible, you can bring it up by right clicking on the
transactions area and select Column grouping – Show.
Note. The shortcut key for the grouping area is Ctrl+G. By pressing this shortcut
key you can toggle the grouping area on and off.

Page 46
Let’s now take a look at the lower part of the transaction window.
Filter transactions
The dark grey area is the Filter area. By pressing the button [Customize... ]
brings up a Filter. Another way to filter is by pressing the arrow button on the
column header and select (Custom...).
Example:
Say you want to filter all transactions with amount 10 to 200. You click the
button [Custom... ] and type in:
Then press the [Apply ] button and if you are happy with the result you press the
[OK ] button.

Page 47
If this filter area is not turned on, you can always turn it on by right clicking and
select from the drop down menu Filter selection.
Note. The shortcut key for the filter area is Ctrl+B. By pressing this shortcut key
you can toggle the filter area on and off.
Now turn your attention back to the inquiry and the transactions.
And look at following buttons:
You can sort the transactions by clicking on a column button. That
column becomes yellow.
You can drill down (or go to the origin) by clicking the magnifying glass
on a button.
This is a filter button. By clicking it you get a drop-down menu,
where you can select (All), (Custom…) or just click those items you
want filtered.
This button brings up a list of all columns you can show or hide. Those
columns that are already marked are the ones that are shown in the
inquiry, like Date, Account, Account name, Voucher, Reference, …
Another way to hide or remove columns is simply to click on the column and drag
it up from the column line, above the grouping area

Page 48
From the F5 Menu you can select Setup and Transaction notes.
To print the transactions. The report has the same columns as is
shown in the inquiry. This means that you can create your own
report with those columns and subtotals you want.
Let’s take a look at other menus that you can bring up.
By right clicking on a column header you get the following menu
These menu items are self-explanatory. We have already talked about Group By
This Field and Group By Box (Show Column Grouping). Remove This Column
hides the column you right clicked on. Footer is the blue total line.
By right clicking anywhere on transactions you get the following menu
These menu items are self-explanatory. We have already talked about Column
grouping (Show) and Filter selection.
Export to… allows you to export transactions to Excel, Html, Txt or XML.
You can also bring up this menu by selecting from the F5 Menu, Setup.

Page 49
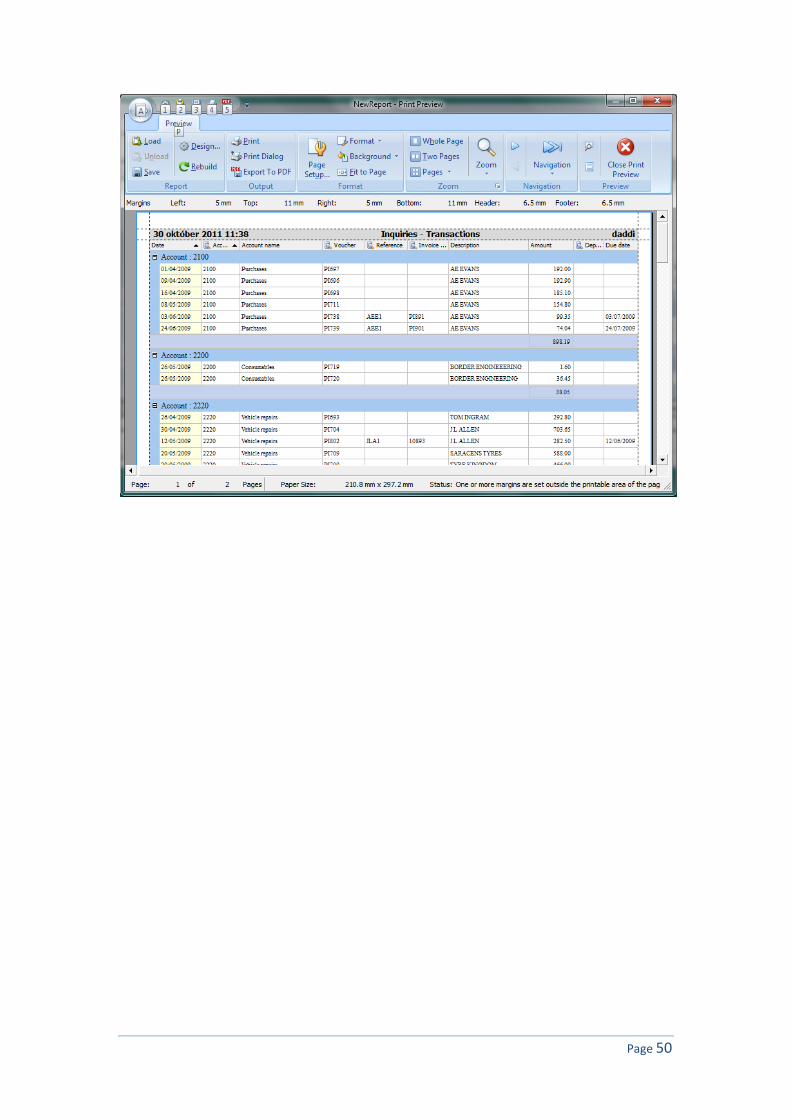
Let’s take a look at the print out. As mentioned above you can look at this
inquiry as a simple report writer. Where you can select columns and group them
with subtotal. You can filter the transactions. You can define the report layout.
Example:
Say you want to print all the accounts belonging to Cost of sales for one
accounting period. You drag the Account column to the grouping area, click on
the filter button on the column and mark all accounts in the range 2000 – 2685.
Then click the [F7 Print ] button and you get the following print menu
You select Preview… and you get the following report
Page 50

Page 51
17. Working with analysis
There are powerful analytical tools in General ledger. The analytical applications
are functioning from the beginning and there is no need for a long and
troublesome setup process with following experiments and tests. It is very easy
to monitor the “big picture” and drill down into the data to specific transactions.
From the General ledger menu select Financial analysis.
Analysis tree
Select the Analysis tree and you get the following window
You can create as many analyses as you want. To create a new analysis, select
Add from the F5 Menu.

Page 52
In this setup several column have already been created. To create a new column,
just click the New button, enter a name for the column and then choose the
column type: Amount, Percentage, Difference or formula. You must specify
whether you want the figures to be actual figures or budgeted figures. You must
specify the accounting period and the month(s). Then you can include opening
balance, include from unposted journals and include unposted vendor invoices. If
you are using dimensions, you can delimit by them.
To save the setup click the [F12 Confirm ] button and give the analysis a
meaningful name
To run the analysis just double click the analysis or right click the analysis and
select Run. Let’s take a look at this analysis, Budget vs. Actual for months Apr
2009 – Mars 2010. You double click the analysis and get the following window

Page 53
You see a compact overview of the financial statement. To expand it click the [+]
button. To drill down to transactions, just double click the highlighted account
name or select Transactions from the F5 Menu.
You can print the analysis tree by pressing the F7 Print button. You can print the
analysis tree as it is seen, only the first level or all levels (the tree fully
expanded).
You can export the analysis to excel by selecting from the F5 menu, Export to
Excel.
You can see the figures on a graph for the highlighted account name by selecting
Graph from the F5 Menu
You can print the Graph by pressing the F7 Print. The F6 Screen button prints the
Graph to the screen.

Page 54
Key ratios
Select the Key ratios and you get the following window
You can create as many key ratios setup as you want. To create a new key
ratios, select Add from the F5 Menu. You create the column the same way as in
the analysis setup. When you have created the key ratios, click the [F12 Confirm
] button to give it a name and save it.
To run the key ratios, just double click on it or select Run from the F5 Menu.
You can print the key ratios by pressing the F7 Print button.
You can export it to Excel by selecting from the F5 Menu, Export to Excel.

Page 55
Appendix
Closing an Accounting period
It is possible to close a whole year or individual months within dkBS in order to
prevent any unauthorised postings to be made within General ledger and hence
to protect the existing account balances from unwanted changes. These periods
can be re-opened and re-closed at any time. The process should, therefore, be
limited to the menu of the Admin user or someone in overall charge of Finance
function. If a period is re-opened and changes are made after having run the
opening balances process for the succeeding year then the opening balances for
that period should then be re-run.
Closing a period
To close either a month or a year, select General – Accounting period. Select the
relevant accounting period and press enter to open up the registration cards.
To close the year simply click the box Period closed on the Accounting period tab;
similarly, click the relevant boxes adjacent to the relevant month(s) you wish to
close from the Closed for registration tab, as shown above. Press F12 to save
these changes.
It would be normal practice to close a month after all of the bank reconciliations
have been correctly performed. It would also be normal practice to close all 3
months relating to a VAT return quarter once the return is ready to submit to
HMRC. The final months(s) or the period as a whole may be closed at various
times during the year-end accounts preparation process as appropriate and
certainly once the final opening balances are ready to be transferred in to the
following period.

Page 56
Opening balances
The “Opening balances” process can be found within the Processes folder of the
General ledger (GL). It creates an un-posted GL journal where each line carries
the opening balance of each GL account with a closing balance in the current
accounting period. Where dimensions are used, a journal line entry is created for
the balance of each dimension relating to each account.
Create the opening balances journal
In the diagram below, 2012 is the new financial year in to which the opening
account balances are to be posted. In this example, GL account 8400 is the
opening reserves (accumulated profit and loss) account.
Dimensions
a) Departments
Where departments are used, the system will automatically break-down the
opening balance brought forward on each account by department. However, the
system offers two options to the user:
the opening reserves (profit and loss) account can be consolidated in to one
department, such as a general department, code 0; and/or
all opening GL account balances balance can merged in to one department
and be brought forward under a single department.
This latter option is used where accounts need to be analysed by department
within accounting periods but where the split of cumulative running balances by
department across different accounting periods does not need to be maintained.

Page 57
b) Cost centres and Funds
Unlike departments, dkBS will not break-down opening balances by either
cost-centre or fund unless this is selected via the first tick-box on the relevant tab. Where this option is selected, the user can then limit the
breakdown by cost centre or fund to just the opening reserves or profit and loss brought forward account. Not-for-profit organisations will tend to use funds as their primary dimension
code. They will normally choose to breakdown only the opening reserves brought
forward account by fund and leave the rest of the balance sheet either without a
fund code or just one, general fund code.
GL Journal
The resulting GL journal is known as a „system generated“ journal and carries an
identity in the header of „OS“ (denoting operating system). This has the effect of
preventing the user from making changes to any of the fields (except for the
voucher and date fields).
Before the journal can be posted in to the new accounting period the lines must
be given a voucher entry. The process to „set vouchers“ can be found from the
list under the F5 Menu button as shown above. The user is given a number of
different options but the simplest and recommended option to make the following
entries, after which the journal can be checked and posted as normal.

Page 58
Re-running opening balances
The opening balances process can be run and re-run as many times as is required
until the correct figures and dimensional split are established. Each time a new
opening balances journal is posted the previous version is overwritten.
It is recommended, therefore, that the opening balances are run up to at least 3
times as follows:
As soon as the first accounting entries are to be made in to the new financial
period;
As soon as the accounts from the previous financial period are ready for
audit (independent examination); and
After the audit or independent examination and once the previous financial
period has been finalised with any agreed audit adjustments
Once the final, audited, balances have been brought forward the previous
accounting period should be closed.
Should it be necessary, say, in the case of a prior year adjustment, it is possible
to re-run opening balances across several accounting periods. The only prior
requirement is that the relevant accounting period (year and month) is
temporarily re-opened.
Currencies
Before you can start handling foreign currencies, you must activate currencies by
going to General – Company – General settings... and click “Use currencies” and
enter Company base currency. If dk Business Solutions is set up locally, then it is
ok to skip “Use own currency table”, but if it is set up in an ASP environment,
then that must be checked.
Then got to General – Currencies – Currencies and set up currencies for those
currencies that are needed and exchange rate.
Then all accounts where transactions in foreign currencies are entered must be
properly set up.
Go to General ledger – Chart of accounts and on every appropriate account select
the Currencies tab, click “Use currency”, “Allow exchange rate adj.” and enter
Currency.
It is good practice to click “Fixed currency”.

Page 59
“Every branch of knowledge has its fundamentals
discovery. In mechanics it is the wheel, in science
fire, in politics the vote. Similarly, in economics, in
the whole commercial side of man’s social
existence, money is the essential invention on
which all the rest is based.”
Sir Geoffrey Crowther (1907 - 1972)
© 2011 dk Software Ltd. All rights reserved