diy wine storage cabinet - addicted2diy.com · the proper safety protection and follow the...
TRANSCRIPT

ADDICTED2DIY.COM 1
DIY Wine Storage Cabinet
ADDICTED2DIY.COM
*Before beginning this project, please read through all of the plans and the blog post. When building this
project, be sure to measure your wood and cut to fit. The measurements listed are all approximates as
wood dimensions can vary depending on the type of wood used and the dryness of the wood. Always wear
the proper safety protection and follow the manufacturers instructions when using any types of tools.

ADDICTED2DIY.COM 2
SUPPLY LIST:
o 1 sheet of ¾” veneer plywood (birch or maple is a good choice)
o 3 – 2x2 select pine boards @ 6’ long
o 1 – 1x2 select pine board @ 8’ long
o 1 – 1x6 pine board @ 6’ long
o 1 24” x 48” sheet ½” veneer plywood
o 1 – 24” x 48” hardboard backing panel
o 14” drawer slides
o 1 – drawer pull
o Wood finish of choice (paint or stain/polyurethane)
o Kreg Jig
o Kreg Rip-Cut
o Circular saw
o Miter saw
o Bar clamps
o Brad nailer
o Drill
o Impact driver
o Orbital sander and 220 grit sandpaper
o Wood glue
o pocket screws (2 ½”, 1 ¼”, 1”)
o brad nails (3/4”, 1”, 1 ¼”)
o Wood chisel
o Rubber mallet
CUT LIST:
o 4 – 2x2 @ 35 ¼” (legs)
o 4 – 2x2 @ 12” (side rails)
o 4 – 2x2 @ 17” (front and back rails)
o 2 – ¾” plywood pieces cut @ 12” x 29 3/8” (side panels)
o 1 – ¾” plywood cut @ 12” x 17” (bottom shelf)
o 1 – ¾” plywood piece cut @ 13 7/16” x 17” (middle shelf)
o 2 – 1x2 @ 17” (shelf trim and under drawer)
o 2 – ¾” plywood pieces cut @ 14 ¼” x 20 5/8” (for X)
o 2 – ½” plywood cut @ 16” (drawer front and back)
o 2 – ½” plywood cut @ 13” (drawer sides)
o 1 – ½” plywood cut @ 14” x 16” (drawer bottom)
o 1 – 1x6 @ 16 ¾” (drawer face)
o 1 – pine project panel cut @ 16” x 21 ½” (top)
o 2 – 1x2 measured and cut to size for the trim on the X
o 1 – hardboard backing cut @ 19 ½” x 31 ½”
ADDICTED2DIY.COM 3
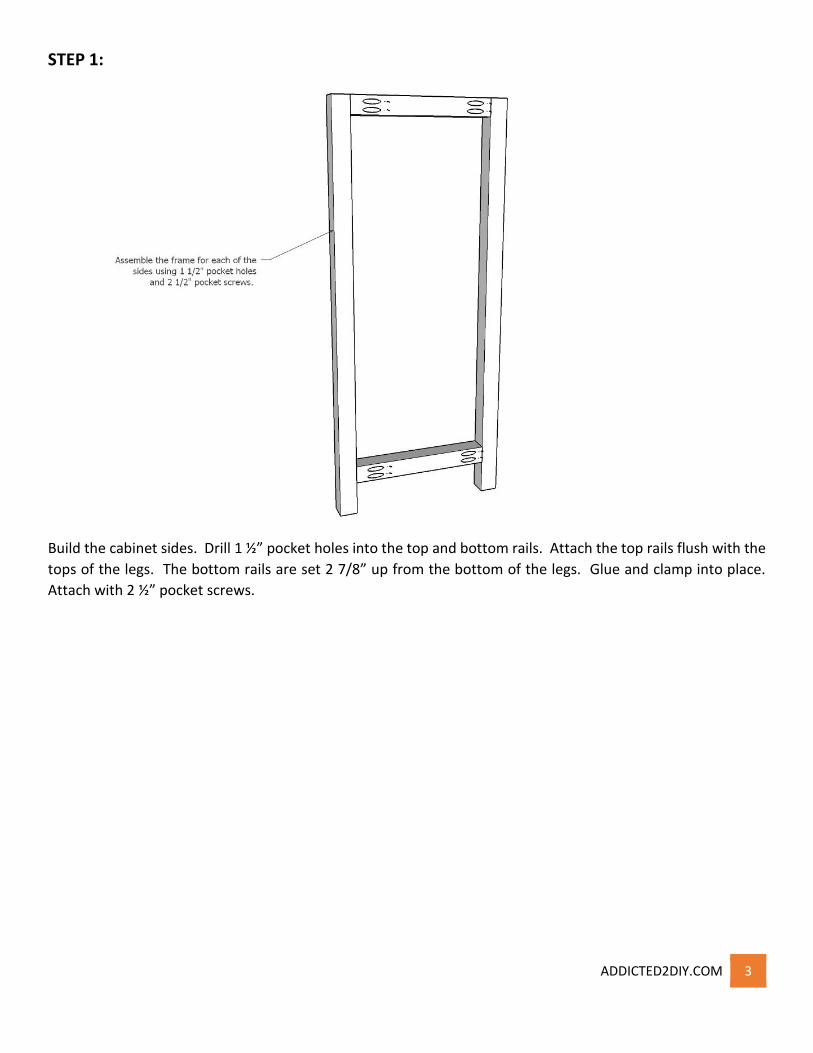
STEP 1:
Build the cabinet sides. Drill 1 ½” pocket holes into the top and bottom rails. Attach the top rails flush with the
tops of the legs. The bottom rails are set 2 7/8” up from the bottom of the legs. Glue and clamp into place.
Attach with 2 ½” pocket screws.

ADDICTED2DIY.COM 4
STEP 2:
Drill ¾” pocket holes into each side of the ¾” side panels. Set flush with the inside of the side frames. Clamp
and attach with 1 ¼” pocket screws.

ADDICTED2DIY.COM 5
STEP 3:
Attach the front and back 2x2 rails. Drill 1 ½” pocket holes into the 2x2s. Glue and clamp flush with the tops of
the legs and 2 7/8” up from the bottoms of the legs, then attach with 2 ½” pocket screws.
ADDICTED2DIY.COM 6
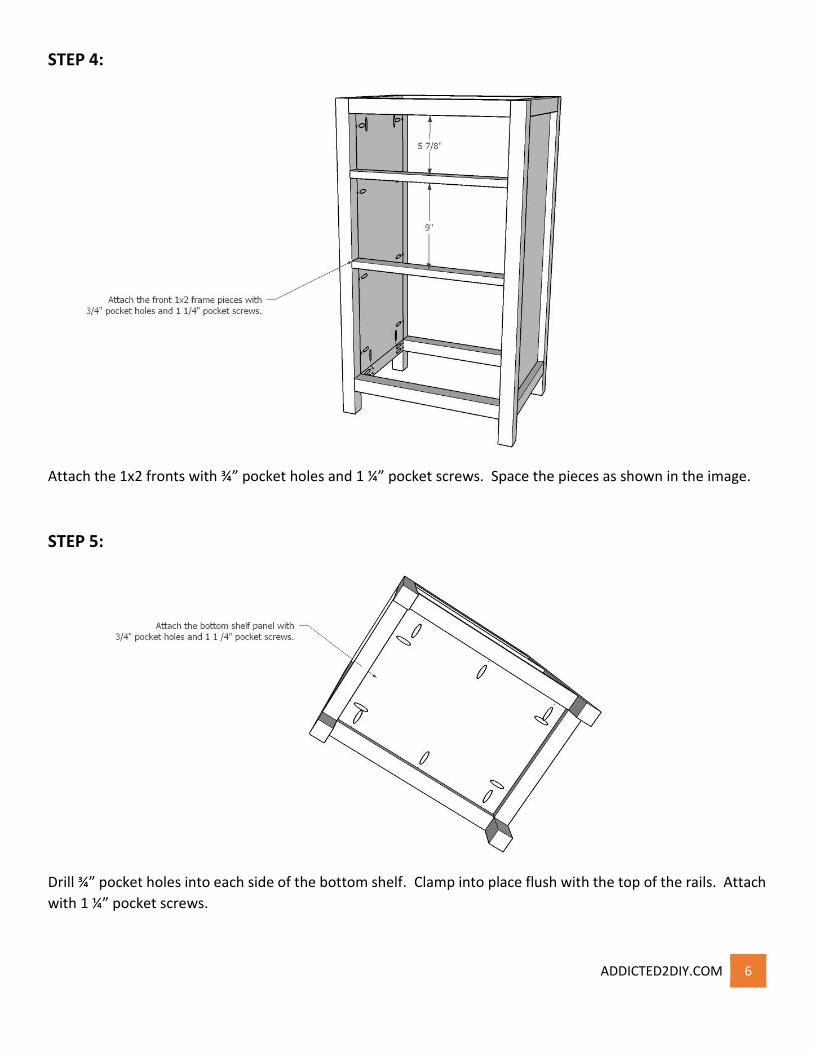
STEP 4:
Attach the 1x2 fronts with ¾” pocket holes and 1 ¼” pocket screws. Space the pieces as shown in the image.
STEP 5:
Drill ¾” pocket holes into each side of the bottom shelf. Clamp into place flush with the top of the rails. Attach
with 1 ¼” pocket screws.

ADDICTED2DIY.COM 7
STEP 6:
Drill ¾” pocket holes into the front and sides of the middle shelf. Attach flush with the middle 1x2 and secure
with 1 ¼” pocket screws.
ADDICTED2DIY.COM 8
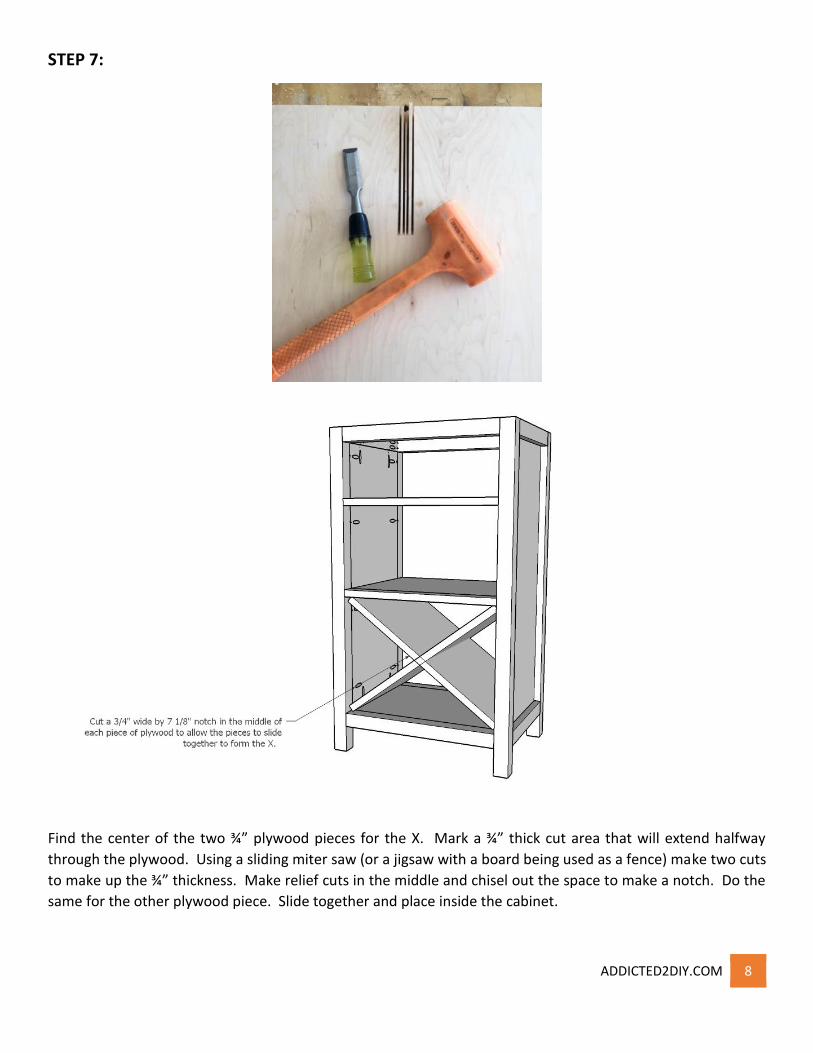
STEP 7:
Find the center of the two ¾” plywood pieces for the X. Mark a ¾” thick cut area that will extend halfway
through the plywood. Using a sliding miter saw (or a jigsaw with a board being used as a fence) make two cuts
to make up the ¾” thickness. Make relief cuts in the middle and chisel out the space to make a notch. Do the
same for the other plywood piece. Slide together and place inside the cabinet.
ADDICTED2DIY.COM 9
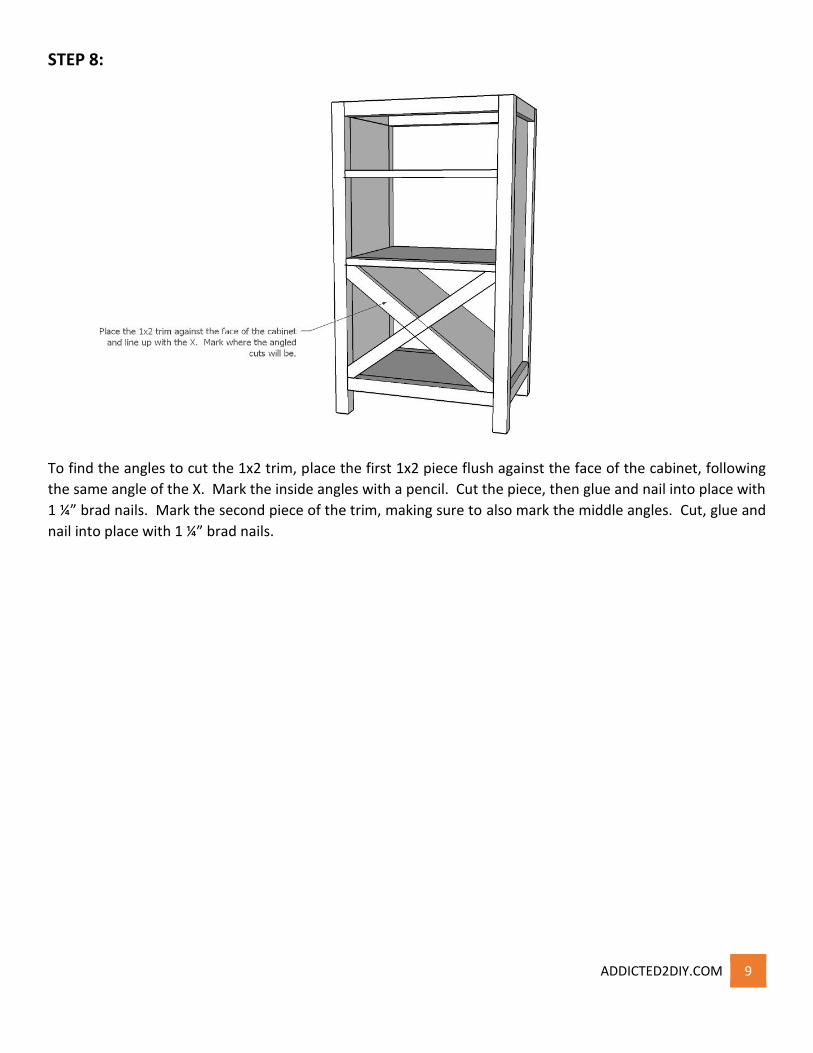
STEP 8:
To find the angles to cut the 1x2 trim, place the first 1x2 piece flush against the face of the cabinet, following
the same angle of the X. Mark the inside angles with a pencil. Cut the piece, then glue and nail into place with
1 ¼” brad nails. Mark the second piece of the trim, making sure to also mark the middle angles. Cut, glue and
nail into place with 1 ¼” brad nails.
ADDICTED2DIY.COM 10
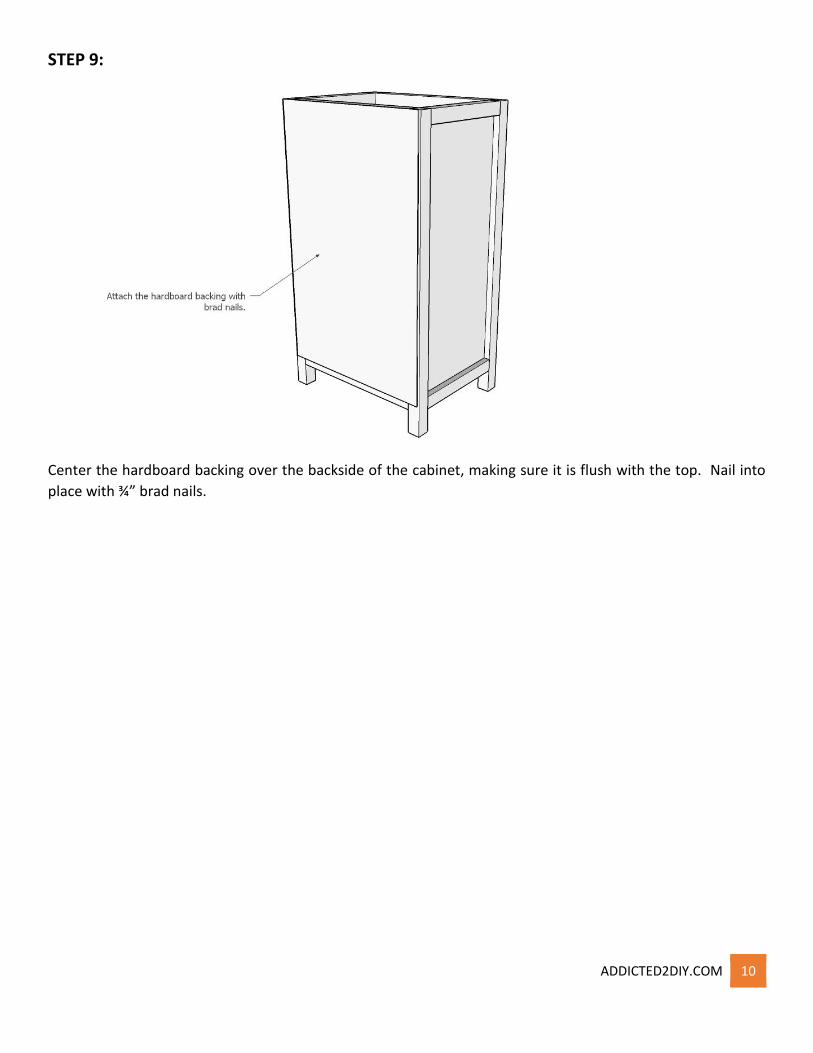
STEP 9:
Center the hardboard backing over the backside of the cabinet, making sure it is flush with the top. Nail into
place with ¾” brad nails.

ADDICTED2DIY.COM 11
STEP 10:
To attach the top, apply a bead of glue around the entire top of the frame, making sure not to add too much
and cause the glue to seep out when the top is attached. Countersink 2” screws into the bottom side of the
front and back 2x2 rails, making sure not to sink them too far and poke the screw out of the top.

ADDICTED2DIY.COM 12
STEP 11:
Build the drawer box. Drill ½” pocket holes into the plywood drawer sides. Glue and clamp the drawer sides
to the drawer front and back. Attach with 1” pocket screws. Cut the bottom panel to size and attach with
wood glue and 1” brad nails.
STEP 12:
Attach the drawer slides to the cabinet and the drawer box. Make sure to set the drawer slides at approx ¾”
inset of the face of the cabinet as the drawer is a flush mount drawer. Once in place, add double-sided tape
and wood glue to the front of the drawer box (make sure the glue does not come in contact with the double-
sided tape). Mount the drawer front so there is approximately a 1/8” gap around all sides. Carefully slide the
drawer out by guiding it from the underside of the drawer. Clamp the drawer front to the box and nail into
place from the inside of the drawer with 1” brad nails.
Sand the entire piece and finish as desired. Add desired drawer front to the drawer.

ADDICTED2DIY.COM 13