diving board - lillipad marine
TRANSCRIPT

Installation Questions: 800-279-3419 INSTALLATION VIDEOS AVAILABLE
- CLICK HERE TO VIEW -
DIVING BOARD INSTALLATION

LILLIPAD DIVING BOARDS MUST ONLY BE INSTALLED USING THE FOLLOWING SPECIFICATIONS. FAILURE TO COMPLY COULD RESULT IN DAMAGE TO THE DIVING BOARD AND/OR BOAT AND SERIOUS INJURY OR DEATH.
BOAT SPECIFICATIONS FOR APPROVED MOUNTING Your LilliPad Diving Board is specifically designed for mounting on a boat with the minimum specifications as listed below. LilliPad Diving Boards patented design is made to contain the forces generated by the jumper within its framework. However, as with any fixture, there are some forces transmitted to the mounting surface (base). When mounted properly, very little to no movement of the diving board will be present.
LILLIPAD DIVING BOARD MINIMUM MOUNTING SPECIFICATIONS
For mounting to a boat ONLY with the following: • Boat length – Minimum 18’ • Boat Width – Minimum 7’ • Floor – ¾” Marine Grade Plywood or ¾” Solid Fiberglass • Floor must be in excellent condition with no flexing, rotting, or damage of any sort present • Floor should be inspected from below the boat continuously throughout the boating season to insure it remains in
excellent condition
APPROVED DIVING BOARD POSITIONING SPECIFICATIONS Placement of your LilliPad Diving Board is very important. As all boats move in the water from wave action and other boat traffic, the most stable parts of the boat are recommended for installation. In addition, proper bracing/support must be present to complete the installation of mounting hardware as indicated in the mounting procedures as described in the step by step processes to follow.
APPROVED Base Position: • SIDE DOOR MOUNTING - Side Door(s) mounting provides stability from boat movement and is free of protruding
obstructions. • REAR PLATFORM / SWIM PLATFORM MOUNTING - If your boat is equipped with a platform at the stern, mount on the
Port side only. • FRONT/BOW MOUNTING – Bow mounting is permitted on vessels that DO NOT have any objects protruding from the
front of the vessel. NOT APPROVED:
• DO NOT MOUNT TO ANY BASE THAT IS NOT A BOAT WITH APPROVED SPECIFICATIONS • FRONT/BOW MOUNTING – DO NOT mount your LilliPad Diving Board on the front of your boat if any fixture
protrudes from the perimeter of the flooring surface. For example, pontoons that protrude from the front of the vessel.
• DO NOT mount your Lillipad Diving Board on ANY structure not listed in the “Approved Base Position” list above. This includes but is not limited to swim-platforms, etc. Misuse of your Lillipad Diving Board could result in injury or death.
FAILURE TO PROPERLY INSTALL THE MOUNTING SYSTEM AND/OR REMOVABLE CLEVIS PINS, EYE BOLTS, QUICK RELEASE PINS AND BUTTON HEAD LOCK PINS CAN RESULT IN PERSONAL INJURY OR DAMAGE TO THE LILLIPAD DIVING BOARD OR YOUR BOAT.
Each mounting screw must be tightly fastened. Each eye bolt must be tightly fastened. The button head lock pin must protrude through all cross sections with the locking balls fully exposed on the protruding side. All clevis pins must protrude
through all cross sections and be securely latched with the clevis pin key. All quick release pins must be seated with the holding ring against the frame to which it is being inserted.
WARNING

SIDE LOCATION
APPROVED MOUNT LOCATION
FRONT LOCATION APPROVED MOUNT LOCATION
ONLY FOR BOATS WITHOUT PROTUDING FIXTURES
DANGER DO NOT MOUNT TO UPPER LEVEL DECKS
AFT LOCATION APPROVED MOUNT LOCATION
PORT SIDE ONLY DIVING BOARD MUST
PROTRUDE FROM SIDE
DANGER DO NOT MOUNT TO
STARBOARD LOCATIONS
INTEGRATED SWIM PLATFORM APPROVED MOUNT LOCATION
SWIM PLATFORM MUST BE INTEGRATED AND MEET MINIMUM
MOUNTING SPECIFICATIONS
APPROVED & UNAPPROVED
MOUNTING LOCATIONS

INSTALLATION WARNING
Do not install on a boat that does not meet the minimum specifications outlined in the installation procedure of your selected mounting kit or on any boat with soft or deteriorated floorboards. Your
LilliPad Diving Board should be solid, without movement in the base, when mounted properly.
If you have questions, contact LilliPad Marine at 800-279-3419.
TOOLS NEEDED FOR INSTALLING AN UNDERFLOOR MOUNT SYSTEM • Drill • 3/16” Drill Bit • 5/16” Drill Bit • 1/2” Drill Bit • #3 Phillips Screwdriver • Aluminum Yard Stick • Square • Painters or Masking Tape • Tape Measure
INSTALLING UNDERFLOOR MOUNTING PLATES Step 1: Determine an appropriate and approved mounting location which is free of obstructions for mounting hardware and provides for safe use of your assembled diving board.
Inspect the floor where board is to be mounted. Flooring material must be ¾” Marine Grade Plywood in excellent condition. It is also recommended to confirm clearance of frame members, cables, wires and lines.
Step 2: Mark the location of your boat’s cross members with painters or masking tape. Confirm the position of your boats cross members to ensure the ability to straddle the cross member with the mounting hardware (See Step 4).

Step 3: Place your assembled Diving Board on the deck in your proposed mounting location. (See Daily Assembly)
Step 4: With the diving platform in the lowered position and the frame perpendicular (90°) to the deck, determine the appropriate frame position:
Position a frame cross member between two of the three mount plates. Place the frame mount on one side of a cross member and a ladder mount on the other side. (This utilizes the frame cross member strength and prevents movement.)
Aft decks or other open areas: Align the lowered platform to be positioned slightly recessed from the gunnel or side railing. Proper installation allows for docking or rafting without exposing the diving platform outside of the vessel’s perimeter.
Over railing or side gate: Align the platform to lay perfectly flat against the outside of the railing or gate. (Silicone stick on buttons are provided in the mount hardware kit to prevent direct contact)
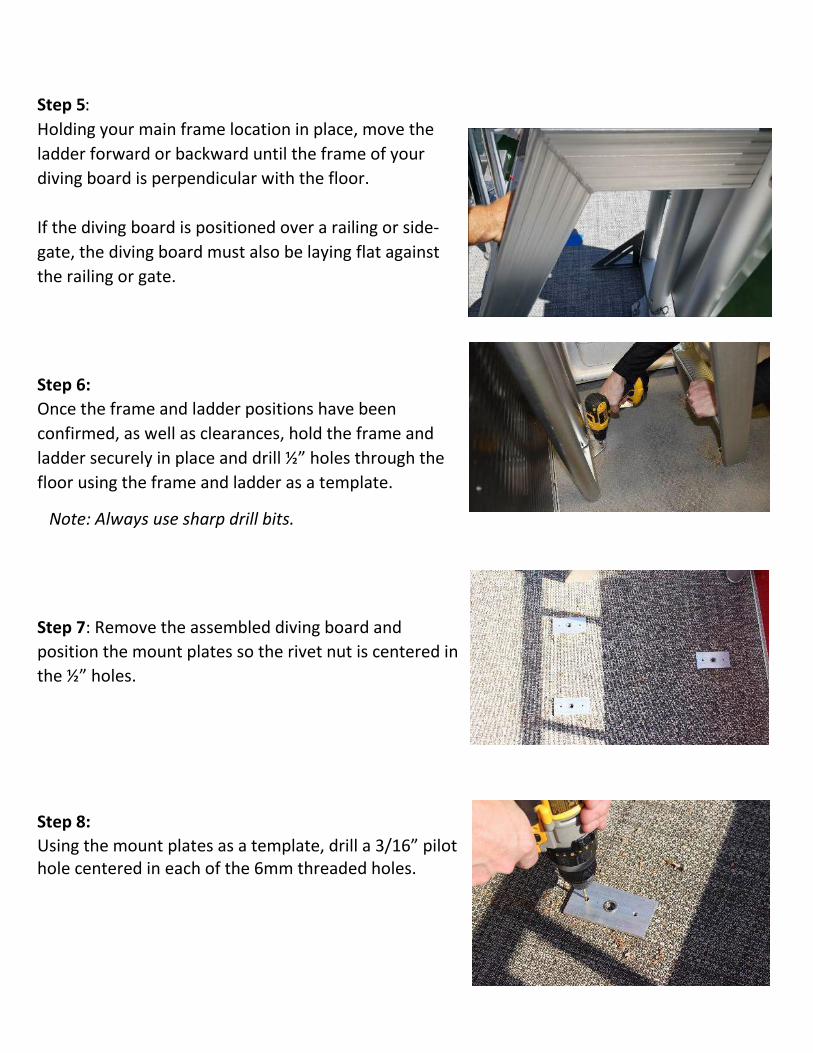
Step 5: Holding your main frame location in place, move the ladder forward or backward until the frame of your diving board is perpendicular with the floor.
If the diving board is positioned over a railing or side-gate, the diving board must also be laying flat against the railing or gate.
Step 6: Once the frame and ladder positions have been confirmed, as well as clearances, hold the frame and ladder securely in place and drill ½” holes through the floor using the frame and ladder as a template.
Note: Always use sharp drill bits.
Step 7: Remove the assembled diving board and position the mount plates so the rivet nut is centered in the ½” holes.
Step 8: Using the mount plates as a template, drill a 3/16” pilot hole centered in each of the 6mm threaded holes.
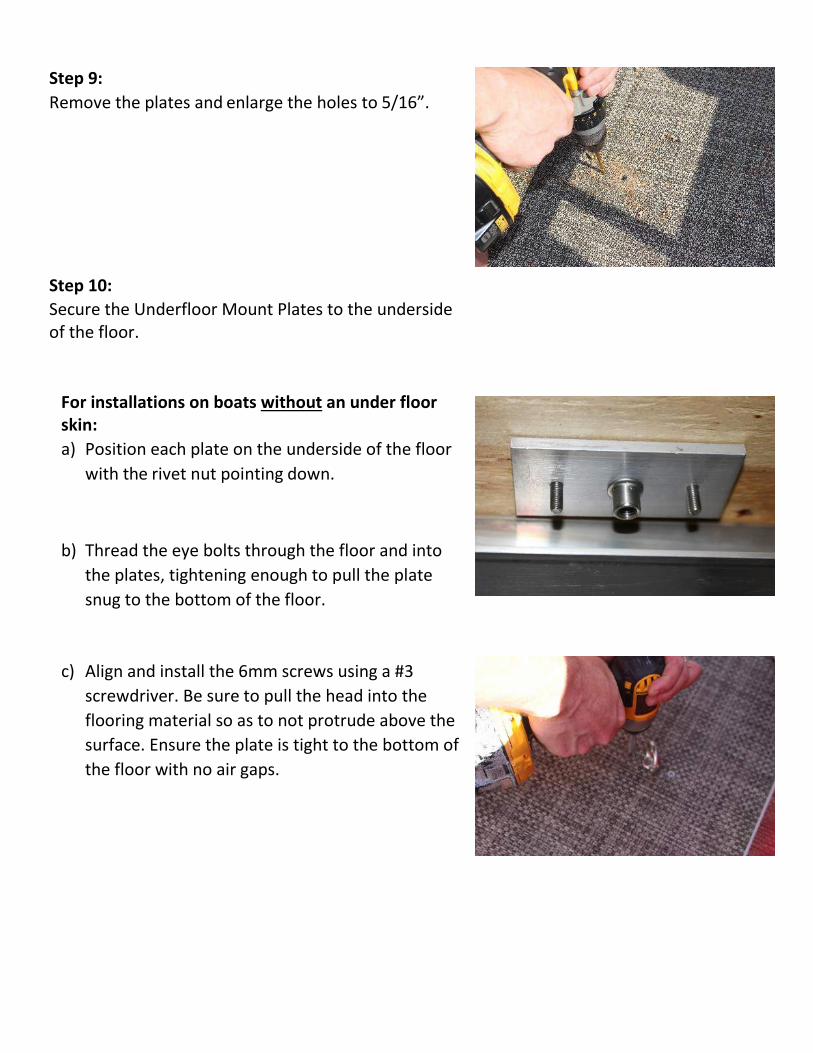
Step 9: Remove the plates and enlarge the holes to 5/16”. Step 10: Secure the Underfloor Mount Plates to the underside of the floor.
For installations on boats without an under floor skin: a) Position each plate on the underside of the floor
with the rivet nut pointing down.
b) Thread the eye bolts through the floor and into the plates, tightening enough to pull the plate snug to the bottom of the floor.
c) Align and install the 6mm screws using a #3 screwdriver. Be sure to pull the head into the flooring material so as to not protrude above the surface. Ensure the plate is tight to the bottom of the floor with no air gaps.
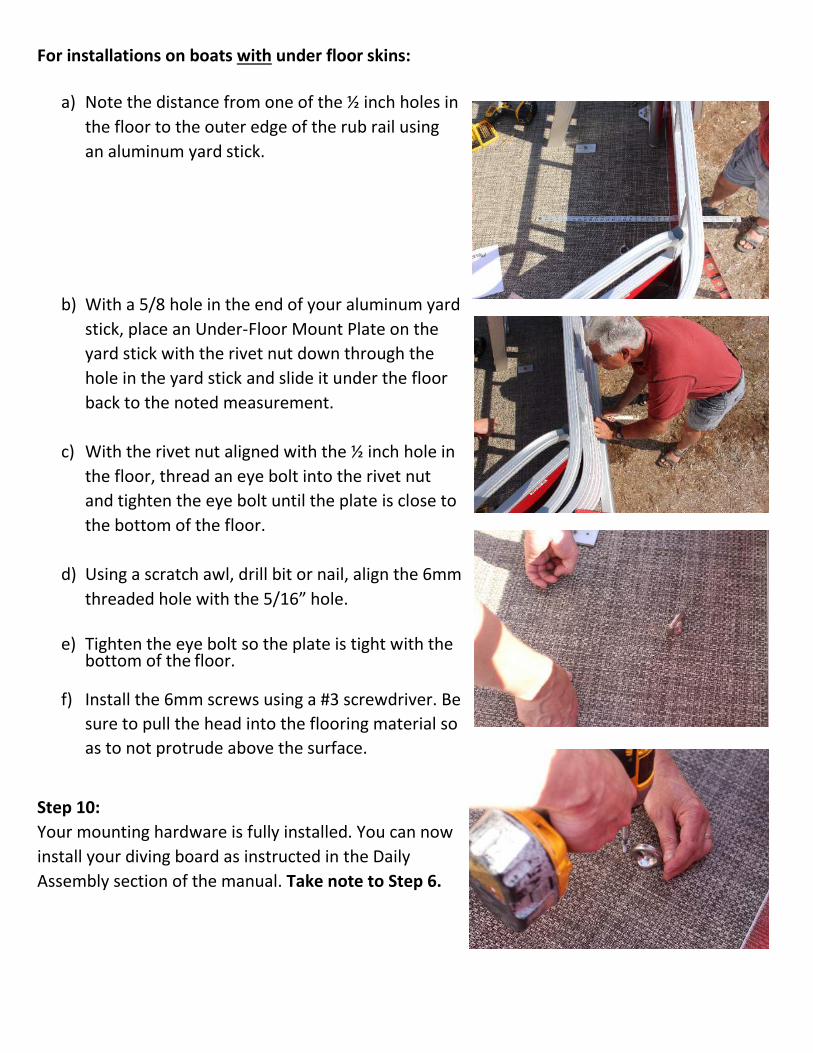
For installations on boats with under floor skins: a) Note the distance from one of the ½ inch holes in
the floor to the outer edge of the rub rail using an aluminum yard stick.
b) With a 5/8 hole in the end of your aluminum yard stick, place an Under-Floor Mount Plate on the yard stick with the rivet nut down through the hole in the yard stick and slide it under the floor back to the noted measurement.
c) With the rivet nut aligned with the ½ inch hole in
the floor, thread an eye bolt into the rivet nut and tighten the eye bolt until the plate is close to the bottom of the floor.
d) Using a scratch awl, drill bit or nail, align the 6mm threaded hole with the 5/16” hole.
e) Tighten the eye bolt so the plate is tight with the bottom of the floor.
f) Install the 6mm screws using a #3 screwdriver. Be
sure to pull the head into the flooring material so as to not protrude above the surface.
Step 10: Your mounting hardware is fully installed. You can now install your diving board as instructed in the Daily Assembly section of the manual. Take note to Step 6.

INSTALLING SURFACE MOUNT PLATES LilliPad’s Surface Mount System is recommended for boats with substantial bracing which can be utilized as a backer to secure the mounting plates to the deck. Surface Plates are also recommended for Fiberglass Boats with integrated swim platforms, Houseboat Decks, Cruiser Decks, Sailboat Decks and Yachts.
TOOLS NEEDED FOR INSTALLING A SURFACE MOUNT SYSTEM • Drill • 9/64” Drill Bit • 11/64” Drill Bit • 1/4” Drill Bit • #3 Phillips Screwdriver Bit • Square • Painters or Masking Tape • Tape Measure • White Lithium Grease
INSTALLING SURFACE MOUNTING PLATES Step 1: Determine an appropriate and approved mounting location which is free of obstructions for mounting hardware and provides for safe use of your assembled diving board.
Inspect the floor where the diving board is to be mounted. Flooring material must be ¾” Marine Grade Plywood or Solid Fiberglass, in excellent condition. It is also recommended to confirm clearance of frame members, cables, wires and lines.
Step 2: Mark the location of your boat’s cross members with painters or masking tape. Confirm the position of your boats cross members to ensure the ability to secure a minimum of one linear set of screws (See lines 1 & 2 and corresponding "A/B" which represent screw holes in step 4) into a frame member.

Step 3: Place your assembled Diving Board on the deck in your proposed mounting location. (See Daily Assembly) Step 4: With the diving platform in the lowered position and the frame perpendicular (90°) to the deck, determine the approximate mounting position:
Position a boat cross member (represented by the white lines in the photo) so that a minimum of one linear set of screws (All three “A” or All three “B”) will be fastened to a cross member.
Now that you have determined that your desired mounting location meets the installation requirements you can begin mounting the plates. Step 5: Determine the exact position of the main frame plate. With your assembled diving board in your proposed mount location and the main frame sitting on top…
Aft decks or other open areas: Align the lowered platform to be positioned slightly recessed from the gunnel or side railing. Proper installation allows for docking or rafting without exposing the diving platform outside of the vessel’s perimeter.
Over railing or side gate: Align the platform to lay perfectly flat against the outside of the railing or gate. (Silicone stick on buttons are provided in the mount hardware kit to prevent direct contact)

Step 6. Once the frame position has been confirmed, make the mounting footprint on the floor using the frame as a template.
Step 7. Remove the assembled diving board.
Step 8. Position the mount plate in the traced footprint ensuring the threaded mount plate hole is centered in the traced hole.
Step 9. Drill a 5/32” hole for fiberglass, 9/64” hole for plywood flooring, closest to the threaded mount hole. Be sure to drill the full depth of the screws. When drilling through an aluminum deck or aluminum cross member under plywood flooring, drill a pilot hole with the 9/64” and then chase with 11/64” drill bit. Step 10. (Fiberglass Only) As an added barrier and to adhere the plates to the deck, apply a quality marine grade adhesive to adhere the mount plates to the deck prior to securing with mounting screws. Secure the mount plate beginning with the drilled hole using a #12 stainless steel mounting screw. Use a #3 screw-driver and take care to not over torque the screw. When screwing #12 screws into aluminum, place a small dab of grease to the screw tip to aid in cutting threads into aluminum. In addition, it is important to slowly cut through the aluminum with a forward and back, ¼ turn threading, movement of the screw to avoid breaking the screw. IMPORTANT: If the center mount screw of the main frame plate (Red "X") does not contact an aluminum deck or frame member, install the supplied 6 mm machine screw, washer, and nylock nut.

Step 11. Pilot drill and install the remaining 2 screws using the specifications in Step 9. Step 12. Secure the main frame onto the installed mounting plate (do not torque down the eye-bolt) and then install the ladder and pins. Step 13. Place a square on the floor of your boat against the main frame. Move the ladder forward or backward until the frame of your diving board is perpendicular with the floor. Step 14. Once the ladder position has been confirmed, mark the mounting footprint and holes on the floor using the frame as a template. Step 15. Remove the assembled diving board. Step 16. Position the mount plate in the traced footprint ensuring the threaded mount plate hole is centered in the traced hole.
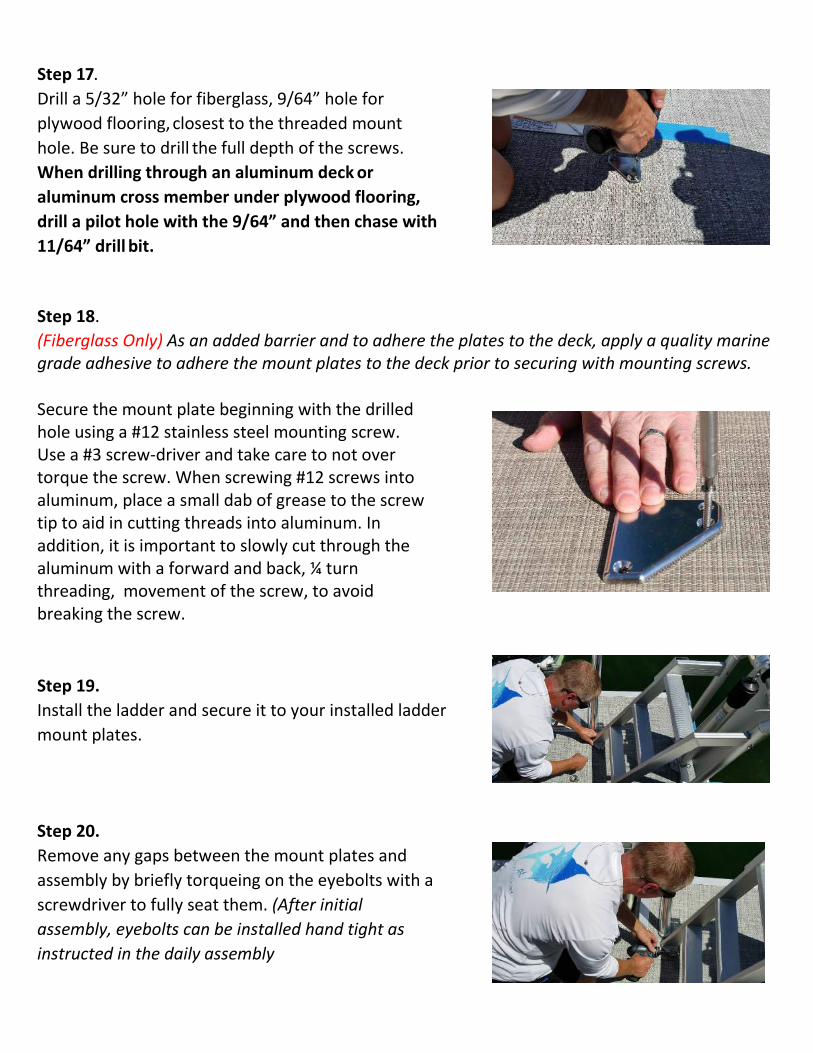
Step 17. Drill a 5/32” hole for fiberglass, 9/64” hole for plywood flooring, closest to the threaded mount hole. Be sure to drill the full depth of the screws. When drilling through an aluminum deck or aluminum cross member under plywood flooring, drill a pilot hole with the 9/64” and then chase with 11/64” drill bit. Step 18. (Fiberglass Only) As an added barrier and to adhere the plates to the deck, apply a quality marine grade adhesive to adhere the mount plates to the deck prior to securing with mounting screws. Secure the mount plate beginning with the drilled hole using a #12 stainless steel mounting screw. Use a #3 screw-driver and take care to not over torque the screw. When screwing #12 screws into aluminum, place a small dab of grease to the screw tip to aid in cutting threads into aluminum. In addition, it is important to slowly cut through the aluminum with a forward and back, ¼ turn threading, movement of the screw, to avoid breaking the screw. Step 19. Install the ladder and secure it to your installed ladder mount plates. Step 20. Remove any gaps between the mount plates and assembly by briefly torqueing on the eyebolts with a screwdriver to fully seat them. (After initial assembly, eyebolts can be installed hand tight as instructed in the daily assembly

procedure.)
Step 21.
UHMW and fabric inserts are positioned on the inside of the stabilizer housing and the profile of your stabilizer needs to be seated into these parts. Slowly work the stabilizer handle into the housing until the bottom of the stabilizer is flush with the bottom of the housing. Apply pressure for 5 seconds, in each direction, to seat the profile into the UHMW. The rail is designed to fit tight but with proper seating will easily slide in and out.
Step 22.
Your diving board is now ready for use. However, please review the Daily Assembly Procedure for future use as it is important to assemble your diving board in the correct order to ensure a proper fit.

DAILY ASSEMBLY PROCEDURES Step 1. Position the frame over the frame mounting hole and secure it to the plate (Surface or Under) using an eye bolt. Step 2. Slide the ladder into the slots in the frame and secure with the 3/8” quick release pins Step 3. Align the mounting holes of the ladder over the ladder mounting holes and secure the ladder to the plates using eye bolts. Tighten each eyebolt to secure the frame and ladder. Begin by hand-tightening and secure by using a button-lock pin as leverage, if needed. (Do not over torque) Step 4. Raise the diving platform into position and install the button head locking pin in the upper mount and shock eye. Position 1 is designed for user weighing 100 – 250 lbs. Position 2 is designed for user under 100 lbs.

Step 5. Insert the stabilizer bar and position it to the height desired. Lock it in place by inserting the locking pin. Step 6. Double check all fasteners to make sure they are properly tightened and/or inserted.

DOCKING & STORAGE Your new LilliPad Diving Board is easily lowered for safe boating, docking or rafting.
You can also quickly and easily remove the LilliPad Diving Board completely from your boat for safe storage by removing the three eye bolts that secure the frame to the floor of the boat and removing the retaining pins.
When the LilliPad Diving Board is not being used, it should be stored in the lowered position with a LilliPad Protective Cover in place to shield the platform from ultraviolet (UV) rays and extend the life of the product. When removed from the boat the diving platform should also be covered to protect the platform surface from scratching.
CARE & MAINTENANCE Following simple care and maintenance procedures, sticking to a schedule and using only LilliPad designed components will help to extend the life of your LilliPad Diving Board.
To protect your LilliPad Diving Board from harsh ultraviolet rays and to prevent the build-up of marine growth it is recommended that the diving board is removed after each day of use, wiped with a dry cloth, and stored in a dry and covered location or dried and covered with a LilliPad Protective Cover.

MAINTENANCE SCHEDULE Apply white lithium grease to the following areas to ensure proper lubrication for smooth movement and to prevent squeaking, as needed.
• White UHMW bushings where bushings meet the aluminum tube • Inside the shock tube where the Urethane Spring touches the inside of the tube
(remove shock and turn upside down) • Button Lock Pins
To increase the life of your LilliPad Diving Board it is recommended that the following parts be replaced within the timeframe listed below:
PART REPLACEMENT SCHEDULE
Grip Tape/Textured Foam As soon as any wear is present
¼” X 2 ¼” Quick Release Pin Every 2 years
3/8” X 2” Quick Release Pins Every 2 years
3/8” X 1 ½” Button Lock Pin Every 2 years
½” X 2 ½” Clevis Pin with Key Every 2 years
6mm Machine Screws Every 5 years
10mm Eye Bolts Every 5 years
Under-Floor Mounting Plates Every 5 years
Shock Assembly Every 5 years
Surface Mount Plates Every 5 years