distribution manager - release v12 r6 m3 - oracle financial
TRANSCRIPT

Global Software, Inc.'sDistribution Manager
User Manual
Release V12 R6 M3
Worldwide Headquarters3201 Beechleaf CourtRaleigh, NC 27604 USA+1.919.872.7800www.glbsoft.com
EMEA Headquarters500 Chiswick High Road London, W4 5RG UK+44 (0) 20 8956 2213
Distribution Manager
As an integral part of Global Software, Inc.'s suiteof data analytical solutions, Distribution Manageris a powerful tool used to automate documentdistribution via email, print, or file archive.

All rights reserved. No parts of this work may be reproduced in any form or by any means - graphic, electronic, ormechanical, including photocopying, recording, taping, or information storage and retrieval systems - without thewritten permission of the publisher.
Microsoft, Excel, Windows, Outlook, Office, Access and SQL Server are all registered trademarks of MicrosoftCorporation. Lotus is a registered trademark of International Business Machines Corporation. GroupWise is aregistered trademark of Novell. Trade names referenced are the service marks, trademarks, or registeredtrademarks of their respective manufacturers in the United States and/or other countries. Global Software, Inc. is notassociated or affiliated in any manner with the respective owners of the foregoing trademarks, trade names orservice marks unless expressly stated otherwise. The respective owners of the foregoing trademarks, trade namesor service marks have not endorsed, certified or approved any of Global Software, Inc.'s products for use inconnection with their respective products. While every precaution has been taken in the preparation of this document, the publisher and the author assume noresponsibility for errors or omissions, or for damages resulting from the use of information contained in thisdocument or from the use of programs and source code that may accompany it. In no event shall the publisher andthe author be liable for any loss of profit or any other commercial damage caused or alleged to have been causeddirectly or indirectly by this document.
Printed: May 2012
Distribution Manager

Table of Contents
Part I Distribution Manager Overview 2
Part II Installation and Registration 3
................................................................................................................................... 31 Additional Components
................................................................................................................................... 42 Installation
................................................................................................................................... 53 Register Add-In
................................................................................................................................... 64 Uninstall Process
Part III Getting Started 7
................................................................................................................................... 71 Navigation
.......................................................................................................................................................... 8DistMgr Menu
.......................................................................................................................................................... 9DM Toolbar
.......................................................................................................................................................... 10DM Ribbon
................................................................................................................................... 112 Settings
Part IV Create a Distribution Control Worksheet 14
Part V Add Specification Rows 22
Part VI Maintain Specification Rows 23
Part VII Distribute Specifications 24
Part VIII Miscellaneous Items 25
................................................................................................................................... 251 Merge Data
................................................................................................................................... 272 View Log Entries
Index 29
Distribution Manager - Release V12 R6 M3I
© 2012 ... Global Software, Inc.

Distribution Manager Overview 2
Global Software, Inc.
1 Distribution Manager Overview
As an integral part of Global Software, Inc.'s suite of data analytical solutions, Distribution Manager is a powerful toolused to automate document distribution via email, print, or file archive.
Distributing spreadsheets can be a very time-consuming and laborious task. Consider the following issues:· A workbook has many worksheets but only select ones are to be distributed.· A workbook has external references to other workbooks needed for calculating the proper figures, but linked
sheets are not to be distributed.· Worksheets to be distributed contain formulas derived from a specific Microsoft® Excel add-in (such as Global's
Spreadsheet Server) or from a special Excel® macro.· The recipients do not have the add-in or macro installed on their PC.· Workbooks need to be encrypted to allow/disallow opening or altering of contents.· Hours are spent organizing, assembling, calculating, copying and pasting worksheets every reporting cycle.
Distribution Manager takes into account each of the above issues and provides users with an easy and time-savingsolution.
Distribution Manager assembles Distribution Controls directly in workbooks. The number of distribution entries islimited only by the number of rows in a spreadsheet. Once the distribution rows are created, users can visually seeand manage "who gets what" from one worksheet.

Distribution Manager - Release V12 R6 M33
2 Installation and Registration
2.1 Additional Components
REQUIRED COMPONENTS
Microsoft® .Net FrameworkMicrosoft .Net Framework 4.0 is a prerequisite for Distribution Manager. If it is not installed, then the DistributionManager setup program will force the install.
Microsoft® Visual Studio Tools for OfficeMicrosoft Visual Studio 2010 Tools for Office Runtime is a prerequisite for Distribution Manager. If it is notinstalled, then the Distribution Manager setup program will force the install.
OPTIONAL COMPONENTS
Distributor Outlook Add-InFor Excel 2010 users utilizing Outlook, Distributor Outlook Add-In is a prerequisite for Distribution Manager. If it isnot installed, then the Distribution Manager Settings function will force the installation of Distributor Outlook Add-Inprior to allowing the user to select Microsoft® Outlook Exchange as the Email Server option.
Microsoft® Collaboration Data ObjectsFor Excel 2007 users utilizing Outlook, Microsoft Collaboration Data Objects (alias CDO) is a prerequisite forDistribution Manager. If it is not installed, then the Distribution Manager Settings function will force the installationof CDO prior to allowing the user to select Microsoft Outlook Exchange as the Email Server option.

Installation and Registration 4
Global Software, Inc.
2.2 Installation
NEW INSTALLS1. Check system compatibility: go to www.queryexchange.com, run System Compatibility Check and click Start.
The system displays a message indicating the results of the test.
2. Close any open sessions of Excel.
3. Run the Setup.exe program from the installation CD -or- from the downloaded and uncompressed zip file fromGlobal's web site. Follow and respond to the installation prompts. Global recommends taking the defaults.During the standard install process the system automatically initiates Distribution Manager add-in for Excel.
Note: For Citrix users, run SetupCitrix.cmd instead of Setup.exe to install Distribution Manager WITHOUThaving the system automatically enable the Distribution Manager add-in for Excel.
Note: If not previously installed, the setup program will force the install of required components prior toinstalling Distribution Manager (see Additional Components).
4. After the installation has completed successfully, it is recommended to:· Reboot if directed to do so.· Perform a Windows Update to check for .Net Framework 4.0 updates and load them if necessary.· Open Excel and ensure that Distribution Manager appears as an add-in. If for any reason it does not appear
as an add-in, then it must be manually registered (see Register Add-In).· Go to the Settings function and assign and/or verify setting options (see Settings).
5. Repeat the steps above for each Distribution Manager user.
UPGRADE INSTALLSGenerally upgrade installs follow the same process as a new install. Occasionally there are exceptions, so it isimportant to read Upgrade Guidelines published when a new version is released.

Distribution Manager - Release V12 R6 M35
2.3 Register Add-In
During the install process the system automatically registers and initiates the Distribution Manager add-in for Excel.If for any reason Distribution Manager is not registered during installation, then it must be manually registered. Inaddition, if multiple users are using Distribution Manager on the same PC, then subsequent users must manuallyregister the add-in. The registration process registers and initiates the add-in for Excel.
Note: If the add-in is not registered on the PC, then Distribution Manager will not appear in the list of available add-ins for Excel.
To Register the Add-In1. From the desktop, click Start>All Programs>Global Software Distribution Manager>Register Add-In. The
Register Add-In panel appears.
2. Click OK to register the add-in. A panel appears indicating that the registration process is complete.
3. Click OK.
To Unregister the Add-In1. From the desktop, click Start>All Programs>Global Software Distribution Manager>Unregister Add-In. The
Unregister Add-In panel appears.
2. Click OK to unregister the add-in. A panel appears indicating that the unregister process is complete.
3. Click OK.

Installation and Registration 6
Global Software, Inc.
2.4 Uninstall Process
Generally, it is not necessary to uninstall Distribution Manager prior to installing new versions. An uninstall shouldonly be performed in order to completely remove the product from the PC.
To Unregister and Uninstall the Add-In1. From the desktop, click Start>All Programs>Global Software Distribution Manager>Unregister Add-In. The
Unregister Add-In panel appears.
2. Click OK to unregister the add-in. A panel appears indicating that the unregister process is complete.
3. Click OK.
4. Ensure that Excel is not open.
5. From the desktop, click Start>Control Panel>Add or Remove Programs -or- Programs and Features.
6. Select the Global Software Distribution Manager program and click the Change/Remove -or- Uninstall.

Distribution Manager - Release V12 R6 M37
3 Getting Started
3.1 Navigation
Distribution Manager uses the following navigation methods for processing functions within Excel. Each function isnot always available from each method.
· DistMgr Menu (see DistMgr Menu)· Distribution Manager Toolbar (see DM Toolbar)· Spreadsheet Server or Executive Dash Ribbons (see DM Ribbon)
For Excel 2003:· The DistMgr menu is accessible from the Excel menu bar.· The Distribution Manager toolbar is accessible in the standard toolbar section.· The Spreadsheet Server or Executive Dash ribbons are NOT applicable.
For Excel 2007 and Above:· The DistMgr menu and Distribution Manager toolbar are accessible from the Add-Ins ribbon.· The Spreadsheet Server or Executive Dash ribbons are only available when Spreadsheet Server or Executive
Dash are selected as an add-in to Excel.
NAVIGATION TIPS:Throughout the manual navigation tips, noted by the convention "NAV TIP", will be listed indicating the variouspaths available to access a function.

Getting Started 8
Global Software, Inc.
3.1.1 DistMgr Menu
After Distribution Manager is initiated as an add-in to Excel, the DistMgr menu is added to Excel. The menu is usedto access/process various functions within the application.
For Excel 2003:The DistMgr menu is accessible from the Excel menu bar.
For Excel 2007 and Above:The DistMgr menu is accessible from the Add-Ins ribbon.
Menu Item Description
About Distribution Manager Opens the About panel, displaying company information and allowing theuser access to the Log Viewer panel, where the user may see informationand error log entries, copy selected log entries, email or clear the log file.Refer to View Log Entries for more information.
Settings Opens the Settings panel, allowing the user to define various criteria tocontrol processing. Refer to Settings for more information.
Create New DistributionControl Worksheet
Creates a new distribution control worksheet. Refer toCreate a Distribution Control Worksheet for more information.
Distribute All Distributes all specifications within the workbook. Refer toDistribute Specifications for more information.

Distribution Manager - Release V12 R6 M39
3.1.2 DM Toolbar
After Distribution Manager is initiated as an add-in to Excel, a Distribution Manager (DM) toolbar is added to Excel.The DM toolbar may be used as a convenient alternative to various DistMgr menu functions.
For Excel 2003:The DM toolbar is accessible in the standard toolbar section.
For Excel 2007 and Above:The DM toolbar is accessible from the Add-Ins ribbon.
Menu Item Description
Distribute AllDistributes all specifications within the workbook. Refer toDistribute Specifications for more information.
DM SettingsOpens the Settings panel, allowing the user to define various criteria tocontrol processing. Refer to Settings for more information.
Maintain SpecsOpens the Maintain Specifications panel, allowing the user to create and/ormaintain distribution criteria. Refer to Add Specification Rows andMaintain Specification Rows for more information.

Getting Started 10
Global Software, Inc.
3.1.3 DM Ribbon
After Global's Spreadsheet Server or Executive Dash are installed, custom ribbons are added for Excel 2007 (andabove) users. The custom ribbons may be used as a convenient alternative to various DistMgr menu functions.
For Excel 2003:The custom ribbons are NOT applicable.
For Excel 2007 and Above:The custom ribbons only appear when either Spreadsheet Server or Executive Dash are selected as an add-in toExcel.
Menu Item Description
Distribute Distributes all specifications within the workbook. Click on the arrow toaccess additional functions. Refer to Distribute Specifications for moreinformation.
All Distributes all specifications within the workbook.
Selected Distributes only selected specifications.
Clone Sheet Creates a copy of the current worksheet, leaving all formulas intact.
Clone Sheet as Values Creates a copy of the current worksheet, converting all formulas to values.
Create New Control Sheet Creates a new distribution control worksheet. Refer toCreate a Distribution Control Worksheet for more information.
Maintain Specs Opens the Maintain Specifications panel, allowing the user to create and/ormaintain distribution criteria. Refer to Add Specification Rows andMaintain Specification Rows for more information.
Settings Opens the Settings panel, allowing the user to define various criteria tocontrol processing. Refer to Settings for more information.

Distribution Manager - Release V12 R6 M311
3.2 Settings
Once the program is added to Excel, it is necessary to define settings. Settings allow the user to define variouscriteria to control processing.
1. In Excel from the DistMgr menu, select Settings. The Settings panel appears.
Nav Tip:This panel may also be accessed by selecting the DM toolbar or ribbon equivalent (see DM Toolbar orDM Ribbon).
2. Use the table to enter data on the Settings panel, or to access other functions.
Field Description
Email Server: Specify the email server to be used for email distributions. When SMTPis selected, additional setting options become available for input.Note: For Excel 2007 users, Collaboration Data Objects (CDO) must beinstalled for the Microsoft Outlook Exchange option to be available.When applicable, a link is available to install the component.Note: For Excel 2010 users, Distributor Outlook Add-In must beinstalled for the Microsoft Outlook Exchange option to be available.When applicable, a link is available to install the component.Note: When using SMTP certain mail configurations may prevent thetransmission of messages. Contact your IT department for assistance.
Getting Started 12
Global Software, Inc.
Field Description
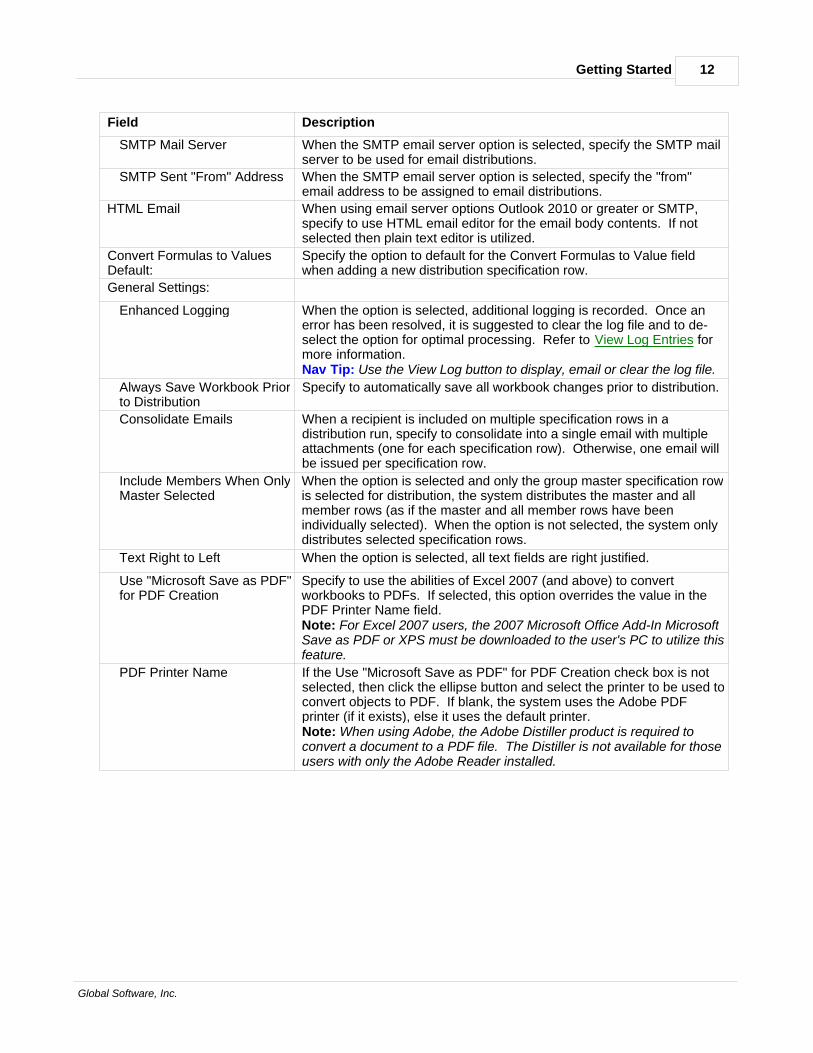
SMTP Mail Server When the SMTP email server option is selected, specify the SMTP mailserver to be used for email distributions.
SMTP Sent "From" Address When the SMTP email server option is selected, specify the "from"email address to be assigned to email distributions.
HTML Email When using email server options Outlook 2010 or greater or SMTP,specify to use HTML email editor for the email body contents. If notselected then plain text editor is utilized.
Convert Formulas to ValuesDefault:
Specify the option to default for the Convert Formulas to Value fieldwhen adding a new distribution specification row.
General Settings:
Enhanced Logging When the option is selected, additional logging is recorded. Once anerror has been resolved, it is suggested to clear the log file and to de-select the option for optimal processing. Refer to View Log Entries formore information.Nav Tip: Use the View Log button to display, email or clear the log file.
Always Save Workbook Priorto Distribution
Specify to automatically save all workbook changes prior to distribution.
Consolidate Emails When a recipient is included on multiple specification rows in adistribution run, specify to consolidate into a single email with multipleattachments (one for each specification row). Otherwise, one email willbe issued per specification row.
Include Members When OnlyMaster Selected
When the option is selected and only the group master specification rowis selected for distribution, the system distributes the master and allmember rows (as if the master and all member rows have beenindividually selected). When the option is not selected, the system onlydistributes selected specification rows.
Text Right to Left When the option is selected, all text fields are right justified.
Use "Microsoft Save as PDF"for PDF Creation
Specify to use the abilities of Excel 2007 (and above) to convertworkbooks to PDFs. If selected, this option overrides the value in thePDF Printer Name field.Note: For Excel 2007 users, the 2007 Microsoft Office Add-In MicrosoftSave as PDF or XPS must be downloaded to the user's PC to utilize thisfeature.
PDF Printer Name If the Use "Microsoft Save as PDF" for PDF Creation check box is notselected, then click the ellipse button and select the printer to be used toconvert objects to PDF. If blank, the system uses the Adobe PDFprinter (if it exists), else it uses the default printer.Note: When using Adobe, the Adobe Distiller product is required toconvert a document to a PDF file. The Distiller is not available for thoseusers with only the Adobe Reader installed.

Distribution Manager - Release V12 R6 M313
Button Function
Advanced... When the SMTP email server option is selected, if necessary, click theAdvanced button to specify optional settings for the authenticationaccount name and password, the SMTP port number, and SSL (securedsocket layer) support.
View Log Displays the Log Viewer panel, where the user may see information anderror log entries, copy selected log entries, email or clear the log file.Refer to View Log Entries for more information.
3. Click OK to write the changes and exit.
Create a Distribution Control Worksheet 14
Global Software, Inc.
4 Create a Distribution Control Worksheet
The columns on a distribution control worksheet are predefined by Global and should not be changed. However, therows defined on a distribution control worksheet will depend upon an organization's reporting requirements.
Note: The examples in this documentation are meant only to demonstrate the capabilities of the product.
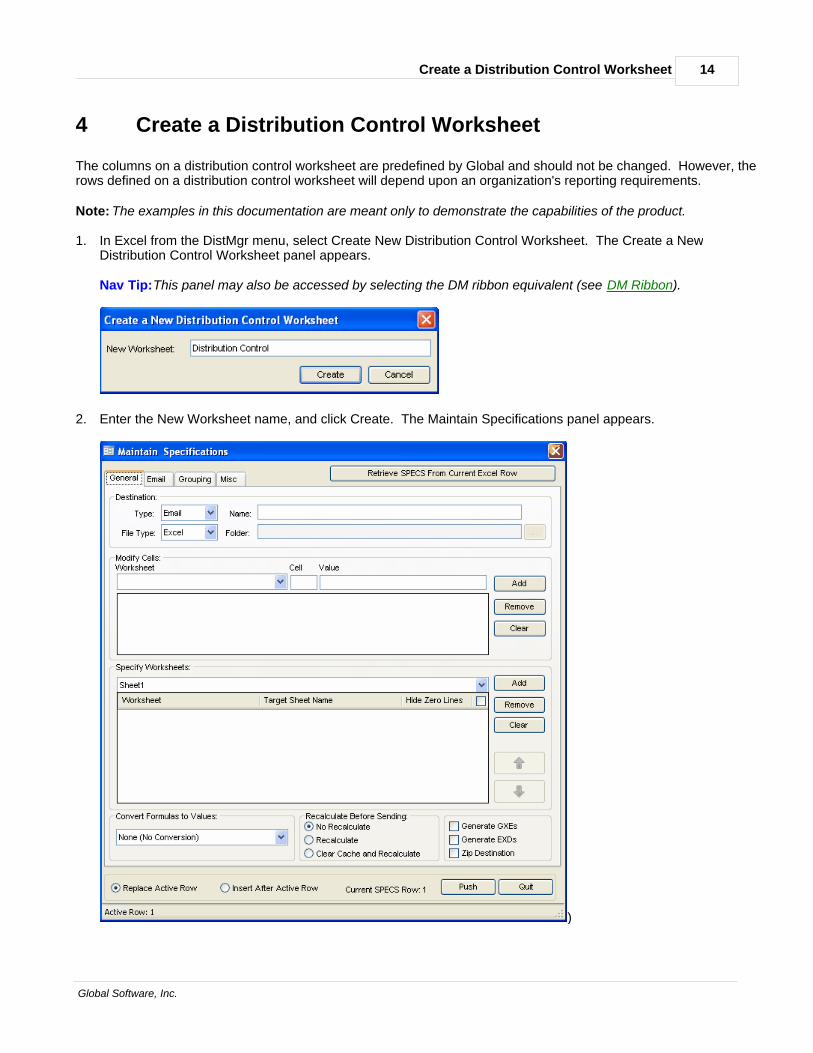
1. In Excel from the DistMgr menu, select Create New Distribution Control Worksheet. The Create a NewDistribution Control Worksheet panel appears.
Nav Tip:This panel may also be accessed by selecting the DM ribbon equivalent (see DM Ribbon).
2. Enter the New Worksheet name, and click Create. The Maintain Specifications panel appears.
)

Distribution Manager - Release V12 R6 M315
3. Use the table to enter data on the General tab of the Maintain Specifications panel.
Field Description
Destination:
Type Specify the destination type for the distribution. Valid types are Email, FileSave, Group (member specification row that distributes only to the groupmaster), and Print. Click the down arrow and select the desired type.Note: When printing, the system prints to the user's default printer.
Name Specify the name to be assigned to the distribution. The name must beunique for each specification row. If left blank, the current workbook nameis used. If left blank on multiple specification rows, the current workbookname and an appended sequence number is used. This option does notapply when Destination Type = Group.
File Type Specify the file type to be assigned to the distribution. Valid types are Excel,Excel (xls), Excel (xlsx), Excel (xlsm), HTML, and PDF. When the typeExcel is selected, the system assigns the current workbook type. Click thedown arrow and select the desired type. This option does not apply whenDestination Type = Group.Note: Excel (xlsx) and (xlsm) file types only apply to Excel 2007 (and above)users.
Folder When Destination Type = File Save, specify the location of the folder wherethe document will be saved. Click the Browse button to locate the desiredfile location or type the destination path. The destination location must bedifferent than the source location. This option does not apply whenDestination Type = Email, Group or Print. See the example below.
Modify Cells: This section indicates the worksheet cells to receive designated values.· To add cell parameters, click the down arrow and select the worksheet,
enter the cell and value information, and then click the Add button. Theparameters are displayed in the window below.
· To modify cell parameters, select the line in the window, and make theappropriate change(s).
· To remove a cell parameter, select the line in the window, and click theRemove button.
· To clear all parameter lines, click the Clear button.
In the example below, for worksheet Income Statement, cell H4 will containthe value 5 (reporting period), and cell H6 will contain the value 00060(reporting company).

Create a Distribution Control Worksheet 16
Global Software, Inc.
Field Description
Worksheet Indicates the worksheet to receive the data.
Cell Indicates the cell to receive the data.
Value Indicates the value to be placed in the defined cell.
Specify Worksheets: This section indicates the worksheets and chart objects from the activeworkbook to be included in the distribution. If blank, then all worksheets inthe workbook will be distributed. When Destination Type = HTML, at leastone worksheet must be specified.· To select a worksheet, click the down arrow and select the desired
worksheet, select whether or not to hide zero lines, and then click the Addbutton. The selected worksheet displays in the window below.
· To remove a worksheet, select the worksheet in the window, and click theremove button.
· To clear all worksheets, click the Clear button.· To control the order of worksheets in the distributed workbook, select the
worksheet in the window, and click the appropriate arrow button to movethe selected worksheet up or down in the list.
In the example below, the Income Statement and Expanded Reportworksheets have been selected, the target sheet names have beenassigned and the hide zero lines option has been selected for bothworksheets.
Worksheet Indicates the worksheet to be distributed.
Target Sheet Name Hardcode, use a cell reference, or use merge data to specify the name to beassigned to the distributed worksheet.Note: When using cell reference, syntax should begin with "=" (i.e."=Sheet2!A3"). The "=" is not required when using merge data syntax (seeMerge Data).
Hide Zero Lines Specify to hide worksheet rows with zero values. This option only applies torows with Global formulas.Note: The Hide Zero Lines check box in the header section of the grid is thedefault value to be assigned when a worksheet is added to the selection.When no worksheets are selected, the check box in the header sectiondetermines whether or not to hide zero lines for all distributed worksheets.
Convert Formulas toValues
Specify which formulas, if any, should be converted to values. Valid typesare Global Only (formulas created from Spreadsheet Server or ExecutiveDASH products), All Formulas (all formulas in the worksheet), None (noconversions), and Global Only (Excel 2000) (for Excel 2000 users only).Click the down arrow and select the desired option.
Distribution Manager - Release V12 R6 M317
Field Description
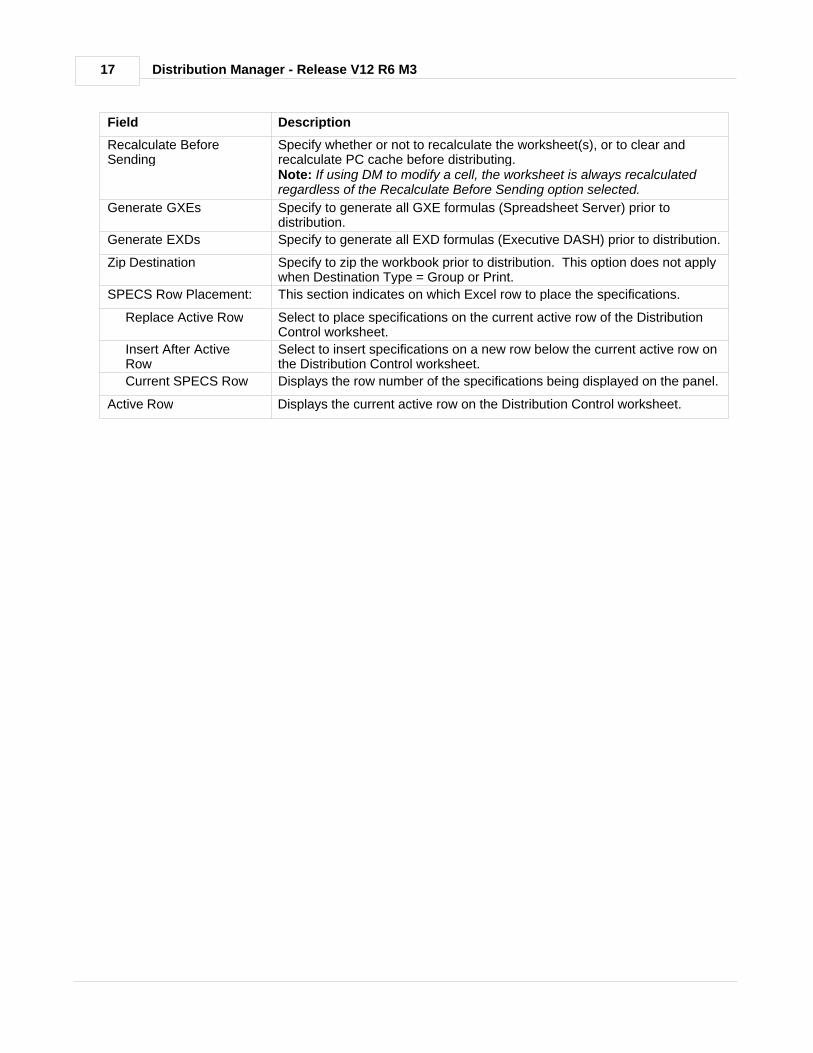
Recalculate BeforeSending
Specify whether or not to recalculate the worksheet(s), or to clear andrecalculate PC cache before distributing.Note: If using DM to modify a cell, the worksheet is always recalculatedregardless of the Recalculate Before Sending option selected.
Generate GXEs Specify to generate all GXE formulas (Spreadsheet Server) prior todistribution.
Generate EXDs Specify to generate all EXD formulas (Executive DASH) prior to distribution.
Zip Destination Specify to zip the workbook prior to distribution. This option does not applywhen Destination Type = Group or Print.
SPECS Row Placement: This section indicates on which Excel row to place the specifications.
Replace Active Row Select to place specifications on the current active row of the DistributionControl worksheet.
Insert After ActiveRow
Select to insert specifications on a new row below the current active row onthe Distribution Control worksheet.
Current SPECS Row Displays the row number of the specifications being displayed on the panel.
Active Row Displays the current active row on the Distribution Control worksheet.

Create a Distribution Control Worksheet 18
Global Software, Inc.
4. Use the table to enter data on the Email tab of the Maintain Specifications panel.
Note: The Email tab is only available when Destination Type = Email.
Field Description
To Specify the email address(es) to which to distribute the associateddocument. Multiple addresses should be separated by a semicolon (;) orcomma (,) depending on the email server type. When applicable click theTo button to select desired email addresses.Note: Use the Settings Consolidate Emails option to control whether arecipient included on multiple specification rows in a distribution run receivesone email with multiple attachments or one email per specification row (seeSettings).
Subject Specify the subject line for the email.
Body Specify the body text for the email. Generally a plain text editor is utilized;however, when using the SMTP email server and HTML Email (seeSettings) various editing options are available (i.e. fonts, tables, insertpictures).

Distribution Manager - Release V12 R6 M319
5. Use the table to enter data on the Grouping tab of the Maintain Specifications panel.
Note: Grouping is used to combine multiple specification rows' specified worksheet(s) into a single workbook fordistribution purposes. Refer to the example given on the panel.
Field Description
Group Master SPEC Specify that the specification row is a group master. When pushed to theDistribution Control worksheet, the system assigns the value [GROUPSPEC #n] (where n is a system assigned number) in the SPEC GroupControl column.Note: Multiple group masters may be defined per workbook.
Member of Group Specify the destination name of the group master to which the specificationrow is a group member. Click the down arrow and select the destinationname associated with the desired group master. When pushed to theDistribution Control worksheet, the system assigns the number associatedwith the group master in the SPEC Group Control column.

Create a Distribution Control Worksheet 20
Global Software, Inc.
6. Use the table to enter data on the Misc tab of the Maintain Specifications panel.
Field Description
Workbook ProtectionOptions:
Open Password Specify the password, if necessary, required to open the distributedworkbook.
Modify Password Specify the password, if necessary, required to modify the distributedworkbook.
Workbook Macros:
Beginning (Prior toProcessing)
Specify the name of the macro, if any, to be executed prior to distribution.
Middle (Default) Specify the name of the macro, if any, to be executed during distribution.
Ending (AfterProcessing)
Specify the name of the macro, if any, to be executed after distribution.

Distribution Manager - Release V12 R6 M321
Field Description
Additional Attachments: This section indicates additional documents to attach during the distributionprocess.· To select a document, click the Add button, then browse and select the
desired document.· To remove an attachment, select the attachment in the window, and click
the Remove button.· To clear all attachments, click the Clear button.Note: Attachments do not distribute when Destination Type = Print.
Attachment Indicates the name and location of the item to be sent as an attachment tothe distribution.
Merge DocumentSource (Range Name)
Specify the range name from which to pull refreshed data elements into theassociated attachment (see Merge Data).
7. Once all data has been properly entered, use the table to select the appropriate row to be updated.
Field Description
SPECS Row Placement: This section indicates on which Excel row to place the specifications.
Replace Active Row Select to place specifications on the current active row of the DistributionControl worksheet.
Insert After ActiveRow
Select to insert specifications on a new row below the current active row onthe Distribution Control worksheet.
Current SPECS Row Displays the row number of the specifications being displayed on the panel.
Active Row Displays the current active row on the Distribution Control worksheet.
8. Click the Push button to replace or insert the specifications on the Distribution Control worksheet.
9. Repeat steps 3 - 8 as necessary to create additional specification rows.
10. Click the Quit button. The Distribution Control worksheet appears.
11. Save the workbook.

Add Specification Rows 22
Global Software, Inc.
5 Add Specification Rows
Additional specification rows may be added to an existing Distribution Control worksheet by creating a new row orcopying an existing row.
To Add a New Specification Row1. On the Distribution Control worksheet, select a blank row, right-click and select Maintain DM Specs -or- select
the DM toolbar or ribbon equivalent (see DM Toolbar or DM Ribbon). The Maintain Specifications panelappears.
2. Continue with step 3 in the Create a Distribution Control Worksheet section.
To Copy an Existing Row to Create a New Specification Row1. On the Distribution Control worksheet, select the desired specification row to be copied, right-click and select
Maintain DM Specs -or- select the DM toolbar or ribbon equivalent (see DM Toolbar or DM Ribbon). TheMaintain Specifications panel appears.
2. Continue with step 3 in the Create a Distribution Control Worksheet section. To create a new specification row,ensure that the Insert After Active Row radio button is selected.
3. To copy an additional existing row to create a new row:· On the Distribution Control worksheet, select the next specification row to be copied.· On the Maintain Specifications panel, click the Retrieve SPECS From Current Excel Row button. The
specifications from the current active row will default on the panel.· Continue with step 3 in the Create a Distribution Control Worksheet section. To create a new specification
row, ensure that the Insert After Active Row radio button is selected.

Distribution Manager - Release V12 R6 M323
6 Maintain Specification Rows
Existing specification rows may be maintained by accessing the Maintain Specifications panel or by manually typingchanges on the Distribution Control worksheet.
To Maintain an Existing Row Via the Maintain Specifications Panel1. On the Distribution Control worksheet, select the desired specification row to be maintained, right-click and select
Maintain DM Specs -or- select the DM toolbar or ribbon equivalent (see DM Toolbar or DM Ribbon). TheMaintain Specifications panel appears.
2. Continue with step 3 in the Create a Distribution Control Worksheet section. To maintain the existingspecification row, ensure that the Replace Active Row radio button is selected.
3. To maintain an additional existing row:· On the Distribution Control worksheet, select the next specification row to be maintained.· On the Maintain Specifications panel, click the Retrieve SPECS From Current Excel Row button. The
specifications from the current active row will default on the panel.· Continue with step 3 in the Create a Distribution Control Worksheet section. To maintain the existing
specification row, ensure that the Replace Active Row radio button is selected.
To Maintain an Existing Row Manually1. On the Distribution Control worksheet, select the desired cell to be modified, and click on the down arrow to
change data in the cell -or- type the desired information into the cell.
Note: To avoid errors, it is recommended to use the Maintain Specifications panel (see above) for makingchanges instead of typing the desired information into the cell.
2. Save the workbook.

Distribute Specifications 24
Global Software, Inc.
7 Distribute Specifications
Distribution specifications for a workbook may be distributed all at the same time or individually selectedspecifications may be distributed at the same time.
Note: If the Settings option Always Save Prior to Distribution is not selected, it is imperative to save the workbookprior to distributing specifications.
Note: Outlook must be open prior to distributing emails via Outlook.
To Distribute All Specifications1. Open the desired Distribution Control worksheet.
2. In Excel from the DistMgr menu, select Distribute All -or- select the DM toolbar or ribbon equivalent (seeDM Toolbar or DM Ribbon). During the distribution process, a panel briefly appears displaying the variousprocedures being processed. This panel disappears when the distribution process is complete.
To Distribute Individual Specifications1. Open the desired Distribution Control worksheet.
2. Select the desired specification row(s) to be distributed:· To select a single specification -- select the desired specification row.· To select multiple specifications -- press and hold the Ctrl key as specifications rows are selected.· To select multiple specifications in a range -- select the first specification row in the range and drag the mouse
to select additional desired rows in the range.
3. After the desired specification row(s) are selected, right click and select Distribute Selected -or- select the DMribbon equivalent (see DM Ribbon). During the distribution process, a panel briefly appears displaying thevarious procedures being processed. This panel disappears when the distribution process is complete.
To Distribute Group Master and All Member Specifications Using Single Row Selection1. Access the Settings panel, select the Include Members When Only Master Selected option and click OK.
2. Open the desired Distribution Control worksheet.
3. Select the desired group master specification row to be distributed, right click and select Distribute Selected -or-select the DM ribbon equivalent (see DM Ribbon). The system distributes the group master and all memberspecification rows.
To Distribute Group Master and Selected Member Specifications1. Open the desired Distribution Control worksheet.
2. Select the desired group master and member specification rows to be distributed, right click and select DistributeSelected -or- select the DM ribbon equivalent (see DM Ribbon). The system distributes the group master andselected member specification rows.

Distribution Manager - Release V12 R6 M325
8 Miscellaneous Items
8.1 Merge Data
Distribution Manager allows the user to add merge fields (place holders for data) in various specification fields, andthen replace the merge fields with values during the distribution process. In addition, these merge fields may be usedto update associated fields within an attached document. See below for one example of how this feature may be setup and utilized.
Syntax: {'sheetname'!cellreference}
Setup 1: Define merge fields within the spreadsheet, and assign a range name.
Setup 2: Use Modify Cells to replace word merge data, and specify merge data in part of target sheet name. Ifdesired, specify merge data within the Destination Name and Target Sheet Name fields.

Miscellaneous Items 26
Global Software, Inc.
Setup 3: Specify merge data within the email To, Subject and Body fields.
Setup 4: Add an attachment and assign the range name from which to retrieve values.
Results: The system modifies cells and replaces text within the curly brackets { } with the actual values from thecells. In addition, the destination name is automatically added as a prefix to the distributed merge data attachmentand the data in the merge range is merged into the attachment.

Distribution Manager - Release V12 R6 M327
8.2 View Log Entries
During the distribution process, the system records various logging information. If the Settings option EnhancedLogging is selected, then the system records additional logging data. Log entries may be viewed, copied and/oremailed if desired.
Note: The email feature is only available for Outlook users.
1. In Excel from the DistMgr menu, select About Distribution Manager. The Distribution Manager panel appearsdisplaying Global's information.
2. On the Distribution Manager panel, click View Log. The Log Viewer panel appears displaying the level, date,time, action, status, description and workbook for each log entry. In addition, in the bottom right hand corner thepanel displays a count of the number of entries listed.
Nav Tip:This panel may also be accessed by selecting the View Log button on the Settings panel (see Settings).
Note: To select a different size font, click on the drop down arrow in the bottom right hand corner.
3. To copy selected records to the clipboard, on the Log Viewer panel first select the desired record(s) and theneither click the Copy Selected Errors button -or- right click on the list and select Copy Selected Errors on thepopup panel:· To copy a single record -- select the desired record.· To copy select multiple records -- press and hold the Ctrl key as records are selected in the list.· To copy multiple records in a range -- select the first record in the range, press and hold the Shift key, and
select the last record in the range.

Miscellaneous Items 28
Global Software, Inc.
4. To email the entire error log to the help desk, click the Email Error Log button. The system opens a new Outlookemail panel with the error log attached. Modify the email address and/or text of the email body as necessary andclick the Send button.
5. To filter log entries for a specific workbook, click the Workbook down arrow and select the desired workbook.The system displays only entries for the selected workbook.
6. To filter for a specific date range of entries in the error log file, select the Filter on Date check box and specify thedesired date range. The system displays only entries for the selected date range.
7. To filter for a specific level of entries in the error log file, select the desired level(s) in the Filter list. The systemdisplays only entries for the selected level(s).
8. To search for a specific value in the error log file Action column, key the desired value in the Find What field andclick the Find Next button. The system will highlight the first log entry containing the value. Click the Find Nextbutton again, to find the next occurrence of the selected value.
9. To clear the error log file, click the Clear Log button.
10. To display the full details of a log entry, double click the selected entry in the list. The Error Properties panelappears. Use the arrow buttons on the Error Properties panel to scroll up or down through the log entries in thelist. To copy detail data for a single log entry to the clipboard, click the Copy button. Click the Close button toreturn to the Log Viewer panel.
11. To exit the Log Viewer panel, click the Close button.

Index- A -add-in 5
register 5
unregister 5, 6
- C -components 3
- D -DistMgr menu 8
distribute 24
all 24
group 24
selected 24
Distribution Control worksheet 14
create 14
DM ribbon 10
DM toolbar 9
- E -error log 27
- I -installation 4
- L -Log Viewer 27
- M -menu 8
merge data 25
- N -navigation 7
DistMgr menu 8
DM ribbon 10
DM toolbar 9
- O -optional components 3
overview 2
- R -register add-in 5
required components 3
ribbon 10
- S -settings 11
specification rows 14
add 22
copy 22
maintain 23
- T -toolbar 9
- U -uninstall 6
unregister add-in 5, 6
- V -view log 27
Distribution Manager - Release V12 R6 M329
© 2012 ... Global Software, Inc.